Overview
What is the Meaning of Light? Why is Lighting Important in SFM? What does Lighting really add to a project/poster? I will explore these questions and offer up insights I have discovered on the meaning of Lighting and Proper use!This Guide is in no way a step by step or a guideline/layout. This guide explores the concept of Lighting, and why it seems to make such a huge difference. Rather than tell you what to do, I will attempt to offer up my discoveries in regards to what Lighting really does, and you can take what you want and apply it in any way you can!I should also note I have no professional lighting experience, so you will see me make up lots of phrases and terms just for the sake of writing something coherent.
Part 1: Ground Zero
What is the Meaning of Light? What is the Point of using Lights to Enhance a Project? Why can good lighting greatly enhance something visually? What is even the definition of Good Lighting? In this Guide, I will be exploring these questions.

But first, let’s start at Ground Zero: Fullbright Lighting!
This example Poster (Featuring the Femscout) Features disabled lighting (Lighting is Disabled Via right clicking the viewport and unchecking Enable Lighting)

Everything is Unlit, and fully displaying their textures.
now let’s slow down. Here’s a good question: Why don’t we stop here? Everything we NEED to see is already in frame (The Character being the main subject, and the 2fort map environment being the Background). Well, Here’s a better question: What time of day is it?
You might say, “its clearly day, because the time of day on 2fort is Daytime!”
Well, how about this?

Let’s look at another deception of Fullbright Lighting
Tell me: How far away does this Barrel seem from the Camera? It would be safe to assume that it’s close to the camera, right?

Well, Here’s the truth
The Barrel is actually Enourmous, big enough to block the passage AND connect to the top of the Battlements. Our Camera here isn’t Orthographic, but the illusion of depth is still very misleading without any lighting, because the environment isn’t telling us anything about the objects that inhabit it.

Which brings me to the first point of this Guide: Lighting is about the Environment. An environment that lacks lighting, lacks dynamic details that lighting can achieve, (In this Example, to covey the time of day, and the size/placement of the barrel.)
Part 2: What Is Light?
It’s bright stuff that makes things bright
the more bright stuff, the brighter the thing!

That’s the very basic aspect of it. The truth is, light is the medium of image. Just like how air is the medium that sound travels through, light is a piece of a visual environment that makes all of the parts apparent to you. Everything you have ever seen and everything you will see, are visible because of light.
So this is some really important stuff.
I like to think of it like this: Lighting is both the most important and least important aspect of the Source Filmmaker. It’s not important, because it really doesn’t exist. Light entities don’t affect cameras, models, animations, scenes, clips, or stories. They actually don’t add ANYTHING
But at the same time, lighting is everything
Just like how air is the medium of sound: without a medium of light, your content is impossible to discern.
Think about light as being a paintbrush. You use them to paint your pictures with the help of the rendering of the source engine.
Part 3: Map Lighting
You can seperate Lighting in SFM into two seperate families: Map Lighting, and Animation Set Lighting.
Let’s take a look at the First: Map Lighting
Map Lighting is lighting provided by a map, which operates similarly to how map lighting acts in Source Games.
When a map is compiled for a Source Game, VRAD.exe generates a Map’s Lighting onto Lightmaps based on the map geometry, and then bakes those lightmaps into the environment. VRAD is actually fairly detailed, being able to generate Ambient Lighting when it does it’s calculations.

These are the basic Light entities for maps in respect to SFM. Let’s look at what these do real quick:


light_environment – an omniscient directional light with settings for ambient
(This picture is just an example I threw together using both entities)


Pretty nifty, huh? And here I was, thinking lighting in SFM was limitted…
WELL…
There’s a huge catch to Map lighting, as you can see in the screenshots: It’s not Dynamic! See, we have these nice little lights that actually visibly react to models and brush geometry, but the effects are very static. If we were to hypothetically remove one of these shapes without recompiling the map, their shadows would still remain.
The only way to get a new calculation on map lighting is to completely recompile the map, which is a process that can take hours on some maps.
But that’s the least of our problems, because our poor femscout here doesn’t cast a shadow, at all. It’s almost like she’s a foreign object in this seperate game world that doesn’t belong, and we can’t be having that. We’re making movies here, and we need environments to accept our subjects – BUT that’s not to say that map lighting is completely Useless. For one, map lighting achieves basic, wide scale illumination that might be tough with SFM lights. light_environment and it’s Ambient property are also very nice to use, but I’ll get into my technique with those when I get to Clipping.
Here’s the thing though: You can’t TECHNICALLY compile a map without lights, or else the map will be stuck in “Zero Light” form; so if you’re making a map, make sure to at least make it a proper Darkmap or have a spotlight somewhere obscure/nonintrusive
SedimentarySocks made a tutorial on how to make a Darkmap HERE:
[link]
Map Lights are cool and all, but lack what we need. We’re going to need to utilize the dynamic properties of Animation Set Lights in order to achieve our lighting-based goals
Part 4: Animation Set Lights
Animation Set Lights, AKA The Lights. These babies are one of the largest features of the SFM, giving creators a huge resource of dynamic elements to add good detail. Let’s slow down here a bit though, because we should go over the function of these things. Yeah, I know I souped this guide up to be more about theory, but if we’re gonna build Theories, we gotta build a System first, and work our way up.
I posted a simple diagram in Part 1, but here’s a more detailed one for this Part:

(Click to Enlarge to read the text)
Since this Guide is gonna be a big ol thing about lights, let’s take a look at each and every one of these sliders, and see what they do.
(Left: Low Intensity. Right: High Intensity)

Intensity is very self explanitory. This is the general strength of the light. Higher intensity means brighter light.
(Left: All the way down. Right: All the way up. Also, Source 2)

ambientIntensity is a weird one Honestly. In SFM, I seriously have no idea what this slider does, and I’m convinced at this point it doesn’t do anything; but it does have a pretty important role in SFM2:
In SFM2, ambientIntensity actually determines how bright the unlit areas of a light will be lit, so to speak. See the above example, both alchemists are being lit by one light each, but the one on the right is being almost completely lit opposite from the light
Otherwise, no idea what this slider does. If you know what this slider does in SFM, let me know and I’ll add to this guide.
(Top: High FOV. Bottom: Low FOV)

These two sliders control how wide the lights are. Now, these sliders are kind of misleading by name, because light frustrums are always square (except for UberLights). In reality, the highest slider will dictate how wide the light is. If you pull the light into your viewport and scroll your wheel, it will actually edit both sliders at the same time.
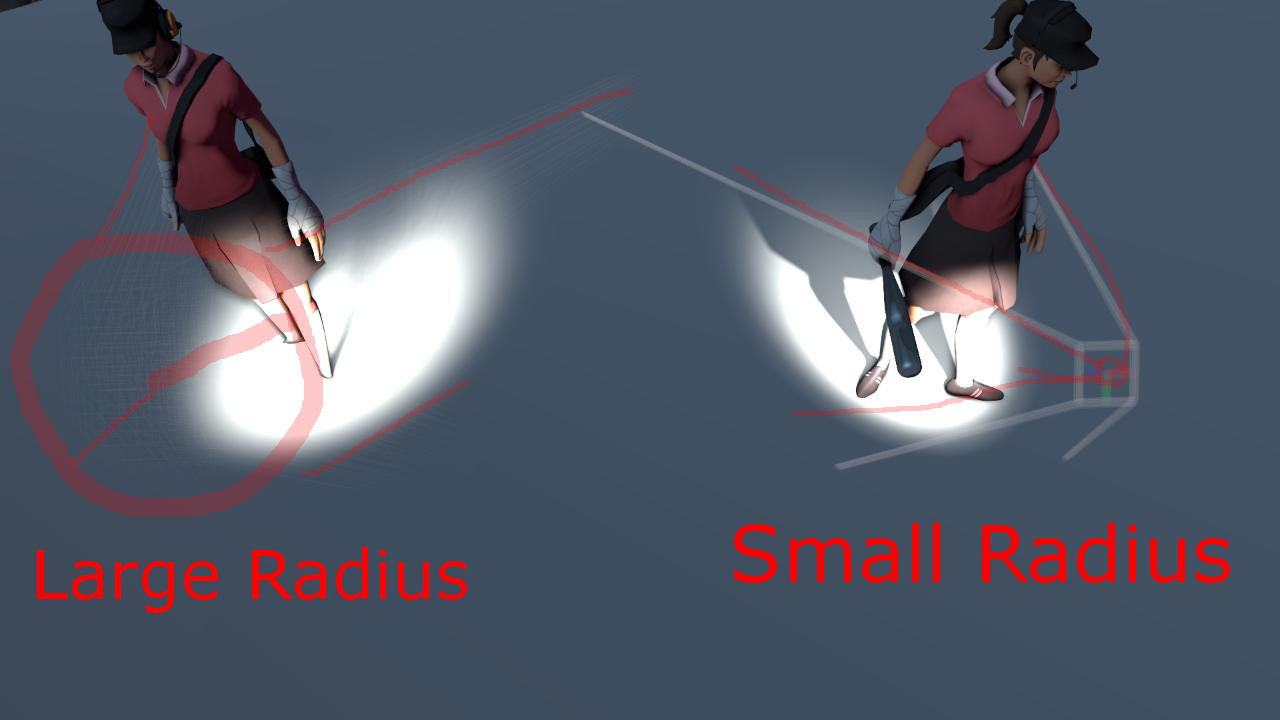
Radius is a very unique slider, because this is the only slider that affects how a light changes as DOF sampling is applied. Radius simulates a flat surface area in the form of a circle, in order to mimic the effect of light being emitted from a surface area, rather than a single tiny point. With frustrums enabled, you can see what happens when it’s sampled (see pic above). For a long time, I thought this slider was useless, but my friend Doomsday Orange pointed out to me just how useful this feature of lighting really is. I’ll probably go further into this when I get to Shadows, but it’s seriously a cool slider, go experiment with it.
(Left: Turned down/off. Right: Turned way up)

This might seem similar to radius, but it’s more simple. Essentially, it determines how how blurry the shadow will be. This slider is useful for reducing pixelated shadows, and that is what it’s most often used for. I will get into this more when I do Shadows.
(Left: Normal Shadowatten. Right: No Shadowatten)

This one is actually pretty similar to ambientIntensity in SFM2, but not quite as useful. Turning it all the way down is necessary if you need a shadow that is completely void of light, but just know that shadowatten only affects the shadow itself, not the actual light hitting objects.
(top: Small minDistance, Large MaxDistance)
(Bottom: Large minDistance, Small MaxDistance)

This one is another slider that doesn’t quite say what it means when talking in terms of frustrums.This picture however shows the relationships of these sliders pretty well. Imagine that a light frustrum isn’t a pyramid, with the tip being at the light’s point. Imagine that it’s actually a trapezoidal prism, with two square bases.
minDistance dictates the size of the base closest to the light point, and maxDistance dictates the size of the base farther away. As MaxDistance get’s bigger, it gets farther and Farther away, because the angles from the bases to the corners is maintained via the FOV. you can see this relationship in the picture above.
Kind of a mouthful explanation, but it’s honestly really simple. Max and Min Distance determine how far lights SHOULD exist. They also determine how distributed volumetric lighting is in the frustrum. Smaller frustrums means denser volumetrics, and larger frustrums means softer volumetrics. Look above at the light to the left, and notice that femscout isn’t casting a shadow, while in the right light, that scout is casting a fine shadow. In order for light to fully exist, the area MUST be within the volume of the light frustrum, and this is your main tool for editing this frustrum.
(left: Normal. Right: With ConstantAttennuation

ConstantAttenuation is a tricky one to explain technically, but I’ll just put it very simply: The Attenuation sliders have everything to do with light falloff (aka, how much a light dims over distance). ConstantAttenuation however, enables a light to never fall off at all at any distance. A light with constant Attenuation lights things just like it would if the light was right up close to it, resulting in default lights being really bright. But don’t worry, if you wanna use this slider, just be sure to turn intensity down to really small levels. Unlike LinearAttenuation, once this slider is up even a little bit, it’s full blast.
Speaking of which,
(left: none. right: Half slider)

Is more or less the same, except it works in gradients. So instead of the light going full blast, you can adjust how much you want the falloff to be linear. Once the slider hit’s value 1000, it pretty much acts exactly like ConstantAttenuation does. Something neat you can do with this slider though, is remap the value to a negative, and you can actually start adding MORE falloff to a light, making it dimmer over distances. Ultimately, this slider is a must use. Not only is it a great way to make a light bright without remapping intensity to extreme values; it’s also necessary for getting a large light to properly light a large area.
Now, Quadratic Attenuation: Is really boring. I’m honestly not entirely sure what it does, but it is nice for making small iterations to falloff. I imagine it has something to do with a quadratic relationship with falloff, but I have trouble getting discernable differences out of it (even with volumetrics). If there’s some hidden secrets to this one I’m overlooking, let me know and I’ll give it a section.

This one is actually pretty simple, but only obvious with huge lights that illuminate lots of objects. ShadowDepthBias determines how much detail gets ignored by the light’s shadows. Honestly, I dont know why you wouldn’t wanna turn this one way down, unless you wanted less shadows on small things
Part 4.2: Animation Set Lights
Don’t confuse this one with maxdistance, because it doesn’t do the same thing. FarZAtten determines how far a light will actually cast. If you look back at the max/min distance examples, notice how the tiny frustrum in that picture still had light hitting the ground: that was because the FarZAtten value was still default, but it was extending past the range of the frustrum, leading to no shadows being cast.
FarZAtten and Max/Min Distance need to be used together and work in sync, or else you get one of these two errors: No light, or no shadows. Make sure that when you remap one, remap the other to the same exact value, so that they work together!

the Uberlight editors include
-nearEdge (distance between two inner red circles)
-farEdge (distance between two outer blue circles)
-cutOn (size of red circles)
-cutOff (size of blue circles)
-width (width of frustrum)
-edgeWidth (width of outer frustrum)
-height (height of frustrum)
-edgeHeight (height of outer frustrum)
-roundness (In Element Viewer, determines roundness of frustrum)
Uberlight editors make up quite a bit of a light’s properties, but are very useful when using Gobo Textures. In the element viewer, you can check a box to enable a light to become an Uberlight, giving you the ability to utilize this frustrum, which operates inside of the main white frustrum. The Uberlight frustrum offers a lot of control, but is mainly used for gobo lighting.
are simple too. Higher volumetric intensity means thicker volumetrics, and noise strength makes it more noisy and less consistent
I will get into volumetrics later, but they’re really simple.
The color of lights is seperated into three seperate channels: Red, Green, and Blue. By default, each slider is turned up to 1, resulting in white. Turn down the red channel, you get light blue. Turn down blue, you get yellow. Turn down green, you get purple.

Very simple RGB stuff, except everything is scaled from 0 to 1, instead of 0 to 255 or 00-FF.
If you wanna convert an rgb value to this format, it’s really simple:
Take the rgb value you want, and divide it by the maximum rgb value for that system. So, if you have, say a green value of 78 or 4F, just divide it by 255 or FF and that is the slider value you will use!
Or, to put it simply without the math: Move them until you get a color you like!
oh, and color_alpha. I have no idea what this does.
well, you don’t REALLY have to. Not like there’s gonna be a test on this or anything. I think it’s important to understand how to utilize the sliders of lights, in order to configure them properly. Also, if you Didn’t Know, you can double click a slider to manually input a value, and right click a slider to remap it’s maximum and minimum values on the slider. Doing this, you can make lights enourmous.
SFM lights have lots of moving parts, so to speak, and knowing how these parts operate is necessary. It also means when I get into more detail, I don’t have to go into functions of lights with detail. Knowing these dynamic elements will be key to constructing lighting
Part 5: Make Dark Things Bright
Lighting serves one very crucial purpose: a purpose that is key to every production in SFM: To make dark things brighter
Take a look at this poster I made.

Pretty awesome, huh?
Yeah… Not really.
This image does come from SFM, but it’s on a map with no lights on it what-so-ever. It’s our femscout from earlier, but placed on a stage background on a black void map. So, without any Map Lighting or Animation Set Lighting, we really don’t have Anything else to work with unless we disable lighting or implement $selfillum onto textures.
Which brings me to the first and foremost function of lighting: Make the Dark Things Bright
The primary function of lighting is to make stuff visible. If we can’t see anything, we don’t have anything. No matter how many models or character poses I implement, this poster will still be Black and indiscernible. Things that don’t rely on lighting to be visible however, will always be visible, so keep that in mind when you Actually Want Darkness.
So, let’s play god. Let’s create light in this black void

Look at that! We’re done now, right?
I mean, I dunno why we WOULDN’T be done. We have fullfilled our purposes for this poster.
Well, here’s the problem. The Light isn’t telling the story that I want it to, so to speak. Recall earlier that I claimed that lighting is all about environment. This lighting implies a pitch black room, with a camera emitting a light directly onto our subject. It almost resembles a Camera Flash
But notice how this isn’t necessarily a good thing. The environment seems very static, even though our light is dynamic. The dynamic properties of this light really aren’t apparent at all.
Let’s disable shadows on the light, and compare it to the Original
They are essentially identical. The dynamic details of our light cannot be utilized here, because they aren’t apparent at all. In other words, the light doesn’t really add anything to our character, and just serves to wash her out and make her look flat.
The key here, is to understand that Lights need to be Dynamic, first and foremost. Generally, a good method of doing this, is to take your light, move it away from the camera to the right or left, and angle it differently from your camera.
Think of the light as if it were a seperate camera. If the light and Camera are both looking at the same thing, it’s almost as if the scene is reduced to 2 Dimensions. But imagine this: If a light can see things that a Camera can’t, then you are adding Another Dimension to your scene.
The Light and the Camera work together to construct a scene, and utilize multiple angles to tell us More about the scene.
So, let’s take our light, move it to the right, and angle it to view the character
Here is the new angle and placement of our light (light in viewport)

And here is the perspective of our Camera

I hope this helps you visualize what Light does for us. The light to the right gives us an entirely new dimension, because it is telling us something about our scene that the camera can’t, because a camera is just one view at one perspective (and that perspective is often Cinematic, meaning low FOV)
But, you may have noticed that we just made a Sacrifice. Look at the parts of Femscout that are Completely Black. It’s almost as if we sacrificed detail on her left, in order to define detail for her from the right. This is one very Notable Limitation of Animation Set Lights: a Limitation that defines what is necessary to Give a Scene Dimensions without Sacrificing Detail. This is a problem called Clipping
Part 6: Clipping; The Enemy of Detail
No, I’m not talking about “Clipping”, as in models Intersecting awkwardly, though the core concept is still exactly the same.
Think about lights as having Maximums and Minimums in terms of something being lit. Once you hit these Maximums or Minimums, you essentially create Extremes, and Extremes lead to an effect I have heard referred to as Clipping.
Let’s look at the two basic extremes of White Light
From the right side, a light is going full blast: Constant Attenuation with an extreme intensity. From the left, absolutely nothing.
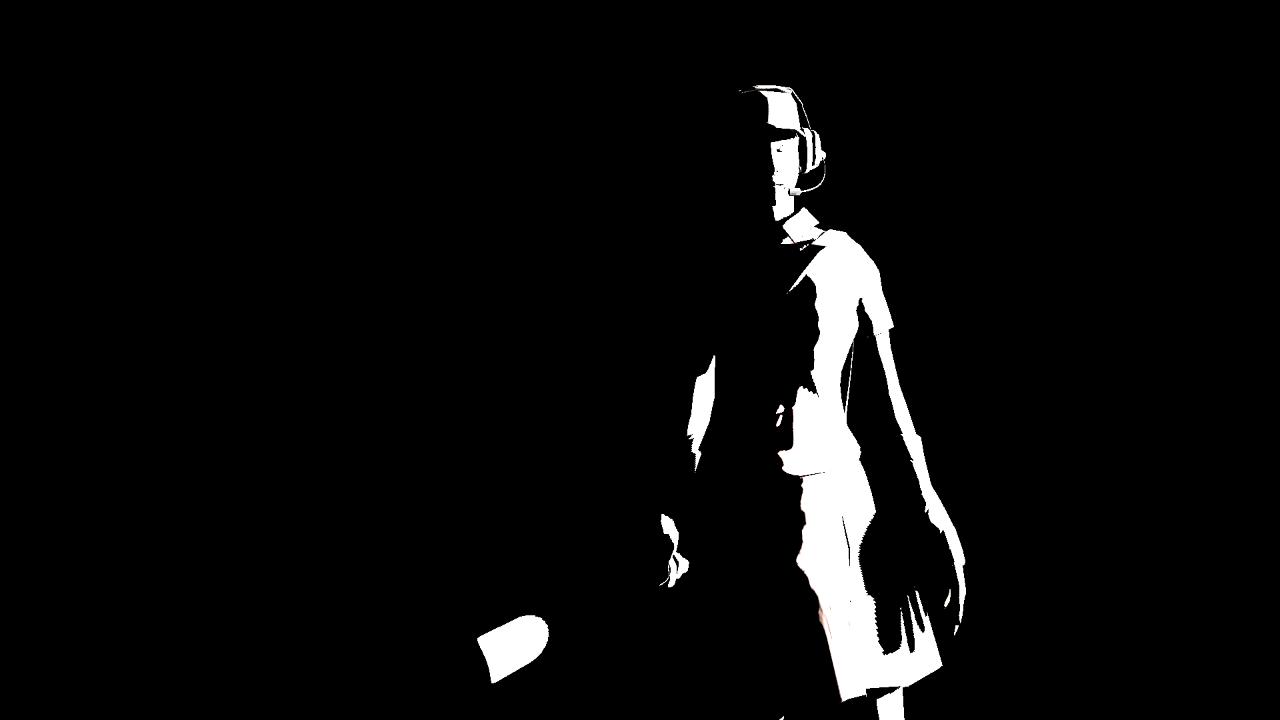
Notice something very important: The Femscout almost completely lacks detail. As I showed in the last section, the pitch black sections of her body tell us nothing, but the very bright light is essentially doing the same thing! Isn’t that pretty weird? The light tells us about her general geometry, but her smaller details like color is lost.. These two extremes of clipping are just that – EXTREME – but that doesn’t mean they don’t affect us.
Clipping is literally the enemy of detail. Black Clipping and White Clipping make detail obscure, to a point where clipped detail cannot be determined anymore.
Now, here’s something Interesting about Clipping:
Take a look at what happens when we take our Clipping light, and reduce it to one color only:


This is very strange, isn’t it? Why don’t Pure Lights result in White Clipping like they should? How come no matter how much brightness we add, a pure light will just become it’s color? Light in the real world Desaturates as it gets brighter: But Pure Lights don’t do this. This desaturation effect is actually pretty important, so I reccommend ensuring it happens
In order for a light to avoid (What I’ll call) Pure Clipping, All 3 color sliders must be over 0. So I’ll take this time to reccommend avoiding pure lights when attempting Realistic/Non Stylistic Lighting. Always try to have every color slider up by some amount, even if it’s tiny
Anyway, back to Clipping. Let’s fix our white clipping by simply reducing our light’s intensity, so it looks more like it did before:

Ok, now we just need to remove that Black Clipping that’s hiding the other half of her body. Hmm, how should I do that?
Oh, I know, let’s add another light to light it!

hmm, that didn’t really seem to work entirely. While we can see the other side of her body now; there’s still a long dark Stripe coming down from her face, blocking out her central detail. Let’s add another light

Better, but we still have ugly black clipping! We need MORE LIGHTS!

Oh No! Look at what happened while I started piling on lights! I turned my black clipping problem, into a white clipping problem! And I didn’t even resolve ALL of it! Now my scene looks really washed out (but that’s probably because of the white lights). I mean, I could start lowering intensities, but as soon as I do that, Black Clipping I removed before still remains! It’s almost like I can’t win!
If only… there was some Really Basic Rule of Lighting I could Utilize as a constant to get rid of Black Clipping without Creating Ugly White Clipping… If Only said method could easily be done with just 3 lights!
Part 7: The 3 Part Plan
If you have read literally any other lighting guide on this Hub, you have probably read about this more than 3 times already. Three Point Lighting, and it’s sister, Four Point Lighting. Three Point Lighting is the most basic and fundemental system of lighting, and you might be suprised to know how often it’s used in all sorts of productions.
Three Point Lighting is made up of – 3 lights! I’ll quickly go over each of them
Key Light – The Main Illuminator. The Brightest Light
Fill Light – The Secondary Illuminator. The Second Brightest Light, complementary to Key
Backlight – I’ll call this an “Outliner”, even though I’m sure it’s already professionally classified. This one is usually Supplementary to Key
(In case you don’t remember: Complementary = 90 Degree Relationship. Supplementary = 180 Degree Relationship. Think of your subject like a circle, and move iterations of Quarter-Circles to place the three lights. Or, just place em until they look good)
Right, let’s start from the top once again
First, let’s add our key light, coming in from the right, and doing most of the illumination

Now, let’s move 90 degrees left from our subject to place our less intense fill

And Finally, let’s move Another 90 degrees, and place our Backlight

Look at that! By simply following these very simple, easy steps, I have created this nice lighting setup, with no real apparent Clipping!
three Point Lighting is a very exact, easy to understand process, and it’s generally a good idea to think about it when lighting a scene. It is a process that contains Limitation though, mostly via the fact that Three Point Lighting is primarily Character Lighting or Single Subject Lighting. Applying the basic principles of Three Point Lighting to an entire environment is possible, but Environments can come in all shapes and sizes.
But Don’t worry. Three Point Lighting IS NOT A RULE of lighting: it’s a Method. It’s a mighty fine Method though, and it’s extensively time tested, so don’t discount this very simple light setup and what it can accomplish for you.
Now, I know it seems like this guide has gone off the handle a bit, but let’s draw back to a point I made earlier: about Deceptive Lighting, and how it’s very crucial.
Part 8: Your Lights Don’t Exist
Deceptive Lighting is Deceptive. In fact, it’s SO deceptive, that it has ALREADY decieved you! What if I told you lights don’t exist? What if I told you that every light you’ve ever seen and used actually Doesn’t Exist?
Deceptive Lighting is Lighting that doesn’t exist. Map Lighting isn’t deceptive, but Animation Set Lighting is.
Light in the real world doesn’t emit from fixed points in space as a spotlight. light in the real world comes from a variety of sources, and is usually not fixed in space.
Look at my scene from the last part, as seen with the light frustrums

The placements of these three lights is creating an Illusion of light that doesn’t really exist. There aren’t really 3 lamps sitting around our character – because our lights are Invisible Light Sources.
It seems like a no-brainer, but you gotta understand how Non-Existent these lights are. Understanding how deceptive they are, helps you to understand how to utilize them to create Reality.
This section isn’t gonna go to much further into this idea. I just need to reinforce to you that Lights don’t exist in a way we’d expect them to. But this is a bonus, because we can use the deceptive nature of light to make it Believable or Stylistic.
Part 9: Shadows are Everywhere
Shadows. Shadows are important. Plain and Simple.
But Why?
Well, it’s common knowledge that light casts shadows – Shadows are a direct side effect of light reacting to objects in an environment, and you might honestly be suprised about How Important shadow detail really is.
Take a quick, easy experiment. Go stand anywhere, and find your shadow. It might be really dim, or really dark, depending on the lighting.
Now look at the nearest object around you. Find it’s shadow
Find an object near it, and look for it’s shadow
etc etc. I gurantee that a shadow or other evidences of an object’s presence will exist in the room. Shadow Detail is something that is all around us, but we generally don’t notice it too much because it’s about as common as light. Shadows cast themselves from objects onto the environment, which establish an object’s presence
Let’s take a look at what shadows can do for us
But before we start, remember: SFM has a Shadowed Light Limit of 8 Lights per shot.
Part 10: Rims and Outlines: A Space Odyssey
Wait Wait Wait. Let’s take a big ol step back for a moment.
Back to three point lighting.
alright, step one: the key light…
then step two, the fill
then… step three? What?
Why did we add that? that seems really extra, doesn’t it? Our key and fill lights have already done their jobs in completely lighting the character and showing us all of her detail. So what gives? What is the Backlight doing?
This is an idea I have struggled with trying to really understand. It’s one of those ordeals where you KNOW it works, but you don’t really get HOW.
Plain and simple, backlights create OUTLINES. These outlines in a way are what seperates the characters from their environment. Look at this femscout example again – notice how once we added a very slight backlight, her full figure became more apparent.
Here’s a fun way to think about it: think back to where I talked about a light being another camera for the viewer camera. The most Valuable information a light can give a camera, is the information about the parts of the character our camera can BARELY see. So if you where to hypothetically plot real estate on the femscout here, the Beachfront property would be the most expensive property, while the central urban housing would be less valuable individually, because there’s more of it.
Part 11: Volumetrics; The Double Edge
Volumetrics. Oh, Volumetrics. What a wonderful feature.
Volumetric lighting is what I would call, “Extremely Geometrically Aware (EGW)”. Don’t worry, I’m not gonna use that term again.

(You can also check the volumetric checkbox in the element viewer btw!)
So what is a Volumetric Light?
It’s a light with a volume. See, lights normally dont have any volume, just surface; A single, flat surface that faces away from the light. A volumetric is essentially that, but on steroids.
See, with a volumetric, our light has become an object, in a way. A fully functional, dynamic model that can serve to define your 3D space. But let’s take a step back for a moment: What exactly IS a volumetric?
Light in the real world is not volumetric. Photons don’t occupy volumes, they move through volumes until they reach impacts. So what exactly is a Volumetric trying to replicate? Well, have you ever been in a dusty attic?
When dust and debris are floating around in the air, strong directional light can illuminate it in a way in which those pieces of debris become illuminated, causing a volume lighting effect! It’s usually a symptom of a place being lived in, or a place being dirty; but that’s really just the surface of it when we talk SFM.
A great deal of Volumetric usage in SFM is what I would call “Fake”. It’s often not used for the logical reasons, it’s used for a reason I briefly stated above: environmental awareness.
Here’s a boring poster
and Here’s the same poster with a volumetric attacking from the rear!

I feel like these are a tool that new users pick up on very quickly. It’s very easy to throw a volumetric or two into a scene and instantly see a difference. Sometimes, even I get weirded out if I’ve lit something without a single volumetric.
But now’s the point where I give you a stern warning!
Let’s look at this little example:
Oh boy, the lighting here sure is boring. Let’s spice it up with some zangy volumetrics!

Oh, hey let’s put another one here, that looks cool

Oh, and here

and here!

Uh oh
Okay, let’s slow down.
See what’s happening? As we continue to fill the scene with volumes and volumes of light, it’s beginning to fight our geometry. Look at our character, and look at how he’s beginning to blend in to the volumetric lighting.
You might be saying to yourself, “ah gee wiz, that’s alot like clipping, innit?” and yes, you’d be totally correct!
I like to compare volumetrics with pillow fluff. It’s a great addition to a pillow, but when you use too much, you’re gonna smother your face and it’ll feel uncomfortable. Our character is being smothered by the surrounding light!
Now is the point where I have to change your thinking on these things. Volumetrics are NOT standard lights! They are Objects! Props, like the ones you used to create your scenes! Once a light gains a volume, it becomes something else entirely, but it’s still familiarly an object, like a prop!
I mean, volumetric lighting effects in source games generally ARE props, you know!
You absolutely CANNOT treat these things as lights, because that will result in situations like the one above.
Now, go back to what I said, about how they smothered out our character
What if we DID want to smother something out here, like say, the background?
A volumetric would be great for doing that! Look at that, and see how the fuzzy-ness of a volumetric sort of cause the background details to blend together into something more uniform and boring – to give more emphasis to the characters or the foregrounds!

This above poster is utilizing only one volumetric, 2 key lights, 2 rim lights, and a single, dark blue fill. Lighting that is cleaner is often more appealing! At least, in this case it is.
There are so many countless uses and applications for volumetrics, that I don’t think I could type them all up in a single session. Seriously play with them and figure out how YOU want to use them! just be sure not to cut yourself on the edge.
Part 12: Ok, I take that Back. Shadows AREN’T Everywhere
I want to bring your attention to another type of lighting phenomenon that I see take place very, VERY often: The STAGE LIGHTING EFFECT.
What exactly do I mean by “stage lighting”? Yes, it’s true that the video game world is essentially a big fat stage, but this leads to a problem when it comes to lighting; a problem that I feel isn’t identified nearly as often as it should be.
let’s take a look at this scene before we begin lighting it:
Tell me, how many lights are in this scene?
well, just by looking, it’s an enclosed room, so there’s no big environment lights apparent, so let’s ignore that.

Let’s focus on what we can clearly see:
This light up above, and this light from behind. Now, let’s enable lighting and add these bad boys to our scene

now, you’ll notice some big problems right away:
for one, the room is WAYY too dark. Also, the door light from before isn’t bright with lighting enabled, so let’s go and add a light LOOKING at the door light, so it can appear to be bright and emitting light.

Ok, now I want the light from the door to be more clear, so let’s take that door light we just added, copy-paste it, turn it around, and make it volumetric. Oh! and let’s also position a dark blue fill light on the camera, to fill in all the black darkness in the room!

and… hmm, let’s see… three part plan… Ah! Rimlighting!

Let’s rimlight the scout, with two rimlights, to make him stand out more! and, on top of that, let’s give him a local key light, so his face is visible!
Ok, lookin good… hmm… Let’s add another light source to this image… how about a floodlight pointing towards the camera and scout (2 way floodlight)? Yeah, that’s a good idea! Let’s do that!

Uh oh.

DAMN. Looks like we hit a hard limit… the shadowed light limit..
This is actually a physical limitation that the SFM has. Only 8 lights in a scene are allowed to have shadows at any given point. Beyond that, newer shadowed lights will not be drawn at all, unless you right click them and disable shadows… but we don’t wanna do that to these! Floodlights are large, directed lights! they NEED to have shadows. So what, now we have to sacrifice existing lights?
well… No!
Not every light needs to be shadowed! That is the big lesson to take away from this section!
Let’s take a look at out lights in this scene…
We have 10 lights, all 10 of which are trying to cast shadows… but that’s just wayyy overkill.

Now it’s time to clear up what needs to cast shadows:
Lights that serve to be KEYS or certain ambients and rims need shadows. Fill lights should NEVER cast shadows, so be sure to always disable shadows on fills, because they should only serve to brighten up dark portions of a scene! So it makes no sense for fill lights to cast shadows.
Here’s how you should guage what lights need shadows:
1. Should the light visibly cast shadows? It needs shadows
2. Is it a rim light? Consider giving it shadows after every key has a shadow
So for our current scene, let’s disable shadows on:
1. door glow
2. door volumetric
3. dark-blue fill
4. screen left rim light
(Note that I don’t do this for screen right… This is because rim lights can often use properties of radius to enhance rims. Generally, the brighter rim can have shadows and radius, to give it the effect of wrapping around objects.)
(You will also notice that I disabled shadows for the volumetric… but this was because the volumetric is more or less assisting the door light with providing definition to the scene. Hence, since it’s assisting, it should not have shadows. We can also add some short range volumetrics to the floodlights too, and disable shadows on them for the same reason!)
That means, we take the light count from 10 to 6 right away. Notice that our flood light here is actually two, but one of the floodlights doesn’t really need shadows, so let’s disable half of the floodlight lights, to bring us down to 5.
That leaves us with 5 lights casting shadows, but one big problem… the problem that I mentioned at the beginning of this section… stage light!

Take a look at how many clean, crisp shadows the scout is giving off here… This is bad.

For one, our local key light is casting a VERY unnecessary shadow on the ground. Another issue here, is that the weak door light is casting a clear shadow, despite being a weak light source compared to the flood light and overhead light.
In total, we have 3 light sources visible, so that means we need 3 shadows, and they need to be appropriate! So here’s how we’ll fix this problem:
1. disable shadows on the local key for scout
2. raise the radius on the emitted door light
3. slightly raise the radius on the floodlight too
4. Raise the radius ALOT on the rim light that still has shadows.
and, once all that is complete, we instead have this:
Look at that! We have 3 visible shadows now, each of them varying accordingly!

If you can’t see the third one, look very closely to the front of his feet. Notice those weird soft dark spots emitting forward? That’s a higher radius shadow!
Determining how much radius to use on a light depends on a lot of things… In this case, it was about understanding the power of the light source in the scene.
Generally speaking, the strongest sources of light need the least ammount of shadow blurring through radius. Weaker sources need more!
Light that needs to wrap around objects also need lots of radius
And lights that emit off of surfaces need sufficient radius, since this is what radius was made for to begin with!
Understanding shadows in this way is essentially. Change your thinking about how they need to work, and your scenes will start making alot more sense! Not everything needs a shadow, and the SFM will thank you for that.
Part 13: Over Whitening and Lovely Color
White is both a useful and dangerous color. Very little light in the world is pure white! On top of that, if you use too much white light, you end up desaturating and washing out your images! Do not use too much white light, and learn to fall in love with color! This section is WIP
Part 14: from 3 to 5 – The 5 Light Toolset
This is a concept of mine that I really wanna get into later. Essentially, it’s about transforming the ideas behind three point lighting into a more applicable format. Turning a character lighting method into a toolbox for you to think about! Oh, and I threw in 2 other light types – volumetrics and ambients – because I love me fancy lighting ideas! This section is def. WIP
Part 15: Let’s Talk About Radius Again
A criminally underused feature of lighting that is actually pretty awesome. Has some really great applications and tricks around it. This is a section stub for when I maybe get around to writing this!
Part 16: Dynamic Range
This section is a stub, but essentially, it’s about understanding the concept of a dynamic range in lighting. In other words, you need to adjust how bright lights are based on how bright the environment is supposed to be. Standing in a dark room, the outside can be very bright, and standing outside in the brightness, a dark room can be pretty dark. That’s the basics of it, I’ll probably get into more detail later.
The Meaning of Light
The meaning of Light, is to make things bright. plain and simple. You need to make your scenes look and feel like “places”. Places where your stories can exist and feel “real” in a way.
even if your intentions are to capture a style

or completely undo reality

The goal of lighting stays consistent, even when the standard methods don’t fit the story you want to tell.


UPDATES AND INFO ON THIS GUIDE
As of right now, you’ll see a good handful of WIP sections of this guide. I started this guide a long time ago but never finished it – but I’m releasing what I did make in here.
I want this guide to be a comprehensive look at lighting and the Source Filmmaker (aka the sauce fun maker)
I wanna try to make this as comprehensive as possible.
If you have any ideas of more sections to have here, or if you noticed an error that needs correcting, OR if you feel something is poorly expained, please comment below and let me know. Thanks for reading!