Overview
Spoiler free list of items not to sell, what ’25/10/80′ means when looking at a chest, and other game information intended to improve your Risen 3 experience in as spoiler free manner as possible.
Uh oh, that wasn’t vender trash after all…
On your quest through the lands you will often accumulate treasures that you can sell for a profit only to discover later on that a specific NPC would pay more, or the item is used as a currency by the faction you joined, or was needed to make a +5 skill potion, or …
Opening Locks
There are two ways to open a locked chest: Dexterity & Magic
When looking at a chest in the UI, you’ll see three numbers. The first number is your lock picking skill, the second number is your magic skill, and the third is the complexity of the lock.
Your lock picking skill is based on your dexterity plus your equipment and training bonus. It’s pretty each to accumulate +25 or more equipment bonus. In order to open a lock, your lock picking skill (the first number) must be greater than the lock’s complexity (the last number). You also need a lock pick. Lock picks are indestructible, so you only need to purchase the one.
Your magic skill (the second number) must be greater than the lock complexity (the third number). Then cast the Rust spell. Unlike lock picking, I’ve yet to come across any equipment or training that give a bonus to Rust directly (indirectly, anything that boosts the magic stat improves Rust).
Given there are several chests with a complexity of 120 and no equivalent of the lock picking bonuses, opening high level chests with Rust will be a challenge.
You can’t place markers on the in game map. If you have access to a printer, consider using Steam’s screenshot functionality (F12) on the Map page, opening in a graphic package, cropping the image, applying 50% transparency, and printing it out!
You will encounter many chests out of your level throughout most of the game, and before you obtain a lock pick, so it’s something of an issue. Ditto for Ore Veins before you get the mining skill (required to get the most Ore from each vein).
There are chests in the game that require a key. These are quest related and cannot be picked or Rusted. These chests are usually named after the owner.
Pick Pockets
Pick Pocketing in only avaliable for some NPCs and is through dialog options only. The first number is your current pick pocketing skill, the second is the difficulty rating.
Unlike Lock Picking, pick pockets has a random element. It is perfectly possible for a character with a skill level of 60 to successfully pick pocket enemies with a difficulty rating of 120. Thankfully, the reverse is not true and a character with a skill equal or higher to the mark’s difficulty level will not randomly fail.
Failing a pick pocket check will trigger an attack. Time to reload.
Combat
You don’t have to hold the button down until the end of the power attack. If the enemy looks like it’s about to attack, you can often release the button early and get a partial power attack / stagger in before they break your attack cycle.
Critical hits only apply to firearms. Despite their being a critical hit chance shown in the UI, you can’t actually get a critical hit until you learn the Critical Hit skill. When you get a critical hit, you’ll see yellow text.
Most enemies have a predicable number-of-attacks pattern – typically 2 or 3. Block for the expected number of attacks and then attack.
Some examples:
Giant Crab
These guys are heavily armored. Use a power attack when they are rearing up to knock them on their back, then follow up with as many quick strikes as you can before they recover. Repeat until they are dead.
Monitor Lizards
These guys tap their right foot twice before charging.
Golums
When these guys lift one arm they are invulnerable from the front. When they lift two, they are going AOE a ground attack. The AOE can’t be blocked, so roll away.
Regular Giant Spider
Parry 3 times, then quick attack until they are dead or you miss. Repeat as needed.
Sand Devil
The easiest enemy in the game and the only one that isn’t dangerous in numbers. Parry once, then quick strike or power strike to death. If attacked by multiple sand devils, you can continue to attack one until they are dead or do not move back, at which point change target to the next one.
Giant Rat
Parry twice, then quick attack until they are dead or you miss. Repeat as needed. You can use partial power strikes if in a hurry (or need the practice),
Leviathon
Doge left or right, make one patial power stike, repeat until they are dead. Don’t bother trying to parry.
Cave Bat
I’ve not worked out a reliable way to kill these safely (other than the hyper boring & time consuming roll, quick strike, repeat). Dodge followed by quick strike until they are dead or you miss is the best I’ve managed.
Normal (non-fantasy) beasts
These all have a two-attack pattern. Alligator’s are slightly annoying as they are one of the enemies in the game that can’t be stun locked. Use the pattern: parry x2, quick strike x3, repeat (it’s not worth trying to get the 4th strike in)
Think of you companion as a satellite under your control. Rolling in such a way that the enemy is moving towards your companion and picks up agro really helps. Attacking the same enemy as your companion more than halves the time they take to go down as they’ll be stun locked or have used up their parry.
The enemy whose name bar is show is you current target. To change targets, move in the direction of the enemy until their name bar is shown.
Provisions heal over time (roll around a bit), alcohol heals immediately.
Where you see mixed monsters in a group (say a giant crab and a alligator), you can shoot one of them with a long range weapon such as a musket and only that monster will agro and will conveniently rush over and attack you separately.
Only kills by companions actually in your group give you Glory. If a companion or NPC not actually in your group gets the killing blow in, you won’t get the Glory for that monster even if you did 99.9% of the damage leading up to its demise. For this reason, I don’t recommend luring monsters back to the well populated areas, with one potential exception:
Expliot: There are a few places where you can lure hard mobs into the range of a lone firearm based NPC. Since the NPC’s reload time is large, you can typically roll around until the monster’s health is down to something you can finish off during the NPC’s reload. If it goes wrong, reload the quicksave.
Exploit: You can often use characters who join you temporarily for a mission to clear far more of the map than intended. Most characters will stand still when you go in the wrong direction, but will run some considerable distance to join you if you are attacked. They then stay there until you start going back in their preferred direction, by continuing to agro monsters in the ‘wrong’ direction they will keep running over.
By triggering a series of attacks, you can often clear quite a large area quite quickly.
Shax is particularly good for this, as he’ll follow you around the most difficult 1/3rd of the Island without resorting to luring tactics.
Sometimes combat sucks. I’ve been killed more times by the camera than the bad guys. The following is marked with a spoiler tag as they are somewhat cheap and knowing them may actually reduce your enjoyment of the game.
Spoilers
- Back monsters into a wall. They’ll not parry / dodge as much
- Eat provisions and roll around while your companion does all the work
- Many locations have water or other terrain the mobs won’t cross. Try standing in water and finishing them at range with a musket for example.
- Dodging against the walls is almost as good as dodging out of the way.
.
Where To Go First…
If you have the DLC, go to Fog Island first in order to get Freddies Shackles. An item granting +10% glory to all quests & kills. I didn’t go to either of the DLC islands until the end of Chapter 2 and as a result missed out on well over 17,000 bonus exp
Another choice for where to go first is an island with plenty of hunters – for example Calador. This allows you to pick up every hunting skill (other than mining) before you kill too many beasties and miss out on too much associated loot. Unlike games earlier in the series, only the skill is required – you don’t need any special tools in order to use any of the hunting skills (other than mining).
Other skills that helpful get early in order to eliminate tedious backtracking are mining (Tacarigua, from a Gnome in one of the mines) and Sneaking (Antigus, Fishing village).
Attribute Potions
This seems to be a big change from previous Risen & Gothic games: the rare potions that give a permanent +5 attribute bonus count against your exp cost.
For example:
- if your current attribute level is 10, it costs 500 glory to raise it by 5 to 15. If you use the potion, you have an attribute of 20 for a total Glory cost of 500.
- If your current attribute level is 10 and you use a potion to raise it to 15, then it will cost you 1,000 Glory points to raise the attribute from 15 to 20
In short, save your potions for later when the cost of raising an attribute via Glory is in the 10s of thousands.
Note: Attribute boosts from Collection items do not cost against your exp, so feel free to pick those up ASAP.
Plan you potion / herb use accordingly.
If you are chasing Steam Achievements, consider saving up enough points to get to 100 in one attribute, then raise each skill to 100 in turn and restoring in order to get each of the attribute achievements.
Bug Warning
If your attribute isn’t at a multiple of 5 and you use the +/- button to increase it the way up to 105 and then all the way back down again, it will actually go down to the muitiple of 5 below where you started, you will not be prompted to save changed, and you will loose those attribute points.
Knowing how many herbs you are likely to find in the game allows you to plan your character better. For example, knowing there are enought herbs for +50 points of dexterity means any investment in dexterixy form Glory points is wasted after 50 (50 glory + 50 potion + 5 legendary collectable = 105 cap).
If you are truely looking to min/max, you’ll also want to know that one Soul Potion (DLC only) and a one Tincture of Toughness can be obtained through quest rewards.
Herbs & Recipes
- Recipes can be found in higher level chests. lying around, or bought from vendors.
- Creating the +5 potion requires the Brew Potion skill (2000G), the recipe, the herb, and the additional component(s) listed in the table below.
- The Alchemy skill does NOT affect the bonus from the potion.
- See also the warning at the beginning of this section about using Glory and perma-potions in the right order.
joining a Faction
Components
Potion of Magic
[tdPotion of Defense x2][/td]
Marksman’s Potion
Ritual Potion]
(No second component)
Potion of Awe
[/tr][/table]
Misc
There are some item (Osters, pouchs, boxes, messages in a bottle, etc) that need to be clicked on in the inventory in order to ‘open’ them and obtain the ‘real’ items.
Note that Silver Tongue can shortcut several quests, costing you Exp. Always consider the long road.
You can buy a shirt of +10 Silver Tongue on Tacarigua Island
A pick axe is required to mine an ore deposit. Pick axes do not break, so you only need the one. Get the mining skill before you mine a deposit as this will increase the yield from 5 to 8.
Your CTRL key isn’t broken :-). You need to learn the skill before it will do anything.
While this is available from the start [default key: Q] it doesn’t actually do anything until you learn the associated skills to highlight plants, weapons, etc
These will disappear if your soul rating gets too high, cancelling several quests you may have in progress. Try to do his quests early, but there is one on Kia Island that you can’t do before choosing a faction. Even if you soul is 100, Mendez will warn you once before leaving in a particularly poorly scripted event, so if you avoid him (get too close, and it will trigger the warning conversation) you may be able to get one last visit out of him by avoiding talking to him for a while. Once he’s given his warning, the next time you encounter and talk to him, he’ll leave there & then.
Do not be concerned. This only happens a limited number of times and the number of souls points avaliable from questing vastly exceed the number needed to get to 100. Additionally when dreaming, head to the spots marked by ‘fireflies’ effect and pick up the soul dust you find there. These can be traded with Edward for bonus soul points
The Haggle skill only effects purchase prices not sell price. It’s a cheap skill at level 1 (500G for the first 5% discount), so you may as well pick it up.
While the Parrot Spell is needed to reach certain locations, it also has a some other uses:
- Quickly exploring a populated area (since enemies don’t attack Parrots). You can also bypass enemies this way, but given exp from killing is much greater than exp from questing, why would you?
- Quickly finding invisible walls and teleporting walls. Much quicker than swimming.
- Apparently parrots are excellent climers. They can walk up inclines you can’t and can fly up verttically if needed.
- It’s much easier to work out how to get up to a location from that location. Quicksave, Parrot up, fly to the destination, see what route actually lead up there, and restore.
- Exploit: If you don’t have the sneak skill, you can Parrot, land within range of the object you want to interact with, and as long as people aren’t facing you, unparrot, and use the item without being detected.
Disclaimer & Pre-faction Saved Game
While I’ve over 60 hours playtime recorded, I haven’t actually progressed past the end of Chapter 4 yet. There may be things I’ve missed or that future knowledge that should be added to the list. Please feel free to add these to the comments below.
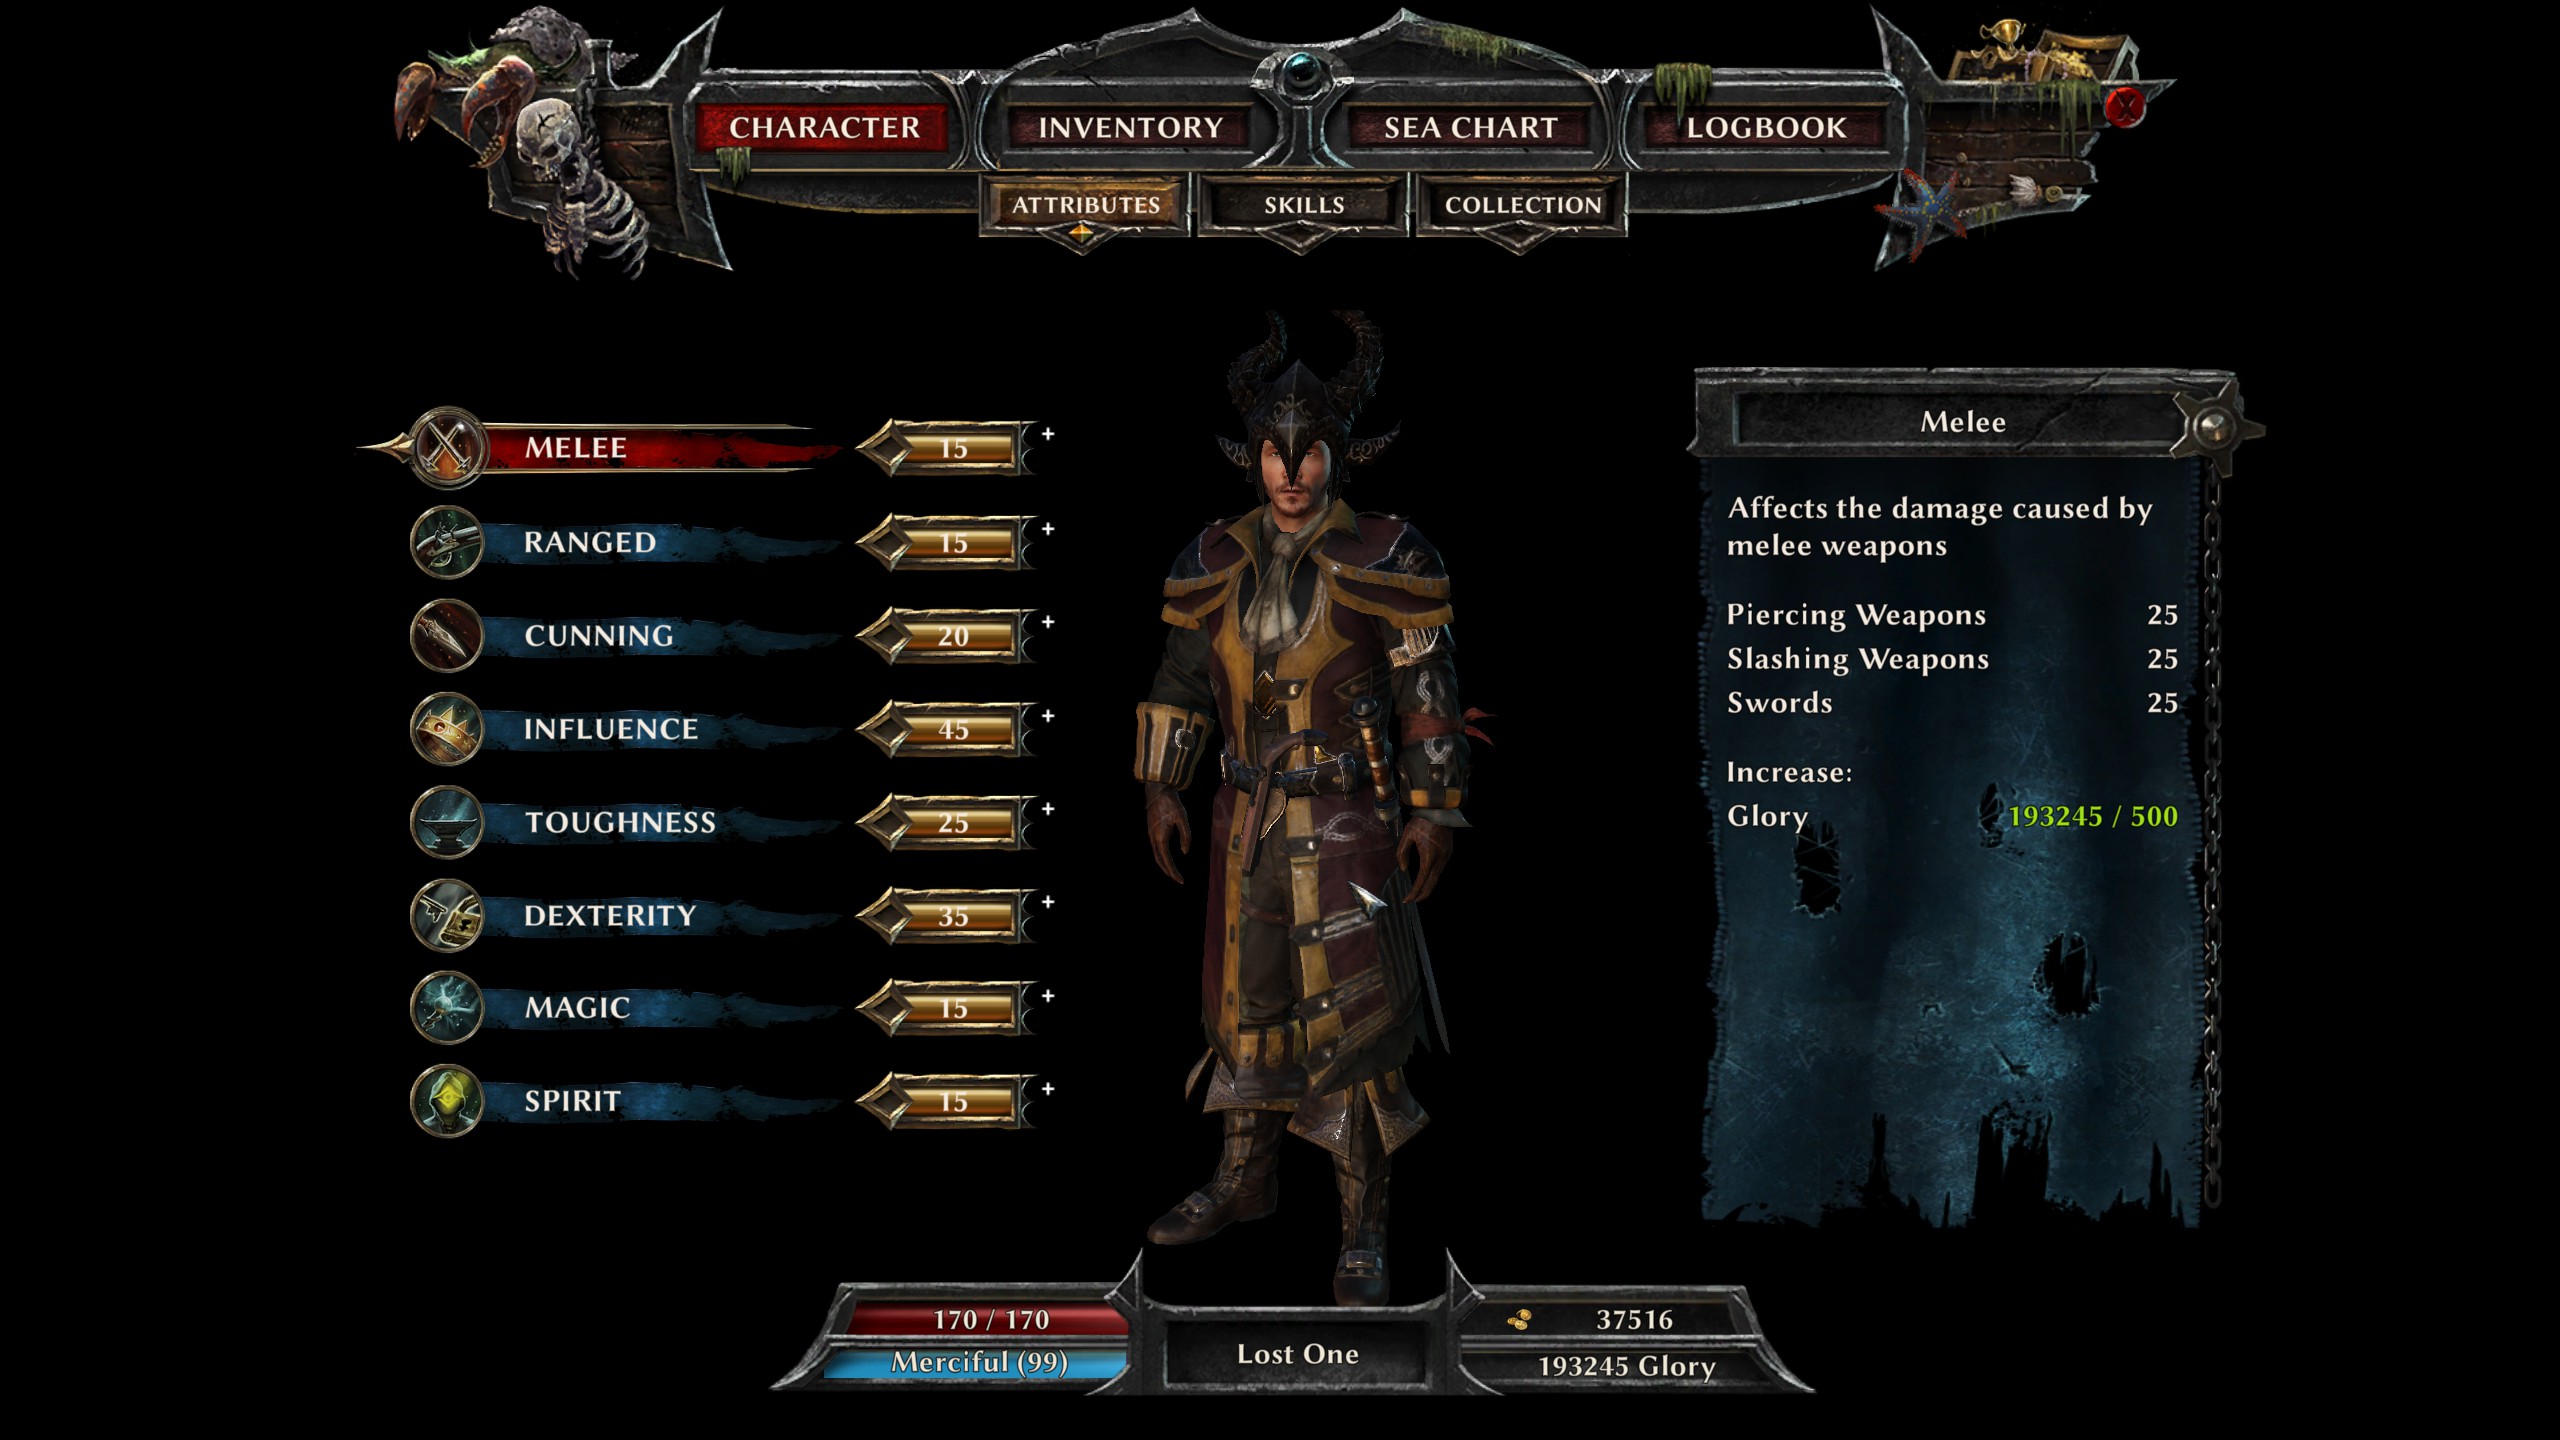
I hate replaying content I’ve already done, so I’m did everything that can be done before joining a faction. This has led to an “interesting” character build: 15 Melee & Ranged, 193,245 Glory, 170 Blood, 37,516 gold (104,309 if I sell my complete inventory – it would be more, but I cleared the whole of Tarcarigua before meeting any of the hunter skill trainers).
I’ve put a copy of this character’s on DropBox ([link]) if you want to use it. He has 177 Jade, 43 Ancient Knowledge, 213 Magic Crystals, 23 collectables, a couple of +5 potions, 52 +2 herbs, and no skills to speak of.