Overview
The official Black ICE mod guide for Hearts of Iron 4. This guide has been developed by the BICE team to help ease in new players coming from the base game. This guide contains the more important aspects of the mod that should be understood, as well as country specific mechanics and FAQs.
Introduction to Black ICE

Black ICE is a total overhaul mod for Hearts of Iron 4 that intends to give the game a more historical feel while keeping to plausible outcomes. All of the major nations have had an extensive makeover, with improved national focus trees, events, technologies, units, and more. Many influential minor nations also have their own national focus trees, events, and flavor. BICE incorporates mechanics from many official DLCs, though none are required in order to play the mod. If you do not have a DLC, some of BICE’s expanded mechanics and features related to or relying on that DLC may be unavailable to you.
BICE is designed for singleplayer playthroughs that roughly follow historical events, but still allows for a few alternative choices. It is very important to note, however, that unlike the base game, selecting the ahistorical focus setting is very likely to ‘break’ the game by having countries act in unforeseen ways. BICE does not include many alternate history scenarios or focuses, and the developers generally don’t provide support for bugs in ahistorical games. The mod is also not particularly fine-tuned for multiplayer, though the BICE discord community still regularly hosts multiplayer games, and we are always looking for more players.
This guide will cover the most up to date version of BICE, and it is intended to serve as an exhaustive resource for many of the new mechanics and concepts introduced in the mod. For more specific questions or for help with any issues you encounter it is recommended to hop onto the BICE community discord server to ask for more help! [link]
In order to maximize your Black ICE experience, you will need to download both the main version of the mod and the Events GFX addon linked here.
[link] [link] In addition, there is a TEST version of BICE that is updated more frequently, but keep in mind that there may be more bugs or instability between saves and versions. For long, drawn-out campaigns played over weeks, use the main version.
Do not use the test version and main version at the same time. Use Main + GFX or Test + GFX.
[link]
Political Power, Stability, War Support
Black ICE has completely revamped how you gain, use, and lose political power. The base gain has been increased to 1.40 per day, with majors receiving an additional 0.20, and there are a multitude of modifiers that influence how much you are able to gain. Most of these modifiers will come in the form of your government’s laws and ministers.
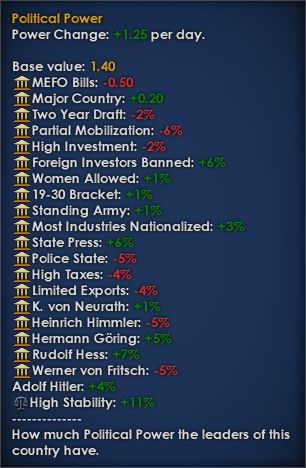
As before, political power is your resource to modify those laws and to put ministers of your choosing in power. Be aware that certain ministers that hold significant powers in your government will require an additional amount of political power to replace. It is also used in a much larger selection of decisions that further influence your country compared to the base game, as well as used in events to potentially alter their outcomes.
Stability has been reworked in BICE from a static number into a fluid and dynamic system of weekly gain and loss. Your government’s laws have a major impact on your weekly stability, especially your economic mobilization. There are many ways to increase your weekly stability, including powerful temporary decisions, civilian technologies, ministers, events, and focuses.
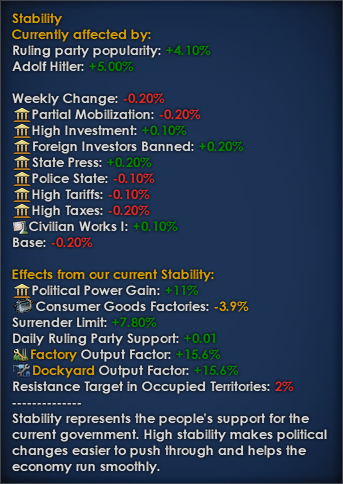
It is very important to keep your stability as high as you feasibly can. A large percentage of consumer goods usage is tied to stability, as is your political power gain, factory output modifiers, surrender limit, and resistance target in your occupied states. Below 50% stability, you will progressively approach -25% political power, -50% output factor, and -10% surrender limit, among other things.
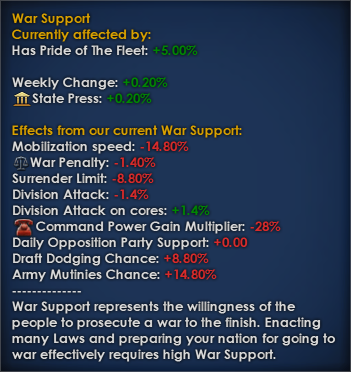
War support impacts such things as your daily command power gain, the chance to get negative events like draft dodging or mutinies, and division attack on and off of your core territory. Its largest impact, though, is your surrender limit. At 100% support, it will increase by 20%, while at 0% support it will go down by a whopping 30%.
Politics, Laws, and Ministers (1/3)
BICE has an expanded assortment of laws that affect your country compared to the base game. Countries are restricted to what laws it can use based on things such as ideology, focus completion, date, and even other laws. They have varied effects, many of them with positives and negatives, and you will have to decide which to use and when.
From left to right, the options are as follows:

Monarchy/Republic: This feature is used as a background mechanic for events and politics. It cannot be influenced or changed by the player, and can safely be ignored.
Economy Policy: Similar to the base game, this law represents your country’s industrial mobilization to war. It is generally ideal to ensure that your economy is as mobilized as possible at all times in order to use as many civilian factories at a time as you can. BICE also introduces a minimum consumer goods level, with each higher level of mobilization reducing the limit. Also keep in mind that mobilization comes with a price – A malus to political power gain as well as weekly stability. Aside from Early Mobilization, this law takes some time to implement fully when changed, and offers incremental benefits during a swap.
Level of Nationalization: This law represents how much the government has control over national industry. More control means faster construction and more output, where less control equals higher productivity and research speed.
Foreign Investment Regulations: This law determines, abstractly, how much influence foreign entities have on your industrial capabilities. More regulation leads to higher weekly stability and political power gains, while less gives some bonuses to your overall industry at the expense of the above.
Industrial Tariffs: This law influences your industry in a variety of ways. More tariffs lead to lower weekly stability and higher consumer goods usage, but improves construction rates and factory output. Lower tariffs provide a consumer goods use reduction and a bonus to industrial research at the cost of the above.
Trade Policy: Like the base game, this law dictates how much resources your country produces are traded away. Other minor effects influence political power gain, weekly stability, and resource gain efficiency.
Tax Policy: This law has a large effect on your industry. More taxes means less consumer goods usage as well as faster military construction and output at the expense of political power and weekly stability. Lower taxes is the opposite, with a boost to civilian industry construction speed.
Press Laws: This law represents how free your nation’s media is. This law influences political power gain, weekly stability and war support, and free intelligence to foreign countries at the expense or gain of consumer goods usage.
Security Policy: This law represents how much freedom the citizens have in your country. A fully fledged police state will provide counter intelligence and ideology drift defense, where a free society provides more free intelligence to other countries while increasing weekly stability.
National Unity: This feature represents, as a whole, how unified or divided your country is. You cannot influence this law, and it acts as another background mechanic for events and politics.
Politics, Laws, and Ministers (2/3)
Foreign Policy: This policy represents your country’s willingness to go to war or intervene in foreign affairs. It influences a wide variety of diplomacy-related items, such as faction and volunteer tension limits, trade opinion, and stability while at war.

War Bonds: This policy determines your government’s fund raising efforts within your country. Most of the laws have a base effect that is coupled with a second timed effect, generally lasting for 270 days. This law cannot be downgraded once a higher level is selected, so plan carefully. Bonds can influence construction speed, factory output, and war support, with a potential negative to political power gain and weekly stability. Note that the decision for war bonds enables a unique type of policy that cannot be manually selected.
Military Mobilization: This policy represents the level of mobilization for your military. Lower levels give a very large penalty to all facets of warfare, land, air, and sea. In return it gives a slight boost to political power gain, construction speed, and factory output. This law takes some time to implement fully when changed to Limited or General Mobilization, and offers incremental benefits during a swap. Remember to mobilize before going to war!
Conscription Policy: This law determines the multiplier for your recruitable manpower. At low levels, it will increase your political power gain and construction speed, but reduce the amount of available manpower. The opposite is true for higher levels, with some other nasty maluses from the highest laws.
Service Ages: This law represents what age bracket your country will draft manpower from. A lower age range will net you more political power at the expense of recruitable population, while large age ranges will provide various negatives with diminishing returns in manpower.
Female Labor Regulations: This law influences if women in your country are allowed (or forced) to work in your factories. Disallowing them leads to a weekly stability gain at a consumer goods use cost. More women in the workforce means less consumer goods usage and more manpower for your military, but cost you weekly stability as well as lower your production efficiency. This law may not be downgraded once taken, so plan accordingly.
Foreign Recruitment: This law influences how much manpower your country can draw from your puppets or occupied territory. Its effects are fairly minor, and it is usually not worth changing.
Training Standards: This law directly affects your army’s training times, organisation, and recovery, as well as naval organisation. This law is influenced by your officer training standards, and vice versa. It is advised to have both upgraded as high as you can comfortably go. This law takes some time to implement fully when changed, and offers incremental benefits during a swap.
Officer Training Standards: This law modifies the effect of your other training standards law. Better officers leads to a more effective fighting force, as well as an increased cap of max experience, command power, and special forces limit. It is usually ideal to increase both of your training standards as high as you can comfortably go. This law takes some time to implement fully when changed, and offers incremental benefits during a swap.
Education Policy: This law reflects how much your country invests into research and education. Higher investment leads to better research rates, naturally, at a cost to consumer goods and factory output. The opposite is true for a low investment.
Figurehead: This figure is your country’s public head of state, and generally cannot be removed or replaced manually. These historical figures have a small effect on your country.

Foreign Minister: This minister will influence how your country interacts with others. Generally they modify trade and relations opinions, though some will influence war justifications, political power, and the like.
Interior Minister: This minister handles the administration of your country and occupied territories. Notable modifiers include resistance suppression, foreign subversive activity, and non-core manpower gain.
Head of Intelligence: This minister affects your spy agencies and their effectiveness, as well as a few smaller bonuses depending on the type of minister in power. Every minister in this position will increase the amount of spies you are able to recruit by one.
Economic Ministers (2): There are two slots for these ministers, allowing you to more easily fine-tune your industry. Their influences are widely varied, and very powerful. This is usually a very strong early game pick for your government.
Political Advisors (2): As with economy, there are two slots for these ministers. Many of these figures will have powerful effects on important things such as political power, stability, and war support.
Domestic Minister: This minister is able to influence a large variety of things depending on what kind of minister he is. Notable modifiers include political power, weekly stability or war support gain, trade, and research.
Propaganda Minister: This position is able to influence your politics in important ways. Propaganda ministers generally have a very good affect on your country, are another good early game pick. Modifiers include base political power gain, stability and war support gain, as well as a large influence on your country’s party popularity.
Politics, Laws, and Ministers (3/3)
Tank Designer: This designer will provide a bonus to any applicable equipment that is researched while it is in place, as well as a research speed increase for armor. Some countries will have a large selection of designers, while others may have only two or three.

Ship Designer: This designer will provide a bonus to ALL applicable ships. Unlike the tank or aircraft designers, you are not required to have this one in place before researching the equipment in order to get the bonuses. Additionally, this designer provides increased dockyard output as well as a research speed boost for certain types of naval technologies.
Aircraft Designer: This designer will provide a bonus to any applicable equipment that is researched while it is in place. It also gives a research speed increase for all aircraft on top of a bonus for their specific aircraft designs. This designer is geared towards single engine planes such as fighters, close air support, etc.
Heavy Aircraft Designer: This designer works in the exact same manner as the previous one, except it is focused on larger, multi-engine planes.
Army Equipment Designer: This designer provides a bonus to ALL applicable equipment while it is in place. Like with ships, you do not need to have this designer in place to get the bonuses for equipment before researching. This designer also increases research speed for its related equipment.
Industrial Concern: This slot is typically filled by a large corporation or industry, and provides industrial research speed bonuses depending on what kind of concern is chosen. Many choices also include small industry bonuses.
Electrical Concern: This slot is typically filled by a large corporation or electronics designer, and provides electronics research speed bonuses depending on what kind of concern is chosen.
Naval Academy: This academy requires navy experience and a large amount of political power to select, and provides minor boosts to certain aspects of naval warfare.
Military Academy: This academy requires army experience and a large amount of political power to select, and provides minor boosts to certain aspects of land warfare. Many of the different choices have large trade-offs, so choose wisely.
Civilian Fuel Allowance: This law influences how much fuel your country is able to produce, and how much fuel your citizens are allowed to use. Civilian fuel usage is linked directly to the number of consumer goods factories you require. Lower fuel allowance gives you a positive percentage modifier on daily fuel gain as well as better resource gain, at the expense of political power, weekly stability, and weekly war support. A higher allowance means the opposite.
Supreme Commander: This figure is in charge of your entire military, and can give a wide variety of small modifiers.

Chief of Army: This general commands your army, and provides general overall bonuses to items such as attack, organization, movement speed, etc.
Chief of Navy: This admiral commands your navy, and provides general overall bonuses to items such as raiding efficiency, capital or screen attack, convoy defense, etc.
Chief of Air Force: This general commands your air force, and provides general overall bonuses to items such as ground attack, air superiority, air experience gain, etc.
Military High Command (3): These three slots can be filled by the top leaders of your country’s armed forces. In order to be selected, the appropriate Chief must first be in place, and you may not have more than two commanders from a single branch of your military. They provide more specific, and generally more substantial, bonuses to things such as armor battalion attack, close air support attack, and convoy raiding efficiency.
Theorist (3): These three slots can also be filled by top leaders in your country’s military, each one providing a research bonus to a certain type of doctrine that they favor. Just like the high command, a Chief must be assigned and you may not have more than two theorists from the same branch of your military. Influential scientists are also added in this area, providing a boost to research for their field of study.
Intelligence
The largest change to intelligence operations in BICE comes in the form of collaboration governments. Instead of being able to acquire 100% compliance with a country though this operation, the maximum is now 50%, with every 2% of collaboration translating to 1% of compliance in the target country. This prevents the snowball effect that can be present otherwise. Another change to this operation is its cost and duration. Both have been increased significantly to further balance this mechanic, with every successive collaboration operation becoming more expensive in the cost of civilian factories.
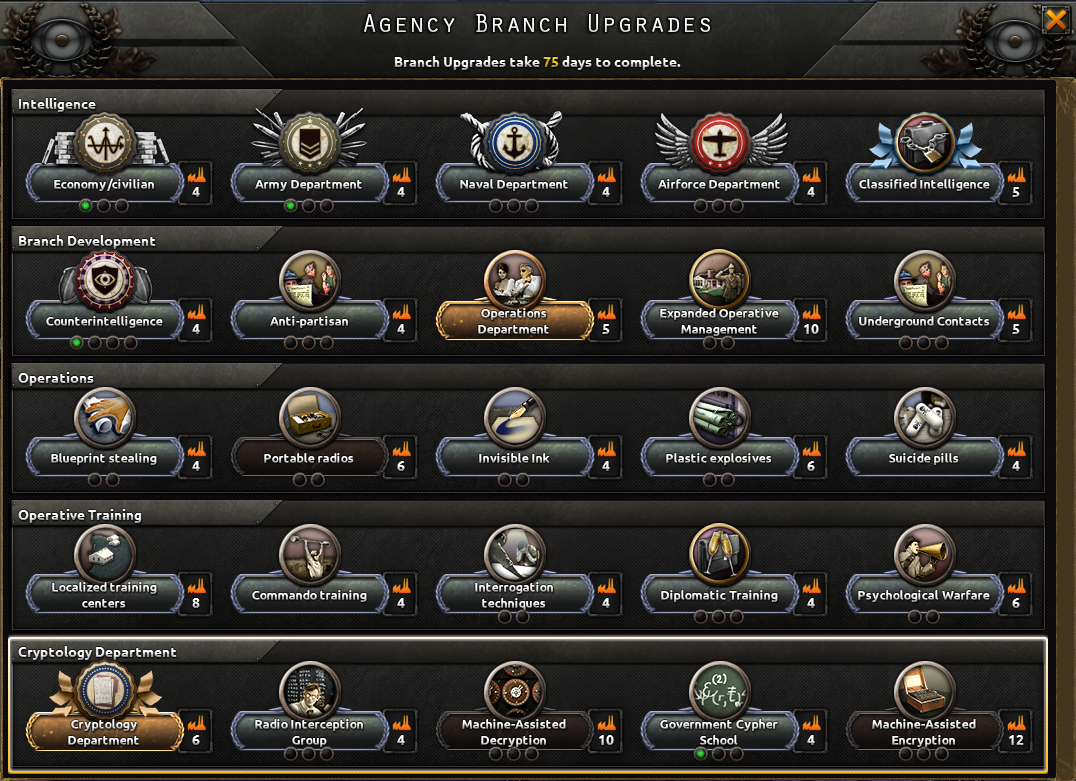
Another significant change is the amount of operatives you are able to recruit. Your Head of Intelligence minister will always provide you with 1 operative slot, but to get more, you must upgrade your agency with the Operations Department. You can get a further 2 operatives by fully upgrading the Expanded Operatives Management. Beyond this, every 10 total upgrades nets 1 more slot to recruit. In order to become your faction’s spy master, and to gain access to the bonus for faction members, you must have 10 unique upgrades in your agency. Multiple levels of the same upgrade do not count towards this requirement.
Technology and Research Overhaul (1/2)
Black ICE introduces an extensive rework to research and technologies in the game. The technology tree has been expanded significantly to increase the variety of options available to you, as well as to model historical equipment and capabilities.

Research speed is now impacted by your laws, ministers, and designers alongside your computing technologies. In addition to this, your ability to develop doctrines and certain types of equipment are influenced by the strength of your deployed military might, with bonuses up to 10% at the largest scales. Your modifiers in this regard are displayed as icons at the top of your research screen that you are able to hover over to view a tooltip, or by clicking the small grey bar on the left side of the screen. Their tooltips will inform you of what your current field strength is, how it is calculated, and what you need to attain the next level of power in order to get a larger research boost.
The ahead of time penalty on research has been significantly increased as well, at +400% per year. With many more options for research, you will have to be very picky on what advanced technologies you consider worth the significantly increased cost. Ahead of time reductions are also very rare in BICE compared to the base game, mostly replaced by percentage bonuses instead.
Additionally, research slots are now restricted to certain categories in order to maintain a more historical balance between the technological capabilities of different countries. Every country will start with at least 2 slots that are marked as all purpose, and can be used on any category of research. Any further slots will be restricted to specific categories, as marked by the icons on the lower right corner of that slot. AI countries do not adhere to this rule, however, and are free to use every research slot however they wish in order to not break the AI entirely and/or to prevent a coding nightmare behind the scenes.
If you are unfortunate enough to have your lands invaded, there is a possibility that research slots will be taken away from you. Every research slot beyond the 2 all purpose ones have an associated research center that is placed in a state within your country. The state that a research slot belongs to is noted in the top right corner of that slot. If you lose control of the state that a slot is based out of, you will lose the ability to use that slot. The current research will finish, and the slot will be marked out in red.
The technology tree has been extended and expanded in a massive way, splitting many aspects of warfare and industry into many different sections. This gives you a large amount of variety in play styles and customization for your buildup to war.


Technology and Research Overhaul (2/2)


Construction, Production, and Storage
Black ICE includes a couple of changes to construction and consumer goods, particularly that your level of economic mobilization impacts more significantly the amount of consumer goods that your country requires. Mobilization laws provide both an amount of consumer goods required as well as a lower limit to the percentage of consumer goods you are able to attain. Partial Mobilization, for instance, gives a consumer goods requirement of 25% while the lower limit is set to 20%. This difference must be made up by laws, technologies, focuses, and events. In the example below, the country is able to reduce the required consumer goods by a further 2% before reaching the minimum limit.

There is also now a limit to the amount of factories of any particular kind that one state is able to construct, determined by your technology level. As a base, you are allowed to construct 5 civilian factories, military factories, and dockyards per state, provided you have the building slots available for them. You can increase these amounts by researching the industrial technologies of construction, military production, and dockyards, respectively. Air bases, naval bases, and land/coastal forts are similarly affected by technology.


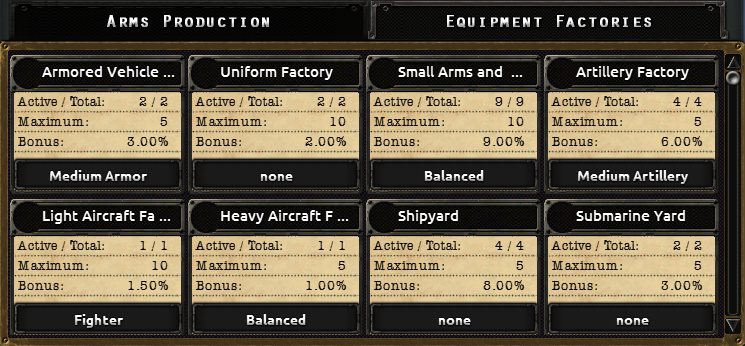
The amount of equipment factories that provide you with a bonus is determined by your technology level. Equipment factory research is a branch from either concentrated or dispersed industry, and every successive technology increases the maximum effective factories by 5. Every nation starts with a base limit of 5 to simulate historical production, but you will be unable to construct more equipment factories until you develop that specific factory’s technology.

This UI at the top-left corner of your screen gives a quick-glance look of how many resources your country has stockpiled. If you click on one of the numbers in its box, the storage UI will pop out for you to manage.
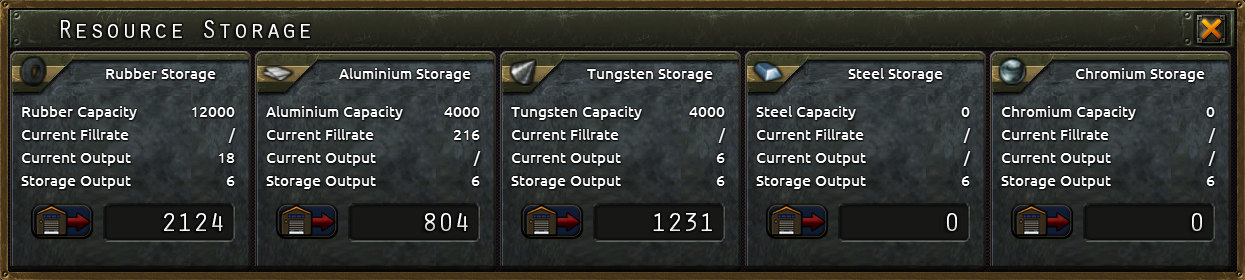
Using this menu, you are able to designate resources for either storage input or output. Every storage building you have for the type of resource you wish to stockpile provides you with 4,000 capacity and a base output rate of 6 units per day. The output rate can be increased through excavation research. This means that if you have 3 storage buildings for rubber, you can stockpile up to 12,000 of it and output 18 per day, or 21 with the first excavation technology. There is no limit to the amount that can be input into storage per day, meaning that you could trade for hundreds of resources at a time to fill your storage very rapidly. Unless designated for output, excess resources will automatically be placed into storage if available.
Equipment Expansion and Design
Black ICE introduces a significant amount of equipment to the game. Instead of a battalion using one single type of equipment, it now uses multiple, with some battalions reaching up to 12 different types of equipment to fully arm. Managing your production efficiently is a massive part of this mod, and balancing your military industry is the key to success.
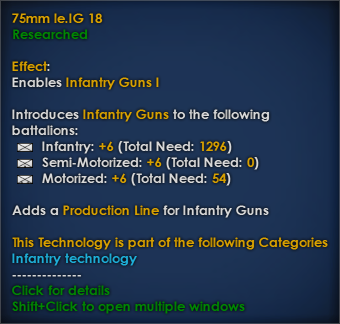
Most battalions will be upgraded over time as you research equipment, and the amount of new equipment they will need can be determined by the tooltip that pops up when you hover the cursor over the technology, as seen here.
The sheer amount of equipment types can be overwhelming to new players in BICE, but you can more or less divide them into five separate categories: Infantry Equipment, Artillery Equipment, Mobile Equipment, Armored Equipment, and Support Equipment.
Infantry Equipment: This category contains everything used by solders on the front lines. This includes field uniforms, infantry weapons, submachine guns, infantry guns, machine guns, mortars, handheld anti-tank, as well as amphibious, mountaineer, and paratrooper equipment. This equipment will make up the bulk of your military production, and is the most important to keep your units stocked up on. If they don’t have these, they can’t fight effectively!
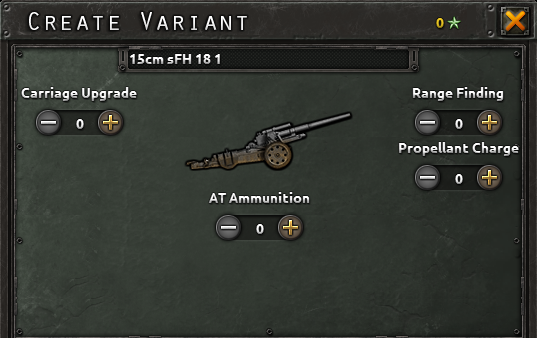
Artillery Equipment: This category is everything used by combat support battalions like artillery and anti-tank. This includes pack, light, medium, and heavy artillery, rocket artillery, light and heavy anti-tank, light and heavy anti-air, railway artillery, and spotter planes. This equipment is what gives your divisions the firepower needed to effectively attack or defend as well as the ability to counter enemy armor or CAS. This kind of equipment is just as important as infantry equipment, as without it, your divisions will lack any kind of destructive force.
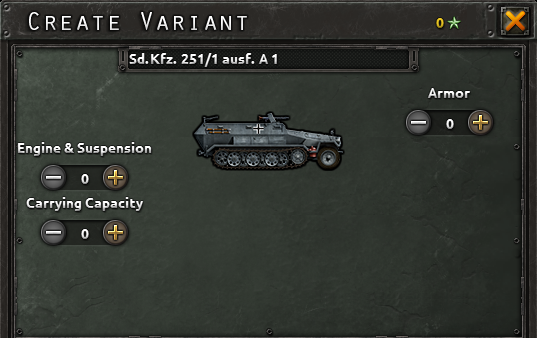
Mobile Equipment: In this category are all the things that provide your divisions with the ability to move quickly. This includes cavalry equipment, light vehicles, transport trucks, mechanized equipment with all of its support variants, as well as horse transports, artillery truck transports, and artillery tractors. Without any of these, all of your divisions will be forced to stick to walking from place to place. As well as providing battalions with speed, trucks and mechanized equipment gives their battalions a slight boost to combat stats and hardness as well, making them even more useful overall.
Armored Equipment: This category, obviously, contains tanks and their many variants. It includes all classes of regular tanks, self-propelled guns, artillery, and anti-air, tank destroyers, flame tanks, amphibious tanks, command tanks, and armored recovery vehicles. If you plan on equipping your army with armored divisions, definitely invest in command tanks. They increase the amount of organization the battalion has, increasing the overall organization of the division as a whole. The recovery vehicles are secondary, but increase the reliability of your armored units, which is important to combat the effects of attrition.
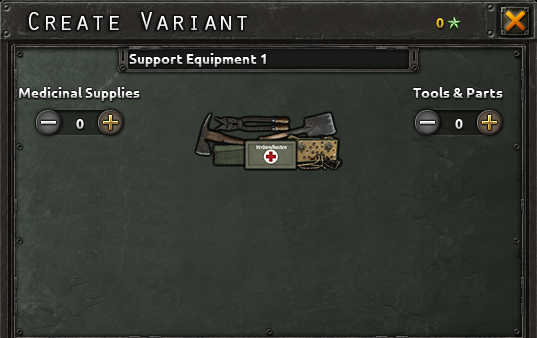
Support Equipment: This category contains everything that holds your divisions together or gives them bonuses to their non-combat capabilities. Most of this will be used in your support companies, and it includes support equipment, garrison equipment, recon equipment, motorcycles, armored cars, tankettes, arctic, desert, and jungle warfare equipment, as well as radio equipment. Much of this will only be used by your military in small quantities, such as terrain-specific equipment, but others will be used by every single battalion, as is the case with radios.
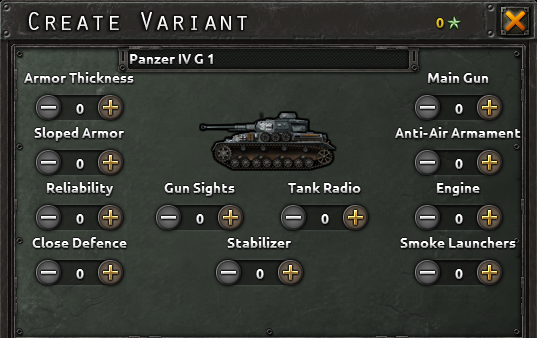
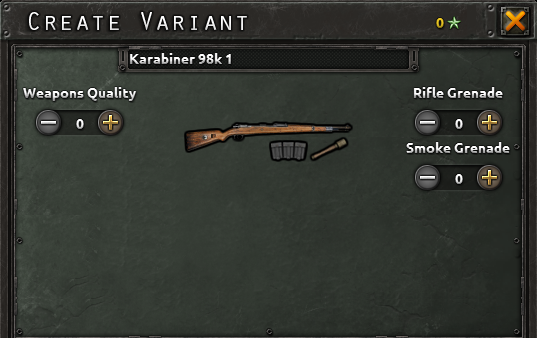
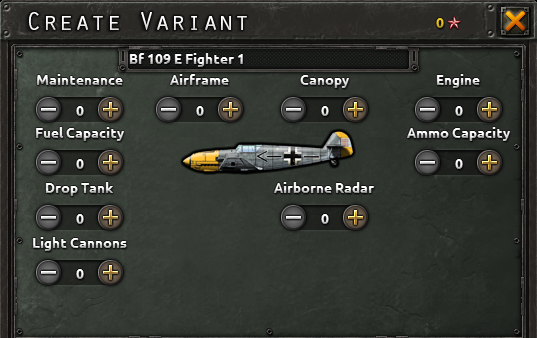
Unlike the base game, in BICE you have the ability to modify nearly every single piece of military hardware you will use in your games. This even applies to things like support or garrison equipment. There are also a wide variety of options to customize your equipment to fit your specific purposes, so experiment with things!
Land Combat and Army Doctrines (1/2)
Compared to the base game, the modifiers in combat due to things such as weather, mud or snow, and terrain have been made substantially more impactful. Many of these factors also tie into other game mechanics, such as the penalty that your divisions will get due to enemy air superiority.
A few key game mechanics are also tweaked or overhauled, including combat width, the special forces cap, and the benefits that armor provides to a division. A much larger change in BICE is the split of army doctrine between offensive, defensive, and support doctrines.
One of the more commonly overlooked changes that Black ICE makes is to the combat width for land warfare. The base width is now 75, and the change is intended to put a higher emphasis on flanking, reduce the amount of divisions that can participate in a battle, and accommodate the typically fewer amount of divisions used in the mod versus the base game. With this change, the most effective size for divisions are a multiple of that value. 12.5, 25, 37.5, etc.
Another small tweak that Black ICE has made is the amount of protection that armor provides to a division. When your division is unpiercable, it now provides a 45% reduction to organization damage instead of the 50% in the base game. The additional damage that armored divisions deal to enemies that cannot penetrate them is also decreased to roughly half of the effect of the base game. Armor is still an incredibly valuable tool, but it is no longer the overpowered mechanic it could sometimes be in the base game.
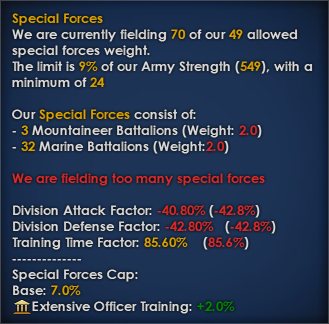
In comparison to the base game’s hard cap on special forces battalions, BICE uses a soft cap limit. This limit is set by the size of your army and your officer training laws, as well as modified by focuses and certain technologies. If you go over the limit, all of your special forces battalions will receive negative modifiers to their stats. Every special forces battalion that is deployed contributes to this number, as well as certain types of support companies. Check the list of unit types further below for more specifics.
By far the largest modifier you will receive to land combat comes from what terrain you are fighting in. Rougher terrain will influence your overall attack values, your divisions’ speeds, attrition rates, air support, and more. Generally speaking, it is a good idea to only attack through easier terrain such as plains or forests, as they provide the least amount of negative modifiers. Conversely, defending in terrain such as mountains, hills, or marshland is significantly easier. Although your attack values will be reduced, your defense values are untouched, meaning that you will typically have a significant advantage over your foe.
< This is one effect of snow-covered terrain, which is a modifier added on top of the normal terrain modifiers
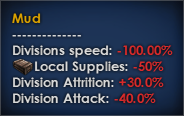
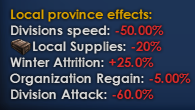
Additional terrain modifiers such as mud or snow also impose a hefty penalty to many of the same values that terrain influences, and they will stack together. Mud in particular is a nasty foe to fight, sometimes worse than enemy troops.
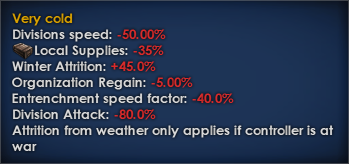
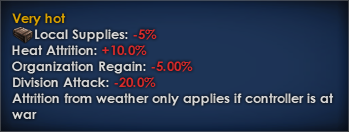
Temperature has been changed into a huge factor of warfare compared to the base game, especially the harsh winter colds. All of these separate modifiers stack together to severely bog down all sorts of offensive operations. With these changes, acclimatization is now a much more useful tool to combat the extra attrition you might take from these conditions.
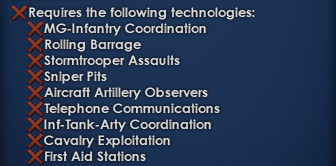
Land doctrines in Black ICE have received an extensive rework. In addition to splitting between offensive and defensive doctrines, World War One doctrines have been implemented in the game. This reflects the massive differences in military readiness that was obvious between the different armies of the period, with the more advanced WW2 doctrines requiring a substantial number of Great War doctrines to be researched in order to be unlocked. All countries are able to research one offensive and one defensive doctrine, with every support doctrine available with no restrictions. Additionally, doctrines are now dated just like any other technology in the game. This change helps to balance the war in multiple ways as well as simulates the changes made to strategic planning and execution that occurred in real life.
< With the exception of Asymmetric Warfare and Special Forces, all WW2 doctrines require all of these WW1 technologies to be researched before you are able to develop them.
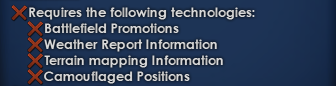
< These are the requirements for the Special Forces doctrine to be developed.
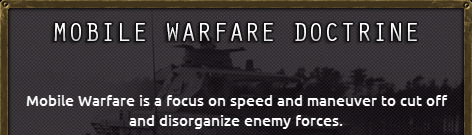
Mobile Warfare: These are the revolutionary methods developed by Germany and implemented in their famous Blitzkrieg tactics. This doctrine focuses on mobility speed, and armored spearheads, in order to overwhelm and overrun your enemies. It heavily boosts the organization and breakthrough of your tanks and mobile infantry.
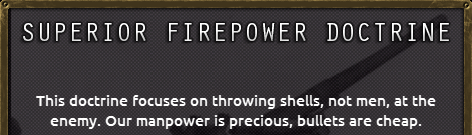
Superior Firepower: The use of this doctrine was the preferred strategy of the United States during WW2 and beyond. It focuses on increasing the attack values of nearly all of your units, and emphasizes the importance of proper support, usage of artillery, and organization. It is typically the best doctrine for infantry or artillery heavy armies.
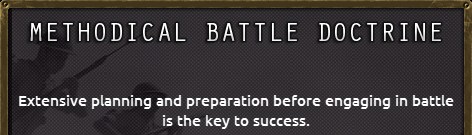
Methodical Battle: This doctrine reflects the older, more traditional ways of warfare, and is utilized by many Europe’s armies. It builds heavily on top of the strategies of WW1 with extensive planning and preparation. The benefits that a big planning bonus gives to your divisions can’t be ignored, and makes this doctrine well worth considering.
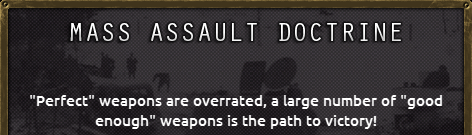
Mass Assault: The brutal method of warfare developed and perfected by countries such as China and the Soviet Union, this doctrine heavily influences the organization of your divisions and how much manpower can be sent into battle against your enemies at a time. It also significantly boosts reinforce rate and lowers supply usage, with a few other options available for consideration.
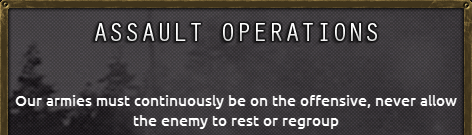
Assault Operations: This strategy was heavily utilized by the land forces of the Empire of Japan in its pacific conquests, epitomized by the famous Banzai Charge. It boosts breakthrough and infiltration as well as lowers supply consumption overall. Planning receives a small amount of benefit from this doctrine as well.
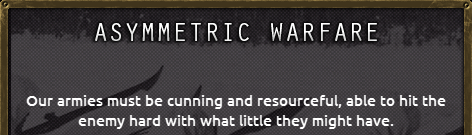
Asymmetric Warfare: Underhanded and dastardly, this doctrine is the only one that does not require any investment into WW1 doctrines to research. It focuses on utilizing non-standard units, such as cavalry, militia, and light infantry, to their fullest effect. It also heavily influences resistance activity behind the lines, increasing the amount of enemy resources that must be poured into keeping your core states garrisoned properly.
Land Combat and Army Doctrines (2/2)
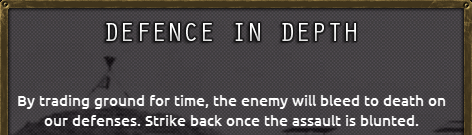
Defense in Depth: As the strategy employed by the Soviet Union, this doctrine focuses on the trading of territory for time, waiting for the enemy to stretch themselves too thin before striking back, and bleeding them for every inch they take. This doctrine boosts entrenchment more than any other, and it also boosts organization and defensive stats.
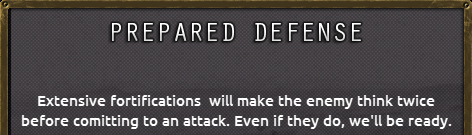
Prepared Defense: This doctrine emphasizes fortifications as a way to stop the enemy assault in its tracks. The French took this idea to the extreme with the construction of the Maginot Line on their border with Germany. This doctrine provides bonuses to the overall defensive capabilities of infantry as well as boosts the soft attack value of artillery.
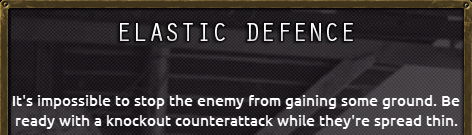
Elastic Defense: The tactics typically used by the highly mobile forces of WW2, such as the German Panzer Corps, this doctrine further emphasizes the use of spearhead tactics and formations. It gives armored battalions more organization and speed, as well as significantly increases the reinforce rate of units.
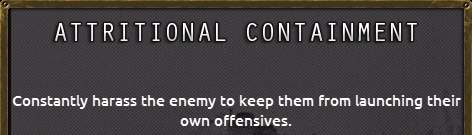
Attritional Containment: A strategy often used by the Chinese United Front against Japan, this doctrine focuses on continually harassing the enemy, preventing them from properly planning and executing their own operations. It provides a boost to organization for your entire army, as well as increased hard attack and a lesser enemy air impact.
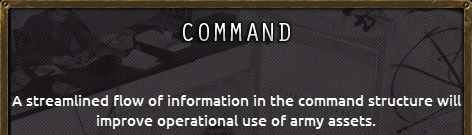
Command: Without a clear structure of military command, one can never be sure of who is calling the shots and who to follow orders from. This concept is incredibly important at all levels of the chain of command, from the smallest tactical units to the supreme commander of all of your forces. This support doctrine has a large influence on the organization provided by your headquarters units, command power gain, and the maximum experience limit.
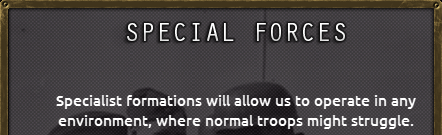
Special Forces: Often the most elite and well trained part of any army, Black ICE introduces a more robust method to upgrade your special forces with this doctrine. It provides a choice of increasing the overall special forces limit available to you, or directly improving the organization of your special forces. It also provides numerous upgrades for your marines, mountaineers, and paratroopers.
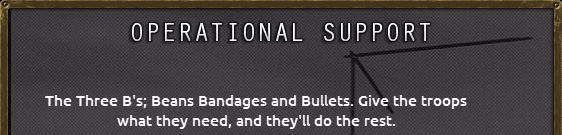
Operational Support: Usually considered to be a doctrine of secondary importance, these technologies improve the logistical aspect of your army. It gives bonuses from manpower trickleback and divisions speed to supply usage and the capture of equipment.
Regimental Doctrines: A doctrine tree in dire need of a rework, it is safe to ignore this section entirely. It provides very minor boosts to the experience gains of your divisions in the field, but the time needed to invest in this research would be much better used anywhere else for much better benefits.
The division designer has been expanded somewhat to allow for more freedom of choice to the player. You may now add up to 10 support companies to your divisions, and the options for units have been greatly increased with the addition of new unit types in all categories, as listed in the land units overview section of this guide.
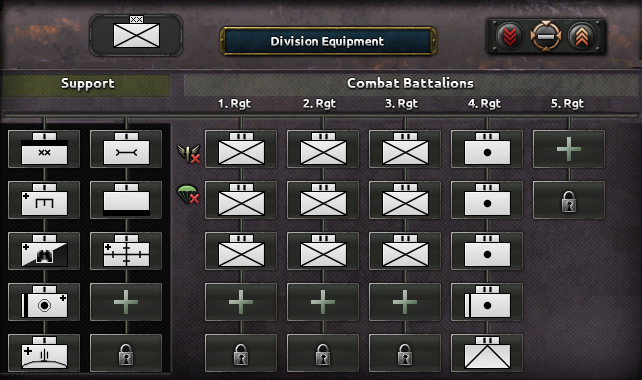
Generally accepted as the most effective design, it is suggested to build divisions to 25 combat width. This allows you to fill out every combat with the maximum number of available divisions no matter how many different directions you attack from. One notable exception to this rule is that marine divisions are often the most effective at 37.5 combat width. This is because naval invasions only offer an attack from one direction, meaning that 2 marine divisions at this strength will fill out the combat entirely, and they pack a larger offensive punch than divisions of smaller size.
Land Units Overview (1/4)
Black ICE introduces many new types of units, or variations of existing ones, to the game for use in your military. Many of them serve singular roles or are intended to be heavily specialized in their use. Support companies in particular have been greatly expanded to provide a wide variety of options.
While BICE does support graphical unit counters, it is heavily recommended to swap to NATO symbols in the game options. While using graphical counters it is very difficult to distinguish between similar unit types such as the various classes of artillery, for instance, and there are lots of new units. After a short time using NATO symbology in game, it will become almost second nature to you (and you may never be able to go back).

Uses: Field Uniforms, Infantry Weapons, Infantry Guns, Machine Guns, Mortars, Handheld Anti-Tank, Radio Equipment

Uses: Field Uniforms, Infantry Weapons, Submachine Guns, Mortars, Handheld Anti-Tank, Radio Equipment

Uses: Field Uniforms, Infantry Weapons, Radio Equipment

Uses: Field Uniforms, Infantry Weapons, Machine Guns, Radio Equipment

Uses: Field Uniforms, Garrison Equipment, Radio Equipment

Uses: Cavalry Equipment, Field Uniforms, Infantry Weapons, Machine Guns, Mortars

Uses: Transport Trucks, Field Uniforms, Infantry Weapons, Infantry Guns, Machine Guns, Mortars, Handheld Anti-Tank, Radio Equipment

Uses: Transport Trucks, Field Uniforms, Infantry Weapons, Infantry Guns, Machine Guns, Mortars, Handheld Anti-Tank, Radio Equipment

Uses: Mechanized Equipment, Mechanized MG/AT/AA/Mortar, Field Uniforms, Infantry Weapons, Machine Guns, Mortars, Handheld Anti-Tank, Radio Equipment

Uses: Armored Cars, Radio Equipment
All tank battalions use 1 Command Tank, 1 Armored Recovery Vehicle, and Radio Equipment


Land Units Overview (2/4)


Uses: Amphibious Warfare Equipment, Field Uniforms, Infantry Weapons, Machine Guns, Mortars, Handhelt Anti-Tank, Radio Equipment, 2 Special Forces Points

Uses: Amphibious Landing Vehicles, Mechanized MG/AT/AA/Mortar, Field Uniforms, Infantry Weapons, Machine Guns, Mortars, Handheld Anti-Tank, Radio Equipment, 2 Special Forces Points

Uses: Paratroop Equipment, Field Uniforms, Infantry Weapons, Machine Guns, Mortars, Handheld Anti-Tank, Radio Equipment, 3 Special Forces Points


Uses: Mountain Warfare Equipment, Field Uniforms, Infantry Weapons, Machine Guns, Mortars, Handheld Anti-Tank, Radio Equipment, 2 Special Forces Points


Uses: Light Artillery, Horse or Artillery Truck Transport, Field Uniforms


Uses: Medium Artillery, Horse or Artillery Truck Transport, Artillery Spotter Planes, Field Uniforms


Uses: Mountain Artillery, Horse or Artillery Truck Transport, Field Uniforms

Uses: Mountain Artillery, Paratroop Equipment, Light Vehicles, Field Uniforms


Uses: Rocket Artillery, Light Vehicles or Artillery Truck Transports, Field Uniforms


Uses: Anti-Tank, Horse or Artillery Truck Transport, Field Uniforms
Land Units Overview (3/4)


Uses: SP-Artillery, 1 Command Tank, 1 Armored Recovery Vehicle, Artillery Spotter Planes if Medium or Heavy, Radio Equipment.


Uses: Assault Guns, 1 Command Tank, 1 Armored Recovery Vehicle, Radio Equipment


Uses: Tank Destroyers, 1 Command Tank, 1 Armored Recovery Vehicle, Radio Equipment


Uses: Self-Propelled Anti-Air, 1 Command Tank, 1 Armored Recovery Vehicle, Radio Equipment


Uses: Varies. Support Equipment, Field Uniforms, Radio Equipment, 1 Special Forces Point if Airborne


Uses: Varies. Recon Equipment, Field Uniforms, Infantry Equipment, Radio Equipment


Uses: Varies. Support Equipment, Field Uniforms, Infantry Equipment


Uses: Varies. Support Equipment, Field Uniforms, Infantry Equipment


Uses: Varies. Support Equipment, Field Uniforms

Uses: Support Equipment, Transport Trucks, Field Uniforms

Uses: Support Equipment, Light Vehicles, Field Uniforms
Land Units Overview (4/4)


Uses: Support Equipment, Light Vehicles if Motorized, Field Uniforms, Infantry Equipment, Radio Equipment

Uses: Support Equipment, Light vehicles, Field Uniforms, Infantry Equipment


Uses: Anti-Air, Horse Transports or Light Vehicles, Field Uniforms


Uses: Heavy Anti-Air, Horse or Artillery Truck Transport, Field Uniforms


Uses: Anti-Tank, Horse or Artillery Truck Transport, Field Uniforms


Uses: Heavy Artillery, Horse Transport or Artillery Tractor, Artillery Spotter Planes, Field Uniforms

Uses: 1 Railway Artillery, Garrison Equipment, Field Uniforms


Uses: Amphibious/Mountain Warfare Equipment, 1 Special Forces Point


Uses: Arctic/Desert/Jungle Warfare Equipment

Uses: Paratroop Equipment, Amphibious Warfare Equipment, Mountain Warfare Equipment, Field Uniforms, Infantry Equipment, Handheld Anti-Tank, 5 Special Forces Points
Air Combat and Aircraft Classes (1/2)

Air warfare has been slightly tweaked in BICE, and every major country now has its own unique air force tech tree. The stats of each aircraft has been developed based on that plane’s historical capabilities and performance, both on paper and in practicality. There are also now multiple different classes of aircraft, detailed below, to more realistically represent what each plane was historically used for. If you are a minor country without your own unique air research tree, you may not have access to every class of aircraft in the mod. You may still receive them through events or lend-lease from other countries, so make sure you stay aware of what planes you have in stockpile. Only planes of the same class will reinforce under-strength air wings.
With the rework, agility is no longer the ultimate deciding factor of air combat. Instead, speed is generally regarded as the number one most important characteristic for air to air dogfights. As a rough estimation, 1 point of agility is equal to 7 km/h of speed, so keep that in mind when selecting the next model for research or modifying a variant. The lethality of air combat has also been increased significantly, so expect to lose upwards of hundreds of fighters per month, if not per week, in heavily contested air zones.
Air superiority has been reworked slightly as well, with later models having higher values. This makes deployment of up to date models extremely important for contesting air zones. Additionally, every class of plane has a different level of superiority impact, with fighters and interceptors being the best, heavy fighters close behind, and CAS now being close to the level of bombers, which provide no boost to air superiority.
Keep in mind as well that certain air missions take priority over others. Even though you have a plane capable of carrying out many different missions, such as multi-role fighters or light bombers, they will not perform every mission at the same time. Therefore it is heavily recommended to only use one air mission at a time in order to ensure that your planes are carrying out the missions you need them to.
Air bases are now much more limited on the space they have available and how many levels you are able to construct. Each level of air base provides room for 100 planes to operate from, and without any additional construction technologies, you are limited to only a size 3 air base in a state. To make up for this change, though, air bases are extremely cheap and fast to construct. Because of this, it is generally advised to uniformly use air wings that are multiples of 100. 20, 25, 50, etc. Aces are unchanged, with the most optimal usage commonly considered to be in wings of 100 planes.
As with all other doctrines, air doctrines are now dated to represent the evolution and depth of the air war.


Air Combat and Aircraft Classes (2/2)


Naval Combat and Ship Classes (1/2)
This guide only covers the features of the mod with the Man the Guns DLC enabled!


The naval system in Black ICE has been entirely overhauled from top to bottom. The largest change comes in the form of a vastly expanded ship designer, allowing you to properly customize your fleets in whatever manner you desire. Beyond that, the core mechanics of how ship-to-ship combat works have been tweaked to simulate more proper engagements, with much reduced lethality and an increased change of retreating with ships intact to allow for more strategic warfare and planning.
The screening requirement for ships has been adjusted somewhat. For every capital ship in combat, heavy cruisers, battlecruisers, and battleships, you will need a minimum of 3 screening vessels, destroyers or light cruisers, in order to not suffer the negatives that inadequate screening gives. Additionally, every carrier in the back line will benefit from having at least one capital ship in front of it for extra screening protection. Some doctrines are able to affect the screening efficiently of different types of ships, so plan accordingly. If you do not have full screening coverage of your large ships, you are at risk of torpedoes penetrating beyond the front line and hitting your capitals. Torpedoes have the ability to ignore armor entirely, and can do massive damage to capital ships.
The positioning penalty for fleets has been made more impactful in BICE, which lessens the effects of death-stack fleets. The maximum penalty has been increased to a whopping -80% attack for the entire fleet, along with other changes to speed, screening, etc. This makes smaller, more efficient forces much better at fighting large and cumbersome fleets.
The accuracy of ship guns has been reduced in order to allow fleets to survive engagements more often than not. As a counter to this, torpedoes have become slightly more accurate, making effective screening all the more important. The type of ship being shot at also makes as difference, with every type of hull having different modifiers to visibility and detection rates, among others. With this change, smaller ships are significantly harder to hit, especially with larger guns, and bigger ships are slightly easier to hit.
The final notable change is that the armor value on all ships is reduced during the night in order to simulate the vastly reduced combat range of nighttime fighting, which in turn increases the penetration potential of all types of shells. Capital ship armor is lowered by 20% while all other ships have it lowered by 10%. Be sure to keep this in mind when designing your ships, as it can play a large factor in the outcome of naval battles.
Naval doctrine has been expanded to provide more choice and flexibility to your strategies. Along with the other doctrines, they have been dated just like any other technology in order to represent the evolution of naval warfare and planning that happened during the war.


Aircraft Carriers


CVB – Super Carriers: The pinnacle of carrier development, this ship can carry a massive complement of planes into combat. They are very late-war innovations as a 1945 technology. As such, they may be launched too late to perform a decisive role in the war. They operate just as any other carrier, but with many enhanced abilities.
CV – Fleet Carriers: Fleet carriers are focused on combat and naval supremacy, They are much larger and more expensive to construct than other classes, but are able to carry vast amounts of aircraft for use in naval combat.
CVL – Light Carriers: Light carriers fill an ancillary role, able to perform adequately in any task they are assigned. They are significantly easier to build than their larger cousin, so often find use in navies that either do not focus heavily on carrier combat doctrine or that simply don’t have the industrial ability to produce larger ships.
CVE – Escort Carriers: As the smallest class available, escort carriers are intended to provide support for convoys as well as anti-submarine warfare task forces. Escort carriers are currently under development and will be released in a near-future update.
Naval Combat and Ship Classes (2/2)
Capital Ships


BB – Battleships: Battleships are the largest ships in any fleet, carrying the biggest guns and heaviest armor. They are more focused on dishing out damage than on protecting other ships. Their guns are able to penetrate all but the thickest of armor, and deal large amounts of damage on a hit. The downside to large guns, though, is a near inability to hit screening vessels entirely.
BC – Battlecruisers: Mostly a relic of the past by the era of WW2, battlecruisers were initially designed to operate as surface raiders. The idea was that they have the armor to avoid significant damage from larger vessels such as battleships, along with the speed to outrun them. Generally speaking, battlecruisers should not be put up against other large ships, as their performance simply is not as good. When used as part of a fast task force, though, they work just as well as any other ship at screening for carriers, and are still able to provide a large amount of firepower.
CB – Large Cruiser: Almost a hybrid classification, large cruisers are a step somewhere between battleships and heavy cruisers. They boast the ability to be outfitted with numerous medium-sized guns or a more limited number of larger guns. The armor of these ships is heavier than that of cruisers, but it typically falls short of proper battleships. This allows them to fit a few very specific and niche rolls in your navy, and can provide a large amount of flexibility.
PBB – Pocket Battleship: A class of ship currently unique to Germany’s Panzerschiffes, this class of ship sits between a cruiser and battlecruiser in size and usage. It boasts large guns akin to battleships, the speed similar to battlecruisers, and a vast range in order to perform surface raiding operations. In order to achieve this, though, the amount of large guns able to fit on this ship is rather limited.
CA – Heavy Cruiser: The heavy cruiser is the workhorse of many navies, particularly those of Japan and the United States. They are able to serve a variety of roles, from screening and protecting carriers and convoys, to operating as an effective scouting ship to locate enemy fleets, and are even utilized as the centerpiece for small-scale ship combat. The heavy cruiser’s guns have the unique ability to hit both capital ships and screens without suffering any penalty to accuracy.
Screens


CL- Light Cruisers: The class with the most damage potential to other screens, the primary job of the light cruiser is to sink smaller ships, such as destroyers. They can pack a significant amount of small to medium caliber guns for their size, with just enough armor to be able to negate most damage from their intended victims. They also are proficient in other operations such as mine laying and sweeping as well as anti-submarine warfare.
DD – Destroyers: On the lower end of size classification, the destroyer is designed to be more of an expendable resource to protect larger vessels than to have a significant role in deciding the outcome of a battle. In spite of this, though, the damage potential of destroyers cannot be ignored, as they have the ability to carry a large amount of torpedoes into the fray. Destroyers also serve very well as convoy escorts and anti-submarine warfare vessels, able to carry the latest sonar and depth charge equipment on cheap hulls for swarms of defensive ships.
DE – Destroyer Escorts: Smaller destroyer designs more intended for anti-submarine warfare, these ships are extremely cheap to produce. They still have some combat ability, bringing some guns and torpedoes to bear on your enemies, but will not be as effective as larger destroyers. This class is still under development and will be released in the near-future.
TB – Torpedo Boats: This type of ship is often a smaller or an older destroyer model with a heavy focus on torpedo warfare. This class is also still under development and will be released in the near-future.
E – Escorts: Escort ships are the smallest ship class represented in Black ICE, and are designed simply to escort your convoys and engage in anti-submarine warfare. They are very weak, and not particularly intended for naval surface combat. It is currently being developed as well, and will be released in a near-future update.
Submarines


SC – Cruiser Submarines: A larger class intended for long-range operations, this type of submarine is able to strike nearly anywhere in the world with proper basing support. With the size required to maintain such long voyages, though, this submarine suffers in its capacity for stealth. The visibility of these vessels is usually considered to be too high for practical use, though the ability to hit escort-less sea zones can make up for it
SS – Submarines: The typical class of submarine that you will use, this ship combines a great degree of stealth, significant torpedo numbers, and a good effective range, making it the best all-round choice for subsurface raiding. It has the ability to participate in mine warfare as well, able to lay mines from below.
SSc – Coastal Submarines: The smallest class of submarine available in game, these ships are some of the hardest to detect. Their small size means that their speed and torpedo load suffers quite heavily, and their range is far shorter than any other hull type. These are a great choice for those that want the maximum amount of submarines possible, while operating close to home.
Designing Ships (1/2)
To go along with the vast overhaul that naval combat has received, a completely redesigned ship designer is introduced into Black ICE. This system allows you the flexibility of design to heavily specialize or generalize your ships into whatever roles you desire. For those who are less inclined to min-max their designs, or who simply wish to utilize historical ships, there is also an option to gain historical ship designs with little hassle, and at the click of a button.

Every ship now has a certain amount of module slots determined by their hull type and how advanced the hull’s design is. Designs with this rework can sometimes be expensive, with the largest ships reaching a cost of 50+ naval experience to complete, so make sure that you are exercising your fleets, enacting training decisions, and completing focuses at the right time to get your designs finished before you want to start construction. Keep in mind that the best ships to exercise are destroyers and submarines, as they are typically the bulk of your navy and they consume much less fuel than larger ships.
All of the module slots on the bottom of the designer must be filled by the appropriate equipment for a design to be completed, or the option selected to forgo that module. In addition, any modules that have a red padlock icon on them are intended to be permanent fixtures on the ship. Any refit that tries to change these modules will often find the refit cost to be double or triple the cost of the initial construction, so be sure to use the best technology available upon initial construction.
Module Types
From left to right, top to bottom.


Designing Ships (2/2)


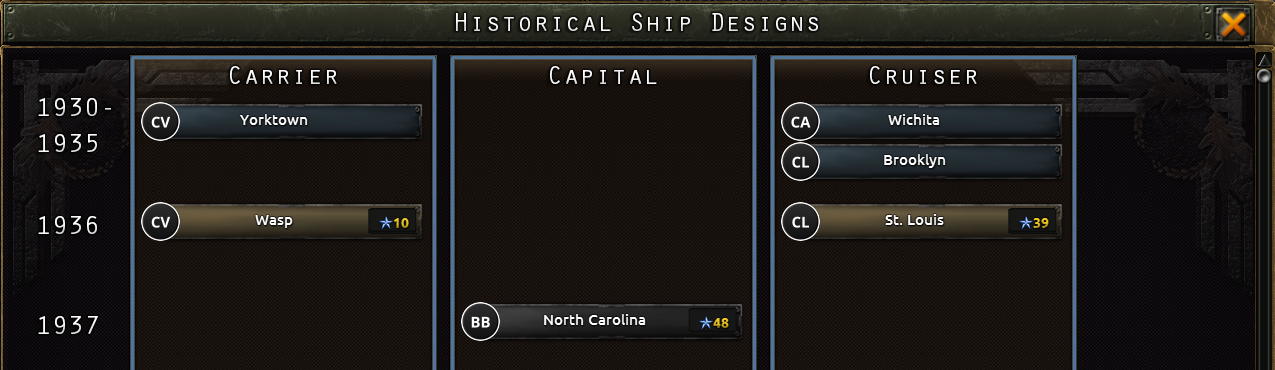
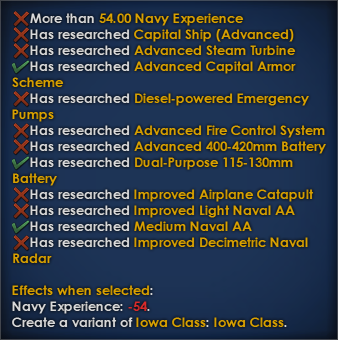

With the simple click of a button, a new design will be available to you in the ship designer. You are able to modify this design as you see fit, just like with any other design you have. In order to acquire the design, you must first fulfill all of the technology requirements shown in the tooltip of the design you wish to build, as well as the Naval XP requirements.
Historical Ship Designs are currently available to the following countries


Country-Specific Mechanics (1/3)

MEFO Bills
The MEFO Bills mechanic has been modified slightly from the base game. It still consumes political power, but the benefits that it provides now extend to all sorts of military-focused buildings, not only military factories. A more significant change is that the construction bonus it provides specifically to military factories is increased to 37.50% at the beginning of the game. This value will go down by 2.50% every time the MEFO Bills must be renewed, so be sure to plan your military construction efforts accordingly.
Waffen-SS


Upon selection of a formation, a division will appear on the map and can be used just like any other, though you will not be able to to customize most of the templates that are produced. In combat, SS battalions have a higher base organization value than their Heer counterparts. Keep in mind that they also require SS-specific uniform equipment, so be sure to produce it in advance if you plan on using this feature.
Military Buildup Decisions

The above decision is available to Germany on the 1st of February 1936 and after ‘Allgemeine SS’, and begins the automatic formation of a number of experienced infantry divisions. They are deployed without much of their equipment and will require reinforcement. Note that they only deploy if you do not change the name of the starting infantry division templates.
Further military decisions are unlocked upon the selection of this decision, as well, such as the historical formation of Motorized divisions, Panzerwaffe divisions, Gebirgsjäger divisions, and more. Many of these decisions are historically date and research restricted, similar to the SS divisions. If you are looking for historical accuracy in your gameplay, it is highly recommended to use these decisions when able.
Note: Do not change the name of the templates used by these events, or else some divisions will not spawn!
Reichskommissariats
With the addition of the La Resistance DLC and its associated resistance and compliance mechanics, it is highly suggested that you do not form Reichskommissariats as puppet states. It does not provide you with any bonuses at the moment, and will only add to micro-management as you will be required to manually lend-lease equipment to them in order to keep the populace from rebelling. This mechanic is being looked at for a future rework, with no solid plans at the present.

(Currently under extensive rework)
The Great Purge


As one of the most brutal and catastrophic events of Stalin’s reign of terror, the Great Purge is an absolute requirement in order to avoid massive stability issue and civil war. There are many steps to completing the purge in Black ICE compared to the base game, with additional mechanics added in.
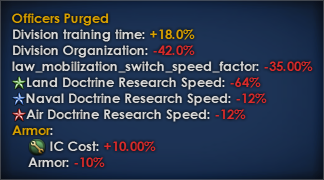
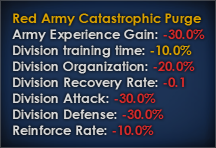
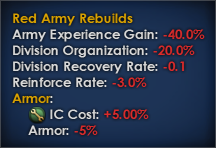
The most obvious effect that the purges have is on your military might and capacity to wage war, develop doctrines, and produce advanced equipment such as tanks. The above modifiers are some of the most extreme effects you will get when purging the Red Army, and there is no way to avoid them without sparking a civil war. Over time, the massive negative effects that the purge has on your military will be reduced, but the purge of officers will have much longer-lasting consequences.
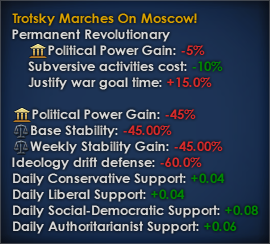
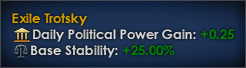
The longer you hold off on starting the purge, the more time you will have to able to efficiently invest in doctrine research, as well as more time to participate in external conflicts such as the Spanish and Sinkiang Civil Wars. However, the issue of a Trotskyite plot brewing in the background will remain until you complete the first purge focus, reducing your weekly stability by a large amount. Beginning in mid 1936, the backers of Leon Trotsky will begin to organize, and there will be rumors that the man himself has returned to Russia with the intent of wresting control away from Stalin. Events will pop up over time, informing you of Trotsky’s progress, and with every step comes more issues with stability and party popularity.
Red Army Guards


Country-Specific Mechanics (2/3)

The Second Sino-Japanese War
In comparison to the base game, the war between Japan and China is all but a guarantee in Black ICE. In order to progress through Japan’s focus tree, the Marco-Polo Bridge Incident must be staged.

Upon the declaration of war on China, Japan gets a small window of opportunity, 90 days, to make large gains against their enemies. This bonus reduces consumer good usage, increases factory output, and improves your weekly war support. In addition to this, the states that border your puppets in Manchuria receive a severe combat penalty against your troops. However, once this window of opportunity passes, the war will slow down significantly. You will get a penalty to your combat strength, and, similar to the base game, you must invest command power over time in order to reduce it.
To represent the historical unwillingness of Emperor Hirohito and his Imperial Government to be at war in China, and the gradual increase in military operations and strength, you will be unable to fully mobilize your army and your economy until you complete the spirit ‘National General Mobilization Law.’ This focus cannot be started until the 1st of January 1938, and it will automatically change your Economic Mobilization law to War Economy and allow you to fully mobilize your military. Be sure to change the Military Mobilization law as soon as you can, as it will not swap automatically.
Enemy Partisans

Reorganized Government of the Republic of China


The advantage of setting up this puppet government in China is twofold. The puppet gets a bonus to resistance suppression with an extra -5% resistance cap in all of their controlled states, and over time, with the right focus choices, this state is able to acquire more cores in China. This will free up manpower and equipment for use in other areas of the Imperial Japanese Army. Keep in mind, however, that you will have to supply this puppet state with proper garrison equipment, as they have very little capacity to produce their own. Otherwise you may find your conquered territories rebelling against you. The second effect is to reduce the damage that enemy partisans are able to inflict on buildings and infrastructure in occupied territory.
The Five Ministers Conference
This focus allows you to select your next course of action, and represents the two dominant ideas in the Japanese military of the time. The choice you make in this event will also influence the balance of power between the Imperial Japanese Army and the Imperial Japanese Navy.


The doctrine favored by Army Generals, the Northern Expansion Doctrine focuses on a future war against the Soviet Union with the goal of annexing resource rich areas in Siberia. This path unlocks many national focuses that are heavily geared towards armored units and tight air integration. This path also leads to much greater cooperation between Japan and Germany, with the option of declaring war on the Soviets at the height of Operation Barbarossa.
The other choice is highly favored by Navy Admirals, and is historical path to follow. The Southern Expansion Doctrine focuses on invading the oil-rich lands of the Dutch East Indies, as well as performing a massive knockout blow to the navy of the USA with a devastating surprise attack. This path will accelerate your naval production and research significantly in preparation for a war with the Allies.
Picking one path will not lock you out of the other, however the requirements for starting down the opposite doctrine are rather difficult to achieve. To turn from North to South, you must have complete control of the state of Vladivostok. In order to refocus from South to North, you must have possession of most of the Pacific Islands, Australia, the Philippines, and the Dutch East Indies.
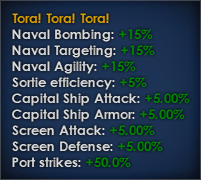
Tora! Tora! Tora!
One of the most famous statements of WW2, this was the phrase that denoted the beginning of the attack on Pearl Harbor and the subsequent entrance of the United States into the war. Black ICE introduces an event to simulate this devastating attack against the US Navy’s battleship fleet, as well as appropriate temporary effects to both Japan and the USA.
Upon completion of the focus ‘Strike the USA!’ a decision will begin to count down a window of opportunity in which you are able to perform the sneak attack. In order to proceed, you must have 6 carriers and 2 battleships within the Hawaii Ridge sea zone. You can then spend 25 command power to launch the attack. This action will put you at war with not only the United States, but with the Allies as well.
Upon completion of the event, you will get a temporary bonus to many aspects of naval warfare. At this point, you are the uncontested ruler of the Pacific, so make the most use of the time you have available. Similarly, reeling from the attack at Pearl Harbor, the USA will get a large malus to their fleet operations. In addition to these, a few events will fire that follow along with historical attacks on places such as Manilla and Guam, damaging ports, air bases, and infrastructure.
Island Hopping Campaign
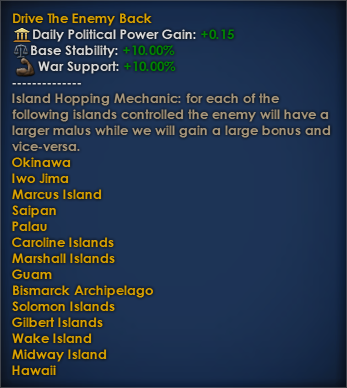

In order to make combat in the Pacific much more dynamic and interesting, a new mechanic has been implemented in Black ICE that makes the islands of the Pacific much more valuable targets to hold and to invade. When the balance of power between Japan and the USA is even, there is no effect. However, if the balance swings one way or another as islands change hands, whichever side is on top will get a bonus to political power, stability, and war support. The opposite is true for the other side, which receives a penalty to those same items.
Country-Specific Mechanics (3/3)

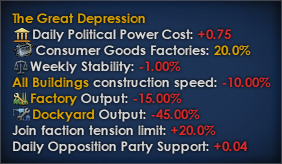
The Great Depression
As the worst economic crisis in modern history, the Great Depression has been reworked in Black ICE to be much more involved, balanced, and interesting to overcome. The negative modifiers that are bestowed on the USA are sizable, and on top of that are smaller events that stack on top of the overall state of affairs such as the Dust Bowl and Pittsburgh Flood.
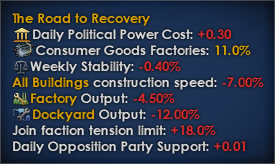
The leftmost branch of the USA’s focus tree contains all of the focuses that go into the economic recovery efforts for the country. These are all historical actions taken by the government at the time, and for every focus that you complete, the modifiers of the Great Depression spirit are lessened somewhat. Once you complete the focus ‘End of the Great Depression,’ the spirit will be replaced by ‘The Road to Recovery,’ which will automatically be reduced over time without the need to complete additional focuses.
Isolationism
In addition to the effects of the Great Depression, the United States had many isolationist policies in place in the 1930’s. As war draws ever closer and world tension increases, you will be able to take focuses that allow you to slowly shake the dust from your industry. In order to begin taking these focuses, though, the worst effects of the Great Depression must be shrugged off, and the Road to Recovery begun. Due to the isolationist nature of the country, much of the potential for military-focused research is also locked behind these same focuses, so it is advisable to focus all of your efforts on ridding yourself of the national spirit as fast as you can.
Pearl Harbor Gambit
Instead of waiting for the inevitable strike from Japan, the USA has the option to encourage a more hasty entrance into WW2. By taking the ‘Pearl Harbor Gambit’ focus, Japan will have the option of launching an immediate attack on your pacific fleet. This does come with significant risk, though, as the damage that you receive from such a strike may be intensified by the openness with which you allow it to happen. You will still get the negative modifiers from the attack, and Japan will still get the positive, but it is a useful tool in order to kick start your economy and join the fray.
Island Hopping Campaign
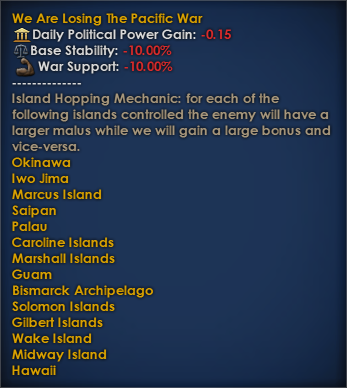
In order to make combat in the Pacific much more dynamic and interesting, a new mechanic has been implemented in Black ICE that makes the islands of the Pacific much more valuable targets to hold and to invade. When the balance of power between Japan and the USA is even, there is no effect. However, if the balance swings one way or another as islands change hands, whichever side is on top will get a bonus to political power, stability, and war support. The opposite is true for the other side, which receives a penalty to those same items.

Foreign Exploitation

Warlords and the United Front
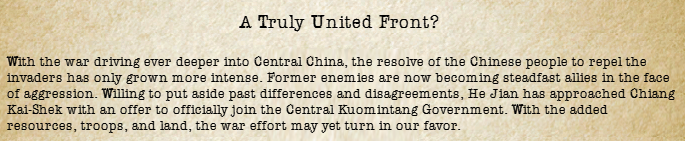
Although many different factions and cliques continually vie for power as a result of the Chinese Civil War, they are still extremely resistant to foreign conquerors. When Japan starts to build up their military forces, the Kuomintang government of the Republic of China has the option to halt all operations against the warlords and opt to form the United Front against Japanese aggression.
As the war against Japan progresses, warlords will approach the central government of China with the offer of full integration. This gives China a much more consolidated position over time, with the industry, equipment, and troops of the warlords being utilized more efficiently. This event will fire whenever China reaches 85% capitulation, plus or minus a couple weeks.
Countries With Modified Focus Trees
Majors
Germany, Italy, Japan
Minors


Slovakia, Hungary, Bulgaria, Finland, Italian East Africa, Manchukuo
Majors

United Kingdom, France, USA, Republic of China
Minors


Brazil, Ireland, Belgium, Greece, Bhutan, Chinese Soviet Republic, Australia, New Zealand
Major
The Soviet Union
Minor

Sinkiang


Portugal, Spain, Denmark, Sweden, Turkey, Iraq, Iran, Tibet
Additionally, North African, Middle Eastern, and Arabian Countries share a common focus tree.
FAQ
If you think a question should be added, let us know in the comments or on Discord!
Q: What country should I play for my first game in Black ICE?
A: This is a tough question to answer, as it depends on how far into the deep end you want to dive. Italy is the usual answer, as it lets you experiment with every aspect of the game. Japan is another good pick for this reason, though it is a difficult campaign overall. In the end, it’s up to you! Choose what you think you would enjoy playing.
Q: Why do my divisions have a massive malus to their stats when they are in combat?
A: Make sure that you mobilize your military before you go to war. While demobilized, your entire military suffers large negative effects to nearly every aspect of combat. If you are playing the Soviet Union, then you are likely still under the effects of the Great Purge. Complete the focus ‘Red Army Rebuilt!’ as soon as you can!
Q: What is the best division size in terms of combat width?
A: The base combat width in Black ICE has been changed to 75, with each new flank adding another 25 width. Due to this fact, the best division designs will be a multiple of 25; 12.5, 25, 37.5, etc, in order to fit the maximum number of divisions into that combat without penalty.
Q: What are the most effective division designs?
A: There are many different methods and tactics that can be highly effective if utilized properly. Most nations in the game have good base division templates at the beginning of the game, and some will acquire more with events or focuses over time. Use these as a guideline and upgrade them as you see fit. For more in-depth questions, it would be a good idea to hop onto the discord server for further help.
Q: Why is my motorized division’s speed so low?
A: Make sure to check all of your support companies, and ensure that you are using motorized versions where applicable. Support companies affect the speed of your entire division, and can slow it down without the proper equipment. Also check that you are not missing a type of equipment entirely, as having 0 armored cars, for example, will drop the speed of the entire division. Go bug Paradox to fix that one.
Q: How does the special forces limit work?
A: In comparison to the base game’s hard cap on special forces battalions, BICE uses a soft cap limit. This limit is set by the size of your army and your officer training laws, as well as modified by focuses and certain technologies. If you go over the limit, all of your special forces battalions will receive negative modifiers to their stats, so try to stay as close to the limit as you can!
Q: What is the best division to use for suppressing resistance?
A: Garrisons are typically the best unit you can use for this purpose, especially when backed up by a military police support company. Cavalry is another good one, though not quite as effective.
Q: Why can’t I assign divisions to a naval invasion order?
A: Naval invasions are much more dependent on technologies in BICE compared to the base game, and the amount of divisions you are allowed to invade with at any one time has been drastically reduced. Make sure you check your transports tech in the naval tree.
Q: What is the best air wing size to use with aces?
A: Anything from 1 to 100. Aces provide bonuses based on how large their wing is, with smaller wings providing larger ace bonuses. Using anything above 100 will diminish the effect your ace has on the wing.
Q: What is the ideal naval composition for screening?
A: Screening is required not only for capital ships and convoys, but for carriers as well. A typical rule of thumb for normal task forces, and to be extra cautious, is to have a 4:2:1 ratio. 4 screens per capital ship and 2 capital ships per carrier, as a minimum. Some players prefer more, some less, so find what variation works best for you. Keep in mind that convoys will increase the amount of screens your fleet needs to maintain a proper ratio, so try to avoid major engagements with convoys in tow.
Q: What is the best way to gain naval experience?
A: Other than actively engaging in naval combat, the best ways to gain experience is by completing focuses and exercising. The best ships to exercise are your destroyers and submarines, since they will consume far less fuel then larger ships.
Q: What doctrines are the best for which country or play-style?
A: Doctrines have been developed based on historical precedent, and typically it is advised for each country to use their historical strategies in the game. However, there is nothing wrong with changing it up and using a different method to attain victory. It’s up to you!
Q: What bonuses does the AI get in this mod?
A: On normal difficulty, the AI does not get any bonus modifiers over the player (other than a bit less attrition). Black ICE integrates Expert AI in order to provide a more challenging experience for the player. Certain AI countries do, however, get WW1 doctrine research for free at the beginning of the game.
Q: Why do my puppets keep revolting against me?
A: A common issue in Japan-puppeted China or with Reichkommissariats, these puppet governments either do not have enough manpower, equipment, or both, to properly supply their garrison troops in order to suppress resistance. Make sure that if you do use these mechanics that you lend-lease the proper equipment to your puppets.
Q: How do I observe an AI game without it breaking?
A: Instead of selecting the country that you want to observe from the start, select a minor and out-of-the-way country, like Haiti, for instance. Use the console to enter the command ‘human_ai’ and then tag switch to whatever country you would like to watch. This command makes whatever country the human is playing act exactly like the AI would, as using the ‘observe’ command has a tendency to warp the AI’s logic.
Q: Why do I not see X that this guide says is in the game?
A: You must be either on the main version of the mod where such a feature is not yet implemented, or you are using extra mods that are interfering with BICE. This guide covers all features currently up to date on the test version of BICE. Make sure you only use BICE and its addon, as even graphics mods have been known to mess with the game.
Q: What DLCs do I need in order to play this mod?
A: None! This mod is able to be played without any official DLCs. However, this mod heavily utilizes the mechanics of some of them, and you may miss out on some more extensive features and reworks. For questions on what you may be missing without a certain mod, come ask us on the discord!