
Overview
Hey everybody! Uncle Sickø here, with the sixth guide in my Borderlands 2 character series. Axton is beast among men. While his abilities and appearance aren’t as unique or flamboyent as other charicters, he can walk into any fight with a smile on his face and a turret ready to rock. Done properly, he’s extremely fast, has awesome defense, and a damage output that never ceases to amaze me. This guide is to help every Commando out there, whether you’re new to being your team’s front line, or you’re an experienced dealer of lead and death. This is a somewhat open- ended build that allows for a few tweaks to work with any setup you may prefer. Also, in case you don’t want to waste your time farming for the perfect gear, I’ll also show you alternate, easier to find, gear for you to substitute.Do you like being the hero everyone supports instead of hiding behind your team? Like witty banter involving turret girlfriends and cold- blooded murder? Read on…
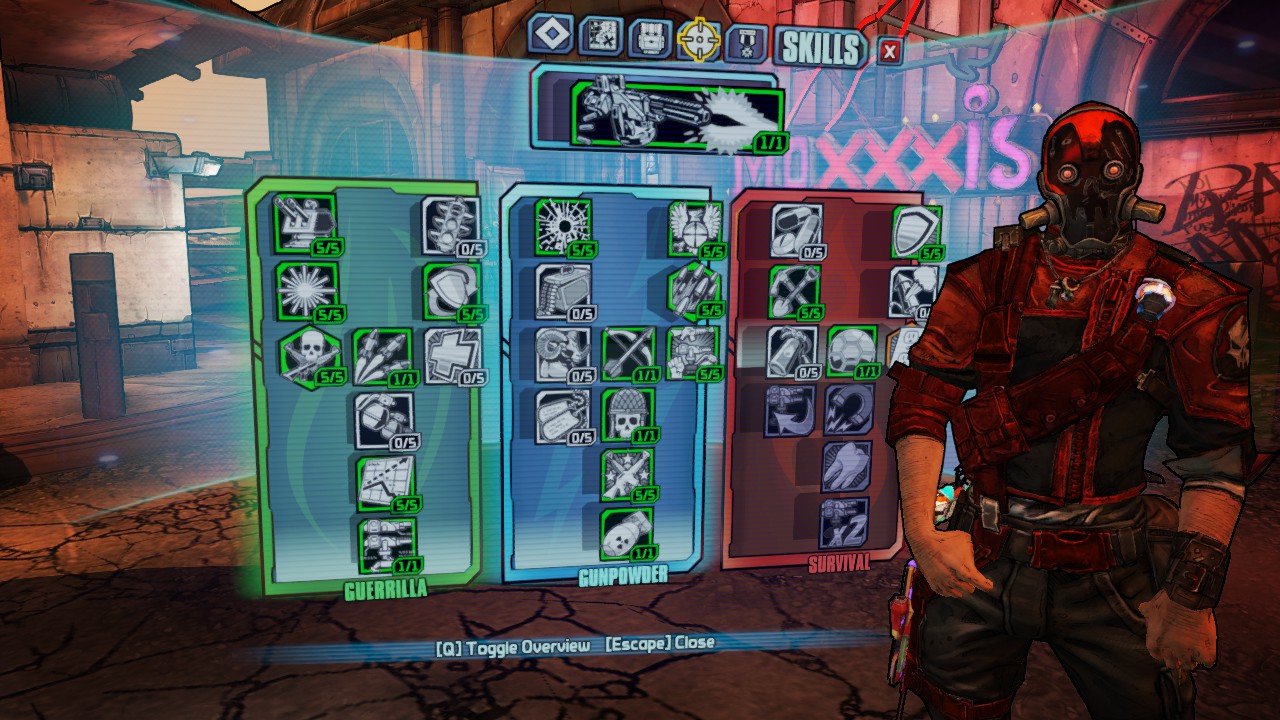
The Build-
We’ll be synergizing Guerrilla and Gunpowder to amplify damage, while only giving a few points to Survival to help keep us alive while we terrorize bandits and badasses alike. The defense choices favor shields over health because we’ll be using the patented zap n’ sap (Chain Lightning+ Rubi) to compensate. Not only does this improve survivability in UVHM and OP, but it also frees up a few points to improve our damage output.
You may already have noted a few dubious- at- best choices, but I’ve got everything set up like this because it works best for me, and I’ll explain why. I’m not gonna send the Gestapo after you if you personalize it. Have some fun with it and feel free to respond with any questions, concerns, or tips you may have.
Guerrilla-
The bottom of the tree opens with Sentry. Longer burst cycles mean more damage output, but more importantly, it’s duration is extended by ten seconds. This may not sound like much, but this also means an extra ten seconds of free slag and Battlefront. We avoid Ready because, while reload speed is nice, it’s just not worth five points.
Level two unlocks two abilities. The first is Willing, which makes your shield significantly more effective. While it does set Crisis Management back a little, the increase in your survivability is more than worth it, to me. Next is Laser Sight. This is a debatable choice, but it’s handy for two reasons. The first is it’s ability to hit fast targets like Surveyors and Rakks. The second reason is it’s needed to reach higher stages without wasting points in Ready and Able. We avoid Able because health recovery will be safely covered by Preparation and our zap n’ sap, along with the Siren that your group ought to have.
The third level unlocks two more abilities. The first is the brutal Onslaught. We need to stack up as much damage as possible, so increasing damage while maneuvering faster into optimal range is both necessary and fun to use. The second ability is Scorched Earth. This immediately increases the effectiveness of our lil’ darlin’, helping her keep up in late game firefights.
We skip over Grenadier because we’ll be using Chain Lightning, which regenerates it’s own ammo, making points in this a total waste.
The fifth level gives us Crisis Management. Our shields will be pretty sturdy, but in intense cases that crush it, having a plan B is always welcome. Especially if that plan involves a point blank shotgun boosted by this ability and several others.
The last point in Guerilla goes to Double Up. I hear mixed opinions about this ability, since Gemini is generally considered to be better, but I love Double Up for a few reasons. The first is that you get a second barrel getting boosted by Sentry, pushing its burst cycles even further. Second, the instant damage bonus it gives its self by slagging targets before its rocket pods land. Third is arguably the most important reason: It slags so you don’t have to. You can use your weapon slots for an elemental spread and trust that your bonus damage is going to be waiting for you capitalize on.
Gunpowder-
We’ll capitalize on the bottom tier with both abilities. Impact is an instant, unconditional damage bonus, which we will take with smile. The second is Expertise, since we’ll be taking as many speed boosts as possible, along with a fun boost to swap speed and aim speed to help compensate for missing our Willing boost.
The second level unlocks Metal Storm. Higher fire rate means faster delivery for all our damage boosts, plus recoil reduction, so more shots will hit their mark.
The third level shows the lil’ lady some more love with Longbow Turret. It’ll let you perform surgery when placing her, as well as giving her more health to ensure that she can do her job. Since we should have a turret up as often as possible, it’s ridiculous not to stack up some more damage while we’re at it. Steady is handy for sniping and other skill based tactics, and the explosive boost is nice, but it just isn’t nice enough to pull five points from elsewhere.
The next level gives us Do or Die. While this isn’t my favorite option, the 10% damage boost is helpful when healing up with zap n’ sap. We avoid Duty Calls because matching elemental damage is much more effective than slightly boosted non- elemental weapons, especially in late game firefights.
Next, we sink five points into Ranger. While an overall 5% boost wouldn’t be felt in any situation at all, We’ll be using a Legendary Ranger Class Mod, making that little five percent look like a whopping 10% boost to all stats. You’d need a whole lot of badass tokens to cover the same ground, so it’s a noteworthy boost. Rangers lead the way.
Our last point goes into Nuke. While it’s rare for this to be the one- hit killer that its name would imply, it’s great for smashing shields early before the Mrs. starts slagging everyone, letting you worry about whether to use fire or corrode, instead of wasting your time with electricity.
Survival-
Since we burned through most of our points in previous trees, Survival gets the short end of the stick, but that doesn’t mean it’s the least bit unnecessary. Our first five points go into Preparation. This makes our shields thicker, so Willing is more effective, and it comes with built in health recovery, making sure you’re healthy and happy before you get on to the next mission.
The second tier gets Last Ditch Effort. Sometimes you’ll go down, but this gives you the option to grit your teeth and take down that badass or to skitter away quickly so your team mates can heal you.
The third tier takes up our last two points. The first goes to Phalanx Shield. While it does get crushed pretty easily, it still eats damage for your turret, meaning it can slag and distract longer, as well as giving you a quick barracade so you can give your own shield a moment to begin regenerating. Only one point goes into Quick Charge. 1% seems like a complete waste, but Legendary Ranger gives it five more points, meaning our shield is going to be thick, fast, and easy. Like most of the women I’ve dated.
The Weapons-
I almost didn’t make a Weapons or Item section for this build because they’re so fluid and interchangeable, but I’ll go ahead and toss up my most used items. While there are many wonderful shotguns on Pandora, two suit this build better than any others. The first is…
Interfacer- With its relatively unique mechanic to not slow a player down when ADS, it lets our Commando take advantage of Expertise and Onslaught to move very quickly into a range where all the interfacer’s pellets can hit home. The second is Conference Call. Despite getting knocked for the debuffs it got in an old update, it’s still my favorite medium range shotgun because of its pellet multiplication. Mine is a Corrosive variant, and it eats OP8 armored targets faster than most other weapons in the game. Next is our old friend, the vampire queen…
Rubi- This is here for two easy reasons. The first is the zap n’ sap, meaning that tossing a Chain Lightning with this out will sap a whopping 12% of health away from targets, restoring you completely in some circumstances. Second, is to cover my Slag requirement. It may take a while a while to get your favorite variant in slag element, but it is worth it. It has a reasonable chance to slag per shot, letting it keep you afloat while you wait for your sentry to recharge. I avoided Grog Nozzle because I always feel bad using it, like it’s carrying me more than my builds do. My third slot is up for debate, but it is….
Kitten- I don’t like assault rifles. SMG’s tend to be more effective and creative, especially in the rarer variants, but I felt obligated to have one here because this is a Commando and Commandos use assault rifles. Given my hatred of the AR pool of options, I chose the one that was easy to get and split each of its shots into three more shots, multiplying your damage output. The problem is its smiley face pattern that drives several shot inaccurately wide at medium- long range. Thus I use mine, a fire variant, similarly to a shotgun, meaning I stand a chance to take more damage. Luckily Kitten is also technically a Moxxi weapon, so each of its 1:3 shots, along with DoT, will heal you for 2.4%, letting you stay warm and comfy amidst any firefight. Fourth ought to be a rocket launcher spot, but since everything other than Norfleet is practically worthless, I opt for the…
Unkempt Harold- Not only is it easy to get in its double penetrating variant, it’s also one of the most effective guns on Pandora. It may require six shots per trigger pull, but it hands out a whopping 14 rockets, each receiving full amp damage, should you opt for the Bee shield. In situations where an enemy is resistant to both Fire and Corrosive, such as Demonic enemies, Ol’ Harry will chew through them with a 3-5-7 smile.
I keep other weapons in my backpack for special occasions, such as; Sandhawk, Chulainn, Trespasser, and Maggie, but for the most part I only break them out when I’m bored.
The Gear-
The gear for this build is more static than the weapons, but there’s still a certain amount of fluidity to them, so this shouldn’t be taken as gospel. For a shield, I tend to opt for the least niche, highest capacity choice, and that is the….
Antagonist- Not only does it reflect incoming bullets occasionally, it multiplies them by around 400% before returning it to sender. Its mechanic works a lot like the Impaler, only with Slag instead of Corrode, making it significantly more versatile. Given its massive capacity, chance to ignore damage, and your abilities that practically always regenerate your shield, you suddenly become a very hard man to kill. Next is my ol’ buddy…
Chain Lightning- It doesn’t do much in the way of damage, but what it does get, it hands out to everyone in the firefight, rarely including you. This means that it eats shields that your turret missed, as well as letting Rubi have a healing party at their expense. This also works with Kitten, but to a much lesser, occasionally negligible, extent. Third was my absurdly lucky drop from a Chubby Spiderant…
Legendary Ranger- Not only does it turn the Ranger ability into a stone killer, it makes your shields massive and lends you lots of firepower. Not much else to say other than it’s the best option for this build. Finally, our chosen relic is…
Blood of the ancients- While this build relies more on shield capacity than Health, the added bonus to survivability is more than welcome. While the ammo boosts are up to chance and personal taste, I recommend waiting for one with at least a pistol ammo boost. This is because that DP Harold will chew through a lot of ammo and you won’t always have a Gunzerker there to top you off.
While Chain Lightning and Ranger don’t get switched out much, I love playing with shields and relics. The spare shields I keep on hand are Hide of Terramorphous, Impaler, Black Hole, and Bee. I chose these four because they’re the best at resisting their chosen elements, while having unique toys to mix up game play and keep it interesting. As for relics, I mostly switch off to Breath of the Seraphs. This isn’t because I don’t trust the Commando to survive, but I just think its fun to time my FFYLs to sync up with my kill skills and feel like an action hero.
Alternate Guns-
Hyperion Shotgun- Hyperion is better at midrange than other shotguns, and holds its own at close range, If you’re lacking in options, pick one up and get back to the killin’. As for the second spot…
Moxxi’s Weapons- While Rubi and Grog Nozzle are relatively easy to get, you may just not have found the proper missions yet. None of those options available? Just pump money into her tip jar until she gives you a Corrosive or Fire variant. Each will heal you for 2.4% of all damage dealt, which you’ll want to stack with your choice of grenade for best effect.
Mid- range option- An assault rifle if you’re using a Moxxi SMG, or an SMG if you’ve already found Rubi. My favorite option was an E-Tech Hyperion SMG. It chewed through enemies and ammo with equal ferocity, and was always fun. If you need an assault rifle, Torgue and Vladof have some decent options for you to choose from.
The “Get out of Jail Free” card- This slot will be your go- to when you’re in FFYL. For most of the game, you’ll want a rocket launcher in this slot. You can also make due with a spinny gun or Torgue shotgun.
Alternate Gear-
The Shield- You’ll probably just want to stick with most effective shields you come across, but for this build I got a lot of use out of absorb shields and nova shields.
The Class mod- I tended to focus on mods that boosted Battlefront. These were Rifleman, Tactician, and Engineer. Aside from the requisite Battlefront, just go with the best mods you find as you level.
Grenade Mod- Singularity and AoE grenades work well with this build, to either bunch them up for your shotgun to eat, or send out damage for you to heal with your Moxxi weapon. That said, as you level you’ll come across all sorts of grenades, so it’s in your best interest to experiment. If you have Tiny Tina’s dlc, but can’t farm, lightning bolt and magic missile are somewhat common. Four is the highest number of shots per grenade throw that I’ve seen for magic missile, but find the best you can. You won’t regret it.
Relic- I went with stockpile relics for the most part, since our One Man Army can chew through more ammo than most battalions, but use what works best for you.
Questions & Answers-
How does this build fare against bosses?
It’s a little slow since a lot of his power comes from his kill skills, which he’s deprived of against larger enemies, but it’s not impossible.
What head is that?
It’s Bone Blinder, the rare drop from Vermivorous, and the skin is just Miss O’Hara, the reward for the rank 3 “Rocket and Roll” challenge.
I’d like those items, but I don’t have time to farm them. Would you mind duplicating them for me?
Not anymore, due to annoyingly high demand. Sorry.
Do you have any other guides?
Yes I do, ta very much for asking. A link to them is in the notes.
Why did you take Laser Sight over Ready or Able?
A couple reasons. First, it looks cool and gives you a moment to predict what target it’s about to Slag before its burst cycle starts. These bonuses are basically cosmetic, and only requre one point. Second it increases the range for free Slag on targets, the more points you use, that farther it can shoot. Normally, this is unnecissary, since Longbow lets you put it pretty much anywhere, but I think it’s helpful against flying targets like Son of Mothrakk. Sometimes I despec four points into other abilities, but it’s up to you.
Uncle Sicko, why did you use an awful cliche like one man army?
A couple reasons. First, I thought a reference to an actual slogan would be a nice change. Second, I wasn’t smart enough to do a cursory Google search to see that, not only had Gearbox used it, but that it was unimaginative in every way possible.
Level Progression-
I focused on offense over defense early on, but deviating from what I chose isn’t a crime. I didn’t need Survival much until tvhm/ uvhm, but if it feels right, show it some love. This is updated, and I’ll catch the rest of the guide up some time. I had to make several changes since I recently learned the nuances in several abilities.
1-5- Get a shotgun and don’t die.
6-10- Five into Impact. A free damage buff this early will help keep you rolling.
11-15- Five into Sentry. Same theory as Impact, more damage is your friend.
16-20- Metal Storm. Because more dakka.
21-25- Battlefront, the bread and butter of this build.
26-30- Willing. This is a pretty big boost to survivability, and as enemies start to ramp up, you’ll feel it.
31-37- One into Scorched Earth and five into Onslaught. I also used this opportunity to grab Longbow Turret. It’s helpful, but I never felt it was essential before this point.
37- 43- A single point for Laser Sight, because it helps me track, and thus stack up against, sentry targets, even before its burst cycle starts. your next five points can go into Able if you don’t have a Nurse Siren with you, or Ready if you do.
44-47- You’ll need three more points in Guerrilla to get Double Up. I opted for Crisis Management, but you may wanna check out Ready instead.
I did a lot of re- specing, depending on my mood, etc., sometimes taking steady, nuke, and other things, but for this I decided to keep it trimmed so we’d have plenty of points to snuggle with Survival.
48-52- Five points into Preparation. Thicker shields and passive healing? Yes please, mate.
53-57- Last Ditch Effort. I play a little more recklessly just because I have abilities like this in my back pocket, and potentially dying also means I’m potentially stronger.
58- 62- We gloss over Phalanx Shield, since Longbow boosts the turrets health enough and the game has plenty of other cover without wasting a point. I typically use my five points here on Quick Charge for survivability, but I occasionally switch to Forbearance when I toy with suicidal weapons like Chulainn.
63- 67- Resourceful is the choice here. Can’t go wrong with faster sentries, especially if you’re using an Engineer class mod.
68- 72- Our last points go into Grit. This ability is just shy of cheating, and I love it, especially when you opt to stack it with a Pointman class mod and Breath of the Seraphs.
Notes-
Feel free to post any questions, tips, or comments below.
Edits-
9/28/2013
– Guide completed
– Various spelling, grammar, and continuity corrections
9/30/2013
– Guide expanded
– Various spelling and grammar fixes
– Guide posted
Thanks for reading, everyone. I hope you enjoy this build as much as I do.
If you’d like, check out my other guides here: [link]