The Tiny Bang Story - Walkthrough Guide (Objects, Pieces and Quests)
Introduction
I set about creating this Guide with the goal of sparing you the long arduous task of painstakingly clicking hundreds of dragonflies, required to unlock hints for missing Quest Objects.
This walkthrough will cut through all the hassle, allowing you to enjoy the game safe in the knowledge that should you hit a brick wall, you can just look here, instead of spending 5 minutes or more clicking dragonflies, which is a long and boring endeavor.
This walkthrough will cut through all the hassle, allowing you to enjoy the game safe in the knowledge that should you hit a brick wall, you can just look here, instead of spending 5 minutes or more clicking dragonflies, which is a long and boring endeavor.
Chapter 1 - Grandmothers House
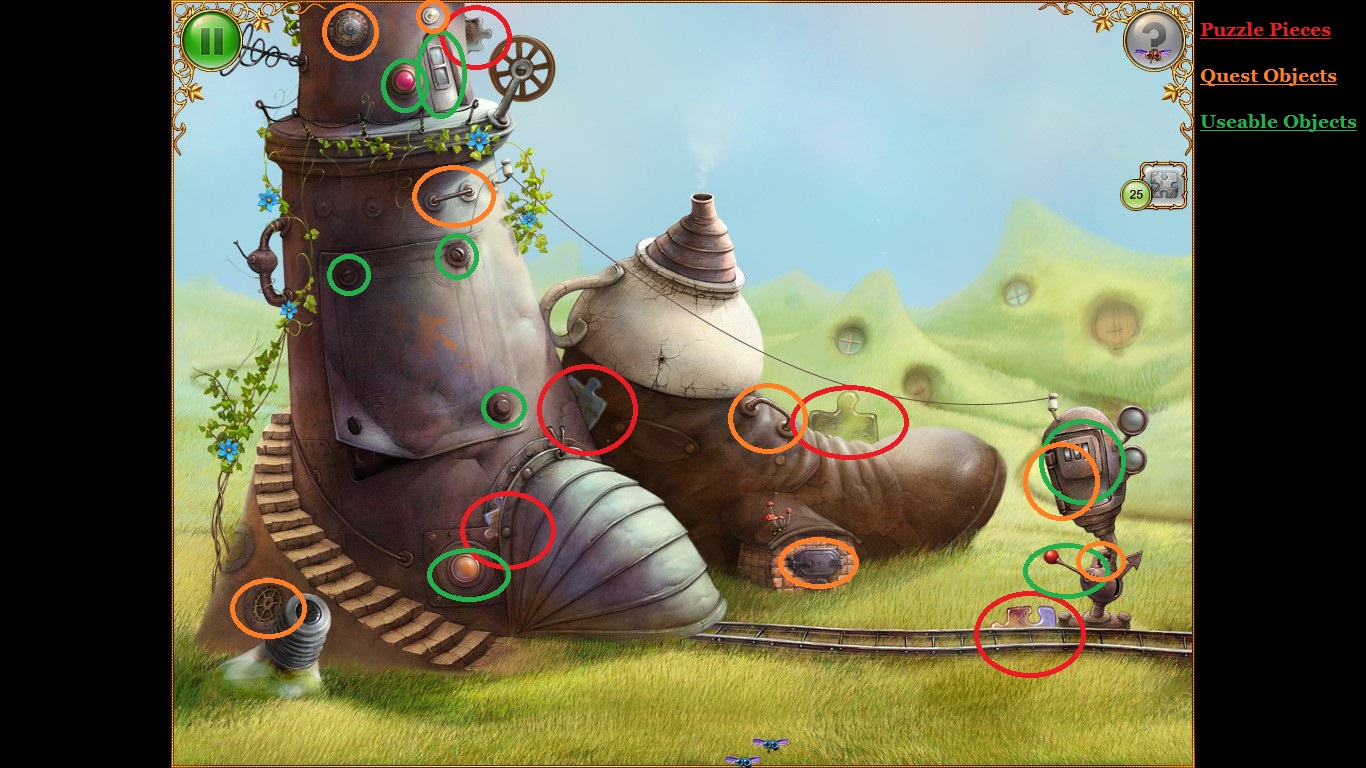
The broken plate corner will give you the Quest to find the Wrench.
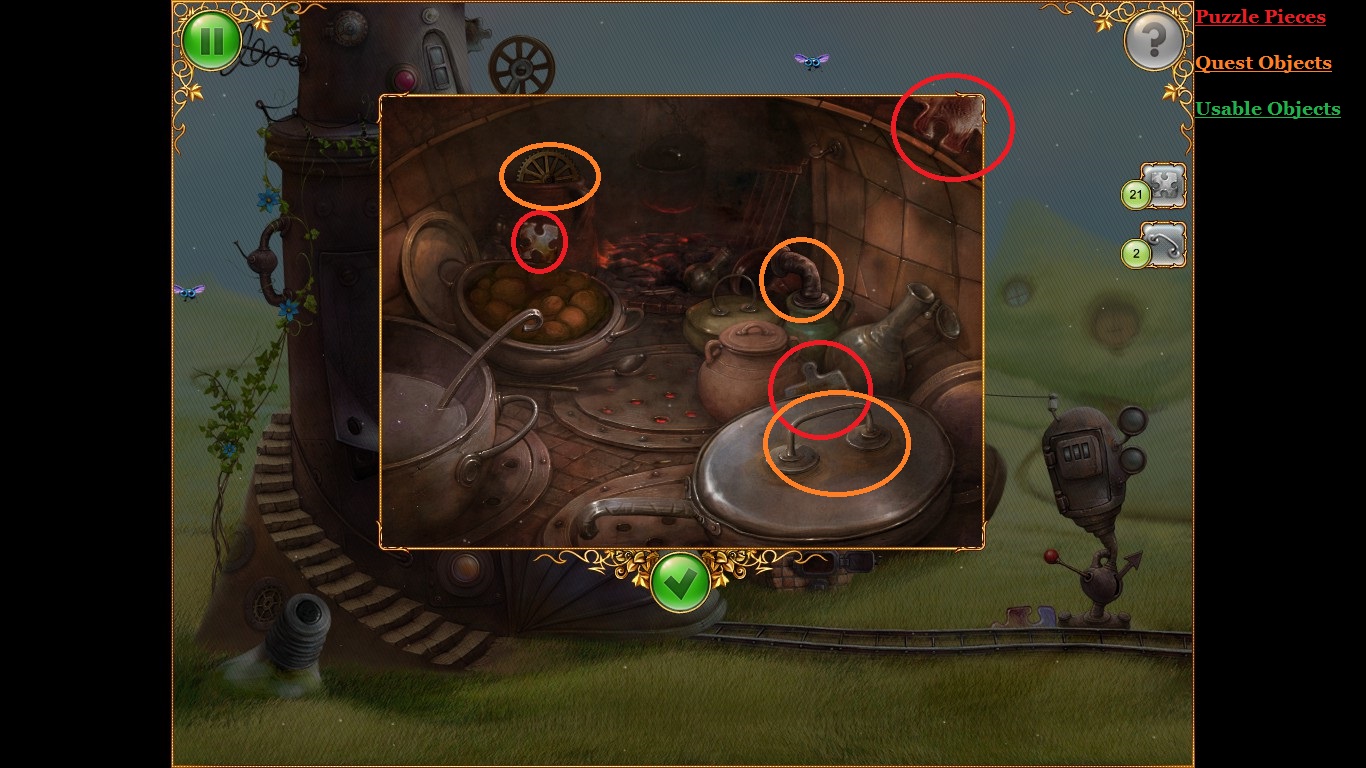
Inside the Ground Floor Oven.
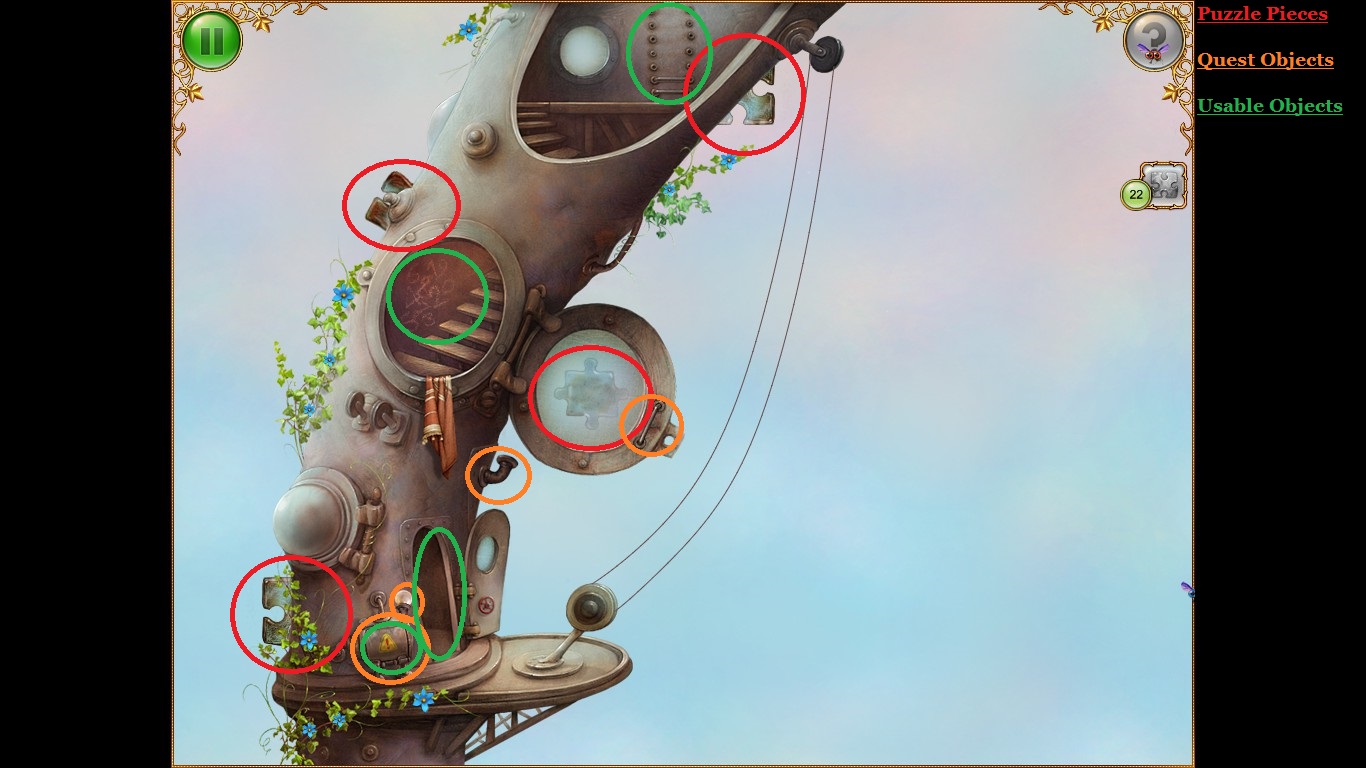
The broken Ladder will give you the Quest to find replacement parts.
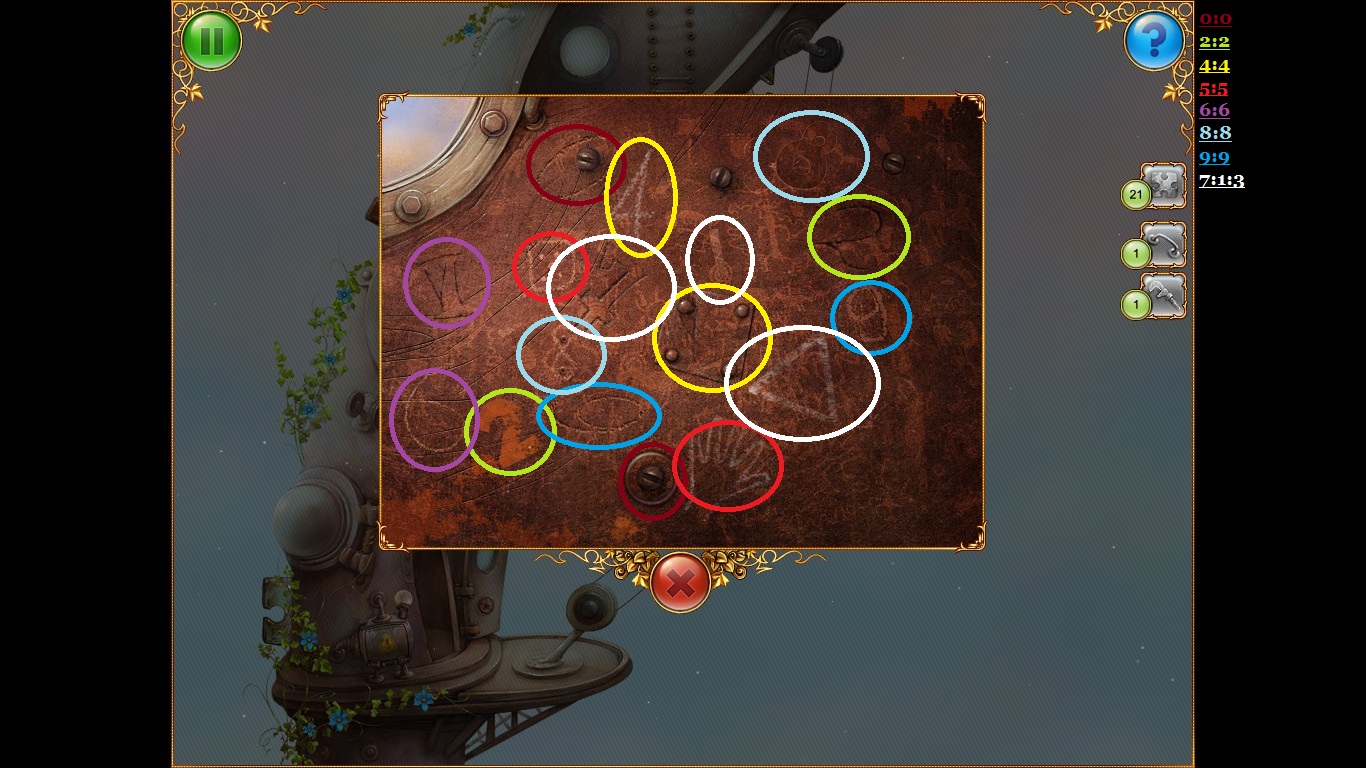
The answers to the First Floor puzzle that gives the code for the ground floor hatch to the power switch.
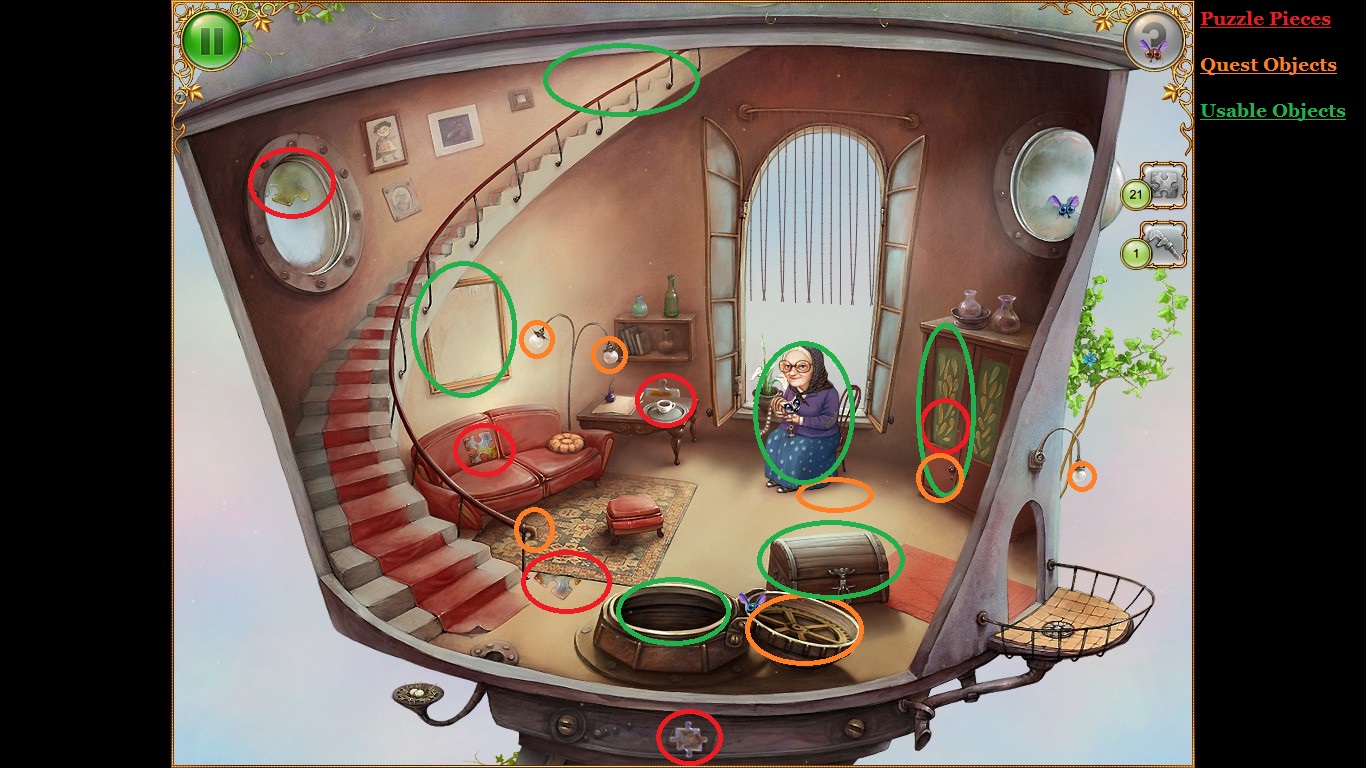
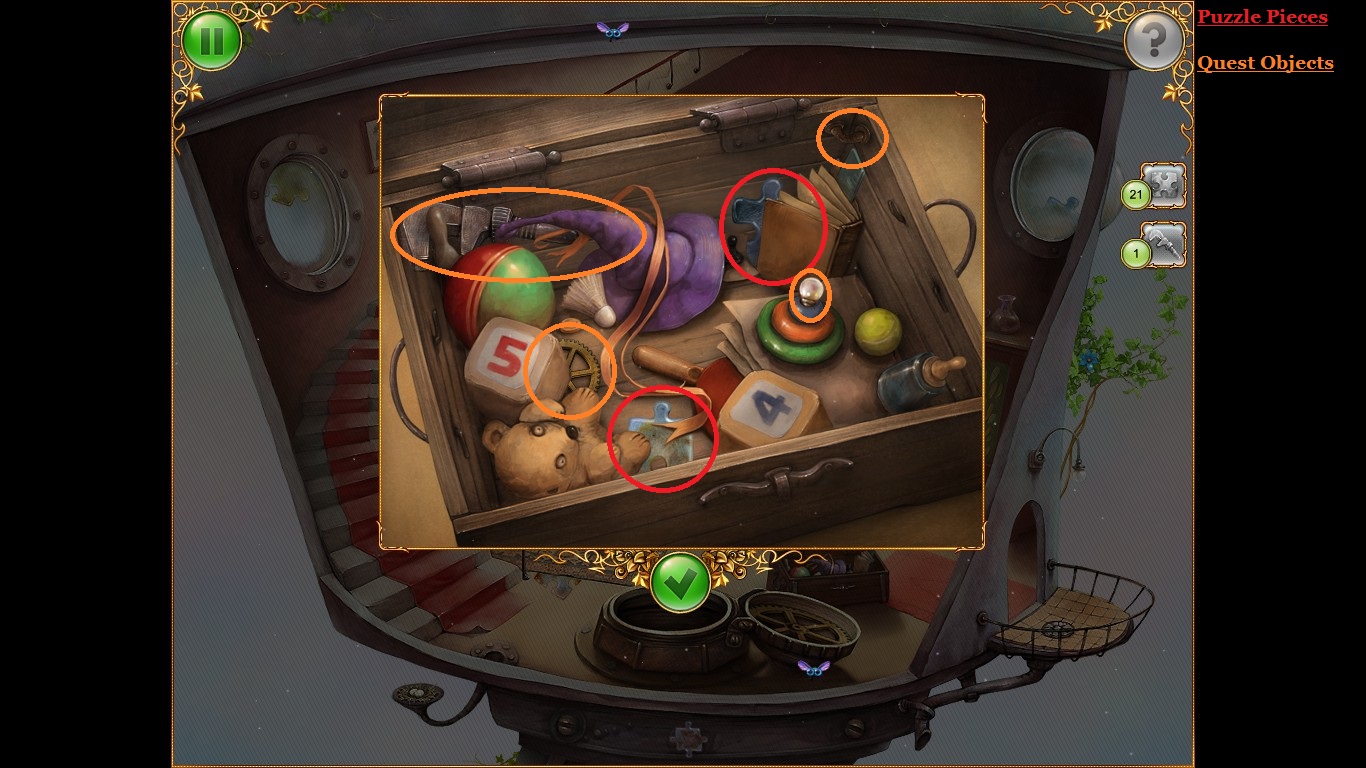
Click both the empty Picture Frame and Chest to get two new quests.
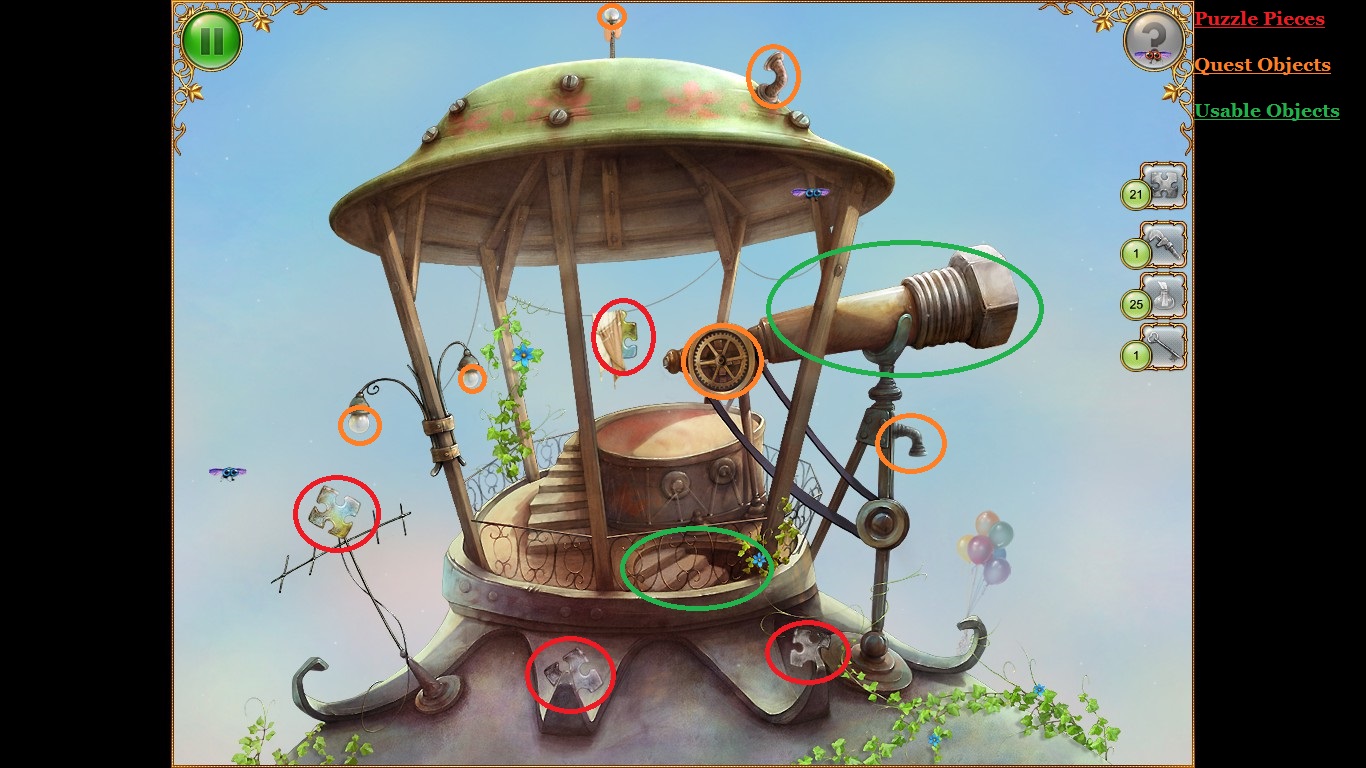
Click the Telescope to start a mini-game where you must pop balloons to collect glass bottles that contain Picture Fragments.
How all the Picture Fragments connect togeather.
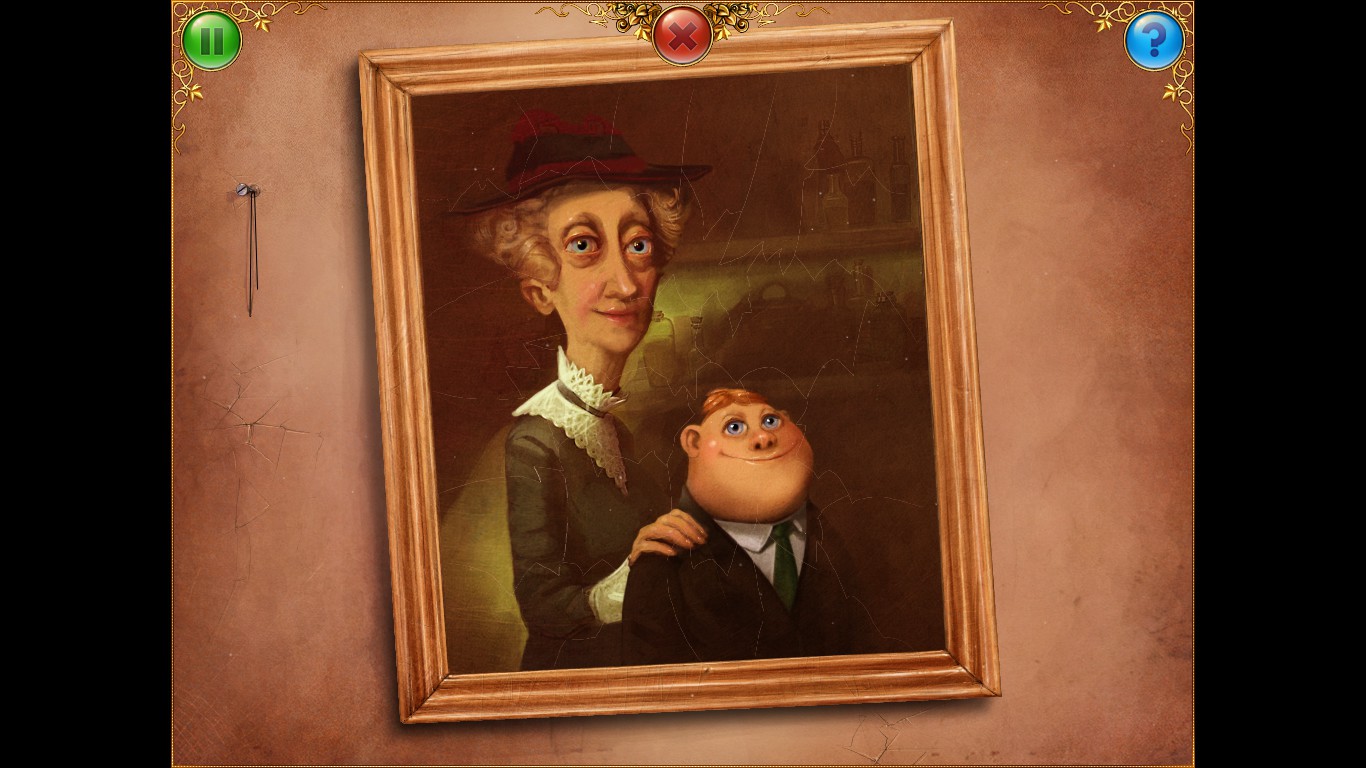
Once the Picture is complete, your Grandmother will drop a key for you to open the chest with.
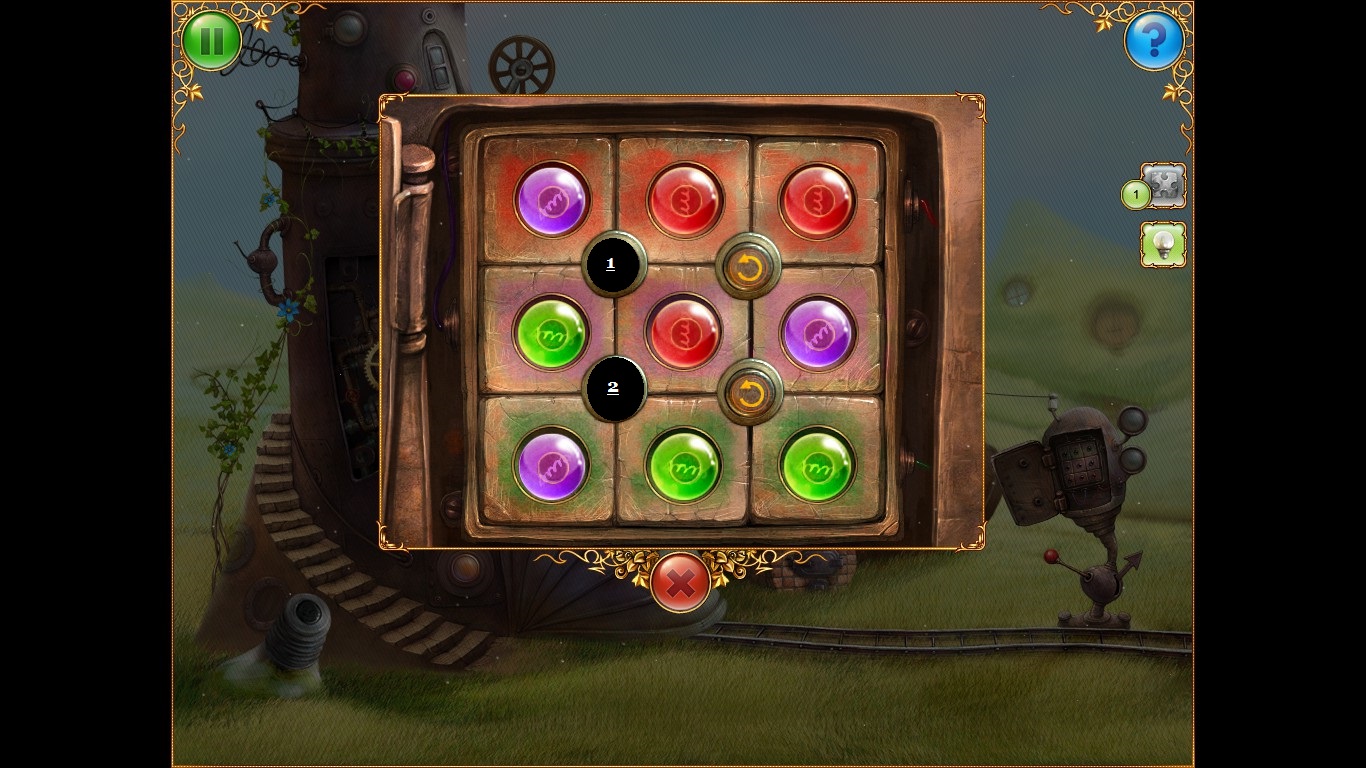
Press the First Button a couple of times until red is lined up, then press the Second Button a couple of times until both green and purple are lined up.
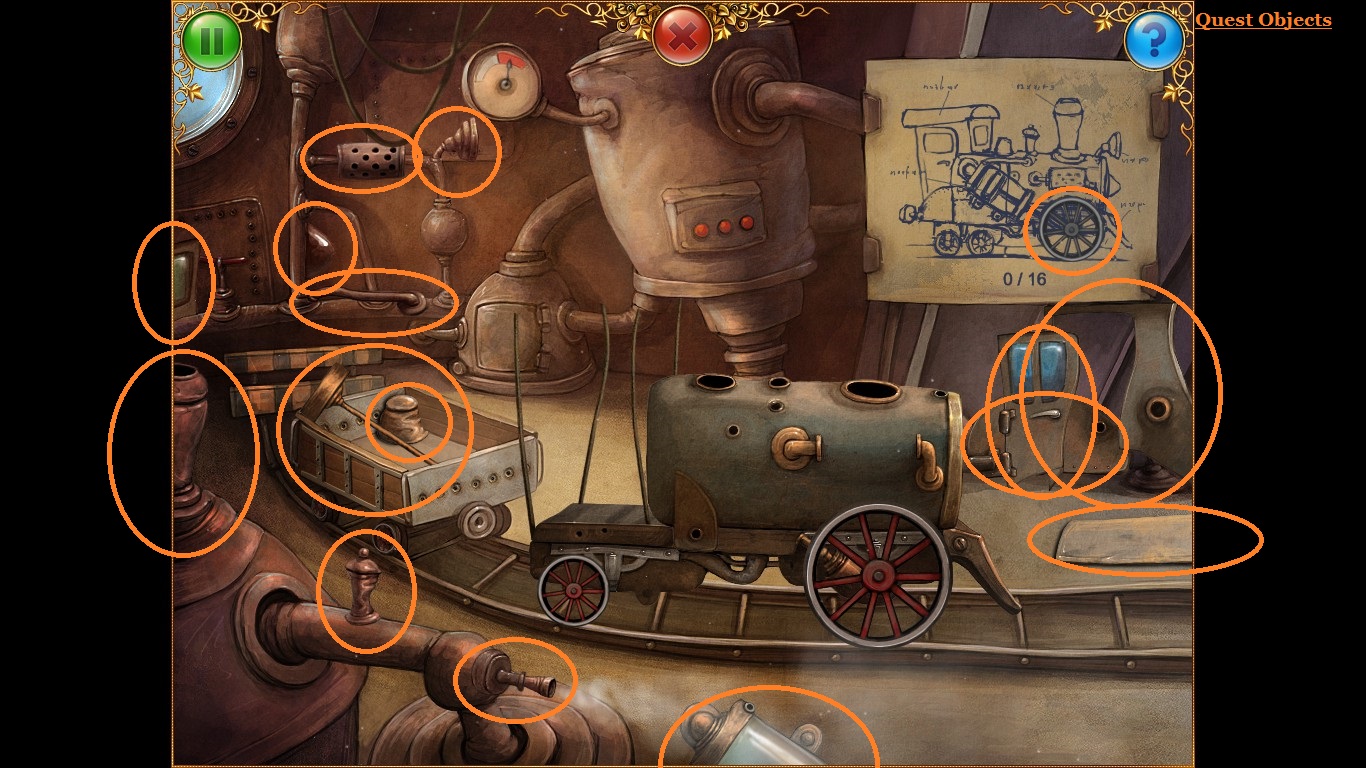
The only difficult piece is the wheel, which is hidden on top of another wheel on the blueprint.
Upon completing chapter one you will be rewarded with some jigsaw pieces that are needed to bring color back to your world and to travel to the next area.
Inside the Ground Floor Oven.
The broken Ladder will give you the Quest to find replacement parts.
The answers to the First Floor puzzle that gives the code for the ground floor hatch to the power switch.
Click both the empty Picture Frame and Chest to get two new quests.
Click the Telescope to start a mini-game where you must pop balloons to collect glass bottles that contain Picture Fragments.
How all the Picture Fragments connect togeather.
Once the Picture is complete, your Grandmother will drop a key for you to open the chest with.
Press the First Button a couple of times until red is lined up, then press the Second Button a couple of times until both green and purple are lined up.
The only difficult piece is the wheel, which is hidden on top of another wheel on the blueprint.
Upon completing chapter one you will be rewarded with some jigsaw pieces that are needed to bring color back to your world and to travel to the next area.
Chapter 2 - Train Station
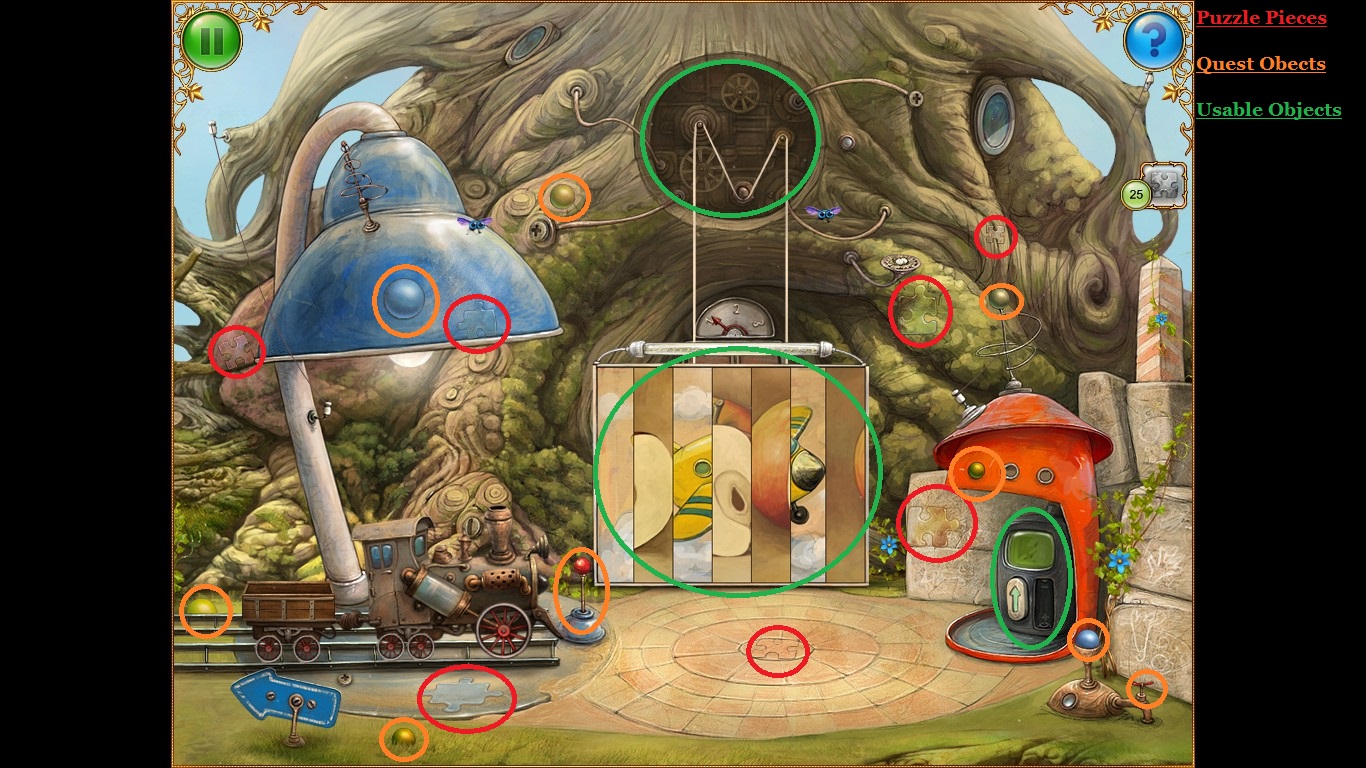
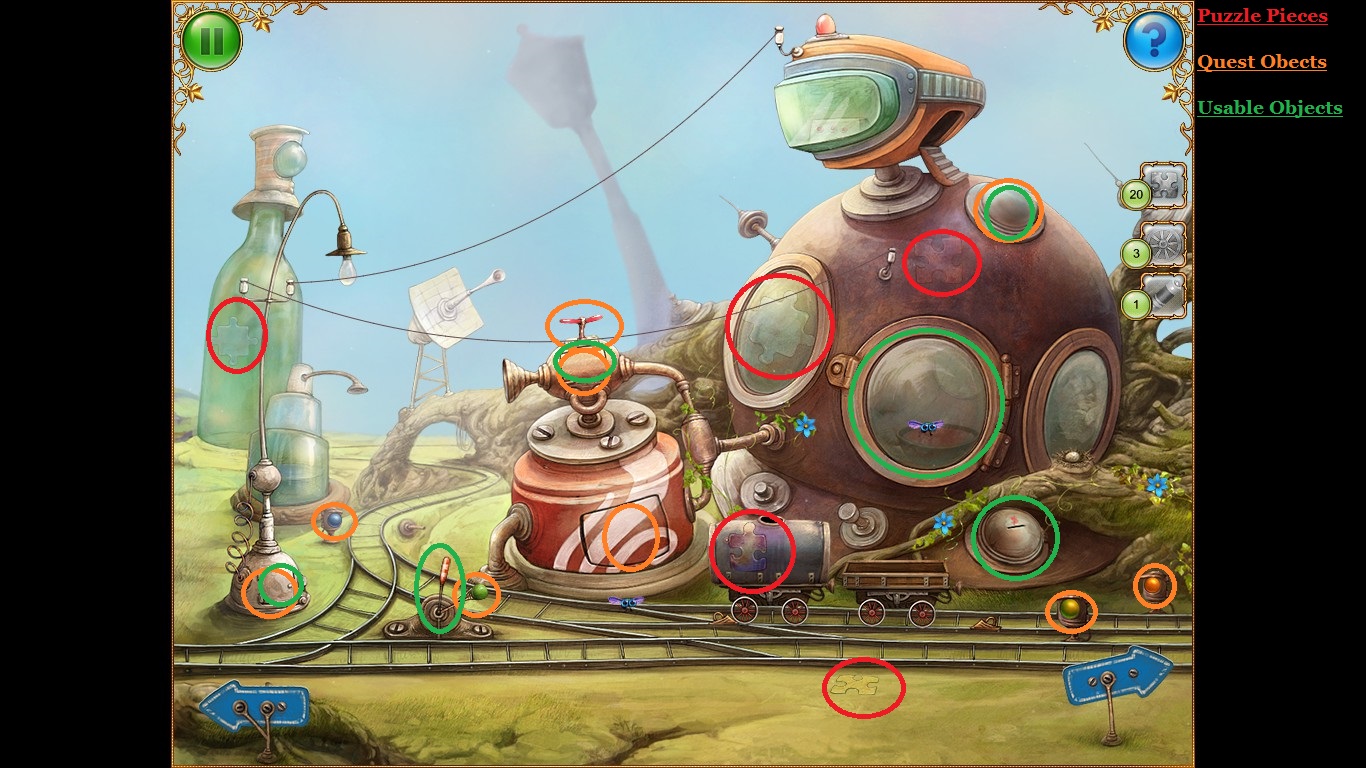
Click the sign control switch and system to get the Quests to repair them.
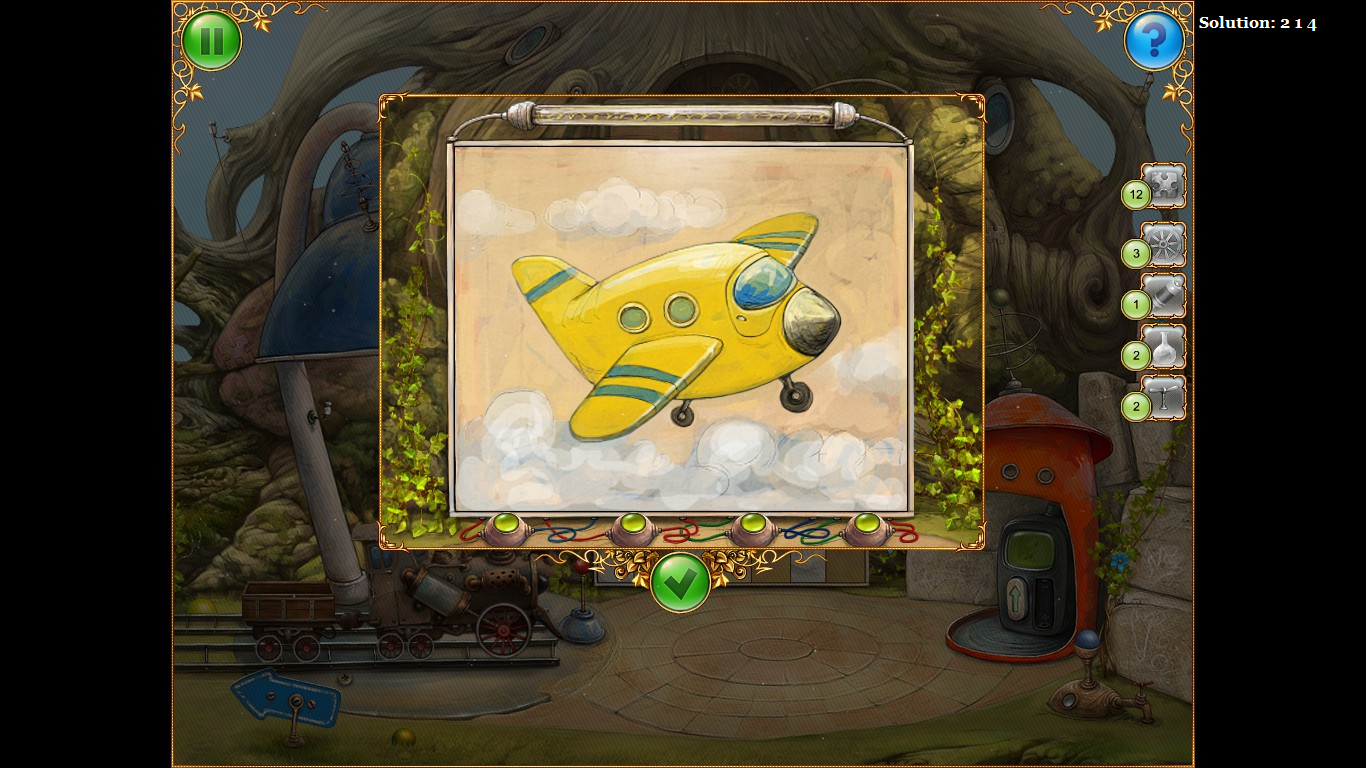
The tree puzzle solution.
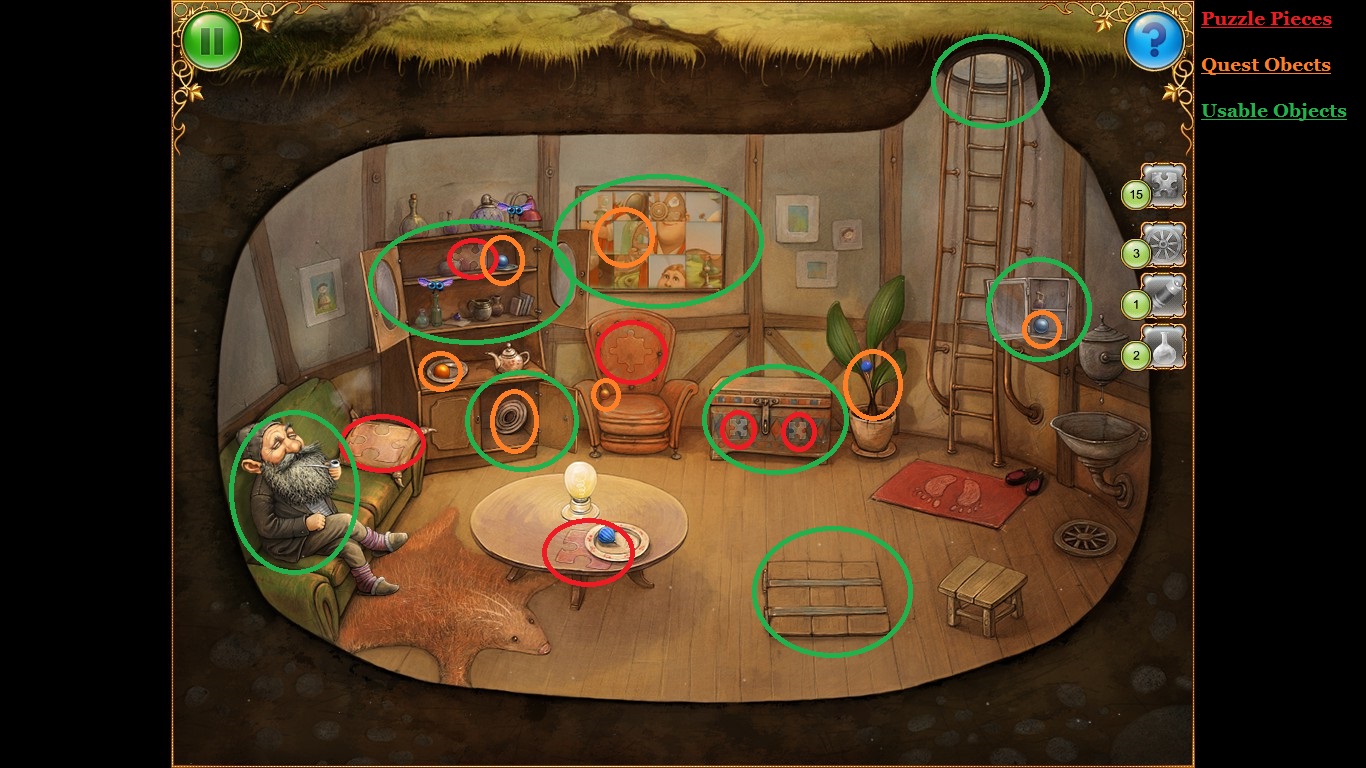
Open the middle window and click again to gain a Quest. Click the hatch below that will reveal a ladder to the underground living area.
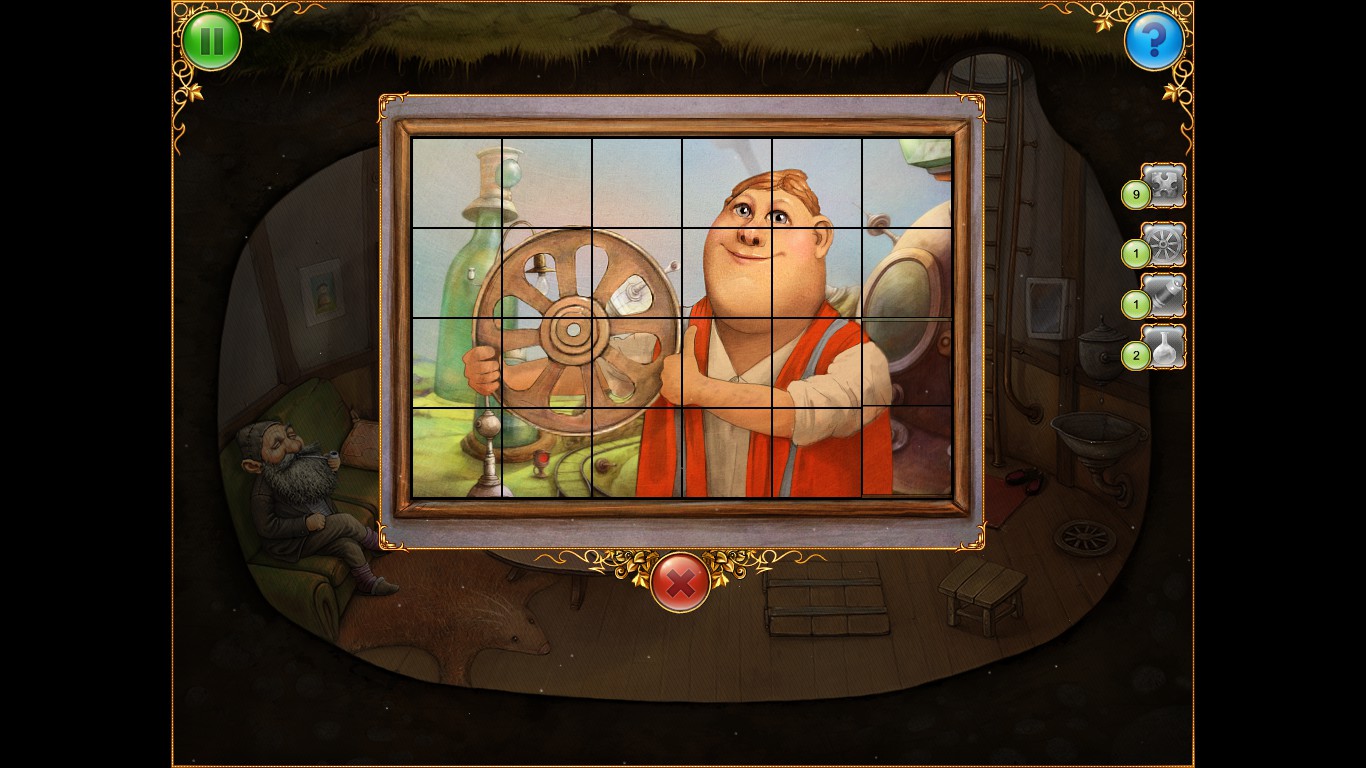
Click the picture above the armchair to gain access to a puzzle.
The gear is clickable after you've clicked the green teck and returned to the living area.
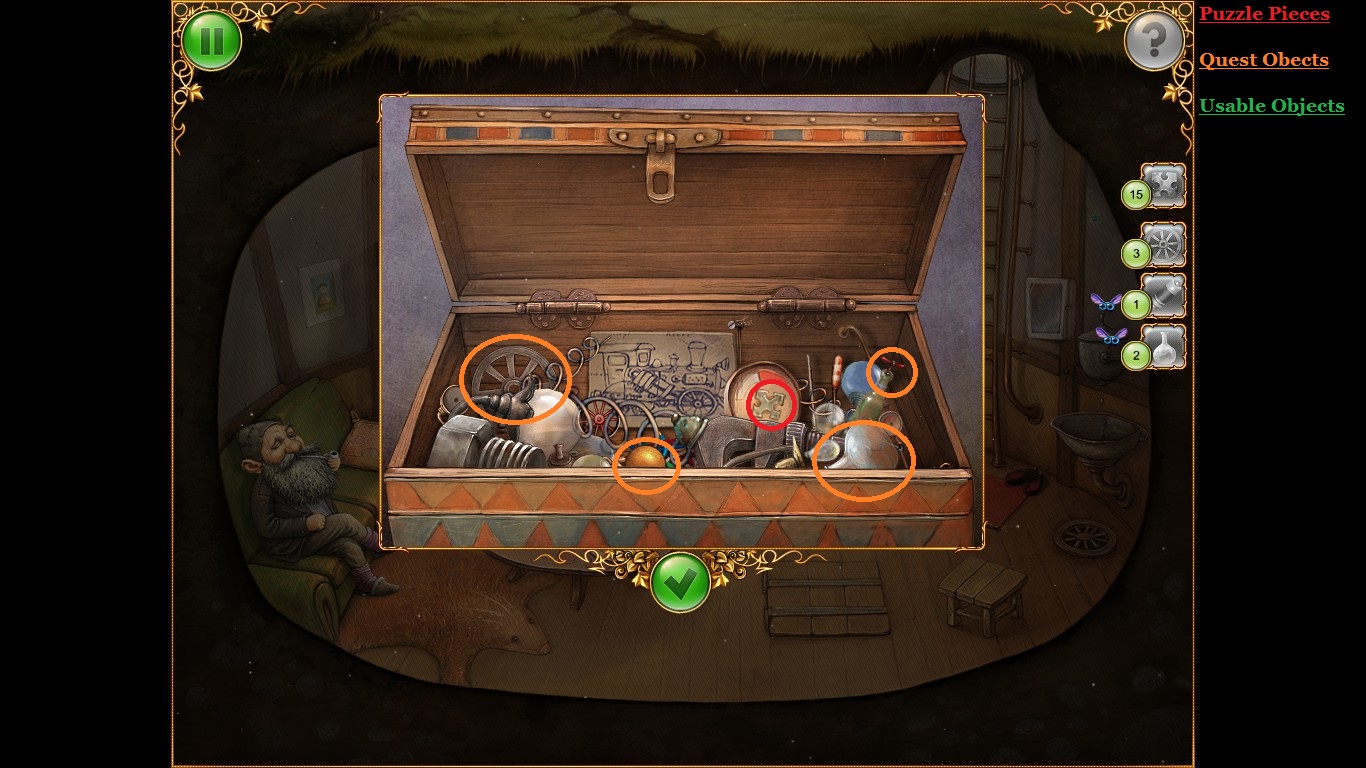
Inside the chest.
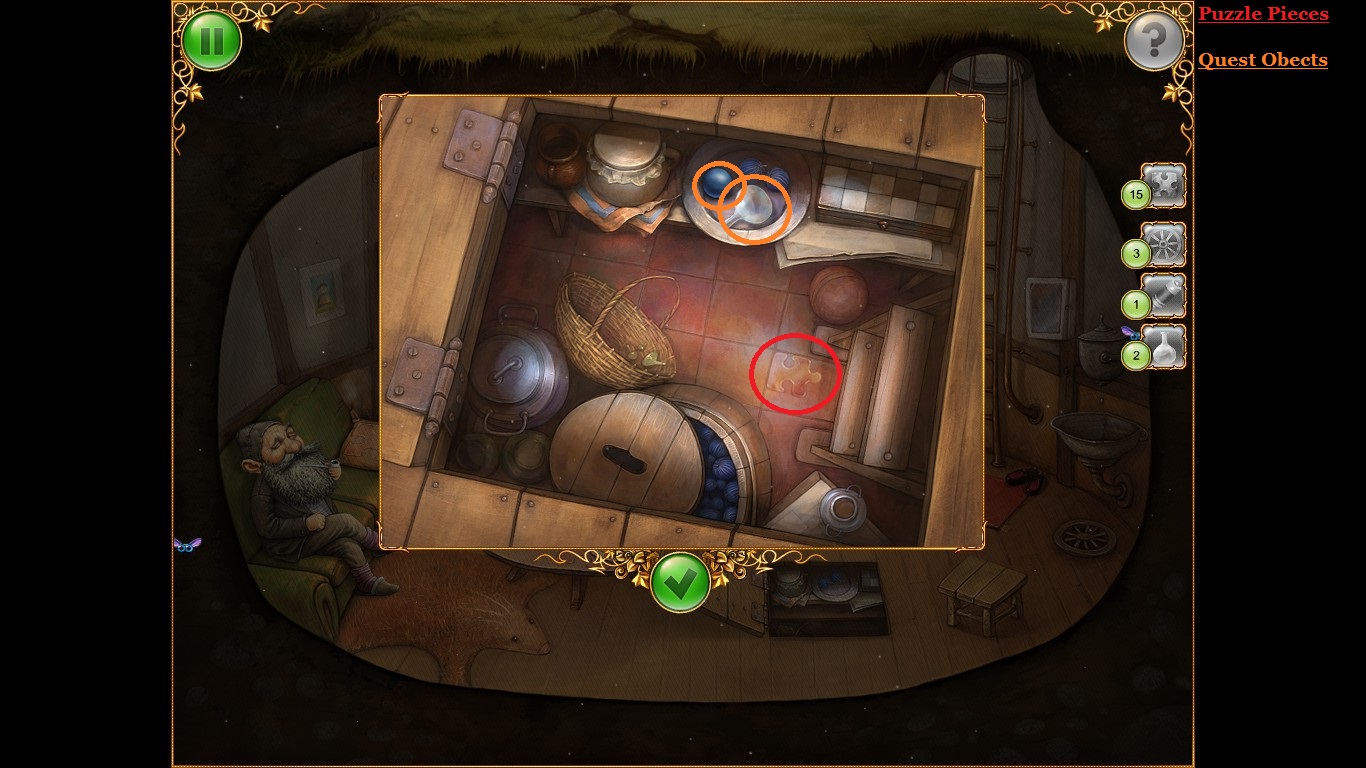
Inside the Larder.
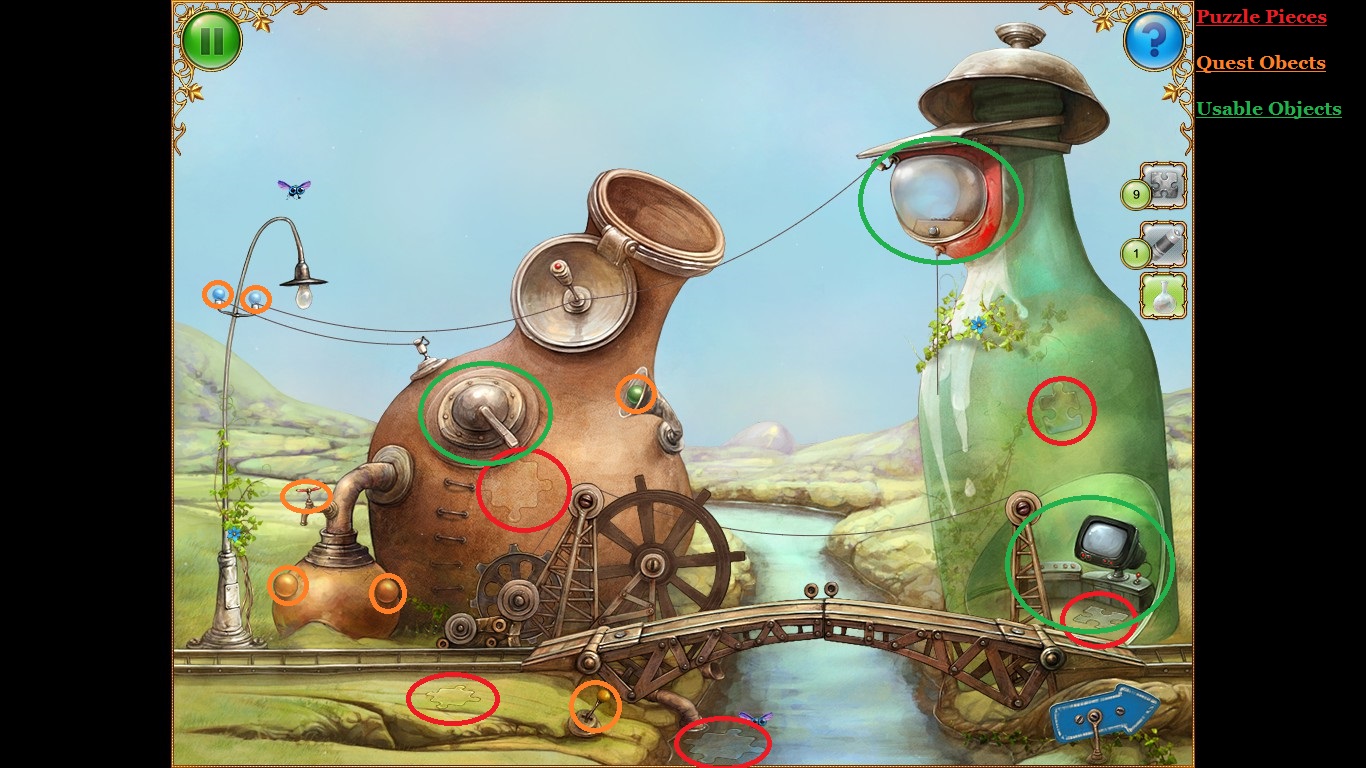
Clicking the signal tower will activate a Quest. Complete the puzzle at the base to guide the boat to your location. Click the hatch on left and then the revealed piping to reveal the pipe puzzle.
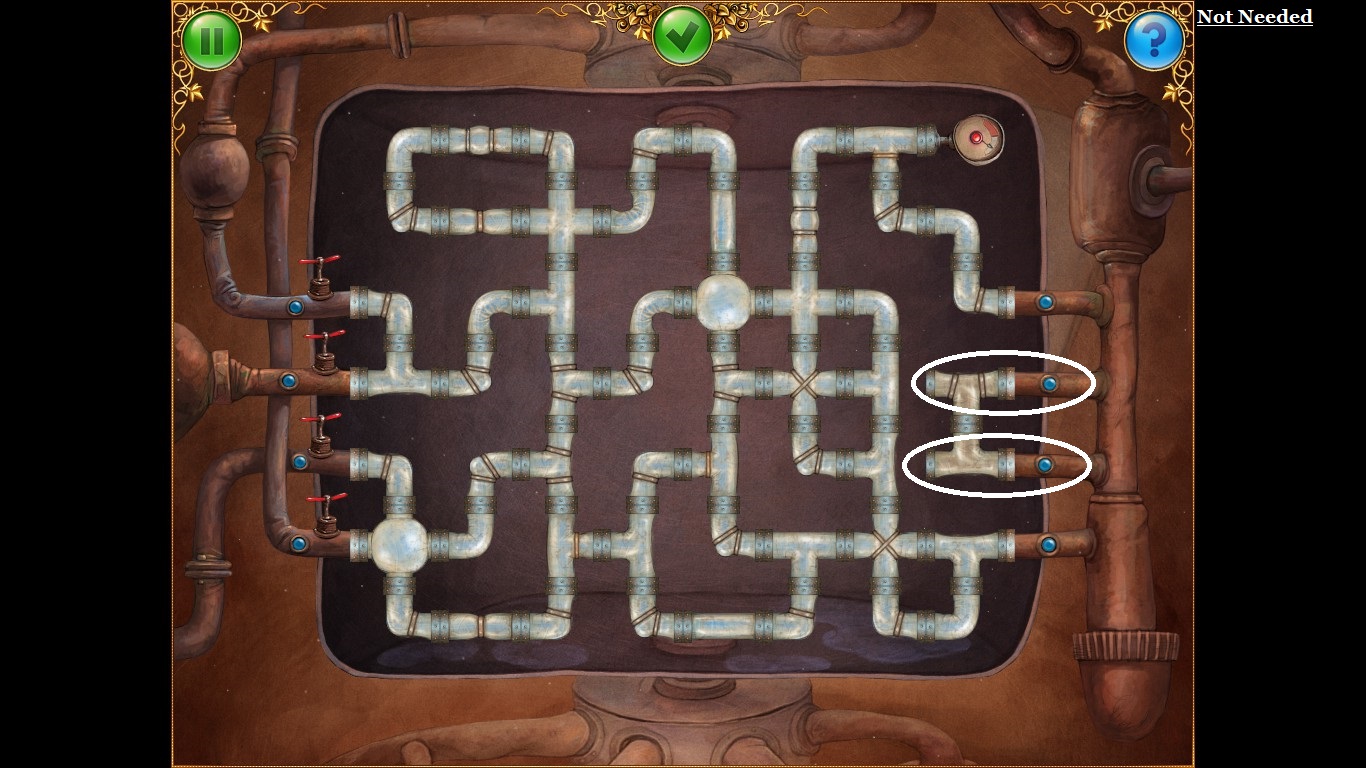
The solution puzzle to the pipe puzzle.
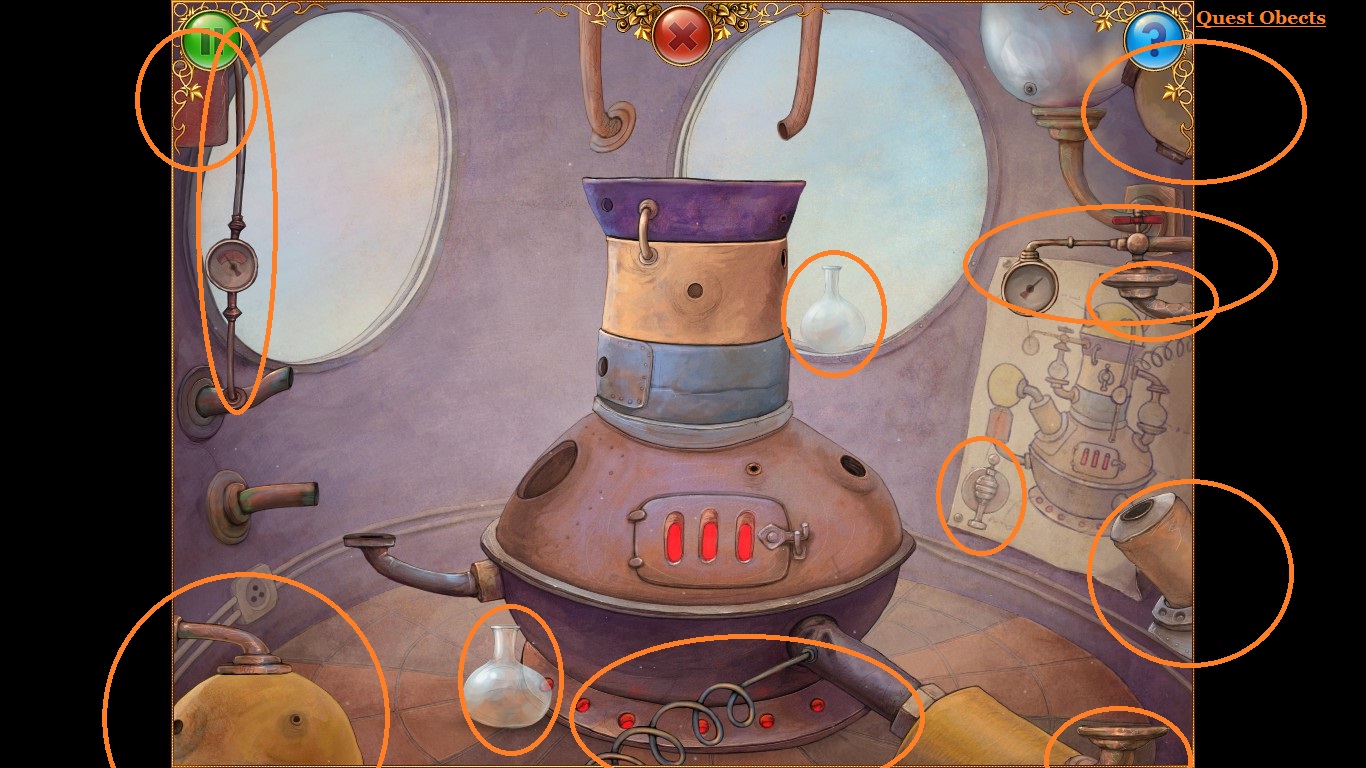
The puzzle accessed via the middle window.
The tree puzzle solution.
Open the middle window and click again to gain a Quest. Click the hatch below that will reveal a ladder to the underground living area.
Click the picture above the armchair to gain access to a puzzle.
The gear is clickable after you've clicked the green teck and returned to the living area.
Inside the chest.
Inside the Larder.
Clicking the signal tower will activate a Quest. Complete the puzzle at the base to guide the boat to your location. Click the hatch on left and then the revealed piping to reveal the pipe puzzle.
The solution puzzle to the pipe puzzle.
The puzzle accessed via the middle window.
Chapter 3 - Apple Tree
Packages can't be collected until you've guided the plane to the launch pad via the flight simulator (don't get too excited).
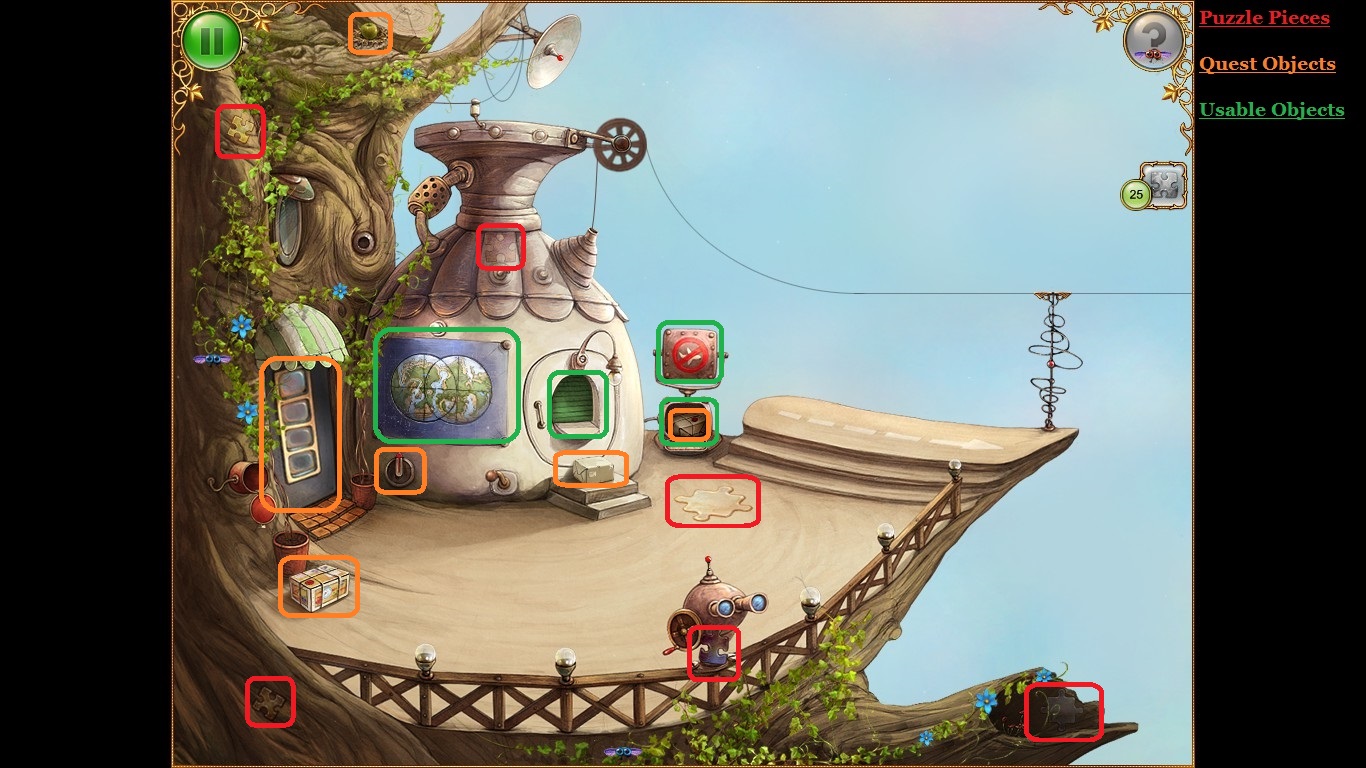
Clicking the camera reveals the area behind the desk. Left door to shop (recommened you go there first), left to the launch pad and the elavator leads to flight control.
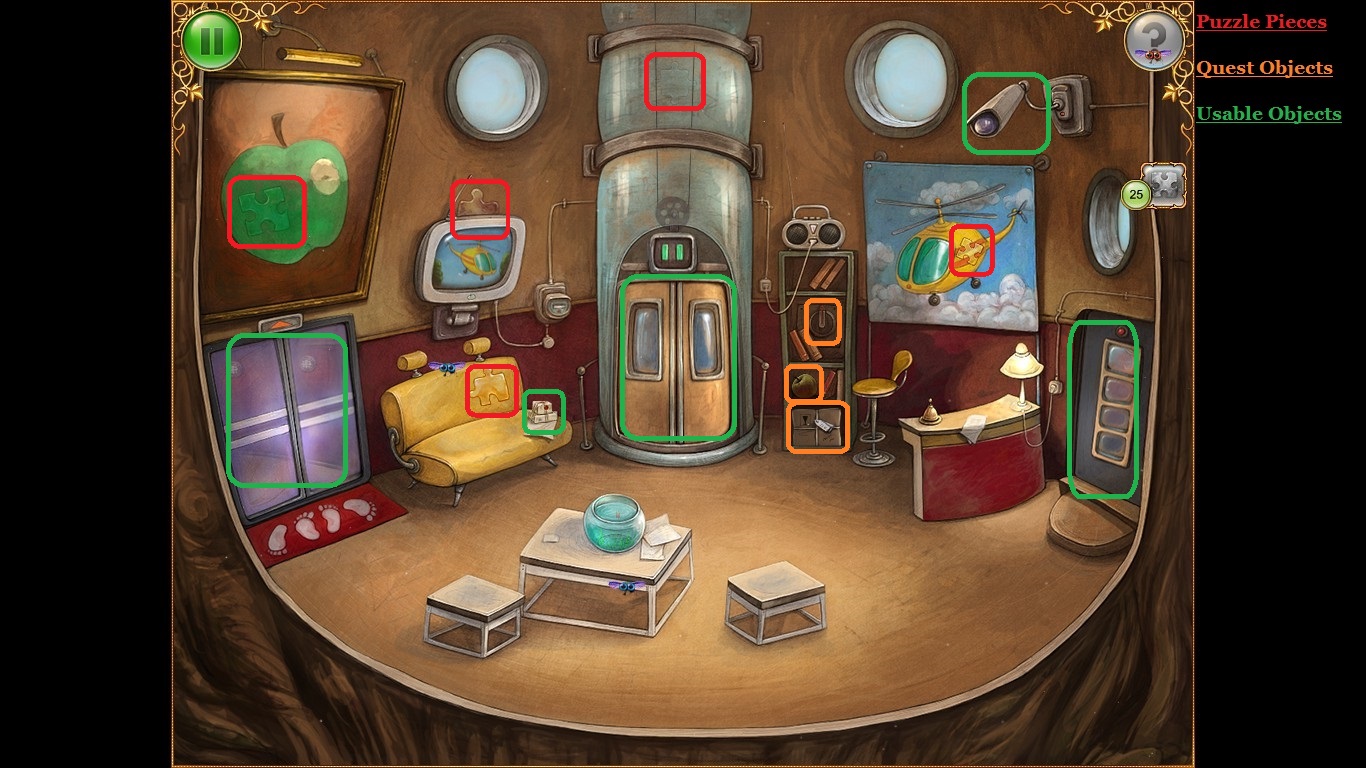
A few Quests can be aquired and completed here.
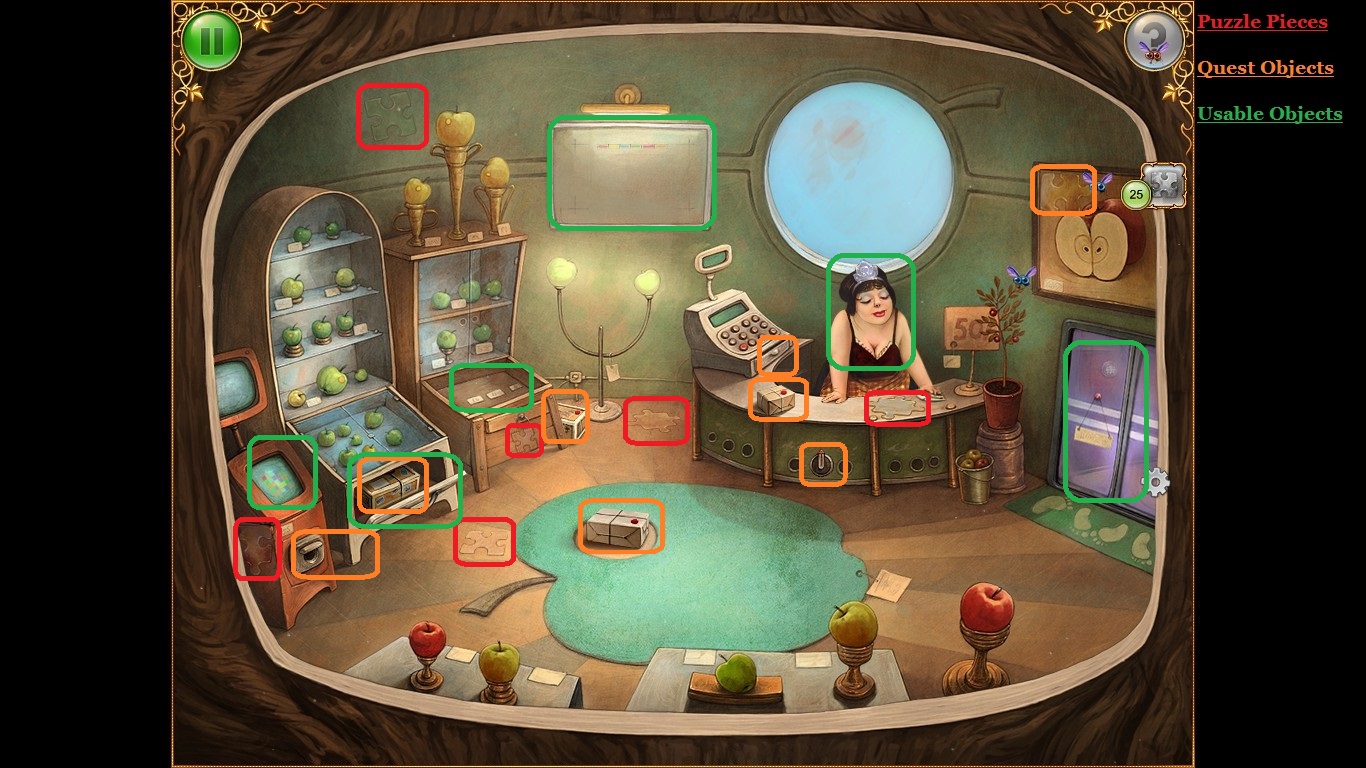
Once the four control dials have been gathered you can skip the time dial and cypher puzzles if you so choose, and use the passcode I provided.
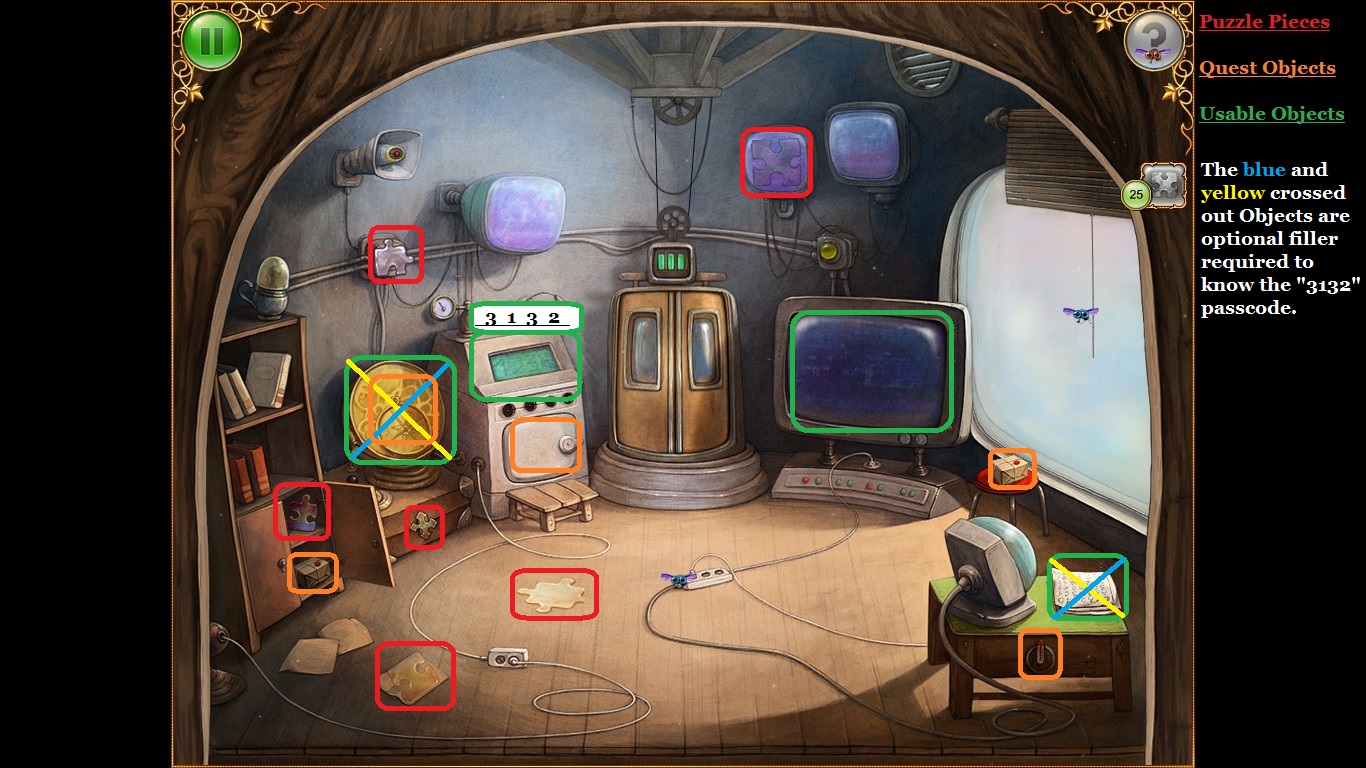
The crossed out piece is part of the time dial repair Quest.
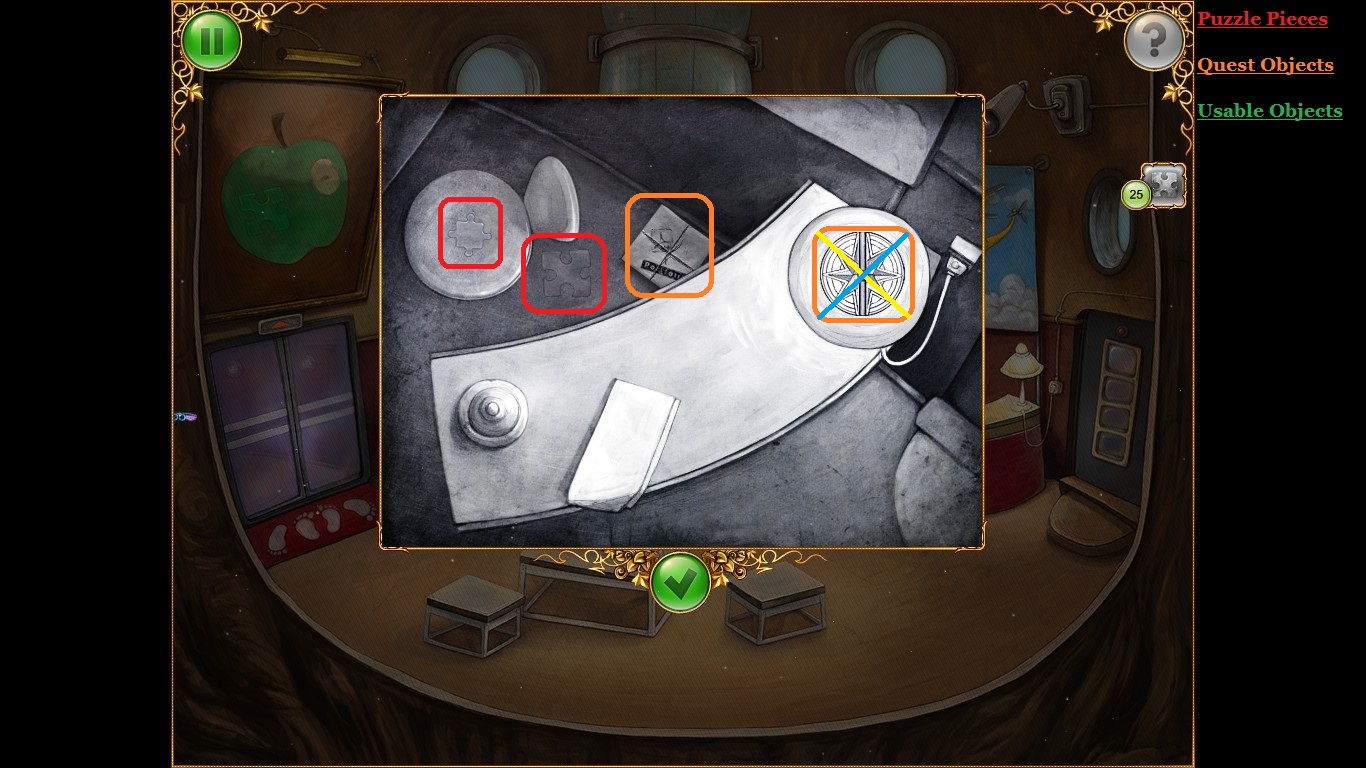
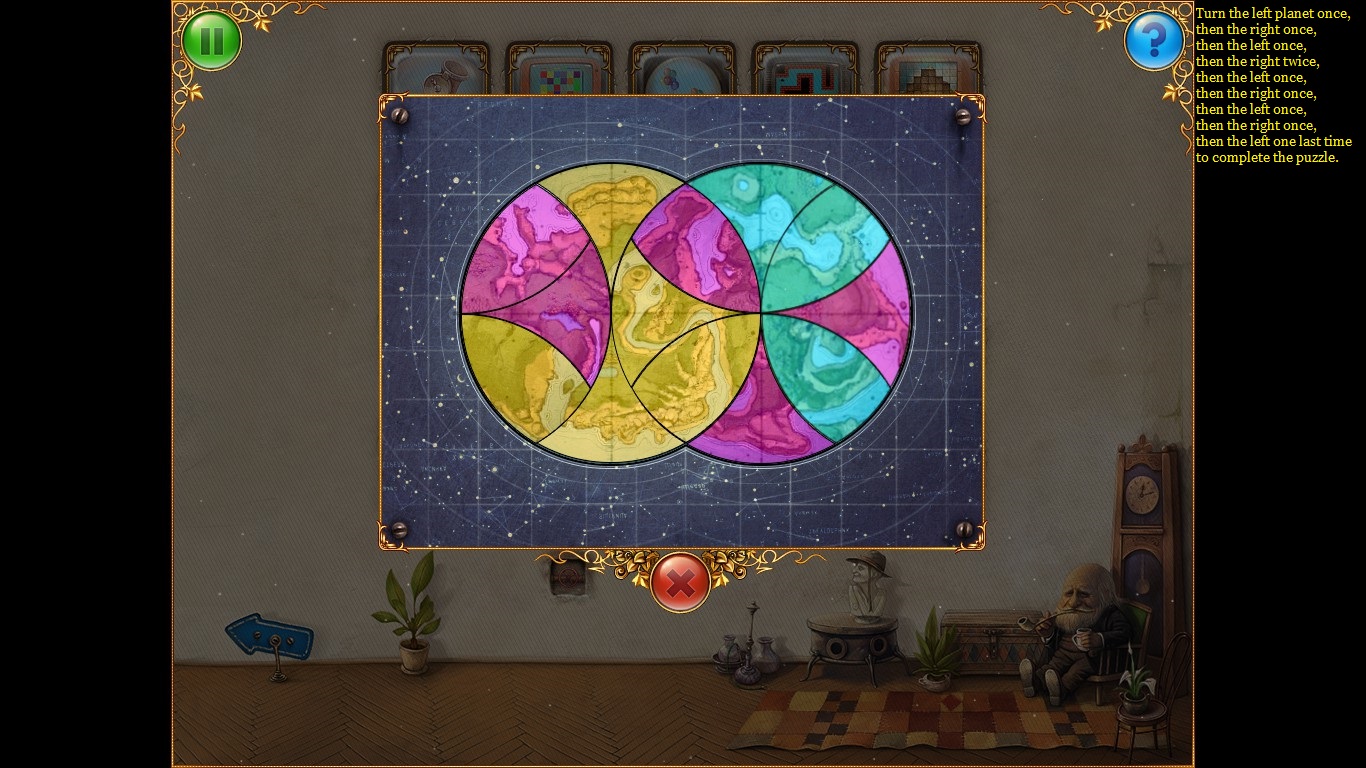
Click the twin circle map to access a fairly simple puzzle.
How to complete the win planet puzzle. (Solution written on the actual picture.)
Clicking the camera reveals the area behind the desk. Left door to shop (recommened you go there first), left to the launch pad and the elavator leads to flight control.
A few Quests can be aquired and completed here.
Once the four control dials have been gathered you can skip the time dial and cypher puzzles if you so choose, and use the passcode I provided.
The crossed out piece is part of the time dial repair Quest.
Click the twin circle map to access a fairly simple puzzle.
How to complete the win planet puzzle. (Solution written on the actual picture.)
Chapter 4 - Harbor
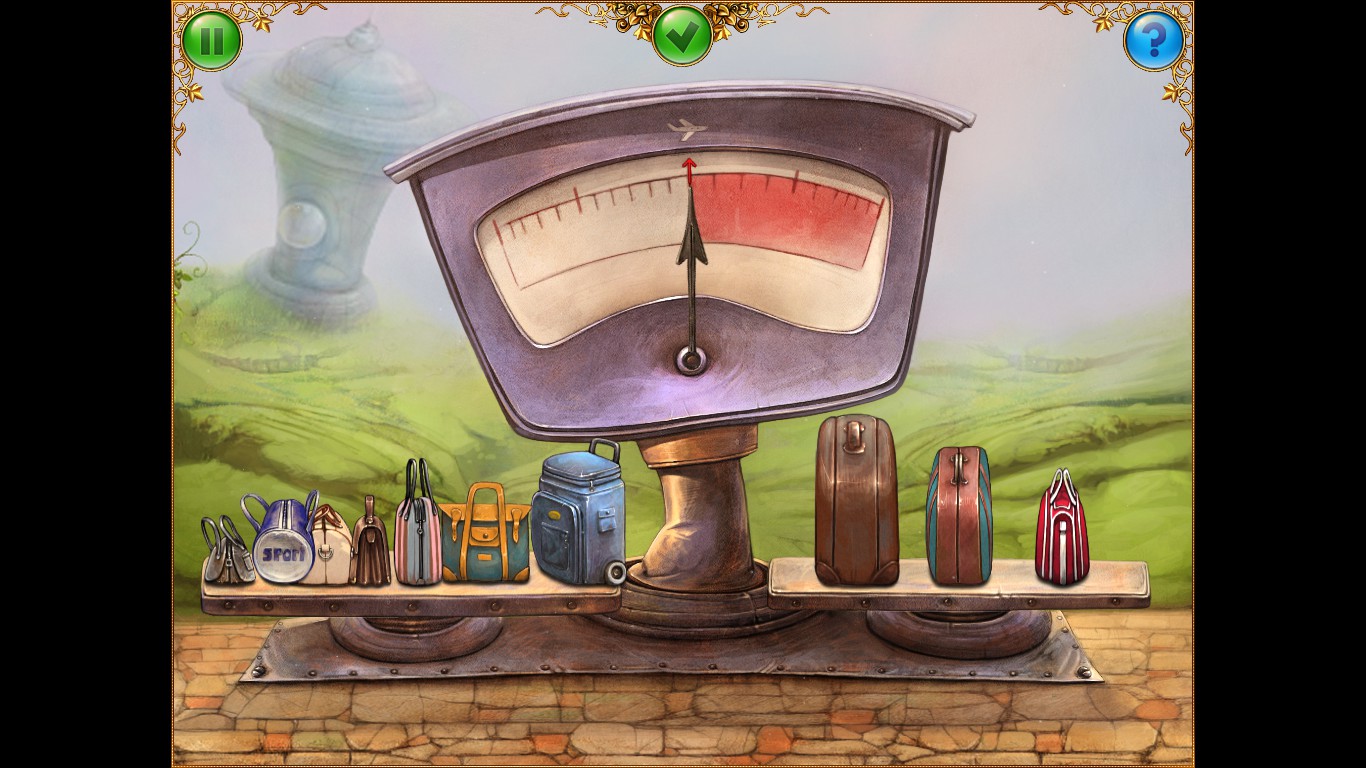
Click the weight reader to activate the luggage collection Quest. The lever at the bottom makes the light go on.
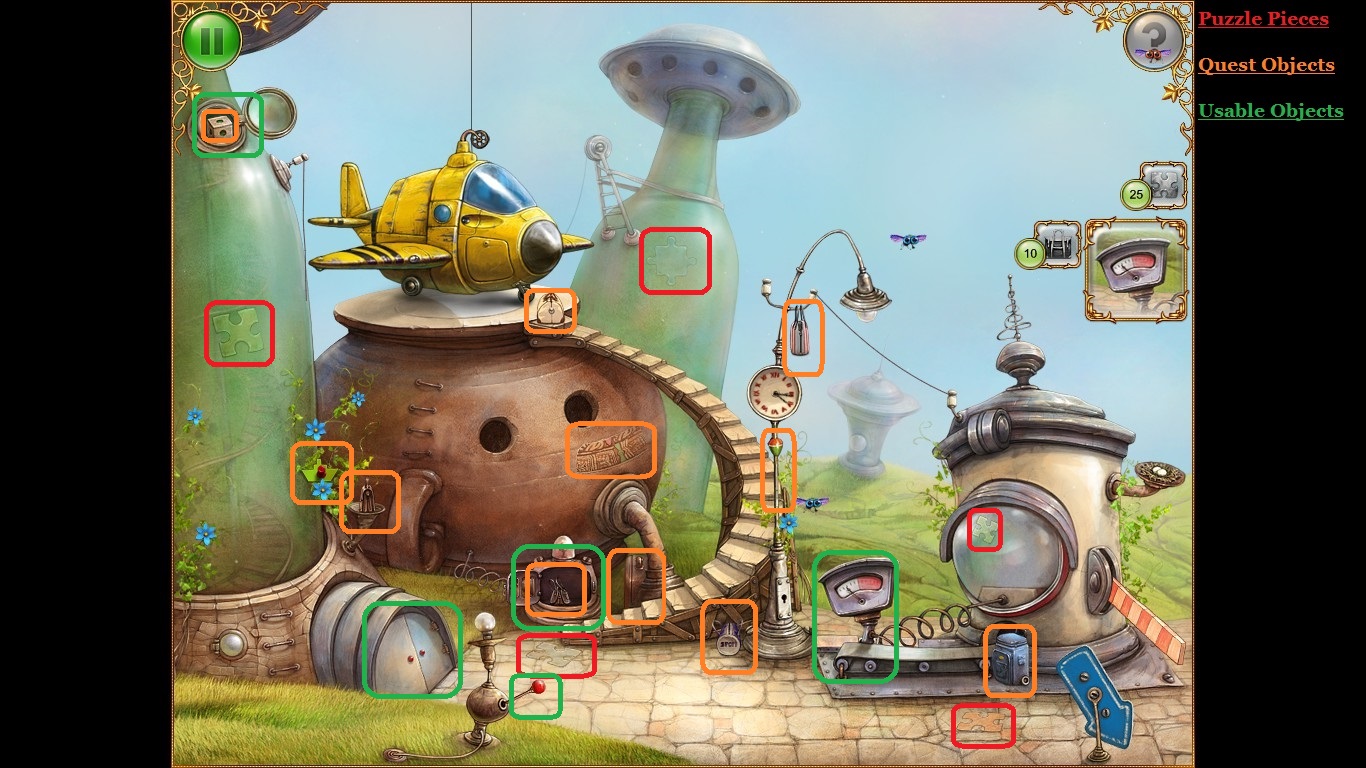
Inside the green bottle.
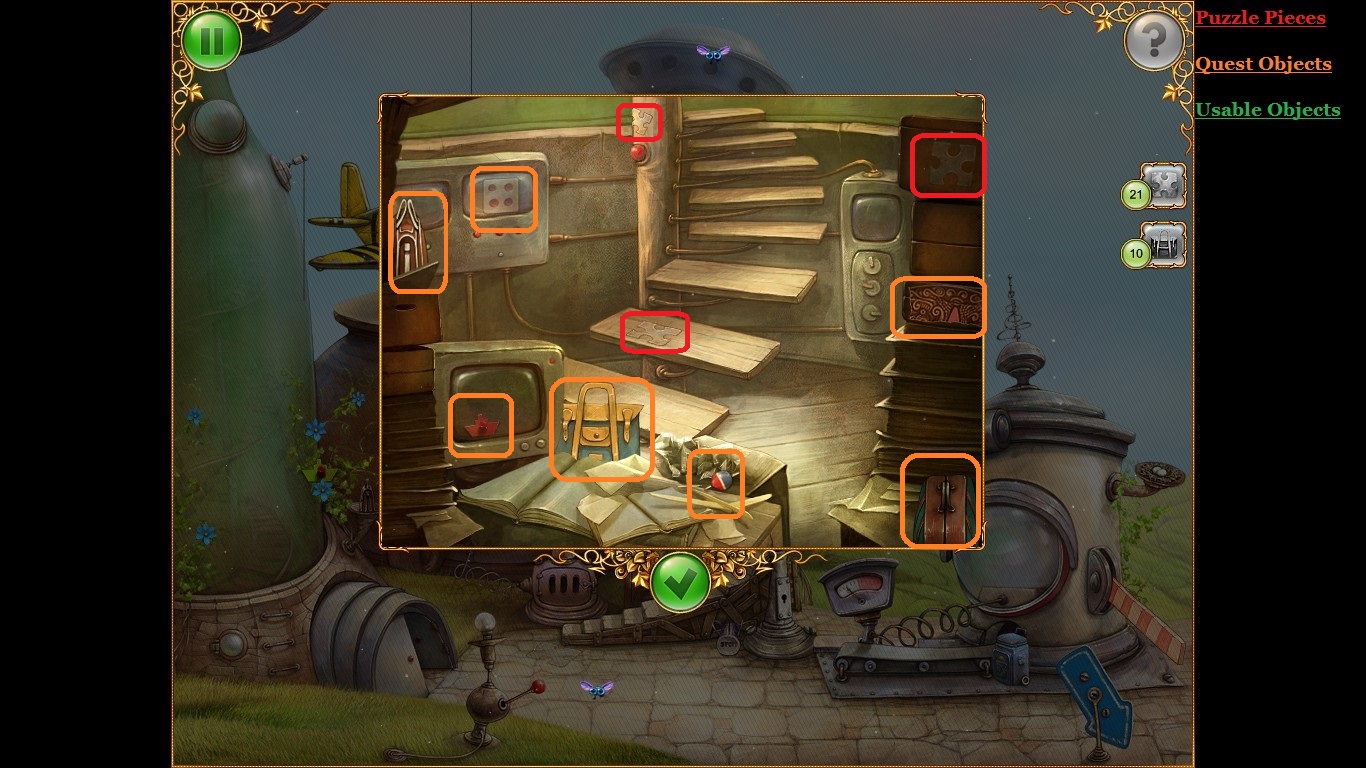
The luggage puzzle solution.
Clicking on the five empty dice slots reveals the Quest to collect them.
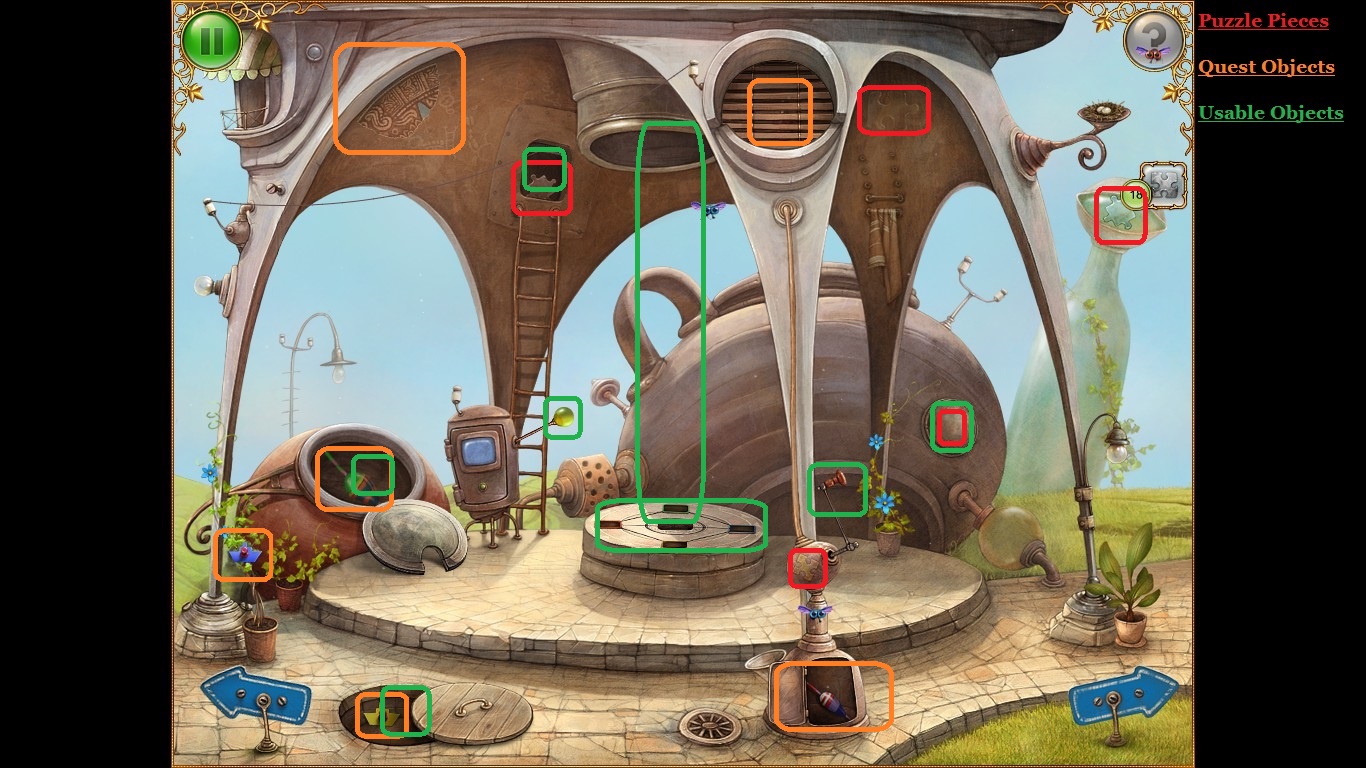
Completing this quest and pulling the lever reveals a ladder to the teapot house above.
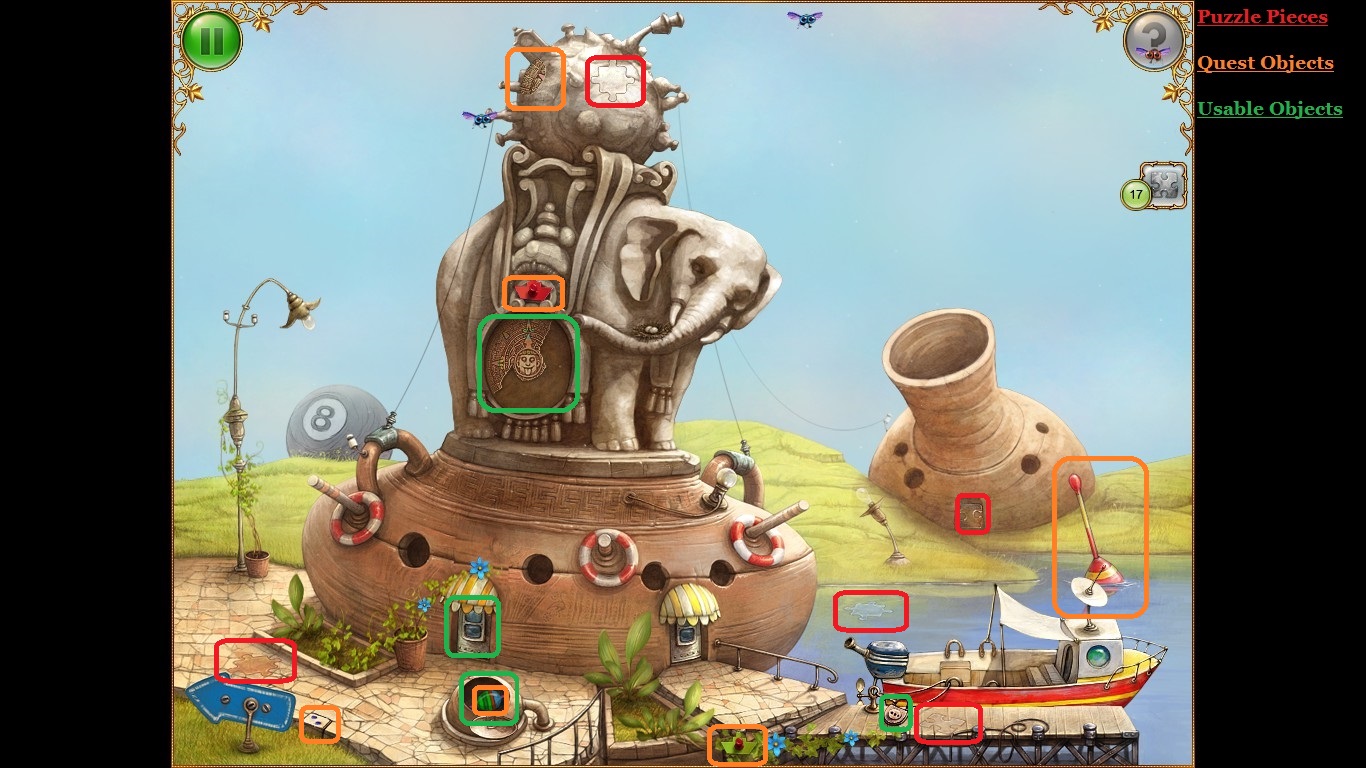
Click the incomplete Aztec puzzle to start a collection Quest. Completing the puzzle opens the doors below. Clicking the padlock will unlock it's quest.
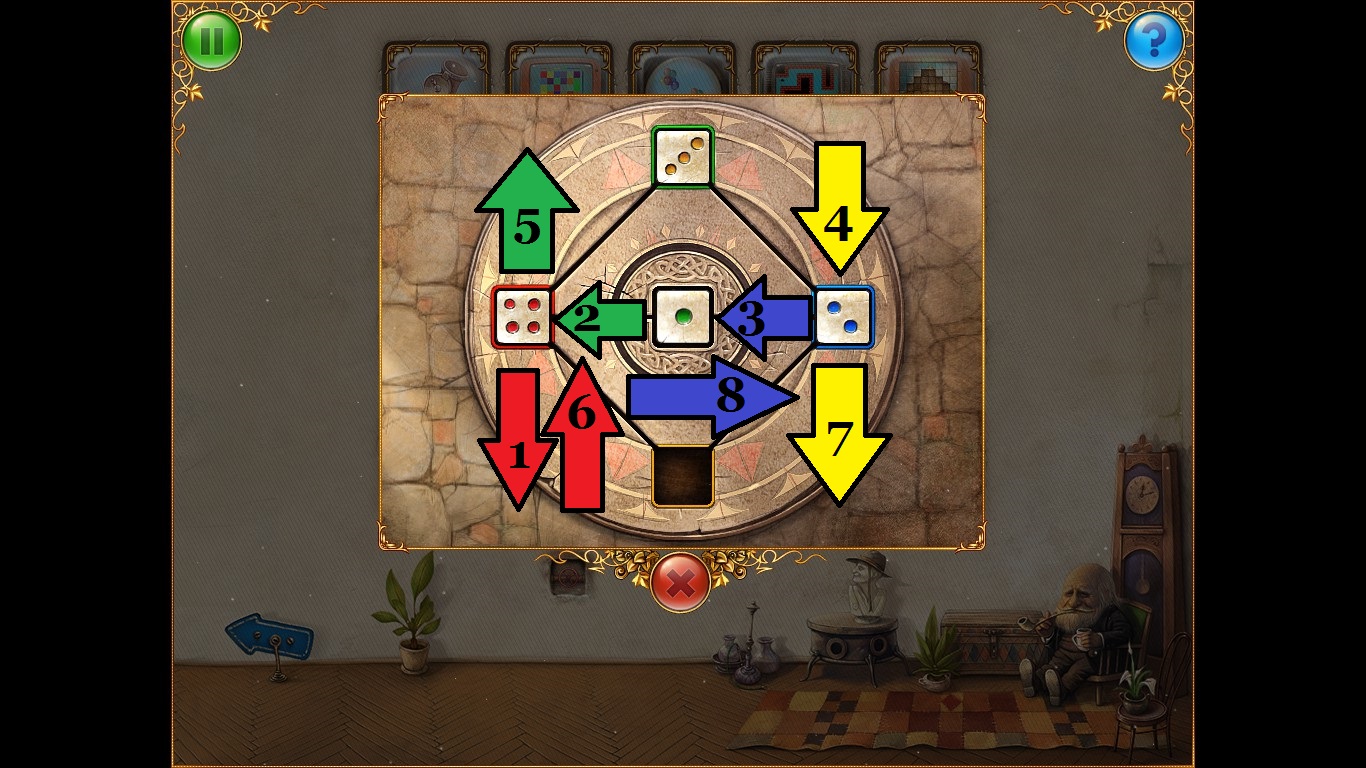
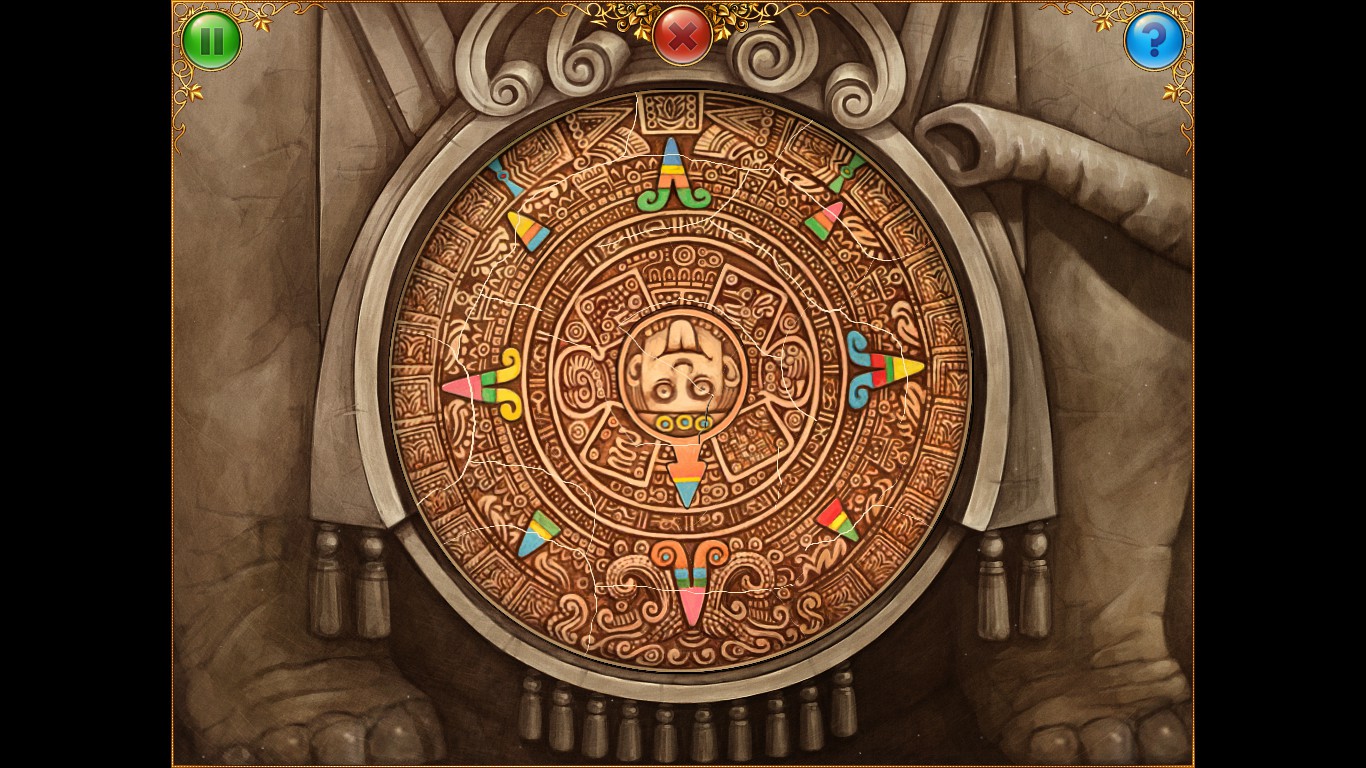
How to complete the Aztec turn dial.
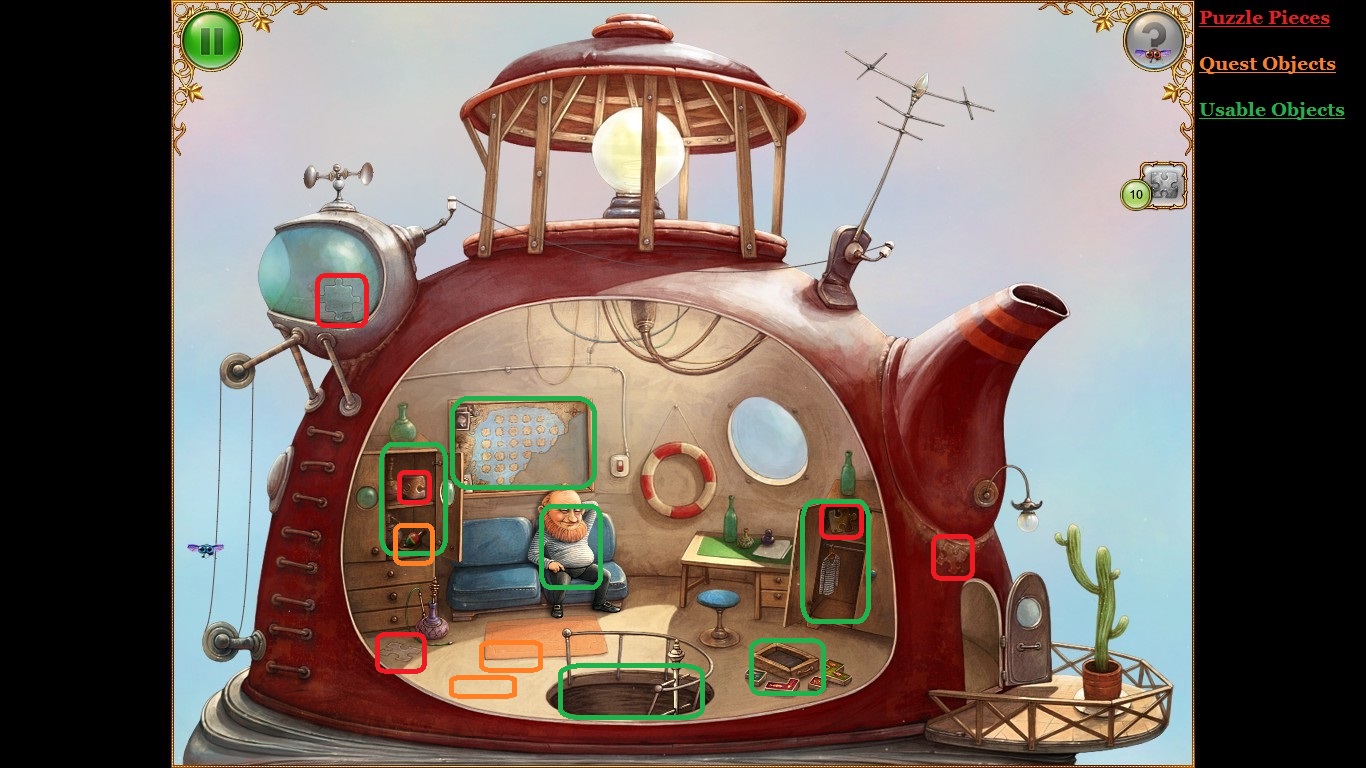
Inside the Aztec Puzzle House
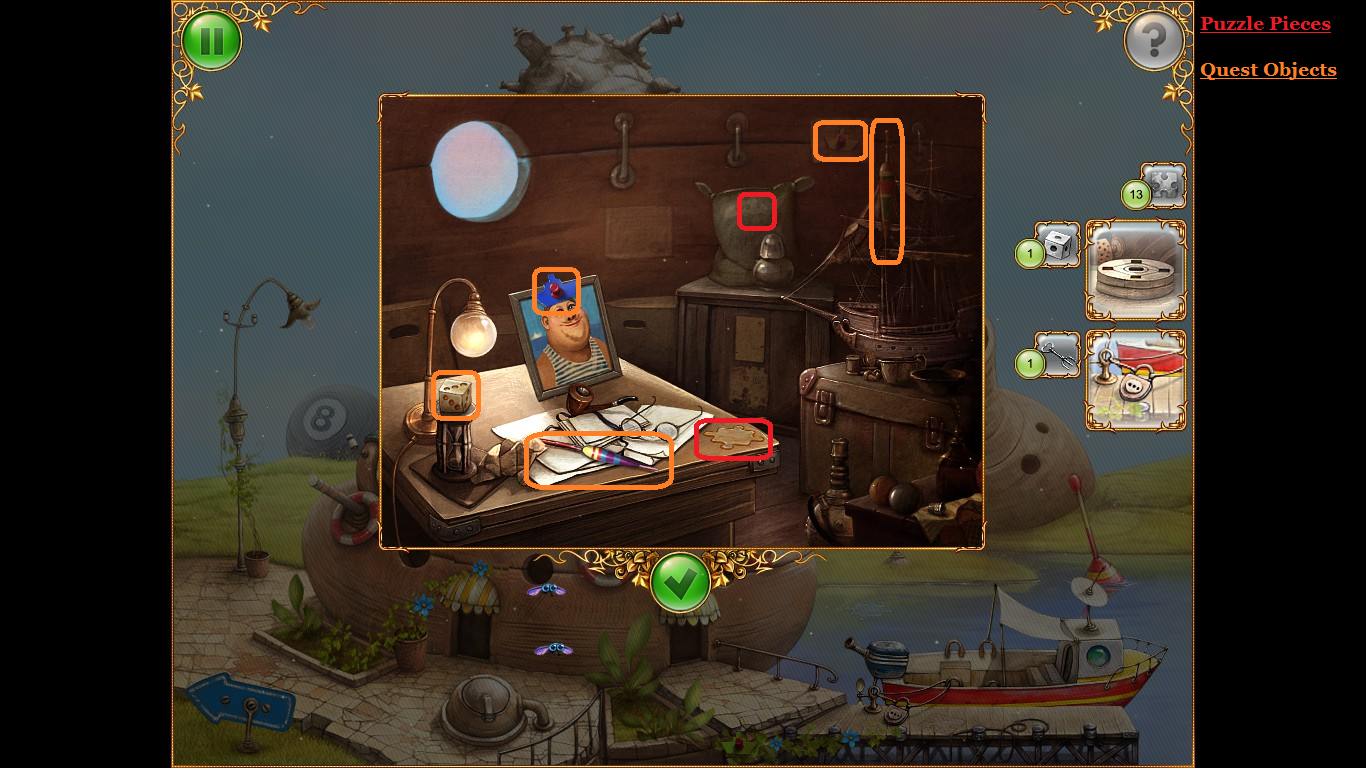
Complete the Tetris puzzle to aquire the missing section of the boat map puzzle.
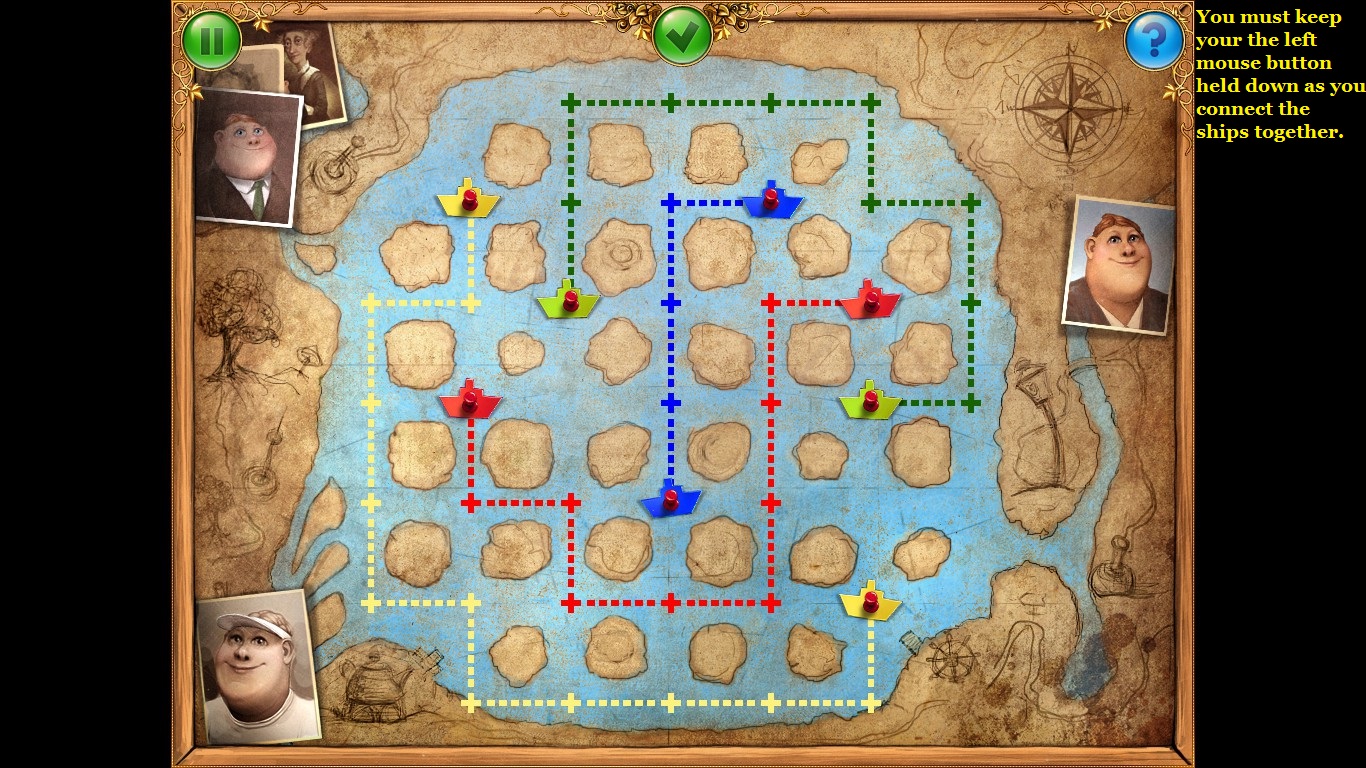
How to complete the ship connection puzzle.
How to complete the tetra puzzle.
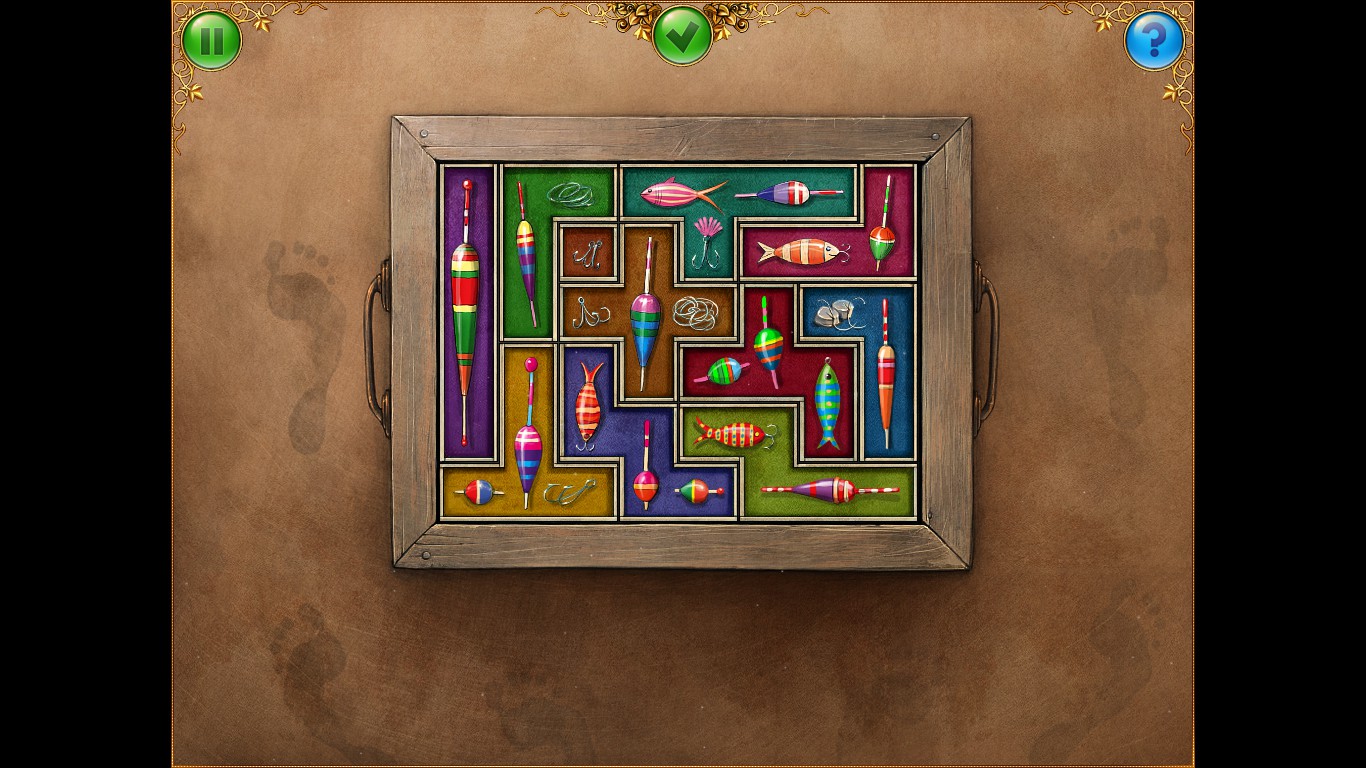
Inside the green bottle.
The luggage puzzle solution.
Clicking on the five empty dice slots reveals the Quest to collect them.
Completing this quest and pulling the lever reveals a ladder to the teapot house above.
Click the incomplete Aztec puzzle to start a collection Quest. Completing the puzzle opens the doors below. Clicking the padlock will unlock it's quest.
How to complete the Aztec turn dial.
Inside the Aztec Puzzle House
Complete the Tetris puzzle to aquire the missing section of the boat map puzzle.
How to complete the ship connection puzzle.
How to complete the tetra puzzle.
Chapter 5 - Town Hall
The object on the far right next to the entrance is the fountain control system. You'll need to collect 5 handles access it in order to deactivate it.
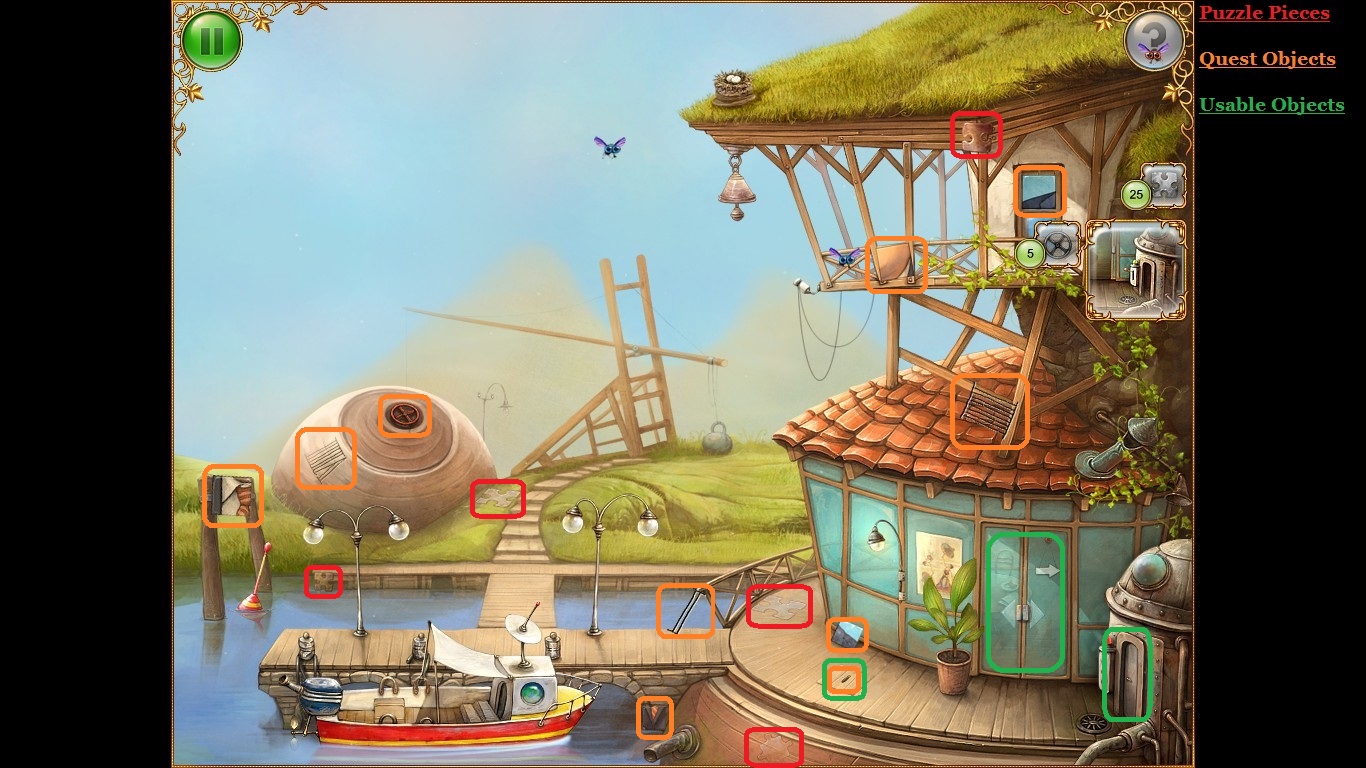
Click the door to start the key Quest, and the portrait to start collecting the pieces for it.
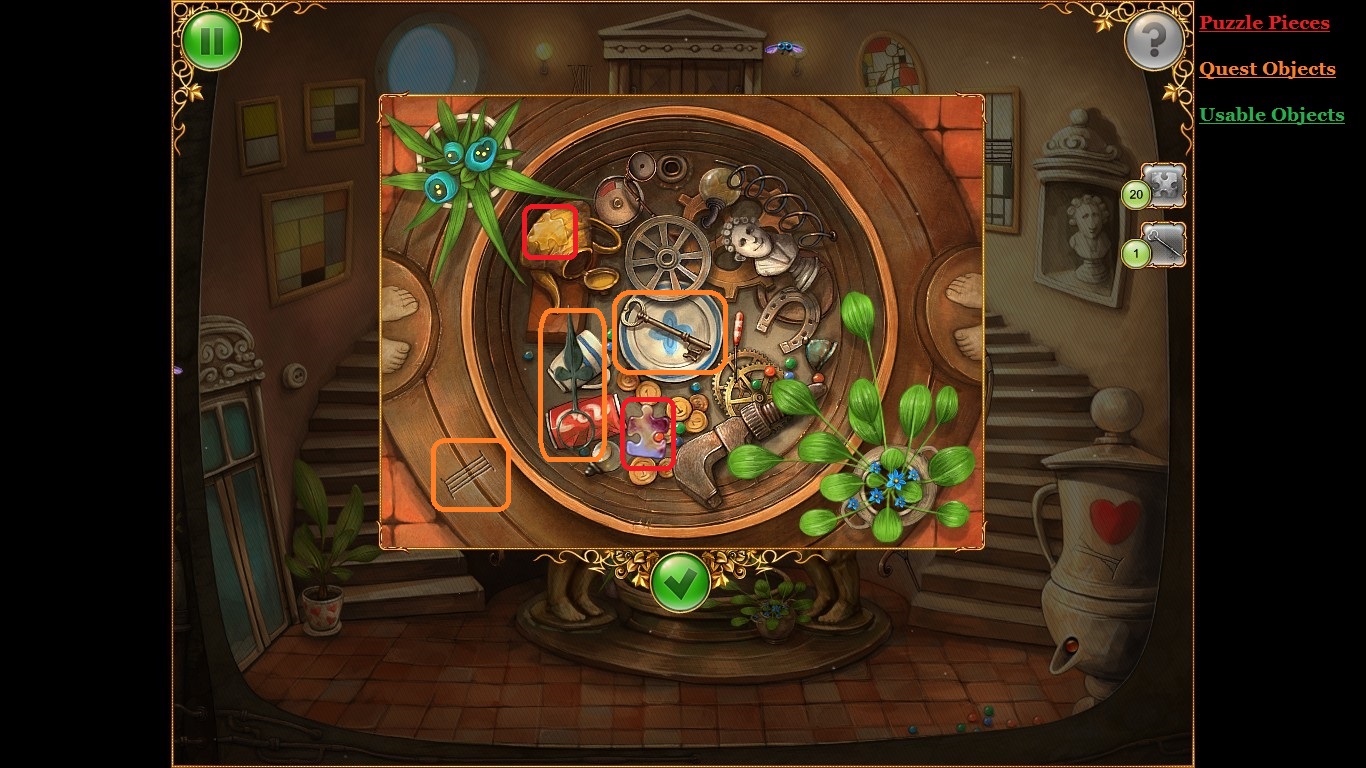
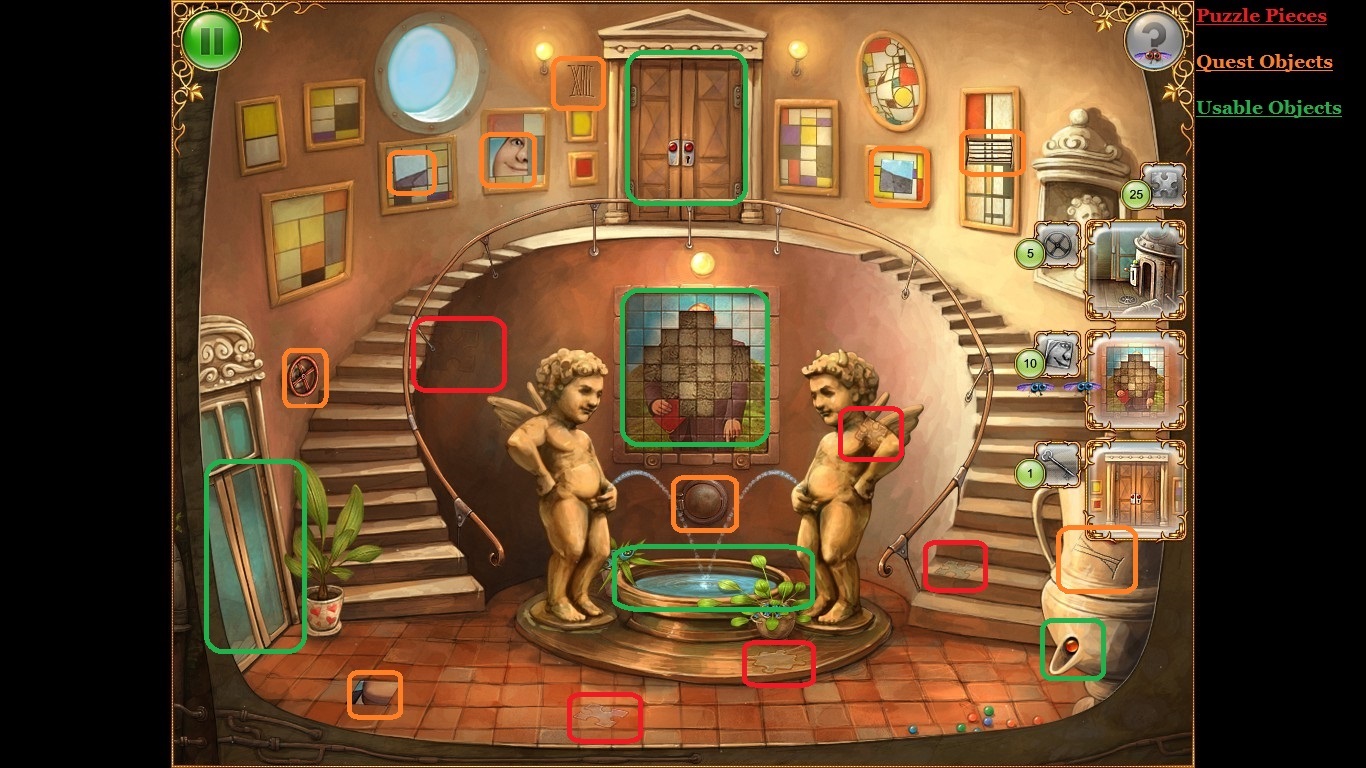 Clicking on the fountain reveals a picture piece and a handle.
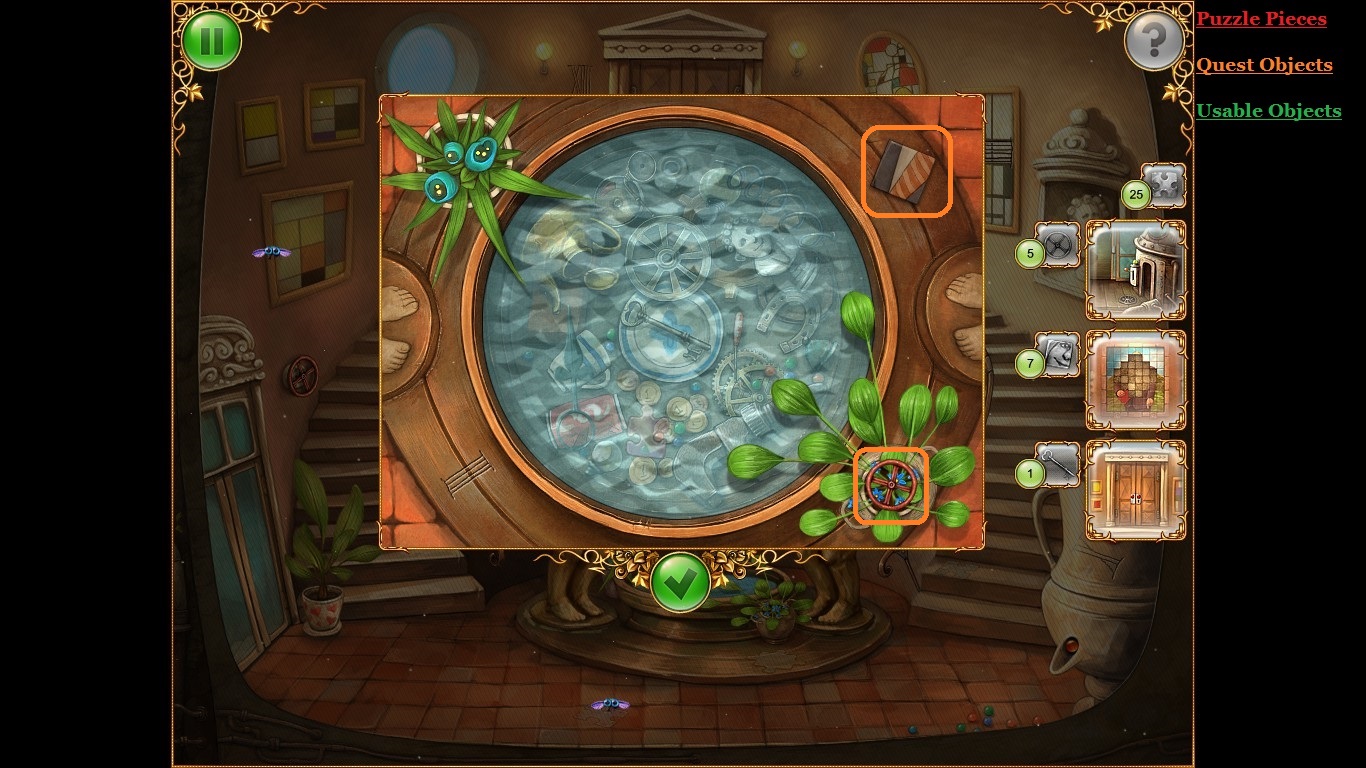
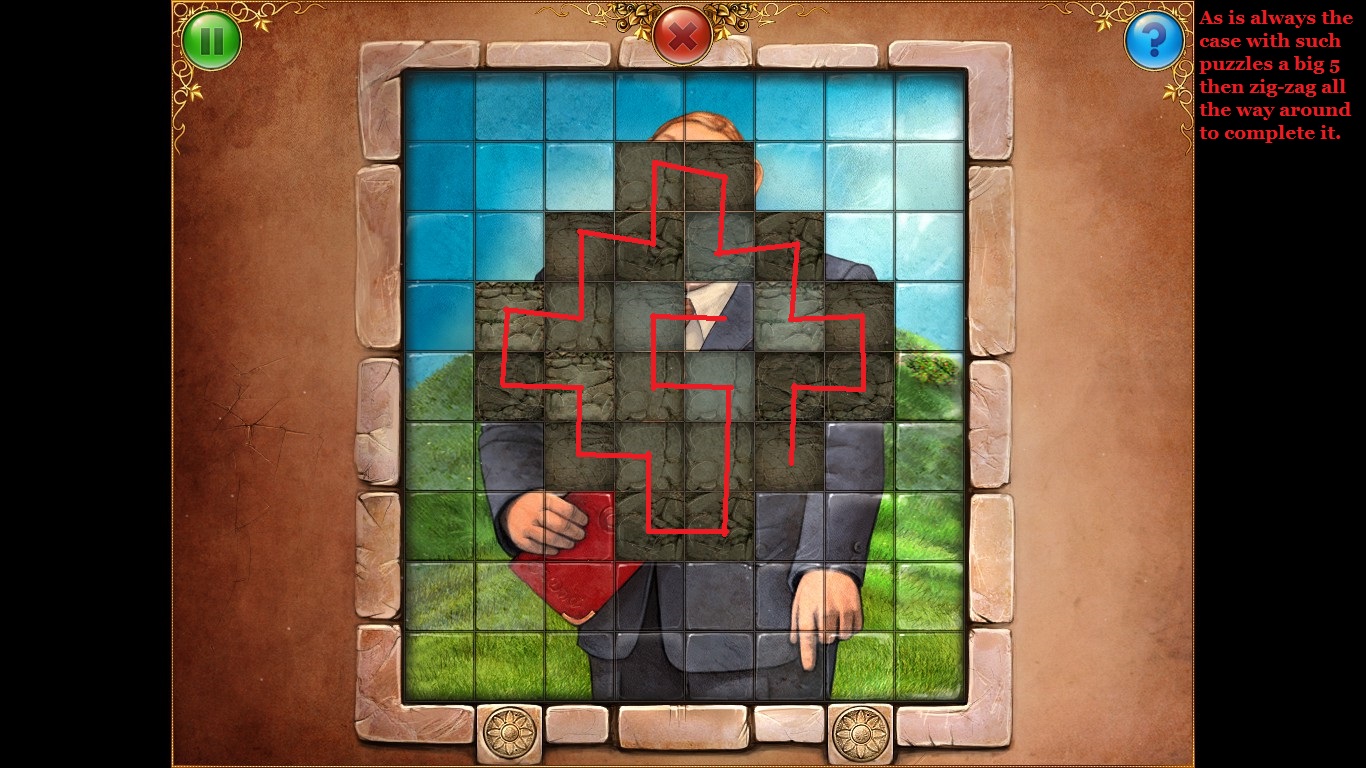
How to complete the portrait.
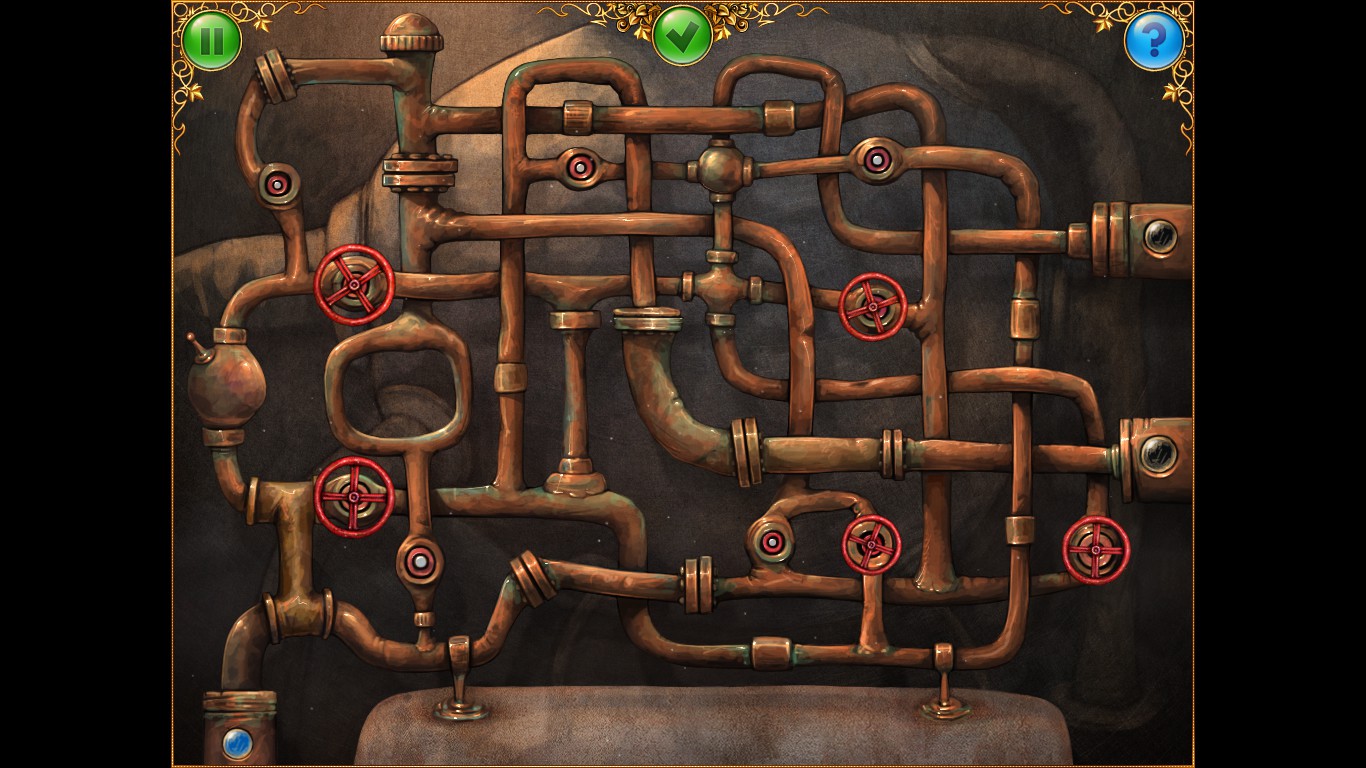
How to complete the waterworks puzzle to drain the fountain.
Once the fountain is drained, the key is revealed.
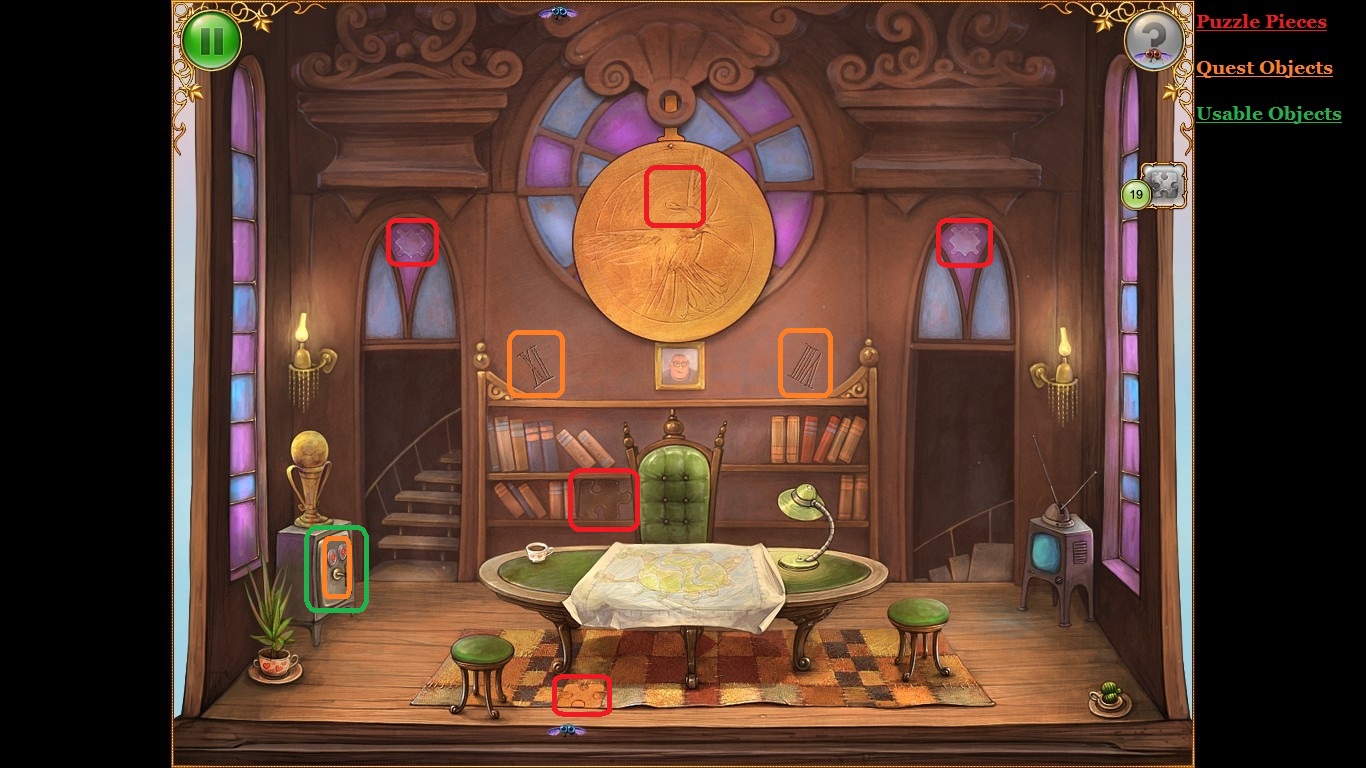
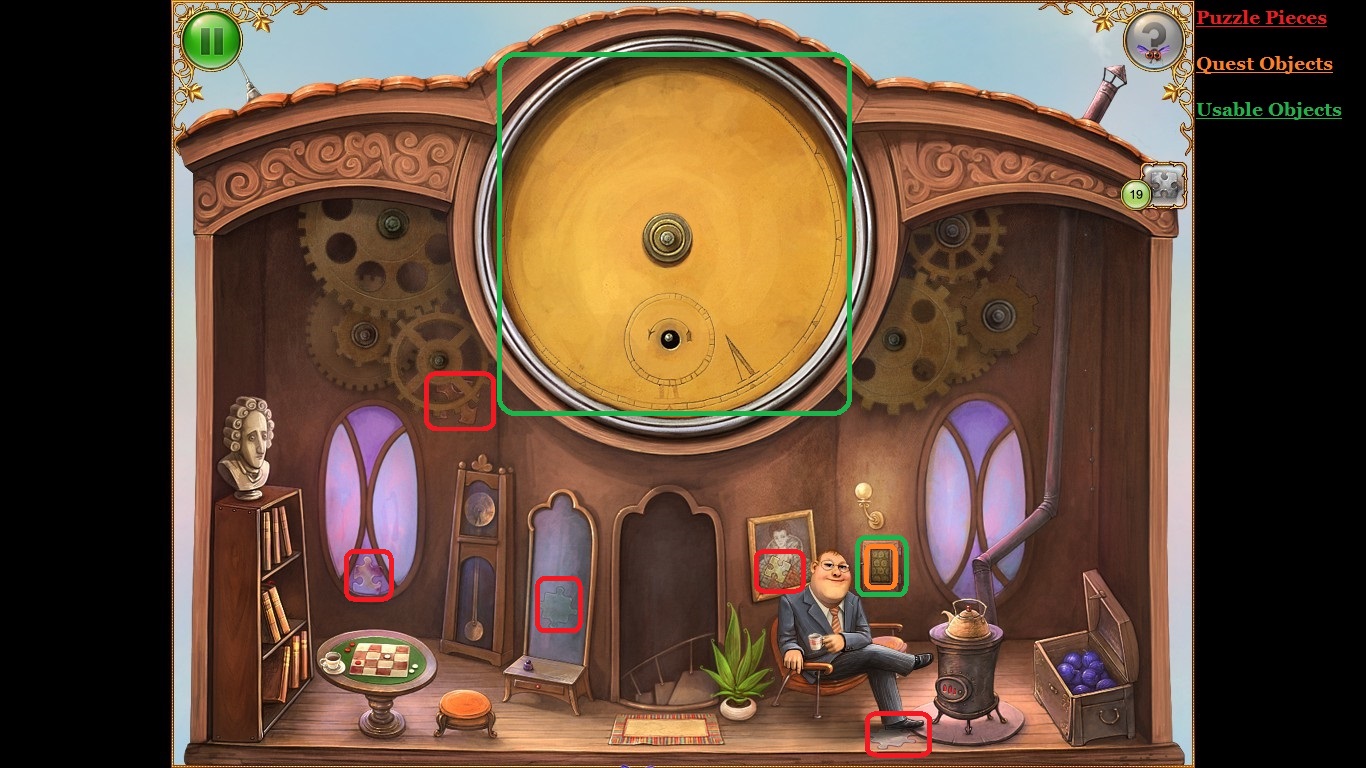
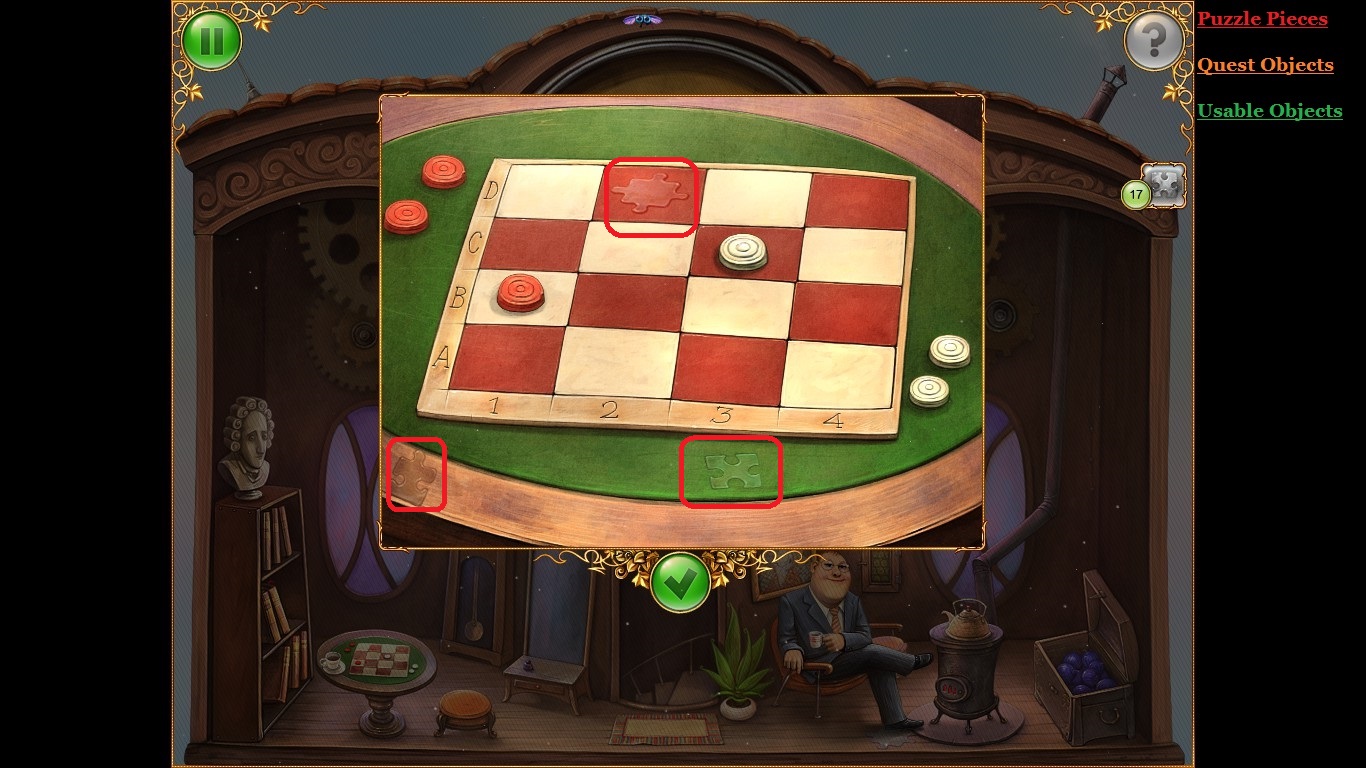
The piece behind the mocking jay can only be obtained once the clock is functioning. Also the safe code is B-1 C-3.
Click the clock to start the last Quest of the game.
Learn that the safe code is B-1 C-3.
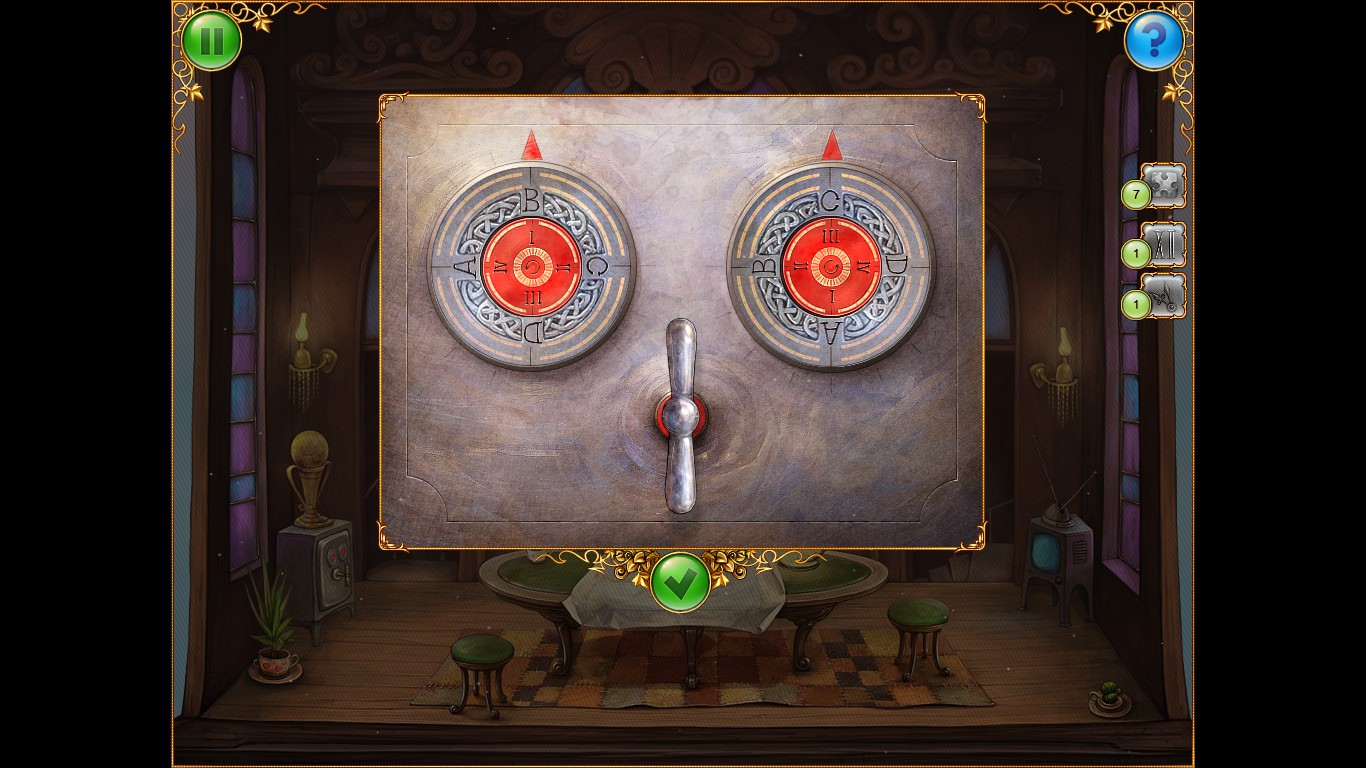
Complete the last puzzle of the game.
Click the door to start the key Quest, and the portrait to start collecting the pieces for it.
Clicking on the fountain reveals a picture piece and a handle.How to complete the portrait.
How to complete the waterworks puzzle to drain the fountain.
Once the fountain is drained, the key is revealed.
The piece behind the mocking jay can only be obtained once the clock is functioning. Also the safe code is B-1 C-3.
Click the clock to start the last Quest of the game.
Learn that the safe code is B-1 C-3.
Complete the last puzzle of the game.
Chapter 6 - The Tea Party
Enjoy a nice tea party with your grandmother and the rest of your family, while you kick back and listen to the games soundtrack.
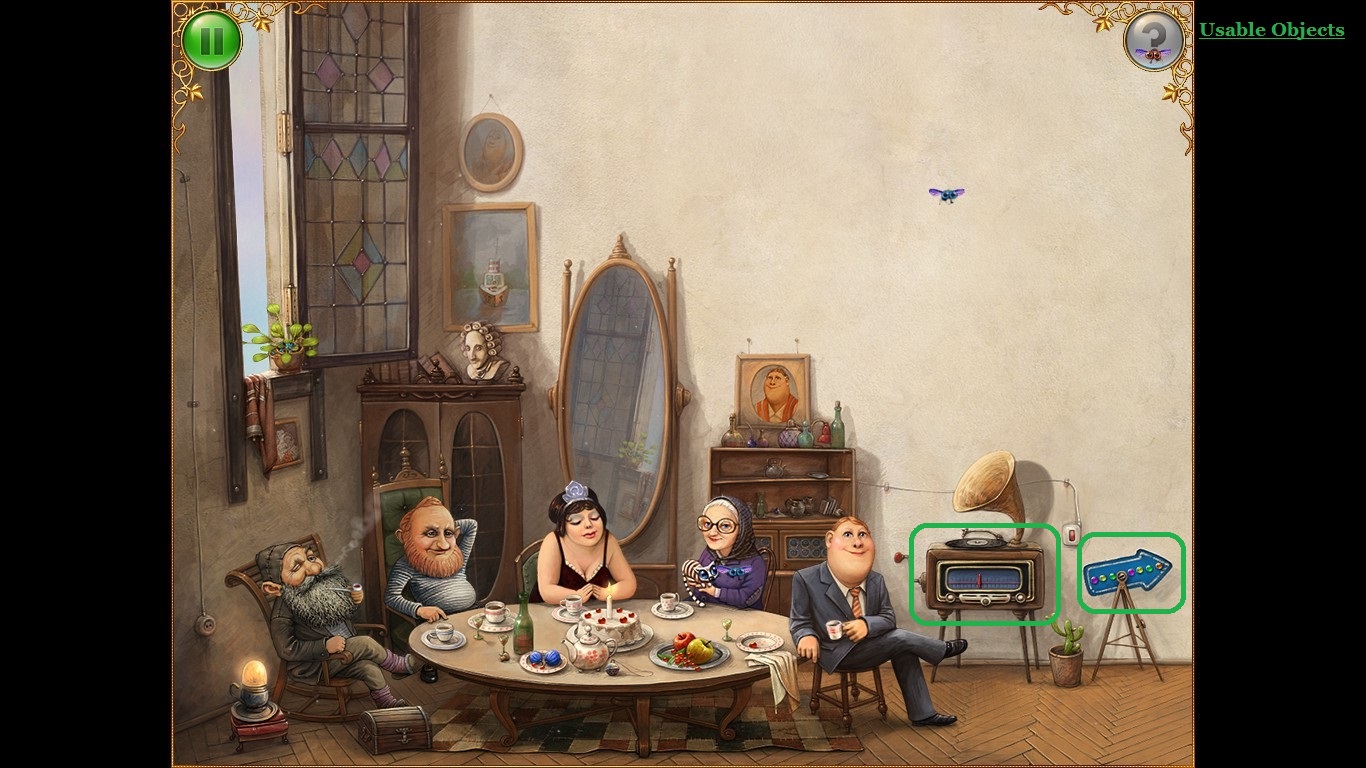
Relive some of your favorite puzzles all over again without restarting the game.
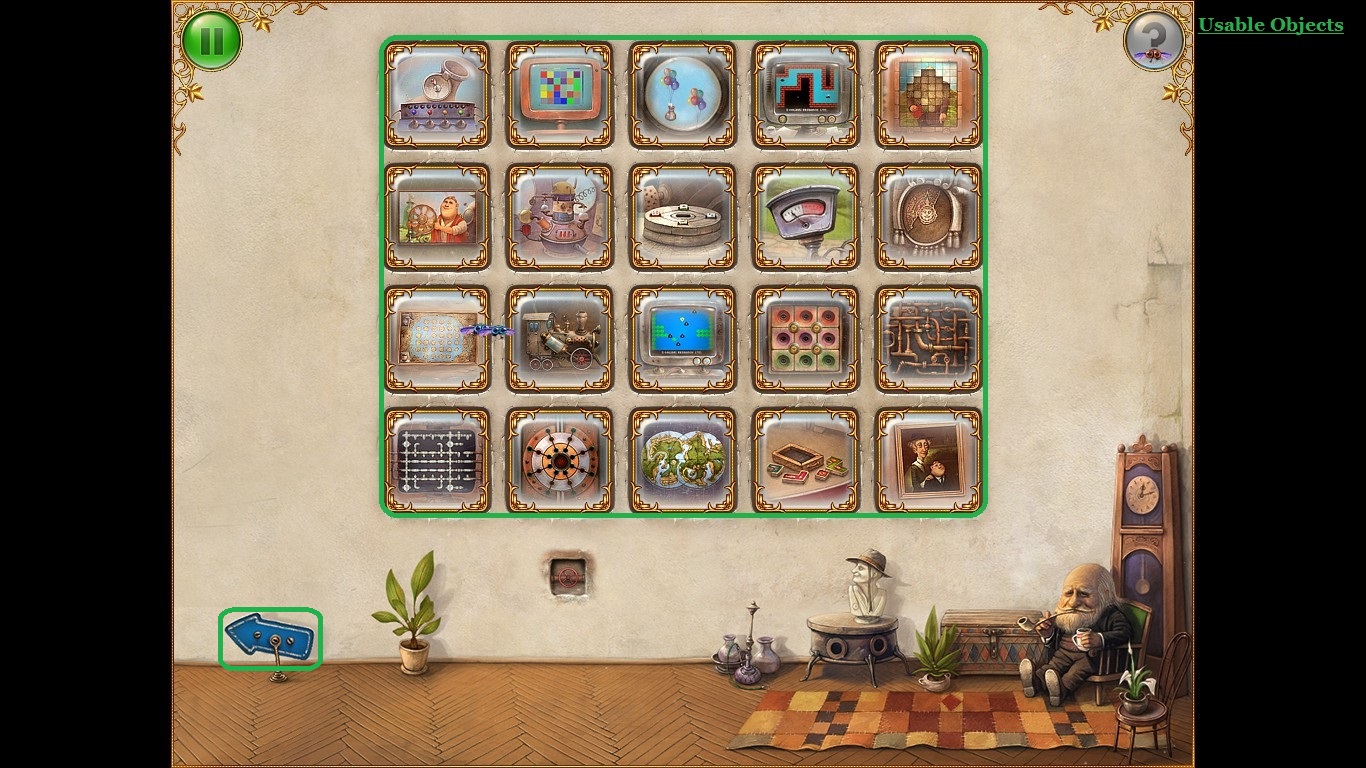
Relive some of your favorite puzzles all over again without restarting the game.
Updates
Update 1 (24/07/2018) - Added new picture solutions for four of the very easy / simple puzzles.
Update 2 (27/09/2018) - Made a few grammar/spelling corrections, and added two solutions.
Update 3 (08/02/2019) - One user made a complaint about being too lazy to click on the provided screenshots, so the safe code is now also mentioned in text form.
Update 4 (24/05/2020) - Minor Grammar corrections.
Update 2 (27/09/2018) - Made a few grammar/spelling corrections, and added two solutions.
Update 3 (08/02/2019) - One user made a complaint about being too lazy to click on the provided screenshots, so the safe code is now also mentioned in text form.
Update 4 (24/05/2020) - Minor Grammar corrections.
Epilogue
For the Greater Good, please Like, Favorite & Follow.
If you found my Guide useful or simply enjoyed reading it, then why not join my Guide Makers Club? It's a group dedicated to helping would-be Guide makers, but if you liked my Guide and want to see me make a Guide for a specific game, then you can make a request there.
Cheers!
If you found my Guide useful or simply enjoyed reading it, then why not join my Guide Makers Club? It's a group dedicated to helping would-be Guide makers, but if you liked my Guide and want to see me make a Guide for a specific game, then you can make a request there.
Cheers!
More The Tiny Bang Story guides
- Full game guide | Полный гайд по игре★ 4 (135)9.1k views41 ♥15 minUpdated Jan 20, 2016
- Прохождение для The Tiny Bang Story.★ 4 (105)6.6k views42 ♥14 minRussian
- Hint guide.★ 4 (41)6.1k views14 ♥2 minUpdated Feb 27, 2014
- Местонахождение пазлов и подробнейшее прохождение игры The Tiny Bang Story.★ 4 (167)5.4k views70 ♥23 minRussianUpdated Oct 8, 2018
- Tiny Bang Story - Turn off the water puzzle guide★ 4 (31)4.4k views4 ♥1 min
- Game Guide | 攻略★ 3 (40)3.3k views34 ♥1 minSimplified Chinese



This guide was created by its original author on the Steam Community. Are you the author and want it removed? Request removal.