Overview
If you are looking for the perfect guide on how to make it to wave 20 and win on The Last Stand then your search is over, this will teach you everything you need to know. Come check it out.
What is The Last Stand?
The Last Stand is pretty much you and two others fighting to survive 20 waves of relentless enemies in either the Bloodied Colosseum or The Anvile of Khorne, which one you play is your choice but I will focus on only one at a time. This guide will teach you how to make it to wave 20. Sounds simple enough right? Go on and try it now and come back if you ready to learn why the swarm of banshee on wave nine killed you or how the plasma rifles kill your so fast. I will teach you some good character setups and mention the pros and cons. I will try and teach you everything you need to know about The Last Stand. I will also give u tips and tricks of how to generaly do well in The Last Stand. This guide will be based on my years and hours I put into this game and will contain mostly facts. If you are looking to see this picture in The Last Stand,
The Bloodied Colosseum
The Colossuem is much easier to pick up on and learn than The Anvil and is perfect for someone new to The Last Stand to start on. This map is more open than The Anvil of Khorne, which allows dragging enemies around the map and makes mobility even more important. There are two buildings on the arena, offering protection from early-game mobs, but these get easily destroyed during later waves, instantly killing any heroes within.
The initial waves are much easier than on Anvil, but the final waves, especially 16 and 20, are actually harder. Waves 4, 8 and 12 have tougher “boss” enemies (Force Commander, Zoanthropes, WraithLords), wave 16 has the team fighting their own clones, waves 17 to 19 have even tougher super bosses supported by vehicles (Carnifexes, Deff Dreds, Dreadnoughts), and wave 20 is the ultimate challenge with an end boss, the bosses from waves 17 to 19, and the clones from wave 16.
There are certain things you must do in order to win these waves though. If you plan on beating these waves you must have somebody who has a high damage output because he will most likely be the backbone of killing these brutes, so you must be sure to keep him alive but dont get yourself killed in the process. If possible everybody must have some sort of fast movement ability such as jet packs, teleporting, etc because this will be vital on wave 20 when bloodletters are rushing in. On wave 20 your clones are the biggest threat because they can revive everyone else(terminater, warboss, chaos lord, and the lictor alpha)and unless you want to kill all them 10 times you need to kill all your clones first because they are the only ones who can revive the other heroes. One important thing to do on wave 20 is to take out the bloodletters, once you have them out of the way all you have to do is kill your clones then everyone else, not very easy. I will go more in depth in the character descriptions on what you can use to get this done.

The Anvil of Khorne
The Anvil of Khorne is similar in overall design to The Bloodied Colosseum. The map is markedly smaller, making it harder to lead enemies around the map for long stretches of time as they can often fire or jump across much of the map.
There is a partially blocked central area with cover and obstacles that allows teams to set up camps. There are two buildings just like on Colosseum, except on Anvil they are located side by side by the back (northeast) wall.
Waves on Anvil start out much tougher than on Colosseum. Having a low-level team wiped during the first waves is not unheard of. However, the waves do not ramp up in difficulty as fast as they do on Colosseum. There is less of a difference between wave 2 and wave 12 on Anvil compared to wave 2 and 12 on Colosseum but on this map if you are armed with some sort of anti armor and follow some of the tips from the colossuem section you will be fine because you don’t get swarmed as often or as bad as on the colossuem.

The Space Marine
The space marine is the one running around screaming “For the emperor!!”all the time. He is the easiest to learn and has an arsenal of weapons and tricks. He is possibly the most versatile of all of the heroes. He can be used as a melee specialist that can be really tanky,or he can be built as a ranged gunner that can support his allies. A favored kind of Space Marine is the Melee Marine.
He can use the Master-Crafted Chainsword for its Zealous Trait,.the Power Axe, which grants the Armor Piercing Trait, and 2 Achievement Weapons,the Lightning Claw,and the 2-handed Thunder Hammer.
2 DLC wargears are the Inscribed Combat Shield which replaces the ranged weapon slot, and can go with a one handed melee weapon, and grants the Shield Block Trait and the Sacred Relic Armor,
The Plasma Gun, which grants the Armor Piercing Trait, and the Hellfire Grenade Ability, and the final Two-Handed ranged weapon is the Plasma Cannon, which grants the Knockback Trait, the Heavy Trait, and the Area of Effect Trait.
One equipment that you probably will use with most combinations(Except the Plasma Cannon) is the accesory,the Jump Pack(unlocks at level 8), which grants the ability Assault Jump(Cost 15 Energy:Jumps to an area and knockback nearby units,the range is a good range for a jump)The Jump Pack is good for ranged weapons too since you can use it to ignore fighting in melee..A good combonation is the Power Axe and the Plasma Pistol or Inscribed Combat Shield,with of course the Jump Pack, while the Power Axe is tradable with the Lightning Claw.
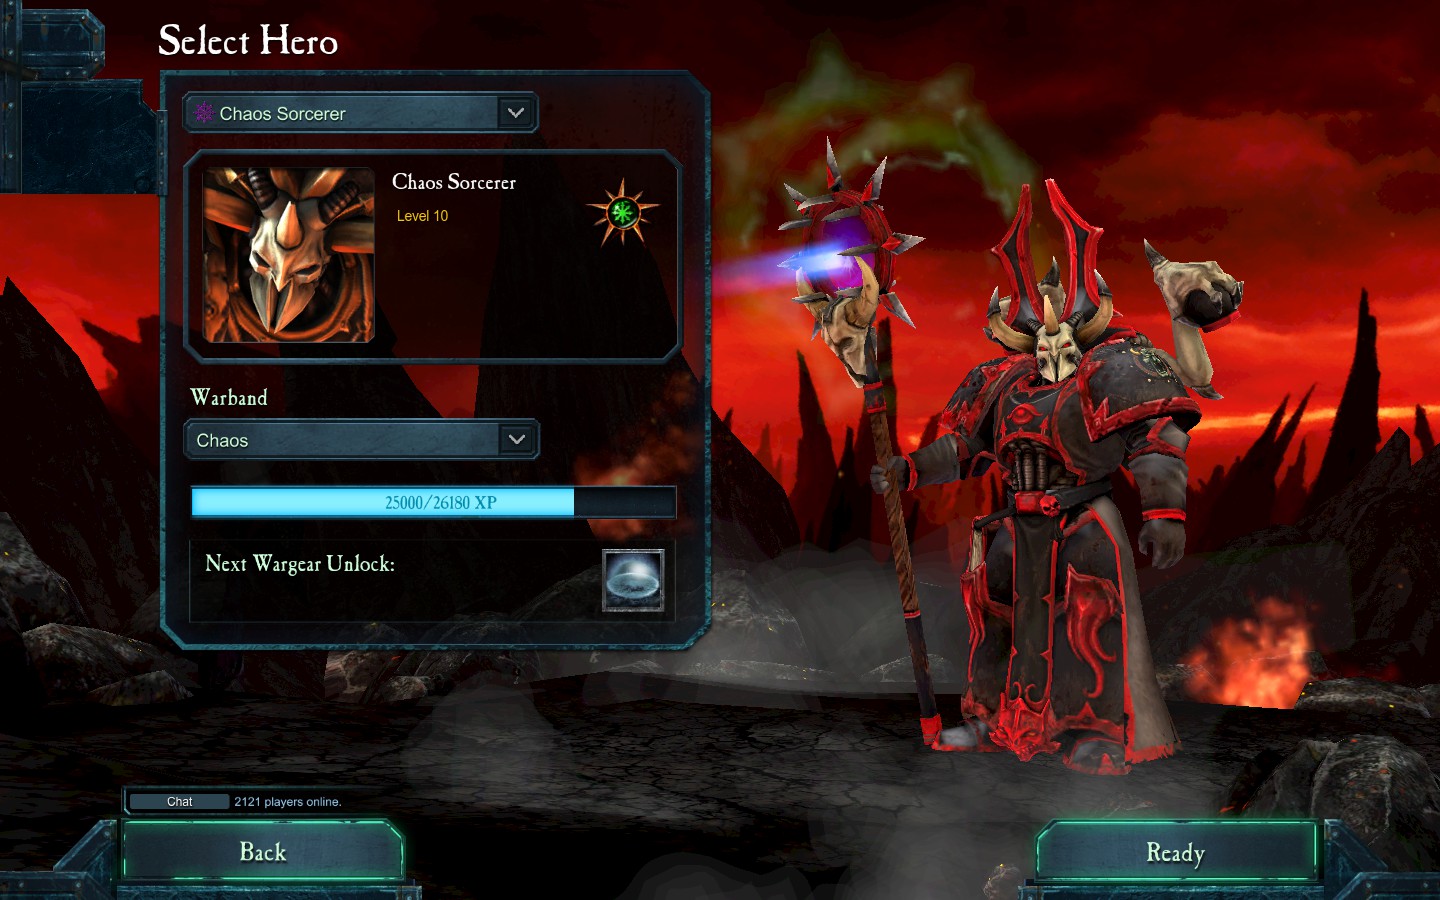
Chaos Sorcerer
The Chaos Sorcerer is mainly a ranged mage that can be used as a support,or a damage dealer.His defining trait is of course the Daemonic Doppelganger.It lets you create a clone of the targeted unit that will DO ALL OF YOUR COMMANDS.Or just attack people.With a commander item,it will let you create a clone of special units(The Force Commander,Apothecary, Zoanthropes,etc).
A common plan is to find the place where The Force Commander is coming and cloning him,that clone will now be your best friend to about wave 10. After that you can clone stronger units,a preferred choice is the Lictor Alpha from wave 17. Note,the Wraith Lord from wave 12 can be cloned but most of the times, it will just stand around doing nothing.Another trait of the Chaos Sorcerer is the Narcissistic trait. It makes it so all of the traits that the clones should get be applied to the Chaos Sorcerer.Some traits or accesories have differient bonuses if you have the Narcissistic trait.
A Narcissistic Sorcerer can be very tanky and go into melee safely. Normally,a Narcissistic Sorcerer would be more tanky than a Chaos Sorcerer who is going with Daemonic Doppelganger.
Mekboy
The Mekboy, like the Chaos Sorcerer, can be built as a support, or a damage dealer. A common thing to see is the Mekboy teleporting everywhere,going all around the map until he comes and revives you. What most Mekboyz use is the Teleporta ability, it has a low energy cost of 7, and has a good range. The name itself explains what it does. He can teleport in,do some damage, and teleport out.
He can be a melee specialist,a dakka gunner, use a flamer,or a rokkit launcher. He can heal you and replenish your energy.But be warned,a tanky built Mekboy with the Teleporta ability can be extremely hard to kill during Wave 16 in The Bloodied Colosseum.

Lord General
Hive Tyrant
The Hive Tyrant is a very interesting hero.He can be built into a incredibly tanky Tyrant,a minion spawner,or a hybrid.Many build him as a tanky hero,and is really effective at being a gigantic living tank for the team.Once you reach level 18,you have 4 minions to choose from,choosing 3 maximum.These are optional.
The first is the Genestealer Nest which is a starting item,spawns a squad of 3 Genestealers that reduce the target’s armor,second is the Tyrant Guard Nest which is unlocked at level 3,the Tyrant Guard is tanky and taunt nearby enemies,third is the Warrior Nest that is unlocked at level 7,the Warrior is able to knock back enemy infantry,the final is Ravenor Nest that is unlocked at level 18,the Ravenor is ranged,and can tunnel to enemies.You can be tanky and have the minions do your work.

Farseer
The Farseer can be made into a great support(That is possibly the only thing people will build as her nowadays).She has many abilities that can change the outcome of a fight.She can make you invincible due to her Ward(Makes the target immune to damage for a short time),
“Shas’O” Tau Commander
The Tau commander is the most offensive character of all. It is a DLC character and it is well worth it. The Tau commander is the robot you see flying everywhere destroying everything with his large arsenal of wepons, explosives, and even traps but the Tau can also be a very good defensive character too with his shield drone and burst cannons and marking support to increase ranged damage to all marked targets and to call down airstrikes on all marked targets.
The Tau has every weapon you could possibly need except a melee one. That is why the Tau has built in jetpacks to all of its armor that way it can get out of sticky situation and avoid melee units. The Tau also has the ability to dual wield any wepon in his hand at the cost of no second hand(shield). You can experiment with all the wepons and cominations you want but in the end you will most likely see that the dual plasma cannons is most effective. It has the farthest range, highest rate of fire, and is armor pierceing, so i think that this would be the best wepon to use for this character.

The Bloodied Colosseum:Wave 1-8
Wave 1-8 is what everyone has atleast gotten to in their time of Last Stand gameplays.It is easy but can be hard for a new encounter.It starts off first as Ork Shooterz,then Eldar Guardians,then Tyranid Hormagaunts and Termagaunts,then Imperial Guardsman,2 Apothecaries,and a Force Commander(Let the Chaos Sorcerer clone him if he can).The first 3 waves are easy,the 4th wave takes slightly more thinking due to the special units.
The next 4 waves go as Tyranid Hormagaunts,Termagaunts,and 2 squards of Warriors,then Ork Shooterz with some melee Orks,then Eldar Banshees,Warp Spiders,and Shuriken Cannons.Wave 8 has the previous Tyranids plus 3 Zoanthropes.Wave 5-6 can be easy,just slightly harder than the first 4 waves,though 7 can kill 2 low levels easily,though 3 members that know what their doing can easily overcome this.Wave 8 can swarm up on you,and the Zoanthropes can do alot of damage AND knockback,while the Warriors will come up and claw your face.So your main priority is to kill the Zoanthropes or the Warriors first.Everything else should be easy.
The Bloodied Colosseum:Wave 9-12
Wave 9-12 are much more difficult than the first few waves,so we’re going to put in some more details.Wave 9 is the eldar’s turn to shine.First,3 Banshees,2 Shuriken Cannons,and a Warp Spider squad spawns.After that,2 more Shuriken Cannons come,with another squad of Warp Spiders.After that,the real problem comes in.2 more Shuriken Cannons and not 3,but 6 Banshees come in a mass.Try to use AoE(Area of Effect) on the gigantic Banshee death blob.Everything else should be easy except for maybe the Warp Spider.Wave 10 is like wave 9,but this time,it’s the Space Marines.A total of 6 Scout Marines appear,they can become stealth and can throw grenades.
The grenades can do alot of damage when stacked up together.What’s even worse is that 10 squads of Tactical Marines spawn,all armed with Plasma Guns.They lack accuracy but they can do very high damage.You should focus fire on the Tactical Marines first since they’re the true threat.The Scout Marines can easily be taken care of once out of stealth.The Orks are loving melee in wave 10.Stronga Shoota can be taken care of easily,while the Choppa and Hamma Nobz just need to be hit by Anti-Armors.The StormBoyz can be a major threat since they can swarm on you and their melee damage can stack up on each other incredibly fast.Remove the StormBoyz first,while the Choppa and Hamma are slow,so you can just kill the Stronga Shoota after the StormBoyz.Wave 12 has all of the previous Eldar units AND 4 Wraithlords.Banshees,Warp Spiders,guardians,and Shuriken Cannons all ripping at you at the same time while the Wraithlord walks menacingly towards you can be extremely scary.
Kill the Wraithlords when you think they have gotten too close.Anti-Armors are incredibly useful here.Only 2 Banshee squards but they can still wreck your day in melee.Don’t let the Banshees come close and kill them before they reach you.5 Warp Spiders can warp in and deal a ton of damage to you and warp out,so think about killing them fast if they get in ranged.Guardians can cause alot of chaos to squishy Heroes,so don’t get cocky.The Shuriken Cannons can cause suppresision,so they might be extremely annoying.1 Wraithlord spawns Earlier than the other 3,so kill him first.As I said before,kill them before they get close.If you survived this wave,then the next few waves might be a bit easier.