
Overview
All-in-one ultimate guide for the best marine in the galaxy!
About the Game
Welcome to the guide! I will try to cover all possible things about Alien Swarm to help you understand the game, so that we can have fun.
Alien Swarm: Reactive Drop (2017) is a remake/upgrade of the original Alien Swarm game (2010), which is also available on Steam for free. In this game, you control a selected marine from a bird’s eye viewpoint and try to navigate him through handcrafted maps filled with aliens, switches, doors, items, lifts/elevators, barrels, bottomless pits and many more things.
This game is very action-packed, it emphasizes positioning, keeping track of your surroundings and strategical use of selected equipment. It can be played SOLO, SOLO with BOTS, or up to 8-player LOCAL and ONLINE CO-OP MULTIPLAYER mode, and also up to 32-player MULTIPLAYER DEATHMATCH mode.
Also this game is integrated into Steam. If you ever played Counter-Strike or other Steam integrated game, you probably know the benefits of that:
- Integrated Text and Voice Chat!
- User-made maps on Steam Workshop!
- Invite your friends through Steam and see them ingame when they are playing.
- Get a handy server list with your favorites:

- Increased player count to 8 (previously was only 4)
- New campaigns (previously just one)
- New Challenge modes (even higher difficulty)
- New bot AI (bots are still bots, but they are definitely better now)
- New Weapons and equipment
- New Achievements
- Ingame Leaderboards – when loading a up a map, a list of best completion times for all your Steam Friends will show up, so you can compete who is better on a given map!
- Better Spectating – if you die, you can watch other people’s mouse positioning, not just their character. Also you can spectate hacking. (previously you couldn’t)
- Steam Workshop support (previously you had to install everything manually, workshop needs a single click)
- And probably more stuff that we have to discover yet…
Troubleshooting
So far I’ve encountered these issues, if you find more, feel free to post them in the comments, I’ll look into it.
Solution:
1) Right click ASRD in Steam library -> Properties.
2) Switch tab to Local Files, select Browse Local Files.
3) Go to Alien Swarm Reactive Dropreactivedropcfg
4) Open video.txt and edit it.
Enabling Fullscreen or Windowed Borderless should fix it, therefore change
“setting.nowindowborder” “1”
or
“setting.fullscreen” “1”
This is only a display bug, it actually remembers what you select, so if you changed into “Headphones” for example, the game will display “2 Speakers” in the Audio settings, but it is actually set for “Headphones”.
You can verify this by looking in the Alien Swarm Reactive Dropreactivedropcfgconfig.cfg file before and after you change the option.
— PART 1 — Game Basics (picture-heavy)
Joining the Game
There are multiple ways to join a multiplayer game.
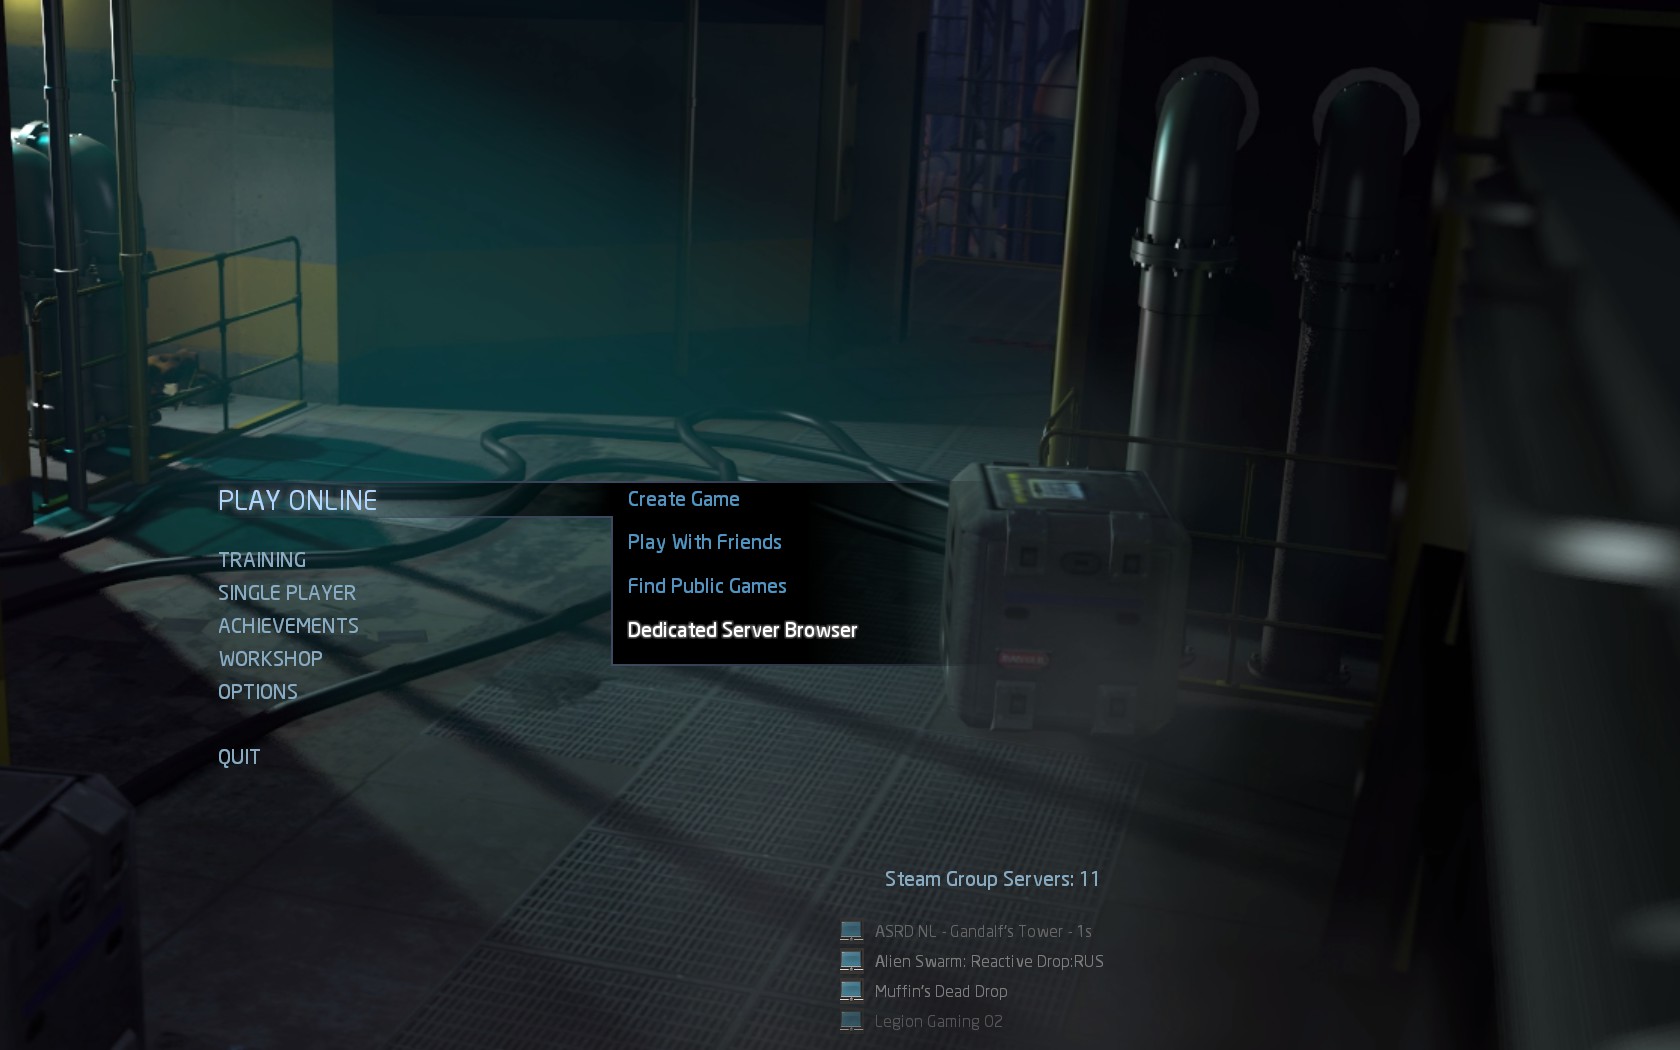
These are games created by other people, who simply press Create New Game. Depending on the host’s internet and PC, the game might be laggy. Also, if the host doesn’t like you, he can kick you out of the game with a single click, which is why I don’t recommend joining public games.

Use these if you to play with friends only.
These are online hosted servers, where anyone can freely join. These are usually much more stable and other players expect random players, therefore you won’t get instantly kicked out. A majority vote is needed for changing the map, kicking other players or selecting a lobby leader, but otherwise the game is identical to a Public game. I recommend playing on dedicated servers.

Sometimes, these servers can also run custom modifications (ASBI ?), which might or might not make the game better for you.
Mission Preparation
When you first join a game, you are greeted with this screen. You can press Z to chat with other players at any time. Voice chat also starts working here in the Game Lobby.

- Your selected Marine
- Your primary equipment slot
- Your switch equipment slot
- Your utility equipment slot
- Your level and Promote button
- Current Mission, Difficulty and Game settings
- Ready button / Start Game button
- Mission Details window
Start off by clicking the Marine selection window (1). Each Marine comes with a default preset of equipment, for example:

You can change the equipment, and it will stay changed until you exit the game. Now you can click the equipment slots (2, 3) and change the weapon and equipment you will use in the game.
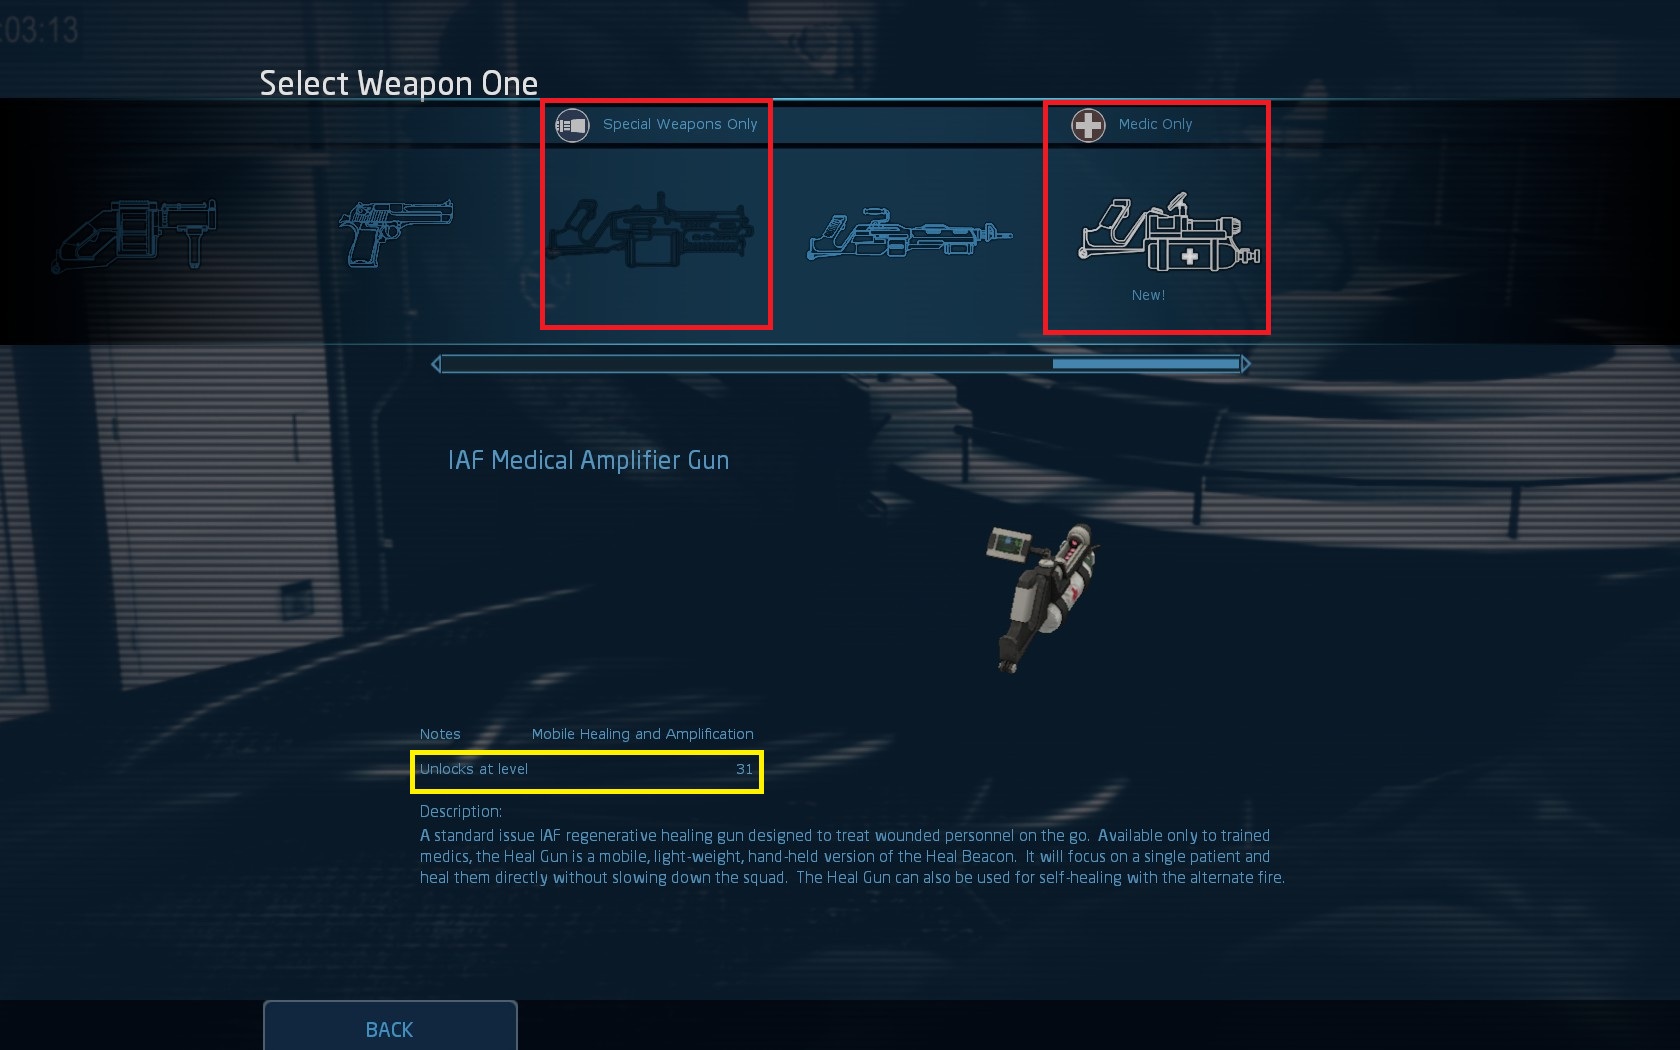
Scroll through equipment by moving your mouse to the sides of the equipment bar, or use the scrollbar. Some equipment is Class-specific and other classes cannot equip it (see RED squares). Some weapons and equipment will be locked and will unlock when your player level rises (see YELLOW square). However, unlocked equipment is not always better than the previous ones, each comes with its pros and cons.

The Utility equipment selection (4) works similarly to weapon selection. You have only a limited supply of anything that you choose, so pick wisely.
After you select your weapons and equipment, you should know what are you going to do in a given Mission. Missions can range from simple “open the door and run through” to clearing massive swarms of aliens. There’s a mission where you need to walk through a complex and activate buttons as a nuclear warhead moves along a rail, and there’s a mission where you need to hold position in a moving elevator.
The Mission Details button (8) opens up an overview of the map and objectives:

Clicking on the objectives on the left side will show different places on the map. You can also draw on the map:
If you’re not sure what to do after checking the Mission Details, you should ask in the chat before the game and the others will help you.

Action Overview
Before you go shooting aliens, you need to know how to play. Let me write default keybindings for you:
- WASD keys move you around
- Mouse aims where your character looks and shoots
- Left Mouse Button shoots your weapon
- Right Mouse Button performs a close range melee attack
- Middle Mouse Button (Mousewheel) uses Secondary ability (shoot a grenade from the Assault Rifle, for example)
- Q swaps between your primary weapon and your secondary equipment
- E opens doors, activates data terminals, levers, etc. Some terminals require Tech class!
- R reloads your current weapon. WARNING! If you manually reload, you lose any ammo that was left in the clip. Your character will reload automatically once you run out of ammo.
- 1 (+) key uses your utility item
- Space performs a roll. Use it to evade ranged attacks and/or friendly fire
- Z is the default chat hotkey
Apart from that, there are many different hotkeys for dropping items, using emotes, controlling bots, etc. but you don’t really need them for now. Consult Options -> Keyboard settings if you want more. The game will also give you hints about keys you should press (which can be turned off in the Options).
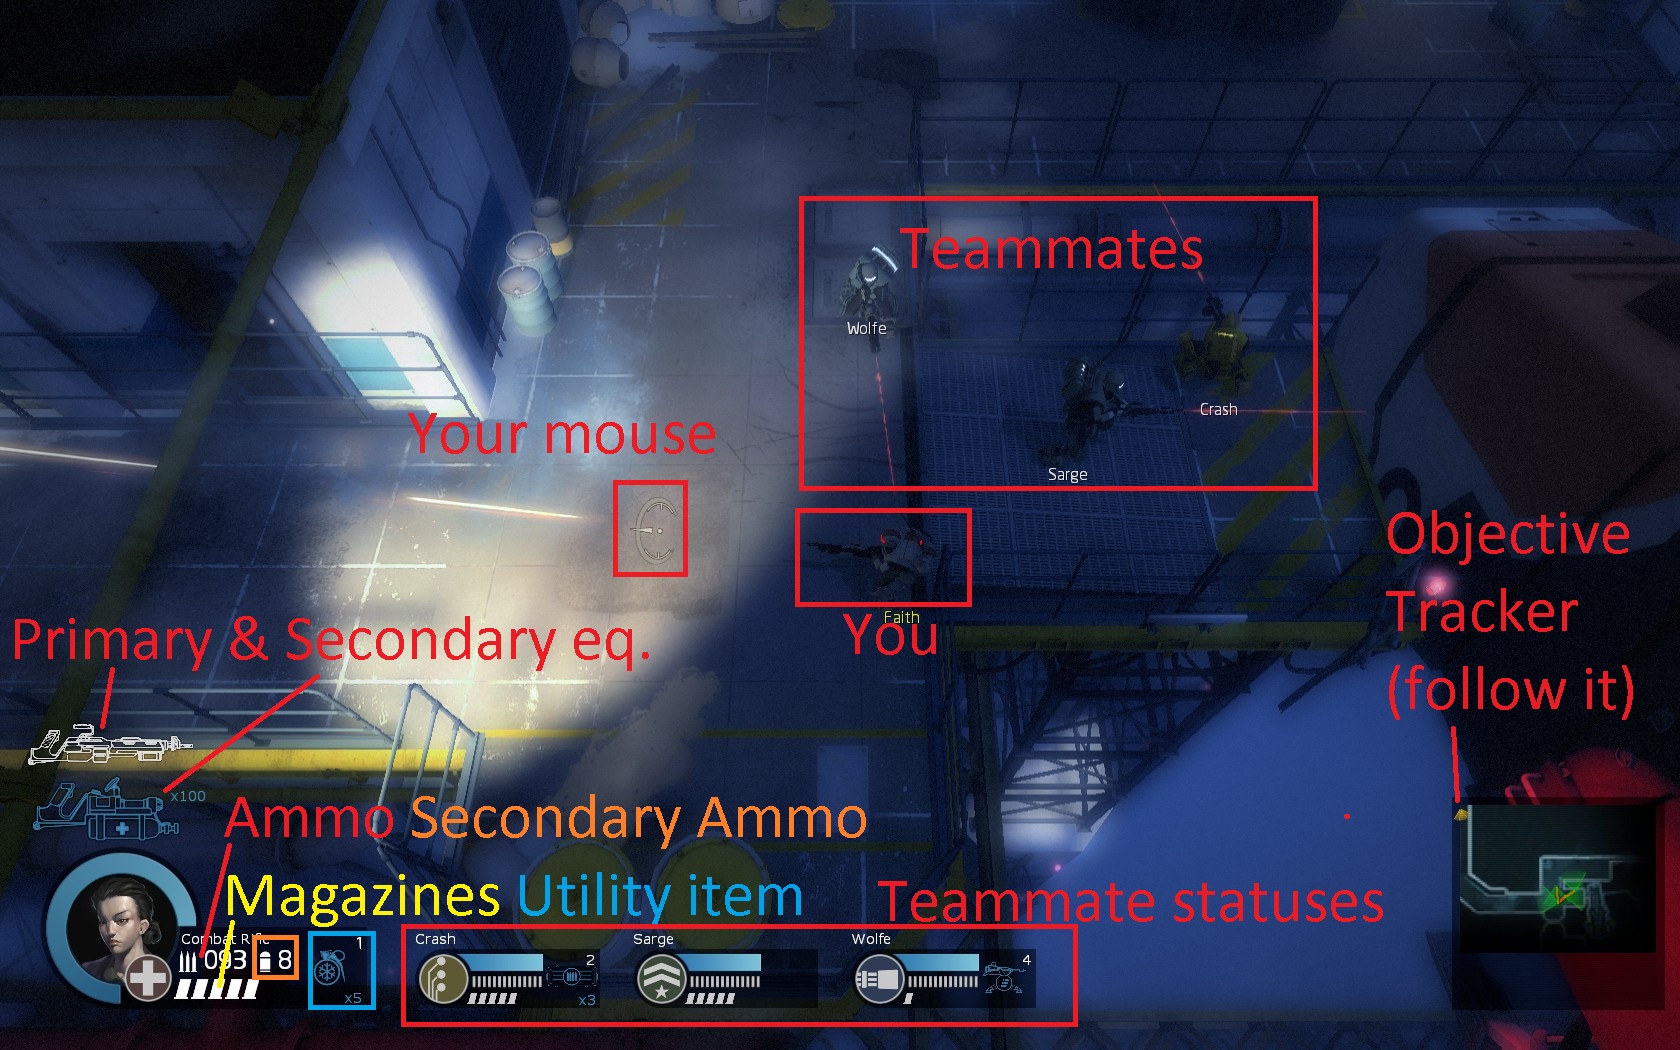
When everyones presses the READY button (7), the game host can Start the game. The game screen looks like this:
During the game, you can press TAB at any time to review the objectives and draw on the map.

Be careful, this does not pause the game, so you can die while checking the objectives. Be quick or tell your team to cover you.
This is how it looks, when your character uses a melee attack. You can break crates and barrels on the map with it, but you can also kill aliens when needed.

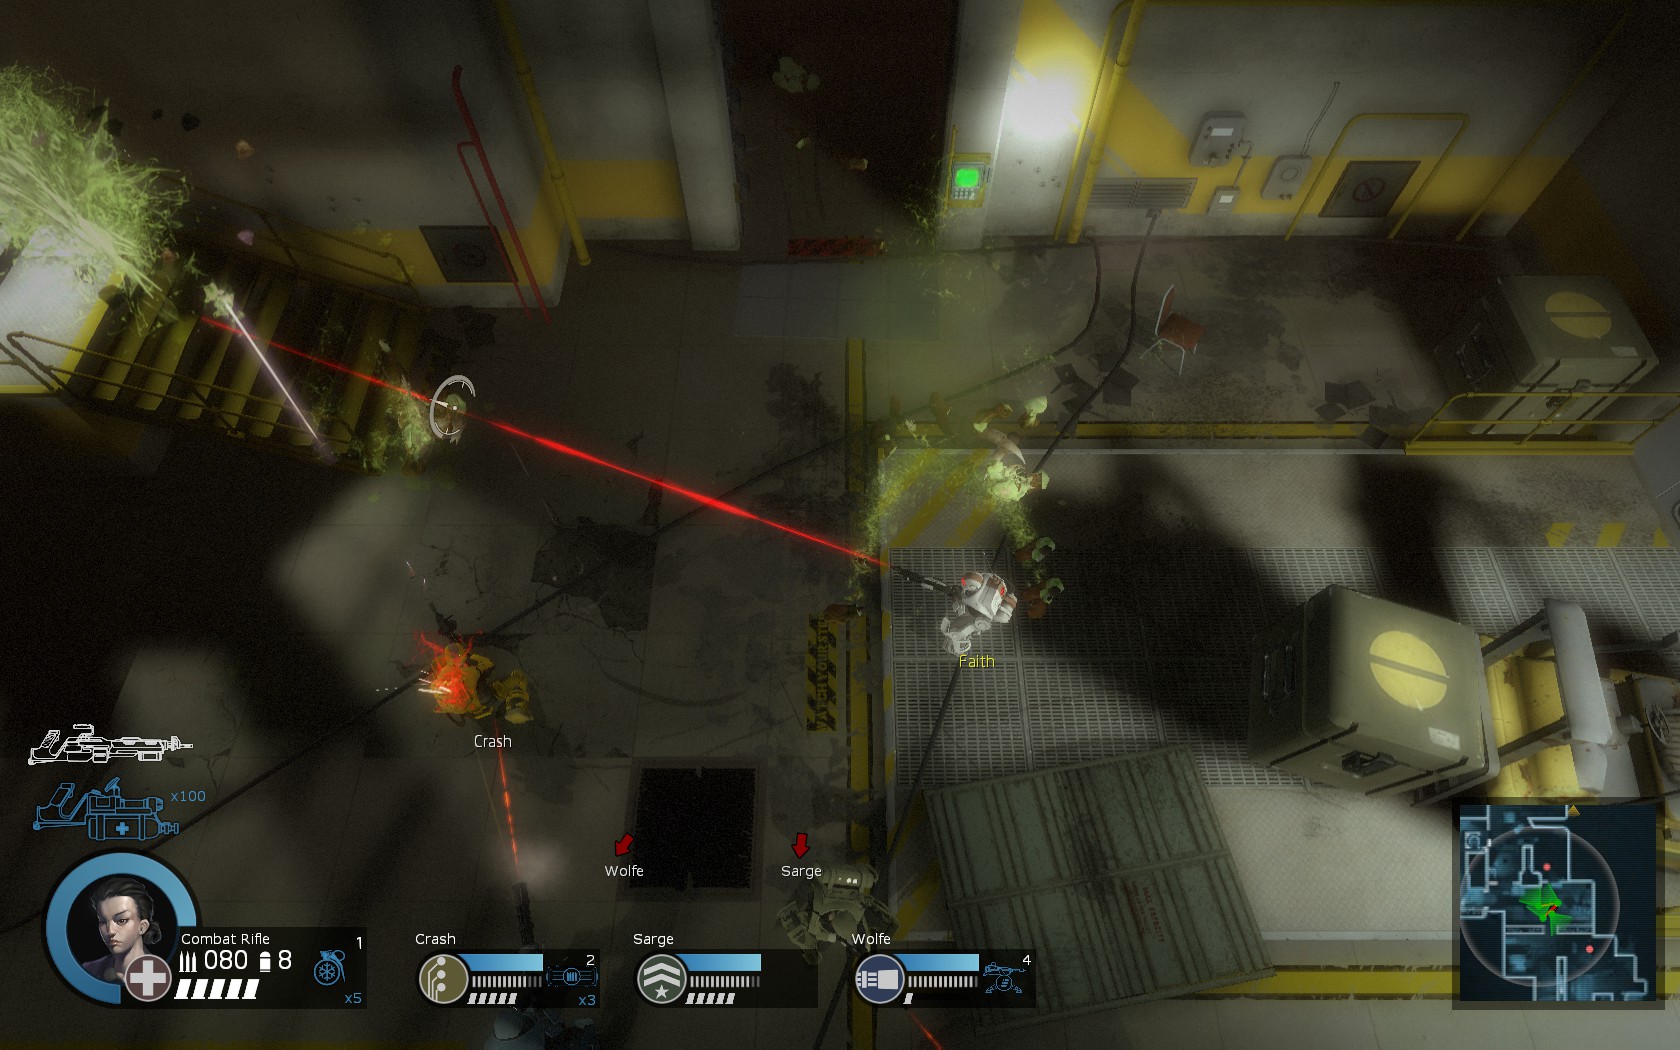
This is what you will be doing most of the game – killing aliens:
But as you play, the game will highlight other actions you can do on the map. For example, using a terminal to open doors:

The game will also highlight some items that you can use. In this case, I could swap my Freezing Grenades for this Hand Welder to open sealed doors. Note that you need to come close to the item on the ground and press E to swap them.

Also, did you notice the RED BARREL in the picture above? That one is explosive, so shoot it when aliens are nearby and BOOM! Any weapon (except medical guns) can be used to explode barrels. Here’s me exploding a barrel with an Assault Rifle from a safe distance.

When using a welder, the game will show you a progress bar. You cannot shoot while welding, so ask your teammates for cover while you work. Also nearby sealed doors will also show a RED BAR, indicating the door health:

If you don’t have a welder, you can shoot the sealed door to break it open, and aliens can also break through it. Be careful – falling iron door can kill you instantly 🙂
One of the most useful equipment you can interact with is the Sentry Gun. You can see blue area indicating where the Sentry Gun will fire. You can also turn the Sentry Gun – point your mouse where you want the Sentry Gun to aim, then press E once. If you hold E pressed down, you will dismantle the Sentry Gun and make it an equipment that you can take with you again.

There are more possible interactions using E
- You can read PDA entries. Those are useless, but provide some storyline background for the Mission.
- You can use terminals to control wall-mounted Sentry Guns. Those cannot be taken with you, but you can use them when you need to hold position at a given place.
- Press switches that control elevators, lower/raise bridges, open hangars, move platforms and more. You will discover these as you play
- You can switch your current weapon for another item on the ground. Be careful not to drop all your weapons 🙂
Apart from that, the game uses a nice physics engine. Falling things can kill you, you can be set on fire and rolling (repeatedly press Space) will stop the burning. Other players will push you if they run into you, crates and barrels will block your way, some aliens can punch you hard and send you flying. You can also fall off a ledge and die, swimming in lava also hurts a lot.
Playing the Game
Now that we know the game basics, there are some things you should focus on.

The game will change your aiming reticule into a red cross everytime you aim at your teammates, indicating you would hurt them if you shoot. This is a thing you need to master while playing online, because bots will usually stay behind you, but during online play, players will regularly run in front of you. Newbies will do it for no reason, but even experienced players will do that – while evading aliens.
Learning the ability to stop firing at the right moment is very hard, but it will prevent unwanted team kills. Each game you can also gain up to +100 XP if you don’t deal any friendly fire damage. And finally, mastering this is a requirement if you want to get the Hardcore Friendly Fire related achievements.
Proper positioning is important to win the missions. Usually the aliens will be attacking from multiple directions, so you need some people assigned at the front and someone at the back and sides of the party to take care of the flanks.
This image with bots is a decent example. You can see two people watching front for incoming aliens, Sarge watching our backs, all while I’m aiming to the side. Also notice that everyone has a clear sight, we can all start firing at aliens coming to our aim.

This is an example of bad positioning. All four members are aiming in the same direction, one of the bots is even aiming at my back and cannot shoot the frozen alien. All while we are in the middle of a crossroads and we can get attacked from any side.
When defending a position (ie. a Tech hacking a terminal), you need to protect the Tech while also staying alive. If there is only one entrance, make sure you stand alongside your teammates so everyone can fire at will. NEVER stand in front of active Sentry Guns. If there are multiple entrances, make sure each entrance is guarded.
This is another example of bad positioning. Tech is hacking the terminal, while me and my bots are all stacked up on our Sentry Gun. But the Sentry is more than capable of taking care of all the aliens in the direction we are facing. My and Sarge’s aim is also partially obstructed by the Sentry Gun. And nobody is checking the right side, where aliens are trying to break the door.
Since these screenshots were taken on Easy difficulty, these mistakes wouldn’t really matter. But if this was on Brutal, we could have been overrun and killed.
Even if you don’t say a single word in chat, you can still observe your teammates and fill the missing links. There should be at least one healing item and at least one ammo pack on the team at any time. Some missions include ammo packs and personal medkits as spawned items.
But taking two different weapons can be useful too. For example, Chainsaw + Tesla combo. Having a Chainsaw can take care of welded doors and fallen rocks, so you don’t need to find a mining laser, while it also serves as a very good melee weapon. Tesla will stun enemies, making them slower and easy to kill with your Chainsaw, so you can alternate and take care of monsters this way, or you can support your teammates with Tesla.
Remember that not every map is the same. While Twin Pistols might be good against default monsters in the open and give you the nice Lara Croft feeling, if you meet a Shieldbug in a narrow corridor, your weapon will be useless. That’s where your switch weapon or utility item will come handy. As you learn the maps, pick items that will help you complete a given map.
If you start talking to the team and work together on this, the game will advance to a whole new level and open many new options.
There are usually two strategies, slowly advance forward, or rush to an objective. The slow advance is usually better for beginners to learn the game, but as you start playing Hard and higher difficulties, in some maps you will have no choice but to quickly advance to a specific area. Be it slow or fast, your team should always stick close and cover each other’s backs to survive.
Most common misplay happens when part of the team advances faster than the others. Isolated members usually get overrun by the triggered spawns and die. This happens with players, who get too occupied with aliens and stop watching the other players, which is why the minimap becomes really useful to keep track of your team, a quick glance can show you when your team starts moving away. Keep track of your teammates so you don’t lose them.
But sometimes when a player advances, aliens can block the path for the rest of the team. In this case, the advancing player should also check if his team is coming and preferably wait for his team to catch up. Use the voice comms and chat to tell your teammates to move with you, don’t run away alone. If the case of slowdown is a shield bug, having a person attacking from the other side can be really helpful. Again, a quick glance at the minimap can tell you that your allies have stopped for some reason.
Being able to talk with the team will greatly help with all of the abovementioned things. While not everyone has a microphone to speak, you can use chat, bind text messages to hotkeys and there are also emotes to tell your team what to do. Even if you died, you can still contribute to the game by chatting and drawing on the map.
To bind a text to a key, go to the Menu -> Options -> Keyboard/Mouse, and Enable console. Then press the key below ESC to open the console and write the following, replacing <key> with your own preferred bind.
Replace “Need Medic!” with your own text.
Replace # with one of the following:
0 – Medic!
1 – Out of ammo
2 – Smile
3 – Hold position
4 – Follow me
5 – Be careful
6 – Anime smile
7 – Ready?
These will show an icon above your head for a short while.
Hacking
Specific to Tech-class only, this game contains a crucial minigame called Hacking, which usually plays a big part in completing a mission. Hacking opens doors, activates elevators, even completes objectives. There are two types of Hacking:
Pipeline
The objective here is to connect the left side to the right side. By clicking on the pipes, you can turn them to connect the sides. Here’s a quick example:

The above example is also a Fast Hack. You can see the small red dot running in the white loading bar. It starts after you press the first pipe. If you complete the hack before the red dot reaches right side, you perform a Fast Hack.
Numbers
The objective here is to put all “1”s into a line. The numbers move either up or down and you have to align the 1s by switching their movement. After this game completes, usually you have to wait on the hacking screen for a data file download. An example here:

You can use utility items during a hack, so you can activate your own Adrenaline. Having Adrenaline slows time for hacking too, making it easier to complete.
After-game Summary
Whenever you complete a mission (or fail a mission), you will enter the after-game Summary.

You will see the XP gained for the mission, and any achievements you earned during this mission.
- Every player gets +1000 XP for completing all the mission objectives.
- Up to +100 XP for killing aliens.
- Up to +100 XP for not causing friendly fire.
- Up to +100 XP for completing the mission fast (in reality you can get +80 XP at most, if you speedrun like crazy due to XP being derived from mission Par Time)
- Up to +100 XP for not taking damage from aliens.
- Up to +50 XP for completing Class-specific task (Tech: fast hacking, Medic: healing the party)
- +50 XP for each achievement earned
- All of the above XP is added and multiplied by your difficulty bonus. 40% on the screen is for Insane difficulty.
In addition to XP, you will also be shown your newly unlocked equipment, and you can notice the Leaderboards in the background, showing who (among your friends) is the fastest.
On the next page you can check some statistics – Kills, Ammo count, Friendly Fire. The most useful part is checking your progress on the map, and if you failed the mission, you can think of things you can improve for the next try.
If you completed the Campaign, you can select a new Campaign to play:

Game mechanics & Tips
Here I will cover some basic game mechanics that might not be so obvious to everyone.
This one should be obvious from the animations, but switching weapons and reloading takes time. During these animations, you cannot shoot. Picking up items, assembling a sentry gun and hacking also prevents your character from moving. If you interrupt the action, you will have to do it again – for example reloading gets interrupted, if you switch weapons:

During a reload, you also cannot shoot the weapon’s secondary ammo (grenades on the Assault Rifle).
Luckily, reloading doesn’t prevent you from using your utility items. This allows you to use Adrenaline, Electric Armor, Incendiary Mines, Freezing Grenades or Rockets when you run out of ammo, but the swarm doesn’t stop. But be careful not to kill yourself with standard Grenades and Laser Tripmines.
Whenever you reload, a reload progress bar will display above your character portrait. Notice the white area in the middle:

When the cursor enters the white area, press R to perform a Fast Reload. When successful, your weapon will shine and your reload gets finished instantly, which is obviously something you want when facing hordes of aliens.
But if you fail to hit the Fast Reload area, your weapon will jam. It won’t shine, it will take more time to finish the reload AND your character will get slowed down until reloaded.
- You can do this with every reload, there is also an achievement to Fast Reload
- The white area is different for different weapons, and it gets smaller with higher difficulty setting
- If you manage to jam your weapon, you can Roll to interrupt the jammed effect and start a new reload (need more testing on this)
In case you didn’t notice that yet, you move much slower while firing a weapon. This is most noticeable when using Autogun, Minigun or the Devastator, but other weapons slow you aswell. Also, if you keep shooting, you will run out of ammo at some point. Which is why you should alternate between firing and running. The goal is to always keep some distance between the aliens and you, if possible.
Twin Pistols, Desert Eagle and Grenade Launcher don’t slow you down even while shooting, so if you need bullets and move speed, picking these weapons might do the trick for you.
Your move speed is affected by the marine you selected and the weapon you are using. Similar to Counter-Strike’s switching to Knife which makes you run faster, switching from an Autogun/Minigun/Devastator to anything else will make you run faster too. So if you happen to be the Weapon Specialist, don’t be afraid to run around with an Ammo pack in hands and switch back to weapon when needed.
When moving around in a co-op game, try to run using straight lines. Aliens don’t shoot, so there is little to no reason for chaotic movement. Your teammates need clear line of sight to fire on incoming aliens and if you run into their crosshairs, you’ll die from aliens AND friendly fire, so run straight. If you must go sideways, go behind your teammates, not in front of them. If you encounter the ranged alien, remember that you can also ROLL by pressing Space.
Another thing that takes time is opening doors. Usually the big metal ones and Airlocks that can’t be breached will take some time to open. Be prepared to hold position until it opens. The key to holding position is to ensure all points of entry are covered – by marines, by sentries, incendiary mines or at least welded doors.
Here is an example of holding position at the door in Lana’s Bridge (with random people), hard difficulty:
— PART 2 — Classes, Items
Character Classes
There are 4 Classes you can choose from, with 2 Marines for each Class. Each Marine also comes with different bonuses.


- High health, buffs whole team, Vindicator shotgun, Incendiary Mines
- The damage dealer class. In addition to making the whole team deal more damage and be more resilient, their Vindicator can destroy multiple aliens in a single shot, has good rate of fire, lots of ammo AND an incendiary grenade to boot.
- With bonuses to explosives, they are the go-to class to use Grenade Launchers.
- Incendiary Mine is an excellent tool for defending a point. The created firewall will incinerate all regular aliens who walk into it. It can kill even shieldbugs on its own, if they stay in the fire for a while.
- Not recommended for beginners, because Officers require good control. If you shot your Vindicator into a teammate, you could severely harm them even with reduced Friendly Fire. Same thing with Explosives. Incendiary Mines are also very dangerous, if you accidentaly place them wrong.
- If for some reason you don’t want to use Vindicator (don’t do that!), Sarge gets bonuses with other weapons while Jaeger gets a small bonus the for Chainsaw.


- Fast firing weapons with big magazines, can often hold off the swarm on their own.
- Beginner-friendly class. Autogun is available from the start, comes with Auto-Aiming (your mouse will stick to enemies near your cursor), you don’t have to reload often, fire rate is higher than usual, so you can save yourself from a bad situation. Practice stop-firing-stop so that you don’t shoot teammates and watch your surroundings.
- Beginners can pick between Wildcat who is more speed-based and Wolfe, who is more tanky. Both have high Autogun damage bonus, giving you the power to kill.
- Great class for countering frontal assaults, also great for watching the back of the squad, destroying everything that might come after the team. That, and others won’t walk into your line of fire that much.
- For advanced players, Wildcat is amazing at soloing parts of the map, due to her speed and high damage bonus for other weapons aswell.


- Healing and Infestation curing, duh
- Another beginner-friendly class. If you ever shoot somebody, you can correct your mistakes by healing them. It’s a good class if you don’t know what to do in a game, you can simply follow more experienced players, supporting them and learn the game that way.
- Medics are limited to non-class weapons, which is ideal if you want to do those not-so-often-used weapon achievements. Many Medics stick to their support role, carrying only healing items, or carrying some support weapon like a Tesla. Imho they are to go-to class to use the Flamer – usually you don’t want to shoot ARs when things are on fire, so having Flamer + Medical Gun makes sense.
- You can pick between Faith who is faster and more healing-oriented, while Bastille is more damage based and brings a boost to team’s Adrenalines.
- When using Healing Beacons, try to ask the team to group up for effectiveness, the amount of beacons is limited after all.


- Tech is a niche class. Tech is required to complete like half of the missions.
- Lifeform Scanner is very important, it can warn the team about incoming aliens and give you time to prepare for an assault. They also get a modified AR, which comes with Stun grenades, those can often be a lifesaver.
- Hacking is very important – other than being an objective of missions, starting a hack often triggers alien spawning. Therefore a Tech should learn the map and know, when to start a hack and when to wait.
- Techs excel at mechanical things – welding doors and building turrets is faster when a Tech is nearby.
- When playing with beginners, Tech should tell his team to cover him during a Hack. Crash is also a great choice if you want to master Fast Reloading, because he gets the best reload bonuses.
- Tech is quite suitable for a support role with Flamers and Tesla Cannon, but Crash gets a decent damage bonuses too. And Vegas is a beast with the Chainsaw.
Character Skills
Apart from their bio, all the marines are actually generic – they all start at 80 Health and 290 Movement Speed, the only differences between them are their skills. Down below you will find the list of individual skills and their bonuses.
- Gives nearby marines the following bonuses:
- Chance to deal 2x damage with each shot (Sarge: 15%, Jaeger: 9%)
- Chance to take half damage from any hit (Sarge: 30%, Jaeger: 18%)
- Bonus is active as long as you have the Officer visible on your screen.
- Extra damage per pellet (Vindicator fires 7 pellets) (Sarge: +4 dmg, Jaeger: +10 dmg)
- Extra Autogun damage per shot (Wildcat: +4, Wolfe: +5)
- Chance that bullets pierce through enemies (Wildcat: 40%, Wolfe: 60%)
- Healing Beacons gain extra charges (base 4) and maximum health restored (base 50) (Faith: +5 charges, +50 health restored, Bastille: +4 charges, +40 health restored)
- Medical Guns gain extra charges (base 40) and increased healing rate (base 5 hp every 0.33s) (Faith: +50 charges, +5 health per 0.33s, Bastille: +40 charges, +4 health per 0.33s)
- IAF Personal Healing Kits restore extra health (base 50) (Faith: +25, Bastille: +20)
- Reduces time required to remove infestation (Faith: 75%, Bastille: 25%)
- Gives the Tech a movement scanner. Red dots on the minimap.
- Sentry Guns are assembled faster while a Tech is nearby
- Welding/Unwelding doors is finished faster while a Tech is nearby
- When you have both Techs nearby, the effect stacks
- Exact numbers are unknown, wiki[alienswarm.wikia.com] has some numbers that don’t really make any sense..
- Hand Grenades and Grenade Launcher: + explosion radius (Sarge, Crash: +40, Jaeger: +80)
- Hand Grenades and Grenade Launcher: + damage bonus (Sarge, Crash: +20, Jaeger: +40)
- Hand Grenades gain additional smaller explosions (Sarge, Crash: +2, Jaeger: +4)
- Hornet Barrage: + damage per missile (Sarge, Crash: +2, Jaeger: +4)
- Freeze Grenades: + freeze duration (Sarge, Crash: +0.6s, Jaeger: +1.2s)
- Incendiary Mines: + firewall duration (Sarge: +10s, Jaeger: +20s, +33% wider firewall)
- Extra Health for marine (Sarge: +60, Jaeger, Wolfe, Vegas: +45)
- Reload time decreases by X, Fast Reload window is bigger
- Crash: +40% decrease, +20% bigger FR
- Bastille, Wildcat: +30% decrease, +15% bigger FR
- Faith, Vegas, Wolfe: 20% decrease, +10% bigger FR
- Melee and Chainsaw damage increased, melee attacks are faster
- Vegas: +80% melee dmg, +24 Chainsaw dmg, +40% faster melee attack
- Jaeger: +40% melee dmg, +12 Chainsaw dmg, +20% faster melee attack
- Marine moves faster (Wildcat: +40 movespeed, Faith: +30 movespeed)
- All Adrenalines last +6s longer (doesn’t matter who uses them)
- Bastille needs to be alive for the bonus to work
- Extra Damage to non-explosive Weapons. Please refer to the Alien Swarm wiki[alienswarm.wikia.com] for the specifics.
Weapons Overview
Let’s have a look at the arsenal of weapons you can take.

The basic Assault Rifle, comes with lots of bullets but very low damage per bullet. The Frag Grenade is weaker than Grenade Launcher, but it can still harm your team, be careful where you shoot. Best used with Damage Amplifier active.

A better version of the Assault Rifle. This one comes with (arguably) better Stun Grenades, which are otherwise not available in the game, but mainly it comes with Auto-Aim, making it much easier to use for new players. This also helps when targeting those small parasites. Again, use with Damage Amplifier to make the most of it.

First available machine gun. The Autogun comes with higher damage than standard rifles as well as much bigger ammo pack. Combined with Auto-Aim, this makes it a great choice for new players. Make sure you’re not shooting into the team. The best place to be with an Autogun is at the front, or in the back, where your bullets pierce through to other aliens. Beware that carrying an Autogun slows your movement, so switch to your secondary weapon if you need to run fast. Again, using a Damage Amp will boost the weapon’s efficiency greatly.

The Vindicator is a beast. Best usage is to wait for the drones to come closer to you (and preferably line up), then you can dispatch several aliens in a single shot. But don’t wait too long, as shotguns take some time between shots. The incendiary Grenade can be either used to hit an alien (explodes on impact), or you can pre-fire it to an area, it will bounce and stay on the ground before detonating 3s after. As the name suggests, it is a fire grenade, so this can be used to ignite Biomass aswell. Do not shoot your teammates with it!

The twin pistols are the most damaging (semi-)automatic weapon in the game. I see absolutely no reason why would a pistol deal more damage than a minigun, but who cares. The rate of fire of Twin Pistols is fake, it shoots slowly if you hold down the mouse button, but if you keep clicking, the pistols will fire as fast as you can click your fire button. Therefore when using a mousewheel (or a script) to shoot, twin pistols are also the fastest shooting weapon in the game. Just keep your eye on your ammo count. Use with Damage Amplifier for maximum carnage.

The automatic sentry gun is a lifesaver for solo playing. Best used when holding position while your Tech hacks a terminal or when you have to wait for a door to open. It can be placed, then dismantled again and taken with you. Sadly, you cannot reload the sentry gun. Once it runs out of ammo, lure aliens close to it – when they destroy the sentry gun, it explodes. When the gun is placed, stand near and press E once to change the direction the sentry gun is facing. If you press and hold E instead, you will dismantle the sentry gun.

The basic equipment for your Medic. When used, places a beacon on the ground which heals all nearby marines in a small area. The healing done is 2x stronger than the Medical Gun, but you must stay inside the beacon area. Also cures infestation – when you get infested, run into the beacon area and stay there. Multiple beacons’ effect stacks, so you can place 2-3 beacons to heal people faster.

Places an ammo crate on the ground. Ammo crates start at 100% capacity, and they lose capacity as different weapons refill their magazines.
- Autogun and Minigun takes 100% to refill 1 magazine
- Grenade Launcher takes 20% to refill up to 3 magazines
- Desert Eagle takes 10% to refill 1 magazine
- All other weapons take 20% to refill 1 magazine
(unlocks at level 3)

The Pump Action Shotgun is for cases when you want to pick a shotgun, but cannot pick an Officer. It has the highest damage of all shotguns in the game, but due to its firing rate, this gun is definitely not good for anyone. It also has a bigger spread than the Vindicator, so you need to be very careful where you shoot. The ammo supply is also pretty short, so reloading often is required, which is why you should pick Officer + Vindicator if you can.
Weapons Overview (cont.)
(unlocks at level 5)

The best weapon for support characters. Deals almost no damage, but you can stun anything in your way. Great for quickly moving around and great for stopping the swarm when your minigun teammate needs to reload. If you want the achievement for this gun, start up Area 9800: Landing Zone and repeatedly kill the small larvas from the sacs on the left wall at the start of the level.
(unlocks at level 7)

The Railgun is a powerful tool to dispatch multiple enemies charging in a straight line. The shot won’t pierce doors, but it will pierce multiple aliens, so it’s easy to kill 4 or more aliens in a single shot. Also this gun’s main disadvantage. You need to reload after every single shot. Great for practicing Fast Reloading, and a deadly tool in the hands of a skilled user. You need a character with at least 2/5 weapon damage skill to instakill a drone on Brutal.
(unlocks at level 9)

Alternative to the Healing Beacon, this gun allows you to heal without stopping. Discharges a healing beam that automatically aims at the wounded marine. The gun automatically stops firing when the target is full health. Healing is half of what the IAF Healing Beacon can do. Very useful on higher difficulties and in speedruns. Will also stop the fire on a burning marine.
(unlocks at level 9)

Another very fast firing weapon, useful for self-defense due to it’s fast firing rate. The ammo count is misleading – in reality you get 40 shots and 5 magazines, because this gun consumes double ammo (unlike Twin Pistols), so it’s easy to run out of ammo quickly. In terms of attack speed, PDW is much faster, but eats ammo real fast. Use it if you need higher damage, consider taking AR if you expect long shooting.
(unlocks at level 11)

One of the most used weapons, due to it’s igniting mechanic. Similar to the rail gun, Flamer’s fire goes through aliens, damaging and igniting multiple aliens in a single shot, but doesn’t suffer from the constant reloading. Ignited enemies are slightly slowed and take damage over time. So as long as you’re not in a rush, Flamer can be a great primary weapon. Flamer is also required for some missions to burn the Biomass or extinguish fires on the way. Best used in short controlled bursts, as the main damage comes from the ignite effect, not from the weapon’s damage.
Utility Items
TBA
Until I finish these sections, you can use this guide for the original game, which describes the weapons and items pretty well.