Overview
All you need to know about The Long Dark, without undermining the exploration, discovery, and sense of accomplishment from doing it yourself.
Introduction
If you want the real The Long Dark experience, you’ve got to go in blind. Put the user PDF maps away, lose your Google-capable smartphone, and stop asking other survivors for advice on the internet. There are no survivors.
It’s obvious right from the start that this game is a labor of love, and the Hinterlands team have made it very clear that the design decision of “no player hand-holding” is deliberate, and central to the TLD experience. Refreshing as this is, it tends to leave new players, well, somewhat in the dark. There are things that you simply don’t know that you can do, and things you very quickly find out you can’t. Trial and horrific error is what The Long Dark is all about, and to simply Google your way through the game is to rob yourself of the sense of exploration, discovery, and do-it-yourself accomplishment that this game wants to give you.
If you are cold, wet, hungry, and simply tired of searching for a damn rifle, yes, you can take out your phone in real life, find detailed user-made maps of the area, find 3 probable spawns, and then get your rifle before you starve to death. The thing is, that isn’t surviving – and this is a survival game, where the entire point is that your character can’t smartphone his way out of a bad situation. Calculated risk-taking IS The Long Dark. Worse, if you do “use a lifeline” and Google where the closest hunting rifle is, you’ll now be stuck in a strange limbo. Let’s say two days later you’re stuck in a blizzard with your new rifle. “If I already used the Wiki to find this rifle that’s been so useful to me, why let my character freeze to death now and lose my 17-day playthrough?”

“Why not just look up directions to a nearby shelter on the internet, instead of dying ingloriously in the snow and letting all my hours of playtime go to waste?”
“Where can I learn to play the game without it somehow spoiling the experience of the game for me?”
“How can I find out the mechanics of TLD without constant location spoilers, walkthroughs, and TMI?”
Welcome to,

Written by Vance (aka Vaius)
The Only TLD Guide You’ll Ever Need
The only thing that you should spoil in The Long Dark is your meat, because you forgot to cook that wolf carcass before eating it like an idiot, and now you’re infested with intestinal parasites.
This guide is geared to preparing you for the MECHANICS of the game and leaving you to develop GAME-SENSE on your own. The story mode, Wintermute, eases you into things a bit with sparse on-screen tutorials, but the experience is obviously linear, featuring quests, characters, and gated checkpoints, unlike the sandbox Survival mode – and Survival mode, in my opinion, is the real Long Dark experience, and is what this guide will prime you for.
There’s a fine line between a guide and a walkthrough, but in short, I aim to give you what I wish I had when I started playing – a manual, not a strategy guide. Instead of relying on Google, Reddit, the Wiki and the forums, exposing your fresh mind to the dataminers and ‘Lopervets that dwell therin, this guide is carefully designed to be self-contained, give you just the information you need, just the mechanics of what you can do, not what to do – you’ll have to figure that out yourself. All this information is triple checked for accuracy, but unlike the bloated information dump that is the Wiki, there are no location screenshots, item lists, pro tips, or walkthroughs. It really is the only TLD guide you will ever need, everything else can be learned by playing.
We may indeed make it to the end of this guide without a single Excel spreadsheet or top-down satellite map – instead just some pared-down TLD 101, a no-frills pocket reference, that will leave you ready to tackle these hauntingly lonely vistas all on your own.
CHAPTER 1 – THE GAME
If you want to go in knowing next to nothing, this section is your only stop.

“Survival Mode” was for many years the only game mode The Long Dark offered, and it is widely viewed as the “real” game. Many players have invested 500-700 hours in this game mode alone. You start with almost nothing in a random location on your chosen map, and the goal is to survive as long as you can. Items spawn in random locations on each playthrough, and manmade items do not respawn once used. The maps are large and all of them link together, so if you start on Mystery Lake you can eventually migrate all the way to Timberwolf Mountain if you so desire.

The story mode is episodic and starts with Episode 1, “Wintermute”. More episodes are currently in development. It follows the story of “William Mackenzie” and “Dr. Astrid Greenwood” (featuring the Mass Effect voice actors for Commander Shepard and female Shepard, respectively). A geomagnetic storm has caused an apocalyptic global blackout, stranding bush pilot William on the fringes of civilization in the middle of the freezing Canadian Wilderness.

These are short, objective-based scenarios you can complete for in-game achievements called Badges.

Different from Badges, Feats are perks with an in-game benefit that you select before starting a Survival game. They are earned simply by playing the game, but require immense amounts of playtime to unlock, and only grant a slight bonus. However, if you do sprint a gajllion miles over hundreds of days and many games, you will eventually unlock a Feat that lets you not get hungry as fast after sprinting. The higher difficulties restrict you to only two or three feats at a time. My advice? Just play the game normally and you’ll get these eventually. You can view the list of Feats in the main menu.

DIFFICULTY: Easy
The “sightseeing” mode. Wildlife does not attack unless provoked. Extra items spawn in the world. Your Needs do not decrease as rapidly. Decay of all items is reduced. Recommended for non-gamers or people not interested in the survival aspect of this game.

DIFFICULTY: Normal
The “survival” mode. Predators will attack you. Weather can be life-threatening, especially at the wrong time. Loot is not scarce, but your character’s Needs require you to constantly work for your survival. The default difficulty. Recommended for players new to TLD.

DIFFICULTY: Hard
The “predator” mode. Wolves and bears are numerous and very aggressive. Needs deplete quicker, loot is more scarce, and weather is worse. Trying to start a fire does not immediately prevent freezing. New diseases. This mode places you as the hunted, instead of the hunter. Recommended for experienced players.

DIFFICULTY: Insane
The “hardcore” mode. Wildlife is scarce, but the few predators that are left, are extremely dangerous. World becomes more hostile as you play. Global temperature drops by the day and blizzards become more frequent as time goes on. Wildlife population decreases as time goes on. Loot is extremely scarce. Rifles, Hunting Knives, and Hatchets do not spawn. The player must craft their own tools. The best clothing and food items do not spawn. Player starts in random region with minimal starting resources. Called “Loper” by longtime players. Intimate map knowledge is almost a must for any chance at long-term survival. Recommended for veterans of The Long Dark.
Use WASD to move your character around. Use SHIFT to sprint. Use CTRL to crouch and sneak around. Interact or shoot with LEFT-CLICK. Aim weapons with RIGHT-CLICK. Use SPACE to bring up the Radial Menu with commonly used actions and quick access to important items.
“SHIFT” – Sprint.
“CTRL” – Crouch / Sneak.

“SPACE” – Radial action menu.
“TAB” – Hold to bring up your stats. **very important!**
“I” – Inventory.
“1” – Cycle through all light sources.
“2” – Cycle through all weapons.
“3” – Drop decoy meat on the ground for predators.
“4” – Place campfire.
“H” – Holster currently held item.
CHAPTER 2 – THE BARE BASICS
The Long Dark is a pure survival game. The majority of your time is spent simply trying to eat, drink, stay warm, and avoid disease. Many of your deaths will be due to dehydration, hypothermia, fatigue, and plain starvation. Often it’s all of them at once.

Condition is your health. It is represented by a bar at the bottom left of your screen. Condition represents your total physical health – if it reaches zero, you die. If one or more of your Needs are not met, it starts slowly depleting your total condition. If multiple Needs are not met (Freezing, Starving, Dehydrated), Condition quickly plummets to zero. Diseases also deplete your condition, often rapidly if left untreated.
The only way to regain Condition is if all your Needs are met (you are fed, hydrated, and warm) and you are not suffering from any Afflictions. With all your Needs met, it will regenerate slowly at a rate of +1% Condition per hour (25% per day). Sleeping doubles Condition recovery. The Condition bar is the main focus of the game, and the only way to maintain a healthy condition is to meet all of your…

You have four Needs – Food, Water, Warmth, and Fatigue, represented by four fillable bars on your HUD. If any of these Needs are not met (i.e. the bar reaches zero), the unfulfilled Need will start depleting your total Condition by a certain percentage per hour. This is indicated by the icon representing that Need turning red.
ICON: Stomach
CONDITION DRAIN: 1% per hour if Starving (25% per day)
The Food bar is replenished by eating anything – canned food, raw meat, granola bars, cattail stalks – and is measured in Calories. The bar reaches a max of 2500 Calories (a full stomach) which empties completely over the course of one day if nothing else is eaten. The Food bar is drained faster if you are sprinting or exerting yourself in a time-accelerated activity like chopping wood (the game will alert you as to how many calories a time-accelerated activity will cost you). If you avoid Starvation for 72 hours, you will get a buff to Condition and Carrying Capacity. The 72-hour timer gets reset every time you begin to Starve. Food can either be found as loot, or you can hunt the local wildlife and eat their meat. Foraging for herbs and plants can also provide small amounts of Calories to stave off starvation. Starvation doesn’t kill quickly, but it kills surely. It may take you four days to die of starvation, but food can be very scarce, and the relentlessness of the daily need for food means you may find yourself one day with no dinner, and nothing around to eat for miles.

ICON: Droplet
CONDITION DRAIN: 2% per Hour if Dehydrated (50% per day)
The Water bar is replenished by drinking water. Both purified and unpurified water can be drank, although dirty water may cause Dysentery. Many foods, like Canned Peaches or Tomato Soup, replenish thirst and hunger simultaneously. Some very salty foods drain thirst. Being completely Dehydrated will kill you in two days. With all the snow around, prolonged Dehydration is rare if one has access to a fire to boil snow, but the Water bar will need refilling three to four times a day, and water is very heavy. Condition loss from Dehydration is severe, meaning it often performs the coup de grâce and kills an already bedridden, stranded, or diseased player.

ICON: Thermometer
CONDITION DRAIN: 20% per Hour if Freezing (kills in 5 hours)
The Warmth bar is replenished by staying above freezing. If your “Feels Like” temperature drops below 0° Celsius (32° Fahrenheit) your Warmth bar will start depleting, indicated by one to three downwards “v” chevrons next to the Warmth icon. At one “v” chevron, a full Warmth bar will drain very slowly, often lasting most of the day. At two “vv” chevrons, a full bar will last you about an hour before Freezing starts to set in. At three “vvv” chevrons, you will go from completely warm to freezing in minutes. Find someplace warm! You freeze even faster on higher difficulties, a single “v” in Interloper means you’ll go from Warm to Freezing in about an hour, instead of the 15 hours for Voyageur. Note that the chevrons measure in distinct “breaks” but your exact rate of cooling is calculated from the difference between your “Feels Like” Temp vs Air Temp + Wind Chill. There is a difference between a low “vv” and a high “vv!” If your warmth bar reaches zero, you will start to Freeze at a staggering 20% Condition loss per hour. It doesn’t matter if your character is only -1° or -100° below freezing, the rate of condition loss is always 20% an hour if your Warmth bar is empty. If you Freeze for two consecutive hours, you will contract Hypothermia, which doubles the rate you lose Condition from Freezing. Replenish warmth by staying indoors or building fires. Clothing and beds provide bonuses to your “Feels Like” temperature, and ducking out of the wind negates Wind Chill. If your Warmth bar hits zero in sleep and you start Freezing, you can easily die in your sleep and never wake up!

ICON: Eye
CONDITION DRAIN: 1% per hour if Exhausted (25% per day)
The Fatigue bar is replenished by sleeping. Sleeping also restores Condition. Sleeping consecutive hours restores more Condition than sleeping in one-hour segments. Like hunger, Fatigue will take a long time to kill you on its own, but unlike any of the other Needs, the effects of Fatigue set in long before the bar reaches zero. Your Recommended Carry Weight will steadily decrease as your Fatigue bar empties – and exceeding your Recommended Carry Weight will cause increasing penalties to your sprint and walking speed. Fatigue also makes it harder and harder to aim weapons steadily. In addition, if you are Fatigued and get involved in a Struggle with a wild animal, your chances of fighting back effectively are severely hampered. If your Fatigue bar reaches zero, you will become Exhausted – halving your Recommended Carry Weight and making it impossible to sprint, and the hourly condition loss will start. Sprinting depletes Fatigue extremely rapidly – walking, a full Fatigue bar should last you the whole day; sprinting nonstop, it will last you around 2 hours! Both sprinting and rope climbing drain fatigue at many, many times the normal rate.

CHAPTER 3 – ITEMS
Items and loot are your lifeblood in the Long Dark. A tool like a Hatchet can be the difference between being able to chop up a fallen log and survive the night’s cold, or being forced to snap small branches into firewood by hand and freeze to death when your tiny fire goes out.
Items are broadly divided into these categories:
- Clothing (coats, boots, hats, socks)
- Tools (hatchets, rifles, lanterns, fishing tackle)
- Food & Drink (venison, water, peanut butter, grape soda)
- Medicine (antiseptic, painkillers, bandages, antibiotics)
- Firestarting (matches, firestarters, accelerant)
- Fuel & Firewood (cedar logs, sticks, coal, tinder plugs)
- Crafting Materials (cloth, scrap metal, pelts, cured guts)
- Field Manuals & Research Books (“Frontier Shooting Guide,” “Dressing Your Kill Vol. 1”)

All useable items in The Long Dark, with very few exceptions, have a Condition ranging from 100% to 0%. The lower an item’s condition, the closer it is to breaking, and the worse it functions – Food is at higher risk for food poisoning, Clothing provides less warmth, etc. In most cases, an item with a Yellow Condition (10% to 30% condition) has a chance to suddenly break if it’s a Tool, or gain a sudden increase in Food Poisoning risk if it’s Dog Food. Beware of using very low-condition items.

All items with a Condition stat will Decay over time, whether they are used or not, with exceptions. Tools like Rifles and Hatchets only lose Condition when used and do not Decay by themselves. Medicinal Teas made from foraged herbs are also immune to decay. Water does not decay. Firewood does not decay. Cured pelts and guts, along with all Crafting Materials, do not decay. All other items, including clothing, canned food, meat (whether raw or cooked), uncured pelts, rabbit snares, and granola bars will all lose Condition over time. The rate of Decay is greatly accelerated at higher difficulties (double the rate on Interloper). Decay is global, meaning items three regions away from you are decaying just like the items in your closet do, and may be ruined by the time you get to them on harder difficulties. In addition, Clothing will Decay faster in harsh weather like blizzards. Dropped items will continue to Decay but will not despawn, so you can leave a Rifle in a cave on the other side of the world and come back to it months later without it disappearing.

In addition to the steady Decay, items may be damaged during a Struggle with wildlife. Bear maulings can shred whatever you were wearing into unusable rags, and damage the condition of items in your inventory as well. Fortunately, items that are not Ruined (0% Condition) can be Repaired. The items required for repair usually consist of a Repair Tool and a Crafting Part. Some simple repairs can be done with just a Crafting Material, or just a Repair Tool, depending on the item. For example, a Rifle only needs a Rifle Cleaning Kit (Tool) to be repaired, and bladed tools only require a Whetstone (Tool) to be repaired. On the other hand, Socks need Cloth (Crafting Material) and a Sewing Kit or Fishing Tackle (Repair Tool) to be repaired.

Many items can be broken down to yield Crafting Materials. Breaking down an item takes some time, but an item that is broken down always yields the same amount of crafting materials, whether its condition is at 100% or 1%.

Simple items like bandages and torches can be crafted by hand, wherever you are, as long as you have the required materials. These can often be crafted in 10 to 30 minutes.

The second level of crafting, and most common, is at a Work Bench. Work Benches are where you craft more complex items like clothing and traps. Crafting here can take anywhere from 30 minutes to 30 hours, and an item can be crafted in multiple sessions over several days without having to complete it all at once, as long as you have all the parts for it. Workbenches can be found in every region.

The final level of crafting is Forging, and is by far the most involved of the three. Forging is the process of creating items made of metal. Only two regions in the game have a Forge, and with only two Forges in the world, you’ll probably have to make a long journey if you want to find one. Crafting at a Forge requires Coal, as it is the only fuel that can create a fire hotter than 150°C, which is required for Forging. In addition to Coal, Forging always requires the use of a Heavy Hammer – a tool you can find out in the world. Forging always requires the use of scrap metal as a Crafting Material, which can either be found or harvested by breaking down a metal tool. You can craft improvised versions of the Hatchet and Hunting Knife, which is very important for Interloper players, as those tools do not occur naturally in the world and must be made. Improvised tools lose condition faster than normal tools.

Curing is the process of drying out animal pelts and guts so they can be used in crafting. Curing must be done indoors, and is done by simply dropping the items on the floor and waiting them to fully cure. Looking at the pelt or gut will show you how far along they are in the curing process with a percentage value. Some locations that are partially exposed to the elements still count as indoors – to check, simply drop a pelt and see if the curing % starts increasing over the hours. If it only says “Fresh Pelt” when you mouse over it, it is NOT curing. Curing takes a long time, often days or weeks. Saplings used in the construction of Bows and Arrows also must be cured in the exact same manner as pelts before they can be used in crafting. Putting the items in an indoor container, such as a closet or safe box, will often NOT cure the item, even if the container is indoors. Drop them on the floor.
CHAPTER 4 – CLOTHING
The Long Dark features an in-depth clothing system. Clothing has different warmth ratings, wind chill protection, weight, waterproofness, mobility, and protection from attack – all on top of the general Item Condition stat, meaning that a Wool Sweater in great condition can be warmer than a Ski Jacket that’s in rags. Comparing items, deciding what clothes to craft and what clothes to rip up into materials to patch up your favorite coat with is an integral part of The Long Dark.

Clothing has seven properties:
-
Warmth
The base warmth of the clothing, added directly to your “Feels Like” temperature.
-
Wind Chill Protection
If worn on the Outer Layer, this garment will decrease the incoming Wind Chill value by this amount.
-
Waterproofness
The higher the value, the slower the clothing gets wet from getting snowed on or walking on a frozen lake.
-
Protection
If worn on the Outer Layer, this garment will decrease direct Condition Damage from wildlife attacks, falls, and burns by this amount.
-
Mobility Penalty
Reduces your maximum Sprint meter by this percentage.
-
Condition
The lower the condition of the clothing, the greater the penalties to its Warmth, Wind Chill, Waterproofness, and Protection values.
-
Weight
Like any item, clothes contribute to your total Encumberance, adding directly to total weight carried.
-
Head Outer
The “hat” layer. Worn on the top of the head.
-
Head Inner
The “underhat” or “scarf” layer. Worn under the hat or around the neck. (Only contributes Warmth and Weight – other clothing stats (besides Mobility Penalty) do not get applied.)
-
Torso Outer
The “coat” layer. Often provides a lot of Warmth, Wind Chill Reduction, and Protection.
-
Torso Inner
The “shirt and sweater” layer. Worn under the coat. (Only contributes Warmth and Weight – other clothing stats (besides Mobility Penalty) do not get applied.)
-
Legs Outer
The “pants” layer. Make sure you have pants on before you go outside.
-
Legs Inner
The “underwear” layer. Usually Long Johns or underpants. (Only contributes Warmth and Weight – other clothing stats (besides Mobility Penalty) do not get applied.)
-
Feet Outer
The “shoes” layer. Gets Wet if walking on ice, and immediately Soaked if walking on Thin Ice.
-
Feet Inner
The “socks” layer. You can double up on socks. Gets Wet if walking on ice, and immediately Soaked if walking on Thin Ice. (Only contributes Warmth and Weight – other clothing stats (besides Mobility Penalty) do not get applied.)
-
Gloves
The “handwear” layer. Like all clothing, not wearing anything in this slot puts you at risk of Frostbite.
-
Accessories
Special slot for extra bags or unique clothing.

Clothing is subject to Decay and will lose Condition over time, even in storage. The lower the Condition of a piece of clothing, the more it loses its Warmth, Wind Chill Protection, Waterproofness, and Protection. Clothing loses condition faster in harsh winds and snow. Clothing can be severely damaged and outright destroyed in wildlife attacks.

Wet clothing gradually becomes heavier, and loses its Warmth and Wind Chill Protection properties. Fully soaked clothing will start to freeze if the ambient temperature is below freezing. Fully frozen clothing does not protect extremities from Frostbite at all, and increases the likelihood you will contract Hypothermia. To dry clothing quickly, stand near a fire, or place the clothing near a fire. Warm interior locations will naturally dry clothing. Falling through thin ice will immediately soak everything you are wearing, in addition to immediately dropping your Warmth to Freezing. Not all ice is thin ice, and most lakes and ponds are safe to run on. Thin ice is a different color than normal ice, and an on-screen warning will appear when you’re walking on Thin Ice.

Man-made clothing cannot be repaired once completely broken, only Harvested for materials. Clothing can be crafted from scratch from animal skins. The boots, pants, torso, and gloves types of clothing all have an animalskin version. The other types of clothing must be found in the world.

The bedroll is a special item, functioning as a portable bed with insulating warmth. Like all cloth items it is subject to Decay, and wears out from use. It provides a flat bonus to your “Feels Like” temperature, depending on the condition of the bedroll, when slept in or used to Pass Time. Regular bedrolls cannot be crafted, but they can be repaired, and hunting dangerous predators lets you craft animalskin replacements. You cannot sleep without a bed or bedroll, unless you are in a closed vehicle or a Snow Shelter.
CHAPTER 5 – BACKPACK
If items are the lifeblood of The Long Dark, then understanding how the Backpack works is key to deciding what to pack and what to leave behind.

Weight is measured in Kilograms (kg) or Pounds (lb) if you are using the Imperial system. The game is built around the Metric system and it becomes much easier to gauge weight, fluid liters, and temperatures if you’re using the default Metric system, as all the item weights are round numbers when using Metric – odd weight numbers result if converted to Imperial (the Rifle weighs an even 4 kilos using Metric, but converts to 8.8 lbs in Imperial weight). All items have a weight, and there are no weightless items in the game. You could theoretically sprain your ankle in-game if you packed a ridiculous amount of matchsticks in your backpack and tried to run.

The Recommended Carry Weight is the maximum amount of weight you can carry in your backpack before you start becoming Over-Encumbered, and is directly dependent on your Fatigue bar. Your Recommended Carry Weight when completely Rested is 30 kilos, and that number decreases as your Fatigue meter depletes until it bottoms out at 15 kilos, half your starting Recommended Carry Weight. Note that this is a soft limit – you can choose to carry much more than your Recommended Carry Weight in weight, but the penalties become increasingly severe for every 10 kilos over the limit you are.
OVER LIMIT (BY ANY AMOUNT) – Cannot Rope Climb
10 KILOS OVER LIMIT – Cannot Sprint
20 KILOS OVER LIMIT – Walking Speed Significantly Decreased
30 KILOS OVER LIMIT – Immobilized
Being over-encumbered also increases your risk for a Sprained Ankle. Your base carry weight can be improved by crafting animalskin items.

Encumberment is the total weight of your clothing and the weight of your backpack combined, and is just a fancy way of saying “your total weight.” Wearing clothing on your body makes it “weigh” about 25% less when calculating your Encumberment total than carrying it on your back would. 10 pounds of clothing in your backpack, when worn instead, only Encumbers you by 7.5 kilos. Note that Fatigue depletes faster the more weight you carry, especially while climbing and sprinting. Packing light enables you to stay rested for longer periods, and stops your Carry Limit from decreasing as fast.
If you run out of room in your backpack, you can store items in the various containers you find throughout the world. Containers cannot be moved, but they are a convenient organizational and space-saving option. The temperature inside a container is the same as the surrounding air temp. Meat left in a container outside will be colder than meat left in an indoor container. Note that even if you leave items outside of containers and leave the region, they will never despawn or disappear unless Decay causes their Condition to reach zero.
CHAPTER 6 – WEATHER
Exposure to the elements is by far one of the most challenging aspects when it comes to surviving in The Long Dark, and changes in the weather can often decide whether your excursions from the safety of the indoors prove fruitful or fatal.
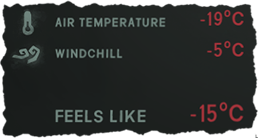
Temperature is divided into three categories in The Long Dark:
- Air Temperature (also known as Ambient Temperature)
- Wind Chill
- “Feels Like” Temperature

Air temperature is the “ambient” temperature of the environment. Indoor temperatures are warmer than outdoor temperatures, even if there is no fire or heat source around, and are usually about +10°C to +30°C warmer than the outside temp. Starting a campfire will quickly increase the air temperature in a small radius around the campfire. If the fire is an indoor stove or fireplace (not a self-placed campfire) the fire will heat up the air temperature of the entire room, so you can walk to the end of the room (far past where a normal campfire would stop warming you) and craft for hours with no fear of freezing. Open-faced caves are warmer at the back than at the front.

Wind Chill can turn an otherwise manageable Ambient temperature into a freezing nightmare. In a blizzard, Wind Chill is often to blame for the dangerously frigid temperature drops experienced when outside in a storm. It’s not uncommon for Wind Chill to be twice as cold as the Ambient temperature, turning a -10°C day into a -35°C day for any unfortunate soul that hasn’t found shelter. Wind Chill can be countered through wearing clothing with Wind Chill reduction on your Outer layers – for example, a -10°C Wind Chill would be reduced to a -4°C Wind Chill by wearing clothing with a total combined Wind Chill resistance of 6°C on your Outer Layer. In a blizzard, however, no amount of protection will completely protect you from the bite of the wind. It is impossible to start a fire in high wind, and existing fires will become “Windblown” and have their lifespan immediately capped at 9 minutes with minimal heat output. Torches will be blown out by high winds, but a Storm Lantern will not. You can use natural terrain like hills, big rocks, and caves to find shelter from the wind. If you are sheltered from the wind, a Shield symbol will appear in the top-middle of the screen for as long as you are in the safe zone. Use caution, however, as wind can change direction unpredictably and start blowing from the other side. In a long storm, nothing substitutes for a real shelter. In an emergency, a Snow Shelter can be built with sticks and cloth to provide protection from the wind and a +15°C warmth bonus, letting you craft, sleep and rest without a bedroll, as well providing an additional +3°C bonus if you do use a bedroll inside.

The “Feels Like” temperature is the temperature your character actually experiences after Ambient Temp, Clothing Wamth Bonuses, Bedroll Warmth Bonuses, and Wind Chill have all been taken into account. If this is above freezing, you start warming up. If this is below freezing, you start losing warmth until your Warmth meter hits zero and you start to freeze. Open the bedroll to determine if it can keep you warm for the night without need for a fire. Bedrolls in bad Condition do not insulate as well, and different beds have different insulating properties. On any difficulty, if your Warmth drops to Freezing and your Condition hits zero within your planned sleep, you will die in your sleep and never wake up.

Snow will gradually wet your clothing, which decreases its insulating properties and makes it heavier. If you have not had the chance to dry off your clothing in a very long time, this could start becoming a real problem. Heavy snow and rolling fog will both severely limit your visibility. Heavy snow and fog at night is close to zero visibility no matter what light source you use.
The spectacular result of the geomagnetic solar flare that caused the global blackout, Auroras are uncommon but beautiful nighttime displays – with their own dangers and benefits. The Auroras from the solar flare make predators highly aggressive while the Aurora is out. They will ignore any attempts to fend them off and immediately stalk and pounce on anything in their path. Also, Auroras cause all the electric lighting disabled by the geostorm to briefly come back online. The Flashlight, an item that is always out of batteries, only works during Auroras and projects a powerful beam of light. The light cast by the Aurora also allows you to see much better at night than by moonlight alone.
CHAPTER 7 – FIRE
Fire is key to keeping yourself warm in The Long Dark, and has many other uses as well, including cooking, purifying water, providing light to read and craft by, and deterring predators.
To start a fire in The Long Dark, you will always need:
- Firestarter – Matches, Firestriker, a lit Torch or Flare
- Tinder – Tinder Plug, Birch Bark, Cattail Head, Newspaper
- Fuel – Sticks, Logs, Books, Coal
To start a fire, either use a pre-existing fireplace, or make your own fire anywhere there is level ground by selecting Campfire from your Radial menu or pressing 4. The firestarting UI will ask you to specify the firestarter, tinder, and fuel you wish to use, as well as optional accelerant. Lighting has a fire has a chance to fail, displayed in the UI after selecting all your ingredients. Failing to light a fire will use up the tinder and match, but will not use up the fuel. Lighting a fire with a lit torch or flare is possible. Torches themselves are a guaranteed light every time and can then be used to light a fire, though the torch will eventually burn out after 1hr 30min of total burn time. Torches need Lantern Oil to be crafted.
Accelerant is any highly flammable liquid that aids in the rapid production of a fire. You are given the option to use an accelerant when you start any fire. A bottle of lighter fluid, your lantern’s oil, and kerosene from a Jerry Can are all useable as accelerant. Accelerant makes your fire a guaranteed start, as well as making it start almost instantly.
These usually come in the form of matches, but there are several unique options for firestarting that you’ll encounter in The Long Dark.
Can be fashioned from sticks, or simply found lying around. Some items that can be used as tinder can be split into several pieces of tinder, which is less wasteful, but takes some time.

(7 minute burn time)
Sticks burn for a short time, and can be found lying around under trees. High wind will blow sticks, branches, and limbs off of trees, and they will fall onto the ground naturally, given enough time. Adding more sticks to a fire increases the lifespan of the fire by 7 minutes a stick, so piling sticks on is just as efficient than throwing them on one at a time. Sticks burn quickly but they burn hot, and will create short-lived and high-temperature fires. Branches can be found lying around, and can be broken down into sticks for use in a fire, but this takes time. Sticks also increase your chance your fire starts by 15% when first lighting it.
(1hr burn time for Cedar, 1hr 30min burn time for Fir)
Logs come in two types – Cedar and Fir. Cedar Logs share the same firestarting bonus that Sticks do, a 15% bonus to firestarting chance. Fir Logs do not have this bonus which makes them worse when first lighting a fire. Although Fir Longs burn longer, Cedar is overall more efficient in weight-to-burn time. However, Fir Logs take the same amount of time to harvest as Cedar logs and burn for longer. There are many tradeoffs here that you’ll have to take into account. Fir limbs are bigger than Cedar limbs. Harvesting a Cedar Limb gives you free Tinder Plugs. Limbs come in various sizes, from small to huge, the bigger ones yielding more firewood but taking longer to chop. Hatchet or saw required.
(30 minute burn time)
Reclaimed Wood is wood harvested from furniture and other man-made items. It is also used in crafting. Breaking down furniture takes time, but can be sped up with tools. It does not burn for long and actually provides a -5% penalty to your firestarting chance if you use it to light your fire.
(1 hour burn time)
Found in caves and mines, coal can only be added to a fire after that fire has been burning for 30 minutes. Light and extremely hot, Coal is the only fuel that can raise the temperature of a Forge past 150°C to allow for metalworking.
(18 min burn time)
Books give a large 35% bonus to firestarting chance. They only burn for a short time though. Research books and Field Manuals can be added to a fire if you wish, but only do this if you’re not interested in reading it or are done using it, as it will destroy the book.

Fires give off heat, measured in degrees and visible when mousing over the lit fire. This is the amount of heat that the fire is raising the local air temperature by. Hotter fires warm you up faster. Walking over a fire will burn you, and requires treatment with first aid.

Snow can be melted in a container to produce Unsafe Water, and Unsafe Water can be boiled in a container to produce Potable Water. (Refer to Chapter 8: Cooking.)

Food can be cooked over a fire to drastically reduce risk of contracting Food Poisoning. Canned foods and beverages can be heated for the Warming Up bonus. (Refer to Chapter 8: Cooking.)

Wolves will always flee from a campfire, often flee from a lit flare, and sometimes flee from a lit torch – depends on how good you smell to them – watch what you’re carrying. Wolves will flee from a fire that hasn’t been fully lit yet, but you may be attacked immediately if the attempt fails. Moose are not scared of fire but are afraid of noises, as long as you are not invading their personal space. Bears shrug off shots to the face with a hunting rifle, fires will not stop them either.
“Fixed” fireplaces will heat their entire indoor area and not just a small circle around them. They are also immune to being Windblown.
Fires in high winds can become “Windblown” and have their lifespan immediately reduced to 9 minutes, no matter how much life was in them. You cannot start a campfire in high wind, so get behind terrain first. You are out of the wind when the Shield indicator appears on your screen.
Lit torches can be taken from a fire at 25% to 50% condition, with a 10-minute lifespan, reducing the warmth of the fire by 1°C.
Charcoal can be taken from the fire after it goes out. It is used for sketching out maps.
CHAPTER 8 – COOKING
Cooking is a core mechanic in The Long Dark and essential to your survival. Cooking larger meals requires the use of multiple cooking containers and multitasking skills – if your fire goes out early, your food will not be cooked, but if it is left cooking too long it could burn and turn into an inedible lump of carbon. Juggling multiple cooking timelines to maximize the efficiency of your fires and get the most out of your available resources is an important survival skill.
Cooking a food item greatly reduces the risk of food poisoning from consumption. Cooking raw meat restores its condition by 50%, up to a max of 100%, and slightly increases its caloric value. Cooking fish slightly decreases its caloric value. Prepackaged food items like cereal, crackers, and dog food can’t be cooked. Canned food items and beverages do not require cooking, but can be Heated Up. Canned foods and beverages that are Heated Up will be labeled “Hot” and will confer the “Warming Up” bonus if consumed while still hot, giving you +4°C bonus to your “Feels Like” temperature for 2 hours. Meat can be eaten raw, but at a very high risk of contracting food poisoning. Note that cooked foods can still give you Food Poisoning if the food’s Condition is low – Cooking reduces Food Poisoning risk by a large percentage, but may not eliminate it completely from old foods.
Cooking a food item will always require a fire – either a campfire, or a contained fire made in a stove, oven, or furnace. There is no difference between using a freestanding campfire or a contained stove fire to cook, but note that “contained” fires inside stoves and ovens cannot be Windblown and extinguished by high wind. Food and containers must be manually placed on designated cooking surfaces, either on the stones next to the fire (in the case of campfires) or on top of the cooking appliance (in the case of stoves and ovens) by using the Radial Menu.
Snow can be melted over a fire to produce Unsafe water, and dirty water can be boiled to sterilize it and produce Potable water. Drinking Unsafe water can cause Dysentery, a crippling disease. Melting snow requires a cooking container such as a pot or can to melt the snow in. The amount of snow or water you can melt or boil is limited by the size of the container you are using. Snow is automatically added when melting snow – you do not need to gather snow. To melt snow, place a pot or can on one of the cooking surfaces next to a fire, then click on the container to bring up the Melt Snow interface. To boil water, click on an empty cooking container next to an active fire and add Unsafe Water from your inventory. The time to boil depends on the amount of water added – water that is removed before being brought to a boil will remain Unsafe. Snow that is melted will eventually boil if left sitting on the fire – and water that is boiled too long will evaporate completely, in an identical manner to the Burning mechanic.
You cannot eat snow. On a side note, eating snow is almost suicidal in a real-life survival situation as it very quickly leads to hypothermia and places great stress on the body, not to mention risk of disease.
Food can be cooked in cooking containers for bonuses. Cooking in a Cooking Pot grants you a 20% increase in cooking speed and delays Burning by an additional 20%. Some cooking containers offer no bonuses. Cooking liquid beverages, melting snow, and boiling water always requires the use of a cooking container. Powdered or ground beverages like Coffee and Tea require potable water to be added when cooking. You can only cook a single item in a single container at a time (i.e. you can’t both melt snow and cook wolf meat in the same pot simultaneously). Cooking containers have a maximum capacity – you can boil much more water in a pot than a can. Cooking containers are unique items – the cans from food items like Tomato Soup are destroyed upon consuming the food item and can’t be used for containers later. Though snow and water must be cooked in containers, water does not require a container to be stored in your backpack.
Both cooking containers and food items can be placed by clicking on the item in the Radial Menu and manually placing it on the highlighted areas, either the stones next to a campfire or the cooking surfaces on a stove or oven. Items like raw meat and canned food can be cooked by themselves without the use of a container. To place items inside of a cooking container, place the container on a heated cooking surface, then click on the container to open up the Cooking Interface, and place the desired item inside the container. Items that can be cooked without a container can also be cooked inside a container as well – containers like Cooking Pots offer bonuses to Cooking Speed and Time to Burn.
Mouse over a currently cooking food item or container to see the time remaining before completely cooked. Cook times vary from item to item and can take anywhere from minutes to hours depending on the item and amount. Cooking times scale with the amount of food cooked – cooking two pounds of meat takes twice as long as cooking one pound. You are free to leave the items cooking and do other things in the meantime, as well as use the Pass Time function – however unattended food can Burn and water can Evaporate if left cooking for too long.
Food that is removed from the fire before being completely cooked will not be cooked at all and will completely reset the cooking timer. If the fire dies out, the cooking timer will be briefly paused and there is a small time window to relight the fire before all active cooking timers are reset completely. Food that is left over an active fire for too long will Burn after a period of time (“time until burn” is visible when moused over) and be rendered completely unusable, in addition to damaging the Condition of the cooking container it was in. Burning is immediate and irreversible, and burned items will disappear when picked up.
Storing meat in areas or containers with an Ambient temperature below Freezing will slow the rate at which the meat Decays and loses Condition. Meat that is left on the ground or in containers will not attract predators unless specifically placed as Bait. However, meat in your inventory, frozen or not, will attract the attention of predators. Raw meat is smellier than cooked meat.

Cooking is a Skill just like Fishing and Firestarting, and cooking items will level up your Cooking Skill – providing Cooking-related bonuses that can be viewed in the Skills page. The Cooking skill is raised by reading cooking manuals and cooking food items. Melting and boiling snow, as well as heating up already cooked items, will not increase your cooking skill.
CHAPTER 9 – WILDLIFE & HUNTING
Daily encounters with wildlife are part of living in the Canadian Wilderness, and hunting is an important skill to master in The Long Dark. Fish, Rabbits, Deer, Moose, Wolves, and Bears can all be hunted for their meat, and all animals except for fish can be skinned for their pelt and guts, for crafting.

Fishing can only be done at ice fishing huts – there is a hole drilled into the ice that you must break with a tool before you can drop a line in, and this hole will freeze over again if enough time passes. Fishing requires nothing except the craftable Fishing Tackle tool. Fishing lines can snap, completely destroying the fishing tackle. If you catch a fish, it’s type will be displayed along with its size and caloric content. Cooking fish is the only way to naturally gain lamp oil.

Rabbits live in rabbit groves and tend to frequent the same areas. They can be stunned with rocks you find laying around – use right mouse button to aim and left mouse button to fire. After stunning them, you can run up to them and snap their necks. They can also be caught with Snares. Like all wildlife in The Long Dark, they may not reappear in an area for a long, long time once hunted, and may not be found in the same place on two different playthroughs.

Deer are skittery and sensitive to noise. Like all large animals, they can smell you coming if you are upwind of them. They are the natural prey of wolves, and man. They tend to frequent the same areas and repopulate slowly.

Moose are solitary and dangerous animals. They will attack if you get too close, and trample you. They mark the outskirts of their territory by rubbing the bark off trees – if you see trees with their bark rubbed off, you might be entering a moose’s territory.

The scum of the earth. Kill them and create a better world for us all.

Bears live in caves – bear caves have bones in them. They are slow and easily avoided, but if you get close to one, you risk being charged and attacked. Bear maulings are no joke and will leave you in critical condition – you can’t fight the bear once it has you.

Crows circle around dead bodies and drop feathers used in crafting. Crows flying away might signal a change in the weather, prepare accordingly.

Your “stink” is represented on a scale of 1 to 3 at the top of your screen whenever you are carrying raw meat, guts, or other freshly harvested and meaty items. Raw meat smells stronger than cooked meat. Although your Stink is measured from 1 to 3, any piece of meat carried causes you to Smell, even if your total Stink hasn’t yet reached Level 1. The wind will carry your scent and alert animals downwind to your presence, even if they can’t see you. Noise will also alert animals to your presence, either causing them to flee, or investigate.

If you are attacked by wildlife you will enter a Struggle. As you are pounced, you will be given an option to select what tool you will defend yourself with. Sharper weapons have the most killing power, but blunter options can get them off you quicker. Bare hands offers no bonus. Upon entering a Struggle, you must rapidly click Left Mouse Button to fill up the Struggle meter. The quicker you fill the meter, the more damage you do to the animal and the faster you get it off you. Struggles always cause immediate Condition loss and damage your items (both clothing and inventory) and often cause Afflictions like Blood Loss, Sprained Ankles and Wrists, and if left untreated, Infections. Struggles that injure you severely can cause you to black out. Moose will trample you, breaking your ribs while you are helpless. There is nothing you can do once you are involved in a struggle with a bear.

Shooting an animal with the bow or rifle will cause it to bleed out over a period of time. You must track the animal, using the blood trail, tracks, and sounds of the dying animal to find its final resting place. Shots to the chest have a small chance to immediately kill, this chance improves the higher your weapon skill is. Shooting an animal in the chest will cause it to bleed out far quicker than shooting it in the leg or the rear. Shooting an animal in the head is always fatal. Unless that animal is a bear. All animals will eventually bleed out if shot with either a bow or rifle except Moose, which must be killed with either a headshot or a critical hit to the body. Bows cause more bleeding damage, but rifles have a higher critical hit chance. Arrows can snap if their condition is low. Arrows can be retrieved and reused, and arrowheads can still be salvaged from broken arrows.
Animals can be skinned and gutted by hand if their corpse is not frozen. If it is, you will need to thaw it out first with a fire, or use sharp tools to skin it. Skinning and gutting is much faster with tools. You can use any bladed tool, though knives are best suited to the job. Hacking tools are better at harvesting frozen carcasses. Carcasses can be Quartered – a process where the animal is skinned and gutted, placing the remaining meat in a large sack. This sack can be carried with you so you can finish harvesting the meat when you please.
You can craft rabbit snares and place them in areas that rabbits frequent. They may catch a rabbit sometime during the day or night.
CHAPTER 10 – DISEASES & MEDICINE
Diseases are a big risk in The Long Dark, ranging from “minor inconvenience” to “life-threatening.” As with everything in the Long Dark, even a minor nuisance, if it happens at the exact wrong time, can end a playthrough.

Cause – Freezing for more than 2 hours
Effect – Doubles condition loss from Freezing and doubles Fatigue drain
Cure – 12 consecutive hours of Warmth (above freezing)

Cause – Uncovered skin while Freezing for multiple hours
Effect – Permanent 10% reduction to max Condition
Prevention – Wear clothing in the slot, and keep it dry
Cure – None

Cause – Wound from animal attack or fall
Effect – 5% Condition Loss per Hour and Fatigue Increase, Fatal if left Untreated
Prevention – Antiseptic applied immediately after incident. The longer you wait, the more chance you’ll develop an Infection the next day
Cure – Antibiotics and 10 hours of Rest

Cause – Drinking unpurified water
Effect – 4% Condition Loss per Hour, cannot heal in sleep, rapid depletion of Thirst bar
Cure – Antibiotics, then drink 2 Liters of Water, then get 10 hours of rest, in that order (cnd loss stops after treatment)

Cause – Eating low-condition food, especially raw meats
Effect – 85% Condition Loss over 18 hours if untreated, can shorten to 10 hours with treatment
Cure – Antibiotics and 10 hours of Rest

Cause – Eating Predator Meat (risks increase w/ each predator meat eaten)
Effect – 2% Condition Loss per day and 4% Max Fatigue Loss, Fatal if left Untreated
Cure – Antibiotics every day for 10 days (20 on Interloper), kills in 50 days or less

Cause – Spending the majority of six days indoors
Effect – Cannot rest indoors for 24 hours
Cure – Spend time outside until cabin fever is cured
Risk – 50 days before risk of CF in Voyageur, 25 days in Stalker, risk starts on Day 1 in Interloper

Cause – Animal Attack or Fall
Effect – 30% Condition Loss per hour if unbandaged, risk of Infection
Cure – Bandage

Cause – Animal attack, falling, or walking on steep terrain
Effect – Cannot equip weapons
Cure – Painkillers or 2 hours of rest

Cause – Animal attack, falling, carrying extreme loads, or walking on steep terrain
Effect – Cannot sprint
Cure – Painkillers or 4 hours of rest

Cause – Moose attack
Effect – 50% stamina reduction and 25% carry weight reduction
Cure – Bandage and Painkillers, then 120h of rest, then Bandage and Painkillers again
(all treatment can be postponed until after the rest period, since it takes 120 hours of rest regardless)

Cause – Animal attack
Effect – Immediate Condition Loss
Cure – None (Immediate Effect)

Cause – Animal attack or Fall
Effect – Immediate Condition Loss
Cure – None (Immediate Effect)

Handcrafted item made from Cloth. Stops Blood Loss.
Disinfecting fluid used to prevent Infections from wounds, several treatments in a bottle. Herbs can be found and prepared that act as a natural disenfectant.
Medicine that kills internal bacteria. Different diseases require different doses. Herbs can be found and prepared that act as a natural antibiotic.
Medicine that provides local pain relief. Herbs can be found and prepared that act as a natural painkiller.
Medical epinephrine auto-injector. When used, it immediately heals 15% of your condition and gives you unlimited sprint/stamina for a few minutes, ignoring all sprains and Fatigue. After the effect wears off, your Fatigue bar will immediately plummet to zero, your vision will be blurred, and your ears will be ringing. The Condition gained remains.
Instantly restores 10% of Fatigue bar and reduces Fatigue decay, sprinting uses half the normal Fatigue (lasts 1 hour).
Condition regained from sleeping improved by 2% per hour (1% for Interloper) for a total of 6 hours (12% condition max, 6% max on Interloper). Lasts for next 6 hours of sleep, whether consecutive or not. Provides a small amount of Calories.
Unlike Herbal tea, which is manmade, Medicinal Tea is made from herbs you forage in the wild. One functions as an antibiotic and the other functions as a painkiller. They do not Decay like regular medicine. Provides a small amount of Calories.
MORE MECHANICS

Activities like Cooking, Firestarting, and Fishing all have a Skill Rating that can be leveled up by doing those activities repeatedly. With each level-up, your character gets unique bonuses pertaining to that activity. Your Skills can be viewed in the Skills tab, after opening your Inventory.
These books can be found and allow you to train skills without actually engaging in those activities. Once fully read, the book is useless and can be used as firewood. Reading, like crafting, requires a light source bright enough to see by.

The map is accessed by pressing “M” or navigating to the Map tab in your inventory. The map starts out blank, but you can fill it in through Surveying, which requires a lump of charcoal which you can take from any burned-out fire that has burned for an hour or more. Surveying takes around 10-20 minutes while you survey and sketch the area around you onto your map. You will also mark the location of any nearby resources on your map. Your position is not indicated on the map and it requires you to be familiar with what it is you drew and where you drew it.

On the map screen, there is a button to view the World Map, that displays all possible regions you can travel to. The entrances and exits on the World Map are not drawn entirely accurately, i.e. the path out of a region may be drawn as leading out from the bottom-left of the region when the actual road out is at the top-left of the region. The world map should given much leeway for interpretation.

Mountaineering Ropes can either be found hanging from cliffs, or can be carried and manually deployed by the player from the top of cliffs that have a thin protruding rock. They cannot be crafted and must be found in the world. Rope climbing is extremely fatiguing. Your current level of fatigue determines how fast and efficiently you climb up the rope. Fatigue depletes around 20 to 30 times as fast while climbing a rope. Rope climbing uses your Sprint meter. If the Sprint meter reaches zero, your climb slows to a crawl and you run the risk of falling off the rope at a random time and for a random distance, up to and including – the ground. You cannot rope climb if your Encumberance exceeds your Carry Limit. Climbing down is much easier than climbing up. Sometimes there are ledges that you can choose to get off on and rest before continuing the climb up or down – look around and click on them to dismount from the rope.

Unlike other inventory containers in the game (Water Bottles, Lantern Oil, etc.) the Jerry Can is a freestanding container and can be carried empty. Its sole purpose is to hold Kerosene, which is the manmade equivalent to Lantern Oil, and can be used as Accelerant.
Distress Pistols fire flares, and to great effect.

The Journal is accessed by pressing “J” or navigating to the Journal tab in your inventory – it includes a daily diary labeled by calendar day, along with a general notepad for to-do’s and a stats sheet tracking your playthrough’s statistics thus far. You can save your journals after your death if you wish and review them all from the main menu.
Items can be manually placed in the game world by clicking on them in the Radial Menu, and then placing them on a surface by left or right clicking (depending on the item). Food and cooking containers must be placed on designated cooking surfaces next to an active fire to enable cooking – stones in the case of campfires, burners in the case of ovens.
FAQ
Common Forum/Reddit/Wiki Questions, and Potential Questions

A: The game autosaves after you are done sleeping, when you Pass Time, or after going indoors (loading screen). The game autosaves on a Wildlife Attack or Affliction so you can’t “undo” it by closing the game. You cannot manually save in Survival Mode.
A: If you die in Survival mode, you are dead forever. There is an option to save your journal and stats from the playthrough as a keepsake.
A: The Hinterlands team are adding new maps to the world all the time.
A: The game entered Early Access in 2015, and was officially released on August 1st, 2017, for PC, Xbox One, and PS4. Physical disc editions are coming to game retailers soon this year.
A: I designed this guide so that every important gameplay aspect was covered. It shows you the tools in your toolbox, it’s up to you to apply them – it is essentially the Wiki condensed to pocket size, and stripped of screenshots, spoilers, item locations, and strategies. Anything else you don’t know, you can find out by simply playing the game.
A: Pretty much anything you can loot, including herbs, saplings, tools, corpses (whether man or animal), and especially food, may not be there on the next playthrough – it may move to another location, may change type entirely, or just not spawn. The same applies to wildlife. Sometimes they’re there, sometimes they’re not. This happens more and more on higher difficulties.
A: If your Warmth bar hits zero, you will start to Freeze in your sleep, and the resulting Condition loss can kill you.
A: Sleeping consecutive hours restores more Condition than one-hour segments. 1 hour of sleep restores your condition by 2%, and every consecutive hour after that restores 1% more, adding up to a total of 13% Condition restored from your 12th hour of sleep alone. (Greatly reduced in Interloper to max of 5% on your 11th hour). If your Condition is already full, however, taking short naps does the same thing as taking longer ones (Fatigue fills one hour at a time, with a max of 12 hours from Exhausted to Well-Rested).
A: Yes.
A: They are different for different difficulties, and can be found out just by paying a little attention to your Warmth throughout the day and checking your “Feels Like.” Again, they only provide an on-screen estimate and there can be a difference between a high “v” and a low “v.”
A: The game lets you apply medicine on the wrong type of illness, and/or when you don’t need it.
A: Find the exit, and there will be a transition to the next region. There are also small transition zones between some regions.
A: Hit F10 for a hud-free HD screenshot.
A: You can create custom difficulties and tweak all the parameters. You can also name them and share them with other users.
A: Due to the fact that you must craft all your own tools at a Forge (there are only two in the world) coupled with the brutally slashed loot availability and relentlessly oppressive, low-visibility weather, the game mode suits those who already know the maps inside and out, and how to move between them. Even for the longtime veterans, survival is never a sure thing.
A: Because you exist. Use their own hatred against them.
A: I learned the game by playing nothing but Timberwolf Mountain for dozens of games, and eventually learned how to survive on the mountain. It takes a long time to fully explore just one map.
A: This is a manual about gameplay mechanics, not a strategy guide or walkthrough. Figuring it out for yourself is the point of the game. Longtime TLD players still disagree about the best approaches.
A: Nothing – I wrote the guide for players like me, who would prefer a short, concise manual for an undiluted first experience of the game. I would suggest veteran players, who have already experienced most of the game, to get on the forums and Wiki to sharpen their knowledge and play.
A: Use your time wisely, and don’t waste any of it. Manage the day/night cycle. Manage your time.

CHANGELOG
v1.1 – Changes to Clothing, Items, Weather, Wildlife, Medicine sections for complete accuracy, doubled the amount of custom icons and images in the guide, thanks to the Reddit and Forum contributors
v1.2 – Updated for the Vigilant Flame update and new cooking system – Cooking now has its own chapter, moved from the Fire chapter and expanded to cover the new cooking system and how to place items using the Radial Menu. (7.15.18)
Survivor “Qossuth” – Full Guide Review & Feedback for v1.1
Survivor “disrespectful” – clarified passive condition gain mechanic, added to the guide
Survivor “valismasher” – clarified rifle weight, added to the guide
Survivor “sf69” – intestinal parasites occur in Stalker, added to the guide
Survivor “Hawk” – you can Pass Time without a Bedroll in all difficulties, added to the guide
Survivor “judge_ned” – you can sleep in a vehicle without a Bedroll, added to the guide
Survivor “ralf_maeder” – added Condition section in the list of Clothing values
Hinterland Forums Thread[www.hinterlandforums.com]
Steam Discussion Thread
The Ultimate Beginner’s Manual to The Long Dark (NO SPOILERS) from thelongdark
Written by Vance (aka Vaius)
[link]