The ultimate(ish) nugget's guide to Ace Combat 7
General gameplay concepts
The first thing one has to pick is control scheme. There are two - standard and expert. The way the game is intended to be played is on expert mode. This mode allows you full freedom of control over the plane, while standard scheme kinda mixes yawing and rolling together into an amorphous blob of WHYYYY??? Two things are assumed by default in this guide:
- You are playing using a gamepad
- You are using expert controls and metric system
So first things first. When you are flying, there are some terms you'll hear all the time.
Reorientation of the plane is defined by pitching (moving the nose of the plane up and down), yawing (moving plane's nose left and right) and rolling (turning the plane around its central axis, so that one wing goes up, other goes down).
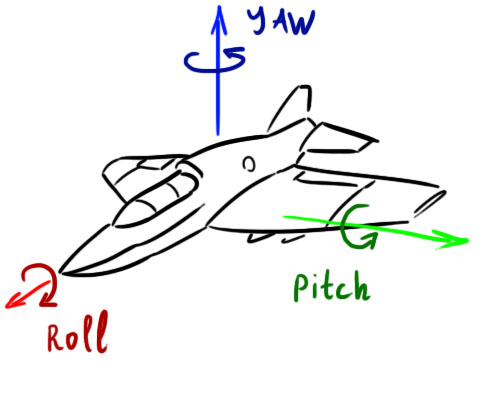
When the jet (or any plane for that matter) is manoeuvring, its ability to change yaw angle is usually much weaker, than its ability to change pitch. So, in order to turn left or right fast, one does not yaw, but rolls sideways, and then turns.
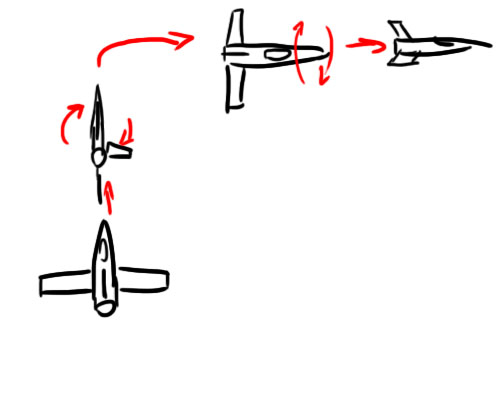
This manoeuvre should become your second nature when playing the game, and it is the only fundamental difference between the standard and expert controls. Yet being able to perform it makes your gaming experience that much richer, I personally think one should consider swapping to standard only if they feel physical discomfort due to sharp turns.
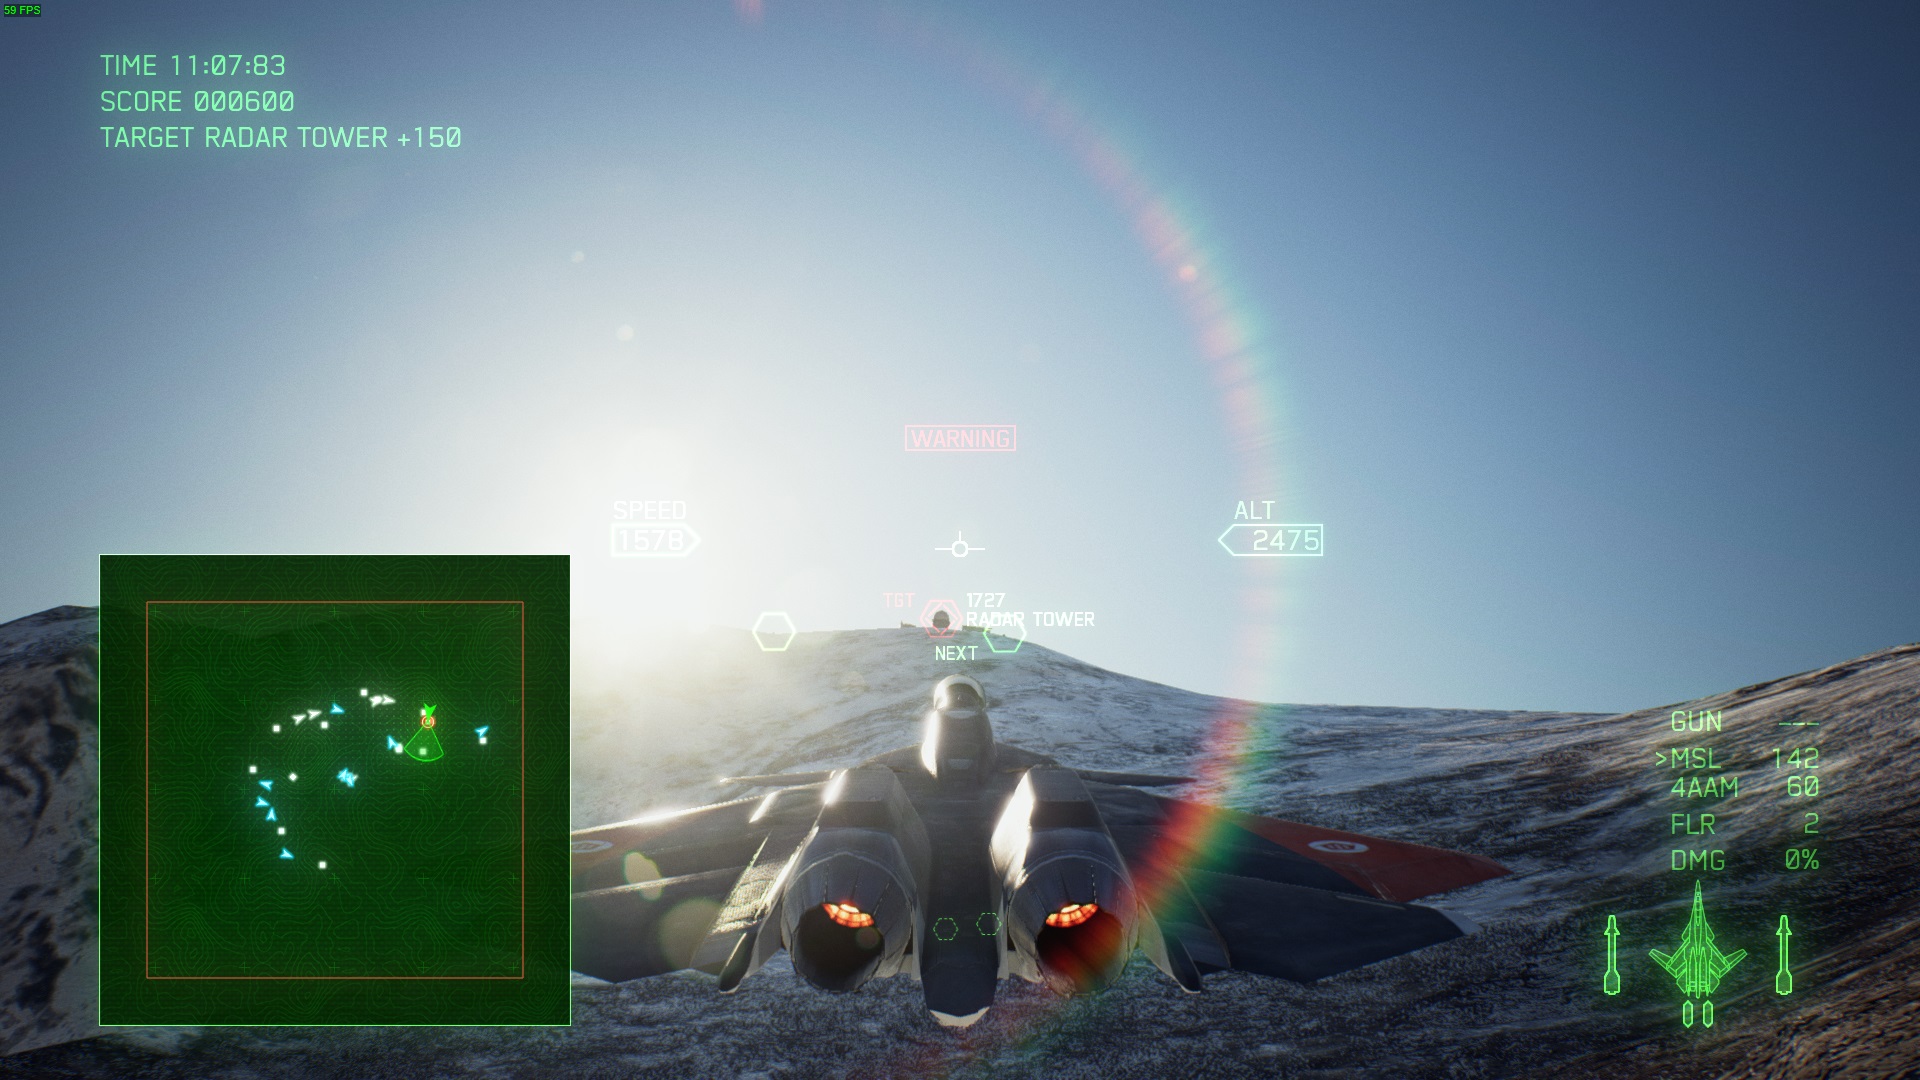
Second important part to controlling your flight is watching your speed and altitude. I'll assume you are using metric system. In real air forces in the west, knots are mostly used to measure speed, but outside we are all used to good old meters and kilometres. Here's a screenshot I've stolen from Google Image Search:
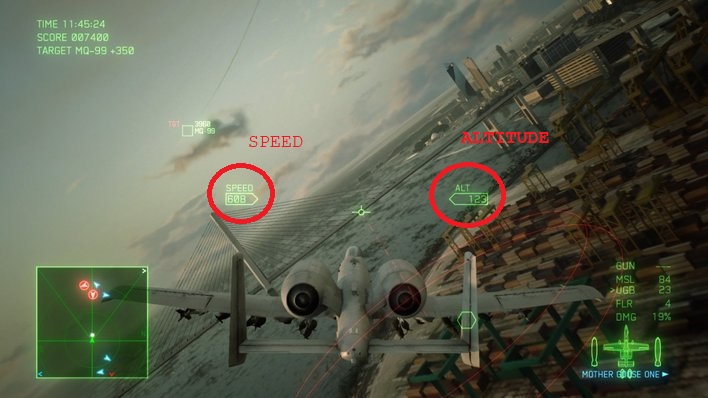
Speed and altitude are shown to you all the time, so take care to watch both of them. Altimeter especially can save you from crashing into the ground, especially while in the clouds.
The plane stalls (i.e, drops down like a rock) at speed around 250. Better avoid stalling, but if stalled - don't panic, immediately increase your speed (right trigger) to above 400 and pull up in a high-g turn if you are at low altitude, or with a normal turn if you have enough space not to hit the mother Earth. Note that if you miscalculate, you might stall again while getting out of stall.
Is a mechanic that was first introduced in Ace Combat 6. It allows the plane to turn around faster at the cost of higher loss of speed (you can stall easily while in high-g turn, so watch your speed). To do a high-g turn, just pull up or down with your left stick while holding both break and accelerate buttons (triggers). You will notice how much faster your turn is, but the speed will fall down frighteningly fast. Don't forget - you can roll to orient the way you want, and then turn to get the direction you need. As soon as you reach needed direction - just release the break button.
You lose speed not just when high-g-turning, but at all times when making any manoeuvres, and when not holding the accelerate button. In last case you'll drop your speed to the 600 mark and keep it.
The higher your speed is, the wider arc you will make while turning, both in high-g and normally. This means that really sharp turns are possible only at low speed, but you are very vulnerable at those speeds. This is a trade - you risk getting hit to position yourself the way you need.
Generally speaking, this game is about your plane positioning itself so that an enemy plane could not effectively avoid your missile fire. Normal missiles are heat-guided, so they fly towards the hottest thing around (as was proven by Ace Combat 5 mission 14). This means that the standard missiles do not target the planes, they target their engines. Considering missile's ability to turn is limited even more so than that of your plane, this is your job to provide the missile the starting trajectory to hit the target. So, set radar to the closest range and observe the enemy's course. To hit the target you need to:
- Be exactly behind them while they are not too far, or else they will turn away or use flares.
- Be literally on collision course in front of them and launch missiles from something like 500 meters or less
- Force the target to stall, and then hit an almost immobile plane
Obviously, the same goes for you. If you hear the 'MISSILE MISSILE MISSILE' and beeping, look at the radar - missiles are marked as kind of white sticks. To dodge a missile, let it get close to you, and then, when beeping starts to accelerate, make a high-g turn.
Flares allow to distract heat-seeking missiles away from your plane. This means that radar-guided and unguided don't care much about flares. Flares have a specific range of effectiveness. Generally, to see whether they will fool a missile or not, look at missile indicator (a red square around your plane). If it is blinking - flares will work on that missile.
Use flares sparingly. In most cases you can avoid missiles, but sometimes you have to keep your speed and trajectory. This is when flares come in handy. To use them click both sticks.
All planes have machine guns on them. those are useful in many cases. For one - they are ideal to take out low mobility targets without wasting missiles. For two - they allow you to keep your missiles ready to launch when needed. And for three - they can finish off damaged targets. To aim MGs close up to around 1000 m to the target, and a big circular reticle will appear. The MG will hit the target if it is in the middle of said reticle. You can get several upgrade parts that help a bit with aiming the MG.
Misison specific advices (1-5)
Then, when MQ-101s arrive, and the ally target "Mother Goose 1" takes off, two drones will be constantly spawned to hunt it. So just keep your eye on Mother Goose 1 and ignore the drones that do not attack it.
Finally, when Mother Goose 1 turns around, at 0:45 seconds left on the timer, kill the drone that flies around it.
This one is infamous for being nugget-unfriendly, and I can certify to that. My arse was kicked, like, 8 times or so, before I've beaten it. But when you know what to do - this mission is actually laughably easy. So, to the tips:
- Take HVAA, 4AAM, QAAM, anything anti-air, and use it only on the bombers
- When the bombers come in groups, slow down to around 400-500 and follow them, while shooting rocket missiles and plasmaeing at them (c)
- If you are hounded by enemy planes, accelerate and pull up until you are flying backwards upside down. let them pass you and then pull "up" further until you are back on course.
- Check your high-range radar from time to time, find bomber groups closest to the control tower and attack them first.
One special missile is enough to take down TU-95, two are needed for TU-160, so take that into account.
As an example I provide a video on how to approach this mission. It is recorded on Normal, with F-16 using 4AAM special weapon and without upgrade parts.
Mission specific advices (6 - 10)
Second part is about protecting allies again. Work with them one by one, try to catch drones that are hit by lightning, and chase them from behind when they are themselves chasing an ally. Don't fly too close to the ground, or lightning strike will make you crash into the ground.
Finally, when Mister X and crew arrive, your task is not to take him down. Prioritize dodging his attacks, and only put your missiles in when he's obviously vulnerable. You need to hit him at least 3 times to win, but between those hits at least 30 seconds must pass from what I've seen. Usually you are free to attack after story-related Mister X's messages. QAAMs are a godsend here, or try to buff standard missiles as much as possible.
Now, first part of this mission is actually simple, just needs planning and practice. You see, those oil tanks are all chain-blow up when hit. So you can take out whole areas of the base with a single well placed missile. But you have to choose targets carefully, watch your speed and altitude. Also, there are 4 tankers for 2000 points, and easily destroyed forward base in the other end of the map. Planes are to be ignored, attack them only if they slowly fly ahead of you with exposed back, no dogfighting allowed until you reach the point limit.
Next, the truck chase. Oooooooofffff. Turn on your wide radar, pick the closest group and fly there, ignoring everything else. Bomb them or 4AGM them. Priority targets are groups in a small ravine close to the centre of the map, they are very hard to hit with MSL due to their position and WIND. Drones are to be ignored, they barely pick you up when you hide in sand clouds.
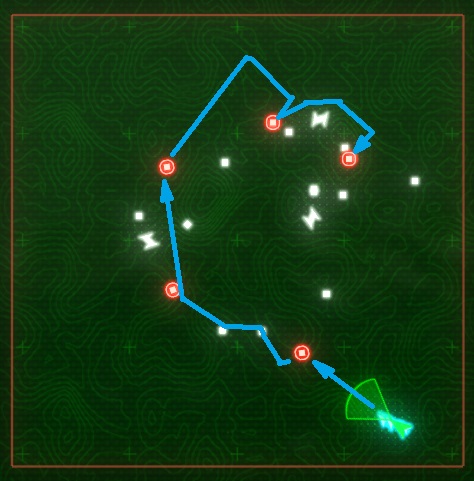
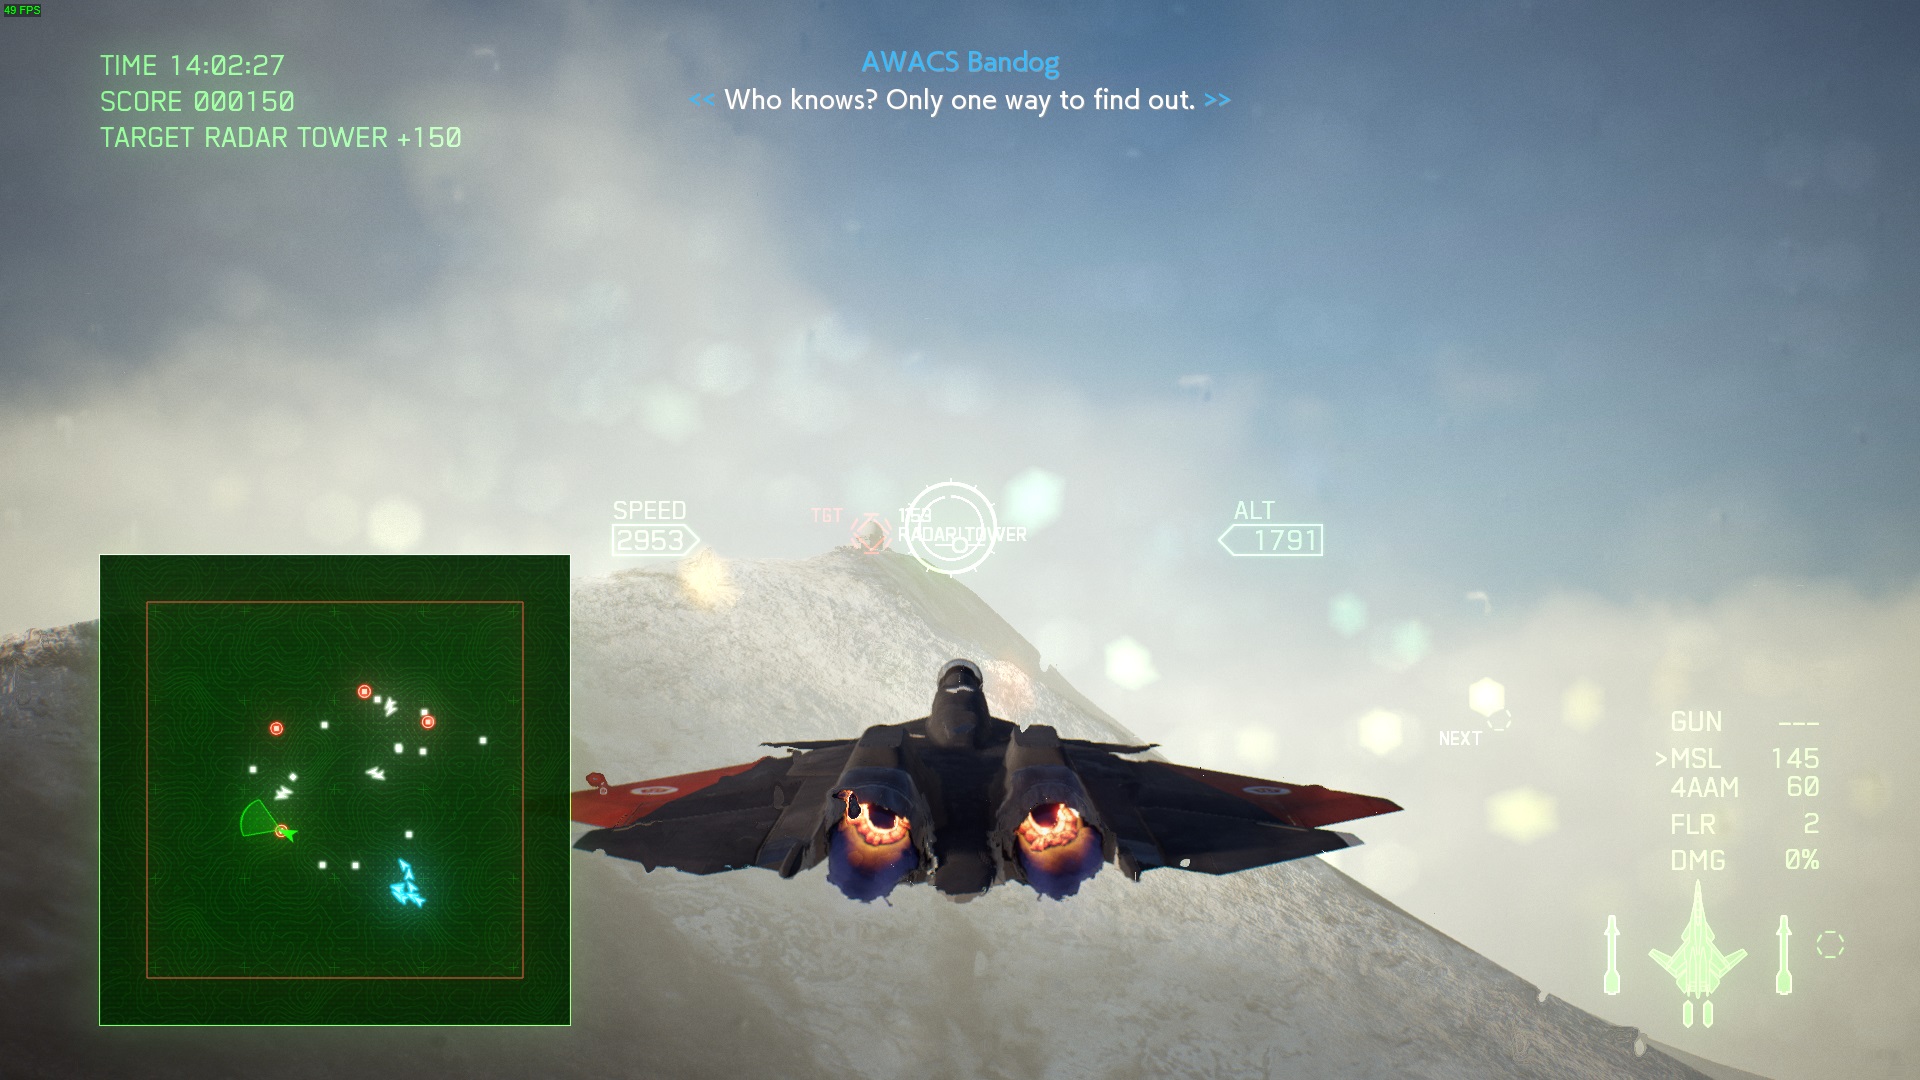
Now, most targets can be easily taken out. In this mission your best friend is LACM, so you need either Gripen or Rafale, but you might not unlocked either by this point. I'll show approach directions for the radars to more or less safely get them with MSL here. Note the radar on the screens. First one is straightforward:
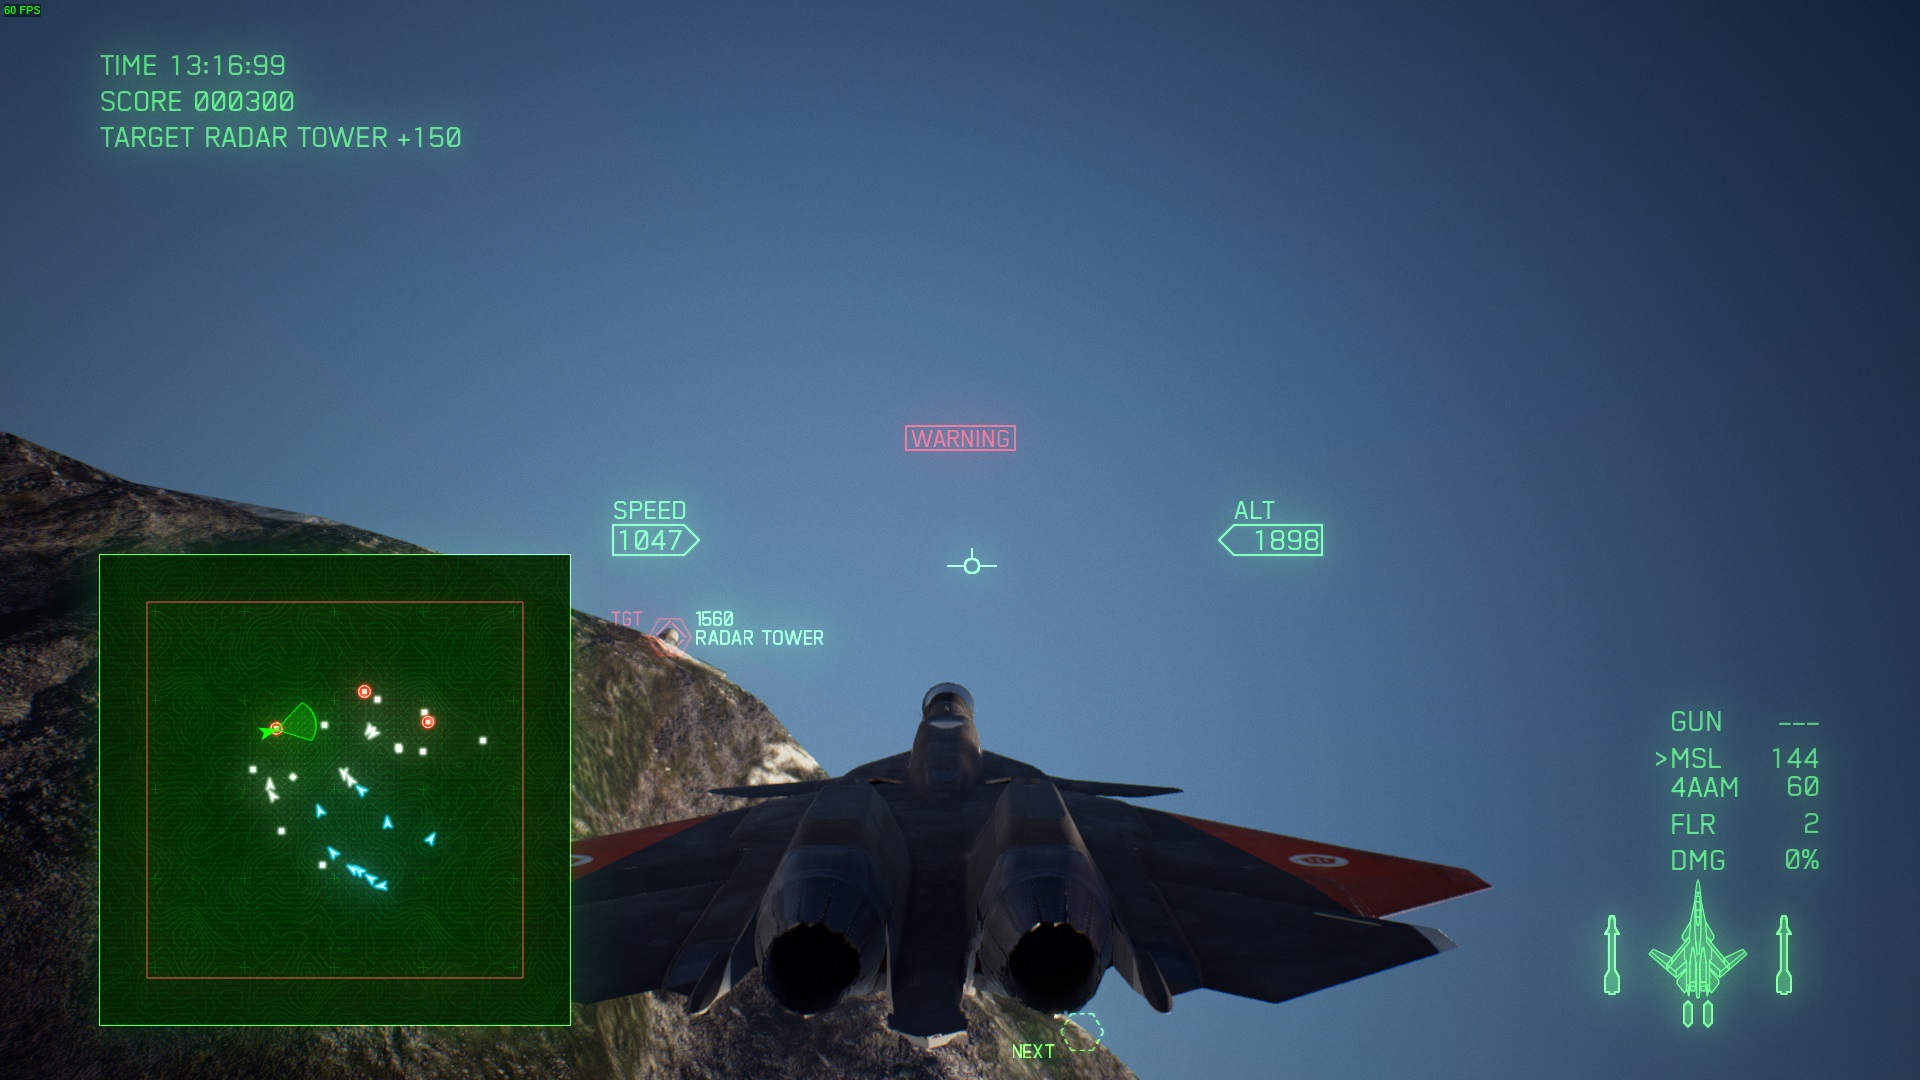
Second one is not too hard, too. Just fly by the mountain, trying to keep in the clouds as long as possible:
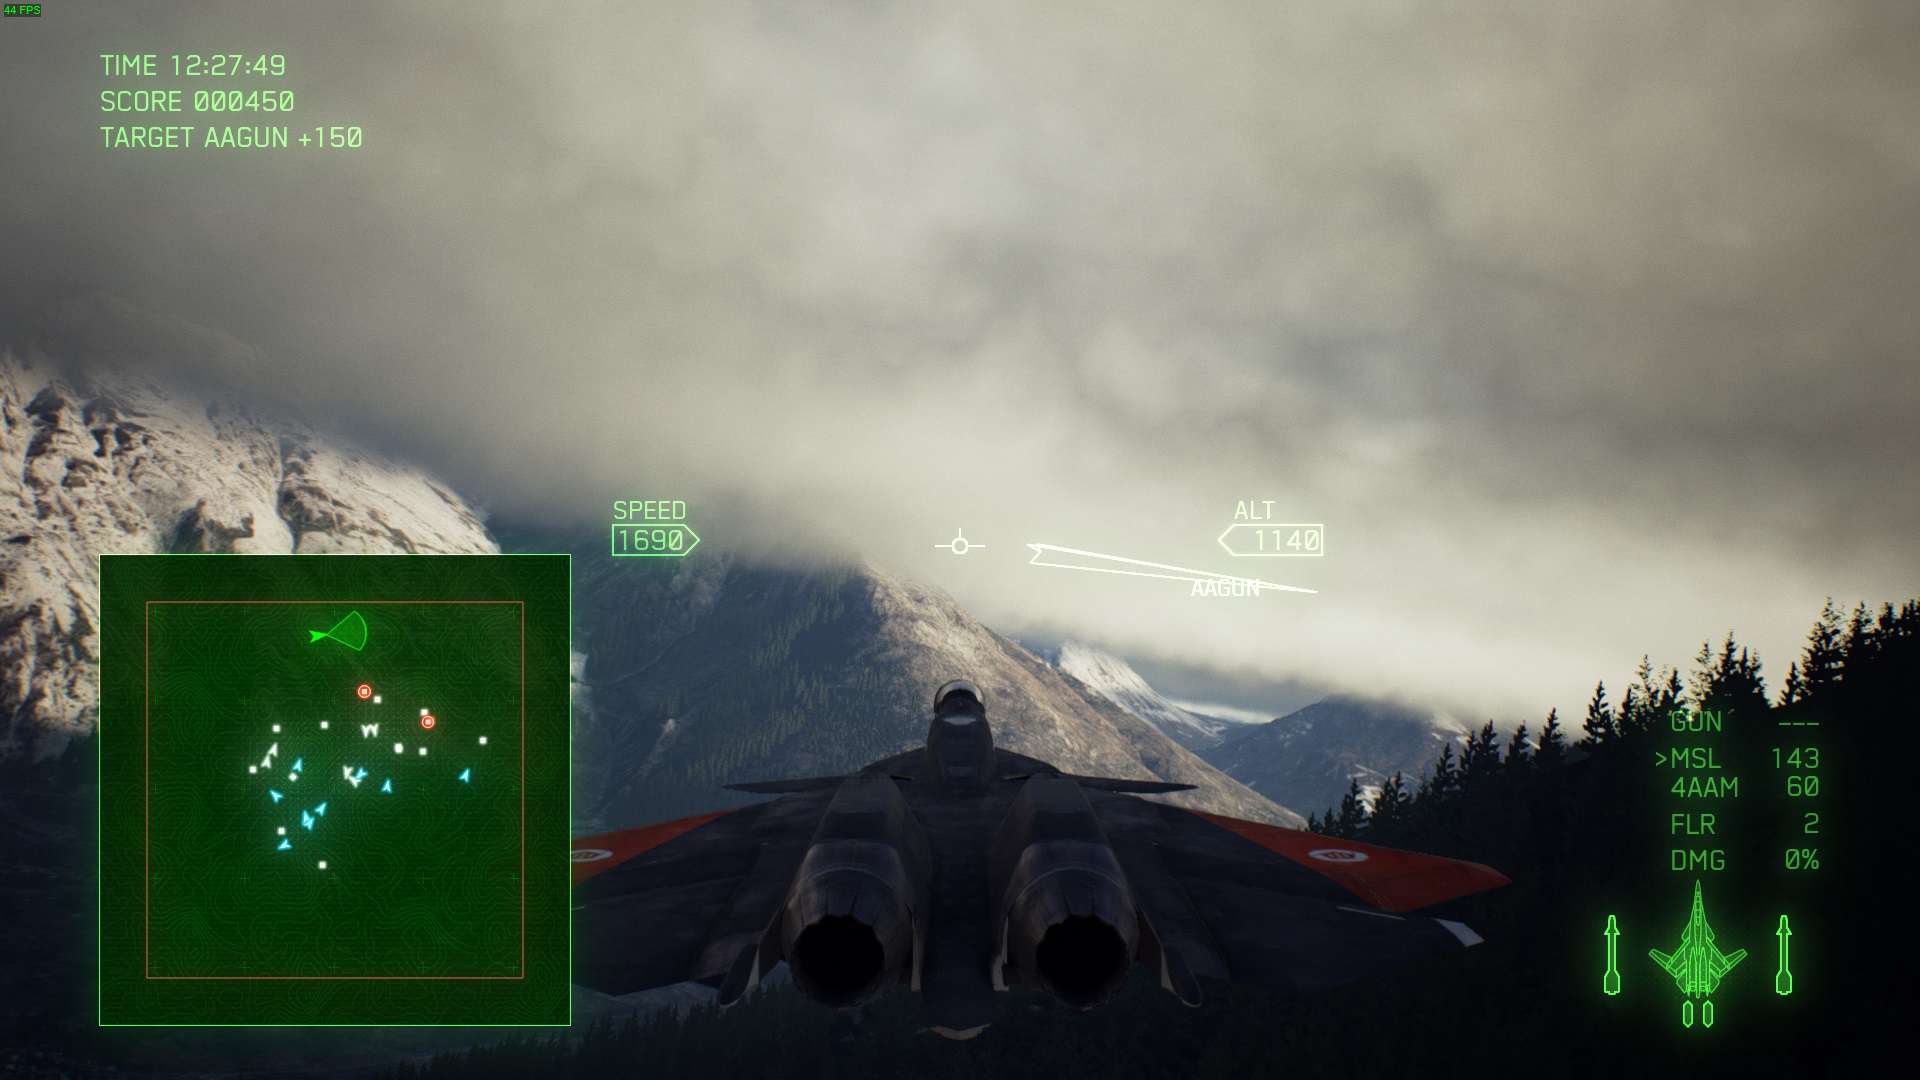
Third is a bit tricky, 'cause you don't have much time, and cloud cover is thin. On easier difficulty levels you can hop over it, on harder you definitely have to pick it and dive back from where you arrived.
From there move north somewhere down here:
This way you'll safely get to the last two radars. First one is approached like this:
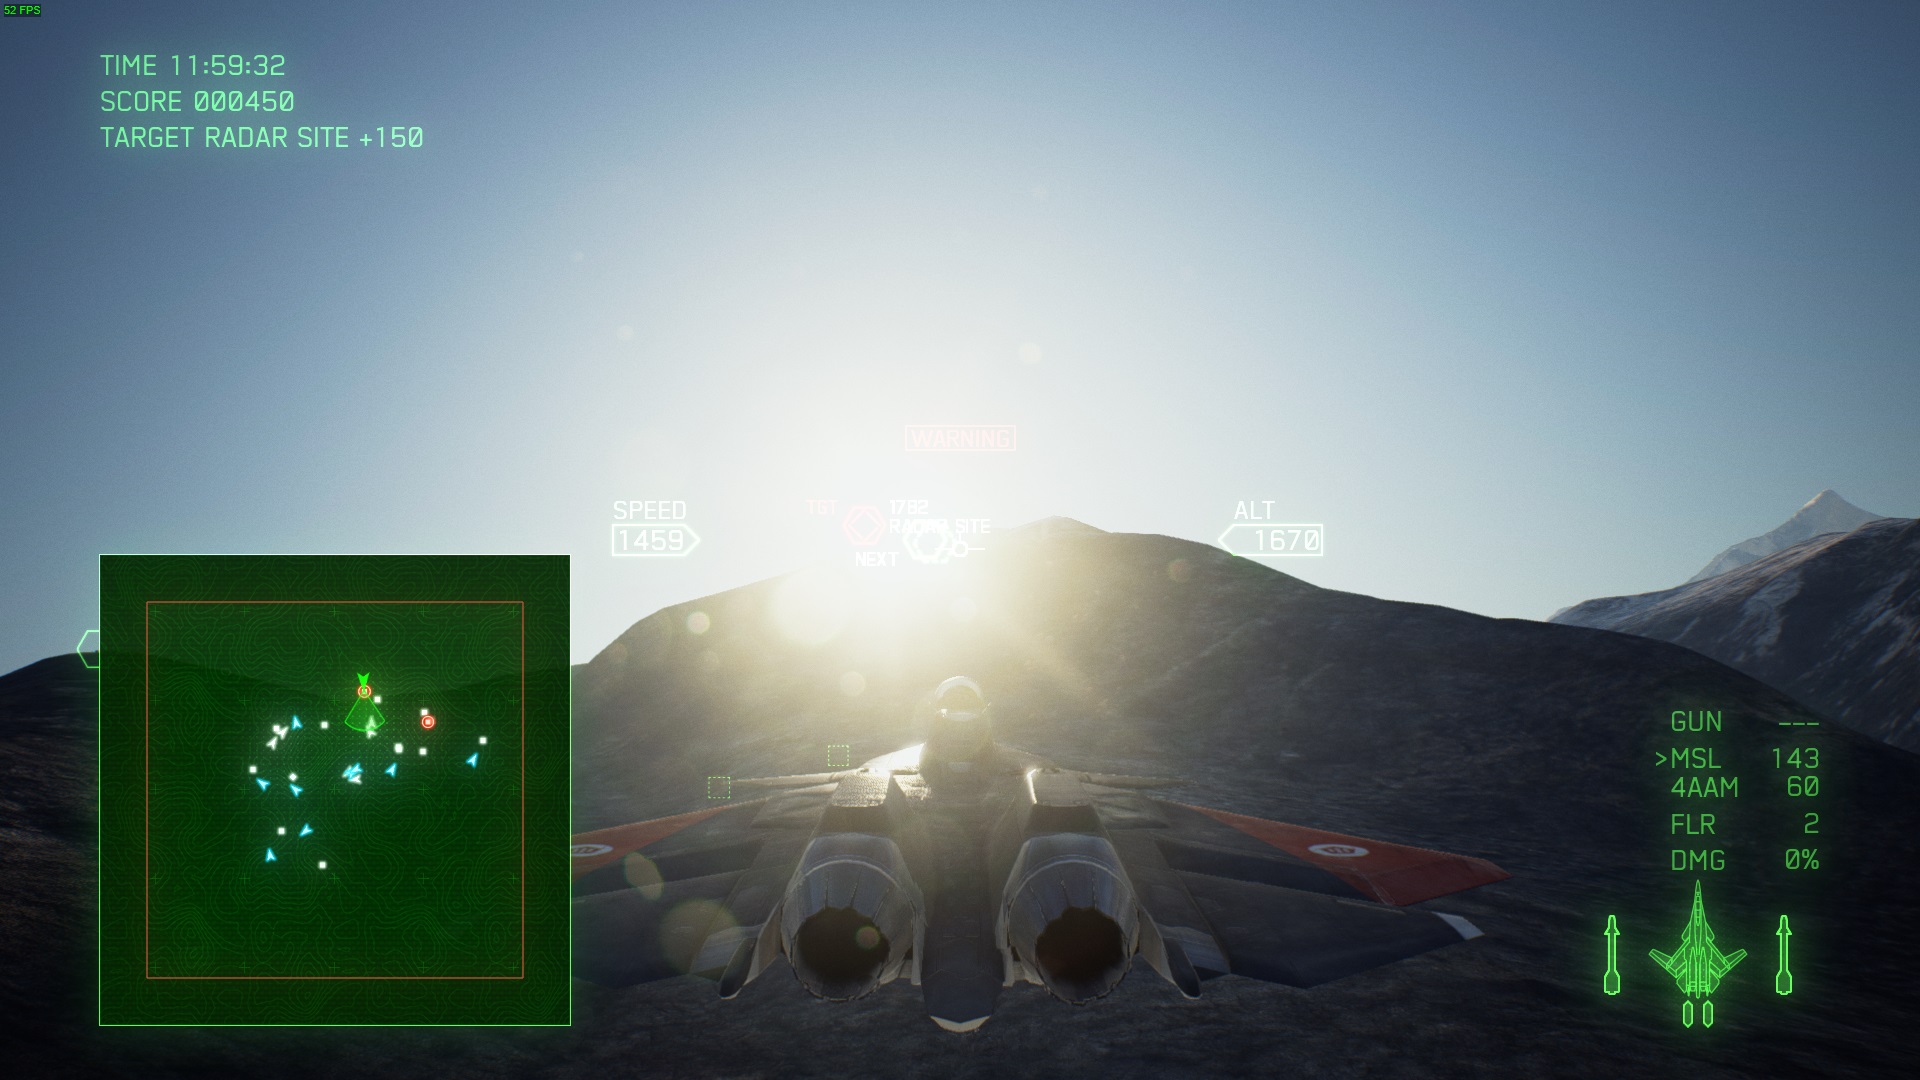
Pull back and dive to the clouds quickly after that, this manoeuvre is risky. The final tower can be reached like this:
If you do it fast enough, you'll fly over the mountains and reach safety if the missile was sent after you. But if you are really fast - AA system won't have enough time to launch it.
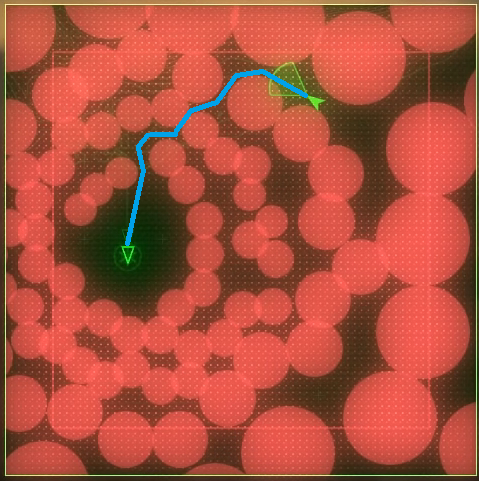
The rest of the mission is quite easy and requires mostly dodging and avoiding HUGE PLASMA BALLS, I'm sure you'll manage it after all that has happened. For that part turn the radar to close range, so that you clearly see burst area.
First fighters will spawn around when you'll get to the fifth battery, so just fly north, take out the two on your way, get the fighters, and then get the last SAMs. By that point another group will come from the east this time, and after that there'll be two groups from both sides. Try to aggro as many planes as you can, because fighters will take out the plane you are guarding very fast.
The boss needs 3 or 4 hits, just catch him when he shows his jet-propelled arse in close proximity. When the drone is flying towards you, he tries to shoot down your missiles, but if they're fast, they can make it through.
Mission specific advices (11-20)
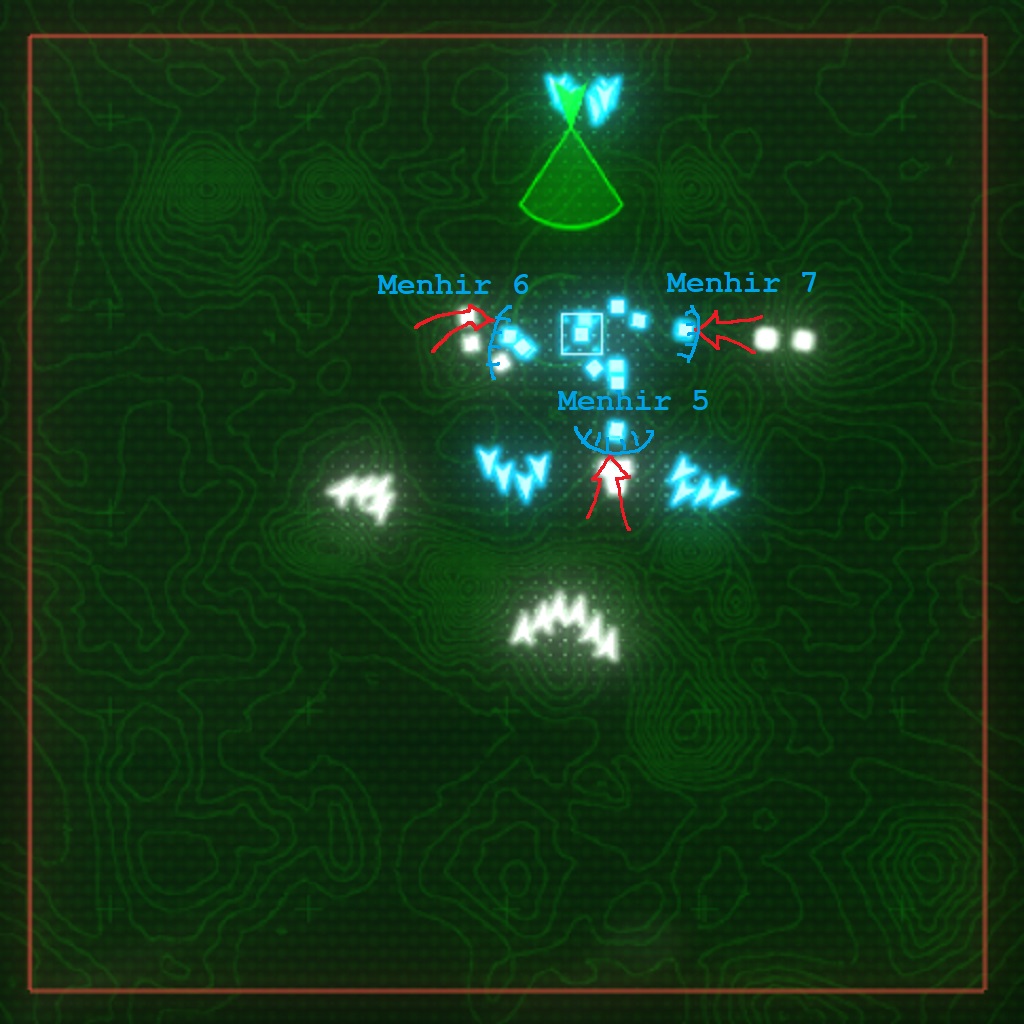
The base is attacked from three directions. Closest enemy group to you is the one attacking Menhir 6. Kill them fast and move to Menhir 5. If you are working fast, by the time you killed about 5 of Menhir 5 enemies, the first bombers will spawn. At this point - focus them as hard as possible. All the other planes are unimportant.
After dealing with bombers, clean up a bit Menhir 5 spot and help Menhir 7. By that time several A10C will spawn nearby - take them out so they don't wipe Menhir 7. By that point second enemy waves will appear and start moving towards allies. I suggest focusing the ones aiming at Menhir 6, as Menhir 6 is the weakest defence point. Soon another group of bombers will spawn, very high. Get 'em.
After them - frag the rest of ground forces, you have more than enough time, and the final bomber force will appear. There will be two TU-160, so hurry to deal with them.
In the middle of you killing the bombers, to make things more fun, a bunch of choppers and a bunch of artillery units will spawn. Finish with the bombers fast and go for the choppers (they are the easier target). As soon as you wipe them - part one is done :D
Now, in second part just frag several drones, or you will fail the mission.
In third part get to the birdie, select the main propellers and shoot at them from all you can. They take 4 MSL each if I recall correctly. There will be an onslaught of enemy fire, so rotate vertically to avoid them. As soon as both main propellers are out - you can break the distance from the birb and concentrate on drones.
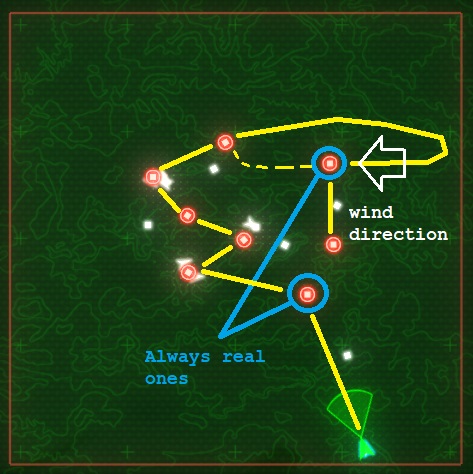
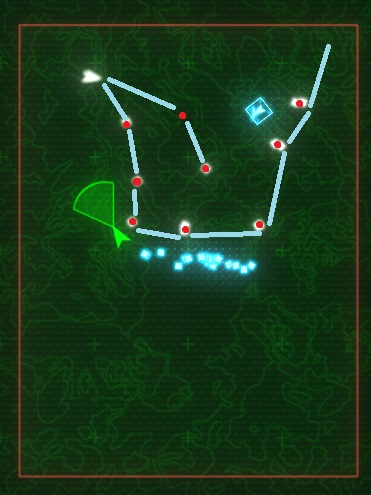
There are 5 real silos, two are always real, and the one further to the north is really windy, so approach is so that wind don't push you to the side. You don't fail the mission if you don't make it in time, but second part gets harder if you don't destroy all target sites.
In this part you kill three IRBMs and all the IRBMs you did not frag on previous stage. Approach them so that you will be just below them in lock-on range. The IRBMs eat three missiles each, so make time buffer for you to launch 2, reload, and launch one more.
When you arrive at the base - focus on searchlights, AA-guns and choppers. Now, the tricky part comes from three waves of enemies attacking main forces you must help to repel. First, a bunch of choppers will attack landing party. You can take them out before takeoff. After landing, a group of ground units will spawn in the middle of the base, take them out fast. Finally, a squadron of fighters and a similar group split in two will emerge from far end of the base, and they have to be taken out equally fast. Bombs are very good on this mission, and better keep them for ambushes.
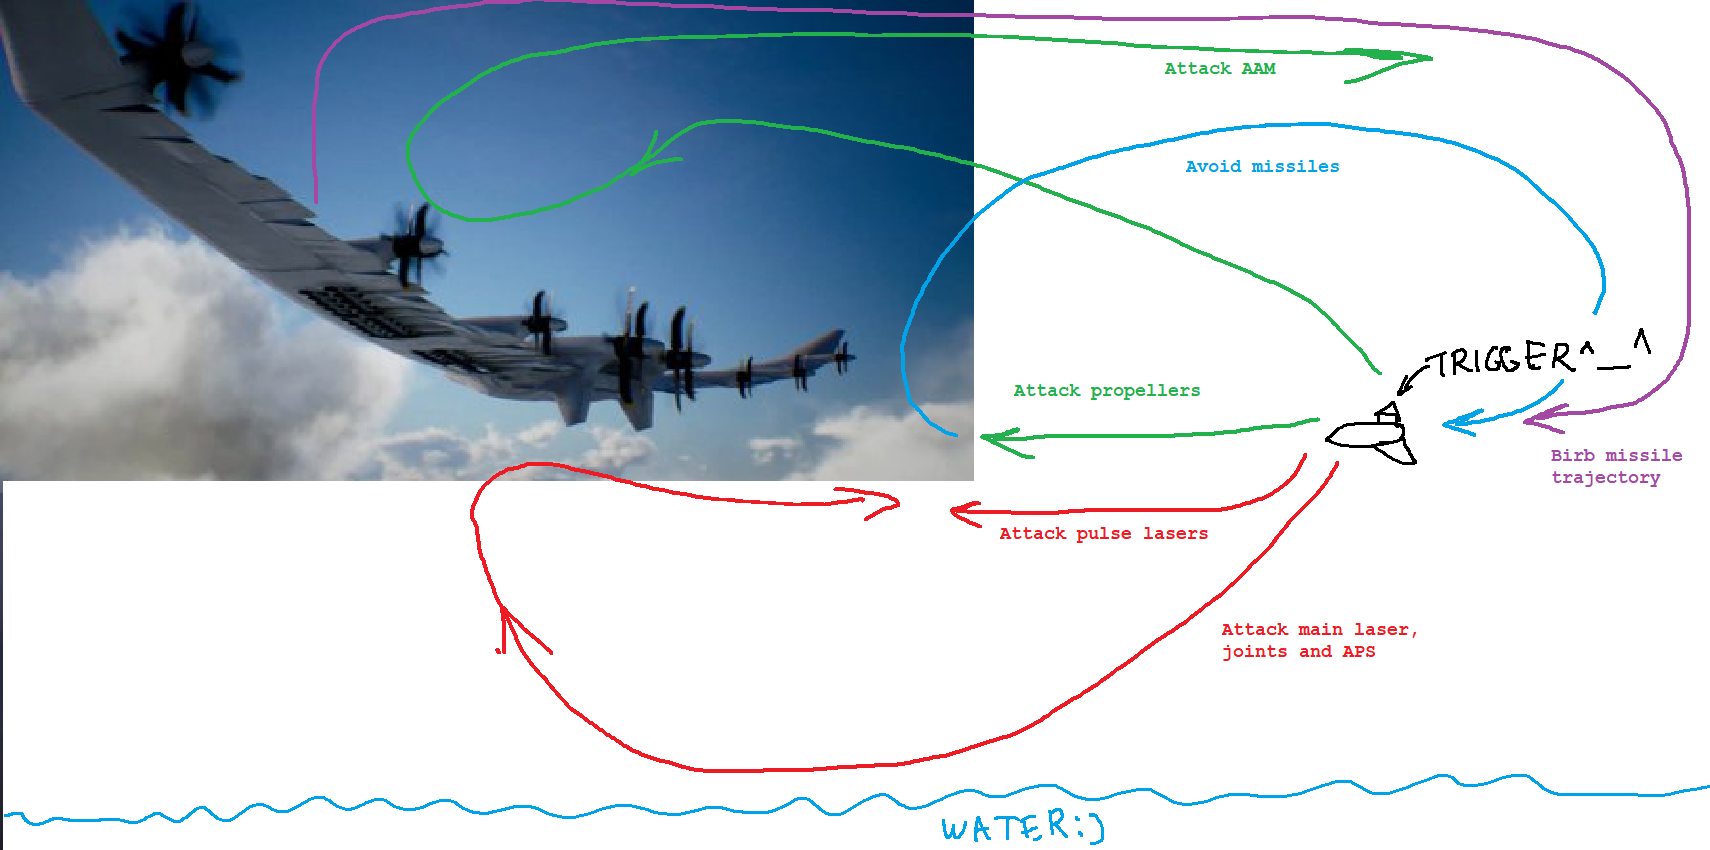
Next part, the birb will arrive. Until its shield is permanently down, focus on survival. Afterwards, you have to dismantle the birb. Here's my personal take on the mission.
- Clean up the drones a bit, they are too annoying.
- Take out the AAM on top of the birb. Missile spam will be stopped.
- Fly a bit below the birb and target the pulse lasers on its wings. They hit hard, so you won't have too much time.
- Drop even lower, almost to the water, and get under birb's belly. Pull up and try to hit its main laser. It takes about 4 hits.
- After that, take out all propellers.
- When marked, attack hooks from behind and joints from below.
Now, the precise part. Slow down to around 500 and wait for a bridge with red lights to appear. High-g turn to fly along it and level your plane. You will be facing exit now. Accelerate a bit, and pull up. Fly up while correcting trajectory with yaw steering. Change pitch a bit to avoid elevator gondolas.

Challenge run advices (General, Speed Run)
There are four runs you can try and make if you feel yourself into some challenge. The tastiest way to do them is on Ace difficulty, but they are counted as done even on Easy, if I understand correctly. Those are speed run (in less than four hours), no-damage run (finish each checkpoint in each mission with 0% DMG) and MG-only run (use only main machine gun and MGP special weapon), as well as S-ranking the missions.
The three challenge runs require you to play through the whole campaign, so start new game and play through it. If you finish the mission with any requirements unfulfilled - you'll have to restart the whole run, so watch closely for run conditions.
Achieving these times is not too hard, actually, once you know how each separate mission works. You see, there is par time for each mission, which grants maximum points bonus for beating the mission. Thus, if you see a significant enough time bonus on your final mission rating, you are probably doing fine.
Now, to the meaty core. When trying to beat this challenge you must take into consideration that when you use "Restart from checkpoint" option, the time spent on previous attempt is accumulated. This means, basically, that you cannot use this option further than a few seconds from checkpoint. This, then, means that if you die - you restart the whole mission.
The rest is not that hard though. There are several main points you need to take into account to attempt this run:
- Always aim only at the targets. How much points you get unless it's points rush mission? No one cares. You need to do it fast.
- You die - you restart the mission.
- Immediately restart when on a checkpoint. As you probably know, if you restart from a checkpoint, your ammo and hull are restored. So, as soon as you hit a checkpoint (CHECKPOINT text appears at the top right corner) just immediately pause and restart from checkpoint. Yes, you do lose several seconds, but you negate the risk to die or get to a point where you have no ammo.
- Try a mission in Free Mission mode before attempting it within your main run. Make sure you are consistently getting into the time requirements for it.
- In this run, multimissiles are generally your friends, but on missions with bosses you generally need QAAMs.
Challenge run advices (Machine Gun Only, No-Damage)
Okay, this one might be harsh. But surprisingly not as harsh as one'd expect. The best planes to do this run are MiG-21bis and ADF-11F Raven. MiG-21 is able to dish out insane MG damage, because it is the plane with SW that actually counts as a machine gun. MGP is essentially a double machine gun, which allows you to fire triple-damage MG fire if you press both MG fire and SW buttons. The problem with MiG is its fragility. This plane holds damage very poorly, so it has to be reinforced with bulletproof fuel tank and automatic fire extinguisher, and even in this case it's far too easily shot down. But, say, in Mission 10 you can eliminate the boss drone when it tries to attack you with MG face-to-face literally within a second, while taking around 50-70% of hull damage.
ADF-11F is a DLC plane, which, if reinforced properly, becomes almost unkillable. It is able to take up to 3 missiles in Mission 9, more if you wait for hull points to regen, for 1 missile takes its health down to in-between 32% and 39%. Plus its machine gun is replaced with pulse laser, able to hit targets from 2000m range, which is almost broken (though, its DPS will still be lower than on MiG).
Note that PLSL as a special weapon, unlike MGP, does not count as machine gun only! Only Raven's main PLSL, which replaces its MG, is excempt from this rule!
Now, there is not much else to say on this run: you have to do what you did with missiles using only MG. So, you have to better plan your routes and more effectively eliminate targets in score run misisons. "Pipeline destruction" is a nightmare, 'cause certain targets are hidden in ravines in the second part of the mission, and those areas are brutally windy. MG autolockon does not help much in scenarios like this. If using it, try aiming so that your MG would overshoot the target, in that case autolockon will have more chances to hit the mark.
Bosses, like Mister X or the final boss, are not as easily taken down. You have to chip down their health and catch them when vulnerable to dish out as much as you can while you have an opening.
Arsenal Bird fights are generally easy with MG, for you can just fly behind it and do your BRRRRR-ing as much as you want.
Finally, again, you launch a missile or use any special weapon except MGP - you lost the run, immediately restart from checkpoint. If flying MiG-21, immediately switch to MGP after refuelings and takeoffs, or you can just make a mistake and launch a missile. On Raven or any other plane, just forget that missile launch button even exists.
The rest boils down to your ability to deal damage with MG, and that arrives only with practice.
This run awards you with Machine Gun Maniac medal.
Now, in this run your priorities and enemy danger rating will change dramatically. Missiles are like kitten. You can dodge those. What you can't dodge is AA gun fire. So take out AA guns from as far away as you can. Same goes for AD tanks and CIWS systems. Try to pass them as fast as possible if you have to get close. Again - one scratch equals restart. Another dangerous aspect is enemy plane MGs, so no face-to-face rundowns and no enemy planes closer than 2000 m, otherwise their MG fire might scratch you.
Finally, you might not have even noticed that, but there are machine gun turrets on the bombers! Get closer than 1,5 km to them - and they'll almost definitely damage you. So, watch carefully when attacking bombers, say, on missions 5 and 12.
And the main problem with this run is randomness. You will get minor damage at random from time to time. Like from lasers in final mission, or from enemy drones passing by when fighting Arsenal Bird. If you hear that specific sound of MG damage or if a missile hits you - immediately restart from checkpoint. Some missions might take up to 20 attempts, so be patient.
- How to S rank all missions on ACE difficulty - ACE of ACES achievement★ 5 (717)26k views1.6k ♥23 minUpdated May 12, 2019
- Native Flightstick Configuration★ 5 (316)24k views670 ♥8 minUpdated Oct 15, 2025
- Named Aircraft/"Bird of Prey" Guide★ 5 (980)20k views1.9k ♥10 minUpdated Feb 8, 2019
- All Aircraft Skins {Detailed Unlocks}★ 5 (414)19k views873 ♥15 minUpdated Dec 13, 2022
- Quick Guide to Maximum Texture Quality★ 5 (405)19k views721 ♥2 minUpdated Jan 16, 2020
- AC7 Achievement Guide★ 5 (417)17k views845 ♥7 minUpdated Feb 8, 2024


- Upgrading to PremiumTeam Fortress 2★ 5 (20k)1441k views11k ♥6 minUpdated May 11, 2022
- No More Room in Hell Official ManualNo More Room in Hell★ 5 (2.8k)569k views2.1k ♥29 minUpdated Apr 22, 2019
- NMRiH Community Hosting GuidesNo More Room in Hell★ 5 (526)351k views653 ♥1 minUpdated Aug 10, 2022
- ULTIMATE GUIDE FOR GAME DEV TYCOONGame Dev Tycoon★ 5 (5.8k)326k views10k ♥4 minUpdated 23 Jan, 2014
- How to 'Git Gud' Soon™MORDHAU★ 5 (2k)318k views3k ♥68 minUpdated Nov 16, 2024
- Лучшие кооперативные игры SteamPAYDAY 2★ 5 (1.5k)315k views2.1k ♥56 minRussianUpdated Apr 27, 2025


This guide was created by its original author on the Steam Community. Are you the author and want it removed? Request removal.