![The Ultimate Layout Guide [Outdated - some of it] for Factorio](https://steamsolo.com/wp-content/uploads/2021/07/the-ultimate-layout-guide-outdated-some-of-it-factorio.jpg)
Overview
In this guide I’ll show you optimized layouts for many things. It includes production chains and intelligent designs.Most of the layouts are made by me, some are from other people. I will always source stuff that’s not made by me.
Electronic Circuit
Input:

- 3 Copper
- 2 Iron
Output:
- 2 Electronic Circuits
input and output per 0.5 ingame time units
To build this layout you need:
- 13 fast inserters
- 5 assembling machines
- 3 medium electric poles
Advanced Circuit
This layout uses one electronic-circuit-layout. If you haven’t seen this layout yet go to the previous section of this guide.

- 80 Copper-Plates
- 16 Iron-Plates
- 16 Coal
- 48 Petroleum-Gas
Output:
- 16 Advanced-Circuits
input and output are per 8 ingame time units
To build this layout you need:
- 192 belts
- 53 fast inserters
- 23 assembling machines
- 16 long handed inserters
- 10 pipes
- 4 tunnels
- 2 chemical plants
Processing Unit
I don’t recommend building this layout. Use Electronic and Advanced Circuits from your main belt, this helps you regulate the production.
I update my previous version. This one should not work on theory, but it’s tested in praxis – and it works. I have no idea why, but it does..
I use 5 of my electronic-circuit-layout as well as 1 advanced-circuit-layout. If you haven’t seen these layouts yet, go to the previous sections of my guide.
Input
from left to right
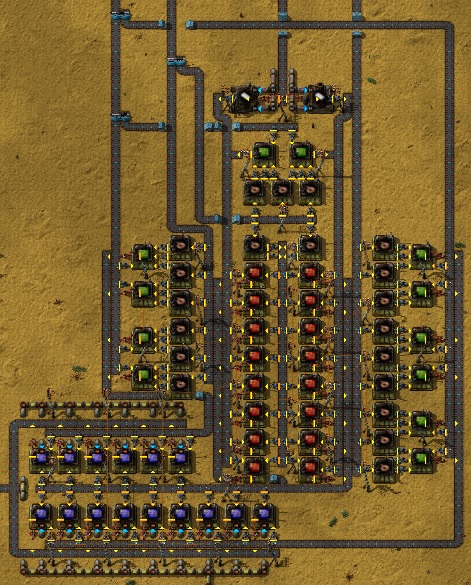
- iron-plates (you need a bit more than a one-lane-express-belt iron stream to get this factory working)
- copper-plates (you need a two-lane-express-belt supply)
- coal
- copper-plates (you need a two-lane-express-belt supply)
- much(!) petroleum gas and some sulfuric acid
To build this layout you need:
- 623 belts
- 138 fast inserters
- 63 assembling machines
- 44 medium electric poles
- 43 long handed inserters
- 41 pipes
- 36 pipes to ground
- 16 tunnels
- 3 splitter
- 2 chemical plants
Battery
There are three different kind of chemical plants required. One producing Sulfur, one Sulfuric Acid and one Batteries. I’ll only use the words sulfur, acid and battery to refer to these to make it easier.
Ratio:
- 5 Sulfur to
- 2 Acid to
- 25 (!) Battery

Suggestion:
Cut the ratio from above in half:
- 2.5 Sulfur to
- 1 Acid to
- 12.5 Battery
You can get the “half-buildings” by using speed modules. Simply use 1 speed module 3 or 1 speed module 1 + 1 speed module 2 to get to 50%. As you can see in the picture, I used one speed module 3 to speed up one Sulfur and one Battery.
If you don’t want to use this many chemical plants you can try to reduce them by using beacons.
Input:
- 35 Iron-Plates
- 25 Copper-Plates
- 160 Water
- 60 Petroleum Gas
Output:
- 25 Batteries
Input and Output per 10 ingame time units
Furnace setup
I use 2 versions. The one on the left uses belts, the one on the right uses the logistic network.


I use the Beacons to speed up the process. If you are short on ore, I recommend using speed modules on the beacon (since you can’t use any others on it) and productivity modules on the furnaces.

But there’s a problem. Logistic-robots only use the neares chest. That lead to empty chests on top and full chests on the bottom of my furnace-row. I think I found a solusion to this problem, even though you have to use slightly more robots:
Replace the passive provider chests with active provider chests. Place a couple of storage chests on top of the layout and limit the furnace output. Place a couple of plates into the storage chests, to ensure that the robots will use them as a storage and not any other ones. Now robots will empty the active provider chests to the storage chests from which other robots can use the plates.
To limit the output, click on a inserter (leading to a active provider chest) and then Logistic Network > Connect > see picture.

9600 because I have 2 storage chests which can hold up to 9600 from any plate type. If you want to produce/store more simply add more chests and increase that number.
Note: If you store lots of plates in other chests increase the number.
Another Version:

I reccomend smelting the ore directly where you mine it and then transport the plates with trains.
There are two major pros:
- You can put twice the amount of plates (100) on a stack than you could with ore (50). This makes the trainsystem much more effective.
- You don’t have to build huge smelting areas at your mainbase.
Solid Fuel
Note: I have not yet found a layout that is compact. I’m working on it.
Do you want to get the maximum solid fuel out of oil. Here’s how you have to build your refineries and chemical plants:
Ratio:
- 4 Refineries with advanced oil processing.
- 1 Chemical Plant converting Heavy to Light Oil
- 21 Chemical Plants converting Light Oil to Solid Fuel
- 11 Chemical Plants converting Petroleum Gas to Solid Fuel
Inteligent Refinery

With this layout you will never have a problem with too many of light or heavy oil. It manages all your inputs.
Oil has changed with the update – a lot!
Here is my version of the new intelligent raffinery
I do not use the optimal setup of 25:3:21 (Rafinery to H-L to L-P). Instead I use a more forgiving and smaller layout with a 8:1:7 ratio.
This build produces 3 things: Flamethower Ammo, Lubricant and Petroleum Gas.
This Layout stores a maximum of 5000 Heavy & Light Oil in tanks and starts filling them at 1000. It stores Lubricant in a tank with a default setting of a minimum of 1000 and a maximum of 3000. All these numbers can easily be ajusted by edditing the numbers on the combinators.
You’ll find the blueprint string on this reddit:
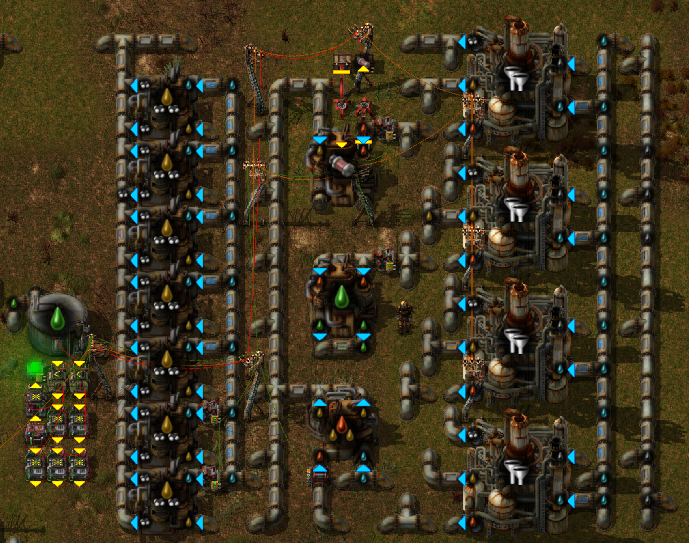
You can set a maximum amount of lubricant. As soon as the maximum ist hit it will stop producing lubricant until it reaches the minimum, which you can also set as you like. If lubricant is produced you will not produce flamethrower ammo and the petroleum output is not at its maximum.
As soon as your maximum lubricant is reached the layout will shut down the lubricant production and will start to produces flamethrower ammo. The same principle here: Set a minimum and maximum value, as soon as the maximum of ammo is reached the setup will shut down the production and now converts everything to petroleum gas.
To optimize the production of flamethrower ammo the setup also shuts down some light-oil-to-petroleum converters.
Also there is a lamp which glows in different colors depending on the process that is active, just for asthetics. (Green for lubricant, red for flamethrower ammo and yellow for petroleum gas)
The ratios:
4 refineries with advanced oil processing to
1 chemical plant that produces lubricant or
1 chemical plant that produces flame thrower ammo or
1 chemical plant that converts heavy to light oil to
7 chemical plants that convert light oil to petroleum gas.

Since it’s a fairly complex wiring I try to keep it simple. To describe the combinators I give each one a number acording to the image to the right. Feel free to rearrange the combinators as you like.(The arrangement on the right was chosen for demonstration purposes only)
- Red Connect lubricant tank to input of 3.
- Red Connect the input of 3 to the output of 6.
- Red Connect the output of 3 to the input of 6.
- Red Connect the output of 3 to the input 9.
- Red Connect the input of 9 to the input of 8.
- Red Connect chest with flamethrower ammo to input of 2
- Red Connect output of 2 to input of 1, 5, and 7.
- Green Connect all the pumps (5 total).
- Green Connect the green wiring from the pumps to:
- output of 1
- output of 2
- output of 9 – also connect output of 9 to output of 8
- output of 7
- 4
- output of 3
- lamp
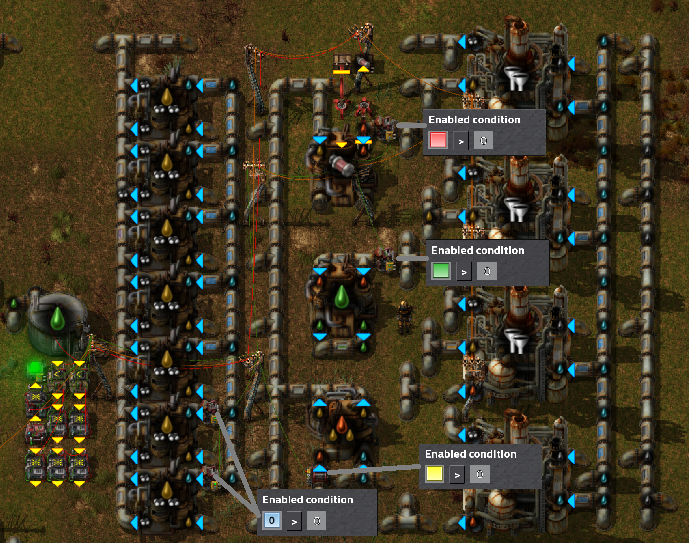
I use the same numbers as above for the combinators.
Lamp: Signal L > 0 (make sure to activte “use colors”)
1: Input: Red Signal * -1 Output: Signal 0
2: Input: Flamethrower ammo < Minimum Amount Output: Red Signal (activate 1)
3: Input: Lubricant < Minimum Amount Output: Green Signal (activate 1)
4: Output: Yellow Signal, Signal 0, Signal L
5: Input: Red Signal * -Maximal Amount Output: Flamethrower Ammo
6: Input: Green Signal * -Maximal Amount Output: Lubricant
7: Input: Red Signal * -1 Output: Yellow Signal
8: Input: Green Signal * -1 Output: Yellow Signal
9: Input: Green Signal * -1 Output: Red Signal
2 Pumps Light-to-Petroleum: Signal 0 > 0
Pump Heavy-to-Light: Yellow Signal > 0
Pump Lubricant: Green Signal > 0
Pump Flamethrower: Red Signal > 0
How to set minimum and maximum amount of lubricant and flamethrower ammo
You can set your minimum amount of flamethrower ammo at 2 and the amount of lubricant at 3. Simply change the number to whatever you like.
Changing the maximum output is a bit more complicated. You can change the maximum value for flamethrower ammo at 5 and that for lubricant at 6. You have to change the number(#) like this:
# = -(max-min)
E.g. I want a minimum of 50 and a maximum of 150 of flamethrower ammo. For the minimum I change the value at 2 to 50. For the maximum I have to change the value of 5 to -100, because -(150-50) = -100
My Request:
Please leave a comment if you are stuck or don’t understand a certain part of my explanation.
Express Transport Belt
This Layot is not quiet perfect, but it works fine. There’s some delay due to the belts I haven’t calculated and I don’t know how. I would be thankfull for tipps here.

- 43 Iron
Output
- 2 Express Transport Belt
input and output per 0.5 ingame units
Module(s) 3
You can use this layout for all the modules, since they use the same ressources.

- 80 Electronic Circuits (belt on top)
- 80 Advanced Circuits (belt on top)
- 25 Advanced Circuits (belt from side)
- 25 Processing Units (belt from side)
- 1 Alien Artifact (Requester Chest)
Output:
- 1 lvl.3 Module
input and output per 60 ingame time units
To build this layout you need:
- 21 belts
- 11 fast inserters
- 7 assembling-machines
- 6 long handed inserters
- 4 tunnels
- 1 requester chest
- 1 output chest
Inserter
If you want one assembling machine per Inserter-type (without the burner-inserter and the plain inserter) you need 52 electronic-circuits, 52 gears, 14 iron and 2 advanced-circuits per 0.5 time units.

- bottom left: 11 electronic-curcuits
- bottom right: 41 electronic circuits
- side bottom: 14 iron-plates and 12 iron-gears
- side middle: 30 iron-gears
- side top: 2 advanced-circuits
Output
- 1 long handed inserter
- 1 fast inserter
- 1 filter inserter
- 1 stack inserter
- 1 filter stack inserter
Input and output per 0.5 time units
Theoretically you need 13 of my electronic-circuit-layouts and 26 iron-gear-assembling-machines to match the requirements.
To build this layout you need:
- 60 belts
- 53 fast inserters
- 22 tunnels
- 14 assembling-machines
- 9 chests
- 5 output chests
- 3 long handed inserters
- 1 splitter
Science Packs 1-4
I found this guy on reddit who made this huge factory that produces every science pack except the high-tech and the space science pack. This build produces one of every science pack per second. I recommend that you use his layout!
You can find blueprints and pictures there.
Note: He forgott to produce miners in his factory! This is the only thing you have to input externaly.

This setup puts all 4 science packs on one belt, making it easier to grab the science packs from the belt to the labs and looking pretty chaotic and cool!
You can see the setup for science pack 1, simply add this for every science pack to make sure you have all 4 science packs an your sushi belt. Connect the inserter (it doesn’t matter what type it is) with at least 2 belts.
inserter: Science Pack = 0
Belts: Mode: Read belt contents Content Read Mode: Hold
The inserter now always puts science packs on the belt if there are no science packs 1 on the sushi belt.
Intelligent Train Loading
Ever had the problem of effectively filling your trains?
This design calculates the average of all the content in the chests. It then sends a signal to the inserter if the content of the connected chest is under the average.
Note: This Design is NOT made by me. I found it as MadZuri’s Smart Train Loading Station:

MadZuri’s Smart train loading station, how does it work? from factorio
Wiring:
Connect all the chests to each other and to the input of the arithmetic combinator. [Wire color red]
Connect all inserters to each other and to the ouptout of the combinator. [Wire color red]
Connect each inserter to the chest it fills. [Wire color green]
Inserter setting:
Ressource < 1

Combinator setting:
Input: Ressource / negative # of connected chests
Output: Ressource

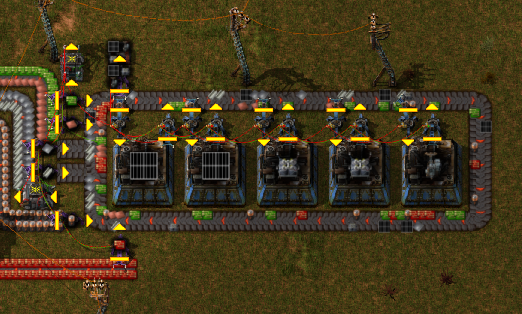
Supply Train
A friend introduced me to this supply train setup. I think he didn’t made it by himself, but I couldn’t find the source. I am searching…

The supply train brings turrets, walls, constructions robots and repair packs to your outposts. If your roboports cover all your defences the construction robots repair and replace everything that gets damaged or destroyed.
As you can see the setup is realy simple. I’ll explain step by step how to settings work:
Station Setting

- Set the filter inserter unloading the train to set filters > read hand contents > hold
- Connect the filter inserter to the first Constant Combinator and to the input of the Decider Combinator
- Connect the first to the second Constant Combinator
- Settings second Constant Combinator: Fill in every item you want your supply train to bring and adjust the amount. I reccommend 50 Walls, 100 Repair Packs, 10 Laser Turrets and 50 Construction Robots.
- Connect the second Constant Combinator to the output of the Arithemtic Combinator
- Settings Arithmetic Combinator: input: Each * -1 output: Each
- Connect the input of the Arithmetic Combinator to the roboport and the Storage Chest.
- Settings Storage Chest: Read Contents
- Settings Roboport: Read Robot Statistics > Total Construction Robots: Item Construction Robot (see picture)
- Settings Filter Inserter filling roboport: set filter to: Repair Pack and Construction Robot
- Settings Decider Combinator: Parameters: Everything < 0 output: Signal G (1)
- Connect Decider Combinator with train stop
Train Setting

- For each station set the waiting setting for the train like you see in the picture on the right.
- Assign places the cargo waggon of the train. This makes sure that you don’t end up with a supply train carrying just one item arround. You can do this with the middle mouse button (scrolling wheel).
- Don’t forget to limit the items in your train. The train only needs to carry arround a few items. On my last map the train had 50 laser turrets, 100 walls, 100 construction robots and 200 repair packs for over 20 train stops/outposts.
- Loading the train: If you are using requester chests make sure to use one chest per item type. If you have more than one item per chest it may be possible that the inserter doesn’t load both items into the train because it can’t load the item it holds because the train is already full.
0.15 update
This build can end in a deadlock. It’s possible that the inserter that fills your roboport with repair packs and building robots doesn’t fill it with one of these 2 items. The new update allows us to controll how many items an inserter picks up. So make sure to set the “override stack” of the inserter filling the roboport to 1.
Another tipp: Use a filter stack inserter to unload the train. This way it’ll be much faster.
Main Base

It has the advantage that you can extend your base in one direction without problems. Also it’s very tidily. Disadvantage is that the base can get very long and robots use a long time to deliver items and build things.
If you build your factories modular (like you see in the picture) you can easily move them aside if you want more supply belts or another order of factories.
What goes on the supply belt?
I normaly use these items:
- Iron-Plates
- Copper-Plates
- Steel-Plates
- Electronic Circuits
- Advanced Circuits
For the other items i use logistic robots.
If you don’t like tranportation belts through your base you can replace most of the supply line with underground belts. It may even help improving your framerate.
Sushi Belt
WORK IN PROGRESS
The Idea
Ideal for every process that requires more than 2 items to assemble and do need a long time to be produced.
You can safe place (transport belts) and complicated layouts by using one belt for every product required.
Calculating the consumption you can use the circuit-network to define how many items you need on the transport-belt-circle arround your assembling machines. You only put items on the belt that are used to ensure that the belt never gets (over-)filled.
The Layout
Wiring
- Wire every inserter with one colour of wire. Connect the same colour to the input of a arithmetic combinator. Connect the output of the arithmetic combinator with the input with the same colour.
- Set the arithmetic combinator to each * 1 and the output to each
- Connect the same colour of wire to the output of an arithmetic combinator. Wire everything that puts something on the belt with a different colour to the input of this arithmetic combinator. Set the combinator to each * -2 and output each
[]
Nuclear Power
Note: I have not yet finished my perfect Reactor and will keep this section up to date with my ideas.

This build will output only the Uranium 235 (the good one) that you don’t need for the next cicle. There are more easy solutions to solve this problem, but I found this the most appealing one. It fills and empties the chests step by step.
How does it work?
First you have to fill the centrifuge with 40 Uranium 235. Then make sure your Uranium 238 passes the centrifuge on the right side (the one with the fast inserter filling the centrifuge). The U235 that get’s generated will leave the build on one side and the U238 will leave back to the belt with all your other U238.
This way it’ll output 1 U235 and 2 U238 every 50 seconds. Everything it needs is 5 U238 to start a new circle.
You can simply stack this layout in a single long row.
Blueprint for a double build available in this pastebin:
Blueprint[pastebin.com]