
Overview
This guide aims to explain the tuning for the forgotten Time Attack mode in CarX Drift.
Why Time Attack?
The time attack mode is an overshadowed mode in CarX Drift Racing Online that was available from the start of this game but is almost never played.
I think this is because of a popular belief that the physics of this game are not suitable for anything but drifting, but this is not the case.
Following this guide will allow you to experience the time attack mode just like in any other racing game without excessive drifting and also prepare yourself for the upcoming CarX Street game, which won’t be as focused on drifting as its predecessor. This guide is useful for keyboard, gamepad and wheel controllers without assists.
In each section of this guide you will find a small spreadsheet with my settings for Voodoo (Viper) tuned for Time Attack mode.
By the way, if you want to know how to adjust your car for drifting, check my other guide.
[link]
Setup: Racing vs Ultimate
When preparing your car for time attack, your first thought is to compare the stats between the cars in Ultimate and Racing modes.
Racing is better for grip and gives a more predictable handling without excessive sliding. Despite having less power than Ultimate mode, I believe this is actually its main advantage and partially explains why the car spins less. Racing mode also keeps the AWD (4WD) drivetrain for cars that have it by default (in stock mode). The Engine adjustments section is disabled in this mode.
The Racing mode also allows you to make a smaller max. steering angle. I will tell why this is important later in the guide.
The Ultimate mode gives consideraly more power and the ability to increase it even more with Engine tunes. Excessive power does harm performance in time attack mode, as there’s no traction control (TC) and functional aerodynamics in the game to make enough use of it.
So after comparing the two modes, it’s obvious that you want Racing mode only when preparing your car for time attack. It’s also cheaper and is accessible earlier in the game!
Suspension part 1
In this section you will find the adjustments for the following components:
- Spring length
- Spring stiffness
- Damper: slow bump and rebound
- Damper: fast bump and rebound
The spring size determines how low your car is.
Very low settings will not allow your suspension to work properly and you will lose control on weight transfers and when going over bumps.
Very high settings will make your center of gravity higher and increase the body roll of the car in the corner.
When adjusting spring length, you should lower your suspension but make sure that the suspension is still working. Your values will typically range from 7 to 15 cm.
The spring stiffness allows you to control how reactive the suspension will be.
Higher values (stiffer springs) mean very fast response but higher chance of losing the car at the same time, this is because you need to be much more precise with your inputs.
Lower values will make suspension’s response smoother and more forgiving.
As the majority of cars in CarX have their engines on front, it’s logical to make the front suspension slightly stiffer that the back one.
I usually use something between 120 kN/m and 180 kN/m depending on the car.
⚠️ If your car understeers, make the front suspension stiffer and/or the rear one softer.
⚠️ If your car oversteers, make the front suspension softer and/or the rear one stiffer.
“Slow” defines weight transfers from driver’s input. This includes braking, accelerating, making transitions and so on.
Bump determines how much resistance is applied on suspension’s compression.
Rebound determines how much resistance is applied on suspension’s decompression.
Higher values mean more resistance, slower reaction.
Lower values mean less resistance and faster reaction.
Extremely high values will not allow suspension to compress leading to a traction loss.
Extremely low values will provide the same effect as above, the car body will simply fall down, losing traction.
Generally, you want to find a sweet spot in which the car reacts fast enough to be controllable and smooth. Wrong setup will make it janky and unpredictable.
You can easily test the work of bump and rebound settings (slow and fast) with the help of “Suspension stiffness” slider. Simply drag it back and forth. Slow movements with mouse will correspond to slow settings and fast movements to fast settings. Your goal is the reaction where the car’s body remains at the same height and the wheel stays glued to the ground (no traction loss).
⚠️ If the body weight transfer is too fast and results in grip loss, increase the overall stiffness.
⚠️ If you lose grip because of a very slow weight transfer, decrease the overall stiffness.
The working principle is the same as for the “slow” parameters. The difference is that “fast” parameters work mainly for fast weight transfers, like hitting road bumps and other imperfections.
⚠️ If you drive on bumpy tracks, decrease the overall stiffness.
⚠️ If you find your car jumping around bumps too often, increase the overall resistance.
Suspension part 2
In this section you will find the adjustments for the following components:
- Toe
- Camber
- Anti-roll bar
- Caster
- Ackerman angle
- Max. steering angle
Toe is the adjustment of the wheels according to the longitudinal axis of the vehicles. Negative toe means that the wheels are facing “outside” hence why it’s called toe-out, the positive one gives the opposite effect, thus the wheels are facing “inside”, alternatively called toe-in.
For time attacks, I would recommend to use zero toe on front and back for less resistance and more speed. Alternatively you can use a slightly negative toe on front wheels like -0.1 or -0.2 for easier turn-in. Never use positive values for rear wheels, as you will lose traction in every corner.
Contrary to drifting, grip racing (time attack) doesn’t require you to use huge camber values.
Zero values provide maximum grip on a straight line, while slightly negative values allow for more grip when cornering.
⚠️For the front wheels use values between -1 and -4 degrees.
⚠️For the back wheels use values between +0.3 and -3 degrees.
Do not underestimate the effect of this setting, this is the first thing you want to tune if your car understeers or oversteers.
The anti-roll bar loads the outer wheel more and takes off load from the inner wheel, while forcing the latter up. This allows the car to roll less and reduces the grip on the end of the car where the ARB is installed. Meanwhile, the other end of the car becomes more balances and starts to have more grip.
If you install a stiff ARB in front, you give more traction to the rear end. If you your ARB in back is stiffer than in front, you will slide all over the place and the front will be grippier. As we don’t want our car to slide, we will typically use stiff front ARB and no rear ARB.
⚠️If you experience understeer, make front softer and back stiffer.
⚠️If you experience oversteer, make front stiffer and back softer.


The caster angle helps to stabilize your car.
With negative caster (- values) it’s very easy to steer, but the car can be unstable on high speeds and under braking. This setting cannot be used in the game.
Neutral caster (0) allow for an easy steering and give you more feedback regarding tyres’ traction in the corner, but the wheels will be less stable at high speed.
Positive caster (+ values) give stability on high speed corners and can give some extra traction in the corners due to the negative camber effect on front wheels. Higher caster give more resistance when turning the wheel. I usually put 5-7 values on my cars.
This setting is a personal preference.
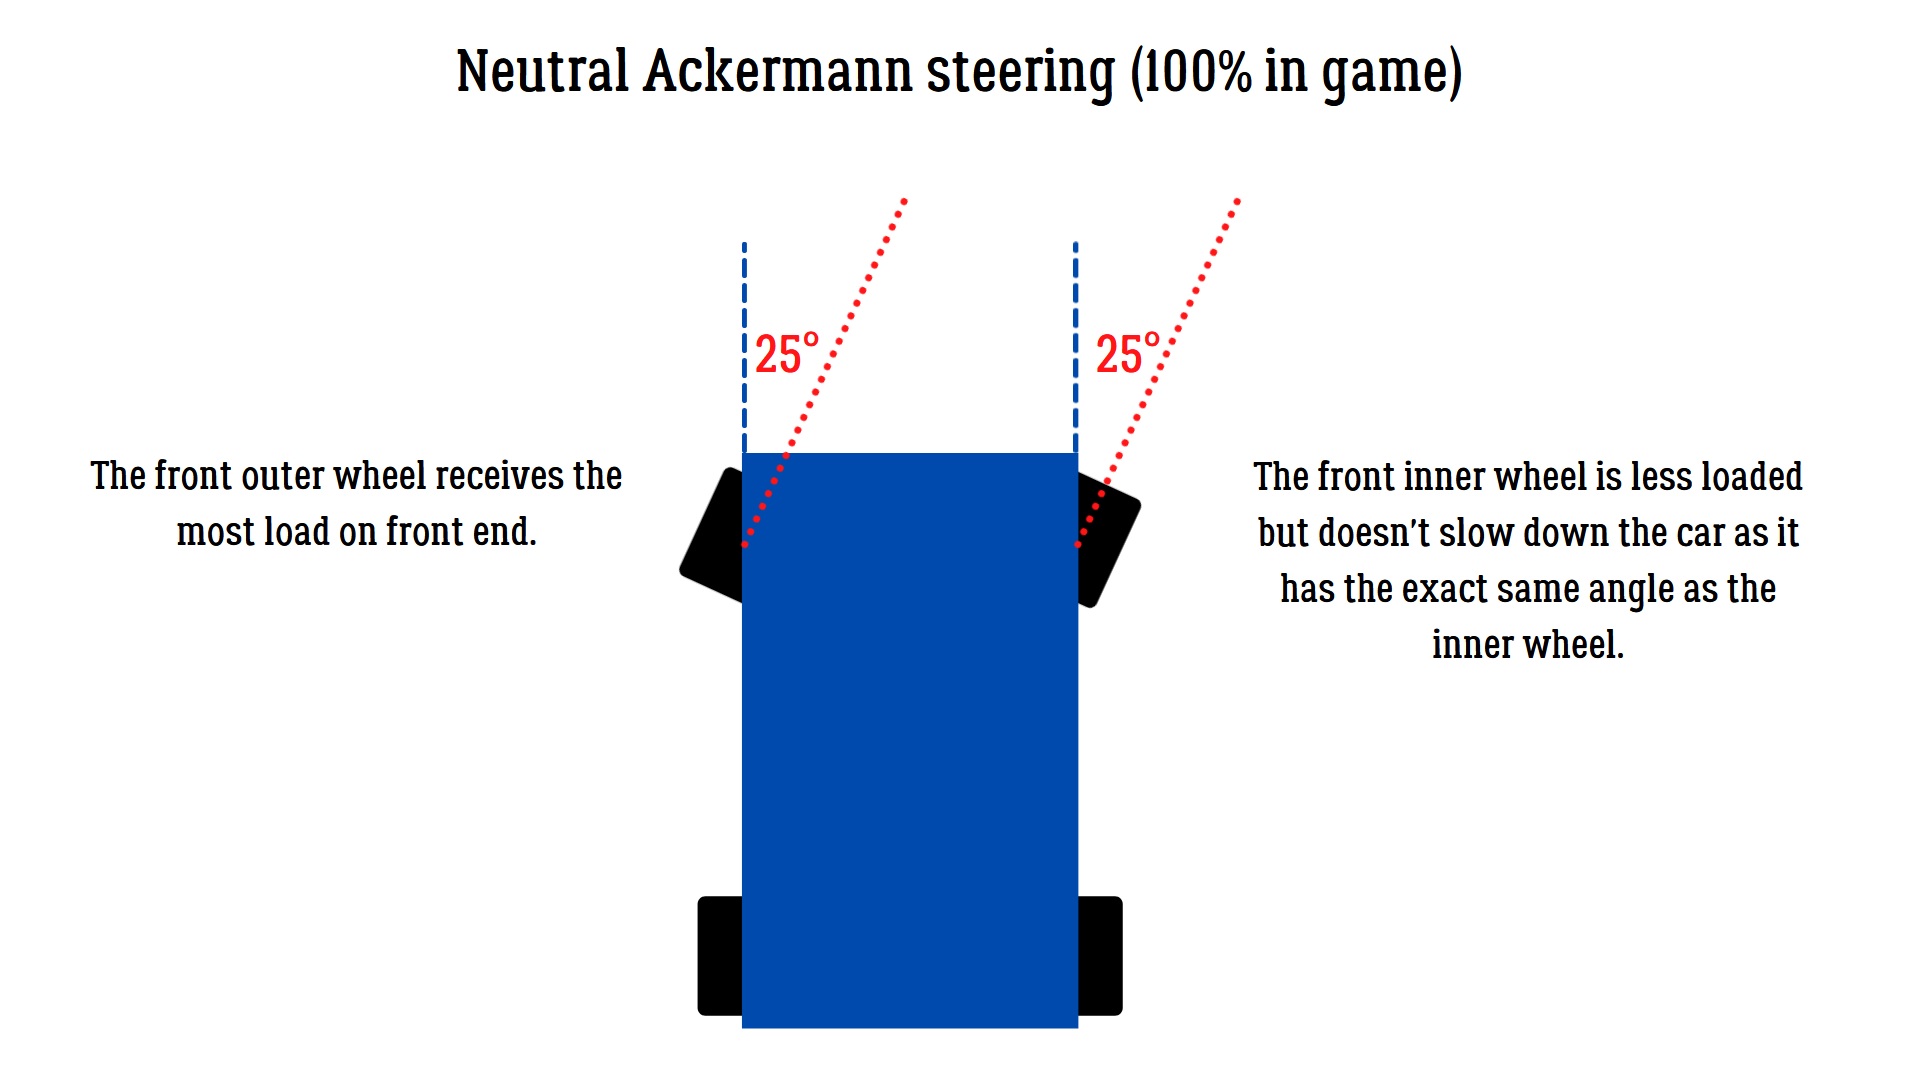
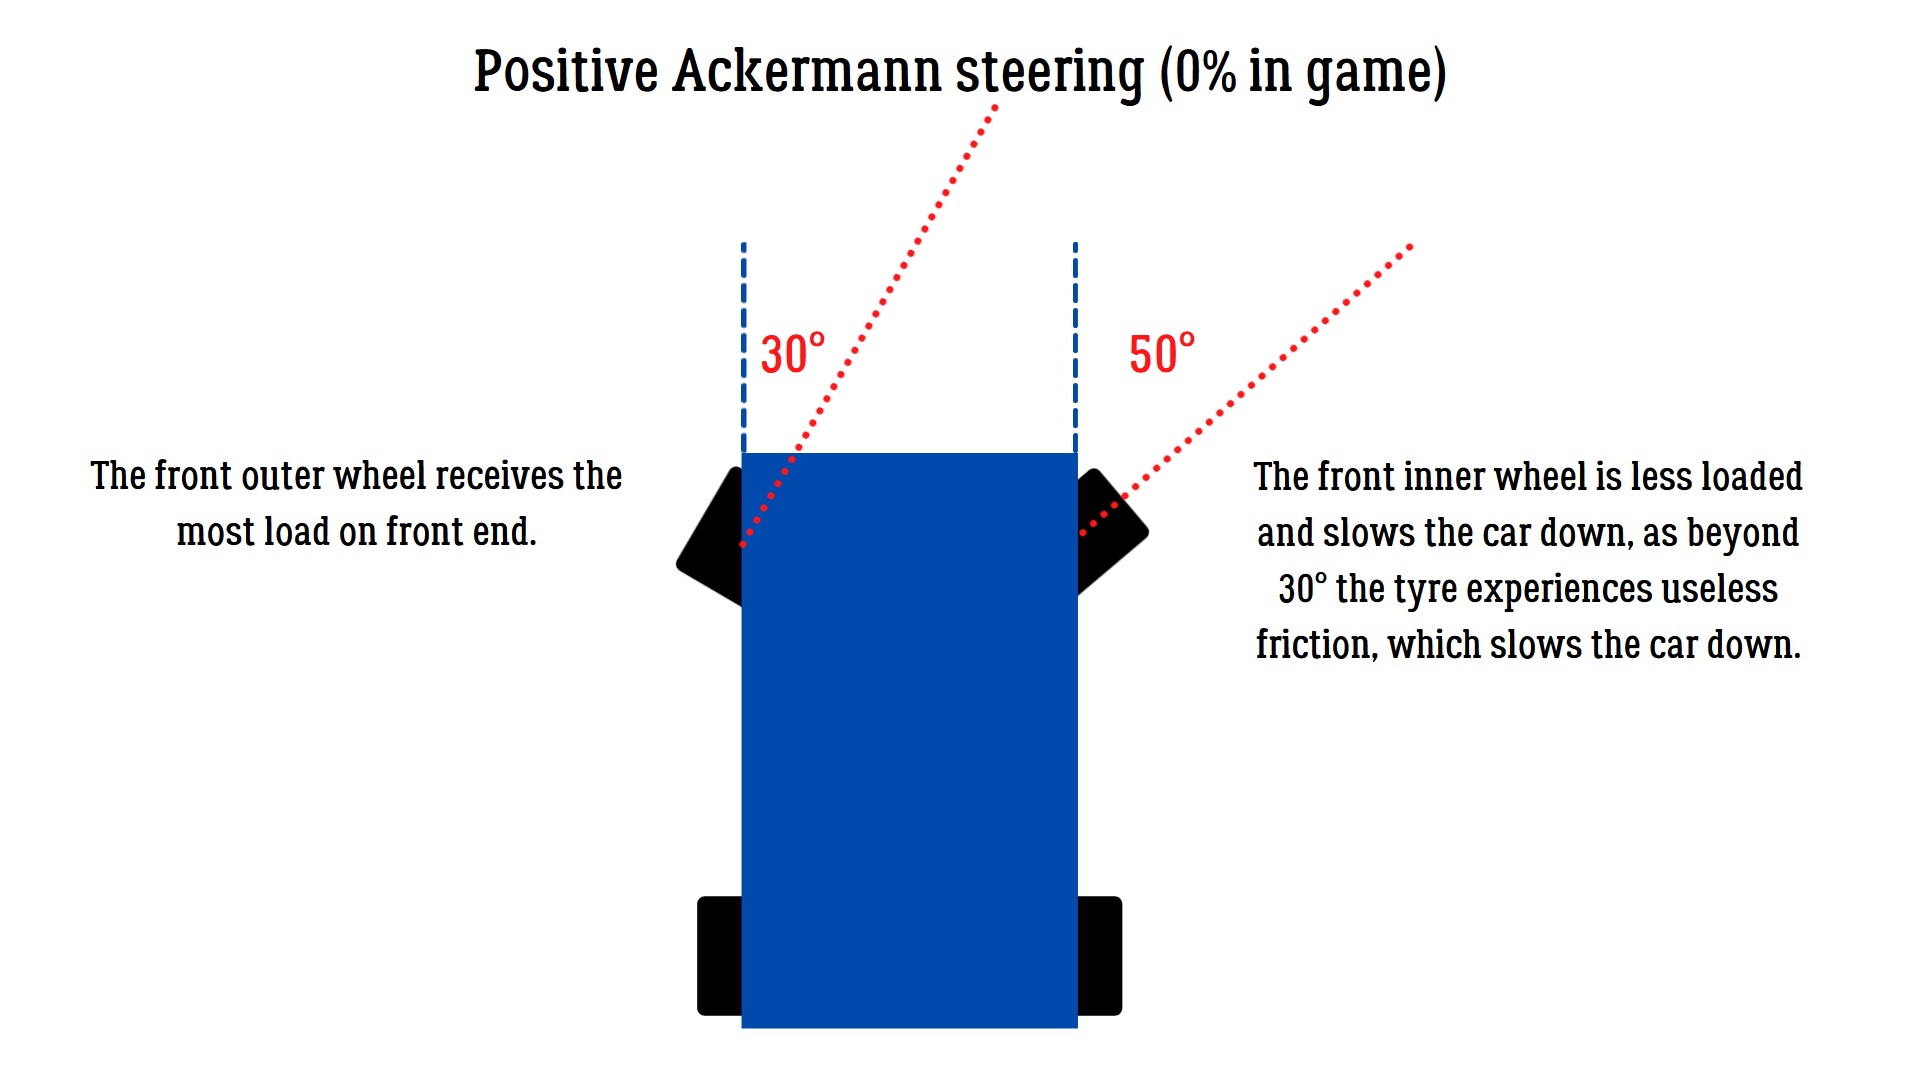
- 0% is the maximum positive Ackerman setting (standard);
- 100% is the parallel Ackerman setting (zero);
Values below 50% will make your car slower because of useless tyre friction. Values between 50% and 100% will provide the best performance. The parallel setting (100%) can work well, especially in tight corners, because the majority of car’s weight shifts to the outside wheel.
In the beginning of the guide I mentioned the fact that Racing mode allows for a smaller max. steering angle. Here you want to tune it down as much as the game allows you. The thing is that most racing cars do not use high steering angles, something between 10 and 20 degrees is more than enough. In the game though, cars are adjustable to values around 35 degrees, which is still better than 60. This is because the less degrees you have, the more precision in steering input you will get, no matter what type of controller you use.
Wheels
In this section you will find the adjustments for the following components:
- Rim diameter
- Tyre width
- Tyre pressure
- Wheel adhesion
- Track width
- Tyre profile
Bigger diameters can give you more traction. Smaller diameters can give you more acceleration and more turning precision. Be careful not to make a donk car or a go-kart, values between 18 and 21 inches are the way to go.
The more the tyre width is, the more traction you get from that tyre.
Usually you want to max both the front and the back tyres’ width. Sometimes slightly narrower front tyres can work as well.
Tyre pressure determines how big is the contact patch (the amount of grip).
Under-inflated tyres increase give too much friction and can slow you down.
Over-inflated tyres decrease grip by having a very small contact patch.
You should find a value that gives you the best results. I would advise for fine tuning these settings between 170 and 240 kPa.
A very easy setting to understand, the more adhesion a tyre has with the pavement, the more grip and speed you get from it.
It is possible to present adhesion parameter as following:
- 90% – Vintage (old) tyres;
- 100% – Steet tyres;
- 110% – Semi-slicks;
- 120% – Slicks.
We’re in time attack, so use slicks (120%).
Track width allow for lower center of gravity and better control.
Try to keep these settings uniform across both ends of the car. There’s no need to increase one setting over another.
The smaller the tyre profile is, the more you get control over your car and the more grip there is overall.
Bear in mind, that a very low profile may yield unpredictable results, as there simply won’t be enough tyre wall to absorb car movements. Simply keep it at 30%.
Transmission
In this section you will find the adjustments for the following components:
- Diff. locking ratio
- Final drive
- Gears
Adjustable limited-slip differential.
- 0% is an open differential, which means that both of rear wheels are rotating independently.
- 100% is a completely locked differential, both of rear wheels are rotating at the same speed.
⚠️ The more the differential is locked, the faster you will exit the corners, but the risk of losing traction is higher.
The final drive adjusts the overall length of all gears, without altering the ratios of every gear individually.
Bigger values mean shorter gears, lower values mean longer gears.
Typically this is adjusted according to the track layout, tracks with a lot of tight turns would need shorter gears for faster power output, while long configurations with high-speed sections would require longer gears. In the end you’ll want to find a sweet spot that would suite the majority of tracks.
The individual adjustment of every gear’s ratio.
Bigger values mean shorter gear, smaller values mean longer gears.
This setting allows you to adjust your transmission more precisely.
Brakes
In this section you will find the adjustments for the following components:
- Brake torque
- Front brake bias
- ABS
- Launch control
The force applied to brakes, the bigger it is, the faster the car will stop. In time attack you go faster when braking.
If you plan on using ABS, max it for the best performance. If you don’t want to use ABS, fine tune the brake torque to avoid wheel lockup.
This setting tells the car where to apply the braking force.
More front brake bias will mean that the front wheels will do more to stop the car, than the rear wheels.
Usually you want values somewhere between 55% and 65% for the best performance.
This settings helps you prevent locking the wheels when braking.
If you just want max performance, turn it on and couple it with max. brake torque. Alternatively you can disable it and achieve the same effect with a proper brake pedal work.
This setting is not used in time attack races.
Performance comparison
In this section I will provide my test results for cars tuned with the help of this guide.
I measured performance of all the cars listed below with Racing tune on Parking A circuit using Thrustmaster T150 wheel. The results should be very similar when using a gamepad with assists switched off.
The acceleration and handling are rated subjectively on a scale from 1 to 5 stars. ⭐
The End
So, that’s pretty much it. If you have any additional info to add, feel free to comment.