
Overview
A deep look into Tree of Savior to guide beginners and experienced players alike.
Opening Notes
Tree of Savior may look simple at first glance but behind the veil it’s a complex game with much depth. In order to cover everything, it requires a group effort. This is a collaboration of information discovered in game and found online. Although some of the content within is from my own experiences I in no way take credit for the hard work people have done to contribute to the ToS Fan Base, Steam, Wiki and Reddit pages.
Some information found out there is outdated and has changed since beta as I’m sure more will continue to change with future updates. It’s my goal to provide the most accurate knowledge for the current state of the game. If you find something that is inaccurate don’t hesitate to let me know in the comments.
Omaclaro’s you think you know jack?
Oma’s blog about lesser known subtleties of ToS.
Well hopefully people are reading these and they might not be but well anyways new week new update. Last week was kind of an oddity so expect more of these to be spaced out at longer periods maybe a week or longer depending on how fast I go through my list… Yes there is a list of things thanks for asking. Anyways…
Lets talk about Jackpot mobs, Whats a jackpot mob you might ask? Well a jackpot mob is one of these super rare things I don’t have an exact spawn timer on them but as far as I know they can spawn on any field minus instanced dungeons. And as of this posting and delving deep into the the knowledge banks of my mind there are four types, Gold, Silver, Blue and Green. These are divided up into two catagories. Exp and Loot. Gold and Silver belong to the loot catagory and Blue and Green belong to the Exp type giving increased exp values and well basicly its a metric ton of exp I’ve been told 2nd hand that people in a level 3 zone have killed a Blue jackpot mob and earned roughly 7 levels going from level 3 to 10 at higher levels you might see a full level ie. going from 226 to 227 so they are worth looking out for.Now you might ask what kind of reward do you get for killing a Gold or SIlver mob? Well lucky for you I’ve encountered a gold and killed it taking a screeny of prof of my work in the name of Godesses. As you can see roughly I got a LOT of items. The silver earn was around 20,000 pretty good for just killing one thing.

Well until next time.
-Oma
Alright so double posting in a week hurray not sure if people read this section or whatever BUT ANYWAYS. This one if for YOU, those weekend grinders. Lets talk about Field bonus modifiers. Now this might be something completely new to anyone but anyways if you’ve stumbled around on reddit you might have come across a post by TheDoddler talking about how you shouldn’t use an exp book/tome in a field. Why is that? Well go read his post for the math on that later I’m not talking about that. Field Bonus, thats why we’re are here. Alright in ToS there are different ways to earn more of that glorious exp one of the ways is the Field Zone Bonus modifier different zones depending on what zone you are in the larger amount of exp you will get. Basicly if something is telling you are getting like 200 exp from a mob in the adventure journal you’re actually getting more depending on the field modifier. So lets do some fun horribly inaccurate theory math. Lets take the 200 exp and have a field zone of 300% you’re going to earn 600exp per kill. So something to think about while grinding, mob density and field bonus. Below I’ll add the reddit post from TheDoddler so feel free to read that. And grind away you weekend warriors you.
How EXP modifiers stack (or, why you should never use an EXP Tome in a field map) from treeofsavior
Also a quick link to the field bonus list also by TheDoddler
Field Bonus list[docs.google.com]
-Oma
Hello I’m Omaclaro or aka on Oshara known as Riveria. (Don’t ask server que time thing…) I’ll be writing up little things that are not covered in this game that might not be in the guide as of yet or just don’t really fit into a spot.
First up lets talk about Exp curves. In Tree of Savior aka ToS there are these things called exp curves this is basicly a level at one point that will reset the amount of exp needed for the next level by a large sum. For new players your first exp curve you hit is at 46 basicly you’ll need around 8000 exp to get the next level, 47, as the 120,000 you needed to get 46. This trend continues. Now why does this matter well its advised by people to not use exp cards during these reset curves and just grind mobs for a few levels. Usually after three levels the exp starts to return to a bit of normalency though it changes on what level you are at the time. Note however that class levels are not effected by this it is just a standard curve. For those of you that like to see a visual example of this.
[i.imgur.com]
Note I didn’t make this I just found this via google search.
Well thats it for now, next time I believe will introduce the subject of Exp % Field bonuses for all those grinders out there. And will add things in maybe a when ever I feel like it format or maybe bi weekly who knows…
P.S. Title is a work in progress so if anyone has better suggestions leave them in the comments.
-Oma
System Requirements
- OS: Windows XP.
- Processor: Intel Pentium Core 2 (or AMD Athlon X2).
- Memory: 4 GB RAM.
- Graphics: Nvidia Geforce 8600 (or ATI/AMD Radeon HD 4650).
- DirectX: Version 9.0c.
- Network: Broadband Internet connection.
- OS: Windows 7, 8, 10.
- Processor: Intel Core i5 (or AMD FX-8).
- Memory: 8 GB RAM.
- Graphics: Nvidia Geforce GTS 450 (or ATI/AMD Radeon HD 6770).
- DirectX: Version 9.0c.
- Network: Broadband Internet connection.
Servers
- [NA] Klaipeda
- [NA] Orsha
- [EU] Fedimian
- [SEA] Telsiai
- [SEA] Varena
- [SA] Silute
Current World statuses can be found on their home page here[treeofsavior.com].
They can also be found on the fan site here[www.tosbase.com].
Links
Official News[treeofsavior.com]
Fan Base News[www.tosbase.com]
Fan Base RSS Feed[www.tosbase.com]
Steam News
Official FAQ[treeofsavior.com]
https://www.reddit.com/r/treeofsavior/
Official Forums[forum.treeofsavior.com]
Fan Base Forums[forum.tosbase.com]
Groups[www.tosbase.com]
Fan Base Streams[www.tosbase.com]
All[www.tosbase.com]
Discord[www.tosbase.com]
Listing[www.tosbase.com]
BGM List[www.tosbase.com]
Starter Tips
You can get yourself familiar with the game by refering to the official starter guide found here[treeofsavior.com].
Controls
Tree of Savior offers three control schemes. The player can choose their preferred mode in the options menu.
Keyboard
This is the original and default control mode. Most of the interaction will be done using the keyboard, this includes movements and skill aiming.
The mouse will only be used to interact with the user interface.

Mouse & Keyboard
Works similarly to keyboard mode but allows the usage of the mouse to move, attack and aim skills. This mode is recommended for ranged classes.

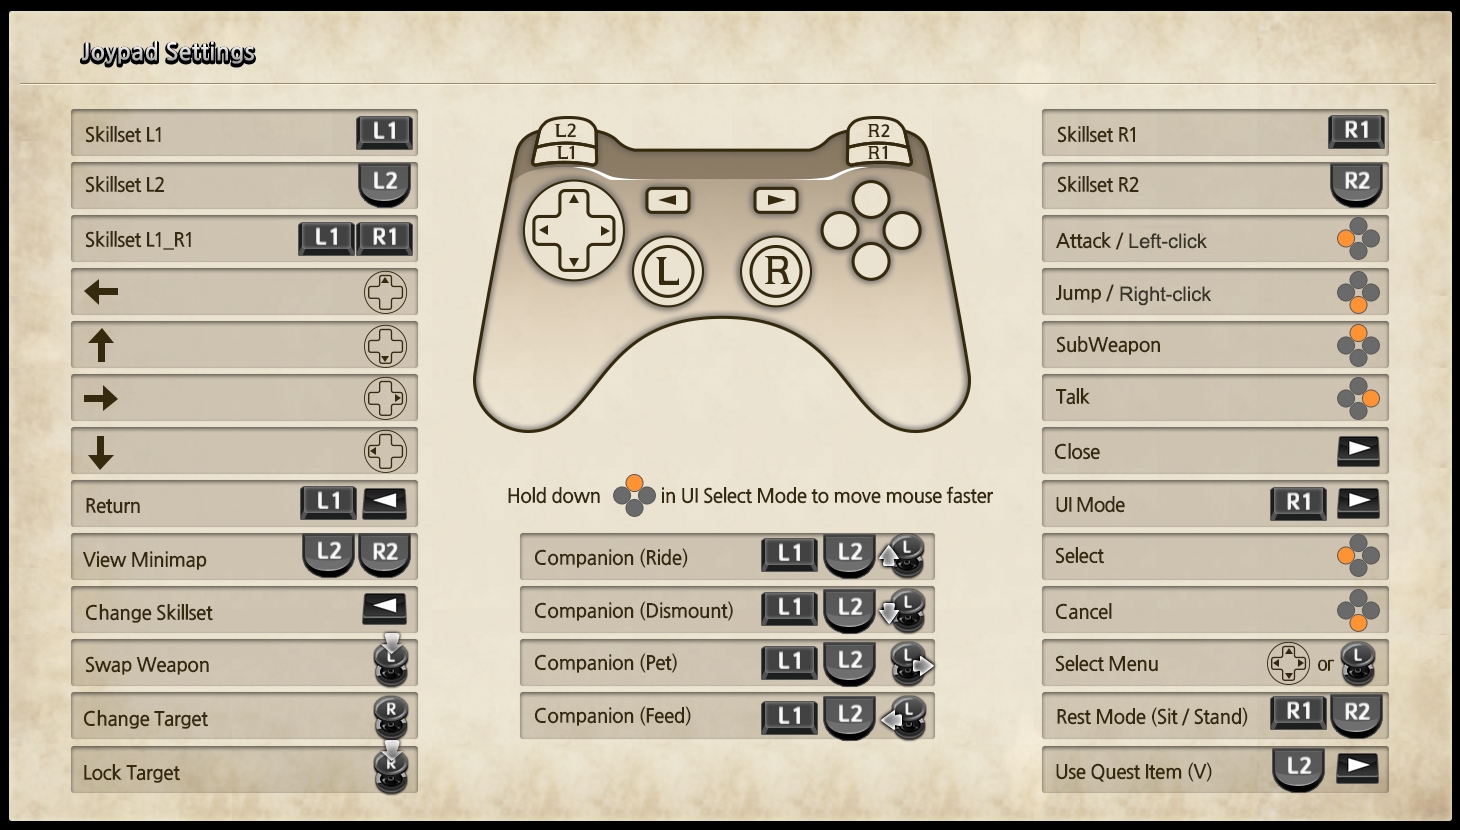
Controller
Allows the use of a Xbox 360 compatible gamepad to control the character, as well as some menu elements. This mode is recommended for melee classes.
Keyboard and mouse will still be needed to chat and interact with most of the user interface.
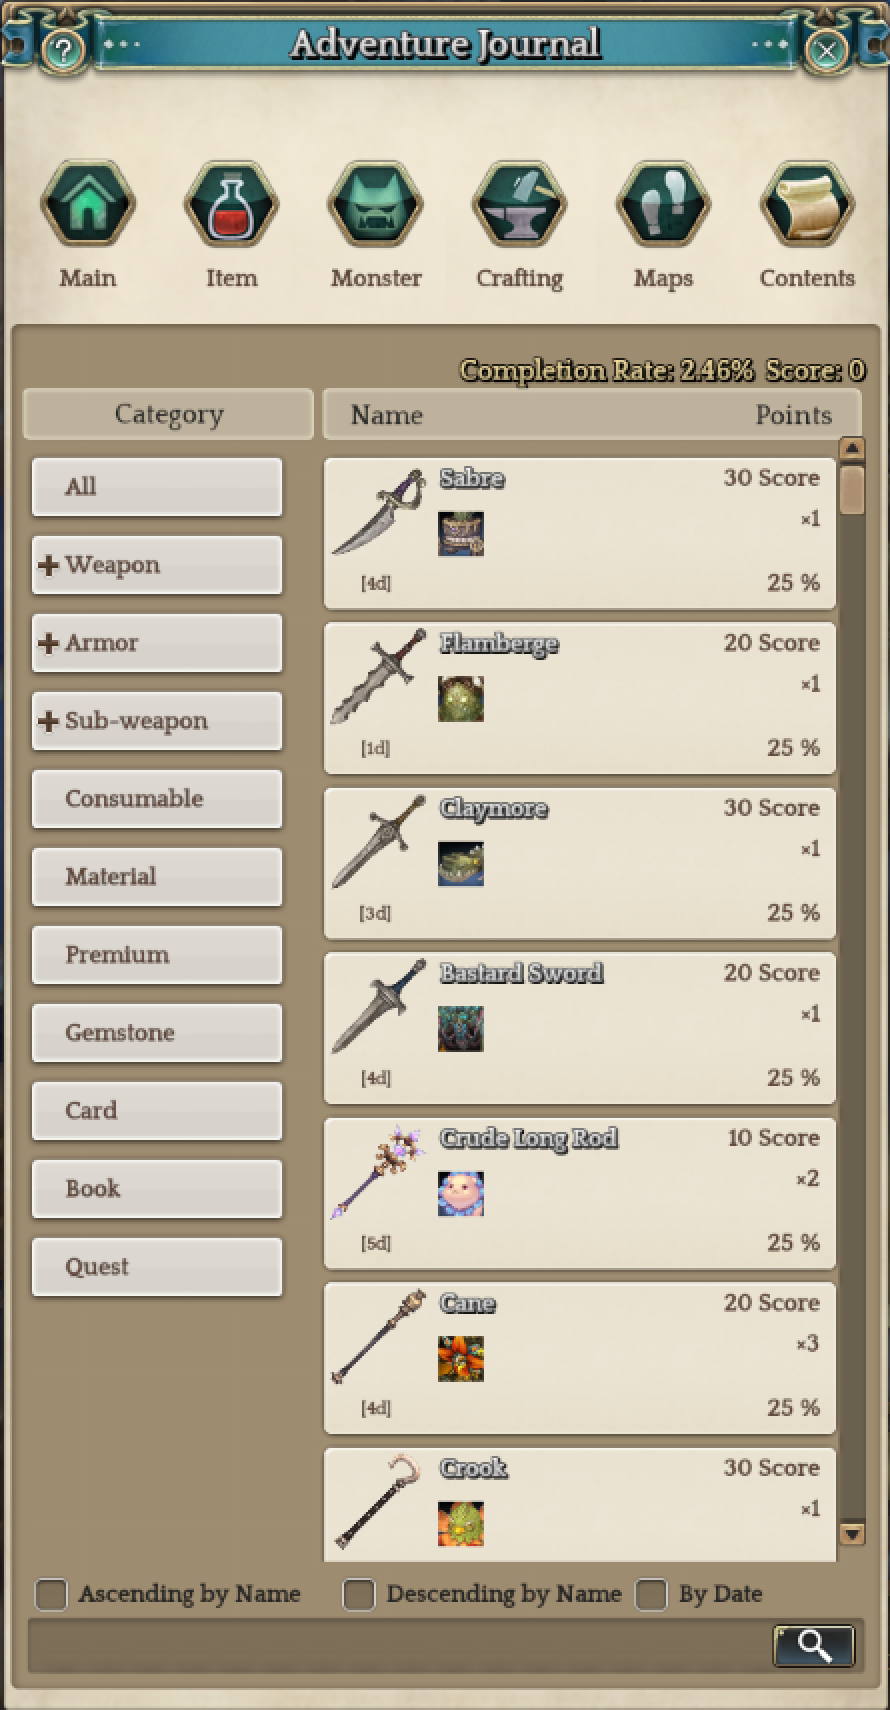
Adventure Journal
Adventure Journal (press F4 to open or click the feather icon in the game menu) contains deep information about your character’s progress in the game. This may be in categories such as Item, Monster, Crafting, Maps and Contents. While exploring the world you will expand your Adventure Journal and information about your travels will be recorded in a suitable category. New records will gain you a certain number of points which will be added to your character’s score. Based on the score, your character’s achievements can be compared to other characters on your server.
Expanding your Adventure Journal also brings you various rewards. By gaining points in various categories you will be rewarded some silver. Finishing monster and map related achievements will also reward you with EXP cards. To receive this rewards, you must visit some of the Wings of Vibora NPCs in cities.

When a completely new item is added to your Inventory it will be added to your Item tab in the Adventure Journal as well.
You will gain:
- 1 point for a new item
- 10 x STAR (+ Refine) points for equipment
- 10 x STAR points for gems
- 10 points for books
In this tab you can also see what monster does the item drops from or when it has been added to your journal.
After you “last hit” a new monster it will be added to your Adventure Journal. As for now, there are few known bugs in this tab. However you still can see what’s the highest damage you’ve dealt to a certain monster, how many monster of given type you’ve killed or even detailed information about the monster and kill/damage ranking for a specific monster by hovering the monster’s image.
You will gain:
10 points for normal monster
50 points for boss monster
When you kill certain amount of a monster you can receive an EXP Card from Wings of Vibora by “sharing tales of battle”.

When you gain a recipe for an item it will be added to your journal. By crafting a new item you will gain 10 points to your score. You can check here which needed ingredients you already have too.

While moving across the zones you will reveal the area around you. You can see here the percentage of revealed area of certain zones.
You will gain +1 points to your score for every 10% of explored area in a zone.
When you explore a zone completely (100% of its area is revealed) you can pick up your reward from Wings of Vibora in the form of EXP Cards by “sharing stories of adventure”.

You can see information about your achievements in other contents of the game here.
You can see here number of quests you’ve completed. For every quest completed you gain 5 points to your score as well as for every collection you’ve acquired. For completing a collection you gain 45 points.
You can also find information on number of NPCs you’ve met (+1 point for every important NPC), achievements you’ve earned (differs from +5 to +20 points) or missions you’ve cleared (+5 points).

Achievements
In Tree of Savior, developers wanted character appearance to tie in with the game’s Achievement System. Therefore, players must work to earn special character customizations such as hair color. Players can also earn titles to show off their accomplishments.
When a player completes the requirements for a title or hair color, there will be clickable treasure chest on that achievement to claim your reward. This screen can be accessed by hitting F1 and selecting the achievement tab.


Once you claimed your reward you can go to a seperate tab called character settings. There you can choose which title and hair color you wish to equip. (You can also change your character greeting here as well as see the remaining time on your active token and what benefits the token grants you.)

Token
<placeholder>
If you hit F1 you will open your character information screen. Go to the character settings tab and here you can view the remaining time of your active token. You can also see what benefits you get for having a token.


Guilds
<placeholder>
PVP
Player versus player is a system allowing players to fight each others. Currently in Tree of Savior, PVP exists in two forms: arenas and duels. There are rumors of a possible future implementation of large scale PVP, but nothing has been confirmed yet.
- 3v3: Two teams of 3 random players are pitted against each other.
- 5v5: Two teams of 5 random players are pitted against each other.
- Group 5v5: Two pre-made groups of 5 players are pitted against each other.
Currently there is no reward for winning a match, but all players participating will be added to the PVP rankings. Users can also spectate matches.
Players fight each other in friendly duels. To request a duel with someone, right click the desired person and select “Request a friendly duel”. As soon as the person accepts it, the duel starts. It is possible to have several duels active at the same time by sending multiple requests before anyone accepts it.
Elements
The damage dealt to an enemy is influenced by the attacker’s and the defender’s elements.
These elements are:


Non-elemental attacks are not influenced
This table shows the damage modifiers for all possible element combinations.
The left column represents the offensive element and the top row the defensive element.

For Example:
Ice deals 150% damage versus Fire.
Lightning deals 50% damage versus Earth.
Holy deals 200% damage versus Dark.
Dark deals 200% damage versus Holy.
Damage Type
Each damage is associated with a type. These types are governed by weapons and skills. Physical damage is divided by three types: slash, stab (also known as pierce) and hit (also known as blunt or strike). Then there’s magic damage type.
These types will deal a certain amount of damage against different armor types. Players as well as monsters each possess a specific armor type and will be affected according to the chart below.

Deals 50% additional damage against cloth armor.
Suffers a 25% damage penalty against plate armor.
Suffers a 25% damage penalty against ghost armor, like all physical damage types.
Note: Swords and 2H swords deal slash damage, as well as numerous Swordsman classes skills.
Deals 50% additional damage against leather armor.
Suffers a 25% damage penalty against cloth armor.
Suffers a 25% damage penalty against ghost armor, like all physical damage types.
Note: Spears, 2h spears, daggers and rapiers all deal stab damage, as well as numerous Archer classes skills and some Swordsman classes skills.
Deals 50% additional damage against plate armor.
Suffers a 25% damage penalty against leather armor.
Suffers a 25% damage penalty against ghost armor, like all physical damage types.
Note: Maces and wands deal hit damage, as well as several of Cleric classes skills, such as Monk’s and Paladin’s.
Deals 50% additional damage against ghost armor.
Note: As you can see, magic damage doesn’t suffer any penalty. This is because most magic damage dealing spells are associated with an element. Elements possess their own bonus/penalty chart.
Note: Wizard classes auto-attacks, regardless of the weapon equipped, as well as most of their skills, deal magic damage. Numerous Cleric classes skills deal magic damage as well, this includes Sadhu’s Out-of-Body melee attacks.
Suffers a 25% damage penalty against M size enemies.
Suffers a 50% damage penalty against L size enemies.
Suffers a 50% damage penalty against XL size enemies.
Note: Bows, crossbows, pistols(?), muskets(?)
AoE Attack and Defense Ratio
Players and monsters both have two stats named AoE Attack Ratio and AoE Defense Ratio. Those two parameters define how many targets are hit by AoE skills.
An attack’s AoE Attack Ratio is the sum of a skill’s AoE-AR(displayed on the skill’s tooltip), the player’s own AoE-AR(can be seen on the Character Info Window), and any applicable Attributes(Bash:Splash, for example).
AoE-AR = (chAoEAR+skAoEAR+AttributeBonuses)
AoE Attack Ratio can be roughly thought to be the maximum number of targets an attack will hit.
Player characters nominally have 1 AoE Defense Ratio. More AoE-DR can be earned through specific equipment.
Monsters generally have 1/2/3 AoE Defense Ratio, depending whether they’re Small/Medium/Large sizes, respectively. Some monsters may have more or less AoE-DR than their size’s default number.
AoE Defense Ratio is the parameter that determines how much AoE Attack Ratio will be consumed in order to hit a specific target within an attack’s Area of Effect.
Any attacks that are governed by AoE Ratio Mechanic will have an X amount of AoE Attack Ratio charges. The game will first deal damage to the target within the AoE which has the highest AoE Defense Ratio parameter(Might also prioritize monsters by size and/or distance. Needs testing). The first target’s AoE Defense Ratio is subtracted from the Attack’s AoE Attack Ratio’s charges. If there are any charges remaining, the AoE attack will bounce to the next target and repeat the process until there are no more AoE Attack Ratio charges, or no more targets to choose from within the AoE.
Example: Using a skill that has a total AoE Attack Ratio of 8 against a group of 5 monsters. The group of monsters within the AoE has 3/2/2/2/1 AoE Defense Ratios, respectively.
-The monster with 3 AoE-DR will be targetted first. After hitting this monster, the AoE still has 5 AoE-AR charges remaining;
-The AoE attack randomly bounces on two of the monsters that have 2 AoE-DR, and loses that many AoE-AR charges each. It has 1 remaining charge;
-The attack bounces one last time to the third monster that has 2 AoE-DR. The target is hit by the attack and there are no charges left. The skill does not hit any additional targets after this;
-The monster with 1 AoE-DR is standing inside the AoE, but does not take damage, because you are already hitting the maximum number of targets that your attack permits;
Test results show that the first target to be hit will be the one with Highest AoE Defense Ratio, with subsequent targets being chosen randomly. It is possible that different skills will prioritize targets differently, but the model of AoE Attack Ratio subtracting from AoE Defense Ratio for each target in the AoE has already been confirmed in several tests, and is probably the same for all AoE Ratio skills.
It is possible to hit an unlimited amount of targets by lowering a group of enemies’ AoE Defense Ratios to 0. Using the Falconer skill Circling will subtract 1 Defense Ratio per skill level, effectively removing monster monster’s AoE Defense Ratios to 0.
Skills that do not display their AoE Attack Ratio will usually hit all the targets within it’s Area of Effect without regarding either AoE-AR and/or AoE-DR.
Status Effects Part 1
Status effects are abnormal states which temporarily hinder their victim. Some of these effects can be cured using Cleric’s Cure, Pardoner’s Indulgentia or Oracle’s Prophecy.
Armor Break
Reduces the target’s defense.
Skills inflicting armor break:
- Skull Swing (Highlander)
- Umbro Thrust (Peltasta)
- Hand Knife: Armor Break (Monk)
Bleeding
A target afflicted with bleeding will lose HP over time.
Skills inflicting bleeding:
- Broadhead (Fletcher)
- Backstab: Massive Bleeding (Rogue)
- Keel Hauling: Bleeding (Corsair)
- Palm Strike: Bleeding (Monk)
- Pierce: Bleeding (Hoplite)
- Thrust: Bleeding (Swordsman)
Skills affecting bleeding targets:
- Double Slash (Swordsman)
- Cross Cut (Highlander)
- Sky Liner (Highlander)
Burn (Flame)
Burning targets receive damage over time.
Skills inflicting burn:
- Fireball: Flame Debuff (Pyromancer)
- Crossfire: Burn (Fletcher)
- Summon Salamion: Ignite (Sorcerer)
Skills affecting burning targets:
- Flare (Pyromancer)
- Targe Smash: Flame (Rodelero)
Confusion (Chaos)
<placeholder>
Skills inflicting confusion:
- Bewitch (Wugushi)
- Back Masking: Confusion (Chronomancer)
- Hounding: Confusion (Hunter)
- Scan: Confusion (Scout)
- Vashita Siddhi: Confusion (Sadhu)
Darkness (Blind)
Targets afflicted with darkness…
Skills inflicting darkness:
- Lachrymater (Rogue)
- Target Smash (Rodelero)
- Effigy: Blind (Bokor)
- Summon Salamion: Dark (Sorcerer)
Death Sentence
A target afflicted with death sentence is killed after the countdown is over.
Skills inflicting death sentence:
- Death Sentence (Oracle)
Decay (Corruption)
Targets afflicted with decay will see their max HP being reduced.
Skills inflicting decay:
- Dirty Pole (Necromancer)
- Create Shoggoth: Decay (Necromancer)
- Flesh Cannon: Decay (Necromancer)
Fear
Targets afflicted with fear will run away randomly.
Skills inflicting fear:
- Flu Flu (Scout)
- Growling (Hunter)
- Pointing: Fear (Hunter)
Freeze
Frozen victims are unable to act.
Skills inflicting freeze:
- Frost Pillar (Cryomancer)
- Ice Bolt (Cryomancer)
- Ice Bolt: Chance of Freeze (Cryomancer)
- Ice Pike (Cryomancer)
- Ice Wall (Cryomancer)
- Subzero Shield (Cryomancer)
- Hail: Freeze (Elementalist)
Skills affecting frozen targets:
- Gust (Cryomancer)
- Ice Blast (Cryomancer)
- Rim Blow (Peltasta)
- Electrocute: Freezing Magic Damage (Elementalist)
- Target Smash: Frozen Stone (Rodelero)
Passive attributes affecting frozen targets:
- Cryomancer: Freeze Specialty (Cryomancer)
Instant Kill
Instantly kills the target regardless of their HP.
Skills inflicting instant kill:
- Turn Undead (Paladin)
- Turn Undead: Spirit (Paladin)
Passive attributes inflicting instant kill:
- Rifle Master: Hunting (Musketeer)
Knockback
Targets are pushed back from their original location.
Skills inflicting knockback:
- Gust (Cryomancer)
- Punji Stake (Sapper)
- Heavy Shot (Archer)
- Full Draw (Archer)
- Full Draw: Knockback Increase (Archer)
- Energy Blast (Monk)
- Embowel (Barbarian)
- Giant Swing (Barbarian)
- Barrage: Knockback (Ranger)
- Cartar Stroke (Highlander)
- Cartar Stroke: Knockback Power (Highlander)
- Skull Swing (Highlander)
- Wagon Wheel (Highlander)
- Hell Breath: Knockback (Pyromancer)
- Umbo Blow (Peltasta)
- Umbo Blow: Add Knockdown (Peltasta)
Skills affecting knockback or knocked back targets:
- Pain Barrier (Swordsman)
- Gust: Collision Damage (Cryomancer)
- Cartar Stroke: Collision Damage (Highlander)
- Cartar Stroke: Remove Knockback (Highlander)
- Skull Swing: Eliminate Knockback (Highlander)
Knockdown (Imbalance)
Targets that are knocked down are temporarily unable to act.
Skills inflicting knockdown:
- Shield Charge (Rodelero)
- Shield Push (Rodelero)
- Siege Burst (Cannoneer)
- Astral Body Explosion: Knockdown (Sadhu)
- Bash: Knockdown (Swordsman)
- Doom Spike (Cataphract)
- Earth Wave (Cataphract)
- Steed Charge (Cataphract)
- Umbo Blow: Add Knockdown (Peltasta)
Skills affecting knockdown:
- Pain Barrier (Swordsman)
- Doom Spike: Remove Knockdown (Cataphract)
- Earth Wave: Remove Knockdown (Cataphract)
- Steed Charge: Remove Knockdown (Cataphract)
Status Effects Part 2
Lethargy
Targets afflicted with lethargy will have reduced physical attack, magic attack and evasion.
Skills inflicting lethargy:
- Lethargy (Wizard)
Loss of control
While not officially a status effect, here are regrouped the skills which prevent a target to act or move, that are not part of the other status effects.
Skills inflicting loss of control:
- Telekinesis (Psychokino)
- Telepath (Druid)
- Retrieve (Hunter)
- Kneel Hauling (Corsair)
- Impaler (Cataphract)
Petrifaction (Stone)
Petrified targets are unable to act.
Skills inflicting petrifaction:
- Stone Curse (Elementalist)
Skills affecting petrifaction or petrified targets:
- Rim Blow (Peltasta)
- Stone Curse: Petrifaction Increase (Elementalist)
- Target Smash: Frozen Stone (Rodelero)
Poison
A poisoned target will slowly lose HP over time.
Skills inflicting poison:
- Needle Blow (Wugushi)
- Throw Gu Pot (Wugushi)
- Wugong Gu (Wugushi)
Skills affecting poison or poisoned targets:
- Detoxify (Wugushi)
- Detoxify: Poison Immunity (Wugushi)
- Throw Gu Pot: Poison Remaining (Wugushi)
Provoke (Taunt)
The provoker will draw the attention of the provoked targets.
Skills inflicting provoke:
- Swash Buckling (Peltasta)
- Tercio (Centurion)
Passive attributes affecting provoke:
- Provoke (Swordsman)
Root (Bind)
Rooted targets are unable to move, but they can still act.
Skills inflicting root:
- Possession (Sadhu)
- Arrest (Squire)
- Dust Devil (Corsair)
- Hangman’s Knot (Linker)
- Throwing Spear: Bind (Hoplite)
Shock
A shocked target will see their INT and SPR temporarily decreased.
Skills inflicting shock:
- Crown (Highlander)
- Gather Sorpse: Shock (Fletcher)
Silence
A silenced victim will be unable to use skills.
Skills inflicting silence:
- Carve Austras Koks (Dievdirby)
- 1 Inch Punch: Silence (Monk)
- Magic Arrow: Silence (Fletcher)
Sleep
A sleeping target will be unable to act but will wake up after receiving a certain amount of hits or after the duration is over, whichever comes first.
Skills inflicting sleep:
- Sleep (Wizard)
Skills affecting sleeping targets:
- Magic Missile (Wizard)
- Energy Bolt: Additional Sleep Damage (Wizard)
Slow
Reduces the movement speed of afflicted targets.
Skills inflicting slow:
- Slow (Chronomancer)
- Arrest: Slow (Squire)
- Bounche Shot: Slow (Ranger)
- Montano: Size Slow (Rodelero)
- Oblique Shot: Slow (Archer)
- Phalanx: Slow (Centurion)
- Restrain: Slow (Swordsman)
Passive attributes inflicting slow:
- Ice Property: Slow (Cryomancer)
Stop
Stopped targets are unable to act for the duration but are immune to damage.
Skills inflicting stop:
- Stop (Chronomancer)
Stun
A stunned target will be unable to act for the duration.
Skills inflicting stun:
- Restrain (Swordsman)
- Backstab (Rogue)
- Help Chopper (Barbarian)
- Seism (Barbarian)
- Montano (Rodelero)
- Stone Shot (Quarrel Shooter)
- Magnetic Force: Stun (Psychokino)
- Psychic Pressure: Stun (Psychokino)
- Rush Dog: Stun (Hunter)
- Rush: Stun (Cataphract)
- Umbo Blow: Stun (Peltasta)
Passive attributes inflicting stun:
- Blunt Mastery: Stun (Cleric)
Skills affecting stun or stunned targets:
- Pommel Beat (Swordsman)
- Pain Barrier (Swordsman)
- Restrain: Duration (Swordsman)
- Cleave (Barbarian)
Transportation
Main means of transportation (excluding running around on your feet or companion of course) in Tree of Savior are statues of goddess Vakarine. Their position on the map are indicated by the wings icon. They can be found in common field zones. Cities such as Orsha and Klaipeda use statue of goddess Austrine as their teleportation point.
Discovering the statue in a zone will unlock the the statue as a teleportation point. Worshipping next to the goddess statue of Vakarine allows the players to travel between each unlocked statue at the cost of silver. The amount of silver needed to teleport will depend on the distance between your starting point to the teleporting point.
A player can teleport to an unlocked Goddess Statue using a consumable Warp Scroll item. S scrolls saves the position where you used to so you can return to the exact same position next time you use a Goddess Statue.
Additionally, there is a possibility to purchase Klaipeda Warp Scroll or Orsha Warp Scroll from an Item Vendor in those two cities cities. Using the scroll will teleport you to the city stated by the item’s title.
Squire’s skill Base Camp also provides teleportation functionality.
Companions
Companions or pets are creatures that will permanently follow you and fight with you. The same way you do, a companion gains experience and levels up, letting you improve its attributes. While fighting, if the companion runs out of HP, it will get stunned. The more you play with your companion, the more its affinity will grow towards you. Acquiring a companion will require 1 free character lodge slot. They can be used by any character of the lodge. However, their affinity level is unique to each character. Different companions possess different attributes. Lastly, some character classes offer skills and attributes which further improve companions, the most notorious being the Hunter class. Some classes can even use them as mount and ride into combat.
To ride a companion, you need the Companion Riding passive attribute, which is only available to the following classes: Cataphract, Schwarzer Reiter and Hackapell. You are able to fight while riding a companion. While riding a companion, your CON and Evasion are increased.
The companion window can be accessed by pressing F9. Here you’ll be able to review and improve your companion’s attribute, as well as toggle it on/off.
The following three companions can be bought in the city of Klaipeda by speaking to the [Companion Trader] Christina.

Velheider

Hoglan

Hawk

Piggy

Lesser Panda

Toucan

Barn Owl

Guinea Pig
Party
The game provides a party system for players to share in an adventure. Every party has exactly one leader. Party members may share some benefits such as buff sharing etc.

- Using Party Information UI panel (F6 or hands icon in the game menu)
- Inviting a player to a party while not being in one
- Using a dungeon party finder
Whoever initiates a party creation becomes a party leader. The party leader can change party information (name and description) on the top of the Members tab in Party Information panel (Note that you need to click Save to update the information).

Individual Item Distribution
(???) Everyone will gain its his loot.
Round Robin Item Distribution
(???) Every member will gain some loot in rotations.
Random Item Distribution
This setting will distribute items randomly.
Individual EXP Distribution
(???) Everyone will gain its his EXP.
Equal EXP Distribution
(???) Every member will gain equal number of experience points from killing a monster.
By Level EXP Distribution
(???) The experience points gained will be based on character’s level.
Quest Sharing
Sets weather the party members will share their quest amongst each other.
Show Nearby Parties
(???) Shows nearby parties.
Use Search Party
If a player nearby matches the criteria you specify bellow, you will be given heads up, that such a player is in your area. You will be able to invite the player in your party by clicking the notification.
Public Party
If checked, your party will be listed in the Public Parties list. That way any player on your server will be able to look up your party and join you.
The experience you can gain in a party depends on its composition and how it was made. If you have certain number of unique base jobs (Cleric, Archer, Wizard and Swordsman) or you use the dungeon party finder you receive further experience bonuses. The different combinations of these bonuses are as follows:
Note: Having less than 5 members in the Finder column means you used the dungeon and subsequently lost players. Finder bonus experience is only applicable in dungeons.
<placeholder>

Rest Mode
Rest mode allows your character to sit, enabling a quicker HP, SP and STA recovery. While sited, the quick slot bar will change and offer you four shortcuts:
- Bonfire: allows you to set up a bonfire, further improving HP and SP recovery (requires a bonfire reagent).
- Crafting: allows you to craft items using recipes.
- Gem Enhancement: allows you to level-up gems.
- Card Enhancement: allows you to level-up cards.
You can enter rest mode by pressing Insert.
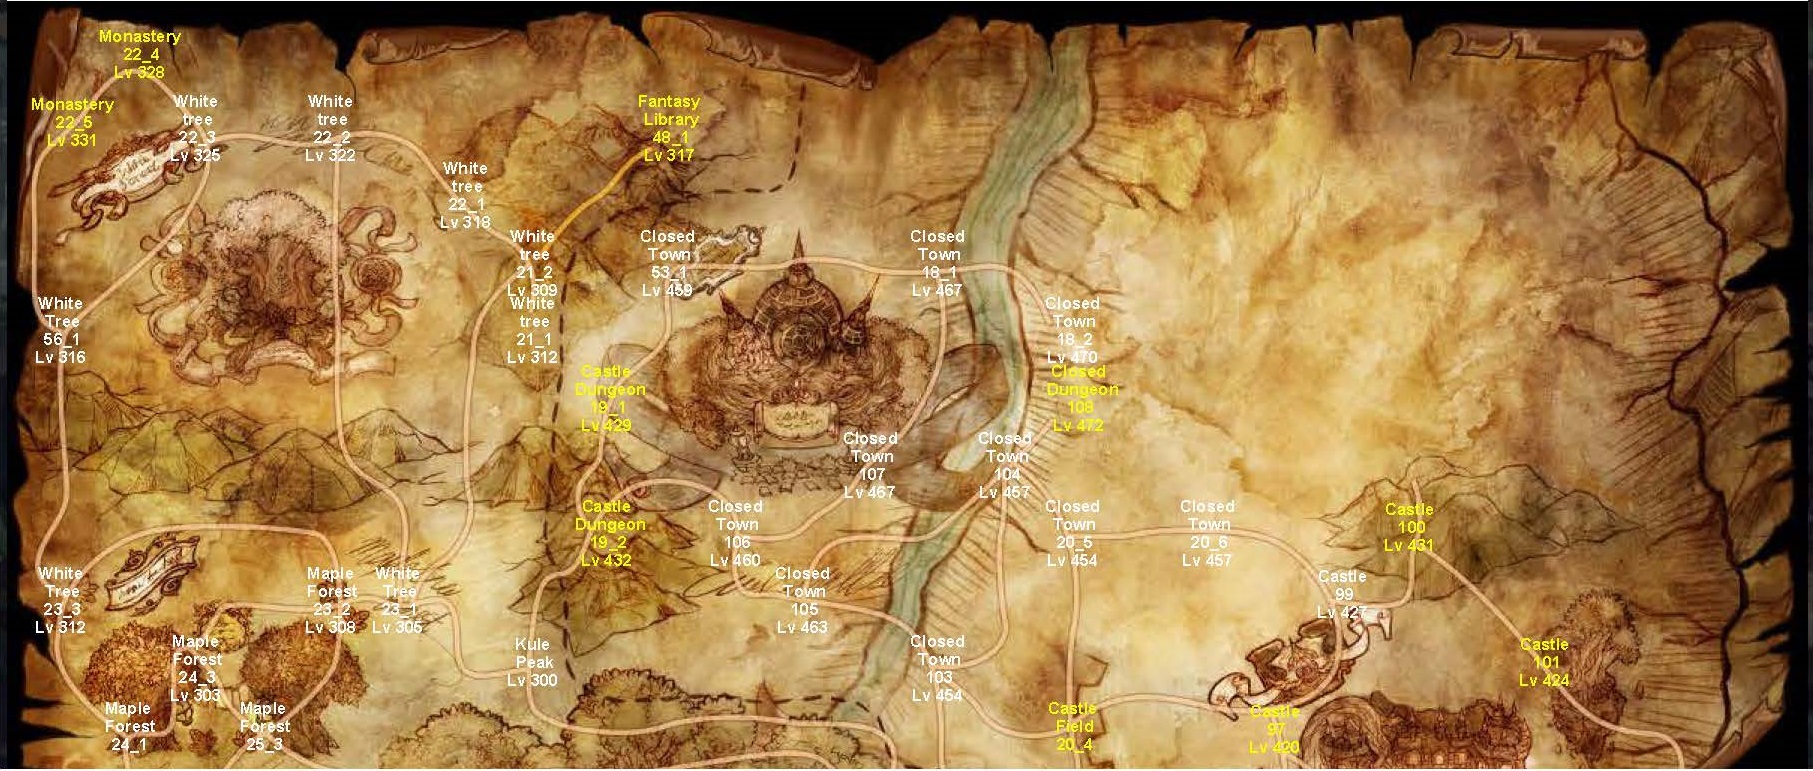
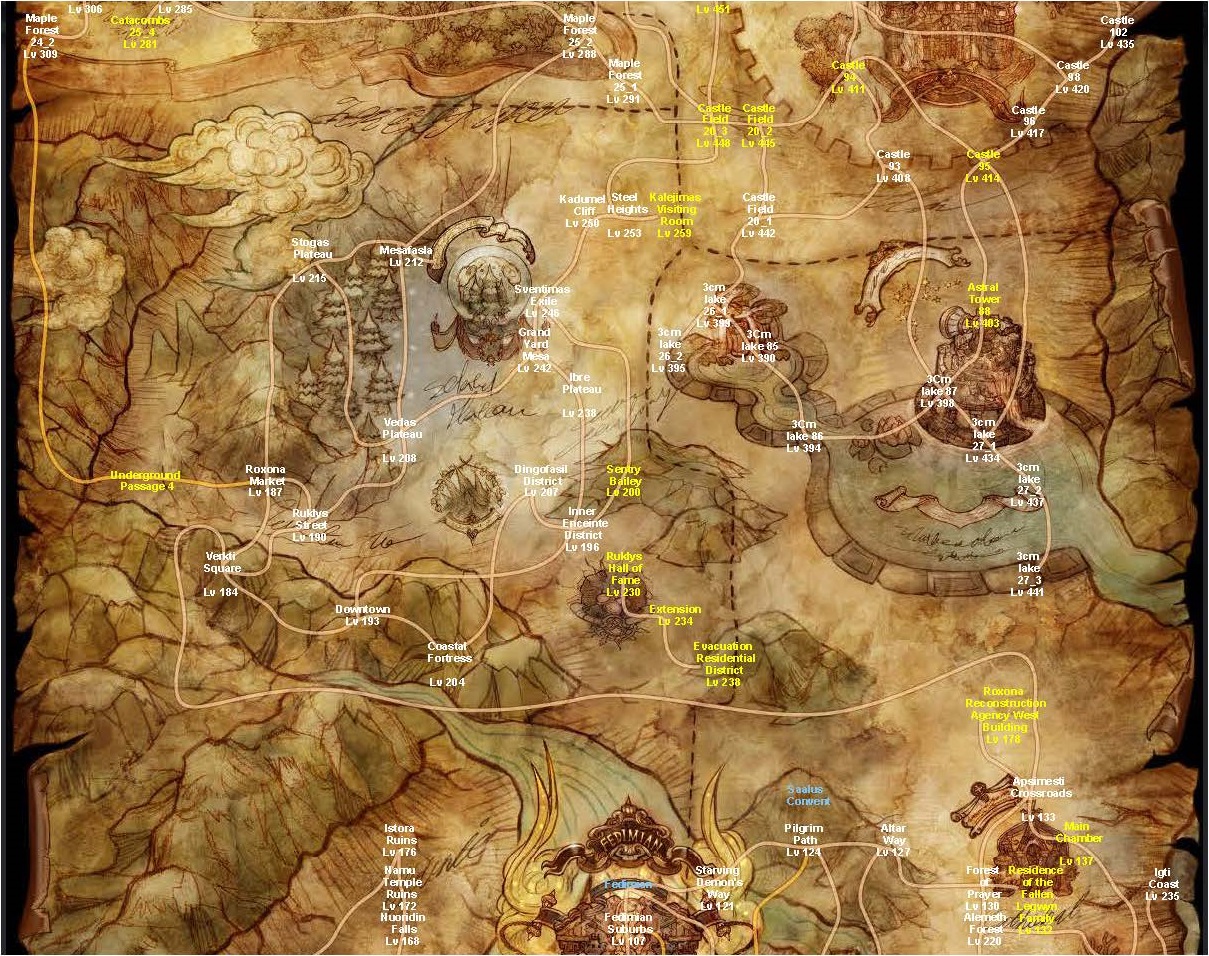
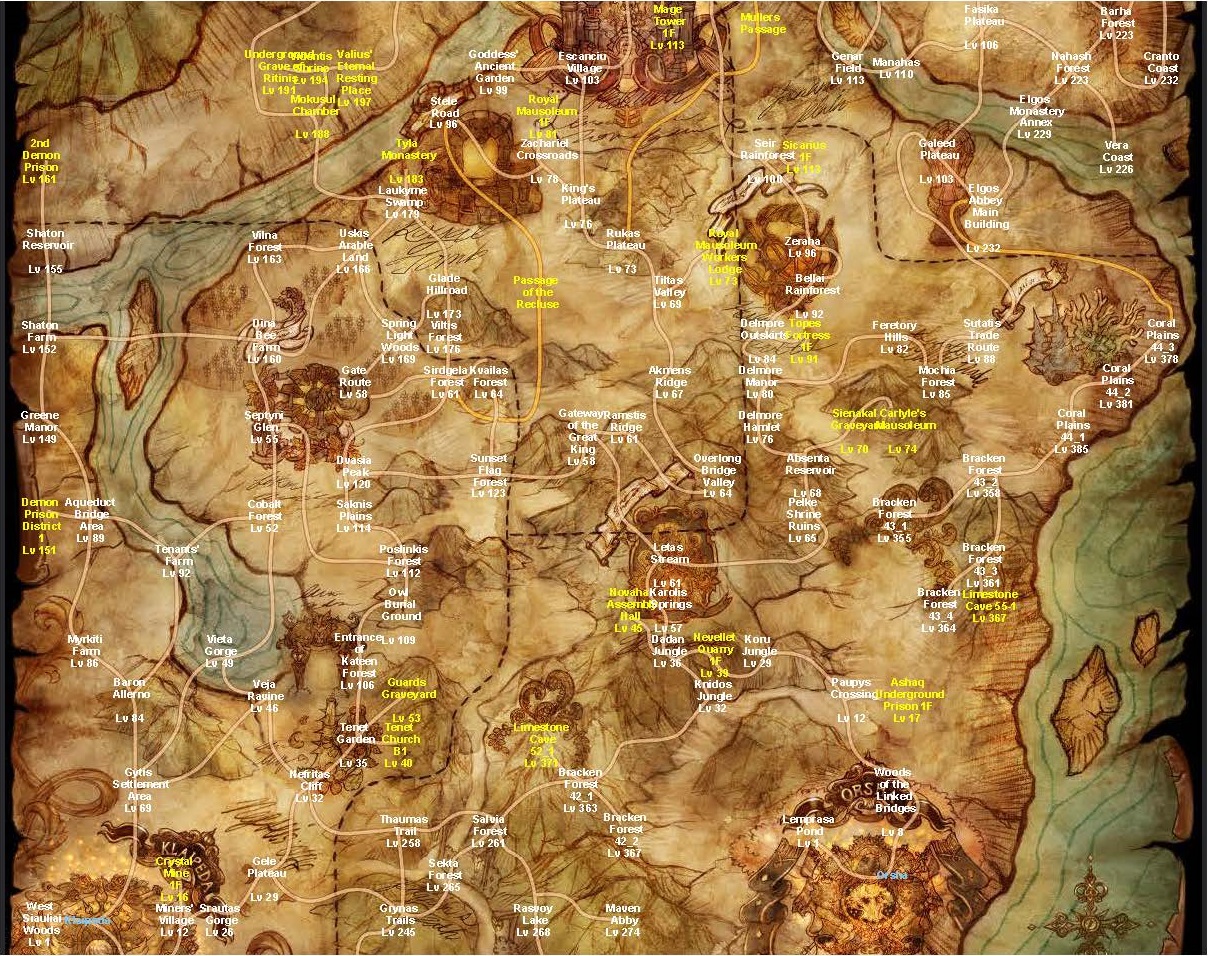
World Map
Interactive World Map found here[www.tosbase.com].

Field Maps
<placeholder>
Dungeons
Dungeons are dangerous maps with stronger than normal enemies.
Although you can manage field dungeons solo it’s recommended to form a group of 2-5.
This is broken down into a few subcategories. You can access the list in game by typing /indun in normal chat.
Dungeons
If you are of the level range then a group of 5 is recommended. There is an option to use a party finder but it’s hit or miss because sometimes you may not get a healer and/or tank and will be forced to rest constantly or abandoned the dungeon with consumes one of your daily limits.

Missions
A group of 2-5 is recommended. Missions scale to your level. Most players seem to run Siaulai. They can only be access from the Mercenary Post once you unlock the city of Fedimian around level 107.

Saalus Convent

Earth Tower

Cities
Cities are hub zones containing numerous NPCs and no enemies. Typical services in cities include the warehouse, auction house, class masters, and shops.
There are three cities,
- Fedimian, located in the north.
- Klaipeda, located in the southwest, is a mining town.
- Orsha, located in the southeast, is the largest city in the game.
Monsters
Please refer to the monster database found here[www.tosbase.com].
Boss Monsters
<placeholder>
NPCs
<placeholder>
Quests
<placeholder>
Goddess Statues
The world of Tree of Savior is populated with numerous Goddess statues, each of them offering some benefits. Some of them are hidden and will only be found by the most tenacious explorers.

The amount of silver needed to teleport will depend on the distance between you starting point to the teleporting point.


Lore
Tree of Savior takes place in an unnamed kingdom beset by trial and tribulation. The Goddesses have disappeared and no one knows why. Even worse the capital has been ravaged by the appearance of Austras Koks and legions of monsters. It is against this backdrop that heroes take up sword, bow, staff, and hammer.
The following is the story as given by IMCGames. It can be read at the source here[treeofsavior.com].
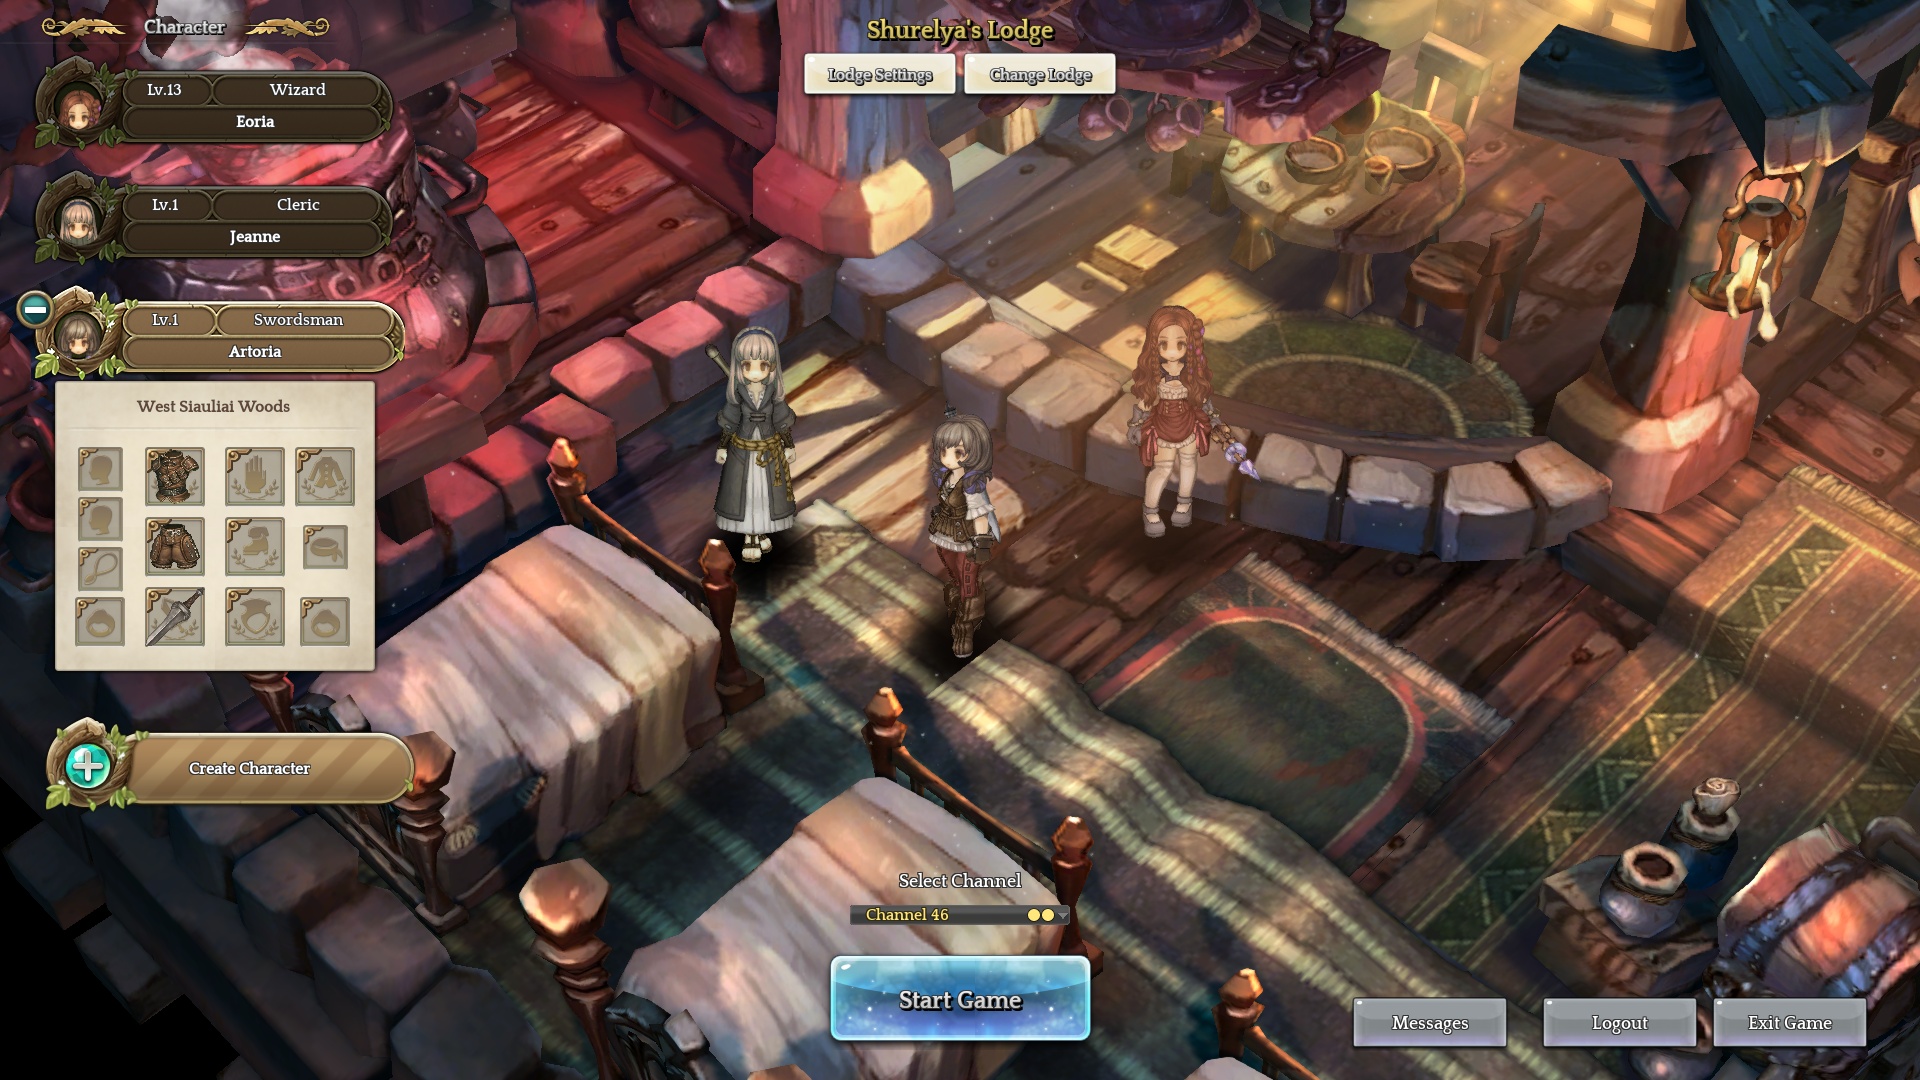
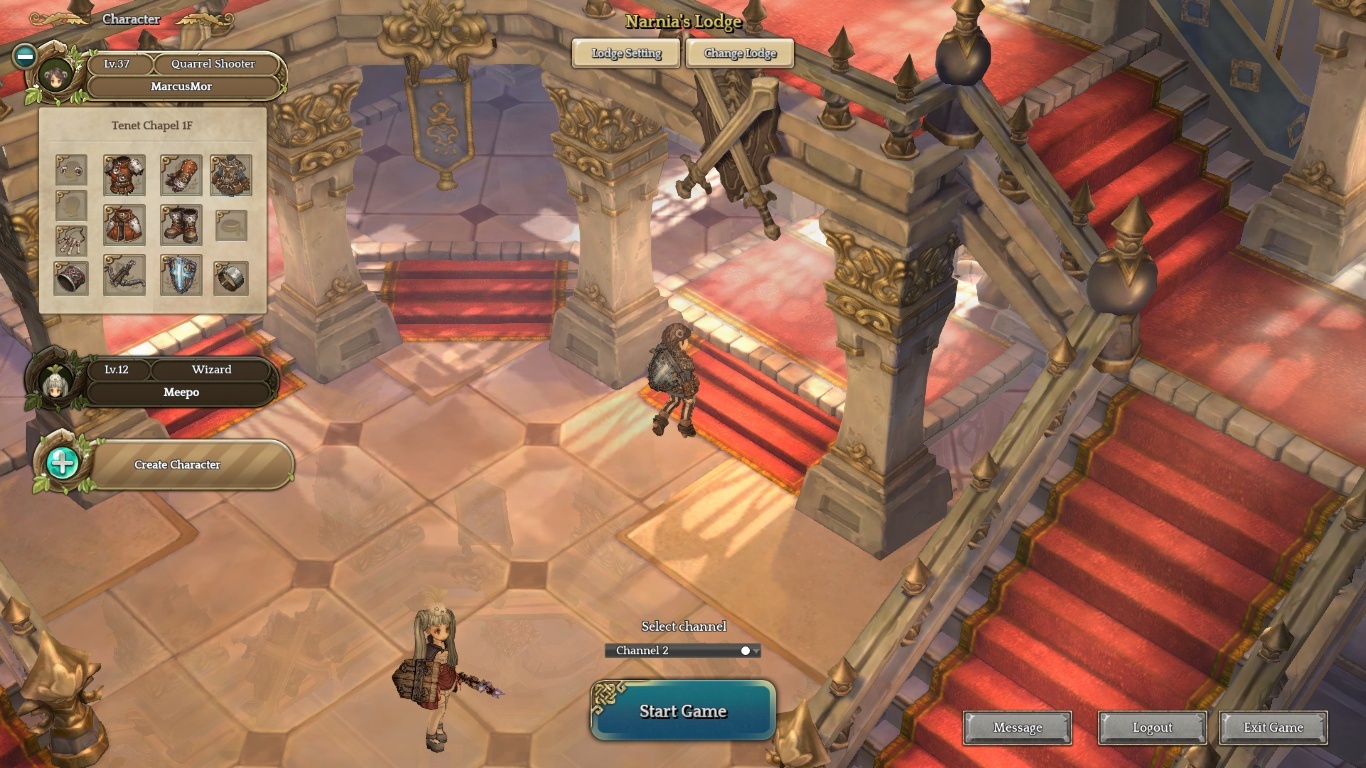
Lodge
When players first log into the game they will be provided a lodge. The lodge is your character and companion selection screen. In the lodge you can create new characters and delete them at any point in time. You can also review your characters and pets and select which ones you want to play the game with. Under the ‘Change Lodge’ button you will receive a list of different lodges which you may purchase to increase your character slots and how it looks. Other players are able to visit another player’s lodge while in game.
Note: Companions count as one character each.
1. Character Equipment Overview
2. Create Character Button
3. Lodge Settings (Rename character’s family/team)
4. Change Lodge
5. Select Channel
6. Start Game
7. Companion Overview
8. Logout & Exit Button


Stats Part 1
Stats, short for statistics, are fundamental attributes which define a character’s strengths and weaknesses. In Tree of Savior, these stats can be fully customized by the player. Each level up awards one stat point which can be allocated in one of the five main stats but players may gain additional stat points by pray at the Goddess Statue of Zemyna which can be found throughout the world. The stats window can be accessed in-game by pressing F1.
Main stats can be directly customized by the player, and can be further increased by equipment and buffs. Main stats possess a hidden bonus where you are rewarded with more stat points when investing into a specific stat. The bonus stat given will raise exponentially as you further invest into the stat. For example, 100 points invested will actually give you a total of 123 points. 200 points invested will give you a total of 253 points, and so on.
Base Stat Values
Bonus Stat Points
For each point in a main stat, you receive the following bonuses:
STR (Strength)
- Increases min physical attack by 1.
- Increases max physical attack by 1.
- Increases critical attack by 1.
- Increases weight limit by 5.
Note: For every additional class rank, you receive a bonus of 10% STR.
CON (Constitution)
- Increases max HP by 85.
- Increases HP recovery rate by 1.
- Increases critical hit resistance by 1.
- Increases weight limit by 5.
- Increases shield block by 1 (Only when equipped with a shield.)
Note: The more max HP a character possesses, the more they’ll be healed by Cleric’s Heal and Priest’s Mass Heal, regardless of the Cleric’s or Priest’s intrinsic stats.
Note: HP recovery is more effective while the character is sitting and located around a bonfire.
INT (Intelligence)
- Increases min magic attack by 1.
- Increases max magic attack by 1.
Note: INT affects most offensive spells, every Wizard classes’ basic-attack bolts, as well as Sadhu Out-of-Body melee auto-attacks. Note: For every additional class rank, you receive a bonus of 10% INT.
SPR (Spirit)
- Increases max SP pool by 13.
- Increases SP recovery rate by 1.
- Increases block penetration by 1.
- Increases magic defense by 0.2.
Note: SPR increases the potency of several buffs, debuffs and healing skills, making it a useful stat for support oriented Cleric classes.
Unconfirmed: SPR raises natural resistance to status effects Source
DEX (Dexterity)
- Increases accuracy by 1.
- Increases critical hit chance by 1.
- Increases evasion by 1.
Note: DEX bonuses only affect physical attacks, as magic attacks can’t miss, can’t crit and can’t be dodged.
Stats Part 2
Sub-stats are affected by main stats, equipment, buffs and debuffs.
HP (Hit Points)
The character must maintain this stat above 0 to stay alive.
The max HP formula is as follows: (Class Multiplier * ((Level – 1) * 17)) + CON * 85
SP (Spell Points)
Spell Points are a resource that slowly regenerates over time. Most skills consume SP. Not to be mistaken with Skill Points (also shortened as SP), which are points invested to level up your class skills.
The max SP formula is as follows: (Class Multiplier * ((Level – 1) * 6.7) + SPR * 13 [ + Level * 1.675 for Cleric]
HP Recovery
Affects the amount of hit points recovered over time. Sitting and bonfires further improve the recovery of HP.
The HP Recovery formula is as follows: (Level * 0.5 + CON)
SP Recovery
Affects the amount of spell points recovered over time. Sitting and bonfires further improve the recovery of SP.
The SP Recovery formula is as follows: (Level * 0.5) + SPR [ + Level * 0.25 for Clerics]
Physical Attack
Affects the amount of damage dealt by your physical auto-attacks and physical skills.
The Physical Attack formula is as follows: (Level + STR)
Secondary Physical Attack
Affects the amount of damage dealt by your off-hand weapon.
The Secondary Physical Attack formula is as follows: Level + STR
Magic Attack
Affects the amount of damage dealt by your magic auto-attacks and spells. Magic auto-attacks are dealt by all Wizard classes, regardless of the weapon equipped. Sadhu’s Out-of-Body melee auto-attacks also deal magic damage.
The Magic Attack formula is as follows: Level + INT
AOE Attack Ratio
Defines your attacks’ area of effect. A higher value will allow your attacks to reach more enemies.
Accuracy
Affects the accuracy of your physical attacks. A higher value will make your physical attacks less likely to miss.
The Accuracy formula is as follows: Level + DEX [ + (Level + 4) / 4 for Archer]
Magic Amplification
Increases the maximum damage of your magic spells.
(Base Magic Damage) + (0~100% Magic Amp Value)
E.G If you do 100 damage with magic and you have 48 magic amp, you will randomly do between 100~148 damage.
Block Penetration
Affects the chance of your physical attacks to bypass an enemy’s passive block. A higher value will make your physical attacks less likely to be blocked.
The Block Penetration formula is as follows:Level * 0.5 + SPR
Critical Attack
Increases the amount of damage dealt by critical hits, added as flat damage after the +50% critical damage modifier. Only physical attacks are affected, as magic attacks can’t crit.
The Critical Attack formula is as follows:STR
Critical Rate
Affects the chance of your physical attacks to land a critical hit. Magic attacks aren’t affected as they can’t crit.
The Critical Rate stat formula is as follows:DEX [ + (Level / 5) for Archers]
Your final chance to crit is: (Crit rate – target crit resistance)*(42/your level)
Physical Defense
Affects the amount of physical damage received. A higher value will reduce that amount.
The Physical Defense formula is as follows:(Level / 2) [ + (Level / 4) for Swordsmen]
Magic Defense
Affects the amount of magic damage received. A higher value will reduce that amount.
The Magic Defense formula is as follows:(Level / 2) + (MNA / 5) [ + (Level / 4) for Wizards]
AOE Defense Ratio
Affects your defense against area of effect attacks.
Evasion
Affects your chances to dodge physical attacks. Magic attacks can’t be dodged.
The Evasion formula is as follows:Level + DEX [ + (Level / 8) for Archers]
Block
Affects your chances to block physical attacks. Magic attacks can’t be blocked.
Critical Resistance
Affects your likelihood of receiving a critical hit. A higher value will make you less likely to receive one.
STA (Stamina)
Stamina is a resource consumed while Dashing. Only Swordsman classes can Dash. A few skills also consume Stamina, such as Monk’s Double Punch and Rodelero’s Shield Charge. The resource is recharged by using certain consumables as well as by breaking Stamina crystals, which are found in most maps.
Weight Limit
Affects the amount of items you can carry.
The max weight formula is as follows: 5000 + CON * 5 + STR * 5
Classes Part 1
When creating your character, you must choose one of the four archetypes: Archer, Cleric, Swordsman and Wizard. As you progress, you’ll be able to unlock, mix and match more classes from their respective archetype. Each class possesses 3 circles. A circle is a progression step, unlocking more and stronger skills for a given class. While ranking up, you can either pick a new class or improve your existing class(es)’ circle. You can rank up by accumulating class experience (CLS), the same way you accumulate regular (character) experience to level up. Upon death, monsters will give you both regular and class experience.
Archer classes deal incredible damage from a distance. They are sneaky and opportunist fighters. They favor bows and one-handed crossbows, and some of their classes can use pistols, muskets and cannons. Thanks to classes such as Schwarzer Reiter and Hackapell, who can ride their pet into combat, they possess great mobility. While Archers are less useful in a group than the other three archetypes, their significant DPS and dangerous contraptions will help eradicate monsters pretty quickly.
Recommended Roles
- Ranged DPS (Physical)
- Utility (CC/Stealth/Pet/Mobility)
Preferred Stats
The ratio of STR and DEX will depend on the class choices. Some classes can get away with investing as little DEX as possible, because they get their source of critical hit elsewhere, namely from skills and buffs. Some CON will always help, but a good Archer will try to avoid getting hit altogether. INT isn’t needed, as no magic damage is ever dealt by them. SPR, while more useful than INT, is not too popular either, as the typical Archers will rather rely on SP potions.
Ranks
Below you’ll find all the Archer classes, sorted by the ranks at which each of them starts being available.
Cleric classes’ main role is support. Thanks to their numerous buffs and debuffs, they are tailored for group play. Clerics are the only classes able to heal themselves and friendly targets. Moreover, the variety of their classes makes them great damage dealers in both physical and magic attacks and thanks to their wide assortment of support skills makes them a very versatile class. They favor mace weapons, as they improve both physical and magic attacks. Cleric classes offer the most variety when it comes to builds as the player can choose to go full support, hybrid support/dps, pure dps and even off-tank. They can also summon an army of zombies, thanks to Bokor’s skills.
Recommended Roles
- Support (Buffer/Healer/Barriers)
- Melee DPS (Physical and Magic)
- Off-tank
- Utility (Debuffer/Teleport/Scrollmaking/Summons)
Preferred Stats
Finding the right stats as a Cleric is probably the hardest part. They are able to make use of all of them and are one of the few classes who possess skills scaling with SPR. The stat improves several of their buffs, debuffs, and even healing skills. Full support characters will want to invest mainly into SPR with a bit of CON for survival. Melee physical DPS such as the Paladin and Monk will favour stats similar to a Swordsmans’, namely a good mix of STR and DEX, as well as some CON. Offensive spells such as Krivis’ Zaibas, Druid’s Carnivory, or Sadhu’s Out-of-Body attacks and explosions and will require further investment in INT to deal more damage.
Ranks
Below you’ll find all the Cleric classes, sorted by the ranks at which each of them starts being available.
Classes Part 2
Swordsman classes are strong and robust melee combatants. They can use most weapons but favor swords and spears, both one-handed and two-handed. Out of all the archetypes, they offer the tankiest classes and are the best at provoking monsters, thanks to the Peltasta, rendering them ideal for group play. They also possess excellent mobility, thanks to Cataphract’s ability to ride his mount into combat, and are the only archetype able to use dash. They are also blessed with a good amount of crowd control abilities. Lastly, Squires can offer excellent utility to the group by crafting food and repairing equipment.
Recommended Roles
- Melee DPS (Physical)
- Tank
- Utility (Food/Repair/CC/Mobility)
Preferred Stats
A good balance of STR and DEX will work well here to improve the Swordsman’s damage, critical hit rate and evasion. Every class will also want some CON to increase their survivability, while Tanks will favor it the most. Excluding a couple Squire’s skills, INT is not needed, as none of the Swordsman classes deal magic damage. Lastly, SPR could have some use if SP recovery is lacking, but it is nowhere near as useful as the other three main stats. The typical Swordsman will rather drink SP potions without moderation.
Ranks
Below you’ll find all the Swordsman classes, sorted by the ranks at which each of them starts being available.
Wizard classes are offensive spell casters. They favor weapons such as rods and staves for their high amount of magic attack. They possess excellent offense but are the most fragile. Out of the four archetypes, they also offer the second best support, thanks to classes such as Linker, Thaumaturge and Chronomancer. They possess the most impressive crowd control abilities, thanks in part to Cryomancer’s numerous freeze spells and Psychokino’s telekinesis. Lastly, their Sorcerers and Necromancers can summon intimidating monsters.
Recommended Roles
- Ranged DPS (Magic)
- Support (Buffer)
- Utility (CC/Summons/Alchemy)
Preferred Stats
A typical Wizard will favor INT to bolster their magic attack, as well as SPR to increase their max SP pool and SP recovery. However, some would rather spend as little points as possible in SPR, at the cost of drinking copious amount of SP potions. DEX isn’t needed, as spells can’t miss nor crit. Nor is STR needed, as their auto-attacks, regardless of the equipped weapon, will always cast a magic bolt, thus dealing damage based on Matk. CON will improve survivability, and in this regard, Thaumaturge’s Transpose skill offers some flexibility, as this buff enables the user to switch INT and CON on the fly.
Ranks
Below you’ll find all the Wizard classes, sorted by the ranks at which each of them starts being available.
Archer
<placeholder>
Cleric
<placeholder>
Swordsman
<placeholder>
Wizard
<placeholder>
Skills
<placeholder>
Attributes
Attributes are skill and class masteries. Passive attributes improve a skill’s effects or grant a class with unique effects and features. Active attributes modify a skill’s behavior and can be toggled ON or OFF. Attributes possess their own levels, you can level them up by training them. To do that, you need to talk to your class NPC. Training an attribute requires time (unless you have an active token) and money.
<placeholder>
Experience
Experience is accumulated by defeating monsters as well as by consuming EXP cards, which are awarded when completing certain quests. There are two types of experience:
- EXP: character experience, used to improve your level.
- CLS: class experience, used to rank up, allowing you to improve and unlock classes.
You can check both experience gauges below your quick slot bar. Monsters give both types of experience, at a varying rate. Note that your companion also gains EXP.
- Base EXP Table[www.tosbase.com]
- Class EXP Table[www.tosbase.com]
- Companion EXP Table[www.tosbase.com]
<placeholder>
Leveling
You have two types of basic levels and one type of advancement level.
Character levels also called base levels and class levels also called rank levels are your basic levels. Ranks themselves (not to be confused with rank levels) are a collection of class levels that allow you to advance your class. A circle is how many rank advancements you have within a specific class.
You will gain character levels much quicker than you will class levels. Character leveling goes up to about 300 levels total and will be increased in future updates.
Class leveling goes up to 15 and which point you can choose to advance to rank 2 after completing a quest. Once you advance your rank your class levels reset to 1 again. Rank 7 is the current cap in the English version as far as I know so you are talking over 100 class levels total.
For example if you start as a Rank 1 Archer (Circle 1) and get 15 class levels you can advance to either a Rank 2 Archer Circle 2, a Rank 2 Ranger Circle 1 or a Rank 2 Quarrel Shooter Circle 1.
So for example if I’m trying to describe a Rank 7 Cannoneer I could say just that but if I wanted to list all my circles it would look something like this:
Rank 7 Cannoneer Circle 1
Rank 7 Falconer Circle 1
Rank 7 Ranger Circle 3
Rank 7 Archer Circle 2
Basically that’s saying I have advanced to rank 7 and I took 1 rank advancement in Cannoneer, 1 in Falconeer, 3 in Ranger and 2 in Archer, totaling 7. If you review the class chart here[www.tosbase.com] you will see at what rank advancement you can unlock a new class. However you can always choose a class from a previous rank. You can also choose the same class to rank up with up to 3 times per class.
You can never switch between different class archetypes on the same character. An archer can never become any of the swordsman classes, etc. Depending on what playstyle you are going for (Single Target DPS, AOE DPS, Mixed DPS, Tank, Healer, Support, Buffer, Crafter, etc), certain classes have better synergies which each other than others. In my previous example that is one of many builds for an AOE focused archer.
Equipment
Equipment may be used to improve a character’s defenses and attributes, or simply to customize their appearance. Armors, which include top, pants, gloves and boots, are defined by type: cloth, leather, plate and ghost. These types affect the amount of damage received according to the Damage Type Chart. Most equipment is not shown visually on the character’s model, which instead displays a class costume. This excludes upper headgears, headgears, lower headgears, armbands and shields. Note that upper headgears, headgears, lower headgears, armbands and costumes do not grant any stats however you can use an enchant scroll on headgears to give a random set of stats.
Equipment comes in four rarity tiers: normal, magic, rare and unique. These tiers can be distinguished by the equipment’s background and name color. Rarers equipments offer stronger attributes.
Armors masteries, which are passive attributes, allow a character to wear and improve the stats of a specific type or armor. All classes have access to the following masteries:
- Enables you to equip [Cloth] armor.
- When equipped with 3 or more pieces of [Cloth] armor, increases your maximum SP and magic damage taken is decreased by 5%.
- When equipped with 4 [Cloth] armor pieces, your Magic Defense increases and magic damage taken is decreased by an additional 10%.
- Enables you to equip [Leather] armor.
- When equipped with 3 or more pieces of [Leather] armor, increases your Evasion.
- When equipped with 4 [Leather] armor pieces, your Evasion increases from attributes by an additional 50%.
- Enables you to equip [Plate] armor.
- When equipped with 3 or more pieces of [Plate] armor, increases your maximum HP and physical damage taken is decreased by 5%.
- When equipped with 4 [Plate] armor pieces, your maximum Stamina increases and physical damage taken is decreased by an additional 10%.
Weapons
Weapons can be equipped to improve a character’s attack power and attributes. Classes and skills often govern the type of weapon that can be used. Some weapons are one-handed, and can be used alongside a shield or an off-hand weapon. Some are two-handed.
Physical based weapons are affected by STR and DEX, each of them deal a specific type of damage: Slash, Stab or Hit. Magic based weapons are affected by INT. Note that maces and wands, while being primarily physical attack based, will also give a magic attack bonus, these weapons are a good choice for hybrid characters. Also note also that Wizard classes will always deal magic damage regardless of the equipped weapon, making physical based weapons not recommended for them. This is because all the Wizard classes auto-attacks throw a magic bolt.
Weapons come in four rarity tiers: normal, magic, rare and unique. These tiers can be distinguished by the weapon’s background and name color. Rarers weapons offer stronger attributes.
Here is a list of all the known weapon categories.
Crafting
<placeholder>
Refining
Refining is the act of improving your equipment’s and weapon’s attributes by using an anvil. Refined equipment is easily recognized by a plus sign followed by a number, ranging from +1 to +15, and possibly higher. Refining also costs a silver fee, which depends on the refine level and equipment quality. All weapons can be refined, as well as armor equipment (top, pants, gloves, boots) and shields.
Below you’ll find the formulas showing how refines improve the equipment’s attributes. ATK is the main attack of your weapon, it can be either physical or magical, depending on the weapon type. Stars represent the quality of your equipment. Refines will grant higher attributes to the equipment the more stars it has.
ATK (If refine level is inferior or equal to 5):
- Level * (Stars + 2)
ATK (If refinle level is superior to 5):
- (5 + (Level – 5) * 2) * (Stars + 2)
DEF, MDEF, Accuracy, Evasion:
- Level * (1 + Stars / 10)
Magic Amplification:
- Level * (Stars + 1) / 2
To refine your equipment, you need to use an anvil. This item will be consumed after one use, whether you succeed or fail.
- In your inventory, click on the anvil to make it appear on the ground.
- Hit the anvil with the equipment you want to refine.
- Enjoy (or hate) the result.
For weapons, past refine +5, success is no longer guaranteed and as you progress further, the success rate decreases. If you fail, the weapon will lose 1 upgrade level and 1 potential. When the weapon reaches 0 potential, you’re no longer able to refine it.
Below you’ll find the weapon refine success rates:
For armors, past refine +3, success is no longer guaranteed and as you progress further, the success rate decreases. If you fail, the armor will lose 1 refine level and 1 potential. When the armor reaches 0 potential, you’re no longer able to upgrade it.
Below you’ll find the armor refine success rates:
At refine +15, your weapon will start displaying a glowing effect. This effect is purely cosmetic.
Socketing
Socketing is the act of adding Gems, Magic Amulets and Monster Gems to one’s equipment to grant it additional attributes. Weapons, as well as gloves, pants, shirt, boots and shield can possess a Maximum Sockets attribute, followed by a number. This number tells you how many sockets you can drill into the equipment.
- Check if the equipment you want to socket has a Maximum Sockets attribute. The maximum number of holes that can be drilled depends on that attribute.
- Meet the Ironsmith NPC in Klaipeda or Orsha and ask him to drill a hole into your equipment.
- Note that drilling a hole will reduce your equipment’s potential by 1. A potential of 0 will prevent you from drilling any more holes.
- Finally, in your inventory, add the gem, magic amulet or monster gem you want to socket by right clicking on it then by selecting the desired equipment.
- Gems: It is possible to remove a socketed gem from an equipment. However, doing so will decrease the gem’s level by 1.
Gems
Gems are socketable items. There are four colored gems, each possessing their own bonuses and maluses. These bonuses/maluses will also change depending on which type of equipment you socket them to. Also, each gem can be leveled up (or enhanced), improving both their intrinsic bonuses and maluses. Moreover, Alchemists (Wizard class) can roast your gems to reduce or remove the maluses. Lastly, if you die, you’ll drop all the gems in your inventory.
To further improve a gem’s intrinsic bonuses (and maluses), you can level it up (or enhance it). To do so:
- Sit, then open the Gem Enhancement Window from your action bar.
- Select the desired gem by right clicking it, in your inventory.
- In the Gem Enhancement Window, your gem is now selected, you’ll notice several item slots on the bottom.
- Feed your gem by adding other gems and items to these slots. This will increase its experience and level it up. You can also use crafting materials to level up gems.
- Once you’re satisfied with your gem’s level, you can socket it into your desired equipment.
- Note: You can remove a socketed gem from an equipment. However, doing so will reduce the gem’s level by 1.
Gem roasting is the act of removing a gem’s intrinsic negative effects (also known as maluses). Only an Alchemist (Wizard class) is able to roast gems.
Red Gem

- Main weapon
- Off-hand
- Shirt/pant
- Boots
- Gloves
- Max Attack +4, Min Attack -1
- Physical Attack +5, Physical Def -1
- HP +23, Evasion -1
- HP Recovery +2, Magic Def -1
- Critical Attack +5, Accuracy -3
Green Gem

- Main weapon
- Off-hand
- Shirt/pant
- Boots
- Gloves
- Critical Rate +2, Critical attack -1
- Critical Rate +3, Max Attack -1
- Crit Resist +1, SP -6
- Evasion +2, SP recovery -8
- Accuracy +2, Min Attack -1
Blue Gem

- Main weapon
- Off-hand
- Shirt/pant
- Boots
- Gloves
- Magic attack +5, SP -15
- Block +1, HP -4
- SP +30, Crit Resist -5
- M.Def +1, HP recovery -1
- SP Recovery +2, Evasion -1
Yellow Gem

- Main weapon
- Off-hand
- Shirt/pant
- Boots
- Gloves
- Critical Atk +6, Accuracy -3
- Critical Atk +7, Block Penetration -4
- Physical Def +1, HP -17
- HP +15, Magic Attack -2
- Block Penetration +1, Max Attack -1
Magic Amulets
Magic amulets were in the game prior to pre-release however they have been removed, at least for the time being. If they are re-added I will adjust this section of the guide.
Monster Gems
Monster gems can be slotted like regular gems with Shift-Right. To slot a monster gem into an piece of equipment, you must open a socket from the blacksmith in town to be able to insert a monster gem. Each monster gem add +1 skill level to the corresponding skill
Only one copy of a monster gem may be used at a time. For example wearing two Crystal Spider Gem will only yield +1 for Swift Step instead of +2. Removing a monster gem will destroy the gem as the gem is considered lv1
<placeholder>
Boss Cards
Bosses have a chance to drop a card which represent them. For now, the cards are used to improve and customize Necromancer’s Shoggoth and Sorcerer’s summoned creature, as well as used in a mini-game duel with other players. Cards may also be leveled up by feeding them other cards.
It is possible to improve a card by feeding it other cards. To do so, you need to open the Card Enhancement window while in Rest Mode.
A Necromancer can insert Animal, Plant and Mutant type cards into their Necronomicon to improve and customize the Shoggoth’s stats.
Similarly to Necromancers, a Sorcerer may insert Demon type cards into their Grimoire to improve, customize and change the appearance of their summoned creature, using Summoning skill.
A player can start a card mini-game duel with another player. The game is chance based, the system will automatically pick certain criterias, such as “tallest monster”, “flying type”, “dark element”, and whichever cards fits those criterias the best, win.
You can consult the list of all known boss cards on TOSBase’s database[www.tosbase.com].
Collections
To be added.
Secrets
<placeholder>
<placeholder>
<placeholder>
Database
Attributes[www.tosbase.com]
Cash Shop[www.tosbase.com]
Collections[www.tosbase.com]
Items[www.tosbase.com]
Equipment[www.tosbase.com]
Boss Cards[www.tosbase.com]
Recipes[www.tosbase.com]
Sets[www.tosbase.com]
Gems[www.tosbase.com]
Maps[www.tosbase.com]
Monsters[www.tosbase.com]
NPCs[www.tosbase.com]
Quests[www.tosbase.com]
Skills[www.tosbase.com]
Status Effects[www.tosbase.com]
Tools
Skill Simulator[www.tosbase.com]
Public Builds[www.tosbase.com]
Stat Calculator[www.tosbase.com]
Roleplaying
As far as I can tell there really isn’t much of a roleplaying community. At least on the server Orsha. That’s subject to change however if enough people are interested I expect.
Notes
Some things to Note: (Will probably, eventually, be added to their own categories)
If you mess up leveling up your skills or want to redo how many points you put into your skills you can use a TP potion from the TP vendor to reset them. TP can only be gained from real cash. If you use real cash to purchase a token (which I would recommend if you can afford it) you get 5 free TP a day but you have to spend that 5 free TP to get your next 5 free. People also sell tokens for in game silver so if you accumulate enough you can buy it that way.
I purchased the 50 dollar founder pack so I got a stat reset as well. I have seen no other way to get those so be warned potions to reset your stats (STR, CON, VIT, etc) will be much rarer thus I recommend you do some research and if you have to reset save it for end game.
The one thing you can never reset and are stuck with are your rank advancements. So be sure that when you advance and are pick your new class you do your research.
The same can be said about merchant classes. Many people will make alts for that type of thing although be forewarned the grind is real in this game and you have to have dedication especially if you are going to make alts for making silver.
One of the popular classes for being a merchant is Squire who can repair equipment. Many people will set up their repair shop by a dungeon entrance for people who need to repair. Equipment degredation is pretty quick. Your weapon degrades the more you attack pretty quickly and if you die your armor takes a bit durability loss.
You have other classes who can enchant weapons for a period of time, give you a spell buff for a period of time, etc. All these merchant classes have a cool little shop. Each player transaction to your shop will cost you certain materials so you want to stock up if you plan to be out there a while. You can go autopilot and let the customers come to you. When running a shop location is important, you want to be in a channel (instance) that has a lot of players. Also, especially early game, most players care about affordability. So while quality will certainly come into play late game, you will make more sales if your services are cheaper early on especially since you will be competing with other merchants.
You may ask okay I have a merchant alt and I want to transfer silver to my main character. The answer is you can’t, well kind of. When you make your first character you will be asked to designate a team name, this is the last name of all your characters under that account. You will also gain access to the team store which by default only has 1 slot but can be expanded. Here you can deposit an item to transfer to another character. If you want to transfer silver the best way to do so is to buy a stackable item on the market (like gold) then drop it in the team store and have your main character sell it to a NPC. There will be a slight loss of silver during the transfer for market fees but the loss will be negliable since you should be making a lot of silver on your merchant. There are a few items which can be used because they sell for a lot to NPCs, you have to do your research on what.
If you abandon the daily mercenary mission which is five steps and pick it up again you consume a step.
Known Issues
Some quests may not work correctly in mouse mode and require you to switch to keyboard mode to get a spacebar prompt to perform an action.
Tree of Savior doesn’t take advantage of your graphics card GPU and as a result has framerate drops and choppy performance in an area with lots of players. Hopefully the game will be optimized to utilize GPUs.
Shout spam can cause server lag is it’s abused to the extreme.
Bots have been an issue since initial head start. The developers have taken a heavy handed approach in dealing with them. As a result you may notice some things and quesion design choices.
Due to regional pricing, some areas could get access to ToS for cheaper. As a result many bots gained access. There is a cash shop item you could purchase called a Megaphone which gave you access to Shout chat. Shout chat could be seen by all players across all zones and channels. In here they would make their spam for cheap silver for cash transactions. Whats more is by default there is an option to have shout chat also displayed at the top of your screen like a scrolling marque which could be extremely annoying.
As a result many people experience significant lag during peak hours because of constant shout spam from several bots. The only work around at the time was to block the spammer so you no longer received their messages. Simply hiding shout chat would not improve lag.
Since then the developers have restricted the purchase of the megaphone to character level 40+ and although it several dimished the amount of silvering selling bot shout spam, now they take up residence in populated cities using local chat. Some even put in the effort to level to 40 so they could continue shouting. The developers also added an in-game option to report bots which will send to a team for internal review and banning if confirmed.
You can’t trade silver directly. There are also limitations in the amount of player trades as well as the amount of marketplace transactions for selling items. Player trades are limited to 30 a month to limit a bot from being able to trade an item of the same value for silver purchased. Marketplace selling transactions are limited to 10 concurent items for token users and 1 for non-token. Once an item is sold you have to wait 48 real life hours before you can claim your silver. This allows the developers to monitor for any fishy transactions since you can’t trade silver, you would put up an item for how much silver you paid a bot for.
The developers continue to make banning announcements as they go through their reports. They have also announced that they are working to implement a better system to combat the bots so that some of these restrictions can be lessened.
<placeholder>
Sources
- Personal Experience
- Tree of Savior Fan Base[www.tosbase.com]
- Tree of Savior Proper[treeofsavior.com]
- Tree of Savior Fan Base Wiki[wiki.tosbase.com]
- https://www.reddit.com/r/treeofsavior/
- Tree of Savior Steam Community Hub
- Tree of Savior Wiki[treeofsavior.wikia.com]
Contributors
Thank you very much to contributing to the guide:
- DarkestHour420 – Team Name: Dyomedes [Orsha]
- Omaclaro – Team Name: Riveria [Orsha]
- virpyre
- Velox
- All those who worked hard to complie information for the Wiki sites
- Tree of Savior Fan Base
- Tree of Savior Proper
- Tree of Savior Fan Base Wiki
- Tree of Savior Subreddit
- Tree of Savior Steam Community Hub
- Tree of Savior Wiki
If you’d also like to contribute to this guide and help maintain it as patches are released don’t hesitate to contact me.
Guide Version Notes
Current Version: 1.05
1.01
– Added Omaclaro’s blog about lesser known subtleties of ToS. First Post also added.
1.02
– Added additional server [SEA] Varena.
1.03
– Added Velox to the contributors list for the information he provided.
– Added Oma’s latest blog entry.
1.04
– Removed information about amulets as they are not in game anymore.
– Tweaked contributor list.
1.05
– Added virpyre to the contributors list for the information he provided.
– Updated the companion chart to include base stats and guild only notes.
1.06
– Added Oma’s latest blog entry covering the basics of Jackpot mobs.