Overview
As a continuation of my guides on building for new players, and at a request received on my guide to building hovercraft, this guide will help new players build their first tanks and jet cars.
Introduction: Tracks Vs. Wheels
I’ve decided to combine these two bot types because they are similar. The major difference is that wheels have a weight limit but benefit well from jets while tank tracks are so heavy they have trouble gaining jet benefits but have as much HP for their CPU cost as armor cubes and more attachment points as well, making them harder to blow off simply by attacking the blocks attaching them. Either way however the bot will be close to the ground and have to deal with damage coming from above as much or more so than from the sides, but rarely see damage coming from beneath the bot. This means armor should go to the top and sides rather than the bottom.
The Tank
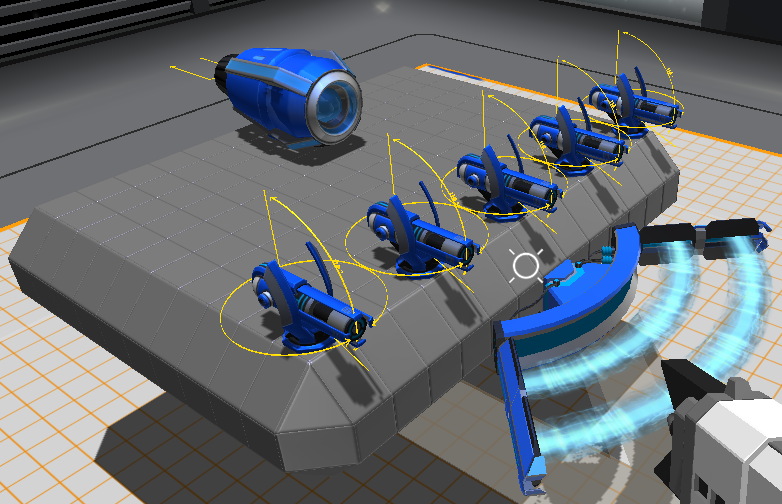
 As always, we start with propulsion. Create a line of blocks first… for the Bison tracks pictured I recommend five, this should give a wide enough space in between to turn easily even when turning in place, and can be replaced when the player has them by Long Rods. Same amount of HP as all five blocks in a single piece, making sure if it gets hit it absorbs all it can before damage is transfered to a tread.
Attach treats to either side as pictured, then make a line back just long enough on each side for a second pair of treads. This will extend the bot back far enough to make flipping over much less likely in addition to giving enemies a second tread to blow off if they want to take out both treads on one side. Since the point of tank tracks is to make the bot durable and low profile, this redundancy is very helpful.
 Next you want to build your armor box. Making a line surrounding the tank tracks, build upwards until the top of the tracks are covered and then fill in the square. Do NOT connect this box to the lines connecting your tank treads on their inner surface… this prevents damage from spreading to them, making it more difficult to seperate them.
 This initial box may not look pretty but it will be very easy to build up from when you have more CPU to spend on things like more layers to armor or things like slopes and curves on the sides and top.
 Now to add guns. Another two rows of cubes at the bottom front will give you a platform to place guns on and add another row above it at the edge of the armor. This is called a “gunbed”, and is useful for allowing the second row to shoot over the top of the first row when targeting enemy bots. This is of course a very simple one, it could easily be made better looking but this is the minimum CPU used version, and also uses all armor cubes which have the highest HP count.
And that’s it for a simple but effective tank. Note this version takes 672 CPU due to the number of armor blocks after weapons are added, but it won’t take long to reach level 18 to make it. It is a cheap but effective tank for low levels.
The Jet Car Part 1: Propulsion
 As mentioned before, wheels are light enough to make good use of jets but have less HP and are more prone to be blown off. This presents a quandry… one has to balance speed and durability, and that means trying to make a vehicle both durable and light. We start as usual with lines of cubes to connect the wheels to, 7 across in this case. Notice the brown blocks in back… to provide room for the back of the last pair of jets, curved armor slopes were used to connect the wheels. Rods would be better, as they have better HP, but for a low level player the slopes are likely to be all they have. The brown blocks are required to attach the slopes due to the way cubes attach when building and the limited means of rotating them… delete these once done.
 Remember that rectangle of grey cubes circling the wheels? Time to make them lighter. Make another rectangle on top of cubes to be deleted later, then use slopes and corner slopes to create a ring where these cubes were.
The Jet Car Part 2: Triforcing Reduces Weight
 Now here is where things get interesting. We’re going to build another ring of cubes to delete later on the outside, then build this entire ring out of slopes. Slopes are used because they weigh half as much HP as cubes would while still having almost as much HP. Note this will still add up to a bot with less HP than one built with cubes, but it will still have an outter armor shell to attach things to, and the jets will be armored. An option at this point might be to connect the propulsion with a bar on top to the sides of the armor to make it more difficult for front and back hits to take out the propulsion, but either way there should be a layer of armor everywhere by the end and the chances for a direct hit without hitting the top blocks first are very small even with this design, and it is simpler to use for now. Either way just ring the outside with slopes so it looks like solid cubes from the outside all the way around.
 After that ring is finished we need one more to clear the tops of the wheels. This time we won’t need a ring of blocks to attach them to, they will attach to the slope sides below them just fine, making this third ring easier. We are finally above the tops of the wheels, allowing us to make a layer of armor above them.
 Lines of cubes allow us to attach more slopes on top. This also makes the lines considerably stronger and less prone to the problem inherent to triforced armor, lines falling off without soaking damage because the blocks to either end were destroyed. The cubes will of course weigh twice as much, so the minimum number of lines required should be used to keep the bot light, allowing the thrusters to do their job in making it speed along.
 Here we have the finished product. The max-level thruster is of course not required, as built the bot will go the max speed allowed by Lynx thrusters, 165 MPH. But sticking the Cheetah on will cause it to fluctuate between 170 and 173 MPH as it goes along, using just one to boost the bot’s max speed to the Cheetah’s max. We also have a devestating Tesla Blade on front with some longer ranged Plasma guns on top, giving it a decent ranged weapon as well. This bot will be somewhat fragile, but will be low profile, hit maximum speeds, and have some powerful burst damage for only 594 CPU. This makes it a good idea to use hit-and-run tactics and stick a good Radar Jammer or two on it when the player has them and can afford to.
Conclusion
In this guide we’ve learned a basic use of triforcing on a larget scale than in my hover bot guide and covered the fundamental uses of wheels and treads. It should be noted all four wheels on the jet car are steering wheels, so even if the front or back two are blown off there’s still two left to attempt a getaway. It should also be noted that keeping the jets on the center or close makes the vehicle easier to control if one gets hit. When making more armor layers on wheeled vehicles that can support more weight due to higher level wheels, remember to balance blocks and either slopes or rounded slopes for best results with triforcing to minimize rows being blown off when their connecting blocks go, and adding shields is a good way to give the bot more durability for less weight than armor in exchange for high expense CPU wise. Radar Jammers are good for faster vehicles as well to make sneaking up on enemies easier.
The tank may make good use of longer ranged weapons when the player has the CPU for it as its slow speed can make the lasers harder to use when enemies keep kiting it. Replacing the wasps with Plasmas can be a good option amoung others, or putting a set of Sniper Rifles on the back connected to rods to give them room and let them clear one another is another good option. The lasers will still be useful for enemies that get close.
Either way, have fun and keep on rollin’. 🙂