Overview
This is a summary of special features available in game. Some of them appear in the tutorials or scenarios but others are not described anywhere.
1. Introduction
I decided to create this guide to have a summary of the special features which are available in game but not included in the manuals or properly described. I had a collection of screenshots and notes for my personal usage and decided to put them all together and share them so that all players are aware of those additional details that, even if not used frequently, add a bit more of fun to the simulation experience.
Most of them are functional procedures and have a physical effect on the game world but others are just cosmetic enhancements. In any case, they are there, so let´s use them! Some of the common features include the basic game operations, safety systems, coupling procedures, carriage lights control and special systems included in some of vehicles, but others may be unknown for some players.
Guide is intended to be applicable to the original game version and any following game releases that still include those features. I will try to include the relevant features from the latest game releases also whenever that´s possible. Please feel free to add comments to this guide if you discover more interesting things and I will try to update it in accordance.
2. Special procedures
In the next sections we will explain some of the special operational procedures available in game.
One feature that is not directly available in game, except in some of the CSX engines, but is related to the procedures themselves, is the radio chatter. I recommend listening to real radio on the background while driving, as it adds a more realistic touch to the simulation experience.
You can find a really nice web with scanners from different areas in the United States here:
[link]2.1. Refueling
The procedure is the following:
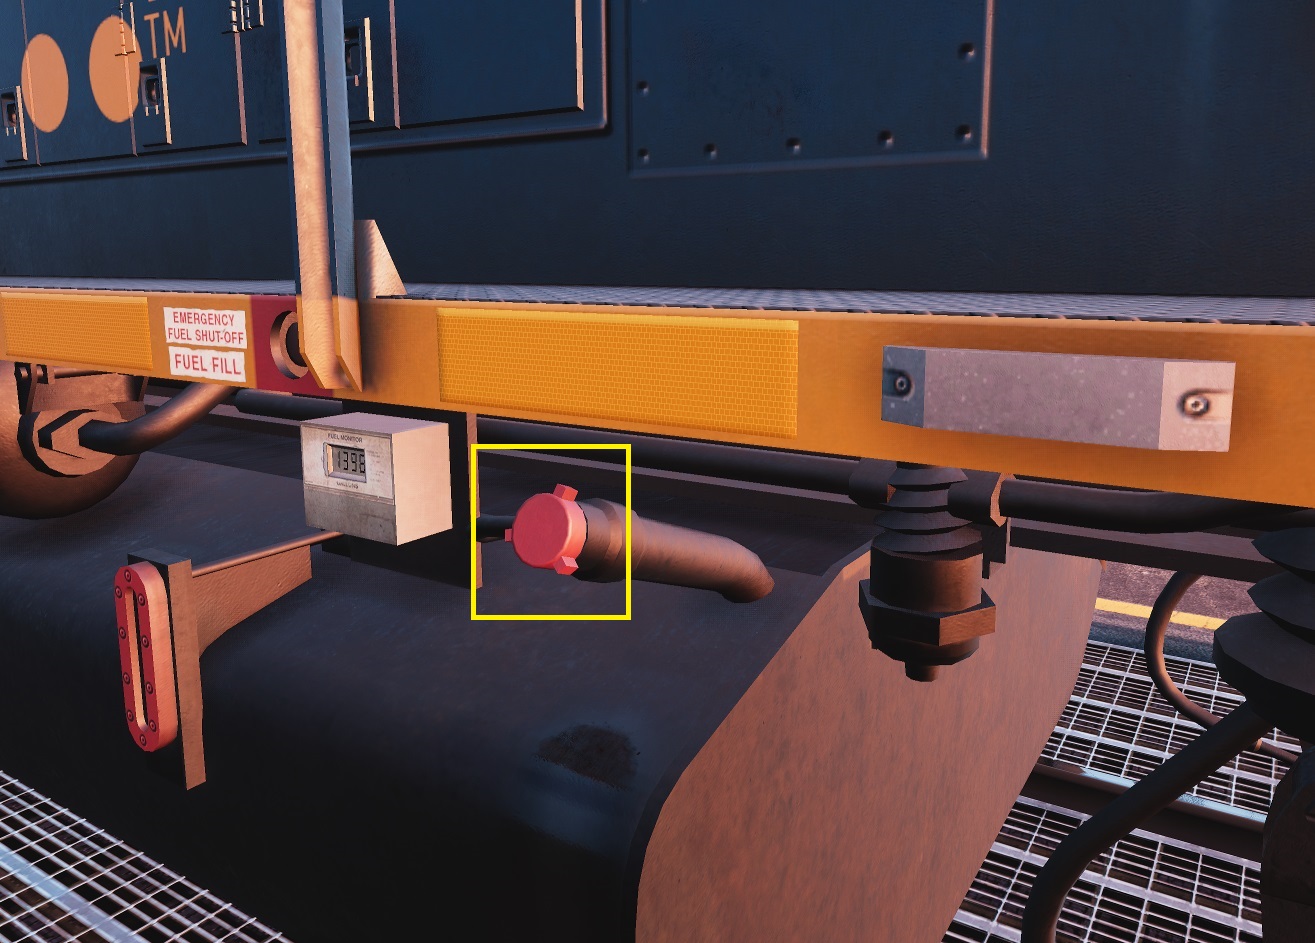
1. Open locomotive fuel tank by removing its red cap
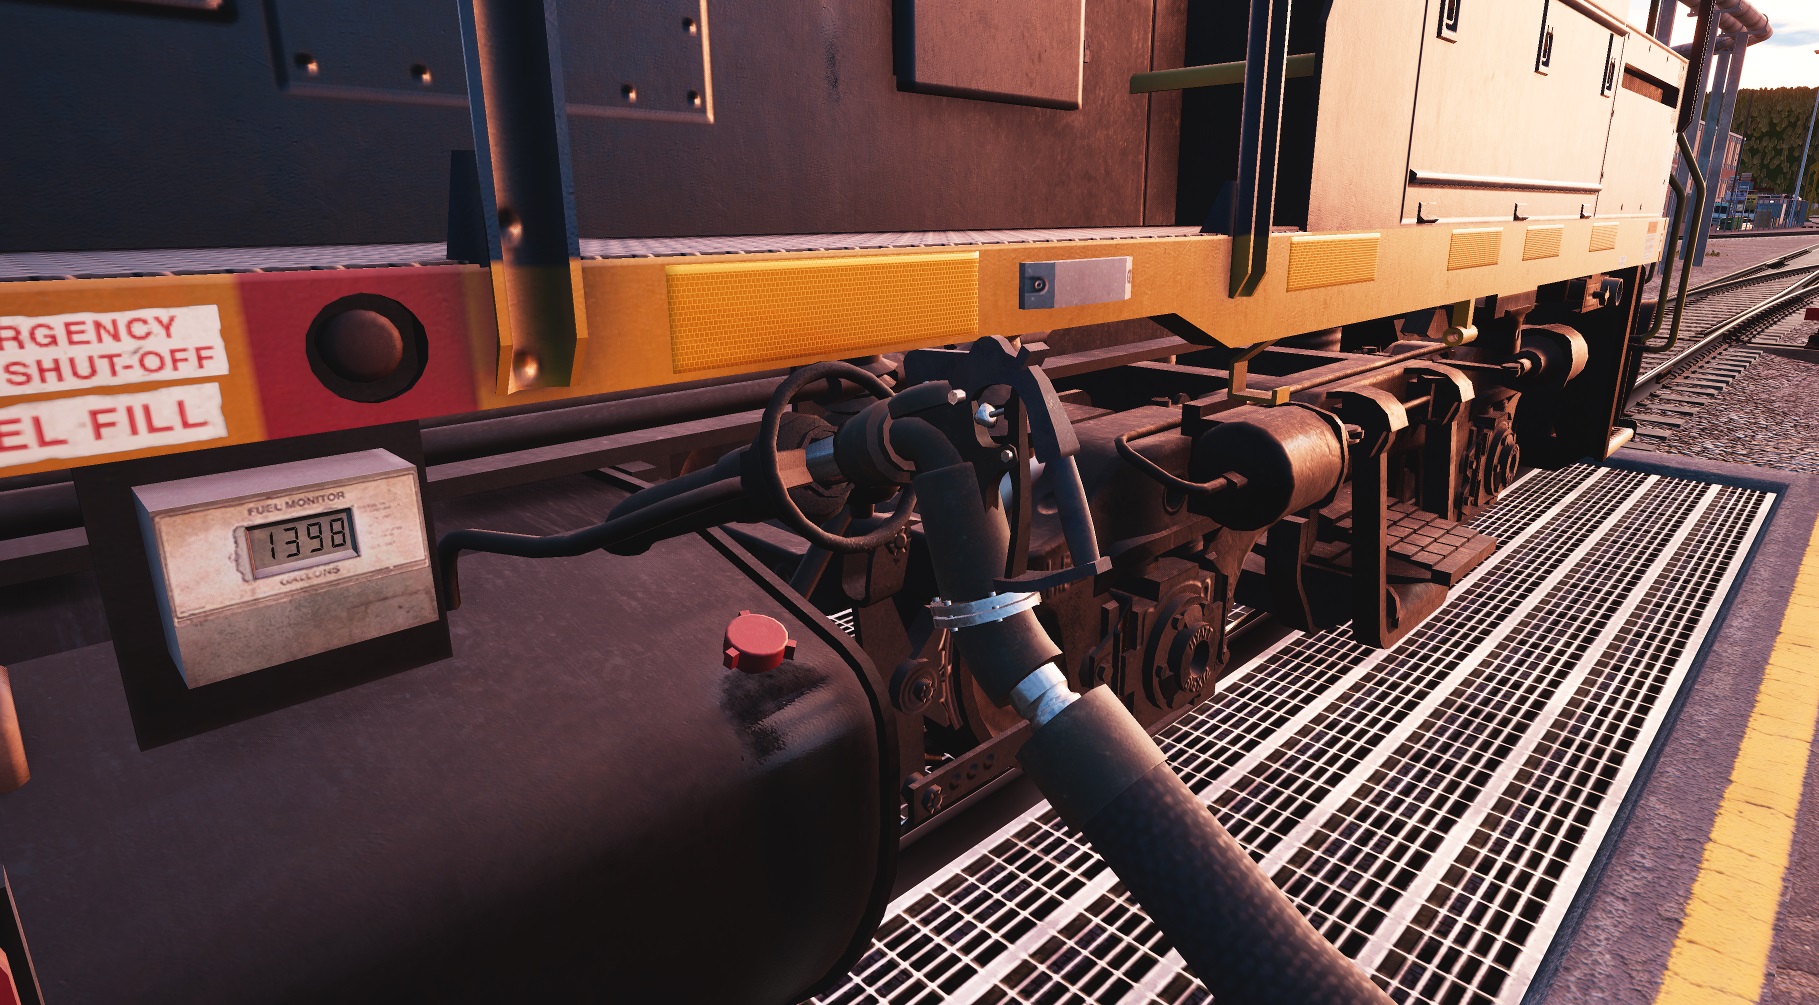
2. Connect fuel hose to the tank
3. Open fuel pump valve

4. Remember to close locomotive fuel tank after finishing
2.2. Turntables
Get inside turntable control room to access its controls and activate it. There is also a light switch and a cam monitor inside it. You can use the lever to rotate the platform.
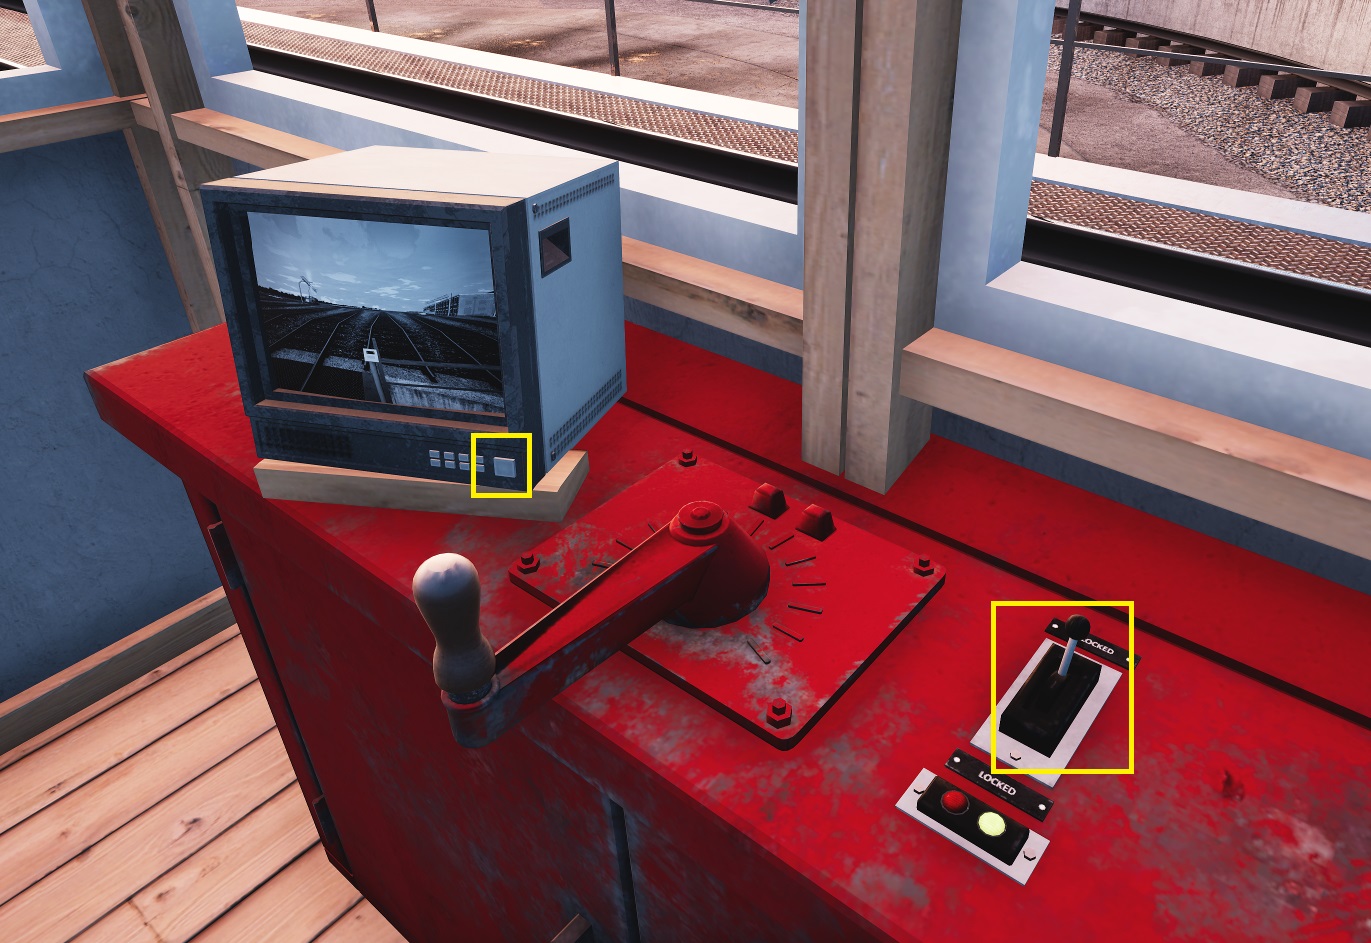

Once you sit on the chair turntable can be rotated with “A” and “D” keys, cam modes switched with “W” key and turntable activated or deactivated with “S” key or by clicking on the controls directly. You can also activate external view with “8” key and still use those keys to operate the turntable. You have to sit on the chair for external view to work.

2.3. Train wash
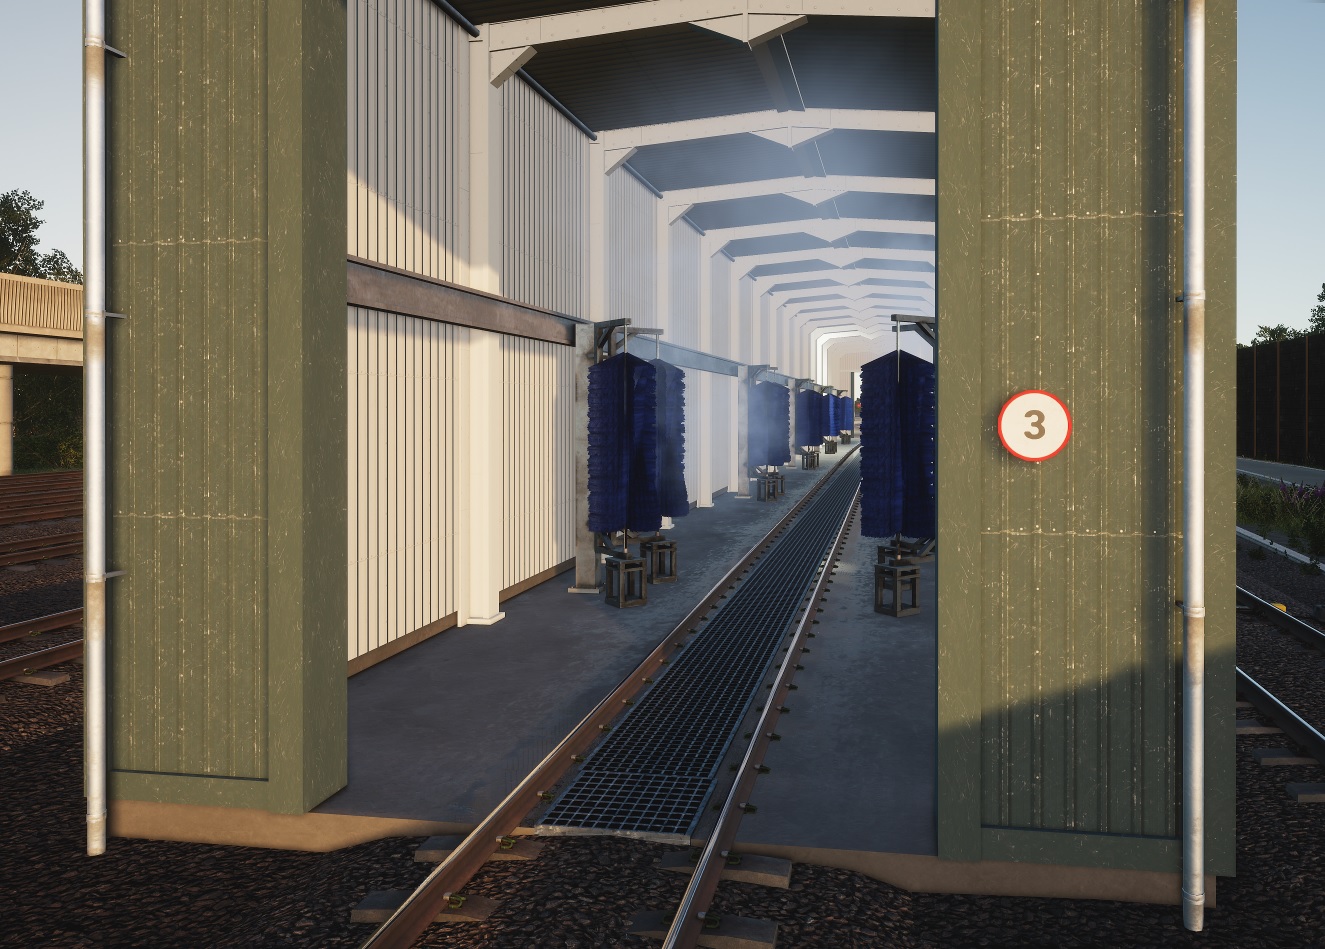
Train wash is also available in some routes but currently it´s just a cosmetic enhancement. There´s no special procedure to activate it. Simply drive through it at low speed. You can use cruise control to keep a constant speed.
In the case of electrified routes main circuit breaker may need to be open as a safety measure. Also pantographs may need to be lowered in case no catenary is available in the train wash track portion.
2.4. Industries
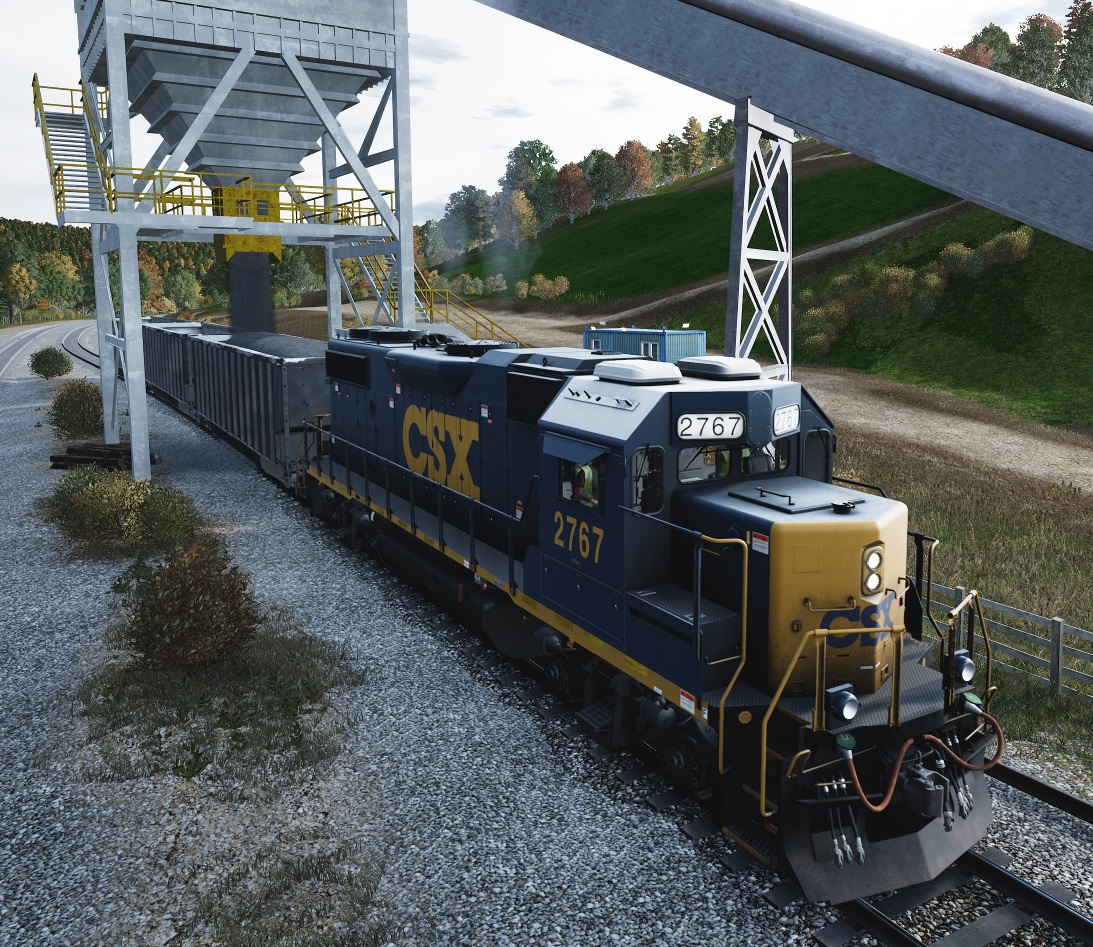
Some routes have interactive industries where train loading and unloading is possible. In the case of coal loaders, as the one on CSX route, you just need to drive through them at low speed. Cruise control usage is recommended in this case.
2.5. Hump Yard
In CSX route there is a hump yard at Cumberland. Despite it doesn´t have interactive dispatching, it is still functional for hump operations.

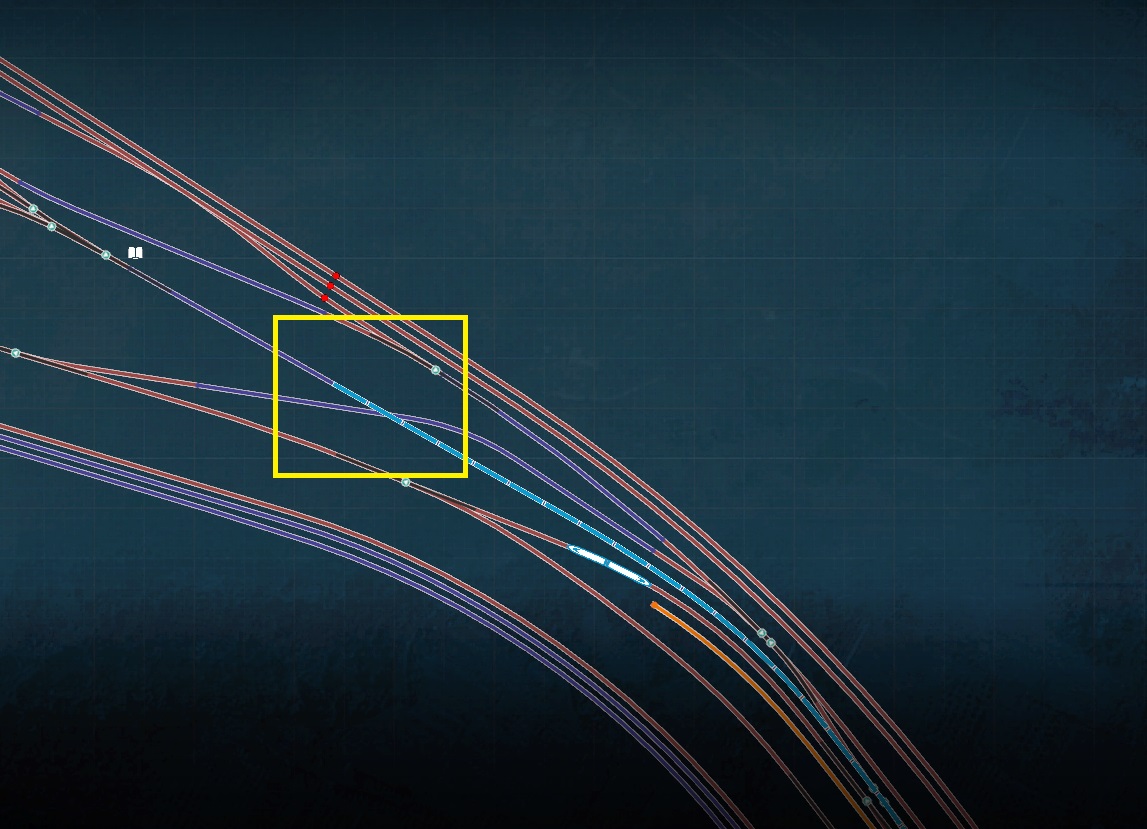
Basic procedure would be as follows, and is done while train moves backwards at low speed. It´s better to use a locomotive with cruise control such as AC4400 to perform the operation:
- Reverse train so that last wagons are placed at the top of the hump, as in the picture above.
- Release brakes and set minimun traction to continue reversing at slow speed.
- While in external view (“8” or “3” keyboard shortcuts) uncouple wagons in groups so that they freely roll to the classification tracks.
- Manually set switches in map view to send the wagons to the desired target tracks.
If you uncouple single wagons their physics simulation will be automatically disabled so you need to quickly couple and uncouple them again to bypass this behaviour. Doing it wrong can produce a derailment so I suggest to uncouple them at least in pairs and use a shunting locomotive to re-arrange the consists at the classification afterwards.
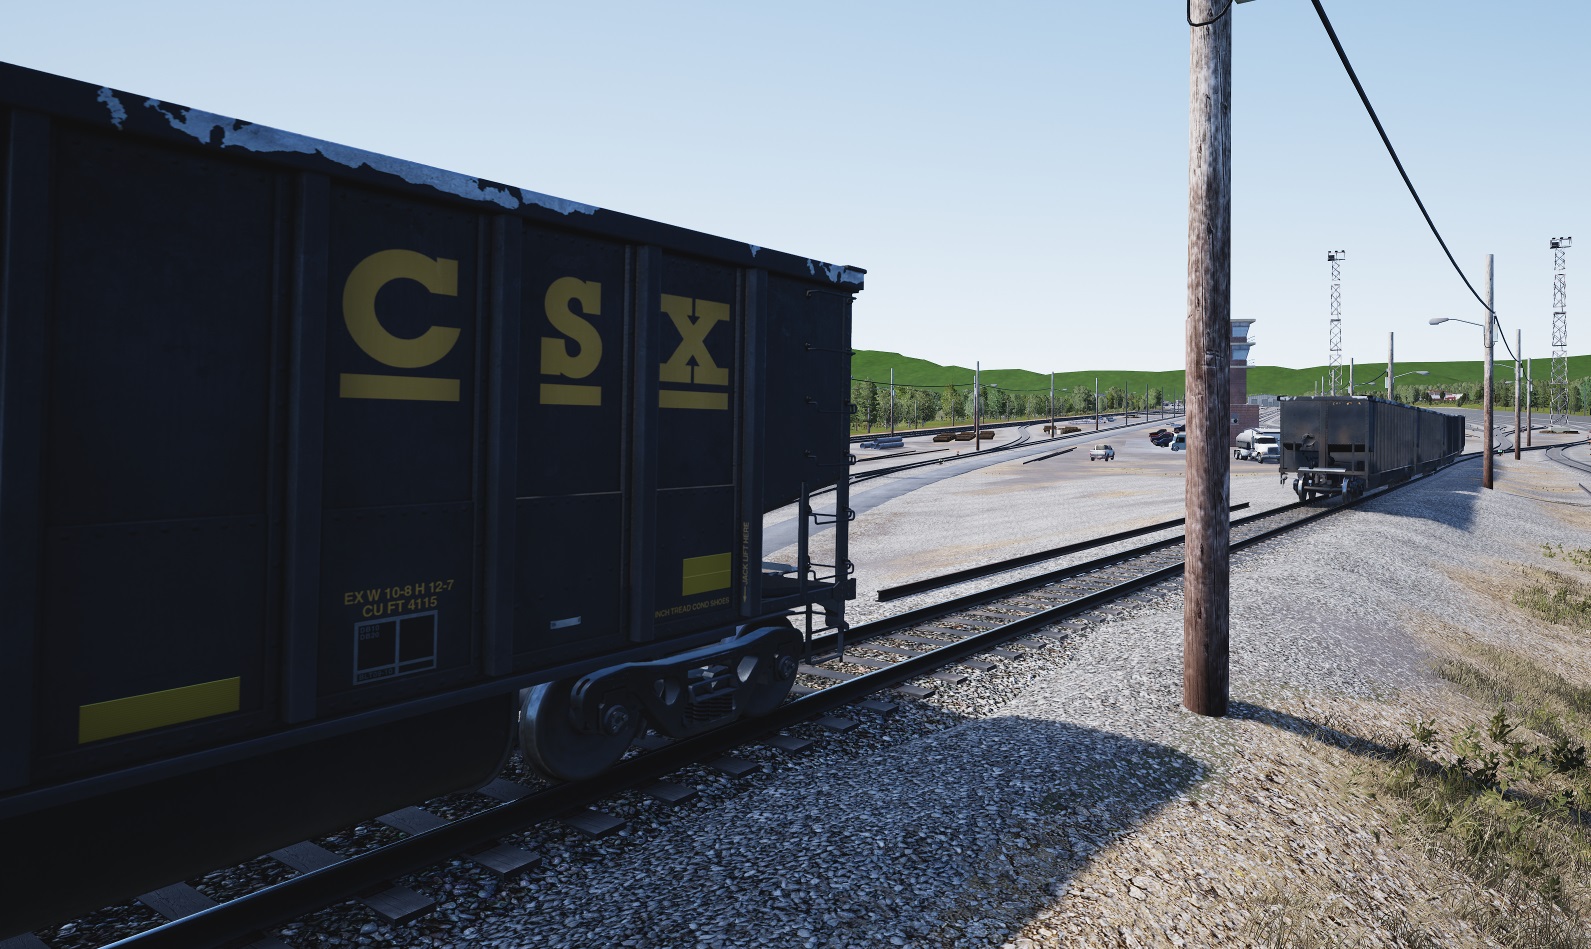
You can test this spawing at 12:00h on the yard and taking a service which is waiting there. You can also watch the following video to see this procedure in game:
2.6. Maintenance
You can spend a lot of time at the depot just simulating real maintenance procedures on the rolling stock. I will include next some examples of very basic checklist that you can easily perform at the depot to prepare rolling stock for their services, using some of the special features that are described in this guide.
Electrical test
- Switch on battery
- Check voltage level and observe any power leak
- Perform a fuse test
- Perform a panel lights test
- Perform a fire alarm test
- Test spotter buttons
- Rise and lower pantographs and observe power indications
- Check master switch and observe power indications
- Test electrical brake isolation
- Test safety systems activation and isolation
- Test train consist doors switches
- Test wipers
- Test horns and bell
- Test locomotive light settings
- Test master/slave lights configurations
- Check train power supply line and train heating
- Check engine fans
- Check the carriage lighting switches
- Check the carriage ventilation system
Brake system test
- Apply parking brake
- Switch off air compressor (or battery) to stop air generation
- Perform brake application and relase loops to deplete reservoir
- Switch on air compressor (or battery) to allow air generation
- Observe reservoir pressure indications
- Perform a train brake test
- Perform an indepedent brake test
- Observe brake pipe and brake cylinder indications
- Test emergency brake valve
- Test EoT emergency brake switch
- Test brakes isolation
Traction test
- Observe fuel level indication
- Perform an engine start-up
- Check governor
- Check power generator
- Check engine pump
- Check engine isolation
- Test regulator and reverser
- Test engine gears
- Observe tractive effort indicator
- Check sander
- Test shunting controls
- Test cruise control or AFB
- Check master/slave traction configuration
- Perform an engine shutdown
Mechanical test
- Check windows and doors
- Check sun visors
- Check couplers
- Perform a coupling test
- Perform an uncoupling test
- Check carriage doors and windows
If you want to go a step forward, in the following link there is a nice collection of real service and operating manuals for some of the most known american locomotives:
[link]2.7. Radio dispatching
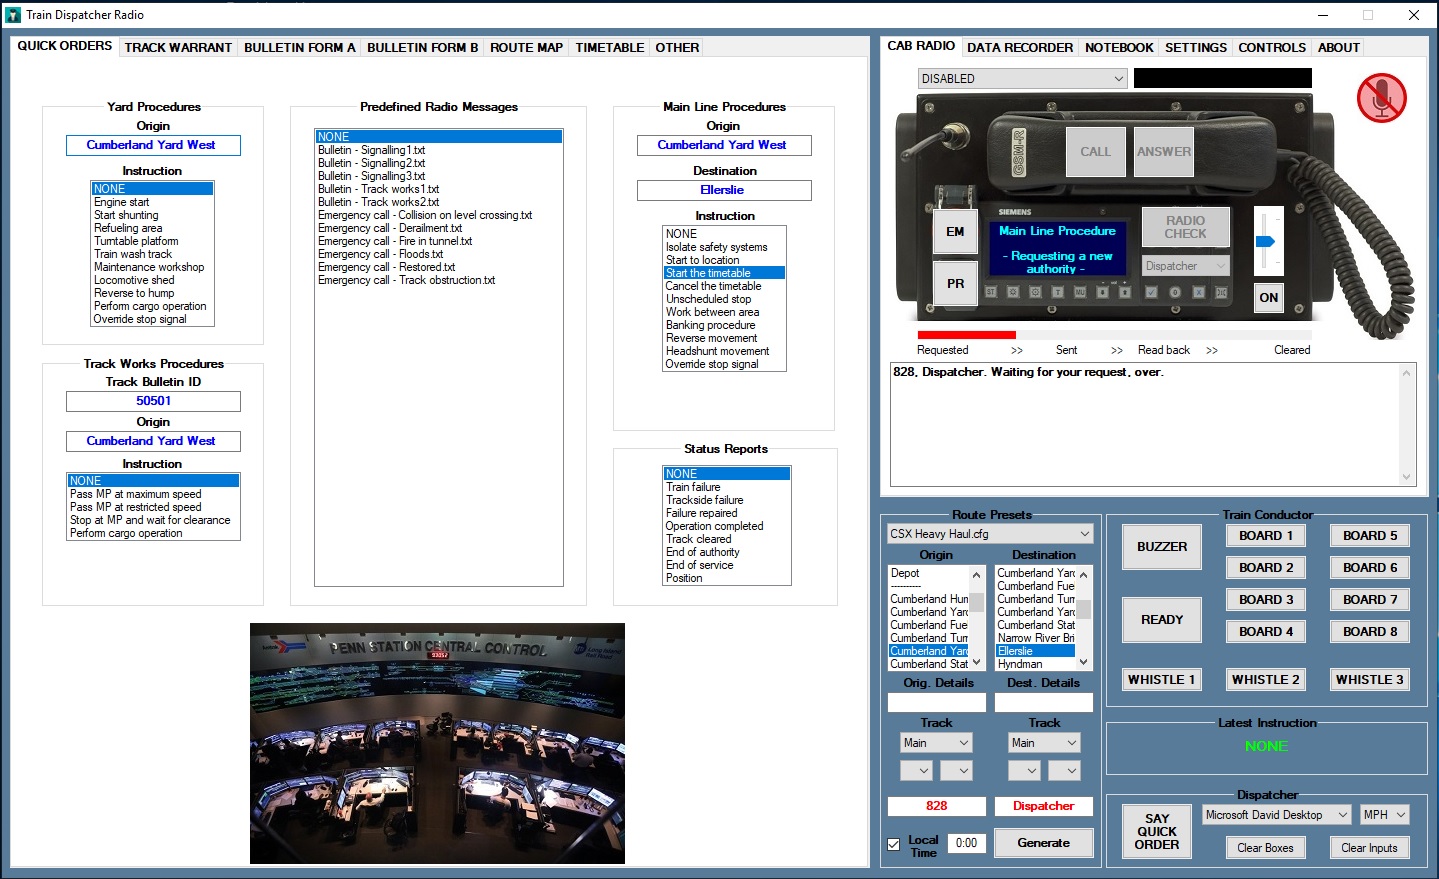
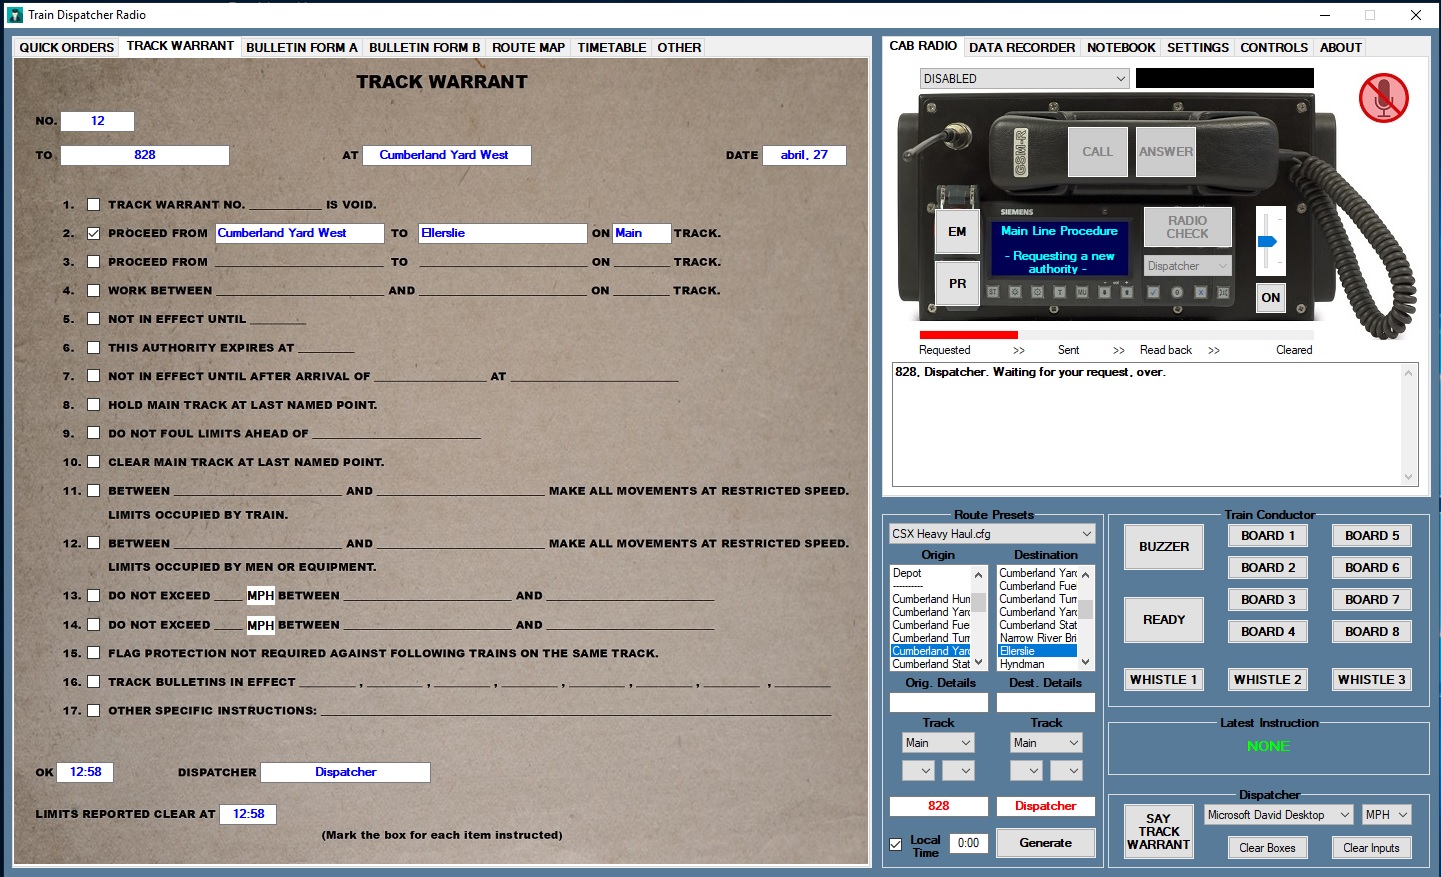
Radio dispatching is an important part of the daily operations. Currently the game does not allow any real interaction with dispatcher, except the request to override signals. But I have recently released a small offline tool that allows us to add those kind of procedures to the game, including the interaction via radio to request authorizations and receive special orders.
With this tool you will have the chance to manage authorization requests, talk to dispatcher and hear the dispatcher voice on the radio as well. You just need a microphone to start using it.
All information and download details are available in the manual and on the following thread:
[link] [link]3. Rolling stock
In this section we will cover the freight and passenger rolling stock features.
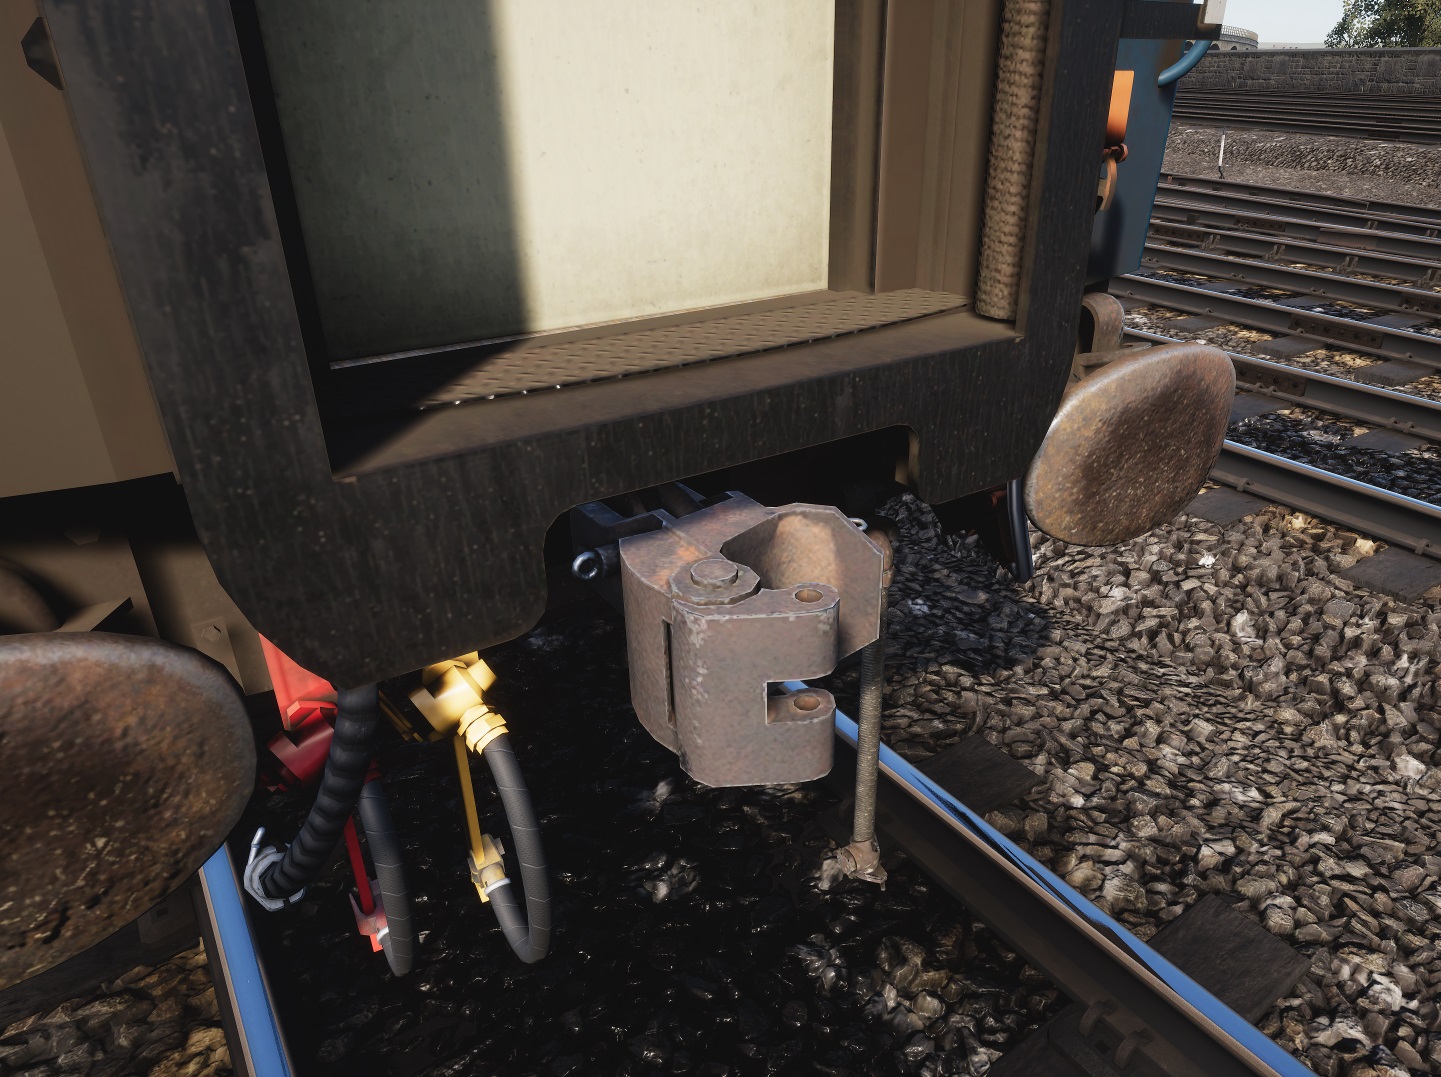
Most rolling stock have at least the possibility to manually couple and uncouple them from the train consist. This is done by clicking on the coupler while in any external view or being on foot next to the wagon. On the case of some british carriages you can also change the coupler type from Buckeye to Hook by clicking on it.
3.1. Freight wagons
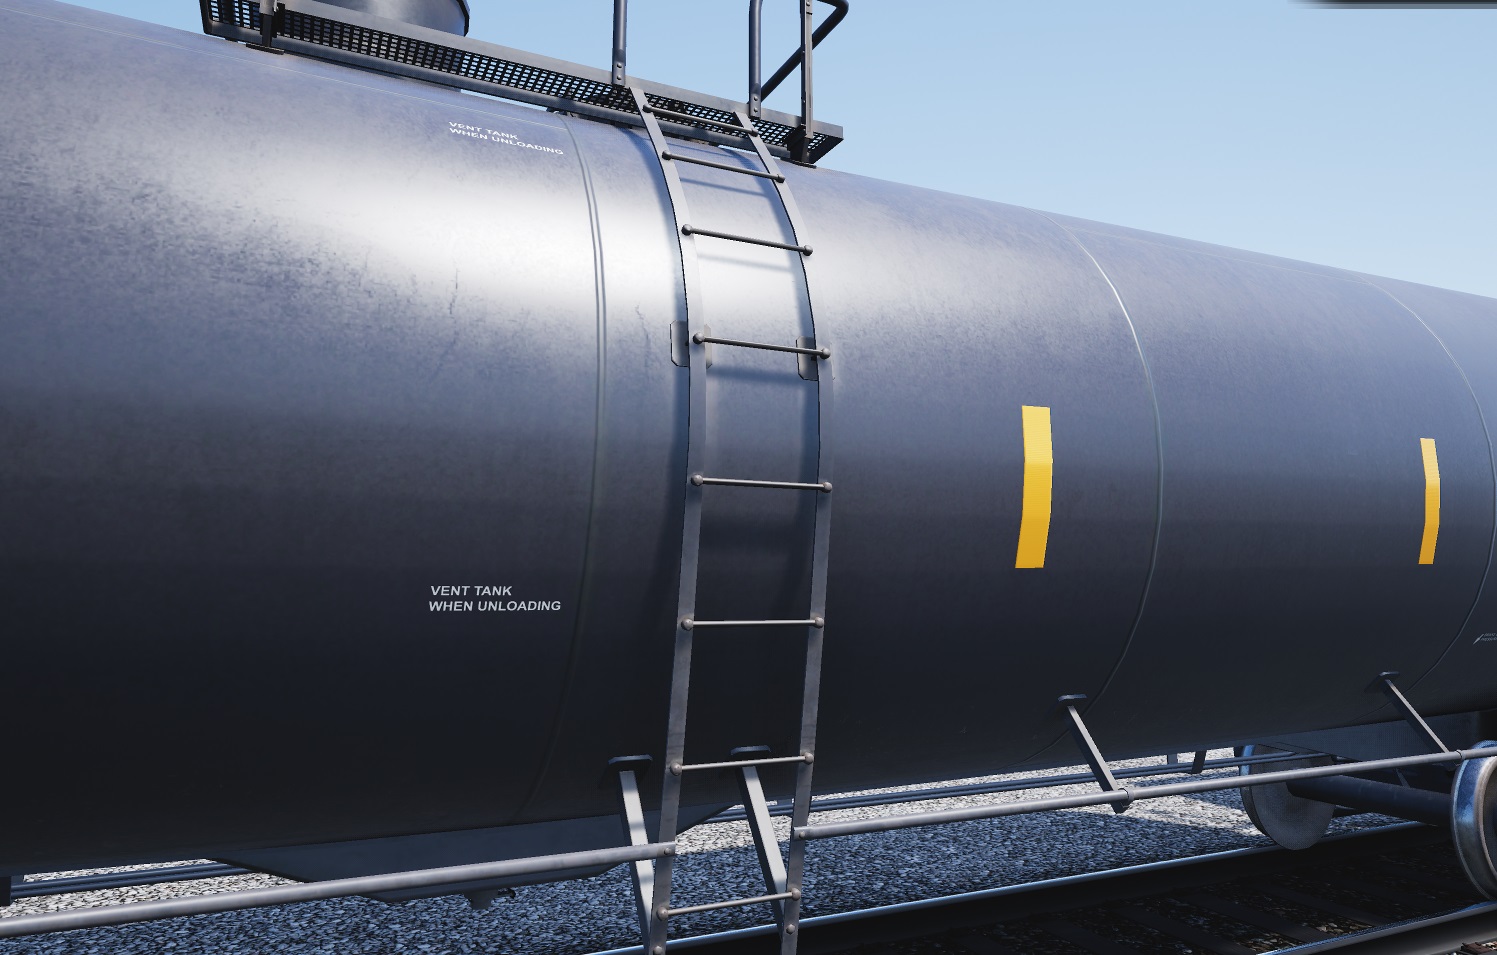
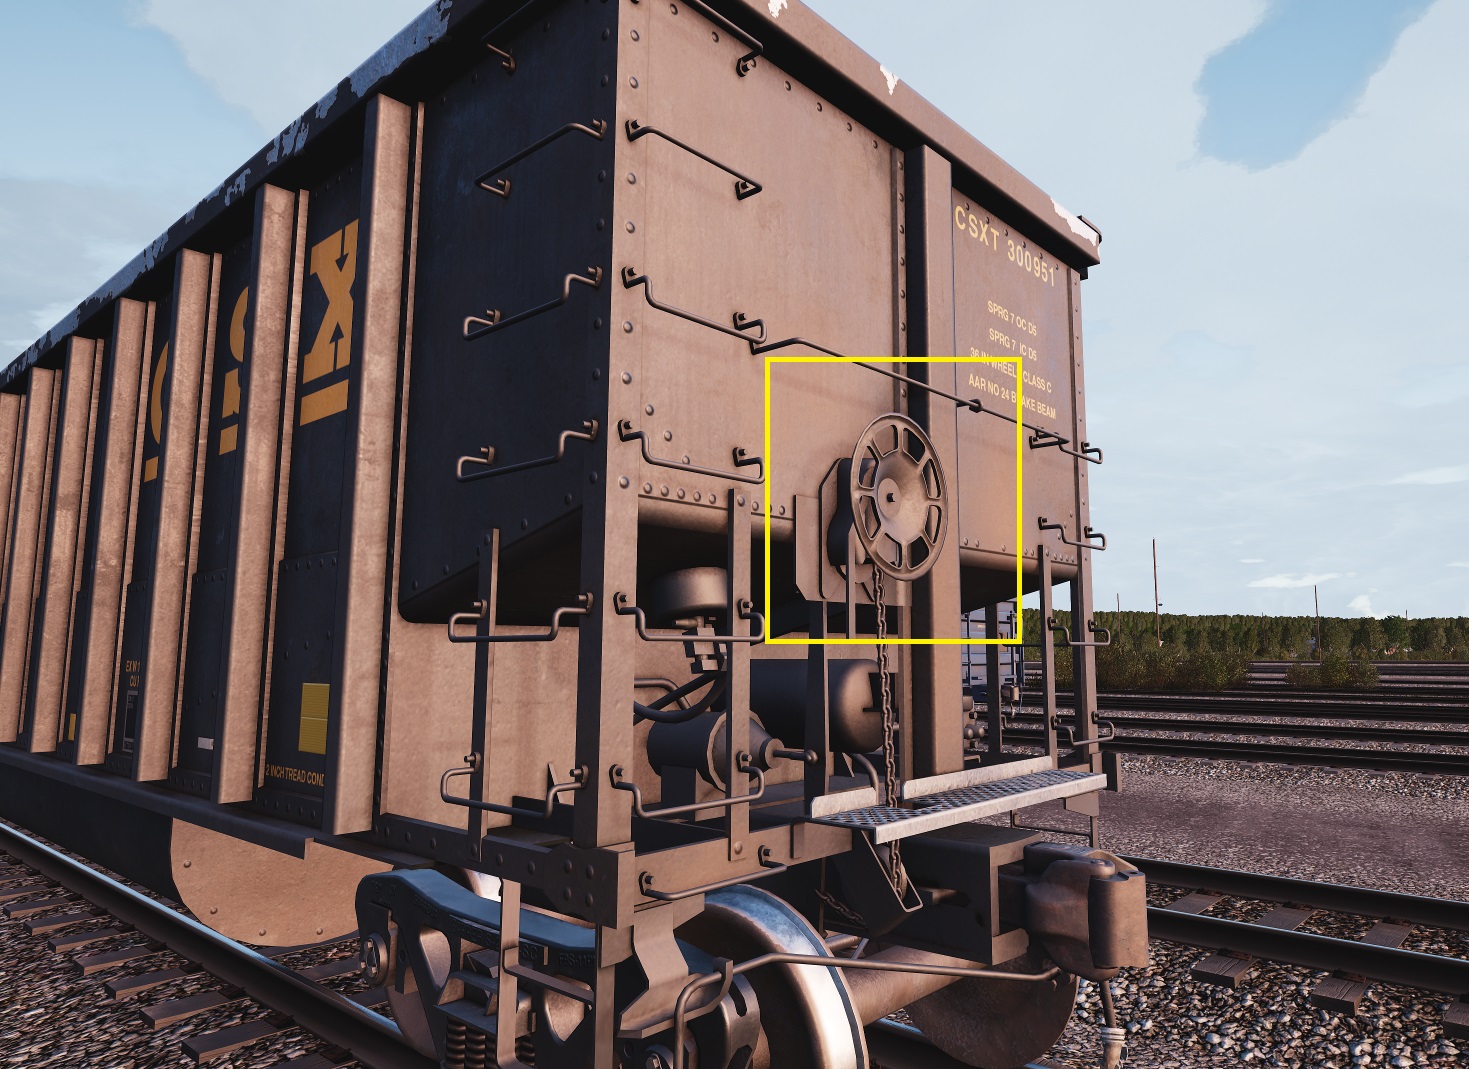
In addition to the coupler interaction freight rolling stock have some more special features:
- Climb to stairs or platforms
- Open/close doors or tankers intakes
- Apply/release wagon´s parking brake
Not all BR and DB wagons in game have interactive moving parts like doors on CSX ones, but most of them at least have the stairs, coupler and brake actions available.

3.2. Passenger carriages
Doors
Passenger carriages obviously implement the manual doors control that you can use while travelling as passenger. Simply click on the doors to operate them.
Carriage/consist lights and heating
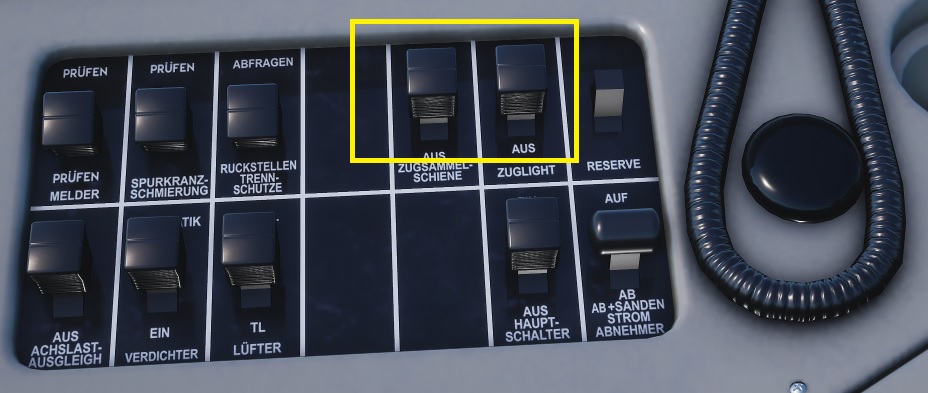
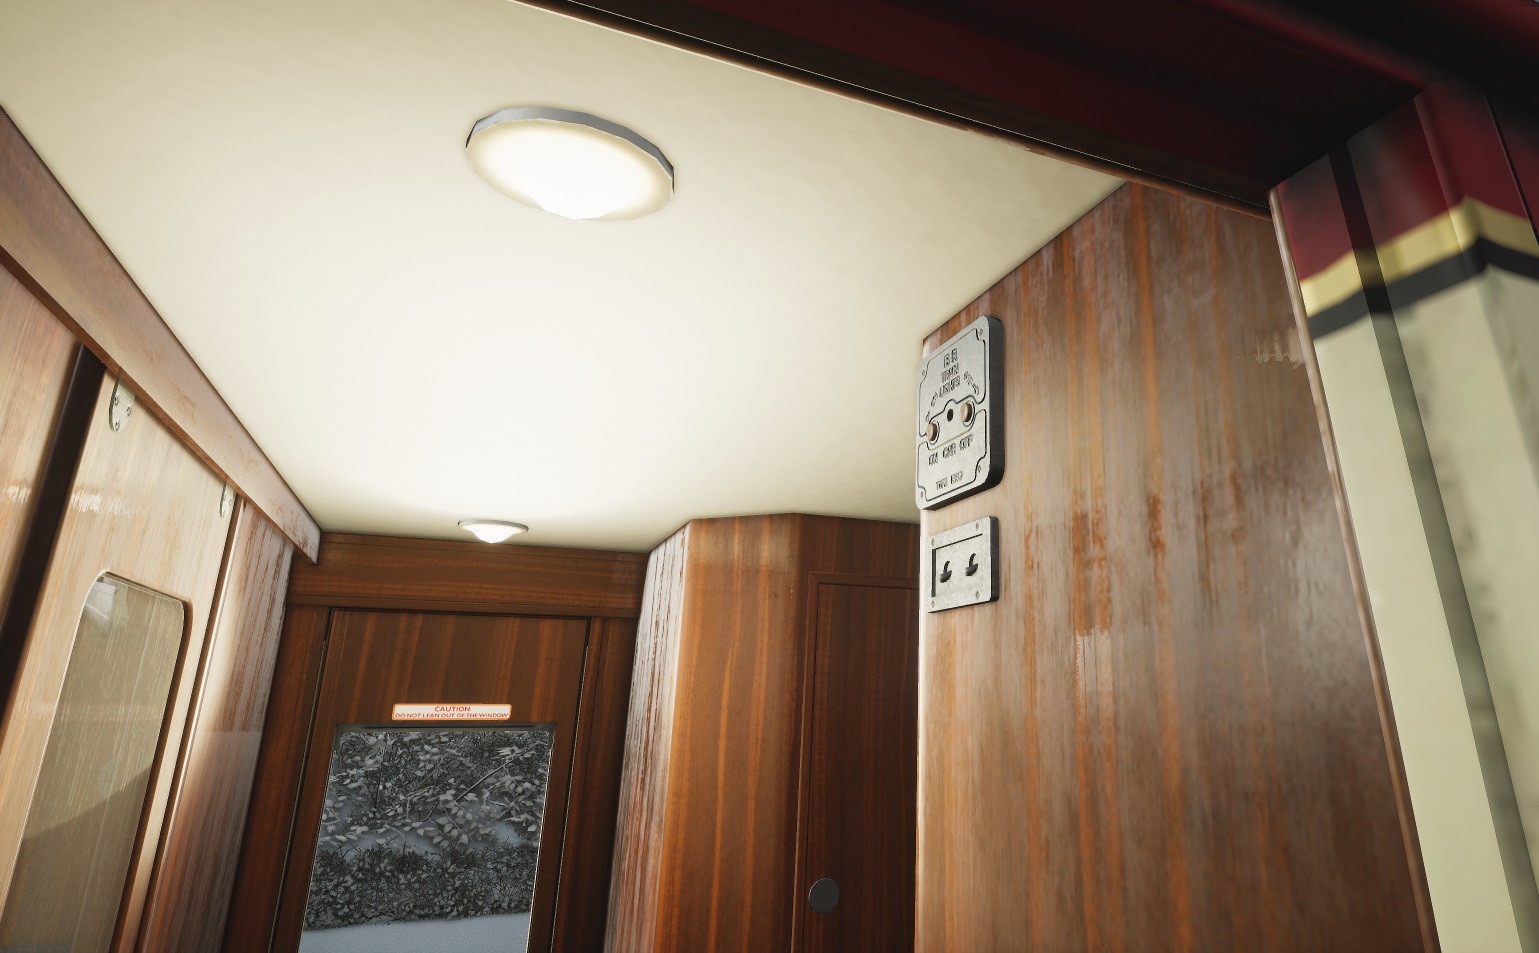
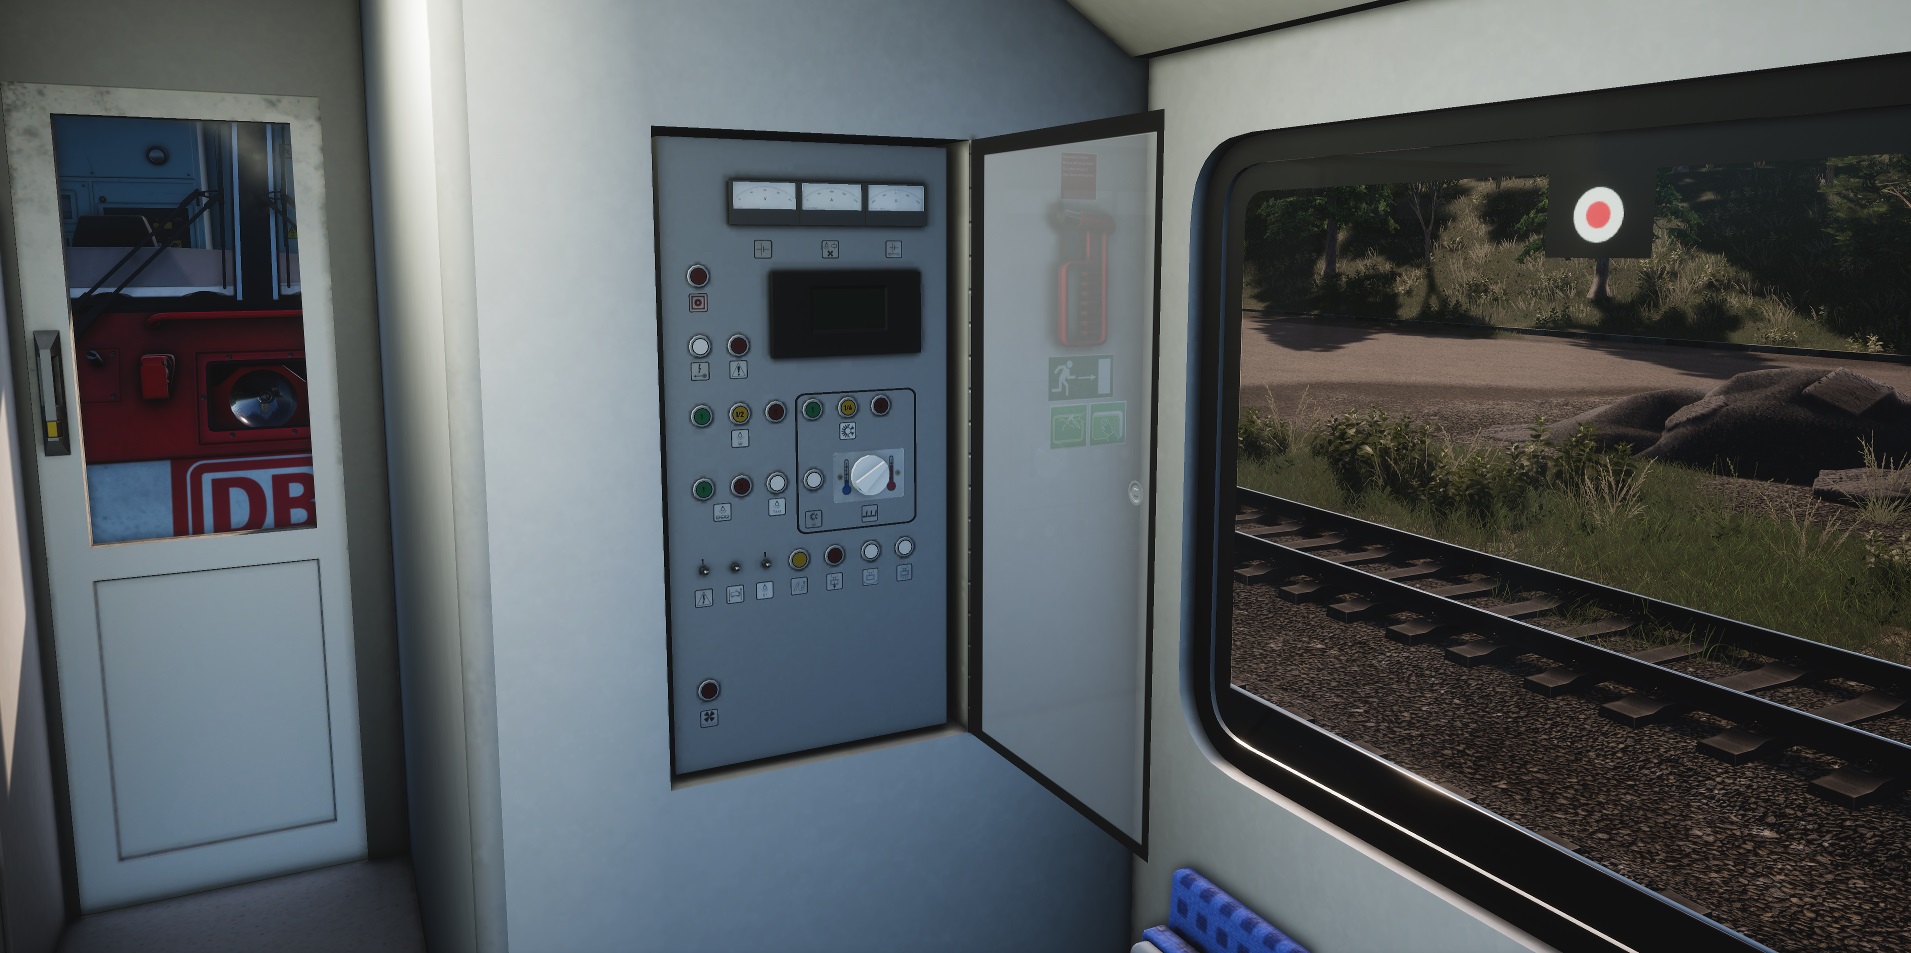
Lights and climate are controlled directly from the locomotive in the case of Amtrak carriages but in other cases as in the BR and DB ones you can operate lights from the carriages as well. Normally you will first need to activate the train power supply line from the driver´s cab on the locomotive to feed the electrical system on the carriages and then the lights and heating themselves, as in the following example of german BR143 locomotive.
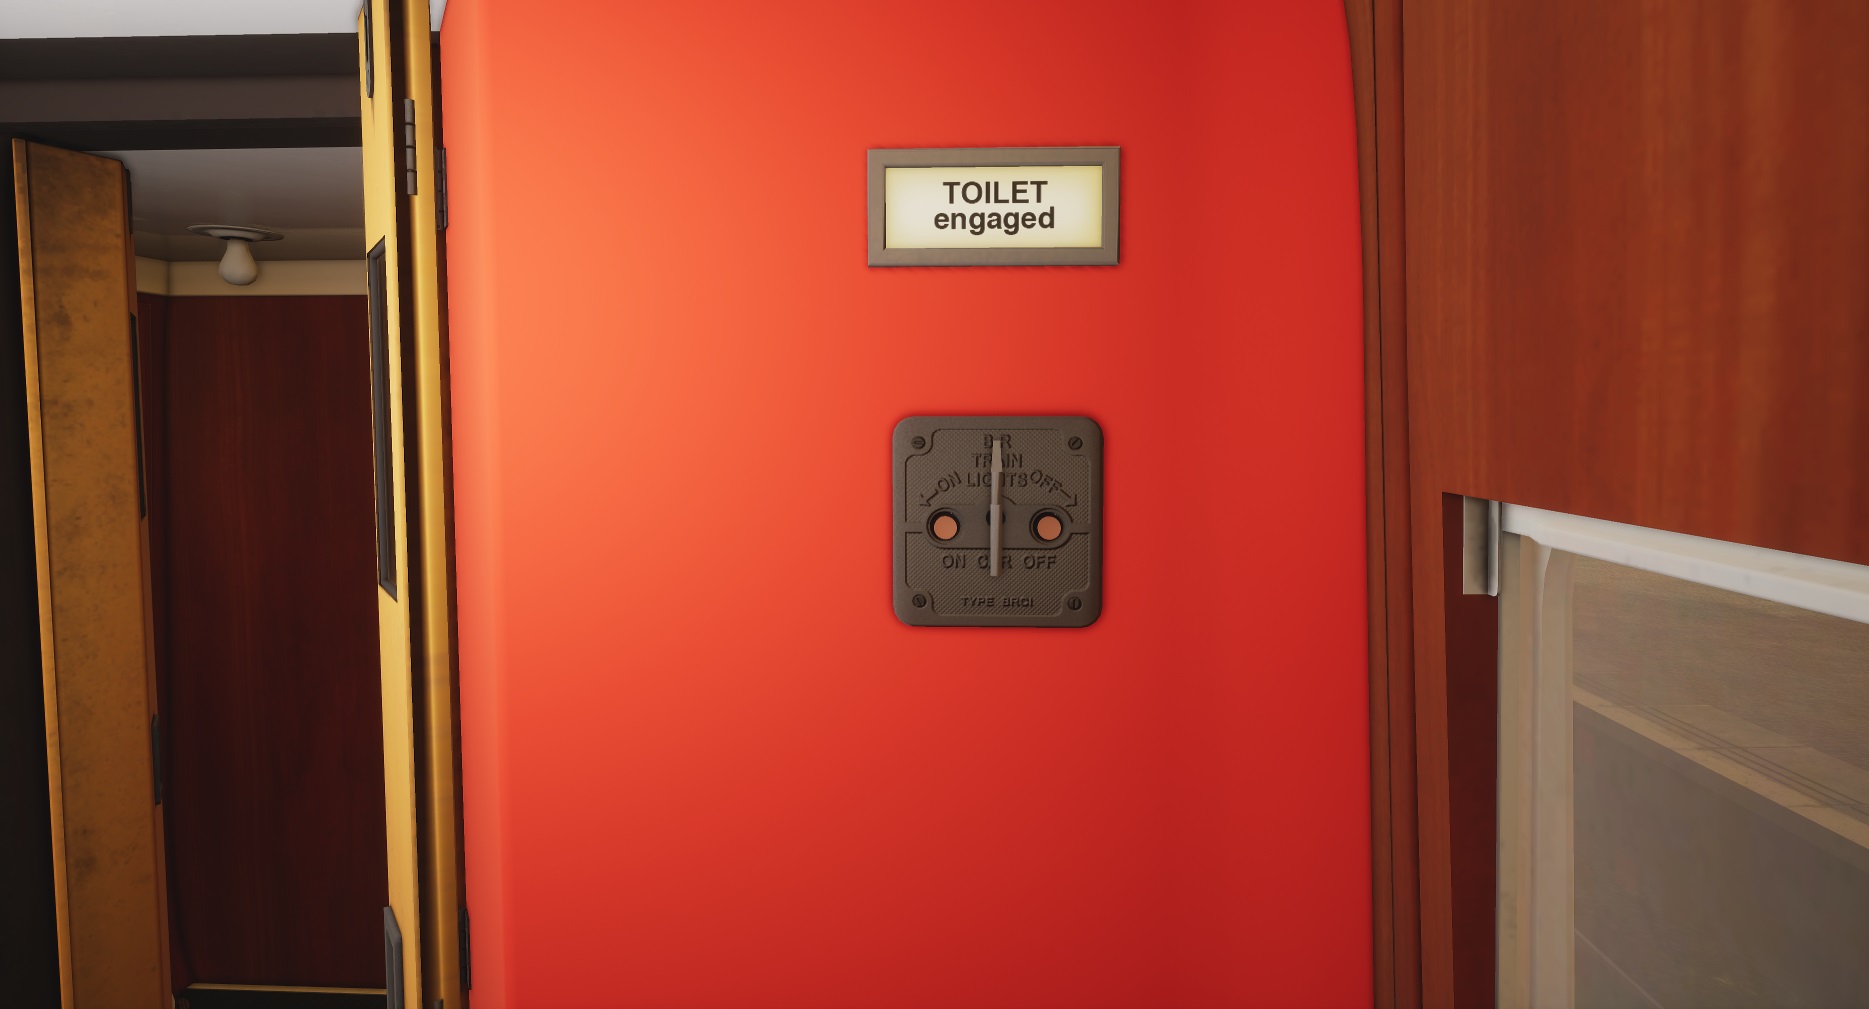
Heating is just a cosmetic enhancement so far, but you will listen to the fans sounds anyway, so it´s a bit functional indeed. Changing temperature has no effect at all except the fact of taking care of our poor passengers in summer and winter conditions. BR Intercity and MK1 carriages have light controls which allow to control each individual carriage or the whole train consist.
The DB double decker carriage has a light panel to access each wagon or the whole consist lights. Heating can be also configured from that panel.
Guard/chief room
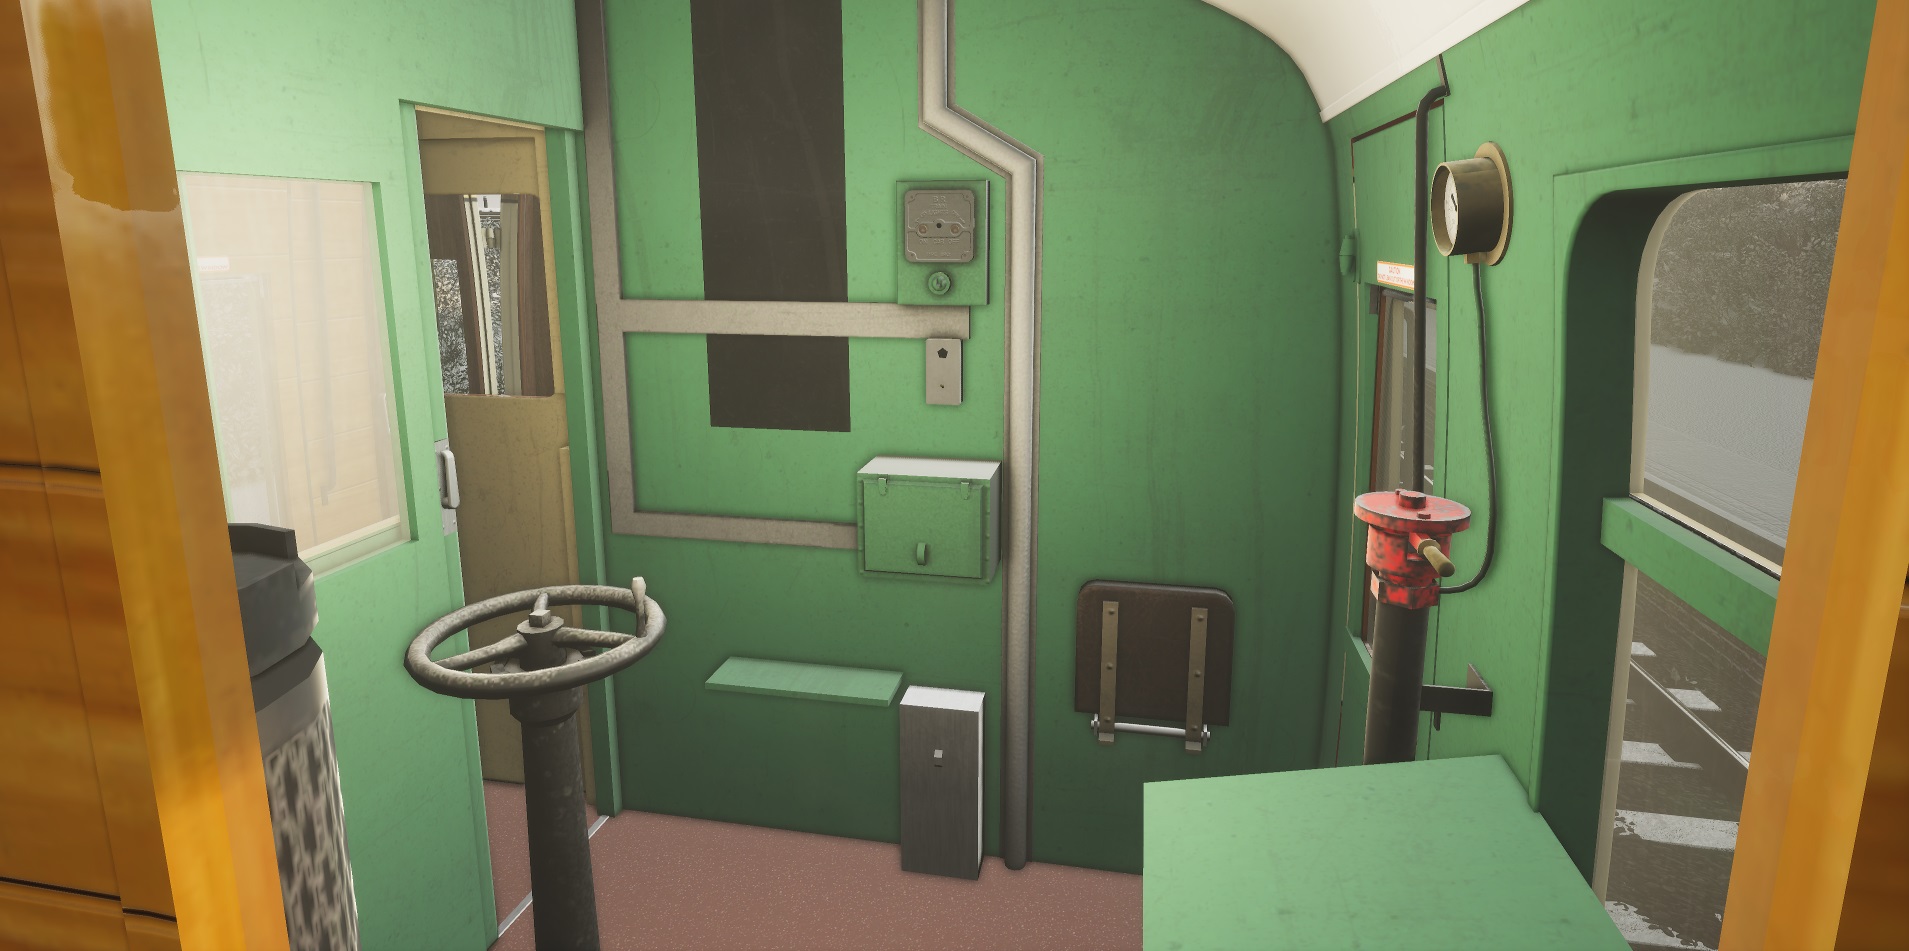
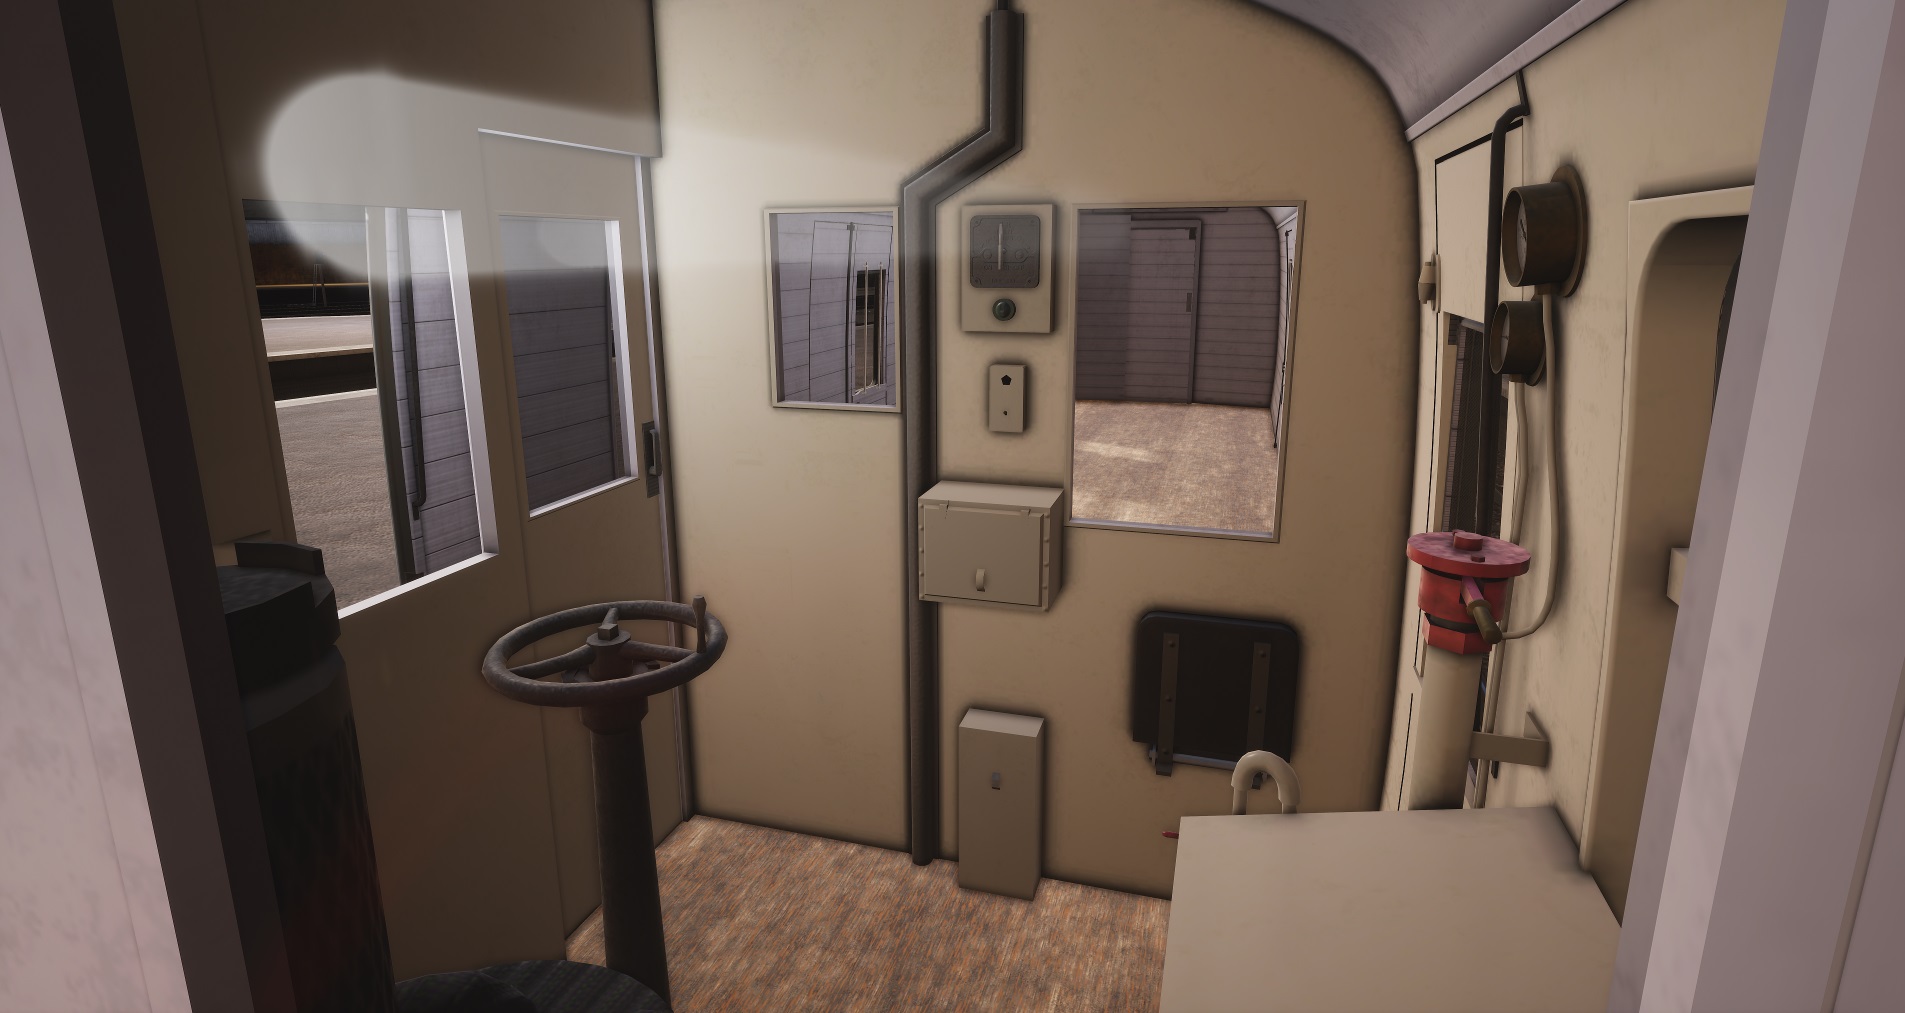
British carriages also have a guard room, with some controls inside such as parking brake or emergency brake valve. Train lights can also be switched from there. Mail wagon has also such room.
Special features
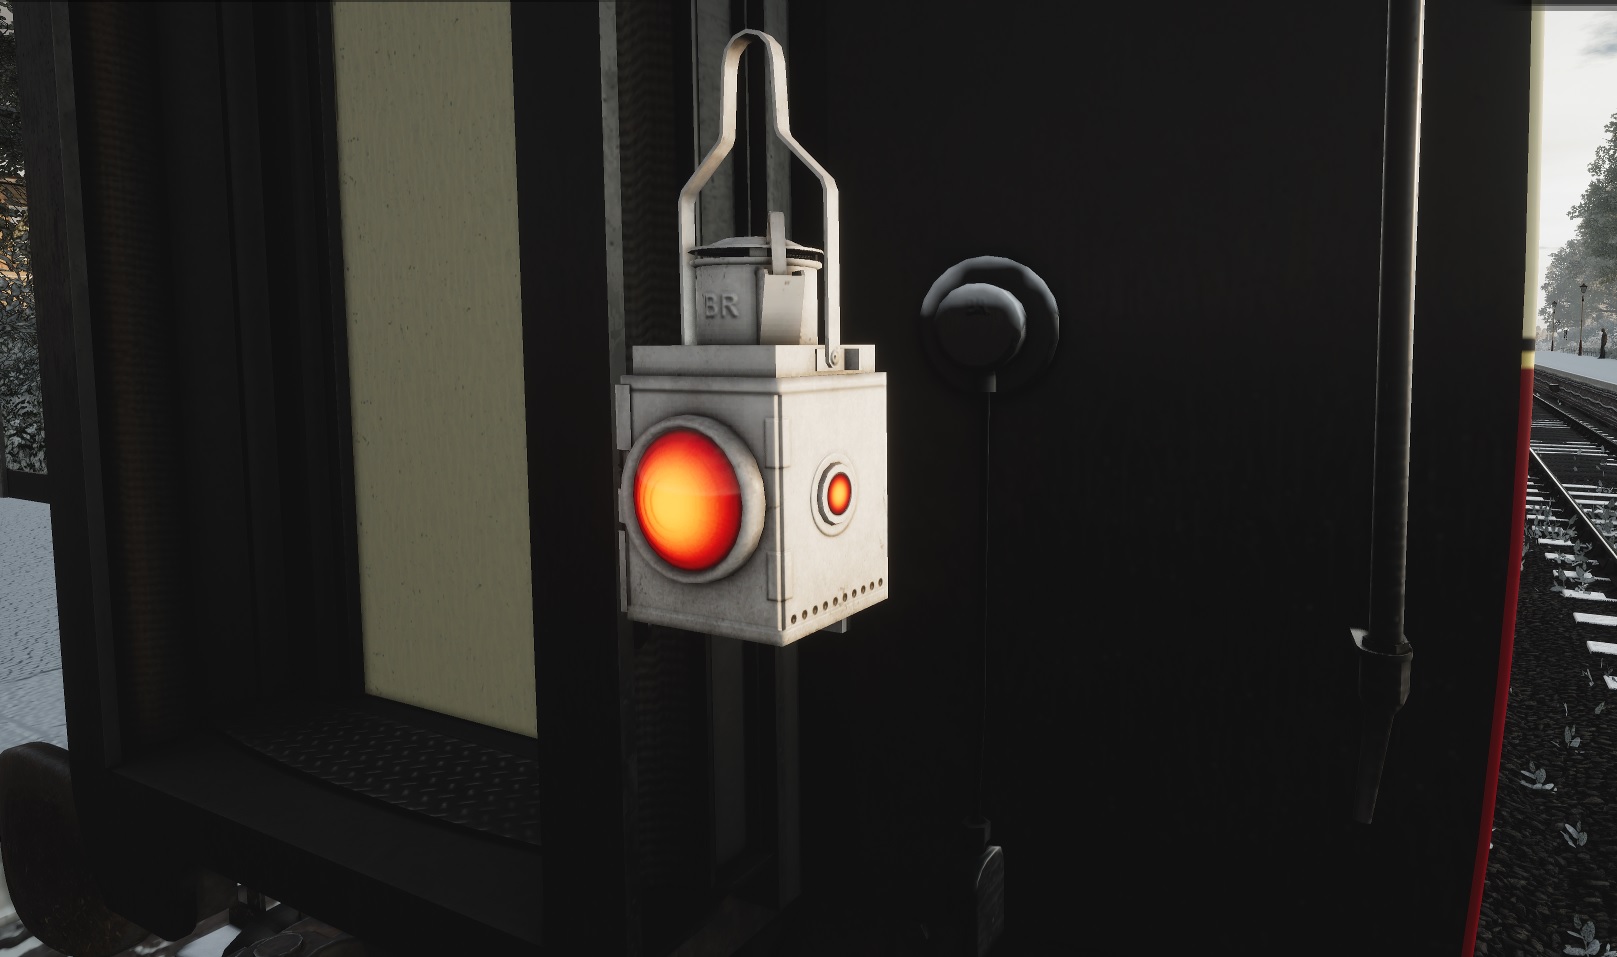
Tail lamp can be turned on and off by clicking on it. You can use this after parking consist on a yard at the end of your service, for instance.
A safety bar which can be deployed in the Amtrak carriages connection doors which will actually block you from crossing or falling from carriage.

4. Multiple Units
In this section we will explain the special features included in DMUs and EMUs.
As a general rule most units at least implement the following common features:
- Manual operation of driver´s cab doors
- Manual operation of passenger doors on the carriages
- Open/close cab windows (increases outside sound level)
- Operate sun visors (block bloom effect from sun simulation)
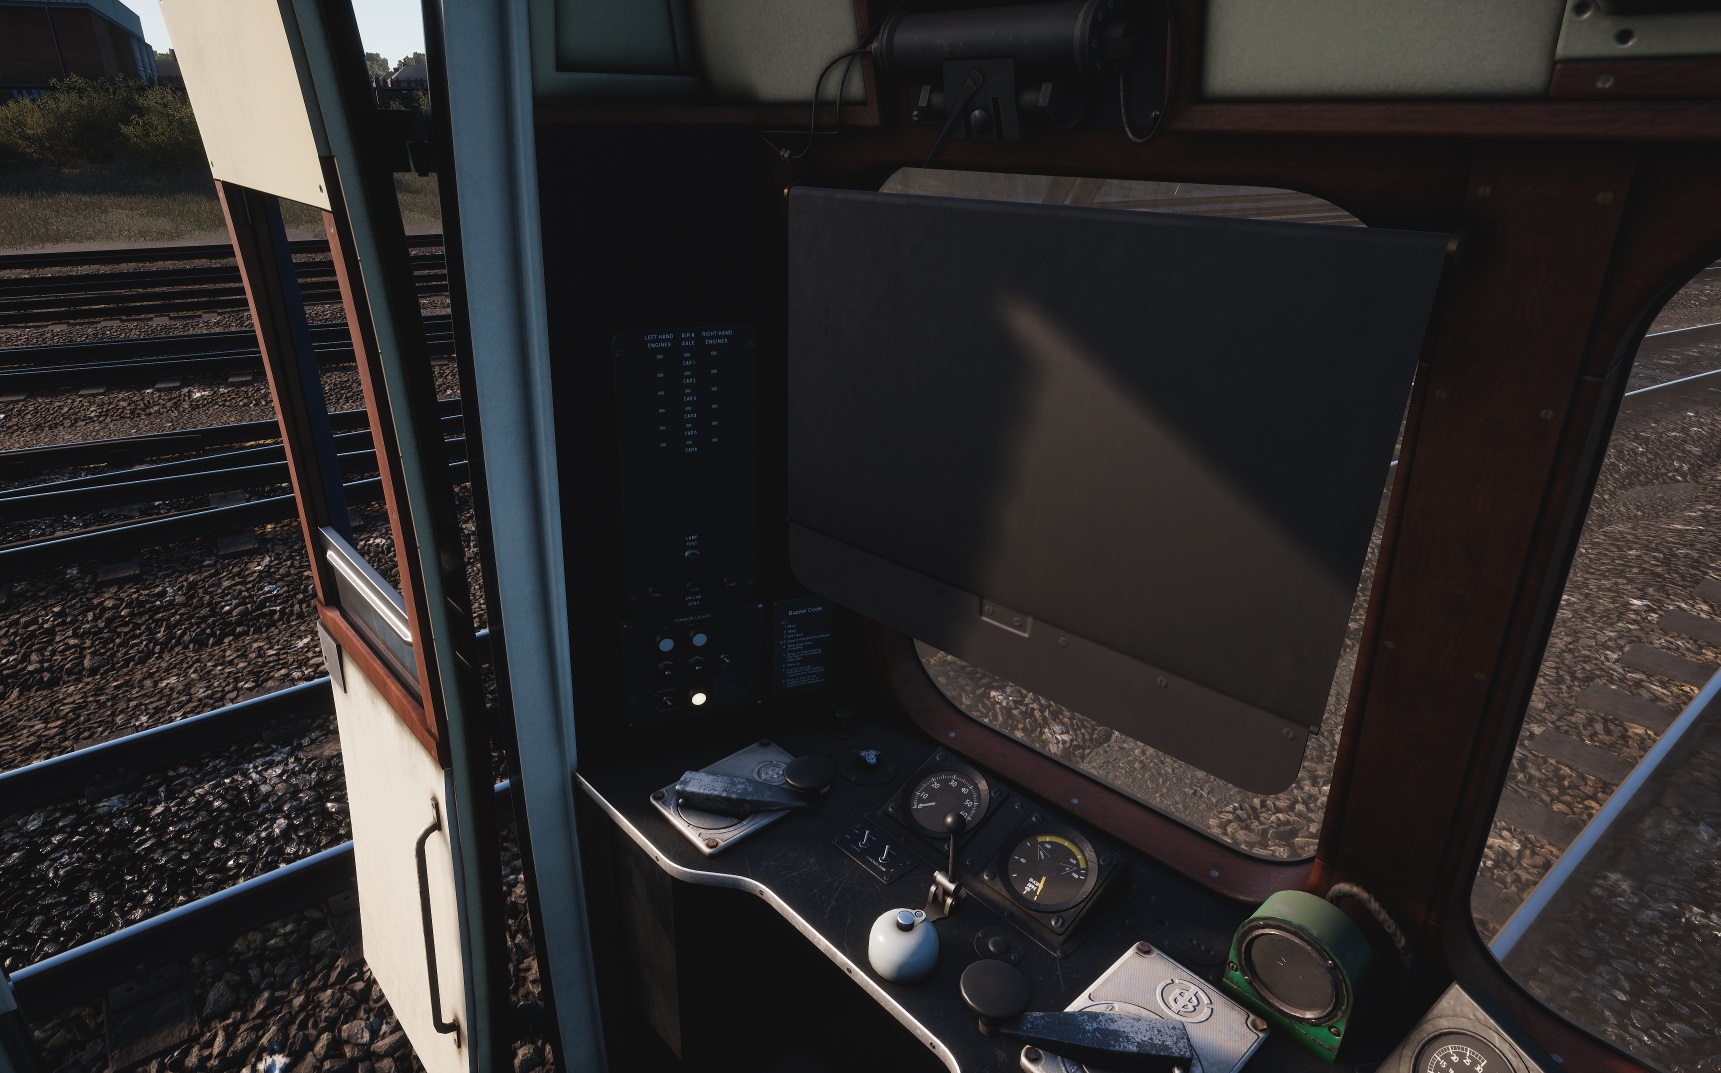
Safety systems
In addition to AWS, one special safety system available in Class 43 and Class 166 units is the DRA (Driver’s Reminder Appliance). When driver activates it, DRA cuts traction power to prevent train movements while train is at standstill in front of a stop signal. Once signal is clear driver can turn off DRA and continue driving.
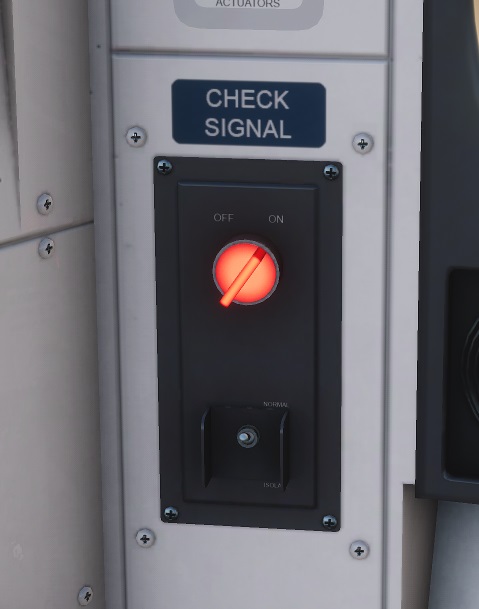
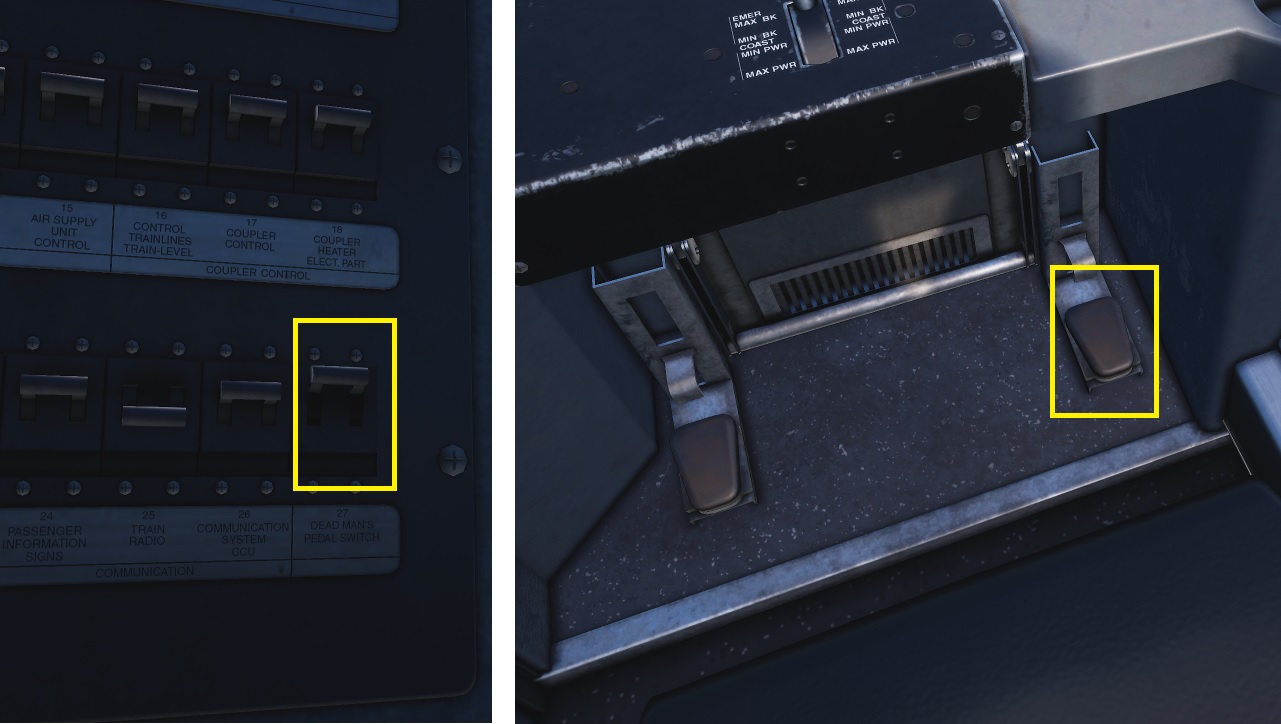
On LIRR M7 a dead man´s pedal is available. To enable it we have to activate its switch on the panel behind driver´s seat. Pedal´s default state is pressed, as a driver would do in a real service. But clicking on it while train in moving will simulate that driver has stopped pressing it, leading to an emergency brake application.
Consist lights and heating
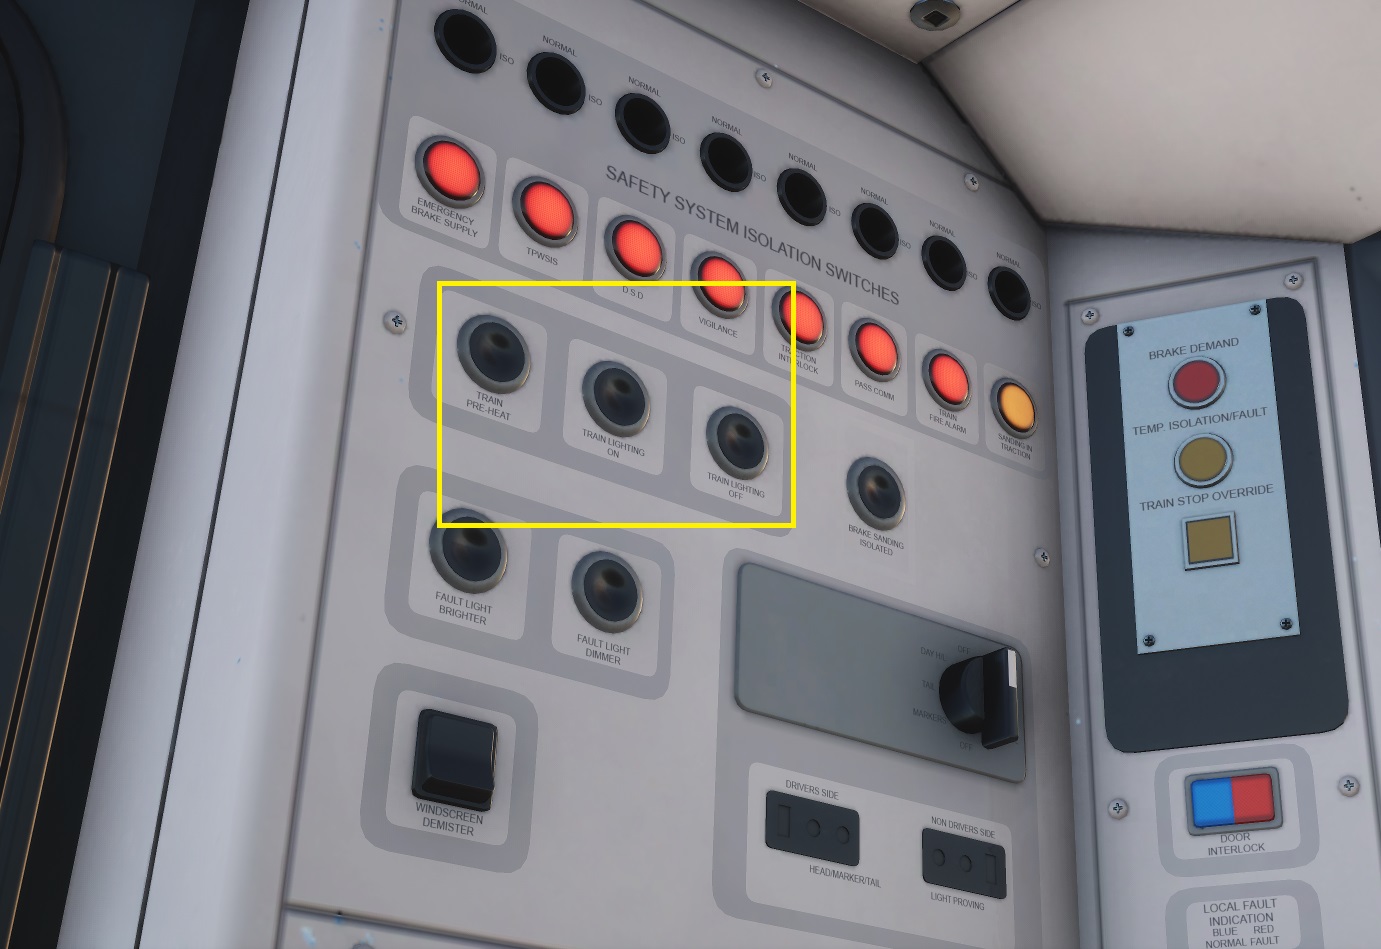
Class 166 lights and heating are available on the left panel in driver´s cab.
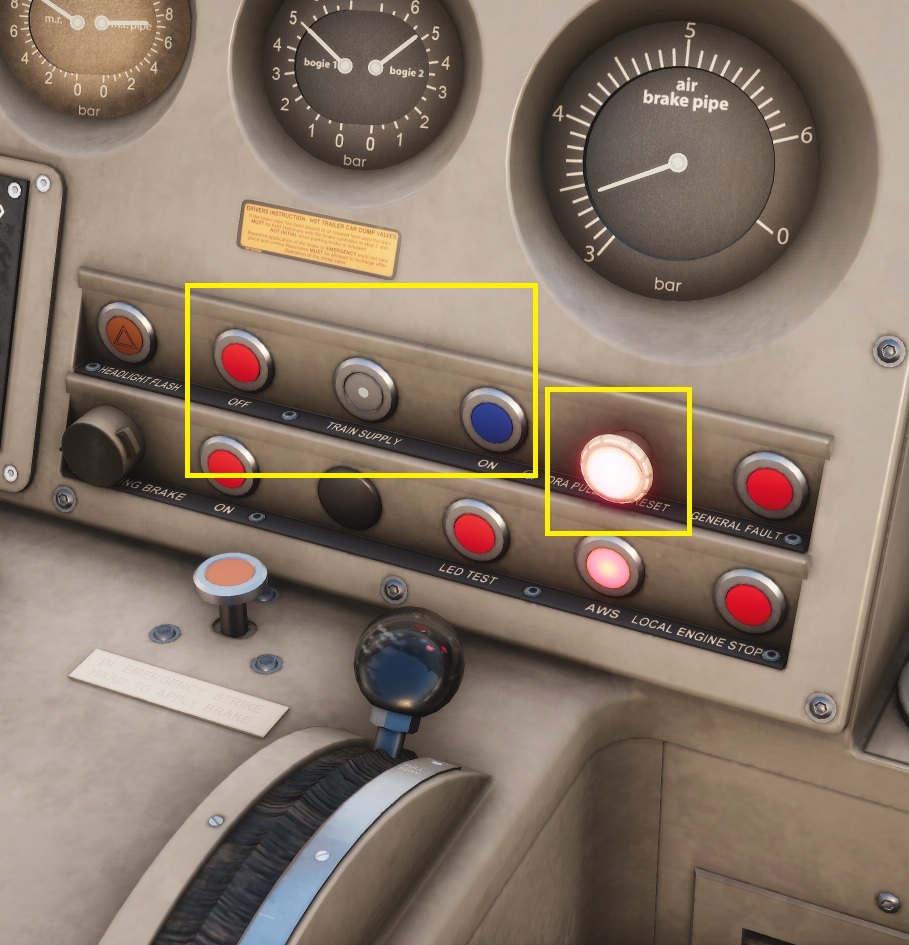
The Class 43 HST has its lights controls and DRA switches next to each other on the cab.
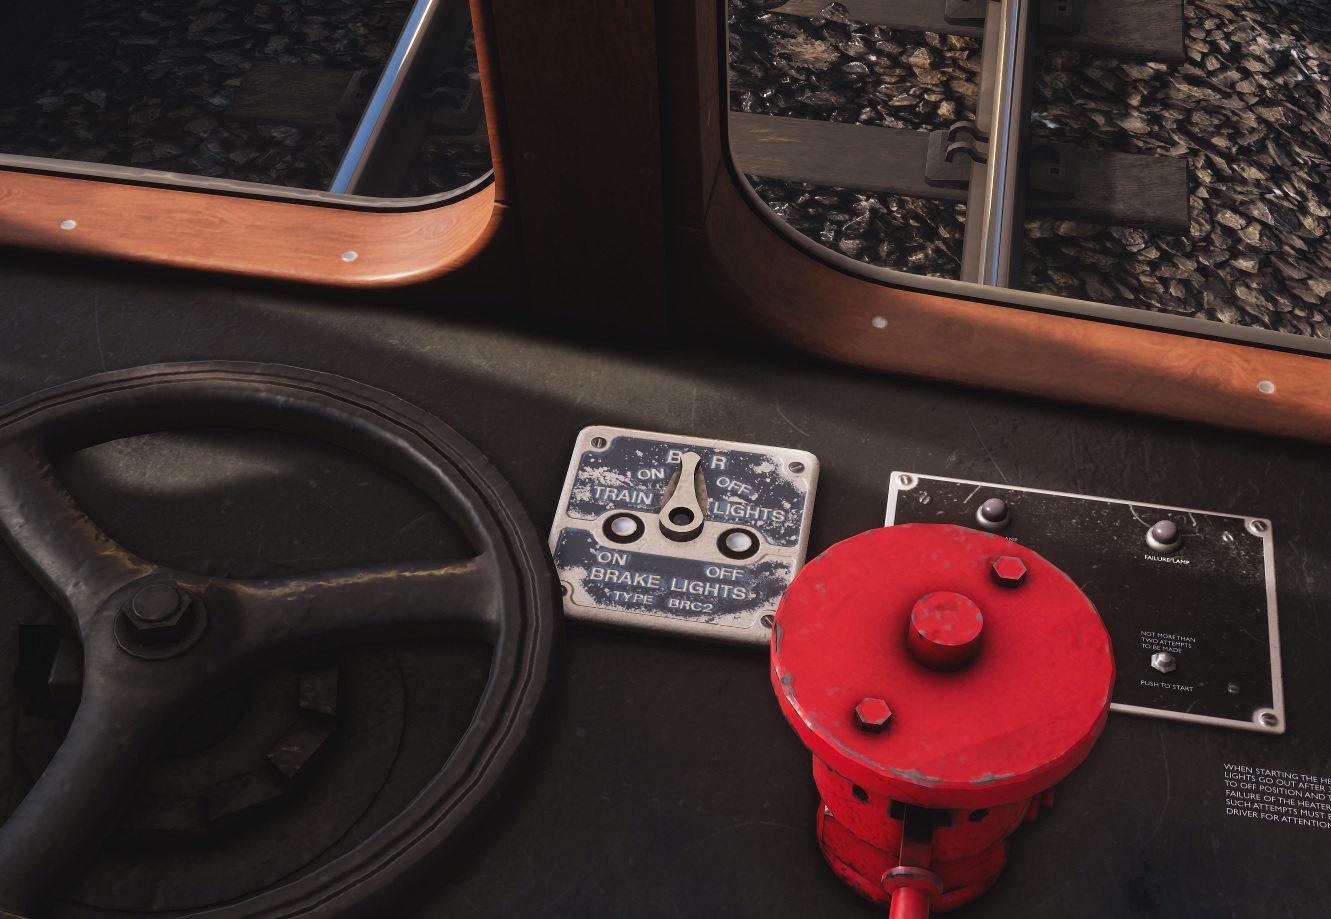
On Class 101 train lights are set with the panel on the right side of driver´s desk.
In DB Talent 2 units the train lights are set by a switch on driver´s desk.
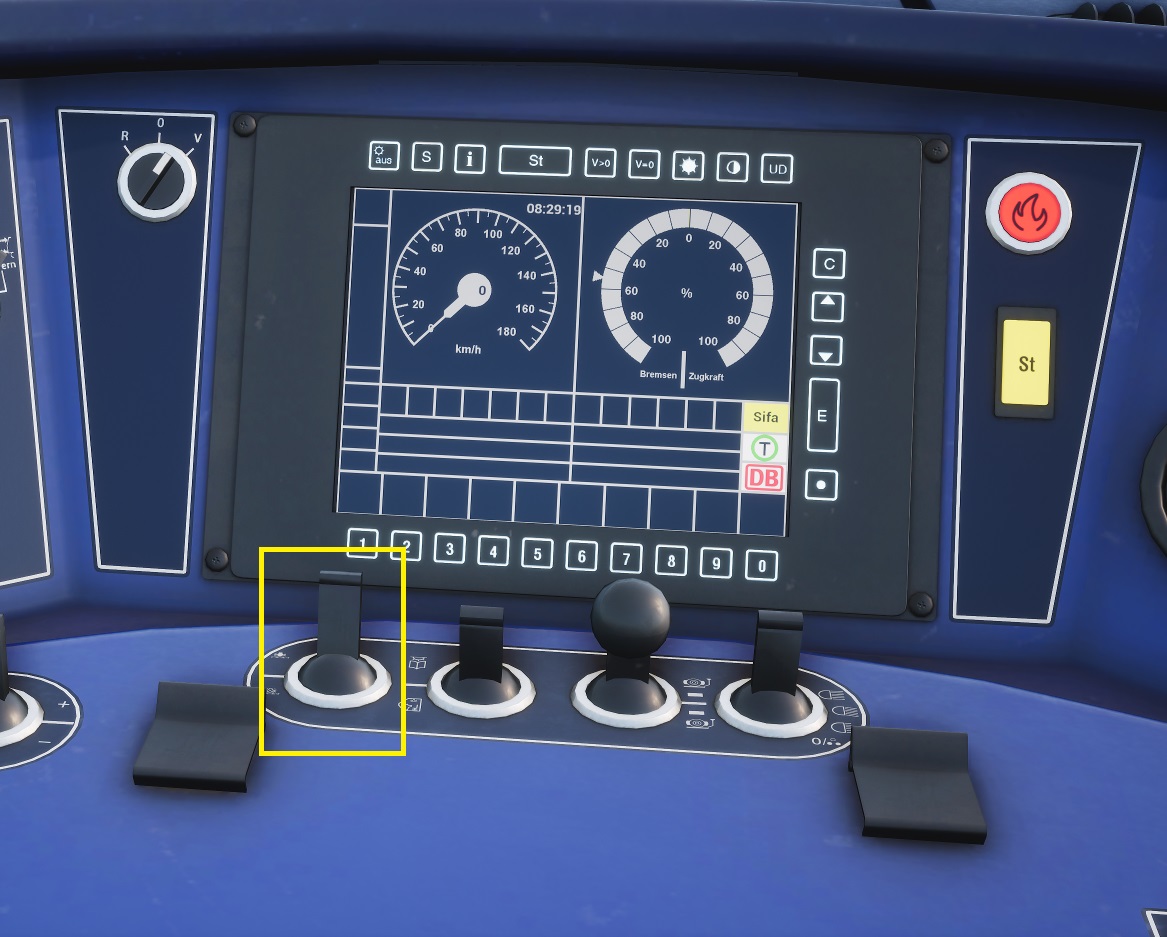
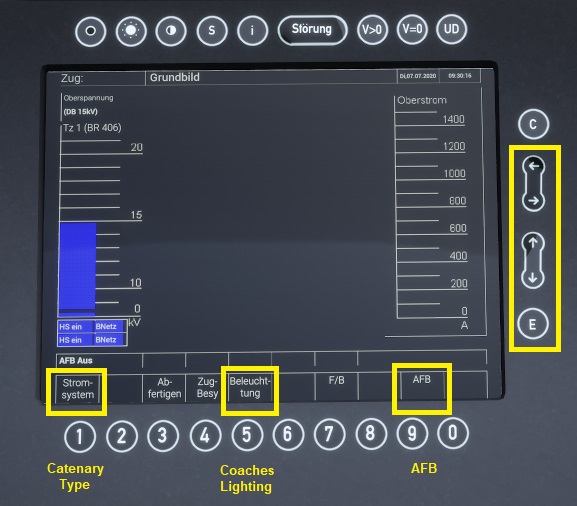
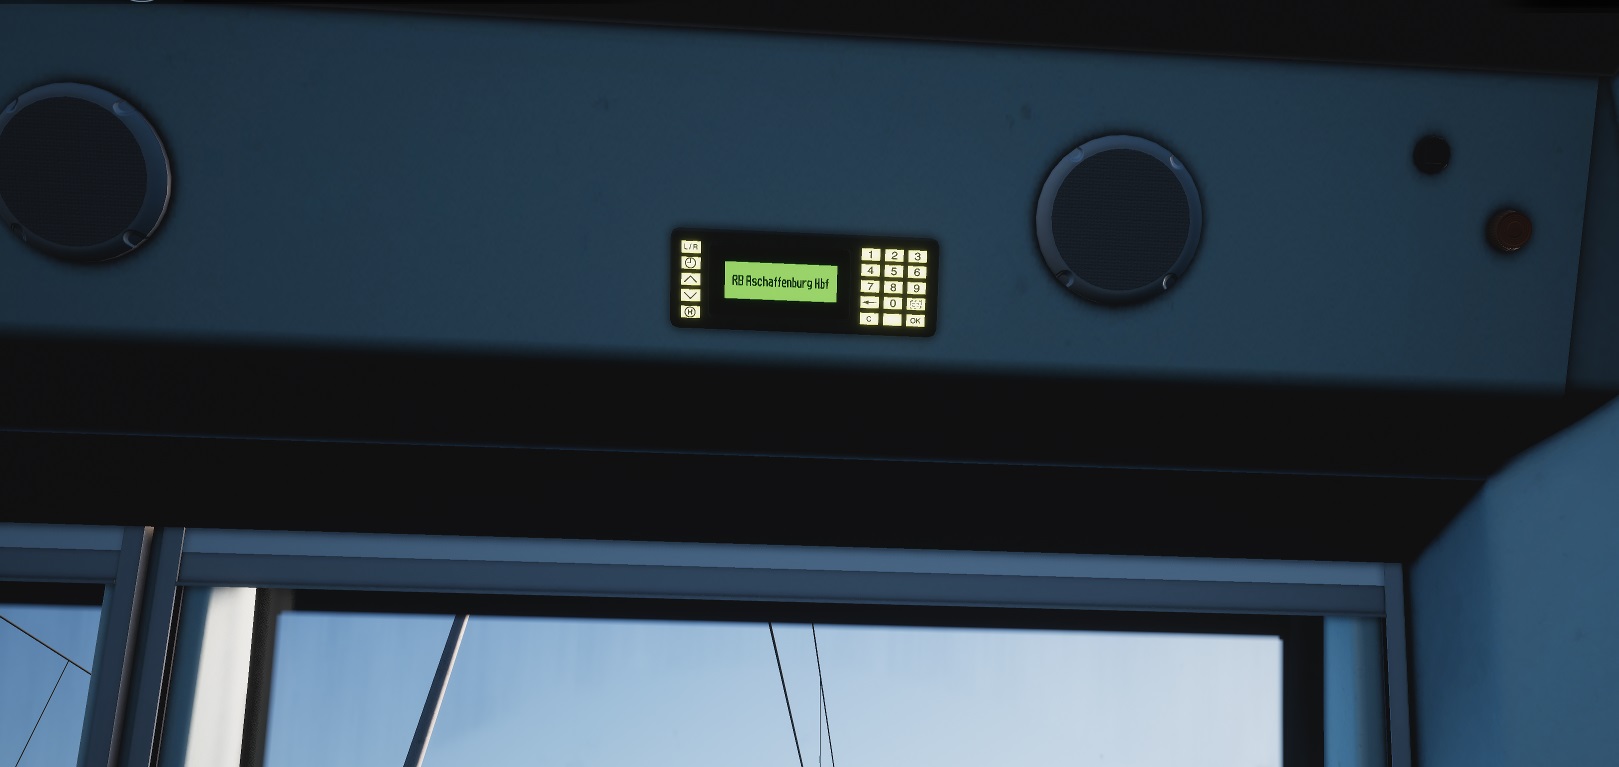
In the ICE3 trains the lights are activated in the auxiliary display. This display also allows the selection of catenary types and AFB. Simply select the menu and navigate using the softkeys.
The M7 included in LIRR has train lights and heating controls integrated on the driver´s display. Click on the marked buttons to toggle them. Master key must be on in order to activate those controls.

Destination boards
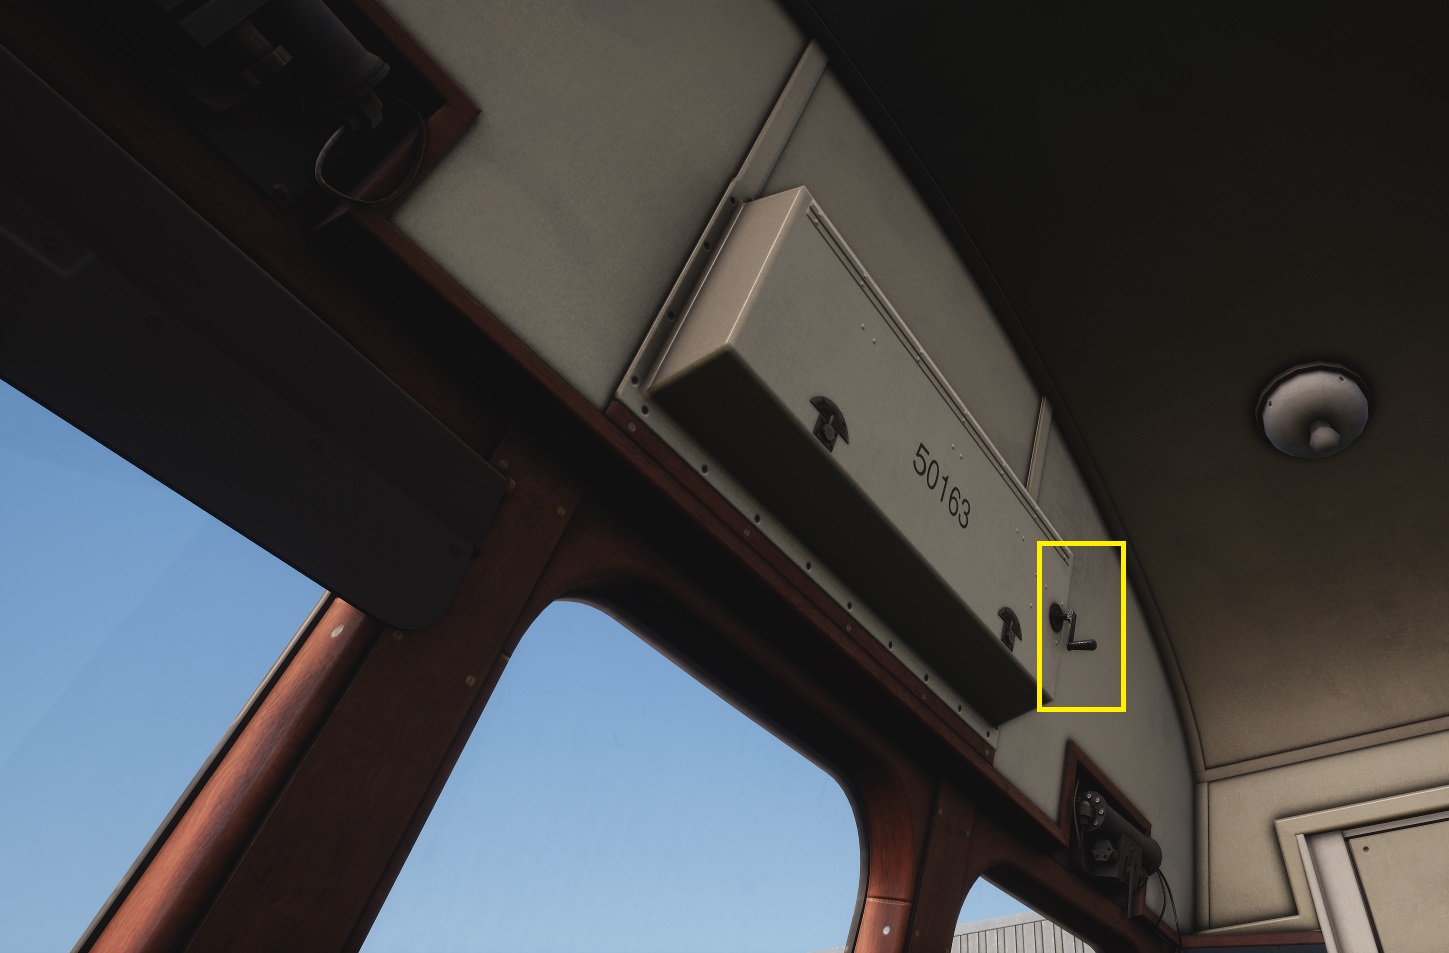
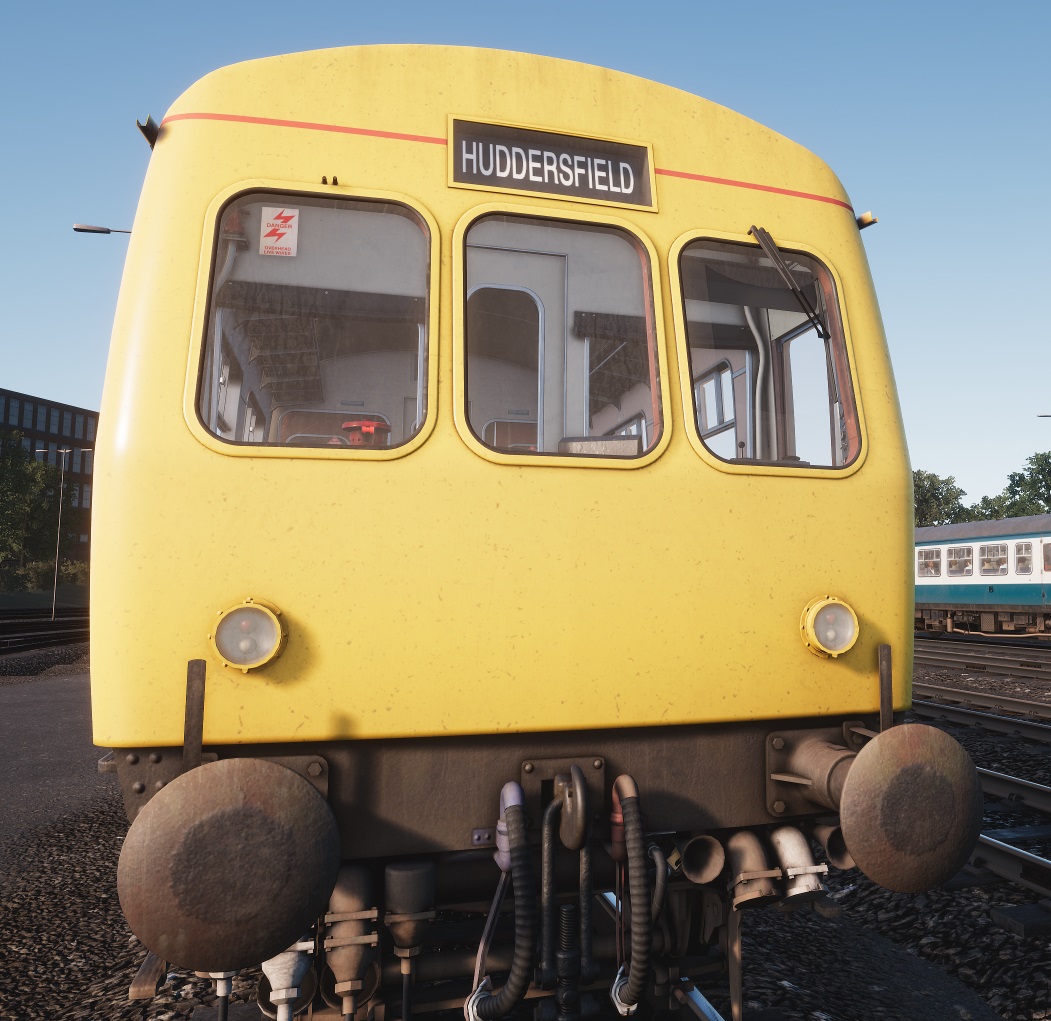
On Class 101 destination boards can be set using the rotary levers on the cab.
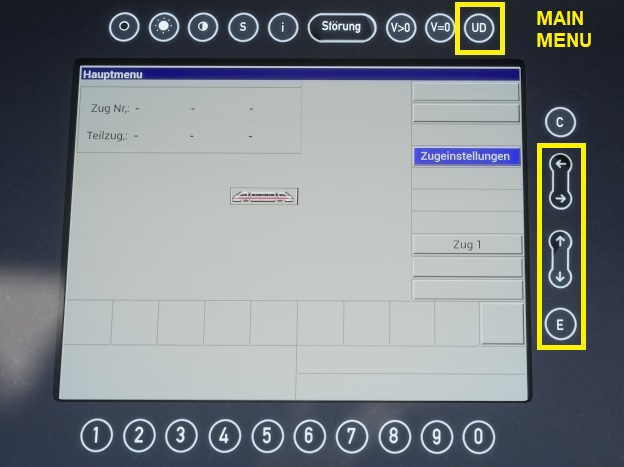
On ICE3 trains they are changed at the auxiliary display, pressing two times the main menu button and using the navigation softkeys.
Special features
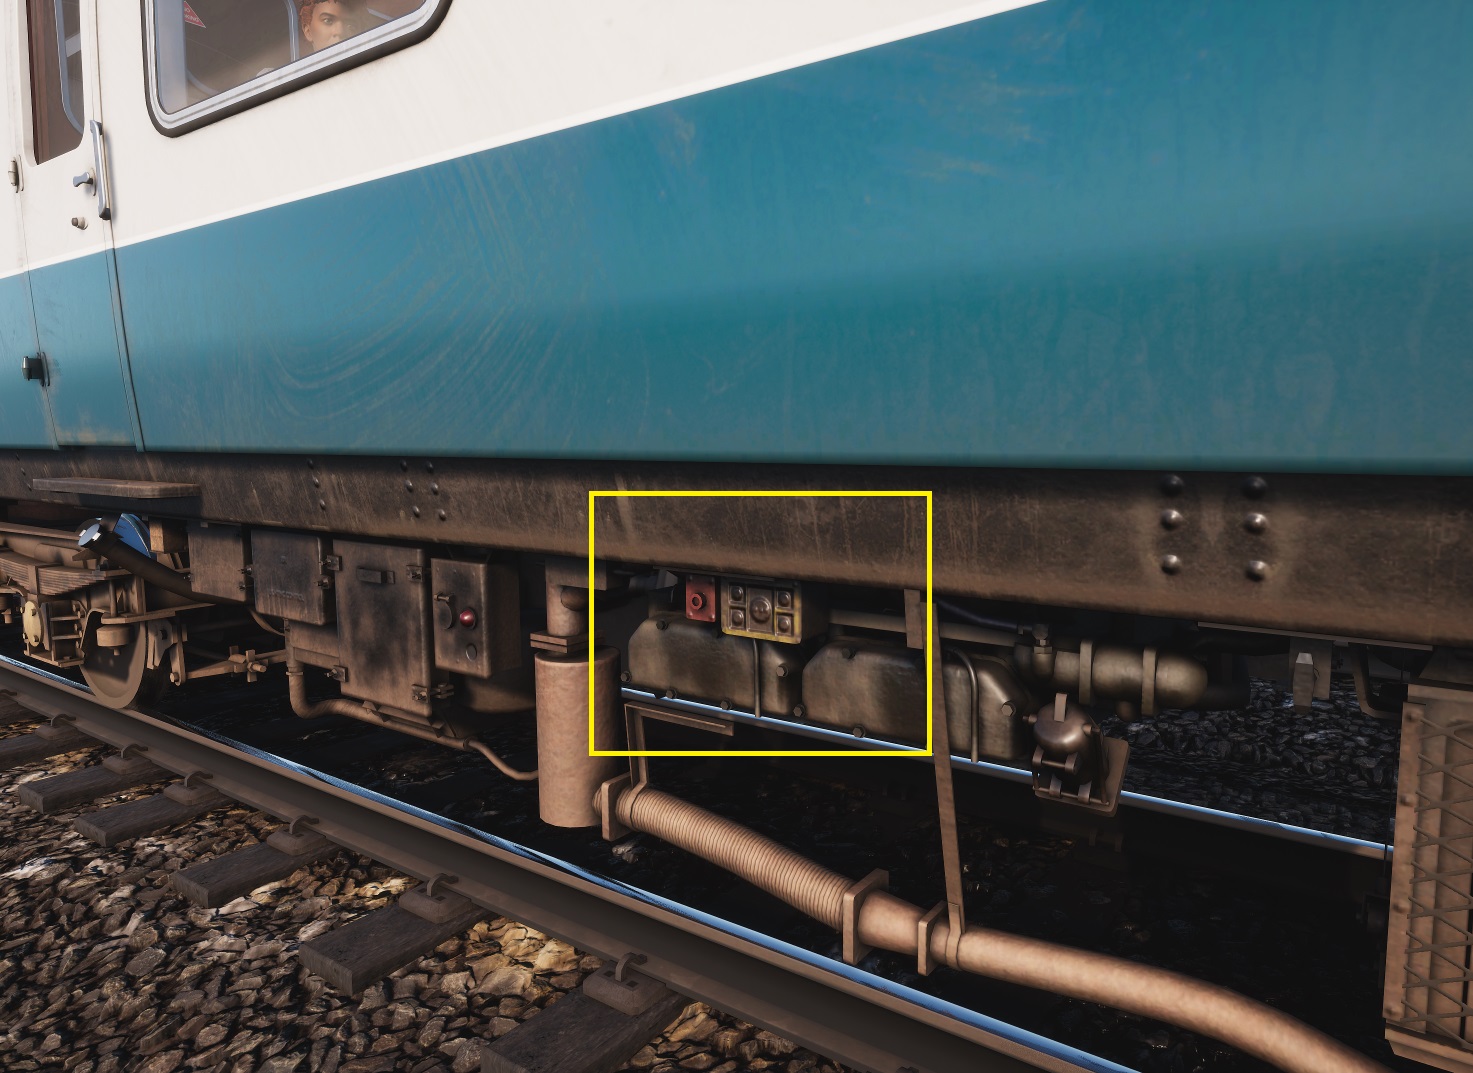
Class 101 has a train chief room where you can sit or operate emergency brake. Also the external start/stop engine controls are available on the side of the unit. Master key must be on in the driver´s cab in order to operate them.

4.1. Coupling and uncoupling
Joining or splitting MUs may involve special procedures to be done by driver in addition to the physical coupling or uncoupling, which would be the only needed action in most cases. As a general rule remember to finish procedures meeting the following conditions on the slave units:
- Cab is not active (master key is OFF).
- Traction and reverser are OFF.
- Brakes are applied (as a safety rule) or isolated.
- Parking brake is released.
- Safety systems are isolated.
- All carriages doors are closed (if any door is open the consist brakes may not be released).
Class 43 HST
Class 43 has a special coupling operation, which allows that the unit is coupled to another unit or to a locomotive, as seen on the GWE scenarios, and includes the following features which are activated by clicking on the coupler area from outside the unit:
- Open/close coupler doors
- Deploy Buckeye adapter
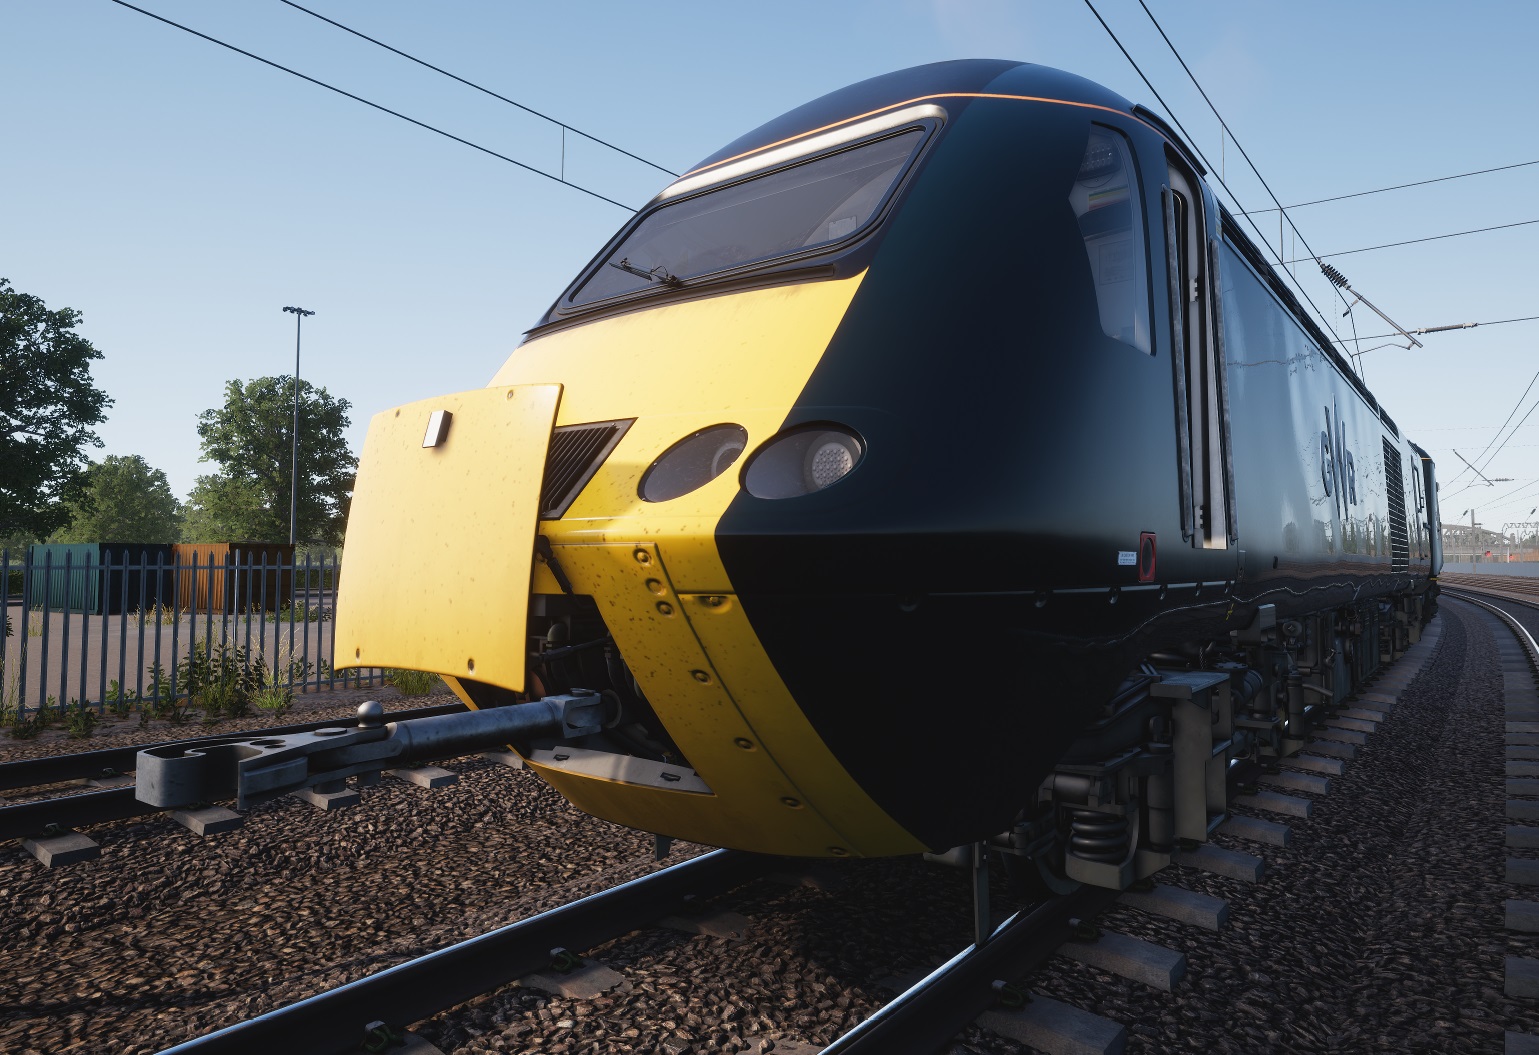

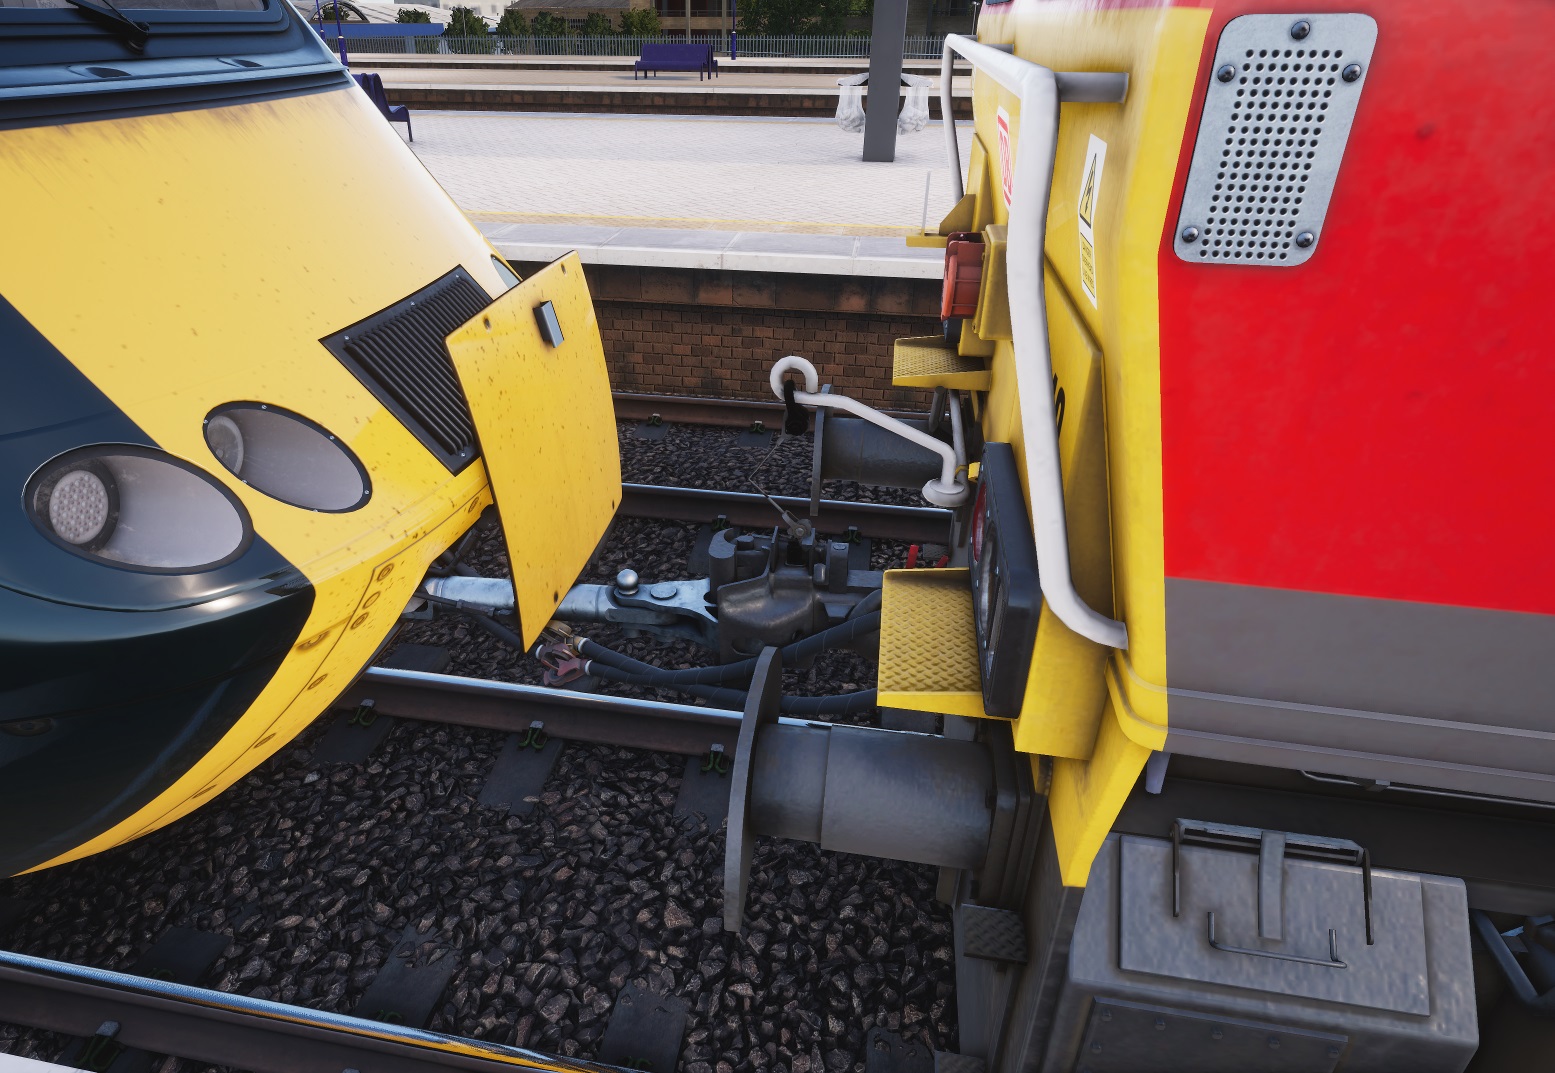
To couple two units simply push one into the other with the special coupler deployed in both. Currently the units can´t be uncoupled afterwards.
You can test this procedure starting on foot at Old Oak Common depot at 05:00h, for instance.
Class 166 DMU
Class 166 can be coupled in a normal way by pushing units one into the other. In theory after that you would also have to push and hold the coupling button for at least 2s and release it on the cab you were driving, but this is not needed. Remember to turn off the position lights in the units which are facing each other.
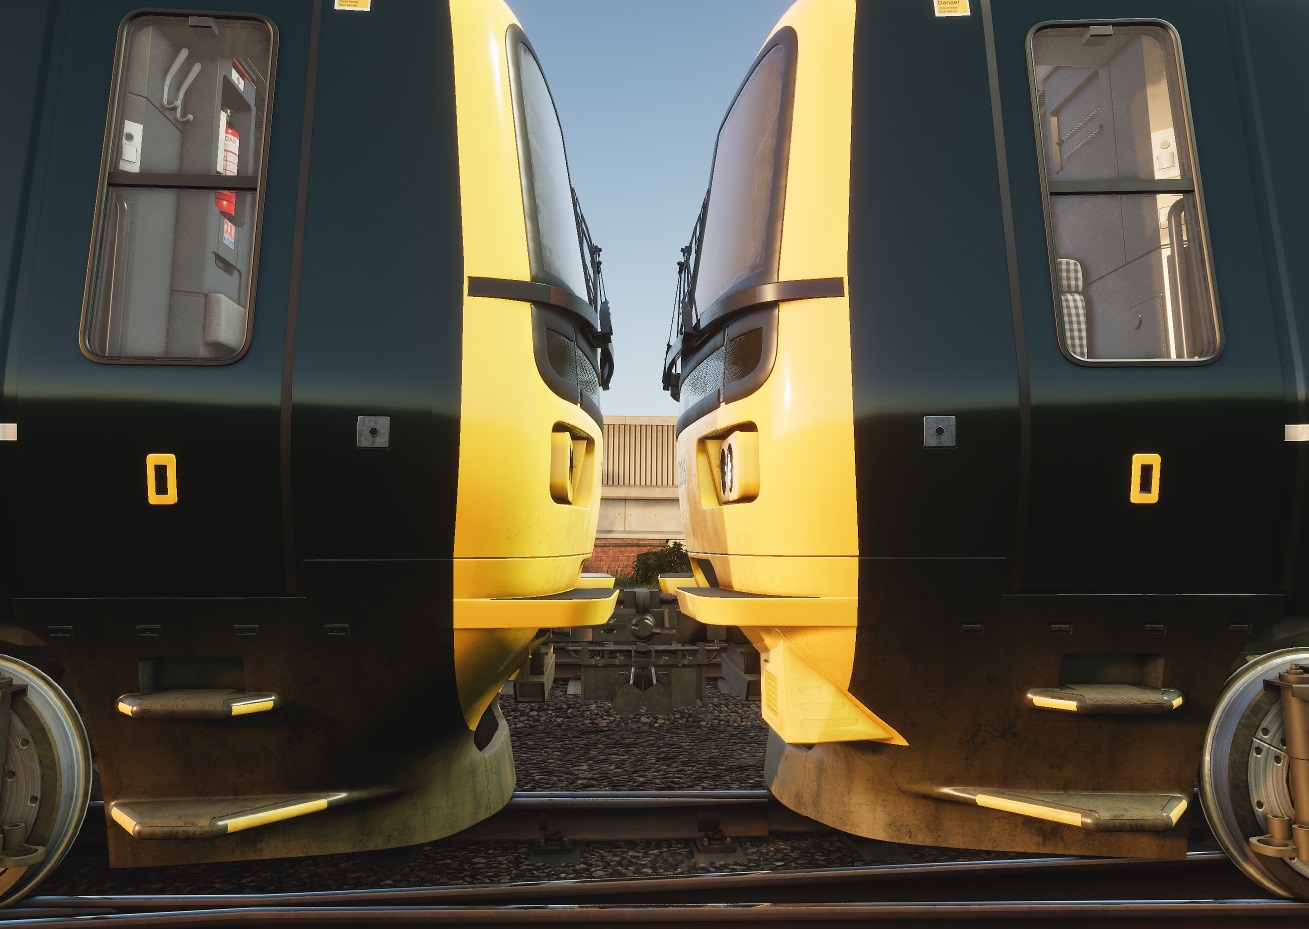
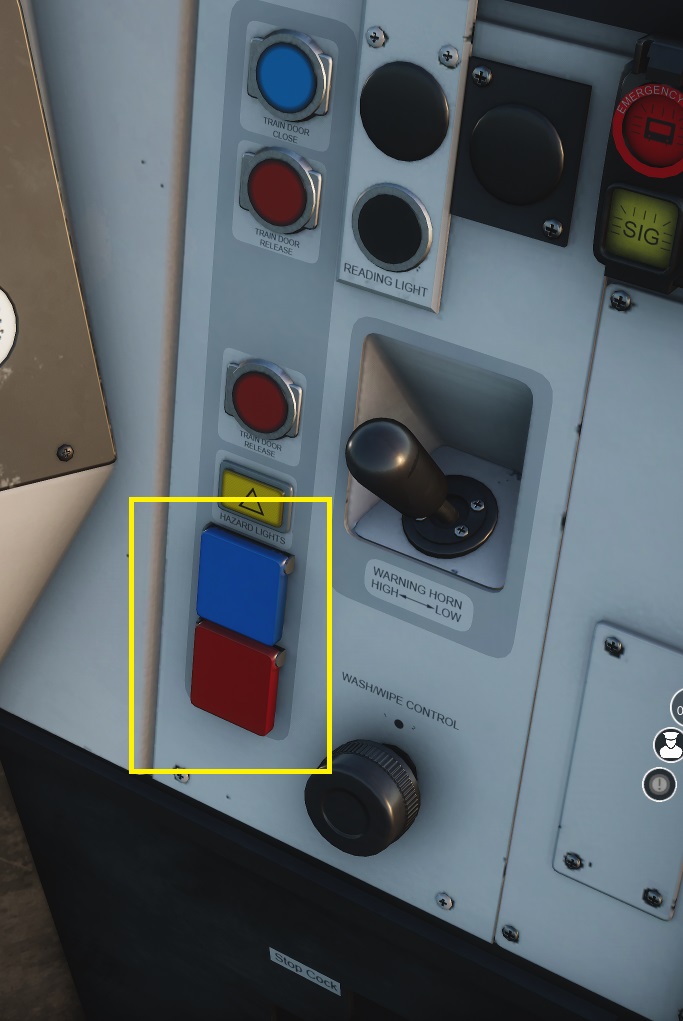
To uncouple the units push and hold the uncouple button for at least 2s and release it. Master key is not required to be active on the cab to perform this procedure. This action can be performed at any of the cabs which are facing each other.
You can test those procedures using service 5W01 which starts at depot at 04:53h.
Talent 2 EMU
Talent 2 can be coupled in a normal way also by pushing units one into the other. Nothing else is needed after that.

To uncouple the units you need to use the uncoupling control available on the cab. This unit has two alternative methods, depending on the unit you want to drive afterwards.
Remote uncoupling (uncouple the unit which is at the rear of your cab).
This is the normal situation where you are performing the procedure from the front cab of the train consist. To uncouple move the uncoupling control to the right and hold it on the remote uncoupling position during at least 5s. Once the display shows only one consist power indication the two units are then separated and the switch can be released.
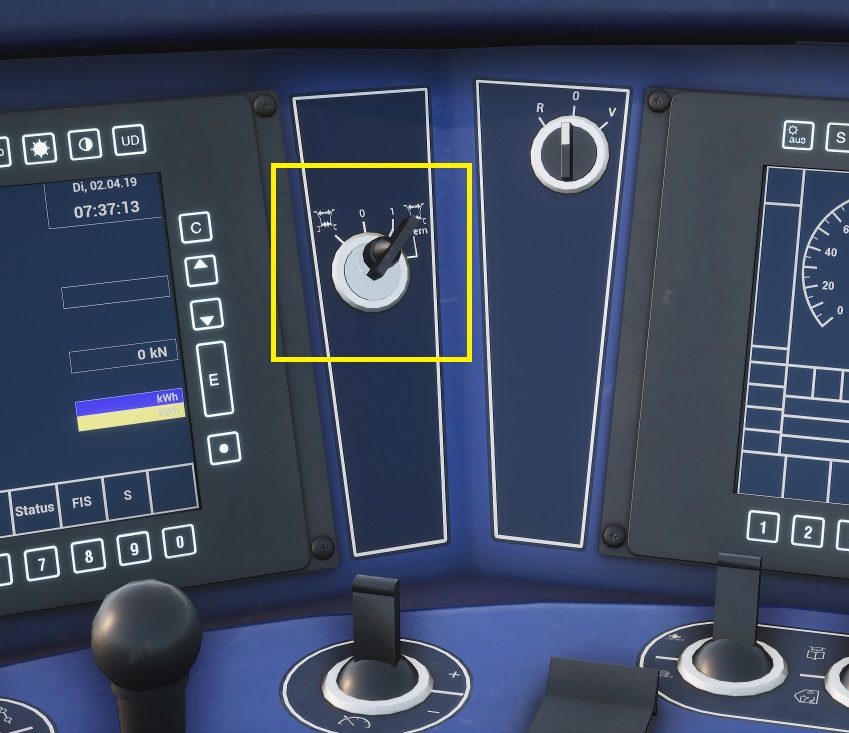

Local uncoupling (uncouple from the unit that you have in front of your cab).
In this case you are performing the procedure from the front cab of the rear unit. To uncouple move the uncoupling control to the left and hold it on the local uncoupling position during at least 5s. Again, once the display shows only one consist power indication the two units are then separated and the switch can be released.
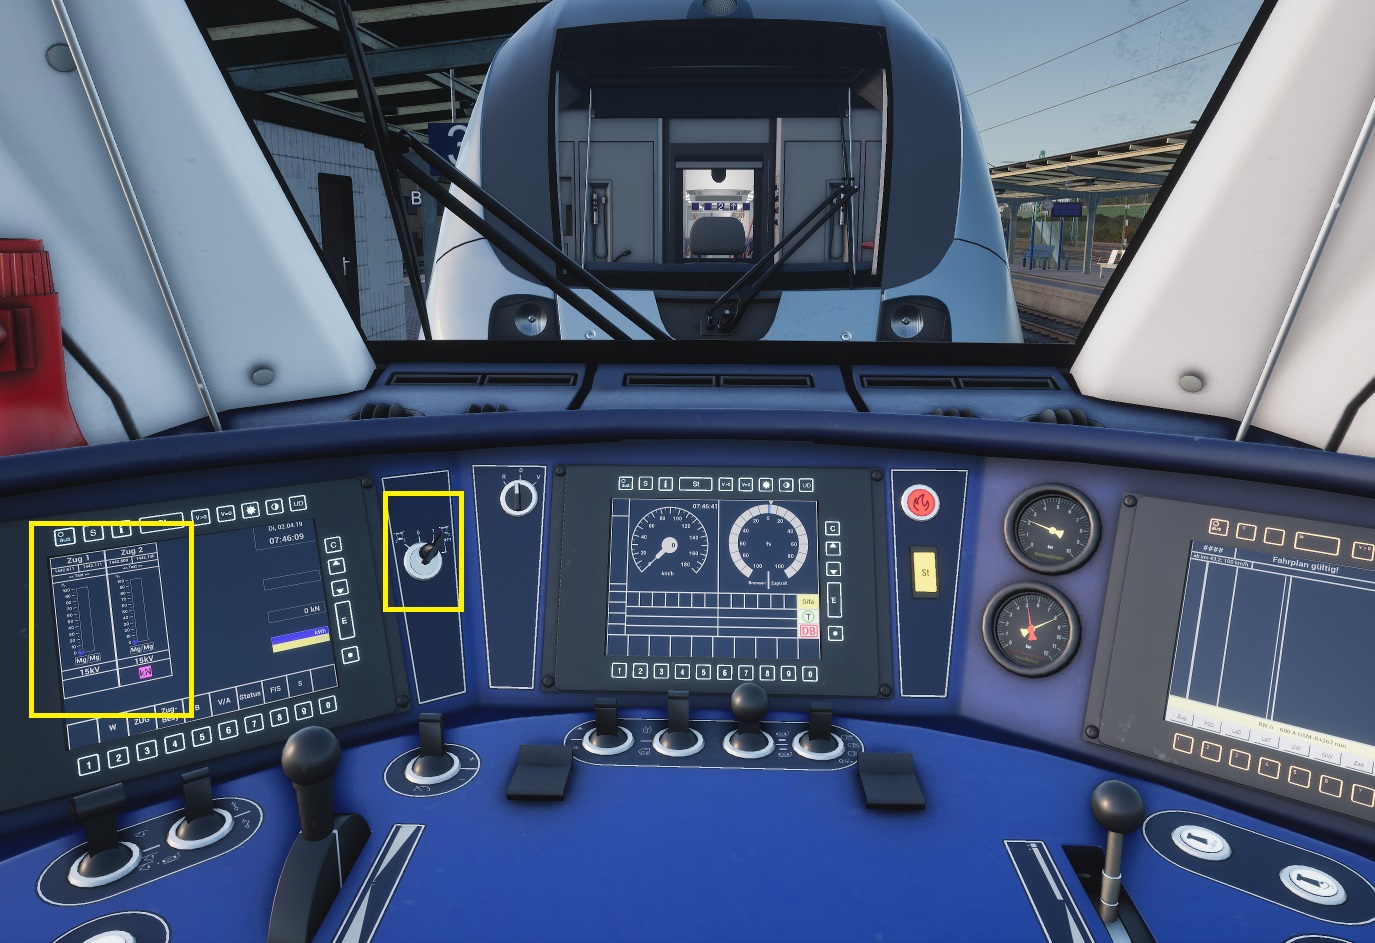
You can test those procedures using service 0641 which starts at Dessau at 07:35h.
M7 EMU
The LIRR M7 can be coupled in a normal way also by pushing units one into the other. Nothing else is needed after that.
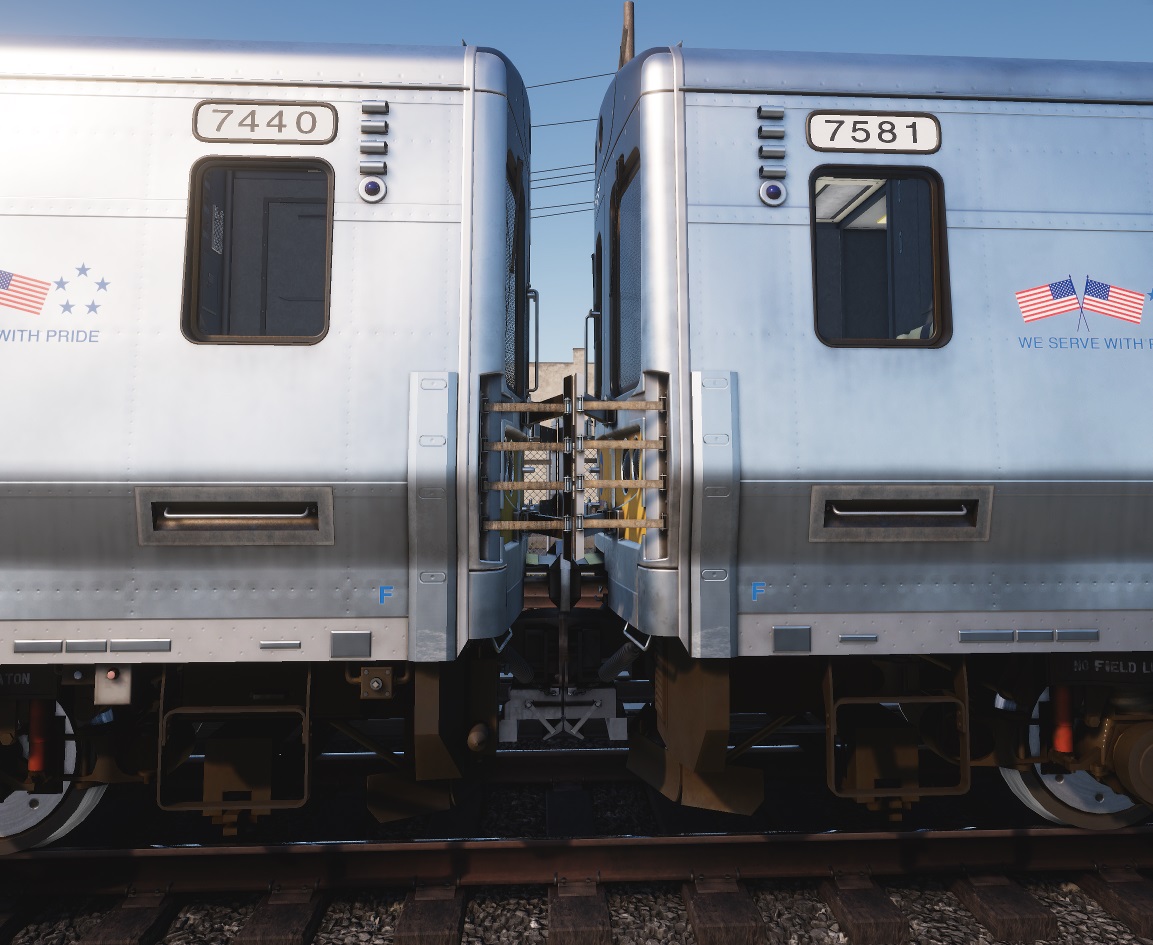
To uncouple move and hold the uncouple key to the right position for at least 2s and release it. Master key is not required to be active on the cab to perform this procedure. This action cab be performed at any of the cabs which are facing each other.

You can test those procedures using any M7 service.
5. Locomotives
In this section we will explain the most relevant features for both electric and diesel locomotives.
As in the case of multiple units locomotives usually implement at least the following common features:
- Manual operation of driver´s cab doors
- Open/close cab windows (increases outside sound level)
- Operate sun visors (block bloom effect from sun simulation)
- Manual operation of couplers
Safety systems
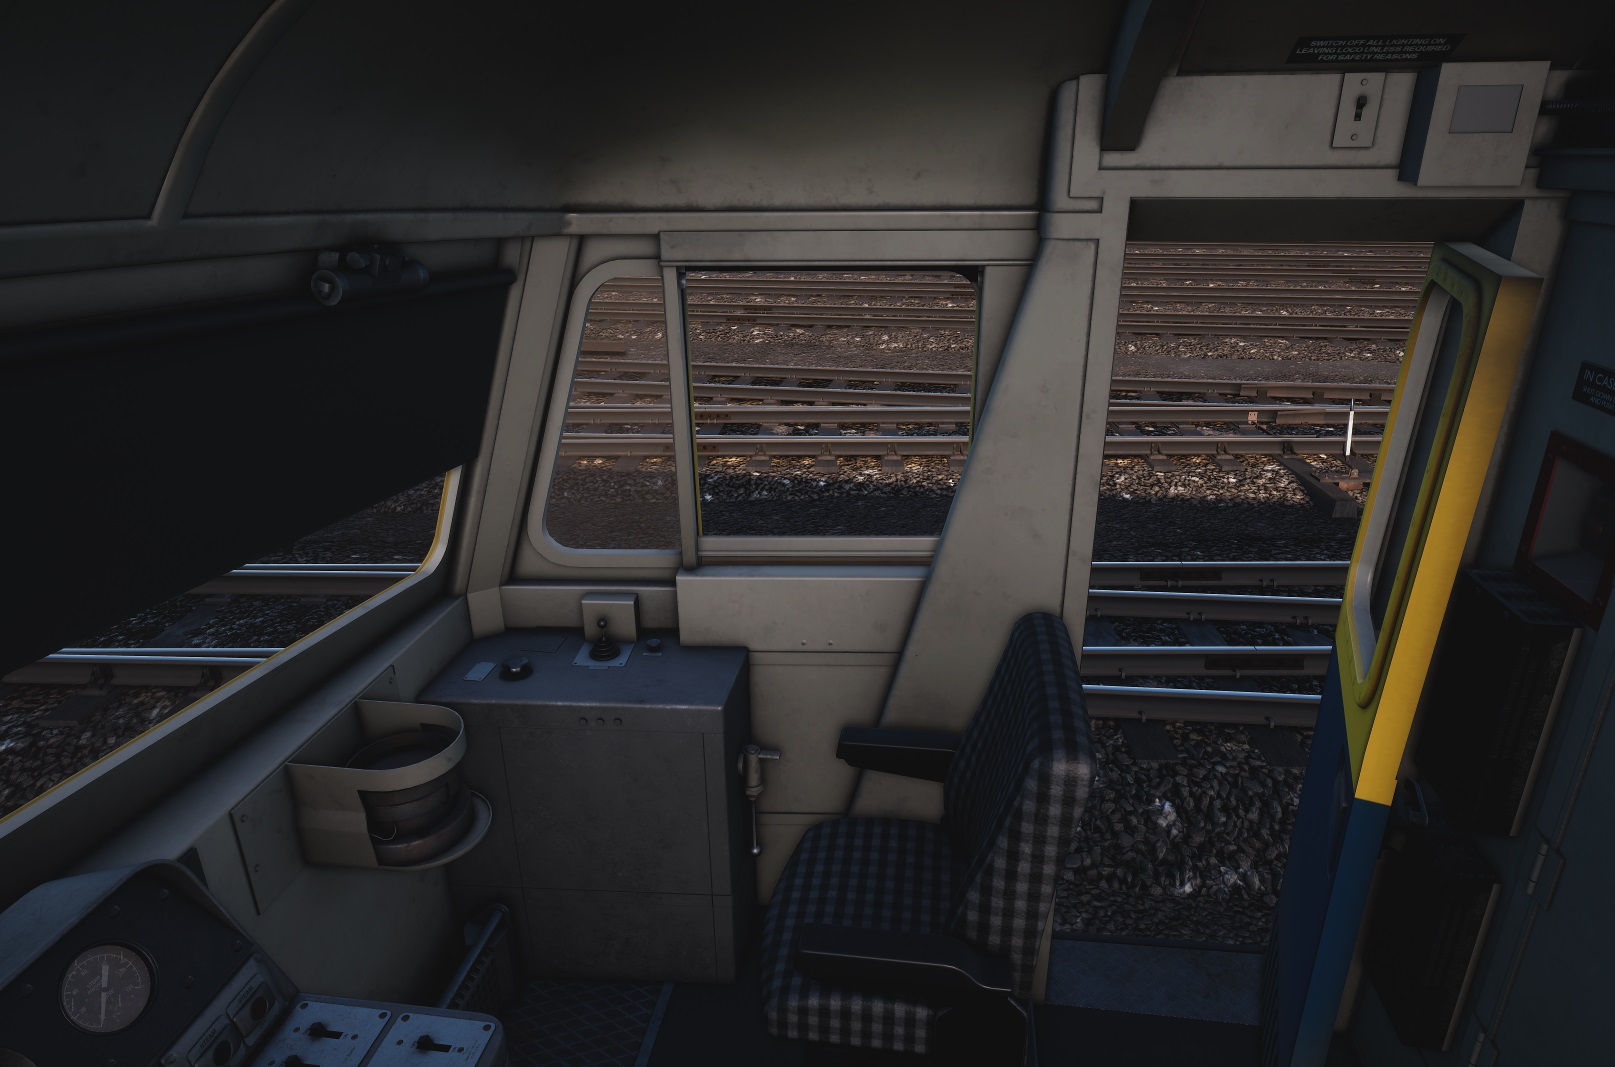
On Class 33, 45 and 47 the AWS safety system is activated by a device on driver´s desk (Class 33), on driver´s seat side (Class 45) or behind it (Class 47). In order to activate AWS you need enable both isolation and cab changeover switches.
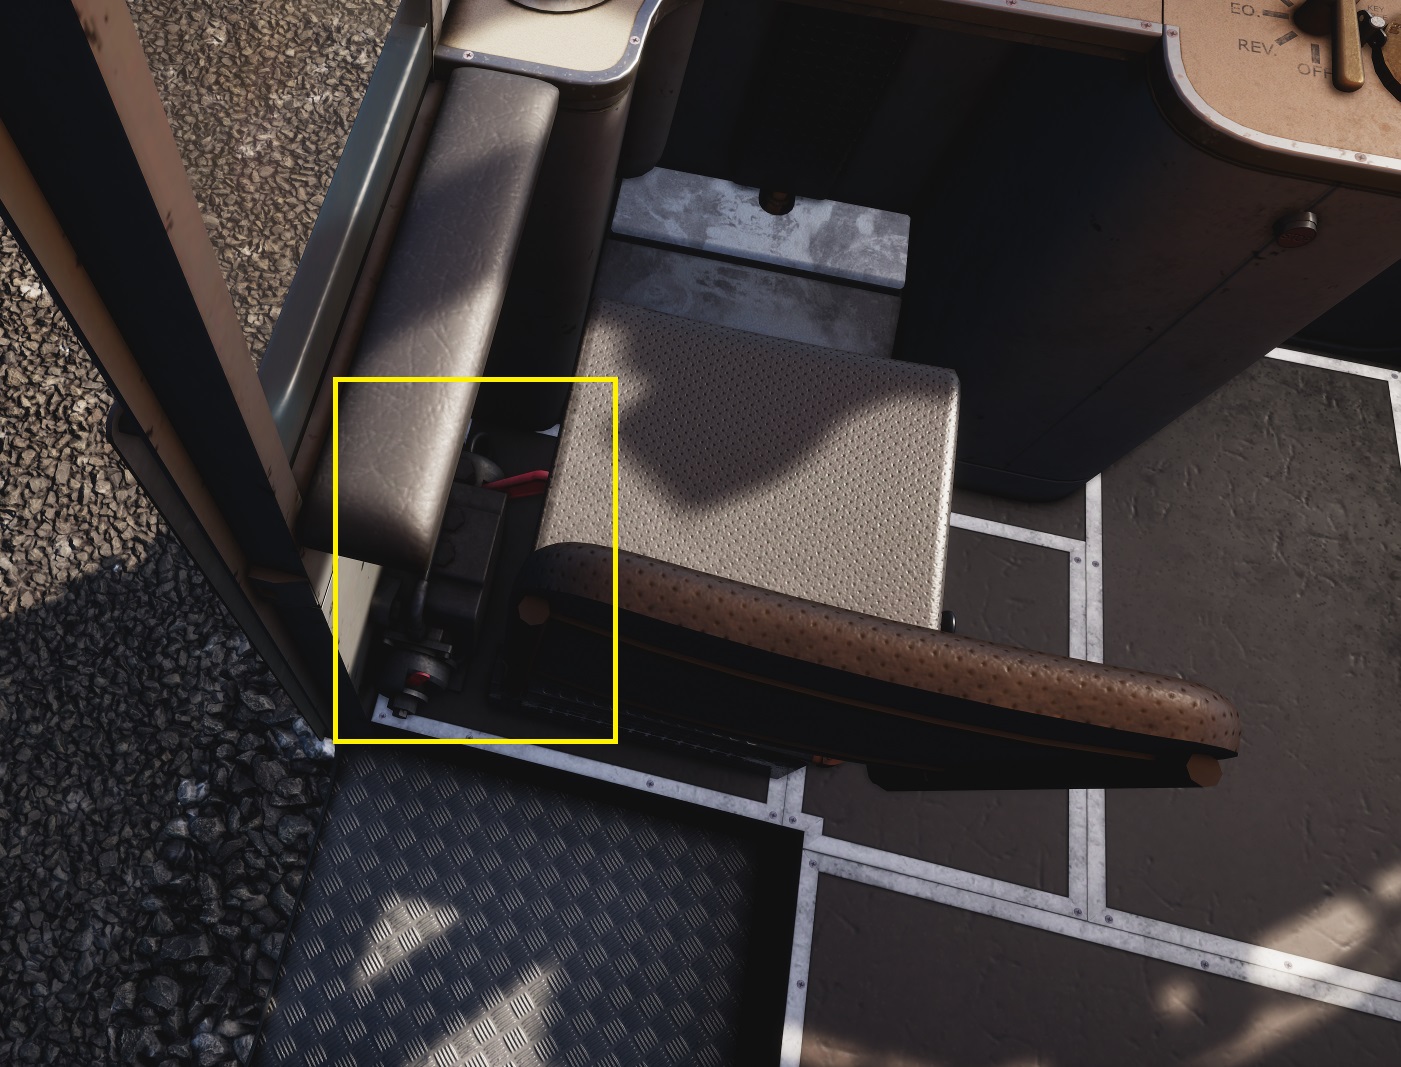
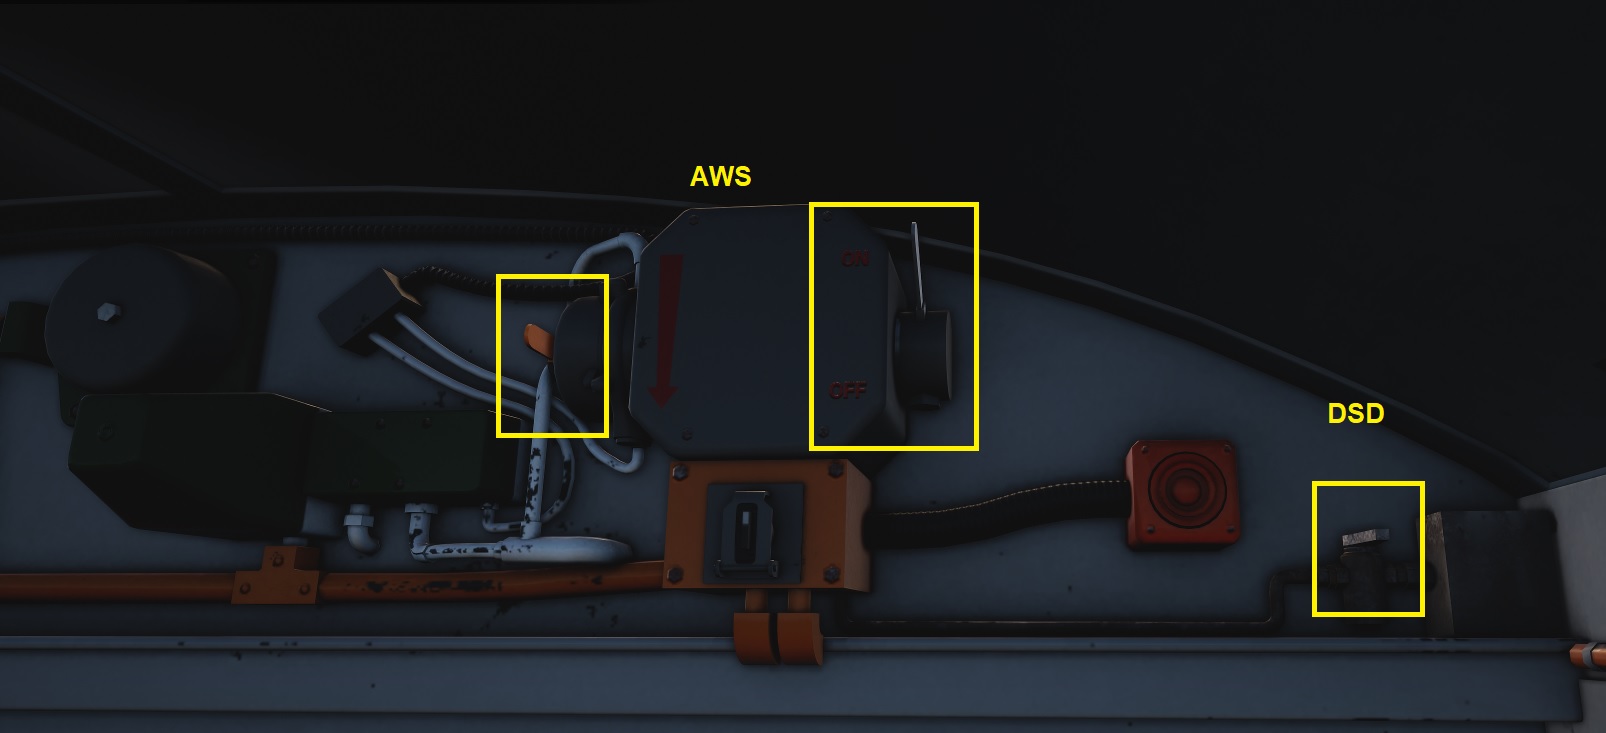
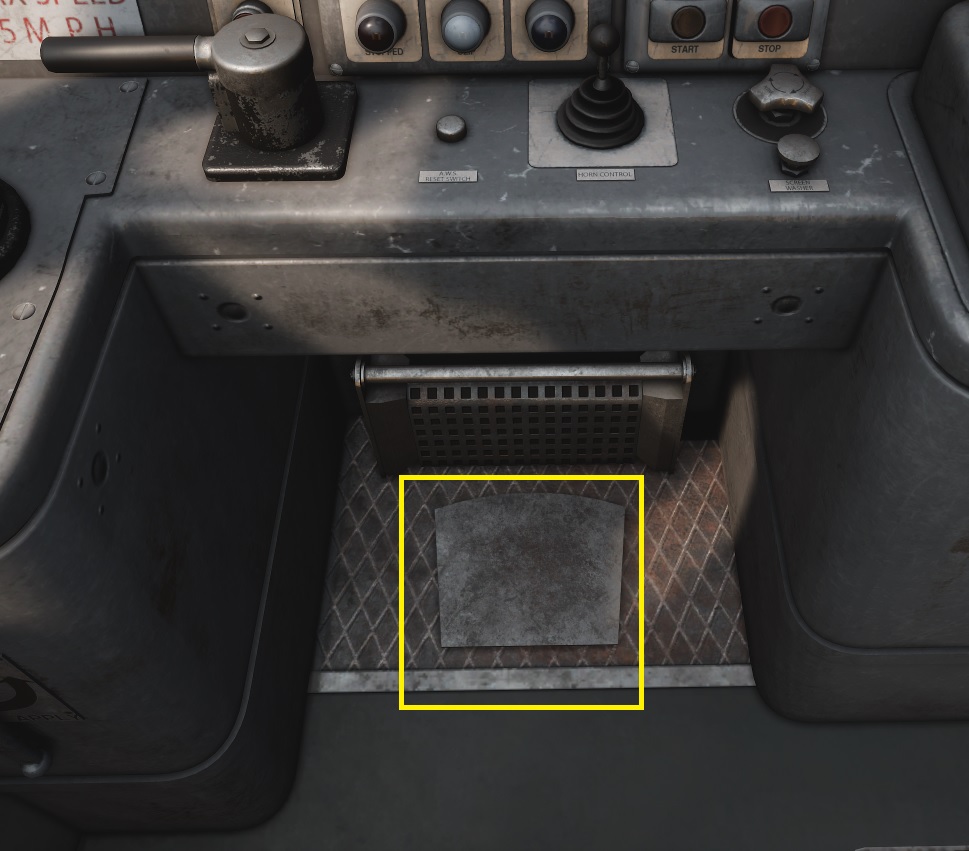
Class 33 and 47 have a dead man´s pedal which is activated by DSD isolation switch on Class 47 and is always activated on Class 33. Pedal´s default state is pressed, as a driver would do in a real service. But clicking on it while train is moving will simulate that driver has stopped pressing it, leading to an emergency brake application. On Class 47 it´s linked to “Q” key too.
On german locomotives PZB can be configured to operate on passenger or freight modes using the dedicated controls on the cab or in the engine room, as in the case of BR143.

Air compressor and engine fans
A very important couple of features that we usually forget to care about, as they are normally enabled by default, are the air compressor and engine fans. Compressor needs to be enabled in order to feed air into the brakes or raise the pantograph and engine fans need to be enabled to prevent engine overheating. Usually, once enabled, those systems operate automatically. The location of such controls depends on each locomotive, and could be integrated into the electrical panel or at the desk as in the case of BR185 below.
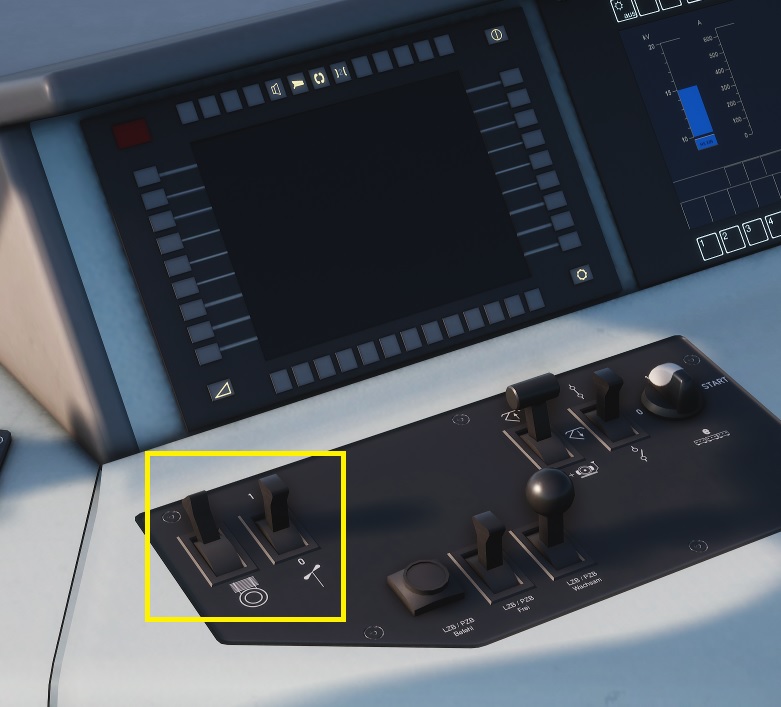
On BR143 you can choose between manual or automatic operation and also turn them off. The controls are also located on the driver´s desk.

Battery and pantographs
Other features important for normal operation are the battery, which is needed for starting the engine, and the pantographs for the case of electric locomotives. In the case of ACS-64 locomotive the electrical panel is located on the engine room, where pantograph configuration can be set, but the battery switch is on the panel behind driver´s seat.

It´s important to check the battery voltage indicator during start procedure for two logical reasons: to check if battery is charged and if it´s properly working. If voltage is too low or you have a power leak you may even need an external electrical source to start the engine. On the other hand remember to shut it down on parked units to avoid discharging it before the next service.
Changing pantograph configuration can be needed in two typical situations: the change of train direction on a service and in case your train stops with pantograph just inside a powerless section. Switching to the other pantograph could sometimes allow you to get energy again and solve the problem.
Train lights and heating
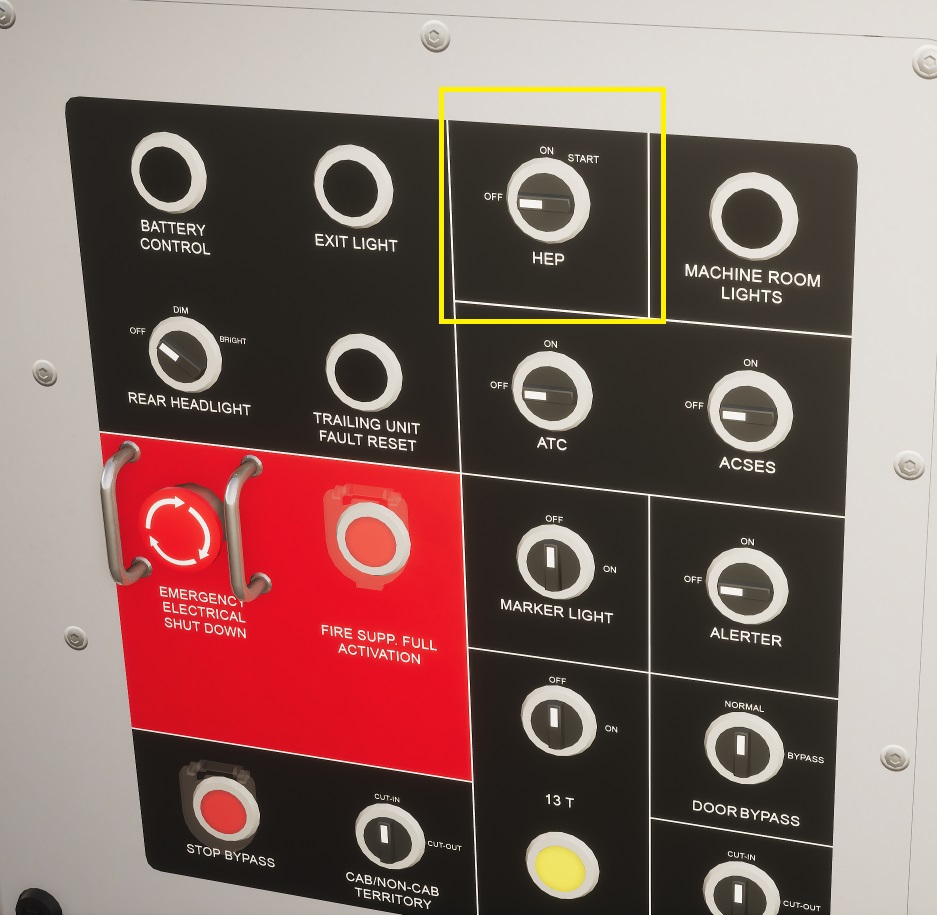
As described before some locomotives allow you to control the electrical supply of passenger carriages and provide power to the passengers heating systems. Those controls are normally in the driver´s cab, like in the examples of ACS-64, Class 45 and Class 47 below or the BR143 described in other sections. In some cases you need to hold switch in the “Start” position during 5s to activate the systems.


Destination boards
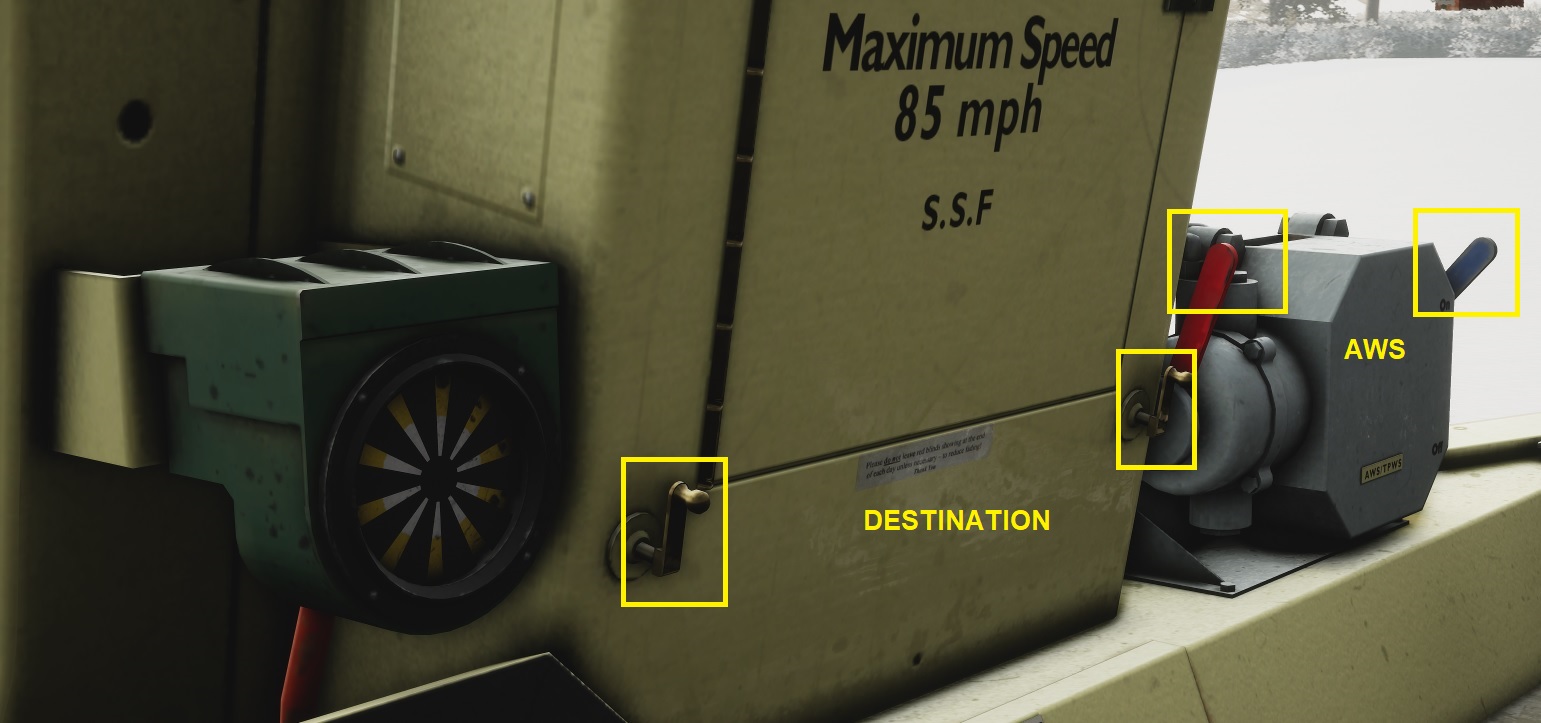
On Class 33 you can change the destination codes using the small levers on the cab panel, next to the AWS controls.
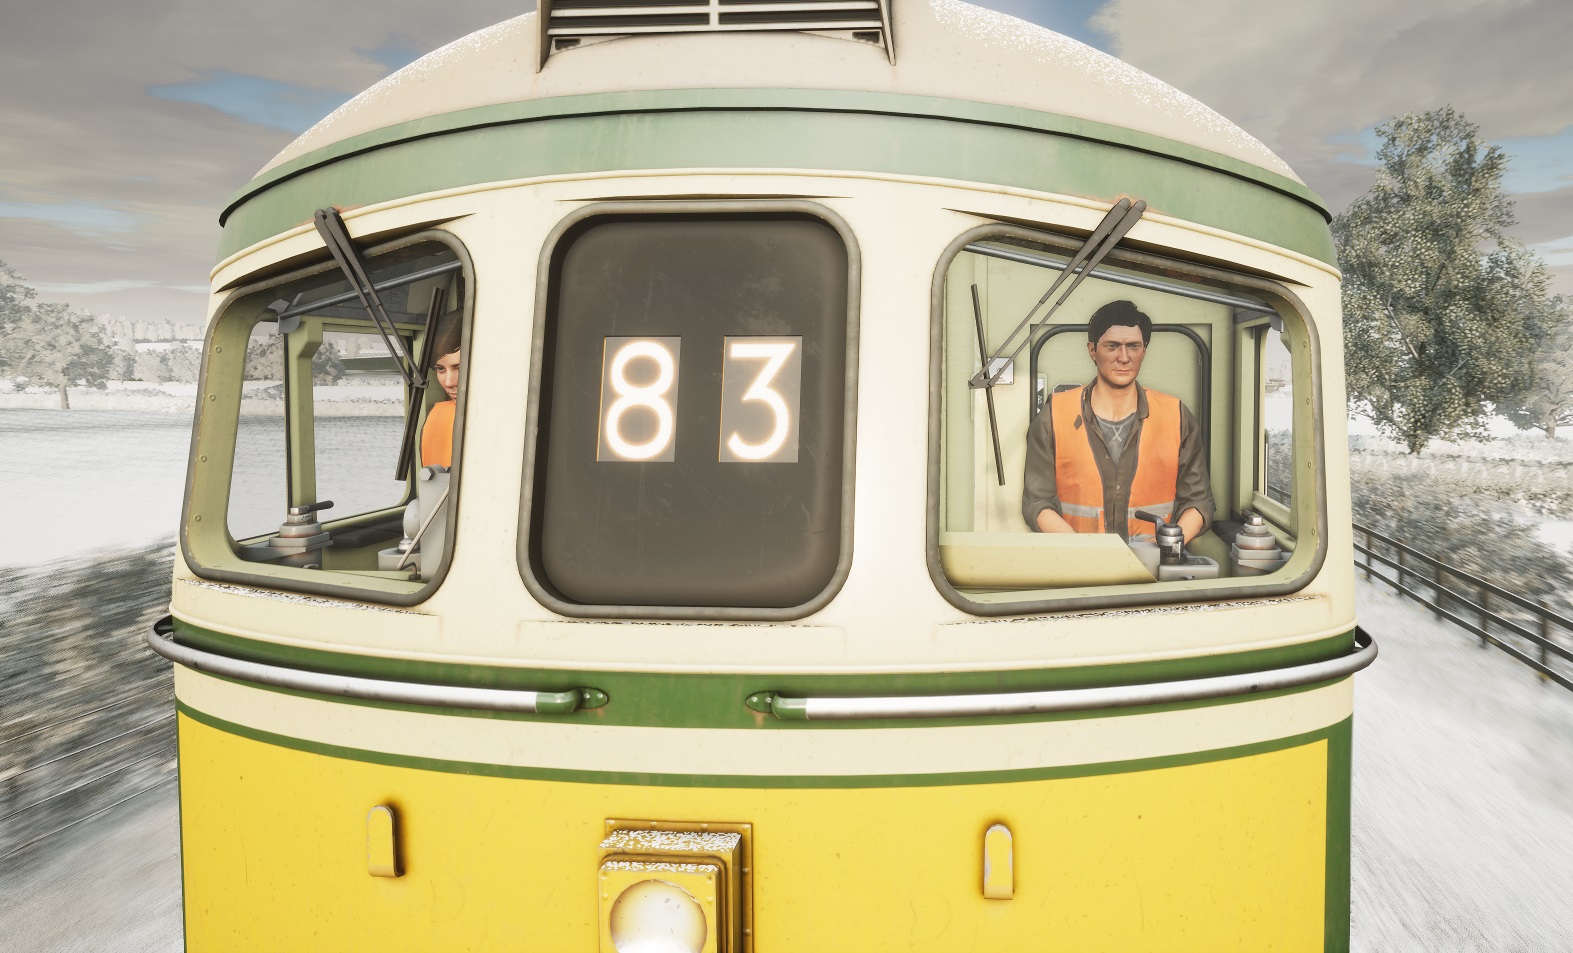
German locomotives use displays or a console in the BR146 case to configure them.
Special features
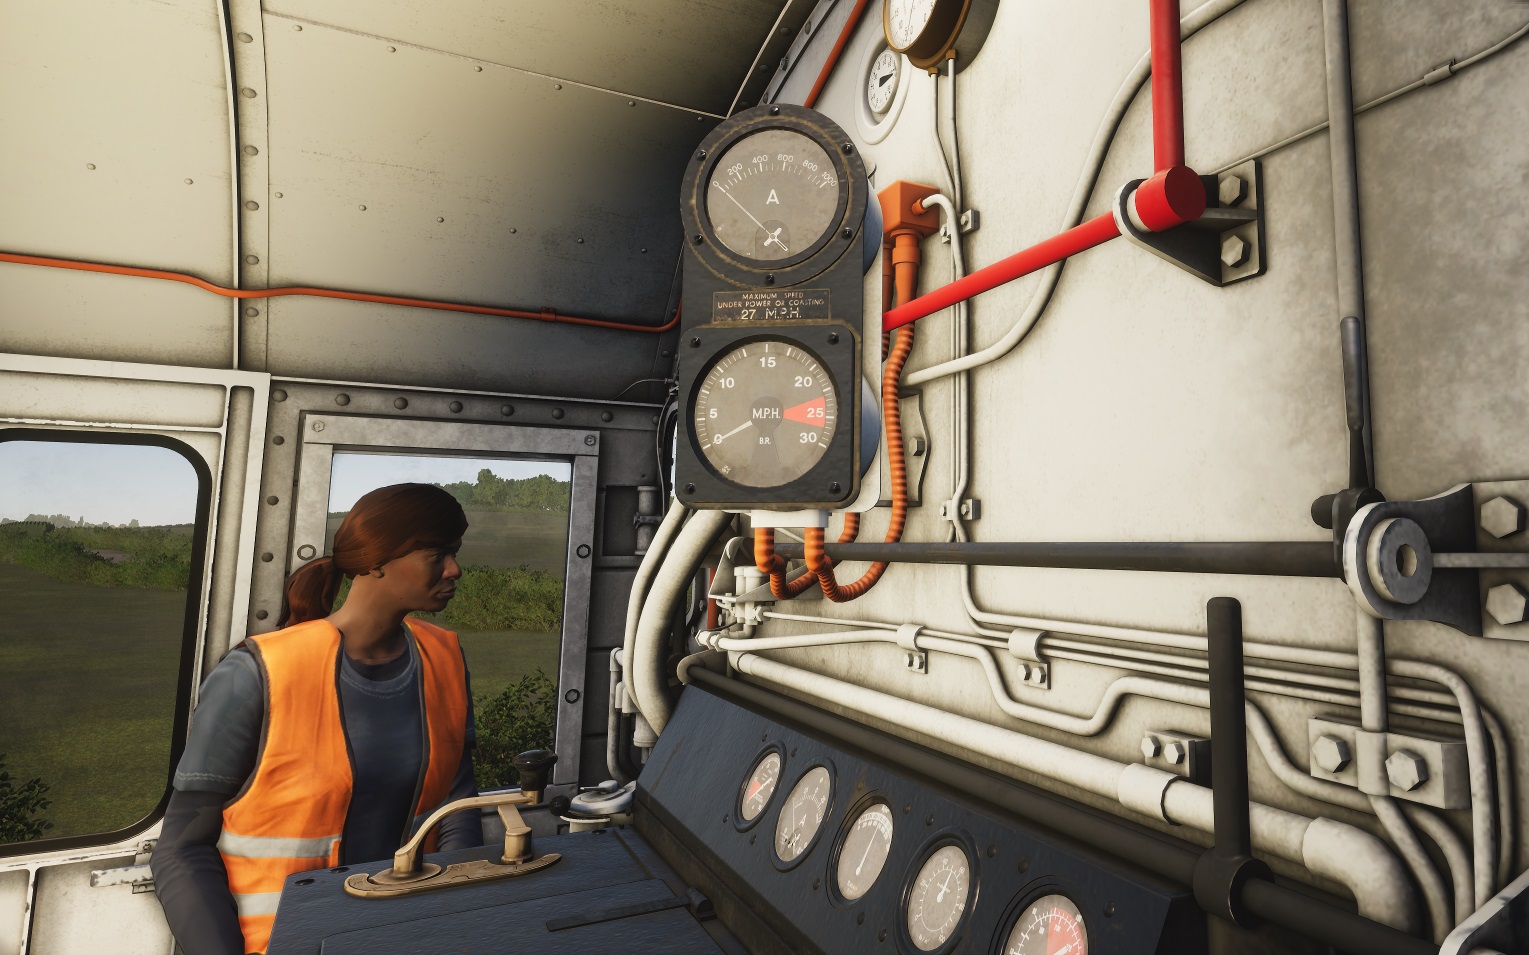
Class 09 has a couple of extra features. First one is the rotation of cab´s gauges to allow using both driving seats and directions. Simply click on them to do it. The other is the activation of position lights from outside the cab by clicking on them.
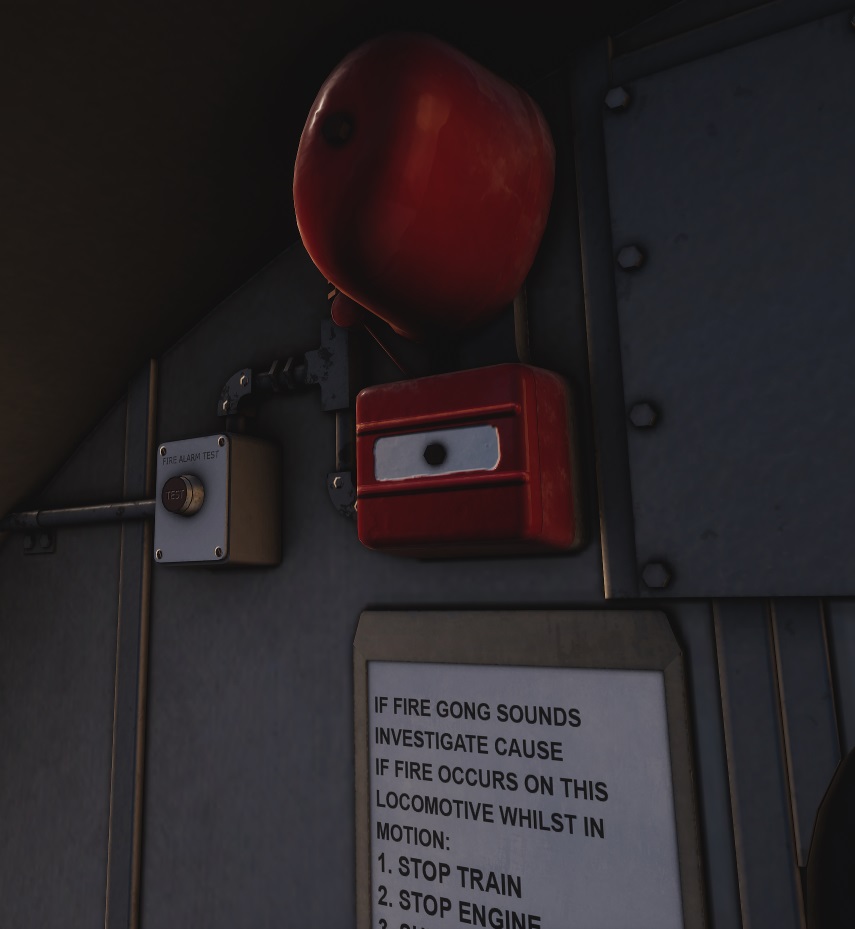
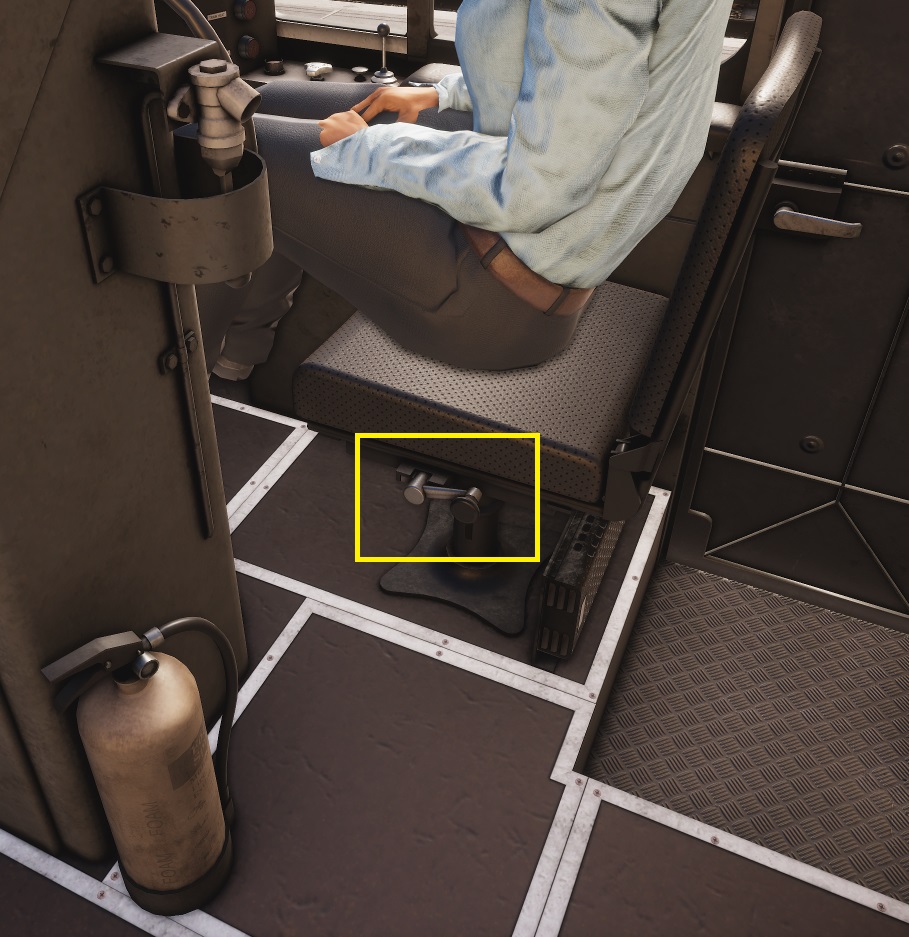
Class 45 has a few extra features. First one is the battery main switch, which is located on the side of the locomotive instead of inside the cab. Next is the fire alarm test that actually rings the bell in the cab. Last one is the option to change driver´s seat height, which also changes your POV in the simulation allowing you to have a better sight from the driver´s seat.

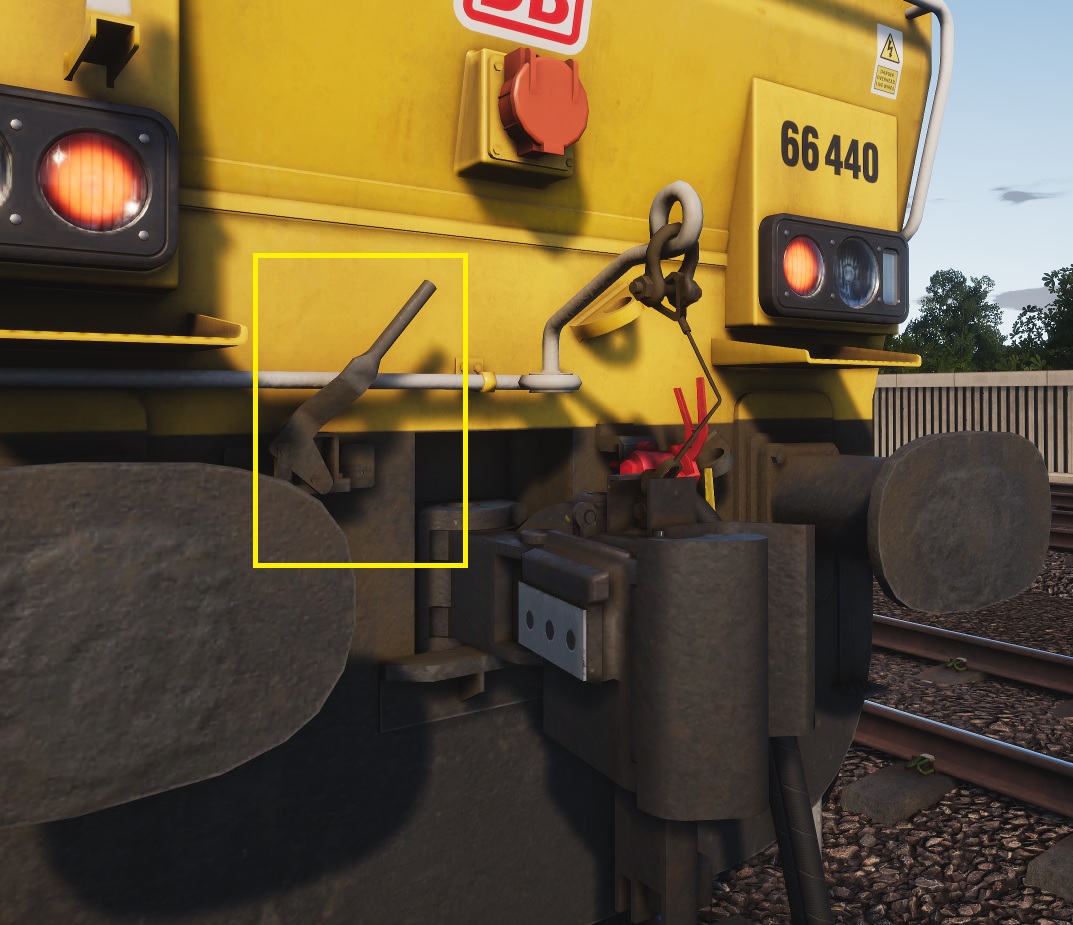
On Class 66 locomotive you can deploy the Buckeye type coupler, by clicking on the lever near coupler area. Click on the coupler itself to change it back to Hook type. This can be used to couple to a Class 43 HST, as seen on the GWE scenarios.

5.1. Braking system
Brakes controls
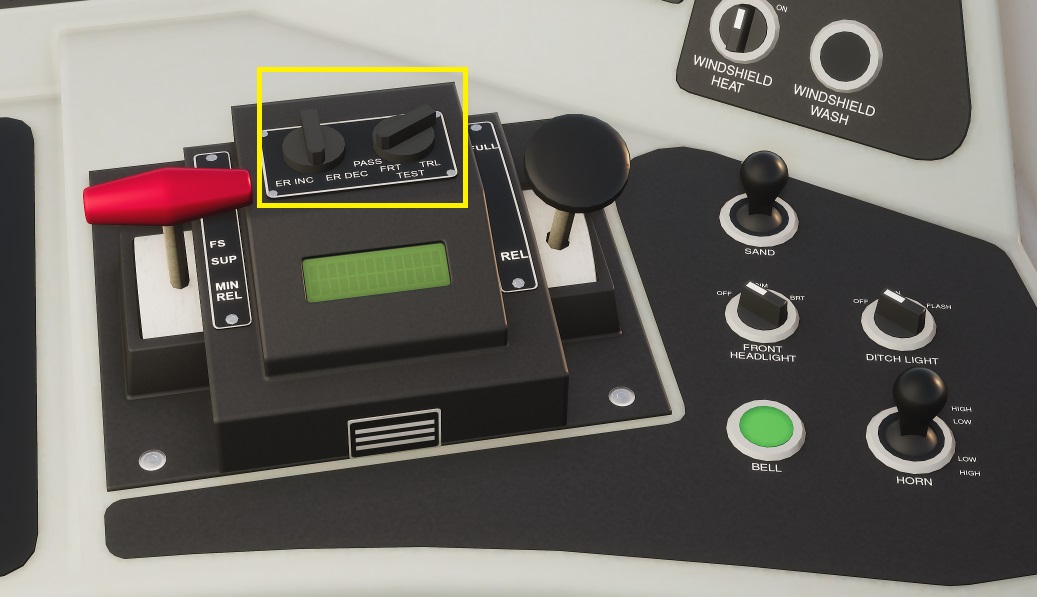
American locomotives have different controls to isolate and set brakes for master/slave operation. In the Amtrak ACS-64 engine a switch is available on the brake handler console. Moving the right selector to the Trail position will isolate the air brakes on the locomotive. In this engine you can also isolate electric brakes using a dedicated switch on the panel behind driver´s seat.

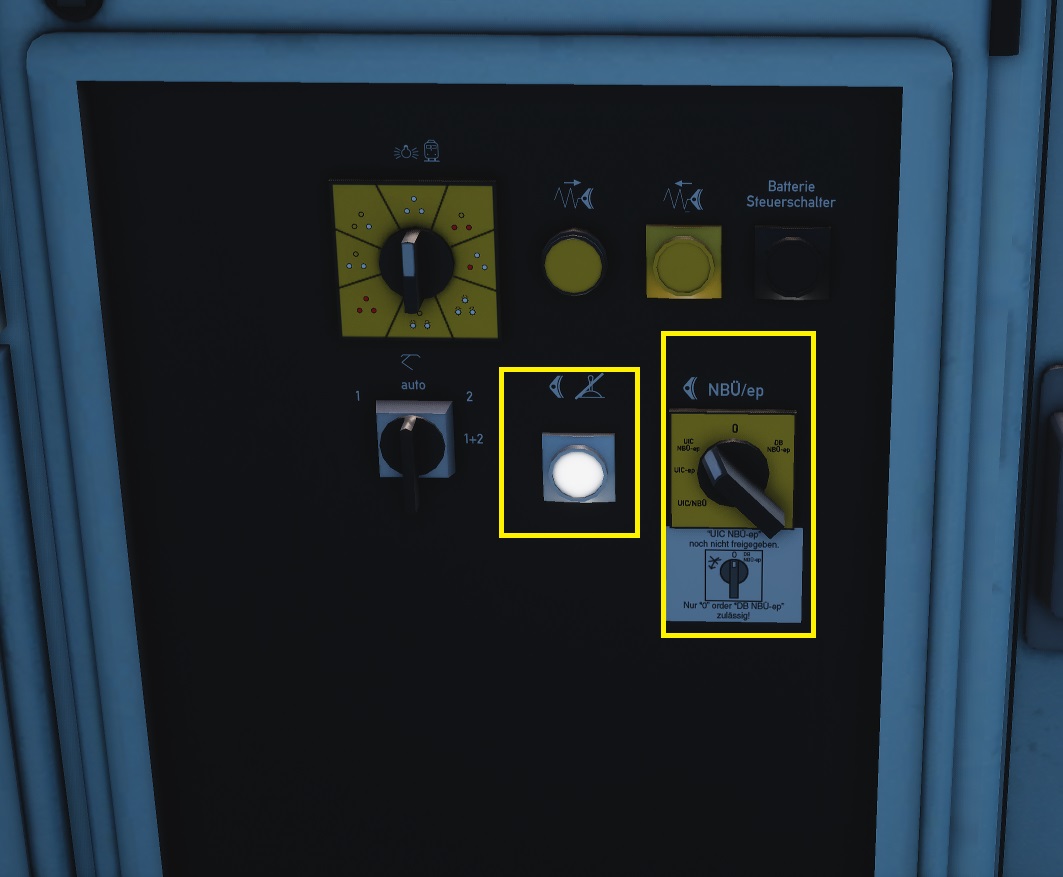
On german locomotives such as BR146 and BR185 the electric brake can be isolated with a pushbutton at the panel behind driver´s seat. Brakes types can be also configured between standard or UIC using the right side switch.
Dual braking system
One of the most relevant features on many british locomotives is the dual braking system. It is configured with a switch in the cab and the correct setting needs to be used for every new service, including the brake type (vacuum or air) and the consist type (passenger or goods).
When two locomotives are used in tandem or banking in the train consist both need to use the same braking system setting as well.
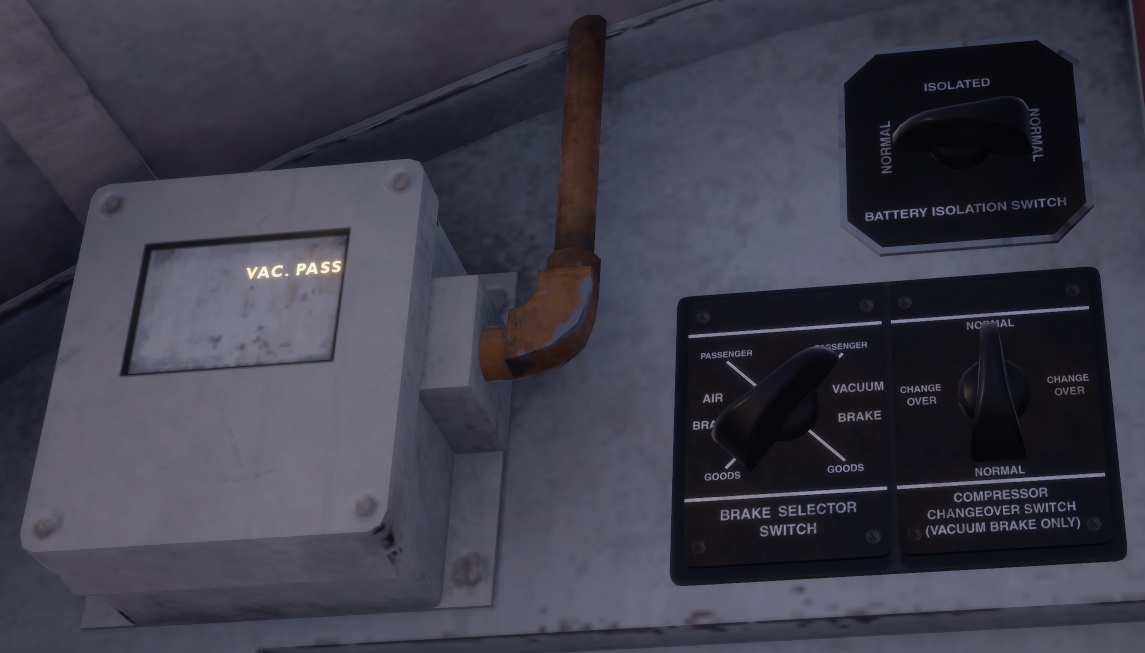
Normally the vintage wagons like the MK1 and the small vans use the vacuum type, while the modern ones like the MK2 and most of the freight wagons use the air type. Others like the mail wagons in NTP route have both brake systems.
In the cases where wagons are fitted with a dual system too we need to set the brake type in the locomotive selector before coupling in order to activate one or the other. If wrong brake type is selected in the locomotive or if it´s changed after coupling to a dual system consist then the train brakes won´t work. Take into account that even if a dual system is available in some vagons we have to use the system which is compatible with the whole set of wagons that will be coupled to our locomotive.
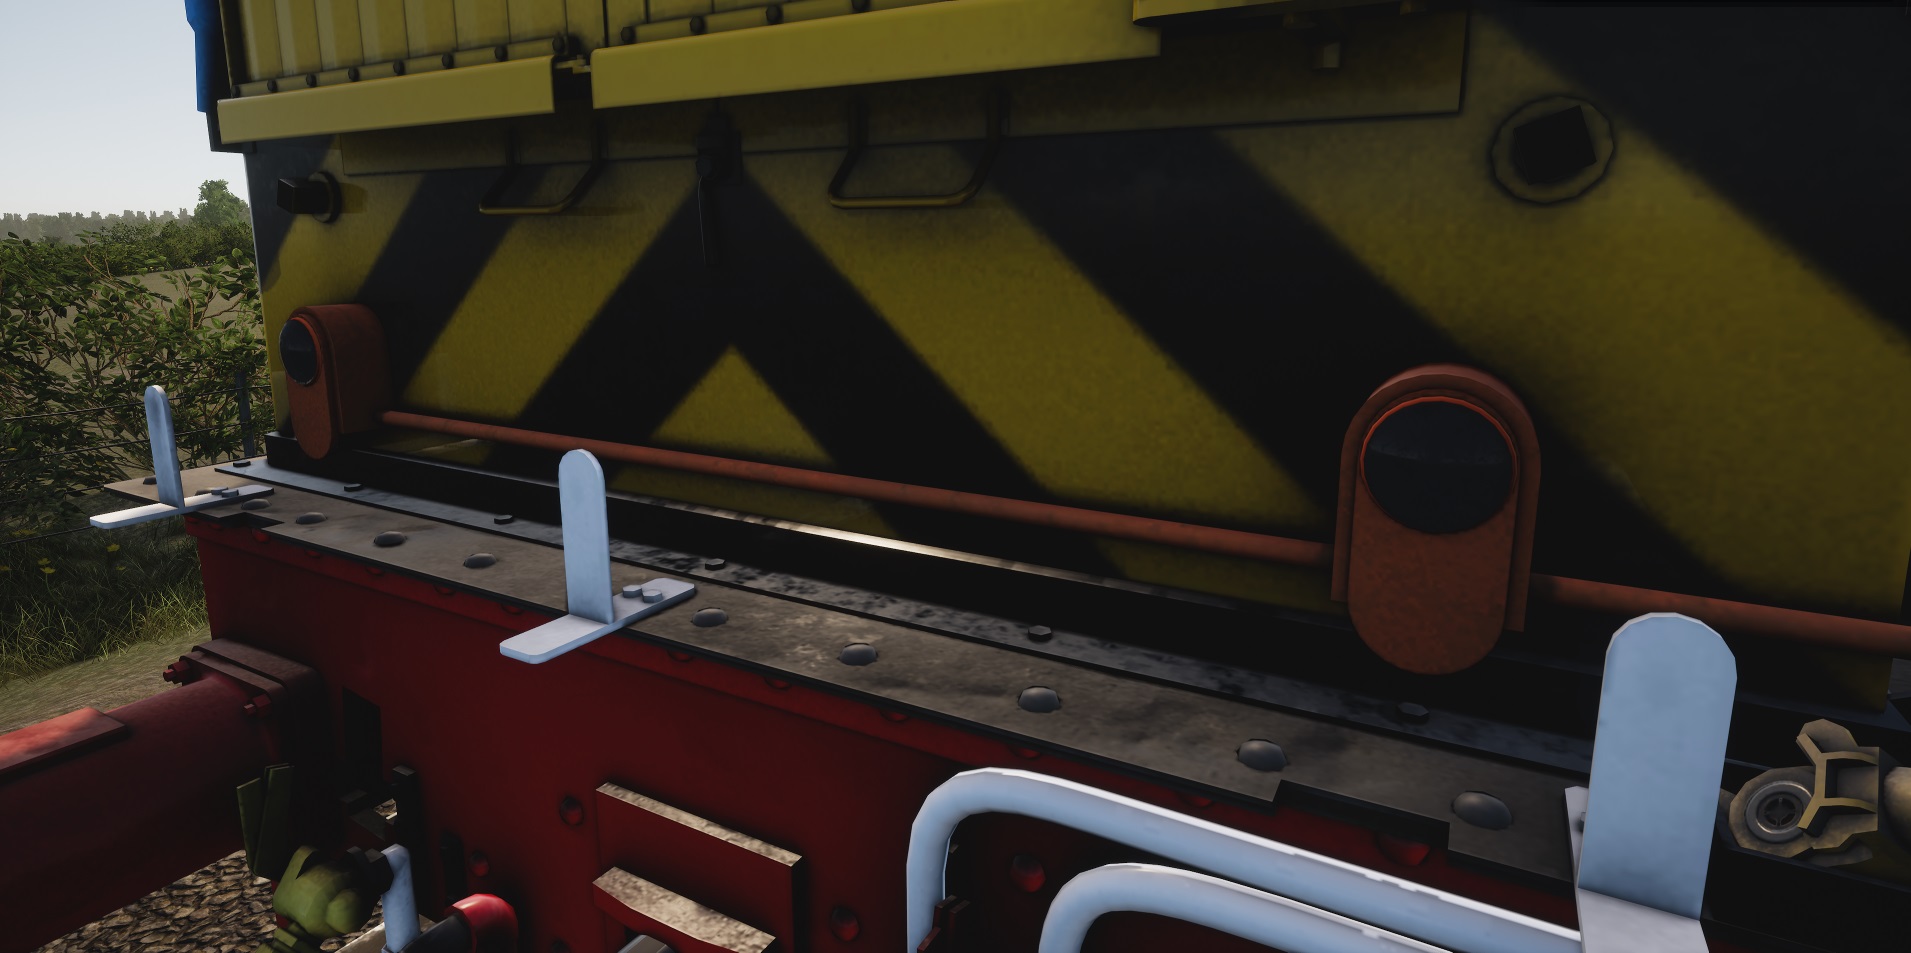
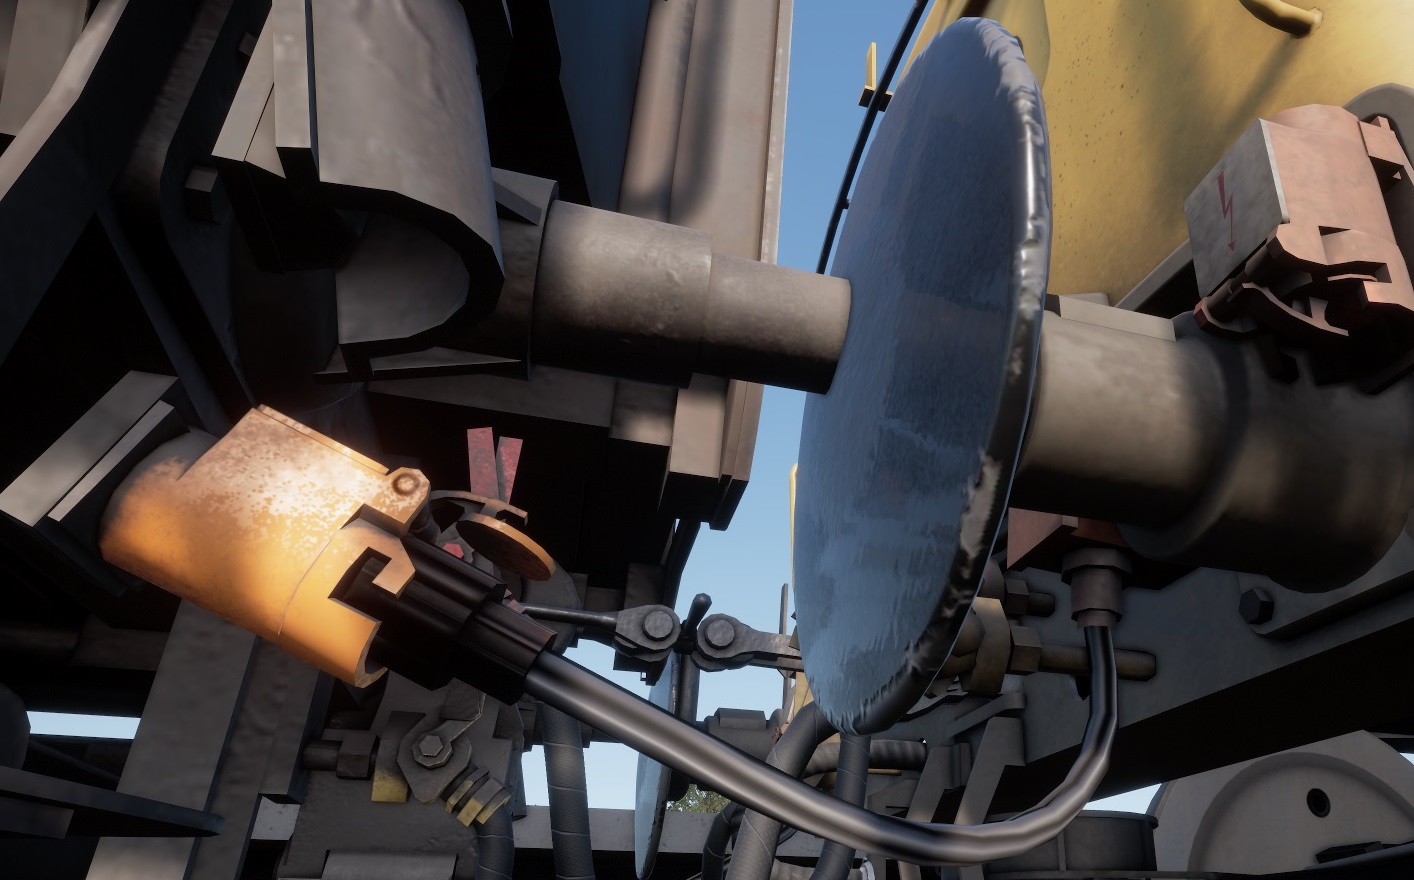
In order to determine the correct brake configuration for our service we need to observe the brake system hoses. In the next example we can see the coupling area from a class 08 shunter. On the left side of the coupler we have the vacuum type hose and on the right side the air type hoses.
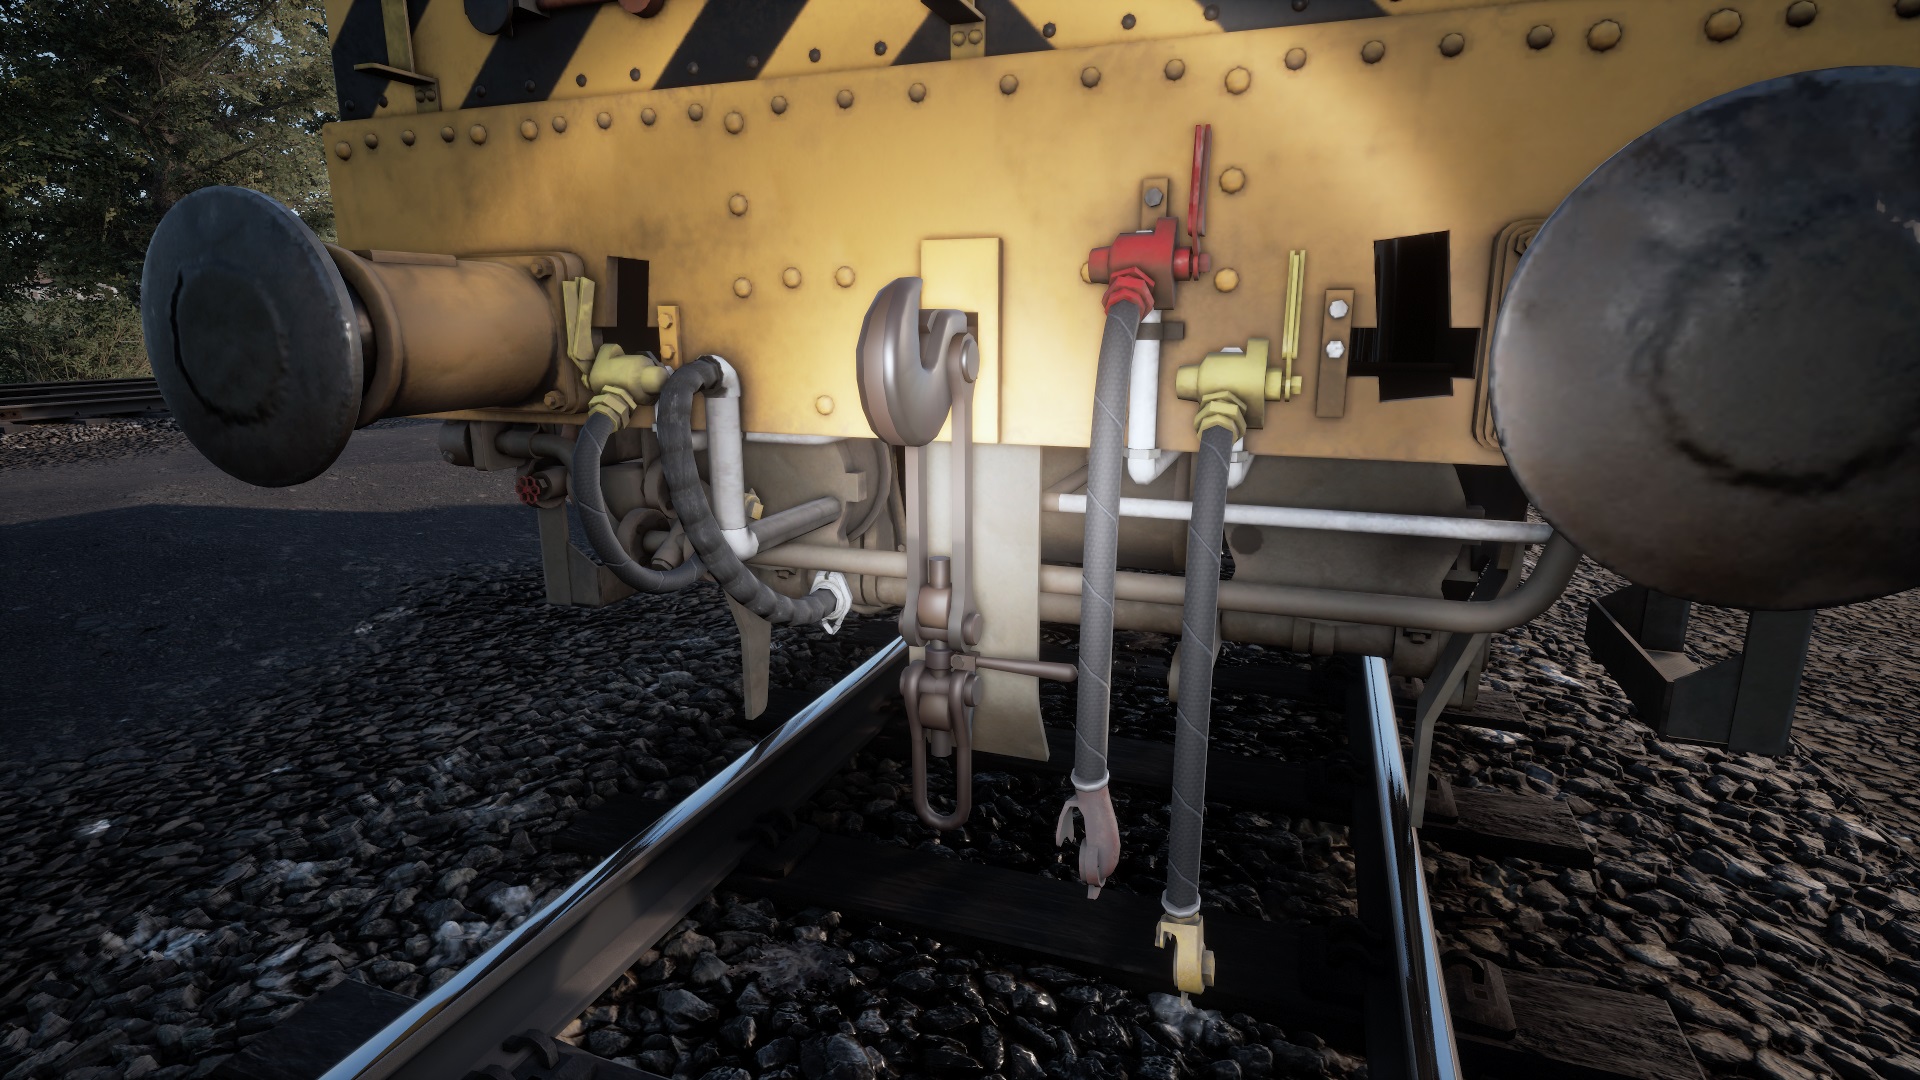
Vacuum brake hose
It has a frontal connection and the hose connector is usually grey.
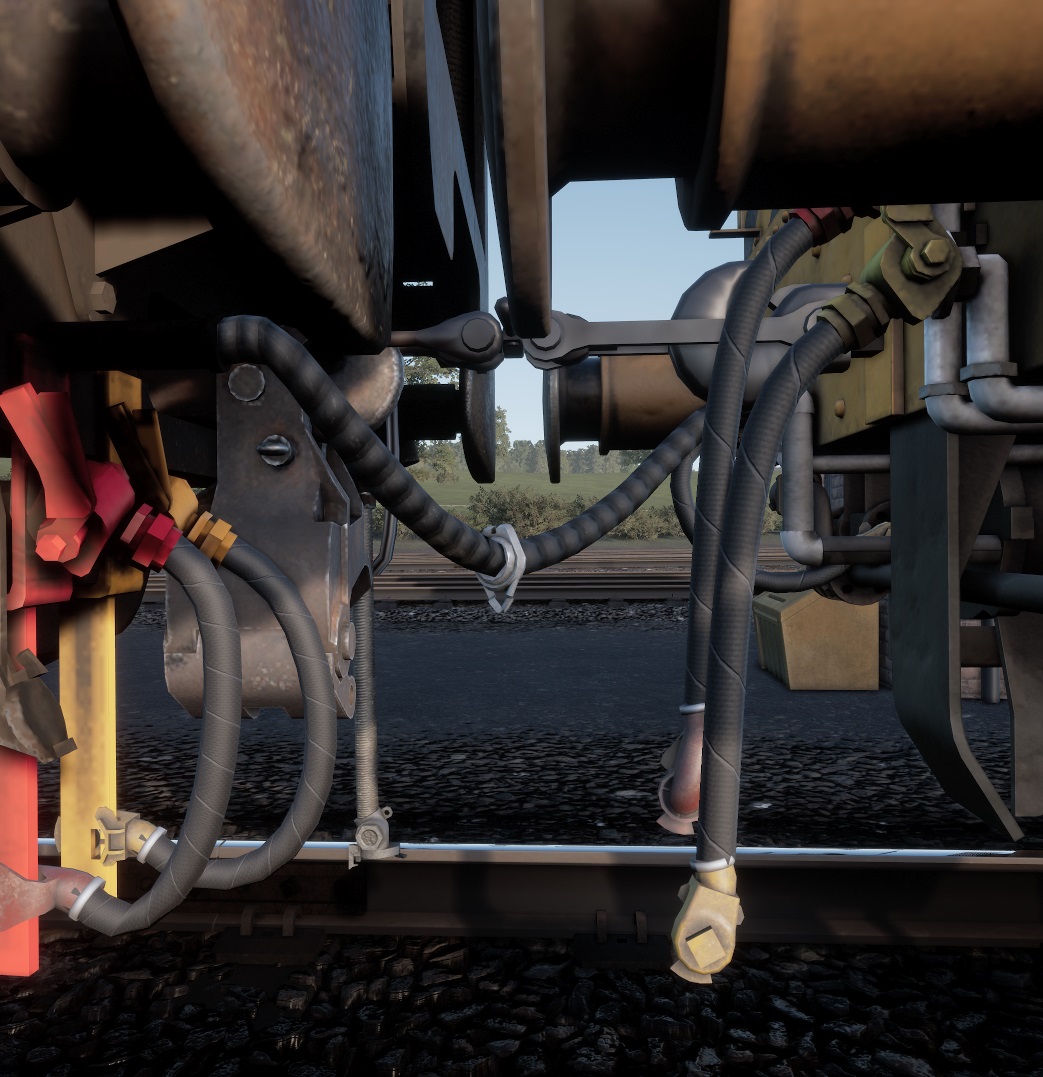
Air brake hose
It has a lateral connection (handshake shape) and the hose connectors are usually red (control hose only) or red and yellow (control hose and fast charge hose).
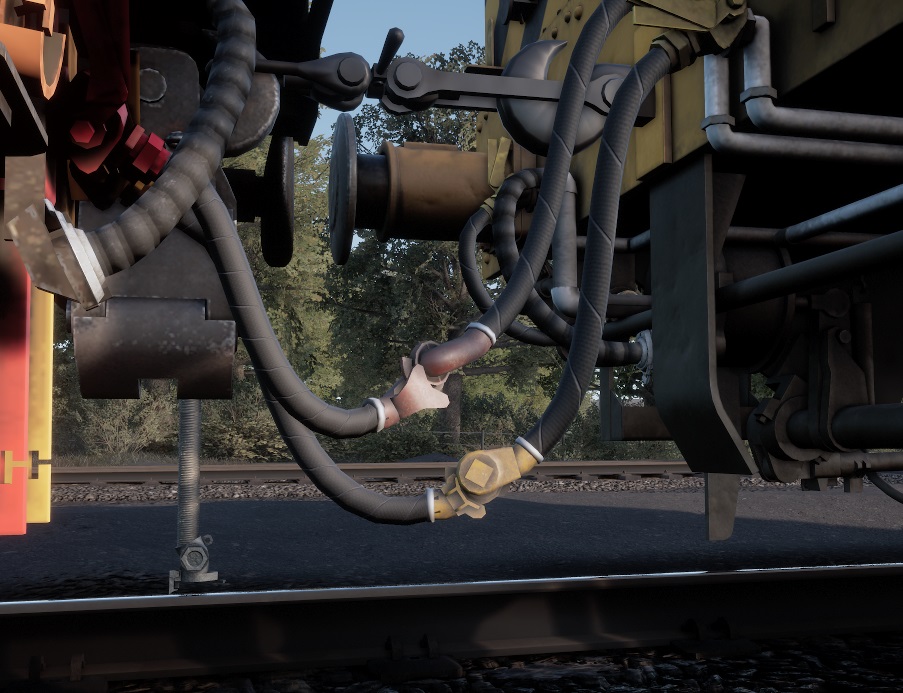
Power supply hose
Some consists use an additional power supply hose to get energy from the locomotive generator to feed the heating and lights in the consist. That one should not be confused with the air brake hoses, as it is also yellow in some cases but its connector is different and normally ends in an electrical box, as seen in the following example from the class 47.
Brakes overcharge
Sometimes the brake valve of a vehicle does not set the operating pressure exactly as the one of another vehicle, as the brake valves have some tolerances. Therefore after coupling/decoupling or starting a service brakes may not be fully released or even remain partially applied while driving, indicating that brakes need to be calibrated. To handle this some modern engines such as BR146 implement brake overcharge controls in the driver´s desk that momentary feeds brakes with a small amount of extra pressure forcing all reservoirs to unlock and allowing brakes to be properly released on the whole train. Older engines like class 47 have a special position in the train brake lever that must be held to perform the overcharge.
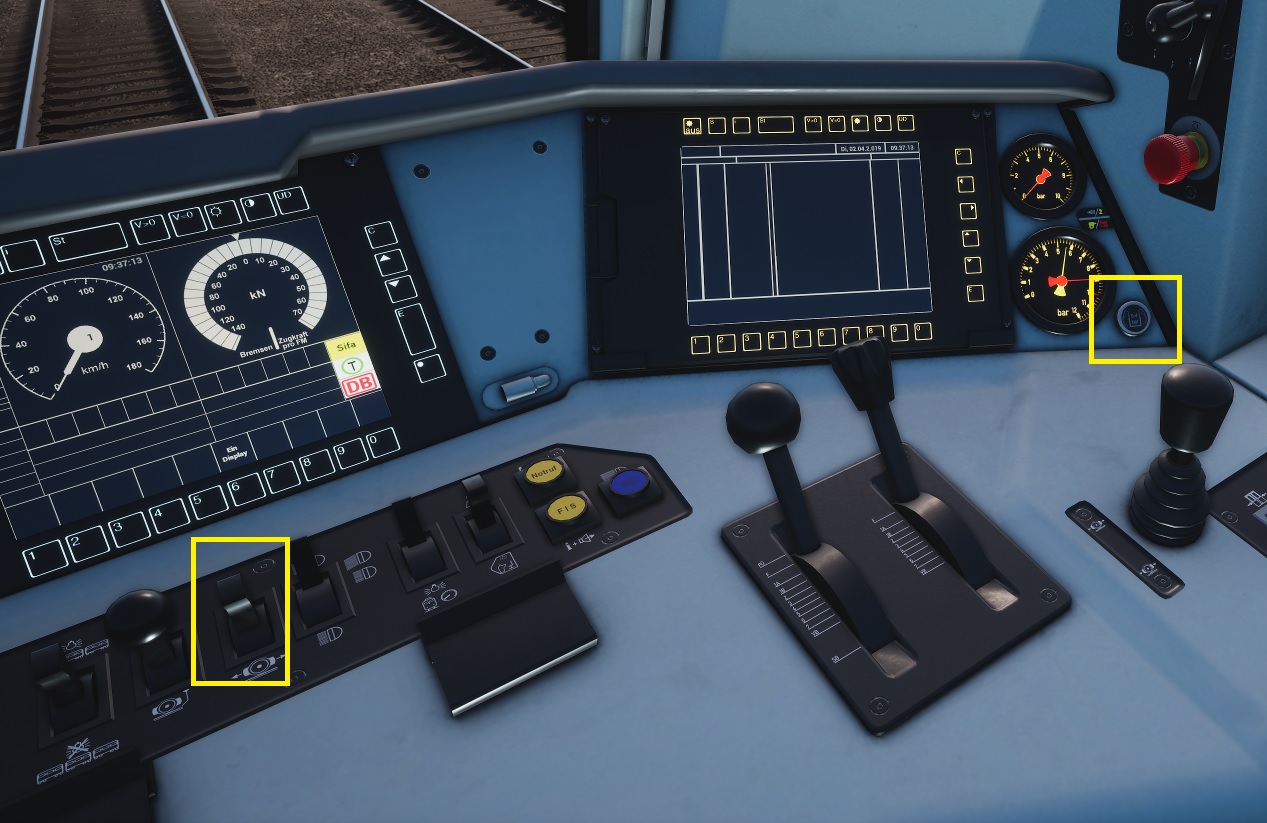
The procedure the following:
- If train is at standstill apply parking brake to prevent train movements
- Move brake lever to release position
- Overcharge brakes until brake pipe is above the nominal pressure (typically 5 bar)
- Return brake lever to release position (if required)
- Wait until brake cylinders pressure indicates that brakes are fully released
- Wait until brake pipe reaches the nominal pressure again
If for some reason brakes need to be applied before overcharge is finished the procedure will need to be repeated the next time brakes are released again.
This procedure is not required when using vacuum brakes as the calibration is done by pulling the manual release valves on each vehicle, which is normally done by maintenance staff. If the overcharge position is available it allows a faster vacuum brakes releasing.
5.2. American locomotives
Cold engine start procedure
In order to turn on engine on a cold start you have to select the start position on the engine switch in the cab.
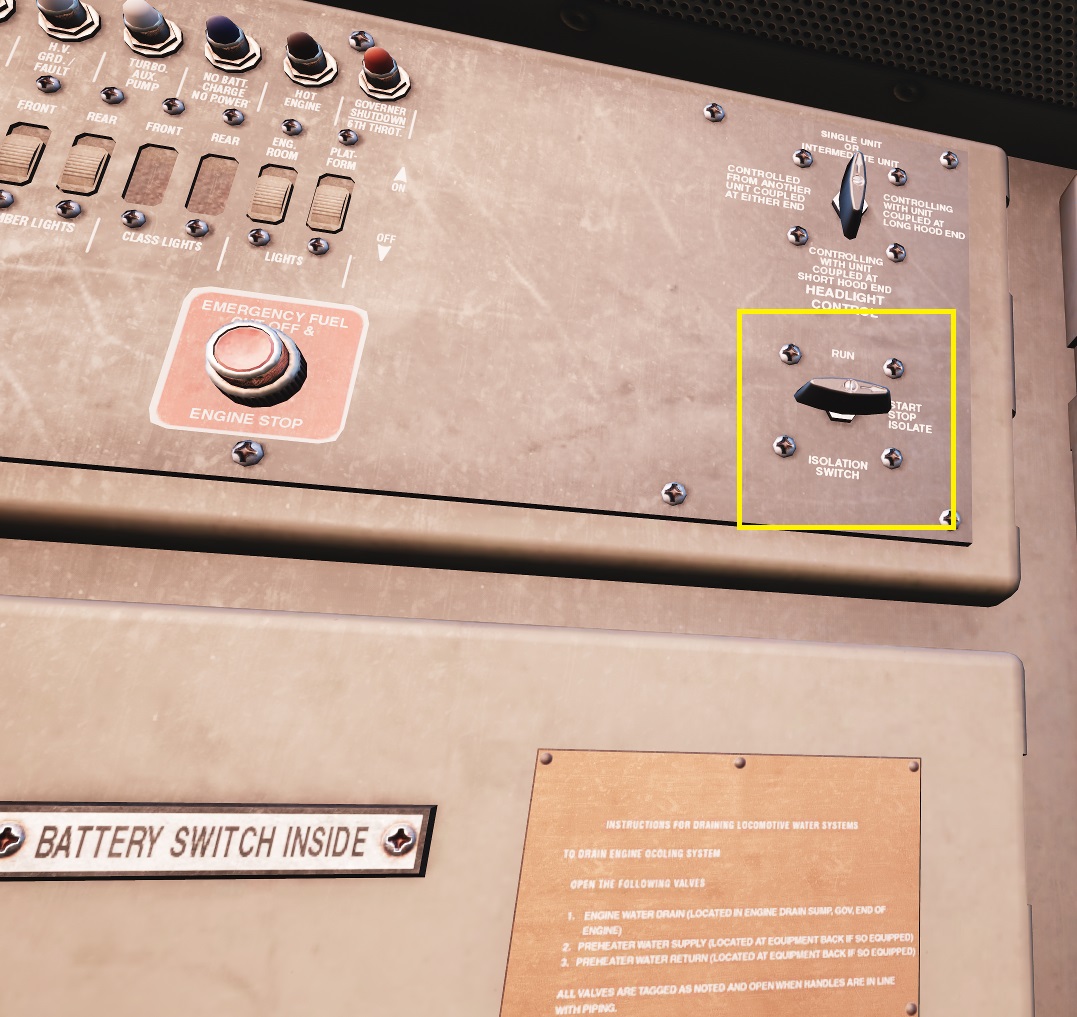
Then use the lock in the engine room door to open it and access the engine.

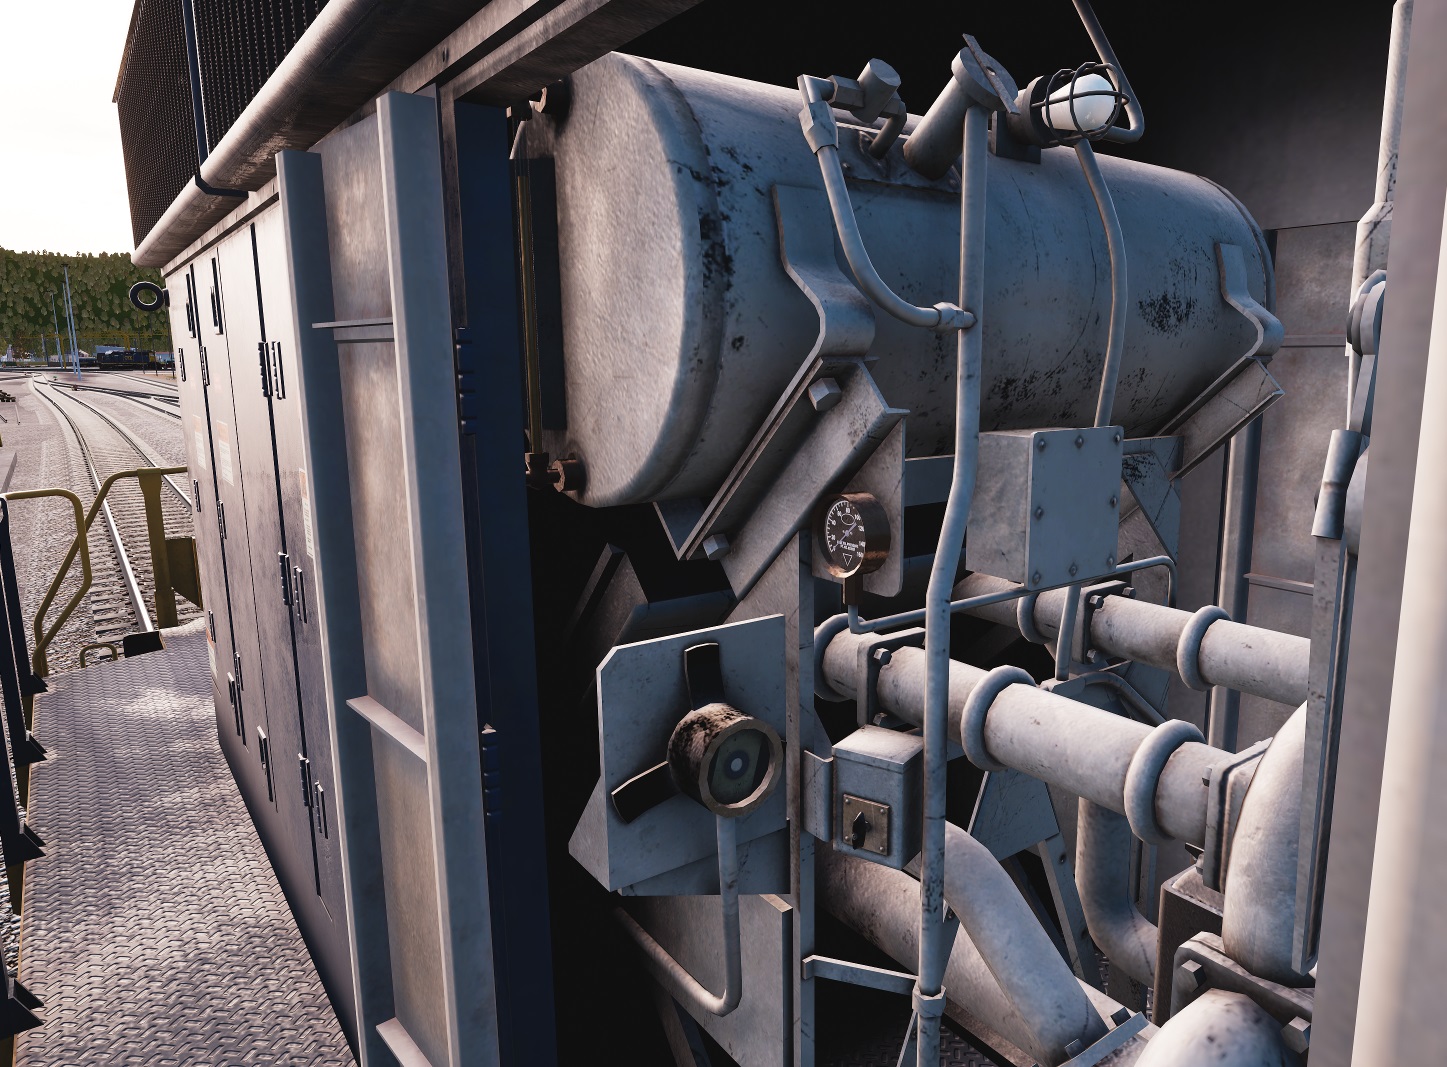
You will need to prime the engine moving and holding the engine switch to its left position during at least 5s and then start it by moving it to the right. You can also use the governor lever to accelerate the engine to help engine gain r.p.m.
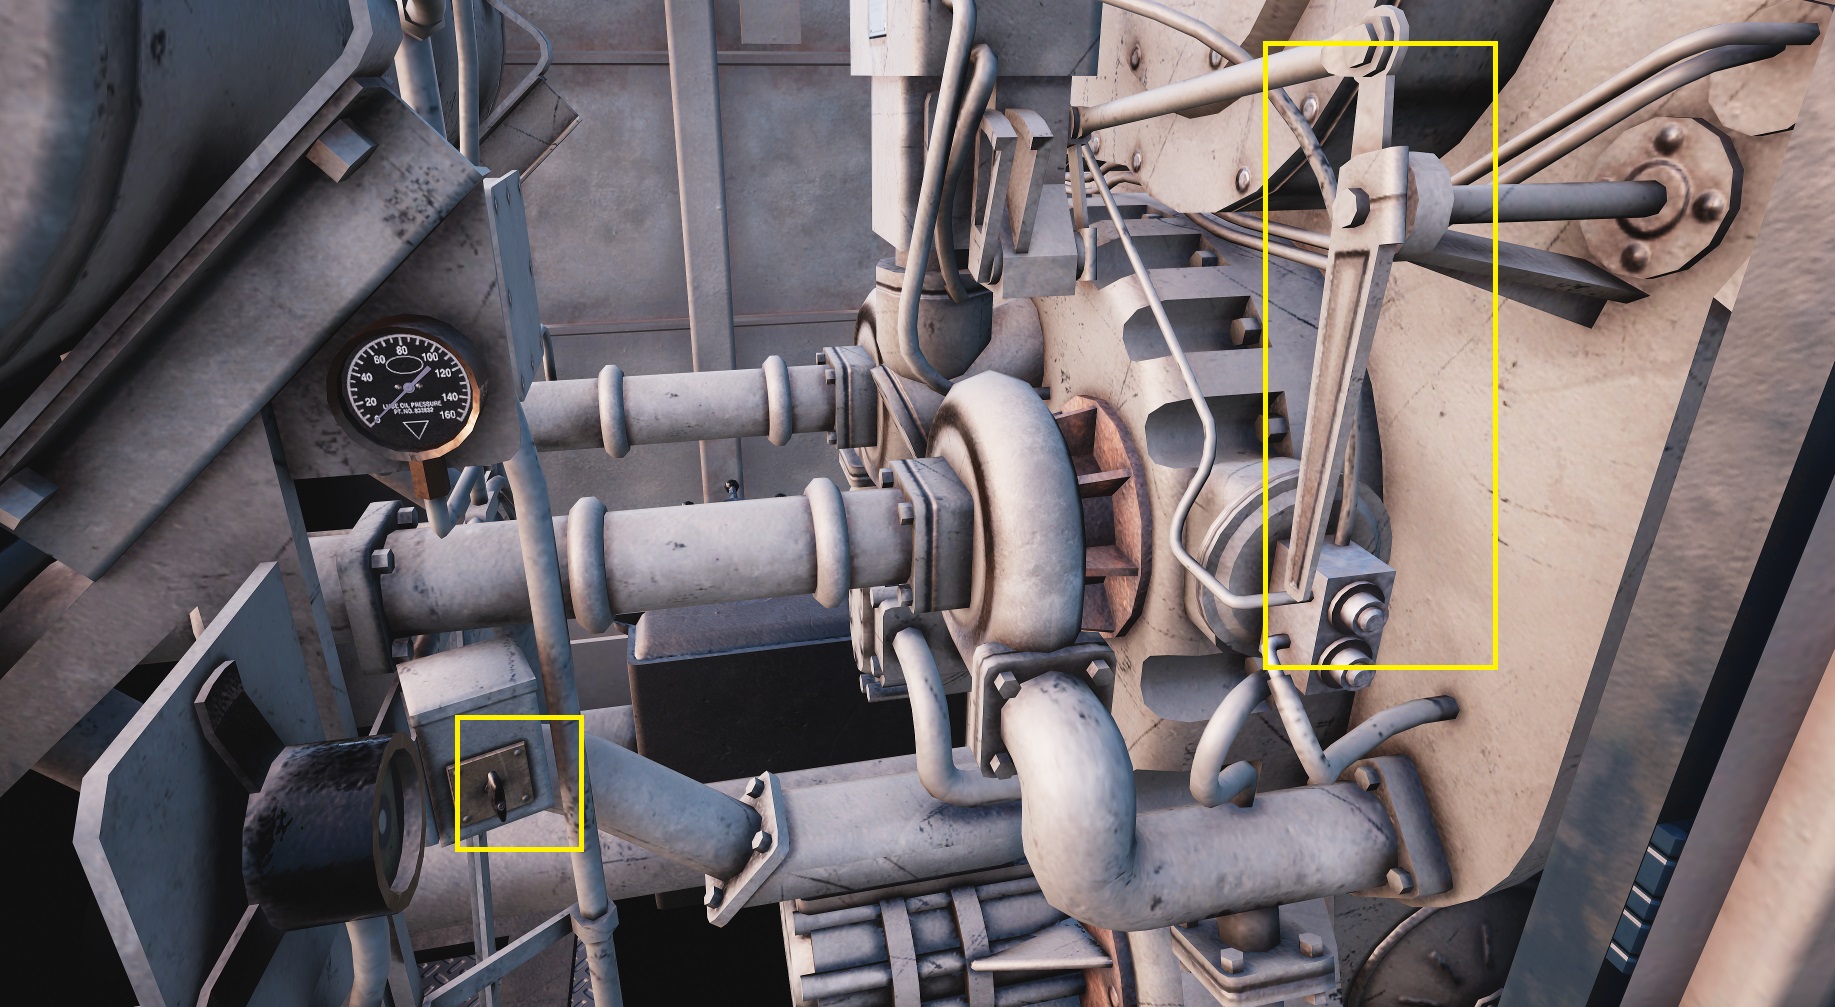
After that you will need to close engine doors, lock them and set the engine switch in the cab position to the normal position.
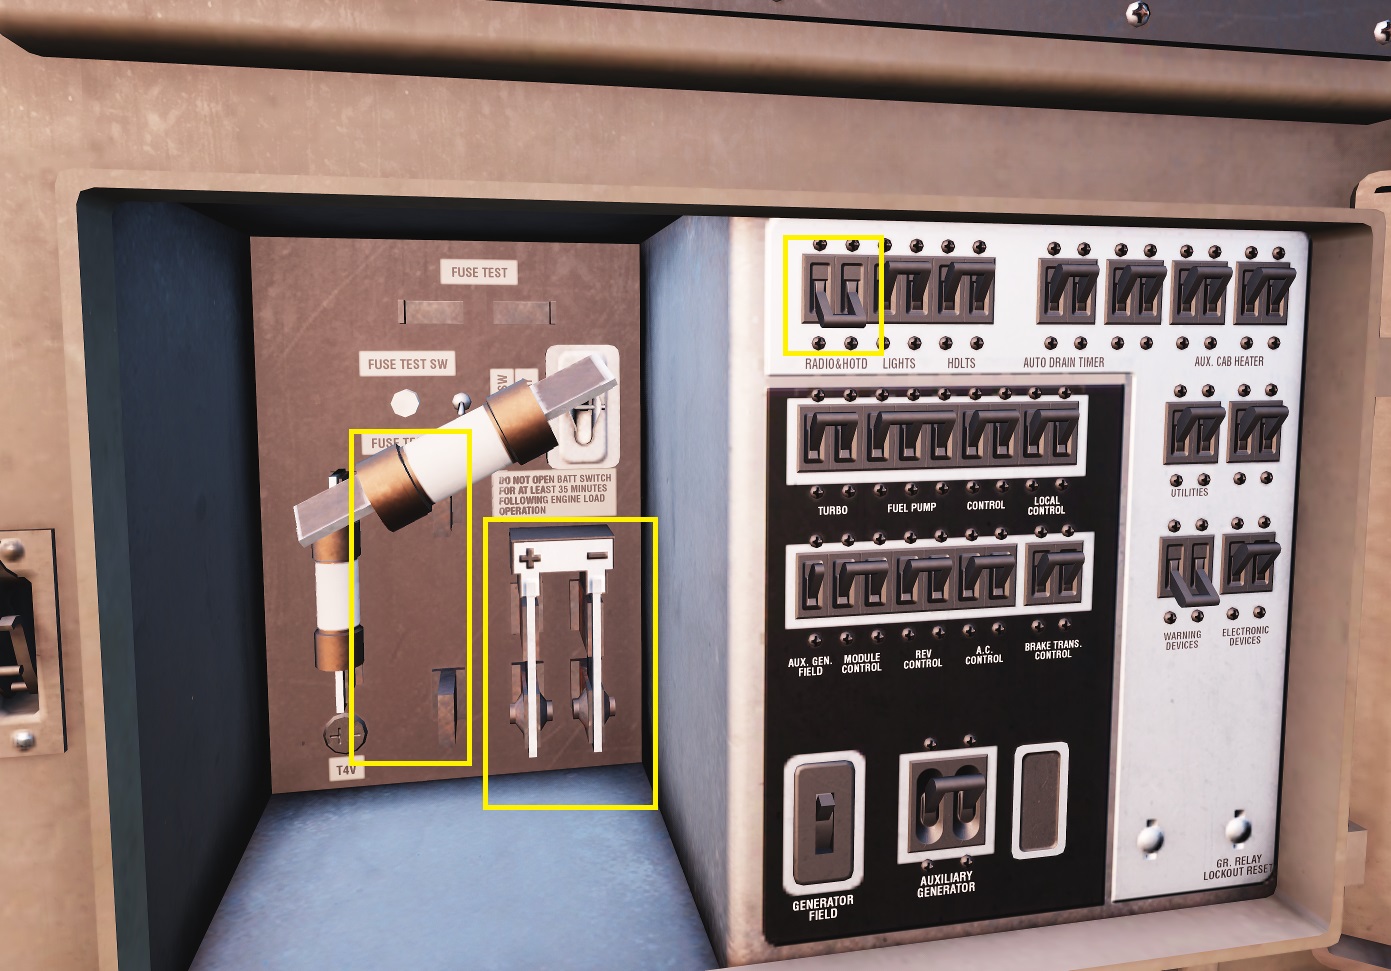
Electrical panel
Electrical panel has some nice features, like a fuse test. You can control battery main switch plus rest of switches from it. One important switch is the “Radio and HoT” one, needed for distributed traction configurations, as described in the next sections. Each locomotive has different panels on the cab.
Train integrity
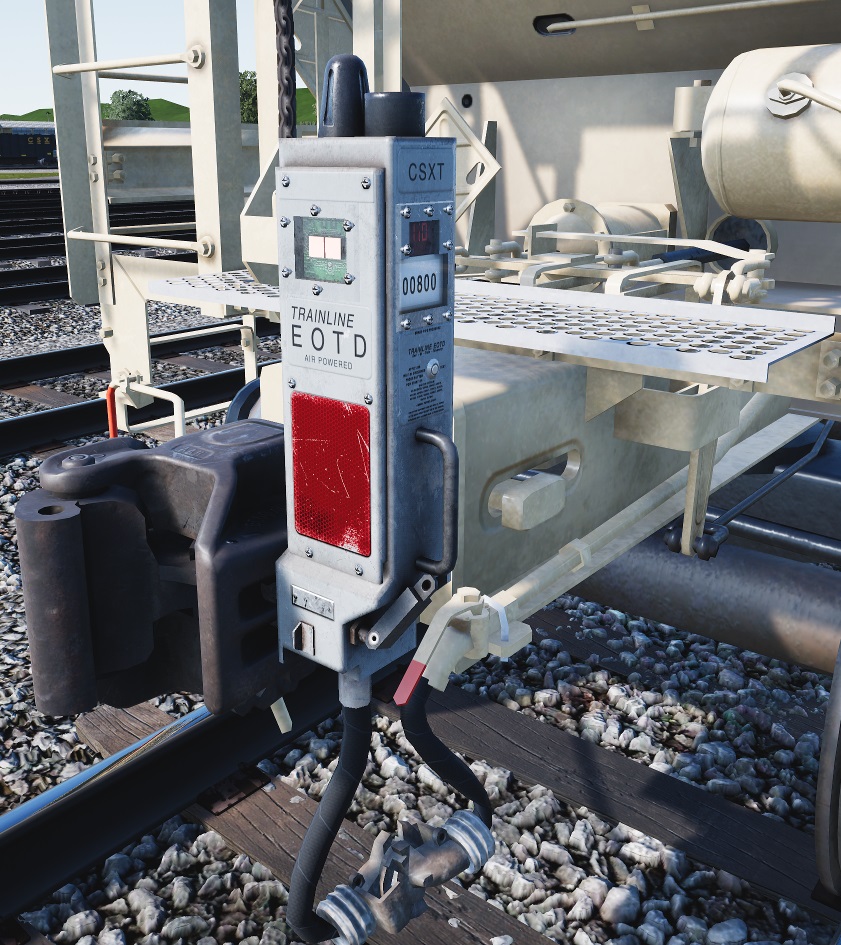
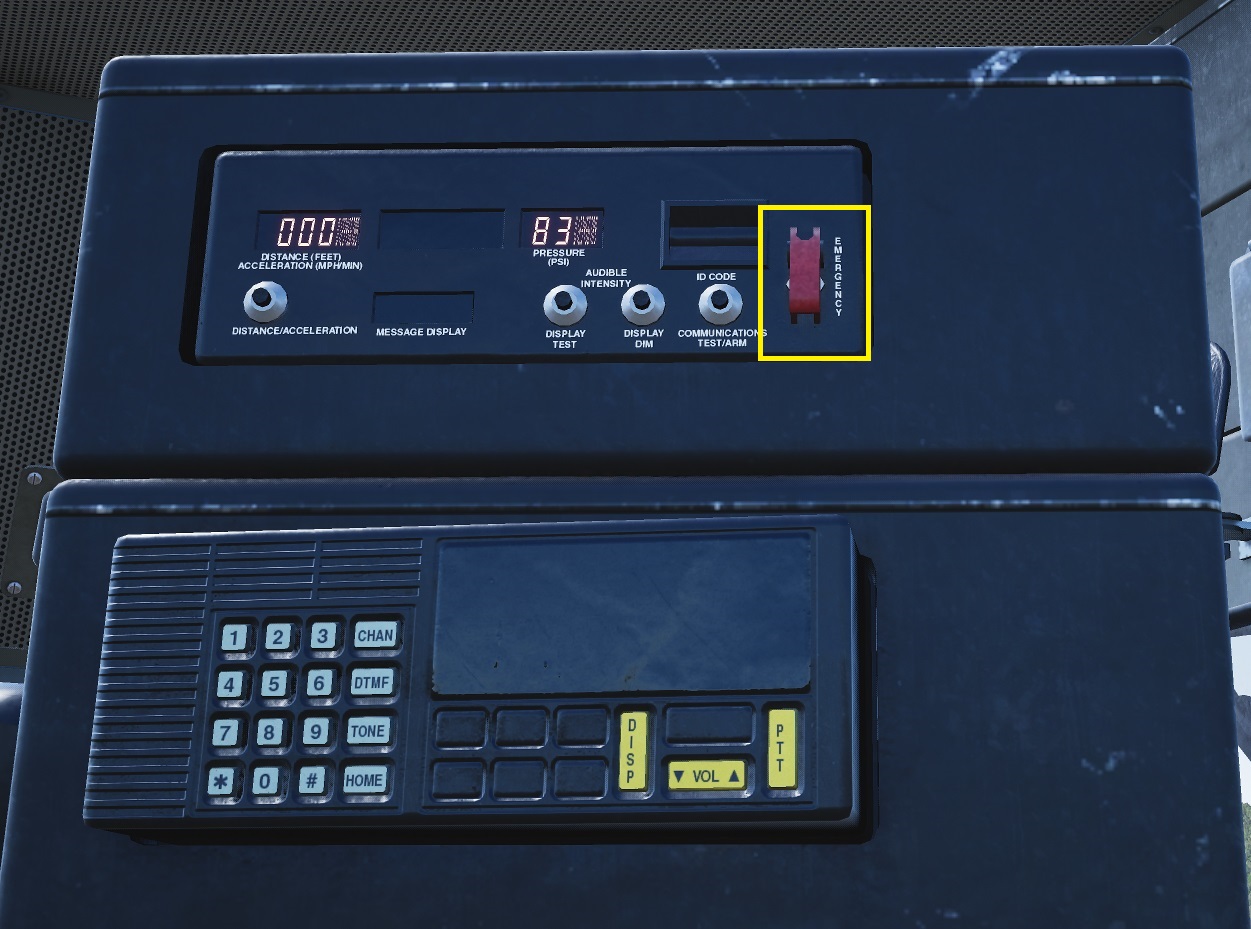
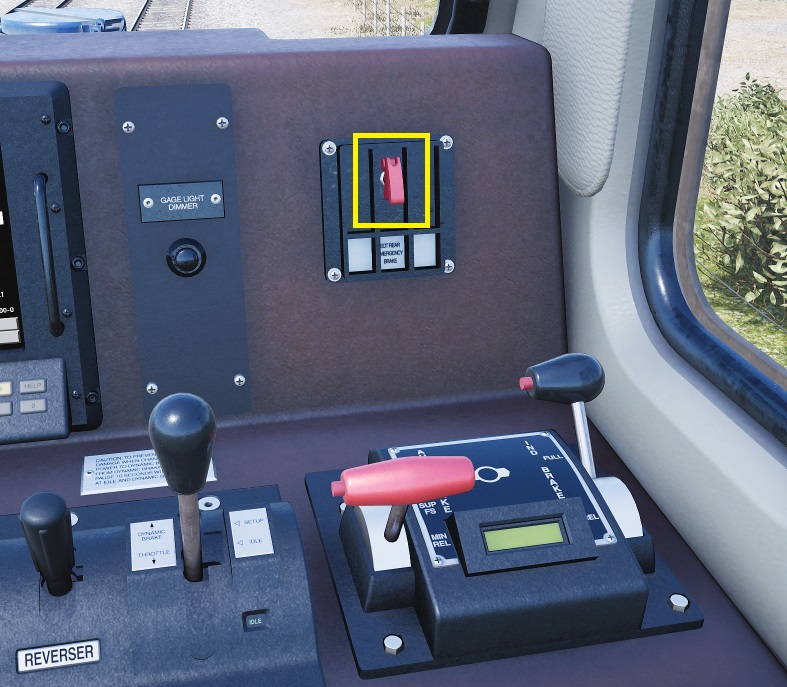
The radio switch also enables the Head of Train/End of Train radio link (HoT/EoT), used for train integrity monitoring. The EoT device is placed on the rear of the train and it´s connected to the brake pipe to monitor its pressure. In the game the EoT device is a cosmetic enhancement without any interactive features. But you can apply emergency brakes from a dedicated switch on the HoT device in the cab. This would send an order for EoT to apply emergency brakes and could be used in case of failure on the locomotive emergency brake application controls or to prevent derailment produced by rear wagons pushing the front ones when emergency brake is applied from the head of train by driver, as you can rapidly apply it from the rear of the train via EoT device as well to stop the rear portion of the consist. For this feature to work you need to activate the radio switch in the locomotive electrical panel.
Special features
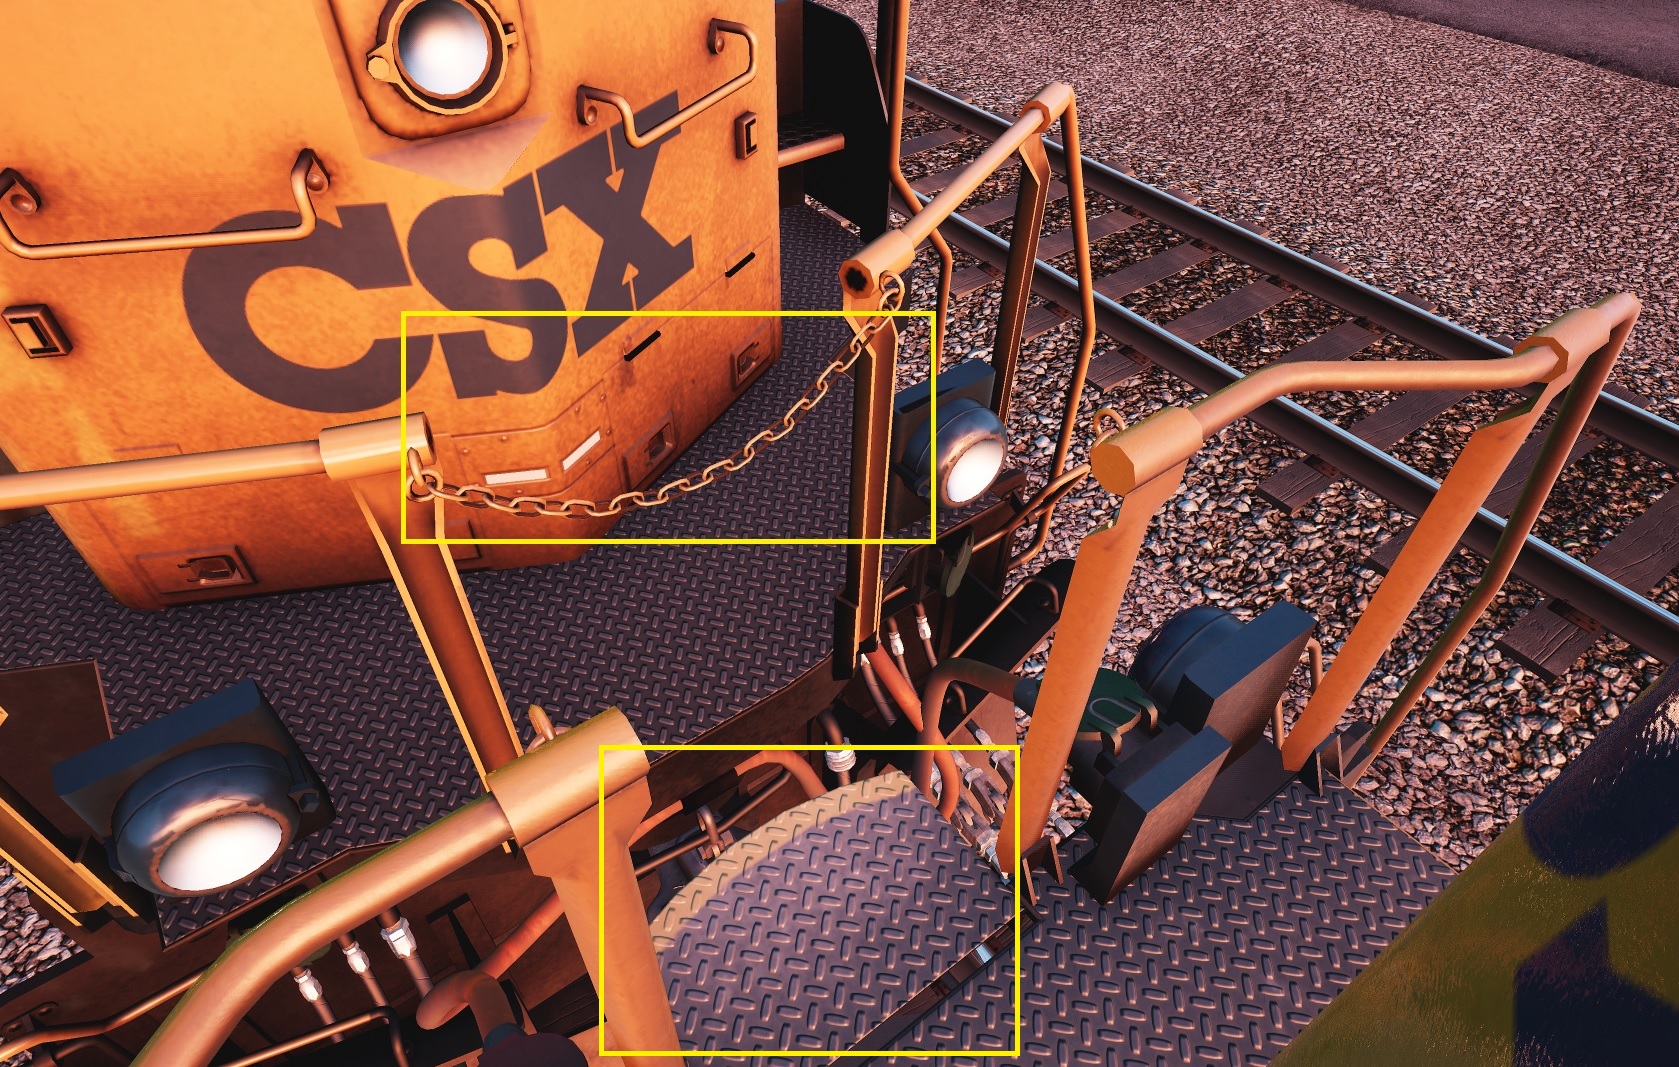
You can use the crossings to move from one locomotive to the other. Click over them to deploy the crossing and then press “E” to cross.
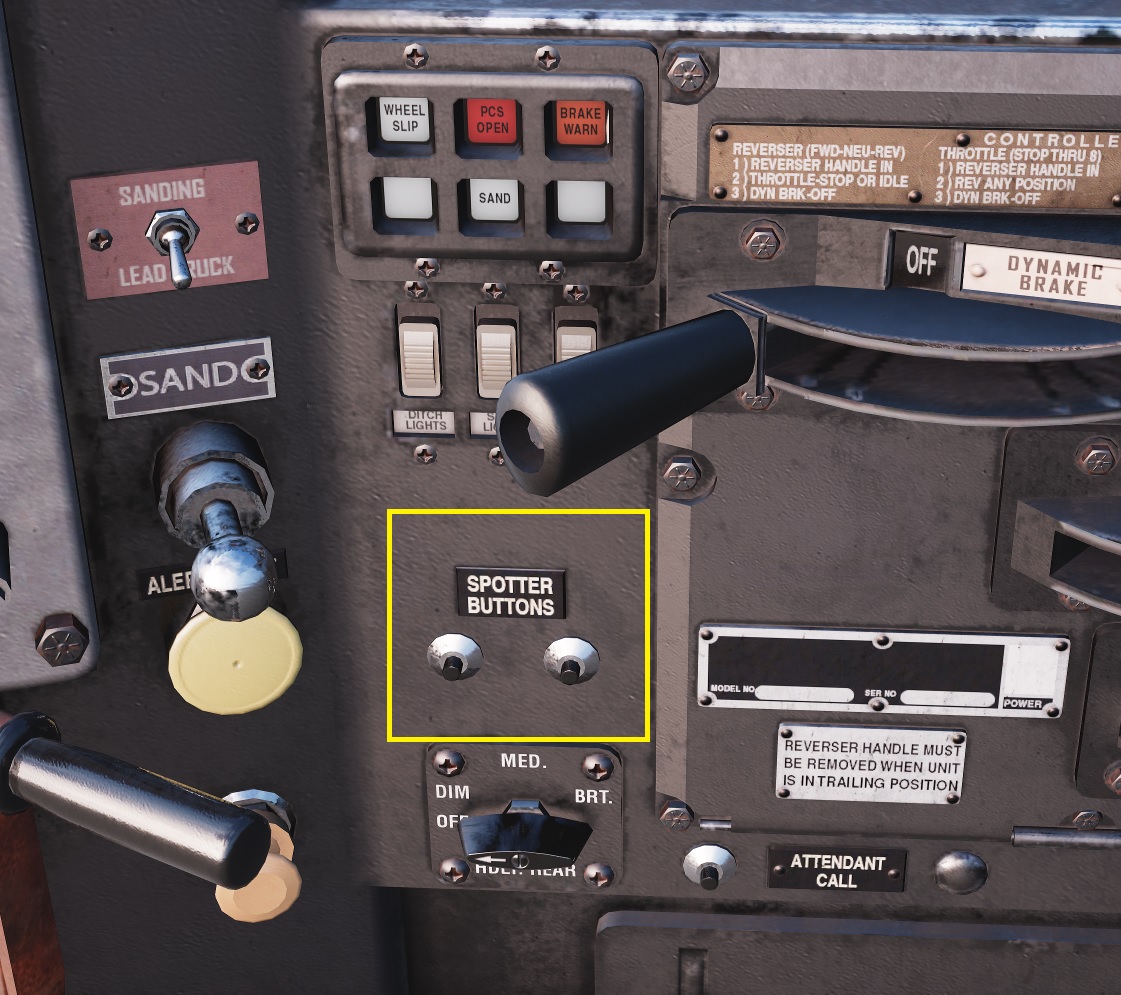
Spotter buttons located in the driver´s desk can be used to move a cold engine using the battery only. This is often used for short movements at the depot or in a turntable. To activate this feature you may need to put the engine control switch on the “Isolate” or “Jog” position. Just release brakes and push and hold them to move engine forward and backward. Reverser needs to be at neutral position for this operation.
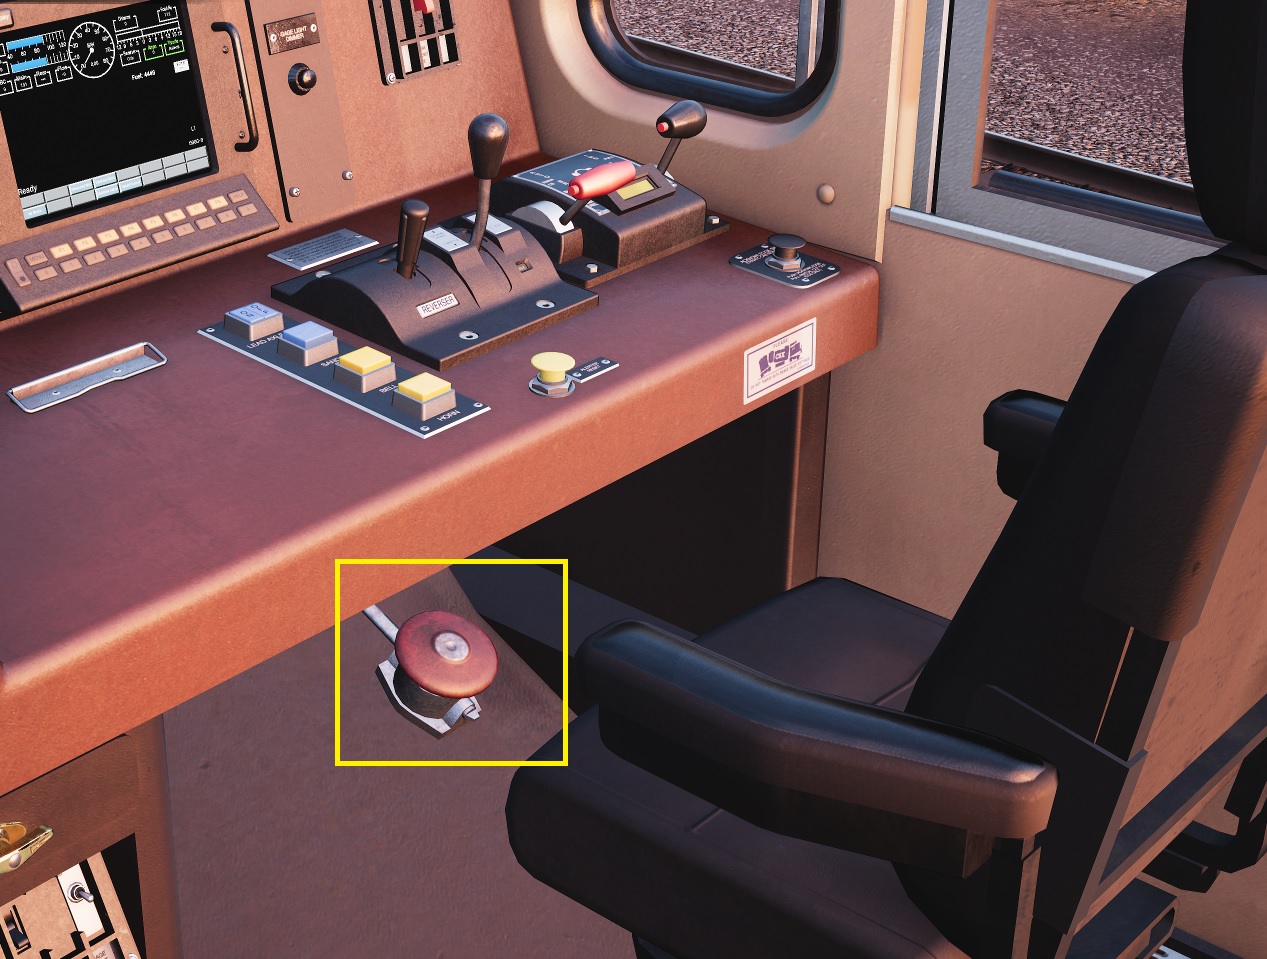
Another interesting feature is the horn sequencer available on AC4400 engine. Pushing it will automatically blow the “Long-Long-Short-Long” horn sequence. While in driver´s seat this can be also activated by “Ctrl-Space” keyboard shortcut.
5.3. Master/slave and banking operations
General
Master/slave (or lead/trail) operation in game normally does not need any special procedure except coupling the locomotives themselves. But some locomotives allow additional configurations as well.
As a general rule, like in the case of MUs, remember to finish this procedure meeting the following conditions on the slave engine:
- Cab is not active (master key is OFF).
- Traction and reverser are OFF.
- Brakes are applied (as a safety rule) or isolated.
- Parking brake is released.
- Safety systems are isolated.
American locomotives
These are the settings depending on the type of configuration:
(Master or Single)
Field Gen. >> ON
Fuel Pump >> ON
MU-A2 valve >> Lead
Radio OFF
(Dead in Tow)
Field Gen. >> ON
Fuel Pump >> ON
MU-A2 valve >> Lead
(No Power + Brakes)
Field Gen. >> ON
Fuel Pump >> ON
MU-A2 valve >> Trail
(Power + Brakes)
Field Gen. >> OFF
Fuel Pump >> OFF
MU-A2 valve >> Trail
The distributed power circuit breaker is only available in some locomotives such as the AC4400. It´s only required to remotely control other engines not when the engines are coupled to each other. For the case of a standard master/slave configuration it can be OFF. The radio circuit breaker is not required either, so it can be OFF as well.
MU-A2 valve has several trail positions:
- “Trail 6 or 26” is used when the locomotive is a trailing unit being lead by a locomotive hauling 6 SL or 26 L brake equipment (e.g: GP-38 or SD-40).
- “Trail 24” is used when the locomotive is a trailing unit being lead by a locomotive having 24 RL brake equipment (e.g: GP-9 or F7) so that compatibility is assured between leading and trailing units.
Remember to configure the proper light setup for master/slave operation on each engine too, as described in the manual.
Distributed power configurations
General rules when multiple groups of locomotives are used:
- Train is managed by one engine (leading group master) via radio banking COMM control
- Any group master needs distributed power and radio circuit breakers activated
- Any group master needs all engine controls activated
- Leading group master needs brake valve set to Cut In and MU-A2 valve set to Lead
- Banking groups master needs brake valve set to Cut Out and MU-A2 valve set to Lead
- Engine control and brakes isolation are configured as required in any group slaves
So you have to follow the next rules for all locomotive groups in the whole train consist:
Master Engine
Field Gen. >> ON
Fuel Pump >> ON
MU-A2 valve >> Lead
Distributed power ON
Radio ON
from other groups.
Controls its own
group slaves.
Master Engine
Field Gen. >> ON
Fuel Pump >> ON
MU-A2 valve >> Lead
Distributed power ON
Radio ON
by the leading
group master.
Controls its own
group slaves.
Slave Engines
Standard setup:
Engine Run >> OFF
Field Gen. >> OFF
Fuel Pump >> OFF
Standard setup:
Brake valve >> Cut Out
MU-A2 valve >> Trail
Distributed power OFF
Radio OFF
own group master.
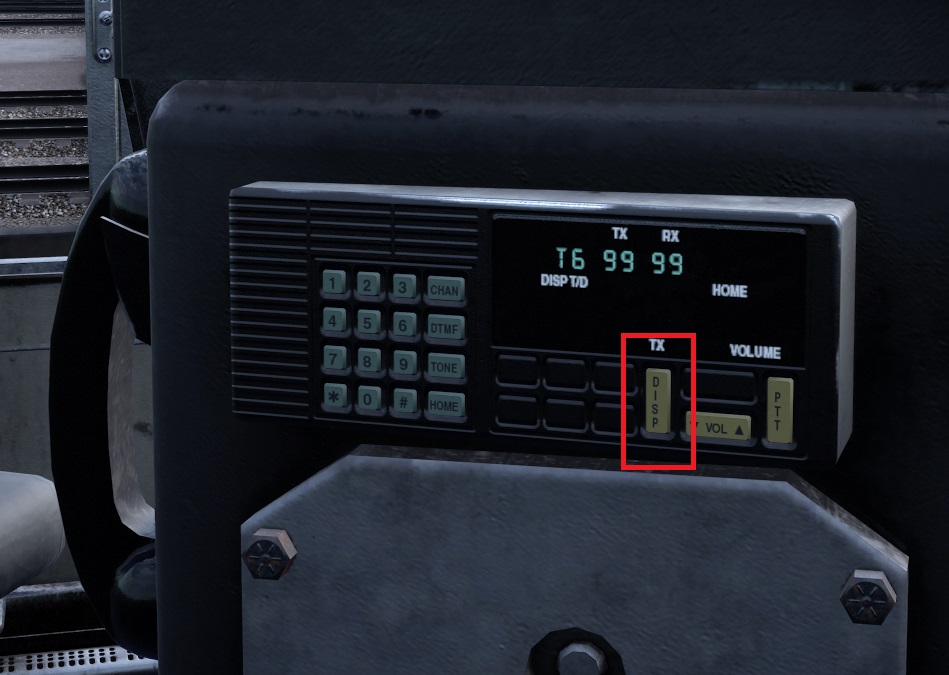
The radio and distributed power are activated at the fuses panel while the banking COMM is activated at the radio panel. After correct setup you could see how the throttle lever is moved automatically on the banking groups masters during driving.
ACS-64 locomotive
You can test this in the NEC scenario that goes by the train wash and ends at Sunnyside yard. There three pairs of locomotives are parked. You will need to start their batteries or raise pantographs as you will use their displays.
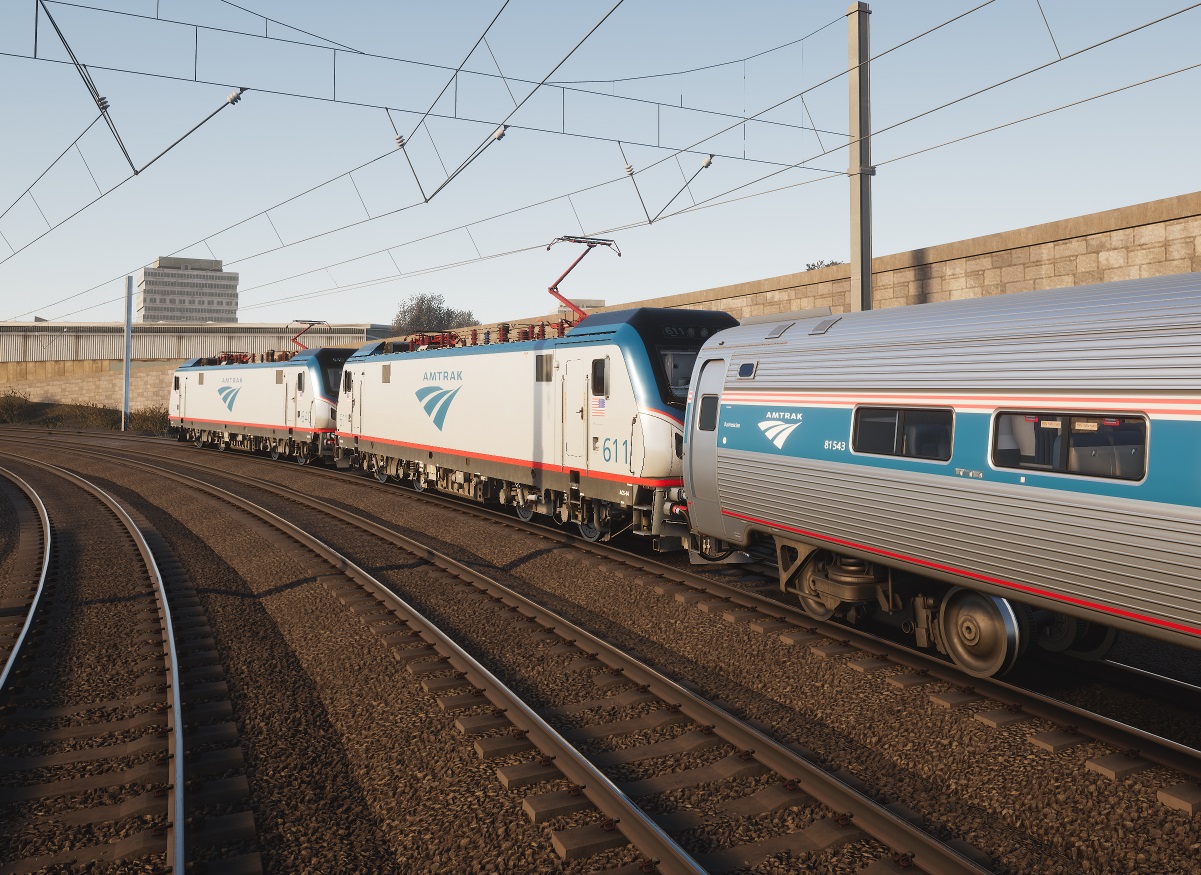
In order to activate master/slave configuration simply couple the two locomotives. On the slave locomotive you should now have a Trail indication on the display and on the leading one a Lead indication. Driver could now operate the two locomotives simultaneously from the leading cab.

As in the case of trail configurations for CSX engines, follow the next steps on the front cab of the slave unit (trail cab in the picture below) if you want to isolate brakes on the unit:
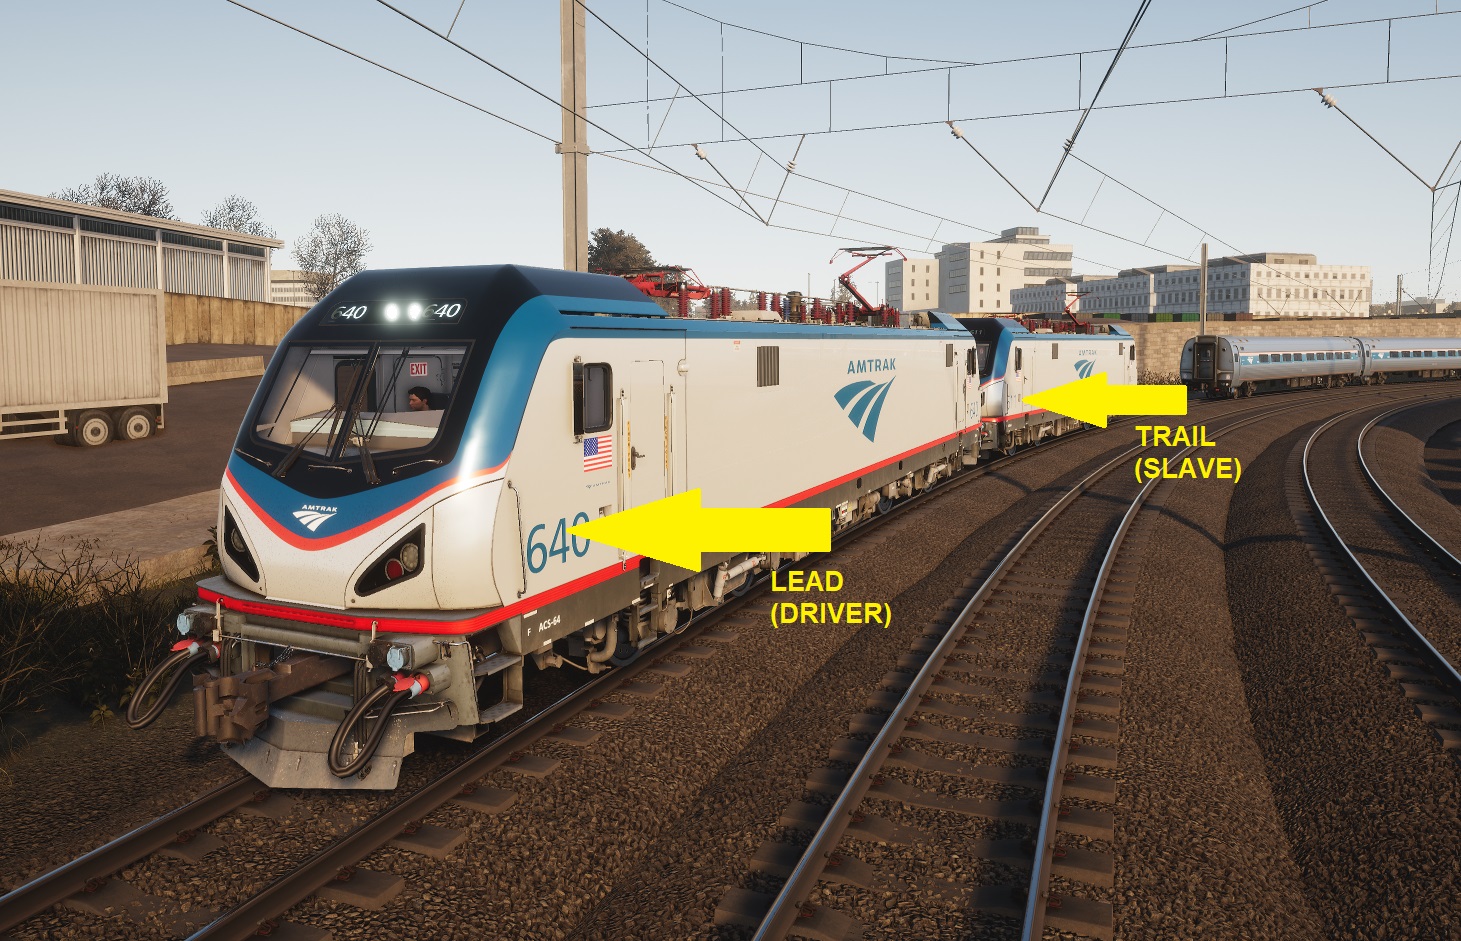
- Leave reverser and traction on the OFF position.
- Set brakes to full application.
- Put the brake switch control in the trailing position moving the right switch in the brake console.
- You can also isolate the electric brakes using the control on the panel behind driver´s seat.


German locomotives
To activate remote control or master/slave configuration simply couple the engines and press the COMM button which is available on BR146 and BR185 locomotives on the cab you want to use for your service. Doing that you will have full control over both engines from that cab. Click again on it to deactivate it.
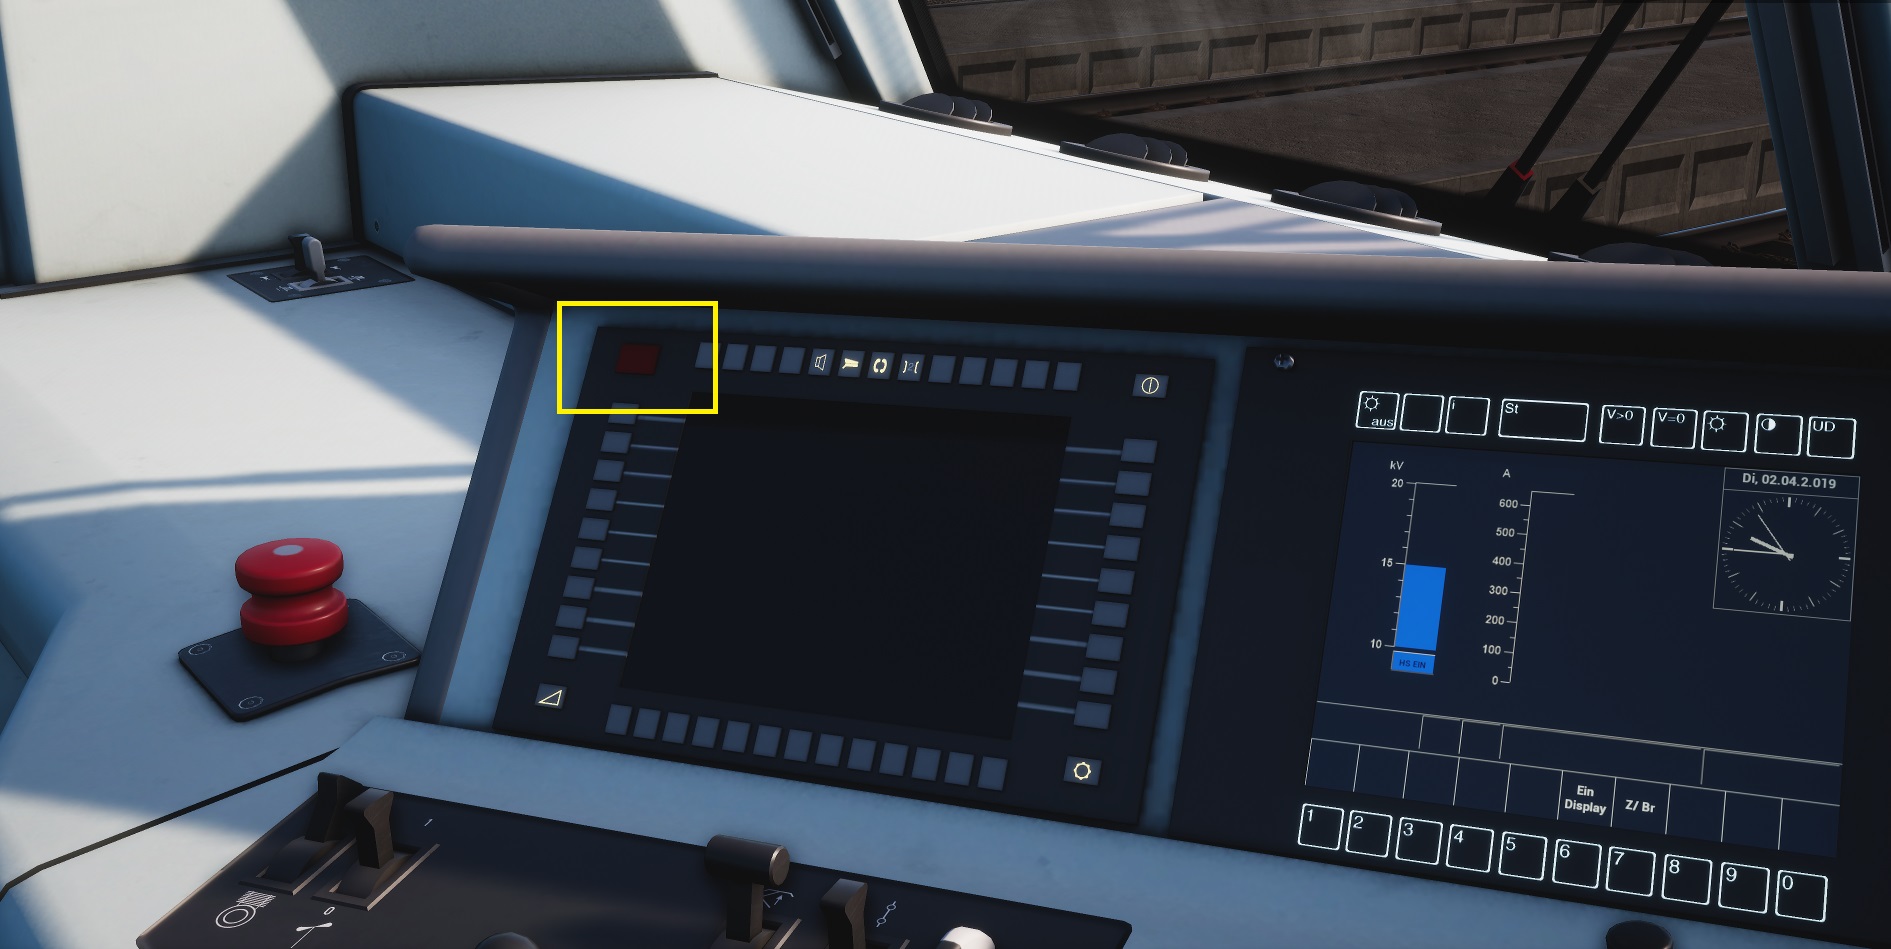
Banking services are available in MSB route (Railion Livery). To drive the baking locomotive you need to press the COMM button on the banking locomotive cab to have full control over both engines.
BR204 shunter has a special multiple unit switch that needs to be set to BOTH in the leading cab. It also includes separate controls to switch each locomotive engine.
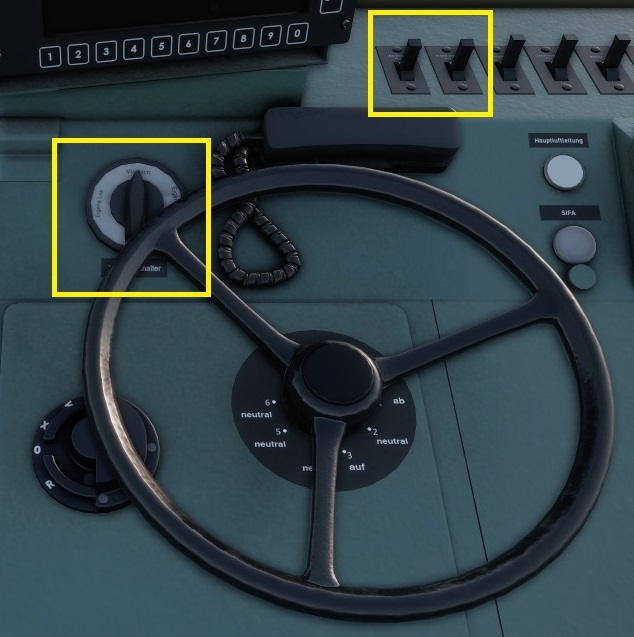
5.4. Caltrain control cars configuration
A special case of banking configuration are the Caltrain control cars used in Peninsula Corridor route. With them we can remotely control the train consist locomotive. Those cars normally operate with just one banking engine but if multiple locomotives were used in the train consist the same principles for master/slave configuration would apply to all locomotives coupled to each other.
Control cars configuration
These are the settings depending on the type of control car used:
Field Gen. >> ON
Fuel Pump >> ON
Parking brake OFF
the locomotive
Engine
Field Gen. >> OFF
Fuel Pump >> OFF
MU-A2 valve >> Trail
by Gallery Car
Field Gen. >> ON
Fuel Pump >> ON
Parking brake OFF
Engine Run Button ON
the locomotive
Engine
Field Gen. >> OFF
Fuel Pump >> OFF
by Bi-Level Car
Field Gen. >> OFF
Fuel Pump >> OFF
Parking brake OFF
Engine Run Button OFF
(Bi-Level Car only)
used for driving
Note: in the case of the Bi-Level Car the Engine Run Button must be kept in the pressed position when using its cab for driving. To release it when leaving the cab you need to press it again.
Passenger lights
To activate lights the auxiliary HEP engine needs to be turned on first and then the HEP system itself has to be enabled. This is normally done at the locomotive cab but the Gallery cars also include the HEP on/off buttons.
In the case of MP36PH-3C locomotive there are two separate controls for the HEP engine and the HEP system. The train line setup switch at the lower part of the panel is used to define which side of the locomotive is coupled to the train consist and therefore configure the power output. Changing it is only needed if locomotive is coupled on the front side or when several locomotives are coupled to each other.
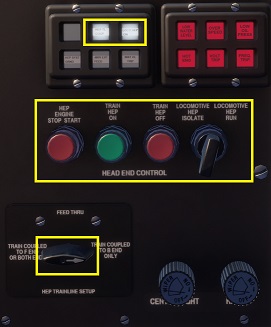
You need to follow these steps to activate the lights:
- Set the HEP mode switch to RUN
- Press the HEP ENGINE START button
- Once HEP engine is started the right side indicator will be lit
- Press the TRAIN HEP ON button to enable HEP system
- Once HEP is providing power to the train line the left side indicator will be lit
To turn lights off you can either turn off HEP system or the HEP engine itself. When the HEP mode switch is in the Isolation position the HEP engine can be still running idle but will not be providing any power to the train line.
In the case of F40PH-2CAT the panel is similar but there are only two buttons as the HEP system is automatically enabled as soon as HEP engine in running. The train line setup switch is also located at the lower side of the panel.
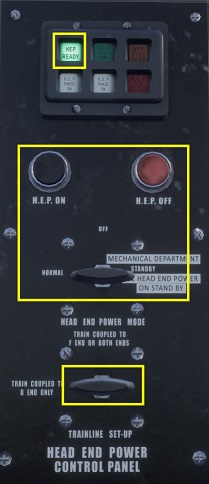
You need to follow these steps to activate the lights:
- Set the HEP mode switch to NORMAL
- Press the HEP ON button to start the HEP engine
- Once HEP engine is started the green indicator will be lit
- The HEP system will be enabled automatically to provide power to the train line
To turn lights off you can turn off the HEP engine itself. When the HEP mode switch is in the Off or Stand by positions the HEP engine can be still running idle but will not be providing any power to the train line.
Brakes reset
If brakes are applied due to alerter supervision there are two different procedures to reset them as alerter will only trigger service brakes in the case of MP36PH-3C but will trigger emergency brakes in the case of F40PH-2CAT.
In the case of MP36PH-3C we need to follow these steps to reset service brakes:
- Acknowledge alerter alarm (if active)
- PCS open indicator is lit
- Set reverser to NEUTRAL
- Set brakes to FULL SERVICE
- Set brakes to RELEASE
- Wait until PCS open indicator is turned off
In the case of F40PH-2CAT we need to follow these steps to reset emergency brakes:
- Acknowledge alerter alarm (if active)
- PCS open indicator is lit
- Set reverser to NEUTRAL
- Set brakes to EMERGENCY
- Wait 60s while brake system is being reset
- Set brakes to RELEASE
- Wait until PCS open indicator is turned off
Note: this procedure is also needed when changing the MU-A2 valve setting to Lead or if emergency brakes were applied by driver as well.
5.5. Train length and cruise control
Train length feature is handy to know when your train has exited from a speed restriction area if you don´t play using the game HUD.
For CSX and ACS-64 locomotives train length measuring is manual and is done using the travelled distance counter. Currently there is no way to know your train length in game except measuring it after starting your service. To do it follow the next steps:
- Start the distance counter system in the cab.
- Place yourself on external view (“8” key) next to a nearby and clearly visible trackside reference such as a board, point machine or signal.
- Once the rear of the train has passed next to your camera position go back to the cab view and note down the displayed distance value.
- After that you can count distance again while in cab each time you are in a speed restriction area and compare it with your train length.
Alternatively you can just wait for next speed limit change and measure distance there, using the HUD to observe when your train enters and exits the speed limit area and using the counting distance feature directly from the cab´s view.
On GP38 engines you activate the counter via a push button available on the cab. Push it to start measuring distance and hold it to reset it and prepare it for a new measurement. Counted distance is shown on the display on the left of the push button.
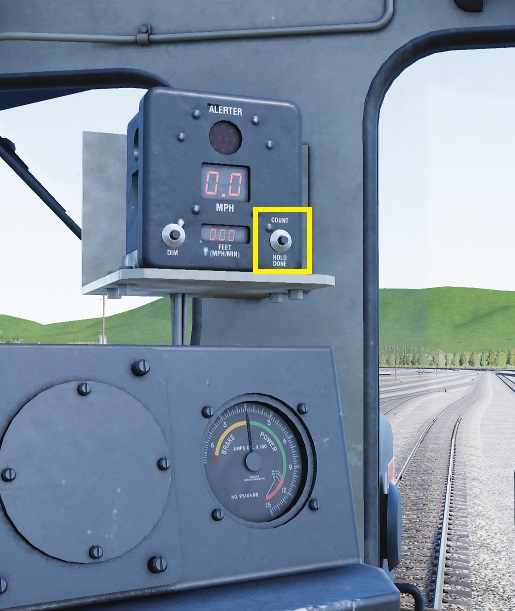
ACS-64 uses the cab display to enable distance counter. Activate it by clicking on the relevant button.
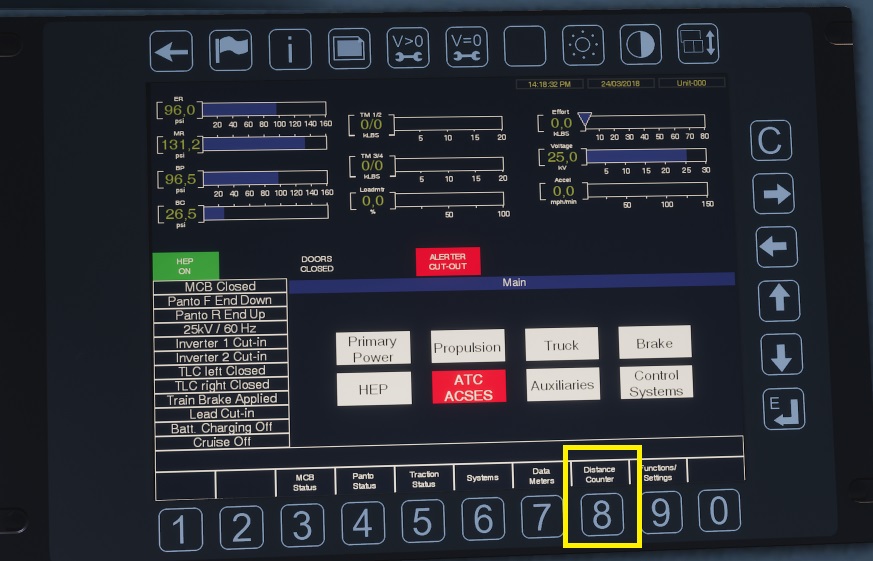
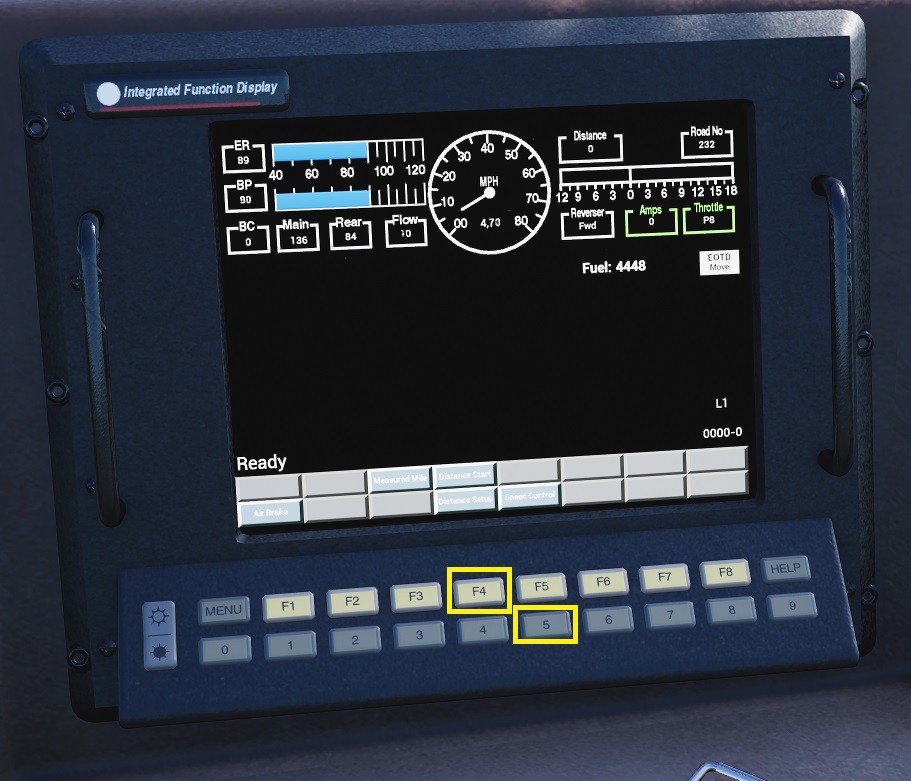
AC4400 also uses the cab display to enable both the distance counter feature and the cruise control, which is handy at the coal loading process, for instance. They can be activated by clicking on the display buttons as well. Once cruise control is set simply release brakes and apply traction and the locomotive will automatically adjust power to meet the target speed.
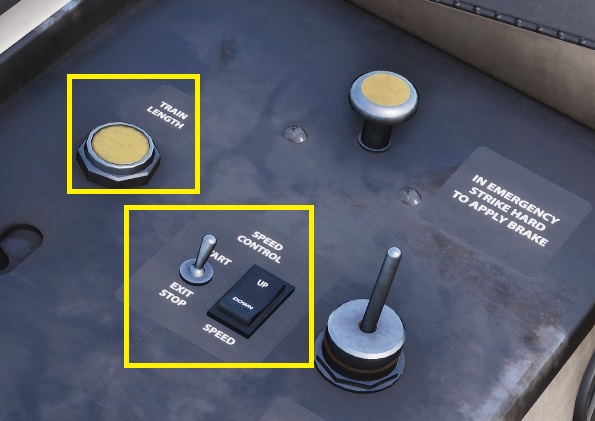
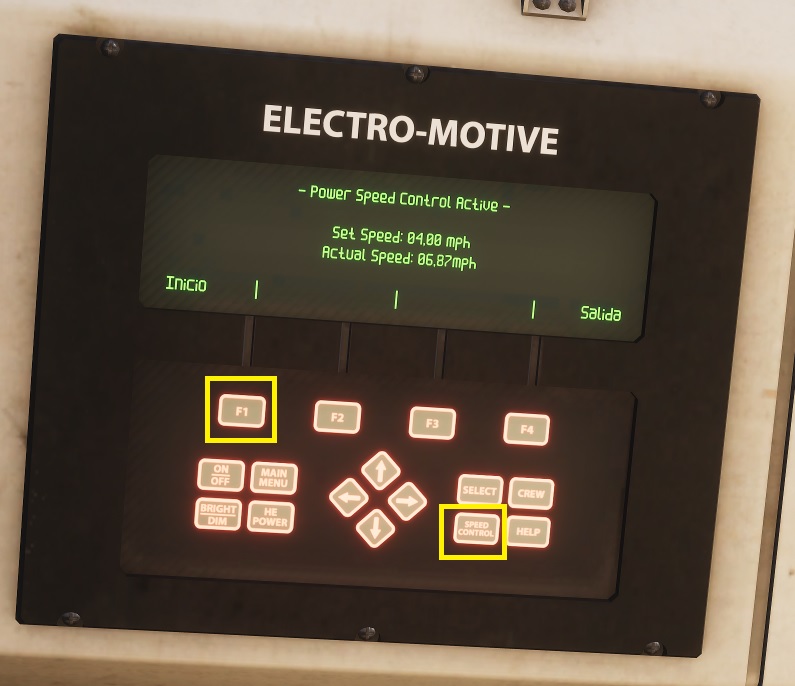
British Class 66 also implements a cruise control feature for loading operations and in this case a train length system which does all calculations for you automatically. In order to operate cruise control you have to follow the next steps:
- Enable it using the switch on the left side panel and set the desired speed with the two-way push button next to it.
- Enable the start of system using the display on the overhead panel.
- Release brakes and apply traction.
Train length system is also available and located next to the cruise controls and it counts distance and automatically notifies driver when process is complete. To activate it simply click on the button while train is moving. After some time you will hear a beep sound indicating that train has run the distance equal to its length.
German BR182 implements a train length system as well. In the real locomotive this system uses a double pressing in the throttle lever. To activate it in game simply double click with mouse on the throttle lever or quickly press two times the throttle shortcuts (A or D keys). The “Roadrunner” beep sound will be triggered once train has run its whole length.
5.6. AFB
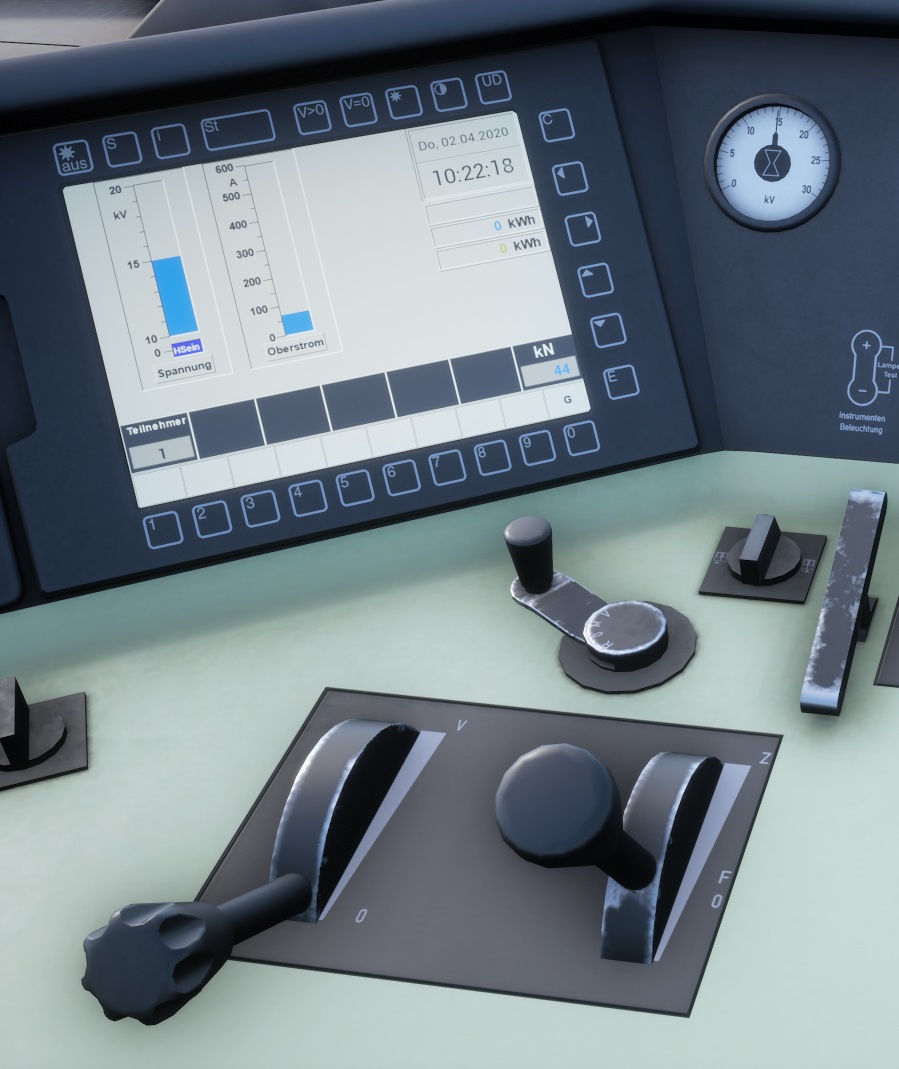
Some german locomotives and MUs have a special cruise control called AFB, which not only keeps the target speed by adjusting traction as we have seen on the case of CSX and Class 66 locomotives, but also applies brakes to adjust speed in real time. This system can be used both for shunting/loading operations and during normal mainline services. AFB controls are usually located in driver´s desk, as in the example of BR185 locomotive below.
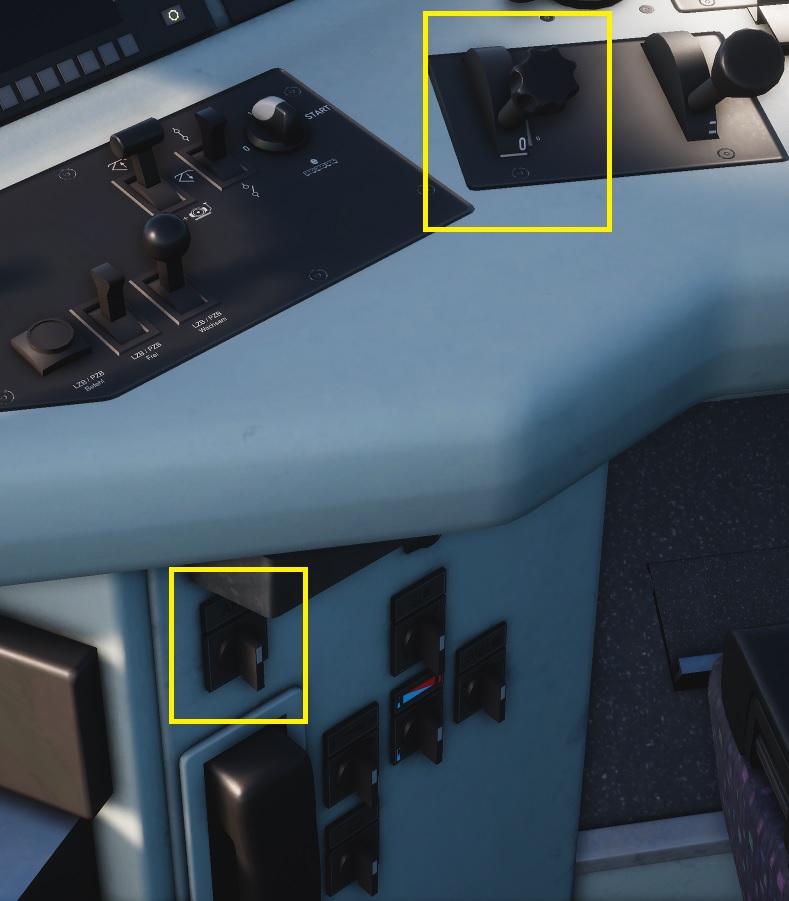
There are two ways to activate AFB:
Activation while train is at standstill
- Set traction to 0.
- Enable AFB.
- Set desired AFB target speed.
- Release brakes.
- Apply traction.
Activation while train is already moving
- Set traction to 0.
- Set AFB target speed to MAX.
- Enable AFB.
- Set desired AFB target speed.
- Apply traction.
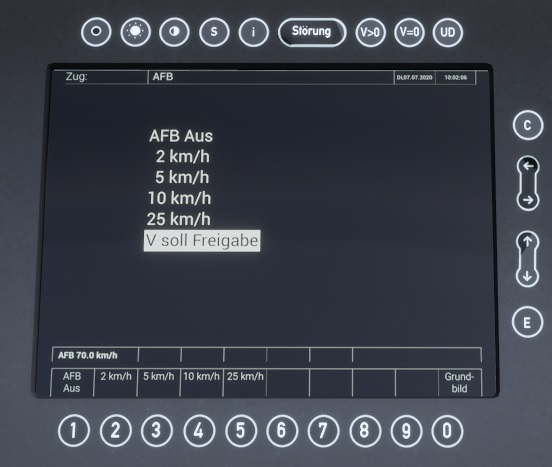
ICE 3 trains have AFB integrated in the left display. Simply enable it there and set desired speed with the AFB lever or using the preset buttons on the display.
The BR143 locomotive as a different AFB operation with some extra features but the basic principle is the same. We will explain it in the next section.
5.7. BR143 AFB panel
In addition to the main AFB level on BR143 there are four extra controls on the driving desk:
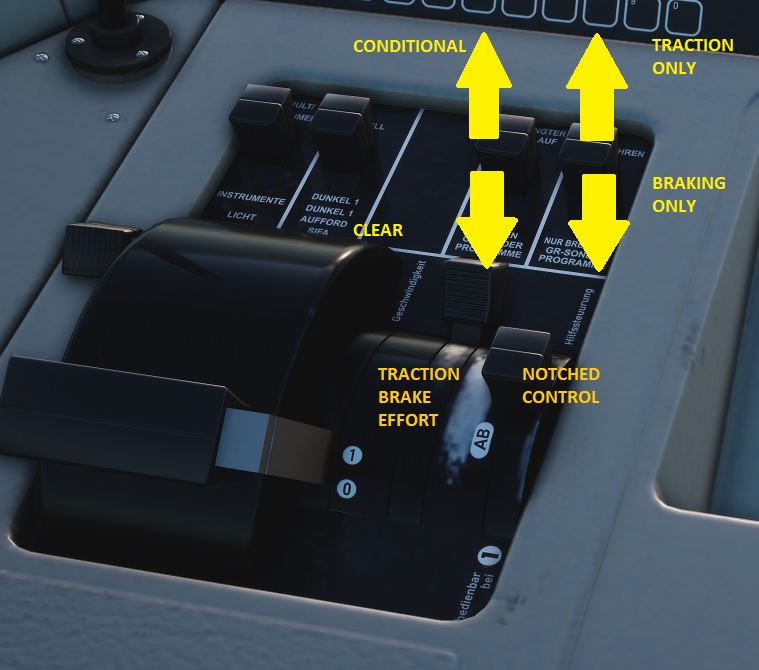
Conditional program: Moving the top left lever up will activate the conditional program, and AFB speed control will be switched off when the target AFB speed is reached. This is normally used in S-Bahn services, where distance between stops is short and you just want to reach a target speed to start braking to the next station afterwards. Moving this lever down to the clear position simply deactivates this programm and restores normal AFB operation.
Traction/braking only: Moving the top right lever up activates the traction only program and AFB will only operate the traction, leaving brake operation to driver. This can be used while driving uphill, for instance. Moving this lever down to the braking only position will do the opposite, and AFB will only operate the brakes, leaving traction control to driver. This could be the case of a downhill ride, for instance.
Traction/braking effort: The bottom left lever is used to set the traction/braking effort for AFB operation, going from 0% to 120%.
Notched control: This allows you to manually control the traction and deactivates the AFB traction control. Holding this lever on the up position will rise the traction notches and holding it on the down one will lower them. Setting a new target speed on main AFB lever will restore the normal traction control to AFB.
5.8. Shunting controls
Some of the german locomotives implement a dedicated console to perform shunting operations from the window position, as in the case of BR143 below.
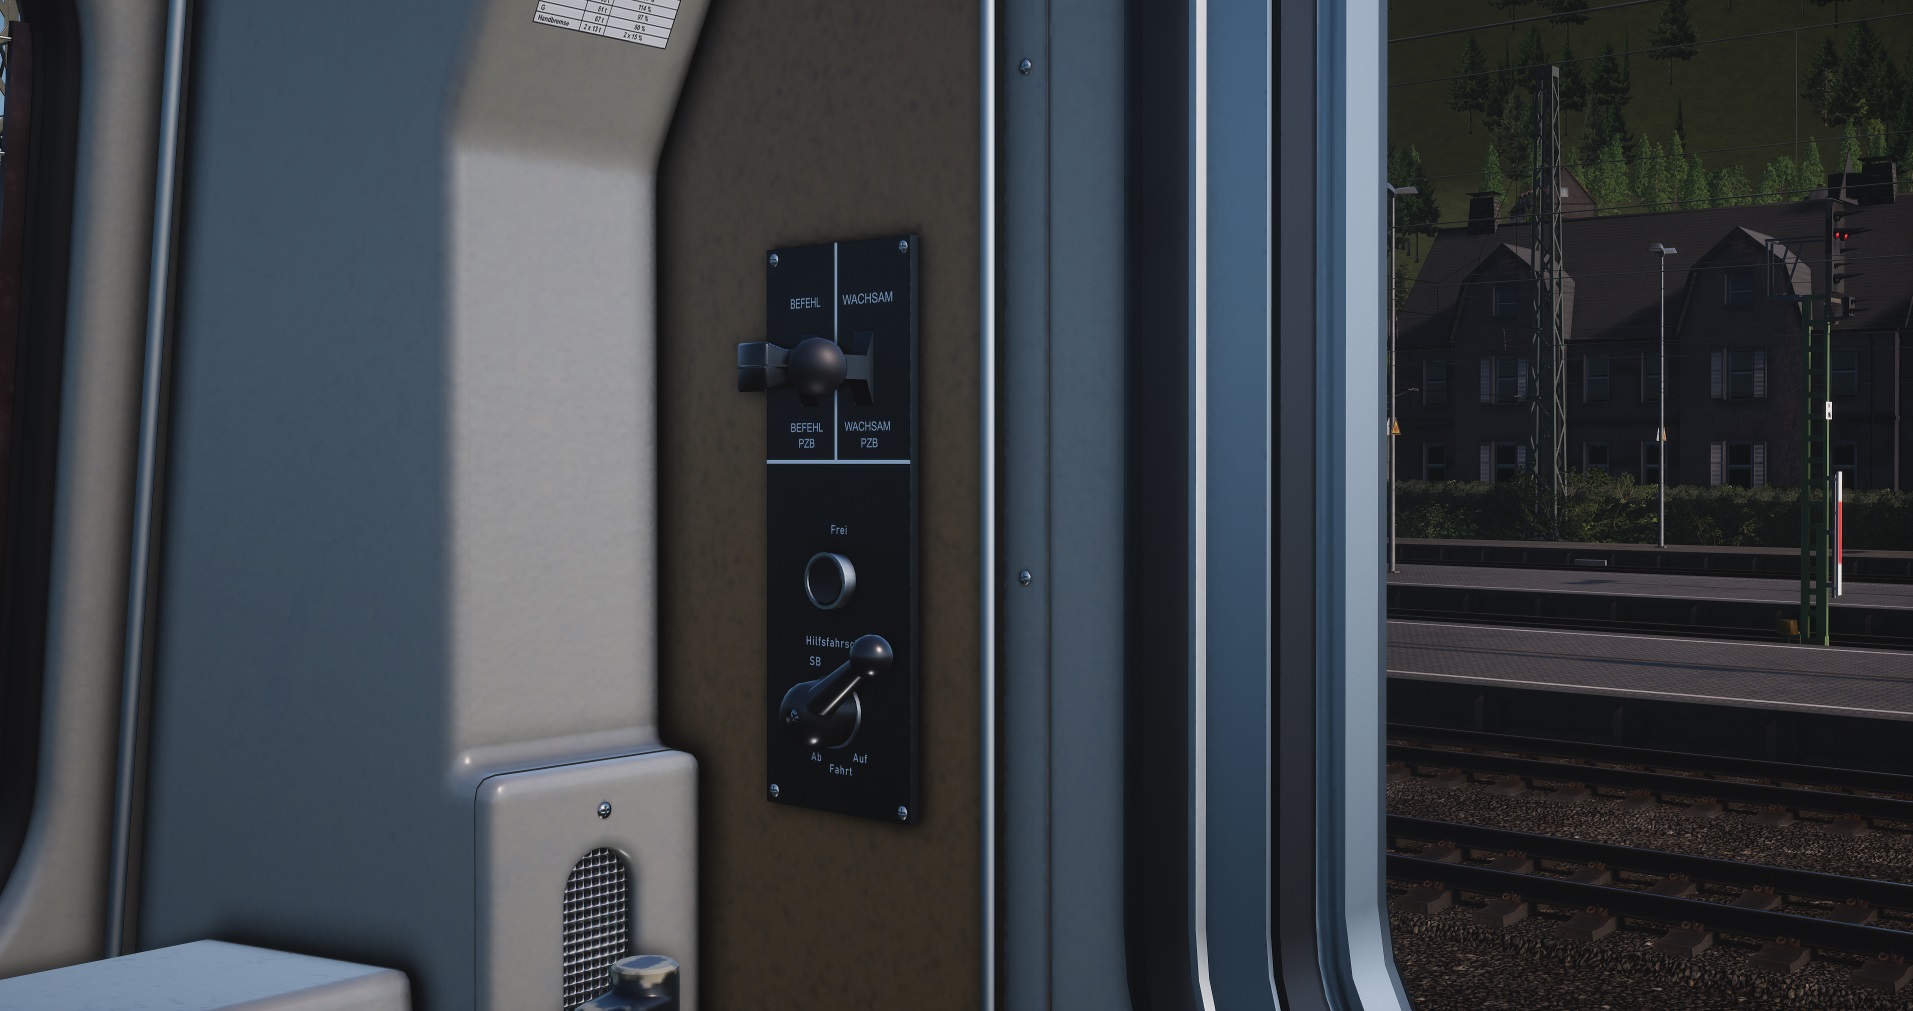
This procedure has two stages. First prepare the cab controls for this operation:
- Set reverser to FORWARD
- Set throttle to MIN (or set AFB handler to ON for the case of BR143)
- Set brakes to RELEASE
Now, on the shunting control panel:
- Set shunting control to NEUTRAL
- Press the “FREI” button
- Move shunting control forwards and backwards to adjust traction
In the SOS position the brakes will be applied. Remember to set shunting control back to OFF to finish using it.
6. Shunters
As a safety measure remember to apply the parking brake on wagons which are uncoupled and check that it´s released after they are coupled to the shunters.
During shunting operations some stop signals may need to be overpassed before entering an occupied track so always check that permission to override them has been granted by dispatcher in case they don´t display any aspect which allows the shunting movements.
Service selector
Some shunters like Caltrain MP15DC include a service selector switch. This is used to control the locomotive engine transition from series to paralell and the amount of amps to be generated, so that we have better control over the traction.
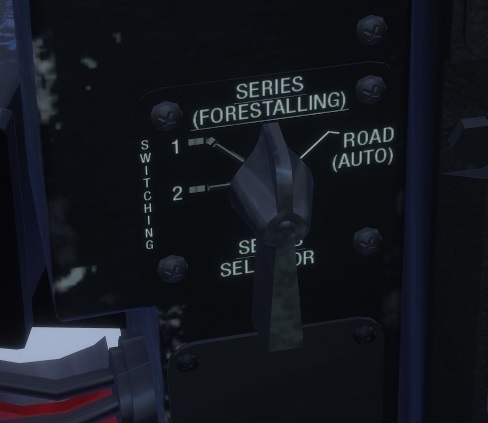
The service switch is located in the driver´s desk and it has four positions:
- Switching 1: This is the normal position for yard switching. Generator provides fast but controlled throttle response for switching operations.
- Switching 2: Same as Switching 1 mode, but engine idles faster resulting in faster acceleration. This position is used when you require fast movements to push empty cars for instance.
- Series (Forstalling): This position is only used when shunter is coupled to other locomotives that require this type of engine control and prevents that the trailing units make the series –> series-parallel transition when driving at low speeds. This position is used in slow speed heavy drag services and provides also smooth application of power for a softer start.
- Road (Auto): This position is only used when shunter is coupled to other locomotives that require this type of engine control and allow trailing units to make the series –> series-parallel transition. This position is used during moderate and high speed road operation.
The Series and Auto positions have the same effect when using a single MP15DC or when it´s coupled to another MP15DC, as those shunters always work in series-parallel with the generator. They are only intended to control the trailing units that require it.
The service switch should not be moved from the Series to the Auto position unless the throttle is a middle or low position. This prevents any forward transition taking place at too high voltage. However, if the locomotive speed is below the forward transition speed, it is possible to move the switch to the Auto position with full throttle operation. Movement of the switch from the Auto to the Series position may be done at any time, as this will not cause the backward transition.
Series-parallel switch
The british Class 08 is using a series-parallel switch which is similar to the service selector and is located inside a cabinet in the cab.
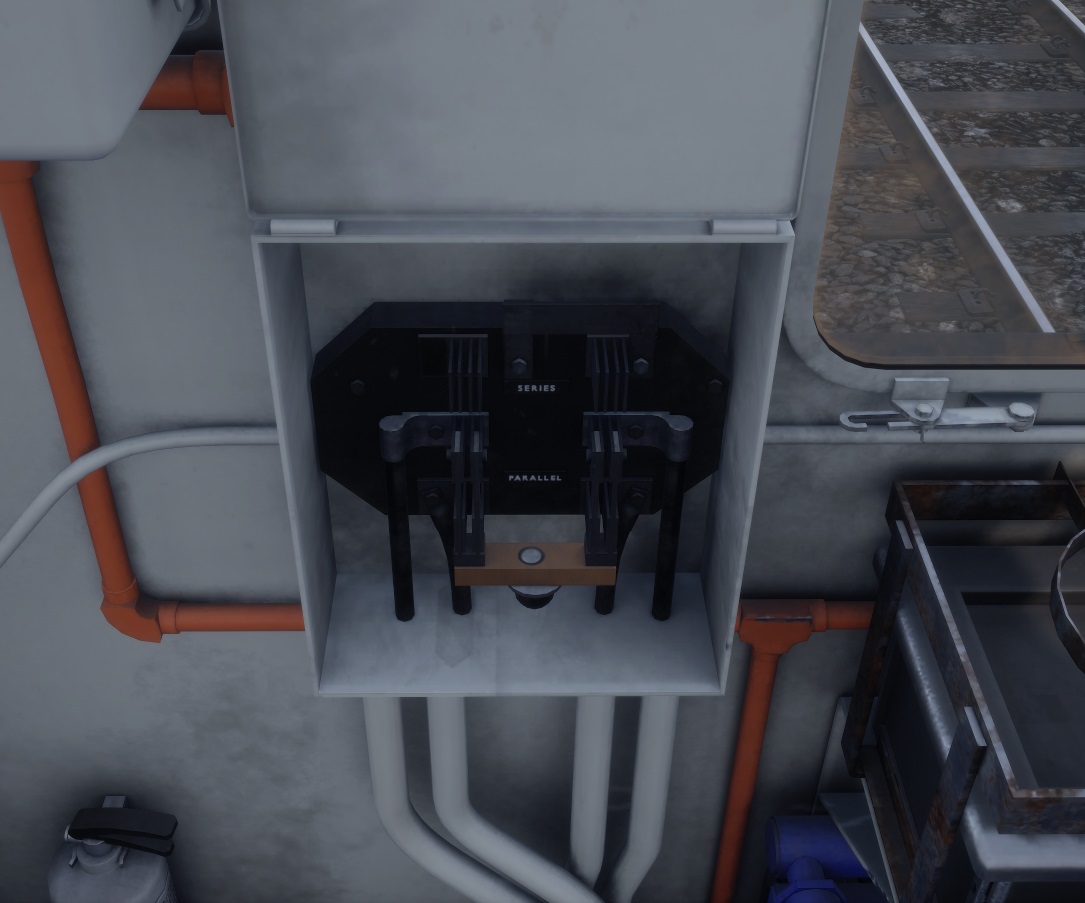
In this case it has only two positions:
- Series: This position is used in slow speed heavy duty operations and provides smoother throttle response from generator.
- Parallel: This position is used in regular shunting or during moderate and high speed operations in mainline and generator provides higher throttle response.
Gears
Other shunters like the german BR363 include a gear selector instead but it´s also intended to configure the engine response for either shunting at lower speeds or mainline operations at higher speeds. In the shunting position speed is limited to 30 km/h (brakes will be applied above that speed).
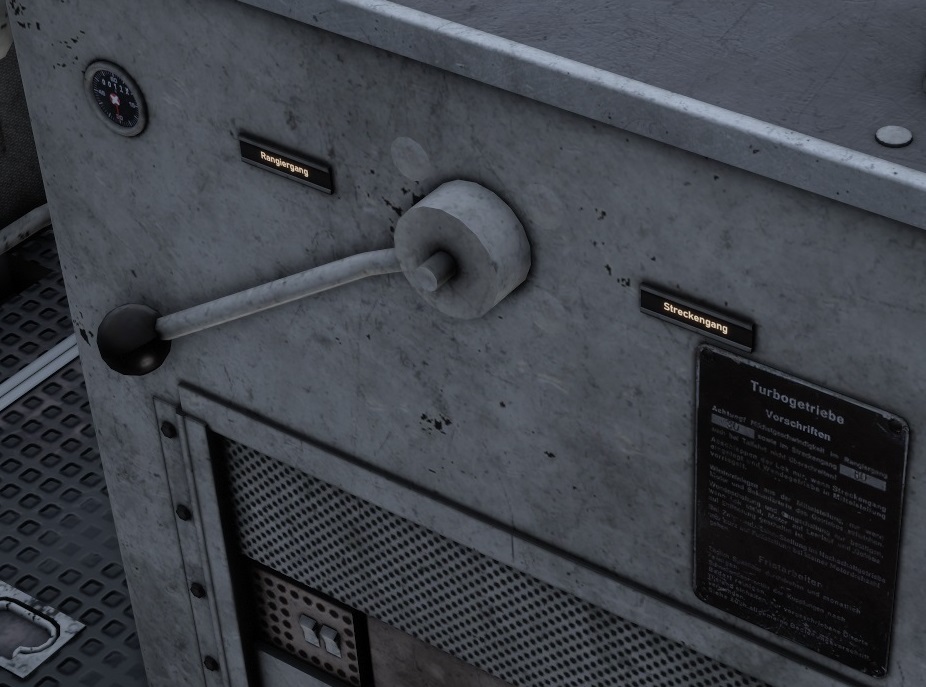
In the BR204 a gear switch on the left side of the cab is available.

Coupling
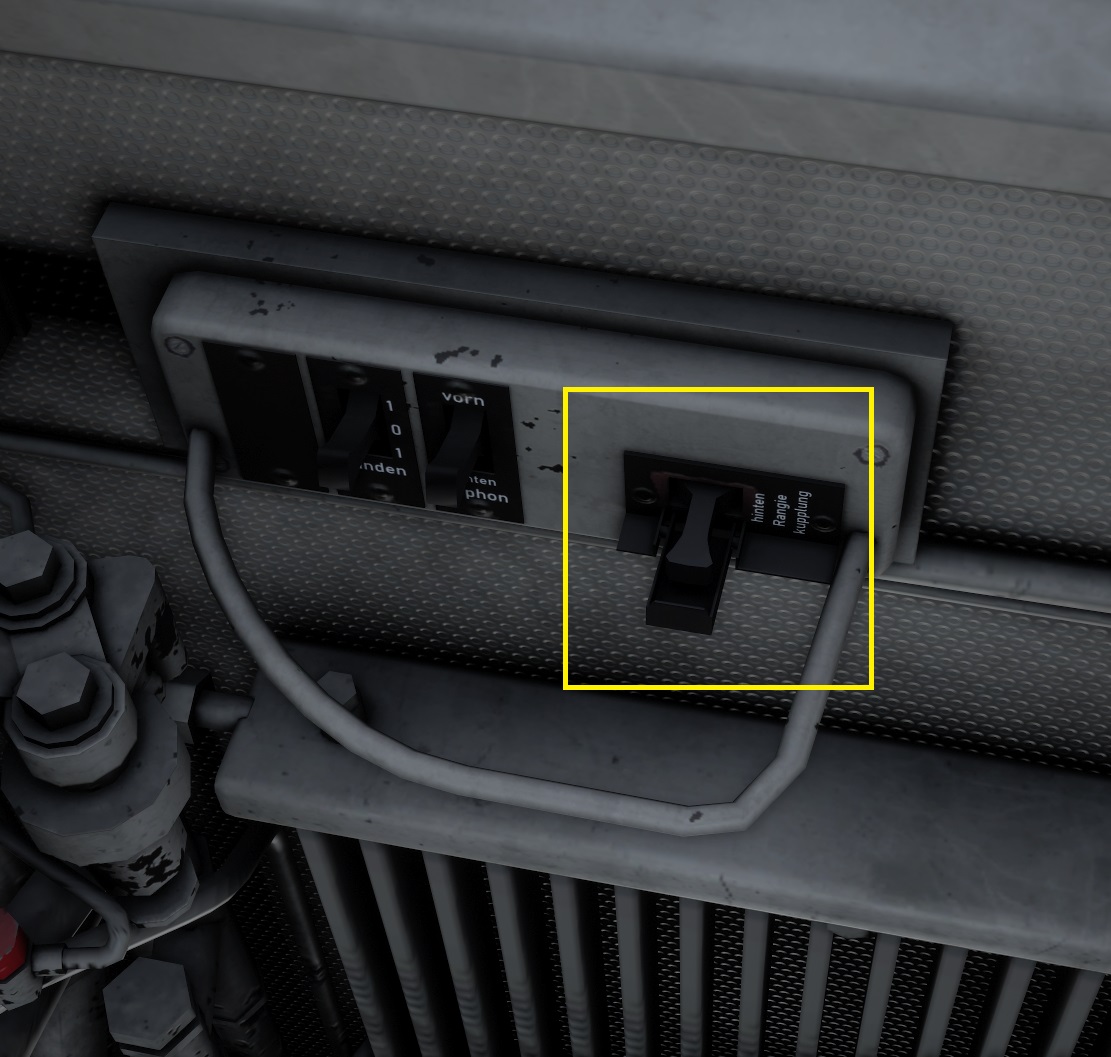
The BR363 has an special automatic coupler that can be used instead of the standard couplers. It must be manually deployed while being next to the coupler area.

When deployed the coupling can be done by just pushing shunter into vagons at low speed. The uncoupling can be triggered directly from the cab using a pair of controls located on the side of driver´s seat or with the coupler lock keyboard shortcuts.
7. Heavy hauling
This sections includes some basic tips for the operation of heavy trains, focused on the american case as they include an important helper: the EoT device.
First thing to know is how to obtain your current train data. Pressing ESC key will display a menu that contains some important data, such as the number of wagons, total train mass and train length. Those data are updated everytime we perform either coupling/uncoupling or loading/unloading operations.

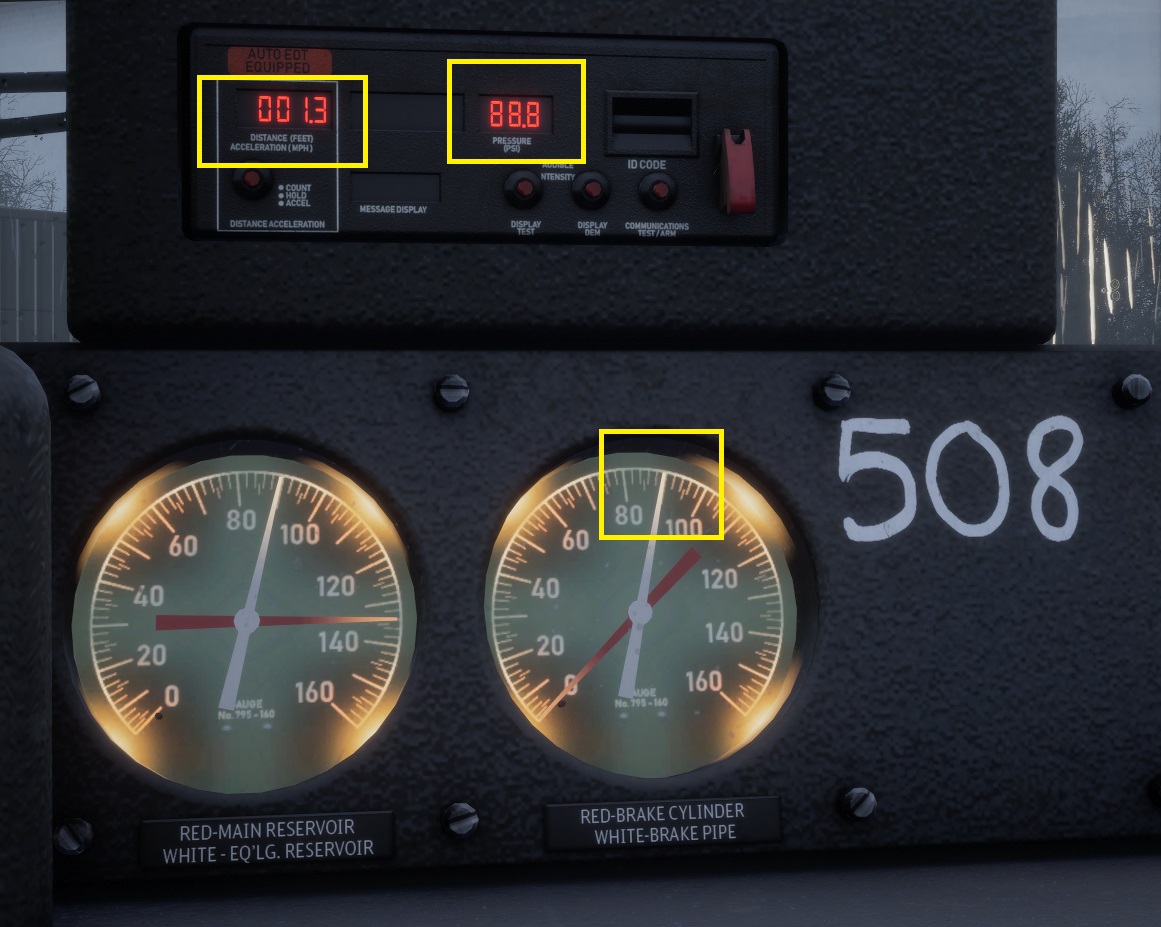
The next important thing is to understand the air flow along the pipe in long trains and the rear of train behaviour. Applying or releasing brakes can take several seconds to reach the rear of your train. That´s why it´s important to monitor the brake pipe pressure (as EoT it´s connected to the brake pipe) and the acceleration on the rear of your train using the information provided by EoT device. This will give you an idea about the status of your brakes and if rear wagons are accelerating or decelerating.
On the next picture we can see the acceleration data on the left side and the pressure data on the right. The acceleration of the rear portion of train is close to 0, as train is at standstill, and the pressure is close to 90 psi, which is matching the locomotive gauge indication for brakes released, so we know that our rear of train is almost at standstill and the brakes are close to be fully released. If pressure was lower than the indication on the locomotive gauges then we would know that brakes are still partially applied and we should wait a little bit more to start increasing traction. On the other hand, if the pressure was higher than the indication on the locomotive gauges then the brakes are applied on the front of train but not yet on the rear, as the air needs to flow along the whole train. Proper operation of brakes and traction prevents any potential damage to brakes and couplers.
The other important thing to calculate is our train length when leaving a speed limit for instance. Some locomotives such as AC4400 include a distance counter in the displays but you can also use the mileposts boards to know the distance. The ones at Peninsula Corridor route will help you better as they include 0.1 mile interval indications, as seen on the next picture. But you can also use the nominal 1 mile interval boards for this purpose. You just need to count boards from the cab to estimate the distance after the end of speed limit was passed and when it´s higher than your train length you will know that the whole train has left the speed restriction area and you could increase your speed.

For the case of german or british trains no EoT device is available but some locomotives such as BR182 or Class 66 include a train length system as described in the other chapters. In the case of electrified routes counting catenary poles is also an easy method to measure distances which is used by some drivers as well, as they are typically installed with a standard 50 m spacing.
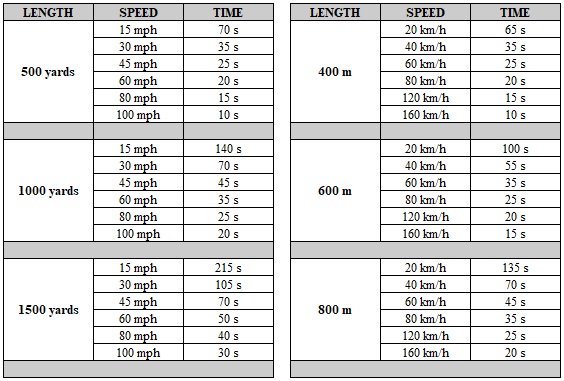
Another simple method is to just count elapsed time since you passed the speed board, depending on train speed and length. The following table is a basic example for some train lengths.
8. Power supply configuration
Some of the locomotives and high speed trains support multiple power suppy configurations to use them with different catenary or electrification types. LGV Méditerranée route includes two working electrification types and a transition between both.
Powerless sections are generally not included in the routes but in case any route includes powerless section boards to identify them you could still simulate the manual procedure for electric trains by following these generic steps:
- Set traction to OFF
- Open main circuit breaker before entering the powerless section
- Close main circuit breaker after passing the powerless section
BR185.5
German BR185.5 locomotive is a special dual voltage electric locomotive as it comes with two pantographs. This is to allow locomotive to run under multiple types of electrified tracks.
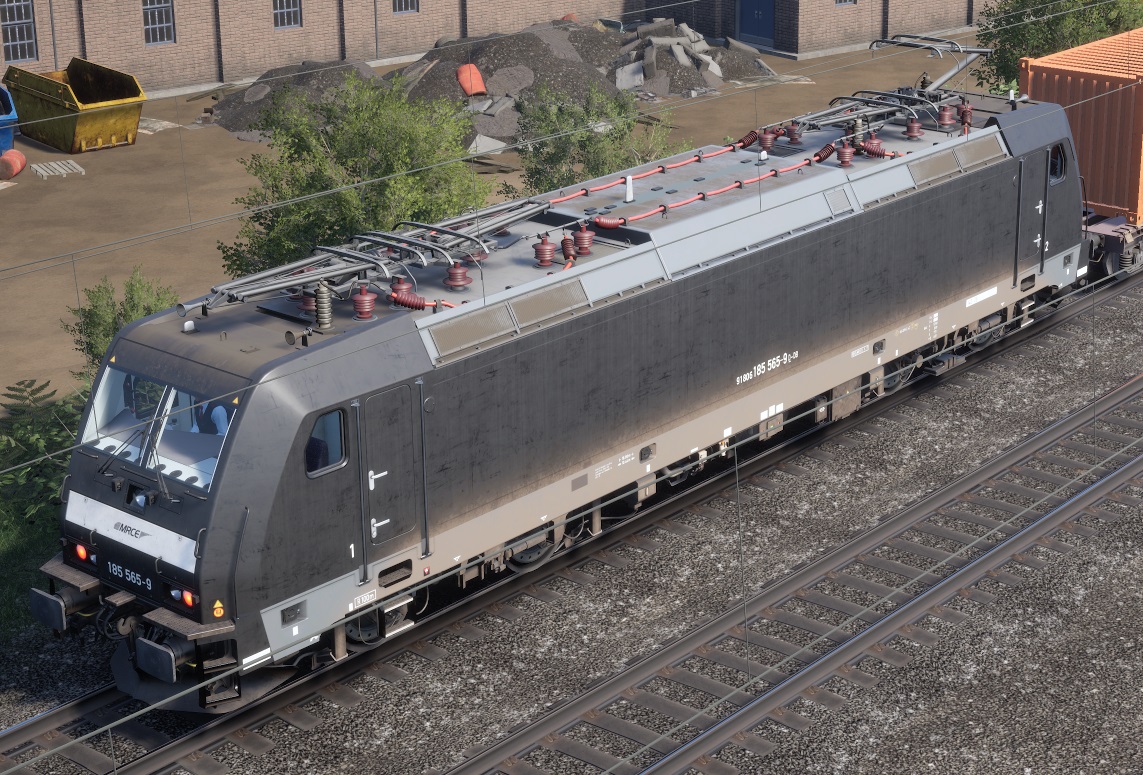
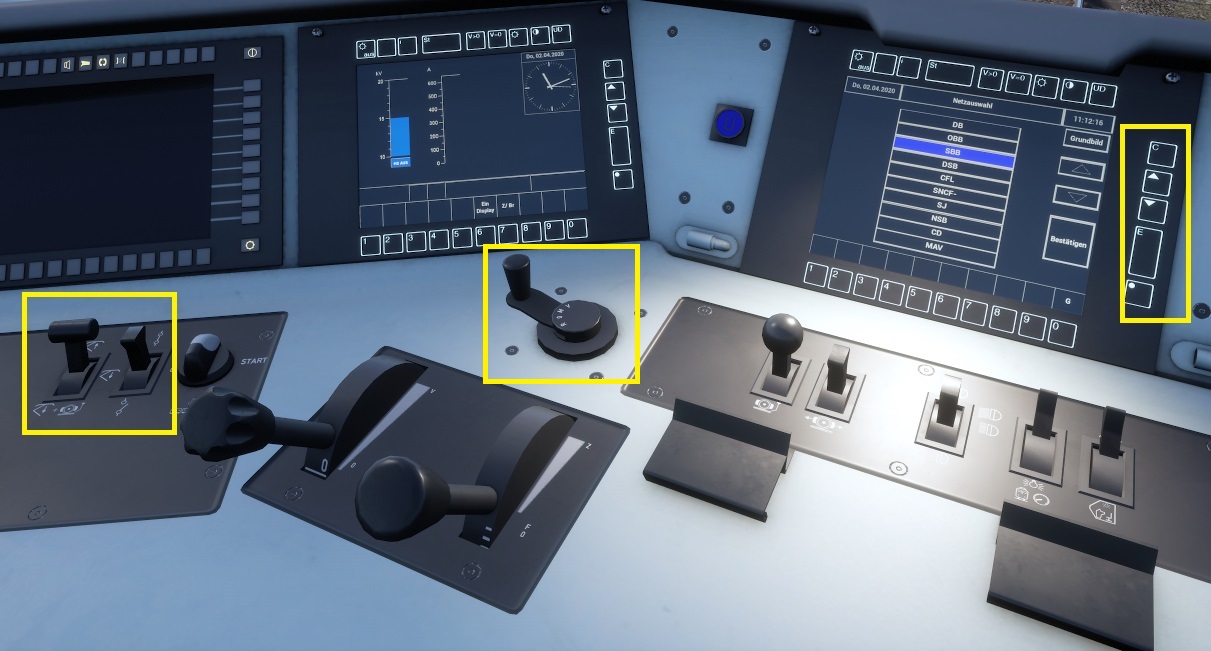
The pantograph configuration can be changed by selecting the railway operator preset at driver´s main display. You can enter this menu pressing the 0 softkey. Pantograph needs to be lowered and raised again for the new configuration to be applied.

The procedure is the following:
- Set traction to OFF
- Set reverser to 0 to activate the desk
- Open main circuit breaker
- Lower pantograph
- Enter pantograph configuration menu pressing the 0 softkey in the display
- Select new configuration from the list using the arrows softkeys
- Apply changes using the E softkey
- Raise pantograph
- Close main circuit breaker
ICE 3
In the ICE3 trains the catenary types are activated in the auxiliary display.

The procedure is the following:
- Set traction to OFF
- Set reverser to FORWARD to activate the desk
- Open main circuit breaker
- Lower pantograph
- Enter pantograph configuration menu pressing the 1 softkey in the display
- Select new configuration from the list using the arrows softkeys
- Apply changes using the E softkey
- Raise pantograph
- Close main circuit breaker
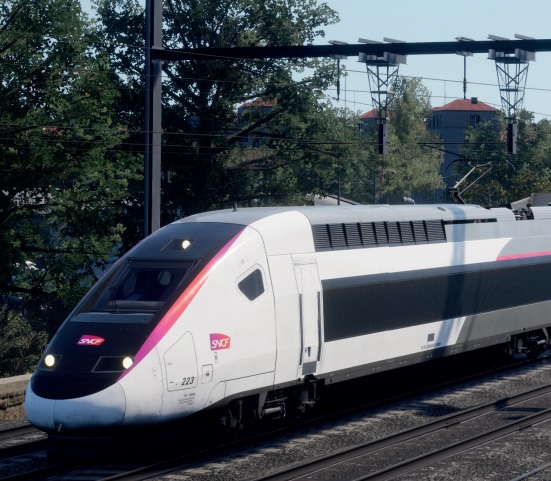
TGV Duplex
TGV also uses two pantographs to allow the operation under DC, AC or LGV lines. It also allows change of power supply while in motion, which is required for the electrification transition in the LGV Méditerranée route.
The pantograph configuration is done using a pair of dedicated rotary switches at driver´s desk.
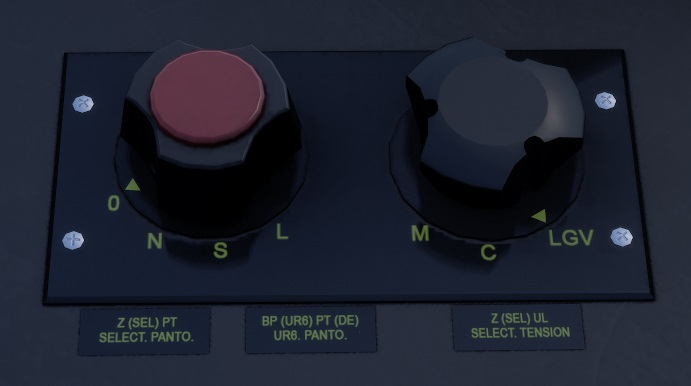
The one on the left side is the pantograph control and has four positions:
- O lowers pantograph
- N raises rear pantograph (normal operation)
- S raises rear pantograph (train rescued or being towed)
- L raises front pantograph
The one on the right side is the electrification mode selector and has three positions:
- M for AC lines (other lines)
- C for DC lines (Marseille area)
- LGV (high speed line)
When train is using the auxiliary battery, as soon as pantograph is raised and the catenary power is available the catenary voltage indication will be activated and a yellow icon will be displayed at the indicators panel to indicate that the battery power can be bypassed and its circuit breaker is open.
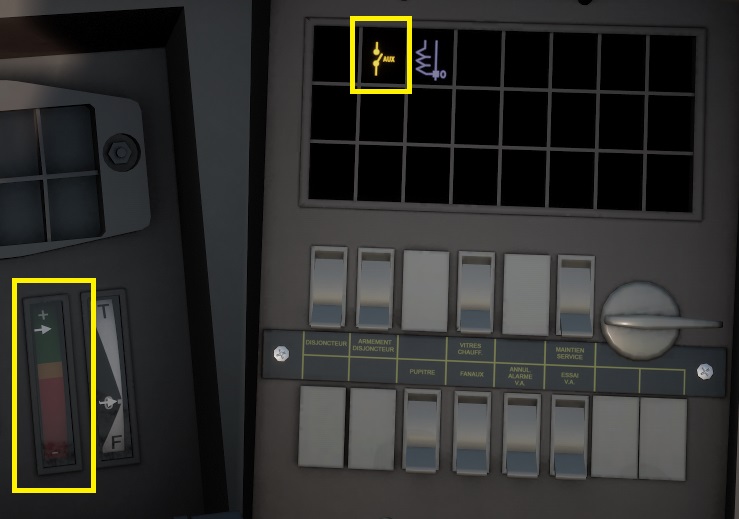
TGV main circuit breaker works a bit different from other trains as it needs to be toggled (closed and opened) and then rearmed (closed again) in order to be fully functional. As soon as main circuit breaker is set and open a red icon will be displayed at the indicators panel. When the rearm indicator is displayed on the right side then circuit breaker can be rearmed to close it, all indicators will be removed and train systems will get the power directly from the catenary. The other blue icon seen in the pictures indicates that traction is currently OFF and it´s the only one that shall remain lit after the rearming process and until we apply some power to start moving the train.

If pantograph is raised but the rearm icon is not displayed either we didn´t set the main switch properly, pantograph is inside a powerless section, train is still executing the electrification transition or the wrong electrification mode was selected.
The procedure to raise pantographs before starting a service is the following:
- Set traction to OFF
- Set the required electrification mode
- Raise pantograph
- Open main circuit breaker
- Rearm main circuit breaker when the rearm indicator is lit
The procedure to change pantograph configuration at the electrification transition in LGV Méditerranée route is the following:
- Set traction to OFF
- Open main circuit breaker
- Lower pantograph before entering the track changeover section
- Set the required new electrification mode
- Raise pantograph after passing the track changeover section
- Rearm main circuit breaker when the rearm indicator is lit
Powerless sections are automatically managed by TGV but as powerless section boards are included in the LGV Méditerranée route you could still simulate a manual operation by following this procedure:
- Set traction to OFF
- Open main circuit breaker before entering the powerless section
- Rearm main circuit breaker after passing the powerless section when the rearm indicator is lit
British EMUs
Class 375/377/395 share a special procedure to operate the electrical systems, being class 395 the only one which uses a dual system. Class 375/377 use third-rail shoes (DC) and the controls and indicators are in the left side of the cab and in the driver´s desk.
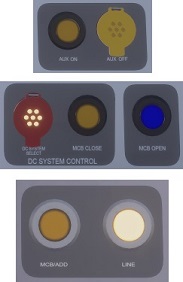
The procedure to activate power supply is the following:
- Set reverser to NEUTRAL
- Press and hold the Aux On button during 5s to switch on battery
- DC system will be enabled automatically
- Main circuit breaker indicator will be lit
- Press and hold the MCB Close button during 5s to close main circuit breaker
- Main circuit breaker indicator will be turned off
- Line voltage indicator will be lit
Class 395 Javelin uses third-rail shoes (DC) and pantograph (AC). The controls and indicators are located at the left side of the driver´s desk.
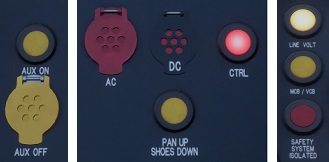
The procedure to activate power supply is the following:
- Set reverser to NEUTRAL
- Press and hold the Aux On button during 10s to switch on battery
- Press and hold the DC (third rail) or CTRL (pantograph) button during 2 seconds
- Press the PAN UP SHOES DOWN button to deploy shoes or pantograph
- Line voltage indicator will be lit if power supply is available from the selected source
- Main circuit breaker indicator will be lit
- Press the PAN UP SHOES DOWN button again to close main circuit breaker
- Main circuit breaker indicator will be turned off
9. Signalling systems
This section describes the relevant topics related to some of the onboard signalling systems implemented in game. This should be complemented with the information included in the manuals.
9.1. Special signals
There are some important special signals used in the routes. Some of the following signal types are also included in different countries but adapted to the country specific rules, so they may look different. The ones which involve any relevant procedure to be taken into account are listed here.
Distant announcement boards
They are included in Munich-Ausburg route in the approach to train wash track, and they are used to announce a main signal. Normally they are mounted on other signals but in this case they are also used alone with a PZB magnet. If no signal is visible after them they shall be considered as a speed reduction announcement or a stop announcement. As in that case they can give a 1000 Hz magnet they should be always acknowledged.
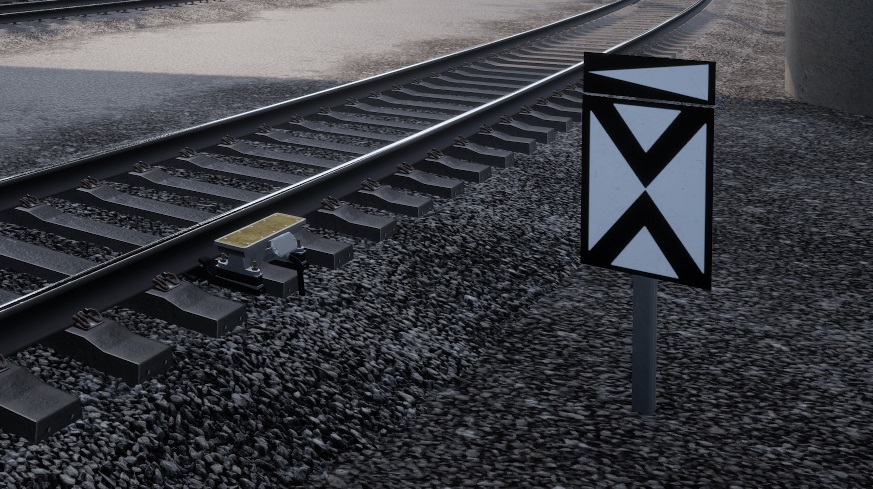
Stop boards
White polygonal boards are used in Rhein-Ruhr Osten route near Wuppertal station. They act as a stop signal and they also include a PZB magnet. We will see a signal announcing the approach to stop before the board and PZB will also display the 500 Hz magnet indication while we approach to the board itself, so the same speed restrictions and procedure used for the standard approach to a stop signal are applicable in this case as well. This means we will need to request override to dispatcher and also press PZB override button in order to pass the board.
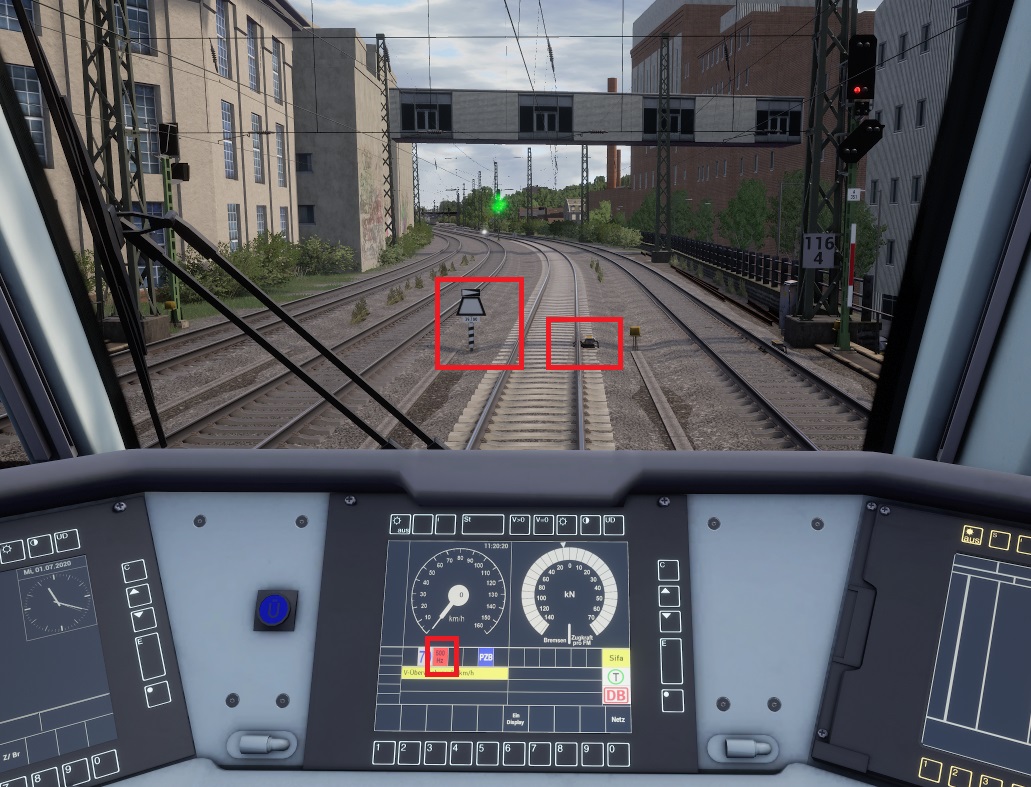
In Sand Patch route we can also find stop boards at the exit from Rockwood mine and at the dead end tracks along the line. In the british routes they are normally used at dead end tracks as well. The american and british board types can be seen in the next picture.

In the Arosa line we find a special type of stop board. They are used before exit signals which are shared by two tracks at the same time (placed directly at the switches) and shall not be passed to avoid fouling the neighbouring track.

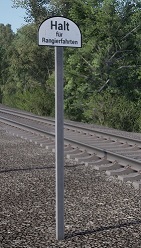
End of shunting boards
They are used in Rhein-Ruhr Osten route and normally they don´t include any PZB magnet. They are used to define the shunting boundaries and they act as a stop signal to prevent movements against the current traffic. They shouldn´t be overpassed without permission from dispatcher during shunting.
LZB block markers
On LZB tracks the LZB blocks limits are defined by special marker boards. They can be used as visual reference in case the train is commanded to stop at the block limit. Therefore they can act as a stop signal. In case signals are installed in the line for non-LZB trains then those markers can be usually found between the signals.

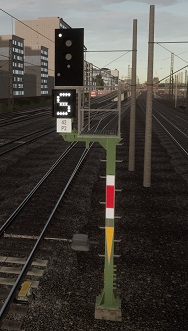
Intentionally turned off signals
This situation can happen at some signals on LZB tracks when signal is close to other signals. If signal is not providing any main aspect then it can be ignored. To avoid that signal could be understood as faulty the small white marker light, which indicates that another signal is expected at short distance, is still lit.
Route against current traffic board
This board can be found at some of the Ruhr-Sieg Nord route scenarios where train is routed against current traffic due to failures on the line. Train speed will be limited during this special procedure.
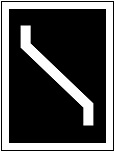
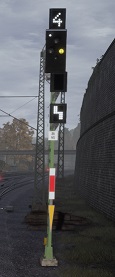
Normally you will find a light board version of this indication at the signal heads instead of a plate, as this is mainly used during degraded operations only or at some special cases as in the Wuppertal station exit, before the polygonal stop board.
Level crossing speed limit boards
In some british routes like East Coastway we will find a special level crossing board which includes a speed limit and it´s placed on the right side of the track. This is intended for trains running against the current traffic. Displayed speed limit must followed from the board up to the level crossing.

Sandite application markers
We can find them in the East Coastway route but they can be ignored during regular driving. Sandite is applied during track maintenance to combat the fallen leaves that could produce degraded adhesion. Sandite is a mixture of sand, antifreeze and steel shot. To assist the crews during the process a set of special yellow markers is used. Those markers are installed in a sequence of three boards:
- Three stripes announce a sandite application area
- Two stripes define where sandite application should start
- One stripe defines where sandite application should end
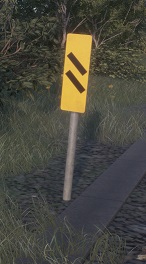
The reason to include them in the guide is that those markers should not be confused with the distance countdown boards as they also use a three boards sequence with stripes but on white boards in that case. Countdown boards inform driver of the distance between the boards and the next signal and can be found at other routes. In the british case countdown boards use red stripes while in the german routes they use black stripes.
9.2. Special speed limits
German speed limits
In german routes speed limits can be defined by speed boards, by boards/light boards at the signal heads or by some signal aspects as well.
General rules regarding signal aspects:
- The vertical yellow-green aspect indicates a speed reduction after the signal.
- The diagonal yellow-green aspect announces a standard 40 km/h limit after next signal.
- The diagonal yellow-green aspect with a speed limit below announces limit after next signal.
- The flashing green aspect indicates “proceed and expect speed reduction after next signal”. Signal can also include the announced speed limit in a board below it. If no board is included then the announced limit is 160 km/h (this is normally used at the LZB lines).
General rules regarding speed indications:
- On top of signal head the limit at the switches after the signal is indicated (white number).
- Below the signal head the limit expected at the next signal is announced (yellow number).
- Signal mast can include a rectangular white board with the limit applicable at the signal itself.
- Signal mast can include a triangular orange board for regular speed limit announcements.
The boards on the signal heads can be a light board to display different limits depending on which route is set on the switches or just a plate if the same limit is always used. When standard speed boards are installed near the switches this type of signals can be also used to announce those speed limits.
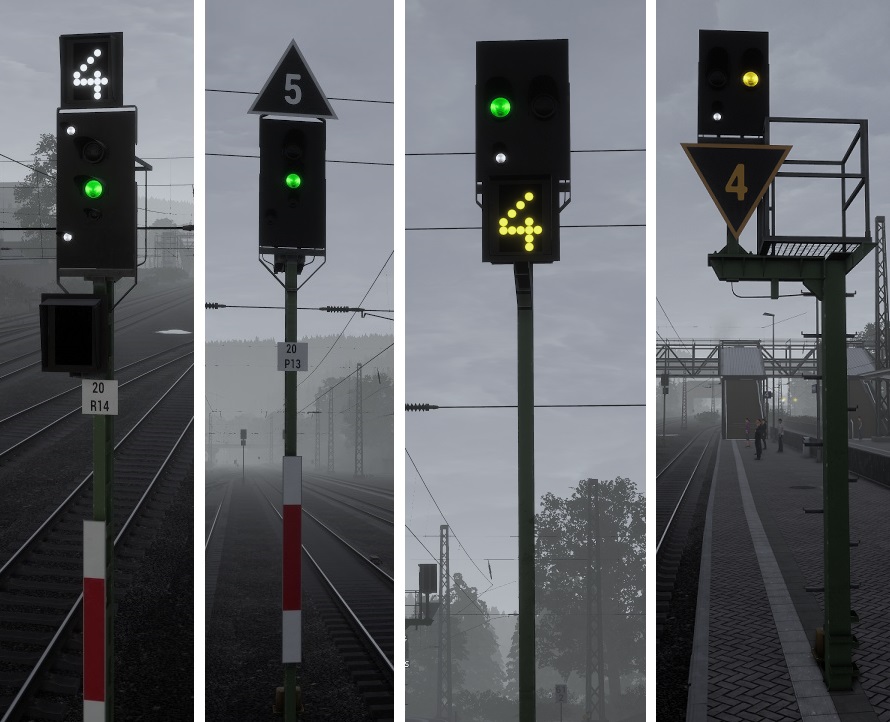
Even if signal indicates a speed limit which will be applicable when passing the switches you should anyway try to adjust train speed in advance and pass the signal itself at the displayed limit. This prevents overspeeding if the switches are very close to the signal.
LGV Méditerranée speed limits
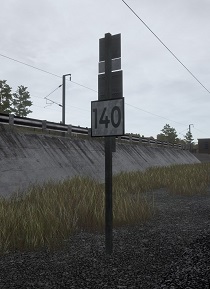
In the Marseille area speed limits are not always defined using speed boards but banners placed at the gantry signals to better identify the locations where the speed limits are in force. Only some speed boards are used in this area. After the exit from the TVM signalling area a speed board is located at the tunnel exit and it provides the 140 km/h speed limit for arrivals.
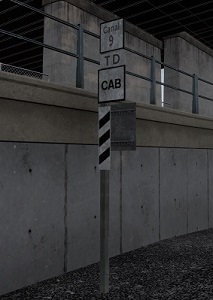
In the opposite direction a CAB board announcing the start of the TVM signalling area is located at the tunnel entry and it provides the 160 km/h speed limit for departures.
The POTENCE P1 gantry gives the 110 km/h (arrivals) and 140 km/h (departures) limits.

The PORTIQUE P2 gantry gives the 60 km/h (arrivals) and 110 km/h (departures) limits.
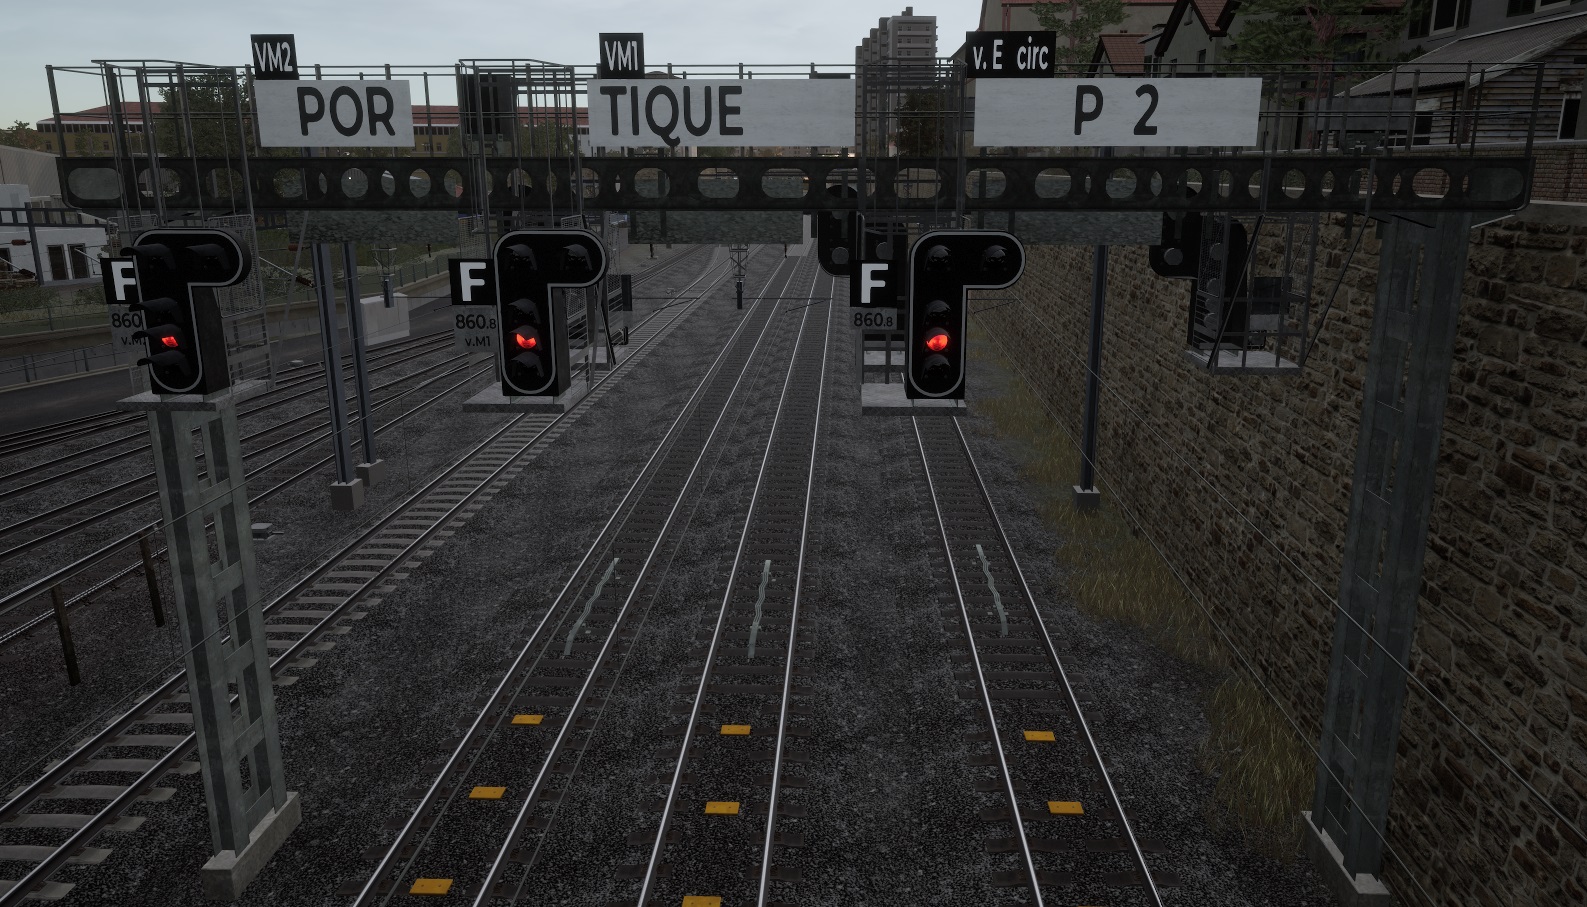
The PORTIQUE P3 gantry gives the 30 km/h (arrivals) and 60 km/h (departures) limits.
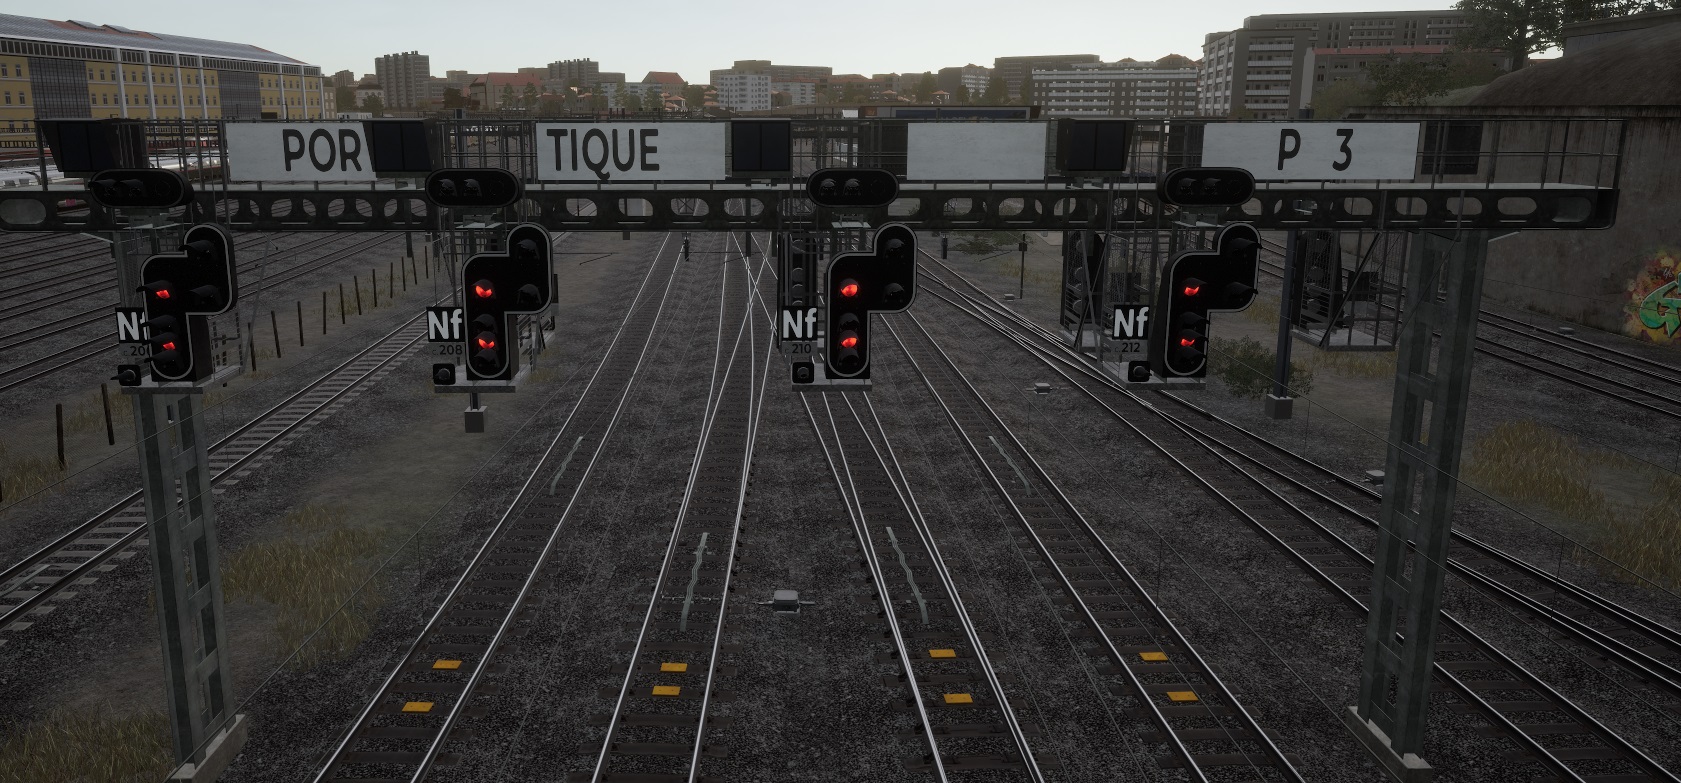
The speed limits sequence for the operations in Marseille area is the following:
(TVM)
(Board)
(P1)
(P2)
(P3)
(Station)
(P3)
(P2)
(P1)
(TVM)
9.3. AWS and TPWS
These are the main signalling systems available on the british trains. Automatic Warning System (AWS) uses magnets installed on the track to provide basic signal aspects information. Train Protection and Warning System (TPWS) is a modern version of the AWS using transmitter loops and providing additional supervision features.
Activation and regular operation
In some of the older locomotives both isolation and cab changeover switches need to be enabled to activate the system. In modern trains a dedicated circuit breaker or a switch is used. After system startup an audible warning will be triggered and you must acknowledge it.

AWS supervision
When train approaches a significant speed restriction announcement board or a signal giving anything other than proceed aspect an audible warning will be triggered and driver needs to acknowledge it or brakes will be applied. After that the AWS “sunflower” indicator will be lit until another signal with a proceed aspect is passed. Signals with proceed aspect don´t require any acknowledgement.

TPWS supervision
System works in the same way as AWS but includes overpass stop signal protection and speed supervision during the approach to stop signals, buffer stops or speed restrictions. Speed supervision uses additional transmitter loops (placed before the signals). In some cases TPWS+ can be used installing even more transmitter loops and allowing multiple speed checkpoints and the supervision for higher speeds operation. The spacing between transmitters defines which will be the supervised speed limit on each situation.
In addition to the “sunflower” indicator TPWS also includes a panel containing a brake demand indicator and the stop override button. Brake demand indicator will be lit whenever brakes are applied by system.
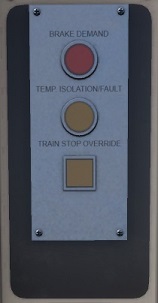
Brakes will be applied by TPWS in any of the following cases:
- Required signal aspects not acknowledged
- Speed restriction announcement not acknowledged
- Approach a speed restriction above the required speed limit
- Approach a stop signal above 100 mph (TPWS+ only)
- Approach a stop signal above 75 mph
- Approach a buffer stop above 10 mph
- Overpass a stop signal
Note: as supervised speed limits are configured by adjusting the spacing between transmitter loops the speed values can be different to the standard ones listed above depending on the situation.
Signal override
To override a stop signal you need to press the TPWS override button before passing the signal. Override will be enabled during 20 s preventing the brake application from the transmitter placed at the signal. TPWS override indicator will be lit while override is enabled and turned off as soon as it´s disabled.
System restore
If brakes are automatically applied due to any system supervision you need to press the acknowledge button on the cab to release the brakes.
9.4. PZB
PZB is the main german signalling system and all indications are given at a dedicated panel and at the main display. Supervision is semi-continuous as cab indications change when Information is sent by PZB magnets installed at the signals or speed boards. PZB sets speed limits according to the selected mode. They include a max train speed and a permitted speed while approaching magnets.
PZB controls
There are four controls used to interact with PZB:
- Mode selector: used to change the PZB operating mode (requires a PZB restart)
- PZB acknowledge: used to acknowledge 1000 Hz magnets and speed boards
- PZB release: used to release speed limits and brakes application
- PZB override: used to override the 2000 Hz magnet at stop signals
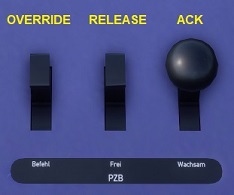
Activation and regular operation
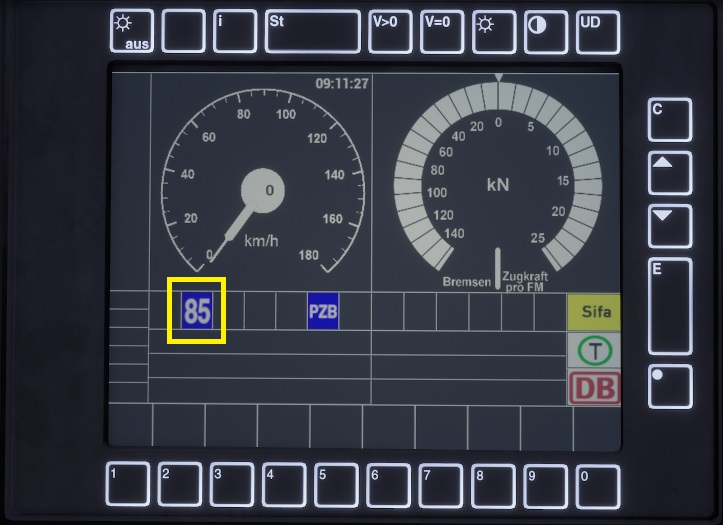
When system is active the PZB indicator and a blue steady speed indicator for the current selected mode will be lit. This indicator will display 85 (passenger), 70 (normal freight) or 55 (heavy freight).
Initial speed limit
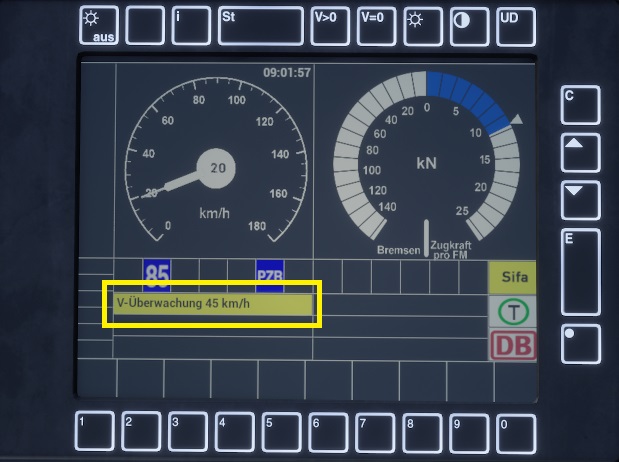
When starting train movements after system startup PZB sets a 45 km/h speed limit. The mode indicator will start blinking and a yellow message containing the speed restriction will be displayed.
This limit will be removed as train moves but if the signal ahead includes any permissive aspect you can also manually relase this speed limit in advance and restore the standard max speed limit by pressing the PZB release button. After that the speed mode indicator will be steady again.
General procedures
As a general rule you need to press the PZB acknowledge button after passing any of the following announcement signals and speed restriction boards or brakes will be applied:
- Stop announcement (single yellow or diagonal double yellow)
- Standard reduced speed announcement to 40 km/h (diagonal yellow-green)
- Custom reduced speed announcement (diagonal yellow-green + custom speed limit)
- Proceed and expect speed reduction after next signal (flashing green + custom speed limit)
- Speed restriction announcement lower than 100 km/h (yellow light board or orange board)
- Distant signal announcement board (see special signals chapter)
Note: a flashing green aspect without a custom speed limit announces a reduction to 160 km/h and does not require any acknowledgement. It is mainly used at LZB lines only.
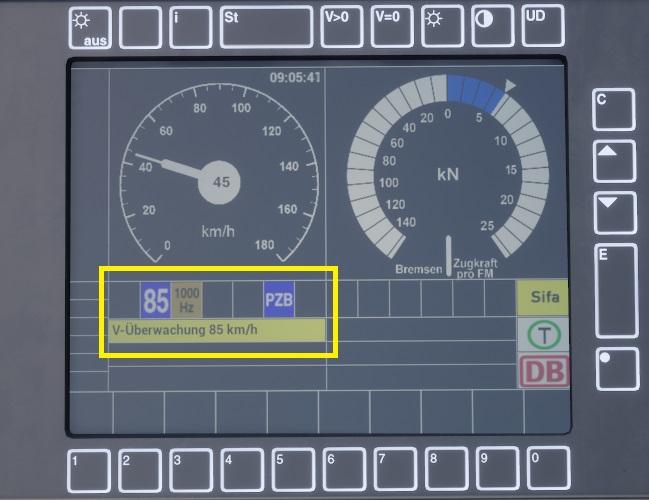
Some of them will include a 1000 Hz magnet. After the acknowlegment of a 1000 Hz magnet a yellow icon will be lit and a speed limit message will be displayed. The speed mode indicator will also start blinking. Train speed must be reduced below the current mode limits or brakes will be applied.
The yellow icon will be automatically removed 700 m after the magnet if no additional 1000 Hz or 500 Hz magnets are passed but the speed limit will be still active and the speed mode indicator will also continue blinking until system restores the standard max speed limit. After that the speed mode indicator will be steady again.
When passing a 500 Hz magnet located before a stop signal a red icon will be lit and a speed limit message will be displayed. This magnet does not require any acknowledgement but it must be passed below a defined speed limit and also train speed must be reduced below the current mode limits or brakes will be applied. Once signal clears and the signal magnet is passed the red icon will be automatically removed and 250 m after the magnet the standard max speed limit will be restored.
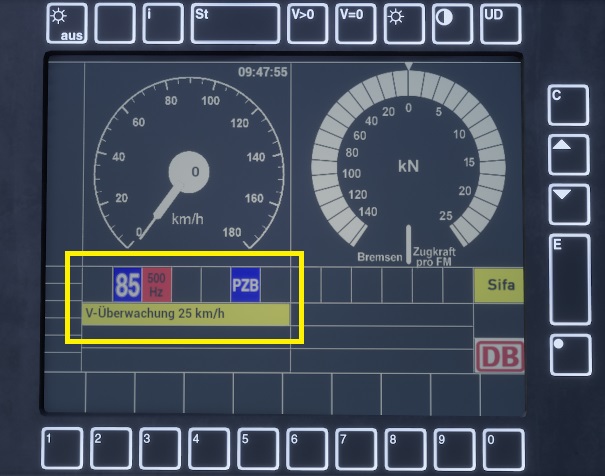
Note: in the previous image the displayed speed limit is 25 km/h because, additionally to the 500 Hz magnet, also the restrictive mode has been activated.
Speed limits release
After the acknowledgement of a 1000 Hz magnet, if the yellow icon is removed this could mean that a former stop signal has changed to a permissive aspect before train has arrived to signal. In this case you can manually relase the speed limit in advance and restore the standard max speed limit by pressing the PZB release button. After that the speed mode indicator will be steady again.
If you manually release the 1000 Hz magnet speed limit and the signal is still displaying the stop aspect when train passes the 500 Hz magnet brakes will be also applied. The 500 Hz magnet speed limit can´t be manually released, so you should always perform the 1000 Hz release before passing the 500 Hz magnet in order to avoid that speed limit.
Restrictive mode
Whenever a 1000 Hz or 500 Hz magnet is active, if train reduces speed below 10 km/h during more than 15 s or stops (at a platform for instance) and continues afterwards, a special restrictive mode will be activated and a speed limit lower than the standard one will be set. This limit can´t be manually released while the yellow or red icons are still lit.
Modes and speed limits
The following table contains the speed limits defined for each of the PZB modes:
165 km/h
85 km/h in 23 s
45 km/h in 153 m
45 km/h limit
25 km/h in 153 m
125 km/h
70 km/h in 29 s
35 km/h in 153 m
45 km/h limit
25 km/h
105 km/h
55 km/h in 38 s
25 km/h in 153 m
45 km/h limit
25 km/h
Signal override
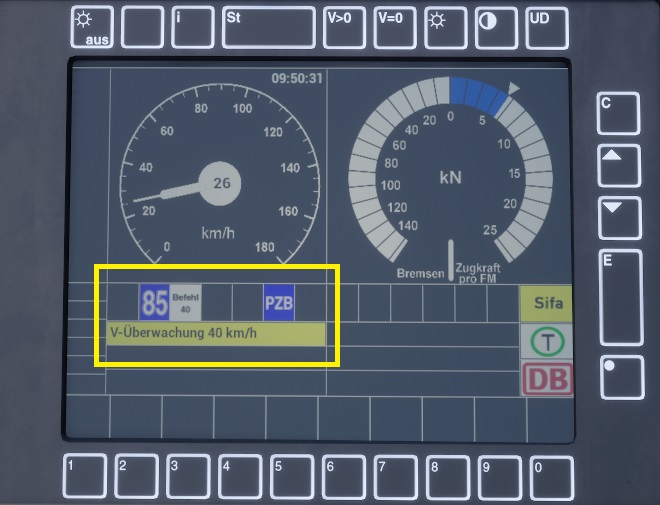
To override a stop signal you need to press and hold the PZB override button before passing the signal and train speed must be lower than 40 km/h. Override will be enabled preventing the brake application from the 2000 Hz magnet placed at the signal and also the 40 km/h speed limit will be activated. When the 2000 Hz magnet is passed a white icon will be lit and then you can release the PZB override button. If you press the button too late or release it too early the brakes will be applied.
System restore
If brakes are automatically applied due to any PZB supervision you need to press the PZB release button on the cab to release the brakes.
9.5. LZB
LZB is available in german trains and all indications are given at a dedicated panel and at the main display. Speed and distance supervision is continuous so cab indications can change dynamically to match the signalling status ahead of train. Information is sent by LZB loops installed along the track.
Activation and regular operation
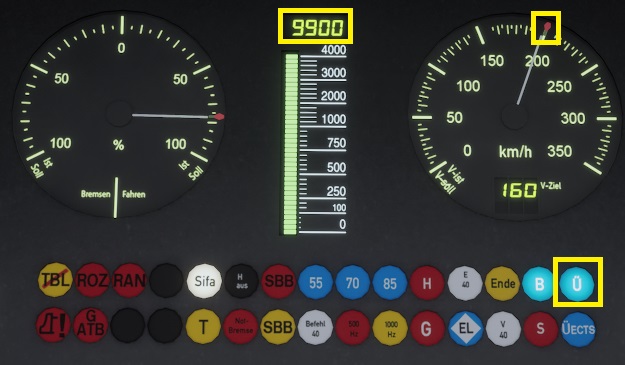
When system is active the blue B indicator will be lit on the LZB panel. When entering a LZB area and communication with LZB loop is fully established an audible warning will be triggered and the blue Ü indicator will be lit as well.
During regular operation trackside will send to onboard the permitted speed limit and the distance to new target speed limits. The speed limit is marked by a small red icon on the speedometer and the distance by a number in the top of main panel and a vertical bar. The max displayed distance is always lower than 10 km and bar is updated for values lower than 4 km only.
Braking curves
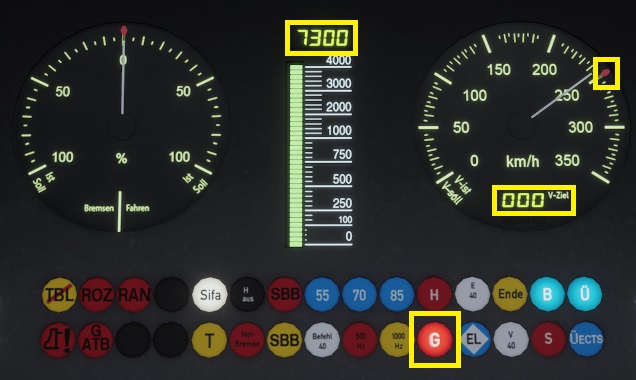
Onboard will display the braking curve permitted speed while approaching to a lower speed limit. The permitted speed and distance indications will update in real time to follow the approach to the new targets. These are the steps when receiving a lower speed limit:
- An audible warning is triggered and new target speed is displayed below the speedometer.
- If target speed is 0 then system is announcing the approach to a stop.
- No driver acknowledgement is required when receiving new speed limits.
- The red G indicator will be lit and remain steady if we approach the braking curve limit.
- If we overspeed the G indicator will start blinking and brakes will be applied.
- While being below the braking curve limit the G indicator will be turned off.
Exit LZB transition
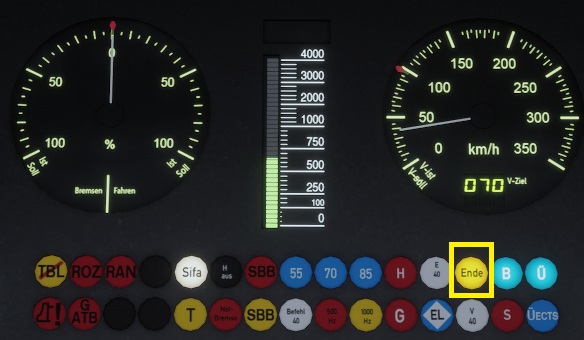
The steps to exit from a LZB controlled area to enter a PZB one are the following:
- An audible warning will be triggered and the Ende indicator will start blinking.
- Transition must be acknowledged by pressing PZB release button or brakes will be applied.
- After acknowlegment the Ende indicator will remain steady until we find the first PZB magnet.
- Then a new audible warning will be triggered and Ü / Ende indicators will be turned off.
- The PZB indicators will be turned on and PZB supervision will start.
System restore
If brakes are automatically applied due to any LZB supervision you need to press the PZB release button on the cab to release the brakes.
9.6. KVB and Crocodile
KVB
It is the standard french safety system for conventional lines and uses balises to provide speed limits information according to signal status. KVB panel is described in the next picture.
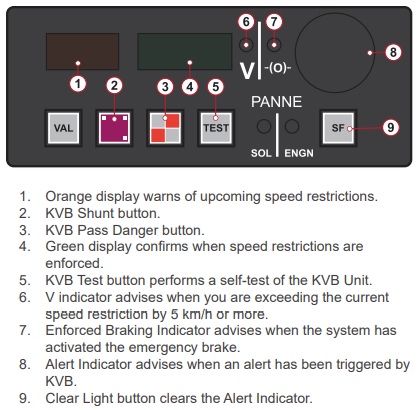
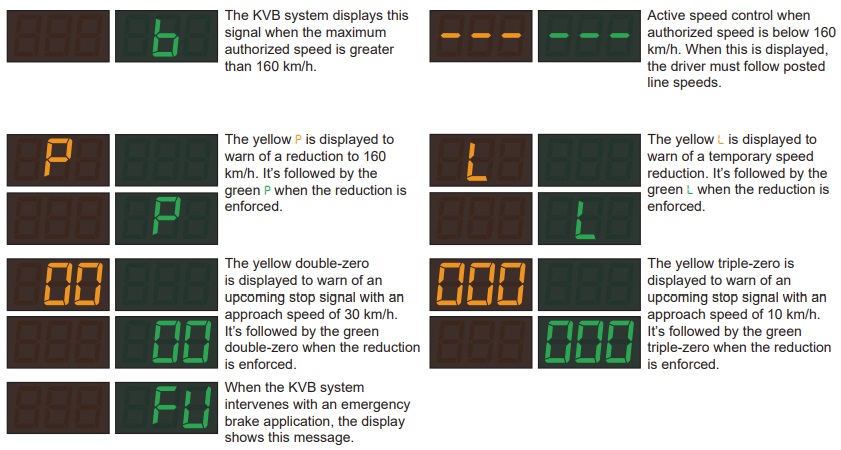
The speed limits are displayed at the panel and if they are not followed an audible warning is triggered requiring driver to reduce speed. If driver does not reduce speed then brakes will be applied. Warnings do not require any driver acknowledgement.
Crocodile
It is an older french safety system that uses electrical devices installed on tracks to provide the signals information. It features two types of signal indications:
Permissive signal
A tone is triggered and no driver action is required.
Stop announcement
An audible warning is triggered, the panel indicator starts blinking and driver needs to press the acknowledge button or brakes will be applied. After acknowledgement the indicator remains steady until signal is passed.
Signal override
To override a stop signal the KVB Pass Danger button needs to be pressed before passing the signal and train speed must be lower than 30 km/h. This prevents the brake application at the signal.
Reversing
While reversing the train during shunting operations the supervision of signals for the opposite direction can be bypassed by pressing KVB Shunt button.
System restore
If brakes are automatically applied due to any system supervision you need to follow these steps to release brakes:
- Press the acknowledge button
- Set traction lever to OFF
- Set brakes lever to RELEASE
- Rearm main circuit breaker (in case of traction cutoff)
9.7. TVM
TVM is the standard french safety system for high speed lines and provides information about speed limits by using loops installed on the track.
Regular operation
As soon as train enters a block it receives the speed limit in force for the current block and also an indication to announce if speed limit for the block after the current one is expected to be further reduced or maintained. Stops are announced by consecutive speed reductions followed by a 0 speed limit at the end. Blocks are marked with boards installed on the track.
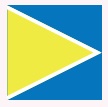
Everytime a speed limit is updated to a new value an audible warning is triggered and the speed indication is displayed at a dedicated indicators panel in the cab. Warnings do not require any driver acknowledgement. If the speed indication starts blinking then an additional speed reduction is expected at the next block. If it is steady no additional speed reduction is expected at the next block, so either the same limit will still be in force or a speed increase will be received. If speed limits are not followed brakes will be applied.
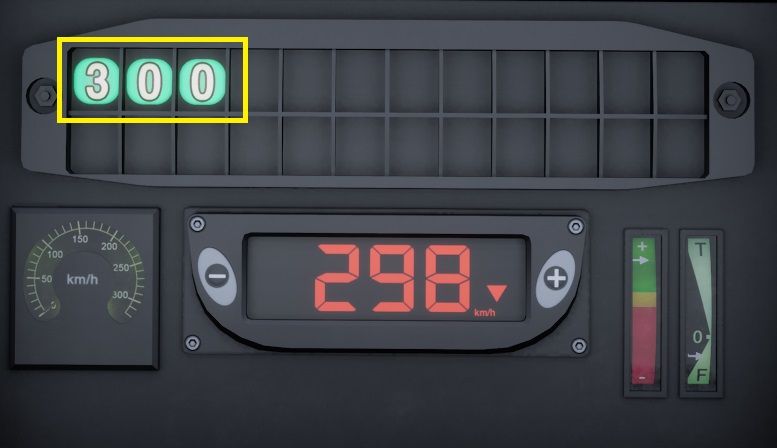
Speed supervision
The different types of speed indications are included in the next picture and they provide the speed limits which are in force for either the current block or for the next one.
The first type (green) is used at main line top speed areas. The second and fourth types (diamonds) are used during approach to lower limits, to a stop or when traffic is ahead. The third type (black) is used where line has any speed restriction, due to a switch, tunnel or curve for instance. The fifth type (red squares) is used to indicate a full stop, the end of the line or an occupied block.
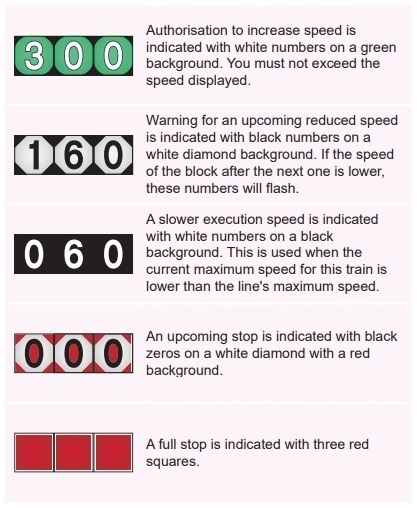
Current block limit: the first and third types (green or black) provide speed limits which are in force for the current block. If displayed speed limit is not followed brakes will be applied.
Next block limit announcement: the second type (white diamonds) provides the next speed limit announcement, which will be only in force at the entry to the next block. If displayed speed limit is not followed after passing the next block board brakes will be applied.
Stop announcement: the fourth type (red diamonds) provides stop announcement, which will be only in force at the entry to the next block. If next block board is passed brakes will be applied.
Full stop / Occupied block: the fifth type (red squares) is similar to a stop announcement so brakes are applied if the next block board is passed. But it also requires that train speed is below 35 km/h or brakes will be applied.
System restore
If brakes are automatically applied due to any system supervision you need to follow these steps to release brakes:
- Press the acknowledge button
- Set traction lever to OFF
- Set brakes lever to RELEASE
- Rearm main circuit breaker (in case of traction cutoff)
9.8. LIRR ASC
LIRR route uses an ATC system called ASC (Automatic Speed Control) that provides MAS (Maximum Authorized Speed) supervision to trains by feeding speed codes into the rails. This system only provides and supervises the maximum authorized limit for the current block according to signal aspects but not the permitted speed at every place inside that block. This means driver must still know where each track speed restriction is in force inside the block (indeed only few speed boards are installed) and drive following the signal indications. The authorized speed is usually updated at the signals but also between them if additional blocks exist there.
Track speed restrictions
In the following link you will find a route map with the track speed restrictions that ATC is not providing. It contains the ones existing due to speed boards, curves, tunnels and entry to branches. It can be used as an additional complement during driving to better anticipate to speed restrictions:
[link]Activation and regular operation
As M7 is the standard train operated in the line we will use its display for the explanations. As soon as ATC is active the ATC operative indicator will be lit on the right side of the display and also a small red indicator will be lit on the left side. The authorized speed limits are displayed on the left side as well.
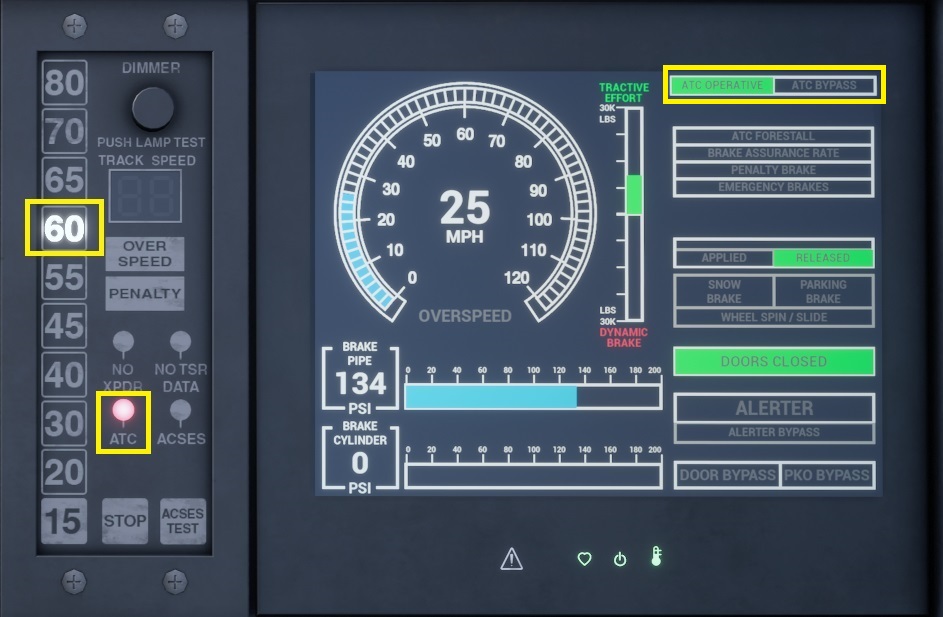
In order to anticipate to ATC speed limits reductions the signal aspects and the track speed restrictions shall be taken into account, including the ones related to routes using switches. Depending on the situation the ATC displayed speed limits can be different to the real permitted speed limit which is in force for the train. The most restrictive one shall be always followed dy driver.
Speed supervision
When a speed limit lower than the current one is received driver needs to acknowledge it or brakes will be applied. Higher speed limits don´t require any acknowledgement but still require that full train length has cleared any previous speed restriction to start increasing speed.
If displayed speed limit is not followed an audible warning will be triggered and the overspeed indicator will be lit. Driver needs to reduce speed and also press the acknowledge button or the penalty indicator will be also lit and brakes will be applied.
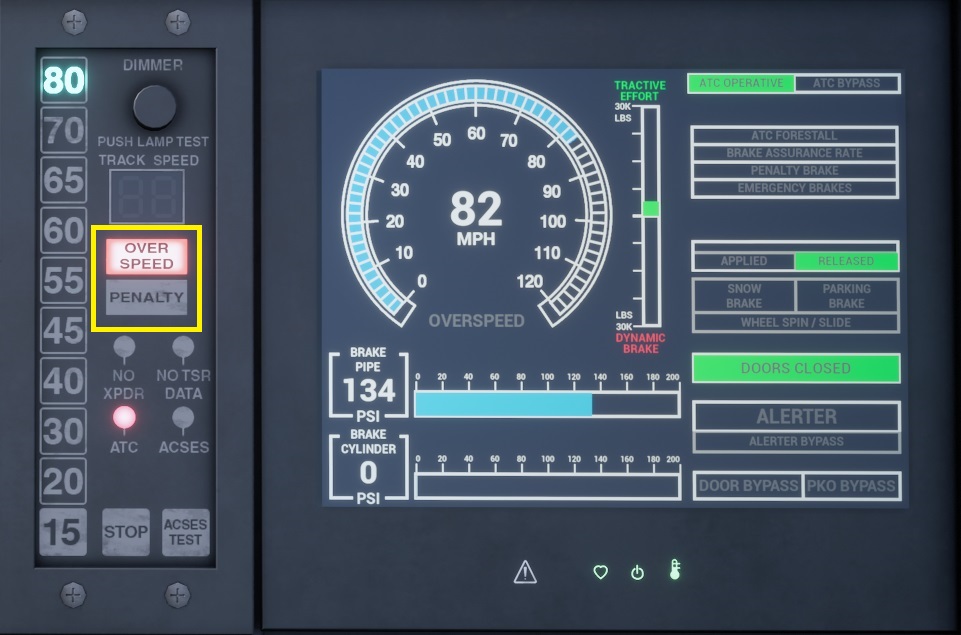
Speed supervision is a bit more complex in the case of a significant overspeed (for instance is the case of a sudden speed limit reduction) as it requires that driver brakes with at least a minimum required deceleration and also presses the acknowledge button. When the required deceleration is reached (normally with around 40-60% braking power) the ATC forestall indicator will be lit preventing any brake application from the system and allowing train to reach the displayed speed limit. The correct deceleration must be maintained during the whole braking process until reaching the required speed limit or brakes will be still applied. Below the ATC forestall indicator the brakes status indicators (applied or released) are also displayed.
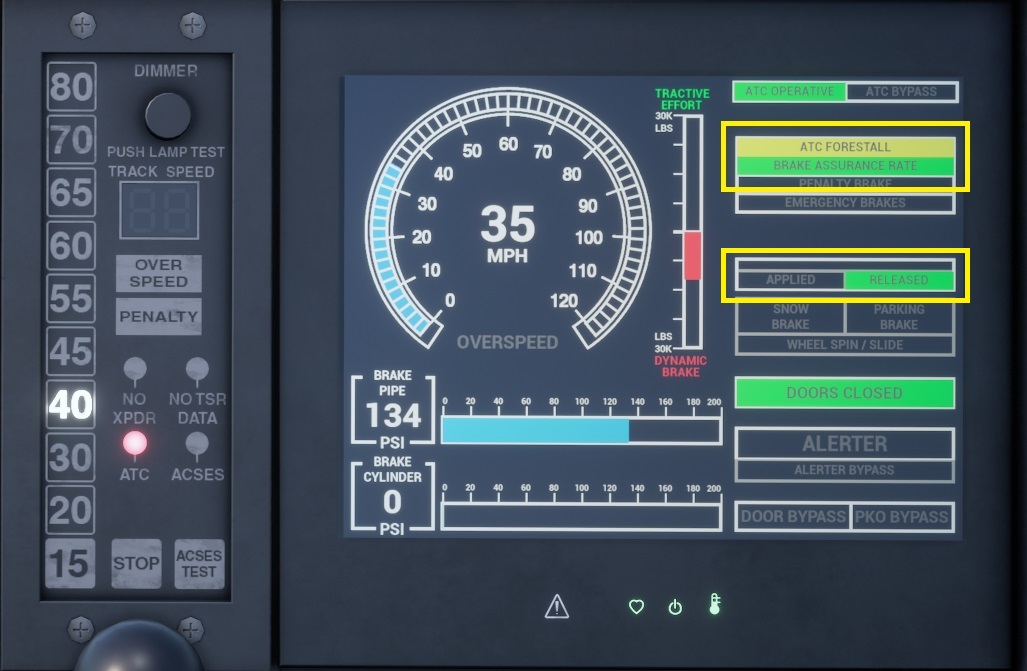
This is the correct procedure to prevent any brakes application from the system:
- Adjust train speed according to signal aspects prior to enter the block
- In case of overspeed an audible warning will be triggered and the indicator will be lit
- Start braking immediatelly to adjust train speed
- When required: reach the minimum required deceleration (ATC forestall indicator is lit)
- Press the acknowledge button
- Maintain deceleration until displayed speed limit is reached
Note: only one acknowledgement is required for a speed limit reduction which is followed by an overspeed. The acknowledgement for the lower speed limit itself is not required in this case.
The following table contains the typical ATC displayed speeds which you can expect according to each of the signal aspects available on the line.
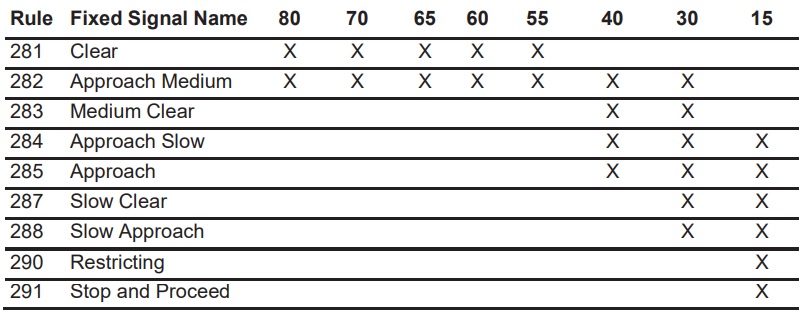
M3 panels
M3 trains use panels instead of a display. On the left side we see the indicators for ATC and brakes status (applied or released) while in the center panel we find the other ATC indicator together with the speed limits, overspeed and penalty indicators. There´s no ATC forestall indicator in the M3 panels so the correct deceleration must be estimated by driver on each situation.
M3 uses a bell warning device which is shared by ATC and alerter systems. An intermitent bell is the alerter warning while a continuous bell is the ATC warning. Operation is the same as in the M7 case.
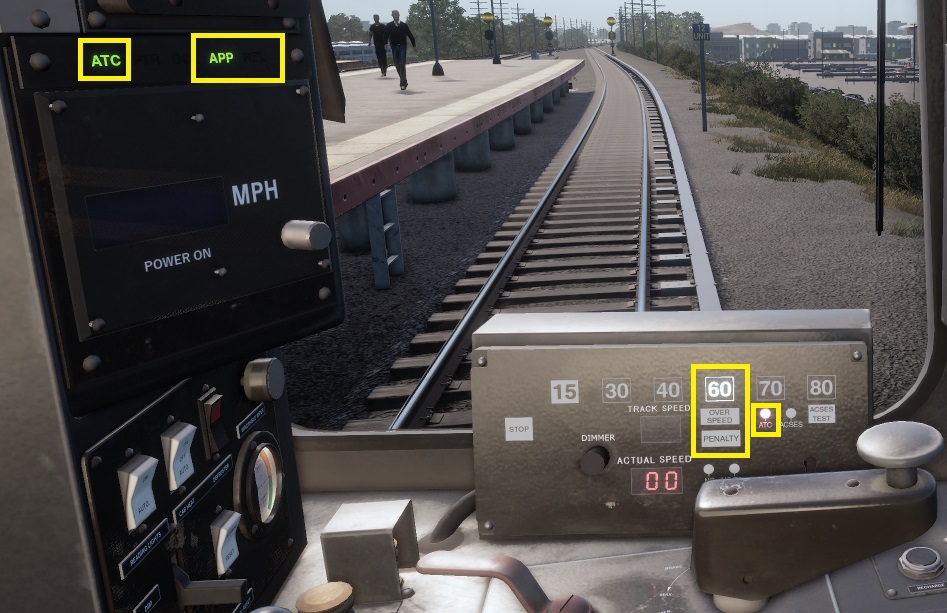
System restore
If brakes are automatically applied due to any system supervision you need to follow these steps to release brakes:
- Press the acknowledge button
- Set brakes to MAX
- Perform a brake pipe full recharge
- Set brakes to RELEASE
9.9. ZSI-90
This swiss signalling system is available on Arosa Line. It uses magnets installed on the track to provide basic signal aspects information.
Activation and regular operation
ZSI-90 is always enabled in the locomotive so no special procedure is needed. System can´t be manually disabled.
ZSI-90 supervision
When train approaches a signal announcing a stop an audible warning will be triggered, an indicator will start blinking on the ZSI-90 panel and driver needs to acknowledge it pressing the ZS button or brakes will be applied. After acknowledgement the warning and indicator will be still active for some seconds but their repetition interval will be longer.
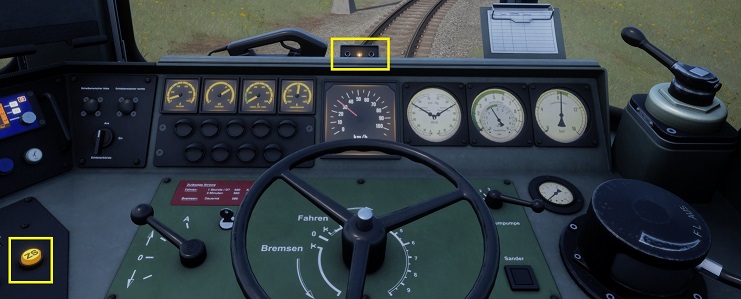
10. Final details
Game is full of additional small details hidden in the routes, that add a special touch to the simulation experience. One of my favourites are the towns including churches. In the Ruhr-Sieg Nord route, when spawning on foot at Finnentrop depot, every hour you can listen to the clock´s bell announcing the time.

In Southeastern High Speed route you can request signal override authorization clicking on the signal boxes directly by using the train external views. This has the same effect as the TAB menu request.

Also some trackside boxes have auxiliary lights. Click on the electrical panel to activate them.
