Overview
Are you missing one?
How to collect every chest in the game
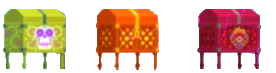
Chests are located within both towns and dungeons. They contain either money (which will always yield $500), a heart piece, or a stamina luchador mask. As grabbing chests strengthens up Juan and allows you to purchase more items from the shop, it is in your best interest to pick them up regardless if you are going for the trophy. Keep in mind that, although you will run into a majority of the chests if you make an effort to explore each dungeon, some chests are unobtainable the first time you discover them. You must backtrack to these sections of a dungeon once you’ve acquired the required upgrade.
- -Note that 100% in a dungeon accounts for both orbs and treasure chests. Therefore, if it appears you are missing out on a chest, make sure you’ve grabbed the orb in the dungeon before cross referencing your maps with the maps posted in spoiler tags below.
- -The numbers in the maps correspond to the text no to the videos.
- -Text locations and video aids (courtesy of http://www.youtube.com/user/MainGameProduction) of each area are listed below:
Pueblucho
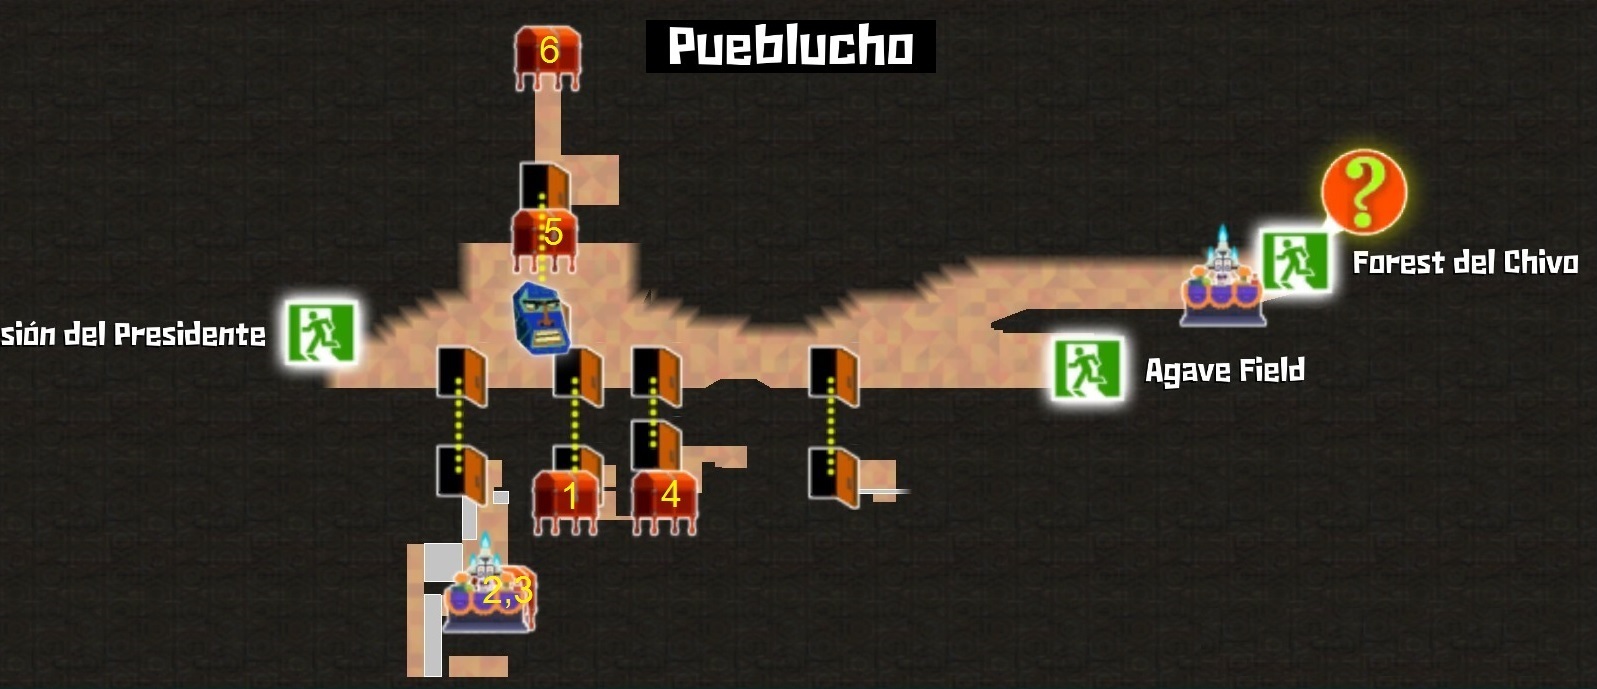
- 1– A chest can be found in the basement in the leftmost house, underneath the church. (Money)
- 2,3– After earning Dimension Swap, in the same area as above, wall jump till you see a hidden-ish area to your right. Switch realms and uppercut to reach the platform. Two chests and a shop can be found here. (Money)(Mask)
- 4– 3rd house from the right, jump down to the basement. You will find a barrel and a chicken tunnel. Go through it. (Money)
- 5– On top of the church. You may need the double jump ability before you can reach it. (Heart)
- 6– A chest can be found inside the church. You will however need the Goat Run ability before you can reach it. Once you have that, run up the left wall. (Money)
Forest del Chivo
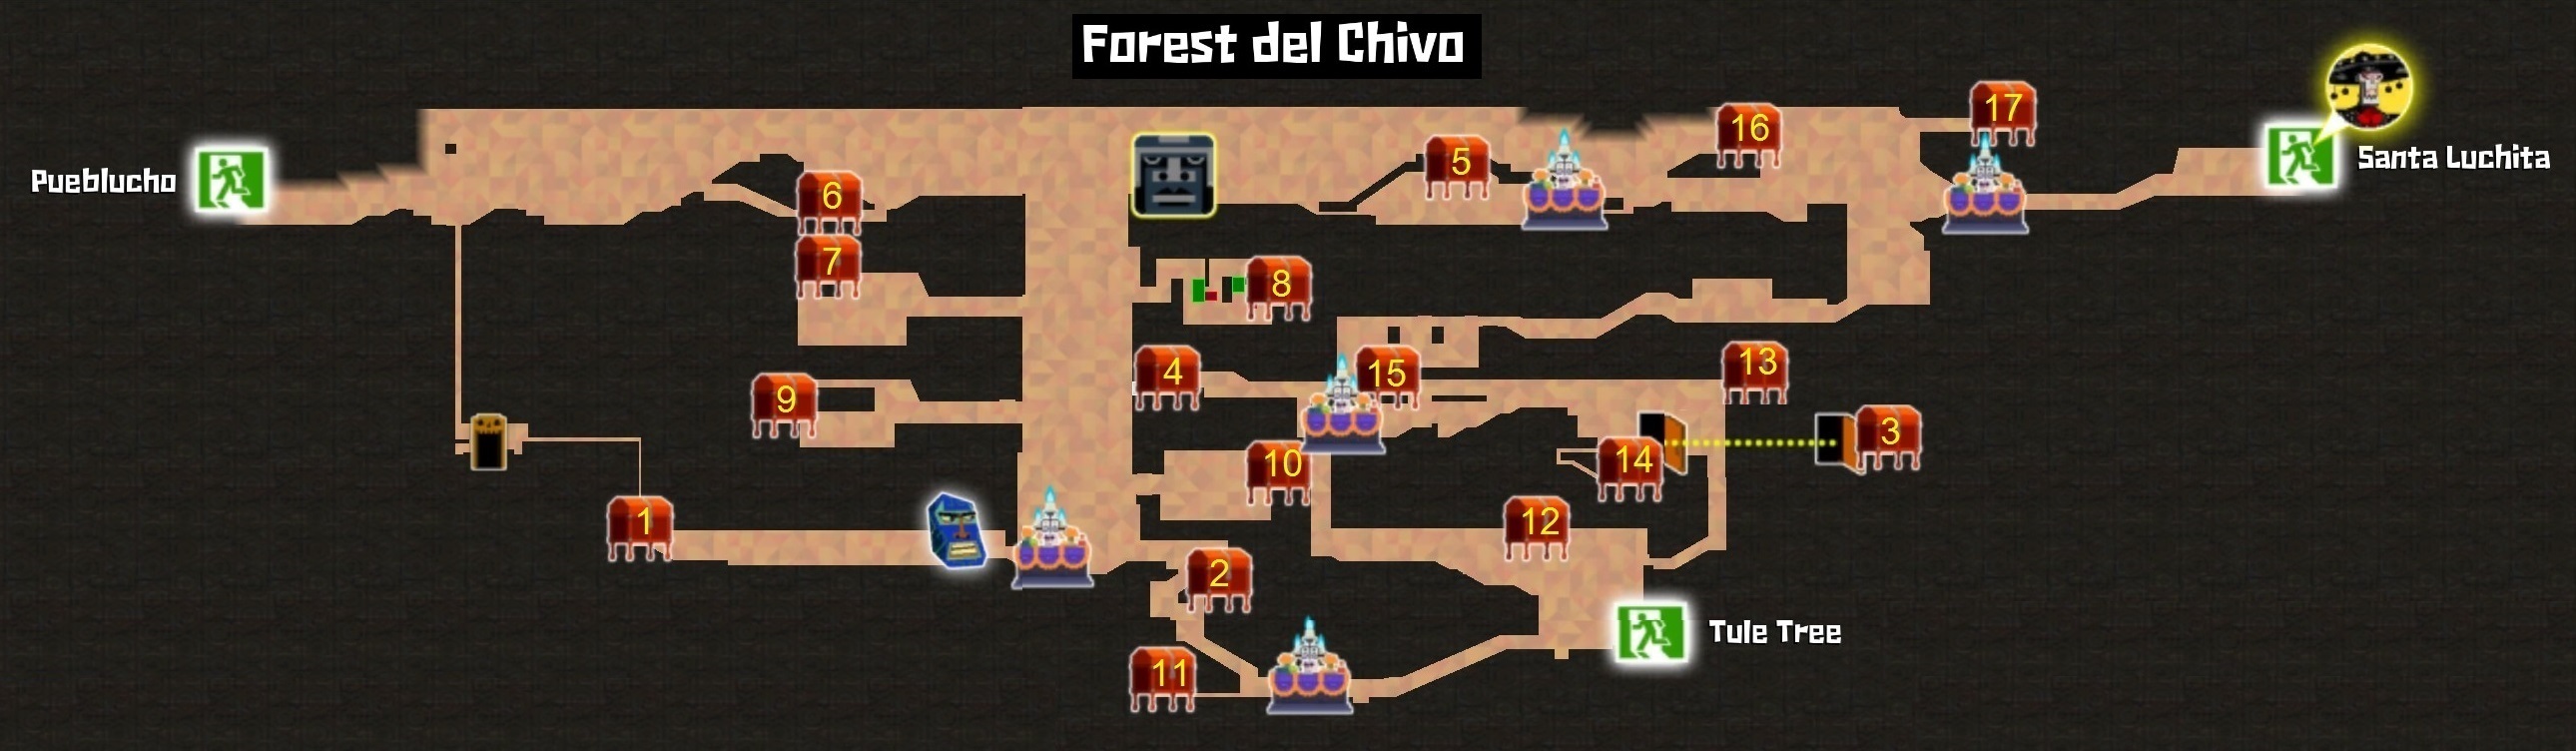
- 1– After Javier destroys the bridge, head left as opposed to your right. Jump over a few moving platforms in this area to reach a chest. (Mask)
- 2– You’ll see this chest in the next area. Come back when you’ve unlocked Wall Jump to nab it. (Money)
- 3– Continue through the level until you pass by a house next to a Choozo Statue. A chest is inside. (Money)
- 4– After learning the Rooster Uppercut, keep backtracking until you’re on top of a store. Instead of going right up some stairs, go left. This chest is behind the two skeletons. (Money)
- 5– Once you’ve earned Pollo Power, backtrack through the forest via the top. You’ll see on your map a chicken tunnel you can use. Jump a few small platforms in chicken form to reach the chest. (Heart)
- 6– In the left entrance of the forest, is a green block you can break; underneath it is a chest. Come back and break it once you’ve earned the Frog Slam to grab it. (Money)
- 7– In the large vertical section of this dungeon, behind a red block. (Heart)
- 8– Behind the green block. Complete the uppercut/slam puzzle to earn it. (Money)
- 9– Behind the yellow block. (Money)
- 10– Behind the blue block. Complete the vine puzzle to grab it. (Heart)
- 11– On your way to Yule Tree, to the left of the shop is a chicken tunnel. Chest is inside. (Heart)
- 12– Above the Tule Tree entrance are some platforms you can climb. (Money)
- 13– Doorway above Tule Tree entrance, is a red block you can destroy in upper right corner. A chest can be found inside.(Heart)
- 14– In the same area as above, a chest can be found through the chicken tunnel to the bottom left. (Money)
- 15– Left of this same area, where there’s a bottom path of vines, is a blue block to the left. (Heart)
- 16– On the trapezoid-shaped floating platform
- 17– Goat Fly required. On the hill where the skull switch is, snatch onto the small wall on top of the hill to the right. Goat Fly to the right and you’ll smack a wall. Wall run up to reach the chest. (Mask)
the chest number 16 is not in this video
Santa Luchita
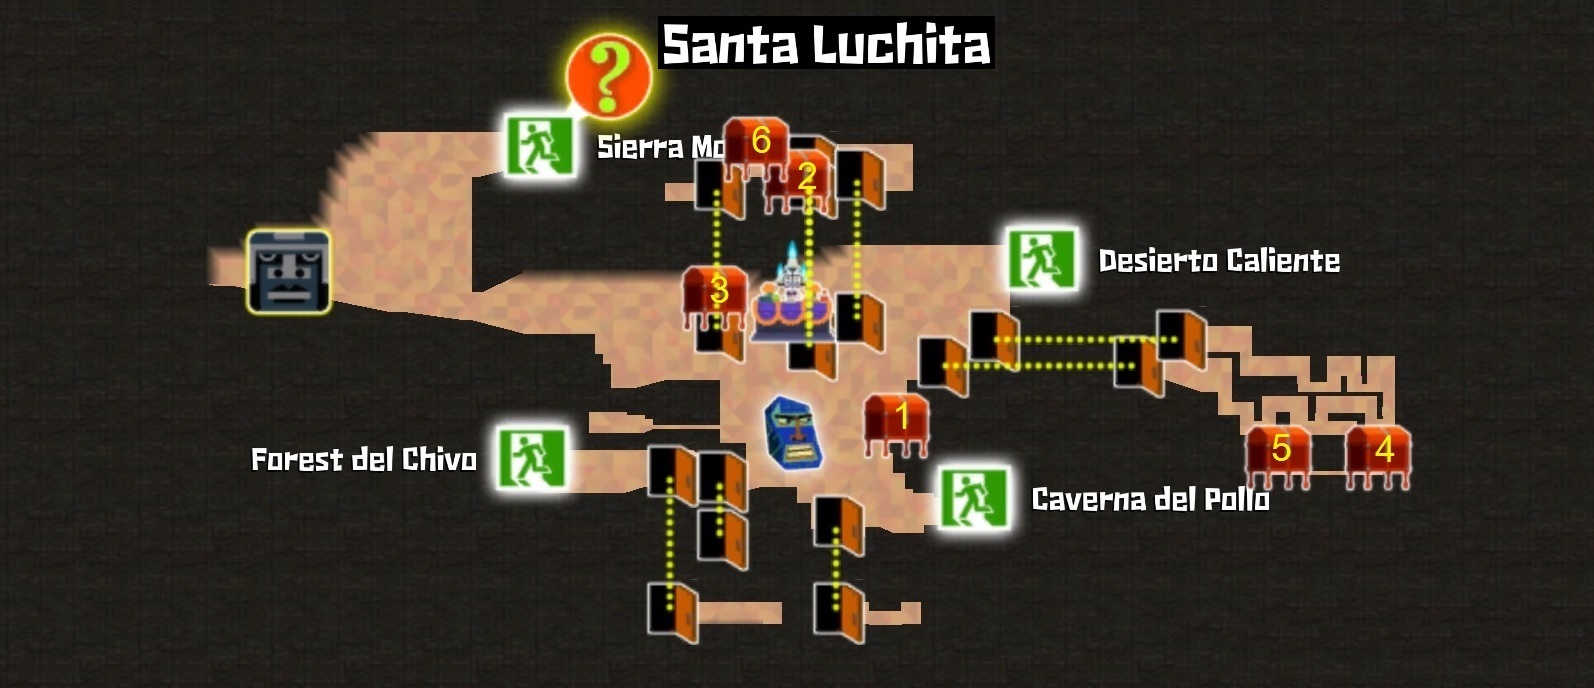
- 1– Head up to the upper portion of the town, and head all the way right. Underneath some kids who are playing, drop down from here. You’ll land on a chest. (Mask)
- 2– In the three story building, 2nd floor. (Money)
- 3– On top of Isabella’s Kitchen. (Money)
- 4– After learning Frog Slam, proceed through the basement of Hermanos Bar. Rather than continue left, you should see a platform you can drop down in the middle. The chest is down here. (Money)
- 5– In the same basement area, once you have your Pollo Power, you’ll find an area you can drop down followed by a chicken tunnel to your left. (Money)
- 6– After earning the Pollo Power, head back into the three story house. Use your chicken form to go through the little vent on the top for the chest. (Heart)
Temple of Rain
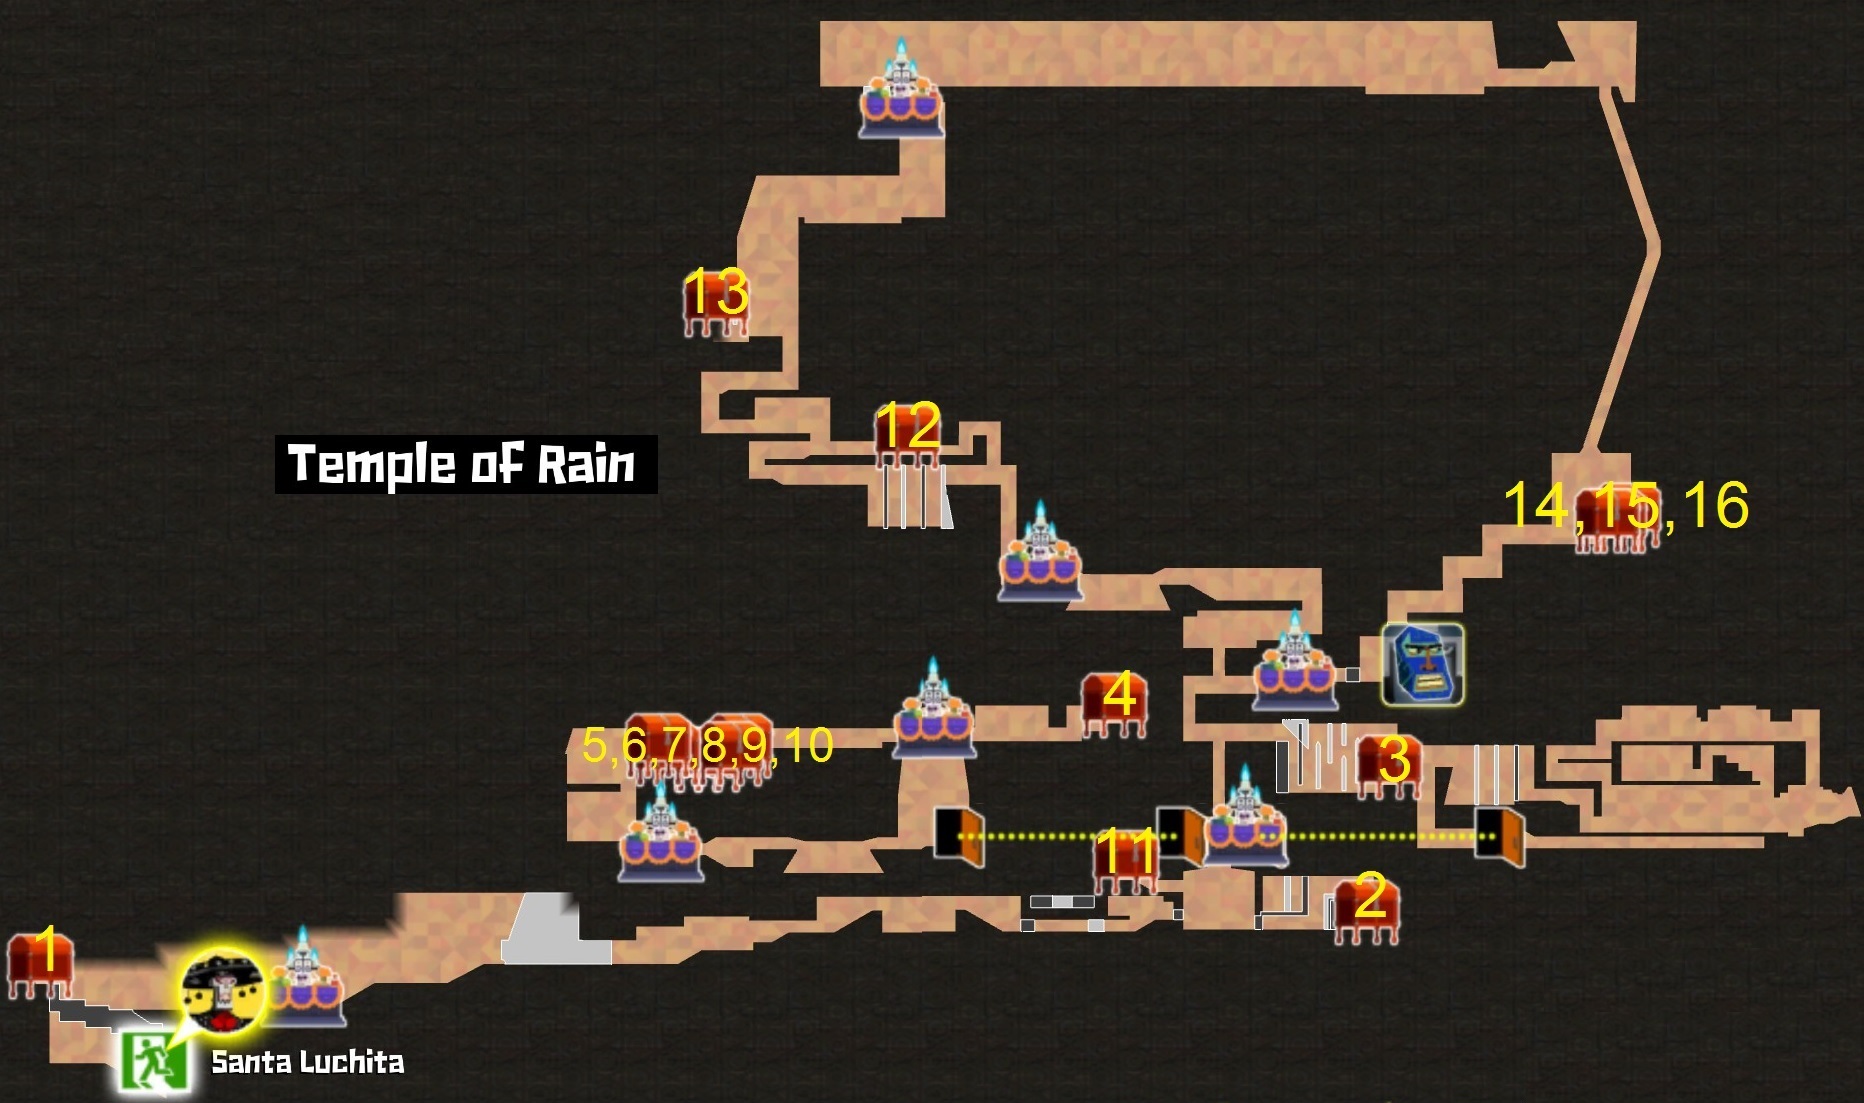
- 1– Proceed through the dungeon and you’ll get to go through your first realm portal. Backtrack to the beginning of the stage to what was invisible platforms before now turned solid. Use uppercut to reach chest. (Heart)
- 2– Go through several portals and you’ll reach a fork; up through a portal or a right path. Head right and you’ll see two portals. For this puzzle, you need to hit the portal on the left with an uppercut, then perform a running jump so that you pass through the portal and can uppercut immediately after to reach the upper platform. (Mask)
- 3– After learning the goat jump, you’ll have to backtrack through a door. Instead of heading back, follow the arrow up via wall jumping; you’ll reach a wall jumping puzzle. Maneuver using uppercuts and wall jumps to reach the chest. (Heart)
- 4– You’ll reach a fork with a shop in the middle. Head right, defeat the two enemies here and continue right once more for the chest. (Mask)
- 5,6,7,8,9,10– 6 chests, can’t miss it. After an arena battle involving red skeletons and portals. (Money x6)
- 11– After learning the Olrec Headbutt, progress through the dungeon until you need to head up. In the area with a door next to a shop, drop down instead to see a yellow block to your left. A chest is behind it. (Money)
- 12– In the area after fighting a few Alux’s and Skeletons, instead of going up destroy the yellow block to your right to find a chest. (Heart)
- 13– After fighting a second giant skeleton, you’ll face another one shortly after. To his left of it, is a portal and a chest. In order to get the chest you must not touch the portal. (Money)
- 14,15,16– After defeating the Alebrije, you will be rewarded these chests. Can’t miss them. (Money x2)(Heart)
Second part
Caverna del Pollo
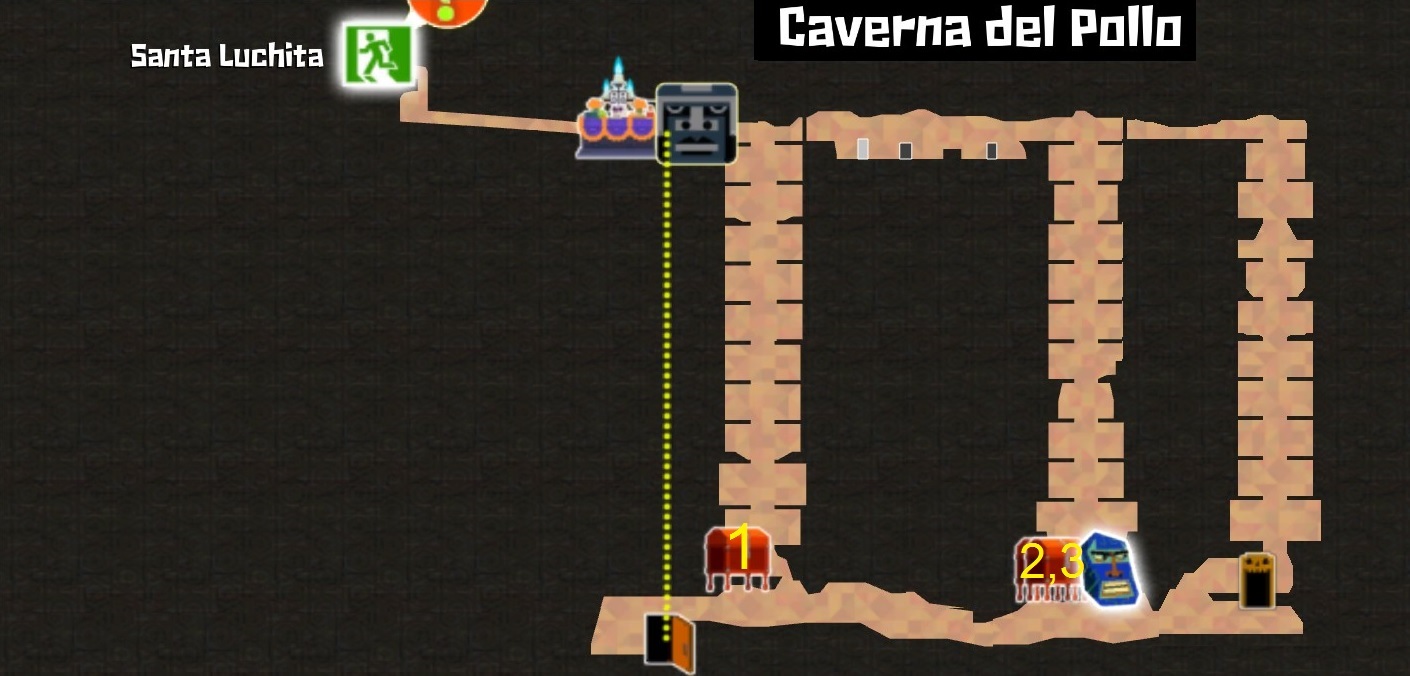
- 1– Reward for completing the first set of deathmatches. Olrec Headbutt required. (Heart)
- 2,3– Reward for completing the second set of deathmatches. Dimension Swap required. (Heart)(Mask)
Desierto Caliente

- 1– Beginning of the dungeon, can’t miss it. You’ll see this just before Frog Slamming down. (Money)
- 2– After heading underground via Frog Slam and fighting an arena battle, you’ll have to uppercut back out. Instead of going right, jump left for a chest. (Heart)
- 3– In your newly acquired chicken power, keep backtracking towards the left until you come to an arena battle with gears and armadillos (dodge them so they run into the gears and suicide). In the next room, you will see the chest on the platforms atop of here. (Money)
- 4– Outside of the Tule Tree entrance in the desert, instead of uppercutting the red block, head left. The chest is in here.(Heart)
- 5– Once you have the ability to Goat Run, outside of the Temple of War entrance is a pillar. Simply run up it for a chest.(Money)
- 6– On the top section of the desert, you will run into this as you’re backtracking from the Temple of War. Its next to a chupacabra and cactus enemy. (Mask)
- 7– In the middle of the dungeon, underneath the area where you first learn about enemy shields (the 3 pillar like holes room). Underneath is an area with a chicken tunnel to the right. (Heart)
- 8– Once you have the Goat Run ability, head to the middle area in the top section of the desert. The chest is in between the 2nd and 3rd shop, counting from the right. (Money)
- 9– Next to the 4th shop on the left, is a blue block. Come back here to claim the chest once you have the Dashing Derpderp.(Money)
- 10– Acquire the Dimension Swap, then return to the upper section of the desert. Above the 4th shop from the left are platforms you can jump on floating in the sky (where cactus enemies and chupacabras are). Head up these platforms to reach a chest. (Heart)
- 11– Behind a blue block located to very left of the dungeon. (Money)
- 12– In the area to the left of where the three colored shield enemies are in the middle of the dungeon, there is a chicken tunnel you can go through. You have to go around from the top via another chicken tunnel to reach it. (Money)
- 13– Between shops #3 and #4, in the upper section of the dungeon is a triangular shaped hill. On it is a chicken tunnel. Access it from the right. (Heart)
- 14– In the bottom left portion of the dungeon is a vine covered maze area. Once you have the ability to Goat Fly, climb to the top right corner of the room and fly to the left. As soon as you come close to the two spikes, dodge and do whatever you need to do to land on the platform. Continue left from there to a hidden area. (Heart)
- 15– In the very same vine room is a chicken tunnel on the bottom left. Go through it to reach another chest. (Heart)
La Mansion del Presidente
- 1– Hidden behind a pillar. Come back to claim it when you’ve learned the uppercut and/or double jump. (Money)
Agave Field

- 1– Break the only yellow block in your house to claim the only chest in this area. (Money)
Tule Tree
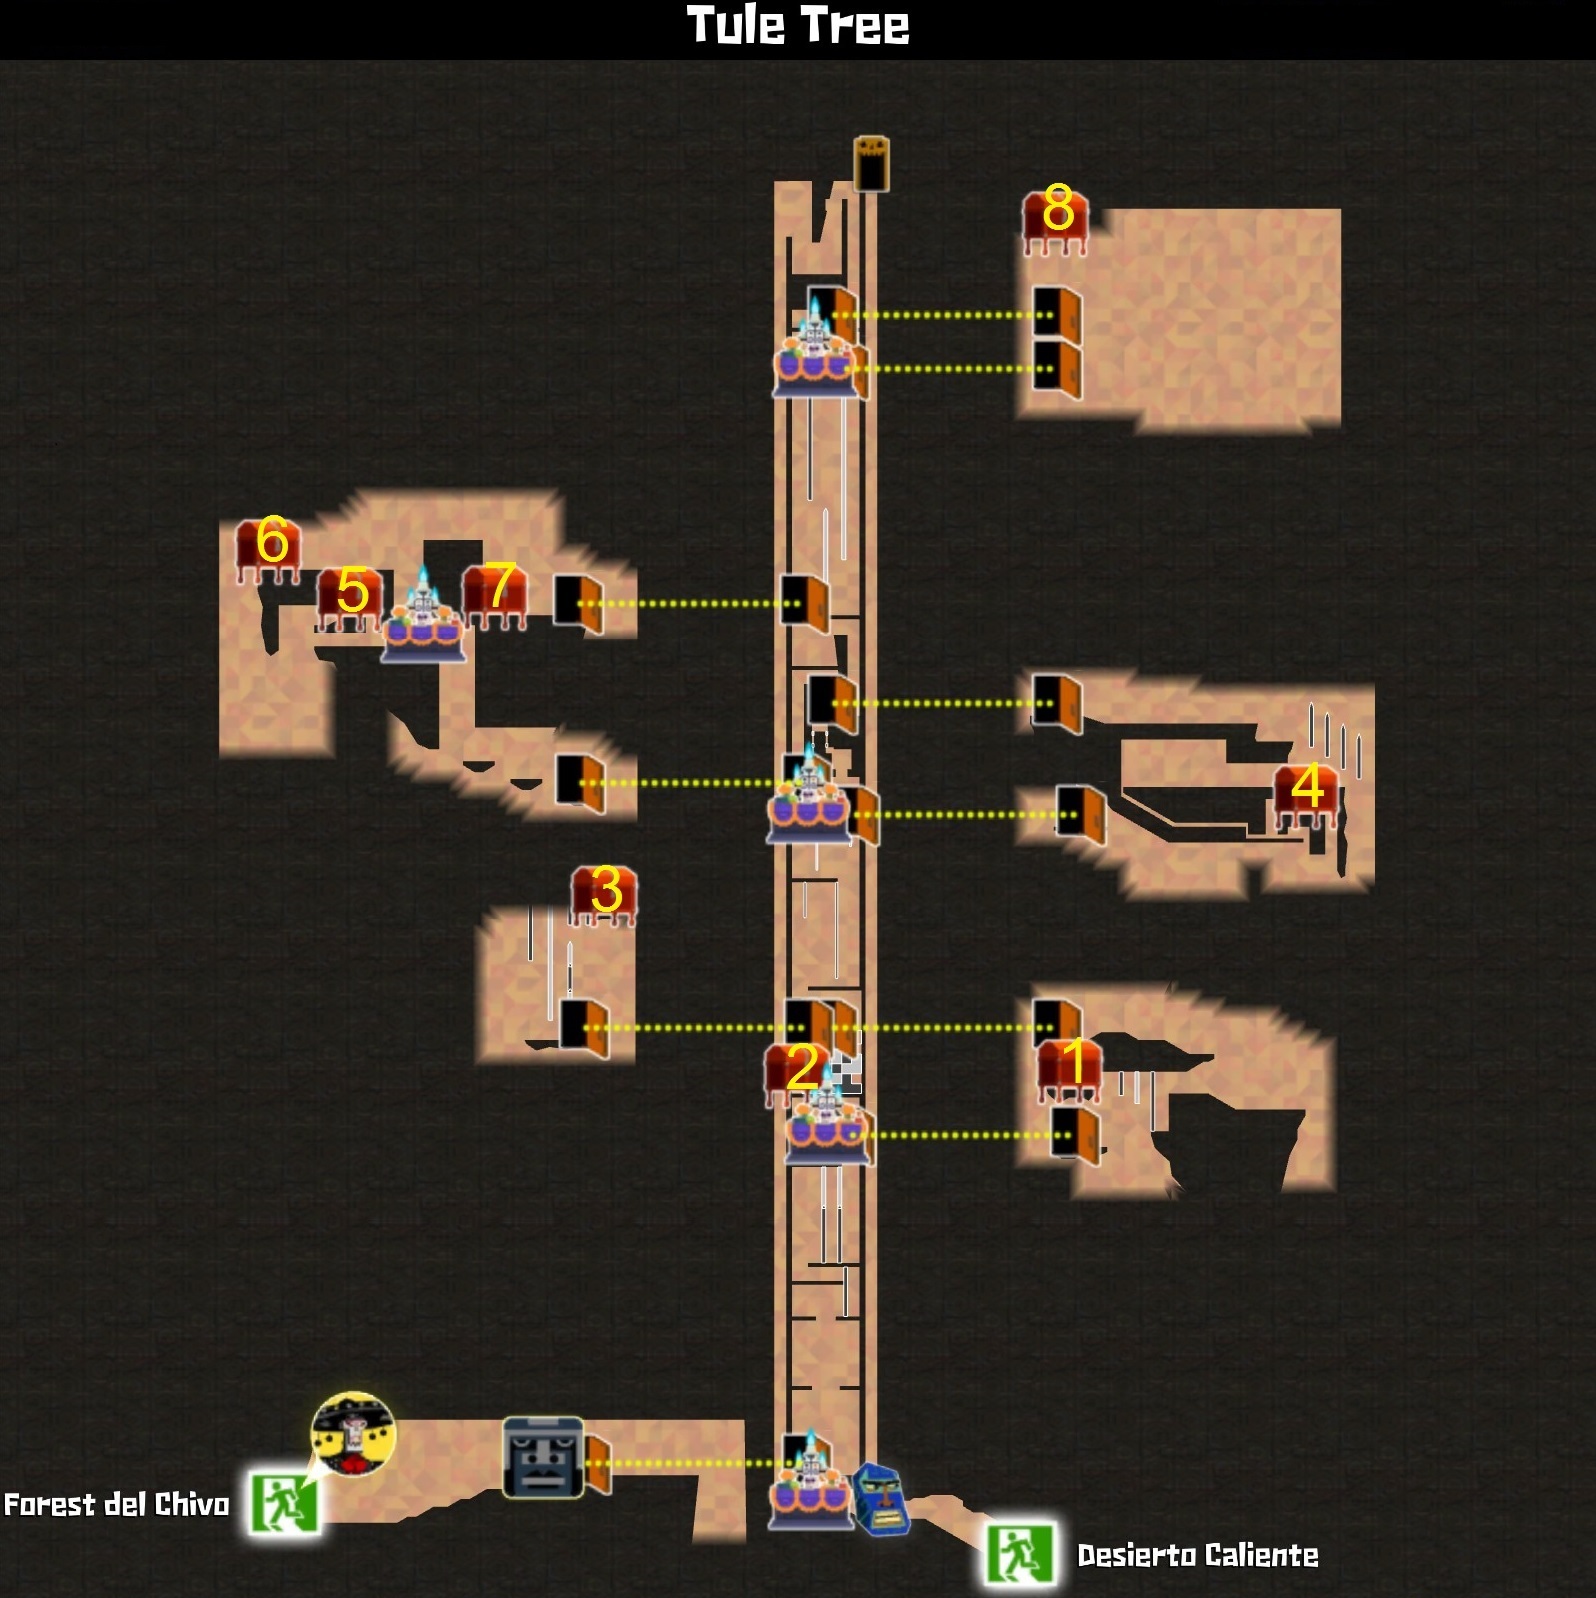
- 1– After going up a trunk via a Dimension Swap puzzle, you’ll head back out. Rather than continue to the right, you should notice some invisible platforms. Maneuver by alternating between Swap and wall jump to reach the chest to the left, covered by leaves. (Money)
- 2– Inside the second trunk, you should see in the bottom right corner an invisible block. Drop down here to a maze like room. Make your way through with Swap to reach the chest. (Heart)
- 3– In the same room as above, take the left doorway instead. Simply go up the two walls for the chest. You will however need the Goat Run ability first before you can reach it. (Mask)
- 4– After walking pass a swap-back-and-forth-bridge, instead of going through the chicken tunnel, see that red block in the corner? Destroy it. A chest awaits you on the top. (Money)
- 5– Shortly after learning how to double jump, you’ll come across a shop. Rather than go up, continue left to see some red vines. You must make use of dodge and double jump to reach the chest. This will take a few tries. (Heart)
- 6– Shortly after the previous chest, you’ll fight an arena battle. Continue left rather than right to a chest near a cliff. (Money)
- 7– Before heading into the third trunk, you should see a chicken tunnel on the left. Go through it for, you guessed it, another chest. (Money)
- 8– In the open area with all the chupacabras and skeletons, a chest can be found on top of the entrance to the 4th trunk.(Heart)
Third part
Temple of War
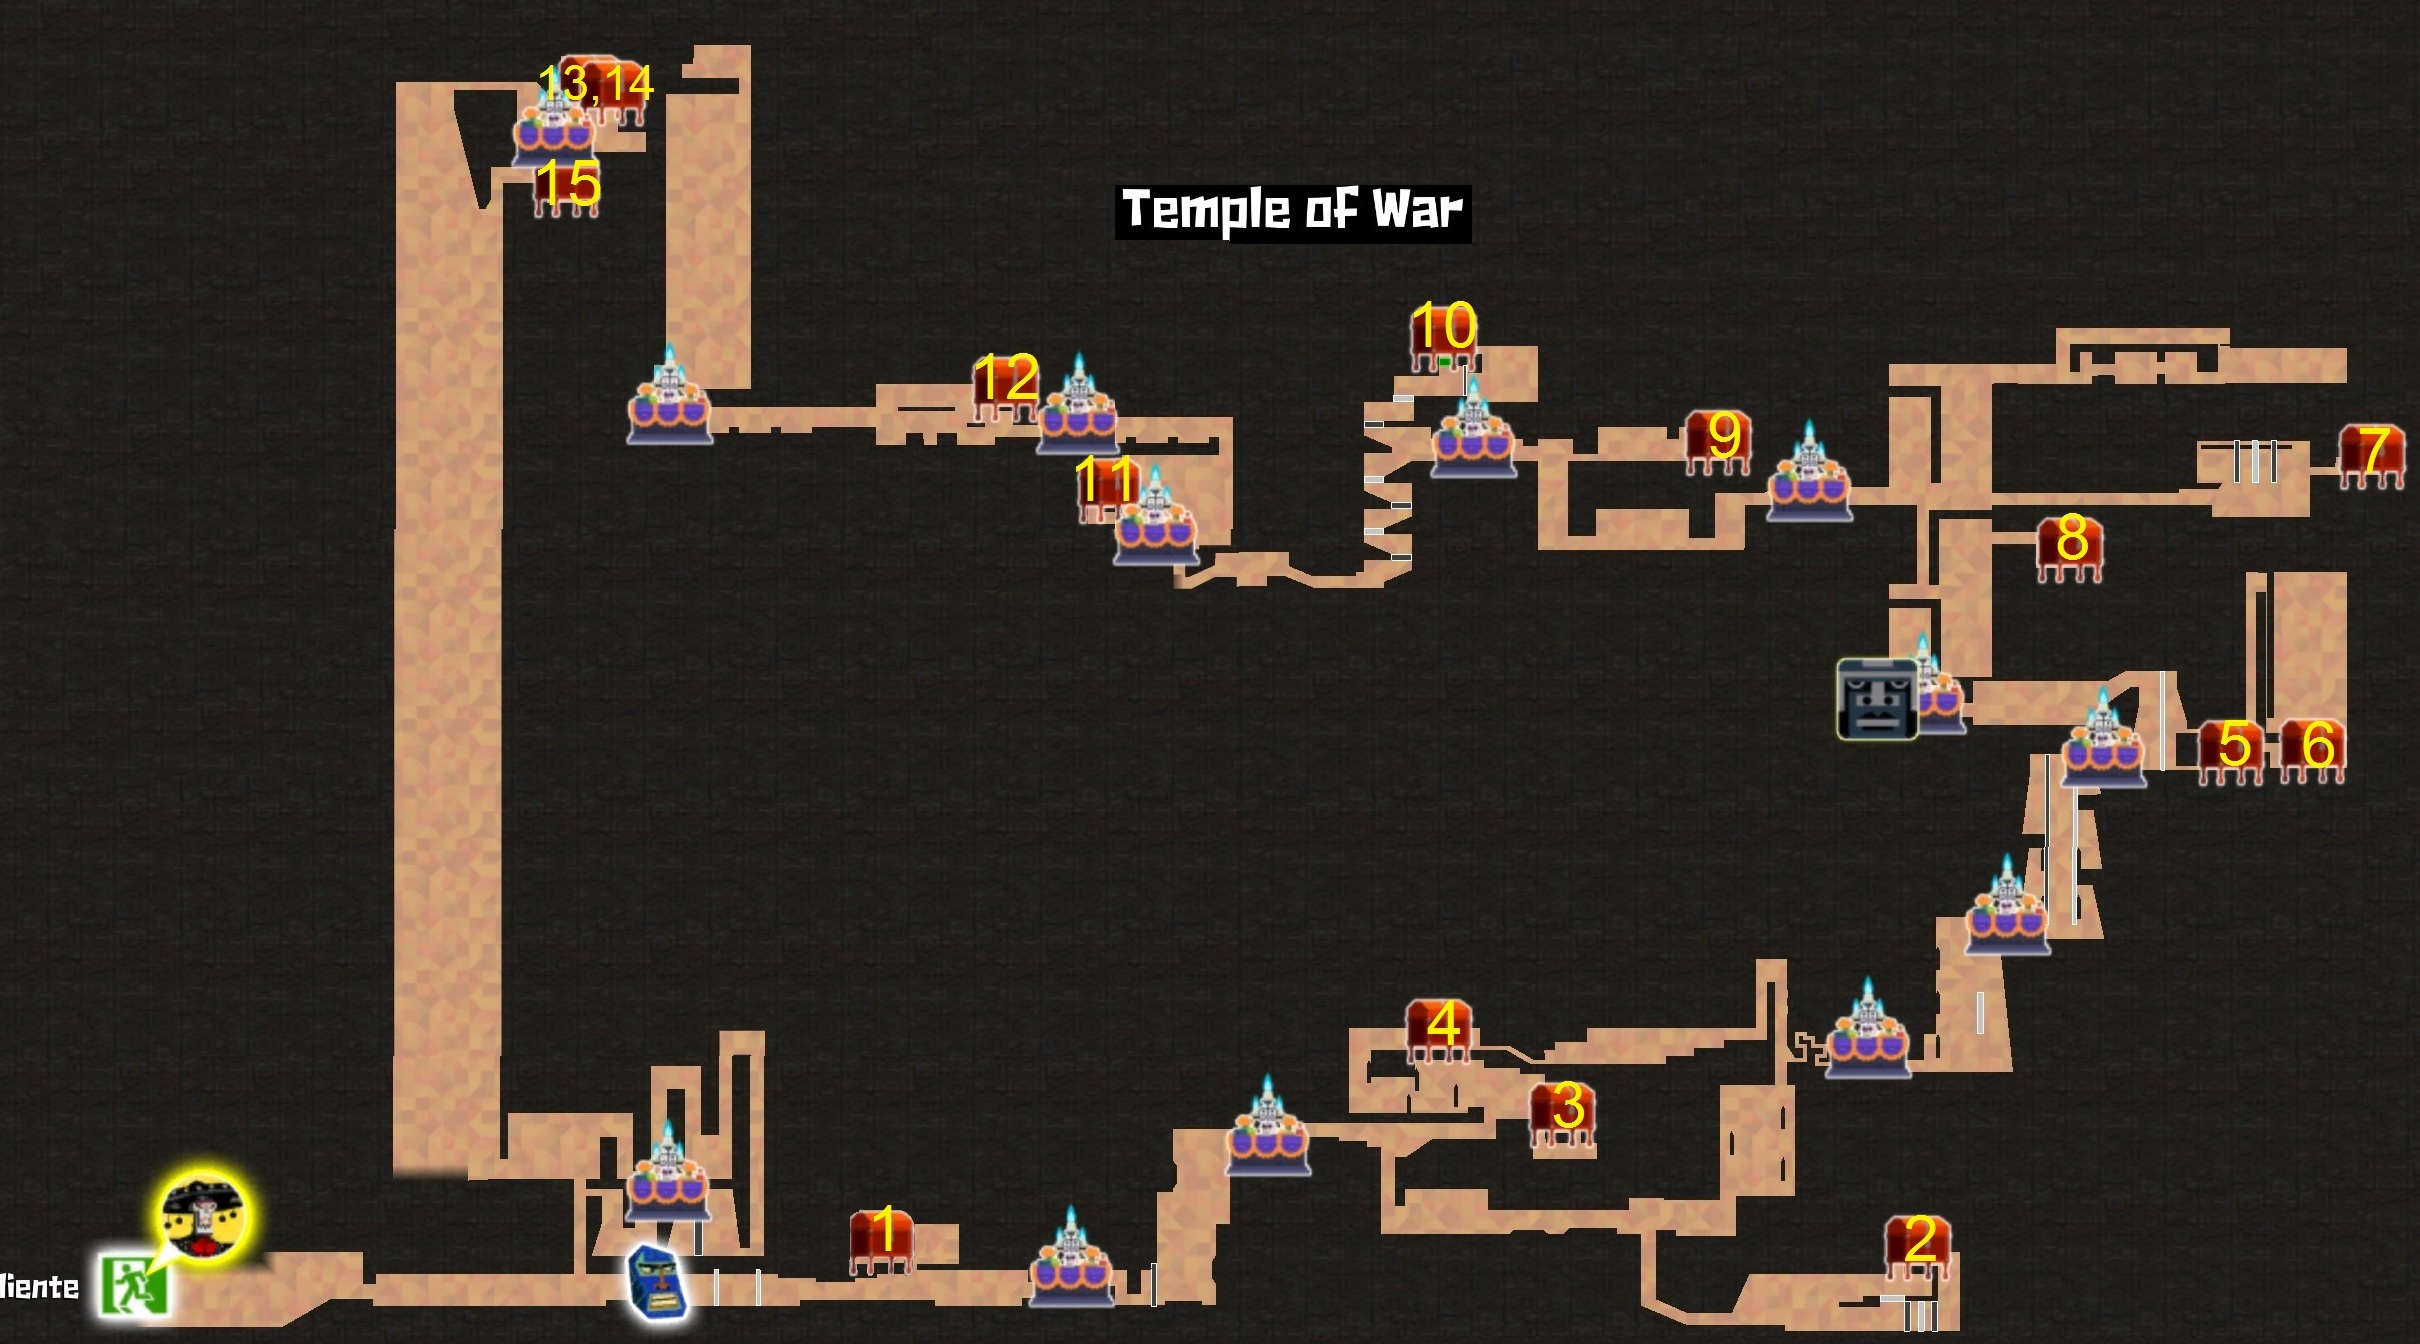
- 1– After crossing some lava you’ll fight two skeletons in two different dimensions. Dispose of them and look up to see a red block. You’ll see the chest before going to the next screen. (Money)
- 2– Continue heading down and you’ll eventually have to fight two cactus enemies. Past them is a small dimension puzzle. Time your wall jumps to reach the chest. (Heart)
- 3– Head back up but go up from the left instead. You’ll find a chupacabra and two skeleton enemies. To the right is a hidden-ish platform you can use to drop down. A chest can be found in this small water/lava filled room. (Money)
- 4– Head back up from the previous chest and go through the flying pillars on the left. You must use the pillars so that you’re grabbing them on the left side to get up. (Money)
- 5– After going up the pillars and switching dimensions to make your way up, you will reach another shop. See that chicken tunnel to your right? Head through. (Money)
- 6– Above this is another chicken tunnel. Head all the way up to reach the top of the pillar. What you have to do here is slide down the pillar and time it so that you make your way down while avoiding the gears. (Heart)
- 7– Shortly after earning the Dashing Derpderp, go back to the room with the giant moving walls. On the top right room is a blue block. Defeat the 3 skeletons in there to reach a tricky puzzle. Here, you must perform a double jump while switching dimensions midair, then perform a Dashing Derderp to reach the platform on the far right. (Mask)
- 8– Below the last chest is another blue block. A chest is behind this block. (Money)
- 9– Continue left, pass an arena battle. Rather than continuing through the blue block on the left, go right. Destroy the Exploders in yet another arena battle, then claim the chest in the next room. (Money)
- 10– Continue progressing up in the dungeon until you see a path heading down that you can drop down by warping back and forth. Instead go up to reach another puzzle. The trick here is to perform a jump as the moving spike block is right beside you, than double jump, derpderp, so you can latch on to the wall on the right. Once the spikes are outta the way, its just a matter of jumping off and uppercutting to reach the platform, than using the chicken form to get on top of the spikes.(Money)
- 11– Continue down by alternating realms. Defeat the skeleton and destroy the blue block you come across, then wall jump up to reach yet another shop. You should see a blue block on the left here. Destroy it to reveal another chest. (Money)
- 12– To get through the next part at the top, you need to jump, dodge, double jump, derpderp punch, then uppercut. After that, continue up and left, and you’ll reach a room where you can see the chest above you. (Money)
- 13,14– After the boss fight in this dungeon, can’t miss them. Two chests. (Mask)(Money)
- 15– After free falling down the next section, instead of leaving the room to the right, cling to the right wall and use your newly learned Goat Climb to climb back up. You’ll destroy a block revealing a hidden area, which also houses a chest. (Mask)
Sierra Morena
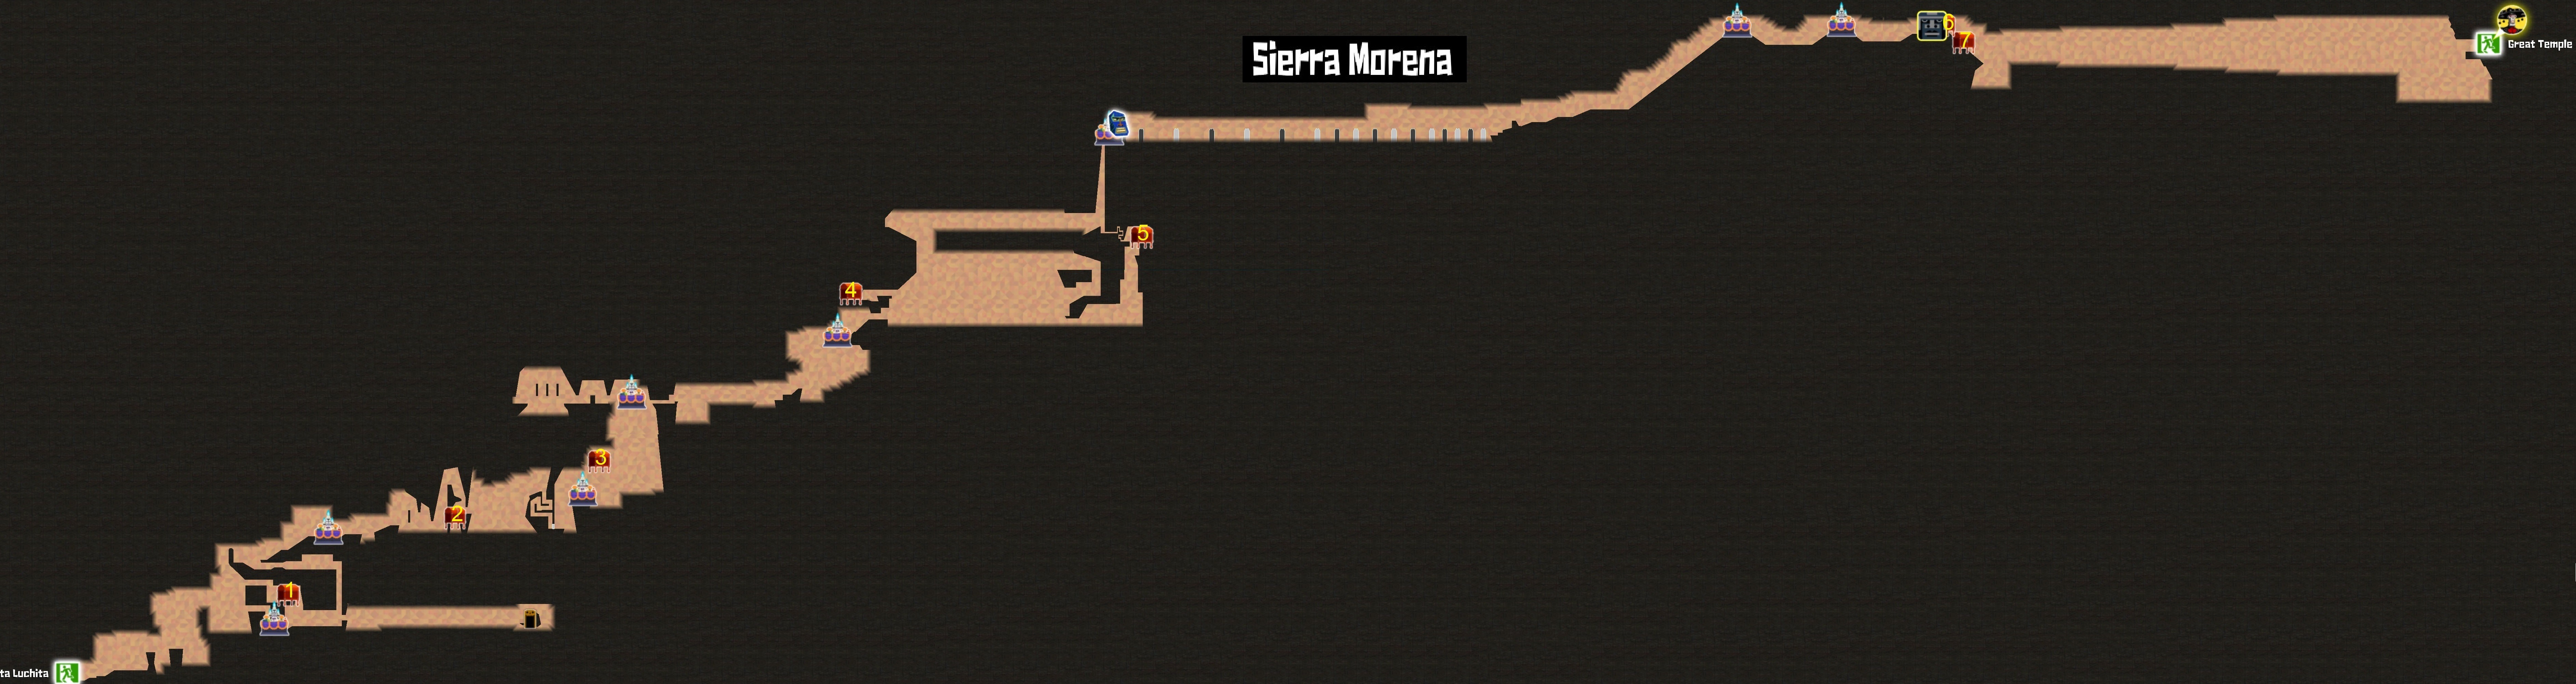
- 1– From the entrance to this dungeon, keep heading right until you have to cross a large gap. In the next room, climb the wall on the top right using goat climb to reach a chest. (Heart)
- 2– Continue through the dungeon and you’ll run come to an area where you have to go up a wall and switch dimensions back and forth to avoid the vines. Here, you should see the chest on the other side. To get it, climb up and drop down to the chest. (Money)
- 3– In the open area with all the chupacabras, there’s a slighting obscured chest hidden in the mid left of this area. Either jump to the platform or fall from above to reach it. (Money)
- 4– After learning the ever so useful Goat Fly, on the third chance you get to use it, climb up a little until you can grab on to a wall on the right. Fly back left and you’ll enter a upper portion of this area. Inside is a blue block, and a chest is behind it.(Money)
- 5– Jump back down and rather then using the supposed wall to fly, jump down near the bottom of the screen for another wall. Fly here, and you’ll fly underneath to a hidden area. Perform wall jumps, run, and fly to reach the chest at the top. (Heart)
- 6– After defeating the boos fight in this dungeon, next to the Olmec Head. (Money)
- 7– Behind the Olrec Head. Can’t miss it. (Mask)
Great Temple
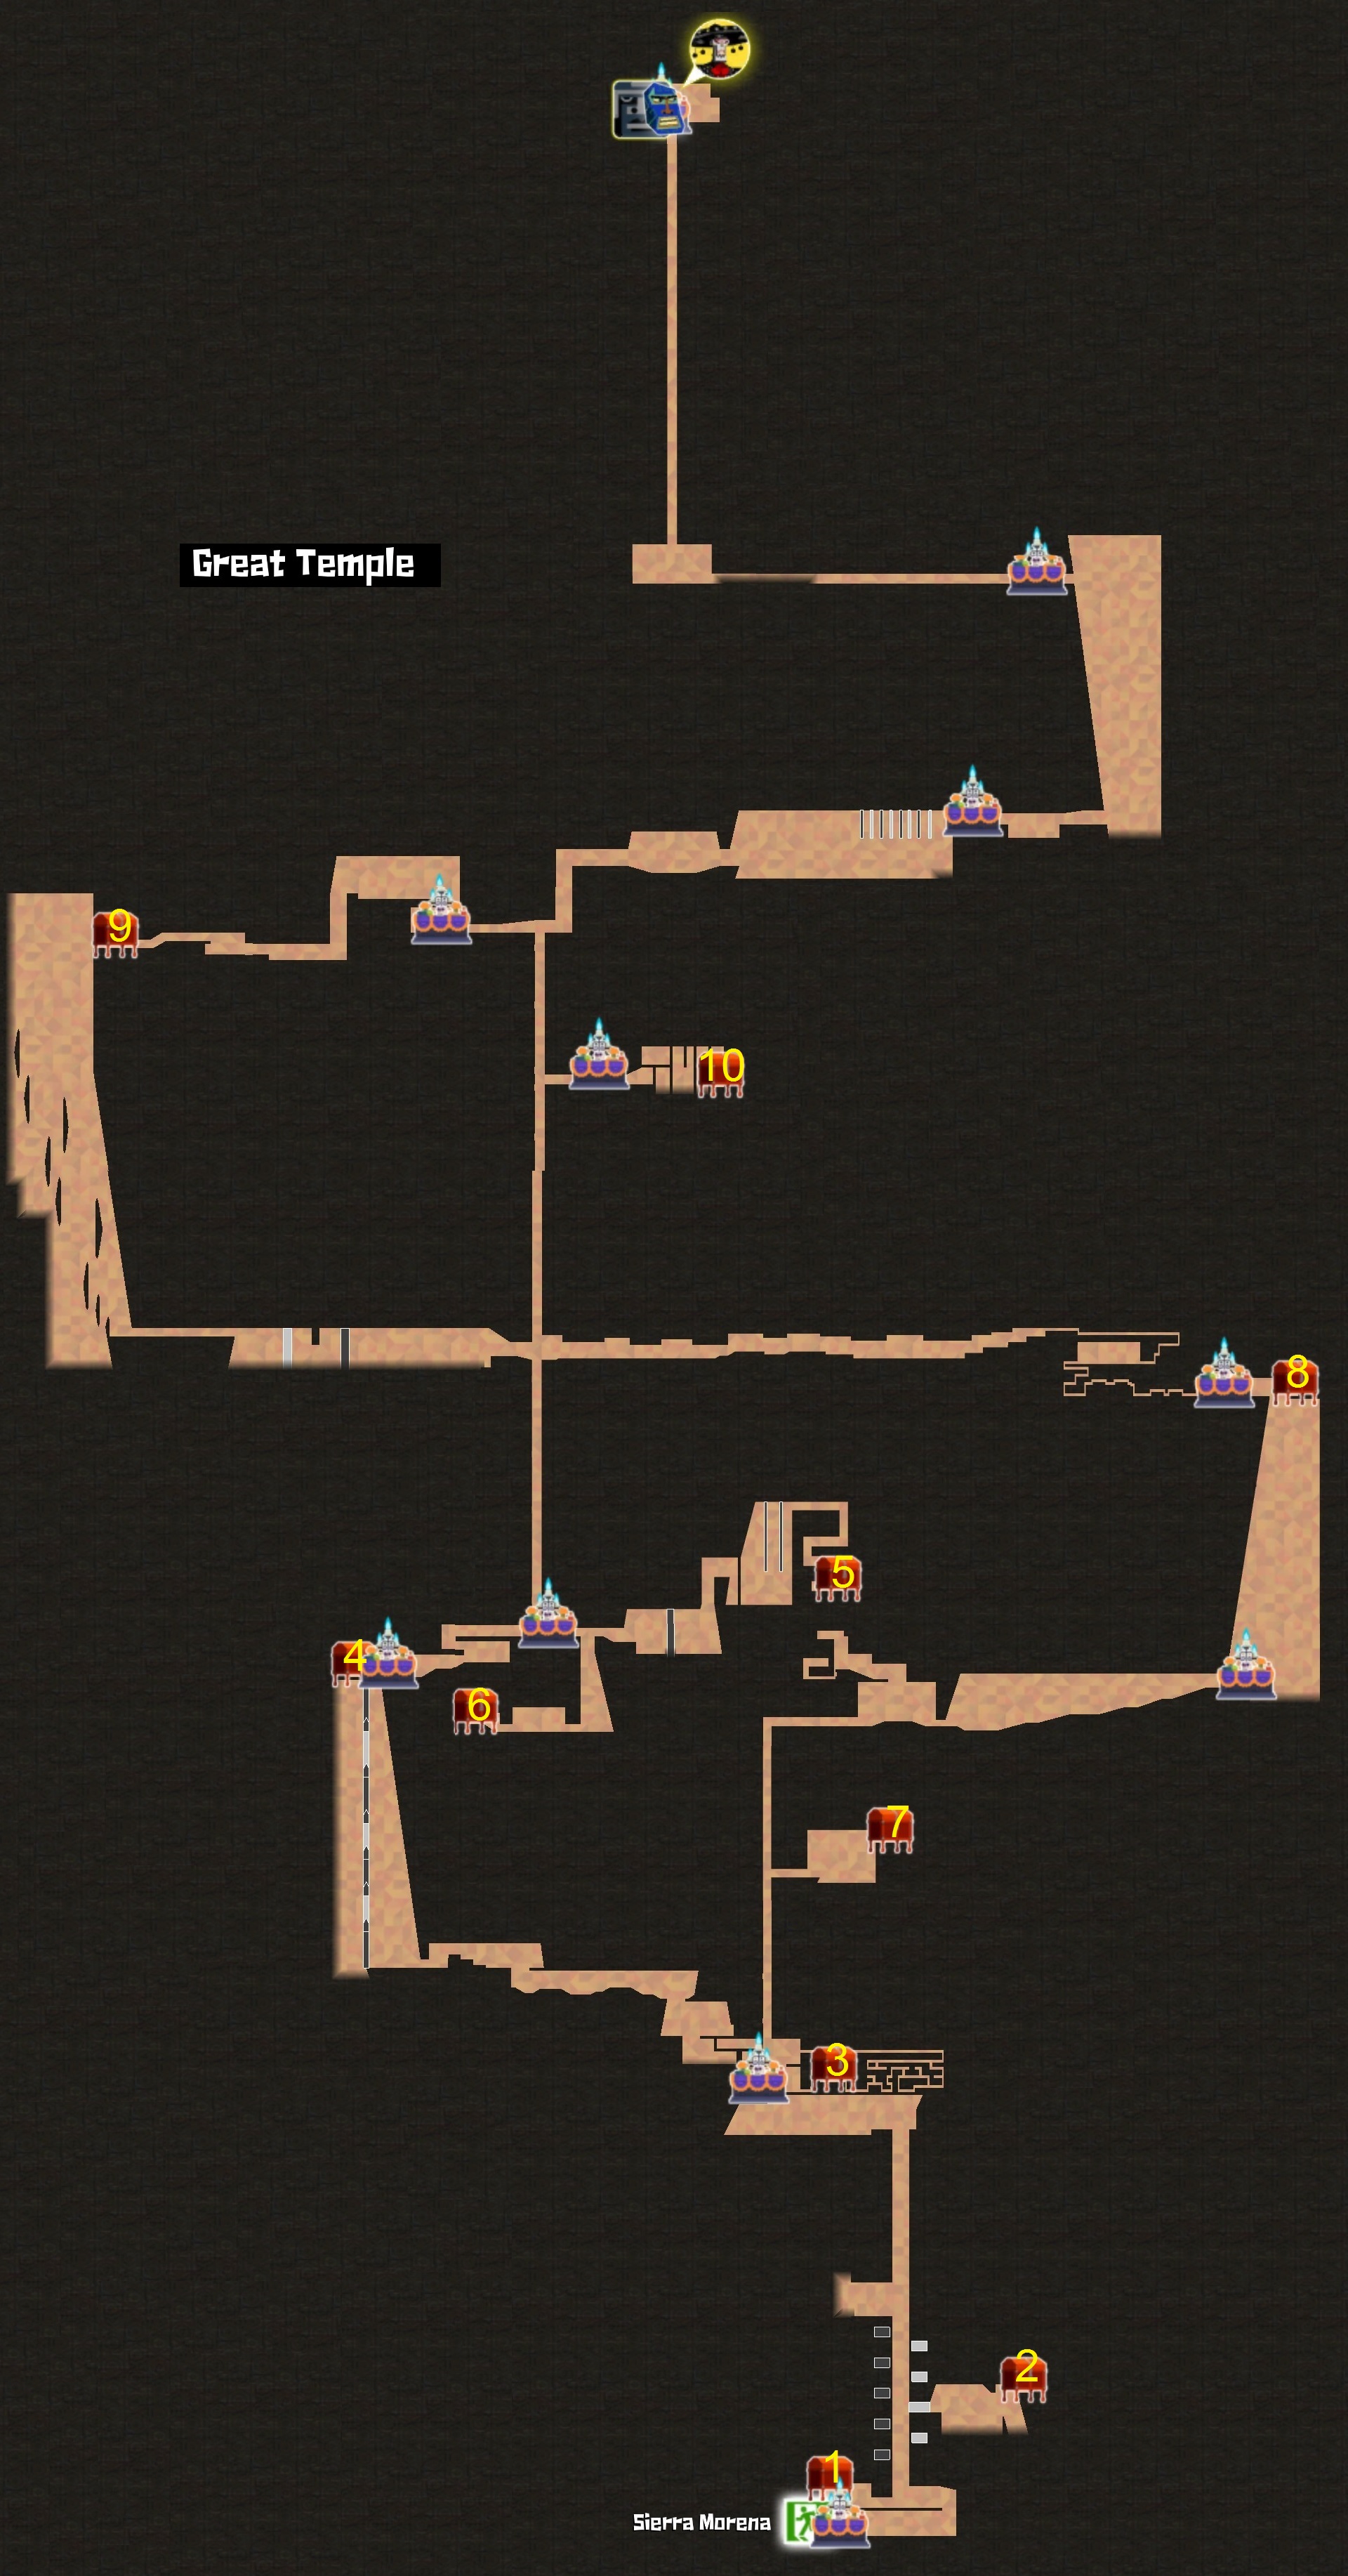
- 1– After the first arena battle against yellow skeletons, go left to a room full of barrels instead of up. A chest will be blending in on the top left corner. (Money)
- 2– Next section requires going up vertical room. There is a invisible block on your right (2nd one from the top) that reveals access to a hidden room. Jump across the gap here in this hidden room to earn the chest. Note that there’s a tiny pillar for you to land here. (Mask)
- 3– After flying across a pool of acid, you’ll come to a shop. Head up to the room above and use the chicken tunnel on your right. Complete this maze (memorize the path before you do so) to reach a chest at the end. (Money)
- 4– You will run into this after goat-running up some pillars, can’t miss it. (Money)
- 5– After completing a short portal puzzle, you should eventually see a portal to your left that you can’t seem to gain access to. Turn into a chicken here to drop into a slightly obscured hole to reveal a path to it. (Money)
- 6– Fight through an Arena full of shielded Aluxes and this will be your reward at the end. Walk through the left exit in the Arena. (Money)
- 7– Go through some more portals, past yet another arena battle with clawed skeletons. Rather than continue right, go left and frog slam down to create a shortcut in this dungeon. Notice a yellow block here. Behind it is a chest. (Heart)
- 8– You will run into this chest as you’re jumping up floating platforms, can’t miss it. (Money)
- 9– You will also run into this after wallrunning up some floating pillars, can’t miss it. (Money)
- 10– After going through some diagonal portals and checkpoint-ing at another shop, you have the opportunity to drop down and create a third shortcut. Similar to another chest, there is a path here on the right you can go into. Complete this short portal puzzle to claim the chest. (Money)