
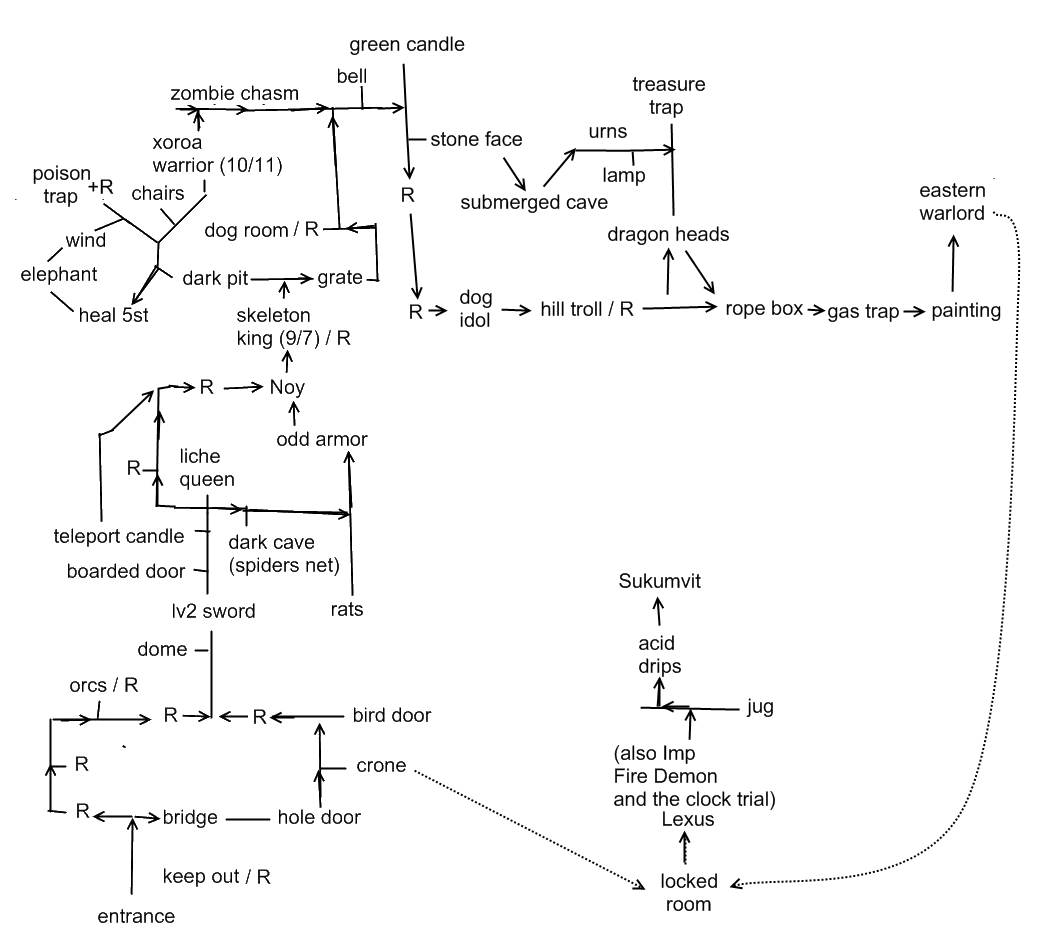
Overview
A map of the dungeon and descriptions of what various rooms and choices lead tostill some Work in Progress, but mostly complete
Introduction, map and general tips
Once you get to the remade deathtrap dungeon (again!..and I’m writing “again” assuming you’ve done the book “Deathtrap Dungeon” before to unlock “Trial of Champions” and not cheated it some way) take note – this part is much more DEADLY than what might have seen before.
Failing many challenges can end in instant death.
If you walk into a TRAP room (I’ve tried to clearly name those rooms as “<something> trap”) and do not have the specific item to cointer – it’s instant death
If you even manage to get through most of the dungeon and do not have enough gold rings – it’s instant death. No harmless cycling to the beginning of the dungeon
If you meet the Chaos Champion as one of your random encounters and do not fight him – it’s instant death (really..you expected a chaos champion to just take your gold and let you live?)
There is still a monster horde in a similar place – those are not instant, but still endless fights until death, just zombies (buffed ones too) instead of skeletons
throughout the whole dungeon you need to find 9 gold rings
leaving any behind will only result in you dying later
the money you have at the beginning is useless – you lose it all way before the dungeon, so spend all you like, though if the alternative is a roll – try to pass the roll. Experience is still useful
Most rooms, especially side rooms, are replaced by random encounters if you’ve beaten their inhabitants before
Random encounters are your friends – you can find items actually needed to get through many rooms..or you can get experience
I’ve tried to mark places with random encounters with an R on the map
One of the random encounters should run you into a Chaos Champion – he has a gold ring in his pack so you want to fight him for it
if your roll goes badly you can quickly exit your game to resume it from the start of the challenge you would have failed at. You can’t avoid most bad choices this way, but you can avoid dying because dice don’t like you.
Unless you want to keep exploring, farming and dying to try again – choose the highest difficulty. 3 lives should be enough, the challenges don’t change in difficulty AND you get 3 perks – all of them help a LOT, I recommend the extra xp and a chance to succeed any luck test, you choose which one to take as last. I’ve only found ONE place where you can get cursed and you can avoid it, so no need for the curse resistant perk
8 luck dice is enough, heck you could even do with 6! if they Often you won’t even take all of them to roll and if you’ve taken the Naturally Lucky perk the first die counts the most..plus the possibility to retry a roll
Port guard
The first choice seems irrelevant
then choose
– convince – luck 3, if you fail you can try other unused options
– threaten – skill 3, if you fail you can try other unused options
– bribe – lose 50gold
The murder case
You don’t need to solve the murder mystery, but you’ll lose chance for some nice experience, titles, and even max stamina!..and you won’t enter the Tavern
Carlo is the guilty one and the wound on the corpse is proof – Carlo claims the victim got stabbed in the back, while the corpse had a hole up front
Make that choice and you get the Master Detective title
don’t and you fail the quest
The Tavern and the rest of Port Blacksand
Poor tavern – only 2 drinks to choose from
You don’t need to enter the tavern, but it doesn’t hurt..and might help.
it doesn’t seem to matter which drink you choose – you’ll still get The Drunkard title
BUT – choosing the stout and then resting just before the ship will give you provisions, raising your max stamina by 1
you’ll lose the item card soon, but the max stamina will stay
just before taking the boat you’ll take a rest, losing 20 gold
and on the ship you get robbed, losing everything else. No gold, boo
The Arena
when the guards come for you
– try to escape – you’ll lose 4 stamina and get an injury, you don’t manage to escape
– eat the food – you would get 2 stamina healed..but you didn’t lose any did you?
you’ll need to fight two opponents each day, the first one you choose, the second will be one of those you didn’t choose, always the same of the three (only change is if you fought that one as your first)
after each fight you regain 2 stamina
day 1
choose between orc (6 skill 5 stamina, 44% xp), dwarf (7 skill 5 stamina, 49% xp) and man-orc (8/5, 54% xp)
then fight the orc (35%) or – if you already did – the dwarf(40%)
as you can see for best experience fight the man-orc
day 2
choose between goblin (5/5, 30%), dark elf (8/5, 45% xp) and calacorm (9/8, 49% xp)
then fight the dark elf(36%), or – if you already did – the calacorm(40%)
for best experience just don’t fight the goblin
day 3
choose between man with eye-patch (shopkeeper 7/7, 32% xp), masked (vagabond leader 10/9, 44% xp) and pirate (6/6, 28% xp)
then fight the vagabond(40%) or – if you already did – the shopkeeper(28% xp)
for best xp just don’t fight the pirate
if you did all things up till now right you should have enough xp to fully level 2 dice and still have 12%, 80% after the arena quest notices it’s complete
you’ll get all stamina back at the end, a lv1 attack card, and a stamina potion before getting into the dungeon
Deathtrap Dungeon version 2 here we come
door signed Keep Out
fight a Wild Dog 7/6
examine the rocks to find a Gold Ring
orcs
luck 2 or ?
fight orc 6/5 twice
win 2 throwing knives (use before a fight to deal 2 damage each)
search the room to find a chainmail (lv2 defence card)
bridge
– pay – you lose a gold ring and pass..for now
– don’t pay – ..nothing bad happens! you pass
– go north – skill 3 or die, fight strider (9/9), win a bone talisman (protects you from testing at a bone devil)
hole door
you can decide to turn back to the T-junction before the bridge
putting your hand in the hole reveals two buttons:
– button 1 opens the door
– button 2 kicks you out of the dungeon and you lose [6-skill] stamina before you get back in
crone
as you come closer the crone will disappear and you have to fight two bats (6/6) one after another
then you have a choice
– take purple dust – you get the purple dust card, needed at the end, unlocks the spill option below in this room
– spill the purple dust on the floor – you’ll get teleported to a small room that starts the ending tests, if you don’t have a silver key – you die
– unlock the box – luck 2 or ? and get teleported to the Teleport Candle room and the Dark Cave now has a dwarf in the net instead of some other random humanoid (no functional difference though)
bird door
it’s locked, but you can barge it open with a skill 2 test
go out or wait to fight a Coldclaw (10/11)
after the fight
– break open the pot – some gas flies out, but if you stay it turns out harmless and you get a Gold Ring
– head further east – examine bones to find a Bone Devil (10/8), if you don’t have a bone amulet test skill 3 or lose 6st..and keep testing and losing stamina until you succeed or die; after that fight the Bone Devil and find another Gold Ring and Winged Sandals after defeating it
if you come here again later after clearing these rooms the first time you can fight another Coldclaw, but will find nothing more
dome
best avoid this room or go out as soon as you enter
The little humanoid is an evil black imp, if you lift the dome he will curse your luck dice (use a four-leaf clover to remove the curse at any time..if you have one) and steal one of your gold rings
..and then he gets stuck in the spiders net at the Dark Cave
boarded door
the “lv2 sword” just before choosing if you want to open this door simply means you get a guaranteed level 2 attack card – the broadsword, you don’t need to use it, but bad things may happen later AND you would not get the dice upgrade for combat
lifting the boards requires a luck 3 test – if you fail you get attacked by an Orc Chieftain (7/6)
inside is a riddle
– the correct answer is Son – you get a Silver Key, needed at the end
– any other answer or trying to run away is instant death
liche queen
– attack – luck 2 or ? lose 1st, get at injury (damages your skill dice) and be forced into taking the gauntlet test anyway
– take the test – lose 3st, test skill 2 or lose 4st more, have to fight the Liche Queen 9/9 and gain an injury after; if you tried to attack the lich before you’ll lose 2st even if you succeed the skill test
If you manage to survive the test you’ll get a Gold Ring
Dark Cave
You’ll find a spiders net here and some poor person stuck in it. The person can change depending on your choices before, but the change is only cosmetic
You can attack the Giant Spider (7/8) and free the person – the first time you do that you’ll get a Gold Ring as thanks
rats
fight Giant Rat 5/4
test luck 1 or die
lose 1st
fight Giant Rat 5/4
test luck 2 or die
lose 1st
fight Giant Rat 5/4
search to find meat (repeatable if you come in here again later) and bread
– eat meat – heal 4st
– eat bread – find Iron File (needed for the Gas Trap room) and heal 2 st
you can do both, the room is a nice way to heal a little if you can win the rat fights without losing life (so you only lose 2st from the guaranteed bites, but then heal 4 from the meat)
odd armor
-go north – just go into the room with Noy and his trial
-decipher runes – pass luck 3 test to get a quest an a warning for the Rope Box room later
-take shield – you’ll get a lv1 defence card and the armor tries to attack you, trying to fight it will only make you lose 2st so just run out north
Noy
the monster monk Noy will give you a trial
– if you try to attack him you’ll only lose [6-skill] stamina and have to take the test anyway
first you have to win three skill tests, if you lose 3 times you die
-first test is skill 1
-second is skill 2
-third is skill 2 or skill 3 if you failed any test before
second test is a riddle
-correct answer is 25, wrong answer makes you lose a life
third test is a series of choices to attack or defend
– attacking first makes you test skill 3 (or die?)
– defending requires you to choose head or ribs – head requires skill 3, ribs automatically succeeds
to pass you need to counterattack after defending and pass a skill 3 test
you only need to pass the trial once, if you come here again you will just pass the room doing nothing
skeleton king
first time you come here you’ll need to fight the skeleton king (9 skill 7 stamina)
and you’lll find a mirror and a whistle (it’s a dog whistle)
future times this place will just hold a random encounter
grate
you can just pass by
or try to lift the grate:
test luck 2 or lose 2st
fight bloodworm (8/8)
then you can climb down to find a quest to light the Green Candle
nothing special, but a chance to get some extra xp
dog room
use the whistle to put the dog to sleep or attack the Two-Headed Dog (6/5) and turn it into a random encounter on later visits
either way you deal with the dog (or the random) you can search the barrel to find a bronze ring
the ring is cursed, so better not try to wear it
dark pit
you need a Rope or the Winged Sandals (from the pile of bones behind the Bird Door) to pass, otherwise you’ll have to turn back and take the path over the Grate
elephant
if you pull his trunk you’ll find a Gold Ring inside (only once of course)
wind
if you come from the Elephant room the wind will let you pass without issues
if you come from the other side you’ll need to pass luck 3 or lose 2st; succeed or fail you stil have to choose another path, but you can just go back (no need to go to the poison trap)
poison trap
if you have an anti-poison potion test luck 2 to be able to use it, if you don’t – you die
if you survive there’s a random encounter here
chairs
you can eat the fruit to heal 2 st
zombie chasm
you can try to attack the zombies, but it’s just an endless series of fights with upgraded 8/12 zombies AND you lose 6 stamina after every win, good to farm xp if you are sure of your dice, have a lot of stamina potions and don’t mind losing a life at the end
otherwise try to jump the chasm
-if you have the winged boots you make it through safely
-if not (cause you used a rope to get here) – ? die im guessing?
bell
ring the bell to get a Gold Ring
green candle
lighting it reveals Set One (a set of numbers needed at the end), not sure if its useful to write them down?)
also completes a quest if you got the Message in a Bottle for some xp
stone face
if you decide to help the elf test skill 3
if you fail also test luck 2 or gain an injury
you won’t save the elf, but you will heal 6st
go further to fight the Giant Tongue (5/6)
you can still turn back or continue to the Submerged Cave
submerged cave
test luck 3 to pass safely
if you fail you have to test skill 4 – try NOT to pass
if you pass..you die
if you fail you have to fight a Tentallus (8/12) with 2 fewer skill dice
urns
you can look into the urns to find a purple cloak (fireproof, needed to survive passing the Dragon Heads)
if you keep looking through the urns test luck 3 (or die?)
lamp
if you try to take the lamp you’ll have to fight a bronze idol (9/6)
you don’t get any lamp for winning, but you do get a Gold Ring
treasure trap
if it looks too good to be true then it’s not – especially here
try to grab the trasure and you die
just go back out
I haven’t found any way to counter the trap except just going back out
dog idol
you can leave a gold ring here to turn off the gas in the Gas Trap..but it’s useless and you won’t have the gold ring
nothing else happens from this
hill troll
you can try to sneak past the troll if you pass a luck 3 test
if you fail or decide not to – just fight the 9/10 Hill Troll
dragon heads
if you have the purple cloak you can pass safely
if you don’t you die
rope box
-cut with axe – luck 3 or lose 2st and have to test again luck 3 or ? (injury?)
-cut with sword – find Clock Hands
-go east – nothing happens and you continue to the Gas Trap
gas trap
if you have an Iron File you can use it to pass and go further to the painting
if not you die
if you left a gold ring at the dog idol and don’t have the iron file..?
painting
examine the painting to reveal Set Three (a set of numbers for the end trials)
eastern warlord
dead end, but when you turn back you have to fight the Easter Warlord (10/9)
and then you notice you’re stuck
only way out is to use purple dust..if you have it
if not..you die?
locked room
this room begins the ending set of trials..but only if you have the silver key to get out of it
if you do not have the silver key you die
Lexus
the trialmaster will check if you have everything you need
– do you have 9 Gold Rings? if not – die, if yes – get “The ring bearer” title
– do you know the sets of numbers? if not – they’re 823, 574, 169, choose the numbers in that order, otherwise – die
then fight the Fire Imp (9/10)
then fight the Fire Demon (12/12, deals double damage on each die)
then
-use clock hands – lose 2st, learn the time (3 o clock), continue to pull levers
-pull levers – lose 2st, choose 3, 6, 9 or 12, right choice is 3
-call out to Lexus – ?
.
jug
drink – luck 3 or lose 4st
pass the test to heal 4st
?
ive only heard theres some sort of trap here, anyone walked into it?
acid drips
if you have the shield you can use it to protect yourself from the acid
otherwise ?
Sukumvit
merely getting here completes the Trial of Champions quest and achievement and gets you the “The Champion” title
heal 6st
but you still have to fight Lord Carnuss (12/12) to enjoy your victory and get the “The Avenger” title