Overview
FPS optimization, Tweaks and settings, Hidden Features and explanations running in a surround/eye infinity setup in American Truck Simulator.
Introduction

First of all, i myself been angry at those bad FPS (Frames Per Seconds) that break fluidity of the game.
This is an issue that Single 1080P users wont have with this game and will not be able to fully help.
There is many thing ive discovered the past few months that has different unexpected impacts on FPS running a surround/Eye infinity setup on American Truck Simulator wich make it worth the reading through.
You dont actually have to put everything to low because you run triple screen setup.
This guide will be fed with community inputs and i will keep it up-dated as i have more and more informations and tweaks confirmed by the community
Lets see this guide as a guide and a group that share information about our beloved ATS for us multi-monitors gamers:D
For the sake of this guide, i run an Nvidia Surround 5900 X 1080 (Bezel Corected) in 2D. For now i wont be covering the 3D aspect as more users have FPS issues with 2D surround…. less alone 3D 😉
So as i run an Nvidia Surround myself, instead of always mentionning eye infinity / nvidia Surround, lets just call it surround all the way through alright ? :o) (particularities will be mentionned if any)
This Guide will Cover Multi-monitor Mode, Tweaks and settings you can set without the need to lower every little details so it still amazing to the eyes to see and comfortable FPS wise
– Many of you made your research and decided to build yourself a surround setup.
– Many of you (myself included a while ago) will first step into the simulation genre of games (this one in this case) without really knowing what to expect out of a Surround setup.
Some of you may get disapointed by the result if this is one of your first game and having such
poors FPS
Dont be discouraged just yet !
I hope that some of you will come across this guide to learn a little bit more of why and what you can do to improve your FPS.
Maybe even share your own results/tweaks to help update this guide.
“Why is my FPS is that low ?” question : To put it in the most easy perspective, your videocard need to produce a single ultra wide image instead of a normal image. That requires not only more Graphic power but also more CPU power.
While a game is well optimized on the FPS side running a single monitor setup, many things step into considerations running a surround setup and in this particular game we will see some points and will explain some of thems if you are interested in the Explanations section below.
****
– This guide IS intended to make you understand some of the points and work around them to improve FPS on American Truck Simulator and probably Euro Truck Simulator 2.
– This guide IS NOT to represent all Surround game avalaible, but only this game 😉
– The very few things this guide will cover will help you understand some points that, of course, can be reflected on many other titles too 😉

A little bit of explanations in general
When you start to work with a surround setup you need to actually be extremely picky about the GPU/GPU’s and CPU Combo you wanna use…. us surround gamers does NOT share the same regular 1920 X 1080 requirements for many aparent reasons….
At the moment, almost every graphic cards on market, even high-end ones, cant render everything on ulra and being ultra smooth FPS Wise on American Truck Simulator
It is asking too much for a single GPU Vs SCS software optimization for a surround gaming experience
i can’t really recommand going SLI to put all graphics to max as it wont entirely solve the issue, but can certainly help a bunch tweaking up those settings higher 😛
Go and see on the internet what is bottlenecking, you will understand one of the reason why im saying that you need to be particularly picky when chosing your hardware for a surround setup
Not only Ram may also cause FPS Issues if dont have enough but Vram become one of the most iimportant thing to consider.
Vram is the Video Ram, the memory of your graphic card.
Anti Aliasing makes the image smoother around the edge removing those pixelated square edge between two layers that doesnt have the same depth. ( Exemple : the edge of the stering wheel and the dashboard behind it) This one uses a tons of Vram on a multi-monitor in surround or in eye infinity.
I wont go more in depths here on hardware as you already research those things while building up your surround setup hardware wise but here is software side.
As you can imagine, the more taxing process reside in software as it need to render what you are playing.
Now the hardware variables start to get into consideration with the software as there is tons and tons of different things that can happen at once on a computer
Do you have spyware that slows down your pc ? / Do you have heavy load program like an anti-virus that is doing active scheduled scan ? / worse do you have real time check ?(often missed but has an impact when gaming on a surround setup where a lil bit more juice can improve FPS) / Do you have an tab stuck in chrome (happens sometimes) that continuously tries to refresh and tax a bit of CPU ? / do you have music playing in a player ? / Did that player started a video clip on your behalf playing your list in the background ?
Those exemples above are taxing and you should shut these program you dont really need as you game on games where you have FPS issues.
A Single Program shut WON’T make your game 100 % smooth in most cases but will surely help…
For those of you who is less comfortable with pc and doesnt really know what process to shutdown go and try razer cortex that will do the exact thing i mentionned for you while the game is open, and will restore back your normal desktop experience once you close your game…
It has tons of options to go trough and you can see on razer Cortex website that can help you
Just the default settings on Cortex actually helped one of my friend gain 15 FPS in large Cities on a single screen monitor older pc config 🙂
There is the link : [link]

Mental Picture
In American Truck simulator there is couple different multi-monitor mode (i will go more in depth later) and there is two main mode :
– the Normal Stretch Surround auto setting i like to call it (most of games) that render one ultra wide image and calculate graphics only once on 5760 X 1080 (mode0)
– The native Multimonitor mode that render 3 single 1920 X 1080 image (depending on your setting of course) and calculate the graphic setttings 3X ( mirrors, reflections, shadows, etc) that will remove the stretch effect of your left and right monitor and look stunning (mode 2)
To understand the process i will strip it down in the most simple 7 steps you can ever visualize between :
– Stretch surround : @
– Hidden native multimonitor settings : #
You want to attach the trailer to your truck.
You have hardware and software : Software (programs) need to comunicate with hadware (actual pc pieces) to render you what you want.
Here is an easy 7 step for you to visualize in ascending step
Step 1
Situation : The game is talking in a language as you ask the game to attach the trailer.
*Often the game has its own language called the game engine.
– @# The game then comunicate to its game engine
Step 2
– @# The game engine translate it to windows language
Step 3
*Windows ask the appropriate core program to talk to respective shell command and tell them to create teamworks CPU/GPU/HDD/RAM etc…
*one of the most known universal video shell engine is called Direct x
– @# Windows ask to directx to talk to the video card kernel
– @# Windows ask to windows Shell command and directx to talk to CPU
Step 4
*video card has their own languages
– @ The kernel ask the video card and processis units (CPU) to render the image to a surround setup using binary code (Electricity on and off basically)
– # The kernel ask the video card and processis units (CPU) to work on 3 distinct completely different image all at once
– # The CPU has to work on calculating each images independantly from each others
Step 5
– @ The GPU receive the order, create it, pass it to CPU quiclky before confirming and render it.
– # The GPU Render Each monitor image and send it one by one to the CPU to calculate each point of view independantly
Step 6
– @ The CPU Examine the new image and gives its okay to determine where it need to cut and to wich monitor it goes to.
– # The CPU examine the new image for monitor 2 (center), then wait to receive monitor 1 (left) and wait a final time to receive monitor 3 (right) and then recalculate shadows/reflexion/weather etc to each respective monitor to give its okay to determine which monitor it need to go to
Step 7
– @ The Gpu Send 3 part of a single ultra wide image to the respective monitor that the trailer has been attached
– # The GPU send 3 1920 X 1080 images to each respective monitors.
Its not exact rocket science, its just so you can vizualize in your head what your PC is doing for a single image.
The most asking to the hardware are Step 5 and 6.
You can imagine now that on a single monitor the GPU and CPU on step 5 has An way easier task than on a multi monitor setup.

In the situation above we only talked about one image and one variable, but as your CPU and GPU renders all that, they have to work on mupltiple thing at once.
Ex: Hows the weather ? You are moving, hows your load doing ? wich AI Traffic im gonna generate, Wich command lines i need to get out of the game engine script as one cut you and you need to activate retarder ? REtarder you said ? whats your load ? ok from the calculation retarder level 3 will give that much brake ? how you said ? you are turning while having retarder on to dodge that iminent accident ? alright your turn will vary depending on the truck suspension ! Whats the truck suspension script ? etc etc etc .. there a lot going on that the hardware need to take into consideration…
If all of the exemples above arent enough, to only name a few, GPU is still asking step 1 to 7 as you drive so you can see what youre doing…
Knowing that step 5 and 6 is still asked 60 times a seconds to render on a triple monitor setup, there is the reason the FPS start to lower down because the system cant keep up the required 60 (or more) FPS
Note : you also can notice with the @ – # how much more the native multimonitor mode (mode 2) is taxing more on the system than the single ultra wide image and you can now understand why.
You also can understand why it is looking so damn beautifull on native multi monitor mode

ATS Multimonitor Mode in a nutshell
The Multimonitor mode is an awesome way that SCS has implemented to play surround with American Truck Simulator and Euro Truck Simulator 2.
Instead of what we are all used to in the surround gaming industry, this mode render 3 distinct image and project them on respectives monitors instead of just one ultra wide stretched on the side image like we are used to by now…
The large yet stretched image is made this way to only have the user focus on the main monitor and the distortion is for your eyes to catch what is left and right without moving your head from the center one
The multimon distinct image wants you to turn your head left and right to your monitor so you can actually look on around you depending on your settings and how much monitor your setup has
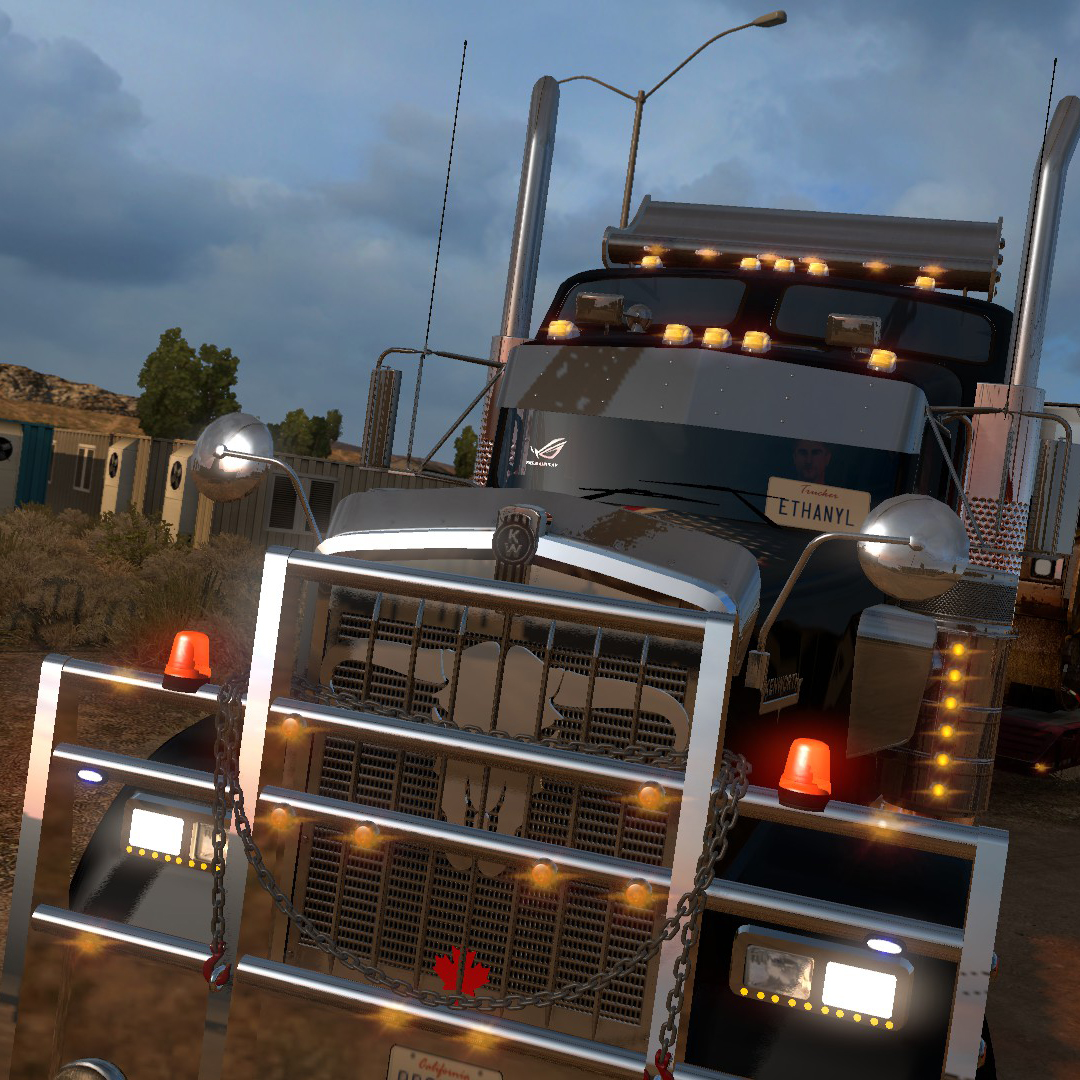
While its hard to really demonstrate the effect that has visually without living it for yourself, here some selected screenshots where you can see the distortion between the 2 modes
Here is some screenshot inside the cab WITHOUT multi-monitor mode enabled


Notice how the far left is distorted when you look directly at it as it was on your left monitor, and notice how the dash become stretched and weird on the far right where the right mirror is way bigger than the left cause of that stretching ?
now my actual truck dash with multi monitor activated


Notice now how the edge are smooth without distortion so you can comfortably directly look at !
Yes in those screenshot you do see a cut in the image due to the bezel corection and the angle you set your monitors at ! like i said its hard to really show the effect but thrust me, with your monitor oriented around your head, the line are perfect and the curve is smooth
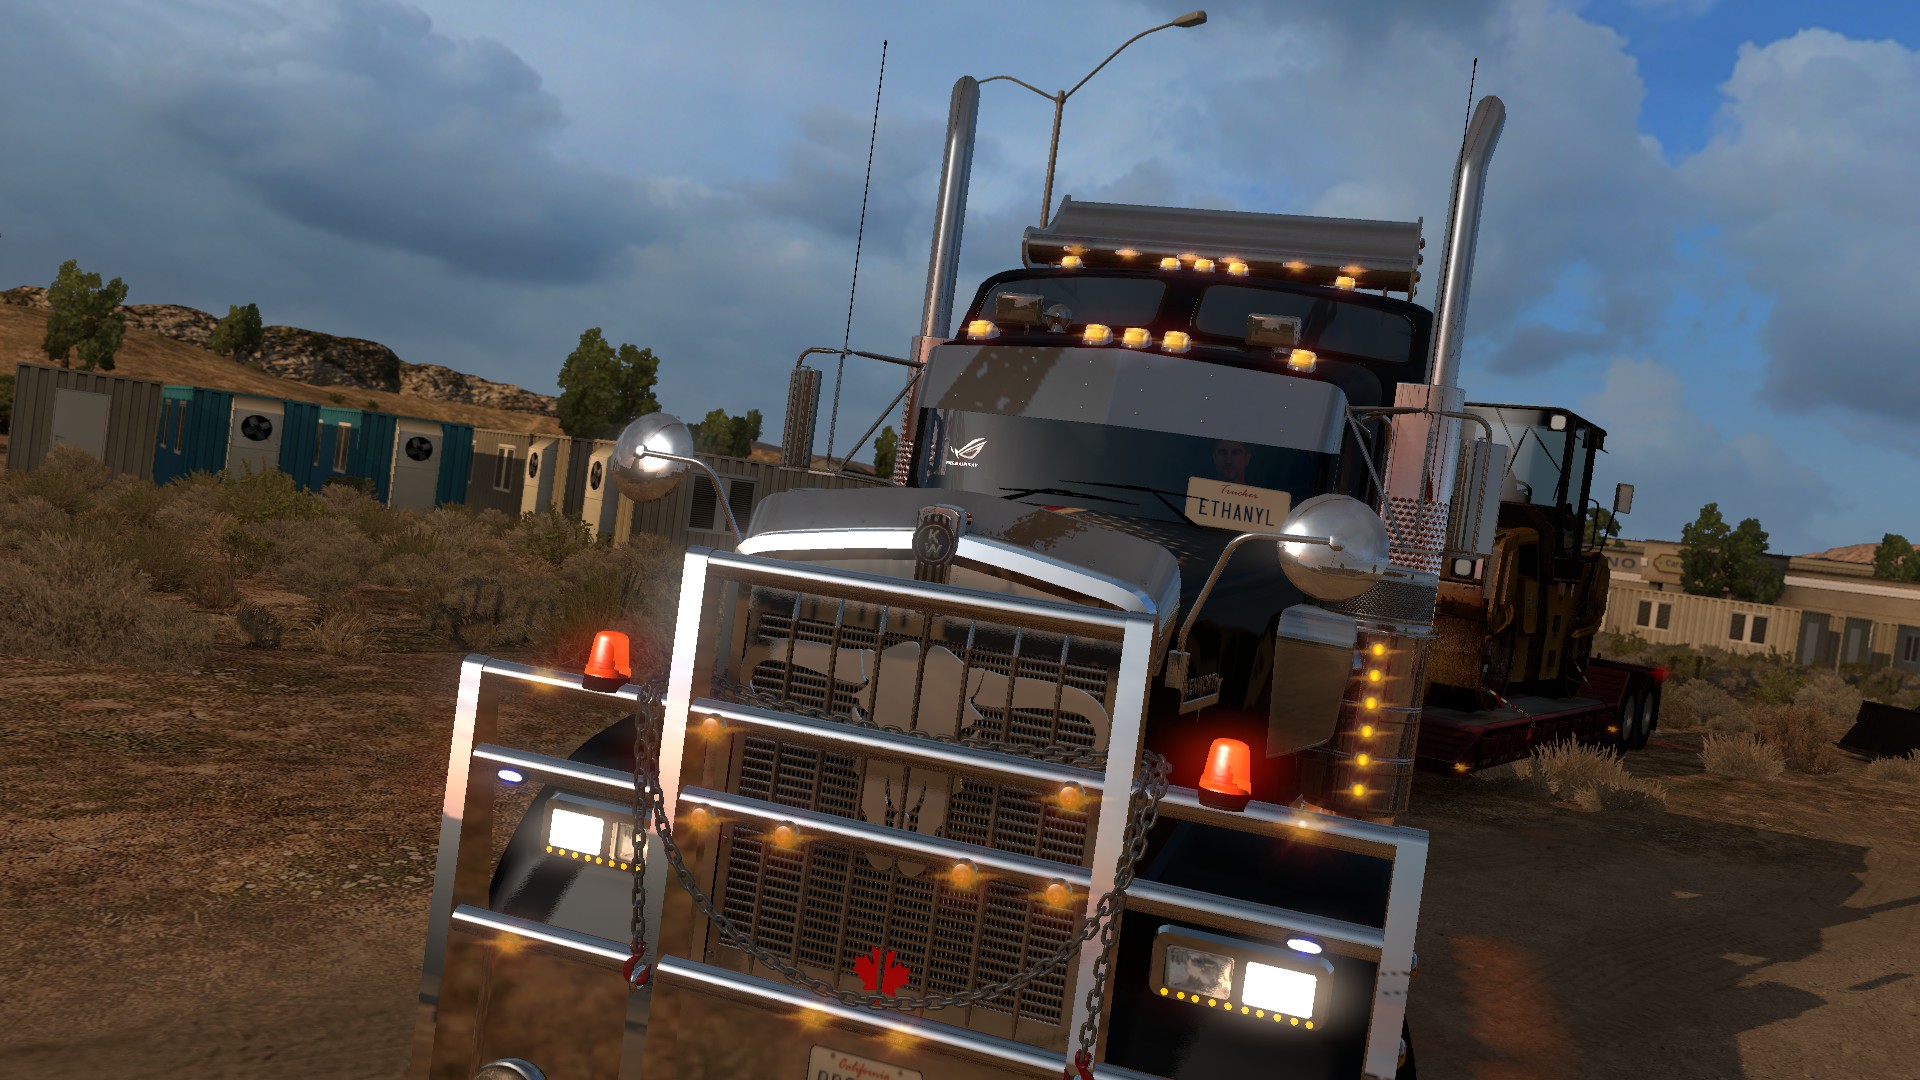
Here is some exemple outside without multimon mode


Once again here you can clearly see the far left and far right distortion
Then here is some screenshots from outside WITH multimonitor activated


Here again we can see the cut and the non linearity of the lines du to my monitor angles set in the multimonitor settings, but from my point of view, eveything is super straight and beautifull. Again your setting may differ a bit from mine. Notice also the stretching effect disapeared and we can cleary see to the far left and to the far right.
you want immersion or eye candy ? you want most In-game graphics settings maxed out or a beautifull cab interior that looks real but more GPU intensive ?
The Multi-Monitor mode is an hidden fonction that resides inside your config files.
Mode 0 and 1: One ultra Wide Image Flat Surround (Default Settings)

Mode 2 : Three separate views for three monitors.

Mode 3 : same as mode 2 with an extra 4th bottom center monitor for truck dash

Its really easy to activate but a lttle pain to work with since its not an in-game fonction.
You guessed it, when you fiddle with the few setting the true native multi-monitor mode has, you need to close the game, save the setting and open it up again and see the result.
SCS made us a page about it without really being dummy proof so it gets hard to understand sometimes but you can find the full page at :
[link].
Dale iMAGGOT and i came out with a beautifull result so that you can try for yourself further down below in the preset section 😛
(It will still requires you to fiddle the settings a little for your own bezel correction)
Activating Multi-Monitor Mode
Only multimon configurations which are presented to the game as a single big resolution virtual screen are supported. You need to be using either Nvidia Surround or AMD Eyefinity or equivalent depending on your graphics chipset type.
Dont worry, its not hard at all, and it takes only two seconds with this guide 🙂
- Optionnal : Use Notepad ++
- Start by accessing your My Documents folder
- Locate American Truck Simulator folder (Euro Truck Simulator 2 for ETS 2)
- Locate and Right Click on config.cfg and click open with
- Open it with what your comfortable using (i use Edit with Notepad++ but you can use either Wordpad or blocnote)
- DONT be confused its not that hard 😉
- Close to line 19 you will find few easy labelled options : uset r_multimon that you can easely differ from the rest
- the last line of this section is
uset r_multimon_mode “0”
> Change the 0 to number 2 (or the mode you want to activate (see Basic Configurations section below)) <
Should look like this :
uset r_multimon_mode “2” - Hit File and save
You just entered the basic Multimonitor mode i was talking earlier.
You can take a moment to tweak your setting a little bit
Basic Configuration of Multimonitor Mode
Heres the different mode types visually :
Multimonitor mode Types[www.eurotrucksimulator2.com]
In short :
Where the 0 means the type
The display is represented as single ultra wide planar display with
the UI (user interface) covering the entire area. This is the default.
The disadvantage is that because of the wide FOV (field of view), the image
on the sides is significantly distorted.
of the third monitor (e.g. on the center monitor in three-monitor setup).
This is similar to 0 however the UI covers only the area of the center monitor.
Each monitor has its own view, with the default FOV of 50 degrees horizontally.
UI is positioned on the center monitor.
as with type 2 and the last monitor shows auxiliary view looking downwards
at the dashboard and steering wheel.
– In other Words : Same as type 2 with a 4th monitor in center bottom
(Click this link for SCS expanded infos : CUSTOMIZED MODE[www.eurotrucksimulator2.com] )
-
Camero Roll Pitch
The default inside cab camera has a little roll effect for you to see better the dashboard while driving. While in Multimonitor mode other than 0 or 1 this roll effect will results in funny wrong camera rotation on side monitors.
So you want to disable it first thing (unless it doesnt bother you at all)
Took from the SCS website :
The default interior cameras look slightly downwards to make the truck dashboard more visible. While that works well for normal monitor, it looks wrong on side views of multi monitor setup. For that reason it is recommended to set g_interior_camera_zero_pitch to 1 before launching the game to disable this feature without need to modify game data.
Look for :
- Change the 0 to 1
- Hit File and Save
*Pro Tips : go to your seat disposition in-game and lower a tiny bit the view if you wanna see dashboard better while having a minimum impact on side monitors
-
Bezel Correction
What is Bezel correction ? :
– The Bezel are the technical term of your monitor frame. Each monitor has different Bezel size wich makes the bezel correction differ from setup to setup
– The Bezel correction is a way for windows/games to know approximately how many pixels are “hidden” behind your bezel so that way, instead of cutting the image and continuing it on another monitor, it just render it BEHIND those bezel making a invisible for the eyes so you can have an immersive exeperience like it is only something blocking your view like some sort of little rod…
– The purpose of Bezel correction is to simulate one large image that feels like it passes behind your bezel (edge of monitor) so the scaling is perfect and the image is uncut and fluid.
* While it is extremely handy and immersive it can be a little bit of a pain in some games where the game isnt fully optimized and the UI shows you some text but a part of it is hidden behind your bezel. The best way to counter that is to have a keybind for Bezel sneak peek wich will momentarily compress left and right image from your bezel to be able to read whats in between, then repressing that keybind will adjust back your image.
In ATS :
Inside American Truck Simulator, it is in your best interest in type 2 and type 3 that you let the game handle your bezel (monitor frames) instead of your custom bezel corrected resolution and fiddle a litle bit with the bezel corection in ATS config where you just activated the multimonitor mode.
– Put yourself in standard 5760 X 1080
The reason for this is because the way ATS works, as said earlier, is writing 3 X images instead of only one large. The way ATS will manage those bezel will be different from normal single image games.
Instead of starting the image at top left (left monitor) and just drawing the image behind your bezel all the way trough bottom right (right monitor), the left image will start top left (left monitor) be slightly larger than your width monitor size (still left monitor) so the image seems to continue HALF way trough center monitor.
Center monitor image will be drawned larger to the right and to the left than your real monitor size to join the left monitor image still HALF way trough behind your bezels and will make the other Half of your bezel. same goes mirrorred for the center right and right monitor
Go to :
- Change Zero to a positive number.
- Hit File and save.
- Open the game and launch a profile save, go to your cab view and try for yourself if the image feels scaled and fluid behing your bezels.
- – If satisfied you’re good to go.
– If not satisfied, Close the game and repeat step 1-2-3 until you are satisfied with your right bezel.
- Change Zero to a positive number.
- Hit File and save.
- Open the game and launch a profile save, go to your cab view and try for yourself if the image feels scaled and fluid behing your bezels.
- – If satisfied you’re good to go.
– If not satisfied, Close the game and repeat step 1-2-3 until you are satisfied with your left bezel.
*Pro Tips :
Normally in a surround setup you have 3 exact same screen, so once you got one side perfect, you just have to copy over the setting to the other side.
-
FOV
What is FOV ?
Those video will easily demonstrate what it does
https://www.youtube.com/watch?v=Se95M2ySzDI
Look at how the FOV change while he move the slider
In American Truck Simulator the default view is at 72/75
I would recommend an FOV of 68/70 depending on your screen size/distance.
Check yours and make sure 70 is a comfortable number for your screen relation to distance.
Look for :
*Pro Tips :
The smaller the FOV is the bigger the game will feel, the closiest everything will get until a point you loose speed/outside distance perspective and will give a dizzyness effect ))
There you go. The Basic configuration is done 🙂
Additionnal Mutlimonitor Configuration
r_multimon_exterior_in_aux
r_multimon_interior_in_main
r_multimon_rotation_aux
r_multimon_rotation_right
r_multimon_rotation_left
r_multimon_rotation_center
r_multimon_vert_offset_right
r_multimon_vert_offset_left
r_multimon_border_fov_right
r_multimon_border_fov_left
r_multimon_fov_vertical
r_multimon_fov_horizontal
The visualization in modes 2 and 3 can be further controlled by following cvars:
r_multimon_border_fov_left and r_multimon_border_fov_right – Visual angle in degrees covered by the bezel (e.g. monitor frame) between center and left/right monitor. Used for bezel correction.
r_multimon_fov_horizontal and r_multimon_fov_vertical – Field of view used for each view. If only one from them is nonzero, the remaining one is calculated to keep the aspect ratio of the resolution. If both are zero, the default FOV calculation based on current in-game camera is used.
r_multimon_vert_offset_left and r_multimon_vert_offset_right – Vertical offset in meters of the left/right monitor from the center one. Can be used to move the left side view up or down to improve visibility of the mirrors given the limited vertical field of view.
r_multimon_rotation_center, r_multimon_rotation_left, r_multimon_rotation_right and r_multimon_rotation_aux – Additional counter-clockwise rotation applied to of views of individual monitors. Most likely used with value 90 or -90 to compensate for monitor which is physically in different orientation (e.g. portrait vs landscape) than configured in the graphics driver. This allows for mixing portrait and landscape orientations even when not supported by the driver.
r_multimon_interior_in_main – Controls rendering of the cabin interior in the main views. Can be used to disable interior if some form of physical interior is present.
r_multimon_exterior_in_aux – Controls rendering of the exterior to the auxiliary view (mode 3). Note that shadows are currently still updated even if exterior is disabled.
Here is the complete page and it is exactly the same game engine as Euro Truck Simulator 2 so you can apply those settings to both respective game config as you wish
>>> CUSTOMIZED MODE [www.eurotrucksimulator2.com]
Deactivating Multimonitor Mode
You can opt to easily deactivate Multimonitor Mode as you wish for your own reason folling those 3 easy steps.
Go in your config.cfg where you activated it.
My Documents > American Truck Simulator > config.cfg
- Open back the config.cfg in text editor
- locate :
uset r_multimon_mode “YOUR SELECTED MODE”
and Change it to :
uset r_multimon_mode “0” - Hit File and save
Want to opt out of multi-monitor mode ?
You can go back to default view without loosing your custom configuration in those 5 easy steps.
- Open back the config.cfg in text editor
- locate :
uset g_interior_camera_zero_pitch “1”
And change it Back to :
uset g_interior_camera_zero_pitch “0” - Locate :
uset r_multimon_fov_horizontal “YOUR CUSTOM NUMBER”
And change it back to :
uset r_multimon_fov_horizontal “75” - and finally locate :
uset r_multimon_mode “YOUR SELECTED MODE”
And change it to :
uset r_multimon_mode “0” - Hit File and save
There you go, the rest of the setting will not affect your game since they are considered only if multimon mode is 2-4

Multi-Monitor Mode Presets
Here is some descent setting preset by me and Dale iMAGGOT : Just Copy and paste over those lines then adjust your own bezel 🙂

What it Does : it deactivate the pitched angle so it is a tiny bit harder to see dashboard (need to be a step or two further back in your seat position and angle your head manually a bit lower but remove the litle weird roll effect on side monitors)
Suitable for : Desktop desk and simulation chair
* Main one i use
uset g_interior_camera_zero_pitch “1”
uset r_segment_buffer_size “128”
uset r_multimon_exterior_in_aux “0”
uset r_multimon_interior_in_main “1”
uset r_multimon_rotation_aux “0”
uset r_multimon_rotation_right “0”
uset r_multimon_rotation_left “0”
uset r_multimon_rotation_center “0”
uset r_multimon_vert_offset_right “0”
uset r_multimon_vert_offset_left “0”
uset r_multimon_border_fov_right “3”
uset r_multimon_border_fov_left “3”
uset r_multimon_fov_vertical “0”
uset r_multimon_fov_horizontal “70”
uset r_multimon_mode “2”
What it does : Gives a better view of the dash but curve a litle bit the camera on side monitors wich looks litle bit funny
Suitable For : simulation chair
uset g_interior_camera_zero_pitch “0”
uset r_segment_buffer_size “128”
uset r_multimon_exterior_in_aux “0”
uset r_multimon_interior_in_main “1”
uset r_multimon_rotation_aux “0”
uset r_multimon_rotation_right “0”
uset r_multimon_rotation_left “0”
uset r_multimon_rotation_center “0”
uset r_multimon_vert_offset_right “0”
uset r_multimon_vert_offset_left “0”
uset r_multimon_border_fov_right “3”
uset r_multimon_border_fov_left “3”
uset r_multimon_fov_vertical “0”
uset r_multimon_fov_horizontal “68”
uset r_multimon_mode “2”
What it does : It de-activate the rendering of the inside gauge leaving them for telemetry on actual custom dash
Suitable For : Custom designed interior vehicules dash setup
uset g_interior_camera_zero_pitch “1”
uset r_segment_buffer_size “128”
uset r_multimon_exterior_in_aux “0”
uset r_multimon_interior_in_main “0”
uset r_multimon_rotation_aux “0”
uset r_multimon_rotation_right “0”
uset r_multimon_rotation_left “0”
uset r_multimon_rotation_center “0”
uset r_multimon_vert_offset_right “0”
uset r_multimon_vert_offset_left “0”
uset r_multimon_border_fov_right “3”
uset r_multimon_border_fov_left “3”
uset r_multimon_fov_vertical “0”
uset r_multimon_fov_horizontal “65”
uset r_multimon_mode “2”
To understand G Roll better :
The default interior cameras look slightly downwards to make the truck dashboard more visible. While that works well for normal monitor, it looks wrong on side views of multi monitor setup. For that reason it is recommended to set g_interior_camera_zero_pitch to 1 before launching the game to disable this feature without need to modify game data.
Graphics Settings Impacts and Recommendations
I have an Nvidia GTX 780 Ti, and a Dale iMAGGOT has 2 way SLI 970 (2 X GTX 970) and we both had FPS issues in big cities on ultra because its harsh on the GPU using surround mode and make it worse on the multimonitor mode not because GPU is not great but more because the game is either poorly optimized for performance on surround without Titan’s and Titan X to counterbalance or it is because it is way more taxing than what it seems ;P hehe
So, no ! Your are not alone in this misery !
Now that you tried Multimonitor mode you cant go away from it ? but it impact the FPS ?
Or you tried it but opted out of it because you like eye candy better ?
To start with, the biggest real impact on performance outside the game settings is this multimonitor mode.
But wether or not you opted for real multimonitor mode or not, we all know the in-game more taxing are :
Mirrors !
But you need mirrors right ?! 😛
Well, technicaly speaking the mirrors arent that taxing, its what the mirrors reflect that are !
Speacking of witch :
-
Reflection details in mirrors
It doesnt seems that could look like an power hungry thing, but on multimonitor mode it can affect quite more than expected.
Well here it comes in an important factor after almost 200 hours of playtime and messing around, i found that the mirrors will also reproduce reflexions, as well as shadows so you might consider wich kind of mirror you would like to put !Image it in your head : looking true your windshield your hood give a beatifull reflexion rendering while driving an W900 but as soon as you add hood mirrors, it’l drain a lot of FPS. It will get even worse with higher reflection details as you will see the whole nose,lights, AI Traffic Ligts and shadows on your truck inside your hood mirrors while side mirrors are way WAY less taxing 😉
See it that way : the game needs to render your vision in about 8 different point of view (1 to 8 from the keyboard) but the more demanding really is the inside cab view for couple of reasons :
First : it has to do everything other camera has to render, BUT ALSO, it needs to render every gauges in 3D even tho youre not really seing it as 3D (try an Track IR or an oculus and youll see it right away that the cab, and the gauge are all in perfect 3D and is designed to be as much real as possible by SCS engine for now )
Not only it has to render everyhing outside, traffic,lights, your own truck and trailer lights, your front lightrs, the traffic AI lights, the cities, the traffic density, the gauges in real time, weather effect on windshield, whipers, animated effect such as light switch and flasher stick, but it also has to render different camera simultanously because you have mirrors !Thats right !! thats why mirrors come in top 1 of FPS hit… but you cant really lower the setting of the nmirror if you wanna immerse yourself as a truck driver because a real truck driver canot fly by to see outside at every minutes using different camera right ? 😛
Normaly, it is not that noticeable, but you are not as everybody else from now on ! you belong with a special community of surround gamers now !
So my point is, the more mirror the better to your vision, but the worse FPS you will get, even worst in cities, because it has to render everything i said cab has to render, beside gauges of courses, and replicate it many many times over from different angles all at onces since you run in Surround and the game cant unload one or 2 mirrors while you’re not looking at them cause they all visibles 😉
So… from 200 hours of gameplay i observed this fact : Hood mirror are top 1 GPU Carnivore because it has to render almost every single lights from your truck from that point of view AND they are wide angle so they render a lot around too … even tho you cant really see much in it because they are oftens small and far away 😉
Suggestion :Leave reflection details at medium or high and enjoy those beautifull reflections while avoiding hood mirrors completely… no matter wich one on wich truck…. Opt for wide angled mirrors underneath your main left and right mirrors instead as they have less reflexions and less FOV to render in most cases.
-
Vsync
V-Sync will stabilize your FPS rate and reduce tearing and stuttering making the game experience fluid and fun but on lower FPS range when you drop below 25 FPS, it will feel like it lags even more with Vsync on.Suggestion :If even on the lowest graphic settings you cannot achieve higher than 25/30 FPS in cities, consider de-activating V-Sync as it will make lower FPS looks a litle bit smoother
-
Shadows and vegetations details
this is not proprietary to this game ! Every game Shadows taxes the CPU AND GPU because it has many calculations to be made before rendering.
Depending on the sun position, it has to pass trough every object and cast a shadow on the other side of it on the ground. the most shadows details will be seens trough begetation such as trees and plants.Suggestion :Depending on how much VRam your GPU has, keep the shadow texture size to high to keep em sharp and reduce Shadow Quality to gain some FPS if needed.The most impact will be noticed in cities. Interesting fact is how much vegetation details you want… if you are willing to have less vegetaion details, then you can tweak you shadow details back up 🙂 * I personaly prefer vegetation details over shadows as medium shadows still looks beautifull
-
Anti-Aliasing
As you may or may not know is taxing on the GPU for Surround setup and use a lot of raw power to round the edge ! This Particular MLAA is horible as much people complains about but for us triple screener its horrible and just add a level of overall bluryness as the effect got stretched across our monitors.Suggestion :I Suggest to de-activatre MLAA whatever your FPS are good or not and opt for higher scale instead where it will act as a similar way but wont blur everything out.Keep your anisotropic filter at max 🙂
Talking of Scaling
-
Scale %
What it does : Scaling is undersampling and supersampling basically. Search on Google for more info on this.
Here the basic thing it does : It renders the resolution on a scale from what youre real resolutioon is.
So if you’re playing 5760 X 1080 Scaled at 200 % it will basically render the image at 11520 X 2160 and shrunk it down to 1080P on the output
Principal Fonction : it smoothen the edge acting as a powerfull anti-alias and gives farther things a much cleaner aspect while driving.
On close range itl make your gauge easier to read and much cleaner
As expected it is asking a lot on the GPU to scale it up but as it is fake : supersampling, it is not as demanding as real 4KSuggestion :Dont scale too high first start with 125 % or 150 % with MLAA off and work your settings before trying increasing it ;)*Remember Scaling will affect all of the above variables
Other settings i tweaked with them for a long time and no FPS improvments came out of it ! So leave them to ultra/max
If you have a very low end CPU you may want to deactivate pedestrians and lower light visibility range but again, you would have an hard time running in Surround with a very low end CPU

My own settings
Windows 10 on 256gb SSD
2X WD normal 5400 RPM 2 TB
Logitech driving Force GT
Ps3 controller emulating an X-Input
An old Logitech Wingman for H-Shifter
An old pedal DIY to use as a standalone clutch
Intel 3570K 4.2 Ghz oced CPU
Nvidia GTX 780 Ti Twin Frozr GPU
16 Gigs of Ram
3 X asus VG278H 27 inch monitor banked appro at 46 from center for the left and appro 55 degree for the right monitor
After hours of fiddling, i use those settings (so you can make comparison and make your own judgement) :
– Enable
– Mode : 2 in config <<< Hit the performances the most, but once you activate it, you dont want to come back to stretched 5760 X 1080 image
– FOV Sector 70
– Other settings inside config for multimon and personnal tweak can be shared if you want on my exact monitor setup 😉
– FFB Plugin
– ETS 2 Telemetry (works as well with ATS) for android gauges
– Shaders Reworked and tweaked for a triple monitor setup
– FPS hungry outside cities : More traffics V 2.0
– i have Foggy Weather anmd sound Fix that slightly use power, the rest are jsut mods that will not have an noticeable impact on performances
89 mods Activated on main Single Player Profiles and running ubber smooth 😛
– Full Screen 5900 X 1080 bezel corected with Vsync on with aditionnal bezel corection from the config file
– Scalling : 150 %
– MLAA : deactivated
– HDR : OF COURSE THAT I WANT IT ACTIVATED 😀
– DOF : deactivated, i hate hate HATE it … did i told you i hate it ? no real impact tho 😉 only a preference
– Sunshaft : of course it is activated, its so beautifull ^_^
– Color correction activated
– Reflexion Details : High -> im avoiding putting hood mirrors
– Vegetation details : Medium
– Grass density : disabled
– Shadow quality : medium
– Shadow texture size : high (it depends on how much VRAM you have, but normally wont be an issue)
– Weather Quality : Ultra always ^_^
– Mirror quality : high
– Mirror resolution : high
– Mirror distance : medium
– Texture quality : high of course !
– everything else activated and maxed
Reno, San Fransisco, LA, Las Vegas, Redding and sacramento for some reasons :
28 to 35 FPS depending on time of the day (22 to 25 when its rainning (i know its bad but well … >-> ))
Bakersfield, Elko, Eureka etc : 38 to 45 FPS (30 to 40 when raining)
Tonopah,Santa Cruz, Ely, Carson city Etc 60 FPS locked barely under 58 (50 to 60 when raining)
**** All those settings are almost exalty the same in ETS2 btw as it is the same graphic engine 😉

Extra : In a Hurry ?


Want to play NOW and get better FPS quick but wanna read on later
Here is Quick copy paste section of the guide
Try those settings as a base 🙂
config file :
uset g_interior_camera_zero_pitch “1”
uset r_segment_buffer_size “128”
uset r_multimon_exterior_in_aux “0”
uset r_multimon_interior_in_main “1”
uset r_multimon_rotation_aux “0”
uset r_multimon_rotation_right “0”
uset r_multimon_rotation_left “0”
uset r_multimon_rotation_center “0”
uset r_multimon_vert_offset_right “0”
uset r_multimon_vert_offset_left “0”
uset r_multimon_border_fov_right “3”
uset r_multimon_border_fov_left “3”
uset r_multimon_fov_vertical “0”
uset r_multimon_fov_horizontal “70”
uset r_multimon_mode “2”
Graphics settings :
– Full Screen 5760 X 1080 with Vsync on
– Scalling : 125 %
– MLAA : deactivated
– HDR : ON
– DOF : as you prefer
– Sunshaft : ON
– Color correction activated
– Reflexion Details : High -> avoid putting hood mirrors
– Vegetation details : Medium
– Grass density : low
– Shadow quality : medium
– Shadow texture size : high
– Weather Quality : Ultra
– Mirror quality : high
– Mirror resolution : high
– Mirror distance : medium
– Texture quality : high of course !
– everything else activated and maxed
Just need to turn multimon mode off as every other settings will stick until you activate it again
config file :
uset r_multimon_mode “0”
Graphics settings :
– Full Screen 5760 X 1080 with Vsync on
– Scalling : 200 or 300 %
– MLAA : deactivated
– HDR : ON
– DOF : as you prefer
– Sunshaft : ON
– Color correction activated
– Reflexion Details : High
– Vegetation details : high
– Grass density : low
– Shadow quality : medium
– Shadow texture size : high
– Weather Quality : Ultra
– Mirror quality : high
– Mirror resolution : high
– Mirror distance : medium
– Texture quality : high of course !
– everything else activated and maxed
Thank you
Thank you for rating up this guide to give it visibility if it helped you
If you have any suggestions, or made any discovery or know interesting fact, leave a comment and well talk
As i said in the introduction, i want this guide to be some sort of comunity collection of ideas and tweaks to bring this game better for us triple screeners 😛
Until then don’t text ‘n drive 🙂 See ya

