Overview
This is a short guide to help you make virtually any controller work in any game, as long as your computer detects your device ; so if your controller isn’t supported by a game, or if it won’t let you bind your keys the way you want, then read on.
Step 1 – The controller emulation software

As I’ve been personally using xpadder for years and I think it’s the best in the business, I’ll just briefly show you some examples of how to use it to map your keys.
Here’s the link to the official website: xpadder[www.xpadder.com]
Do note that the lastest version (currenly 5.7) of the software needs to be activated and is not free. However, any version prior to this one is, so feel free to google xpadder 5.6 and find a link.
Since I’m a rather nice guy, I’ve made one for you myself :
xpadder 5.6[www.dropbox.com]
For other softwares, you can find plenty of tutorials easily on the internet.
For more information, here are some more links to their official websites:
- Joytokey[joytokey.net]
- Motioninjoy[motioninjoy.com]
- Pinnacle[www.pinnaclegameprofiler.com]
Step 2 – Disabling the automatic controller support

If the game doesn’t even recognize your controller at all, you can skip this step.
In order to do that, you’ll need a little file, kindly provided by JottiLF on the steam forums : nox360[jotti.org]
Download the file, extract it and put its content in the root folder of your game, where your .exe is.
This is initially a fix for 360 controllers, but it should work for any controller supported by most games.
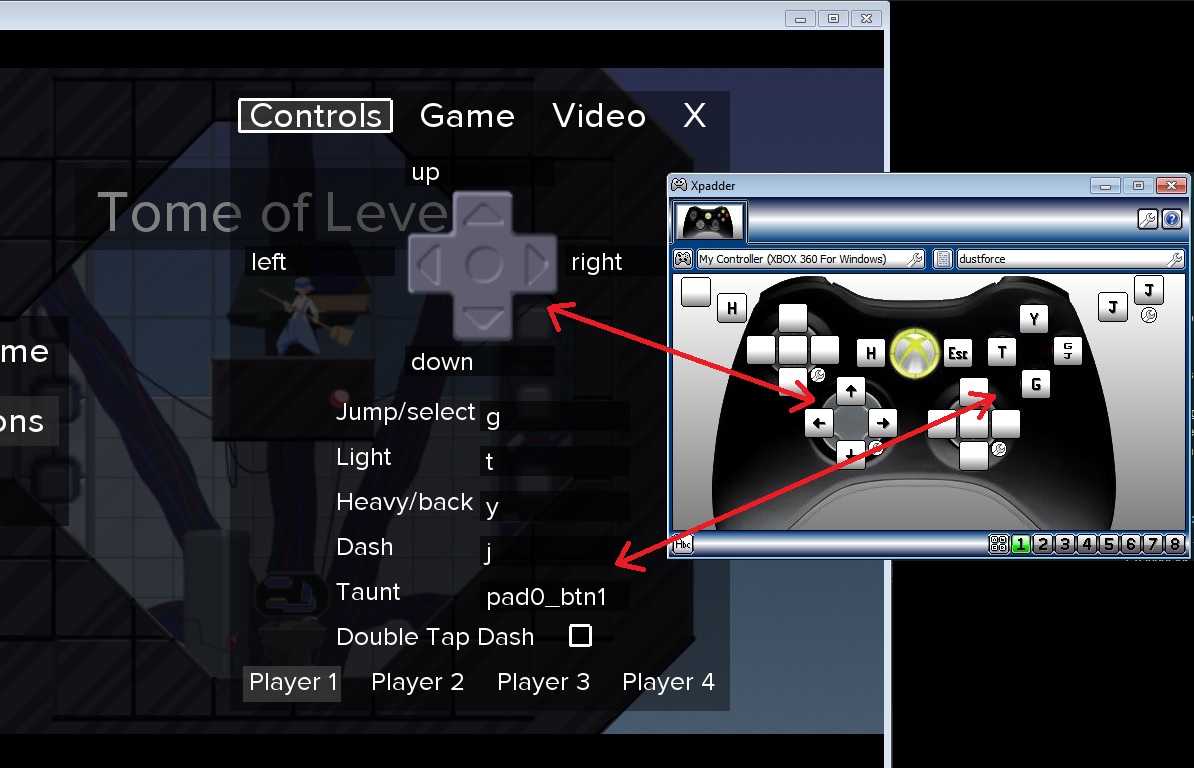
Step 3 – Mapping the keyboard keys to your pad
Assuming you’ve picked xpadder, after downloading it, extract its content and run the .exe
Plug in your controller, and if your windows is able to detect it, so will xpadder, in most cases.
You’ll have to create 2 profiles, one for your pad (a standard layout for the controller), and another one for the game specifically.
Once again, there are plenty of tutorials that will explain how to use xpadder in-depth better than I can, but I’ll still briefly show you around the program, feel free to fiddle with it yourself as well, it’s not exactly rocket-science and it’s really easy to use.
- First create a new layout for your pad (the pad icon on the left), you’ll get several options (sticks, d-pads, triggers, etc) to configure. It’s really straightforward, just press the buttons on your pad and they’ll appear on the purple screen, then arrange them the way you want (conveniently the same way as they are on your controller) so you can easily know what each key is by just pressing it.
- Purely for aesthetics, you can also add an image of your pad (that you can either find in the image database included with the program, or one that you can make from scratch yourself).
- Here are 2 of my profiles for a 360 controller and a Madcatz TE arcade stick for those who might be interested:

My Xbox 360 pad profile[www.dropbox.com]

My TE stick profile[www.dropbox.com]

- Now you’ll have to check every keyboard keys used by the game. So start your game, hit the option menu and take note of the keys you’re interested in. Then just click on one of your pad’s blank boxes in xpadder, and choose the respective key from the virtual keyboard that just popped up. Repeat the process for all of your buttons, save your second profile, and voilà !
Remember to let xpadder run in the background while playing.
You can also change the sensitivity and deadzone of your sticks to your liking, switch the in-game directions from joystick to pad, or even right stick, map the mouse to a stick (so you can browse the internet or casually use your computer with your pad if you want to), set a command to several buttons, or map 2 commands on a single button, which can be quite useful in some games.
Credits
Props to Jonathan Firth for having created such a great software, GALAXY for helping me with the page layout, pictures and proofreading, me for writing this guide, JottiLF for sharing his fix, and you for taking the time to read this. Hope this helped.