
Overview
Ever wondered, how nice it would feel to consistently hit 70⁰-80⁰ to even 90⁰ on ANY car you like and get many points?This comprehensive guide will help you do just that and without any risk of spinning out!This guide is for you, if: Your car seems to be constantly spinning-out for no particular reason, or You have little knowledge about tuning and just want to have fun drifting, or You find yourself consistently tanking hours into tuning a new car, or You’re struggling with keyboard drifting, or You’re struggling to gain enough points for medals/multiplayer, or You’re just new to the gameI’ll try to address all of these scenarios in this guide by providing a single, universal tune guide for all cars in the game. Yep, it works even for that one semi-serious semi-truck.In this guide I’ll be explaining very basic concepts, so if you’ve pumped hundreds of hours into the game or just already know your way around tuning cars – this guide is not for you and will probably feel boring or uninformative.Also, I’m not an engineer or a mechanic, so all of this is based on my own experiments, other guides, some research and experience in other games.
What? One tune for all cars?
Well, not exactly one single tune. More like a general basic direction, from which you can then comfortably experiment to see what suits your own driving style. Yup, you’ll learn something about tuning just by reading this – no more copying other people’s tunes from screenshots! 😉
That’s the process:
– You start with this guide, set up your new car using base values
– Now you already have a car that is comfortable to drift and set some high-scores on tracks
– You’re free to experiment with the parameters yourself, to see what’s best for you!
Below I will explain the whole setup in detail, so if you want just the numbers – see Summary (TLDR)
Beware that this setup is tuned for maximising drift points (not precision drifting or tandems) and requires you to almost always floor it on your car in order to work properly.
Though this comes with a benefit of effortless 80k+ on Kami Road, 100k+ on Navaro and other tracks, so I don’t know who could complain. 😉
So, without further-a-do, let’s jump into it!
I’ll be using the “Ultimate” setup for all examples, as it is the most tunable one. Note, however, that any preset will do, as long as the parameters are set correctly.
Step one: suspension
I see, you’ve decided not to go straight to Summary (TLDR) and stay for the good stuff. Nice. I like you.
First, we need to deal with suspension, as it is the most important component that makes all of this drift-thing work.
Steering angle will obviously help get better angles and sharper drifts.
I’ll tell more about Ackerman later in the guide.
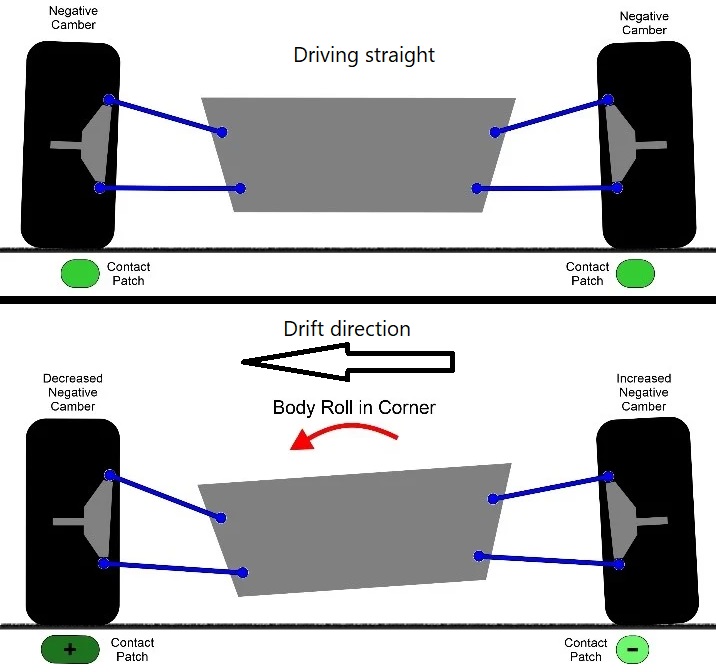
Rear camber should result in rear wheels being flat on the road or slightly negatively tilted – this helps with handling.
However, if you plan on leaving rear suspension soft – a slightly positive rear camber will do more good. This is because your rear camber will then increase significantly (-1 to -6 degrees) during drifts, if the rear suspension is soft.
Front camber and Caster are complementary to each other – the second needs to “match” the value of the first so the outer front wheel is in almost full contact with the ground when fully turned:
For our purposes, Front camber is mostly for style: you can have as much or as little as you like, as long as Caster is set correctly (like in the image above).
Place the camera to the left of the car (as in the image above), start tuning caster and pay attention to the “front camber” value: it should be a bit positive (from 0 to 1). This allows the car to keep maximum traction on the outer front wheel, which is essential for balancing during drifts.
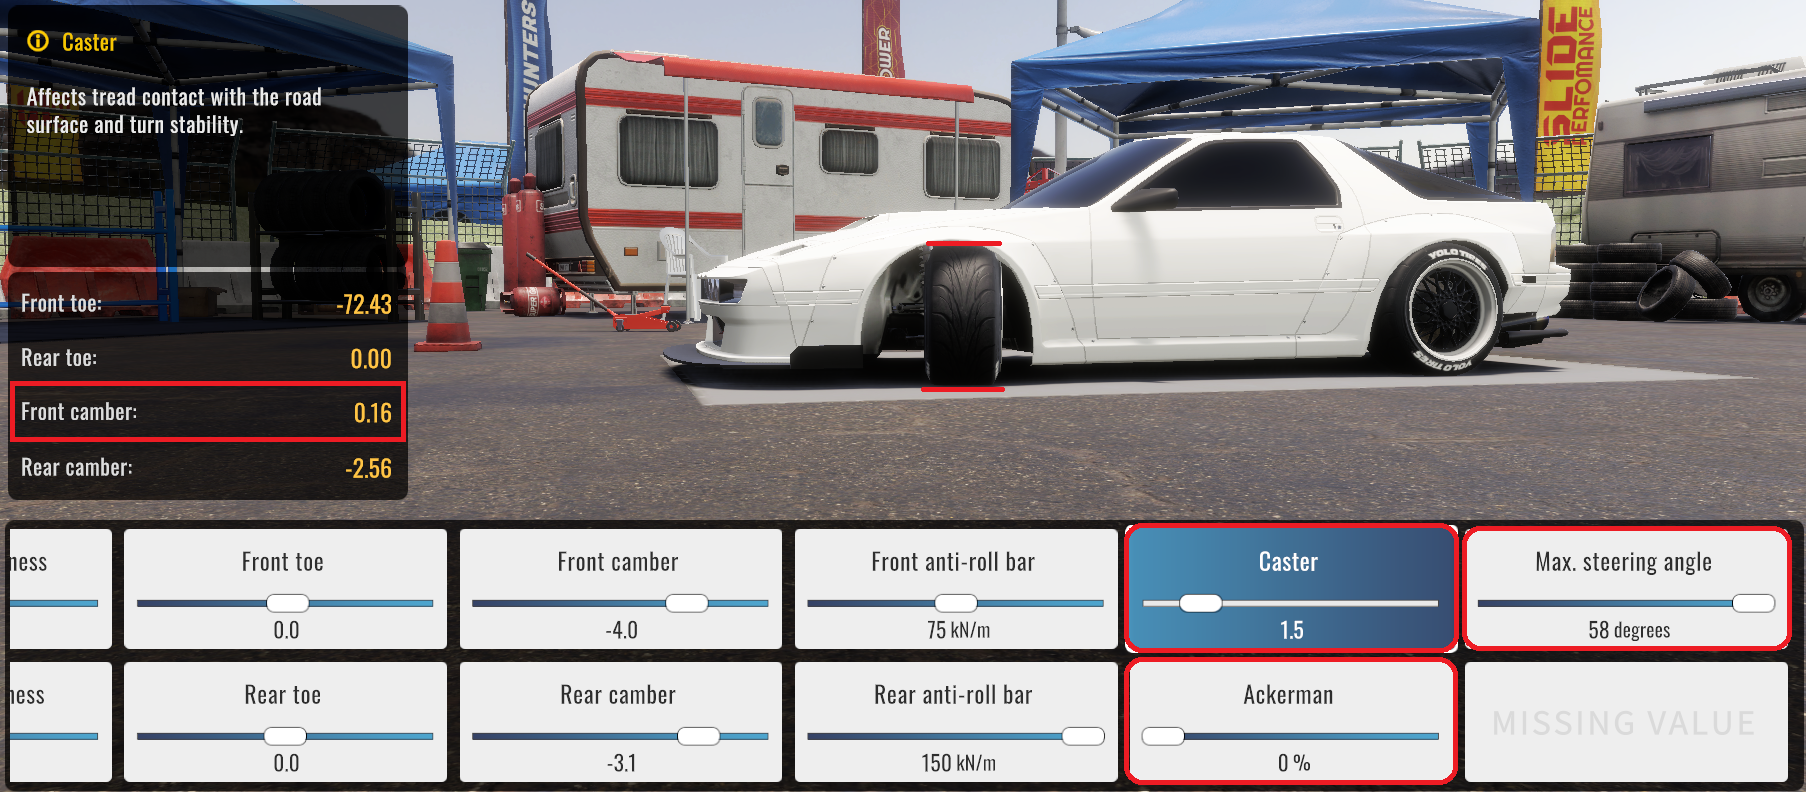
Note: more positive camber angles (2-4 degrees) will help the car snap out of oversteer/backward-drifts and make it more stable on uneven roads (mountain roads, for example).
These are mostly for the ride feel:
– if the back ones are soft, the car will feel heavier and more “lazy”; It will also help with grip during drifts;
– if the back ones are much stiffer than the front ones – the car will feel more agile and alive, but will have less stability.
There are many nuances to it, but this is a general rule-of-thumb.
Anti-roll bars can be used to fine-tune the behaviour, following the same basic rule.
I, personally, prefer the back ones to be almost at their max stiffness, while keeping the front ones’ values around the middle – this generally makes the car more agile (and more unstable, to be fair).
Some people like softer back springs, and that’s perfectly fine too.
So this one is mostly preferential.
Simple: the lower the springs – the less inertia and body roll the car has when swinging from side to side. This helps with controlling wheel camber during drifting.
Keep your car low – 5-12 cm off the ground – and you’ll be ok.
Toe regulates how much your wheels “look” inward or outward.
Slightly negative Front toe helps in initiating drift and, as a bonus, adds some steering angle;
Rear toe will help the car push itself out of a very sharp angle (for example, when backward-drifting), while sacrificing acceleration:
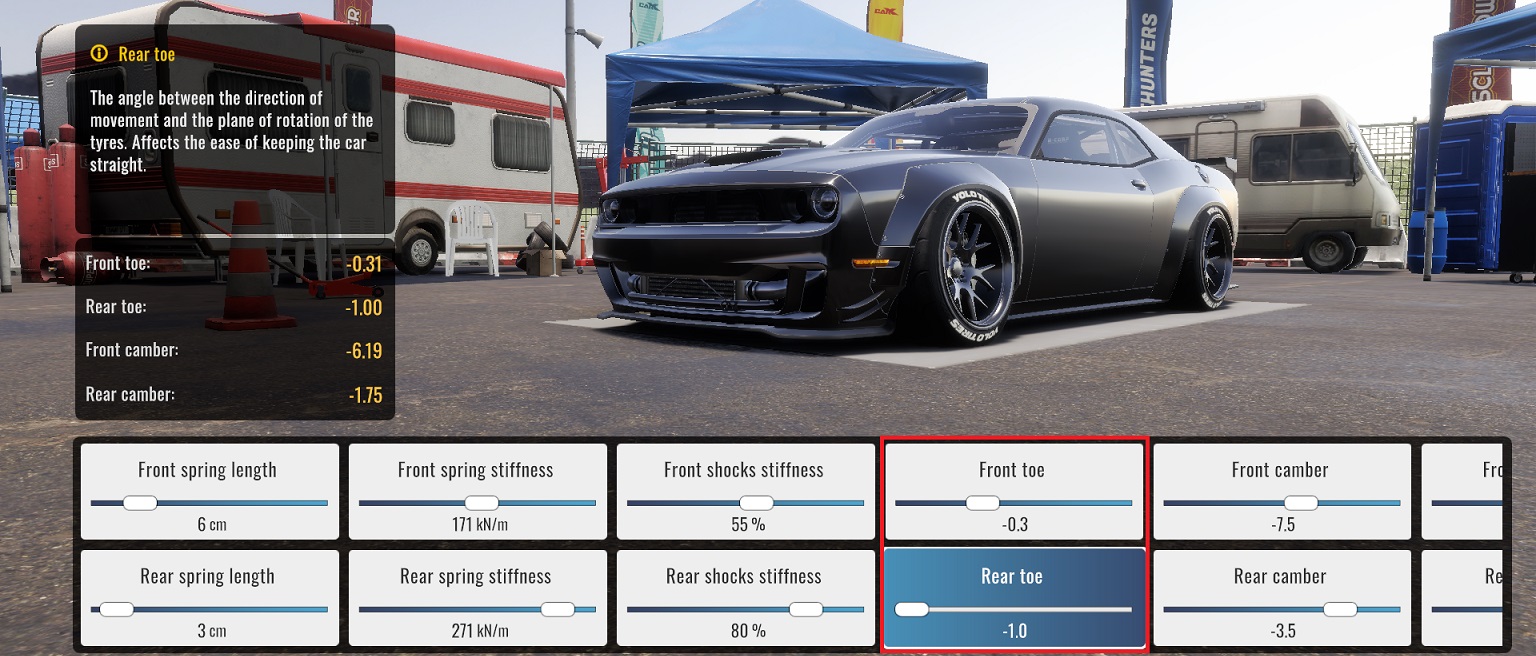
Rear toe helps make it easier for this car to snap out of oversteer and prevent spin-out.
And with an extreme negative front toe, at the expense of straight-line stability, comes a bit bigger steering angle, which helps in holding wider drifts.
Step two: wheels
Oh yeah, make’em wide! To increase the grip, of-course.
For now, our main goal is to maximize front wheel friction to make it easier to hold on to wider angles (like 70-80+ degrees). For this, we have to tune:
I generally make them as wide as possible for maximum contact area and looks. 🙂
Best grip and efficiency is achieved by carefully lowering the width and testing for the individual car.
The same theme here as for springs and dampers: rear is more, front is less.
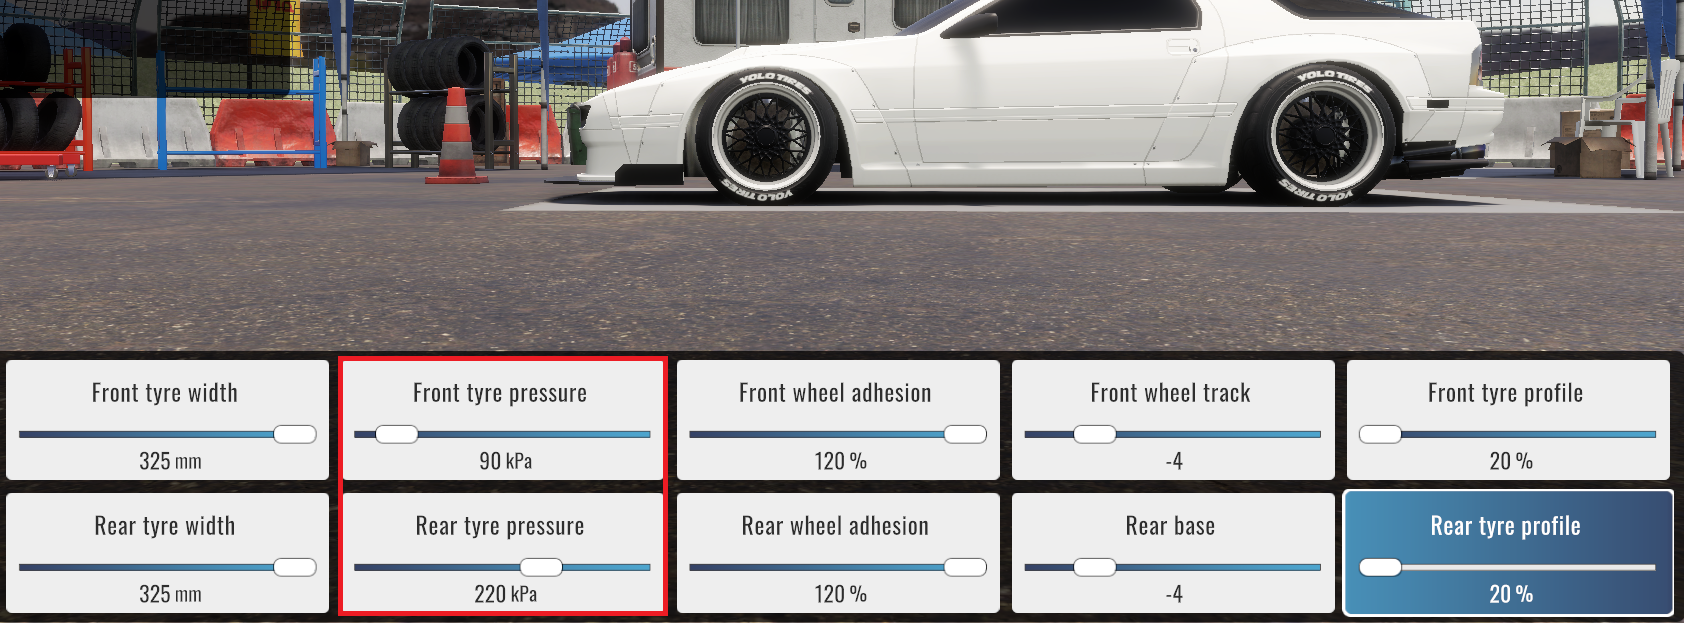
Increased friction on front tires makes it very easy to hold onto angles close to 85-90 degrees without sacrificing stability or risking spinning-out. The exact perfect value differs from car to car, so try setting 100kPa (14.5 PSI) as the base value and then adjust: higher if the car seems to spin-out, lower if the drift angle is not wide enough.
Now, such low pressures are usually frowned upon, at least in tHe ReAl wOrLd. This is due to huge tyre wear on lower pressures, which can get very expensive very quickly.
Welp, we don’t have this limitation in the game, so… good for us!
Update 2.7.1: new physics make front tyre pressure a lesser factor in drifting angles, so for some cars it now has to be set lower than it’s possible to achieve the same effect as in pre-2.7.1. This can be balanced-out by softening your front dampeners to about 10%-30%.
As for the rear tires – set it higher – around 220 kPa (~32 PSI), for better grip. With even higher values grip lessens, which means easier change of direction… and easier spin-outs. So be careful.
This depends on the power level of your car and your preference.
Generally, you can just set it as high as possible: front needs it for maximum grip, rear needs it to prevent spin-outs (and for faster launches).
Keep in mind though, that adhesion “eats” power, so for some cars that are underpowered (like miata) or have difficulties holding angles, lowering adhesion will actually help get longer drifts.
The following rule applies: the bigger the adhesion, the more your car “gravitates” towards the inside of a turn (which means tighter drifts), while less adhesive tyres make your car slide like it’s on ice, with wide and long trajectories.
So, choose what you prefer.
Bigger wheels spin faster and require more power – that’s just how it works. Make’em too big – they spin too fast – you spin out constantly. Make’em too small – they spin slow – need higher gears to drift, less top speed. Generally, what looks good – also works good here.
Tire profile affects two things:
– how forgiving the wheel is to camber and tire pressure;
– how easy it is to overcome the initial friction (spin the wheel faster than it moves);
Higher profile helps with the former, lower profile helps with the latter.
I’m not a fan of huge camber, so I prefer lower profile (20-25%) just so my wheels are easier to spin.
Base track is mostly aesthetics, though it does seem to affect suspension stiffness a bit.
And also, if the front wheel base is much wider than the rear, the car becomes immensly nimble and agile, but that’s a bonus you can get even without murdering your car’s looks.
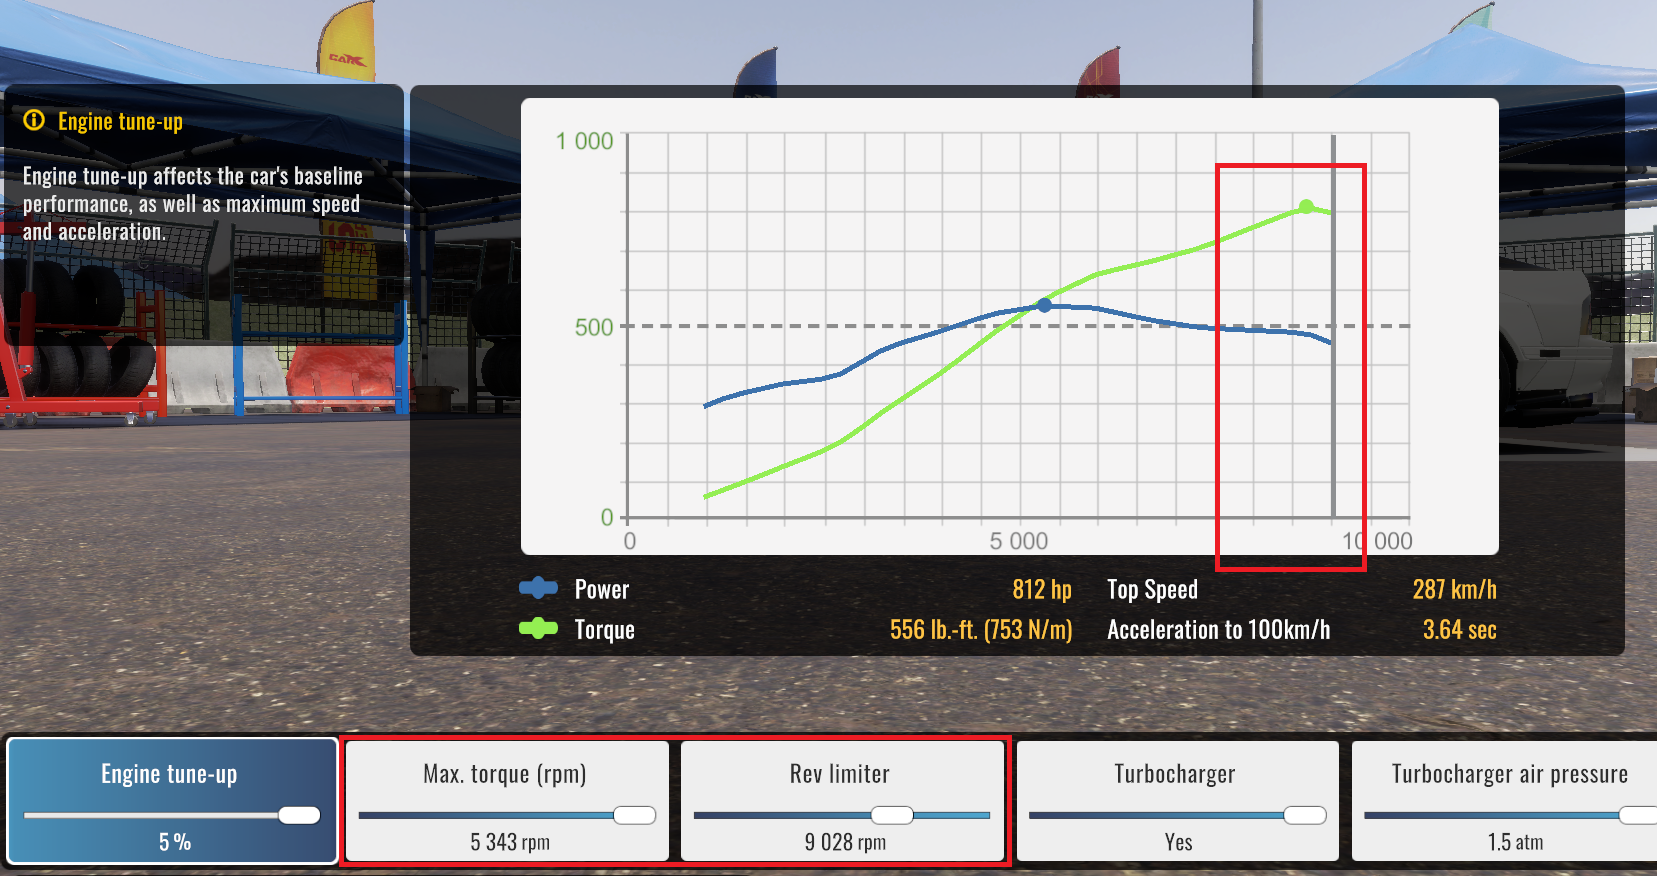
Step three: engine
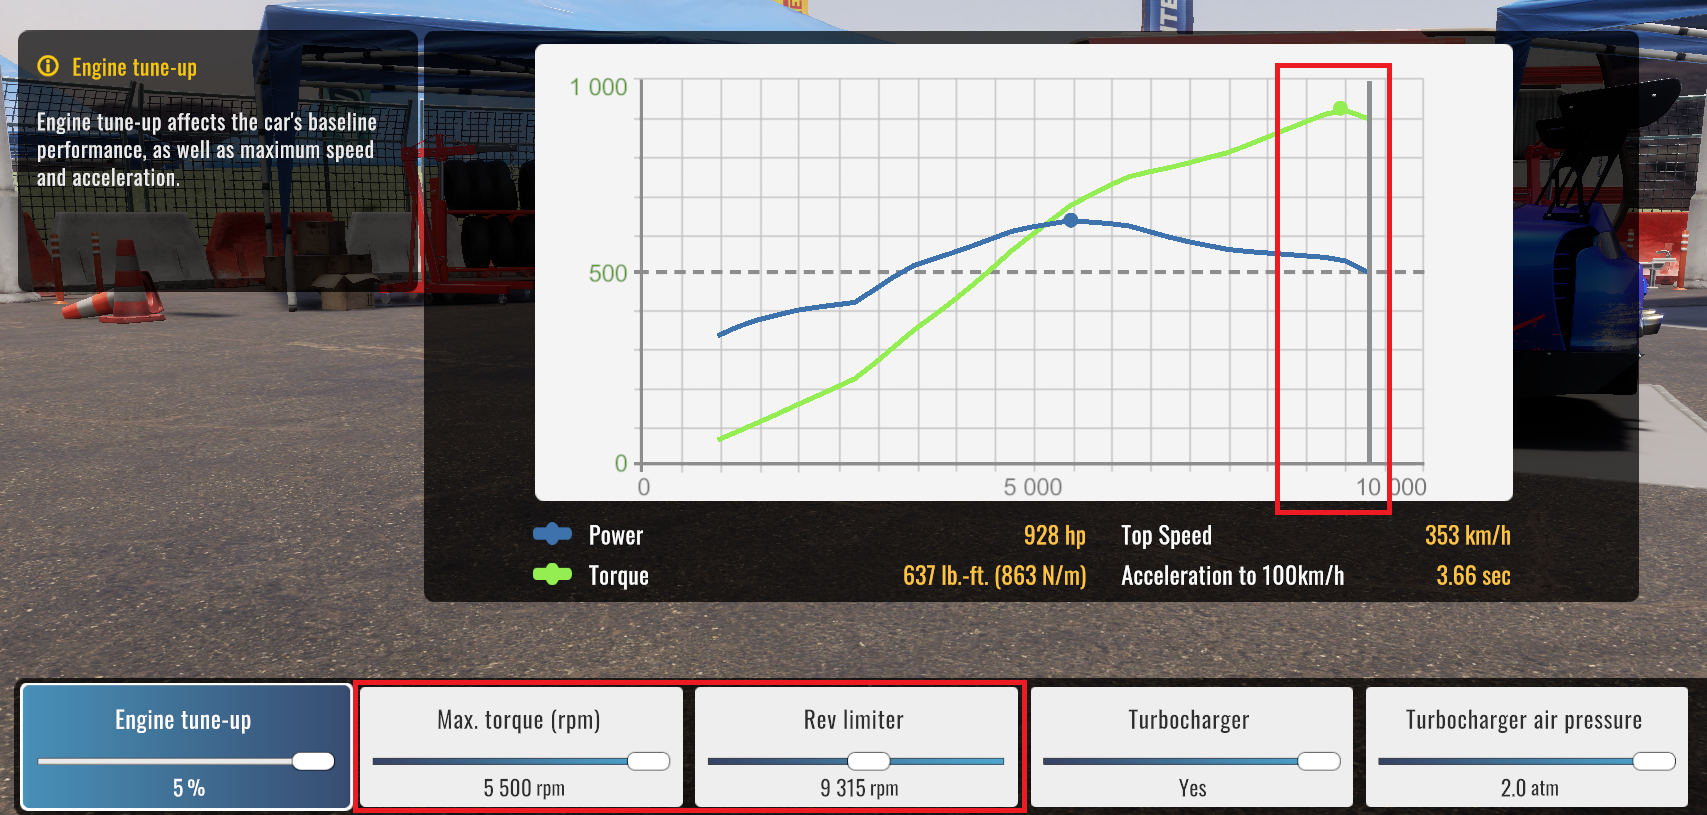
This one is easy: just turn everything to its maximum, except for the Rev limit.
We will use Rev limit to set the top of the torque curve around the usual drifting RPM range, which is usually around the end – because it’s easier on keyboard to just floor it.
With this, the engine will always put out maximum torque, while you’re redlining your car through the track.
Best way of tuning it is setting it to the maximum first, and then tuning it down, until the peak is reached:
Note, however, to try to leave some wiggle-room for your throttle, just to be sure to always get that sweet power, even if you’ve let go the pedal for a bit.
However on some cars this is impossible.
So it’s okay, if the torque is at its peak at the end of RPM range – you don’t need to lower any other parameters to create additional wiggle-room.

Step four: transmission

I like to set the diff to full lock, just so that the car always sends itself drifting every turn.
Configuring the gear ratios is another story.
I’m gonna leave it to you or other guides, as it’s just too time-consuming to tune them for this guide’s sake.
I mostly leave them stock, and just try to use the ones that feel right for the current speed.
Using automatic or manual transmission, clutches or not – doesn’t matter much with this tune either.
But just as a small recap: bigger value means shorter gear means less power/speed is needed to drift in it. The inverse is also true.
There’s a good guide on this too.
Step five: fine-tuning
Ha, you thought this step would be breaks, didn’t you? Tricked ya.
While breaks can be a useful tool in precision drifting – like for XDS or tandems – they’re not really of any use to us now; for an initial setup, at least.
So, all is set and done, the car is ready and should already give you some solid drift performance without the need for actual steering wheels and whatnot.
But if something’s still off – I have several suggestions for you:
If your car seems to still spin out – try increasing front tyre pressure a little bit – by 5-10 kPa (0.5PSI) – then test it on the track. Repeat, if it didn’t help much.
Best grip should occur around 220 kPa (~32PSI), but don’t rush to this value – 5-10 kPa (0.5 PSI) at a time and then test. If your car is still spinning out – you most probably forgot to stiffen rear anti-roll bars and springs, or the camber is not right.
Once spinning out is not a problem anymore…
“But you said!!!”
Originally posted by me:Parameter nameValueAckerman0%
And yes, yes, I know. This is just to give the car a sense of stability – with 0% ackerman its less likely to spin-out.
Let’s dive into the details.
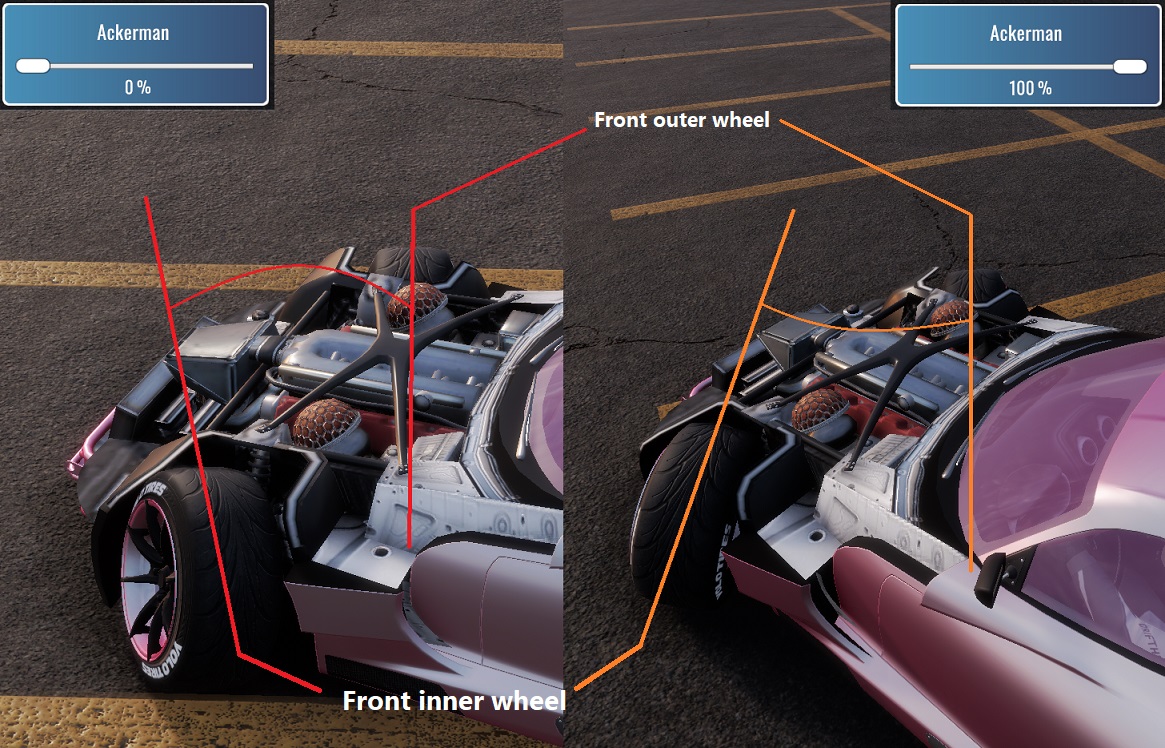
Ackerman angle allows you to control the toe of the front wheels, but only when they’re turned:
0% ackerman makes the front inner wheel look towards the inside of the turn while you drift.
This achieves one crucial thing: your inner wheel is pulling the rear side of the car towards the inner side of the turn during drifting. And this pull becomes increasingly bigger with bigger drift angles.
This effectively prevents the car from spinning out and helps you exit the drift by counter-steering. But it also comes at a price – reduced speed – because the inner wheel is constantly fighting against the vector at which your car is moving during drift:
 In the case of 0% ackerman (left), the green arrows show how the inner wheel has low friction (because it’s already sliding) and is actively pulling the car out of the drift (because it is not aligned with the trajectory of the car), by acting as a lever against the main friction point – the outer front wheel. In the case of 100% ackerman (right), however, there are 2 friction points – both front wheels. And both of them, combined with the “oversteer force” at the rear, lead the car to spinning out, because their rolling directions are in-line with the trajectory of the car’s movement and their high friction (orange lines) pushes the front of the car behind the rear wheels.
By increasing the percentage, the force of inner wheel’s pull decreases, giving the car more freedom and drift speed but also allowing for easier spin-outs… and, yes, potentially wider drift angles, if you manage to control it.
If you want this freedom – try to balance the higher ackerman angle with a bit higher front tyre pressure (120 to 220 kPa or 18 to 32 PSI) to get more grip on your outer tyre. This will keep the car stable and give you more front grip as you increase the ackerman percentage.
Keep in mind, though, that you should increase ackerman a little bit (3-5%) between tests! Otherwise you might end up in oversteering mess earlier than you think.
With higher ackerman it’s also benefitial to move your brake bias to the front – with this you’ll be able to initiate mega-backwards at any time by simply applying the brakes. However, you’ll then need to quickly change to a lower gear in order to restore the direction of your car, so this takes some getting-used-to.
“But you said!!!”
Originally posted by me:Front camber is mostly for style
Yep, you’ve caught me again. It’s not.
It’s the easiest way to control the stability of your car while in drift.
Keep in mind that this effect can be increased by softening your anti-roll bars – the stiffer they are the less body roll your wheels experience. Using this, you can tune your car to either use the body roll to have easier exits from drifts or prevent it altogether, to have consistent handling at any drift angle.
Usually the front camber should be more negative than the rear. If your car understeers – decrease front camber; if your car oversteers and spins-out – increase camber on the rear a bit.
For most cases, the ideal final front camber angles are from -3 to -8 degrees (accounted for spring length).
If you play around with it – I’m sure you’ll have some fruitful results.
Summary (TLDR)
So, to recap:
These are all of the base values, which will instantly give a pretty good drift performance for any car in the game.
Values with * (a star) are absolutely essential for this to work.
Others – not so much, but they guarantee the result.
If something doesn’t feel right – change front tyre pressure, front camber or ackerman.
May come in handy, if quickly tuning a new car.
Usually takes from 40 seconds to 2 minutes to tune using this table.
Less time spent tuning – more time spent drifting. 😉
So there we have it!
That’s it! Basics are covered.
Thanks for reading!
Now it is all up to you to go and tune the hell out of your cars.
If you found this guide at least a tiny bit useful – please rate up. ^_^
If you have any suggestions, corrections or criticism – I’ll gladly take all of it. English is not my native language, so a few dumb errors might crop up here and there.
I will expand this guide with new information and variation as time comes, so star it and stay tuned. 😉