(Updated) Delta V Map and Transfers for Newbs
dV Map
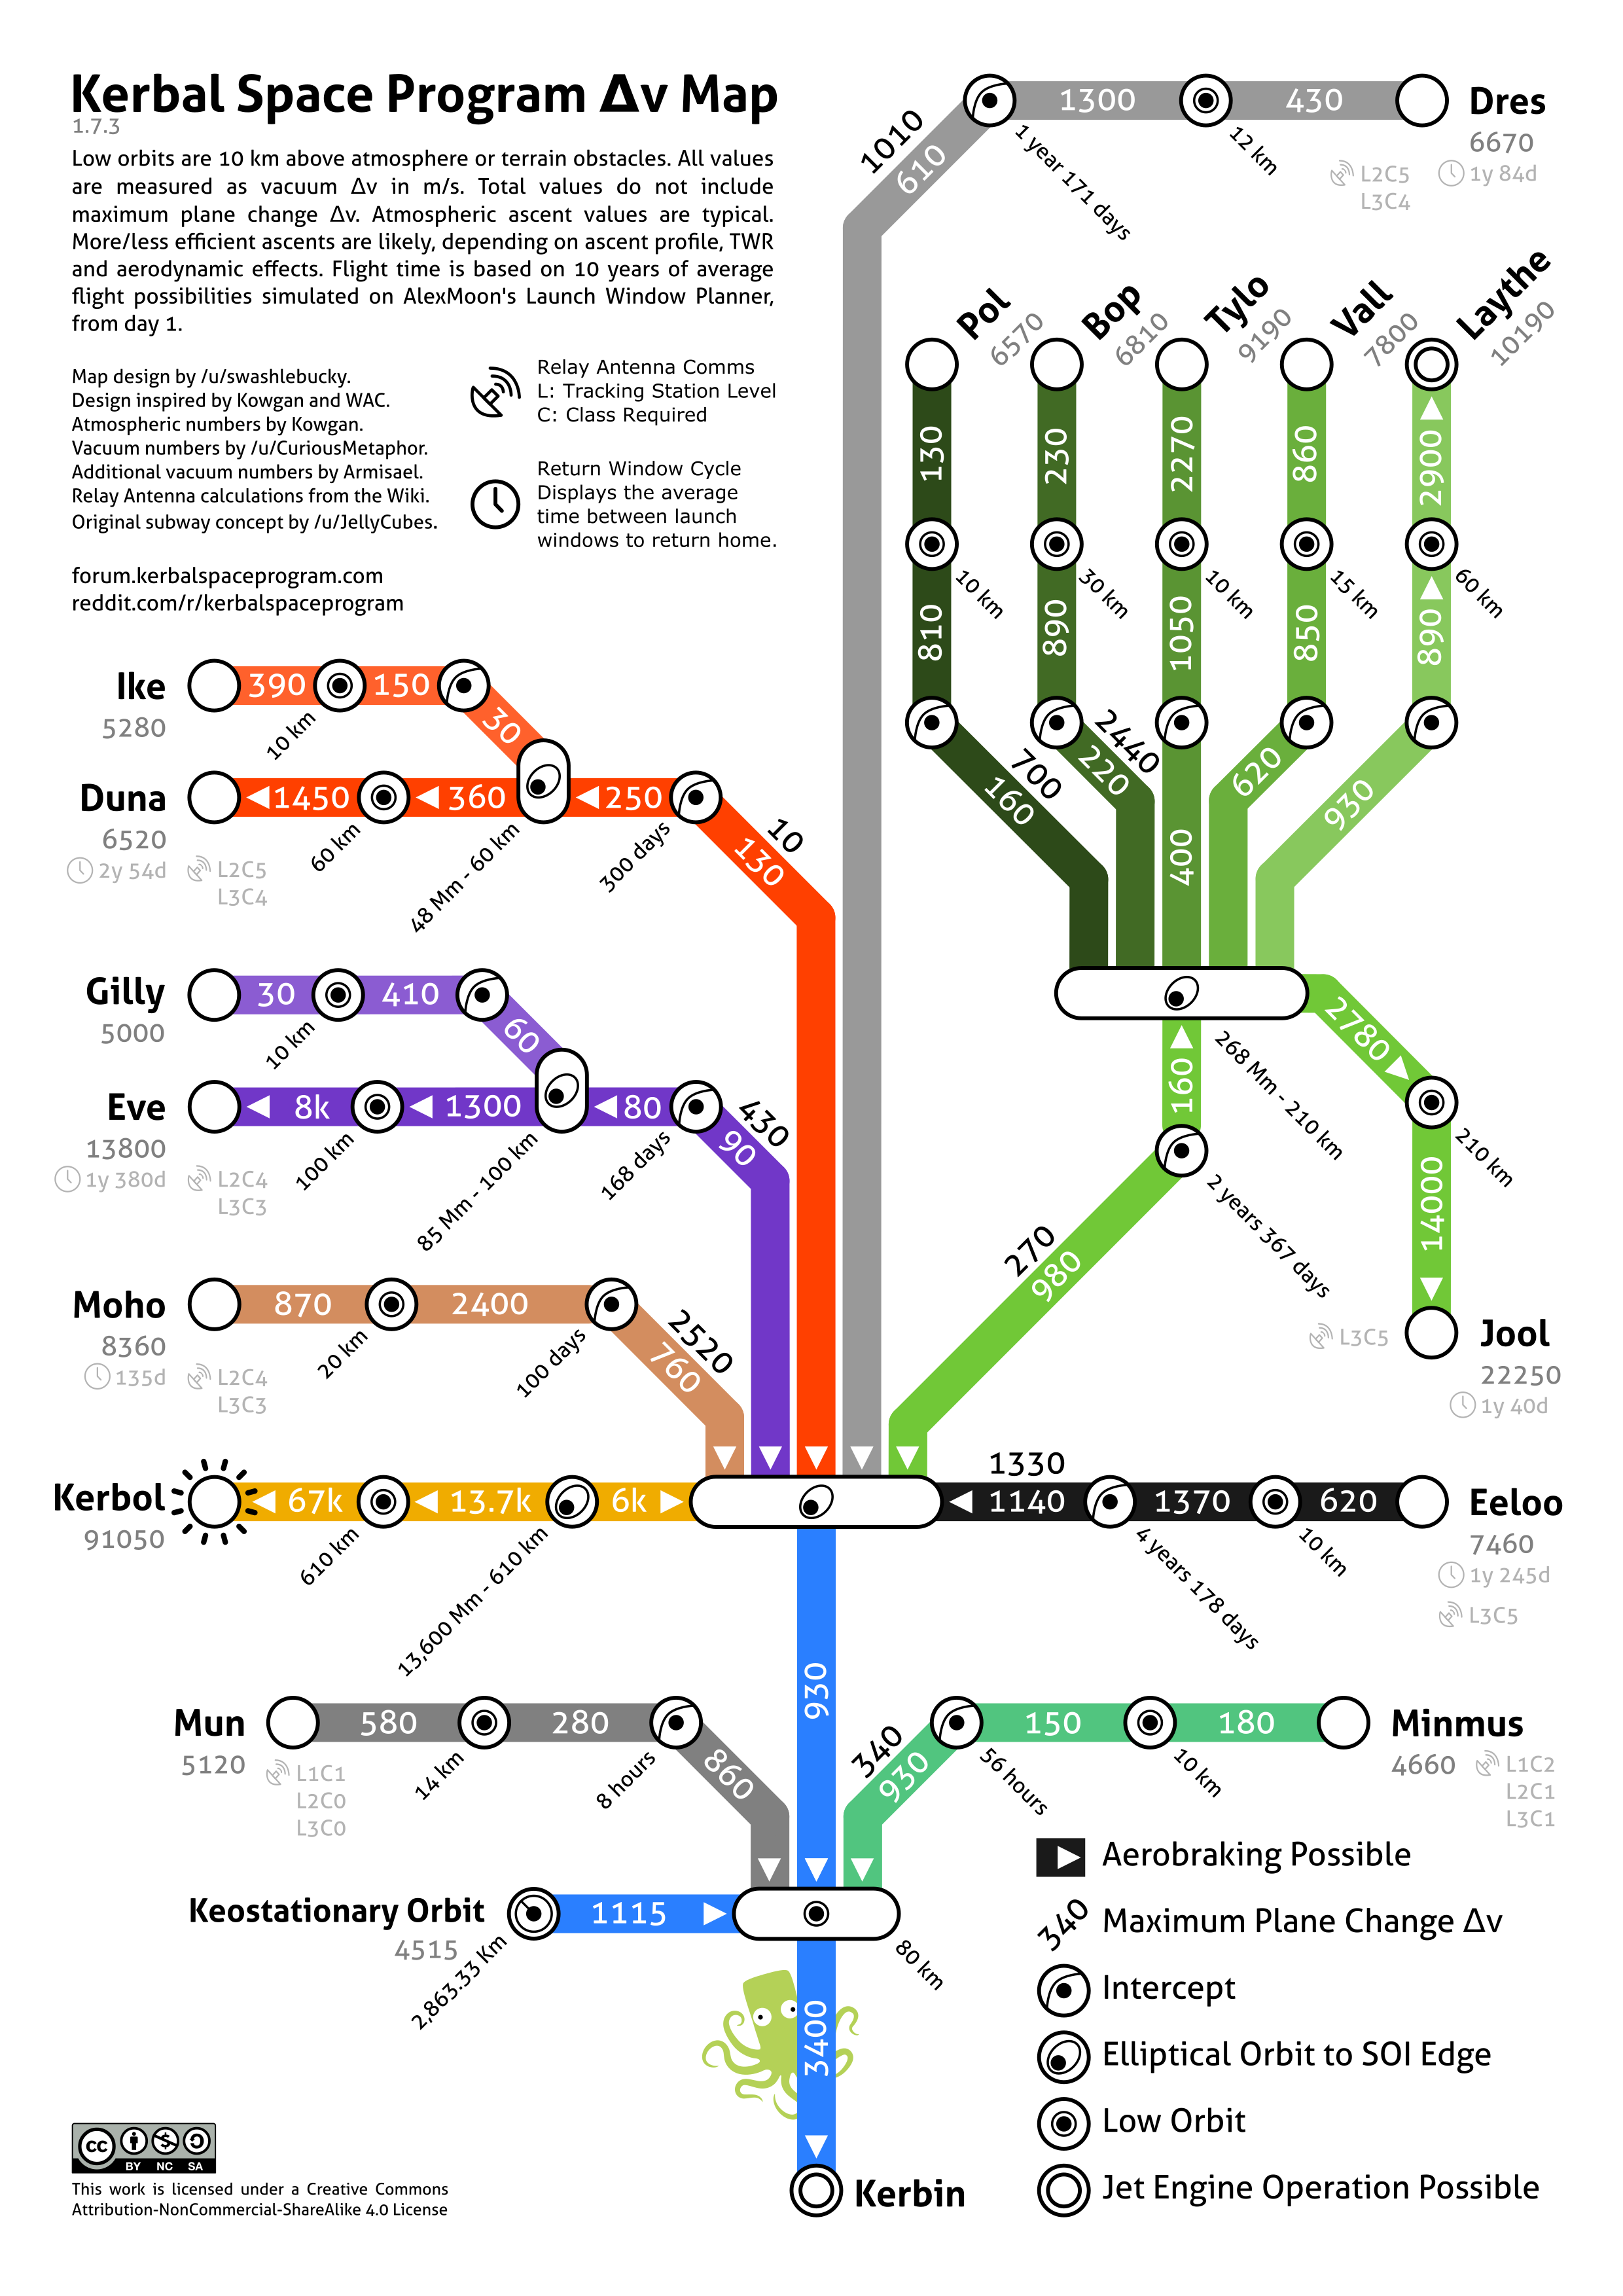 --------------------------------------------------------------------------------------------------
Note: I did not create this map, I just found it and put it in this guide
Credits (also found on the image):
"Map design by /u/swahlebucky
Design inspired by Kowgan and WAC
Atmospheric Numbers by Kowgan
Vacuum Numbers by /u/CuriousMetaphor
Additional Vacuum numbers by Armisael
Relay Antenna Calculations from the Wiki"
Updated 2/28/26:
-Added credits
-Added basic mission guide
How to use this information
First and foremost, I recommend installing Kerbal Engineer Redux and BetterTimeWarp.
"So what the heck is DeltaV(dV)?"
Simply put, "delta" means change and "V" represents velocity. Thus, DeltaV means your craft's potential for change in velocity. This doesn't account for air resistance, gravity, etc. by nature. If you need more DeltaV, try minimizing your "dry mass" (ship weight without fuel) and use the concepts of onion/asparagus staging (outside the scope of this guide).
"Ok that's all well and good but how does this number help?"
And with this we can get into the meat and potatoes of this guide. I'll walk you through a theoretical transfer to Duna which is IMO pretty straightforward and a good first interplanetary hop.
"So what the heck is DeltaV(dV)?"
Simply put, "delta" means change and "V" represents velocity. Thus, DeltaV means your craft's potential for change in velocity. This doesn't account for air resistance, gravity, etc. by nature. If you need more DeltaV, try minimizing your "dry mass" (ship weight without fuel) and use the concepts of onion/asparagus staging (outside the scope of this guide).
"Ok that's all well and good but how does this number help?"
And with this we can get into the meat and potatoes of this guide. I'll walk you through a theoretical transfer to Duna which is IMO pretty straightforward and a good first interplanetary hop.
Duna Mission Route Plan and Build
Before you even build your craft, you should know how you're gonna get there and what you'll need to do that. In this guide I'm only concerned with the actual transfer process, but don't forget things like science, comms, electrical, RCS (!), etc, suited for your specific mission.
You'll want your stages to reflect your intended route to avoid (A) Carrying unwanted mass and reducing efficiency and (B) so you're not staging mid-burn.
Disclaimers: First of all, I can't help your piloting or building. This game takes a lot of practice. Second of all, this guide does not account for a return trip and assumes direct landing. If you follow this guide to the letter, Jeb will be stuck on Duna. You'll need to account for that yourself.
Without further yapping:
1. Duna atmospheric entry/landing
This can be fairly simple, though Duna's atmosphere is very thin. The "easiest" way to go about this is an engine stage with ~1k m/s dV and enough parachutes. Sometimes the next stage will also end up being used towards this goal. If you plan on returning, this will also have to contain enough fuel for the entire return trip depending on methodology.
2. Duna Circularization module
Following our map from the encounter with Duna onwards, we see a total need of approximately 610 m/s dV to capture and circularize. You should probably add some wiggle room too, 700-800 perhaps? This should be a fairly efficient engine with lower thrust to allow for a small fuel load.
3. Kerbin>Duna transfer module
The all mighty map says we need 1060 m/s dV to get from LKO (Low Kerbin Orbit, ~100Km) to a Duna intercept. Highly recommend nuclear engines (don't forget to drain the oxidizer if you use those) or something similarly low-thrust but high-efficiency. This is also the stage that will have to do any corrections on the Hohmann transfer (we'll get there).
4. Kerbin surface>LKO
This is either one or two stages, entirely up to you. You'll need about 3400 m/s dV as per Tha Map. I reallllly like using the 5m fuel tanks and Mastodon engines but they are definitely overkill. Also remember aerodynamic control surfaces here, you'll want them in-atmosphere.
You'll want your stages to reflect your intended route to avoid (A) Carrying unwanted mass and reducing efficiency and (B) so you're not staging mid-burn.
Disclaimers: First of all, I can't help your piloting or building. This game takes a lot of practice. Second of all, this guide does not account for a return trip and assumes direct landing. If you follow this guide to the letter, Jeb will be stuck on Duna. You'll need to account for that yourself.
Without further yapping:
1. Duna atmospheric entry/landing
This can be fairly simple, though Duna's atmosphere is very thin. The "easiest" way to go about this is an engine stage with ~1k m/s dV and enough parachutes. Sometimes the next stage will also end up being used towards this goal. If you plan on returning, this will also have to contain enough fuel for the entire return trip depending on methodology.
2. Duna Circularization module
Following our map from the encounter with Duna onwards, we see a total need of approximately 610 m/s dV to capture and circularize. You should probably add some wiggle room too, 700-800 perhaps? This should be a fairly efficient engine with lower thrust to allow for a small fuel load.
3. Kerbin>Duna transfer module
The all mighty map says we need 1060 m/s dV to get from LKO (Low Kerbin Orbit, ~100Km) to a Duna intercept. Highly recommend nuclear engines (don't forget to drain the oxidizer if you use those) or something similarly low-thrust but high-efficiency. This is also the stage that will have to do any corrections on the Hohmann transfer (we'll get there).
4. Kerbin surface>LKO
This is either one or two stages, entirely up to you. You'll need about 3400 m/s dV as per Tha Map. I reallllly like using the 5m fuel tanks and Mastodon engines but they are definitely overkill. Also remember aerodynamic control surfaces here, you'll want them in-atmosphere.
Kerbin to Duna
Now having planned our route, calculated our minimums, and built a craft thats at least theoretically capable of accomplishing the mission, its time to do the flight. Before liftoff, go into map view/tracking station and time warp until, as Matt Lowne says, "If you draw a line from Kerbin to the sun to Duna, the angle that line makes should be about 45º with Duna ahead of Kerbin"
1. Liftoff
The second most exciting part of any mission, that first spacebar hit to send your space frogs hurtling through the void. SAS is probably wise here. Once you've built up some speed, start tipping to the east, aiming for 45º pitch at 10k. Don't start this pitching too early, but also don't start too late. Like everything else, this takes practice. Once your Apoapsis reaches ~100km, move to the next step.
2. Circularization
Once your Ap is at 100km, you'll want to kill your engines and switch to map view to plan a maneuver. Place the node directly on the Ap marker and drag ONLY the prograde handle until the dashed orbit's markers are closeish. Your periapsis MUST be above 70km, 75 to be safe, or else you will end up back in the atmosphere. Start the burn when the Time to Node is half of the total Burn Time. Once you've gotten a Pe above 70km, you're officially in orbit.
3. Transfer
Now that we are in LKO, some of the pressure is off. Take a minute to reconfigure your craft for the long haul through space, and then jump back into the map. You're going to want to make a prograde maneuver to escape Kerbin, being mindful to barely escape Kerbin's SOI so as to not waste any fuel. Once you are in orbit of the sun, start a maneuver node, again burning prograde, to get your apoapsis to line up with Duna's orbital path. Drag the node around until you see a Duna Encounter appear. It doesn't have to be a pretty encounter yet, just within a million or so km. once this burn is executed, start a maneuver node in the middle of the transfer path and focus your camera on Duna. You should see the planned orbit line, and now you want to get this line to as close to equatorial as possible, and with a Pe generally between 60-100km (If you want to do a more advanced maneuver, this is a potential aerobraking opportunity if you put the Pe inside the atmosphere. Just be gentle with it so you don't explode). This should be a very small burn, and may be easier to do with RCS translation controls (ijkl plus h/n for forward/backwards by default).
4. Circularization/landing
Once you have a good encounter that gets you close to the planet, its time to prepare for yet another burn. This one will be A large retrograde burn at our Duna Periapsis with the goal of a circular orbit. Once this is achieved, you can burn retrograde to de-orbit and then prepare for atmospheric entry and landing! With any luck, you'll be able to plant a flag on Duna!!
5. Return trip
Oh... we forgot about the return. Well, Jeb's stuck here forever now.
If you made it this far, congratulations. This game has a heck of a learning curve (it literally is rocket science). From here on out, follow the same basic principles and steps and soon you'll be doing missions like a pro.
1. Liftoff
The second most exciting part of any mission, that first spacebar hit to send your space frogs hurtling through the void. SAS is probably wise here. Once you've built up some speed, start tipping to the east, aiming for 45º pitch at 10k. Don't start this pitching too early, but also don't start too late. Like everything else, this takes practice. Once your Apoapsis reaches ~100km, move to the next step.
2. Circularization
Once your Ap is at 100km, you'll want to kill your engines and switch to map view to plan a maneuver. Place the node directly on the Ap marker and drag ONLY the prograde handle until the dashed orbit's markers are closeish. Your periapsis MUST be above 70km, 75 to be safe, or else you will end up back in the atmosphere. Start the burn when the Time to Node is half of the total Burn Time. Once you've gotten a Pe above 70km, you're officially in orbit.
3. Transfer
Now that we are in LKO, some of the pressure is off. Take a minute to reconfigure your craft for the long haul through space, and then jump back into the map. You're going to want to make a prograde maneuver to escape Kerbin, being mindful to barely escape Kerbin's SOI so as to not waste any fuel. Once you are in orbit of the sun, start a maneuver node, again burning prograde, to get your apoapsis to line up with Duna's orbital path. Drag the node around until you see a Duna Encounter appear. It doesn't have to be a pretty encounter yet, just within a million or so km. once this burn is executed, start a maneuver node in the middle of the transfer path and focus your camera on Duna. You should see the planned orbit line, and now you want to get this line to as close to equatorial as possible, and with a Pe generally between 60-100km (If you want to do a more advanced maneuver, this is a potential aerobraking opportunity if you put the Pe inside the atmosphere. Just be gentle with it so you don't explode). This should be a very small burn, and may be easier to do with RCS translation controls (ijkl plus h/n for forward/backwards by default).
4. Circularization/landing
Once you have a good encounter that gets you close to the planet, its time to prepare for yet another burn. This one will be A large retrograde burn at our Duna Periapsis with the goal of a circular orbit. Once this is achieved, you can burn retrograde to de-orbit and then prepare for atmospheric entry and landing! With any luck, you'll be able to plant a flag on Duna!!
5. Return trip
Oh... we forgot about the return. Well, Jeb's stuck here forever now.
If you made it this far, congratulations. This game has a heck of a learning curve (it literally is rocket science). From here on out, follow the same basic principles and steps and soon you'll be doing missions like a pro.
Where to now?
At this point, having made it to Duna (and maybe even back!), there are so many more places to go and missions to do, but the basics I covered here won't get you everywhere. Eventually, you'll need to learn gravity assists, aerobraking, Oberth effect burns, and much much more.
Until I decide to write another guide like this, I can only recommend other people's work. Matt Lowne, Scott Manley, Bradley Whistance, and many others have made fantastic youtube videos covering very advanced missions from sending megastructures to Minmus all the way to landing on every single* celestial body in one mission (*except Jool and Kerbol/the Sun, neither of which CAN be landed on)
Keep playing, keep trying new things out, and have fun! Let me know if you got anything useful out of this other than the map itself lol, maybe I'll do some more.
Until I decide to write another guide like this, I can only recommend other people's work. Matt Lowne, Scott Manley, Bradley Whistance, and many others have made fantastic youtube videos covering very advanced missions from sending megastructures to Minmus all the way to landing on every single* celestial body in one mission (*except Jool and Kerbol/the Sun, neither of which CAN be landed on)
Keep playing, keep trying new things out, and have fun! Let me know if you got anything useful out of this other than the map itself lol, maybe I'll do some more.
More Kerbal Space Program guides
- DeltaV map★ 5 (1.2k)46k views2.5k ♥1 minUpdated Feb 11, 2021
- The Complete Idiot's Illustrated Guide to Space Travel (Not Being Updated)★ 5 (875)43k views1.6k ♥30 minUpdated Feb 9, 2018
- Kerbal Physics: An Illustrated Guide To the Stars★ 5 (1.6k)43k views2.6k ♥21 minUpdated Mar 21, 2021
- MOD Essentials [ENG]★ 5 (587)38k views1.6k ♥12 minUpdated Mar 6, 2023
- Geostationary Orbits★ 5 (455)26k views899 ♥3 minUpdated Jun 28, 2020
- Lander Design★ 5 (325)22k views629 ♥27 minUpdated Jun 5, 2015



This guide was created by its original author on the Steam Community. Are you the author and want it removed? Request removal.