Overview
Outlines how to properly get any war paint working in SFM, including custom war paints not yet in TF2.
Introduction
If you’re looking to showcase your own custom war paints in SFM, you’ve come to the right place! The overall workflow is as follows:
- Create a TF2 mod that replaces an existing war paint
- Zip up the TF2 mod and upload it to weapons.tf
- Obtain the .vtf file for the desired weapon from weapons.tf
- Import the weapon and texture into SFM
Create a TF2 mod
This guide assumes that you already have a custom war paint. If you don’t but still want to follow along, feel free to use this repeating texture that I tossed together for this guide. It’s downright tiny for a war paint, but it gets the job done nicely for the tutorial.

Ultimately you’ll want to save the image as a .tga file. You can use several programs to accomplish this; the most common ones are Photoshop[www.adobe.com] or GIMP[www.gimp.org].
Once you have a .tga file, it is time to convert it to a .vtf file.
- Download and install VTFEdit.
- Open the program and go to File > Import
- Locate the .tga file, and import it.
- Click Save, then save it as a .vtf file (name it whatever you’d like for now).
Now that the image has been converted to a .vtf file, it can be turned into a mod for TF2.

- Go to [link] and pick an existing skin that you want to overwrite with your custom creation. This step is important, because each skin has a different number of textures, and different groups for each texture. For this tutorial, we’ll use Croc Dusted.
- When you pick a weapon and war paint, the text box in the upper left updates to provide the file structure and material names used.
- Determine which pattern you want to replace.
- War paint patterns are located under materials/patterns. These are the files you want to take note of. Material names should be fairly indicative of which part of the weapon they’re on.
- Other texture files are located under materials/models/weapons. You do not need to worry about any of these.
- Since we are using Croc Dusted for our example, the exact file location is materials/patterns/yeti/crocodiles01.vtf.
- Once you know the exact directory and filename, you have everything you need to proceed.
Now that we know exactly where to put the custom file for the mod, create the mod folder structure and place your .vtf pattern inside.

- Navigate to your TF2 custom directory under:
<steamapps>commonTeam Fortress 2tfcustom
- Create a new folder and name it whatever you’d like. For my example, the folder name is ‘silly string’. The name of this folder has no impact on the final product; it’s just a way to keep track of all your mods.
- Recreate the folder structure seen in the material path on weapons.tf, starting with materials. Since we’re replacing Croc Dusted, the full file structure should go:
<steamapps>commonTeam Fortress 2tfcustomsilly stringmaterialspatternsyeti
- Move your custom pattern .vtf file into the newly created mod destination folder.
- Rename your .vtf file to the pattern you want to replace it with. For my example, my .vtf file has been renamed to crocodiles01.vtf.
- Launch TF2 and verify you skin is working in-game!
It’s an ugly skin, the image dimensions are way too small, and it’s way too shiny, but it works! Hopefully your custom skin looks a lot better than mine.

Use weapons.tf to obtain a custom .vtf file
Once you’ve validated your skin is working in TF2, it’s time to upload the mod file to weapons.tf.
- Navigate to your TF2 custom folder under:
<steamapps>commonTeam Fortress 2tfcustom
- Right click on your mod folder, then click Send to > Compressed (zipped) folder. For operating systems other than Windows, use your preferred method to create a .zip folder.
- Go to [link] and hover over the gear icon in the lower right.
- Click Choose File, and select your .zip folder.
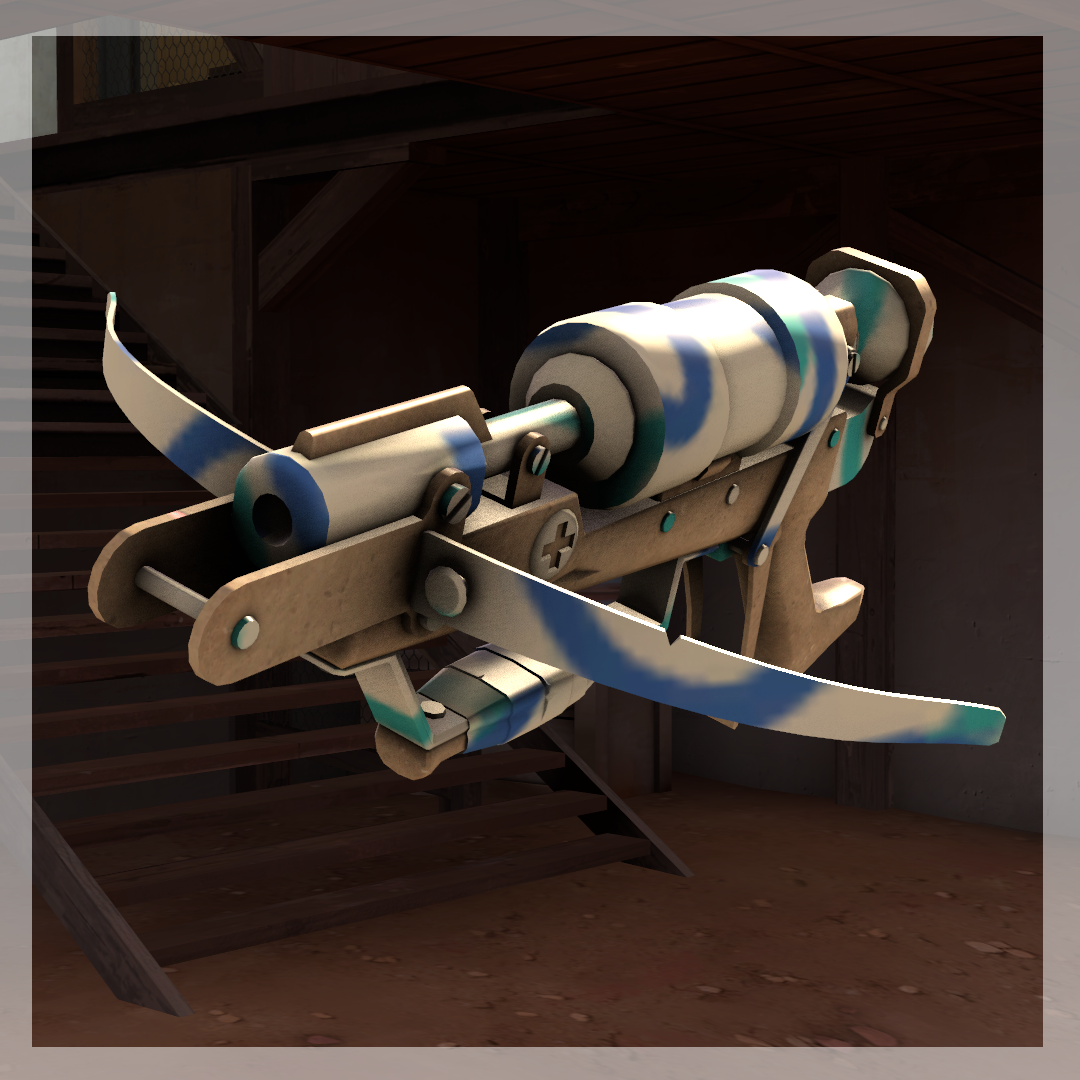
- When you click OK, your mod file is applied to the site until you refresh the page. Pick the weapon you want to use in SFM, and the pattern you chose to replace. For this example, I’ll pick the Crusader’s Crossbow and the pattern Croc Dusted.
- If you want to “reroll” your pattern placement, click the wear grades in the upper right until you have a desirable texture.
- Once you’re satisfied, hover over the gear icon again and click Save texture VTF.
Your texture is ready for Source Filmmaker! Here’s how mine turned out:

Bringing everything together in SFM
Now that you have the combined .vtf texture for the weapon you intend to use, it’s time to bring everything together into Source Filmmaker.
- Subscribe to All Decorated Weapons, which contains all TF2 war paint weapons with correct UV maps. Be sure to give it a thumbs up while you’re on that page so others can appreciate these assets!
- Launch Source Filmmaker and create a new session. Confirm the download of the workshop files, and sit tight while it downloads (it’s a hefty 400MB, so be patient).
- When SFM confirms completion of the download, navigate to
<steamapps>commonSourceFilmmakergameworkshopmaterialsmodelsdecorated
- Open the desired weapon folder you intend to include in your scene. Since I’m using the Crusader’s Crossbow, I’ll open the c_crusaders_crossbow folder.
- Inside this folder is a bunch of .vmt files and a single .vtf file. Replace the single .vtf file in this folder with your downloaded .vtf file from weapons.tf. Ensure the file is fully replaced and not simply added to the folder.
- Back in SFM, open the console (tilde key), and type
mat_reloadallmaterials
- Right click the Animation Set Editor, Create animation set for new model, and locate your decorated weapon .mdl file. Add it to the scene.
- Right click your model > set skin > 10. You should now see your custom skin in SFM!

Concluding Thoughts
Hopefully this guide has provided some value to you! Please note that if you intend to use decorated weapons for any extended SFM projects, it is highly recommended to move all the decorated weapon workshop files from:
to:
This is because if the workshop submission is updated, it will overwrite and revert any textures you’ve placed in there.
Do you have an SFM image or video that uses custom decorated weapons? Please share them here, we’d love to see them!