
Overview
This guide lists the strong points and weak points of vehicles, as well as tips on where to shoot in a frontal engagement.
Overview
In this visual guide you will see where the armored strong points and weak points on many of the vehicles in Squad are. Armor strength is the main focus of this guide — things such as tracking a vehicle, damaging the engine, and ammo racking shots, while occasionally mentioned, aren’t the main focus. There will also be tips on where to shoot an enemy vehicle if you have to engage it head-on instead of its rear or flanks.
The pictures you will see were made using the transparent damage models as a guide. I decided on using the full in-game model since that’s what you’ll be seeing out there in a real match, not the transparent one. It helps to memorize certain features the actual models have that the transparent ones don’t.
Please note that vehicles and factions not yet added are not covered in this guide.
The Armor Values

Memorize this image.
It illustrates the armor values on any given vehicle, and determines how much damage a projectile will do when it hits.
Blue = Strongest armor
Nearly impenetrable; you’ll have to rely on either a Main Battle Tank round, ATGM (Anti-Tank Guided Missile), or multiple Heavy AT rockets to have a hope of defeating this armor rating**.
Green = Strong armor
It will take multiple explosive projectiles to damage, and it is not vulnerable to Heavy Machinegun (HMG) rounds
Yellow = Average strength armor
It provides okay-ish protection but is especially vulnerable to AT rockets. This armor and below are also vulnerable to other weapons*
Orange = Weak armor
A good target for engagements if you can get it.
Red = Weakest armor rating
Red rated armor is the prime target for any engagement, along with what is technically the worst “armor” rating…
Black = No armor
It’s like it’s wearing nothin’ at all…
Armor Addendum
About Yellow/Orange/Red rated armor: Aside from AT rockets, Yellow armor and below is vulnerable to the following weapons/vehicles:
-M2 Browning .50 cal HMG (emplacements included)
-Dshk 12.7mm HMG (emplacements included)
-NSV/Kord HMG (emplacements included)
-BRDM 14.5mm main gun
-BTR-80 14.5mm main gun
-BTR-82 30mm main gun
-MT-LB 30mm main gun
-Bradley/Warrior/LAV main gun(s)
Do not engage Green or Blue rated armor with 14.5mm main guns — in terms of damage you’ll only be scratching the paint.
Heavy Machine Guns will not damage red/yellow/orange rated armor on Tanks and some IFV’s (like the Bradley)
Other notes:
Many of the turrets on vehicles in Squad have Blue rated armor, which as mentioned above protects the vehicle from serious harm when faced with explosives. This does not, however, mean that you should avoid targeting Blue rated turrets. The turret, along with other parts of vehicles, all have specific health values. If damaged enough, these parts become broken and (mostly) useless until they are repaired, even if the overall health of the vehicle is still intact. The damage to a turret can range from the gunner losing stabilization to being completely unable to move the turret in any direction.
It is possible, and advisable, to break a Blue rated turret and either disengage or flank around to the side or rear for a kill. One other thing to mention is that hitting frontal Blue rated armor with an ATGM is not at all a waste of ordinance — it does do significant damage. However it often takes two or more ATGM missiles to kill a vehicle with Blue rated frontal armor, instead of the 1 it typically takes for a side or rear shot. The difference between 1 and 2 here could mean victory or a trip back to the spawn menu.
Deflections and Penetrations:
There are some visual cues that denote how your shots on enemy armor are being received. For example, if you shoot at an enemy vehicle and notice your shots are producing green/yellow sparks with no smoke upon impact, that means that your shots are not penetrating and are actually bouncing off the armor being shot at. This is indicative of your main gun either being underpowered to do damage to the armor or hitting it at an angle that causes deflections no matter what. This does not necessarily mean your main gun cannot defeat the vehicle you’re engaging, just that you need to aim at a weaker part of the vehicle. The obvious exception would be an IFV engaging a main battle tank with its autocannon — you’re only going to ever scratch the paint.
An exception to this exception is an IFV versus the old T-62, but we’ll get to that later.
But how do you know if you’re doing damage and not deflecting? Easy — a damaging or otherwise penetrating shot produces grey/black smoke upon impact. Black smoke in particular is indicative of a seriously damaging shot. If you score a penetrating hit on an enemy vehicle and manage to hit its ammo rack or engine compartment, you will see black smoke every time. Engine hits are also noticeable by how there will be copious amounts of sparks flying everywhere upon impact, along with a very loud and distinctive audio cue that sounds like firecrackers.
Deflection
Note the yellow sparks
Deflection
Note the green spark(s)
Penetration
Note the smoke


Range:
The distance you engage a vehicle at plays a role on whether a shot will penetrate or bounce. For example if you’re in an APC or IFV and are engaging another APC/IFV at extreme ranges (1000 meters and above) it is entirely possible that you will not do damage to the other vehicle, even if you’re in a stronger vehicle and hitting a relatively weak spot. Close the distance and this ceases to apply. However this does not apply to tanks, which can easily engage and knock out vehicles (and other tanks) at extreme ranges.
Transparent Damage Models Note
With V.2 released there are some new vehicles for the British as well as INS factions. The white toyota looking insurgent vehicles are all Red rated by virtue of being just regular civilian cars with ordinance mounted in the bed. This will pose no problem for any vehicles or infantry.
The UK is different. Much like all the Canadian vehicles (and the MEA’s T-72S), the transparent damage models in Jensen’s Range haven’t been updated to show their strong and weak points. It’s this spot:

It has looked like this for many updates now, despite the addition of numerous new vehicles and playable factions. If you read a section and notice the strong/weak points aren’t listed then it’s because they haven’t been added to this spot in Jensen’s Range. I will only be able to list where I think the weak/strong points are.
When (or really “if” at this point) OWI bothers to update this part of Jensen’s Range I will update the vehicle’s information accordingly.
Insurgent/Militia/Russian/MEA Vehicles
Please note that despite the change in camouflage between each faction, the shared vehicles have the same armor values
(A Militia T-62 has the same armor as an Insurgent T-62, a Militia BRDM has the same armor as an MEA BRDM, etc.)
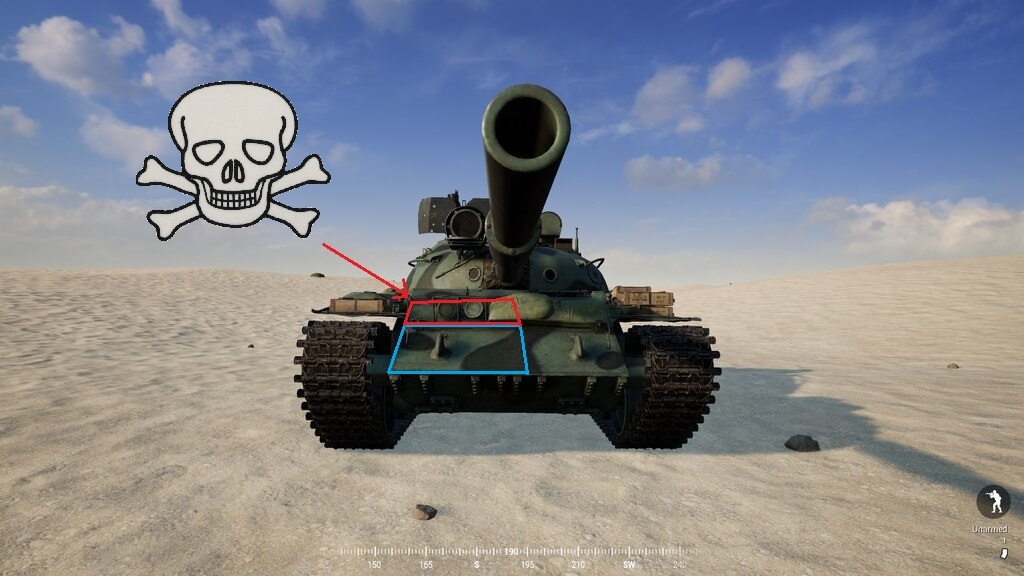
T-62
Front:
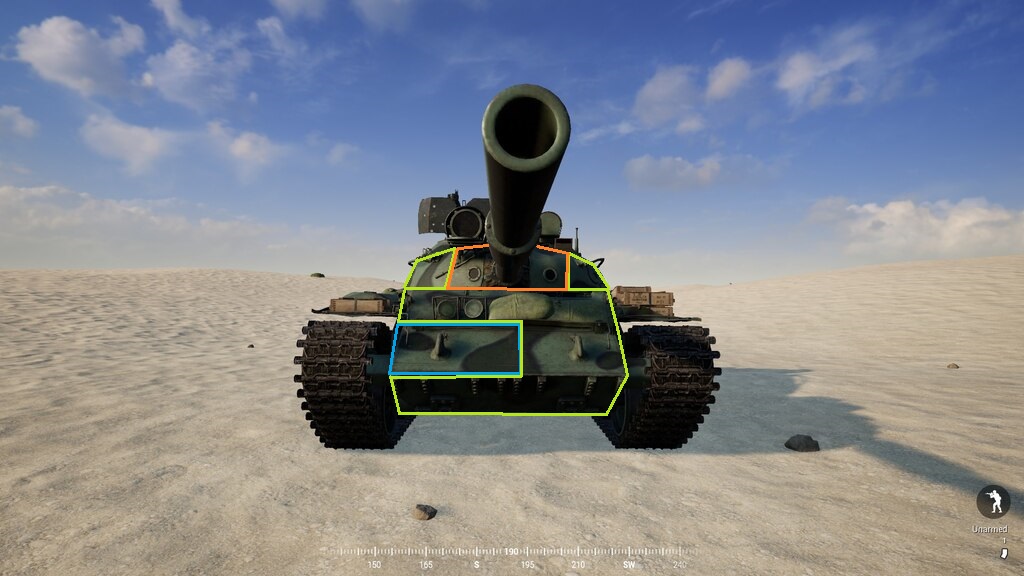

Frontal engagement tip(s):
The T62, being a long outdated tank, is very weak to every other modern tank, including IFV’s with 25mm or 30mm turrets. A shot to anywhere but the sides of the T-62’s turret will yield high damage.
An AP shot to the ammo compartment on the front right of the T-62 can ammo rack it.
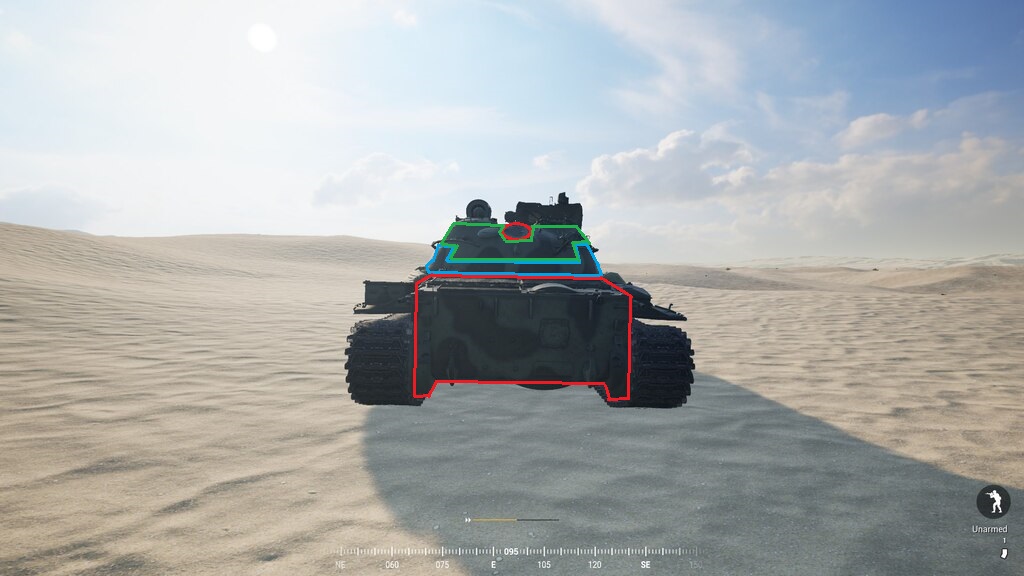
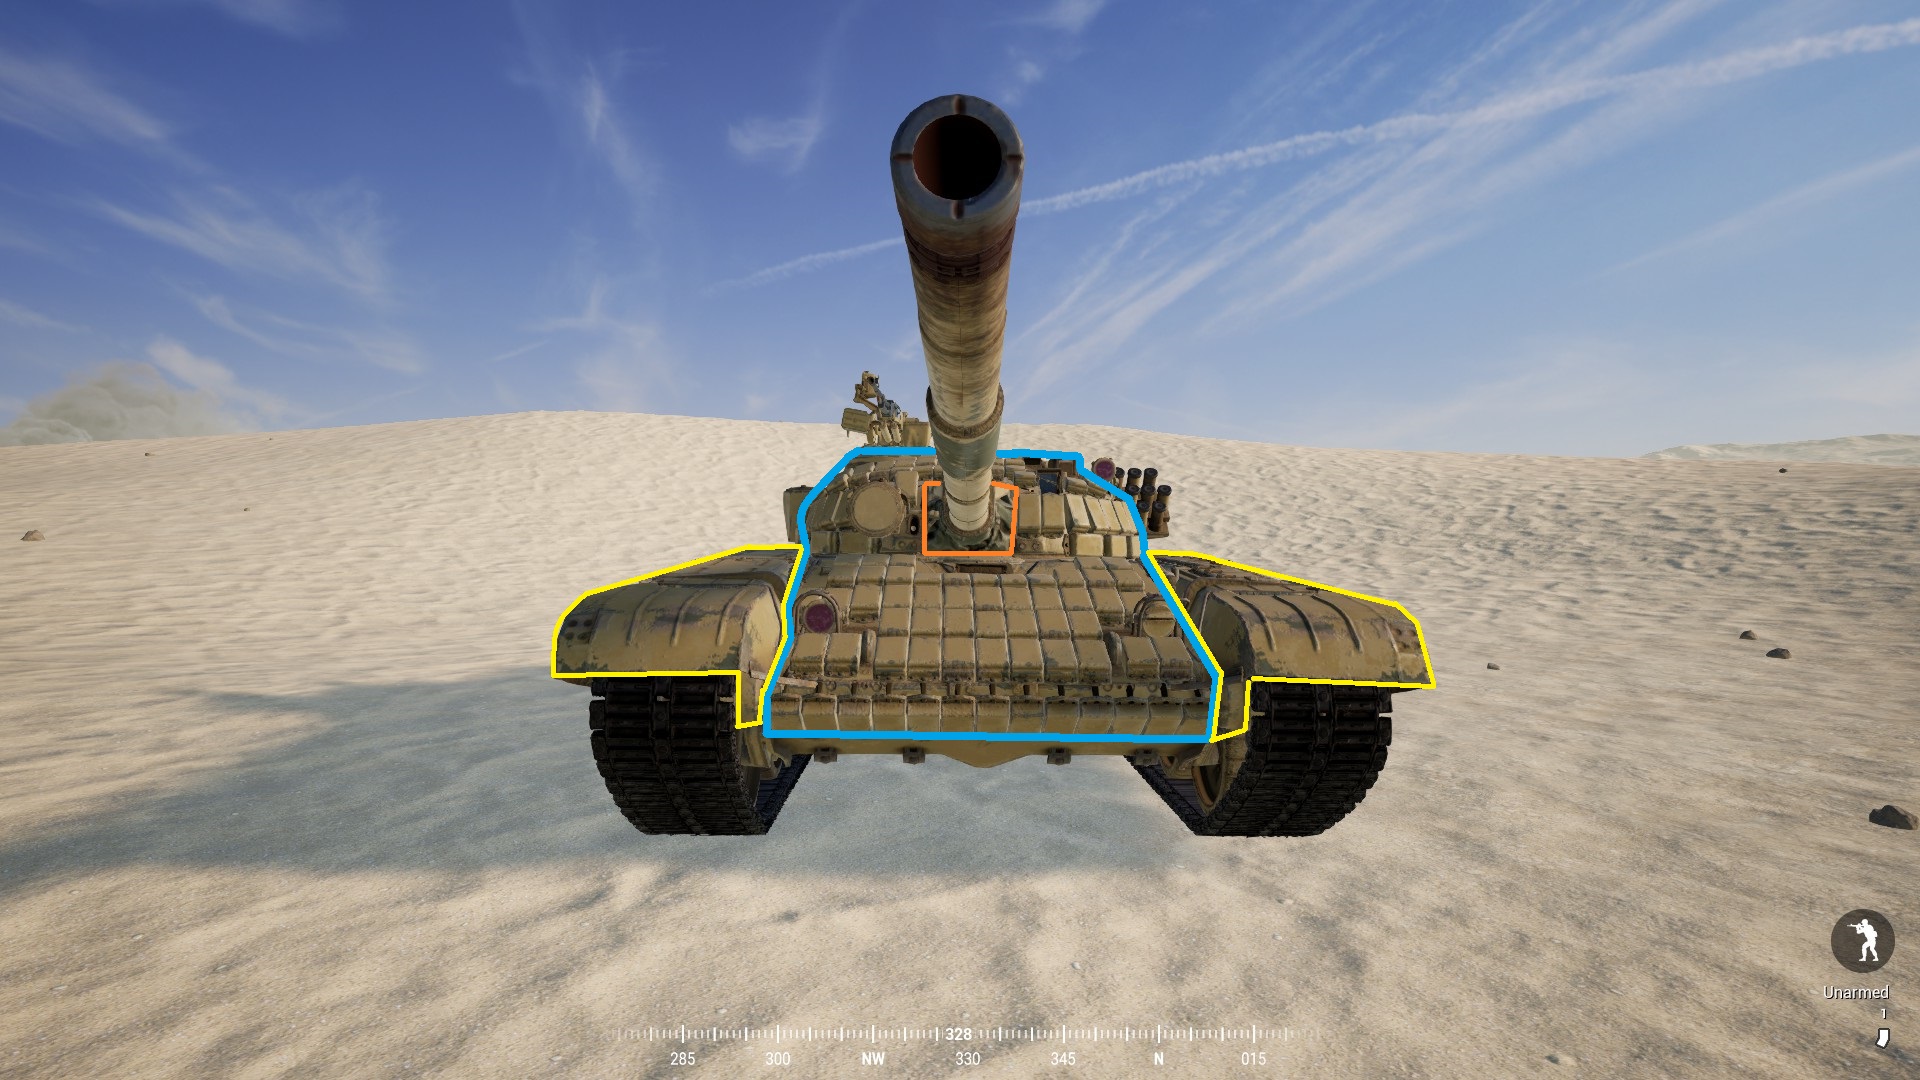
T-72
Front:

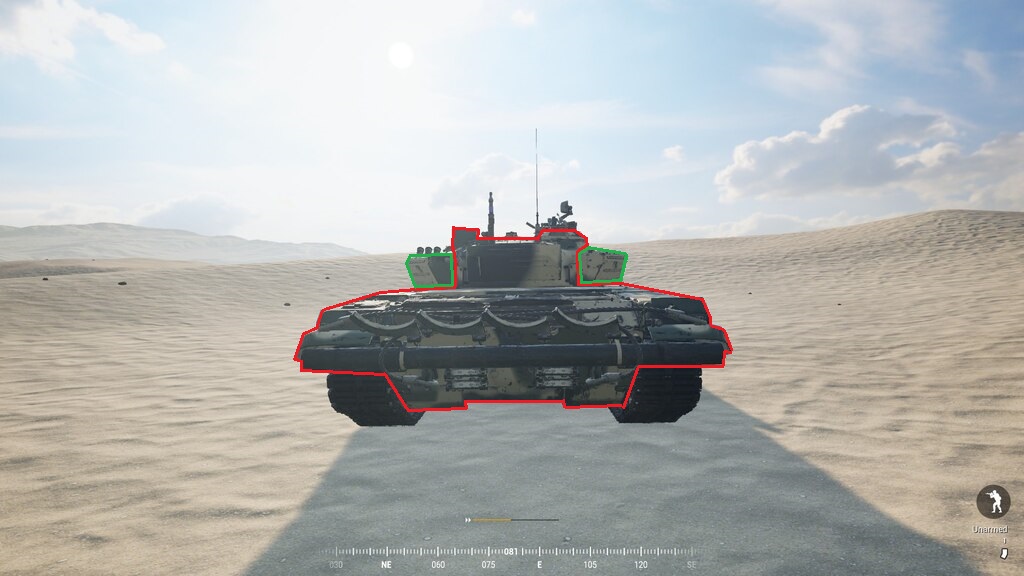
Frontal engagement tip(s):
The T-72’s most glaring weakness in a head-to-head fight is the main cannon mantlet (the square area around its turret). While this is a near universal weak spot in all the other tanks in the game, the other tanks have at least some armor in this area. The T-72 lacks even that — it has no armor around its main cannon mantlet.
Hitting here is the most reliable way to damage/kill a T-72 from the front. Accurate gunnery here is a must, since a shot too far to the left or right will almost always deflect.
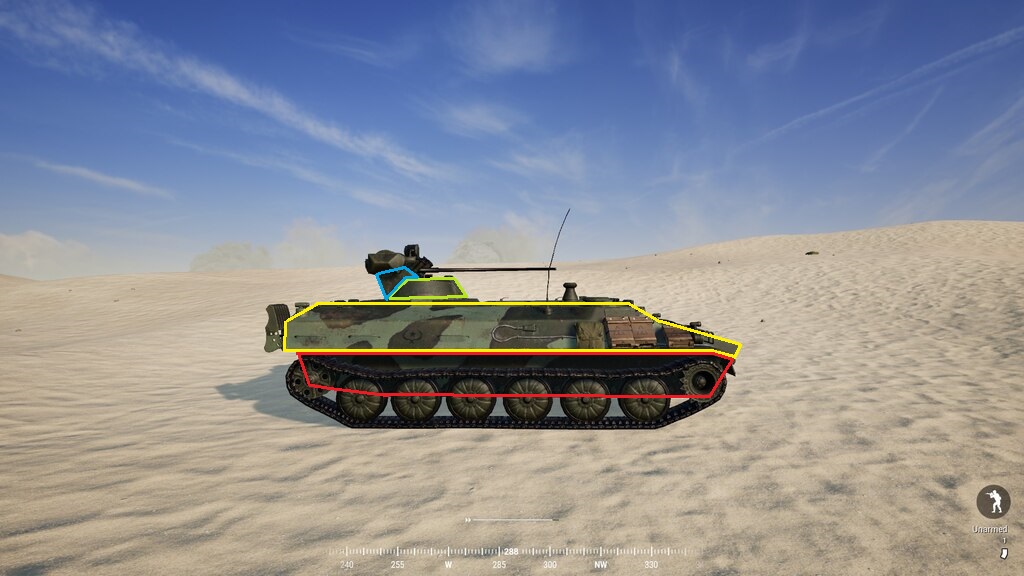
BMP 1 and BMP 2
The BMP-1 and BMP-2 are largely the same, but not quite.
No BMP-2 model though.

Insurgents and Militia get the BMP-1 which has an older Malyutka ATGM missile and a small 73mm cannon. The Russians get the BMP-2 which has a 30mm autocannon and a more modern Konkurs ATGM. Keep in mind that the BMP-1 does not offer stabilization* or laser range finding for the gunner; the BMP-2 offers stabilization but not laser range finding. The MEA gets both the BMP 1 and 2.
*Only the MEA’s BMP-1 offers gunner stabilization.
Be aware I might be wrong on the BMP-2’s frontal values; however I believe the side armor values to be accurate:
Front INS/Militia/MEA:
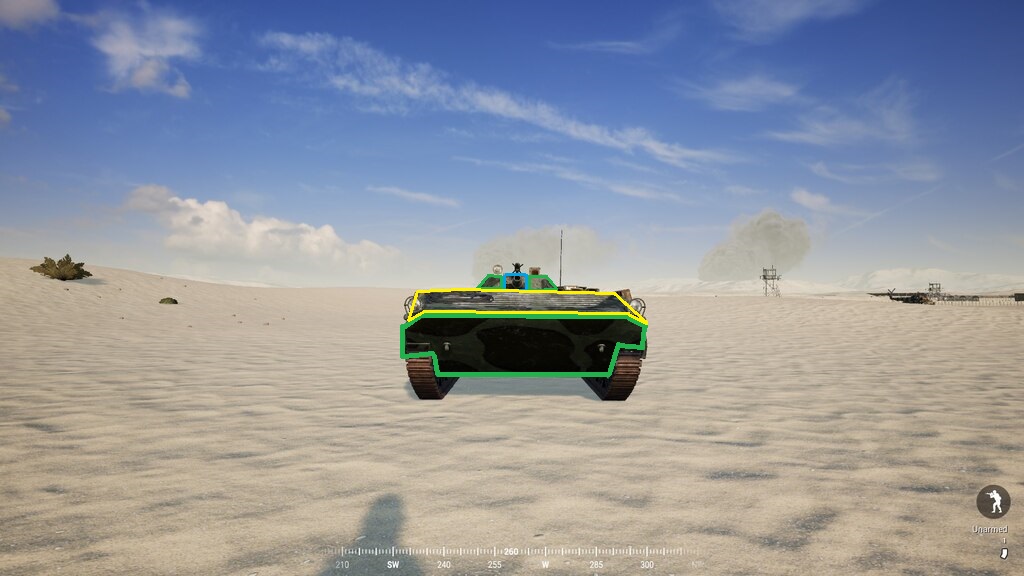
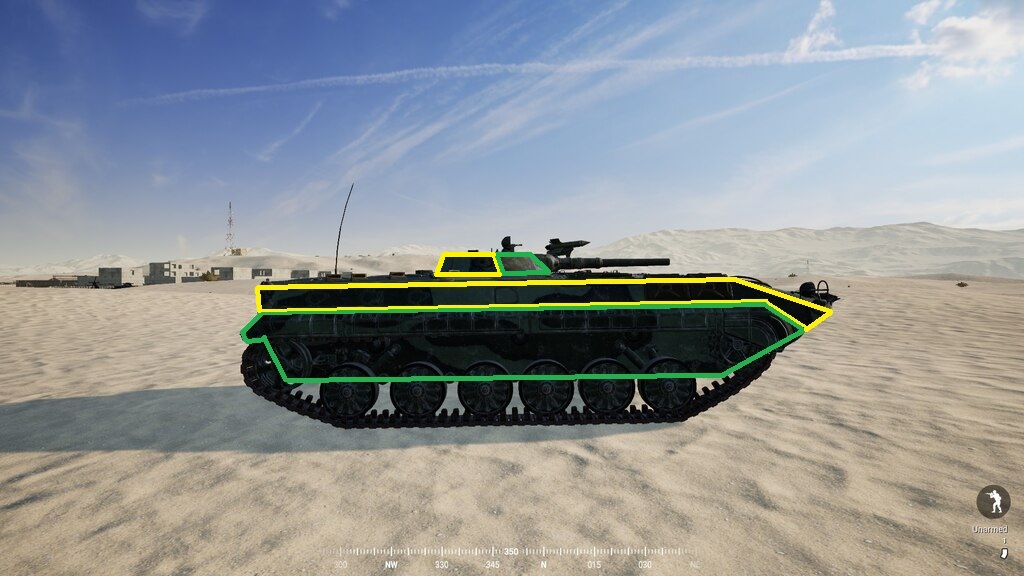
Front RU/MEA:
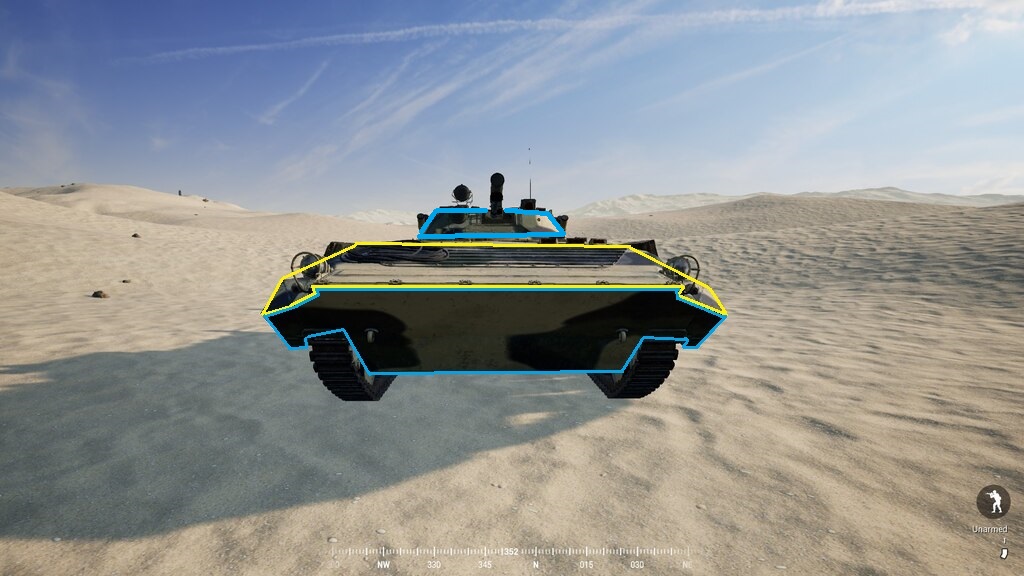
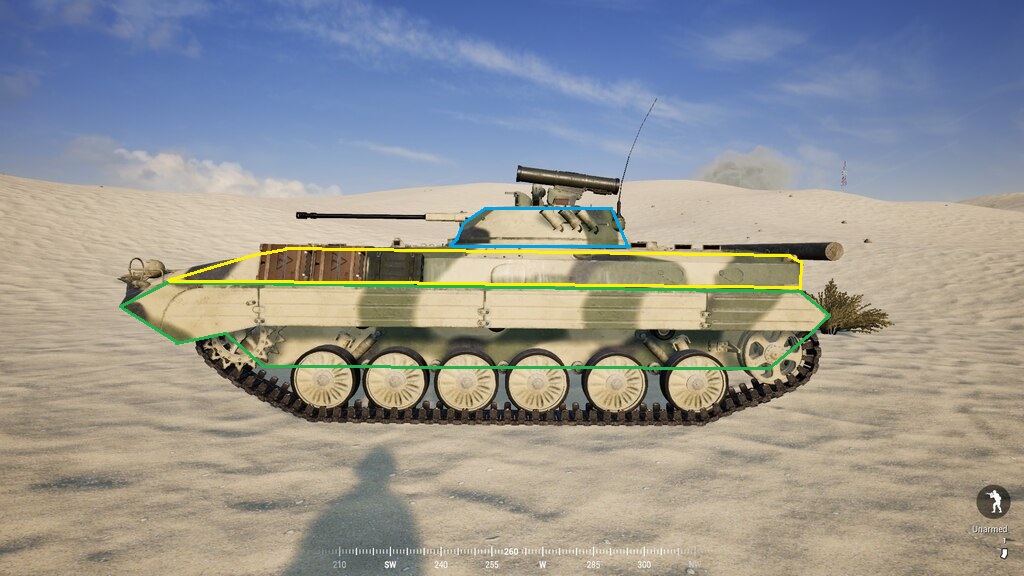

The top of the frontal sloped armor is weaker than the bottom slope on both. Disabling the turret with repeated hits to the ring is also an option. In addition, the tops of both BMP’s are exceedingly vulnerable to AT, and a well placed HAT/MBT round can 1 shot it if hit there.

If facing off against the BMP-1, an unorthodox (and risky) strategy is to get as close as possible to it — the BMP-1’s 73mm projectiles have an arming distance, as does its ATGM rocket. If you’re close enough then neither projectile will detonate since it didn’t travel far enough to arm. This tactic will also work for the BMP-2’s Konkurs ATGM, but only the ATGM. It will not work against the BMP-2’s main autocannon which can engage any target from point blank range.
BTR-80 + BTR-82
Note: The difference between the BTR-80 and BTR-82 is that the 82 has a 30mm autocannon turret.
Front:
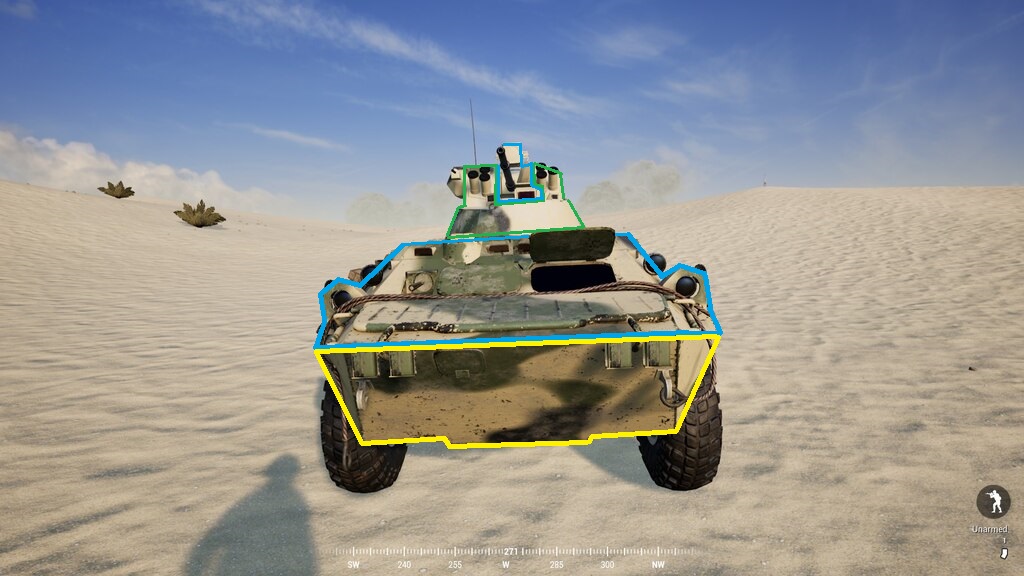

Frontal engagement tip(s):
Unlike the BRDM the open driver window doesn’t do extra damage, so just ignore that. When fighting the BTR-82, focus on the 30mm cannon’s turret ring. Hitting here is the only reliable way to do damage or kill the BTR when going head-to-head without ATGMs or being in a tank.
Just keep in mind that if you’re fighting the BTR-82 with a Stryker (the most common engagement) your HMG will likely overheat and need a few seconds to cool down before you manage to pump enough rounds into the turret ring to kill it.
In the case of the BTR-80, aiming at the small area around the gun is your best bet, since the BTR-80 doesn’t have the rather large turret ring the 82 does.
An unorthodox method to fight the BTR as a Stryker is to ram into the front of it at full speed. The Stryker is, oddly enough, quite good at flipping over BTRs.
MT-LB
Front:

Frontal engagement tip(s):
Ah yes, the MTLB. Affectionately known as the “Sh*tbox” it gets this nickname from its poor overall armor and underwhelming armaments against other armored vehicles. The armor on the MTLB is weak on the front. In fact, when facing it from the front, the lower sloped armor is Red rated, so aiming there will especially hurt when hit.
BRDM
Front:
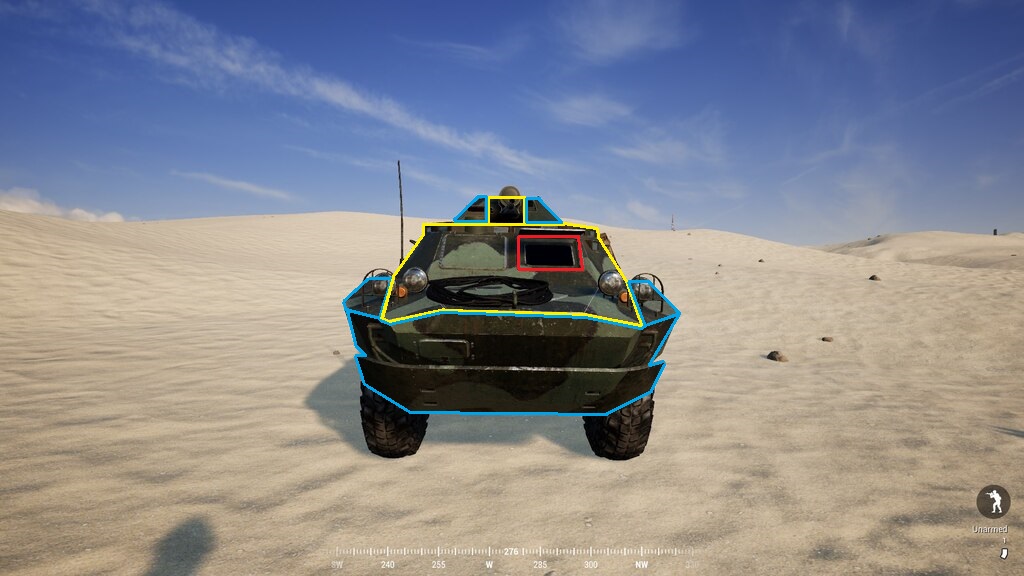

Frontal engagement tip(s):
The open driver’s window is weakest to AT and HMG fire.

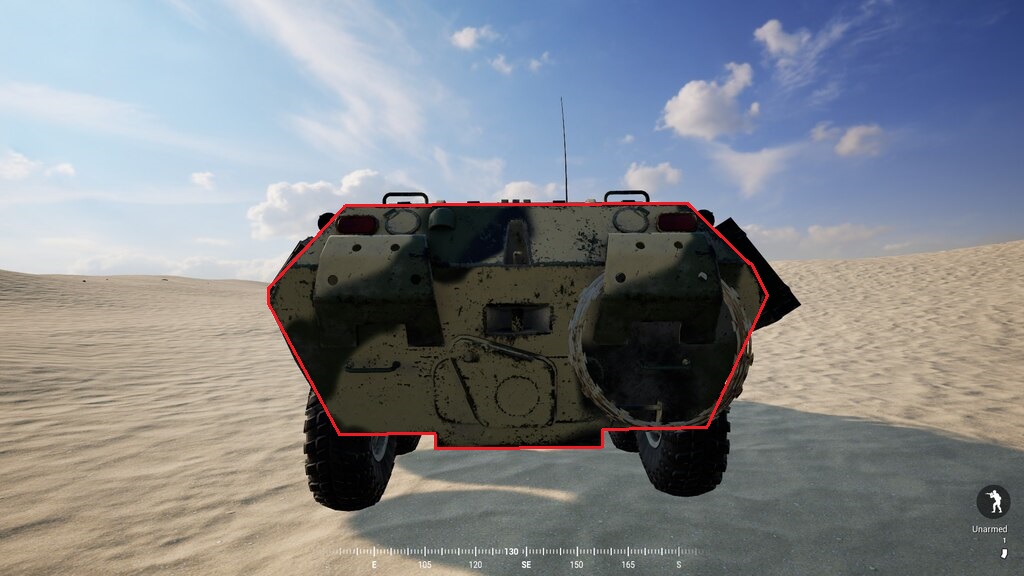
Tigr Armored Vehicle
Front:
Side:
Rear:


I don’t know its armor values since it wasn’t added to the Jensen’s Range transparent armor area. However, after running some weapons damage tests, I feel fairly confident in saying that it is similar to the M-ATV’s armor and is at least Orange rated all around.
Disclaimer: This is just a guess


When it gets a full transparent damage model in Jensen’s Range I’ll update accordingly.
Frontal engagement tip(s):
If it’s an open top Tigr just shoot the guy on the gun. If it’s a remote operated Tigr and you only have small arms then you’ll want to hide, or get your AT to hit it. If you’re on an HMG or in a vehicle with an HMG on it, aim for the windows — HMG’s like the M2 Browning .50 can easily penetrate the windows and kill the guy on the remote controls.
The gunner on the RWS variant is sitting in the back cab. If looking at it from the front, he’s behind the guy sitting in the front left seat.


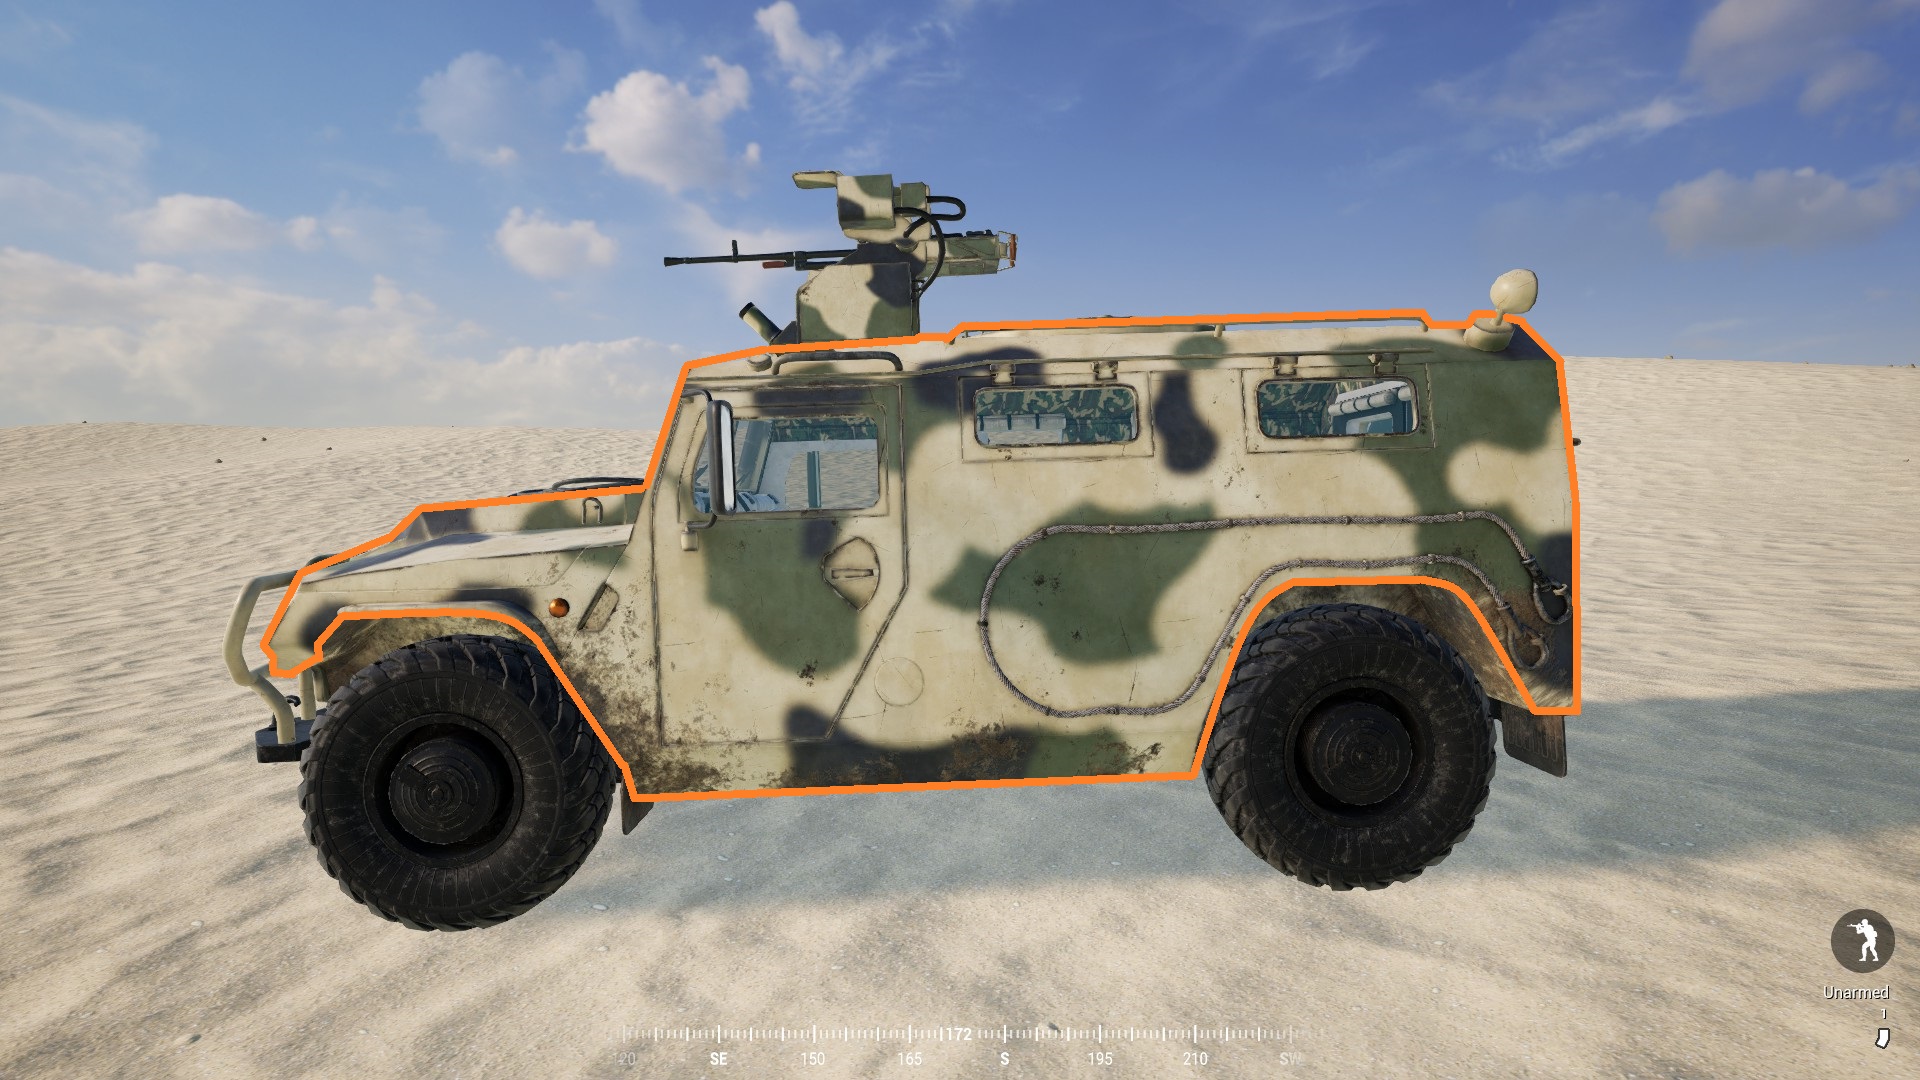
Insurgent Humvee
Front:
Side:
Rear:


Frontal engagement tip(s):
The venerable Humvee makes its return as an Insurgent vehicle. Despite the armor not being listed, it is safe to assume it is Orange rated all around as opposed to its Red rated civilian armored counterpart. The windows on the Humvee are immune to small arms fire, making this the best light vehicle Insurgents have in terms of protection. However the windows are easily penetrated by heavy weapons and AT, and the gunner is exposed in the open top turret, so don’t get too cocky when driving this around. The black armor makes it stick out in desert environments, so spotting it won’t be hard for enemies.
Armored Technical
Front:


Frontal engagement tip(s):
The armored technical is actually somewhat difficult to deal with if you’re an infantryman. Aiming at the driver’s viewports on the front and side of the cab is what you want to do, but doing it while it’s driving at you can be hard. Its Red rated armor makes it easy to deal with if you’re in any vehicle with a main gun that can beat Red rated armor (which is most of them).

This techie is a favorite among Insurgent sappers who do Vehicle Borne Improvised Explosive Device (VBIED) attacks, right behind the motorcycle. By itself with no IED however, it’s only a threat if you don’t shoot whoever is manning the HMG or SPG mounted in the truck bed. Shoot the guy manning that and it ceases to be a threat.
United States Army Vehicles
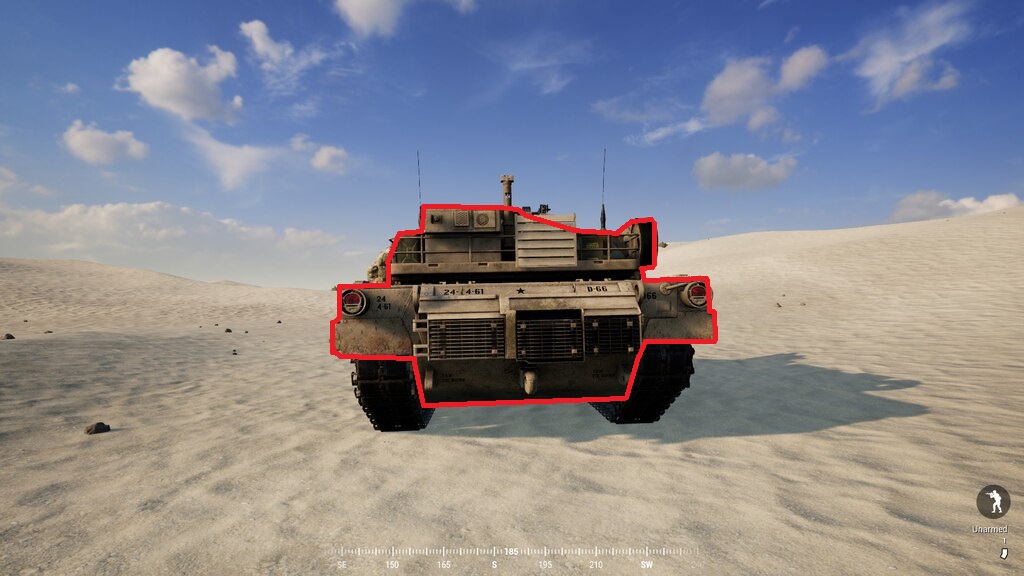
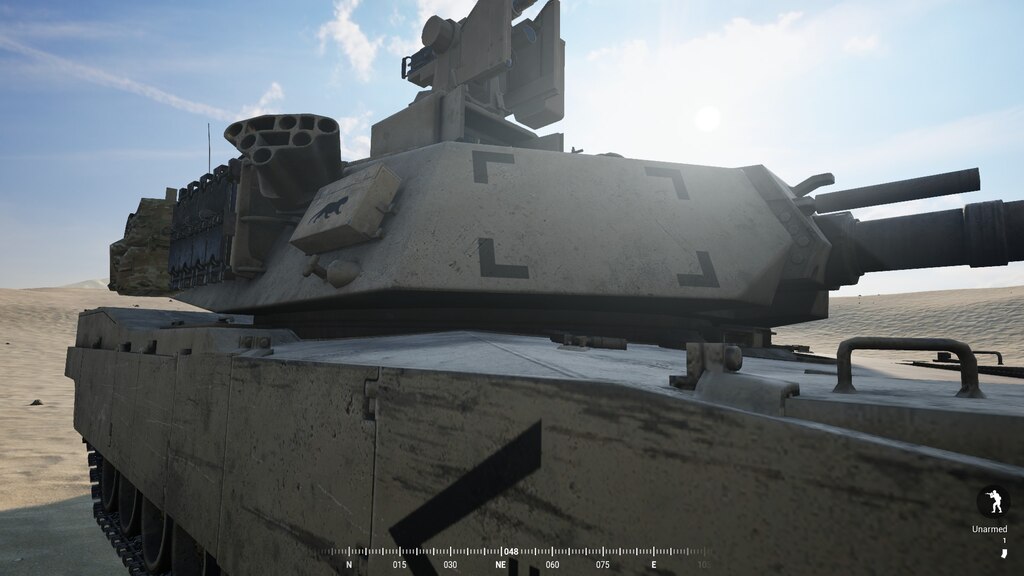
M1A2 Abrams
Front:
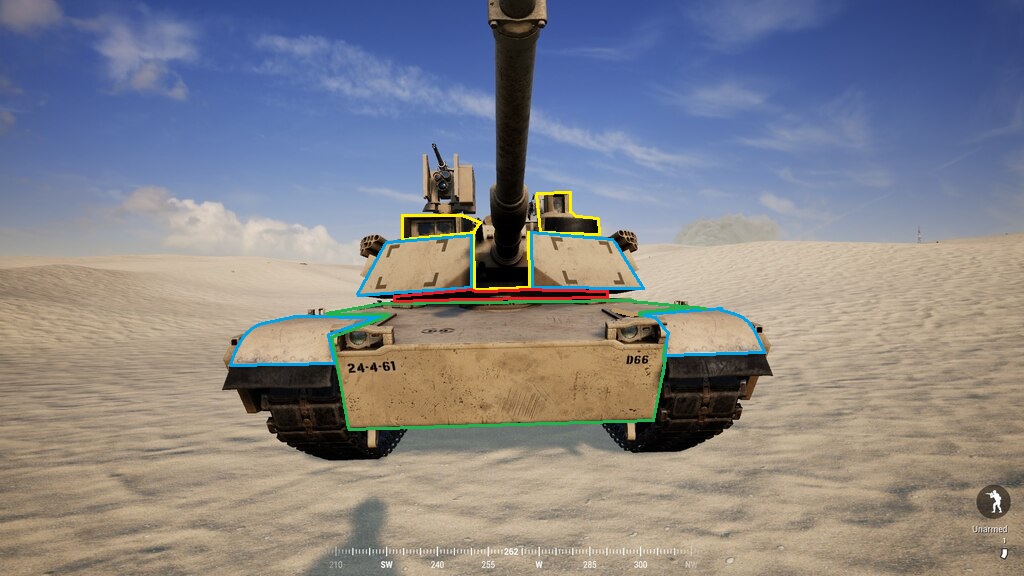
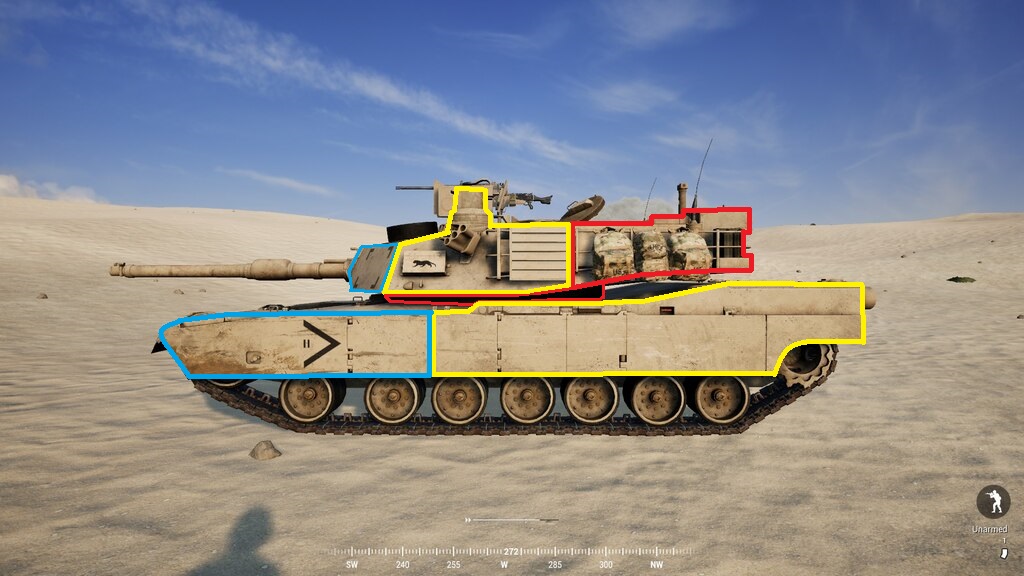
Frontal engagement tip(s):
Like all other tanks, the area right around the tank cannon isn’t as strong as the rest of the frontal armor. And, like all other tanks, it has a turret ring that can result in a one hit kill if hit by skilled (or lucky) gunners. The Abrams, however, has by far the most exposed turret ring of any tank currently in the game. One hit here from any AP tank shell or ATGM can doom an Abrams.

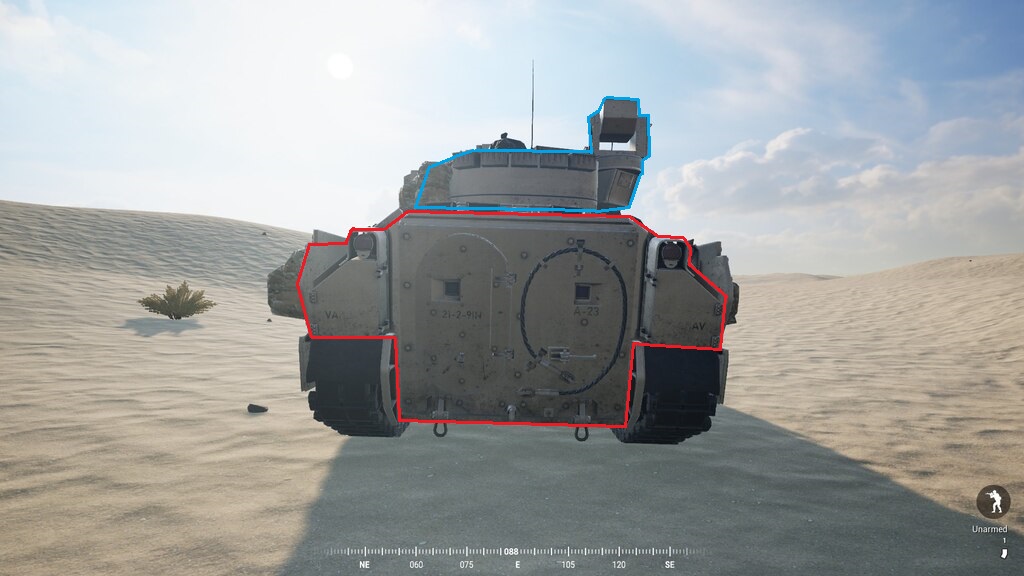
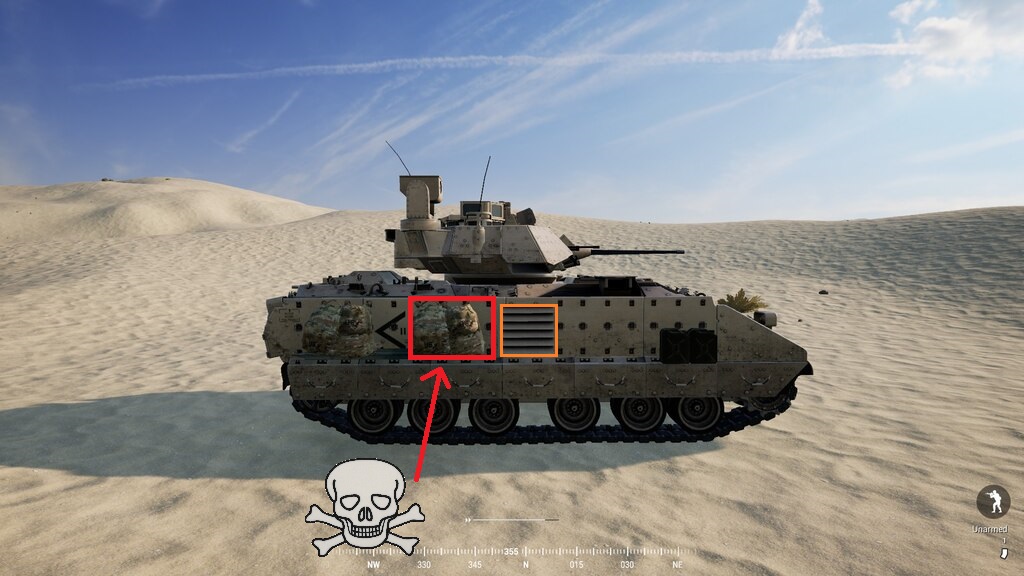
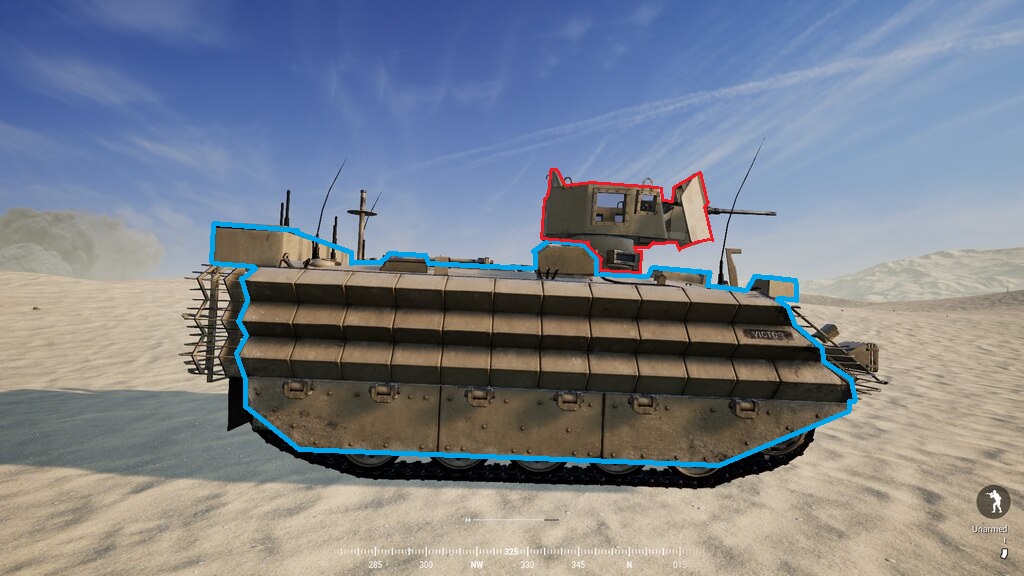
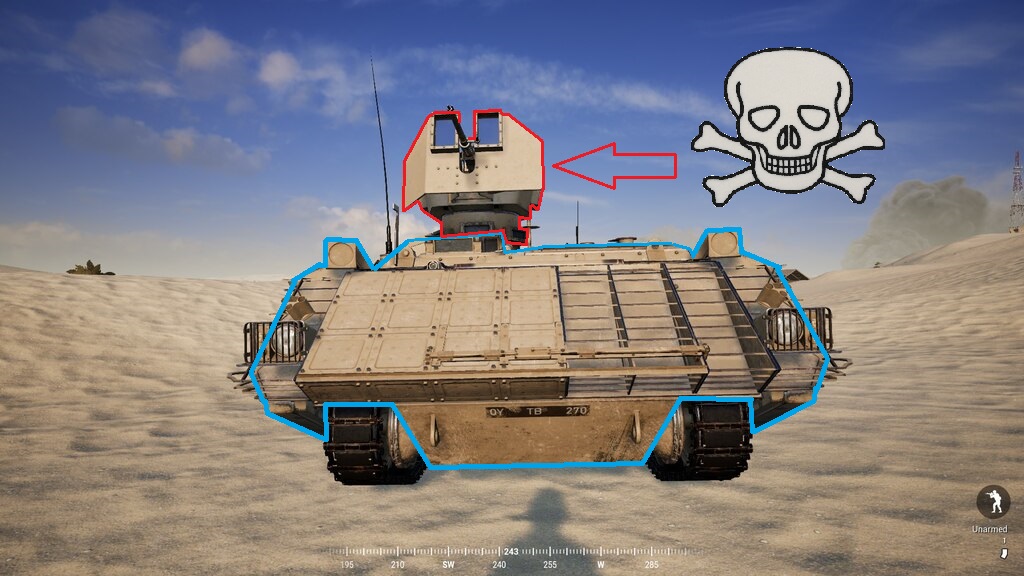
Bradley IFV
Front:
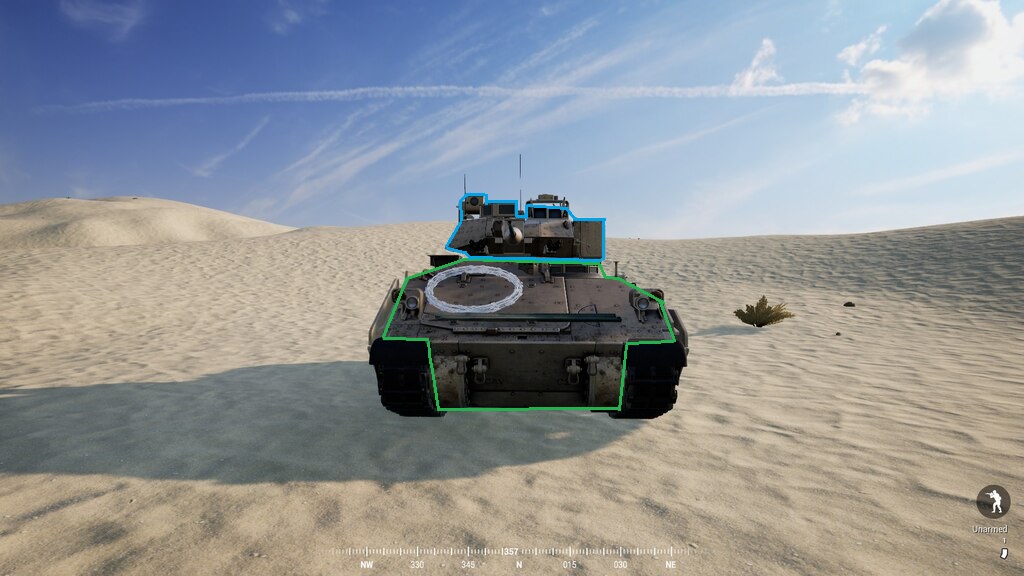

I used to say “Don’t” but V2.0 changed things, if only slightly.
A frontal engagement with the Bradley is highly risky even in a MBT. Its main gun will make short work of most enemy IFV/APC’s, and its 2 TOW missiles make it more than capable of killing a main battle tank. Russian (and, for now, only Russian) IFV’s like the BTR-30 and BMP-2 got upgraded AP shells for their autocannons in V2.0. Whereas before they fired Armor Piercing rounds, now they fire Armor Piercing Composite Rigid (APCR) rounds. What’s that mean? It means that in terms of damage you can actually do some respectable damage to Green/Blue rated frontal armor as opposed to just scratching the paint. Even so, you’ll still want to flank the Bradley or unload as many rounds as you can into its turret to break it. Just because you can engage a Bradley from the front doesn’t mean you should.
However, there is one spot on its side that can yield great results if you’ve got an ATGM or skilled HAT trooper at your disposal.
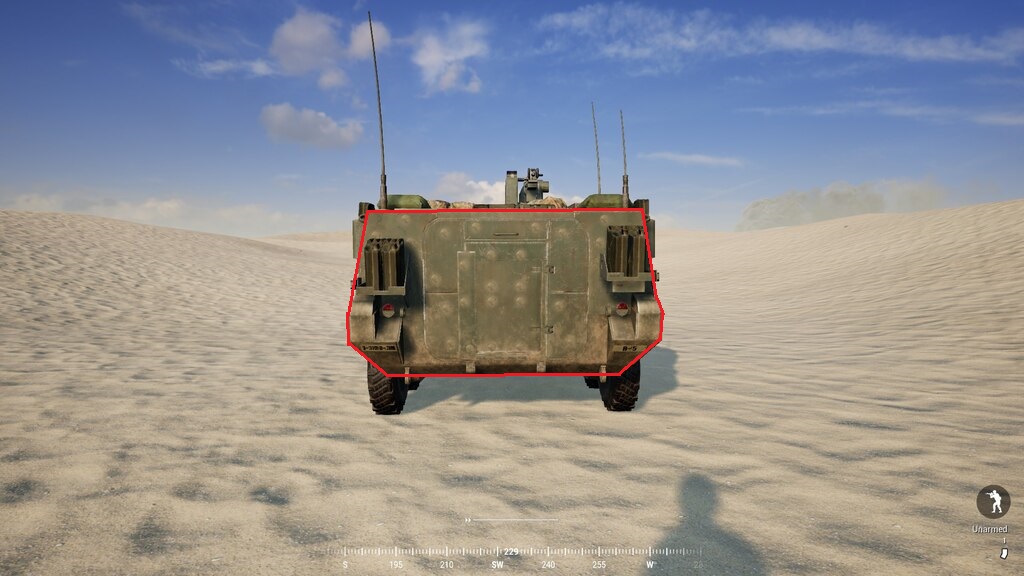
Stryker
Front:

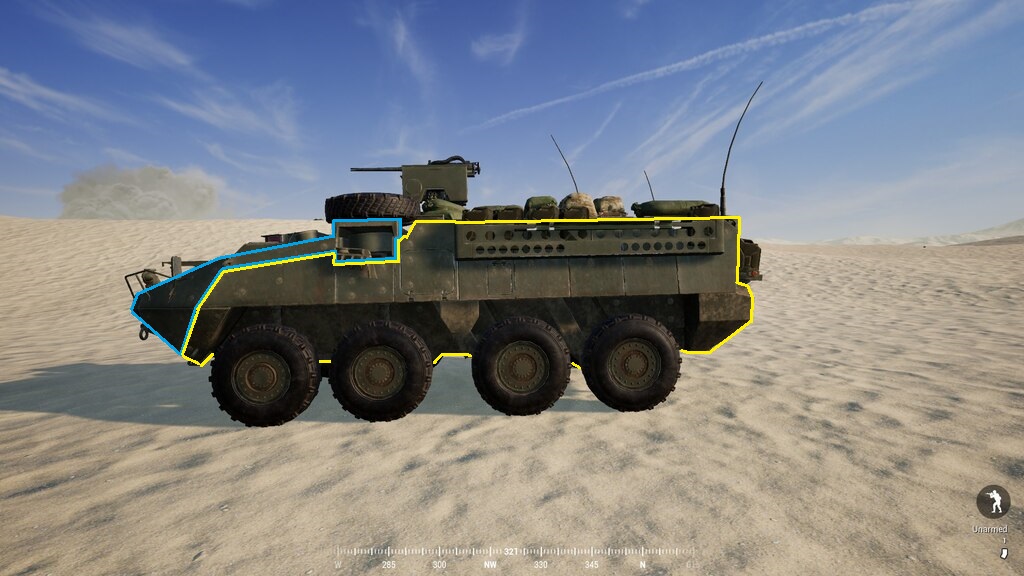
Frontal engagement tip(s):
The Stryker’s biggest advantage as an APC is its Blue rated frontal armor. Your best bet is to either unload into its .50 cal CROWS HMG to break it or blind it while your driver flanks for a side or rear shot. If you have a shot on the Stryker’s right side it’s advisable to aim for the highlighted black grate, which contains the CROWS’ ammo. It’s easily identifiable by how it juts out when looking at it.


Another possible strategy is to aim for the flat armor that’s inbetween the upper and lower frontal slopes; it’s the black rated “grille” you can only see front on. Aiming here does do good damage, but it’s not always so easy in an actual game. You or the Stryker may be at an odd angle or elevation that doesn’t allow you to hit it reliably. It’s also exceedingly difficult to hit if either you or the Stryker are on the move, which means your shots will possibly just bounce off the frontal armor if you miss.
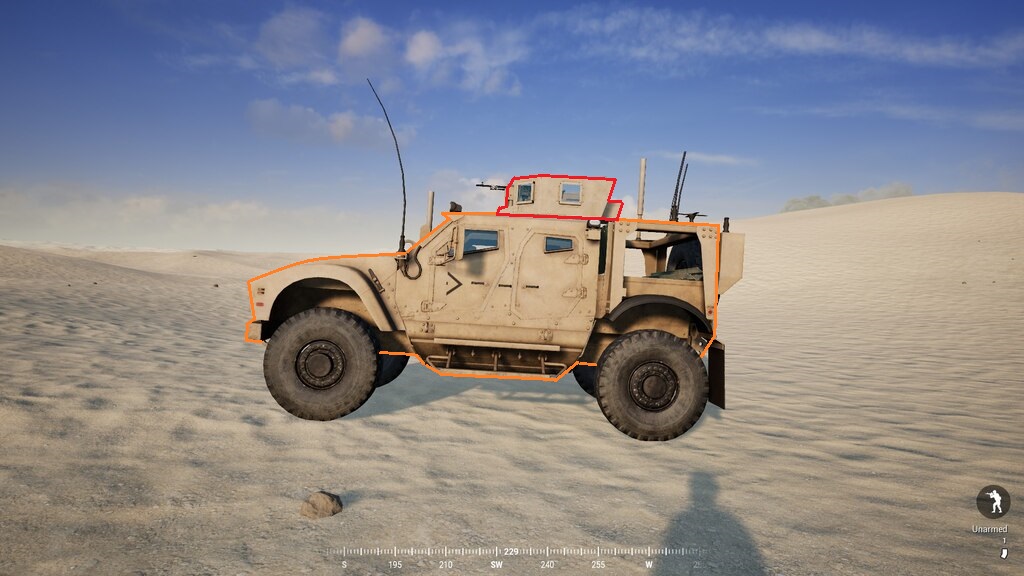
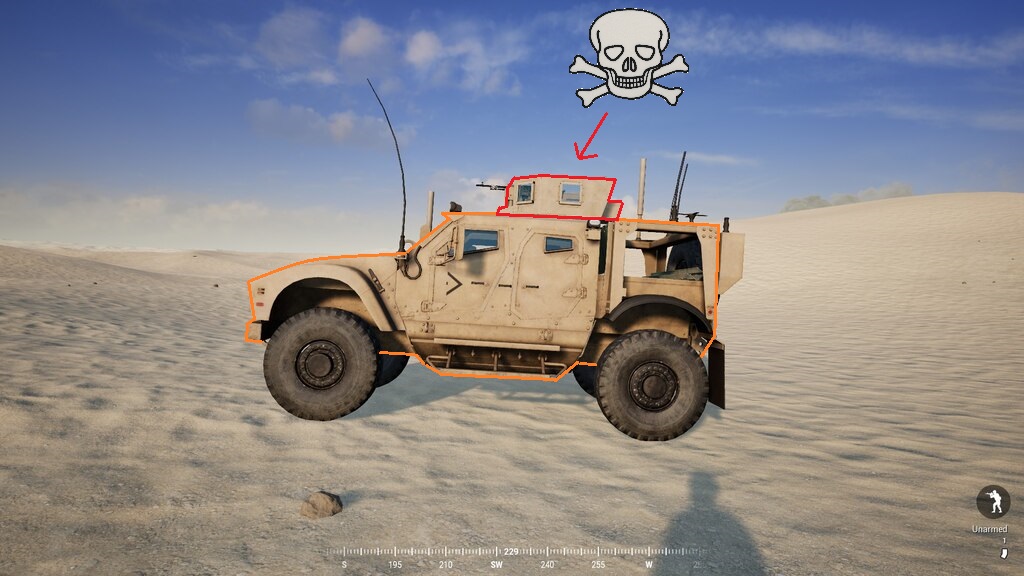
M-ATV
Front, Side, and Rear:
It’s Orange rated all around, except for the open top turret.
Frontal engagement tip(s):
If you’re dealing with an open top MATV then all you need to do is aim for the the guy manning it.
If you’re dealing with a CROWS then it’s potentially trickier depending on what you’ve got on hand. The CROWS gunner on the MATV is sitting behind the driver.

A .50 caliber MATV CROWS is fully capable of killing everything except MBT’s. The same can be said for all other light vehicles with a .50 caliber CROWS/RWS system. Do not discount it just because you’re in a vehicle with bigger guns; it’s imperative you deal with it if you see it.

Great Britain Vehicles
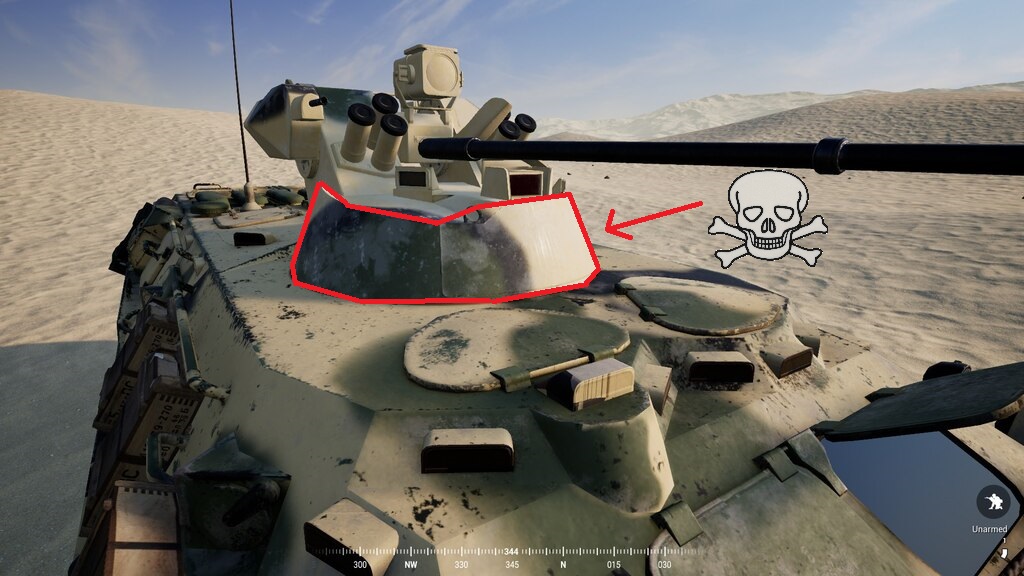
Challenger Tank
Front:

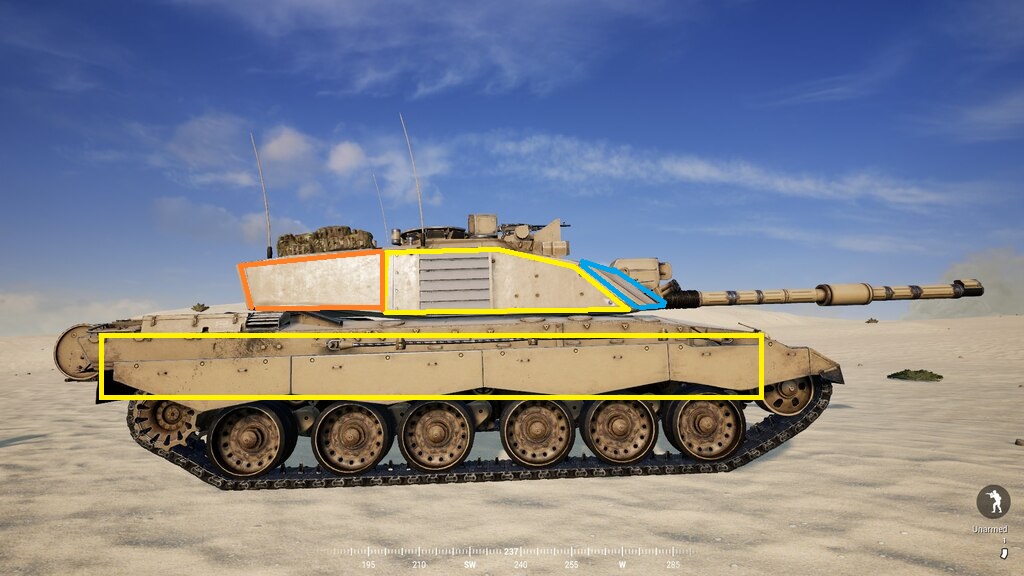
Frontal engagement tip(s):
The Challenger’s biggest frontal weakness is its very large driver’s window.
Warrior IFV
Front:
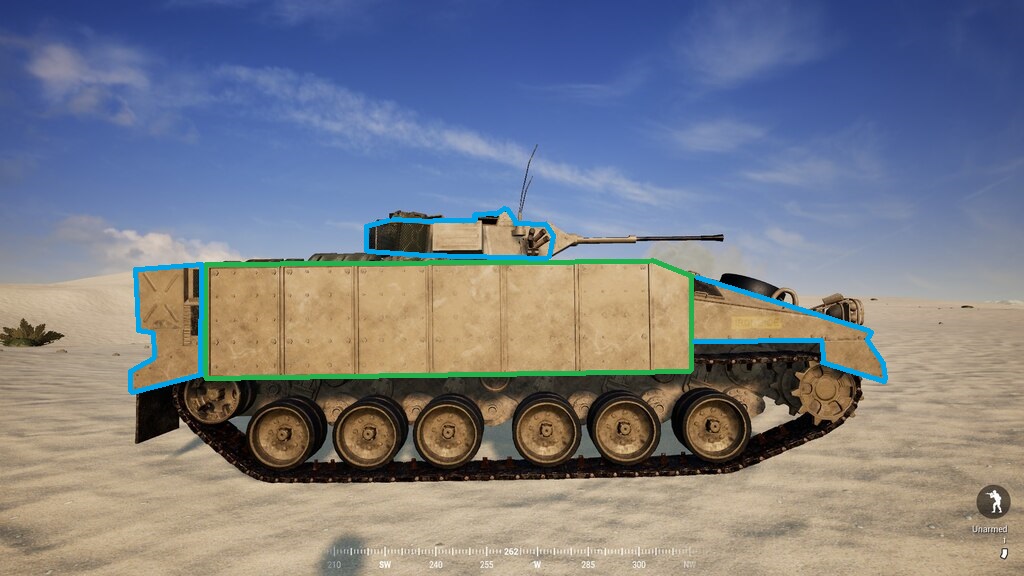
Much like the Bradley, a frontal engagement with the Warrior in anything other than a main battle tank is risky even with the newly upgraded munitions for RU IFV’s. Luckily for tank crews, the Warrior doesn’t have any ATGMs like the Bradley. IFV or Scout Car crews are not quite as lucky. Disengage or unload on the turret as you’re running/flanking. If you’re in a BMP then immediately switch to the ATGM to engage it.
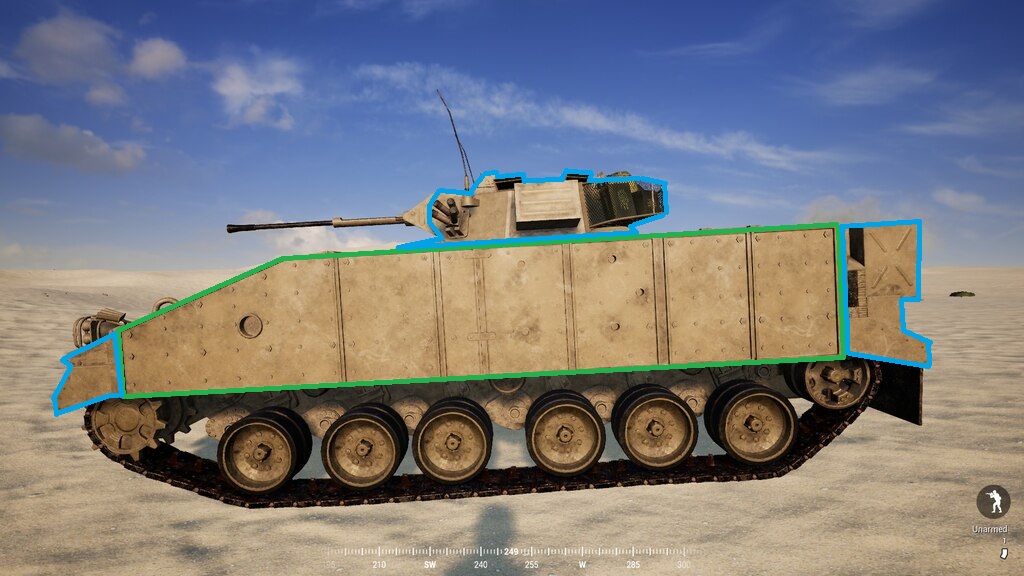
It’s quite possible for IFVs to blitz the Warrior and get at its rear armor since it does not have turret stabilization. No turret stabilization makes anything other than stationary shooting an unbelievable pain in the rear end for a vehicle’s gunner; which is why the next vehicle listed is so dangerous…
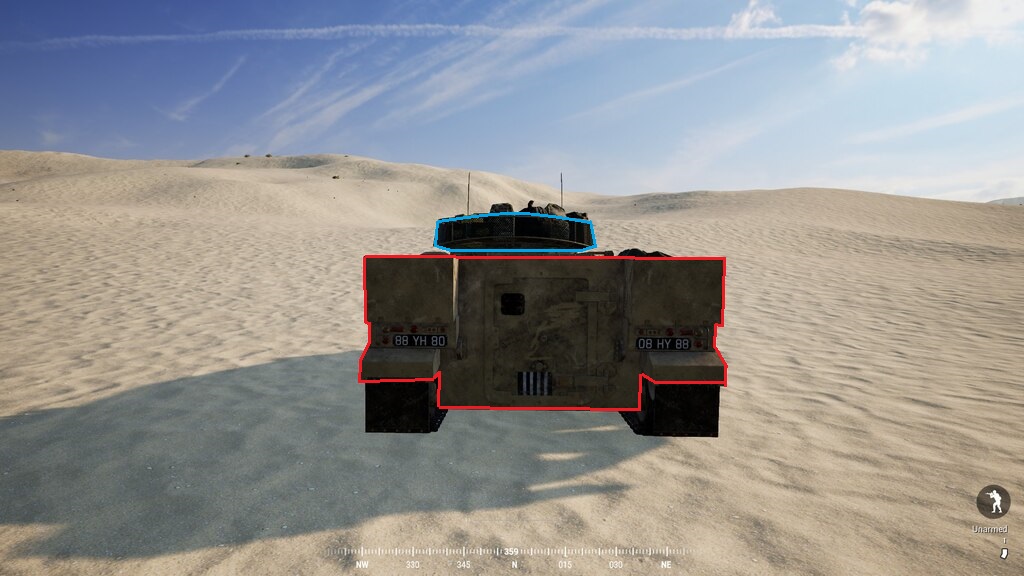
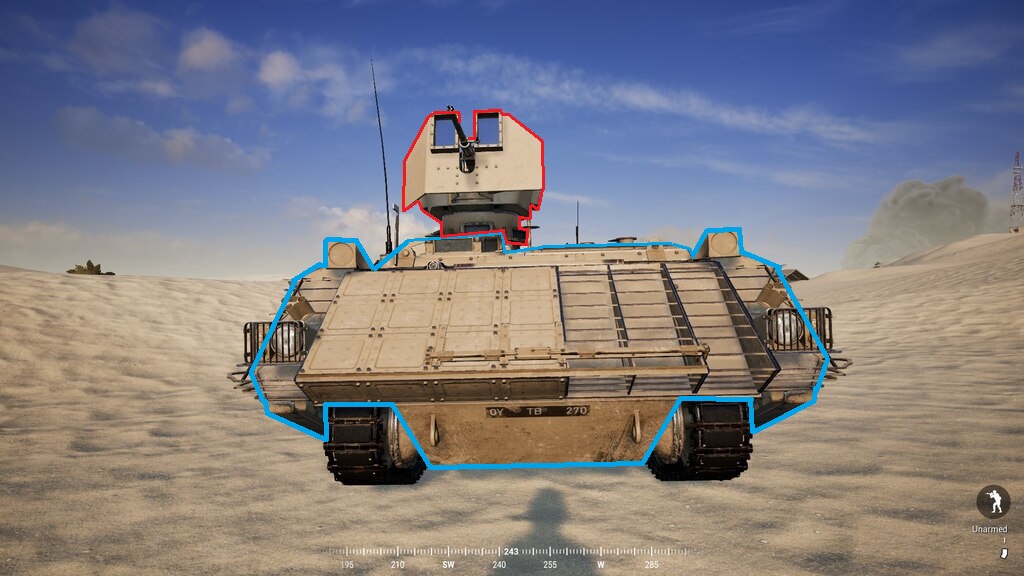
Warrior CTAS
Front:
Side:
Rear:


Frontal engagement tip(s):
Thanks to the rapid firing 40mm autocannon and turret stabilization this upgraded Warrior offers, fighting this vehicle front on in an APC/IFV is suicidal. The CTAS’ firing rate cannot be understated — if this thing gets a bead on you it will utterly shred your vehicle in moments. Breaking the turret of the CTAS or ambushing its flank(s) with an ATGM is absolutely vital if you’re not in a MBT.
The CTAS’ main drawback is that it has a very limited ammo pool that it can exhaust in one or two engagements before needing to re-arm. But be warned, a competent gunner can completely mop the floor with any armored vehicle you throw at it in those one or two engagements. I can only assume that since it is just a Warrior IFV but with a better turret that it has the exact same armor values as the non stabilized base variant.
For armor values, check the Warrior IFV’s.
Scimitar
Front:
Side:
Rear:


Frontal engagement tip(s):
The Scimitar is a recon vehicle with the same main cannon as the Warrior IFV (not the CTAS). Like the Warrior IFV, it doesn’t have turret stabilization either. So what makes it different than the Warrior? Speed. It is a very fast vehicle that can reposition quickly to flank enemy vehicles. But, as in real life, it sacrifices protection to gain this increased speed. It’s very possible for a BTR-82 or BMP-2 to essentially melt the Scimitar in a frontal engagement thanks to the Scimitar’s weaker armor and the upgraded ammunition the BTR and BMP recently got.
The Scimitar is also one of the weakest vehicles to Heavy Anti-Tank launchers. One hit from a HAT shot, even to the frontal armor, is enough to instantly kill it.
I would have to guess that the front is Green rated, with the sides being Yellow, and the rear definitely being Red.


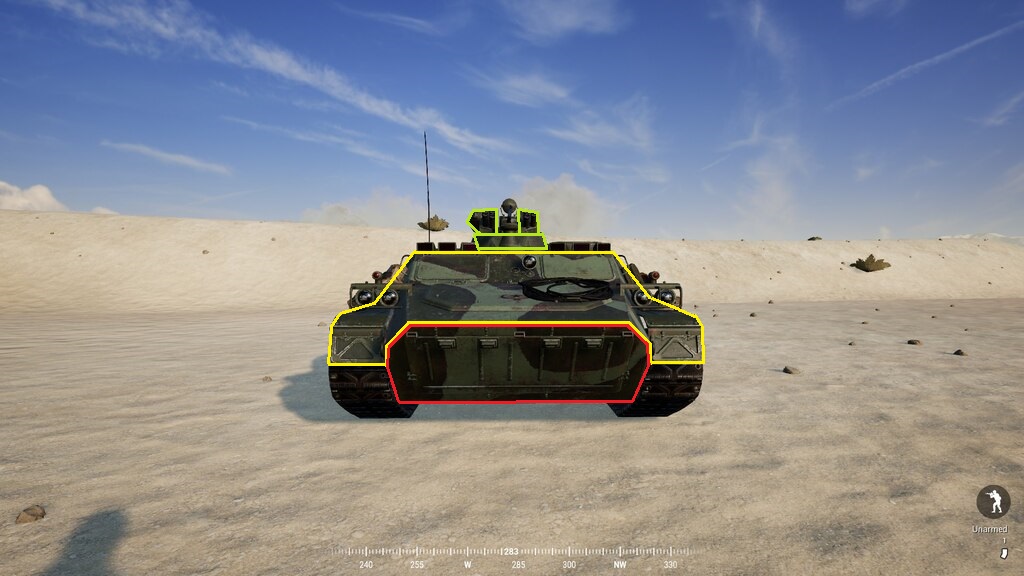
Bulldog APC
Front:

The Bulldog has excellent front and side armor, along with decent rear armor. The real threat is the open top turret M2 Browning. Hitting that with HMG fire or explosives will kill anyone on it and deal enough damage to hurt or kill the Bulldog. Rear armor hits with HMGs or explosives will also suffice, but the very large turret is the best target to go for.
The Bulldog also has a Remote Weapon System (RWS) variant. The RWS only has an M240 LMG. This means that in vehicle-on-vehicle combat the RWS is utterly harmless to all but unarmored Technicals.
Infantry going up against the RWS Bulldog should be on notice however, since its Blue rated front and side armor along with metal slat protected rear make it a true force to be reckoned with.

LPPV
Front:
Side:
Rear:


Frontal engagement tip(s):
Since the damage model hasn’t been shown yet I can only assume that this vehicle is similar to the MATV and TAPV in terms of armor — Orange rated all around; and the windows being Red rated and easy to penetrate with heavy weapons. So where to shoot? Well if you run into the LPPV open top with two M240’s then the obvious target would be the exposed gunners manning them.
But what if you run into the CROWS LPPV? Well not to fear since he’s somewhat of an easy target as well. See, the CROWS operator is sitting right in the front seat next to the driver. This being a British vehicle means he’s on the right side.
Aim at that window with appropriate weaponry and you’ll kill him easily, thereby disabling the CROWS.


Unmentioned Vehicles
You may be wondering, “But what about technicals, logistics/transport trucks, and armored vehicles with a ZSU Anti-Air gun on them?”
I didn’t mention them since the Ural ZSU has absolutely no armor and the BMP/MTLB AA platforms have the same armor value as their other variants. The AA guns in particular are easy to deal with, since all you need to do is aim at the exposed gunner on the top of the vehicle to kill him and disable it. Doing so is very easy even to an infantryman with no AT capabilities.
Canadian Armed Forces Vehicles
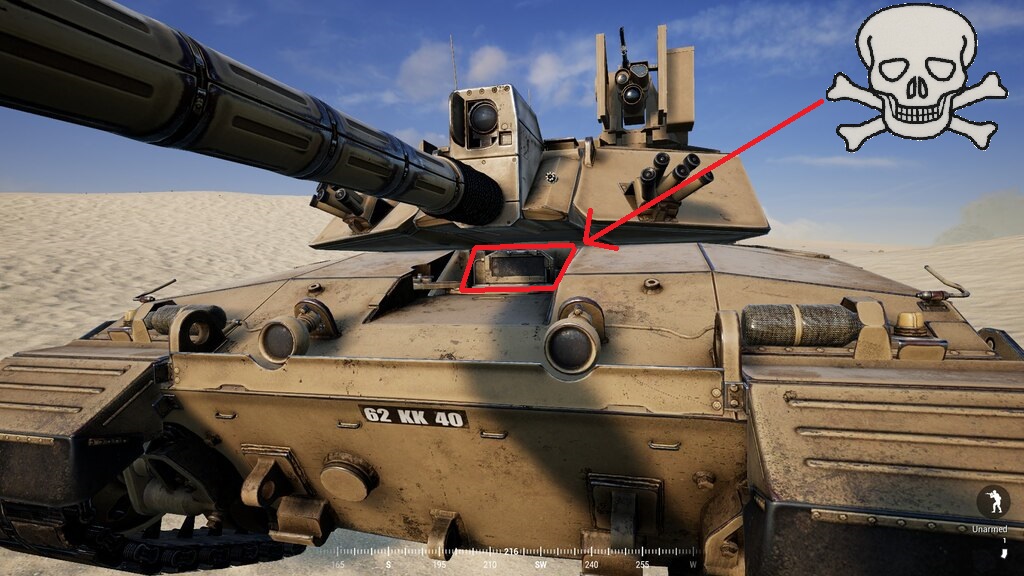
Leopard 2A6M
Front:
Side:
Rear:


Frontal engagement tip(s):
After looking around I learned that the Leopard’s biggest frontal weakness is its ammo rack, which can be hit if you aim at the highlighted area in red.
A few hits from any AP tank shell in this spot and it’ll be dead.

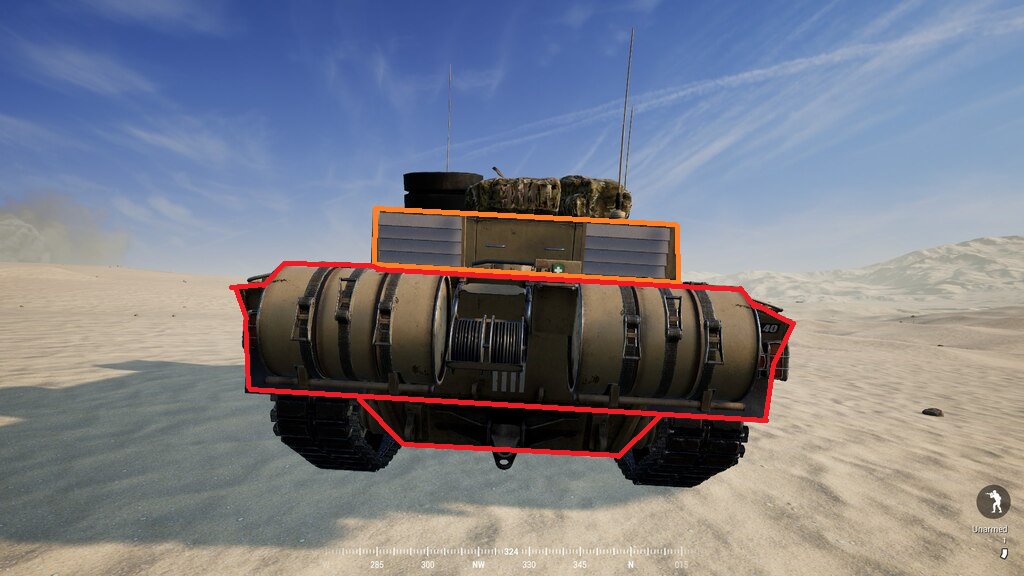
Leopard with slats:
Still, it’s always safe to assume that the rear armor is weakest, with side armor being second weakest. Flank it and aim there.

LAV 6
Front:
Side:
Rear:


Frontal engagement tip(s):
Yet another vehicle I don’t have a transparent model to base strategy off of. All I do know is that the LAV 6’s main 25mm cannon is a terror. That cannon coupled with the LAV 6’s very high speed makes it almost as good as the US Bradley. The only thing that makes the Bradley better is its 2 TOW missiles. Unless you’ve got an ATGM of your own, then I highly recommend either running or flanking the LAV 6. Even then it may not prove much good since the CAF often gets 2 or 3 LAV 6’s in a match; if they’re organized enough to run wolfpacks then it can be extremely difficult to kill even one unless you’re in a tank since the LAV you decide to shoot at can call his buddy or buddies to rapidly show up and flank you. If you manage to kill one LAV, then you can be almost guaranteed there’s another one close nearby moving to flank you.
LAV III
Front:
Side:
Rear:
Frontal engagement tip(s):
The Canadian LAV III comes in 2 variants — one equipped with an M240/M2 .50 cal combo, and one with two M240’s.
.50 cal RWS
M240 RWS


While I don’t have the damage model to look at, it stands to reason the LAV III has the same damage values as the US Stryker. It is, after all, just a Stryker with a different coat of paint and a crewman operated M240 MG. It even has the same vent on the vehicle’s right side.

Much like the UK’s Bulldog APC, one is only a threat to infantry while the other is both an infantry and armor threat.
If you run into the LAV III with 2 M240 MG’s then you don’t have to worry if you’re in a proper armored vehicle. Insurgents or Militia in techies obviously aren’t as lucky. But if you spot a LAV III with the .50 cal RWS, then you need to deal with it since it can kill other armored vehicles with that HMG. Hit the flanks, or aim for the flat armor inbetween the upper and lower slope. Check the previous section on the Stryker for the (likely) armor values for the LAV III.
Also it may be tempting to shoot anybody manning the non-RWS M240, but if you’re fighting the LAV .50 then you need to ignore him since he cannot hurt you; that remote operated .50 cal can.
TAPV
Front:
Side:
Rear:
Frontal engagement tip(s):
Aim for the windows to kill any crew inside, including the man operating the remote operated .50 cal. He sits on the right side towards the back.


LUV-A1
Front:
Side:
Rear:


Frontal engagement tip(s):
The LUV, like the MEA’s Simir, likely doesn’t have much armor to it. Also like the Simir, the LUV’s occupants are completely exposed.
Middle Eastern Alliance Vehicles
The MEA uses many of the same vehicles that the other REDFOR (Insurgent, Militia, RUS) factions use, so you can look at those vehicles earlier in this guide.
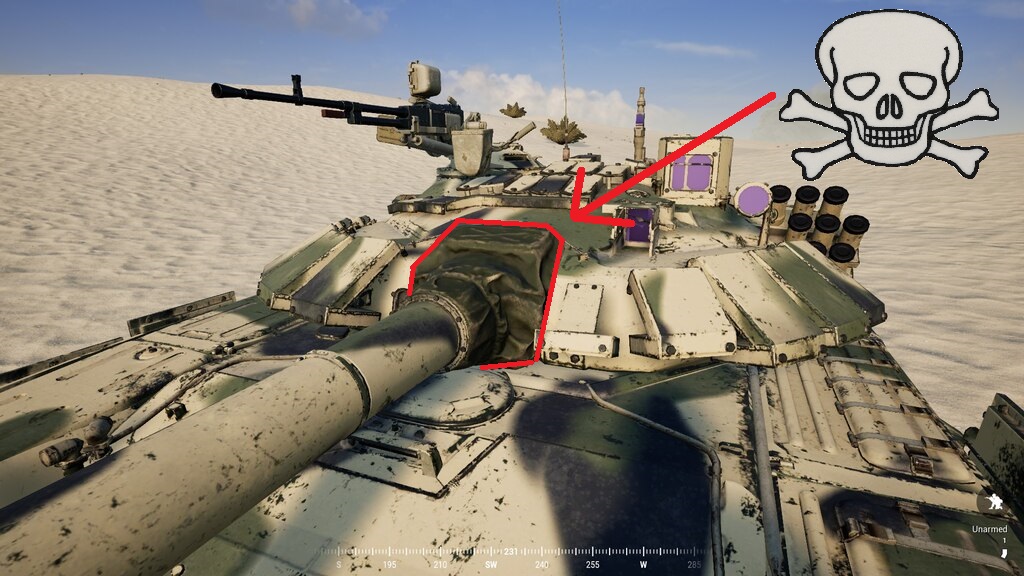
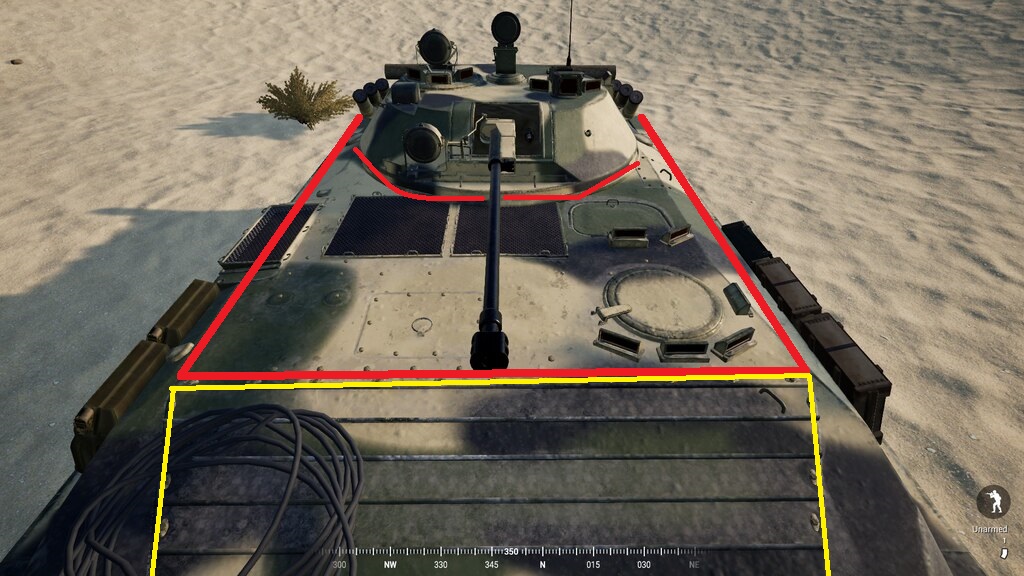
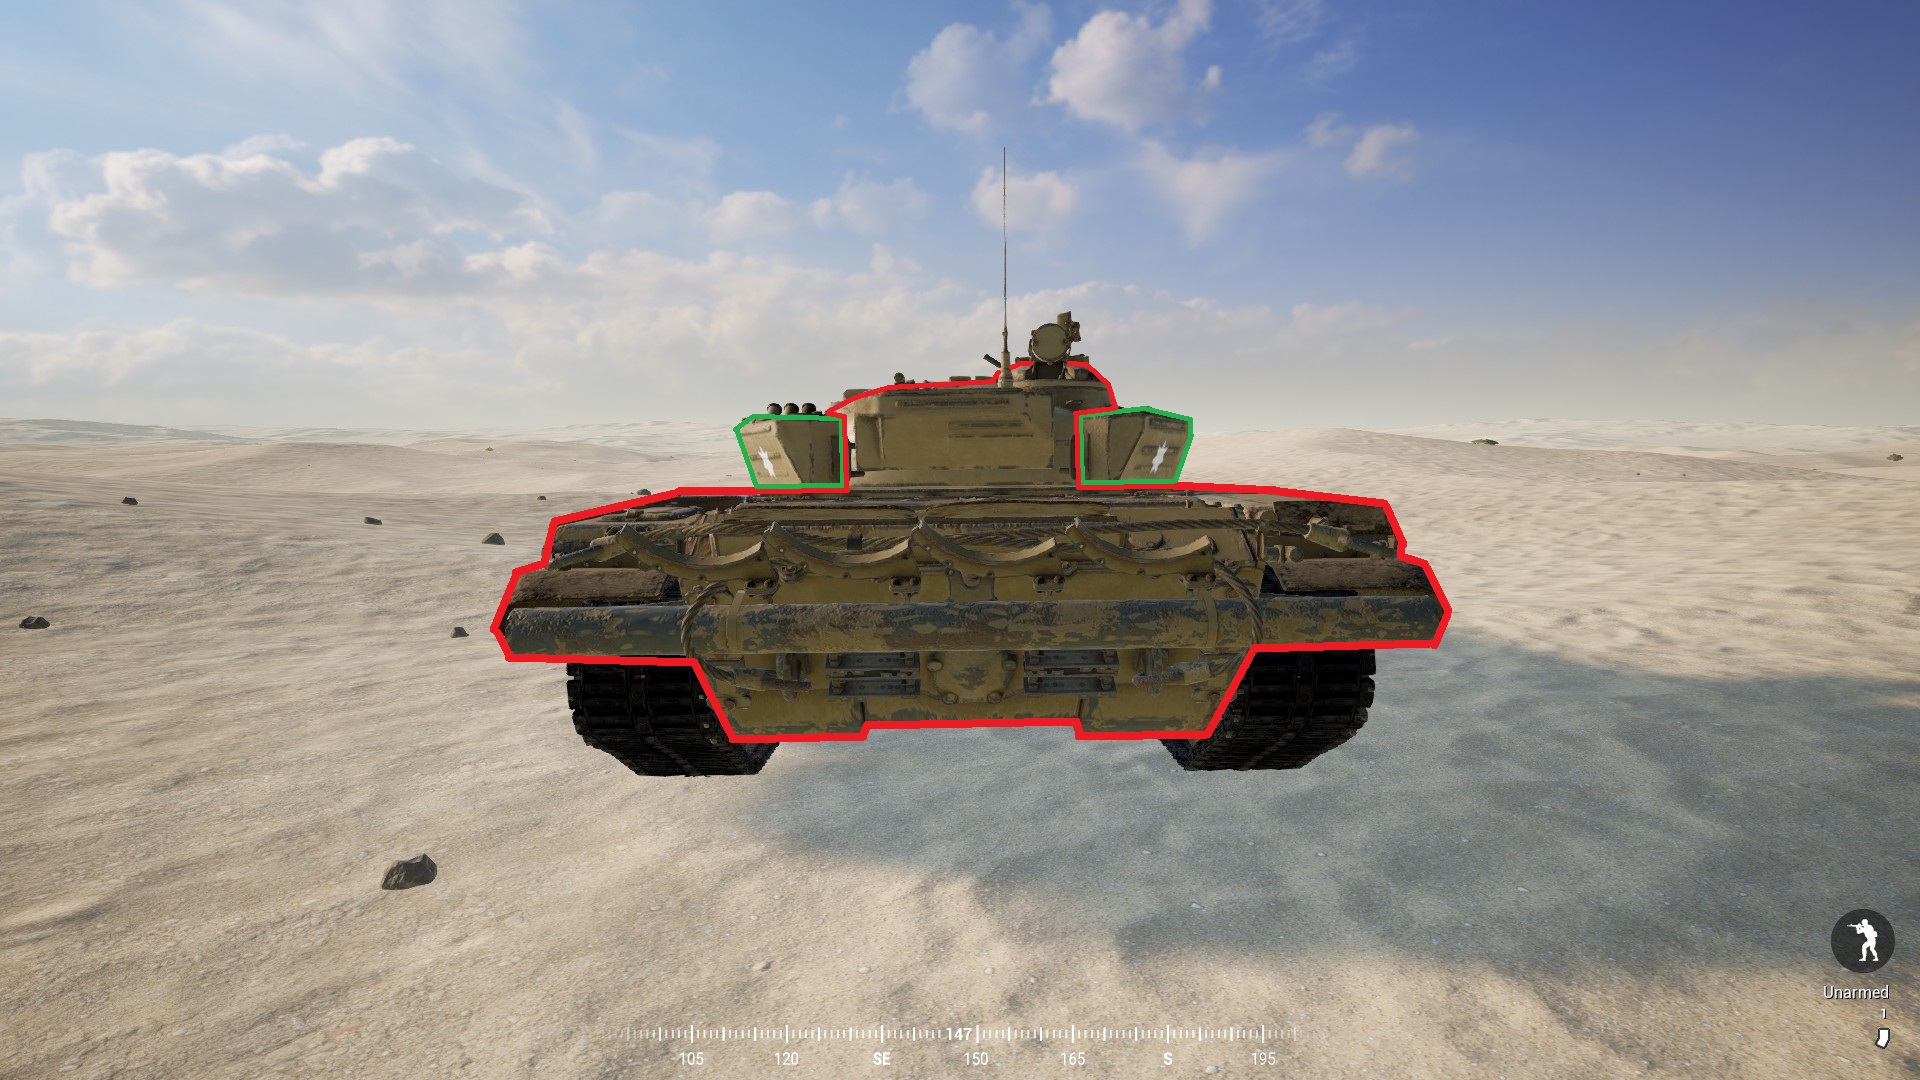
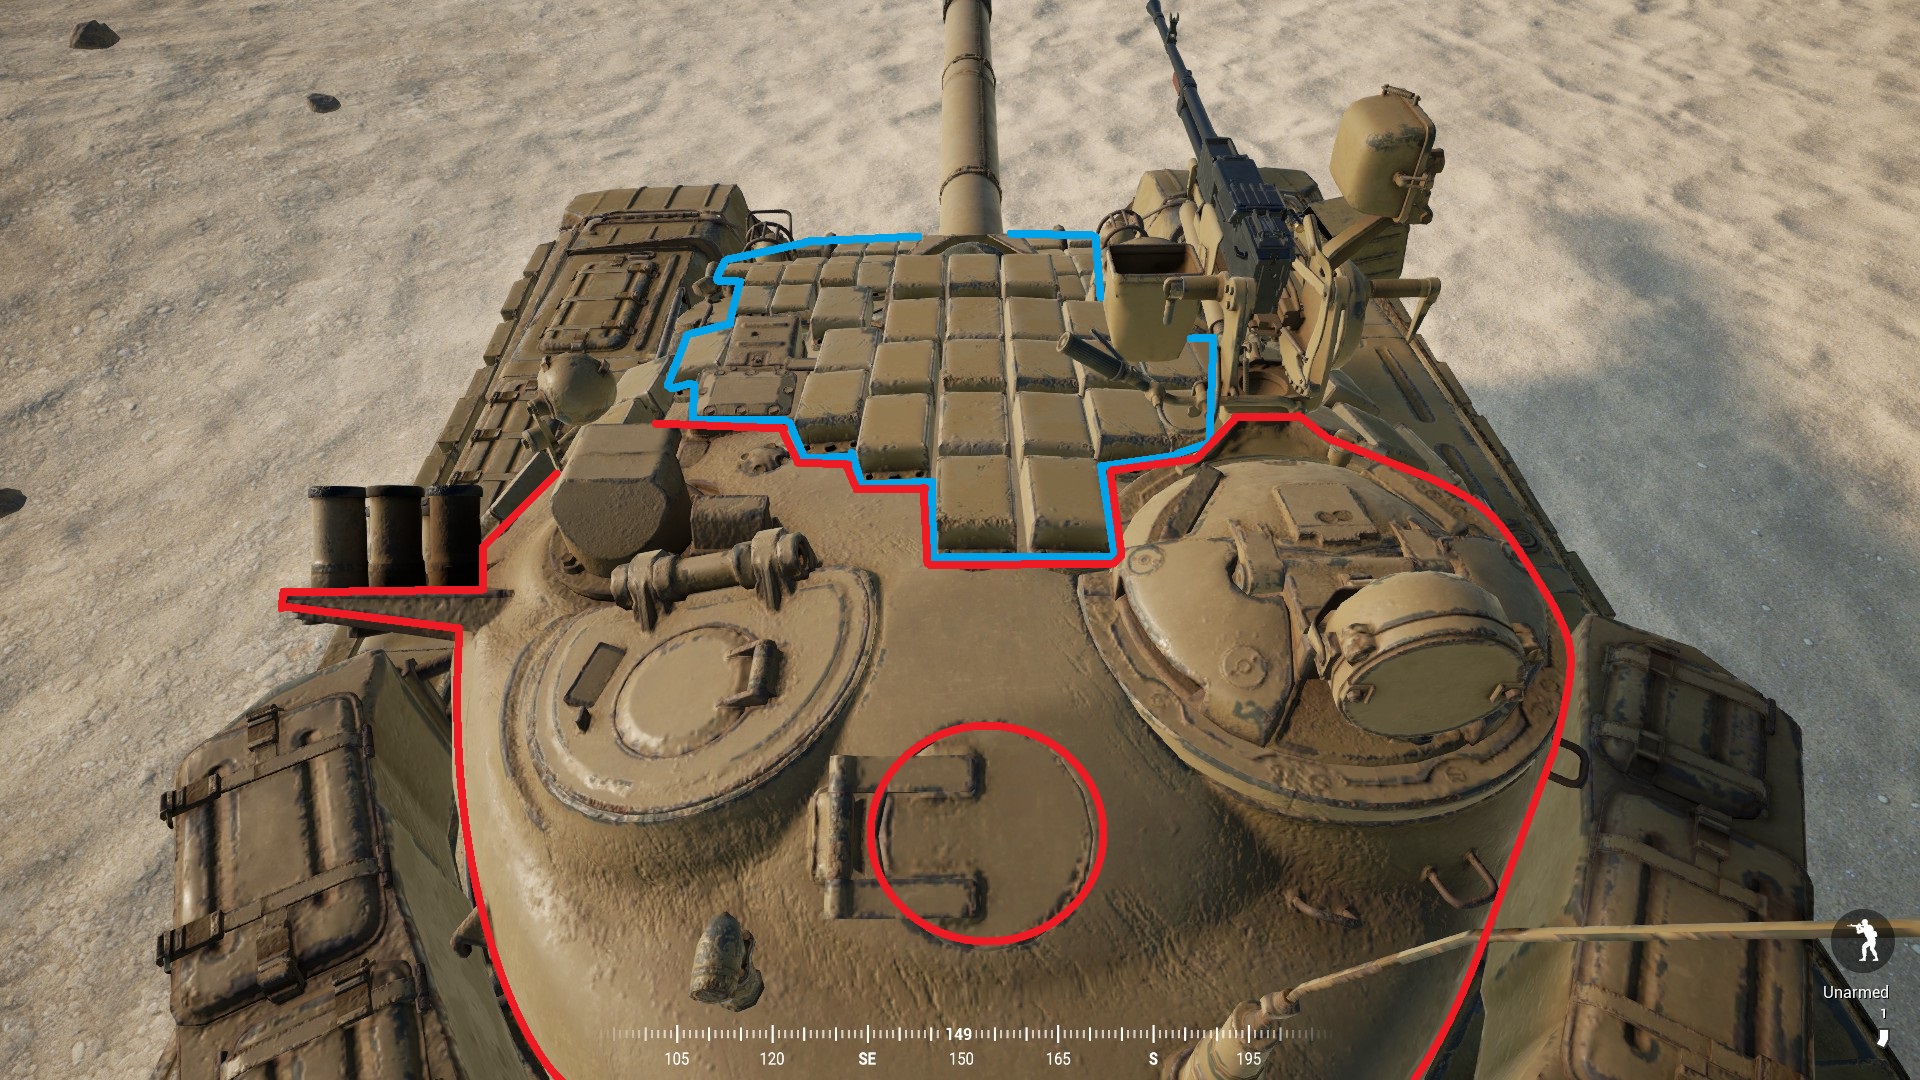
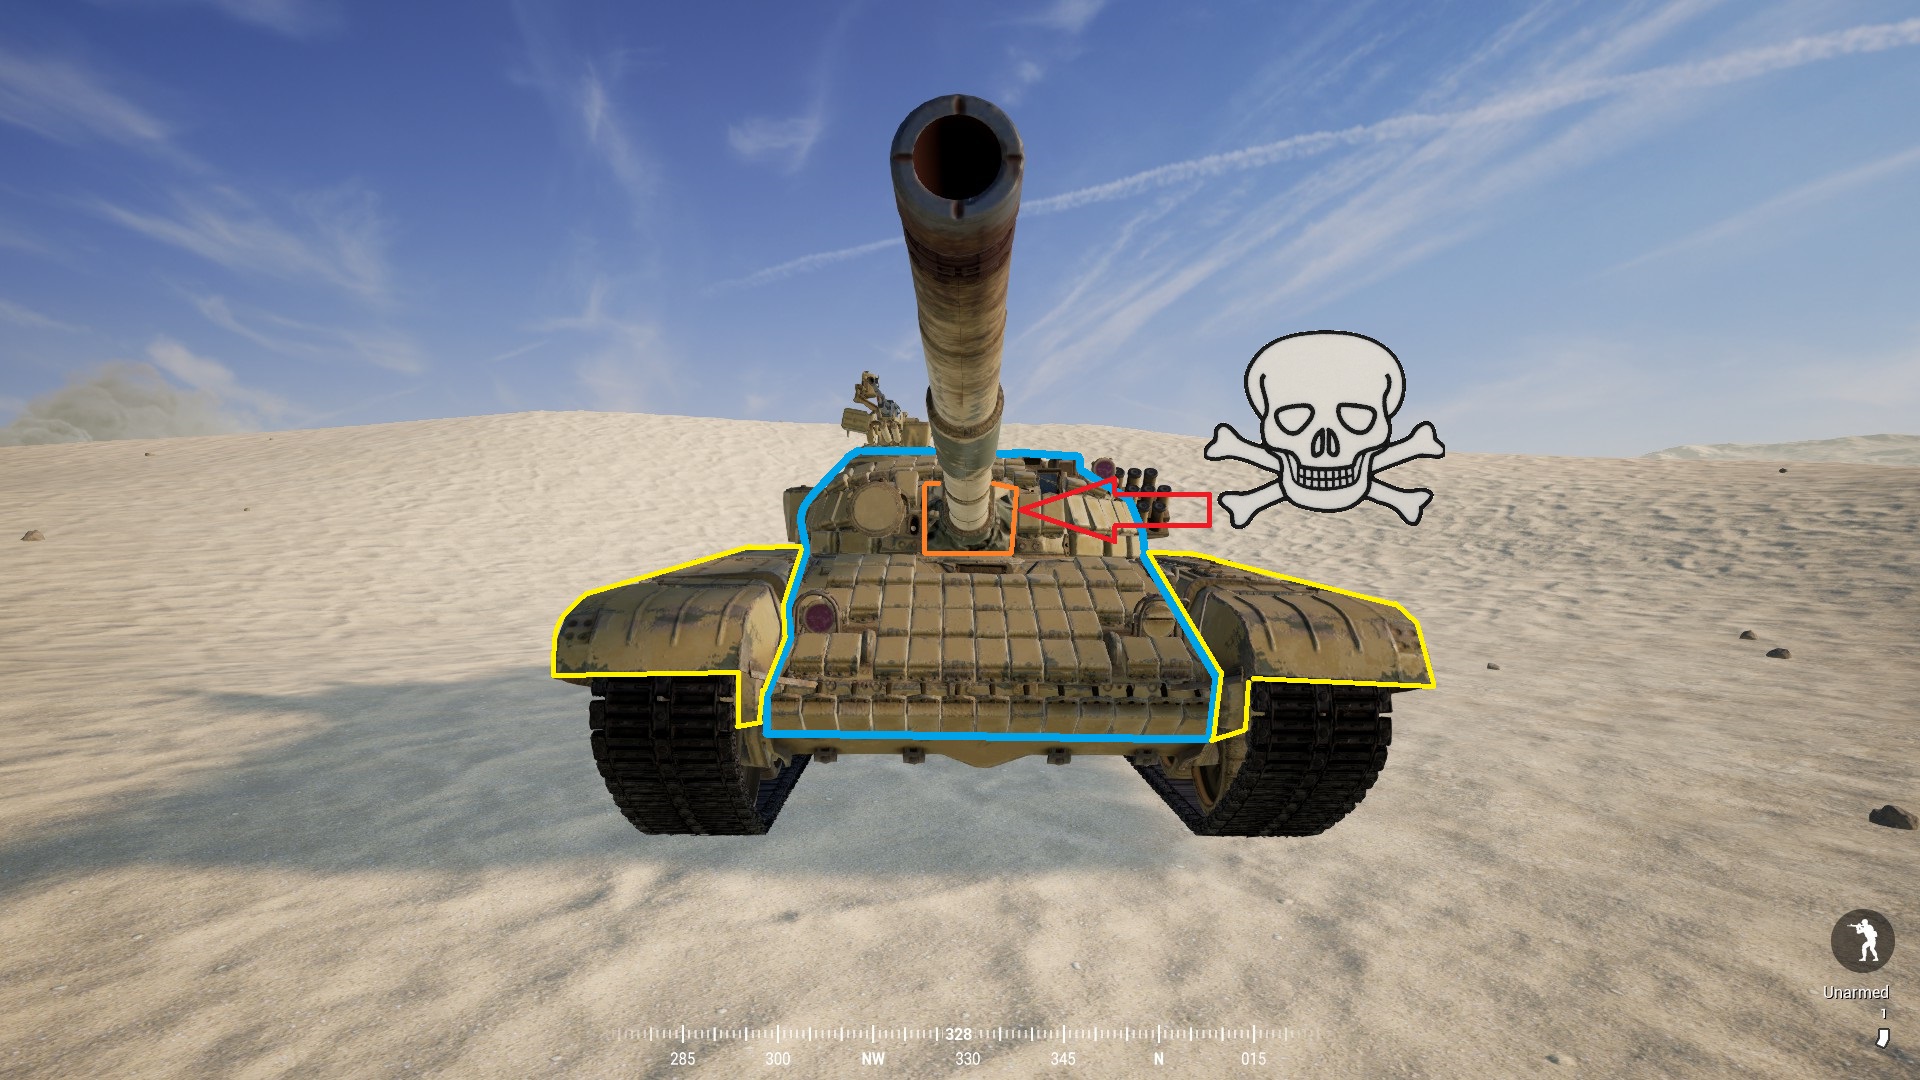
T-72 S
There is (still) no transparent model as of V1.0 V2.0. However I believe the tank to have largely the same values as the base T-72 except for the new armor plating. The MEA’s T-72 has ERA (Explosive Reactive Armor) plates all over the front and side of it; they’re the little square looking metal plates.
Again, please note that these armor values are guess work, and I will certainly update them when OWI gets around to updating Jensen’s transparent models.
Front:
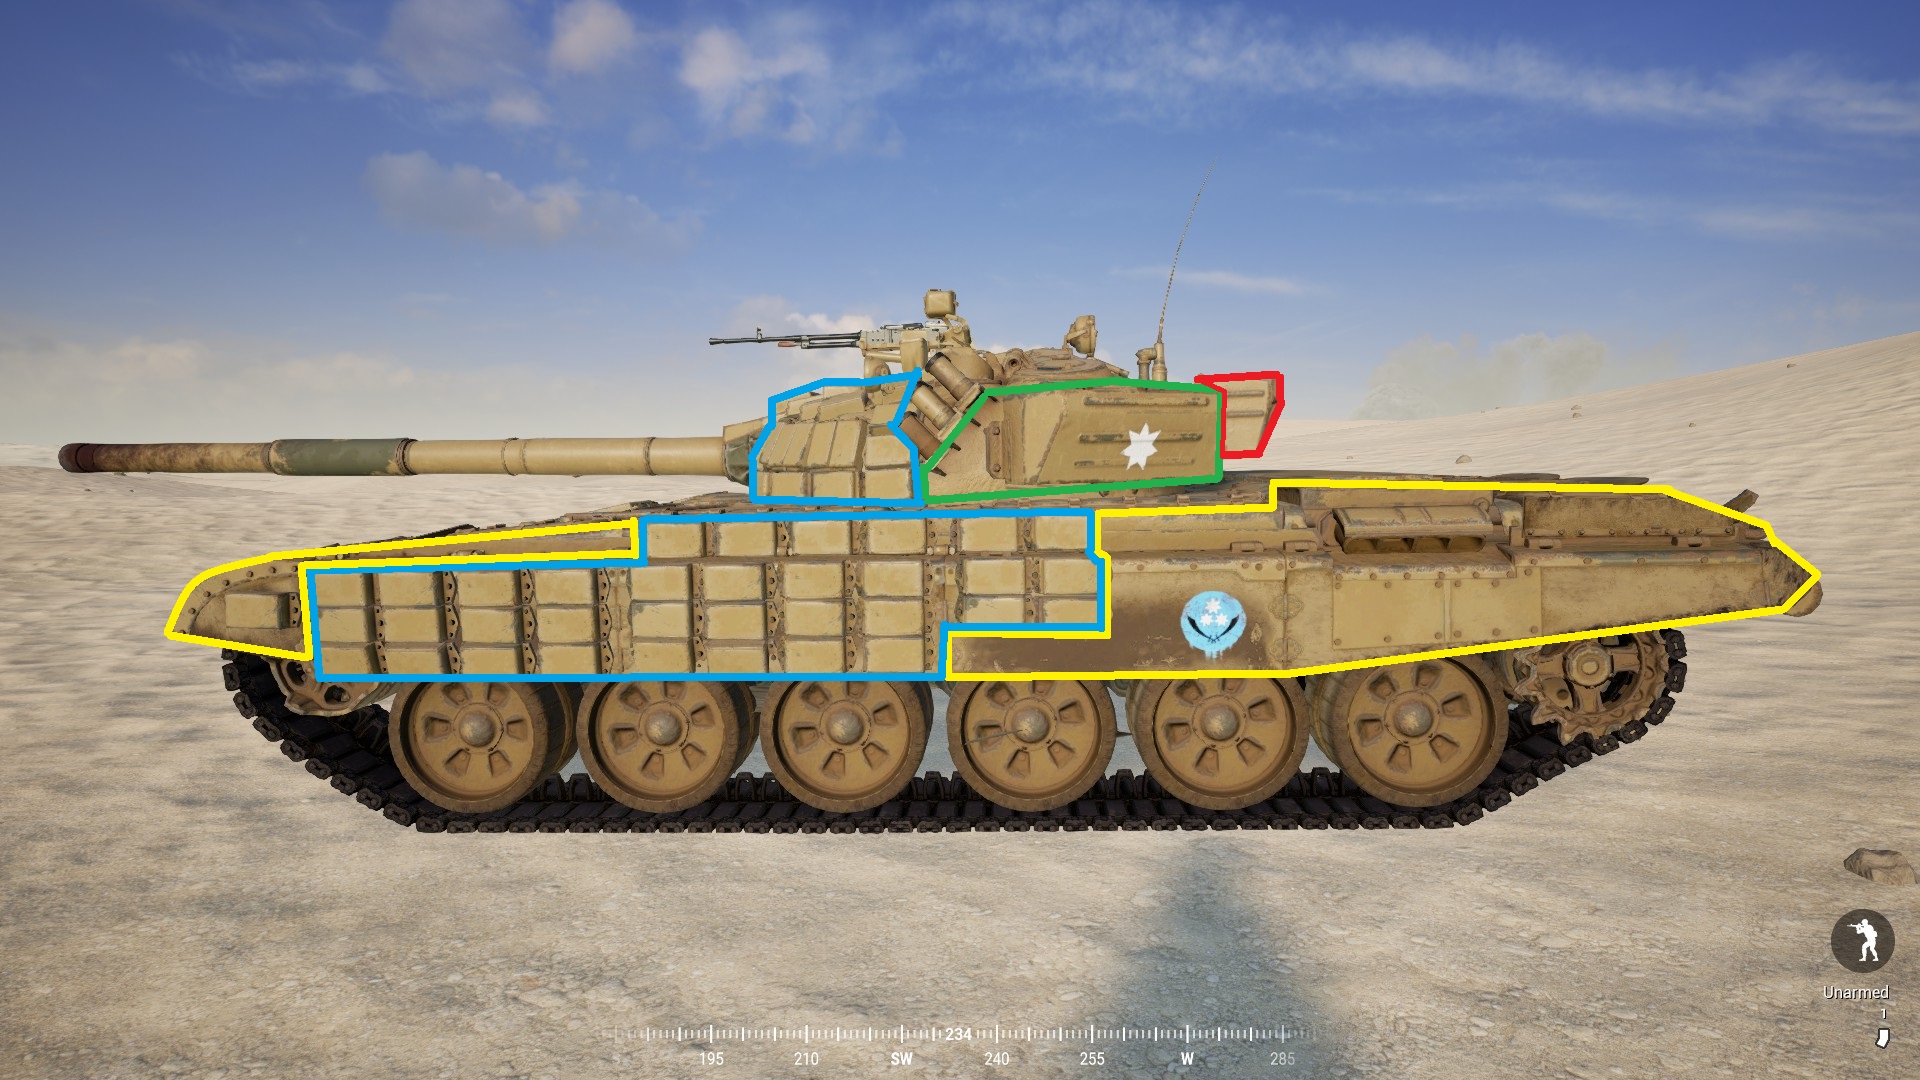
Frontal engagement tip(s):
After doing some testing I came to the conclusion that the T-72 S is just as (nearly) impervious to a frontal assault as its base model. The ERA plates offer great protection, so your best bet if you run into this tank head on is to aim at the turret mantle or knock its tracks off then flank around the side(s).
One important thing to note is the ERA plates on top of the turret:
Simir
Front:
Side:
Rear:


Frontal engagement tip(s):
This vehicle doesn’t have a transparent model as of writing, however it’s really not worth mentioning anyway. The occupants are completely exposed, so small arms fire alone can deal with the occupants. It probably just has Red rated armor.
Australian Forces Vehicles
Soon-ish.
United States Marine Corps Vehicles
Eventually
Panasia Vehicles
Not for a while.