
Overview
Learn how to capture demos and export them to video using this powerful tool.Get HLAE from here[advancedfx.org].This guide only provides the basics on videomaking with the tool.For more advanced features, see the HLAE Manual – http://advancedfx.org/wiki/Manual
Introduction
Half-Life Advanced Effects (HLAE) is a collection of powerful tools to enrich GoldSrc (Half-Life 1, Counter-Strike 1.6, Team Fortress Classic, Day of Defeat..) engine based movie making. You can apply various effects to the frames while capturing demos.
Using this tool, you can capture your in-game demos in the best quality, using various options.
If you wish to learn how to record demos, go to this guide.
Warnings
- Be aware of hard disk space requirements for long videos. It’s easy to chew through gigabytes as every game frame takes a lot of space. You can calculate how much disk space you’re going to need for your video by using the built-in file size calculator inside HLAE.
- The HLAE tool is technically a hack, therefore you should use it for making movies / watching demos only. DO NOT ATTEMPT TO JOIN SERVERS.
- Capturing a demo with this tool might take a while, so it’s only recommended to use it for serious videos. If you want to make a short clip, consider using other software, such as Fraps instead.
Configuration
Once you have downloaded the tool, launch it. A blank window will appear. To launch the game, you’ll need to configure the tool to run at your desired settings. Go to File -> Launch. A configuration window will appear.
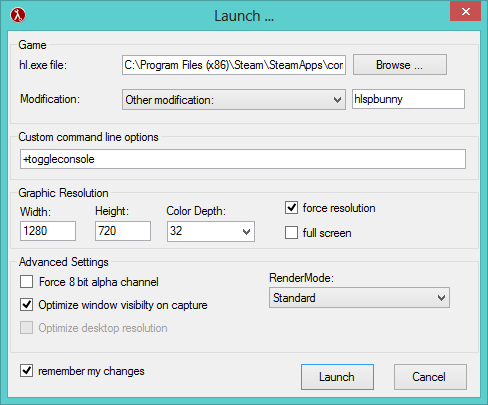
- If your demos were recorded using a mod (e.g. HLSP BunnyMod or Adrenaline Gamer), in the Modification section choose Other modification: and write the folder name of the mod (e.g. hlspbunny, ag, decay and so on..).
In the image you can see HLAE configured to run a mod hlspbunny on 1280×720 resolution.
Once you’re done configuring, click the Launch button to start Half-Life.
In-game configuration
Once you launch Half-Life (or your mod) using HLAE, follow these steps to capture the demos. Before recording, you need to set the framerate, post-processing effects and other options using console commands. Here’s a list of required commands before starting the demo recording.
- mirv_movie_filename – sets the location of recorded files (e.g. mirv_movie_filename C:HLAEhlstuff)
- mirv_movie_fps – sets the framerate (e.g. mirv_movie_fps 60 will record your demos at 60fps)
- mirv_movie_bmp – set it to 1 if you want to use BMP files instead of TGA.
- mirv_movie_export_sound – set to 1 if you want to export a WAV sound file of your demo (sound will not get recorded any other way).
Post-processing Effects
HLAE offers a wide variety of [post-processing] effects, such as motion blur, zooming and even object tracking.
Sampling is a feature which samples frames and creates a motion-blur effect.
- mirv_sample_enable – set to 1 if you want HLAE to add sampling to your frames (motion blur).
- mirv_sample_sps – samples per second. Bigger value will increase the strength of motion blur (e.g. mirv_movie_sps 180)
- NOTICE: Capturing demos with sampling enabled will highly increase the capturing time.
If you need to zoom into something, you can do it with a few simple commands.
First off, we need to set the zoom amount. You can set both digital and optical zoom amounts, although using only optical zoom is recommended. Maximum value for both commands is 100.
- mirv_zoom_digital – Digital zoom, will zoom everything, even the game GUI.
- mirv_zoom_optical – Optical zoom, will only zoom game’s view.
Now we need to set the zooming speed. You can do that with this command.
- mirv_zoom_speed <number>
Feel free to experiment with all the commands to find the perfect values you need. To start zooming, use mirv_zoom_start (zooms in) and mirv_zoom_stop (zooms out).
Object Tracking feature allows the camera to track a certain entity in a demo. This will only work on HLTV-type demos.
If you have recorded a demo of yourself playing in first-person, you can force the demo behave like it was recorded using HLTV (allowing you to use free-look and other options). To do this, enter a command – dem_forcehltv 1. Now you’ll be able to use the entity tracking feature.
- IMPORTANT: To work with this feature, you’ll have to use viewdemo instead of playdemo; otherwise, camera modes will NOT work.
Lets say we want to track a certain player in the game.
First off, we need to get the entities’ ID. To do that, we can use a command mirv_showentities.
This will print a list of all available entities in the demo. Usually, the player entities are the first ones right after the map itself. If we want to track ourselves in thirdperson, the entity will probably be #1.
Now we need to tell the game which entity we want to track. To do that, we’ll have to enter this command. In this case we’re tracking the player so the entity will be 1.
- mirv_aim_layers add 0 1
The game has now added the entity 1 to tracking layer 0.
Now that you’ve added your entity, you’re almost set to go. There’s a few cvars which you might want to take a look at first:
- mirv_aim_onlyvisible – If set to 1, the entity will not be tracked if it’s not visible (behind a wall or so).
- mirv_aim_snapto – Perfect tracking of the entity.
To start tracking the entity, you can use commands mirv_aim_start and mirv_aim_stop or bind a key to +mirv_aim and then hold it to activate tracking.
For more detailed explanations on Tracking, visit this page[advancedfx.org].
You can easily replace the map’s skybox with another one to fit your movie.
In the HLAE window, go to Tools -> Sky Manager.
A window will open up where you can add BMPs from your custom skybox and export them to the game.
When that is finished, go back to the game and use a command mirv_fx_skyhd to activate the custom skybox.
Capturing
Now let’s get to capturing. Once you’re all set with the commands, you’ll need additional two commands to start and stop the capturing:
- mirv_recordmovie_start – starts capturing the demo
- mirv_recordmovie_stop – stops capturing the demo.
I suggest you to bind these to your mouse buttons, so you can quickly start the recording once the demo starts playing, and stop it when needed.
Simply play your demo (using playdemo or viewdemo) and hit your recording-start button. Once the demo is done playing, hit the recording-stop button. Recording will NOT stop automatically.
Exporting frames
After you stop recording, head to the directory where your demos are recorded (in this case it’s C:HLAEhlstuff). Here you will find folders named “take%number%” and numerous TGA files named %videoname%%framenumber%.tga inside together with a Wave file named sound.wav. Now you need to take these frames and the audio and turn them into a complete video, using the external video creation application of your choice.
The easiest way to export your recorded demos to a video is using an application VirtualDub[www.virtualdub.org]. However, it only provides a minimal set of tools for exporting your video.
- Open VirtualDub, then go to File>Open. Browse to your specified directory with the recorded frames
- Select the first frame of a specific demo, and VirtualDub will automatically import the following.
- Go to Audio>Audio from other file.. and choose the WAV file created along with the frames.
- Go to Video>Compression and select your preferred codec.
- Go to Video>Frame rate and select the option for the frames to match audio length.
- After you set everything up, go to File>Save AVI… and choose a save path. When you click OK, VirtualDub will process the frames into an AVI file.
- Start a new project and set the project settings to match those you recorded the video in (frame size, pixel ratio, framerate).
- Import the audio (File->Import… and browse for sound.wav).
- Import the set of frames by selecting the first frame of the video (%videoname%0000.tga) in the same Import window, and checking the “Numbered Stills” checkbox.
- Drag the set of frames and the audio onto your timeline, and line them up at zero.
- Select File->Export->Movie… to save out your video. Remember to check and tweak the codec settings to get a balance between quality and filesize that you are happy with.
- Open Sony Vegas, then go to File>Properties to set up your project-settings. These should be matching your frames you extracted. Field order should be None (progressive scan) and Deinterlace mode should be None. Click OK.
- Now go to File>Import>Media and to the folder with your captured frames.
- Select the first frame, such as %videoname%_0000.tga. Vegas will take a moment to scan all the frames it can find. Make sure Open still image sequence is checked, and the number of frames is correct in the textbox of range.
- Click Open.
- A new window called Properties will show up. You can make some settings on your new clip, but leaving everything on default will doing fine.
- Click OK to close the Properties window.
- You now have a new clip in your Project Media window. Drag’n’drop the new clip into your timeline. Now you can start editing it like a usual movieclip.
- To add your soundfile, go to the Explorer window, and find your sound.wav file. Drag’n’drop your soundfile to your timeline, like you did it with your videoclip.
- To render your movie, go to File>Render As….
That’s it! You can now record high-quality movies/demos using the tool. If you have any questions, feel free to ask in the comments, I’ll try my best to answer them.