![Virtues Last Reward [Puzzle Walkthrough] [100% Endings + Achievements] [Passwords] [Eng] for Zero Escape: The Nonary Games](https://steamsolo.com/wp-content/uploads/2021/07/virtues-last-reward-puzzle-walkthrough-100-endings-achievements-passwords-eng-zero-escape-the-nonary-games.jpg)
Overview
Zero Escape: Virtues Last RewardYou can find the correct paths for the endings in this playthrough… and additionally you`ll receive all possible achievements (there are no missables). Additionally here are the explicit solutions for every puzzle room. This ending guide tries to be spoiler-free!🔑 30 total achievements in Virtues Last Reward Remember that you can always skip the things you already played by using the flowchart (reaching the endings is far easier that way!).Hope i can help
All Endings and Story Locks [100%]
Okay, you`ll have 3 choices in the first intersection: Either you choose the Cyan, Yellow or Magenta door. If you`re playing the game for the first time i`d reccommend the yellow door first, then the Magenta Door and eventually the Cyan one (that is just a reccommendation, nothing you have to bind yourself to!). Therefore this will also be the structure of the following guide.
If you want to get all achievements, you have to open the safe with the gold file password everytime. Each puzzle room has an optional password with an extra puzzle. Explicit descriptions are in the puzzle walkthroughs below. You can return to the escape rooms whenever you want, so don`t worry about missing those.
There are no missable endings!

——————————————–
① Reccommended as: 1st ending
Yellow (𝛟 + Tenmyoji)
Betray (Tenmyoji)
Green (Clover + Quark)
Ally (Quark)

Clover Ending
———————————————-
② Reccommended as: 2nd ending
Yellow (𝛟 + Tenmyoji)
Ally (Tenmyoji)
Blue (Clover + Tenmyoji)
Ally (Tenmyoji)
🔒—LOCK 2—🔒
White (Quark, Tenmyoji)
🔑 LOCK No.2 Requirements: Solve the laboratory puzzle at least once:
Yellow –> Ally –> Red

Tenmyoji Ending
———————————————–
⑦ Reccommended as: 7th ending
Yellow (𝛟 + Tenmyoji)
Ally (Tenmyoji)
Red (Clover + Dio)
Ally (Dio)
🔒—LOCK 3—🔒
🔑 LOCK No.3 Requirements: This lock is a tough one. You need to have reached the Dio Ending, the Alice Ending, the Tenmyoji Ending and the Sigma Ending at least once before!

Quark Ending
————————————————
③ Reccommended as: 3rd ending
Magenta (𝛟 + Luna)
Betray (Luna)
Red (Alice + Clover)
Betray (Clover)

Dio Ending
———————————————
④ Reccommended as: 4th ending
Magenta (𝛟 + Luna)
Ally (Luna)
Blue (Alice + K)
Betray (K)
🔒—LOCK 1—🔒
🔑 LOCK No.1 Requirements: Reach the Clover Ending at least once before.

K Ending
——————————————
⑧ Reccommended as: 8th ending
Magenta (𝛟 + Luna)
Ally (Luna)
Green (Alice + Luna)
Ally (Luna)
White (𝛟)
🔒—Passive Story Lock—🔒

Luna Ending
——————————————-
⑤ Reccommended as: 5th ending
Cyan (𝛟 + Alice)
Ally (Alice)
🔒—LOCK 4—🔒
Blue (Luna + Alice)
Betray (Alice)
🔒—LOCK 5—🔒
🔑 LOCK No.4 Requirements: Solve the laboratory puzzle at least once (Yellow –> Ally –> Red)
🔑 LOCK No.5 Requirements: Reach the Dio Ending at least once

Alice Ending
——————————————-
⑥ Reccommended as: 6th ending
Cyan (𝛟 + Alice)
Betray (Alice)
Green (Luna + Clover)
🔒—LOCK 6—🔒
Ally (Clover)
🔒—LOCK 7—🔒
🔑 LOCK No.6 Requirements: Solve the laboratory puzzle at least once (Yellow –> Ally –> Red)
🔑 LOCK No.7 Requirements: Reach the Dio Ending at least once

Sigma Ending
——————————————-
⑨ Reccommended as: Last ending
Cyan (𝛟 + Alice)
Betray (Alice)
Red (Luna + 𝛟)
Ally (𝛟)
🔒—LOCK 8—🔒
🔒—LOCK 9—🔒
🔒—LOCK 10—🔒
White (𝛟, Tenmyoji)
🔑 LOCK No.8, 9 and 10 Requirements: Reach every other ending at least once before. Save this ending for the last (after you reached everything before)! If you forgot some passwords, you can find them at the end of this guide!

𝛟 Ending
Puzzle Segment: ELEVATOR
The elevator is the first puzzle room you enter when you start the game. It kind of serves as a turorial puzzle room and therefore, these puzzles are not that difficult to figure out.
Partner: 𝛟
Story Path: /
Difficulty: ✯
Length: ☂
Total Number of Steps: 11
⓵ First Step: The Green memory card
[1] Remove the yellow, green, red and blue handles from the elevator handrails.
New items: Yellow handle, green handle, blue handle, red handle
[2] A fire extinguisher is located in the corner of the elevator. Remove the pin
New items: Fire extinguisher pin
[3] Open the fire extinguisher cabinet by using the fire extinguisher pin as a lockpick.
Items used: Fire extinguisher pin
New items: Triangular tip, square tip, pentagonal tip, hexagonal tip
[4] Combine the hexagonal tip with the red handle. Combine the pentagonal tip with the green handle. Combine the square tip with the blue handle. Combine the triangular tip with the yellow handle.
Items used: Triangular tip, square tip, pentagonal tip, hexagonal tip, yellow handle, green handle, blue handle, red handle
New items: square socket wrench, pentagonal socket wrench, hexagonal socket wrench, triangular socket wrench
[5] Take a look at the elevator shaft right at the bottom next to the exit door. Use the 4 socket wrenches to remove the coloured screws.
Items used: square socket wrench, pentagonal socket wrench, hexagonal socket wrench, triangular socket wrench
[6] Solve the box puzzle: Right, Up, Right, Down, Left, Down, Left, Up, Right, Down, Right, Up, Right, Up, Right. You will gain a green memory card.
New items: green memory card
⓶ Second Step: The Blue memory card
[1] Pick up the poster at the backside of the elevator and read it on the file screen. You`ll have to count the babies and the old people. –> There are 4 babies and 7 old people
New file: Poster in the elevator (File 1/52)
[2] Enter the number 4 at the side of the elevator with the picture of babies. Enter the number 7 at the side of the elevator with the picture of an old man. There were 0 bunnies in the picture, so choose the number 0 and you`ll receive the blue memory card,
New items: Blue memory card
[3] Enter both memory cards into the card reader machine above the safe and you`ll receive the exit password.
Items used: Blue Memory Card, Green Memory Card
⨷ Optional Step: Gold File
[1] Instead of 0, push the button “3” right next to the exit door, because we were talking to Zero III. You`ll receive the red memory card.
New items: red memory card
[2] Enter the red memory card into the card reader machine above the safe and you`ll receive the bonus password
Items used: red memory card
Puzzle Segment: INFIRMARY [Y]
The infirmary is the first puzzle room of the yellow path. This puzzle room can be entered at any time and is not locked.
Partner: 𝛟, Tenmyoji
Story Path: –> Yellow (Infirmary)
Difficulty: ✯✯
Length: ☂☂
Total Number of Steps: 18
⓵ First Step: Picking up items
[1] Look at the table below the TV Screen and pick up the metal coin-like thing
New items: Metal coin-like thing
[2] Right next to the table is another small table. On the lower half of that table you`ll need to pick up a worn-out a key. On the upper side is a scalpel.
New items: Worn-out key, scalpel
[3] Take a look at the bottom drawers right next to the table. Behind the right shelf a clipboard is located. Take the memory card and the paper.
New items: Memory card
New File: Paper with drawing on it (File 2/52)
[4] Look on the shelf above. Take the jar.
New items: Jar containing white power
[5] Turn to the far right bed and pick up the metal stake. Combine it with the metal coin-like thing in your inventory to receive a key.
Items used: Metal stake, metal coin-like thing
New item: Metal stake, Pretty Key
⓶ Second Step: Cleaning the dirt
[1] Enter the memory card into the TV Screen (right side) and the screen will turn on, giving you information. Apparently you need to mix White powder and water to receive a fluid to remove dirt.
Items used: Memory card
New File: Big monitor hint (File 3/52)
[2] Use the white powder with the wash basin on the table right next to the TV Screen. Empty the jar.
Items used: Jar containing white powder
New items: Empty jar
[3] Move to the sink and fill the empty jar with water.
Items used: Empty jar
New items: Jar containing water
[4] Use the scalpel to cut of the part of the second bed behind the partition
Items used: Scalpel
New items: Dirty Fabric
[5] Fill the wash basin with the water and use the Dirty Fabric to wash of the dirt.
Items used: Jar containing water, Dirty Fabric
New items: Plaid fabric
⓷ Third Step: Medicine Puzzle
[1] Use the 2 keys on the keyholes next to the medicine boxes (left of the exit door).
Items used: Worn-out key, Pretty Key
[2] Pull the medicine case out, activating a box puzzle. Here`s the solution: Up, Right, Up, Right, Down, Left, Up, Left, Down, Right. Now count the pills, the yellow triangles and the red bottles –> 2 red bottles, 6 yellow triangles, 5 pills
[3] Try to open the drawer to the left of the medicine puzzle. Enter the correct amount –> 562. You`ll receive a note
New File: Colourful note (File 4/52)
[4] Use the plaid fabric on the bed on the far right (not the ones behind the partition!)
Items used: Plaid fabric
[5] Take a look at the screen directly left to the table. This device is called ADAM and seems to be some kind of medical equipment. Push the power button on the bottom right to activate the scanner.
[6] Use the scanner and click the 5 squares in the right order according to the colourful note we received earlier. First the blue pills, then the red bottle, then the yellow triangle, then the 4 and then the 5. CURED. You`ll gain the escape password!
⨷ Optional Step: Gold File
[1] In your mind overlap the clean sheet that you placed on the bed with the medicine box.
Positions of Elements on Clean Sheet:
line 1 position 2 –> Yellow Triangle on Medicine Box
line 2 position 2 –> Blue Pill on Medicine Box
line 2 position 4 –> Blue Pill on Medicine Box
line 4 position 4 –> Red Bottle on Medicine Box
line 5 position 2 –> Yellow Triangle on Medicine Box
Therefore return to the puzzle with the 3-digit combination and enter 2*blue-pill, 2*yellow triangle and 1*red bottle. You`ll find Clean Plaid Fabric.
New items: Clean Plaid Fabric
[2] Place the clean plaid fabric on the bed next to the ADAM, scan it and click the boxes in the right order. You`ll receive the Gold File password.
Items used: Clean Plaid Fabric
New Files: Sun Key (File 5/52), Floor Map for floor A (File 6/52), Supplementary Rules (File 7/52), Newspaper Excerpt (File 8/52)
Puzzle Segment: TREATMENT CENTER [YBG]
The treatment center is behind the green door on the second floor.
Partner: Clover, Quark
Story Path: –> Yellow (Infirmary) –> Betray (Tenmyoji) –> Green (Treatment Center)
Difficulty: ✯✯✯
Length: ☂☂
Total Number of Steps: 14
⓵ First Step: Opening up the treatment center
[1] Take a look right next to the entrance of the treatment center. Below the giant wall clock there`s a safe, a binder and a tablet. Take them. Examine the tablet… on it is written: “Four pieces for the first password. One piece for the second password”. This will come in handy later.
New items: tablet
New Files: Door Puzzle Instructions (File 9/52)
[2] Look at the giant monitor right of the exit door. You`ll receive a new file. Additionally also take the plants right and left of the monitor.
New Items: Healthy Plant, Withered Plant
New Files: Illustration of a dice game (File 10/52)
[3] Open the door to the treatment center. You`ll be confronted with a puzzle; your goal is to find the correct 4-digit-code. This puzzle is random, so i`ll be giving you some tips how to solve this puzzle:
a) In your first step pick the numbers 1234
b) In your second step pick the number 5678
If only 3 hits or blows were displayed in both steps, means that the 9 is part of the 4-digit-code.
Let`s go for an example:
1234 = 0 hits – 3 blows
5678 = 0 hits – 0 blows
That means the 9 must be a part of the 4-digit-code. Next i try to eliminate the 1 digit of 1,2,3 and 4 that is not part of the code.
1256 = 0 hits – 1 blow
That means either 1 or 2 is not part of the 4-digit-code.
1567 = 0 hits – 1 blow
That means the 2 is not part of the 4-digit-code, the 4-digits are 1,3,4 and 9. Now we only have to find the correct order of the digits. We know for sure, that:
1 can`t be on the first position, 3 can`t be on the third position, 4 can`t be on the fourth position
4391 = 0 hits – 4 blows
1 can`t be on the first and fourth position, 3 can`t be on the second and third position, 4 can`t be on the first and fourth position, 9 can`t be on the third position.
All possible solutions are therefore: The 9 and the 3 must be on positions 1 and 4; the 1 and 4 must be on positions 2 and 3. Let`s narrow the possibilities down:
3149 = 2 hits – 2 blows
Either the 3 or 9 must be swapped or the 1 and 4. Let`s try one:
3419 = 0 hits – 4 blows.
That means the correct code must be: 9143
The door code is completely random though, so you`ll either have to use a similar tactic as mine, or your own one!
⓶ Second Step: Quark and the treatment pod
[1] Take a look at pod 1 (the one on the left). The clock points to 7:15. Open the pod and pick up the key.
New items: White key
[2] Open pod No.2. The clock on the inside points to 6:20. Also don`t forget to pick up the key inside.
New items: Silver key
[3] Open pod No.2. On the cover there`s another code: 11:1. That`s the last one we need.
[4] Examine the wall clock. It says “No.4”. Use the white key on the bottom left part of the wall clock. Open the cover and take the chip (green glowing thing) out.
Items used: White key
New items: Chip with “NO1” written on it
[5] Again enter the pod room. Click on the leftmost monitor and use the chip on it. The system needs to be initialized first though. Therefore open the leftmost pod and use the healthy plant for a test run. Next up is the withered plant. You`ll receive a green and a red memory card.
Items used: Healthy Plant, Withered Plant
New items: Red Memory card, Green memory card
⓷ Third Step: The dice game
[1] Open the aquarium by using the silver key from pod No.2. Examine the second lid and solve the minigame to get the purple jellyfish to the top: Down, Right, Down, Right, Right, Right, Right, Up, Left, Left, Left, Up, Up, Right, Up. Receive the artificial jellyfish. Examine it and get the Circular tile.
Items used: Silver key, artificial jellyfish
New items: Artificial Jellyfish, Circular tile
[2] Look at the painting and use the circular tile on the empty hole. A laser pointer will appear after that.
Items used: Circular Tile
[3] Open pod no.3 and look at its cover. Due to the laser pointer the numbers displayed on the cover are now 00:15.
[4] Examine the wall clock again and enter both memory cards in the bottom right corner. Two hands on the clock will now appear. They point to 4:05.
Items used: Red Memory card, Green memory card
[5] Examine the tablet in your inventory again. You`ll have to enter a 4-letter-code. Look at the dice game file you received earlier. Minutes are counted clockwise, hours counter-clockwise. We`ll go through the times we received now one by one:
7:15 = 7 steps counter clockwise, 15 steps clockwise = 8 steps clockwise = P
6:20 = 6 steps counter clockwise, 20 steps clockwise = 14 steps clockwise = A
00:15 = 15 steps clockwise = S
4:05 = 4 steps counter clockwise, 5 steps clockwise = 1 step clockwise = T
The password for the escape file is therefore PAST
⨷ Optional Step: Gold File
[1] “One step for the second password” refers to the bonus password. That means you only play with one game piece and you don`t have to start at the beginning again.
7:15 = 8 steps clockwise = P
From the P we go 6:20 = 14 steps clockwise = O
From the O we go 00:15 = 15 steps clockwise = U
From the U we go 4:05 = 1 step clockwise = R
The gold file password is therefore POUR
New Files: Injection Gun (File 11/52), Moon Key (File 12/52), Floor Map for Floor B (File 13/52), Supplementary AB Rules (File 14/52)
Puzzle Segment: LABORATORY [YAR]
The laboratory is behind the red door on the second floor. The laboratory is one of the most important puzzle rooms, because solving it opens a lot of mandatory story locks. The laboratory is therefore of great importance.
Partner: Clover, Dio
Story Path: –> Yellow (Infirmary) –> Ally (Tenmyoji) –> Red (Laboratory)
Difficulty: ✯✯✯
Length: ☂☂
Total Number of Steps: 13
⓵ First Step: Enormous item collection
[1] Left of the safe an IG Replicator is located. Examine it. Afterwards pick up the two binders and the items on the tray left of it. Also pick up the scalpel at the far left of the room.
New items: Empty Capsule, Empty Capsule, Seed, Seed
New Files: Steps for dissecting a frog (File 15/52), Hydroponics Research 1 (File 16/52), Hydroponics Research 2 (file 17/52)
[2] To the right of the previously mentioned safe is a microscope. Pick up the seeds right next to it. On the right wall there`s another seed container which is placed left of a weird machine. Take it. Also examine the binder to the right of the weird machine.
New items: Seeds, Seeds
New Files: DNA Extraction Instructions (File 18/52)
[3] Look at the containers at the far back of the laboratory. Take everything you can find out of that shelf.
New items: Saline Solution, Frog, Seed, Roots
⓶ Second Step: Dissecting a frog
[1] Examine the left wall (the part of the wall with the 3 chambers at the bottom). Take the seeds out of the right chamber. Afterwards examine the drain at the top and eventually use the frog on it.
Items used: Frog
New items: Seed
[2] Take the liquid waste tank from the bottom left chamber. Afterwards examine the frog and use the scalpel on it. Take the blue capsule.
Items used: Scalpel
New items: Liquid waste tank, Blue Capsule
⓷ Third Step: The mixer
[1] Examine the mixer at the right wall and read the instructions for DNA extractation. First use the roots on the mixer and then put the saline solution in.
Items used: Roots, Saline Solution
[2] Next put the ethanol from the liquid waste tank into the mixer. Use the empty capsule on the DNA afterwards to receive a green capsule.
Items used: Liquid waste tank, Empty Capsule
New items: Green Capsule
⓸ Fourth Step: The valve puzzle
[1] Look at the valves on the right wall. Examine them to start a puzzle.
The left exit needs 30 units of water, the right of that also 30, the one in the middle 20, the fourth one 50 and the last one again 30. We have to regulate the water flow of the pipes here.
The 40 at the top left must be split into 20 + 20. The twenty units that flow down the right pipe must again be split into 10 + 10. Therefore the bottom right exit will receive 20 + 10 = 30.
The second chamber only receives 10 though. That means it needs another 20. The 80 therefore must be split two times. The top middle lever splits the 80 into 40 + 40. The bottom middle lever splits the 40 that flow down the left pipe into 20 + 20. Twenty of that flow to the left. The second container thus receives 10 + 20 = 30.
The container at the far right needs 30 units. The last two valves must also be split to reach that result: 20 + 10 = 30. The container that needs 50 receives 40 units from the 80 valve and 10 units from the 40 valve.
Top Row: Middle, Middle, Middle
Bottom Row: Middle, Middle, Middle
Push the lever to the right of the valves. All lights at the bottom should light up in green now!
[2] Examine the beakers to trigger another puzzle. The rules for this puzzle are written in the Hydroponic Research Files. To each beaker a type of seed must be attributed. We have 5 types of seeds:
——————————————A——————–B—————C————-D————E——-
Long seed—————————–x——————–x—————————————————–
Striped long seed ———————————————————-x————————————
Marked round seed—————————————x—————-x————–x——————–
Round seed—————————x——————–x——————————-x———————
Striped round seed—————————————x—————-x————–x———————
+ striped seeds don`t germinate in either Fluid D or Fluid E.
This diagram is structured due to the information given by Hydroponic Research File 2.
Logical Conclusion: The striped long seed must germinate in Fluid B.
–> Therefore the Long Seed can only germinate in Fluid D
–> That means the round seed must germinate in Fluid C
–> Striped Round seeds must germinate in Fluid E
–> The marked round seeds have only Fluid A left
Solution: A = Marked round seed; B = Striped Long Seed; C = Round Seed; D = Long Seed; E = Striped Round Seed
Put the seeds in the correct beakers. You`ve “sown your seeds”… …
Take the red capsule out of the hole
New items: Red capsule
[3] Use the capsules on the microscope in the middle of the room to trigger a microscope puzzle.
Items used: Red capsule, blue capsule, green capsule
[4] Solve the DNA puzzle. A = Adenine; G = Guanine; C = Cytosine; T = Thymine. A and T, as well as C and G must be on opposite positions in a DNA sequence. Align the DNA correctly:
1. Move the fourth line one position to the left
2. Move the second line three positions to the left
3. Move the fourth line three positions to the right
4. Move the fifth line three positions to the right
You`ll immediately receive the escape password.
⨷ Optional Step: Gold File
[1] Put the last seed you have into the mixer. Repeat the previous process by using the saline solution and the liquid waste tank on the mixer. Then use another empty capsule on the DNA and receive the yellow capsule.
Items used: Saline Solution, Seed, Liquid waste tank, empty capsule
New items: Yellow capsule
[2] Put the yellow capsule into the microscope and you`ll receive the gold file password.
New Files: Researcher`s Journal (File 19/52), Axelavir (File 20/52)
Puzzle Segment: PEC [YAB]
The pressure exchange chamber is behind the blue door on the second floor.
Partner: Clover, Tenmyoji
Story Path: –> Yellow (Infirmary) –> Ally (Tenmyoji) –> Blue (PEC)
Difficulty: ✯✯✯
Length: ☂☂☂
Total Number of Steps: 16
⓵ First Step: The first glimpse
[1] The pressure exchange chamber consists of 3 different section. We`ll call them “upper floor”, “lower floor” and “pressure exchange room” from now on. First of all, move to the upper floor and collect some items. Examine the lockers and the protective suits to put them on.
[2] Examine the little table left of the safe. Take the binder and make some notes of the symbols on the table.
New Files: PEC – Outside (File 21/52)
[3] Use the elevator to get down and enter the pressure exchange room. A puzzle will trigger, you`ll have to connect the coloured dots according to the File we found on the upper floor:
Red: Right, Down, Bottom Right, Bottom Right –> Orange
Yellow: Right, Down, Right, Bottom Right, Right –> Green
White: Up, Bottom Right, Down, Down, Bottom Right –> Black
The door`ll open. Enter the pressure exchange room
⓶ Second Step: The pressure exchange room
[1] Examine the table at the far back and take the tablet. Write down the numbers on the table and overlap them with the table from the upper floor:
1 = Star; 2 = cylinder; 3 = parallelogram; 4 = arrow; 5 = hourglass; 6 = boat
New items: Tablet
[2] Examine the electronical machine and you`ll receive a key.
New items: Small Key
[3] Examine the exit door. After some dialogue Clover should be heading out. Afterwards examine the door to the lower floor.
[4] Return to the electronical machine and push the pressurization button. Look at Zero III and use the Small Key on it. Pick up the doll that is left behind.
Items used: Small Key
New items: Zero Jr. doll
[5] Remove the metal plates near the pipes. Next up is… pick up the 4 laser emitters and use them on the pipe minigame. There are 2 pipe intersections; one is on the left and the other one is on the right. For us, only the left intersection matters.
Place the yellow and purple emitters on the bottom pipes, so that these are connected. Next, connect the last emitters to the top right pipe (this one should be read now) and the second from the top on the left.
The puzzle is now solved, redirecting power to the electronical device. Examine it and again push the pressurization button.
[6] Click on the window toward the lower floor. After some dialogue, click on the binder below the electronical device on the lower floor. You`ll receive a file from Clover.
New Files: PEC – Inside (File 22/52)
[7] Examine the door leading to the lower floor again, triggering a similar puzzle to the one before:
White: Top, Top Right, Top, Right –> Purple
Yellow: Down, Down, Right, Up, Right, Top Left, Top Right, Left –> Red
Blue: Top Right, Top, Top, Top Right, Right, Top Right, Down, Right –> Green
Exit the pressure exchange room.
⓷ Third Step: Colours, Symbols and Numbers
[1] Enter the elevator and look at the machine in it. The numbers say “25113”. According to what we received earlier (see Step 2 – 1), the order of the symbols must be: cylinder, hourglass, star, star, parallelogram. You`ll receive another item.
New items: Small key
[2] Use the small keys on the locked lockers on the lower floor. In the middle locker is a small protective suit. Pick it up. Combine the Zero Jr. Doll with that suit. In the right locker is another file for the archive. Elevate yourself to the upper floor.
Used items: Protective suit, Small Key, Small Key, Zero Jr. Doll
New items: Protective suit, Zero Jr. in suit
New Files: Paper with colourfol picture (File 23/52)
[3] Look at the little chamber to the left of the exit door. Use the tablet with the USB cable on the desk. Examine the tablet after that. Then place the Zero Jr. in Suit on the stool on the left.
Items used: Tablet, Zero Jr. in suit
[4] Look at the tablet again. This will activate a new puzzle:
You`ll need to enter the correct code to get the escape password. Take a look at the colourful sheet:
1st line: Cyan, Red, Blue, Yellow, Purple, Black –> look at the puzzle screen. Those colours form a 6 (green is not included which would be the top right line!).
2nd line: Cyan, Green, Black, Blue, Yellow –> Red (top left) and Purple (bottom right) are not included. The number is therefore a 2.
3rd line: Cyan, Green, Black, Purple, Yellow –> Red (top left) and Blue (bottom left) are not included, thus making the number a 3.
The escape code is therefore 623
⨷ Optional Step: Gold File
[1] Look at the colours next to the stool in the chamber. You can structure them like this:
1st line: Green + Purple
2nd line: Green + Purple
3rd line: Cyan, Green + Purple
[2] Examine the tablet again:
Green and Purple form a 1 together.
Cyan, Green and Purple form a 7 together.
The gold file password therefore is 117
New Files: Memory card for PEC (File 24/52)
Puzzle Segment: DIRECTORS OFFICE [YABAW]
The director`s office is behind the right white door on the second floor.
Partner: Tenmyoji, Quark
Story Path: –> Yellow (Infirmary) –> Ally (Tenmyoji) –> Blue (PEC) –> Ally (Tenmyoji) –> White (Director`s Office)
Difficulty: ✯✯
Length: ☂☂☂
Total Number of Steps: 17
⓵ First Step: Opening up the big safe
[1] Look at the table and examine the laptop. This will come in handy on a different path. It`s good to get a look at it early though.
[2] Examine the shelf and take the globus right next to the safe. Open the shelf and take the brandy from behind the right glass window. Examine the globe to receive a new file.
New items: Globus, Expensive brandy
New Files: World Map (File 25/52)
[3] Look at the bookshelf and take the brandy and the tablet out of the upper shelf. Take the books out of the lower shelf.
New items: Cheap brandy, Tablet, Historical Adventure saga, literary analysis, philosophy books
[4] Examine the safe and solve the puzzle according to the world map we received by examining the globus earlier. Green must be connected to red. Purple to yellow and white to blue:
Green: Up, Right, Top Right, Down –> Red
White: Down, Left, Bottom Left, Up –> Blue
Purple: Right, Top Left, Top Right, Left, Left, Left, Left, Up, Top Left, Right –> Yellow
Open up the safe and receive a binder and a deer.
New Items: Mounted deer
New Files: Business cards page 1 (File 26/52), Business cards page 2 (File 27/52)
⓶ Second Step: The business card puzzle
[1] Examine the headless knight and take the slingshot as well a spear.
New items: Short spear, slingshot
[2] Examine the desk and take a closer look at the business card holder to trigger a puzzle. We`ll have to structure the business cards correctly. According to the first note, the following positions become clear:
Bob————a—————–b
c————-Chris————John
Tony———–d—————-Ian
e————-Michael———–f
Let`s examine the second business card file a bit closer:
Carole is either positioned at point C or E.
Ann is either positioned at point A or C.
Ellen is above Ann – that means she`s in A, B, C or D.
Ann can`t be at point A or B then!
Sophie is either at point B or F.
Kate is either at point E or F.
Who could be at which points then?
Ellen is the only one who can be at point A! –> A = Ellen
Ann must be at position C then! –> C = Ann
Carole must be at position E then! –> E = Carole
Bob———Ellen————-b
Ann———Chris————John
Tony———d—————-Ian
Carole—–Michael———-f
Kate is either E or F. –> F = Kate
Sophie is either B or F. –> B = Sophie
Lola must be D then. –> D = Lola
Bob——–Ellen——-Sophie
Ann——–Chris——-John
Tony——-Lola——–Ian
Carole—-Michael—-Kate
Look at the back of the business cards again and note: B00K 334
[3] Examine the bookshelf again and place the books in the order: 3 3 4
Items used: Historical Adventure saga, literary analysis, philosophy books
⓷ Third Step: Scattered letters
[1] Look at the bookshelf again and place the expensive brandy on the green plate. Look at the bookshelf from a zoomed out perspective and you`ll see the letter “H”.
Items used: Expensive brandy
[2] Place the cheap brandy on the green plate below the little safe and it`ll create a parallelogram.
Items used: Cheap brandy
[3] Look at the red marks above the bookshelf. Place the deer next to the outlet and you`ll create the letter “E”.
Items used: Mounted deer
[4] Enter the short spear in the desk drawer and receive a small key.
Items used: Short spear
New items: Small key
[5] Insert the small key into the facial recognition device and examine the photo a bit closer. There`s some new stuff to investigate now!
Items used: Small key
[6] Take the helmet from the chair and use it on the armor stand, so that the letter “L” appears.
Items used: Helmet
New items: Helmet
[7] Is this seat taken? Well… apparently not. Sit on the chair and use the slingshot to destroy the balloon. The room now shows the numbers “HEL”. Push the lever right next to the chair to make the letter “P” appear.
Items used: Slingshot
[8] Take the battery of the small table and combine it in the inventory with the tablet to make it work. Afterwards pull the lever again to return to the office.
Items used: Battery
New items: Battery
[9] Examine the laptop now. We`ll need to enter a password. We already got the letters “HELP”, so what about trying that one? You`ll receive the escape password that way!
⨷ Optional Step: Gold File
[1] Look at the shelf with the safe. The bottom screen is flickering. Examine the monitor to trigger a tangram puzzle. We`ll need to create a parralelogram, like the one in the shelf:
Items:
2 small triangles
1 middle triangle
2 large triangles
1 square
1 parallelogram
Put the 2 large triangles at the bottom left. They must be positioned next to each other to form one giant triangle with the tip facing north (that means the left triangle`s tip faces south east and the adjacent triangle to the right faces south west – they are touching each other and forming one giant triangle)
To the right of the rightmost large triangle the middle triangle is located. It`s tip should face south.
Only the top right is missing now. At the far top right, the parallelogram must be placed. Left of it the small triangle, its tip facing north west, then the square (not tilted) and last but not least the small triangle facing north east.
——-“”””””””””””””””””””””””””””””””””””
——/—-“—–S-“–Sq–“-S- /-P—/
—/—-L–“–L—“””””””””””””””””””
-/———“————–M——-/
/———-“———————/
“””””””””””””””””””””””””””””
L = Large Triangle
S = Small Triangle
M = Middle Triangle
Sq = Square
P = Parallelogram
You`ll eventually get the gold file password: IILP. Enter it on the tablet.
New Files: Star Key (File 28/52)
Puzzle Segment: LOUNGE [M]
This room is one of the first rooms you are able and allowed to enter. It`s not that difficult, but it contains a lot of items which could confuse you – i got confused a bit too much i guess…
Partner: 𝛟, Luna
Story Path: –> Magenta (Lounge)
Difficulty: ✯✯
Length: ☂☂☂
Total Number of Steps: 14
⓵ First Step: Dozens of Items
[1] Examine the couch. Remove the left cushion to reveal a magazine. Read it to gain a new file. Additionally don`t forget to take the globe part from below the couch. It`s only a part of a globe, so we`ll have to find some more parts.
New items: Northern hemi-hemisphere
New Files: Astronomy today (File 29/52)
[2] Examine the shelves below the safe therefore gaining a new globe part and a note.
New items: Southern hemi-hemisphere
New Files: Bartender`s journal (File 30/52)
[3] Look at the destroyed globe and take the items scattered around it.
New items: Mysterious disc, northern hemi-hemisphere
[4] Examine the bartender`s table and take the three drinking glasses, as well as the two needles sticking out of the right glass.
New items: Two needles, Empty Glass, Empty Glass, Empty Glass
[5] Next examine all the drinks in the shelf. Take all you can see – no exceptions.
New items: Liqeur (red), Liqeur (yellow), Liqeur (white), Liqeur (green), Liqeur (blue), Bottle of Alcohol (sun), Bottle of Alcohol (Moon), Bottle of Alcohol (Island), Bottle of Alcohol (Ocean), Bottle of Alcohol (Planet), Southern hemi-hemisphere
⓶ Second Step: The globe
[1] Combine the southern hemi-hemisphere with another southern hemi-hemisphere. Combine the northern hemi-hemisphere with another northern hemi-hemisphere. Combine the new northern hemi-hemisphere with the mysterious disc and the result with the southern hemi-hemisphere to reconstruct the globe.
Items used: southern hemi-hemisphere, southern hemi-hemisphere, northern hemi-hemisphere, northern hemi-hemisphere, mysterious disc
New items: Globe
[2] Place the globe on the desk.
Items used: Globe
⓷ Third Step: Mixing some drinks
[1] Look at the wall clock and place the needles on it. Rotate the needles until they are posititioned at 4:50 (according to the astronomy magazine). The short hand should be positioned at Green and the long one at sun. It`s laser time…
Items used: Two needles
[2] Time to look at the globe table again. The globe says “Blue Planet”. Afterwards look at the wall and the letters. Try to read only the black letters. The result should be the word “Red Moon”.
[3] We`ve got 3 drink names now: Green sun, Blue Planet and Red Moon. Time to mix them. Look at the mixing device. Use the red liqueur and the Moon alcohol on the device. Then place a glass below it to get the red moon drink. Repeat this with the two other drinks to get all three drinks you need.
Items used: liqueur (red), liqueur (green), liqueur (blue), bottle of alcohol (Sun), bottle of alcohol (Planet), bottle of alcohol (Moon), Empty Glass, Empty Glass, Empty Glass
New items: Red Moon, Green Sun, Blue Planet
[4] Place all three drinks on the plates on the bartender`s table to receive the escape password.
⨷ Optional Step: Gold File
[1] Read the bartender`s note again. These are the three testimonies:
—————————–mother—————–father———————son
Father:———————red———————white———————Ocean
Mother:——————-Planet——————Island———————blue
Son:———————–Moon——————–green——————-Moon
One of those three lies. Every person must be attributed exactly 1 alcohol name and 1 colour. If we cross out the father, the mother won`t have a favourite colour. If we cross out the Mother, the son won`t have a favourite colour. That means the liar must be the son.
Conclusion:
Father: white Island
Mother: red Planet
Son: blue Ocean
[2] Look at the mixing device. Use the red liqueur and the Planet alcohol on the device. Then place a glass below it to get the red planet drink (if your glass if full, empty it by using the drain below the mixing device). Repeat this with the two other drinks to get all three drinks you need.
Items used: liqueur (red), liqueur (white), liqueur (blue), bottle of alcohol (Island), bottle of alcohol (Planet), bottle of alcohol (Ocean), Empty Glass, Empty Glass, Empty Glass
New items: Red Planet, White Island, Blue Ocean
[3] Read the bartender`s journal again. The father sat in the center, the mother on the left and the son of the right. But that`s from his perspective. Let`s look at the plates near the tablet again and place our cocktails in the right order to receive the gold file password.
Left: Son: Blue Ocean
Father: Middle: White Island
Mother: Right: Red Planet
Items used: Red Planet, White Island, Blue Ocean
Puzzle Segment: PANTRY [MBR]
The pantry is behind the red door on the second floor.
Partner: Alice, Clover
Story Path: –> Magenta (Lounge) –> Betray (Luna) –> Red (Pantry)
Difficulty: ✯✯✯
Length: ☂☂☂
Total Number of Steps: 16
⓵ First Step: Ice Puzzle
[1] Examine the device right next to the exit door. Take the empty containers from the bottom shelf with you. Besides, don`t forget to examine the date notes at the bottom right: 1/13; 3/27; 11/11; 5/7; 7/30.
New items: Empty container, Empty container, Empty container, Empty container
[2] Open the drawer above the notes you just examined and take the item out.
New items: Metal piece, Warm Drawer
[3] Examine the safe and take the beaker next to it.
New items: Empty beaker
[4] Look at the big refrigerator box. Take the button part from the left table and combine the button part with the metal piece to receive a button.
Items used: Metal piece, button parts
New items: Button parts, Button
[5] Use the button on the refrigerator box to trigger a mini-puzzle: Right, Down, Left, Down, Right, Down, Left, Right, Down, Left, Down.
You`ll receive a ice cube.
Items used: Button
New items: Ice cube
[6] Open up the inventory and combine the ice-cube with the warm drawer in order to unfreeze it. Put the drawer with the ice back in the previously mentioned device. After some while the ice cube should be completely defrosted. Pick up the remaining ID card.
Items used: Ice cube, warm drawer
New items: ID card
⓶ Second Step: pH detection
[1] Use the id card on the card slot on the top right of the device. It`ll give you an error message. We`ll have to fill the containers first, apparently.
Items used: ID card
[2] Examine the right cabinet behind the food boxes to get access to a binder. Take it.
New Files: Nutritional balance chart (File 31/52), Staff Nutritional Chart (File 32/52)
[3] Examine the front and the back of the previously mentioned cabinet and release all 4 wheel locks. Move the cabinet and search the right part of the cabinet now. Take all items.
New items: pH detection chemical
New Files: pH detection document (File 33/52)
[4] Examine the monitor left of the entrance door. Next to it is a calender. Take it. On the back “The day the man was abducted” is written.
New Files: Calendar: First half of the year (File 34/52), Calendar: Second half of the year (File 35/52), Calendar note (File 36/52)
[5] Take a closer look at the water device between the entrance and exit door. We now have to detect a variety of pH values:
Push the “0” button, and fill the empty beaker in your inventory with water by combining it with the faucet. After that combine the water-filled beaker with the pH detection chemical. Compare the result with the pH detection document in your file menu. Empty your glass by making use of the drain afterwards.
Repeat this with all 7 buttons to receive the following results:
+3: Dark Blue –> pH9
+2: Blue –> pH8
+1: Green –> pH7
0: Light Green –> pH6
-1: Yellow –> pH5
-2: Red –> pH4
-3: Dark Red –> pH3
Items used: pH detection chemical, empty beaker
[6] We have to fill the basic water tanks in our inventory with ph9. Therefore you`ll need to push the button +3. The neutral water tank must be filled with pH7. Push button +1 for that one. Last but not least the acidic water tank that needs pH4, that means button -2. Fill all 4 water tanks with the right water.
Items used: Empty container, Empty container, Empty container, Empty container
New items: water-filled container, water-filled container, water-filled container, water-filled container
[7] Put all 4 containers into the device from the beginning.
Items used: water-filled container, water-filled container, water-filled container, water-filled container
⓷ Third Step: Food rations
[1] Let`s take a look at the screen left of the entrance door again. We`ll have to enter a specific code. Let`s take out the calendar and look those dates from the device earlier up:
123 456 789 101112 means we`ll have to decide in which season the date falls (123 means January – March. 456 means April – June. 789 means July – September. 101112 means October – December)
The letter represents the column (that means the weekday of the date: A = Monday, B = Tuesday, C = Wednesday, D = Thursday, etc.). E is f.e. column number 5 in our calendar file.
The last number represents the week (that means the line in our calendar. We`ll now have to enter the codes for our 5 dates:
1/13 –> column E, line 3. Solution: 123 E 3
3/27 –> column B, line 14. Solution: 123 B 14
11/11 –> column G, line 6. Solution: 101112 G 6
5/7 –> column A, line 7. Solution: 456 A 7
7/30 –> column A, line 6. Solution: 789 A 6
Enter those codes into the monitor and you`ll receive a variety of different items.
New items: Box of meat rations, Box of fish rations, Box of pasta rations, Box of salad rations, Box of soup rations
[2] Enter all 5 rations into the device from the beginning. The screen should light up now, giving you access to another puzzle.
We`ll have to structure the food rations of every day according to our balance charts:
Red dish: +1 bread, +3 meat, +3 cheese
Blue dish: +1 bread, +3 meat, +2 cheese
Green dish: +2 bread, +1 meat
Purple dish: +3 bread, +1 meat, +2 cheese
Yellow dish: +1 bread, +2 meat, +1 cheese
Let`s make an example of day 1. The goal is 8 bread, 10 meat and 8 cheese rations with 5 dishes. The game gives us an example:
————-bread————-meat———-cheese
1*red——–1——————3—————–3
1*blue——1——————-3—————–2
1*green—-2——————-1—————–0
1*purple—-3——————1—————–2
1*yellow—-1——————2—————–1
–> 8, 10, 8
We have 4 red dishes, 4 blue dishes, 4 green dishes, 4 purple dishes and 4 yellow dishes left for the last 4 days.
Day 2 needs 7 bread units, 9 meat units and 4 cheese units. That means we don`t have that much possible combinations. I`ll spare us the algebra solution, unfortunately i have character limitations in this guide, therefore here`s the solution without too much ado:
0*red——–0——————0—————–0
1*blue——1——————-3—————–2
2*green—-4——————-2—————–0
0*purple—-0——————0—————–0
2*yellow—-2——————4—————–2
–> 7, 9, 4
Day 3
2*red——–2——————6—————–6
0*blue——0——————-0—————–0
1*green—-2——————-1—————–0
1*purple—-3——————1—————–2
1*yellow—-1——————2—————–1
–> 8, 10, 9
Day 4
1*red——–1——————3—————–3
2*blue——2——————-6—————–4
1*green—-2——————-1—————–0
1*purple—-3——————1—————–2
0*yellow—-0——————0—————–0
–> 8, 11, 9
Day 5
1*red——–1——————3—————–3
1*blue——1——————-3—————–2
0*green—-0——————-0—————–0
2*purple—-6——————2—————–4
1*yellow—-1——————2—————–1
–> 9, 10, 10
You`ll receive the escape password shortly thereafter.
⨷ Optional Step: Gold File
[1] Let`s take a look at the calendar note again. We were abducted on December 25th. Look at the calendar again and use the same method as before to enter the correct numbers into the monitor left of the entrance door: 101112 B 13
You`ll receive the gold file password.
Puzzle Segment: REC ROOM [MAB]
The rec room is behind the blue door on the second floor. It will only be available if you have chosen the magenta door at the beginning though.
Partner: Alice, K
Story Path: –> Magenta (Lounge) –> Ally (Luna) –> Blue (Rec Room)
Difficulty: ✯✯✯
Length: ☂☂☂
Total Number of Steps: 16
⓵ First Step: Suits of Armor
[1] Examine the billard poster left of the exit door. Take it with you.
New Files: Billiards poster (File 37/52)
[2] Take a closer look at the refrigerator taking everything you can grab. Billiard balls are on top of the refrigerator, inside is some kind of scrap and a bottle of luminol.
New Items: Billiard balls, Scrap of felt, Luminol
[3] Examine the ride and grab the extension cord. We`ll need a coin for the ride, so we should come back later.
New items: Extension cord
[4] Zoom in on the suits of armor. Steal the lance and the axe from the center armor suits. The armor suit on the left has a pool cue. The one on the right a trident. Take all of them.
New items: Lance, double-bladed axe, pool cue, trident
[5] Again zoom in on the center armor suits. Give the left one the double-bladed axe. Afterwards look at the control panel and push the circular button. You`ll receive a wrench soon after that.
Items used: Double-bladed axe
New items: Allen wrench
⓶ Second Step: Billiard and the jukebox
[1] Use the luminol on the billiard table in the middle of the room. Afterwards, push the lightswitch next to the exit door to turn the light off. Look again at the billard table to reveal the following symbols:
C–A
F–D
B–E
Use the scrap of felt on the bottom right corner of the table to reveal the letter “E”. Push the light switch again to turn the lights on.
Items used: Scrap of felt
[2] Examine the billiard table in the middle of the room. Make use of the billiard balls you received earlier to trigger a puzzle: The file from earlier will be a huge clue to uncover this mystery:
—————–1—————–
————-14—9————–
———-6—–8—2————
——13—-7—15—3———-
–5—–12—4—-11—10—–
The billiard table instructions show you: Ball A must be a non-striped purple one.
Looking at the poster that can only be Ball No.4.
Comparing it to the luminol results: (A) Ball No.4 must be thrown into the top right hole
Ball B must be a non-striped yellow one.
Looking at the poster that can only be Ball No.1.
Comparing it to the luminol results: (B) Ball No.1 must be thrown into the bottom left hole
Ball C must be a striped orange one.
Looking at the poster that can only be Ball No.13.
Comparing it to the luminol results: (C) Ball No.13 must be thrown into the top left hole
Ball D must be a non-striped blue one.
Looking at the poster that can only be Ball No.2.
Comparing it to the luminol results: (D) Ball No.2 must be thrown into the center right hole
Ball E must be a non-striped green one.
Looking at the poster that can only be Ball No.6.
Comparing it to the luminol results: (E) Ball No.6 must be thrown into the bottom right hole
Ball F must be a striped yellow one.
Looking at the poster that can only be Ball No.9.
Comparing it to the luminol results: (F) Ball No.9 must be thrown into the center left hole
Items used: Billiard balls
New items: Dart tips
[3] Combine the wrench with the pool cue and use this make-shift key on the blue box in front of the ride. Finally some coins!
Items used: Pool cue, allen wrench
New items: Coins
[4] Use some coins on the ride to get a photo.
Items used: Coins
New items: Photo of K
[5] Look at the jukebox and use the extension cord to power it. After that, use a coin to activate it.
Items used: Extension cord, coins
[6] The back of K`s photograph says Z9, D1. Enter both of these codes on the jukebox to receive 2 gold discs.
New items: Gold disc, gold disc
[7] Examine the picture frames right next of the jukebox. Put the two gold discs inside to get access to the darts in the middle frame. Take them.
Items used: Gold disc, gold disc
New items: Dart case
[8] Combine the dart case with the dart tips to receive complete darts.
Items used: Dart case, dart tips
New items: Darts
⓷ Third Step: The dart puzzle
[1] Look at the darts machine and take the poster from the right.
New Files: Darts Poster (File 38/52)
[2] Use the dart tips on the dart game to trigger the next puzzle: We´ll have to reach 91 points in order to success. Read the darts file to understand how the puzzle works. We have only 3 darts though.
That dart case shows that the red dart is the smallest and the green dart the biggest. That means Green > Blue > Red. The green number must be the highest and the red one the lowest. There is only 1 way to do so:
91 =
1) 40 = 2*20 = center (green) circle of 20
2) 33 = 3*11 = outer (blue) circle of 11
3) 18 = 3*6 = inner (red) circle of 6
40 + 33 + 18 = 91
You`ll get the escape password.
⨷ Optional Step: Gold File
[1] We`ll have to use all colours this time to create the number 91. That is because the dart case has some arrows pointing from left to right: Red > Blue > Green. The red number must be the highest and the green number the lowest. There`s only 1 way to reach that result:
91 =
1) 33 = 3*11 = inner (blue) circle of 11
2) 24 = 3*8 = inner (green) circle of 8
3) 34 = 2*17 = center (red) circle of 17
33 + 24 + 34 = 91
You`ll be rewarded with the gold file password
Puzzle Segment: GAULEM BAY [MAG]
The gaulem bay is behind the green door on the second floor.
Partner: Alice, Luna
Story Path: –> Magenta (Lounge) –> Ally (Luna) –> Green (Gaulem Bay)
Difficulty: ✯✯
Length: ☂☂☂
Total Number of Steps: 20
⓵ First Step: The Chevron blocks
[1] Examine the robot on the table. Take all the items that are scattered around him.
New items: Radio, Chevron block
[2] Examine the safe and press the button above the safe to activate the robot on the table.
[3] Look at the shelf left of the exit door. Again, take all items you come across. There`s a battery on the left side of the shelf and a rusty key in the keyhole of the box.
New items: Blue Battery, Rusty Key
[4] Look at the shelf on the left. There`s a chevron block on top of it. Take it. Above the shelf is a poster. Examine it and add it to your file collection.
New items: Chevron block
New Files: Poster with an eye on it (File 39/52)
[5] Open the 3 lockers to the left of the shelf and take everything you can out of them.
New items: Name tag, chevron block
New Files: Frequency List (File 40/52)
[6] Look at the computer terminal on the left. Examine the shelves below the laptop. Take the tablet out of the lowest drawer.
New Items: Tablet
[7] Combine the three chevron blocks in your inventory.
Items used: Chevron block, Chevron block, Chevron block
New items: Combined blocks (star)
⓶ Second Step: Finding the handle
[1] Put the rusty key into the oil puddle next to the robots head.
Items used: Rusty key
New items: Oil-covered key
[2] Put the oil-covered key into the workbox on the shelf left of the exit. Open it and take all items out.
Items used: Oil-covered key
New items: Bottle of detergent, screwdriver, silver key
[3] Again examine the drawers beneath the laptop. The top drawer can now be opened by the silver key. Open it and make use of the combined blocks (star). Next open the middle drawer and take out the handle.
Items used: Silver key, combined blocks (star)
New items: Handle
[4] Place the handle on the star indendation behind the robots table and turn it.
Items used: Handle
⓷ Third Step: Powering up the robots
[1] Examine the robots to the right and take the red battery that one robot holds in his hand.
New items: Red battery
[2] Combine the screwdriver with the tablet and place the blue and red battery inside to start it up. We still need a password though, so… let`s keep looking.
Items used: Screwdriver, blue battery, red battery
[3] Take a closer look at the laptop again and place the radio on the cable next to it. You`ll trigger a puzzle. The name tag from earlier had some notes on the back: ID 11010. Let`s take a closer look at the frequency list in our files. This ID is connected to the frequency 400Hz.
The left button in the radio puzzle moves the arrows 3 to the right.
The middle button moves them 5 steps.
The right button moves them 7 steps.
We`ll have to place the arrows at 400Hz after pushing 4 buttons. The total number of steps has to lie between 4*3 = 12 and 4*7 = 28. The possible combinations how we can reach this 400Hz is:
a) 2 steps to the right –> not between 12 and 28
b) 11 steps to the right –> not between 12 and 28
c) 20 steps to the right –> correct
d) 29 steps to the right –> not between 12 and 28
Conclusion: We have to go 20 steps and find a combination to reach the number 20 with 3, 5 and 7.
Solution: 7 + 7 + 3 + 3
That means we have to push the left button twice and the right button twice to solve this puzzle.
Items used: Radio
New Files: Rough sketch of the room (File 41/52)
[4] Examine the robot with the boxers a few times and take his boxers with you.
New items: Boxers
[5] According the rough sketch of the room there`s something below the oil puddle next to the robot. Combine the bottle of detergent with the boxers and use that on the oil puddle. There is written “120V”.
Items used: Bottle of detergent, boxers
[6] Look at the yellow screen right of the exit door and trigger a puzzle: We`ll have to reach 120 volt. You`ll have to form a line that starts at the left side of the screen, crosses the boxes (adding all up must result in 120) and ends at the right side of the screen. These numbers must be connected in the following order:
Left side of the screen –> right (35), down, right, down (10), left, down, right, down (30), right, up, right, up, right (40), up (5), right, down, right –> right side of the screen
[7] Press the button located in the middle of the big console to start up the robots.
[8] Let`s concentrate on the eyes of the robots for now. Starting from the left
B = Black
R = Red
BR BB RR BR RB RB
—middle of the room—
RB BR BB RB RB RR
Let`s look at the poster again:
RB EM EA IC ON NI
—————————
OS CF EN HC OE PE
Let`s combine the poster code and the black/red code. But let`s only concentrate on the red eyes (ignoring the black letters):
/B // EA /C O/ N/
O/ /F // H/ O/ PE
The solution for the puzzle is “BEACONOFHOPE”. Enter that into the tablet in your inventory (the one that you powered earlier to receive the escape password).
⨷ Optional Step: Gold File
[1] Let`s concentrate on the black eyes now:
B = Black
R = Red
BR BB RR BR RB RB
—middle of the room—
RB BR BB RB RB RR
Let`s look at the poster again:
RB EM EA IC ON NI
—————————
OS CF EN HC OE PE
R/ EM // I/ /N /I
/S C/ EN /C /E //
The password for the gold file is therefore “REMINISCENCE”. Enter that into the tablet to receive the gold file password.
New Files: GAULEM bay plug (File 42/52)
Puzzle Segment: SECURITY [MAGAW]
The security office is behind the left white on the second floor. It`s therefore one of the last rooms you encounter in the game.
Partner: 𝛟
Story Path: –> Magenta (Lounge) –> Ally (Luna) –> Green (Gaulem Bay) –> Ally (Luna) –> White (Security)
Difficulty: ✯
Length: ☂
Total Number of Steps: 9
⓵ First Step: Codes
[1] Ascend the stairs. Push the lion button behind the safe. Turn around and remember the two colour schemes.
Right: hexagons – green; triangles – purple
Left: hexagons – purple; triangles – green
[2] Descend the stairs and examine the stairs again. There are a bunch of codes. Each code corresponds to a colour:
Red (TMJYUVGJ)
Purple (ZYKGLPE)
Cyan (TISG)
Yellow (SGDQNY)
Green (ADGB)
Blue (ESDMAS)
Push the lion button again to turn the lights on.
[3] Examine the left shelf and take the hourglasses.
New items: Hourglass with red sand, hourglass with yellow sand
⓶ Second Step: Monitors
[1] Descend the stairs and open the electronic panel. Push all switches to green. Examine the big monitor in the middle afterwards.
[2] Examine the monitor behind the red chair and enter the red password: TMJYUVGJ. You`ll trigger a puzzle:
The monitor is on the same side as the left colour scheme code from above. Therefore all hexagons need to get purple and all triangles green:
– Push the 2 hexagons in the middle
– Push the 2 triangles in the center
The message “WILL BE ME” will appear on the screen above you.
[3] Look at the monitor behind the green chair and enter the green password: ADGB.
Trigger the next puzzle (all hexagons need to go green and the triangles purple):
– Push the 2 hexagons in the middle
– Push the hexagon in the top center and in the bottom center
The message “I WAS YOU” will appear above you.
[4] Enter the yellow password behind the yellow chair: SGDQNY. You`ll trigger a hourglass puzzle:
Each hourglass corresponds to exactly 1 number. The number each hourglass corresponds to, is the number of lines in each hourglass. You can count them or just try other methods. It`s not that big of a deal, so here`s the solution:
Red = 4
Blue = 7
Green = 9
Yellow = 11
Pink = 15
0407091115 is therefore the solution you have to enter below.
[5] Stop the puzzle you just triggered and move to the power switches. You need to remove the words “SHE”, “EVERYTHING” and “KNOWS”. That means 3 switches have to be off:
On——On—–On
On——On—–Off
On——Off—–Off
Return to the big monitor and move the remaining words around (you have to move the black squares to the bottom, so that the following sentence appear at the top two lines):
I WAS YOU
WILL BE ME.
You`ll receive the escape password.
⨷ Optional Step: Gold File
[1] Let`s turn this last puzzle around. This time we only need “SHE”, “KNOWS” and “EVERYTHING”:
Off—–Off—–Off
Off—–Off—–On
Off—–On—–On
Return to the screen and form the sentence:
SHE KNOWS EVERYTHING
to receive the gold file password.
Puzzle Segment: CREW QUARTERS [C]
The crew quarters are behind the cyan door on the first floor. Therefore it`s one of the first rooms you can reach.
Partner: 𝛟, Alice
Story Path: –> Cyan (Crew Quarters)
Difficulty: ✯✯
Length: ☂☂
Total Number of Steps: 16
⓵ First Step: Unlocking door No. 3
[1] Enter door No.1. Look at the book “Schrödingers Cat” that has been placed on the table. Afterwards, examine the bed. The area with the left knee has been ripped out.
[2] Enter door No.2. Take the metal piece from the desk. Examine the bed again. The area around the left forearm has been ripped out.
New items: Small piece of metal
[3] Enter door No.4 and take the key part. Examine the bed: The right knee has been ripped out.
New items: Part of a key
[4] Return to the hallway. Combine the two key parts to receive a solid key. Use that to open door No.3.
Items used: Small piece of metal, part of a key
⓶ Second Step: The lockers
[1] Enter door No.3. On the bed the right forearem has been ripped out. Take the knife from the table and try to open the locker… that surprisingly isn`t locked. Take the aluminum out of the locker.
New items: Box cutter, Large roll of aluminum foil
[2] Combine the box cutter and the aluminum 4 times to receive 4 aluminum foil shapes.
Items used: Box cutter, Large roll of aluminum foil
New items: Aluminum foil (shapes), Aluminum foil (pattern 1), Aluminum foil (pattern 2), Aluminum foil (pattern 3)
[3] Look at the desk and use the aluminum foil (pattern 3) on it so that the lines overlay. You`ll receive the code “LOCKER”.
Items used: Aluminum foil (pattern 3)
[4] Enter door No.1. Use the aluminum shapes on the table in this room. You`ll reveal the code: circle, star, rotated square, triangle.
Items used: Aluminum foil (shapes)
[5] Enter door No.2. Use the aluminum foil (pattern 1) on the table in this room which will reveal the code 4985. Turn towards the locker in this room. We`ll have to enter the code 4985 by adding one number of the horizontal line with one number from the vertical line.
3+1 = 4
6+3 = 9
6+2 = 8
3+2 = 5
Take the cassette tape out of the locker.
Items used: Aluminum foil (pattern 1)
New items: Small cassette tape
[6] Again return to Door No.3. Examine the phone and put the cassette tape you found behind the lid.
Items used: Small cassette tape
[7] Enter door No.4. Put the last aluminum foil on the table to reveal the next code: 3472. Again turn towards the locker.
0+3 = 3
3+1 = 4
6+1 = 7
0+2 = 2
Examine the wallet and take the coin.
Items used: Aluminum foil (pattern 2)
New items: Coin
[8] Face the poster and use the coin to trigger a minigame. The star-6 is on her right arm. The circle-1 is on her left arm.The triangle-9 is on her right leg. The rotated square-8 is on her left leg.
Items used: Coin
[9] Enter door No.1 and examine the phone. Push the Number 2 on the top to call Alice and get the code 25**. Push the number 4 to get the rest of the code **92. Call the number 2592 to hear the message from the tape from earlier to get the code 2652. Again enter this code into the same phone to open up the lid. Take the metal pin.
New items: Small metal pin
[10] Examine the locker and use the pin to activate the last number puzzle. We now have to combine the two codes from earlier (circle, star, rotated square, triangle):
1) circle = 1
2) star = 6
3) rotated square = 8
4) triangle = 9
Well, now here`s a pretty nefarious trick. The triangle and the star on the girl poster were pointing downwards, that means we have to rotate the two numbers in 180 degrees. The 6 turns into a 9 and the 9 turns into a 6. The finished code is therefore 1986.
0+1 = 1
6+3 = 9
6+2 = 8
3+3 = 6
You`ll receive the escape password.
⨷ Optional Step: Gold File
[1] We`ll have to find a different code for opening the locker now. The code for the escape password was 1986. Let`s enter this code into the phone. You`ll immediately receive the mirrored password 9861.
[2] Okay, let`s try to open the locker again now. The password this time is 9861:
6+3 = 9
6+2 = 8
3+3 = 6
0+1 = 1
You`ll be rewarded with the gold file password this time.
Puzzle Segment: B.GARDEN [CAB]
The B.Garden is behind the blue door on the second floor.
Partner: Luna, Alice
Story Path: –> Cyan (Crew Quarters) –> Ally (Alice) –> Blue (B.Garden)
Difficulty: ✯✯✯
Length: ☂☂☂
Total Number of Steps: 20
⓵ First Step: Preparations
[1] We start at the left of the big tree. Walk toward the waterfall. Look at the little bench to the left and take the metal rod that`s lying on top of it.
New items: Metal rod
[2] Zoom in on the little shack on the right and take the shovel and the key that are placed inside the shack with you.
New items: Large shovel, Bronze key
[3] Return to the starting point. Look at the mushroom that`s positioned in front of the big tree and use the shovel to dig something out,
Items used: Large shovel
New items: Box with silver lid
[4] Return to the waterfall area and examine the grass next to the little stream in front of the big tree. Again use the shovel to dig here and you`ll find another box.
Items used: Large shovel
New items: Box with bronze lid
[5] Walk to the center of the garden. Look at the flower pot to the right and move it to reveal a silver key.
New items: Silver key
[6] Take a closer look at the bushes. There`s a pepper lying left of it. Examine it to find a coin in there.
New items: Yellow coin
[7] Continue walking toward the scales. Examine the white flowers next to the pool and use the shovel to dig out the next box.
Items used: Large shovel
New items: Box with gold lid
[8] Examine the tombstone behind the pool and take the metal detector.
New items: Metal detector
[9] Examine the scales and take all items you can find.
New items: Gold key, Small knife, piece of metal
[10] Combine the boxes in your inventory with their respective keys. Afterwards combine the torn scraps of paper, so that you get a full paper with dots.
Items used: Box with gold lid, Box with silver lid, Box with bronze lid, gold key, silver key, bronze key
New items: Paper with dots
⓶ Second Step: Coins
[1] Return to the middle of the garden. Use the metal detector on the tomato bushes to get a tomato. Next, combine the small knife in your inventory with the tomato to reveal a red coin.
Items used: Metal detector, Small knife, Freshly-picked tomato
New items: Freshly-picked tomato, red coin
[2] Use the metal detector on the onions in the middle. You`ll receive a onion. Again use the knife on it to reveal a white coin.
Items used: Metal detector, Small knife, Freshly-excavated onion
New items: Freshly-excavated onion, white coin
[3] Use the metal detector on the right cucumbers. You`ll receive a cucumber. Again use the knife on it to reveal a green coin.
Items used: Metal detector, Small knife, Freshly-picked cucumber
New items: Freshly-picked cucumber, green coin
[4] Use the 4 coins on the balance scale. You should find out which coin weighs the most and which weighs the least. Don`t try the scale too often, otherwise the gamemode will automatically switch to “Easy” if you`re not careful enough.
White + Green ———- Yellow + Red
White and Green weigh more
White + Yellow ——— Green + Red
draw
Yellow —— White
Yellow weighs more
Green —– Red
Green weighs more
Yellow —- Green
Green weighs more
Solution: Green > Yellow > White > Red. We can`t enter the solution here though. We`ll just have to keep that in mind…
⓷ Third Step: Stars in the stream
[1] In your inventory combine the piece of metal with the metal rod to get a lever handle.
Items used: Metal rod, piece of metal
New items: Lever handle
[2] Return to the starting point and use the lever handle on the indendation to the left. You`ll reveal stars in the water stream. Write them down.
From the waterfall to the pool:
1. Small purple star
2. Big blue star
3. Normal yellow star
4. Very small green star
5. Giant red star
Turn the lever again to change to daytime.
Items used: Lever handle
[3] Turn toward the red buttons near the waterfall. Take out the paper with dots. According to this note you`ll have to push the button in this order: Left, Right, Right, Left, Middle, Middle, Right. The waterfall should cease now.
[4] Take a closer look at the rock behind the waterfall. Remember the coins? Enter the coins you weighed in this position:
Red < White < Yellow < Green
[5] We`ll now have to push the stars in the right order.
1. Small purple star
2. Big blue star
3. Normal yellow star
4. Very small green star
5. Giant red star
–> Purple, Blue, Yellow, Green, Red
You`ll receive the escape password
⨷ Optional Step: Gold File
[1] Now, let us order the stars after their size: Giant -> Big -> Normal -> Small – > Very Small
According to our list above, that must be:
–> Red, Blue, Yellow, Purple, Green
Congratulations for the gold file password
New Files: Mystery schematic (File 43/52), Note about IG (File 44/52)
Puzzle Segment: ARCHIVES [CBG]
The archives are located behind the green door on the second floor.
Partner: Luna, Clover
Story Path: –> Cyan (Crew Quarters) –> Betray (Alice) –> Green (Archives)
Difficulty: ✯✯✯
Length: ☂☂
Total Number of Steps: 12
⓵ First Step: The Cylinder code
[1] Okay, first off, we`ll need to take 4 books out of the bookshelves. These 4 books are coloured differently and pretty easy to spot. Starting from the safe, the bookshelf on the right contains a blue book. One to the right is the red book. One to the right is the orange one. One to the right (left of the entrance door) is the green book. Take them all.
New items: Blue book, red book, orange book, green book
[2] Examine the scales and take the weight and the die. Also open the drawer to take the screwdriver.
New items: Weight, red die, screwdriver
[3] Look at the desk. Grab the ink, the blue die, the paper and the music box.
New items: Blue ink, blue die, music box, notebook paper
[4] Combine the music box with the screwdriver to reveal the cylinder.
Items used: Music box, screwdriver
New items: Cylinder
[5] Combine the cylinder with the bottle of ink. Combine the result with the notebook paper to receive a pattern. We`ll need this later.
Items used: Cylinder, blue ink, notebook paper
New Files: Report (File 45/52)
⓶ Second Step: Of Books and dices
[1] Look at the monitor in the center of the room. We`ll now have to place the books in the correct slots. Let`s read what they say on the back:
The Stairway: B-06-30
Go Up: A-05-02
To the sun: C-05-18
And Lion: D-07-03
The letter of the code represents the bookshelf. The numbers in the middle the bookshelf-line. The numbers on the place of the book in the specific shelf line. These empty spots are the same spots you took the books out of before.
That means:
Go Up: Bookshelf A, line 5, free slot 2
The Stairway: Bookshelf B, line 6, free slot 30
To the sun: Bookshelf C, line 5, free slot 18
And Lion: Bookshelf D, line 7, free slot 3
A secret passage should open now.
[2] Climb the stairs, finding a doll. Examine the stuffed lion to receive a memory card.
New items: Memory card
[3] Look at the little box in the corner of the room. Take the green die.
New items: Green die
[4] Return to the scales and use the dies on them. We`ll have to figure out how much every die weighs:
Green, Blue —— 50g
Green, Blue weighs more
Blue —— 50g
Blue weighs more
Green —- 50g
Green weighs more
Red —– 50g
Draw——————————-> Red weighs exactly 50g
Blue —- Green
Blue weighs more
Red, 50g —— Green
Draw—————————–> Green weighs exactly 100g
Green, 50g —– Blue
Draw—————————-> Blue weighs exactly 150g
Items used: Blue die, green die, red die, weight
[5] Let`s return to the box. According to it, we have to add Blue and Green and multiplay with red:
Red = 50
Green = 100
Blue = 150
150 + (100 * 50) = 150 + 5000 = 5150
5150 is the correct code. Enter it and take the book. Examine it in your inventory to receive a bookmark.
New Files: Bookmark (File 46/52)
[6] Enter the memory card into the small slot of the device in the middle of the room. You`ll trigger a dice puzzle. Let`s structure the dice according to our report and our bookmark in our file collection:
—–6—5
2—4—–
—-1—–
—-3—-
——–Blue–Red
Red–Green——
——–Blue——-
——-Green——
This is how we`ll have to move the dices:
Red 5: Left, Left, Up, Up
Blue 2: Up, Up, Up, Right
Green 4: Right, Right, Right, Right, Right, Right, Down, Left, Left, Up, Up, Up
Red 1: Down, Left, Left, Left, Left, Left, Left, Up, Right, Right, Right, Down
Blue 3: Down, Down, Down, Left, Left, Up, Right, Down, Right, Down, Left, Up, Right
Green 6: Right, Down, Left, Up, Right, Down, Down, Right, Right, Down, Left, Up, Up
You`ll receive the escape password
Items used: Memory card
⨷ Optional Step: Gold File
[1] The gold file password is way easier. We`ll just have to match the colours of the dices:
Red 1: Down, Down, Down, Left, Left
Blue 2: Up, Up, Up, Right
Green 4: Right, Right, Right, Right, Up, Up
Red 5: Up, Up, Up, Up, Left, Left, Left
Blue 3: Down, Down, Down
Green 6: Right, Right, Down
The gold file password is yours.
Puzzle Segment: CONTROL ROOM [CBR]
The control room is behind the red door on the second floor.
Partner: Luna, 𝛟
Story Path: –> Cyan (Crew Quarters) –> Betray (Alice) –> Red (Control Room)
Difficulty: ✯✯✯
Length: ☂☂
Total Number of Steps: 12
⓵ First Step: The Compass
[1] Examine the shelves between the red and blue clock. Take the compass and the protractor.
New items: Compass, Protractor
[2] Examine the box right left of the shelves. Behind them a clipboard is located. Take it with you.
New items: Numbers clipboard
[3] Zoom in on the laptop to the right side of the control panel. Next to it is another clipboard. Take it. Also don`t forget to take the memory stick with you by examining the laptop.
New items: Test clipboard, memory stick
[4] Look at the poster left of the lever wall. Combine the protractor with the compass in your inventory and use the extended compass on the poster. These words are on the circle periphery created by the extended compass (starting with the top and going clockwise):
ON, OFF, ON, OFF, OFF, OFF
Items used: Compass, protractor
⓶ Second Step: Levers and switches
[1] Move to the levers right next to the laptop you investigated earlier (the levers left of the exit door). Pull them according to the code you receives some moments ago:
Pull the 1st and the 3rd lever.
You`ll receive a lever handle.
New items: Lever handle
[2] Examine the wall with the tons of pipes. There`s a lever handle missing. Put it in there. You`ll trigger a puzzle afterwards. This puzzle is similar to the one in the laboratory:
-The bottom right unit needs ??. These are only two digits. Due to that, the 240 from above must be split two times. The right levers must therefore stay in the middle: 240:2 = 120. 120:2 = 60.
-The one left of that one says ?4?. 120 + 60 = 180 are already flowing to that unit. The tens digit has to be a 4 though. That means we need ?60 more. Just split the 320 in half. 120 + 60 + 160 = 340.
-The one next to that one is only a ones digit. Nothing should flow toward that one. The lever above it must face to the left.
-The one left of it needs ??0. It currently receives 160 already. No problem here.
-If you split 210 you receive a 5 at the ones digit. Cause the ??0 can`t have a 5 there, the lever that faces the ??0 has to be turned to the left. The 210 must therefore be split at the beginning.
-The 105 from the left are not allowed to be split again, therefore the lever at the bottom left has to face left. The bottom at the top left therefore has to face left too.
Solution:
Top Row: Left, Middle, Middle, Middle
Bottom Row: Left, Left, Left, Middle
Items used: Lever handle
⓷ Third Step: Mysterious Machine
[1] Look at the wall clocks. The red wall clock shows the number 11400sec. The blue one on the right shows the number 510min.
Let`s face the left locker and trigger a math puzzle:
Red clock: 11400sec. = 190min. = 3 hours + 10min.
Blue clock: 510min. = 8 hours + 30min.
The code we need to enter is therefore 8 30 3 10:
6+2 = 8
13+17 = 30
1+2 = 3
6+4 = 10
Take the item out of the locker.
New items: Rainbow tree root
[2] Combine the USB stick with the Numbers clipboard and put it back into the laptop. We receive the following code:
——–3
–2——
7–1—-
Examine the screen again to receive the code: 7213
[3] Examine the right locker now. We`ll have to enter the code 7213:
5+2 = 7
2+0 = 2
2/2 = 1
1+2 = 3
Take the disc out of the locker.
New items: Disc-shaped part
[4] Put the rainbow tree root and the disc into the mysterious device right next to the pipe puzzle.
Items used: Rainbow tree root, disc-shaped part
[5] The last puzzle is craving to be solved. Let`s scroll the right part up. Every color corresponds to the number 100. Scroll to the middle:
Yellow = 4/16 = 1/4 = 25%
Red = 3/15 = 1/5 = 20%
Green = 6/20 = 30/100 = 30%
Blue = ?/? —> Blue must be the remaining 25%
Scroll to the bottom. You`ll have to select the right numbers and place them next to the correct colour here. If we add both numbers of the same colour up, we`ll have to match it with the exact percentage number from above:
Yellow = 25% = 19 + 6 –> Yellow = 6
Red = 20% = 12 + 8 –> Red = 8
Green = 30% = 21 + 9 –> Green = 9
Blue = 25% = 15 + 10 –> Blue = 10
You`ll receive the escape password after that.
⨷ Optional Step: Gold File
[1] Combine the USB stick with the Test clipboard and put it back in the laptop. You`ll easily receive the gold file password.
New Files: Small computer terminal (File 47/52)
Puzzle Segment: Q [CBRAW]
Q is behind the center white door on the second floor and the last room you`ll encounter in the story. It is therefore by far one of the most difficult rooms in the game.
Partner: 𝛟, Tenmyoji
Story Path: –> Cyan (Crew Quarters) –> Betray (Alice) –> Red (Control Room) –> Ally (𝛟) –> White (Q)
Difficulty: ✯✯✯
Length: ☂☂☂
Total Number of Steps: 12
⓵ First Step: The center cube
[1] Examine the 4 different sides of the cube. We`ll have to play minesweeper with each one:
Look at the side of the cube with the exit door in the background:
0 0 0 0 0 0 0
0 0 0 0 0 0 0
1 0 0 0 0 0 0
2 1 0 0 0 0 0
3 1 0 0 0 0 0
3 1 0 0 0 0 0
2 1 0 0 0 0 0
These must be the indicated panels then:
c c c c c c c
c c c c c c c
c c c c c c c
x c c c c c c
x c c c c c c
x c c c c c c
x c c c c c c
Examine the wall around the exit door and enter this exact pattern (you`ll have to click the x squares).
[2] Look at the side of the cube with the wall left of the exit door and right of the entrance door in the background:
0 0 0 0 0 0 0
0 0 0 0 0 0 0
0 0 0 0 0 0 0
0 0 0 0 0 0 1
1 0 0 0 0 1 2
2 1 0 0 0 1 3
2 1 0 0 0 1 2
These must be the indicated panels then (match the following panels with the wall left of the exit door and right of the entrance door):
c c c c c c c
c c c c c c c
c c c c c c c
c c c c c c c
c c c c c c x
x c c c c c x
x c c c c c x
[3] Examine the side with the entrance door in the background:
0 0 0 0 0 0 0
0 0 0 0 0 0 0
0 0 0 0 0 0 0
0 0 0 0 0 0 1
0 0 1 0 0 1 1
0 2 2 1 0 0 1
1 2 3 1 0 0 0
These are therefore the indicated panels (enter them on the wall next to the entrance door):
c c c c c c c
c c c c c c c
c c c c c c c
c c c c c c c
c c c c c c x
c c x c c c c
c x x c c c c
[4] Let`s examine the last remaining side of the cube:
0 0 0 0 0 0 0
0 0 0 0 0 0 0
0 0 0 0 0 0 0
1 1 1 0 0 0 0
3 4 2 2 1 1 0
4 4 3 3 4 3 1
3 3 2 3 4 3 1
Here are the last indicated panels you must enter on the wall:
c c c c c c c
c c c c c c c
c c c c c c c
c c c c c c c
x x x c c c c
x x c x x x c
x x c x x x c
⓶ Second Step: Familiar puzzles
[1] Examine the four purple books in the bookshelf.
New Files: Picture of blue dice (File 48/52), Picture of red dice (File 49/52), Picture of Green dice (File 50/52)
[2] Take a closer look at the colour scheme. This will trigger a puzzle that is similar to the one in the security office. We`ll have to colour the hexagons and triangles red:
– Push the hexagon in the top center
– Push the two hexagons in the middle
– Push the two triangles in the bottom middle
The other shelf will open. Take every item you can find there.
New items: Memory card (red)
New Files: AB Game, Q Edition (File 51/52)
[3] Grab the darts out of the dart showcase.
New items: Darts
[4] Use the darts on the dart game to trigger a puzzle similar to the one in the rec room:
We now have to throw 3 darts and reach a point total of 100. We`ll have to throw a dart at each colour and… the same rules as in the dart game in the rec room apply too:
100 =
1) 39 = 13*3 = inner (green) circle of 13
2) 28 = 14*2 = center (blue) circle of 14
3) 33 = 11*3 = inner (red) circle of 11
33 + 39 + 28 = 100
Take the green memory card out of the showcase.
Items used: Darts
New items: Memory card (green)
[5] Examine the dice board. This puzzle is similar to the one in the archives. Read all the dice files you have and overlap them in your brain:
c c c c c c c c
c c c c c c c c
c c c g c c c c ———— g = green (2)
c c c r c c c c ————- r = red (4)
c c c b g c c c ———— b = blue (5), g = green (6)
c c c c r c c c ————- r = red (3)
c c c c b c c c ———— b = blue (1)
c c c c c c c c
To reach this result, we have to do the following steps (A user notified me that this solution is indeed wrong and sent me the correct solution. I do not take credit for this puzzle solution!):
-Credit to DeceptiKhan-
Blue 6: Left, Down, Down, Down, Left
Red 6: Right, Down, Down, Down, Down
Green 1: Down, Right, Right, Right, Down
Blue 2: Down, Right, Up, Right, Up, Up, Right
Red 5: Right, Right, Down, Left, Left
Green 3: Down, Down, Right, Up, Up, Up, Up, Up, Up, Right, Down
Take the blue memory card.
New items: Memory card (blue)
⓷ Third Step: AB Game
[1] Enter the three memory cards into the slots near the computer below the bookshelf. You`ll trigger the last puzzle.
Items used: Memory card (blue), Memory card (red), Memory card (green)
[2] We need to get 9 points. That is the aim of this puzzle. A and B are pairs. C, D and E are solos. The note says we have to get 9 points along with the others. The votes therefore always have to be Betray – Betray and Ally – Ally.
A and E are betrayers.
B and D always ally.
That means A and E must play against each other and B and D too.
C always copies his opponent, that means he`s our partner for now.
-Round 1-
US vs. C
A vs. E
B vs. D
–> Ally
-Round 2-
US vs. C
A vs. E
B vs. D
–> Ally
-Round 3-
US vs. C
A vs. E
B vs. D
–> Ally
You`ll receive the escape password after that.
⨷ Optional Step: Gold File
[1] Start the AB game again. According to the note, we have to be the only one to reach 9BP now. Try this:
-Round 1-
US vs. D
A vs. C
B vs. E
–> Betray
-Round 2-
US vs. C
A vs. E
B vs. D
–> Ally
-Round 3-
US vs. C
A vs. E
B vs. D
–> Ally
The gold file password is yours. Congratulations.
New Files: Axelavir x2 (File 52/52)
All Passwords you might`ve missed
If you missed some passwords and you don`t necessarily want to repeat the scene where you get it, here is a list of the passwords:
Two Headed Lion ✓
ID: GTFDML016 (origin: Sigma Ending)
Password: MILKEVOLI (origin: K Ending)
One Headed Lion ✓
ID: KURASHIKI (origin: Quark Ending)
Password: JUMPYDOLL (origin: Quark Ending)
Alice Ending – Decoding ✓
COMPLETED
Bombs ✓
No.1: BQZ RGJ DXR (origin: Tenmyoji Ending)
No.2: EQD DYR NTK (origin: Sigma Ending)
No.3: LXQ LHC NMR (origin: Alice Ending)
No.0: LXA QNS GDQ (origin: Dio Ending)
Additional Info [Map + FAQ]
❔ Question: *How do i reach the Hug Ending?*
❗ Answer: The Hug Ending doesn`t really count as an ending. It can be reached by failing to defuse one of the bombs in the cyan path route (leading to the 𝛟 Ending).

❔ Question: *I am disoriented. Is there a complete map of the facility?*
❗ Answer: Of course there is:
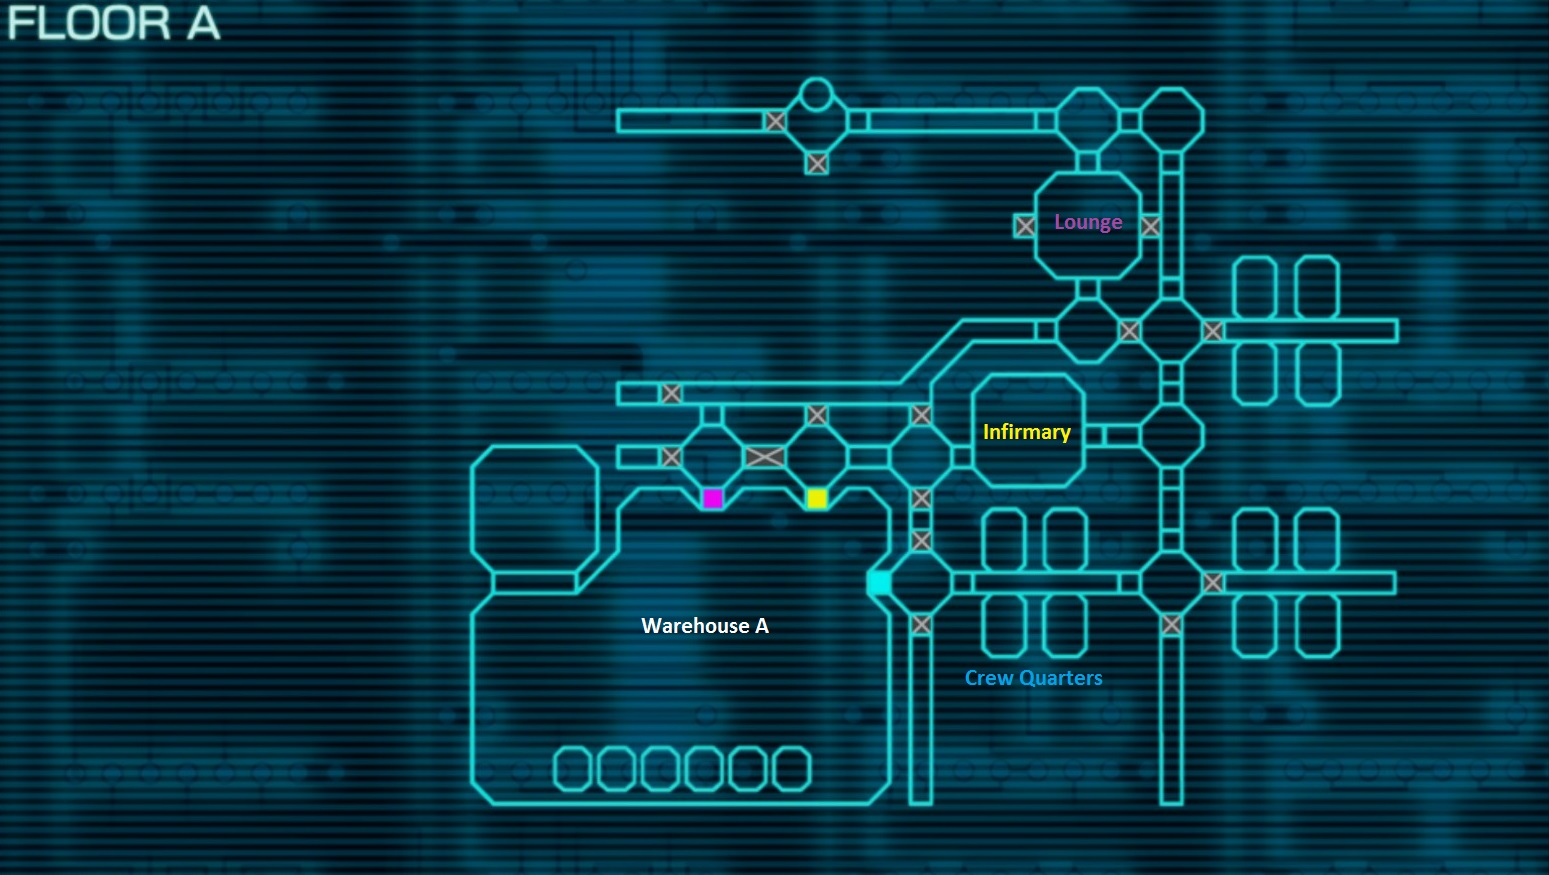
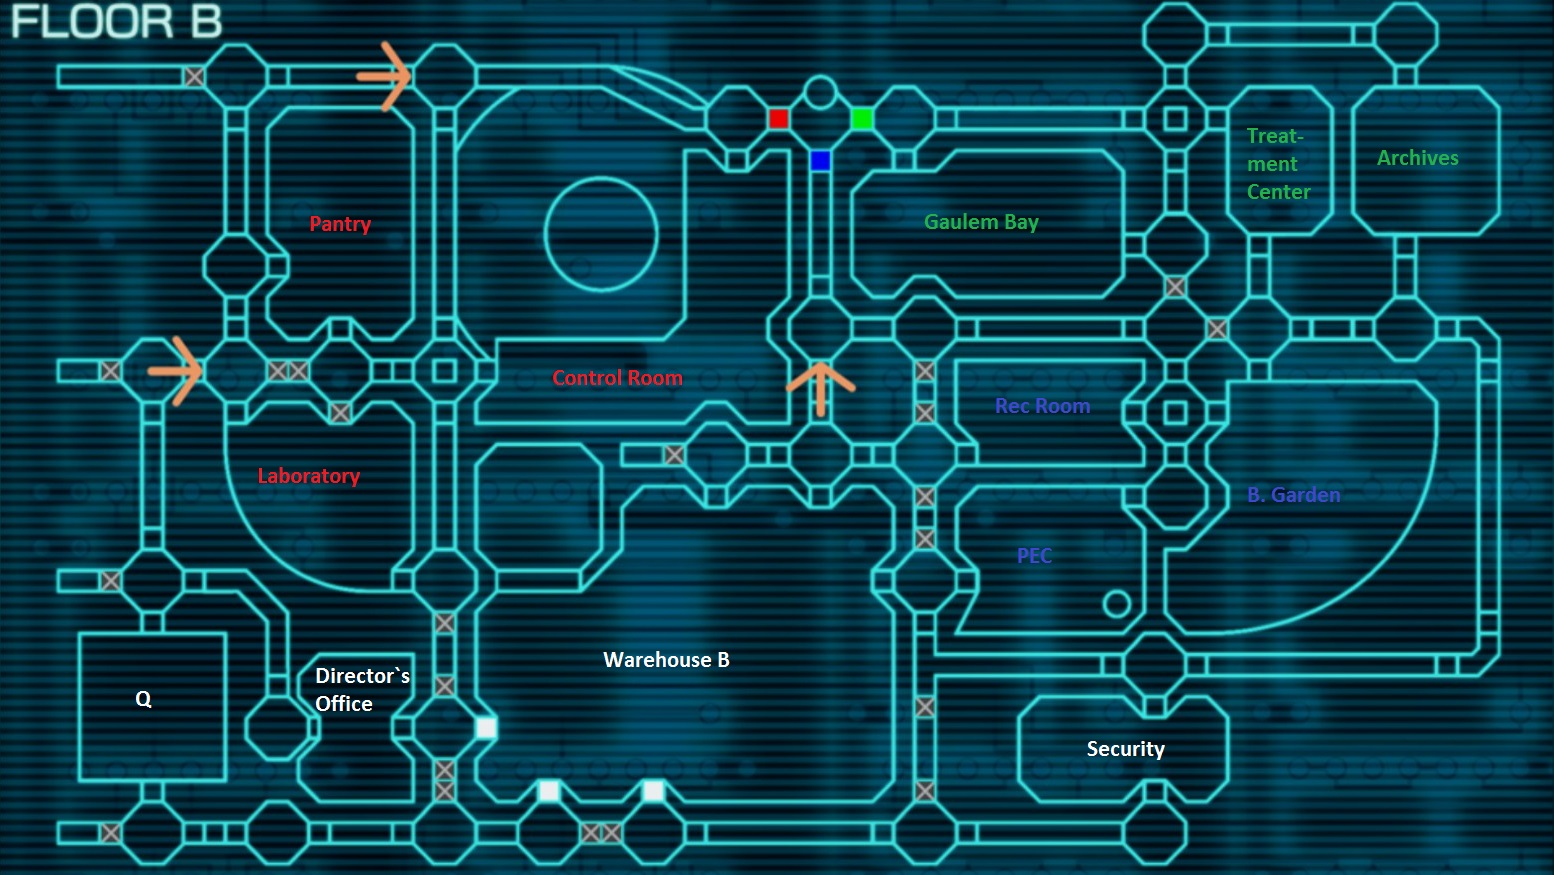
❔ Question: *What`s up with the bomb codes?*
❗ Answer: The bomb codes are actually some kind of easter egg. If we decipher them, we get these codes:
BQZ RGJ DXR –> CRASH KEYS
EQD DYR NTK –> FREE Z SOUL
LXQ LHC NMR –> MYRMIDONS
LXA QNS GDQ –> MY BROTHER
Password: MILKEVOLI –> I LOVE KLIM
❔ Question: *How often do we enter a puzzle room with which person?*
❗ Answer:
K: 1 ————–(Yellow Path: 0, Magenta Path: 1, Cyan Path: 0)
Dio: 1 ————(Yellow Path: 1, Magenta Path: 0, Cyan Path: 0)
Quark: 2 ——–(Yellow Path: 2, Magenta Path: 0, Cyan Path: 0)
Tenmyouji: 4 —(Yellow Path: 3, Magenta Path: 0, Cyan Path: 1)
Alice: 5 ———-(Yellow Path: 0, Magenta Path: 3, Cyan Path: 2)
Clover: 5 ——–(Yellow Path: 3, Magenta Path: 1, Cyan Path: 1)
Luna: 5 ———(Yellow Path: 0, Magenta Path: 2, Cyan Path: 3)
𝛟: 7 ————-(Yellow Path: 1, Magenta Path: 2, Cyan Path: 3) + Elevator
Thanks for reading. Hope i was able to help you! ♫
-LastNonak-