
Overview
This is a very simple and straightforward guide spoiler free.
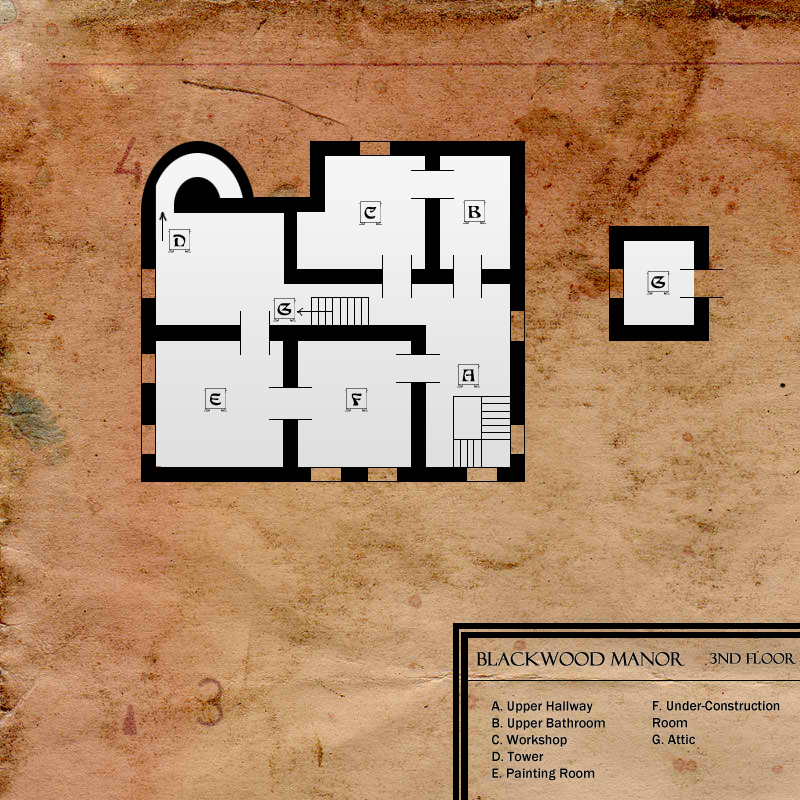
Maps
I created a map based on memory and the manor blueprint on the painting room. If there are any errors don’t hesitate to comment.


Saturday, October 12th
— Garden
- Open the car door.
- Inside open the glove compartment get [CAR KEY].
- Manor house door use [GOLD KEY].

— Main Hall
- Stand in the hallway for a few minutes to answer the telephone. It is possible to miss the telephone.

— Living Room
- Check a book on the table [DIARY].
- Inspect the fireplace with unused woods.
- Try turning on the light switch.


— Study
- Go to the desk and read [DIARY].
- Open the second drawer to get [ENVELOPE].
- Open the third drawer to get [BORING TOOL].

— Kitchen
- Open the drawer underneath the sink then open the second drawer inside to get [KNIFE].
- You can also check the grinder on the table.


— Maid’s Room
- Inspect the desk and take the [PAPER].
- Open the drawer on the right to get a [PENCIL].
- On that drawer is a hidden picture hinting a pot and above it is a key holder.
- Use the [PENCIL] on the [PAPER] to get [MAID’S LETTER].

— Maid’s Bathroom
- Bathroom turned Darkroom. Nothing of interest here.
— Small Hallway
- Go to the window and open the curtains.
- Inspect the pot’s opening to get a [BASEMENT KEY].

— Lower Bathroom
- Open the lowest drawer on the cupboard to get a [RUG].
— Main Bedroom
- Check the painting of a woman in red near the door and check the ball she was holding to reveal a safe. Nothing you can do about it right now. This is important as it gives you an option to ask Jerry about the combination key later on.

— Gallery
- Go to the desk and read a letter hidden beneath a map.
— Guest Room
- Put your [BOX] on your desk and set up the papers and typewriter.
- Put your [CASE] on the little table.
- Inside the [CASE] are:
- Phone book containing [BARBARA’S TELEPHONE NUMBER].
- A [PEN].
- [JERRY P. CARTER’S CARD].
- [MATCHES].
- A letter.
- Your book the Vanishing Town.
- Near the fireplace is the Doctor’s bag. Open and get [STETHOSCOPE].
- Examine the trash can for a crumpled torn page from previous [DIARY].


— Upper Hallway
- Below the ladder neat the can of paint is a [NEWSPAPER].
- Use the [NEWSPAPER] under the door and the [BORING TOOL] in the keyhole. Leave as it is for now.

— Upper Bathroom
- Inspect the messy bricks and get a [METAL ROD].

— Workshop
- Next door is a stove on a plank. Use the [METAL ROD] on it and leave as it is.

— Attic
- Open the chest and get the [OIL LAMP].

— Main Hall
- Call Jerry about two things:
- The previous inhabitants of the manor.
Originally posted by Note:I haven’t verified this but in case you miss the following you might not be able to call Jerry to inquire about the inhabitants of the manor.
- Read the diary in the Study (Jump to the section).
- Read the diary in the Living Room (Jump to the section).
Source: Gameboomers: Scratches (Director’s Cut) by Nucleosys[www.gameboomers.com]
Thanks to GarouxBloodline for inquiring about this.
- The combination key of the safe in the Main Bedroom.
- Call Barbara to ask a favour to translate the [MAID’S LETTER].
- Combine the [MAID’S LETTER] and the [ENVELOPE] and use the [PEN] to get the [ADDRESSED ENVELOPE].
— Garden
- Examine the mailbox and read a letter.
- Drop the [ADDRESSED ENVELOPE] in the mailbox.

— Main Hall
- Call Jerry.
— Basement
- The basement is located inside the Kitchen. Use the [BASEMENT KEY].
- Attempt to fix the fuse box. Nothing can be done for now.


— Main Hall
- Call Jerry twice.
— Garden
- Go back to your car and insert the [CAR KEY]. Attempt to start the car.
— Main Hall
- Call Jerry.
— Attic
- Check the stack of newspapers.
— Guest Room
- Go to sleep.
— Gallery
- Attempt to pick up the hammer.

— Guest Room
- Use the [STETHOSCOPE] in the fireplace wall.
— Living Room
- Use the [STETHOSCOPE] in the Living Room’s fireplace as well.
— Basement
- Attempt to open the door.
— Gallery (You may not need to do this section)
- Examine the bottom of the display case where you have previously found the hammer.
- Use [KNIFE] on the panel to remove it. Examine the wheels. Nothing you can do about it right now.

— Guest Room
- Go back to bed.
Sunday, October 13th
— Main Hall
- Answer the telephone.
— Main Bedroom
- Open the safe and enter the combination.
- Read the contract (Bank’s number is 01912 94144) and get the [PAINTING ROOM KEY].
— Upper Hallway
- Use the [PAINTING ROOM KEY] on the door beneath the ladder.
— Painting Room
- Take the [HAMMER] from the stool and the [GARAGE KEY] and [CAN LID] from the painting table.
- Examine and magnify the secret room on the first floor of the manor blueprint.


— Under-Construction Room
- Climb the ladder.
- Get the [OIL CAN] from between the paint cans.
- Use the [RUG] on the dirty green can to reveal its content.
- Use the [BORING TOOL] to pierce a hole.
- Use the [OIL LAMP] on the can.
- Go down the ladder one (1) time and look above the ceiling where the rope’s end has been tied up.
- Use the [KNIFE] on the rope.
- Go down the ladder and walk over to the door, face the [ROPE] and pick it up.

— Lower Hallway
- Face the main bedroom and pan left and examine the wall. Use a [KNIFE] to reveal a bricked wall.
— Tower
- Climb the spiral staircase.
- Attach the [ROPE] to the lamp near the cracked wall.
- Use the [HAMMER] on the crack.
- Pick up the [ROPE].
- Go back to the second window and on the top right of the screen pull the [ROPE].
- Click on the rope multiple times to descend.

— Nursery Room
- Examine the Birth Certificate on the cupboard.
- Notice the blocks on the floor is spelled BIN.


— Attic
- Check the newspapers about the child.
— Gallery
- Inspect the bottom of the display case and use a [KNIFE] on the panel.
- Use the [OIL CAN] to oil both wheels.
- Hold the gold bar to move the display case.
- Use [HAMMER] to remove the boards.
— Store Room
- Use the [MATCHES] on the [OIL LAMP] and use the latter by clicking it on the screen.
- Remove the bamboos to clear the window.
- Examine the documents.
— Guest Room
- Check the typewriter.
— Main Hall
- Call Jerry.
- You can also call the bank’s number 01912 94144 mentioned on the contract.
— Guest Room
- Go to bed.
— Gallery
- Check the mask.
— Basement
- Light the [OIL LAMP] using [MATCHES] and use it on the screen.
- Open and crawl inside the furnace.
— Guest Room
- Sleep.
Monday, October 14th
— Living Room
- Light up the fireplace using [MATCHES].
— Main Hall
- Call Jerry.
— Garden
- Check the mail box. Read the rolled up letter* beside the translated letter.
- Facing the manor/fountain to the right is a path leading to garage.
* Thanks to Batty Gloom Pony.
— Garage Area
- Use the [GARAGE KEY] to remove the chain.

— Garage
- From the toolbox get the [PLIERS] and [SCREWDRIVER].
- Pick the [CROWBAR] next to the stool.

— Main Bedroom
- Left of the safe is a small cupboard.
- Use the [SCREWDRIVER] on the mirror to free the [MIRROR].

— Backyard
- Go out at the back of Kitchen and follow the path until you reach the Family Mausoleum.
- Use the [PLIER] to remove the wires on the door handle. You’ll get a [WIRE].

— Family Mausoleum (Crypt)
- Inspect the two coffins.
- Look on the floor between the plaques and pick up a [ROCK].
- Go down the stair.

There are two steps to completely light the crypt:
- First:
- Go up and inspect the ceiling.
- Throw the [ROCK] on the ceiling and you’ll miss. Go down the crypt and pick it up.
- Throw it again.

- Second:
- Go up and inspect the lamp.
- Combine the [WIRE] and [MIRROR] and attach the [WIRED MIRROR].

- Inspect the little coffin’s name plate.
— Main Hall
- Call Jerry.
— Attic
- Read the newspapers.
- Police Chief William Bailey’s number is 01665 65217.
— Main Hall
- Call Bailey.
— Garden
- Check the mail box and retrieve the translated [MAID’s LETTER].
— Maid’s Room
- Underneath the nightstand is a hidden compartment containing a picture.

— Garden
- From the front of the manor facing the fountain there is a path to the right. Follow the trail until you reach the Greenhouse.

— Greenhouse
- Use the [OIL CAN] on the door handle.
- Go up the ladder and inspect the table.
- Open the left drawer to read a letter.
- On the right drawer get the [GARDENING SHEAR] and use it on the plant on the table to get [BERRIES].
- Ignore the key for now.

— Basement
- Use [CROWBAR] on the valve. Then use [HAMMER] on the [CROWBAR].
- Pick the [CROWBAR].

— Greenhouse
- On the second floor is a hose. Click top end to attach in a shovel and drop the lower end to the first floor.
- Go down and click the hose end to attach in the faucet.
- Turn the faucet on.
- Go upstairs and get the [SHOVEL] and go back down again.
- Use the [GARDENING SHEAR] on the overturned plant to clear the drain.
- Remove the hose from tthe faucet.


— Eastern Garden
- Exit the Greenhouse and go forward two times. Go to the trail to the right.
- Examine the pool of water to get the [STUDY DESK KEY].
See Garden map for more info.

— Study Room
- Use the [STUDY DESK KEY] on the right drawer of the study desk.
- Read the letter and open the box with combination keys 59097.
R-O-B-I-N based on the blocks in the Nursery Room and the letter R in the crypt name plate. - Get the [CHAPEL KEY].

— Northern Garden
- Facing the fountain in the Garden is a path to the right. Facing the path going through the Greenhouse is another path to the right. Proceed to that path until you reach the Chapel.
— Chapel
- Go upstairs and examine the small cabinet. Inside is a drawer. Flip through the Bible pages to get a [NAIL].
- Examine the statue’s feet at the center of the Chapel and use the [NAIL] in the orifice.
- Use the [CROWBAR] on the small ring on the floor.
- Use the [CROWBAR] on the statue’s INRI sign which is behind the statue’s head.


— Secret Room
- Use [MATCHES] on the lamp to your right.
- On the desk is a [BRANCH] and a couple of letters.
— Main Hall
- Call Jerry.
— Garden
- Go to the front gate and check the mail box.
- Check the car’s compartment and get the [DEAD BATTERY] for charging.
— Garage
- Place the [DEAD BATTERY] on the small crate near the bike’s read wheel.
- Click on the bike’s device to attach the wires then pedal the bike to charge the [BATTERY].


— Garden
- Put the [CHARGED BATTERY] to the car’s compartment and attempt to start the car.
- Go to the path leading to the Chapel and dig through the barren soil using the [SHOVEL]. For more info about the location refer to the Maid’s photo of Mr. Blakwood digging which was hidden under the cupboard.
- Use the [PLIERS] to pull a tooth on the corpse.


— Gallery
- Use [PLIERS] to free the [LION’s CLAW].


— Kitchen
- Put the [TOOTH] on the grinder, close it and grind. From the ginder’s compartment is a [POWDERED TOOTH].
- Same process with the [LION’s CLAW] to get a [POWDERED CLAW].
- Mix the two powder to get [MIXED POWDER]. Combine [MIXED POWDER] and [BERRIES] to get the [AMULET INGREDIENT].

— Workshop
- Go to the room with the stove.
- Place the [CAN LID] on the top of the stove.
- Put the [AMULET INGREDIENT] on the lid.
- Use [MATCHES] on the stove.
- Get the [GREEN STONE]. Combined the [GREEN STONE] and [BRANCH] to get [AMULET].

— Gallery
- Go to the secret room and use the [AMULET] on the mask.
— Living Room
- Check the fireplace.
— Lair
There are some things to check:
- The remnants of food on the table.
- The teddy bear.
- The bucket near the dripping pipe.
- The meat under the window.
- Save your game and enter the hole.
- End.
