Overview
Showing a possible Solution to every Level of Shapez.io
Introduction
Since i found the initial Tipps and Tricks provided by the game and other guides on how to solve lvl18 quite useful for inspiration on how to solve the levels by myself i decided to give some more “inspiration”.
NOTE and Disclaimer:
- The solutions shown are ONE of many many possible solutions. Every of your own creations works wonderful as well and are beautiful 😉
- The solutions shown are often not the most efficient. There are always better solutions. Effectiveness overall is greatly depending on your current Tier of the different buildings!
- The solutions shown are highly situational since the map itself is infinite and shapes and colors may be located different on your own run(s).
- The solutions shown are therefor for inspirational use only.
- The solutions shown are mainly utilizing my blueprints i presented in my other Guide:
[link]
Levels 1-6
I made this section for the sake of completeness. I tink you know what to do on the early stages – since there is the ingame-Tutorial as well 😉
- Level 1:
Nothing to say here.
- Level 2:
Since rotating isn’t a thing yet – i just delivered both halfs of the circle. Because…why not.
- Level 3:
Nothing to say here.
- Level 4:
Cut them and deliver the correct half. Easy as that…
- Level 5:
Cut them, rotate them, and deliver BOTH halfs. One for the Level-requirements, one for the Tier2-Upgrade of Belts 😉
- Level 6:
Cut and rotate until you get what you need.


Levels 7-12
Now things get literally colorful and therefor way more interesting (like everything in life!^^)
- Level 7
Easy scaleable manifold (expand to the top – when you aren’t blocking the space like i did when i took the screenshot ;))
- Level 8
Remember the half-cuttet shapes from Level 4 that went to trash? Let’s give them a better purpose and splash some blue paint on them!
- Level 9
Mix red and blue and splash it on some circles.
- Level 10
Pretty much like Level 9. This should be an easy task by now – but slowly longing for some sweet blueprints 😉 Note that i didn’t color every star by now, since some basic ones are needed fpr Upgrades. At the beginning i decided to keep them on the same belt but splitted them up later when demand rose.
- Level 11
Well lucky me – i found a shape on the map which was already the correct one. So i just had to cut it in half and apply some flashy colors. Done 🙂
- Level 12
Ah finally we are making blueprint-Stuff! Bless level12!
Again lucky me found the basic shapes requiered on the map and hadn’t do a thing. Just paint and combine them. Build a lot of these shapes. You will thank me later 😉


Level 13-18
So now the more complex Stuff is coming up.
- Level 13
Well we’ve done that before, haven’t we? Mixing some colors (more purple since its needed 2x), apply them to the full shapes and slap them together.
- Level 14
Somehow easier then Level 13 since only two colors are needed this time. So we can copy a lot of that (and rotate^^). This time we just need more red then green. Make a lot of this as well. I always ran short on this shape since you need it for Upgrades and can use it for the next level as well!
- Level 15
“Just” mix some white, splash it on another star and put it on the shape of Level 14. et voilà!
(Note: yes this is a different Set-Up then i have shown in the Screenshot for Level 14.)
- Level 16
Time for your “windmill”-Production. You need them in various combinations and colors. So i started with some basic red ons (for Upgrade) and the blue ones on white circle.
And regarding Level 16: take some of those windmills on a circle and put them on another blue colored shape that i could conveniently mine in its correct form already. 🙂 (Screenshot is located directly “south” of the previous one.)
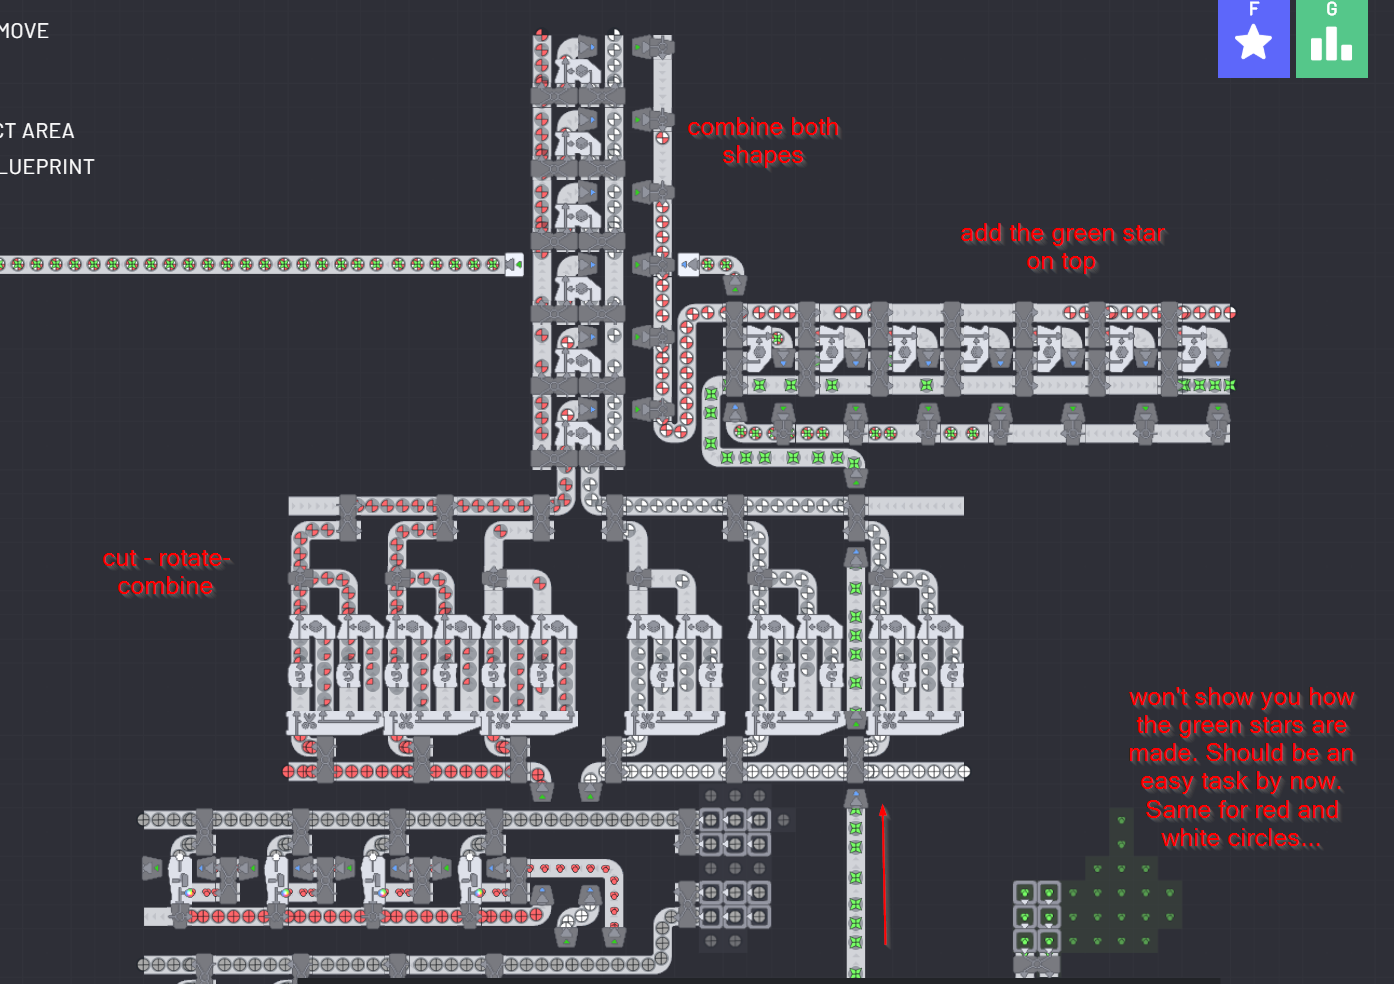
- Level 17
Well…..Level 17 was the most complex thing i build leading to the hypothesis that there might be more effective solutions out there – but thats just a wild guess… 😉
But lets get started.
First we have to make a bi-colored circle with a green star on it. How to color the individual components should be clear by now and isn’t shown.
Now we produce the second shape we need – half Windmill, half Square. In different colors…*sigh*
Then we can combine those two shapes in the easiest was possible and are finally done.
- Level 18
Well. Just take another guide 😉 Personally i favor the one of imortaliti – and used it myself. Worked like a charm. Thanks mate! 🙂
Check it out here:
[link]