Overview
WIP: Vital info about enemies, skills, items, strategies, gameplay, etc.
Introduction
This is a guide about the most important stuff in the game.
Do note that I’m playing the polish language version, and since I can’t find any option to change it to english, some (or most) names based on my translation may be different from what you can actually see in your game. Any suggestions, translation errors and tips are more than welcome.
Enjoy!
FAQ
Q: Is this game really that difficult (like Darkest Dungeon or worse)?
A: No. Read the gameplay basics, and you should have no issues beating it. And if it’s still too hard you can always pick a lower difficulty.
Q: How long is this game?
A: 8h should be more than enough to complete it once. Getting 100% will most likely take much over 50h.
Q: The game ended after October 3rd, wtf?
A: It’s because Warsaw is historically accurate and the Warsaw’s uprising ended on that day during WW II.
Q: Which character is the best?
A: Go to heroes section, I’ve tiered all heroes and you can consider everything with S or A tier ‘best’.
Q: Which weapon is the best?
A: It depends… on the positioning, skills or character traits. The rule of thumb is: go for the highest damage if your hero has good base accuracy, and go for the highest accuracy bonus if your hero is not the natural born sharpshooter.
Q: How much ammo should I take on a mission?
A: For a balanced team 2 stacks of every type is more than enough. The default inventory selection before mission is usually more than you will ever need. With time you will gain a good understanding of your team’s ammo consumption and you will limit the amount accordingly.
Q: Do i need healers in my team? How many?
A: Yes, 1 is usually enough (like Jadwiga), or 2 when they are weaker (like Franek + one recruit)
Q: The name of XYZ is wrong
A: Yep, cause I’m playing polish version of the game and there is no way to change it to english. Leave a comment and I’ll be more than happy to change my translation errors.
Q: The skill/hero description is wrong
A: The game is changing rapidly from update to update and I’m not able to verify all the content every few weeks. If you find some errors/updates – leave a comment.
Q: I did XYZ and there is no entry in the codex
A: The codex is still bugged as hell, I’m hoping it will change in the future.
Gameplay – map
When you move around the city there are a few important factors to keep in mind. To get an idea of what you might stumble upon during the current mission see the bottom-right part of the screen.

Keep in mind that the buildings are a physical barrier you cannot cross and later in the game on a rare occasion some paths inside or near destroyed buildings won’t be passable due to rubble blocking your path.
Pressing TAB on the map will zoom it out giving you an overview of the whole district.
1. Objective arrows
There are two types: white and yellow. The brighter the arrow the closer the object is. Though the detection radius is rather small and you will really want to use flares (see items section).
- White – indicates enemies, loot crates and random events.
- Yellow – Objectives. Take note that in missions like “gain X influence” or “kill X german squadrons” they will still be indicated as white arrows.
In rare cases the mission objective won’t be revealed (see screenshot) – if you happened to be in such situation – use flare to reveal the objective.

2. Enemies
If possible avoid any unnecessary fights. The rewards may or may not compensate for ammo loss and you will most likely get your heroes injured or killed.
Encounters come in 2 variants:
- Normal squadrons – they are not aware of your presence and you can decide whether or not you’ll fight them.
- Outposts/sentry – they have a red circle around them which is a detection radius. If you are within the red circle AND germans have a clear line of sight – you will be forced to fight. Buildings will help you to stay undetected. Use any physical cover if possible and you will be able to sneak past the outpost. The detection radius varies per squadron and they may overlap each other which might put you in a very unfavorable chain of fights. Often the enemy has a much greater detection radius than you and you will end up in an ambush. Flares are your best friend here – see items section for details.
Click on the screenshot to get an idea on how to use buildings to sneak around enemy detection radius without being detected:

3. Loot crates
You’ll want to keep at least a few empty spaces in your inventory to get any usable loot you can find on the map. Prioritize medals, ammo (heavy>long>short) and weapon parts. One stack of long ammo is worth 4×50 money (3×50 when sold), while a single money stack is just 50. Try to maximize the value of your inventory as much as possible – every penny is important. Obviously try to get as much loot crates as you can during any mission, yet try to avoid any unnecessary fights in the process.
4. Random events
Watch what dialogue option you choose as the outcome might be fatal for your party. Possible lethal or harmful answers are marked with red cross near the dialogue option. Random events do count for the “gain X influence” mission types so you may decide to prioritize events over fights. Since żmija update, random events can give our heroes a quite large amount of experience if the outcome is positive( from around 100 to 300). Outcome often depends on trait checks so try to have at least one party member with high stats (like Kazimierz for charisma-based checks). The same type of event gives the same pool of posivite/negative closures – but the one you get is random every time.
Gameplay – base
1. Party management
You will want to have two full parties ready for a mission. In 95% cases your squad will be heavily injured when the mission is over and it won’t be wise to take them to the next one without healing them first. Thus the advised scenario is to complete a mission with party A, then go for next one with squad B while A takes its time to treat the wounds, then go with full hp A party and let B rest and so on.
2. Injuries
Every character got 3 levels of injuries. Which basically equals to how many days it will take to bring them back to full health. Going on a 3-4 days mission is enough for your injured folks to recover. Sometimes you will be forced to go on a mission with injured heroes – in such cases prioritize the ones with most hp, take 1-2 healers with you and heal them asap during the mission.
3. Recuits
- They come in a few variants.
- They are quite expensive but still you’ll want to have 2-4 of them ready, preferably with different skillsets.
- They cannot gain levels but they are still very useful.
- They can be a valid replacement for your injured heroes, especially in the early-mid game.
- Keep in mind their low hp pool.
The most useful recruits skills (see weapons & skills section for more details):
- Healing – more potent than Franek’s while it can also remove one debuff from the target. Having one such recruit along with Franek is a good substitute for Jadwiga when you cannot take her on a mission due to injuries
- Ploy – gives one of your heroes an extra activation point while also removing one activation point from the enemies.
- Cheap 1-heavy ammo strike
- Good rifle 2-target strike
- Pistol repositioning skill
4. Resources & party composition
These two factors come together when it comes to managing the economy and battle efficiency. You’ll want to balance your ammo consumption. A good party consists of short, long and explosive ammo users. Try to avoid single type ammo users in the same party as much as possible, especially early game when you don’t have a large quantity of ammo stacked. Pay extra attention to pistol ammo: it is cheaper and more common than long and explosive, A single stack is 100 bullets instead of 50 for long and 25 for explosive and it can be used by 3 weapon types: pistol, revolver, and SMG. Having one pistol/revolver, one SMG, one rifle and one demolition weapon users in a team is a favorable scenario – at least early-mid game. Also, pay attention to skill ranges – it is unwise when your only attack that can reach this last enemy staying in the last row is a very expensive 4-row aoe strike. Ps: you’ll always want to have at least one healer in your party. First aid kits are scarce, expensive and can only be used outside battles. If possible try to have a mixed meele attack types available in your team and favor heroes with meeles that can move target +/- 3 rows.
5. Repairing weapons
You will always want to repair any weapon you’ve recovered from a mission. Selling weapons will be your main income source during the game. Always have some money left (~100) to affort repairing cost for at least one weapon.
6. Shop
Don’t waste resources for ammo and items unless absolutely necessary, also later in the game when you will have a large quantity of ammo you can consider selling some to afford extra actions to strengthen city districts.
7. Helping districts
It might seem useless and expensive but it’s really worth it in the long run. Though you may skip it early game due to lack of money, try to help city districts when possible to keep the morale even across the city. Also, you may notice that cheaper actions are more money-to-morale efficient than the most expensive ones.
8. Choosing mission
Prioritize the weakest districts to keep them from surrendering for as long as possible. Then prioritize non-violent missions. You will really want to think twice before going on a mission against armored targets like artillery or tanks, especially early game when you lack skills and resources. You might be tempted to choose missions with better rewards – i.e. heavy weapon parts instead of pistol parts – and that’s completely fine but keeping the city alive is important as well in the long run. As a side note – failing a mission is better than letting you heroes die, unless they are recruits and you can afford new ones. You can run away from a mission whenever you like, both on a city map and during any fight.
9. Post mission events & cheats
After every mission, there will be a random event with a positive or negative effect. If the outcome is very unfavorable – like the death of a party member or loss of a city district you can close (or Alt-F4) the game and load it again. You will be placed at the end of your latest mission and there will be a different event waiting for you. Every few missions there will always be a ‘new recruit’ event. Alt+F4 can be used for a chance to get a different hero every time you try, especially if you are struggling to get a particular party member to join you.
10. Skipping a day
This is a new mechanic introduced in ‘Baszta’ update. You can basically skip a single day instead of going on a mission. This will result in 1 point exhaust penalty for 3 districts but otherwise behaves just like a mission. You’ll get a post mission event afterwards and your folks will be healed for that extra day. Don’t fall into a trap of skipping a few days in a row though. This will give you more events for free in a short time period, but will also cause a lot of damage to the city districts. Treat it as a last resort when you really don’t have a healthy team to succesfully complete any mission.
Codex
Żmija update brings us a complete codex overhaul. It still has 3 chapters: characters, weapons and enemies. But now every entry apart from a brief description, contains all detailed statistics as well. We can check every acquired weapon stats here, along with its skills, and the same goes for enemies – no more speculation about possible attacks or effects.
It seems that most (or all) issues with codex are also fixed in the żmija update. So far I’m able to unlock codex entries for heroes without any issues.
Gameplay – experience
Żmija update introduced a complete overhaul of skill progression. Medal-based system was swapped to a more RPG-like system with experience points gained from different sources.
Every experience gained is ‘per hero’ experience (not a shared pool), meaning that 1000XP mission will give 1000XP for EVERY participating hero. Why is that important? Because unlike many other games you do not benefit from taking less team members on a mission, thus you can’t do stuff like single character power leveling.
Since recruits do not benefit from gaining experience, try to limit their mission presence as much as possible, to maximize XP gain for your heroes.
Experience sources:
- succesfully finishing a mission
- winning a fight (more skirmishes in a mission -> more XP)
- completing additional random skirmish objectives
- random events with positive outcome
- medals
XP are utilized between missions at the base. Unlike the previous system, now it is actually important to take a particular hero we’d like to upgrade on as many missions as possible since they won’t get XP (other than optonal 300 from consumed medals) if they are not fighting.
We can spend XP for skills, and what’s new – on stats upgrades, which gives us a great deal of depth to our decisions and long term strategy. Some insurgents are very skill dependant (hello Helena), while others can do just fine with minimal (or zero) extra skills. In this case we can spend more experience points on statistic – like better accuracy, more hp and so on. If you find some character skills useless, or just prefer to use more weapon skills – just go for better statistics.
Gameplay – fights
1. Positioning
- Avoid placing your heroes in the first row, place them in the 2nd one instead. The reason for this is that often there will be barricades present on your side of the battle arena and they are usually placed in the first rows, meaning that taking 2nd row will grant you the extra protection for free.
- Think about your squad skillsets, and choose flexible party composition where there is someone that can utilize his skills from 2nd row, someone for the back rows and someone for the middle rows.
- Scatter your team between upped and lower rows, so there won’t be 3 party members lined up together waiting to be obliterated by a single shrapnel shell.
- Hitting target from the opposite row grants a 20% damage bonus (upper/lower row and vice versa), abuse it. However the bonus does not apply vs machines.
- Having repositioning attack skills is essential for an aoe-based party. You can push the enemy back, you can switch the row (up/down) the enemy is in as well. Before using any expensive aoe skill try to first group your enemies together. Keep in mind they can also reposition themselves.
- Maximize aoe skills effect. It is useless to waste 4 field attack on a single enemy. If it will take you a few action points to maximize aoe damage for the rest of the fight – go for it.
- Some enemies can reposition your team members i.e. by switching their position from 2nd to the last row – expect this and have a skill set that can be used from both front and back rows, otherwise, you will have to waste action points for repositioning to a more favorable spot.
2. Priority targets
Always think about who you gonna kill first or if you can afford aoe attacks to weaken the whole enemy squad instead of focusing a single target. If you are fighting 4 cramped grenadiers with one sniper in the back it would be tempting to nuke the grenadiers but sniper alone will give you hell, so focus him instead, especially seeing his low hp pool. Important note about armored targets – they are often accompanied with supporting crew (engineers) that can and will repair them for a considerable amount. It might be wiser to kill all other enemies before switching back to this pesky cannon. Doctors and radio operators may be annoying but they have limited fighting capabilities so consider them low priority targets. The same goes for commanders. Few enemy types have two action points per turn which automatically makes them high priority targets. On the other hand, 2 action points mean they will bleed and burn twice as often – abuse this fact.
3. Activation points
- Usually enemies will outnumber you and will start the fight with more actions per turn than you. Your goal is to turn the tides of battle as efficient as possible by eliminating priority targets (like units with two actions per turn) and change the ratio in your favor.
- Your heroes start the battle with 3 action points.
- They will recover 1 action point per turn (unless it’s Franek who can regain 2 when trained).
- Actions will use 1 or 2 action points, most simple attacks use one, most explosive and some aoe skills use 2.
- The more action points you got during the attack the better the accuracy.
- Passive skills do not use action points, therefore it is wise to get some of them.
- Repositioning your heroes uses an action point, avoid doing it.
- Try to lure your enemies to waste their action points if possible. When there is a doctor in enemy squadron he will try to heal any bleeding or burning effect which will waste one german’s action point. Many enemies will prioritize buffs/help on their weakened comrades which is also a win for you. Heavy weapons will use one turn for the attack and one turn for reloading giving you a more breathing space. Also, use your recruit’s skill to strip enemies from one action point – it’s often a lifesaver.
4. Healing
- Having a healer in your party is rather obligatory.
- Any healing effect can hit critically doubling the healed HP amount.
- If you have to choose between killing an enemy or healing a party member – prioritize killing the enemy unless your party member is in a critical condition.
- Focus more on healing after you have more actions per turn than your enemy (after killing at least part of the enemy squad), otherwise, you won’t be able to outheal the damage anyway.
- Try to leave a single weak enemy alive at the end of the fight and use ploy/suppression skills on him. This will give you an opportunity to fully heal your party before the next battle.
- Jadwiga FTW
5. Armor and hit chance
- Armor – some enemies (machines) will have a non-zero armor value. The armor percentage equals to damage reduction applied to every single attack received. Without a proper skillset, it might be way too difficult to deal with enemies like tanks or Pak cannons. Some heroes can buff armor-piercing capabilities of your team’s attacks. On top of that, every skill has its own armor-piercing potential which is usually around 5%.
- Hit chance – Every attack has its own chance to hit and every target has its own chance to dodge the attack. The substraction of both is the percentage hit chance. Both accuracy and dodge chance can be further buffed by skills on both our side and enemy side. Some attacks, like Shield breaker, have higher accuracy when used vs heavy targets and lower accuracy vs infantry.
6. Skirmish objectives
Żmija update introduced additional optional goals we can fulfill during skirmishes for a small bit of extra experience points. There are always two such objectives, randomly selected for every fight. The amount of extra XP is constant, thus you won’t gain more for fulfilling harder objectives. The objectives themselves are stuff like “don’t use more than X ammo of Y type during the fight”, “kill 2 enemies during a single turn” and so on. An extra mention on “don’t lose more than X hp” – as mentioned in the objective description you can heal your team members to lower the dmg counter, thus if at the end of the fight you are below damage treshold – congratz, you fulfilled the objective.
7. Cheats
This game has nondeterministic RNG, which means the same situation will be different every time you load the game and is not determined by pre-generated seed (like Xcom2 or Slay The Spire).
What does it mean to you?
When you get to an unfavorable fight where half of your team was obliterated by a single critical hit aoe explosive you can Alt+F4 the game. Load it again and try the fight with slightly different enemy setup and positioning and a chance to get a different outcome.
Gameplay – formation archetypes
This chapter describes a few typical battle formations and reasoning behind them.
For examples of an actual setups see Heroes – example formations chapter.
Obviously there’s much more choices than the ones presented here – those are only examples to give you a general idea on how to play.
Dictionary:
AOE – area of effect / multi-target
BUFF – positive effect cast on our heroes (i.e. damage bonus)
AURA – passive skill that affects the user and all adjecent units
1. T-formation

+ Maximum usage of a single aura
– Prone to AOE attacks
– Repositioning of an aura user is a big issue
2. 2×2 square formation

+ Can utilize multiple auras
+ Better buff utilization
– Prone to AOE attacks
– Lower single aura efficiency
– More problematic to pick heroes and cover all rows with attack skills
3. Mixed single aura

+ Can use single aura / but -with lower efficiency
+ Better protection vs AOE attacks
+ Can place 2 Rifle/Explosive/MG in the back row
4. Wave/Spread formation

+ Best anti-aoe defense
– Hero on the front is not covered with barricade
– No aura synergies
– Low efficiency of AOE buffs
Gameplay – status effects
*** STATUS EFFECTS IN THIS GAME ARE ADDITIVE. ***
What does it mean exactly?
Consider the following scenario:
Our Wanda has take cover skill equipped which got 25% armor penetration out of the box.
She has to the limits passive aura equipped as well, wchich gives her +15% penetration bonus.
Now she has 40% bonus (25%+15%).
There is also Martin in her team which can buff her for +20% bonus so in the end she has 25%+15%+20%=60% armor penetration.
You can stack as many buffs of the same type as you please and they will have the full effect every time – contrary to multiplicative stacking used in most other games.
- Resistances – it is a percentage chance to dodge debuff and it is subtracted from the apply chance of a skill. Most bleeding/burning debuffs got 80% chance to be applied, so in case our enemy has 30% resistance the actual odds are 80%-30% = 50%. Nazi’s field medic can boost ally resistances by 60%, also armored enemies have high debuff resistance bonuses. Still, if the resulting odds are above zero you can even cause Nebelwerfer to bleed (tested). Don’t bother debuffing such targets though, you’ll most likely miss and waste a precious turn.
- Duration – most positive and negative effects lasts for 1 to 3 activations. Do note that one activation does not equal one turn in most cases. Consider the following example: At the beginning of my turn I was able to apply bleeding on a machinegunner putting 2 activation stacks on him. After his action the bleeding activates dealing damage then at the end of the turn bleeding activates again therefore both activations were done in a single turn.
- Stacking & renewal – buffs and debuffs with the exact same effect does not stack. If you applied 2-activations bleeding and then use it again it will still be 2 stacks instead of 4. Same rule apply for buffs – recasting the same effect will only renew the duration to the original value, e.g. I’ve put a 3-stacks damage buff on my teammate, then used one stack, then recast the same effect and I’m back to the original 3 stacks. The name of the skill may be different but as long as the final effect is the same – it won’t stack. HOWEVER, as mentioned at the beginning of this chapter – you can stack the same buff type from different sources as long as they give different bonus values. So when I cast Martin’s armor penetration buff on Wanda’s armor penetration passive the effect will stack additively, but the duration and renewal will follow the same logic as for other effects – so recasting will only renew the given effect to the initial amount of activations.
- Tiers – some status ailments have two effect tiers, i.e. Waldemar’s Triage skill puts improved toughness I on all targets, except the most wounded who got improves toughness II. The math is simple, tier 2 has double the effect of tier 1. In the given example it’s 20% toughness & 40% toughness.
- Targets – some debuffs work different on enemies and on your allies, namely suppress. In case of enemies it skips their single turn, in case of allies it prevents one person from doing any actions till the end of the turn.
- Heroes – some heroes specializes in buff manipulation more than others: Jadwiga can renew buffs duration, Martin can copy buffs from enemies and recast them on allies and Konstanty can remove all positive effects from enemies.
- End of turn activation – at the end of the turn all debuffs are activated once, e.g. bleeding deals damage or suppression is lifted.
Debuffs:
- Bleeding – applies a damage over time effect, in the current patch it is typically 2 ticks for 7-8 damage. It works on infantry as well as machinery, barricades are immune. It means that you can still apply bleeding vs e.g. Nebelwerfer despite its being a machine type – of course when your %chance to hit will be greater the %bleeding resistance of your target.
- Burning – same mechanics as bleeding except it can hit and damage barricades as well.
- Blind – lowers accuracy by 15%, weak and pretty much useless.
- Suppression – in case of enemies it prevents their next action, in case of heroes it prevents any action till the end of your turn. Don’t bother casting suppression after the enemy’s attack – the effect will be lifted at the end of the turn for them and won’t be transferred into the next turn.
- Delay – if I understand this one correctly it delays the affected enemy activation to the very end of the current turn.
- Reposition – not really a debuff as the outcome is instant and works only once, but it is still an effect that can complicate your life or life of your enemies. Especially when the target will be put outside of its attack range.
- Ploy – steals a single action point from target, used by recruits.
Items
On the mission preparation screen press shift + l-click to take only one piece of a given item instead of the whole stack, e.g. single flare instead of 5.
Flares
In my opinion, the most important item when it comes to survival. The flare will reveal all nearby objectives including german outposts, loot crates, etc. When you are near a few objects and you want to avoid ambushes – go on and use a flare. They are quite expensive but you will find them in most missions and usually it won’t be necessary to restock them in the shop.
Compass
A must for longer missions with a lot of objectives, especially the ones that require you to find X objects that are not german squadrons. Compass will temporarily slow down action points loss on the map, effectively giving you more time to explore the map.
Weapon parts
A reward from any mission, also a rare drop from loot crate. Grenades and heavy weapon parts are the most expensive to both sell and repair. Then comes machine guns & rifles, then pistols, revolvers, and SMGs. When you got two similar missions to take – take the one with a heavier and more expensive weapon reward.
Medals
Same as weapon parts – always acquired for completing a mission, and can be found in loot crate as well. Medals can be used between missions, in base, in a skill menu as a consumable which adds 300 XP to a hero experience pool.
Med kits
Expensive, rather rare, can heal one person for a large amount of hp outside the battle. Consider them a good source of money and an emergency healing tool. You’ll still want to always have a healer in your team and with proper battle management, you won’t need the first aid kits anyway.
Camouflage
Recently added to the game, camouflage lets you turn into a ninja for a while – for a very short while. After using it there will be a percentage counter on the top-right corner of the screen which will rapidly decrease when you move. Try to use it as close to the enemy as possible since it works for like 4 seconds of moving, tops. When you attack an enemy there will be a question mark over their icon meaning you’ll ambush them. It drops pretty often, it’s not particulary expensive so feel free to use it a lot during missions. The effect of one less activation for the enemies may not seem like much, but it’s still pretty useful. The effect lasts ONLY for the first turn. Camouflage can be used vs mission objectives (yellow markers).

Ammo
There are 3 types:
- Short – 100 in a single stack, Used for SMGs, pistols, revolvers. Low damage, but cheap and common. 100-150 per mission should be plenty for 1-2 users.
- Long – 50 per stack. Used for rifles and machine guns. How much you will take heavily depends on a skill set. Aoe skills use a lot of ammo while a single rifle shot can use as low as one bullet.
- Explosive – 25 per stack, Used for heavy weaponry and grenades. Try to use it as effectively as possible. If the attack can hit 3 targets – hit 3 targets. With proper usage, you won’t have to buy them in shops. 2 stacks for a single user should be more than enough for a mission. Also, most attacks with this kind of ammo use two action points so you won’t be able to spam explosive attacks with the same person anyway.
Money
Used to strengthen city districts (morale boost) to repair weapons and to buy resources. A single stack accommodates 50, which makes it least effective use for inventory slot, as the full ammo or item slot is worth much more when sold. Always try to have at least ~100 to be able to repair any weapon you’ll get from a mission.
Weapons
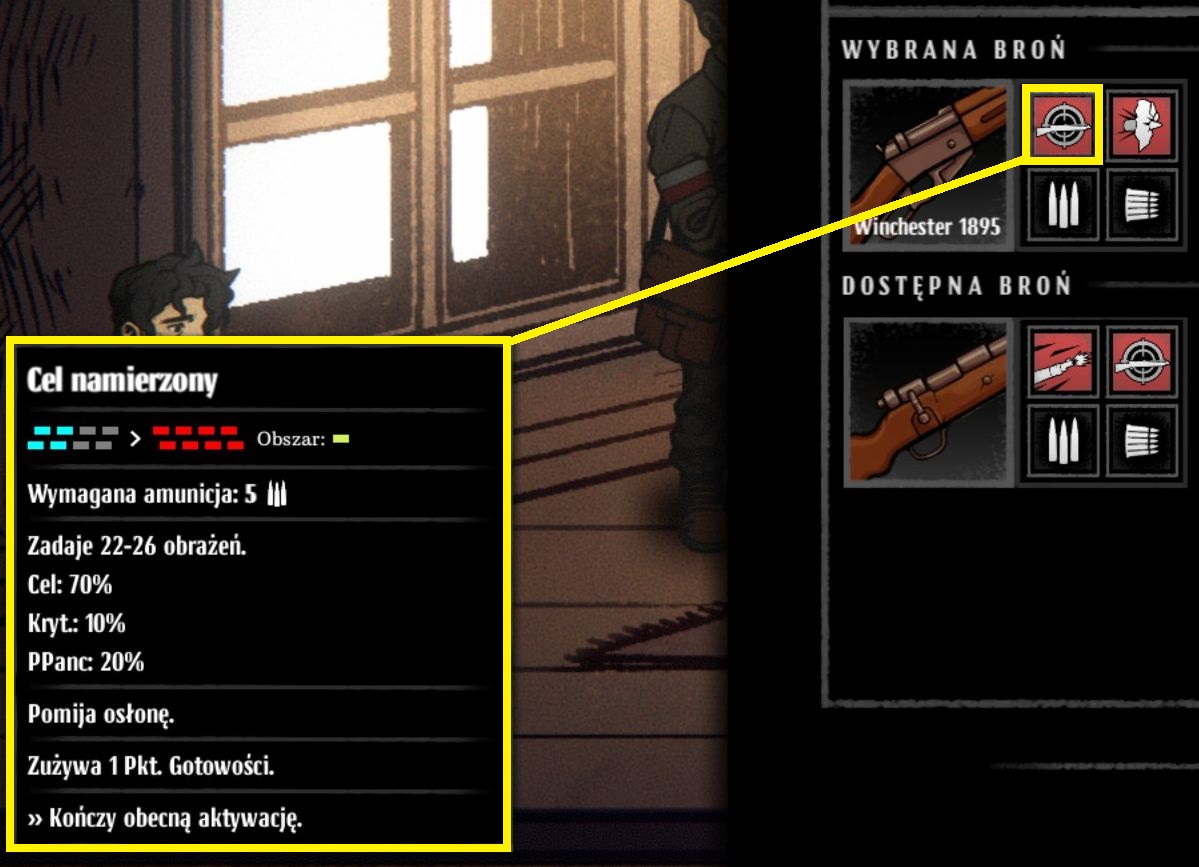
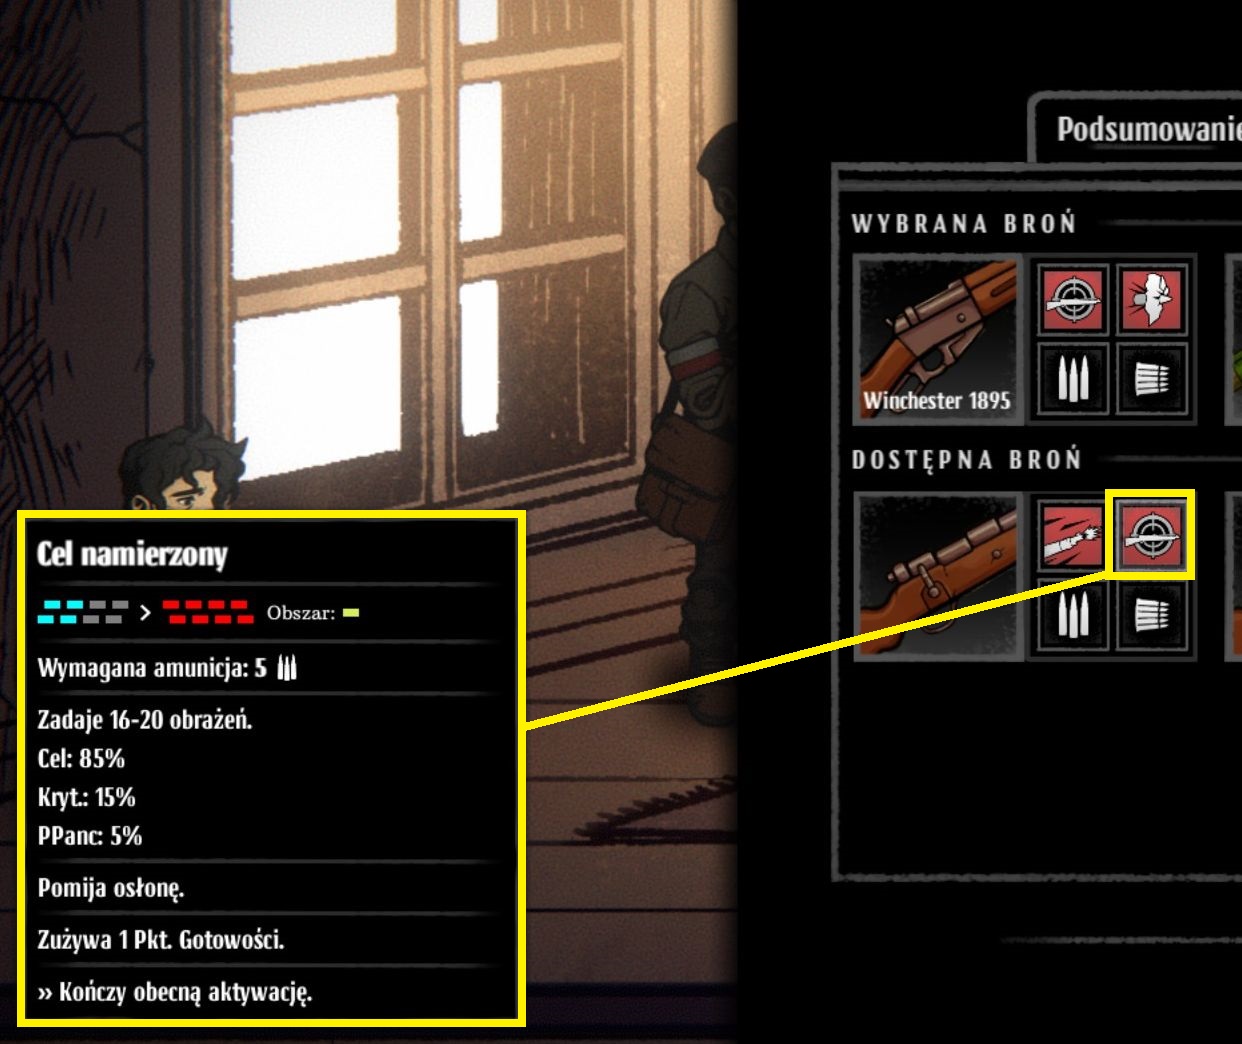
Parasol update – weapon model DOES matter and it alters the skill parameters.
See the following screenshots for comparison between the same skill for Winchester 1895 vs Kar98k used by Krzysztof:
Unfortunately I still don’t know if there is any way to change the displayed language to english.
However you can clearly see the differences:
List of weapons
In the following section I’ve listed all in-game weapons, so you’ll have an idea on how many you’re missing to get the corresponding achievements.
Pistols
1) Walther PP
2) TT-33
3) Mauser C96
4) Colt 1911
6) Luger P-08
8) Vis
9) Steyr M1912
Revolvers
1) S&W Victory
2) Nagant wz. 1895
3) Colt 1917
4) Lebel Model 1892
5) Webley & Scott Mk VI
6*) Enfield Mk3
7) Enfield No. 2
8) S&W M&P 1905
SMGs
1) Sten
2) MP 40
3) Lightning (PM Błyskawica)
4) MP 34
5) Thompson M1
6) MP-28
7) PPD-40
8) PPsh-41
Rifles
1) Winchester 1895
2) SWT-40
3) Kar98k
4) Gewehr 43
5) Lebel Model 1886
7) Mannlicher 1890 (currently M1888 in codex)
8) Mosin-Nagant
Machineguns
1) DP-27
2) Bren
3) MG 34
4) MG 42
5) MG 13
6) BAR wz. 1928 (aka polish Browning M1918)
Grenades
1) Molotov
2) Stielhandgranate
3) F1
4) No. 82 Gammon
5) ET-40 “Filipinka”
6) Nebelhandgranate
7) Stielhandgranate cluster
Heavy weapons
1) Piat
2) Panzershreck
3) UR wz. 35
4) PTRS-41
5) Panzerfaust
Unique weapons from personal quests
Zmija update introduced personal quests for our heroes and with them a set of unique powerful weapons. So far this weapons are not listed in the codex and I cannot verify whether or not they are counted towards the weapon-related achievements (since I got most of them already). As a side note – Władysław does not have any quest weapon, during his personal quest we will get broken parts of a random, normal rifle.
Helena – “Kercelak” rifle
Henryk – “Macher” revolver
Janos – “Remeny” rifle
Jadwiga – “Soteria” revolver
Kazimierz – “Radosny subiekt” (happy subject) – machinegun
Marian – “Józefina” (Josephine) – heavy weapon
Anna – “Dorotka” (Dorothy) – SMG
Krzysztof – “Szpon” (Claw) – Rifle
Ernest – “-Kara- mówisz” (-Penalty- you say) – revolver
Franek – “Mysza” (mouse) – pistol
Skills
Every character can use up to 4 skills + meele strike. Those 4 skills can be any mix of weapon attacks and character-specific skills, including passives.
Note about passive skills – they might be passive but you still have to equip them in one of 4 available skill slots.
1. Meele strikes

Currently there are 3 kinds of meele attacks:
Strike: 3-5 damage without any additional effects (e.g. Ernest and Konstanty)
Thrust: 1-3 damage + 3-row pushback (e.g. Władysław, Anna)
Pulling:1-3 damage + 3-row pull forward (e.g. Franek, Jan)
Do note that most enemies have a non-zero toughness values, and 10-15% is enough to mitigate some damage. Don’t be suprised when the 3-5 damage hit will deal 2 in most cases.
2. Notable starting skills
This section contains the most useful (in my opinion) early game skills for recruits and (mostly) starting characters with default weapons that I’ve been using to successfully survive through the whole uprising. For a more detailed guide and builds – see heroes section.


Historical aspect
This game is based on true events from World War II.
Some game mechanics might seem weird to you, some events may feel odd, but keep in mind this all actually happened and one of the goals of this game is to teach you about the past events.
Take time to read the index, to learn about the history of polish folks who fought germans. Read about the german army and their cruel deeds, see how the beautiful capital of Poland was completely destroyed. That’s why there is so much death in this game and that’s why many battles and events are so unfair – it was even worse for the citizens who decided to fight for their freedom during WW II despite having no chances of success against nazis.
If you wan’t to get more insight into the historical background of this game, check some wiki articles:
Warsaw uprising[en.wikipedia.org]
Auschwitz – german death camp[en.wikipedia.org]
Warsaw Ghetto[en.wikipedia.org]
Dirlewanger brigade[en.wikipedia.org]
RONA troops[www.warsawuprising.com]
Polish Home Army[en.wikipedia.org]
Enemies – part 1
There are two main types of enemies – infantry and machines. Machines cannot be repositioned (row change/push back), and the opposite row damage bonus does not apply to them. Other than that, mechanical enemies tend to have high armor values (% damage reduction) and high bleeding/burning resistances (it can still be applied if the resistance is below 100%). Ordinary suppression skills don’t work vs them.
Many infantry enemies cannot attack from all rows and repositioning them from front to back rows or vice versa can force them to change position instead of attacking you – abuse it.
Since Żmija update we can see a complete description of every encountered enemy in the codex, along with skills and attributes. I’m focusing more on hints and strategies since you can read all the details in game


Enemies – part 2


Heroes – introduction
The following chapters describe all characters that can be obtained in the game.
1. Acquisition
After every few missions there will always be an event present where one random hero will join your forces. If you are not particulary happy with the outcome – you can always close or Alt-F4 the game and load it again for a chance to get someone else.
After you’ve obtained a hero at least once – he/she will be added to the starting characters pool for custom campaign (without the tutorial).
2. Upgrades
- Skills – The skill progression went through complete overhaul in Żmija update and now depends solely on gained battle experience. See the gameplay – experience chapter for more detailed XP description. What is even more important than XP – the skill choice constraints are no more, meaning we no longer have to pick single skill out of a pair, and have to go through consecutive ‘1 out of 2’ choices but are free to pick and mix whatever we find useful. There are no tiers as well, and currentyly there is no randomness involved in leveling our character. The fact that we can currently create an unstoppable beast is somehow balanced by the different cost of every skill, thus game changers like Jadwiga’s continous care are super expensive to get XP-wise in comparison to less powerful skills.
- Stats – Apart from battle skills, as mentioned in the experience chapter, we can now invest points in stats as well – upgrading traits like accuracy, hp pool, resistances etc, effectively mitigating all drawbacks a given hero has. This balances the game greatly and makes even less favorable heroes useful – as we can just boost their stats instead of wasting resources on poor skills that won’t be used anyway. Stat upgrades are additive, so buying +4% accuracy bonus and then +8% accuracy bonus gives +12% bonus.
3. Stats
Every character is described by two sets of statistics.
- Battle stats – HP, debuff resistances, damage reduction, accuraty, critical chance etc. Naturally accuracy and critical chance affect weapon attacks.
- Character traits – one point means +10% bonus above 50% for skill check during mission events or post-mission events. E.g. “charisma +++” means 30% bonus which means (50+30) 80% success rate for charisma based checks.

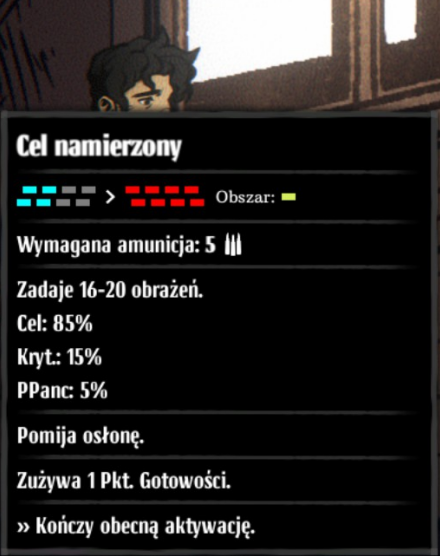
The above example shows the stats of the same skill “Target sighted” using the same weapon – Kar98k.
Stat comparison:
As you can see in case of accuracy 7% base difference equals 7% final difference, but in case of crit chance 3% difference converts to 2% final difference. This might be due to number rounding, because of other tested case: Krzysztof vs Wanda, weapon: Piat, skill: take cover, the outcome was exactly one to one.
All you have to remember: your hero parameters does affect the attacks now.
4. Personal missions
After fulfilling a codex entry for a hero (play 5 missions + gain 7k XP), a personal mission for this particular hero will be added to random mission pool on the city city map. In each case (so far) its as simple as to go and find the mission objective. Such mission gives us an extra story for the hero, +300XP for the party, +1000XP for the mission and an unique powerful weapon that does not require repairing. Personal missions may be played more than one time, giving us an easy XP boost along with another piece of decent weapon.
An example of how a personal mission looks like:

Heroes – example party setups
This chapter shows a few viable party compositions and reasoning behind the choices. This is based purely on my preferences and if you find you can do better – feel free to do as you please. Your setup will usually be a mix of anything described below anyway.
!!! Unless stated otherwise all placements are in rows 2 to 4 to utilize barricades in the front row !!!
1. The all stars

2. Rowdy fellow

3. Can openers

4. Can openers II

4. I need ammo

5. I need ammo II

6. The immortals

Heroes – Anna

- S tier.
- Stats: low hp pool, good accuracy & dodge chance.
- Very universal and powerful skillset.
- Uses SMG – mediocre weapon damage, poor vs armored targets.
- Most suited for 3rd row.
- +3 intuition, +2 agility skill checks bonus
Anna is a great damage dealer vs almost every enemy setup thanks to her snipe skill.
She is also one of the best anti-tank character due to her covering fire ability that will always pin down a single mechanical unit. Cap off is a great addition for burning/bleeding/aoe parties to finish off low hp enemies for free.
Example upgrade path
Get both accuracy bonuses first to ensure your snipe will hit more often. Grab covering fire next. Get cap off next or focus on more survivability (hp and dodge bonus). All other stuff is optional, she’s already lethal.
Example build:

Alternatives:


This is my typical anti-tank build. Snipe for killing frontine soldiers, Cap offfor other infantry if needed, slicing salvo if I’m forced to use 1 action point attack and covering fire vs machinery.
Covering fire can be switched to escape, controlled assault or any other weapon skill for either greater mobility or more offensive options if you are not fighting vs mechanical enemies.
Skills


Heroes – Wanda

- S tier.
- Stats: above average hp pool, low accuracy, good thougness.
- Best anti-tank character in the game.
- Heavy weapons and machineguns user, can attack all rows.
- Most suited for 4th row – or 3rd when using armor piercing aura & surrounded by allies.
- +2 knowledge, +2 agility skill checks bonus.
Great vs infantry groups, even better vs armored targets. Her starting weapons are all she needs to be a successfull damage dealer. Get to the limits armor piercing aura as the first upgrage. That single skill is all she really needs to shine. She can survive a lot due to her toughness and high hp pool, but will most likely take all debuffs on face. Loses a lot of potential if moved to the front rows. Consider invesgint most XP for accuracy and even more surivability.
Example upgrade path:
To the limits -> both accuracy bonuses -> optional demolition -> toughness/hp/evasion -> debuff resistances
Example build:


Alternatives:


This is a typical all around tank-ready build. You will most often start the battle with take cover to hit 3 enemies at once. You’ll want to have at least one machinegun skill to be able to attack with only one stamina point left – full salvo if someone else can take care of the back rows or slaughter for better aoe. To the limits can be swapped for something else if you don’t really need that extra armor piercing bonus, same goes for shield breaker as it’s purely anti-tank attack. Crippling strike is a decent anti-infantry skill as it is a 2×2 explosion with a chance to cause bleeding, but it is expensive (8 explosive ammo) and the Panzerschreck launcher is a rare weapon. Barricade can be useful early game as well, but this can be covered by your recruits.
Skills:


Heroes – Jadwiga

- S tier.
- Stats: average hp pool, below average accuracy, moderate dodge & crit chance.
- Best healer in the game, almost obligatory for toughest missions.
- Very versatile in terms of positioning, usualy placed in the middle of your team (T shaped setup) to maximize passive effects.
- High bleeding resistance. Mediocre resistances for other debuffs.
- +2 knowledge, +1 intuition skill checks bonus, uses revolvers.
Jadwiga is a decent healer with myriad of uses. Her continous care passive is a core for many team setups. Her kit revolves around healing and reducing activation cost. Unlike most other healers she cannot heal debuffs – but can prevent them from happening. Her starting attack skills are suprisingly useful, even in the late game. If you can only afford to have a single healer in your team or you want to fight vs the most difficult enemies like tanks or artillery – Jadwiga is the best choice.
Example build:

Alternatives:
Żmija update made Jadwiga into even greater healer because currently you can equip both auras on her and they are both damn good. Currently my typical build consists of one attack skill (highly weapon dependant), one healing skill and both auras. In terms of healing we got a single target first aid and the famed aoe passive. Such combo can cover most of our offensive and defensive needs. The truth is that even now most of her skills are useful and you are free to try other builds as well. E.g. get two skills that reduces activation cost when playing with Kazimierz utilizing rowdy fellow passive. I’d still leave at least one attacking skill on Jadwiga, just in case.
Skills:


Heroes – Krzysztof

- A/S tier.
- Stats: high hp pool, high accuracy & relatively high debuff resistances.
- Jack of all trades, can fit in most team compositions.
- Great substitute for Wanda or Kazimierz.
- Uses heavy weapons & rifles which makes him very universal pick.
- Most suited for 3rd or 4th row.
- +3 toughness, +1 constitution skill checks bonus
This guy is a versatile anti-nazi terminator right from the start. He doesn’t really need any upgrades to be a decent addition to almost every team. Weapon composition mixed with his high accuracy makes him very effective and lethal. He can both do an aoe strike with explosives or kill enemies one by one with a low-cost rifle skills. He can be specialized for a tank killer or to be even more lethal vs infantry targets. When your Wanda is wounded or you don’t have her – Krzysztof can serve as your main armor piercing damage dealer. Oh – and he can survive a lot due to high HP and high debuff resistances. Why not S tier then? Because his other skills are either too expensive or not that great overall.
Example upgrade path:
Accuracy -> one or both counterstrike auras -> you are godlike already, use excessive XP however you please.
Example build:


Alternatives:

As you can see this is his default build and it is actually decent and very universal. It has both good aoe damage, and good single target skills. If you want to invest medals into upgrades then you got a few valid options to change either his decoy skill or one of the rifle skills.
Skills


Heroes – Marian

- A tier.
- Stats: highest hp pool in the game, above average accuracy, good resistances & toughness.
- Uses pistols, heavy weapons and his exclusive flamethrower.
- Great frontline tank with versatile skillset.
- Most suited for 2nd row, 1st is viable as well.
- Can be played with minimum ammo consumption.
- Decent, consisten performance independent of RNG.
- +3 constitution, +2 charisma skill checks bonus.
Marian is an unique character that can serve as a tank, a frontliner, a damage dealer and as a support both vs infantry and vs machinery. His pistol will be used mostly for repositioning and debuffing enemies (push back, suppression, bleeding), while his flamethrower will compliment it by adding aoe burning and yet another suppression. On top of that he can use high damaging explosive strikes. In theory this versatility enables Marian to be placed in any row depending on build, but my preferred one is 2nd – as the most universal position when he can use most of his kit.
Example upgrade path:
Wall of fire -> dodge/hp/resistances -> accuracy -> any skill we find viable. We will be using his flamethrower most of the time, the accuracy bonus is not that critical. Since Marian is typically placed on the frontlines the resistances and/or hp/dodge bonuses are a viable choice. You are free to take any skills at any time (like rioter), I just don’t find them that useful.
Example build:

Alternatives:

The all around build got it all – free aoe burning, extra bleeding for double damage over time debuff (+repositioning), good armor piercing strike and a free aoe crowd control. You can switch incinerate for rioter(?) aura, you can also switch shieldbreaker for take cover or run of luck if you plan to play on 3rd or 1st row.
Skills


Heroes – Helena

- A tier.
- Stats: average hp pool, low accuracy & mediocre resistances.
- Versatile, powerful skillset.
- Can only use rifles.
- Needs upgrades to shine, got two extra skills gained with levels.
- Can earn you a lot of money – see skills section.
- Most suited for 3rd or 4th row.
- +3 charisma, +1 knowledge.
Don’t be deceived by her poor base stats – this blonde lady with a cable spool on her back is a versatile powerhouse. If you are concerned by her low accuracy – Gewehr 43 (+20% acc) or Mannlicher 1890 (+15% acc) is all you need to be the Simo Häyhä[en.wikipedia.org] of Warsaw’s uprising. Her starting skill – noise is useless, and you’d like to her more powerful skills early. Consider Helena a sniper-support character that lacks anti-tank potential and be sure to read the skills section to get a better idea on how to play her.
Example upgrade path:
Cocktail party -> accuracy bonuses -> Call reinforcements / Connected and coordinated or any other skill of your preference -> survivabiliy or critical chance bonuses depending on playstyle
Economy build:
Support build:

Alternatives:


Since you won’t be able to afford getting all her skills – try to pick your preferred playstyle and buy skills accordingly. Get one or two attacking skills for the rifle of your choice and some high cost skills that will determine her role – like call reinforcements or cocktail party or comforting transimission.
Skills


Heroes – Kazimierz

- A tier.
- Stats: above average hp pool, average accuracy & resistances.
- Versatile, consistent performance, few different play styles.
- Can use rifles and machineguns.
- Most suited for 3rd or 4th row.
- +3 charisma, +1 intuition.
Kazimierz is a decent starting character and he proves to be useful through the whole game. His skills are (mostly) straightforward and are not prone to RNG. His base accuracy is acceptable, he can survive a lot of beating and he will be your most trusted guy when it comes to charisma-based skill checks. There are a few drawbacks that keeps me from giving him S rank – he lacks anti tank capabilities (except ‘rifle grenade’), his buffs/debuffs are meh, his rowdy fellow passive is inconsistent and his performance is greatly hindered in the front rows. There are three main ways of playing him: all-arounder, economy sniper or a damage dealer with support. PS – give him Bren machinegun (or any other with good accuracy bonus) and you are golden.
Example upgrade path:
Starti with both accuracy bonuses. Then pick any preferable subset of skills, then invest XP into critical chance. You can also get rowdy fellow asap and then follow up with accuracy and cc.
Economy sniper build:
All-around build:
Damage dealer build:
Alternatives:


You can clearly see how versatile this builds are.
Eco revolves around single shot that costs only one long bullet and the garbage collector passive to help us maintain the ammo pool in the long run. The secondary attack: target acquired is there for greater flexibility and the suppression grants him an extra utility vs priority targets. Use it when you are extremely low on ammo.
All around build is my everyday build for Kazimierz. It’s very flexible, it has both good aoe and single target damage and a handy pin down, this is a no brainer.
Damage dealer build is based on a rowdy fellow passive and needs a support with cost reduction/replenish skills to really shine. Since every attack costs 2 activation points you’ll want to replenish as much points as possible. This build has an extreme damage potential and you’d like to use a lot of AOE skills to maximize the effect – like slaughter or crossfire. Single shots for over 40 damage or crossfire killing an entire group in 2 salvos are a common view. The only problem with this build – it’s inconsistent. You can get a +50% damage bonus, or a great critical chance bonus one turn and completely nothing for your next attack. Do note that skills like buffs or debuffs are unaffected by the rowdy fellow effect. They will still cost 1 action point and their effect won’t be altered in any way. Give this build a try – even for the ‘wow’ effect alone, like this one:

Skills


Heroes – Bronisław

- A tier.
- Stats: decent hp pool, above average accuracy, high thougness.
- Great tank and an excellent choice for a frontline unit.
- Uses machineguns and SMGs
- Most suited for 2nd row.
- +3 intuition, +2 constitution
This guy is tough. His tanking potential is great and he can still pack a punch with his machinegun attacks. He is usable right from the start due to his stay behind me skill and DP-27 machinegun. He synergizes well with Władysław (the doctor) who can make Bronisław a true brick wall with additional damage reduction buffs. In the current game version he is a rare sight however. I was able to get him only in the late game and only after numerous rerolls (loading the same save file over and over). This should change when ‘Baszta’ update will be released out of beta stage as the odds of getting rare characters were increased.
Example upgrade path:
Start with armor bonuses. Why? Because you can! And because being immortal is pretty cool. Follow with draw fire, accuracy bonuses and any skills you’d like to use.
Example build:

Alternatives:
This is a typical frontline tanky build. You will want to use stay behind me at the very beginning of a fight to maximize its effect. Draw fire compliments his taunt greatly and is highly recommended. The two gun attacks are up to you. Full salvo is very universal and push back / slicing salvo both serve as an additional utility. You can consider slaughter if you want to have any attack that will work from the back rows in case of repositioning.
Skills


Heroes – Jan

- A/B tier -> A with upgrades
- Stats: high hp, low base accuracy – mitigated by starting weapon & skills, low crit & dodge chance, low resistances (except suppression)
- 90% suppression resistance
- Powerful starting rifle
- Can use rifles and grenades
- Most suited for 4th row, or 1-3 with a different rifle
- +2 toughness, +2 agility, +2 constitution skill checks bonus.
There are two great things about Jan – his starting rifle and his suppression resistance. When you upgrade him, there will be three great things about Jan – two of the above and his passive healing. His weapon – Mannlicher 1890 is a decent rifle with high damage skills and good accuracy bonus (+15%). You will most likely stick with both skills this weapon provides. On the other hand – to utilize them you’d like to place Jan in the 4th row, which makes his grenades more problematic to use. You can consider swapping the weapon for something that can be used from the front rows – like Kar98k to utilize better grenade skills, but in my opinion it’s not worth it due to low accuracy of grenades and their relatively lower damage compared Mannlicher 1890. His starting skill is basically a waste of activation due to how random and situational it is. You’ll find yourself using One-two skill most of the time anyway.
Example upgrade path:
Get both accuracy bonuses to compensate for his low base stats. Follow with perseverance and optionally – methodical. Anything else is situational. I’d get critical chance to compliment his extensive rifle usage.
Example build:
Alternatives:
My preferred setup is a simple damage dealer build using Jan’s default Mannlicher 1890 rifle.One-two is what I tend to use 70% time, shatter is there to finish off any single targets and vs machinery. Two passives for extra damage and free healing. Simple yet very effective build. Grenade skills are not really worth it due to low damage & accuracy. Rifle skills can be swapped for whatever suits you, when you decide to switch weapon to something like Gewehr 43 or SWT-40.
Skills:


Heroes – Karol

- A/B tier.
- Stats: high hp pool, good accuracy & resistances vs bleeding & blindness.
- Uses SMGs & grenades.
- Versatile skillset with good passives.
- Most suited for 2nd or 3rd row, depending on used weapons.
- Consumes a large quantities of ammo.
- +2 toughness, +2 agility skill checks bonus.
Karol, Cichociemny[en.wikipedia.org] is an iteresting character. Super weak early with default weapon and without upgrades, becomes a viable pick later in the game with upgrades and when equipped with better weapon (like Thompson M1 or MP 28). His starting skill ace up one’s sleeve is what makes him usable early – use it often.
Example upgrade path:
Start with one (or both) accuracy bonuses to make ace up one’s sleeve more reliable source of damage. Then keep buying skills of your choosing (see example builds) and finish off with critical chance or dodge bonuses.
Example builds:
Standard:
Anti tank:
Alternatives:


With a good weapon, slicing salvo will be your main damage tool due to good damage, good accuracy and extra bleeding debuff. His ace up one’s sleeve often misses but it’s still more reliable than grenades. It’s even better when paired with saboteur passive. He is not as good as Wanda or Krzysztof vs armored targets, but his anti-tank built is still a viable alternative if you don’t have the mentioned heroes. You may notice that pretty much all of his attacks are very ammo-hungry and he does not have many options to attack the back rows. Keep that in mind and take someone with rifle to take care of the back rows, preferably in a cheaper way (ammo-wise).
Skills:


Heroes – Martin

- B+ tier
- Stats: high hp pool, average accuracy, good toughness & resistances.
- Uses SMGs & grenades.
- Gameplay concentrates around buffs,
- Random and unreliable performance.
- Most suited for 2nd row, requires 2×2 formation.
- Weak without upgrades and better weapon.
- +2 toughness, +1 agility, +1 consutution, +1 intuition, +2 charisma.
Martin the BuffMeister. His playstyle revolves around getting buffs with former comrades in arms and casting them on your team with knowledge of the enemy. Without a good weapon and with no upgrades he is just a waste of a mission slot but with proper build AND proper enemy setup he is a beast. For best effects he must be played in 2×2 formation on 2nd or 3rd row to maximize his kit effectiveness. Due to the random nature of encountered enemy squadrons his performance will vary greatly from skirmish to skirmish. The more buff casters on the enemy team – the merrier. Try to pair him with at least one good buff caster (with tier 2 buffs) on your side, Jadwiga works well with Martin as well since she can renew buffs duration on him.
Example upgrade path:
Start with former comrades in arms, follow with accuracy bonuses, then get any other skills you’d like to use.
Example build:

Alternatives:
Skill:


An example of a proper way to manage buffs with 4 enemy buff casters:

Heroes – Wladyslaw

- B tier.
- Cannot use weapons -> cannot use any weapon skills.
- Stats: above average hp pool, his attack-related stats does not matter – see above.
- Basically a weaker version of Jadwiga with more focus on buffs/debuffs.
- Starts with only two skills, needs upgrades to be useful.
- +3 knowledge, +1 intuition, +1 charisma skill checks bonus.
- Has problems with alcohol.
- Hight bleeding & burning resistances, very low blindness and pin down resistances.
Definitely not your first choice in terms of healer, as Jadwiga outperforms him and is more universal, Władysław can still be useful and got his own niche. He has numerous healing options and he can make your team more resistant to damage. His only damaging skill is painful mixture so consider placing him in a team where other folks can mitigate his lack of damaging potential.
Example upgrade path:
You’d like to get two skills asap to fill all skill slots. Pain relief, patient care or increased care are a great candidates to rush. Spend all excessive XP into tankiness, since any offensive bonuses are useless on Władysław.
Example build:
Alternatives:
Since we have to invest a lot of XP into this guy we will use both starting skills for the most time anyway. You can consider 2×2 team placement instead of T-shape to maximize effect of both starting skills. Also placing Władysław in front of other comrades will help us to make use of his relatively high survivability and debuff resistances. Regarding other skills – if we have no need of healing then moving two action points via increased care from Władysław to our damage dealer (like Wanda) can be pretty useful, Throw in the pain relief passive to make your team even more tanky. Alternatively if you REALLY need to deal any damage take painful mixture, and if you prefer single target healing – then medical recommendations is a valid choice if you can afford repositioning.
Consider the following team placements for better starting skills utilization and less aura efficiency:
or
Skills:


Heroes – Ernest

- B tier.
- Stats: very high accuracy & hp, relatively high critical hit chance, good toughness and medium debuff resistances.
- S**tty skills.
- Uses machineguns and revolvers.
- Difficult placement: most skills work from front-mid rows, most MG attacks require back rows.
- High damage starting weapon – MG 13
- +1 toughness, +3 constitution, +2 intuition skill checks bonus
A newest addition to the heroes pool, Ernest is rather unique persona. His very high base statistics combined with his high damage starting machinegun – MG 13, make him both very tanky, accurate and lethal. He becomes even more deadly when equipped with weapons having high critical chance bonus – like MG 34 (+15% crit chance). His skills, are rather problematic to use along with machinegun due to placement restrictions. Let’s face it – typical MG user is placed on a 3rd or 4th row, while most of Ernest’s skills are usable from 1-3. You are more than welcome to try different combinations with revolver skills as well, and suggest me some viable builds.
Example upgrade path:
Get deatly squad aura, then all crit chance bonuses and optionally accuracy bonuses if you have low tier machinegun. Use all excessive XP for active skills of your choosing or more tankiness.
Example build:

Alternatives:


Deadly squad is obligatory, no exceptions. You can optimize your team for critical hits – with mentioned MG 34 on Ernest and weapons like Panzerfaust on Wanda etc. for some ridiculous damage potential. If you don’t own any top tier revolver – you can safely skip his revolver skills, unless you are short on long ammo or want to place him in rows other than 3 or 4. An extra note about his awareness skill – many build have limited range so awareness can be used to mitigate this drawback, also using it on guys like Krzysztof (or other rifle user) can help to make single shot skill able to hit any enemy in a cheap and efficient way.
Skills:


Heroes – Franek

- B tier.
- Stats: average hp,accuracy & above average resistances.
- Good dodge chance.
- Low damage but good supporting potential.
- Uses pistols & grenades.
- Good for conserving ammo.
- Most suited for 2nd row.
- +3 agility, +1 intuition skill checks
Everyting about this little fella is mediocre. His mediocre tankiness, average accuracy, weak healing, low damage pistols and unreliable grenades. He is definitely not a damage dealer, nor a healer but he can serve as a support for others. He is also a viable pick when we are low on ammo, as two of his skills are dedicated for economic playstyle. A perfect position for him is the second row, right behind the barricade, where he can soak much more damage, or just avoid hits more often than others thanks to his relatively high dodge chance.
Example upgrade path:
Start with ammo generator skills if you want some early eco, if not then get accuracy & dodge bonuses and follow with any skills you’ll find useful.
Example builds:
Standard
Support:
Eco:
Damage dealer:
Alternatives:


There is plenty of viable builds on Franek with no winning ‘meta’. I tend to play him with either standard or support builds for more versatility. I also tend to take Franek on easier missions, which does not include a lot of fighting, especially not vs armored targets as his grenade strikes are too unreliable and not too good in penetrating armor. I also always try to take another healer with me, usually a recruit with helping hand, since Franek’s healing potential is poor. You may notice that there are the same pistol skills: Potshot & Stinger in most builds. This is due to the fact that he might not be a great damage dealer, but repositioning enemies is still viable in most setups, so are debuffs – in our case bleeding. His grenade strikes are all expensive and unreliable due to low accuracy and randomly picked targets. If you have to pick one – take conflagration early game and more expensive but also more accurate peculiar parcel in the later stages when you can afford the ammo cost.
Skill comparison


Heroes – Konstanty

- C tier -> B+ with a good weapon
- Stats: high hp pool, above average resistances and toughness, good accuracy
- Most of his skills don’t use ammo.
- Uses SMGs and pistols.
- Must be placed in the first row to utilize most skills.
- Good vs infantry, useless vs machines.
- Weak starting weapons
- +1 toughness, +2 agility, +2 constitution, +1 intuition skill checks bonus.
Our ulhan[en.wikipedia.org] was buffed recently and after both his bleeding chance buffs (nerfed a bit in Zniwiarz update) and introduction of different weapon stats he is actually not as useless as before. He is a frontline unit and his gameplay consists of slashing, debuffing and dispelling enemies. He does not have a single good armor piercing skill, also both pistols and SMGs are not really good vs tanks. Konstanty can be used to conserve a lot of ammo, especially early game when there is not a lot of armored enemies present. The major issue with him is his placement – he needs to be placed in the first row, otherwise you won’t be able to use most of his skills. Placing him there means he will always receive full damage and hiding behind a barricade is not an option. On the other hard, some weapon skills can only be used from the 1st row, so Konstanty is the best candidate to utilize them. Both his starting guns are poor in terms of damage and utility and he REALLY needs a better weapon to shine. Get him a better pistol like TT-33, Luger P08 or a good SMG (like Sten) and his efficiency will skyrocket.
Example upgrade path:
Since Konstanty is played from the first row – prioritize surivability bonuses: dodge, hp, armor. Then pick any skill(s) you’d like to use and put all spare XP into even more surivability. Accuracy it not especially critical since we won’t shot often plus Konstanty’s base accucary is excellent.
Example build:


Alternatives:
As you can see, my typical build is a mix of slashing, utility and damaging skills. Obviously your build will heavily depend on the weapons you got. Keep in mind that you can slash heavy weapons like mortars or Paks. You can also take only one slashing skill with you to make a room for one of his passives or just more damaging skills.The fact that his sword skills does not deal any direct damage is a joke and a huge drawback. I mean come on, you can deal damage with a tiny knife but a big-ass saber can only apply bleeding…
Skills


Heroes – Janos

- B tier.
- Stats: high hp pool, high debuff resistances, good toughness
- Potentially a great tank-support but with some serious issues
- Uses rifles & revolvers. Starts with Kar98k.
- Inconsistent, gameplay revolves around debuffs
- Despite being a tank back rows are best for him
- +3 constitution, +2 toughness skill checks bonus
Janos is a survivor of GERMAN DEATH CAMP – learn ur history folks and don’t let anyone to rewrite the historical facts. He lived throuh hell, he is hardened by the horrors of the concentration camp and and this is indeed reflected in his skillset. His gameplay revolves around debuff management. The more debuffs the enemies are using the stronger Janos becomes. So he relies on getting negative effects but on the other hand he got high debuff resistances which hinders his skillset. This makes him very inconsisten and thus I consider him B tier only. It is also possible to completely abandon this part of his skills and focus on attacks only – then we are getting a decent, tanky and a rather accurate rifleman. 4th row is my preferred position for him due to excessive use of one two, 3rd is more suitable for debuff builds. Dont bother with his revolver skills – not worth it.
Example upgrade path
- Weapon oriented: get accuracy bonuses, then will to live and reckoning (in any order). Optionally get survivor and place all other XP into stats.
- Debuff oriented: survivor -> camaraderie -> mental fortitude.
Example build
Debuff oriented
Alternatives
Skills


Heroes – Henryk

- B+ tier.
- Stats: below average hp, above average accuracy & resistances, good dodge.
- Support class.
- Uses SMGs and revolvers.
- Most suited for 2nd or 3rd row.
- Weak starting weapons.
- +3 knowledge, +2 intuition bonus.
Henryk gives a rather negative first impression – very weak weapons, average stats and poor starting skill. He needs XP and a better SMG to be considered viable. Henryk is a support and should be played as such – in late game I was hardly using his skills, but his presence alone was more than enough to ensure smooth nazi slaughtering.
Example upgrade path:
Start with excellent command then refreshment and/or coordinated actions. Get accuracy and crit chance bonuses along with (optional) lethal shot. Finish with either dodge and hp/toughness bonuses or any other skill you’ll find useful.
Example build:
Alternatives:
Skills:


Misc. & bugs
Stuff that is not suitable for any other chapter.
1. Save location
Saves are located in C:Users<current user>AppDataLocalLowPixelated MilkWarsaw
If you are tired of constantly losing and just want to get it through the game – you can ‘scum save’ and periodically make a copy of save files.
3. Performance issues
I’ve noticed that after around half of the game when the city begins to burn there will be a dramatic increase in map loading times. The game will be unresponsive for a while and then it will continue to load as nothing happened. This will most likely be fixed soon, but still, be aware this is not a game-breaking bug – just wait a while longer – IT’S MUCH BETTER IN THE ZNIWIARZ UPDATE
4. Index issues
- When you acquire a new weapon it won’t be immediately visible in the codex. You have to complete the next mission first – FIXED IN PARASOL UPDATE.
- Maybe it’s just me but after killing 4 tanks (Panzer IV) I still don’t have it listed in the Index. – FIXED IN ZNIWIARZ UPDATE
- Index bugs seems to be (mostly) fixed but I’m yet to prove it.
Credits
List of people who helped me to make this guide better:
El Presidente – translation errors, enemies and skills suggestions.
Tacitus – a bunch of helpful tips about enemies and heroes.
Kratochek – for pointing out that weapon stats do matter in the latest update.
Lord Chanka – list of missing weapons and character tips
Haxinous – for pointing out that SS veteran can strip staminaa points
idkwhattosayk? – numerous tips and strategies I was not aware of + translation errors
Prussian Wolf – translation errors
awg – translation errors