
Overview
This guide will go over the basics of weapon modding for Ravenfield and provide a list of required softwares, as well as helpful links. People with better insight, feel free to give suggestions to this guide.
Intro
Welcome to my weapon modding guide for Ravenfield. I will do my best to provide all the resources and tips you need to start making your own modded weapons. I’ll cover everything in as clear terms as possible. For the example, I will be using my own RK5C since it is already made and covers almost every topic. This guide will be in depth and long, so be prepared to spend some time.
If you want a quick way to see all the videos in this guide, I’ve added them all to playlists on this channel: https://www.youtube.com/channel/UCcvpo3AJvQQg62Xa8Kd8H3g?view_as=subscriber
What you will need:
You will need several softwares (all of which can be free) to mod for Ravenfiled.
The first is Unity 3D version 5.6.3p1, found here: [link]
size: ~4 GB
Cost: $0
Next is a 3D rendering software of your choice, I use Blender since its free, but its down to personal preference. For this guide I will be using blender, but most of this applies to other softwares. Found here: [link]
size: <1GB
cost: $0
Or 3DS MAX: [link]
Size: ~6 GB
Cost: $0 [student, up to 3 years], $185/month otherwise
Lastly you will need the ravenfield tools pack. This is found at: [link]
Size: <1GB
Cost $0
Optional, but recommended:
Audacity, an audio editing software. If you have a background in audio editing/SFX, this can be a powerful tool. Or if you’re a lazy hack like me, you can simply use it to cut and splice sound effects downloaded for youtube. Found here: [link]
Size: <1 GB
Cost: $0
Additionally, you can get discord and join the Ravenfield Channel. It is a useful resource for getting help.
Discord: [link]
Size: online
Cost: $0
invite link: [link]
There is also a subreddit, it is not terribly active, but its still a nice community: https://www.reddit.com/r/Ravenfield/
Modeling
Your first task will be modeling your weapon. This is one of the longer parts of the process and will take some time to get good at. It requires patience and creativity to master making weapons in 3D.
It is important you get acquainted with blender’s UI and functions, for that, these tutorial series are excellent.
I recommend watching both in their entirety.
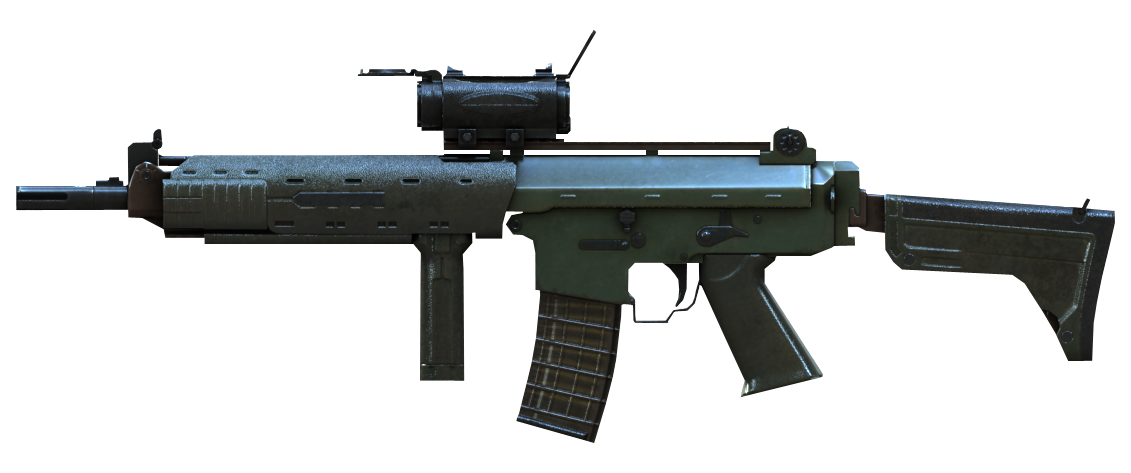
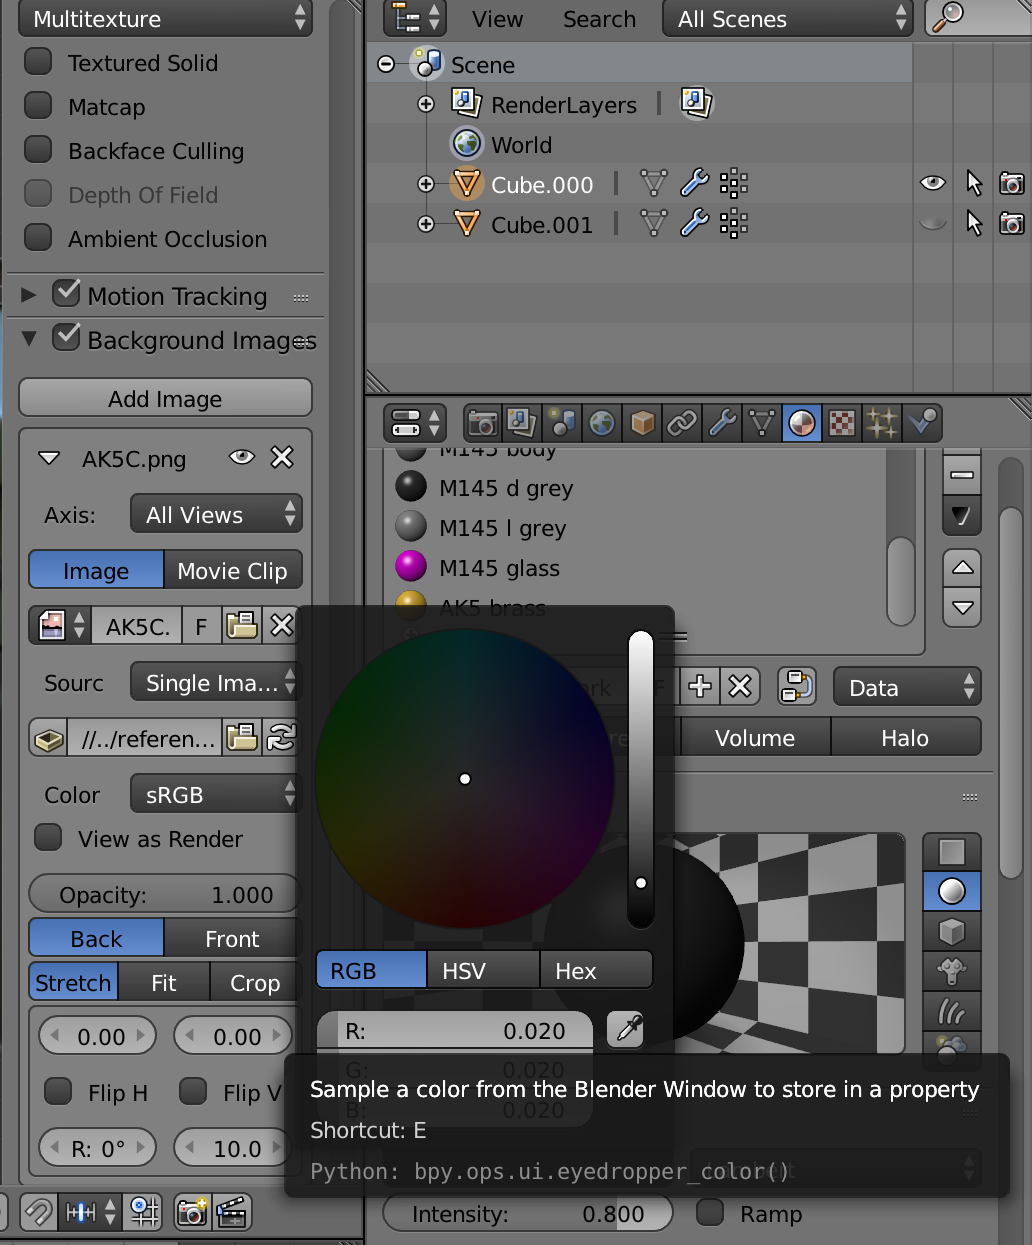
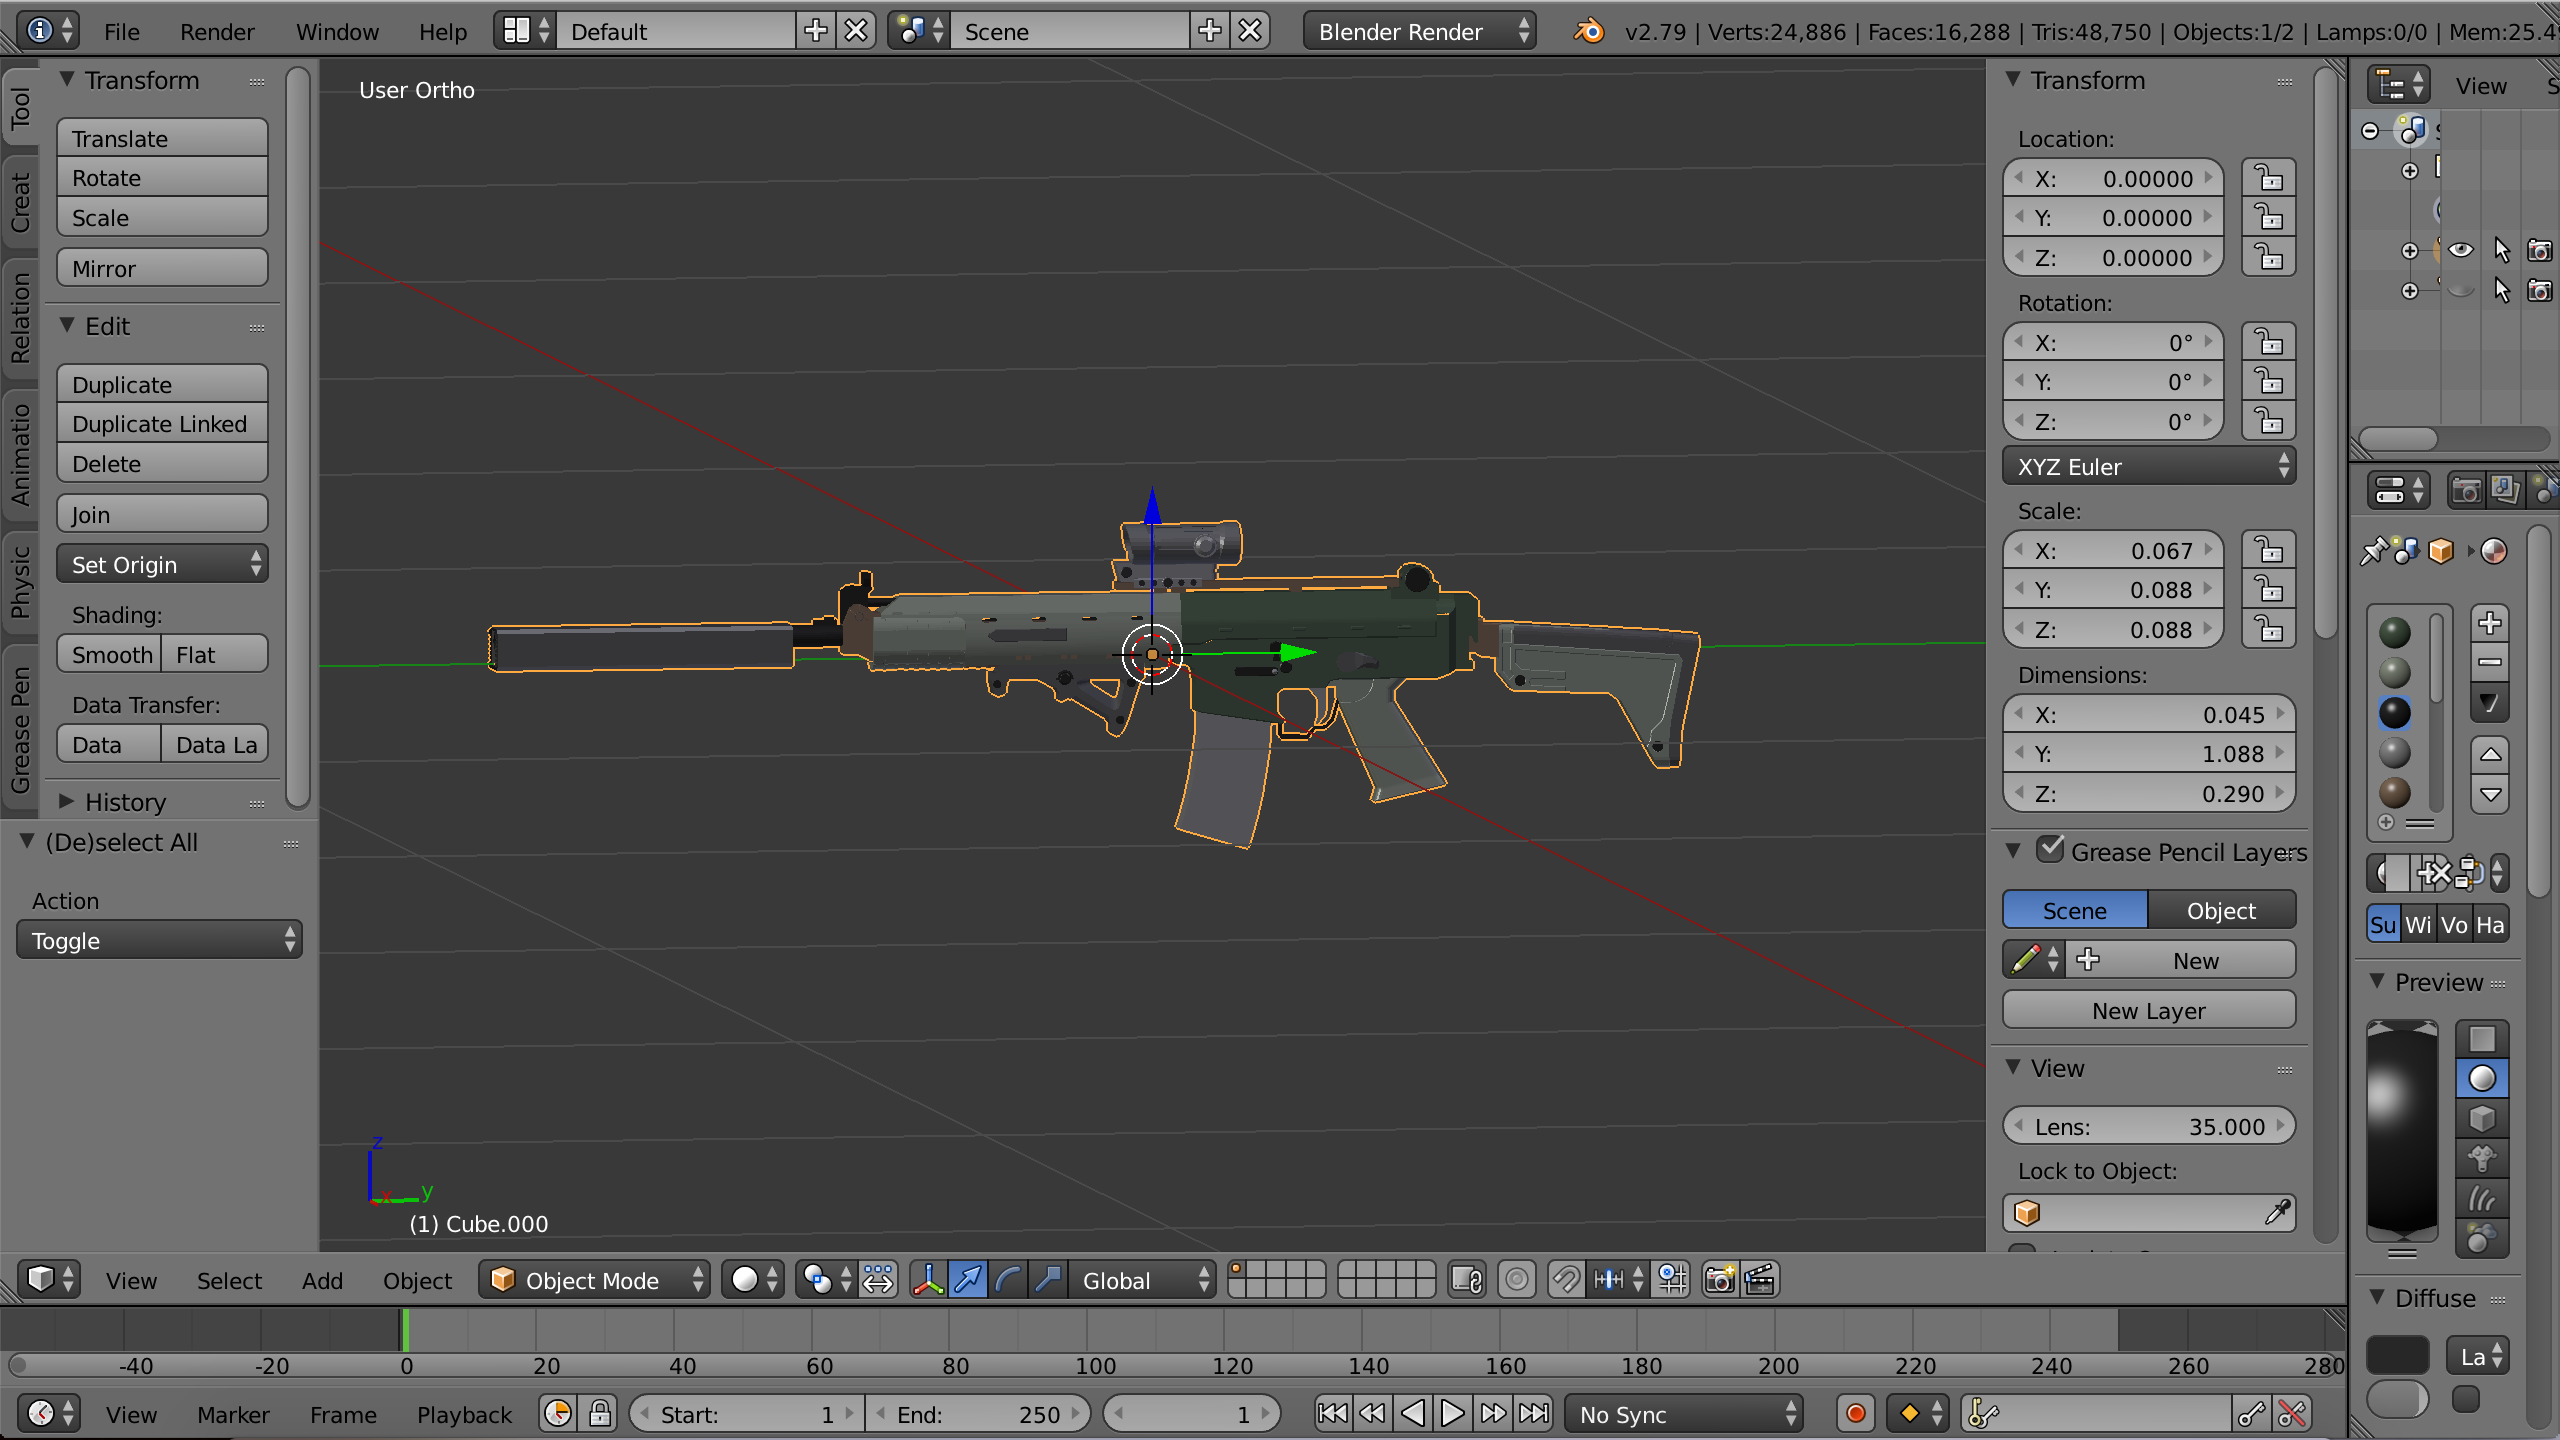
You will need a good reference image to start. Simply Googling your weapon of choice will yield the best results. For our example, we will use the AK5C since I have already created it. This particular reference image was taken from Battlefield 4. You want an image that is side-on with little to no rotation, and high quality.
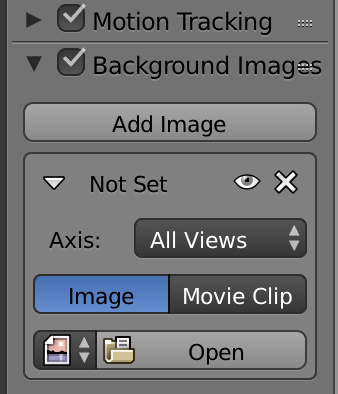
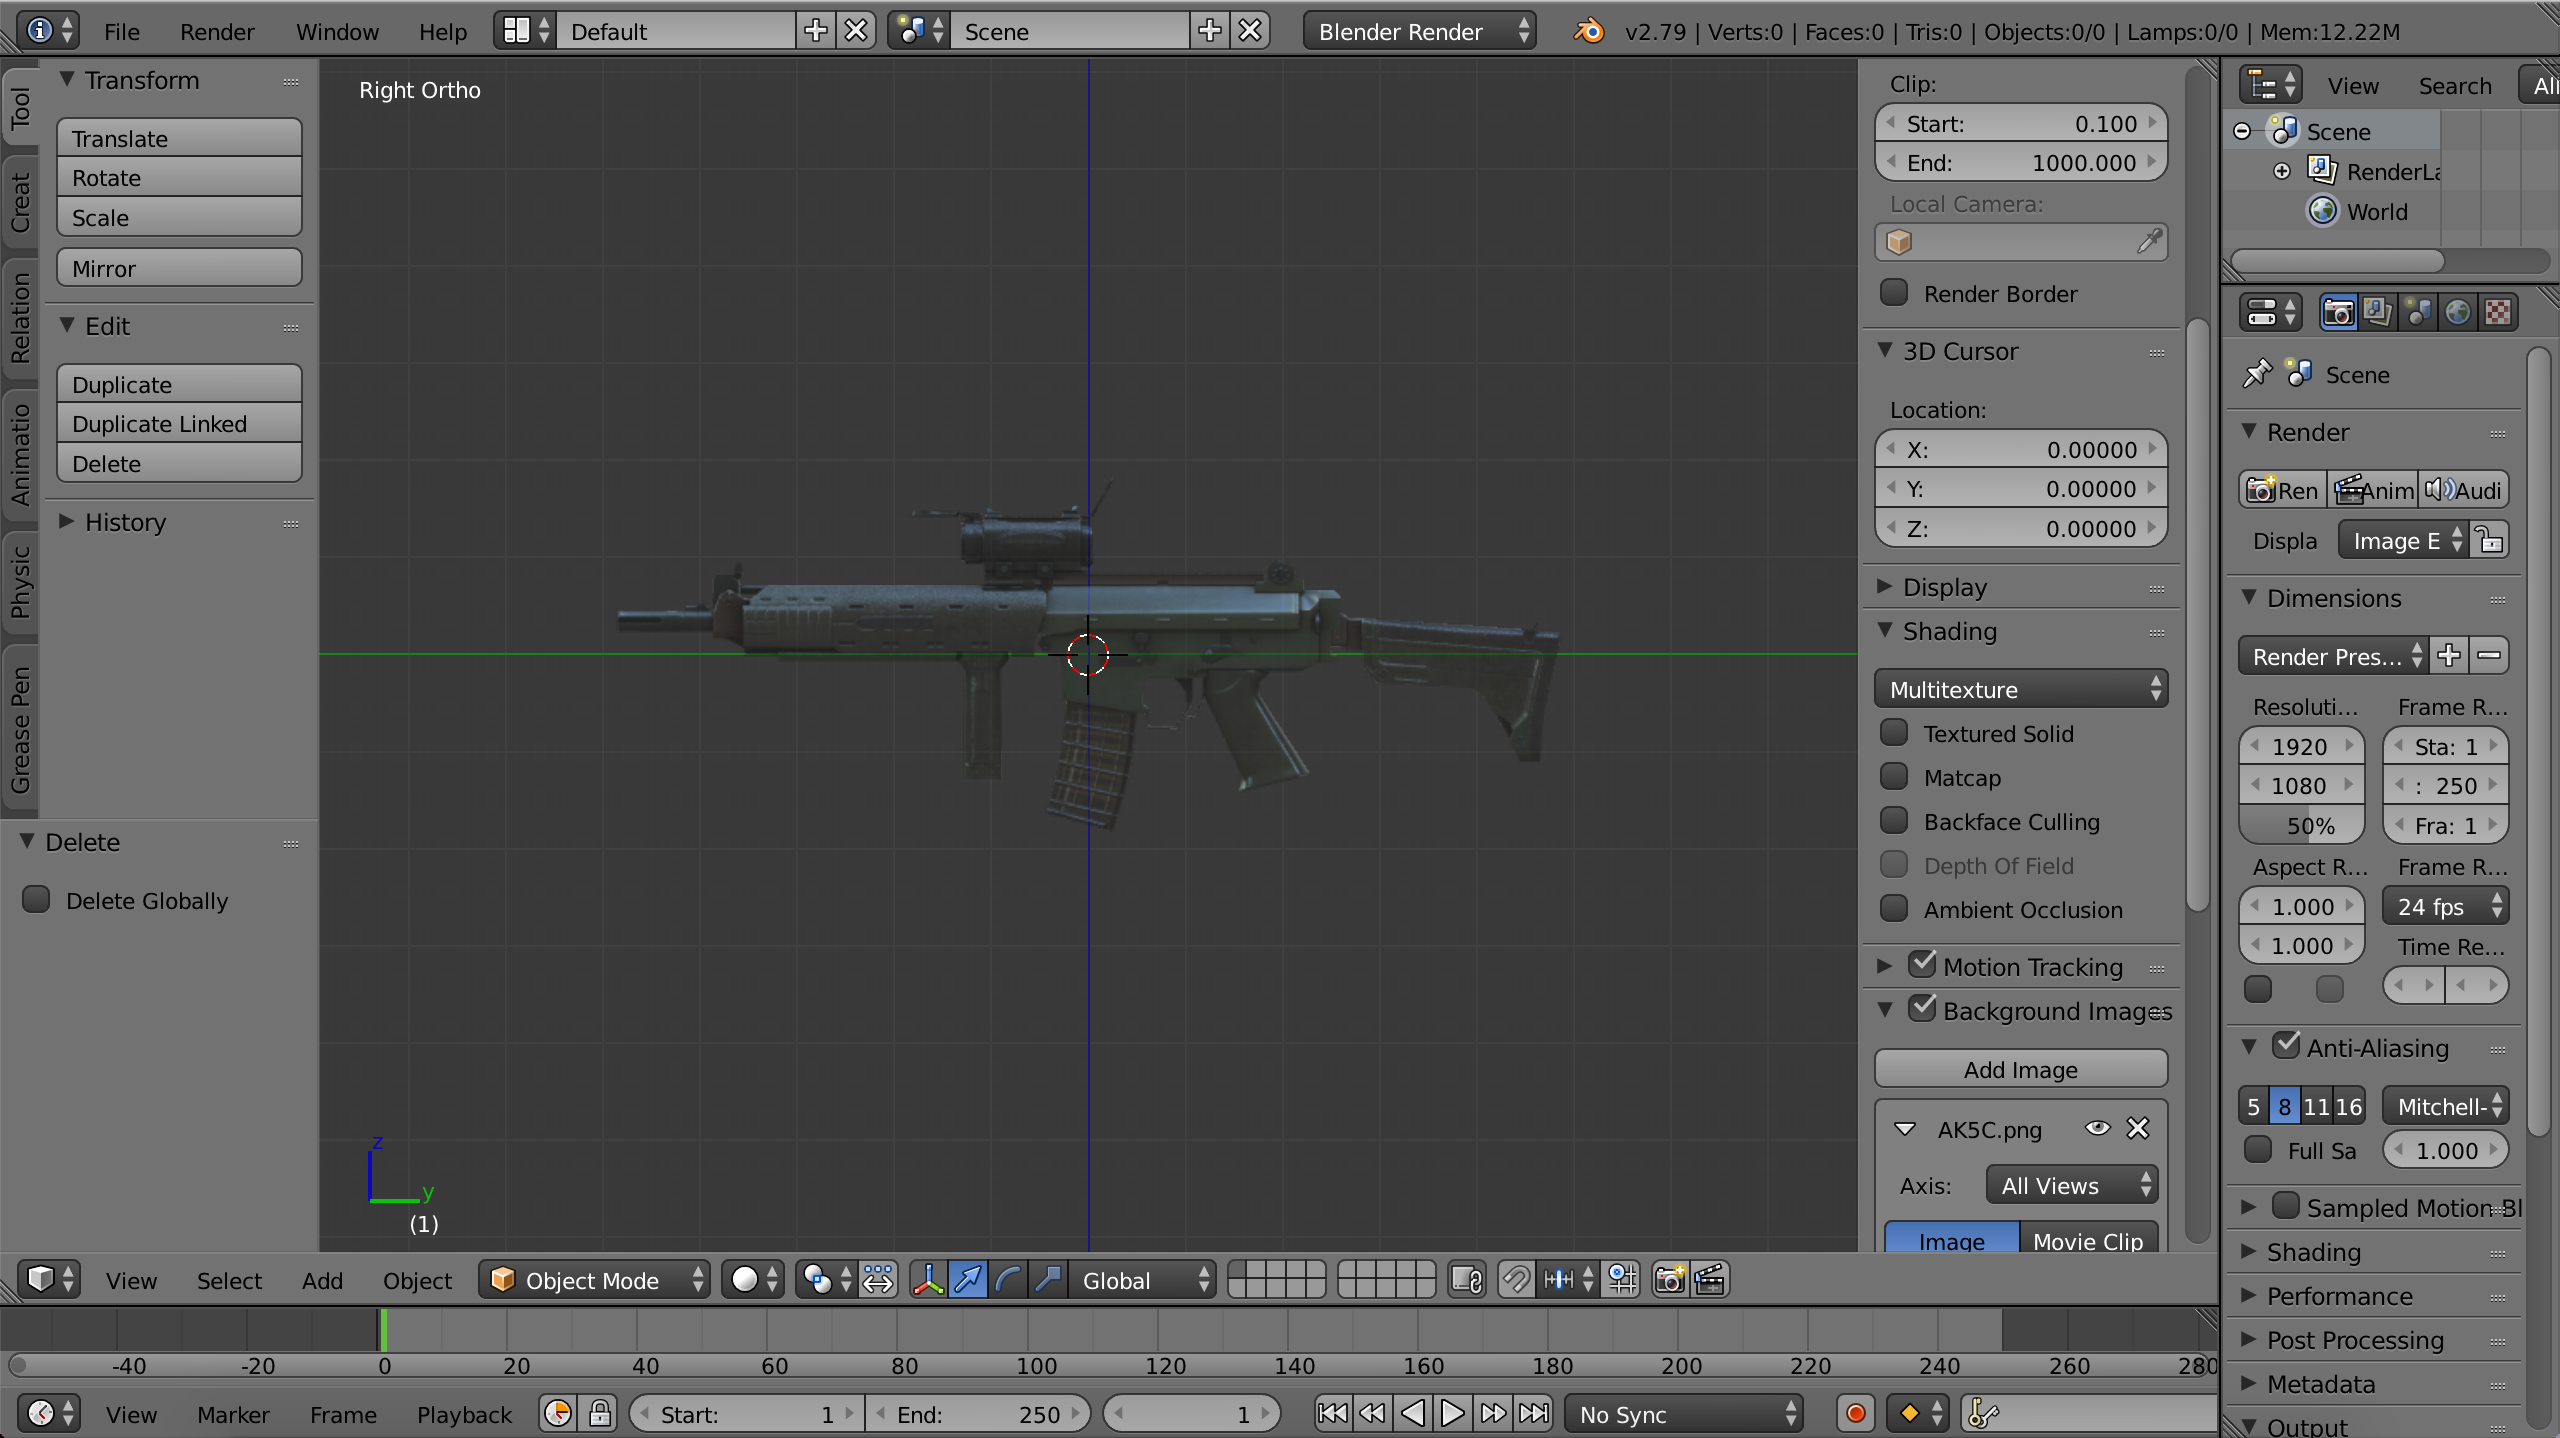
Once you open Blender, press ‘n’, this will open a tab on the right of your screen. Scroll down to the bottom and you will see a box labeled ‘background images’. Click it, then click ‘add image’. Click ‘open’ and find your reference image. I also recommend that, for the time being, keep the renderer set at ‘blender render’, we will switch to cycles later.
Once this is done, you’ll have something like this:
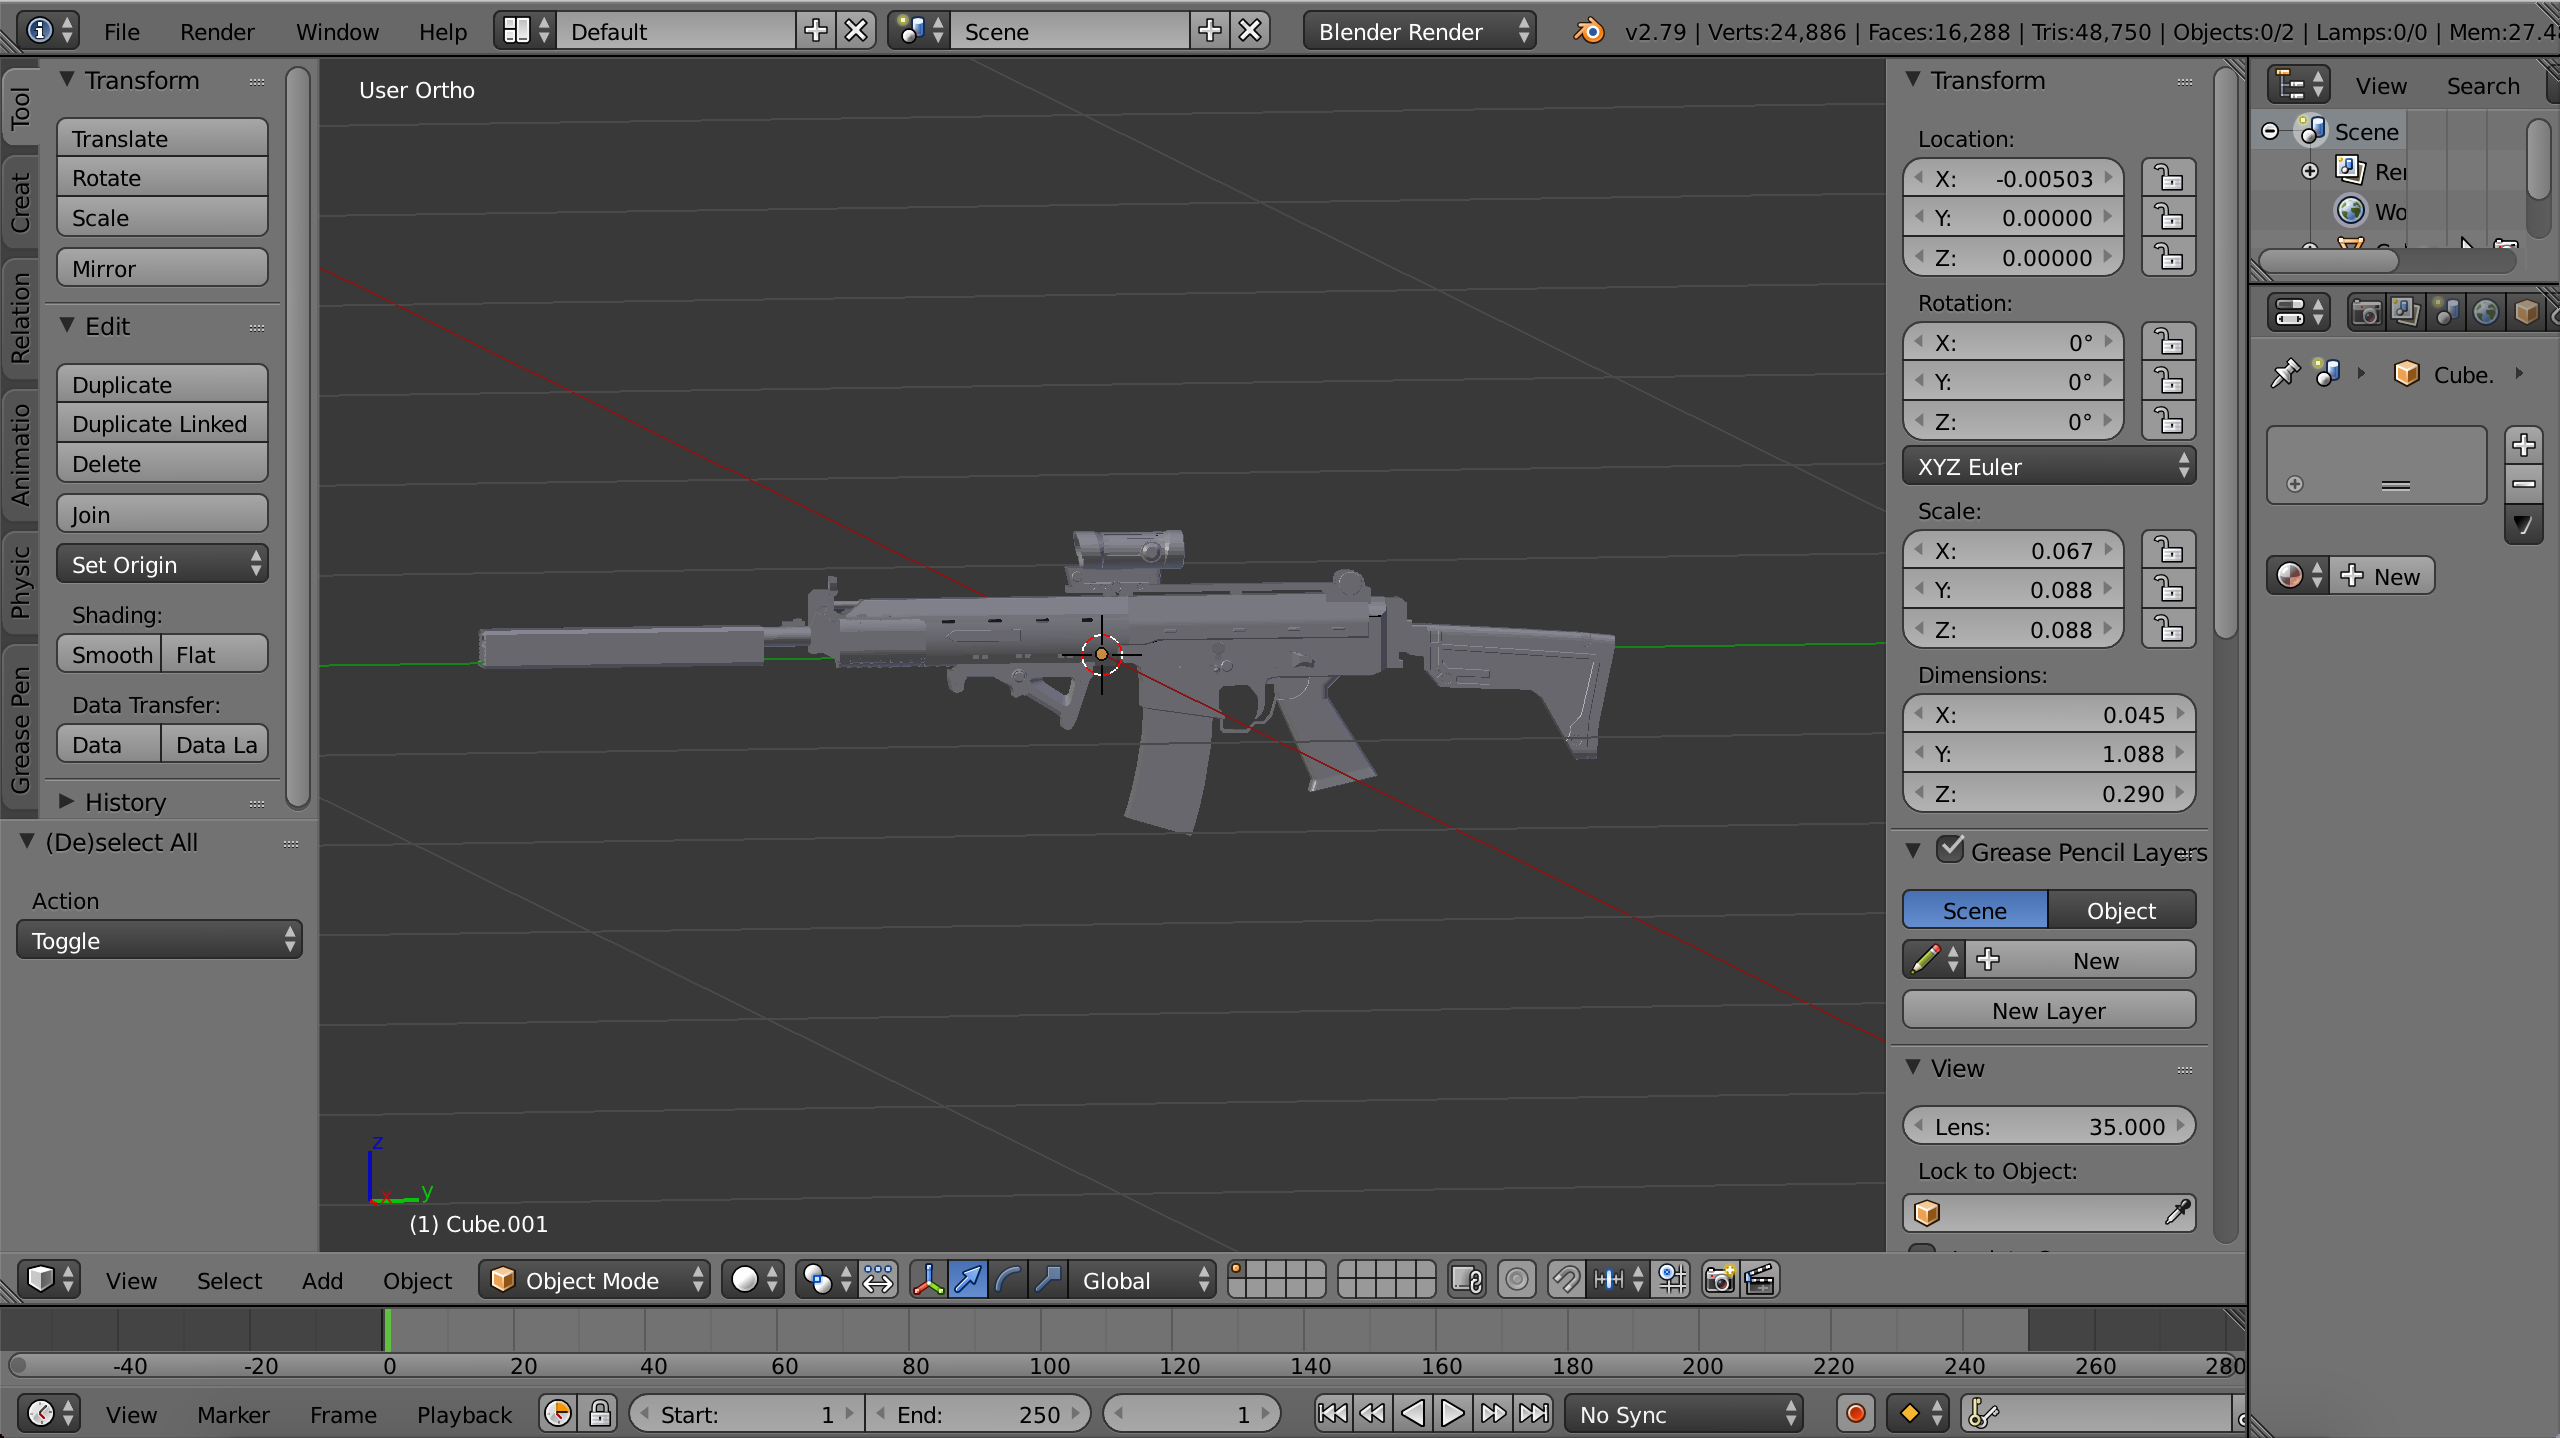
From here, its time to model your weapon. If you’re ever stuck, there a tons of low-poly weapon modeling tutorials available on YouTube, simply find one you like and watch. In the end, you’ll have a nice solid grey weapon.
This is the perfect time to make the UI icon. Hit the ‘3’ key and add a camera. Hit ‘g’ and move the camera around until the weapon takes up most of the camera’s view.

Now, in the lowest, right most tab, click the small globe icon. This sets the world parameters. Change the horizon color to black.
In that same line of icons, choose the camera. Scroll to the bottom and enable ‘freestyle’ and set line thickness to 2.000 px.

Finally, move one icon over to the two pictures, scroll to ‘freestyle lifestyle’. Expand the tab and change the color to a very light grey, I use .627 in RGB.
Now, simple point lamp. Move it a fair distance from the weapon and camera. Click ‘render’ next to file and see the result. If the weapon is brighter than the white outline, move the lamp further back, if its too dark, move the lamp closer.

Optimally, you should have something like this:
You can save the ui icon by clicking image>save as image, and giving it the name [weapon name] UI icon.


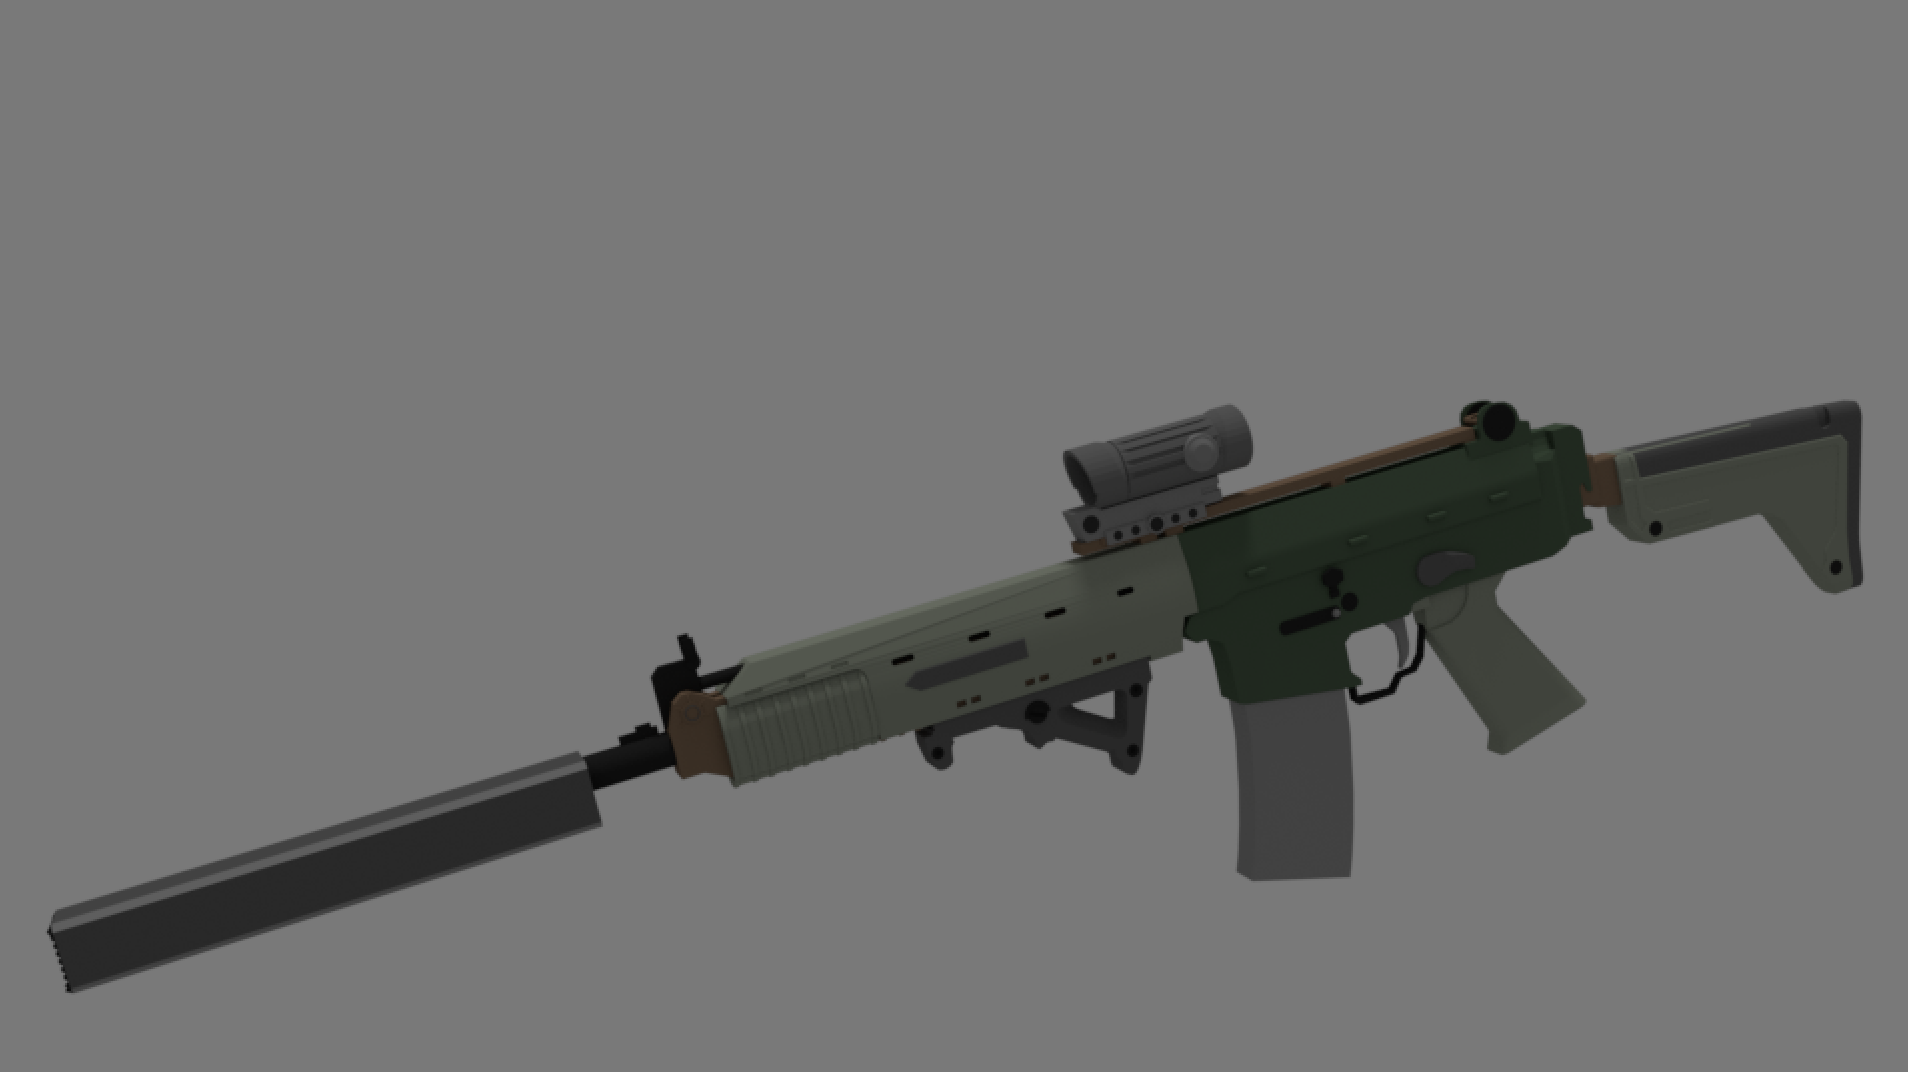
Now to add color to your weapon. I personally choose to name my colors for their weapon as an organizational tool. By keeping the rendered set to ‘blender render’, you make sure that the colors you select will transfer seamlessly to Unity. One easy way to get accurate coloration on your weapon is to hide the mesh, and turn the opacity of your background image to 1.000. Once you’ve added a new material, click the box of color under ‘diffuse’, and use the sample color tool to directly lift the reference image’s color.
Once done, you should have something like this:
This is a good time to render a image for the workshop thumbnail if that is the style you want. Turn off freestyle render, change the world background to a lighter, muted color, and slightly rotate the model to give it some depth. Also, make sure you change to ‘cycles render’.
This is the end of modeling, it is now time to begin animations.
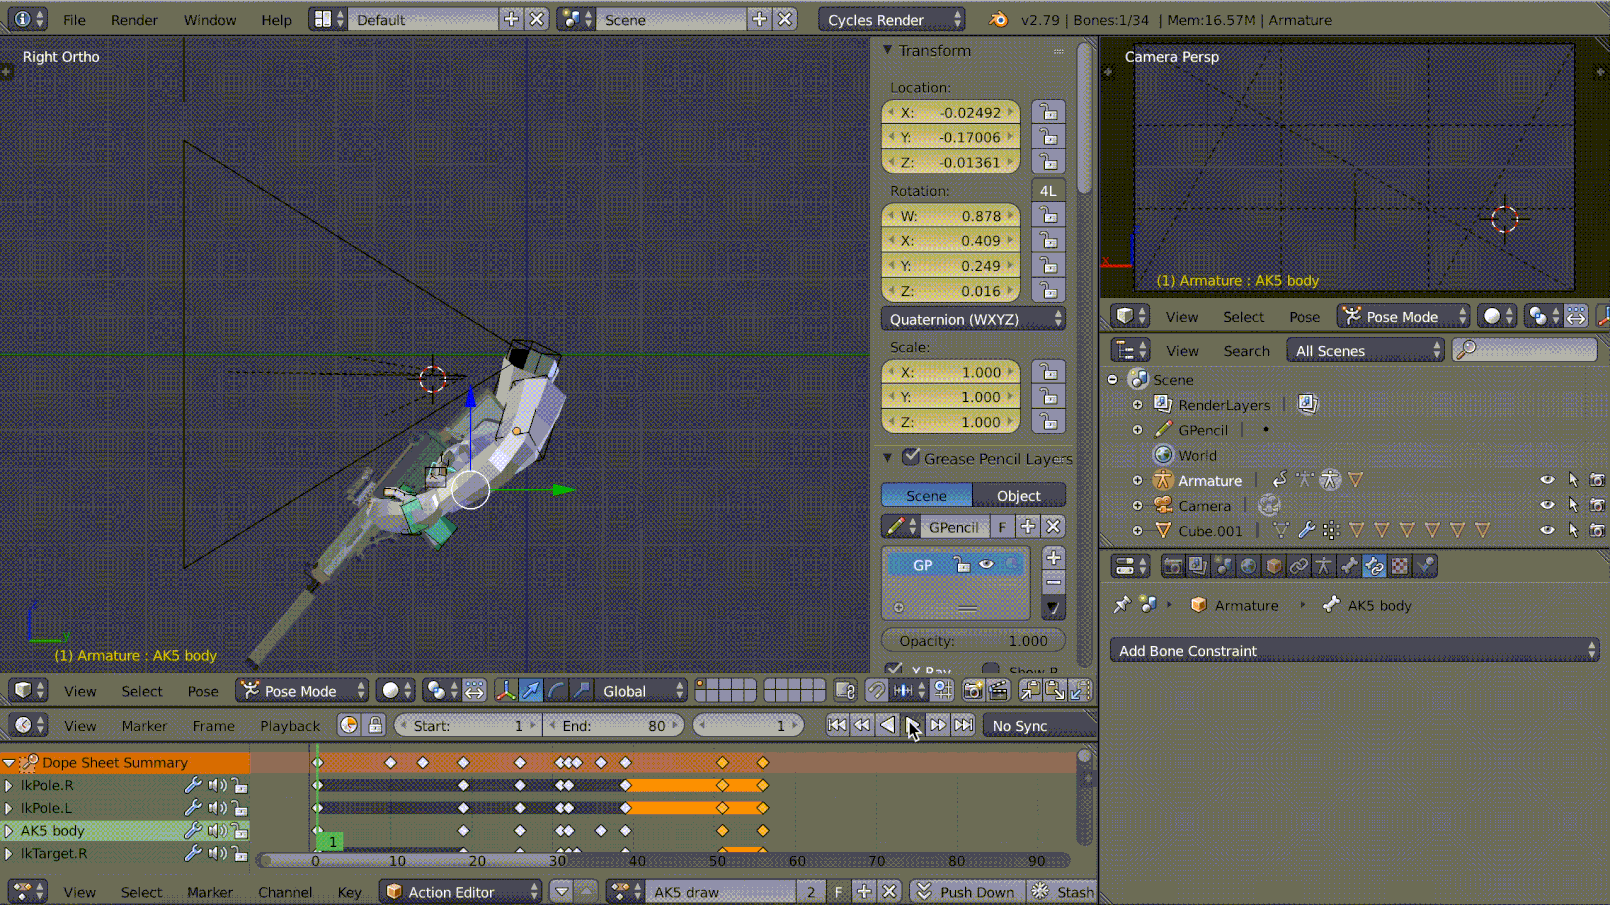
Animating
Animating is another difficult part of your weapon making process. It is time consuming and requires a good bit of practice.
This tutorial series is overall pretty good, though it goes into further detail than is really required.
My own tutorial that covers the most effective method for ravenfield:
[link]
You will need to create at least 8 animations:
-draw
-idle
-reload
-sprint
-kick
-call squad
-direct squad
-aim
-fire (depends on weapon)
MAKE SURE YOUR CAMERA IS AT 0,0,0 WITH 0 ROTATION, OTHERWISE THINGS WILL NOT WORK!
Draw:
This is the animation that plays when your weapon is equipped. It should be fairly quick to prevent a frustratingly long delay between switches. It can be as simple as raising the weapon from off frame, to a complicated stock fold and weapon charging. It’s personal preference what it entails.
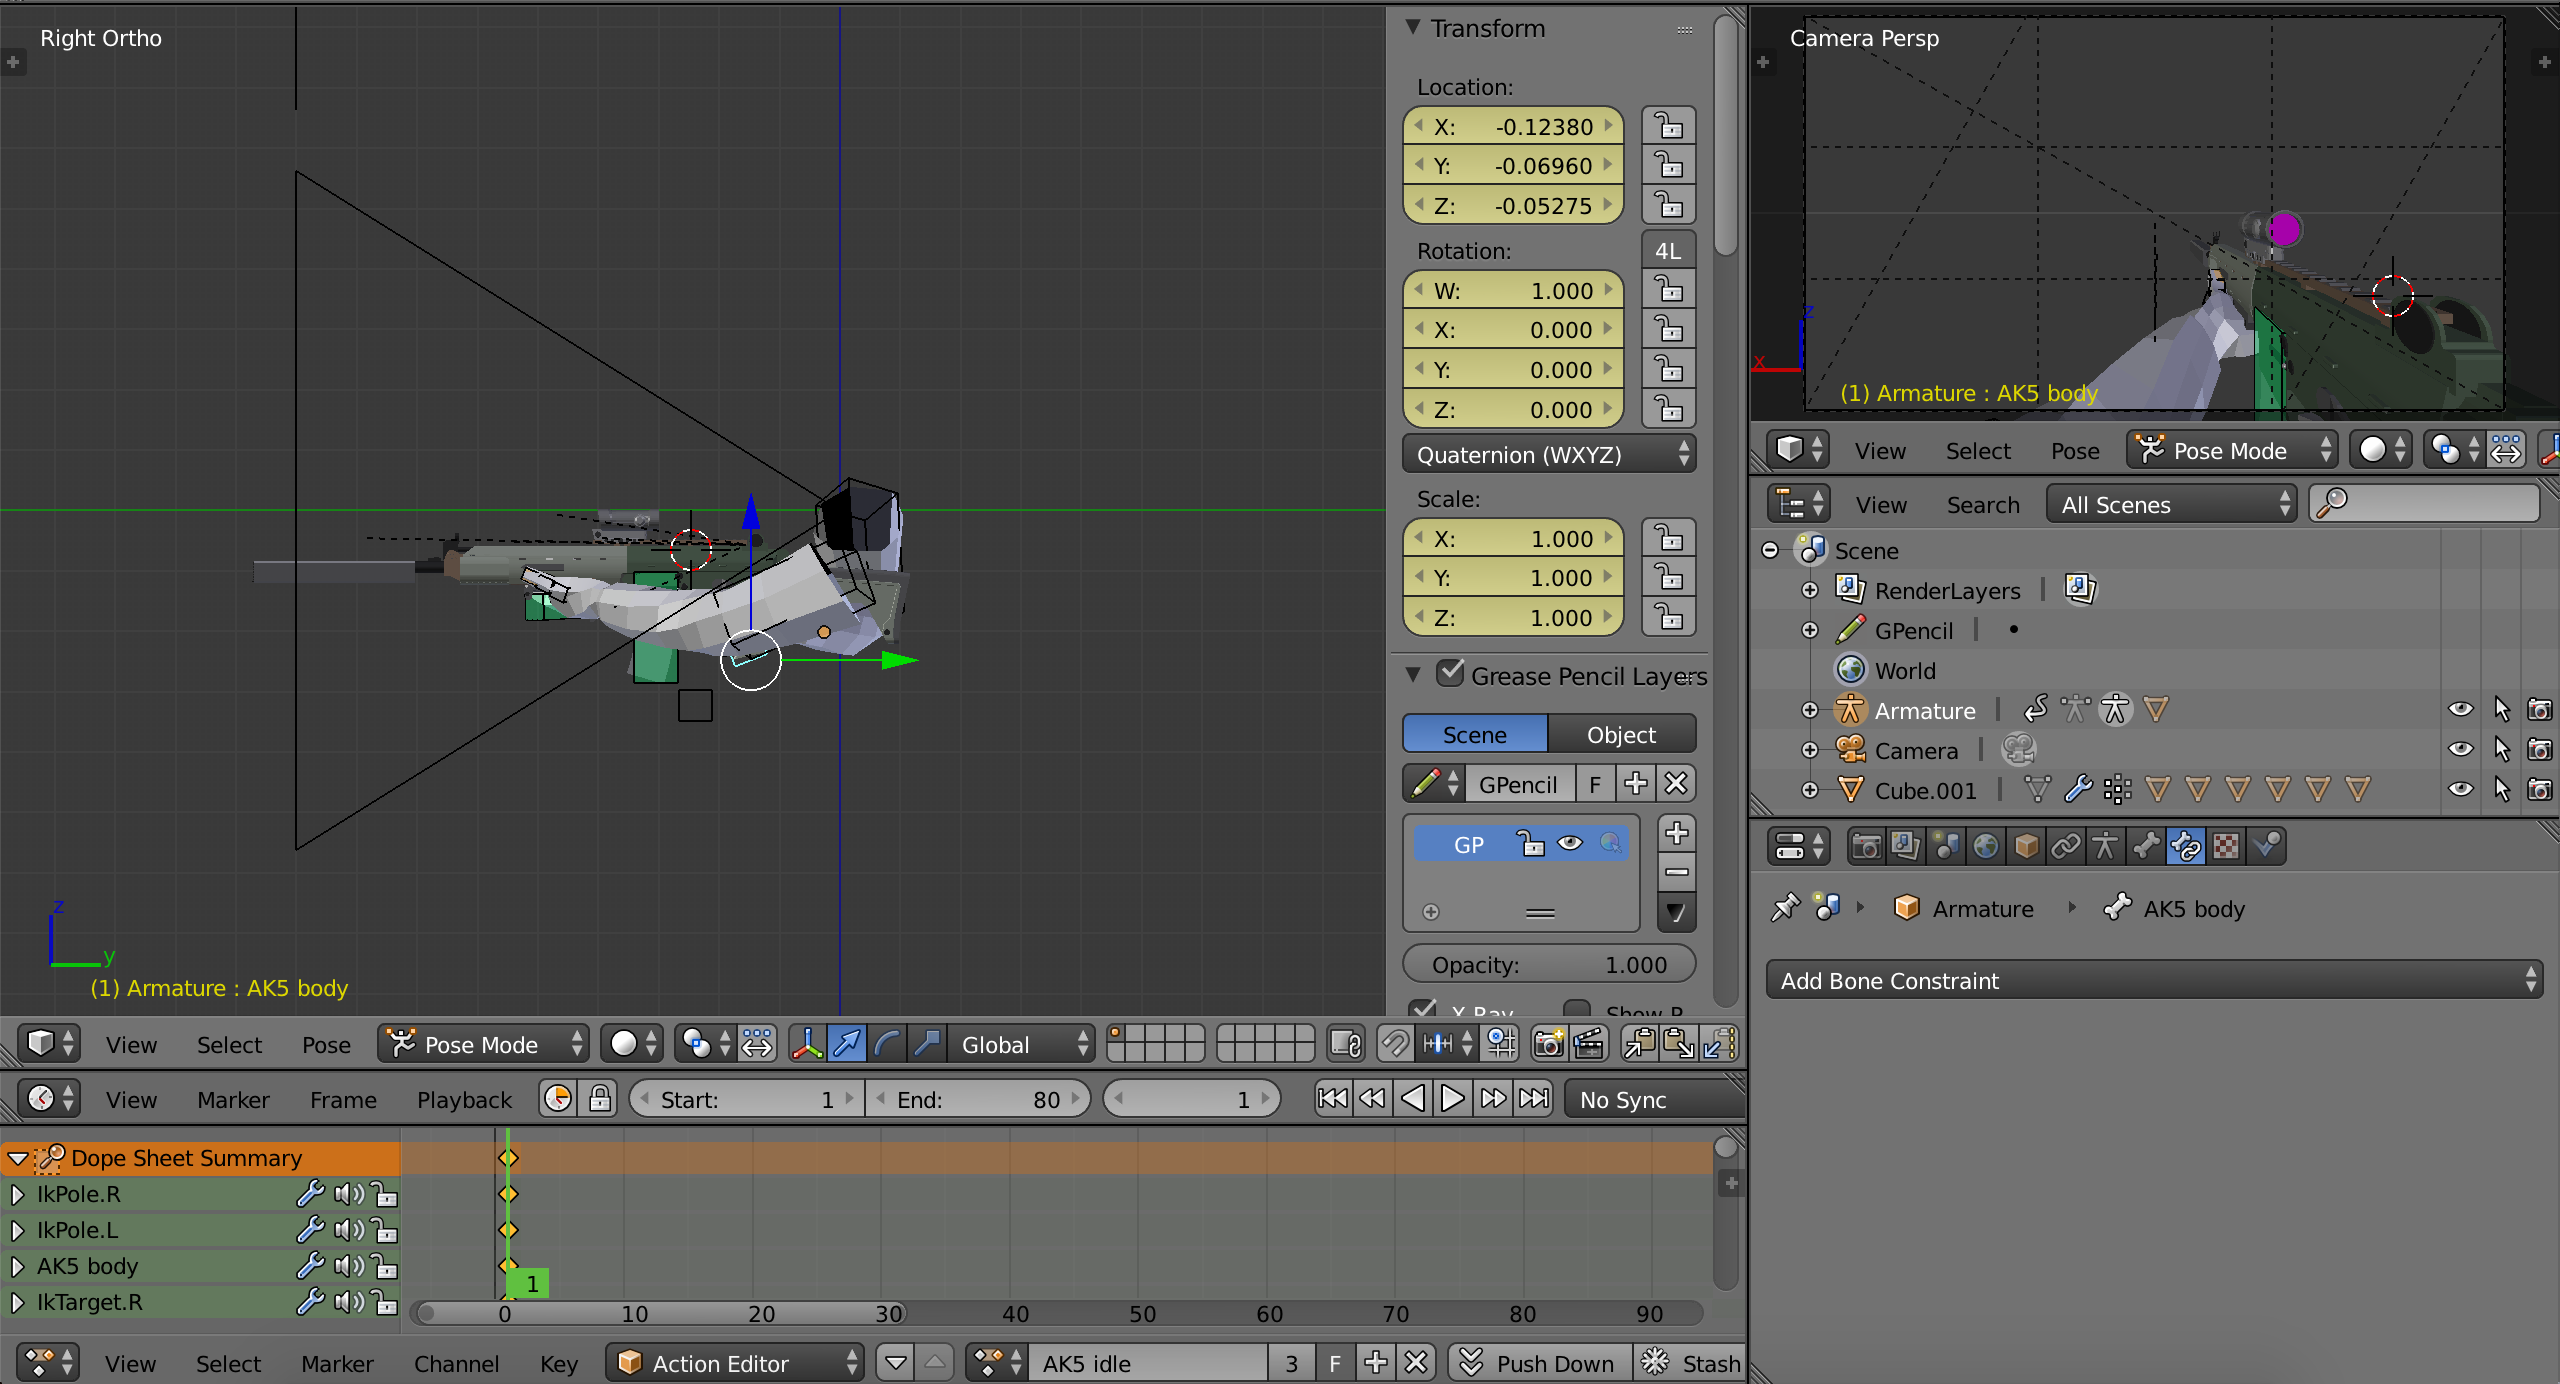
Idle:
This is generally just a single frame that plays when the weapon rests at the hip. Don’t worry about having to animate weapon sway as the player moves, that is already set up in Unity. Make sure your weapon is well positioned and takes up an appropriate amount of the screen. Pistols will be fairly small, while launchers may take up significant amounts of your FoV.
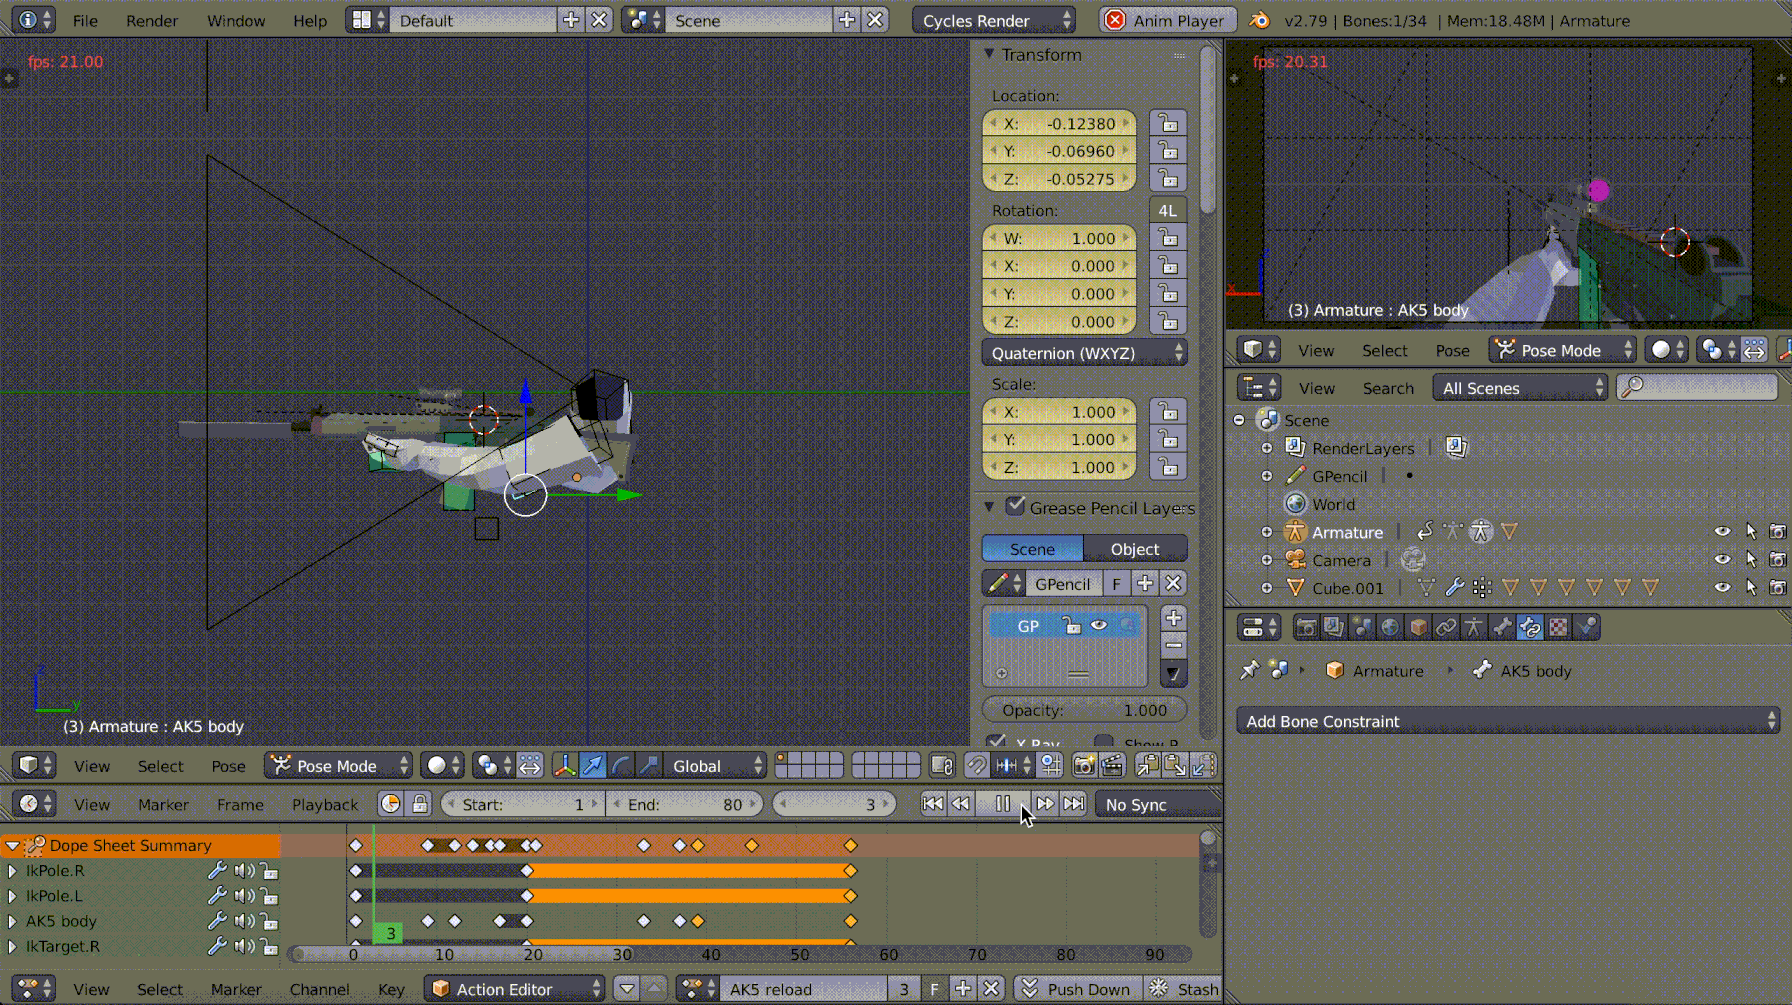
Reload:
Self-explanitory, but also the most complex animation you will make. For mag fed weapons, it is slightly simpler. Don’t forget that the mag has mass and momentum, when it is removed and returned to your weapon, it will react. Study both other animations and real reloads to get a good idea of what looks good. For clip fed or single load weapons, you will have more work to do. The M1 Garrett that comes with the game technically has 4 reload animations. One for the full clip, one to begin the single round loop, one for the loop, and one to end it. Additionally, depending on your weapon you will need an empty idle animation.
Sprint:
Another fairly simple animation, generally consisting of a single frame of your weapon in what ever pose you want it to have when sprint.

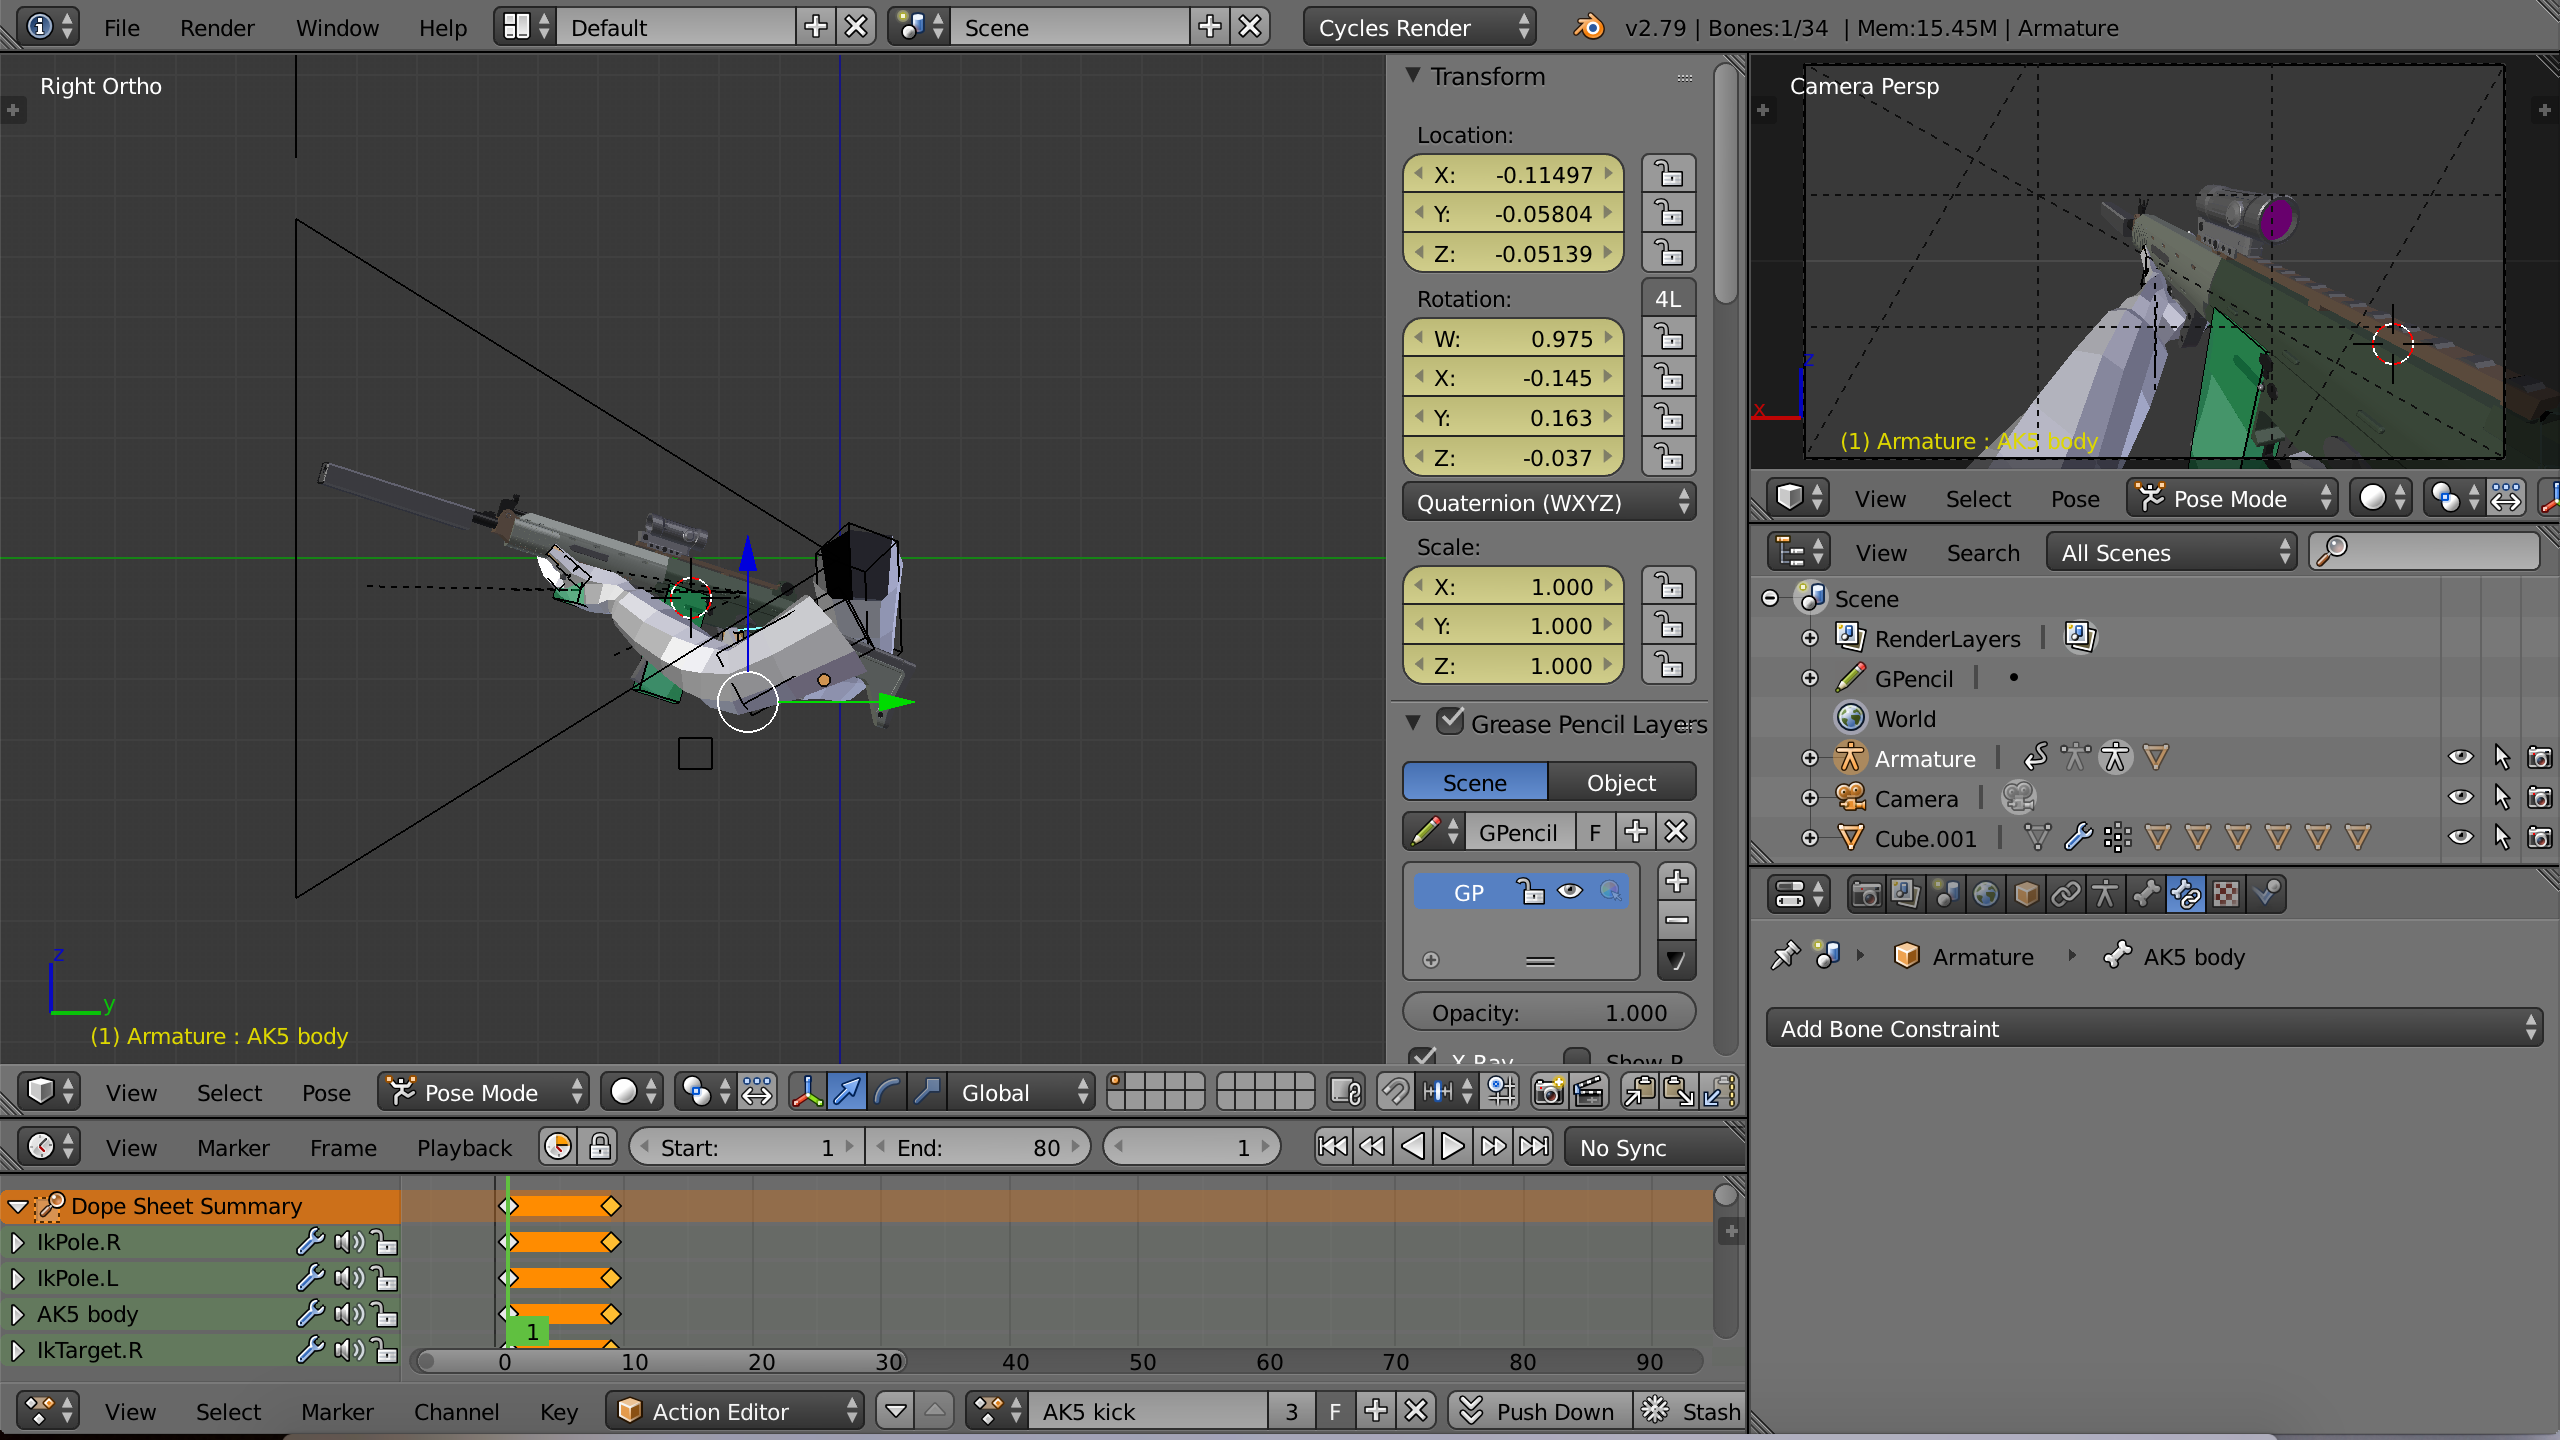
Kick:
This animation should be about 10 frames of your weapon raised high enough to allow the foot to pass under it without clipping.
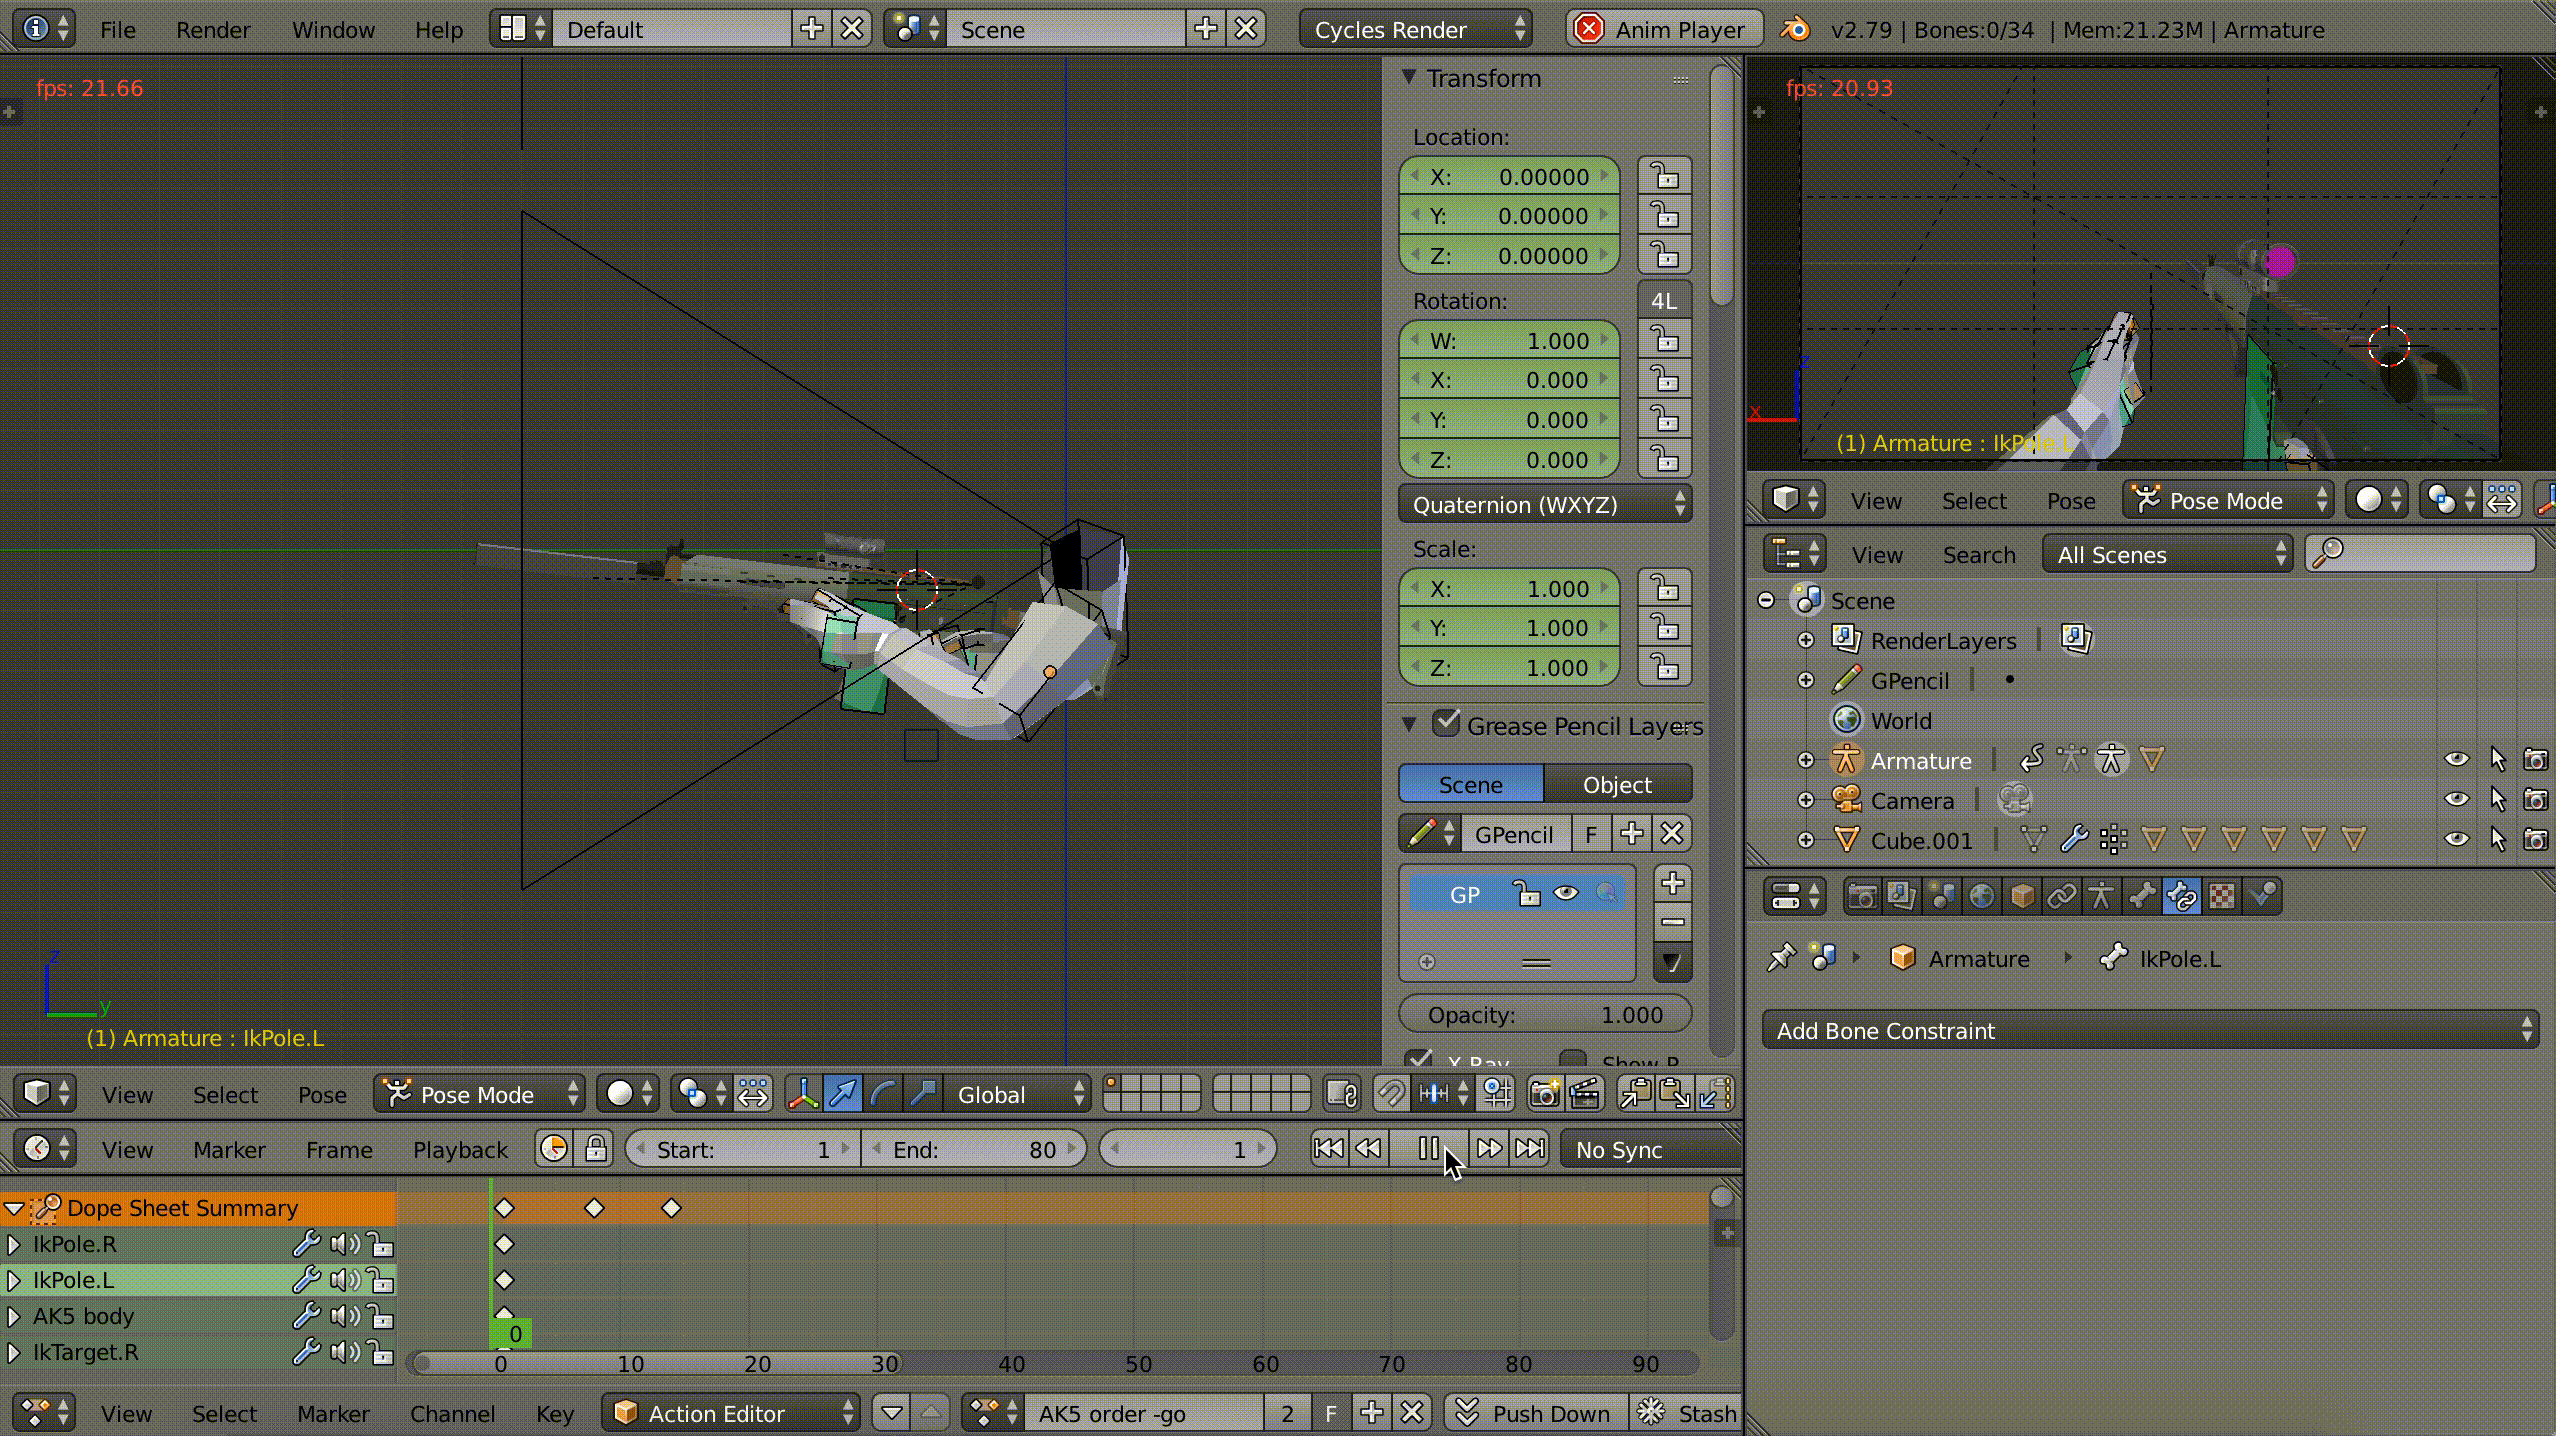
Call squad:
This animation consists of what ever method you want to use to call squad members to you. I personally have the full weapon beacon soldiers over, but as with all animations, this is personal preference. Keep the order animations quick as you don’t want to leave players vulnerable for too long while they direct their squad.

Direct squad:
More or less the same idea as the call squad animation. Generally consists of a quick point forward.
Aim:
Another simple animation, generally a single frame of your weapon raise to the center of the screen. Alignment is key, otherwise your shots won’t go where you aim. Notice in this example, the center of the sight (in this case a scope) is perfectly aligned with the intersection of the horizon and diagonal line of the camera view.
Fire:
If you are making a weapon that must be cycled each time it is fire, such as a bolt-action rifle, or has a visibly moving part when fired, such as the slide of many SMGs, you will have to make this animation.

Configuration in Unity Part 1: set up and parameters
Now that you’ve completed your weapon model and animations, all that’s left to do is to configure it in unity. This is by far the easiest part of making a Mod and allows you to add your own twist on the weapon.
Iwanplays made a some great beginner tutorials about Unity modding, but I’m going to deviate and expand on what he went over. You can see his vids here:
[link]
[melee weapons]
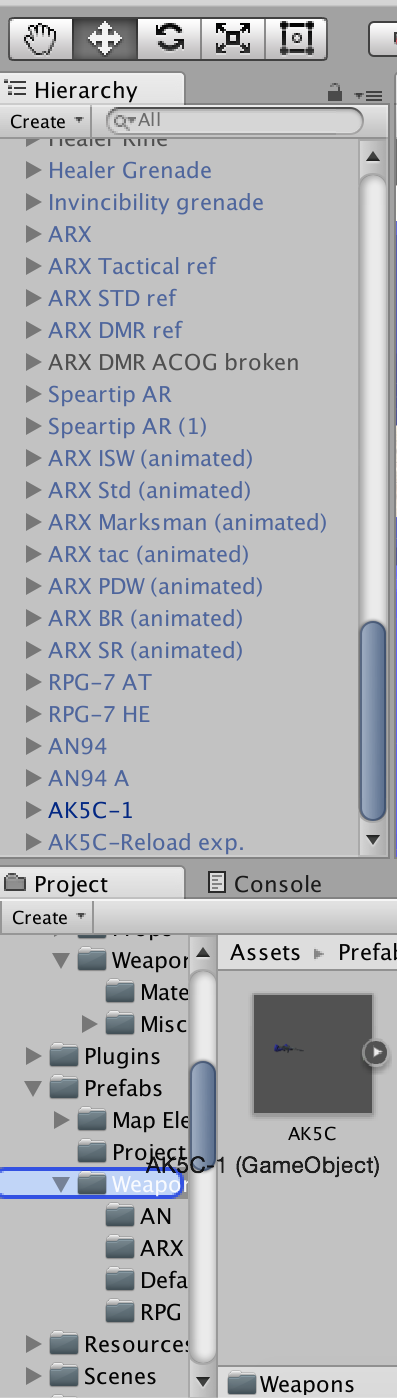
Once you have opened the weapons lab, make sure all other prefabs are turned off, your hierarchy should look more or less like this:
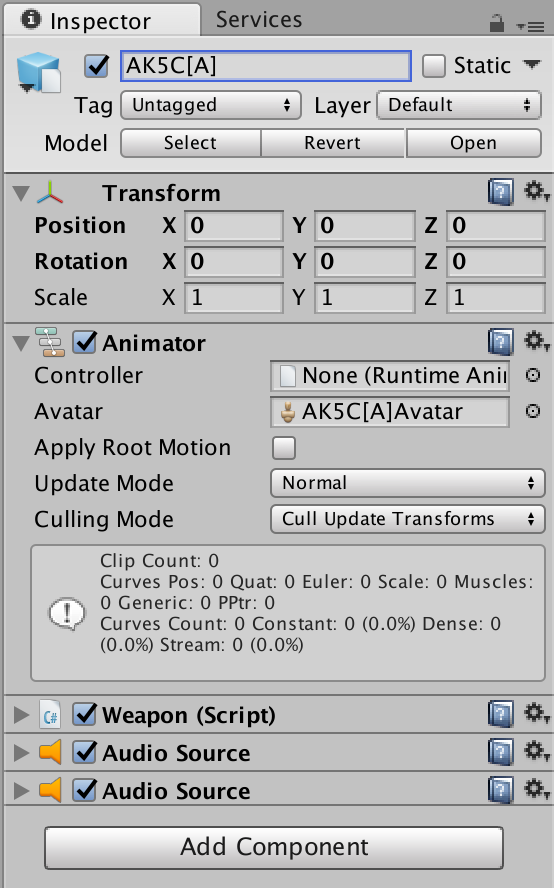
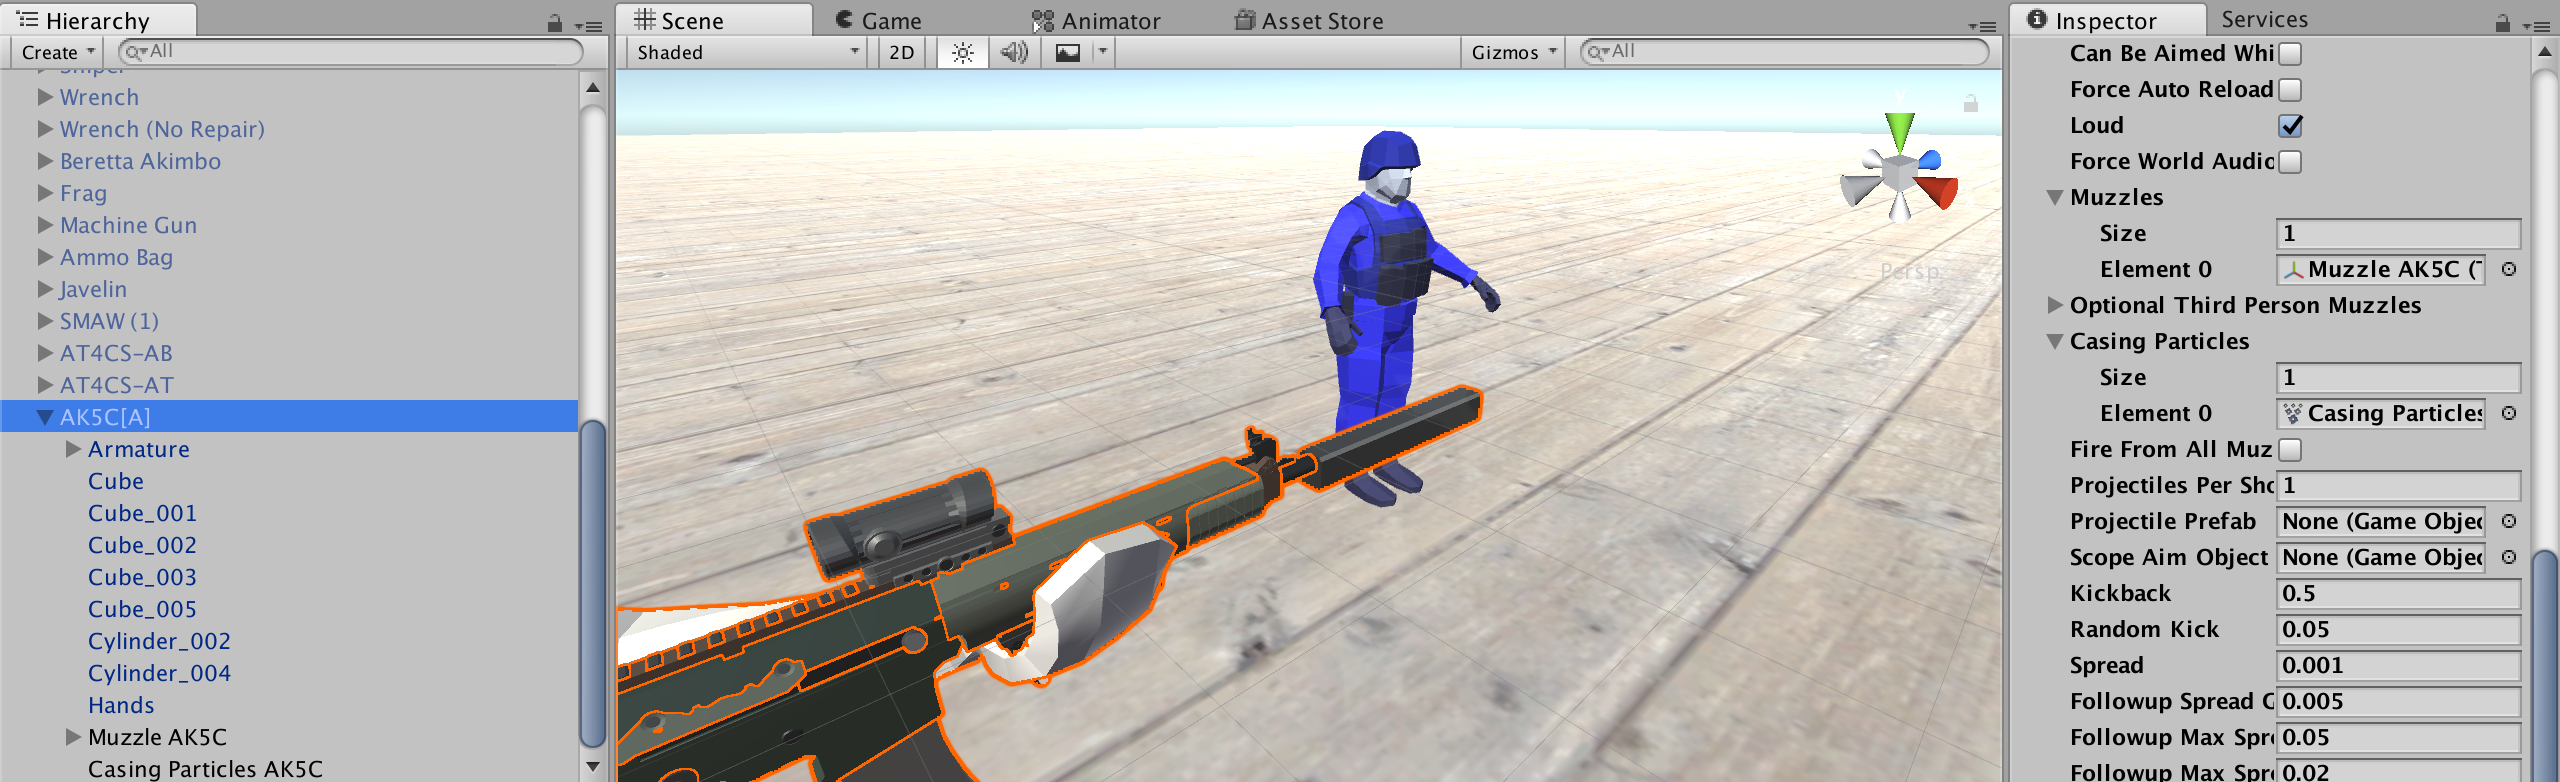
After you’ve imported your weapon model, drag it from the project tab to the hierarchy. Select it and add three components, the first is a weapon script, and then two audio source.

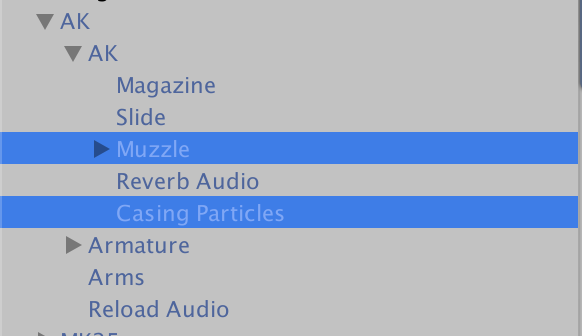
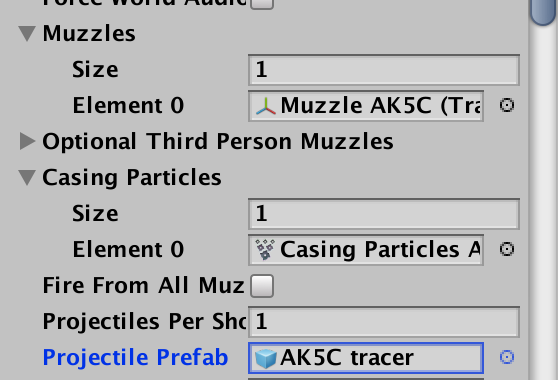
Open the weapon script and set muzzles and casing particles to 1. Open the AK in the hierarchy and duplicate its muzzle and casing particles by selecting them, right clicking, and choosing ‘duplicate’; or use ctrl +D. Drag and drop them into your weapon, rename them to muzzle [weapon name] and casing particles [weapon name]. Then, drag and them into the appropriate space in the inspector.
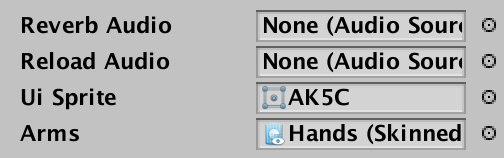
Select the hands in your hierarchy, in the inspector, change the material to ‘actor blue’ by clicking the small circle to the right of the material name and locating the actor blue material. Return to your weapon, then scroll to the bottom of the inspector and drop the ‘hands’ from your weapon into the arms slot.

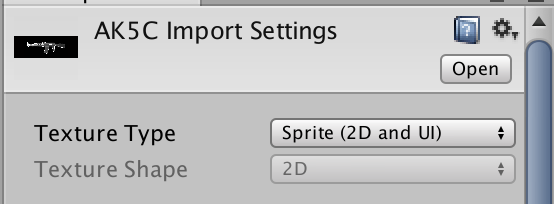
Now go in the project tab select assets>materials>textures>UI>weapons and import the UI icon from earlier. Make sure texture type is set to ‘Sprite (2D and UI)’. Return to your weapon in the hierarchy and at the bottom of the inspector, choose it for the UI sprite.
Under assest>prefabs>projectiles>select the ‘rifle tracer’ and press ctrl + D to duplicate it. Rename it to [weapon name] tracer. In the inspector, expand the ‘configuration’ tab. Adjust at will.
Speed: self explanatory, higher velocity rounds reach targets quicker and have longer range
Impact force: how hard it hits, high values will move vehicles that they hit
Lifetime: how long the projectile stays in world. Unless you are making a very long range, or very short range weapon, don’t bother messing with this.
Damage: self explanatory, bots have 100 health
Balance damage: how likely it is to knock bots over, higher values means more likely to topple them.
Impact decal size: how large the ‘bullet’ hole it leaves in terrain and structures is. .2 is good for most weapons, .1 might work for birdshot shot guns, and .3 or higher for .50cal or large rifles.
Pass through penetrate layer: can go through objects flagged certain ways on maps, like leaves on trees. Unless you are making a very low power weapon, leave this on.
Piercing: goes through the glass of helicopters and planes. Mostly reserved for sniper rifles.
Makes Flyby Sound: you can hear it when the round goes by your character
Flyby pitch: changes flyby sound, I personally don’t change it.
Dropoff end: distance at which damage drop off ends. High for sniper rifles, low for shotguns
Gravity multiplier: changes effect of gravity on the projectile, generally don’t change this.
Damage drop off: move around the dots to set up the damage drop off profile. Drop depends on the kind of weapon.
Inherit velocity: projectiles speed is effected by the players speed.
Automating armor damage: automatically adjusts damage to vehicles
Armor damage: small arms (rifles, pistols, etc) don’t really damage vehicles, heavy arms (HMGs, anti material rifles, etc) can damage lighter vehicles but not tanks, anti-tank self explanatory.
Outside of very specialized circumstances, I wouldn’t change the material or mesh for the projectile. In the inspector for your weapon, choose your projectile prefab.
Now on to the fun part, actually configuring how your gun will preform!
The first series of configurations are basic handling
Auto: self explanatory, makes weapon full auto when on
Ammo: amount of ammo per mag
Spare ammo: extra ammo carried, usual 5-8 mags for rifles, pistols and SMGs, 2-4 mags for machine guns, and 5-7 mags for sniper rifles and shotguns
Resupply number: amount of ammo taken each time from an ammo box or crate. Typically half a mag, or one rocket/grenade for heavy weapons.
Reload time: how long the weapon is unusable while reloading, should be exactly as long as your animation.
Cooldown: amount of time (in seconds) between shots, equal to 60/rate of fire.
Unholster time: time it takes for the weapon to be fireable after it is drawn, should be equal to animation length
Aim FoV: how much you see while ADS. 30-40 for iron sights on rifles and SMGs, 40-50 for pistols and shotguns. 25-35 for weapons with red dots, holo sights, or other low magnifications optics. 20 for mid power optics like ACOGs and PSO-1s. >10 for high powered scopes.
Auto reload delay: if you have force auto reload enabled, how long after the first round it takes to begin reloading.
Can be aimed while reloading: toggles exactly what is says, only recommended for sniper rifles.
Force auto reload: weapon automatically reloads when empty, generally only recommended for rocket launchers
Loud: self explanatory, generally leave this on, except for stealth weapons.
Forces world audio output: don’t know, but on default weapons have it on, so I leave it off.
The next configurations set up how your rounds will act once fired. All values are up to personal preference the the kind of weapon you are making.
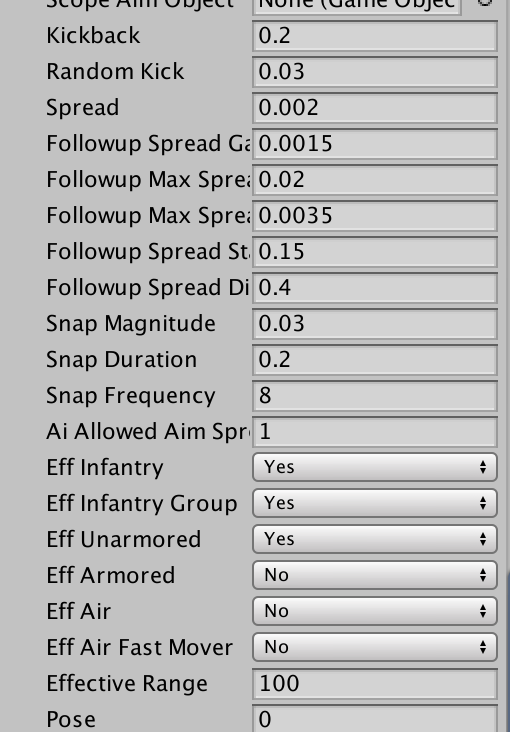
Kickback: the raw recoil of your gun, the higher, the more recoil per shot
Random kick: amount of random direction your recoil will have, higher values mean the weapon will spray more wildly.
Spread: raw spread of the weapon as it fires, the higher the number, the greater the spread
Followup spread gain: how much the spread increases per shot
Followup max spread hip: limit to spread while hip firing
Followup max spread aim: limit to spread while aiming
Followup spread stay time: how long it takes for the effect of firing on spread to go away after you stop shooting
Followup spread dissipate time: it think this is very similar to the previous configurtion
Configuration in Unity Part 2: parameters continued and audio
Snap magnitude: effects visible recoil effect, larger value increases recoil
Snap duration: effects length of time it takes recoil snap to occur
Snap frequency: larger values increase number of snap starts per second
AI allowed aim spread: how much the AI spreads when firing
Eff [category]: tells AI when to use the weapon. Infantry is a single soldier, infantry group is for multiple soldiers close to each other, unarmored is jeeps and turrets, armored is tanks and attack boats, air is helicopter, air fast mover is planes and bomber.
Effective range: tells AI the maximum range shoot at. Does not effect player.
Pose: don’t know, always set to 0 for default weapons
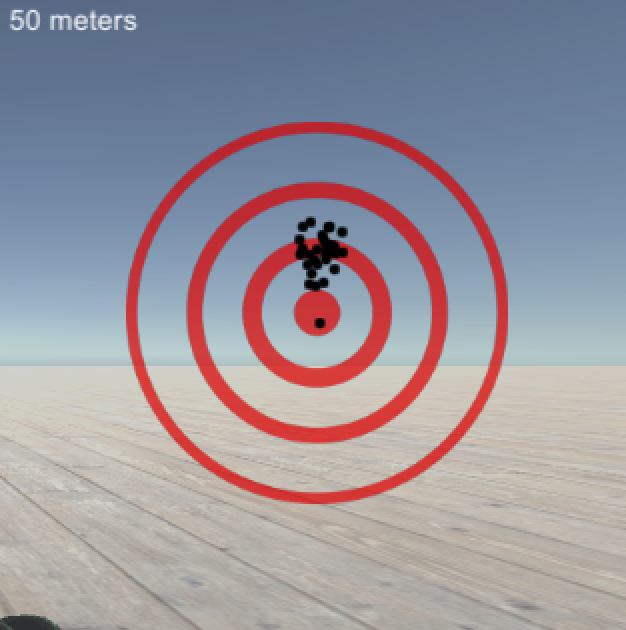
My set up for the AK5C, and its spread at 50 meters after a mag-dump, aimed and unaimed:

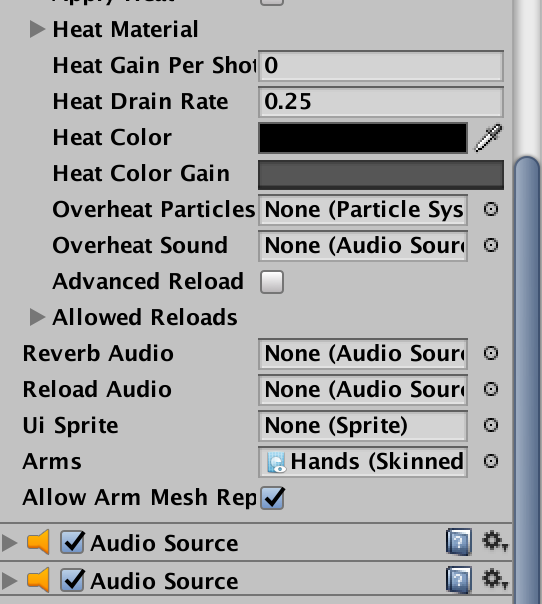
Apply heat: when on, allows weapon to overheat, generally only for machine guns or energy weapons
Heat material:
-target renderer: choose your weapon, specifically the component with the part that will visibly overheat
-material slot: what material in that mesh will visibly overheat
Heat gain per shot: value out of 1 that determines how fast the weapon overheats. So at .25, the weapon will overheat in 4 shots, and at .01 it will overheat in 100, etc
Heat drain rate: how fast the weapon cools down, the higher the number, the faster the cooling.
Heat color: what color the visibly heating part will turn as it heats
Heat color gain: how that color changes as more rounds are fired. Adjust the dots to change
Overheat particles: the particle system seen when overheated. In general duplicate from machine gun
Overheat sound: sound the weapon makes when it overheats
Advanced reloads: allows for different reloads depending on number of rounds left in the gun
size: dictates how many different reloads there are. At this point I do not know how to properly configure this category.
Scope aim object:prefab to use for the scope of a high magnification optic.
Helpful tutorial:
Sounds:
I am far from an expert on audio editing, so I recommend you find a YouTube tutorial of your choice about which ever audio editor you choose. Most functions you won’t need to use.
You will need a audio clip for:
-fire
-draw (depending on the animation)
-reload(s)
Most sound effects can be easily found through forums or youtube. Alternatively you could purchase assets, or even create your own.
In the inspector, make sure that the fire audio is above the draw audio, this will prevent a looping draw sound.
For fire audio, automatic weapons should have only the ‘loop’ toggle selected, other weapons should have this turned off. This is my set up for the AK5C, copied from all default weapons. I recommend following a similar set up to prevent annoying audio bugs.
For the draw audio, only ‘play on awake’ should be elected. This will ensure the sound plays as soon as the weapon draws, and does not repeat after that.
Your reload audio should be duplicated from the AK prefab and dropped into your weapon. Simply replace the audio clip with yours. At the bottom of the inspector for your weapon you will find the slot for reload audio just about the UI sprite. Place your audio there.
Reverb audio is optional in my opinion. Its the audio that plays after your weapon finishes firing. If you want it, follow a similar process to the reload audio.
Configuration in Unity Part 3: animator and 3rd person transform
Now for the final steps of Unity configuration.
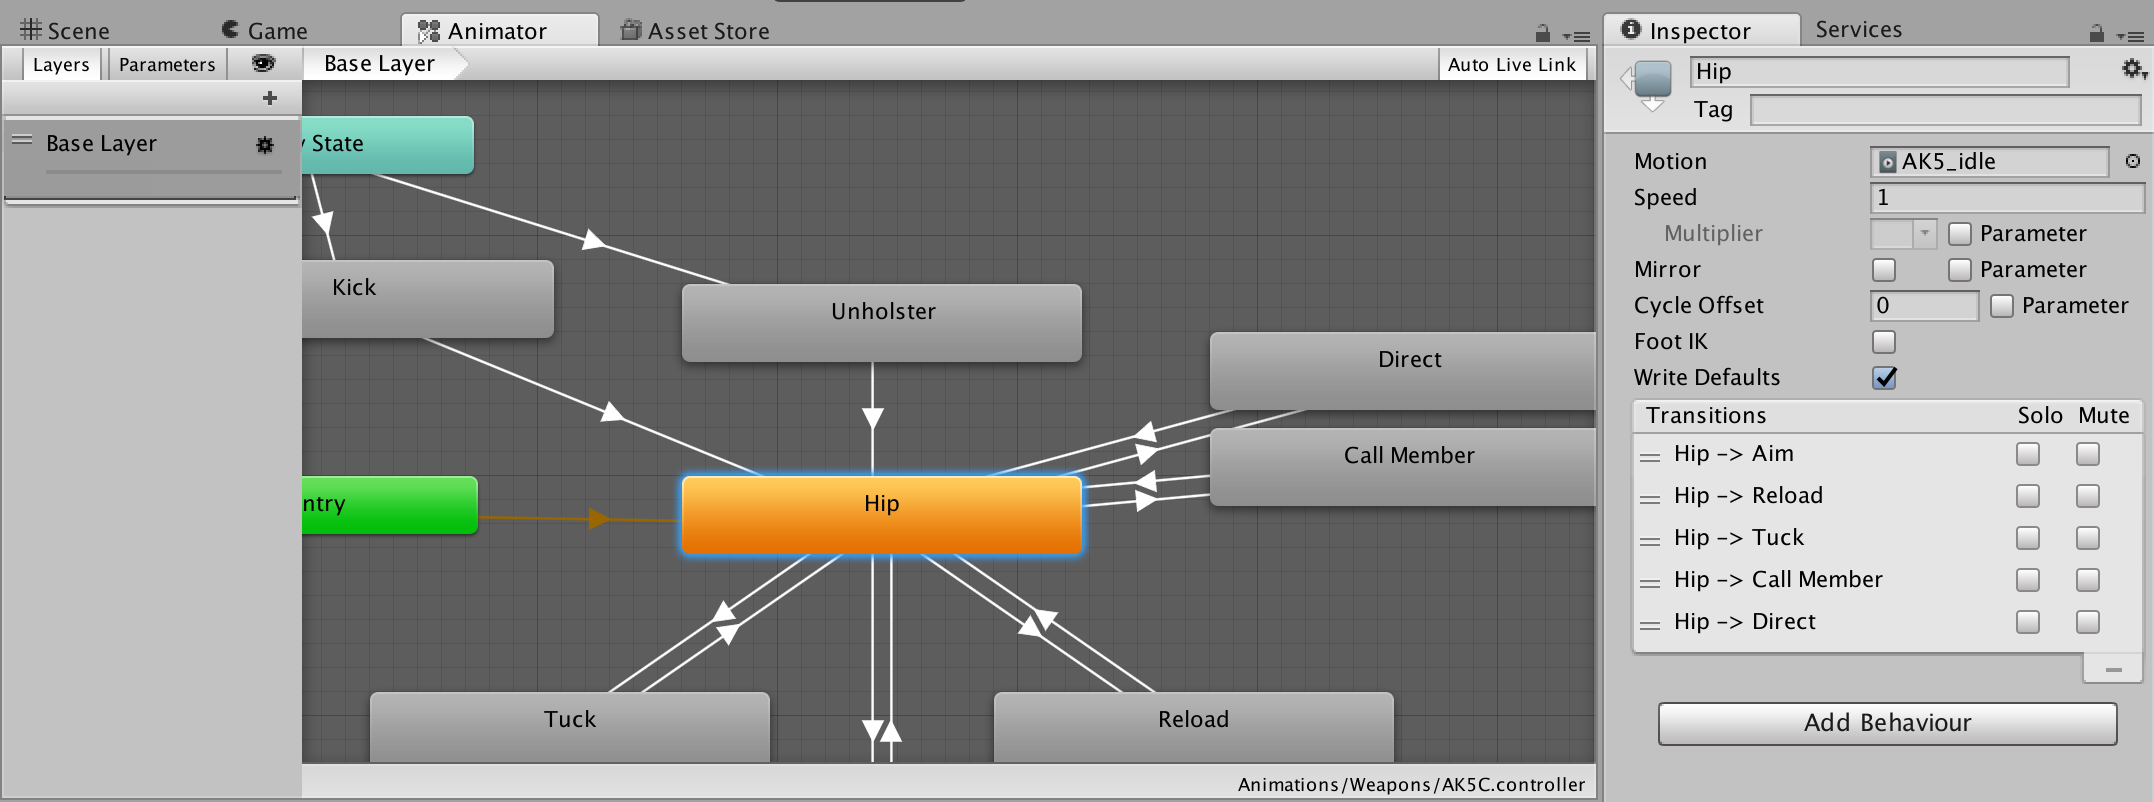
Enter assets>animations>weapons in the project. Select and duplicate an appropriate controller. The AK or AR15 will suffice if you don’t have a fire animation, if you do the Sniper will work. I unfortunately do not know how to set up advanced reloads at this point. Once you have your new controller, rename it to [weapon name].
Return to your weapon in the hierarchy and in the inspector, select your controller in the controller category.
In the top bar select the ‘animator’ tab and select any of the states. Where it says ‘action’, click the small circle to the right and choose the corresponding animation from your weapon. Do this for all states.
Once done, press the play button at the top of the Unity window. This will put you in play mode. Assuming all is right, your draw animation and sound effect will play. For the time being, ignore the static version of your weapon also on screen. Aim down sights, dump a few mags, and test your weapons accuracy.
New method for the third person transform highlighted in my tutorial from 13:00 on
[link]
Play test one more time and Unity, and if everything works, congratulations, you’re ready to beta test!
Configuration in Unity Part 3-A: dynamic and advanced reloads
There are effectively three types of reload system; standard, dynamic, and “advanced”.
Standard reloads are a single animation that will play regardless of ammunition left in the weapon and is the system used by all default weapons, except the Garrett and 76 Eagle. In order to implement this, all you have to do is duplicate the AK47 controller and, after keying off your animations, insert the animation into the “reload” action.
Dynamic reloads are a system most modern shooter games employ. The animation will be different depending on whether or not there is ammunition left in the magazine. Many workshop weapons employ this system.
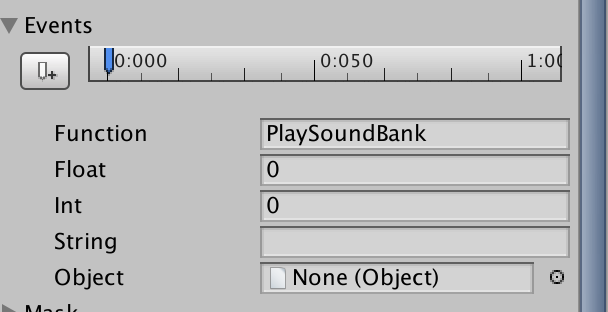
In order to achieve this, first you must animate both the reload for empty and partially empty magazines. Once these have been keyed and imported into unity, the first step is to add the necessary events. Events are added in the same import settings tab as where you key off the animations.
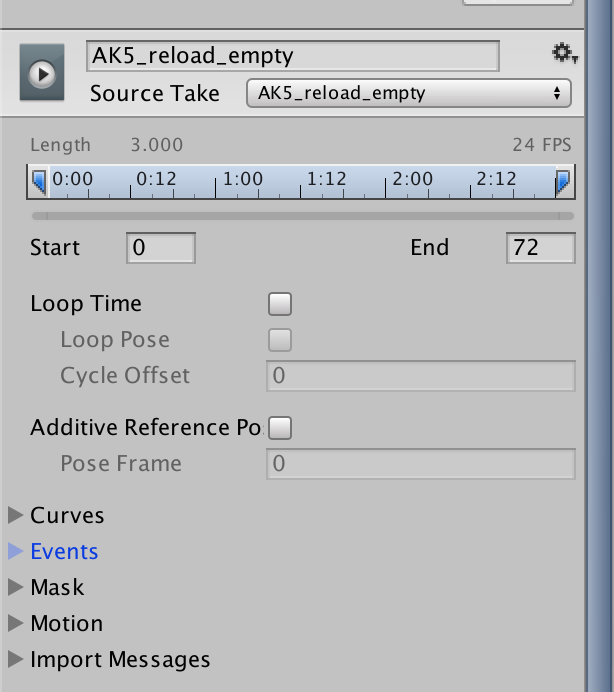
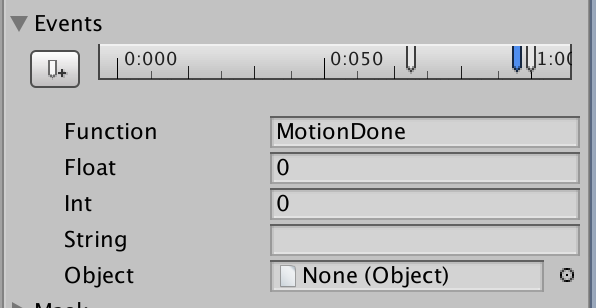
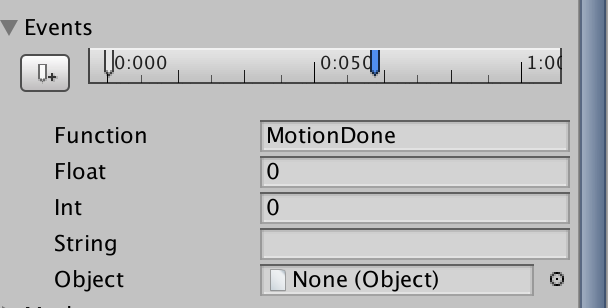
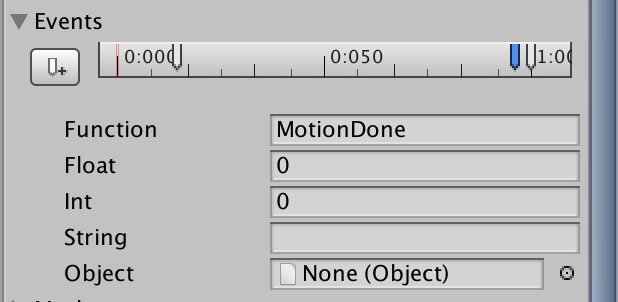
For both reload animations, it is necessary to add two events. At the absolute then of the animation, add an event with function “ReloadDone”, and just prior to it and event with function “MotionDone”. Both events should have int and float at 0, string left blank, and object left with one.

The earlier event in these screenshots is a sound bank event, something often necessary if your reloads will have different audio. Audio for reloads will be discussed later in this section.
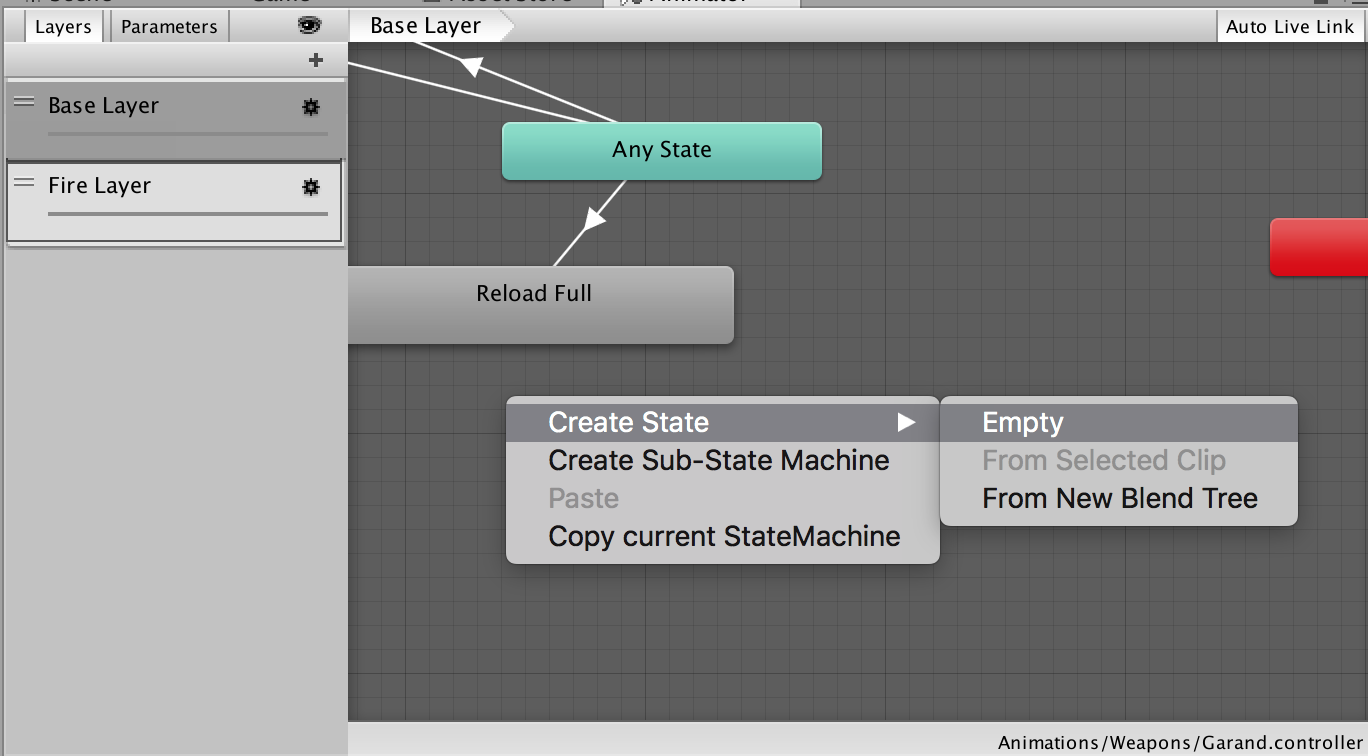
Next, duplicate the Garand controller. Delete the three loop actions. Add a new empty state, and change its name to “reload part”. Connect it to the “idle” and “any state” blocks like the “reload full” event is.
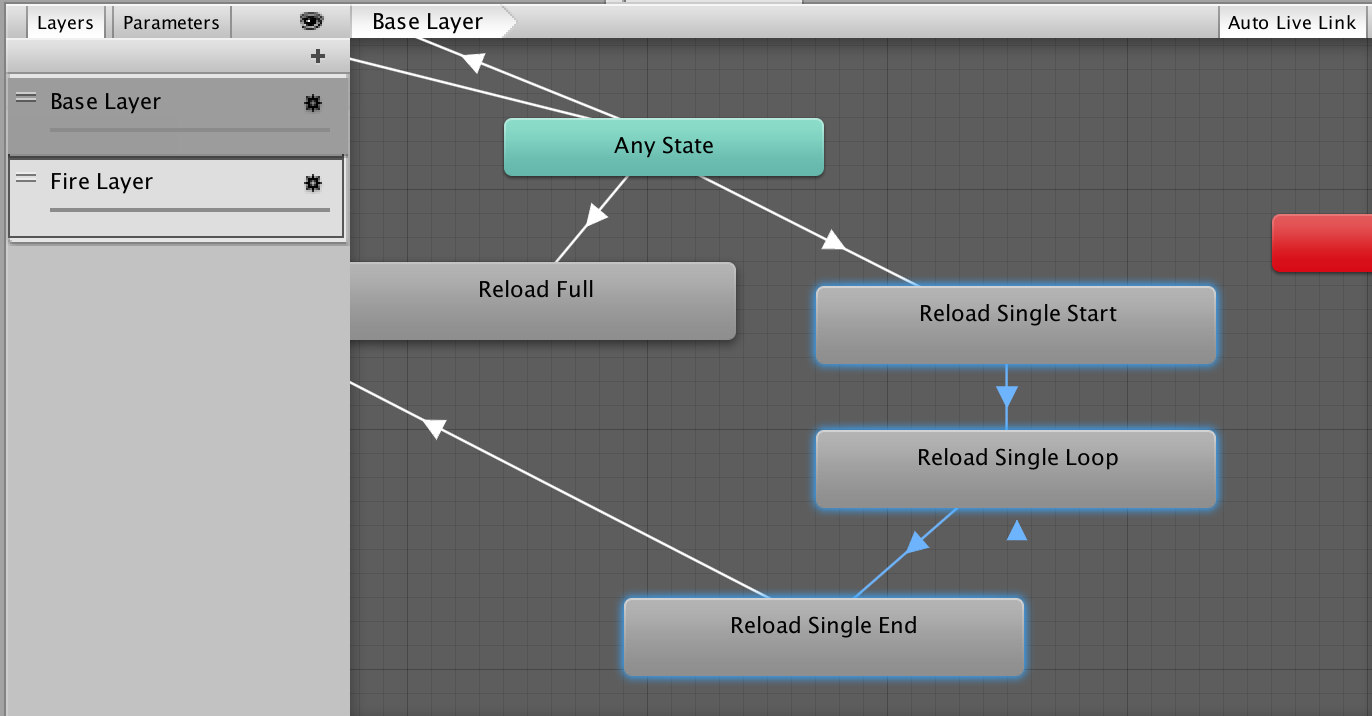

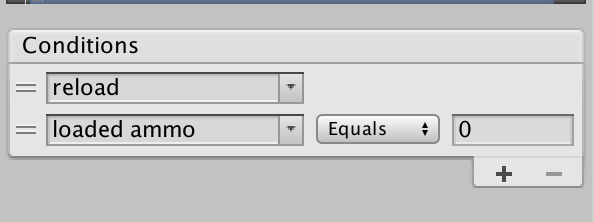
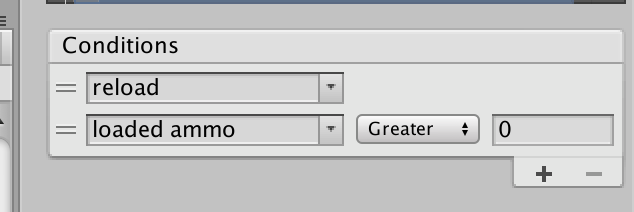
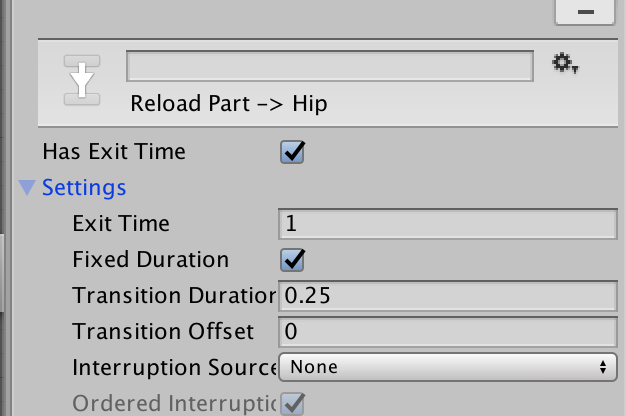
Change the conditions of the transition form “any state” to “reload full” to reload, and loaded ammo equals 0. For the transition from “any state” to “reload part”, use conditions reload and loaded ammo greater than 0. For the transition from both reloads to the idle state, make sure “has exit time” is enable, and exit time is 1.
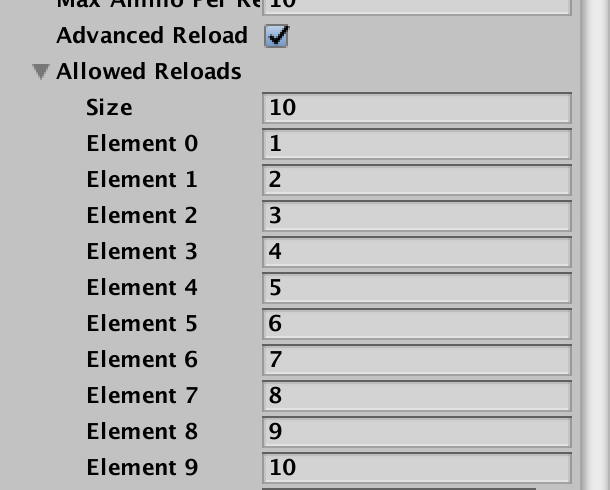
Now, in the weapon configurations, scroll towards the bottom of the inspector, and enable “advanced reloads”. In the size field, enter the magazine size of your weapon. In each element enter the numbers from 1 to the magazine size of your weapon sequentially. This example uses 10 rounds for brevity.
Lastly, set the reload time configuration to something significantly longer than the actual reload time to avoid the weapon loading before the reload is actually done.
Test to ensure everything is working, and this should allow the reloads dynamic reloads.
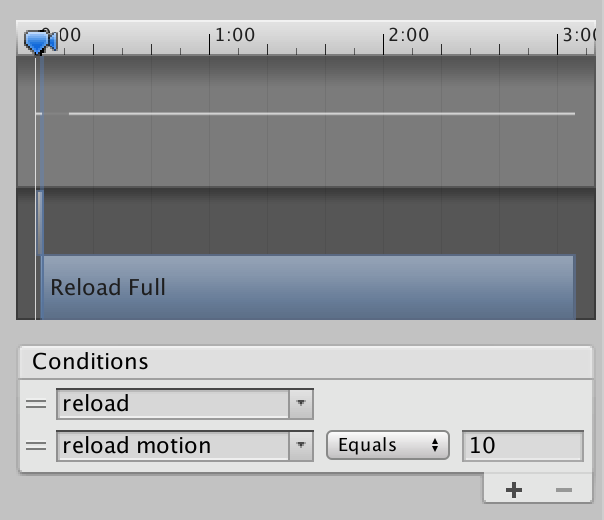
Advanced reloads is the system used by the Garret and 76 Eagle. These allow for single loading of rounds, and the usage of clips or other loading devices when applicable. I will discuss the system for a weapon like the Garret, specifically using the KSK from my NVA pack, which uses clips, but is also capable of single loading. If your weapon does not use clips or other loading devices, simply do not use the “reload full” animation.
You will need to make 4 animations, an animation for the use of the clip, an animation that begins the single loading loop, and animation of single loading a round, and an animation that ends the single loading loop. It is important that the hand and weapon position at the end of the loop start, both start and end of the loop animation, and beginning of the loop end animations are identical to avoid jumps in position.
Once you have the animations done, and the model imported into unity, key off the animations. Add a “MotionDone” event to the single load loop animation just after the point at which the round is inserted.
In the loop end animation, add a “ReloadDone” animation at the end of the animation. For the clip animation, add the “MotionDone” and “ReloadDone” events as was done for dynamic reloads.

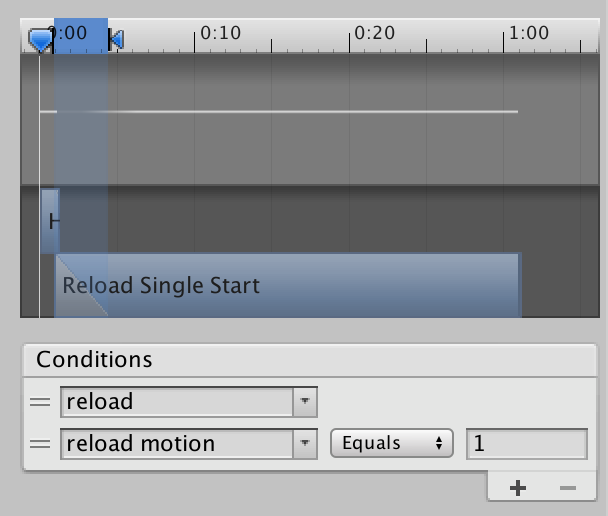
Now, duplicate the Garand controller. Insert the animations into the appropriate slots. Set the transition conditions for “any state” to “reload full” as reload and reload motion equals (weapon capacity), in this case 10 rounds. The conditions for “any state” to “reload single start” should be already set to reload and reload motion equals 1.
In the weapon configuration the inspector, enable advanced reloads and in the size field, enter 2. In the first element, enter “1”, and in the second, the capacity of the weapon.

Test to ensure everything works.
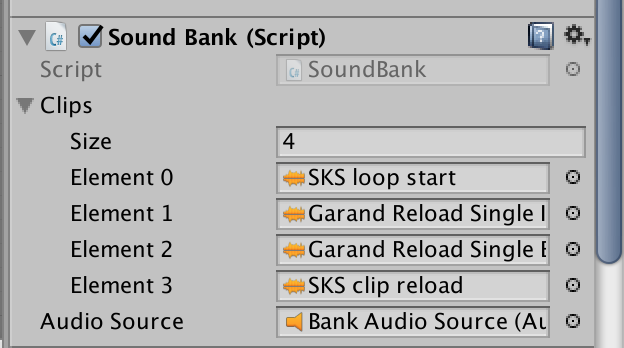
Sound banks are used to play different sounds at different times. In order to use them, first duplicate any audio component already in your weapon, or from a default weapon, rename it to “Bank Audion Source”. The clip in the audio component is not important. In the inspector for your weapon, click “add component” at the bottom, and enter “sound bank”. Drag the “Bank Audion Source” into the “audio source” field. For the size of clips, enter the number of audio clips that will be required, in this case 4.
To call the sound bank in an animation, use an event with function “PlaySoundBank”, with the int field’s number corresponding to the element number of the audio clip. Position it so that it plays at the moment you want it to.
It may take some trial and error to get the positioning right.
Configuration in Unity Part 4: Casing particles and explosive weapons
It may be the case that you want to change the mesh of the casings used by your weapon. Though this step is not required, and in some ways against the conventions of the game, I choose to do so for some of my weapons.
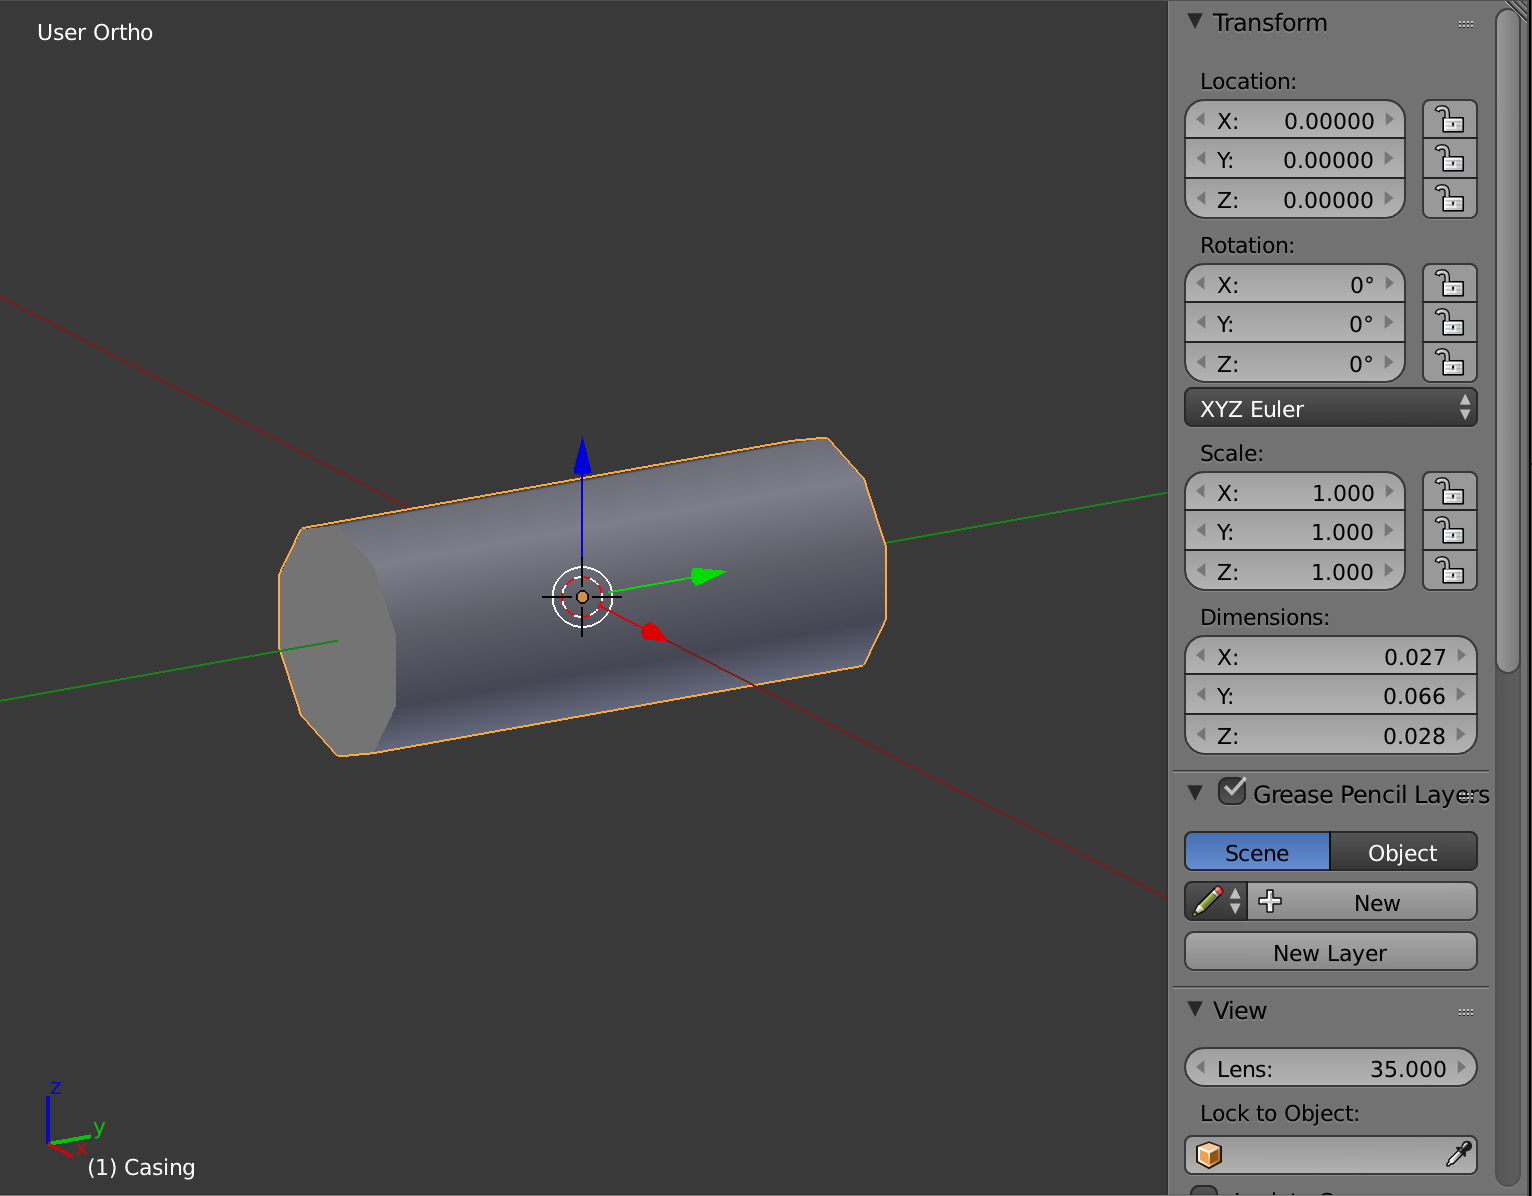
To start, you must model your casing. Same procedure as all other modeling you will do. When modeling, make sure to keep the dimensions of the casing small, otherwise you will have to adjust in Unity. For reference, these are the dimensions of the default casing:
Once done, save your casing as ‘[caliber] casing’. Import it into Unity under assets>models>weapons>misc. Now open the casing particles for your weapon in the inspector. Scroll to the bottom and open the tab ‘renderer’. Where it says ‘mesh’, click the small circle and locate your mesh.
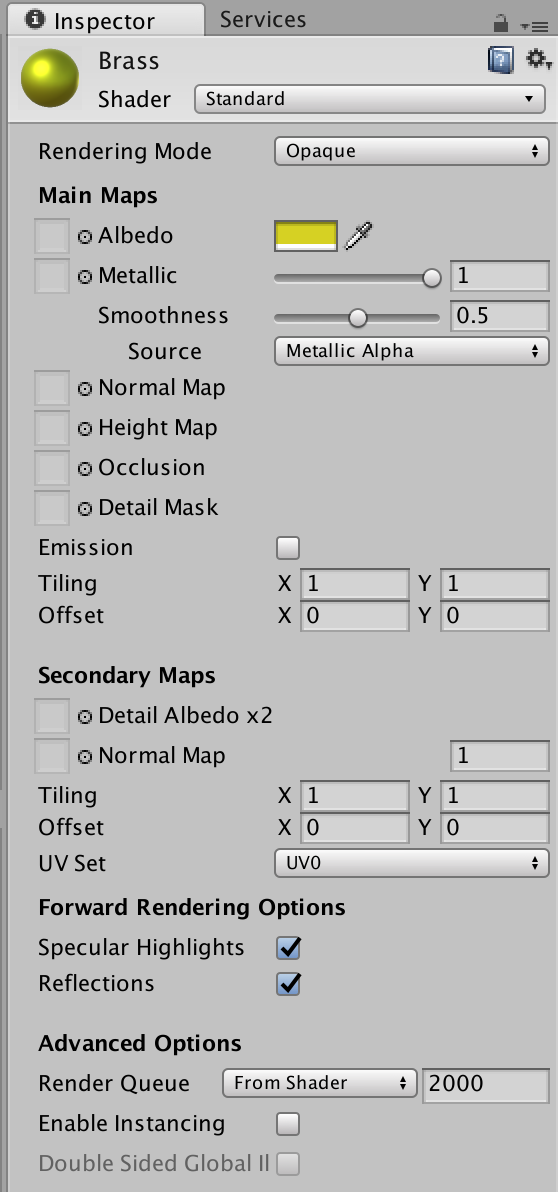
If you want, you can also change the material used on the casings. I recommend duplicating the default material and renaming it either ‘casing’ or ‘brass’. You can simply change the color to yellow, or you can be a bit more fancy and change the source to ‘metallic alpha’, this will give your casings a metallic shine as they fly through the air.
If your casings are coming out at a odd place, adjust the location of the casing particles object in the scene.
Special weapon types:
The weapon you are making my not be a normal rifle. Perhaps it is a shotgun, or rocket launcher, or grenade launcher.
Shotguns are very straight forward. For this example I will simply make my AK5C into a shotgun. The first step to click your weapon in the hierarchy and change the ‘projectiles per shot’. We will use 8 since that is common for most FPS shotguns. Also, create a new projectile prefab by duplicating one of your choice. Rename it to ‘[weapon name] tracer’ as before, or, as I do, to ‘gauge-shell type]’.
In a later section I discuss balancing of weapons and go into some detail on shotguns, if you want, you can consult that for my specific thoughts on shotgun projectile stats, but for now, this is my configuration for a standard 12-guage shotgun:
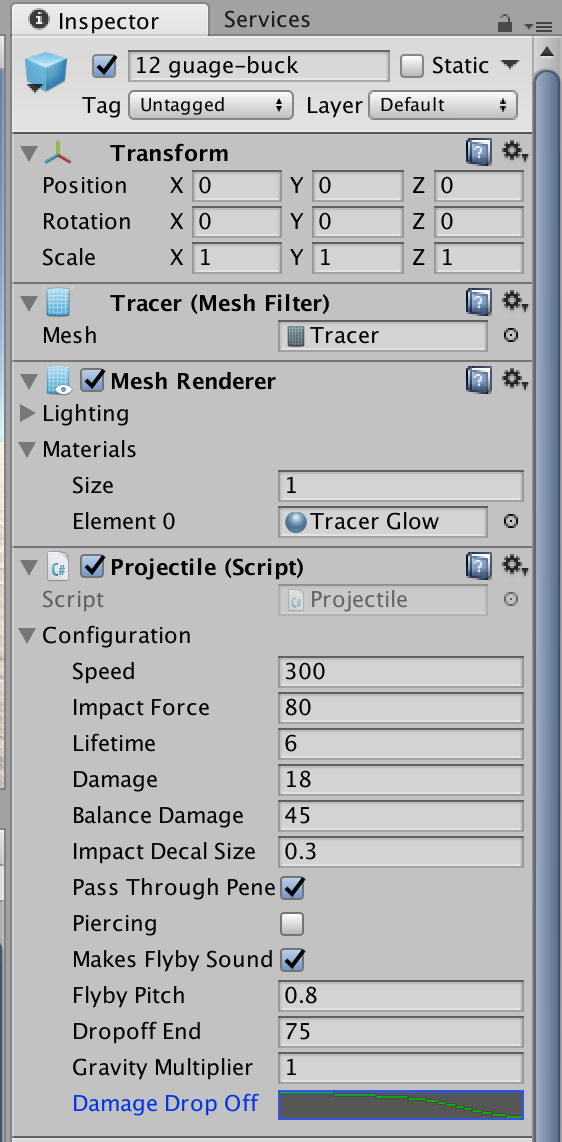
If you were to enter play mode with your weapon at this point, you would probably see that is has very low spread at 50m. The spread of your shotgun is up to you, but I generally go for a covering of the target area at 50m, that equates to a spread value of .03. You will also want to to turn ‘follow up spread gain’ to 0, otherwise your spread will grow per shot, unless you are making an automatic shotgun, this behavior is superfluous.
Rocket launchers follow a very similar process to regular firearms until you get to the projectile. We will take a quick detour, and use my RPG-7 as an example. For the projectile prefab, duplicate the default ‘rocket’ prefab, renaming it to ‘[weapon name] rocket’. The configurations are mostly the same as with regular weapons and fairly self-explanitory. These are the stats of the rocket in my RPG-7:
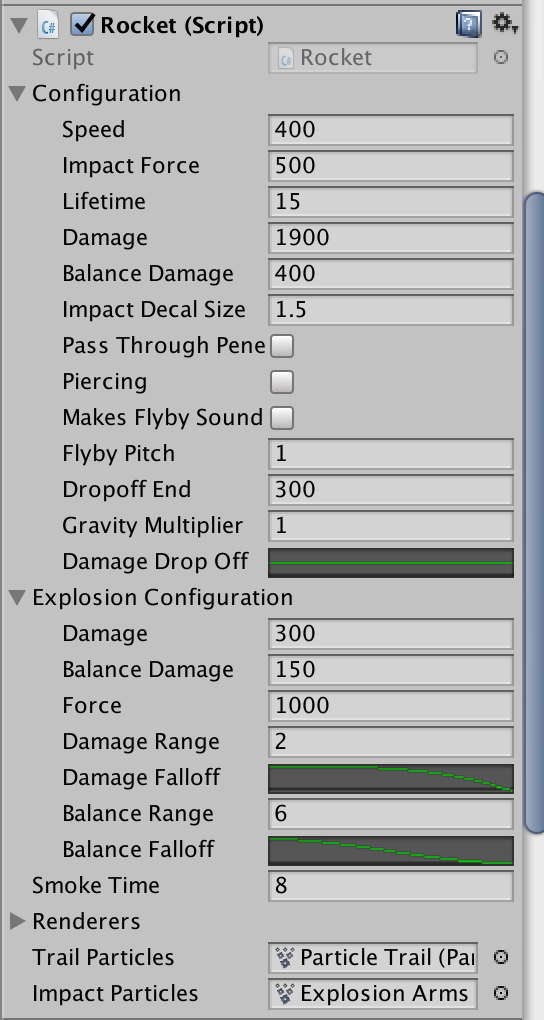
As far as performance, I generally keep spread low as most rocket launchers are single shot and have long reloads.
Grenade launchers are very similar to rocket launchers. The main difference is that your projectile will be much slower. This is one case where you can increase the gravity multiplier to increase the arc of the grenade. The simplest way I have found to create the grenade is simply use the rocket prefab projectile. You can keep the smoke trail if you want, or disable it by toggling its renderer off in the inspector.
The final type of explosive weapon are anti material rifles. These rifles fire high caliber armor piercing or explosive rounds. The simplest way to create their projectile is to duplicate the ‘gatling tracer’ prefab and reconfigure it to your liking.
Scopes and sights
There is a good chance that you will want to add some kind of optic to your weapon. There are three basic types of optics: low magnification, mid magnification, and high magnification. I will go over creating and configuring each in relative detail.
Low Magnification:
These include red dot sights, holo graphic sights, some thermal optics, and other similar sights. Most have no magnification, to 2x magnification. They are generally used for long guns, SMGs, and some handguns.
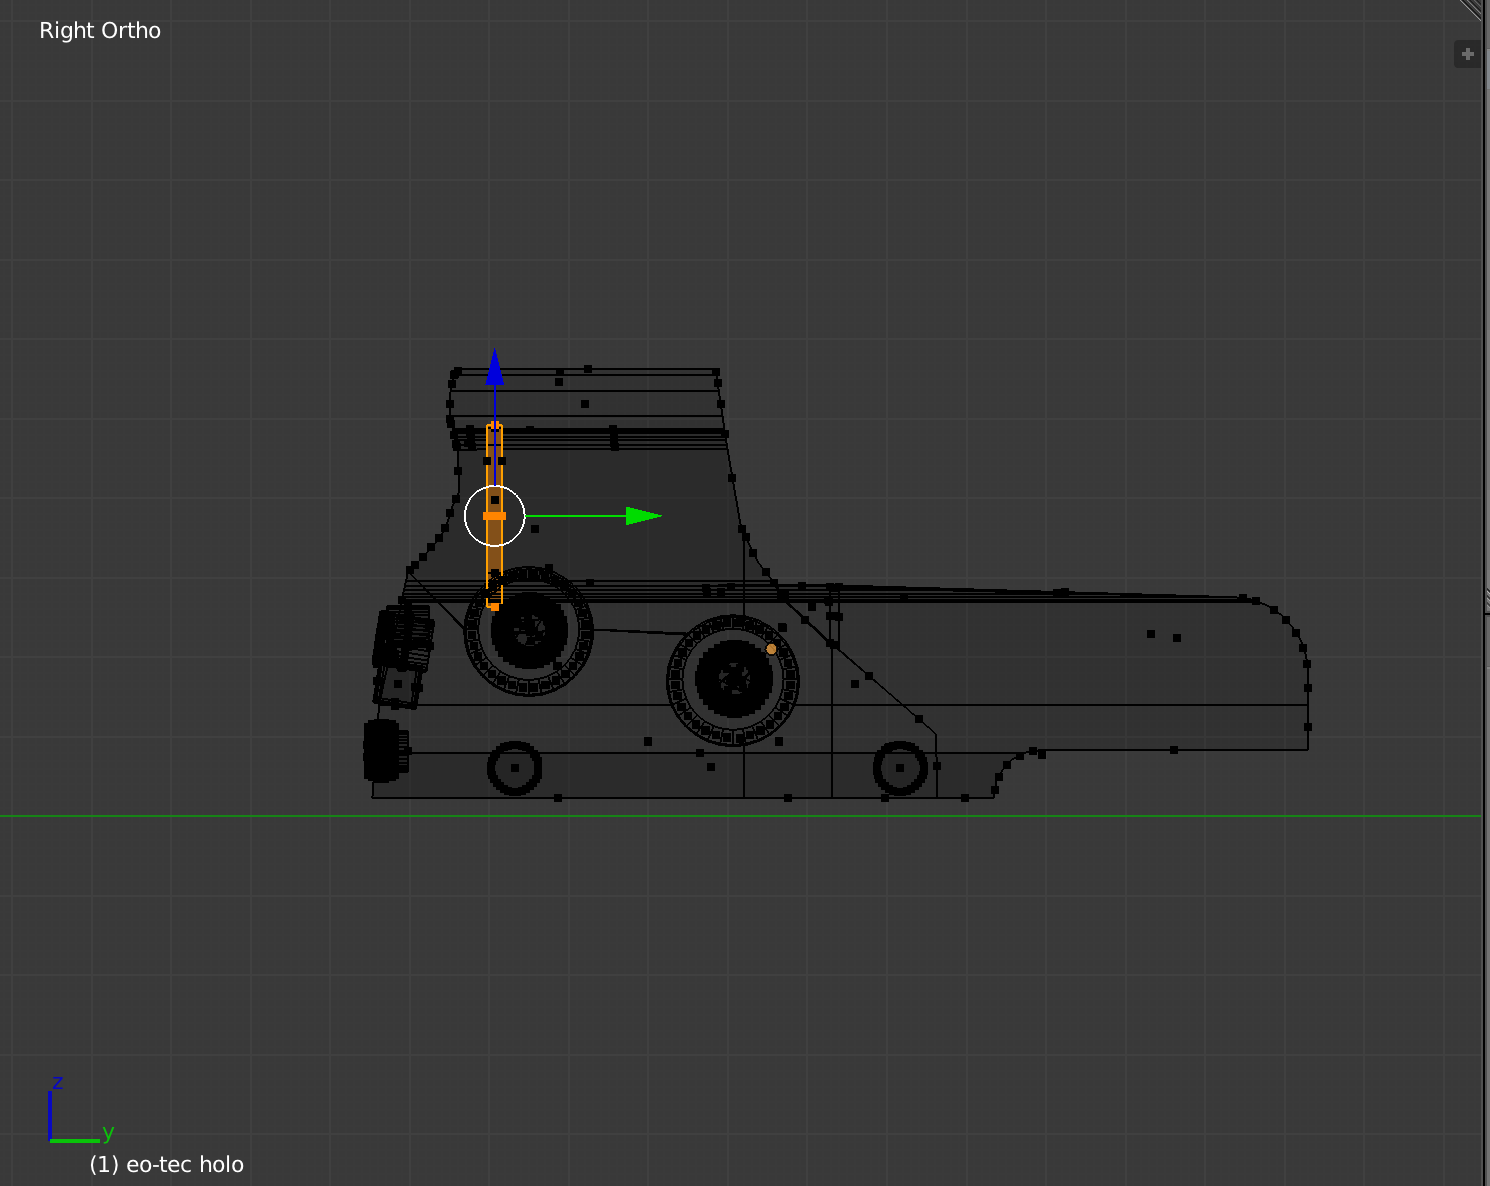
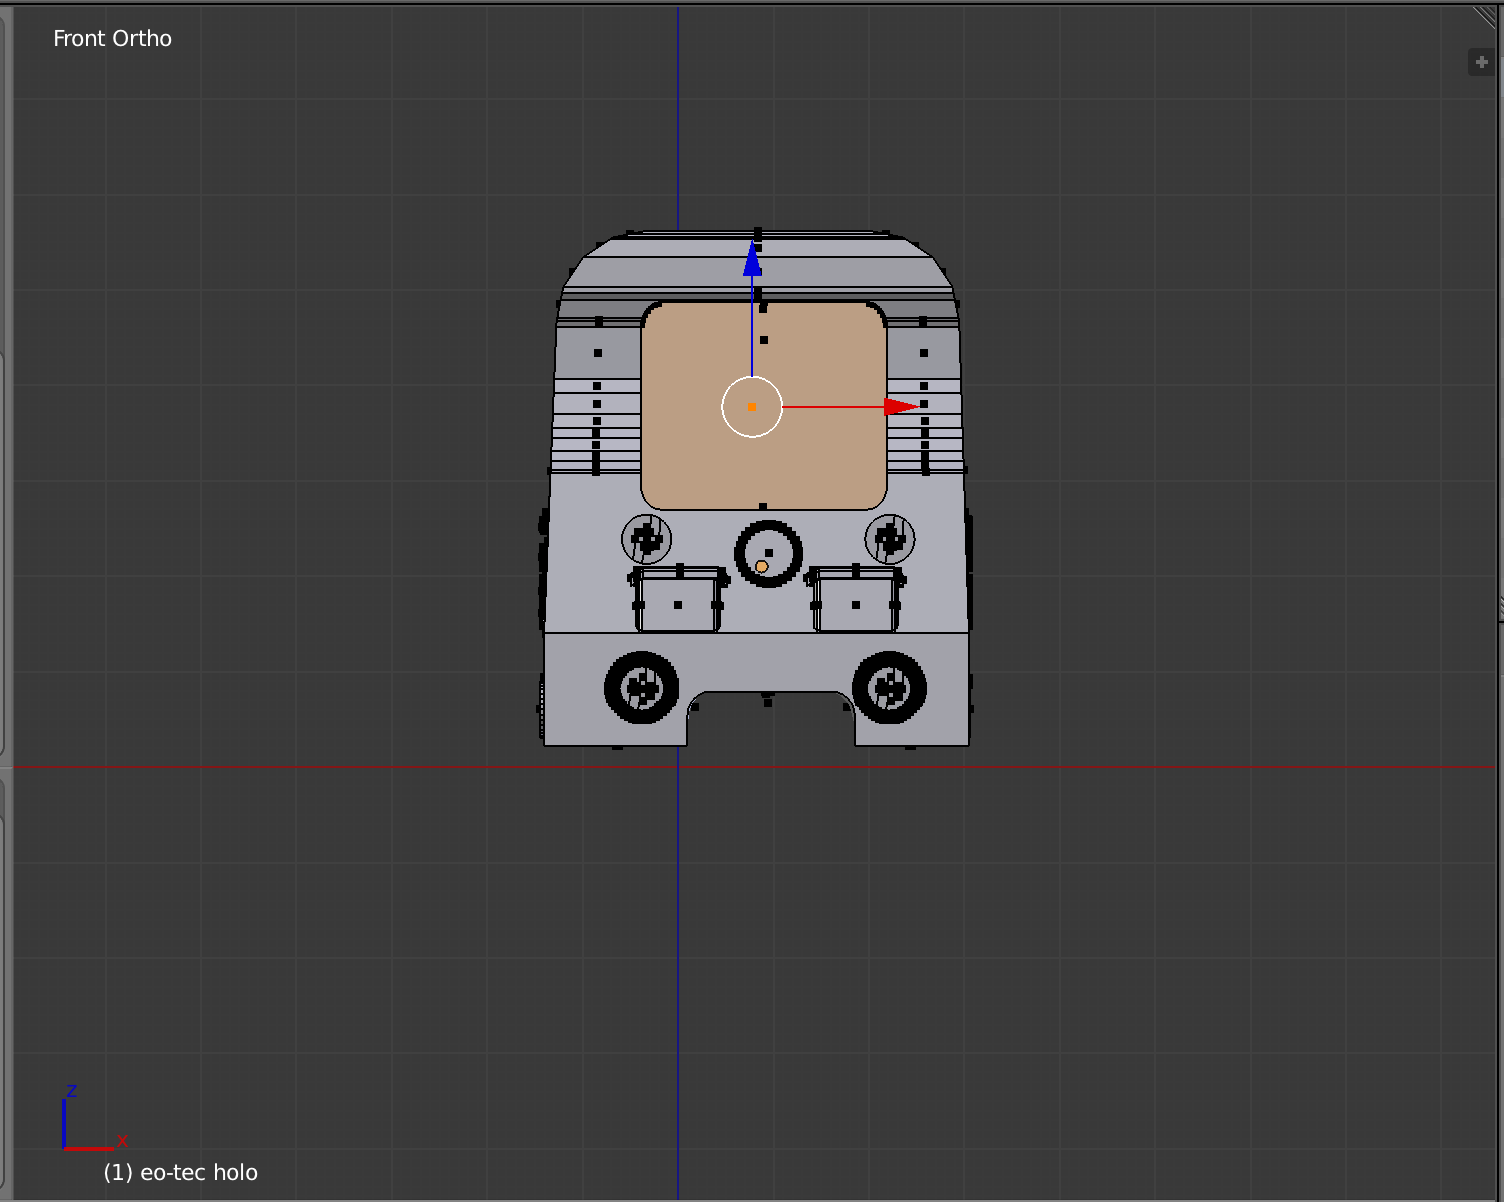
Your first step is modeling your optic. Follow a similar process to modeling your weapon. For our example, I will be using a optic based on the popular EOTech Model 522.
The one specific thing to do is to add a very thin object that takes up the entire interior of the sight, like this:
For a sight with a circular interior, a cylindrical object may be easier. Example here modeled after the Russian Kobra:
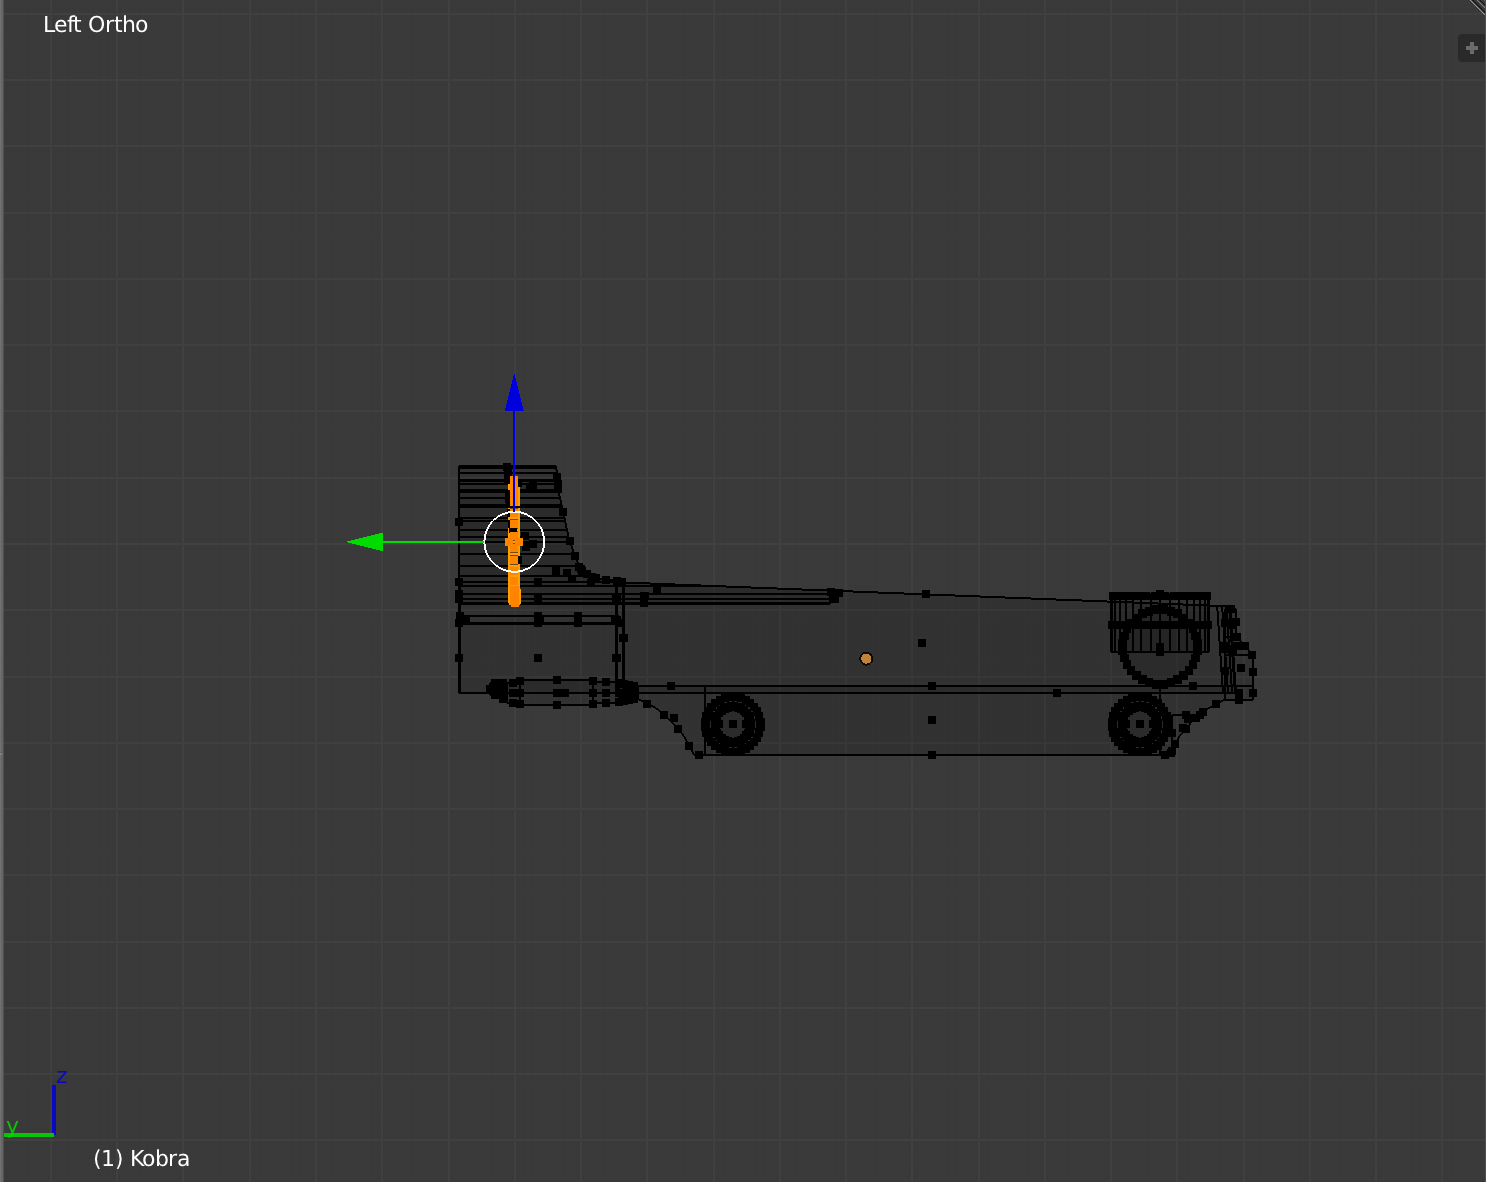
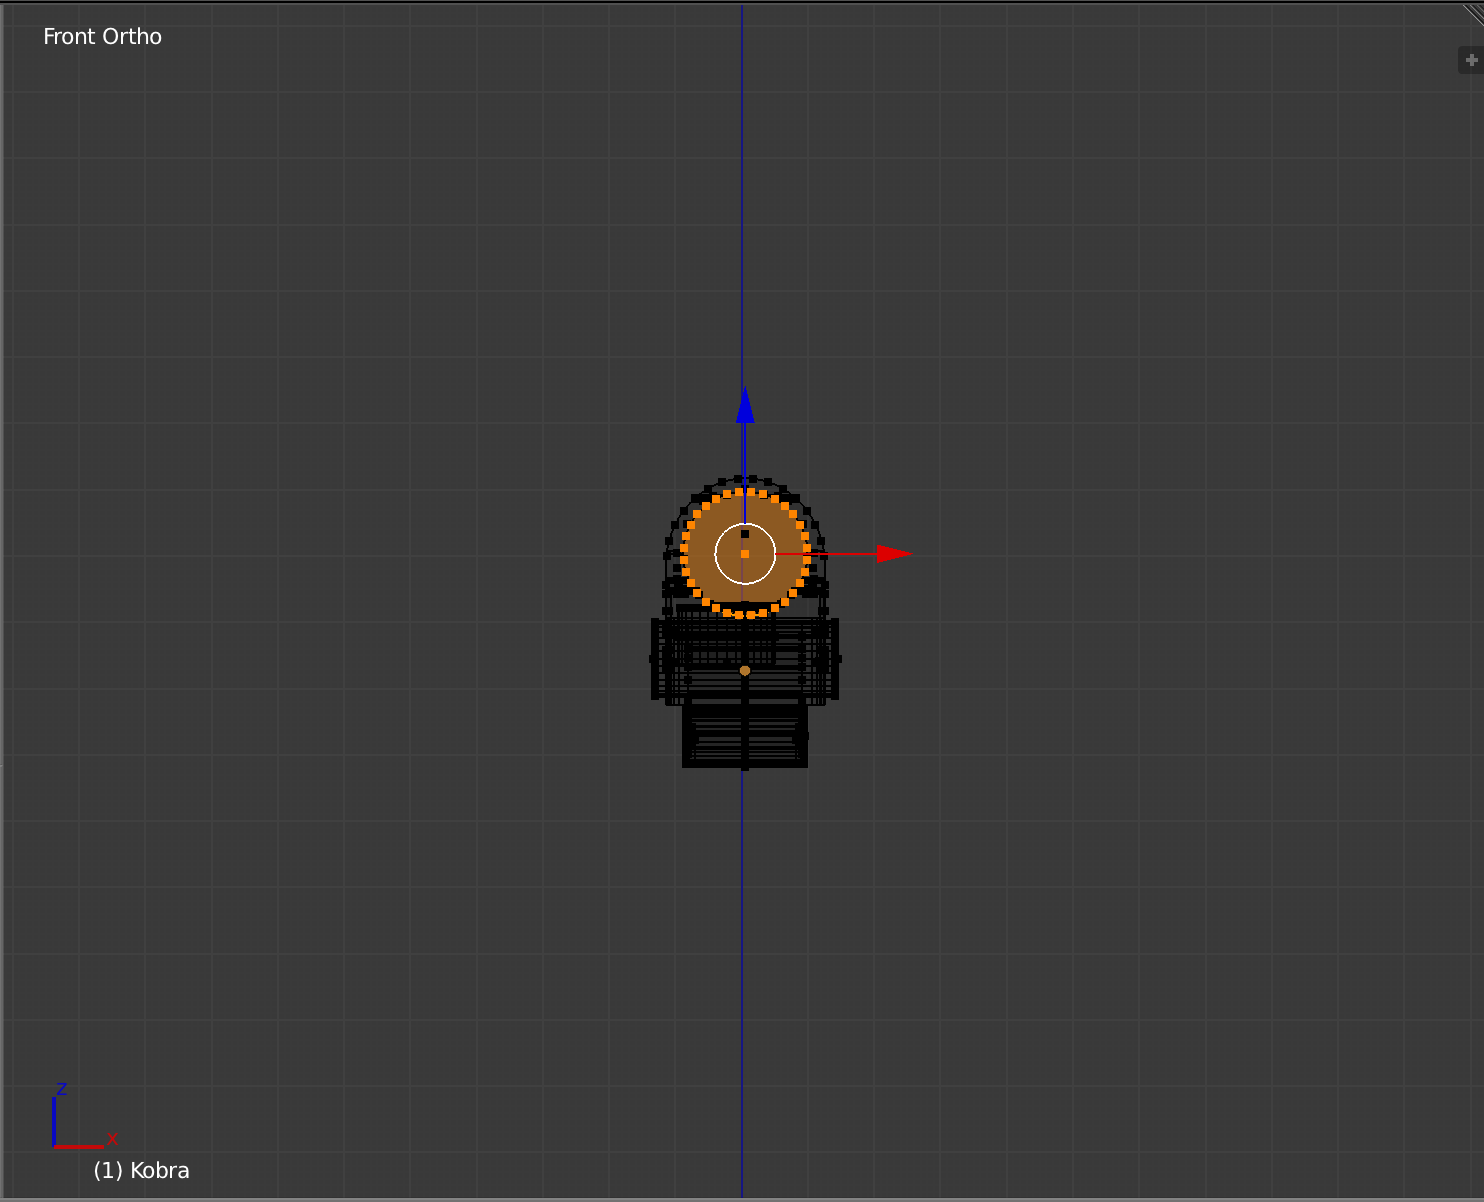
Assign this object to a material named ‘[sight name] glass’. It can be any color as it will be changed in Unity. I personally use a bright pink for ease of troubleshooting.
When adding the sight to your weapon, it is generally easiest to simply join it to the weapon mesh, though you can add it in Unity be importing the .blend file and dragging it into the weapon prefab. This method is more time consuming and more prone to errors, so I will be demonstrating the former method.
Once the sight has been properly added to the weapon object, make sure it has been added to the appropriate vertex group if you have made custom animations. Run the animations through, watch for clipping with the arms, or parts so the mesh moving improperly.
If everything is working, save the file and open Unity and find your weapon in the hierarchy. For this example, we will shift focus to my ARC-170 PDW as it already uses the Holo sight. In Unity again run the animations to make sure everything has updated properly.
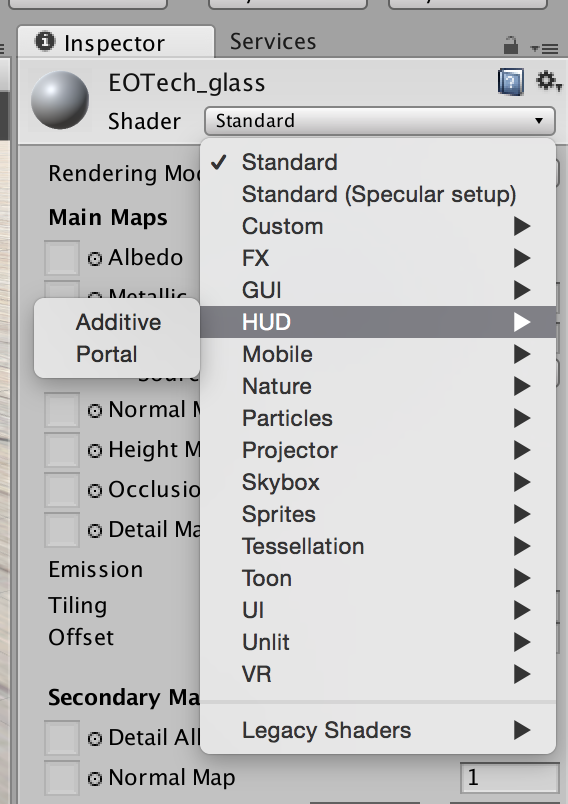
In the project tab, find the material named ‘[sight name] glass’ and click on it. In the inspector change the shader to HUD/portal. For the tint color, makes sure the ‘A’ balance is about 50/50. The color you choose will give the sight a slight tint. Personally I use a slight grey or blue. Be warned, anything too dark will be hard to see through in low light, and if too light in color it will be rendered more or less invisible. Enter play mode to make sure it is working.
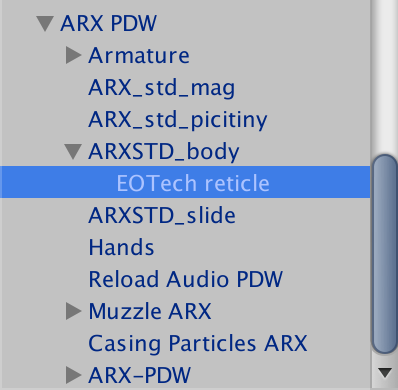
Once you have everything set up, expand the AR-15 prefab in the hierarchy, duplicate the object labeled ‘sight’, drop it into your weapon and rename it to ‘[sight name] reticle’. Then, drop it into the object that contains the sight.

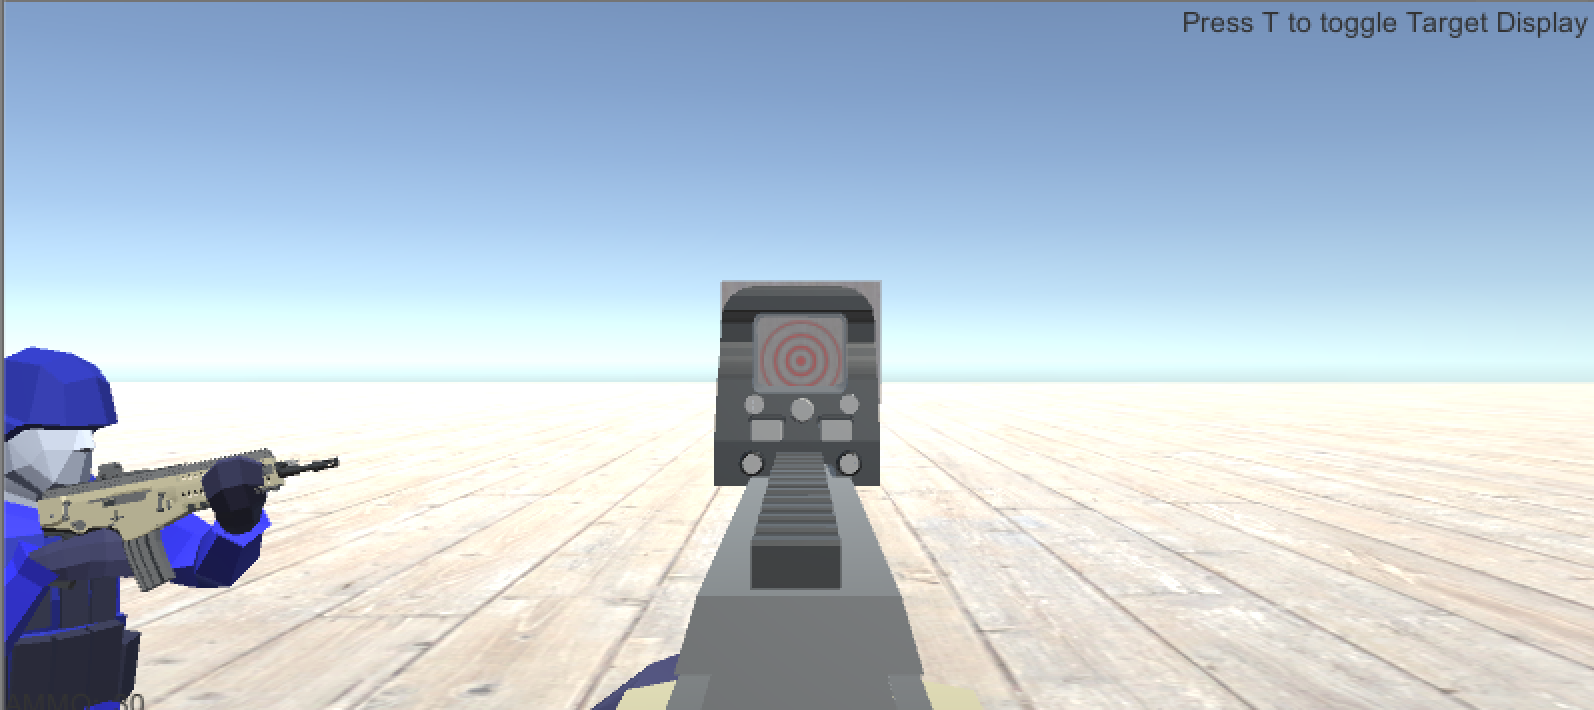
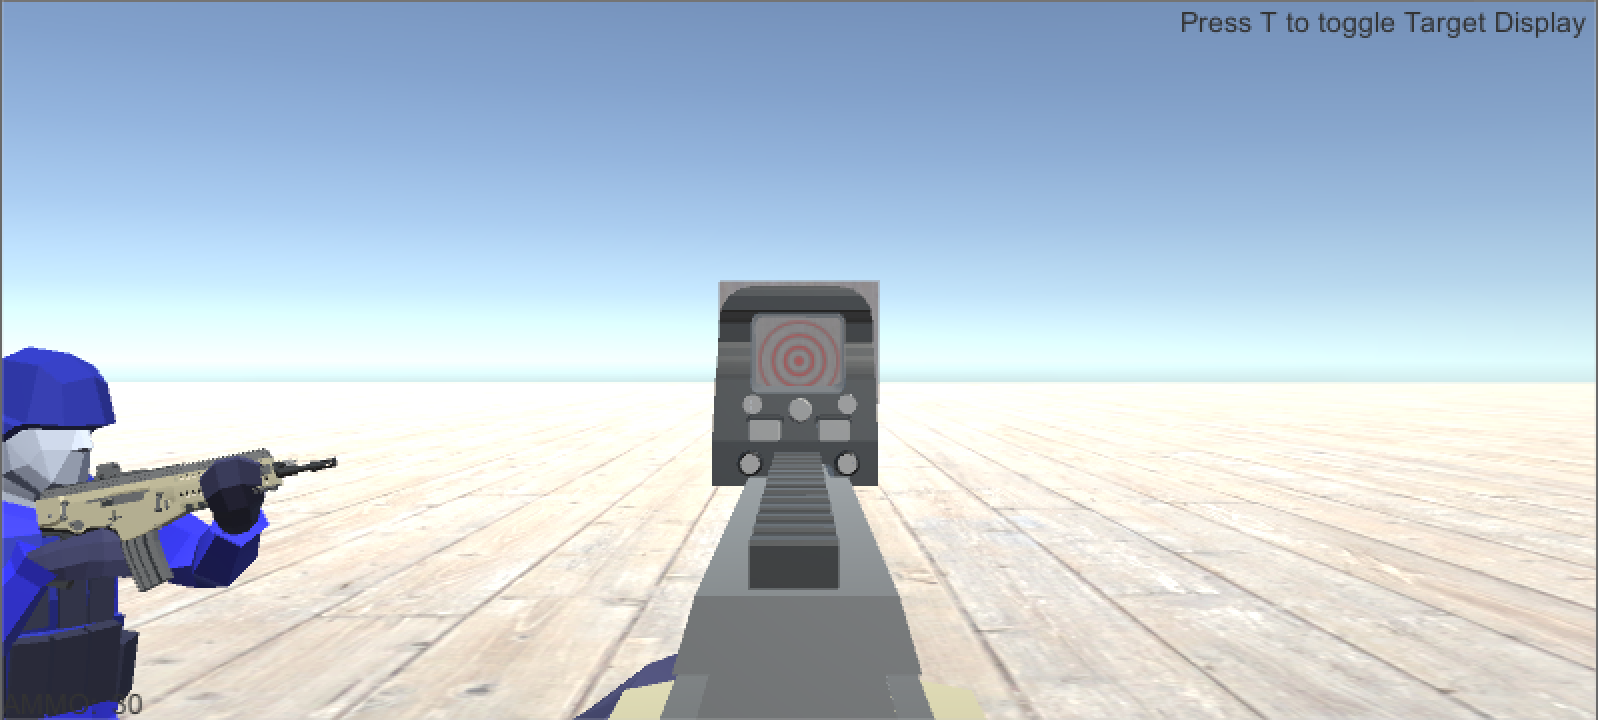
Enter play mode, and you will probably see something like this:
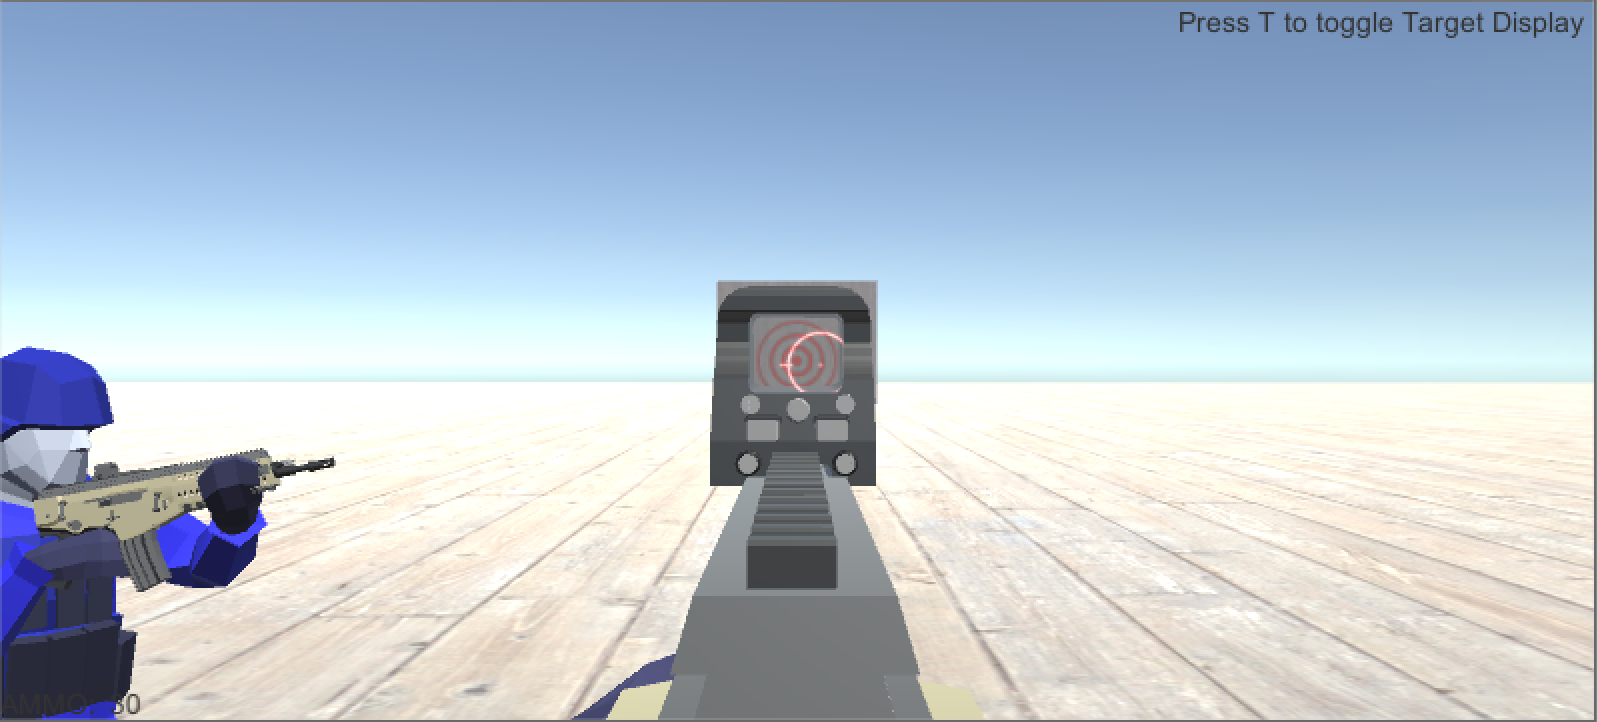
This is easily fixed. In scene mode, carefully adjust the position of the ‘[sight name] reticle’ object. Continue back and forth with play mode until the reticle is properly aligned. Adjust the scale to the appropriate size. Use video game screenshots, or real images for scale reference.
You may choose to use a different reticle shape that is more appropriate for you sight. to do this, in the inspector, expand the materials of the sight. Click element 0, labeled ‘Holo Sight’. Duplicate it and rename ‘[sight name] reticle’. For this example I will change it to a simple red dot.
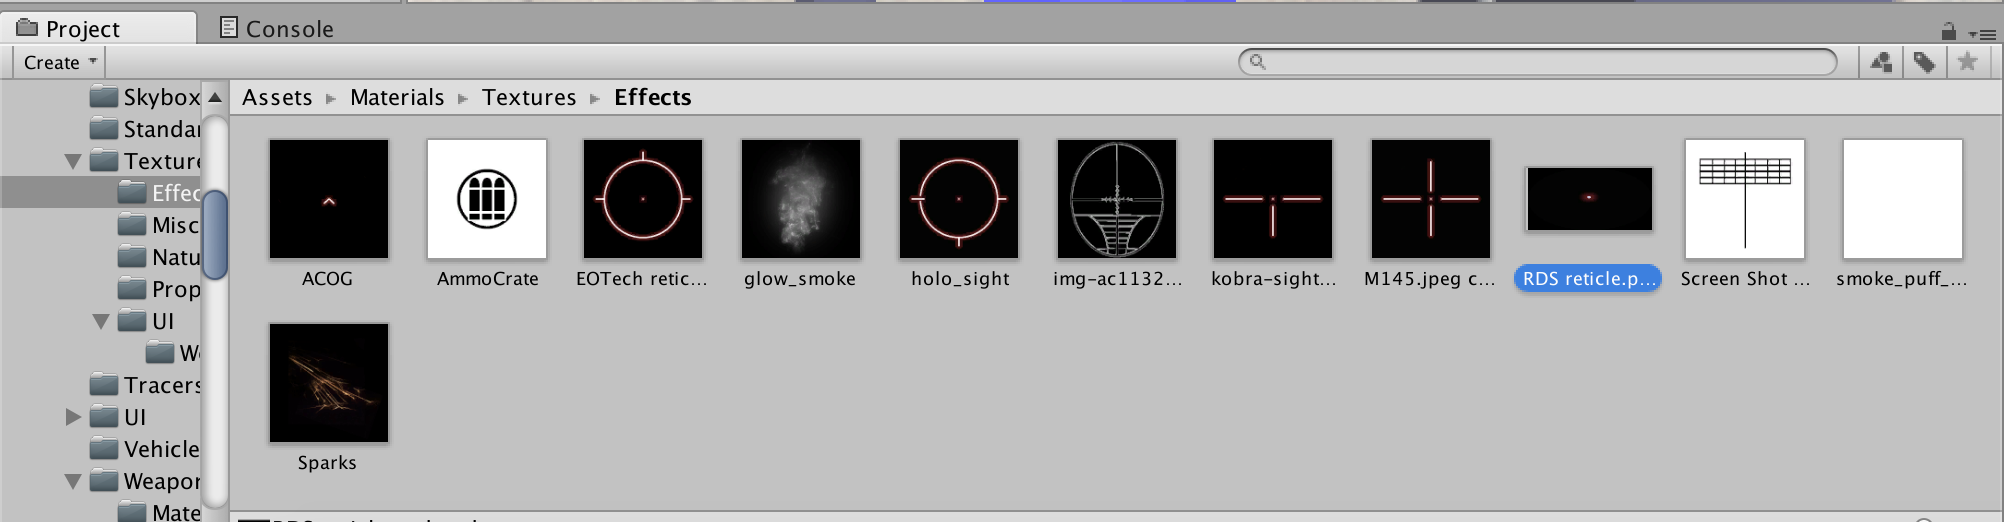
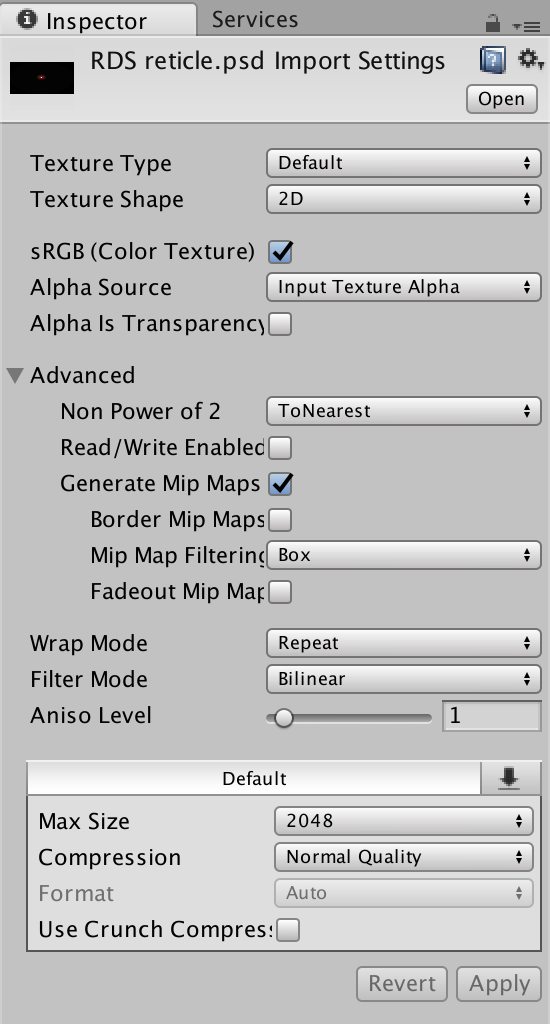
In the photo editing software of your choice, create a white outline of what you want your reticle to look like on a black background. Save as a .psd if possible. If your software does not allow saves as .psd, there are file converters available online for free.
With your new reticle done, save the file as ‘[sight name] reticle’.psd. Import it into Unity in assets>materials>textures>effects
In the inspector, make sure your file has the following properties:
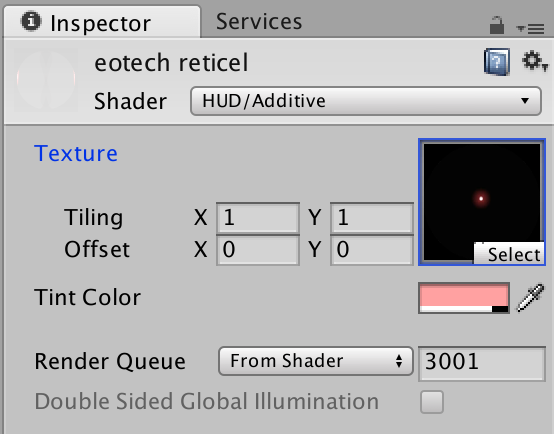
Locate the material created earlier in the project tab. In the inspector, click the image next to the texture to change it to the texture you created. Adjust the tint color to your liking. Adjusting the ‘A’ slider changes the intensity of the reticle. At a value of 255 your reticle will be more or less opaque, at 0 your reticle will be invisible. I generally use a value of around 200-210

Mid Magnification:
Mid magnification sights are generally fitted to combat rifles, LMGs, and occasionally sniper rifles. They are generally magnified 3-6x and include the ACOG series, M145, and PSO-1. They are often shown in games with out the black peripheral vision associated with a traditional scope.
For dual render, the modeling procedure is more or less identical to all previous modeling stages.
There are two ways to make a mid magnification scope: follow the low magnification process and simply lower the aim FoV, or dual render. See below for an in-depth tutorial for dual render. Verrater’s M200 and M14 are great examples of what dual render can be.
High Magnification:
High magnification scopes are almost always fitted to a sniper rifle or DMR, and use magnifications over 8x. They are what one would consider the classic sniper scope.
As with mid magnification, there are two methods to create a high mag scope; dual render, and scope aim objects.
Of course, regardless of method, you will still have to model and mount your scope. Follow the same procedure as you did for all other models.
The dual render procedure should be exactly the same as illustrated for a mid magnification optic, only the camera will have a lower Field of View.
I already discussed scope aim objects briefly in my overview of Unity configuration. This process is best explained by these two tutorials, demonstrating different methods. I use the later tutorial for my earlier Nifty Fifty mod with acceptable results.
[link]Sights and Scopes: Dual Render
First off, a special thanks to {442}Ryuu Turner for walking me through this method, it is very simple and very effective.
Step 1: Modeling:
As always, we must model our optic first. This can very easily be done on an optic you have already made. For this example, we will be using an Elcan Specter as it covers all aspects of dual render. In the below picture the side has been cut away for easier viewing.
Shown in blue is the glass lens of the optic. This is only needed if you are using a .psd reticle like in the red dots discussed earlier, however, you may choose to keep it regardless for aesthetic reasons. Behind that, in green, is the reticle. This is only needed for optics with physical reticles, such as sniper scopes and some mid power optics. Finally, in red, is the dual render lens. This is the surface that will display the dual render. It must be a separate object from the rest of the optic and must be a flat plate. It should also be parented to the optic object, and its origin should be its center of mass (which can be done by using shift+control+alt+c and selecting “center of mass…”. Either surface or volume will suffice for our purposes.).
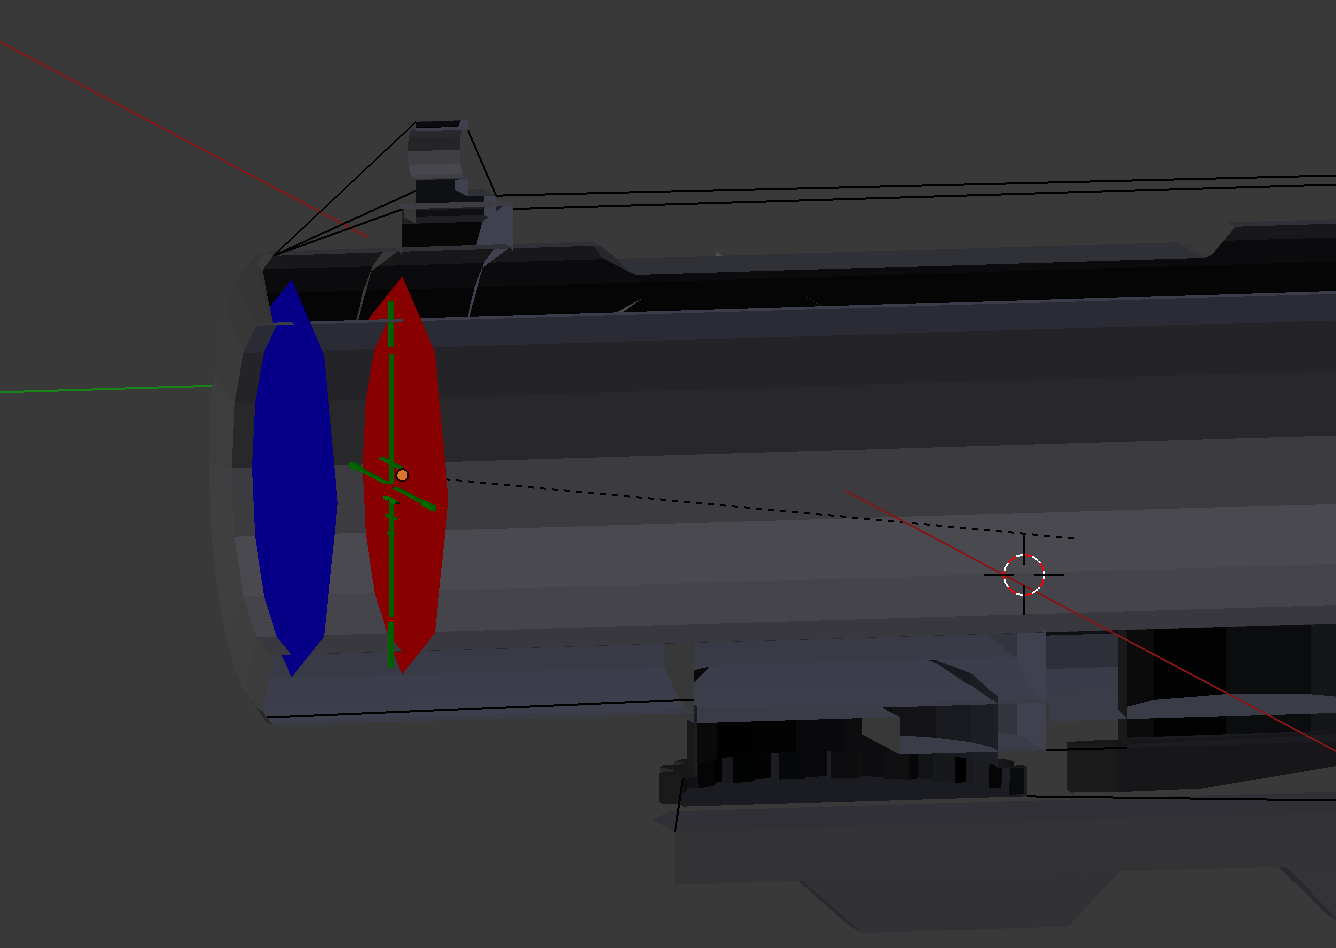
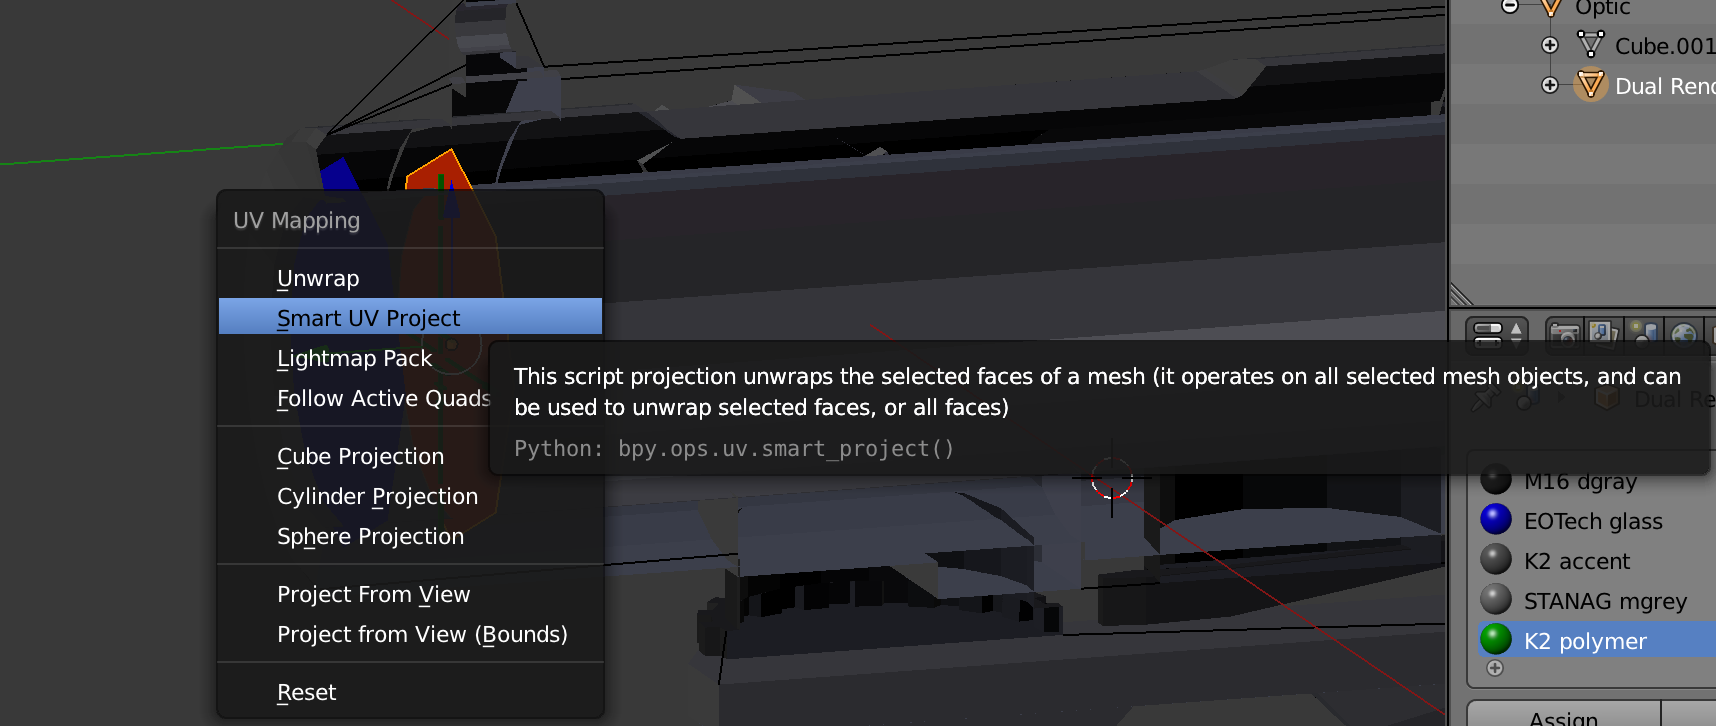
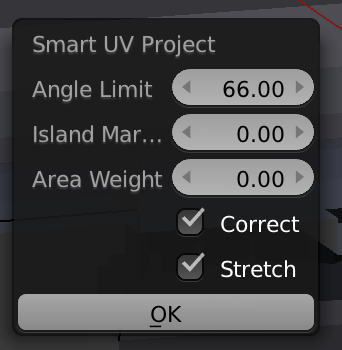
Lastly, you must preform a UV unwrap on the dual render lens object. In edit mode, press ‘u’ and select “smart UV project”. Leave the settings of the next options box at the default and press ok. Nothing will noticeably change, but the action will be competed.
Step 2: Unity:
Once this is one and the optic is all set on your weapon model, open unity. In your project, under materials>textures>effects, create a new render texture, and rename it to “Dual Render Texture” for ease of location. You will only have to do this once.

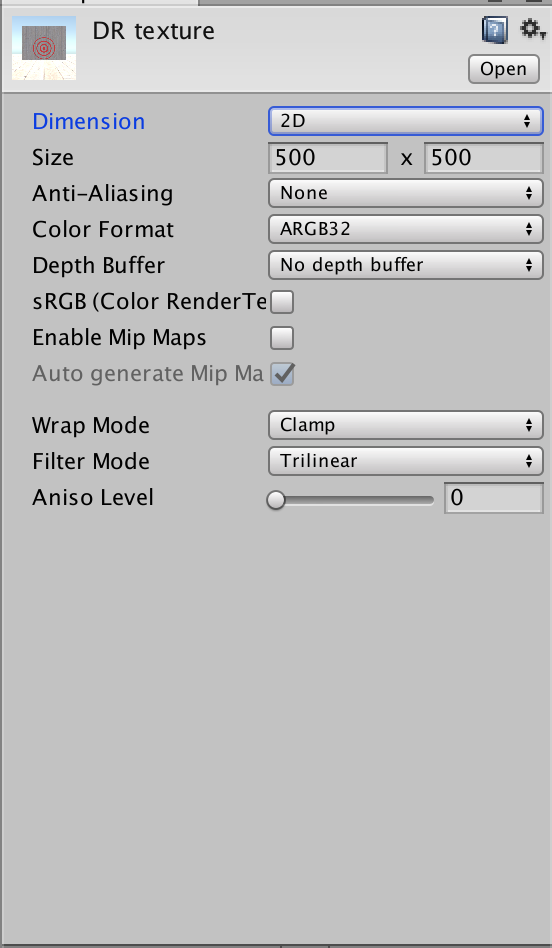
Give the texture the following settings in the inspector. Size will determine resolution. 500×500 will be more than sufficient for most purposes, however higher sizes will give a better image quality, at the cost of additional stress on the computer.
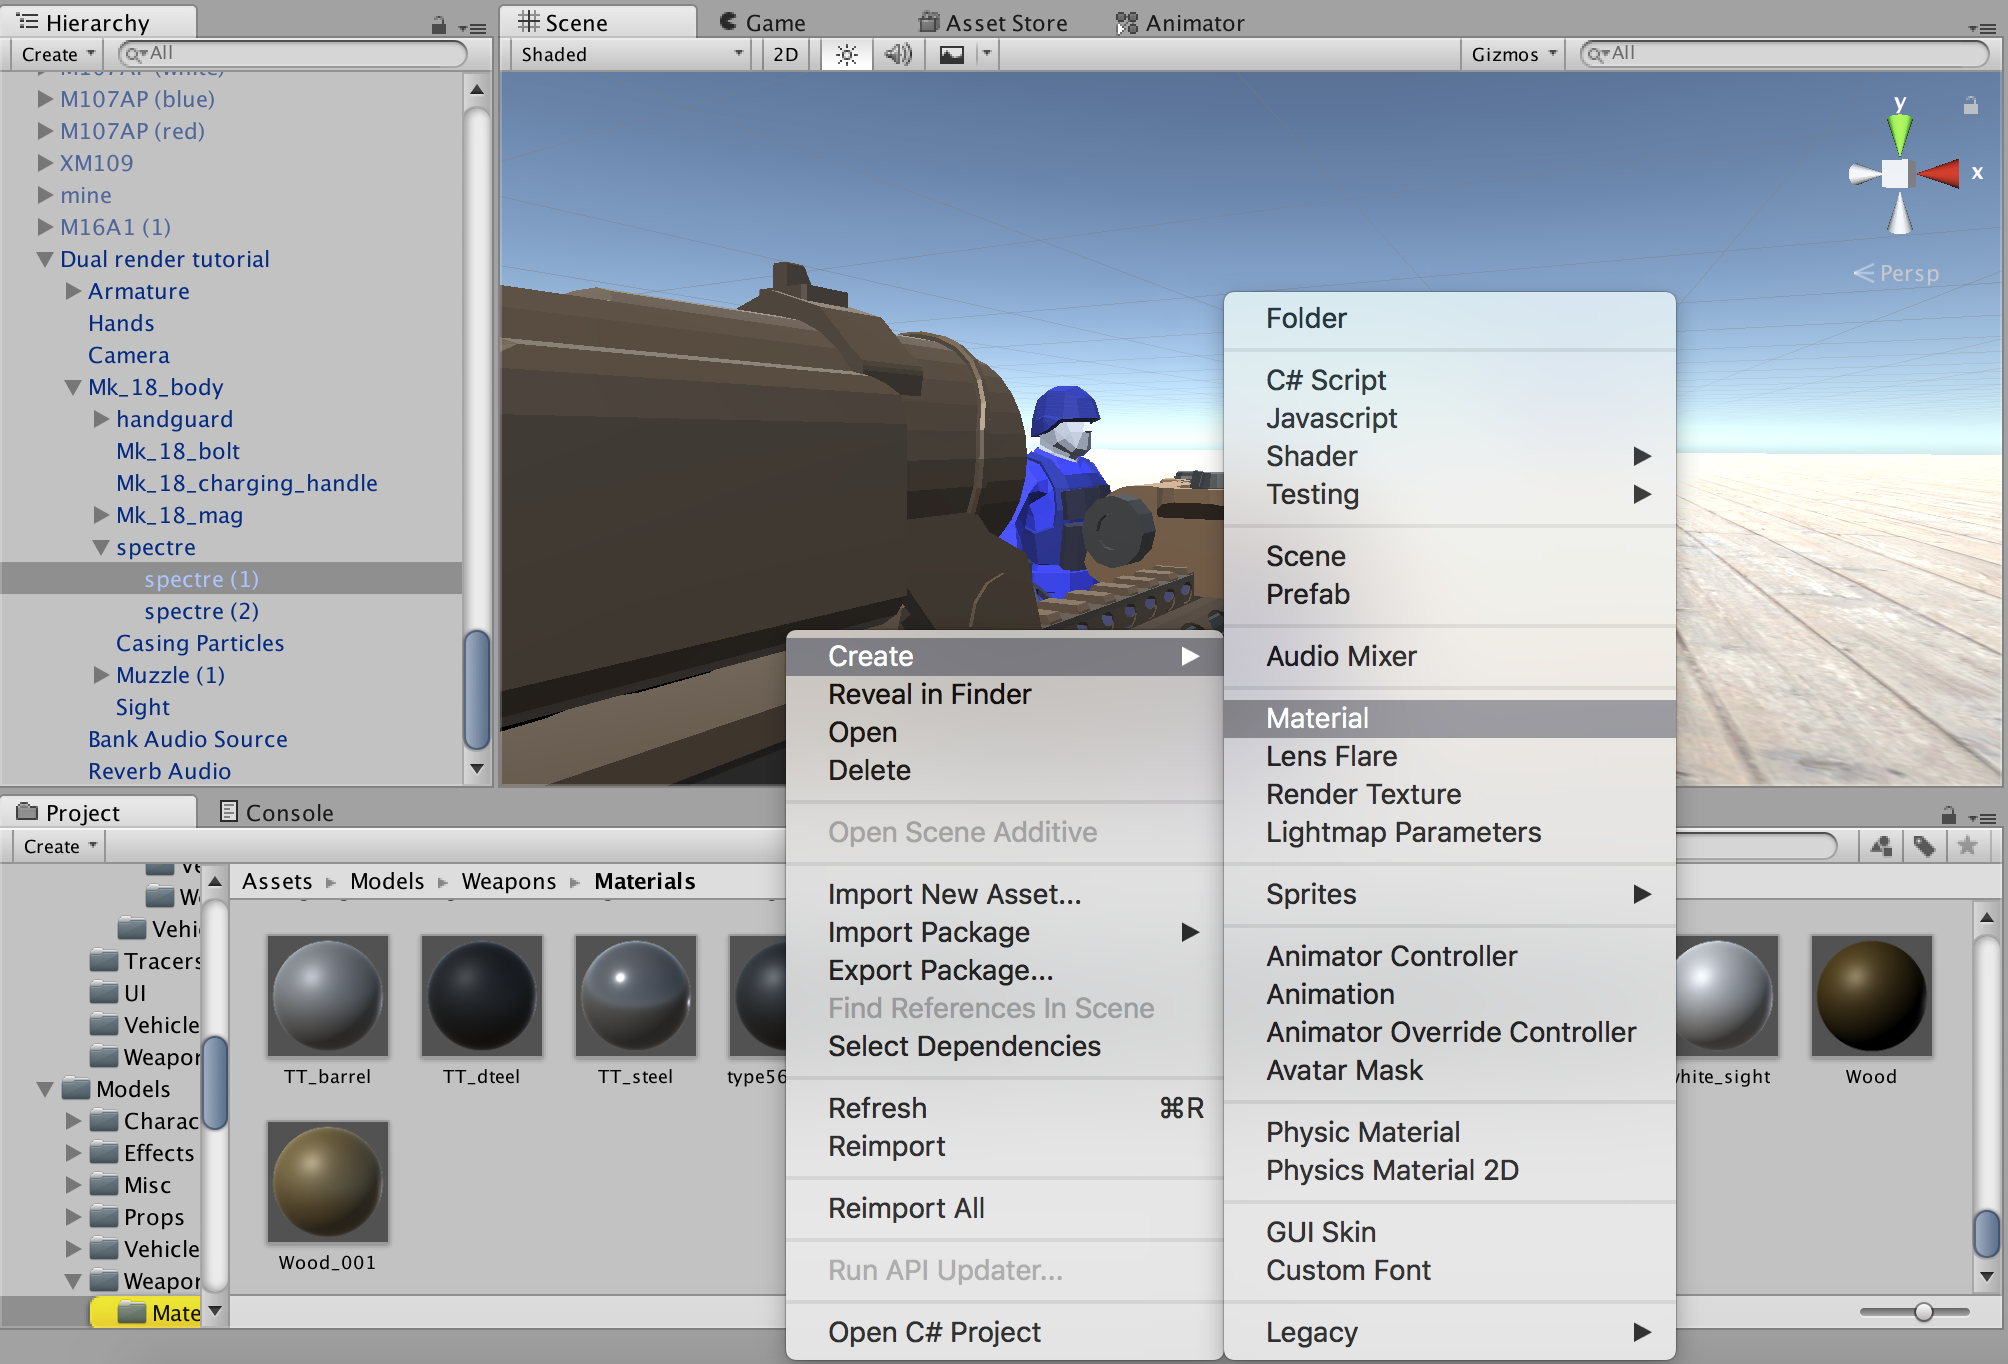
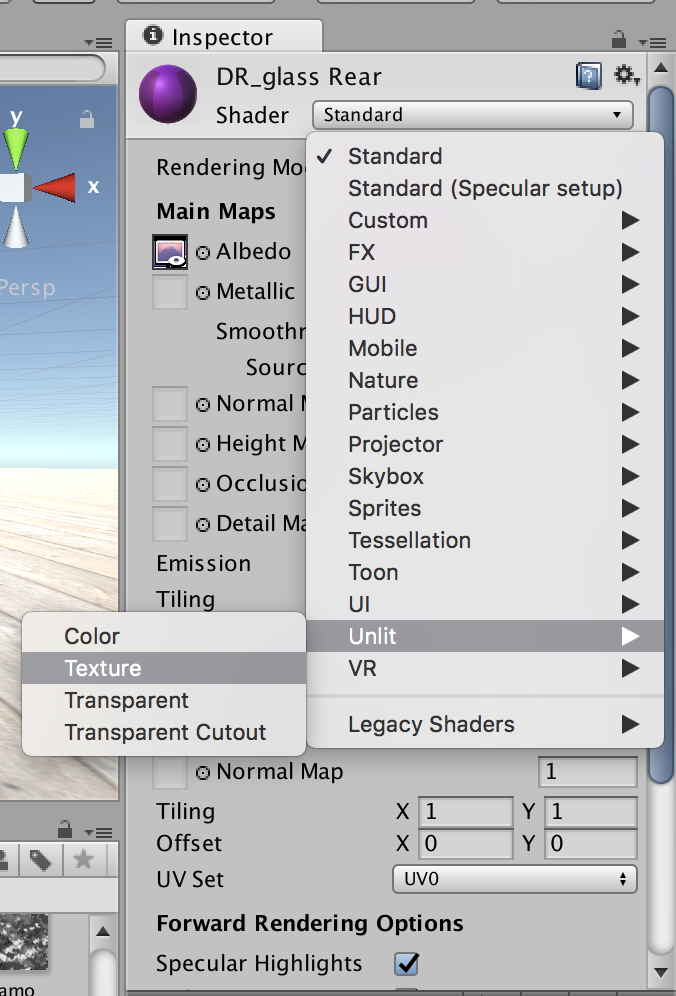
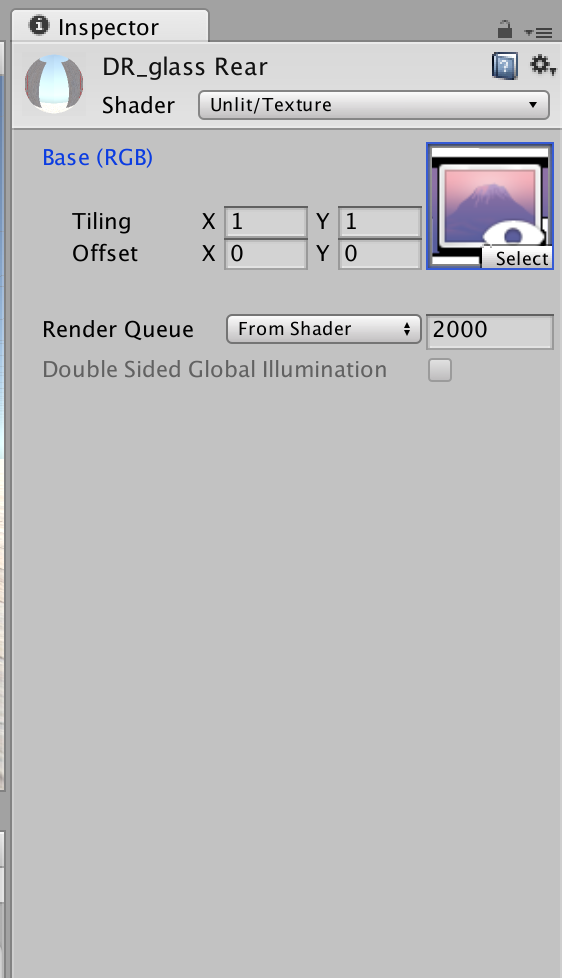
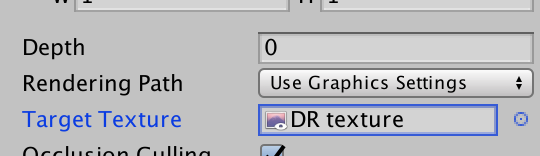
Next, under models>weapons>materials, create a new material, and name it “Dual Render lens”. Change the shader to “Unlit/Texture” and, the inspector, choose the dual render texture as the target texture in the texture box. This also only has to be done once
Change the material of the dual render lens in your weapon to the “dual render lens” material.
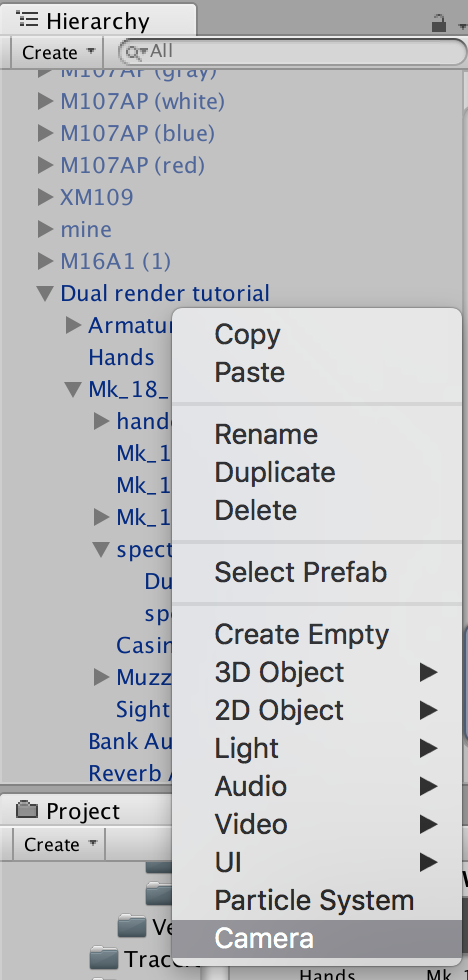
Now, in you hierarchy, add a camera. It is important that the camera not be a child of the weapon object as this causes issues. It should be in the same level as the weapon object, armature, and hands object.
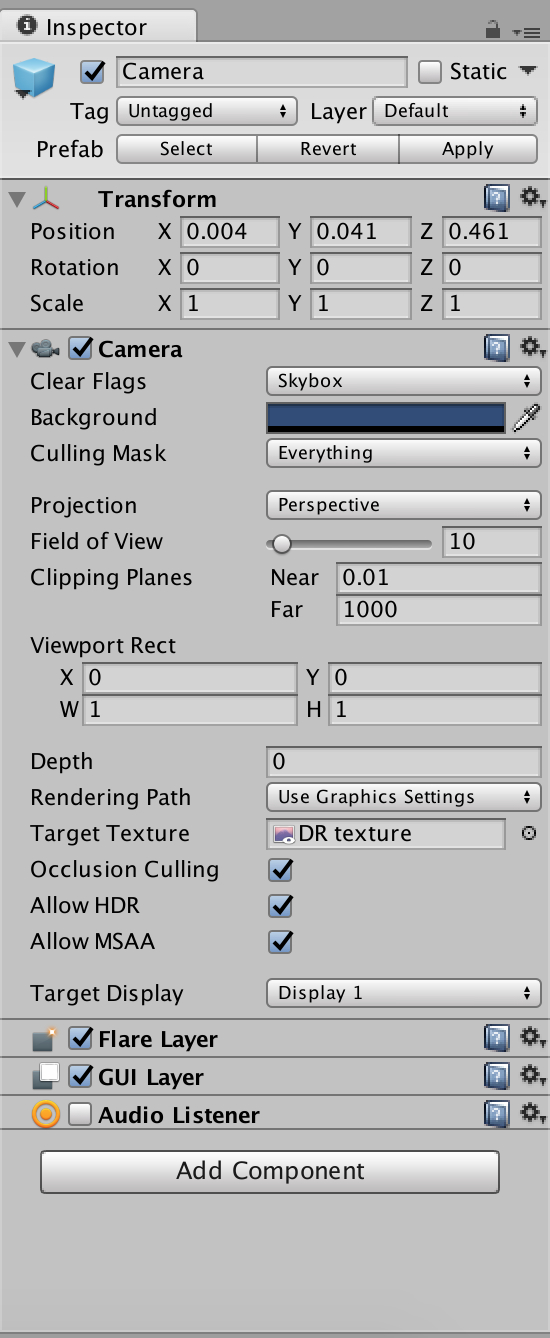
Give your camera these settings in the inspector. Make sure the near clipping plane is a low value to prevent your scope from seeing through walls. The camera’s Field of View will determine zoom, and is something you will have to tailor to your preferences and purposes. Also choose “dual render texture” as the target texture.
In the scene, move the camera around until the target bullseye is exactly centered like this:

It may help to lower the camera’s FoV to 1 for this.
Now test your weapon. If the rendered target is angled, rotate the lens in blender about the y axis. do this in edit mode to avoid animation issues.
If you wish to add a .psd reticle as was discussed earlier, follow the same steps as there.
Again, a huge thanks to {442} Ryuu Turner for helping me with this process.
Weapon balance
Though Ravenfield is, and is to remain a single-player game, weapon balance is still a factor. For one, an OP weapon in the hands of dozens of bots may prove annoying to the player. Additionally, the majority of players prefer a balanced weapon regardless.
Often related to balance is realism. Statistics like magazine size, muzzle velocity, rate of fire, and effective range are all easily found for most weapons. Due to the physics and engineering of fire arms, these factors tend to have a balance.
Additionally, understand a weapon’s role. Most popular FPS games follow the same formula of weapon roles, which is generally appropriate. Understanding a role makes balancing accuracy easier. LMGs and ISWs are not generally very accurate under sustained fire, while sniper rifles are incredibly accurate with a very low rate of fire. One benefit of Ravenfield being single-player is the option to drop the conventional fire mode damage balance.
Typically bolt and pump action weapons have greater range than their semi-automatic counter parts, and great still than fully automatic weapons. I personally balance weapons based on caliber. For those who do not have a technical interest in firearms, or are simply uninterested, understanding caliber can be odd. A 9mm bullet is often balanced below a 7.62mm bullet, logically the larger round is more powerful. For those who are unfamiliar with firearm calibers
Standard pistol cartridges:
Most modern handguns chamber in 9x19mm, .45 ACP, .40 caliber, or similar cartridges. Some more exotic and advanced pistols like the FN 57and QSZ-92 use ~6mm high velocity rounds, however I place these in the same damage tier. Most should kill in 2 or 3 shots (at least 34 damage a shot) and have a velocity around 300-400.
High caliber handguns:
The big boys of the pistol world, such as the Desert Eagle, or famous .44 Magnum fire exceptionally large rounds. Though they are typically lower in capacity, their rounds pack quite a punch. Among such rounds are the .375 Magnum, .44 Magnum, .50AE, and .500 S&W Magnum. Most should kill in 1 or 2 shots (at least 51 damage a shot) and have a velocity around 400-500.
Standard rifle cartridges:
Rifles in general fire smaller, faster rounds than pistols. Older rifles fired much larger rounds, but we will get to them later. The most common rifle rounds today are either in the 5mm (.22 caliber) range or 7.62mm (.30 caliber). Balancing rifle rounds is less clear than pistols due to the sheer number of rounds available. Most should kill in 2 or 3 shots (at least 34 damage a shot) and have a velocity of 800 and up to 1000. If your sniper or marksman rifle uses one of these calibers, 1 or 2 shot kills and a velocity of 1000 or greater will be appropriate.
Larger rifle cartridges:
Among these are the mighty .50 cal (12.7mm), .45-70 Gov, and any round over 8mm. These calibers are reserved for either anti material rifles, or weapons made before 1930. A one shot kill is generally recommended, and velocity greatly depends on era. Modern rounds such as .50 BMG will be close to 1000, while older rounds like .45-70 or muzzle loaded .50 calibers will have velocities less than 600.
Shotguns:
Shotguns are available in a multitude of calibers and shell types. Unlike other weapons, a lower gauge (term for shotgun calibers) is larger, so a 12 gauge is larger than 28 gauge. Most modern shotguns use 12 or 20 gauge, though 10 and 28 gauge are not uncommon either. Much less common are the rather small 67.62 gauge (.410) and the massive 4 bore.
Beyond gauge is shell type. Buckshot, slugs, and birdshot are the most popular. More specialized rounds like breaching and dragons breath rounds do exist as well. There are different measures of buck and bird shot, however 00 buck is the most common and birdshot does not follow any set convention in FPS games. Slugs fire a single massive projectile.
Shotgun muzzle velocities are generally low, less than 500, but usually not under 300.
Testing and upload
Once you have set up your weapon, it is incredibly important to test it. I personally recommend making a private mod content that you use as a test range. You can play with your weapon before it goes public, allowing you to find major bugs. There will be things that slip through the cracks, but as long as you avoid mod or game breaking bugs, it will be safe to upload.
Once you have determined you mod is ready for the public, make an attractive thumbnail. You want something that is flashy, but not overdone, that will catch the attention of other players. I personally choose a rendered image of the weapon, over a simple background with the mod’s name, and mine. However, screenshots of the weapon in action, standalone rendered images, or even the UI icon will do. You can make this in the photo editing software of your choice, I personally use pixlr ( [link] ). It’s online, free, and has plenty of features.
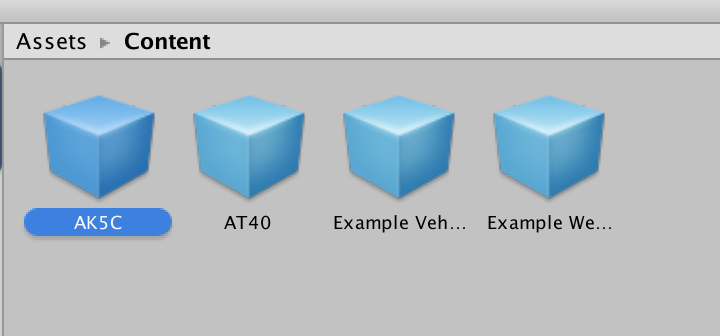
Back in Unity, drag the entire weapon into the prefabs>weapons folder in the project.

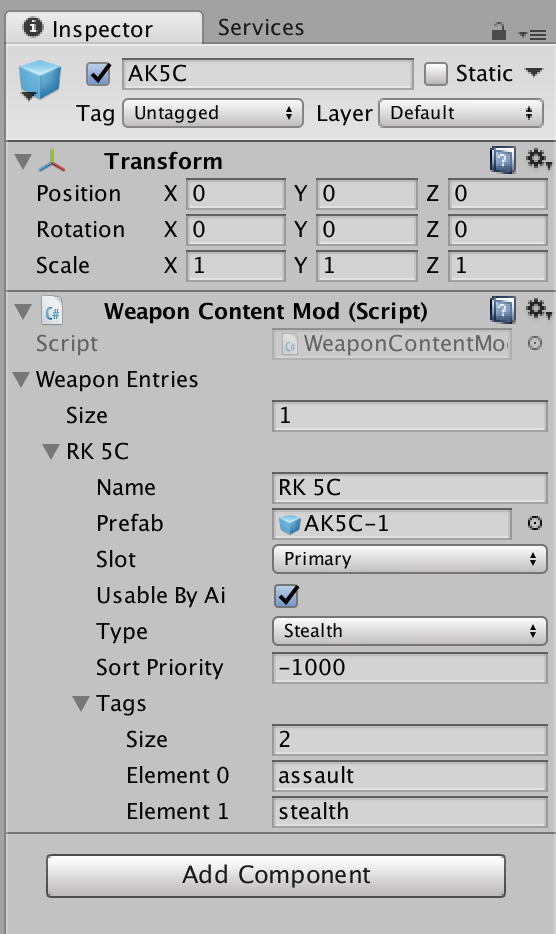
Under assets>content, select ‘example weapon content mod.prefab’ and duplicate it. Rename it to [weapon name].
Open it and in the inspector you will see a few parameters:
Size: how many weapon this mod has
Name: the name your weapon will have in the UI menu
Prefab: choose the prefab you just made
Slot: what slot the weapon occupies in your inventory
Useable by Ai: toggles if AI uses it by default or not
Type: dictates how AI uses it, and add some functionality. normal is for regular weapons, stealth makes it inaudible to AI and keeps you off the map, anti armor makes AI use it against tanks and vehicles, repair makes AI use it like the wrench, resupply makes AI use it like those items.
Sort priority: how high it appears in the UI menu, I’ve found this is rather fickle.
Tags: categories your weapon appears in, generally only one will do, but you may add others if it is a pack or similar to other tagged weapons such as ‘Star Wars’ or ‘WW2’.
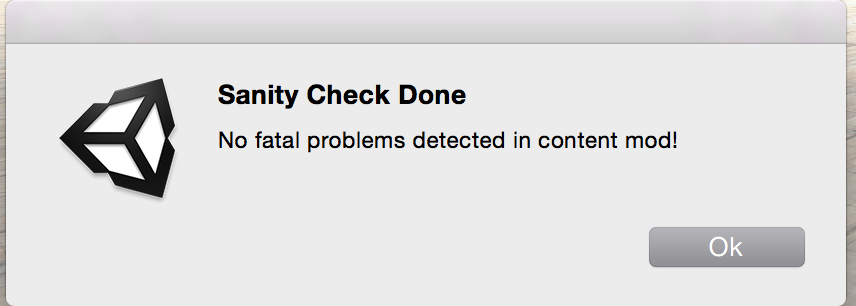
And now, finally exporting your weapon. Before you export, open steam. This will be important momentarily. In the top bar, choose Ravenfield Tools>content>sanity check content mod. This will run a quick test and tell you if everything is in working order.
Hopefully you will see this:

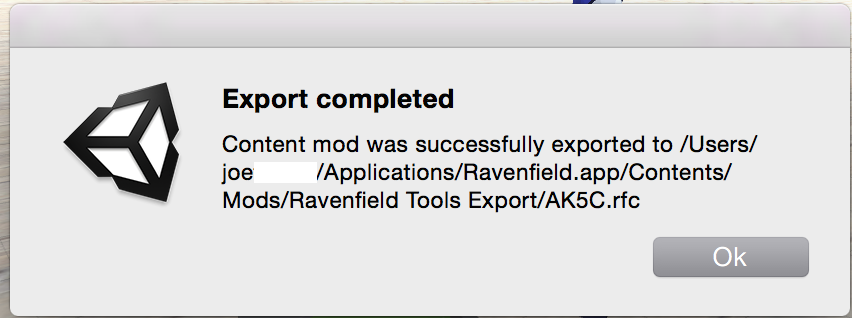
Now choose Ravenfield Tools>content>export content mod. Make sure your content is selected. If all goes well, you will see this:
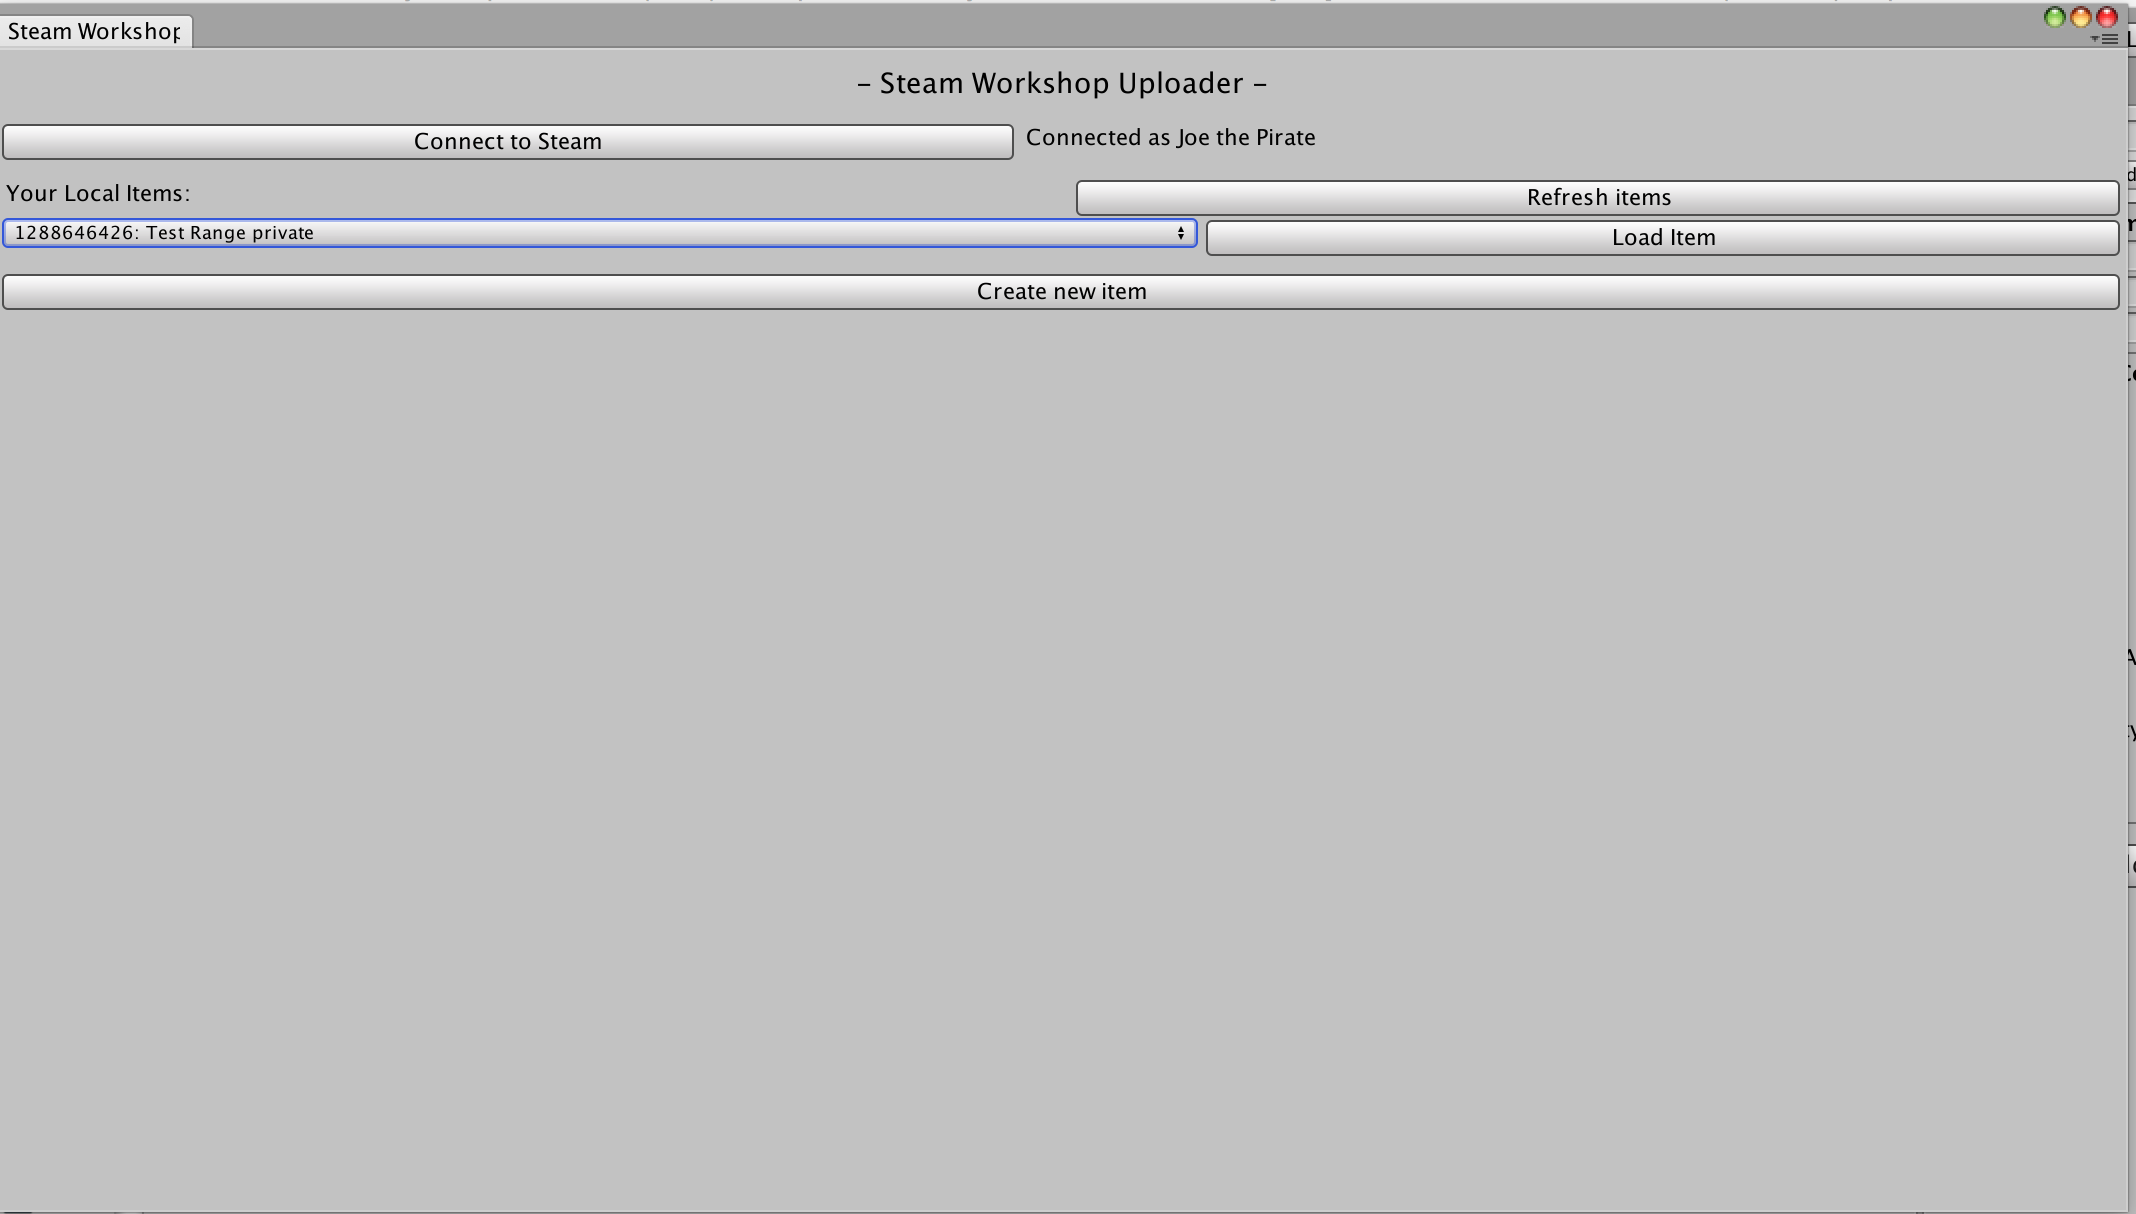
Choose Ravenfield Tools>publish to steam workshop, and this window should appear:
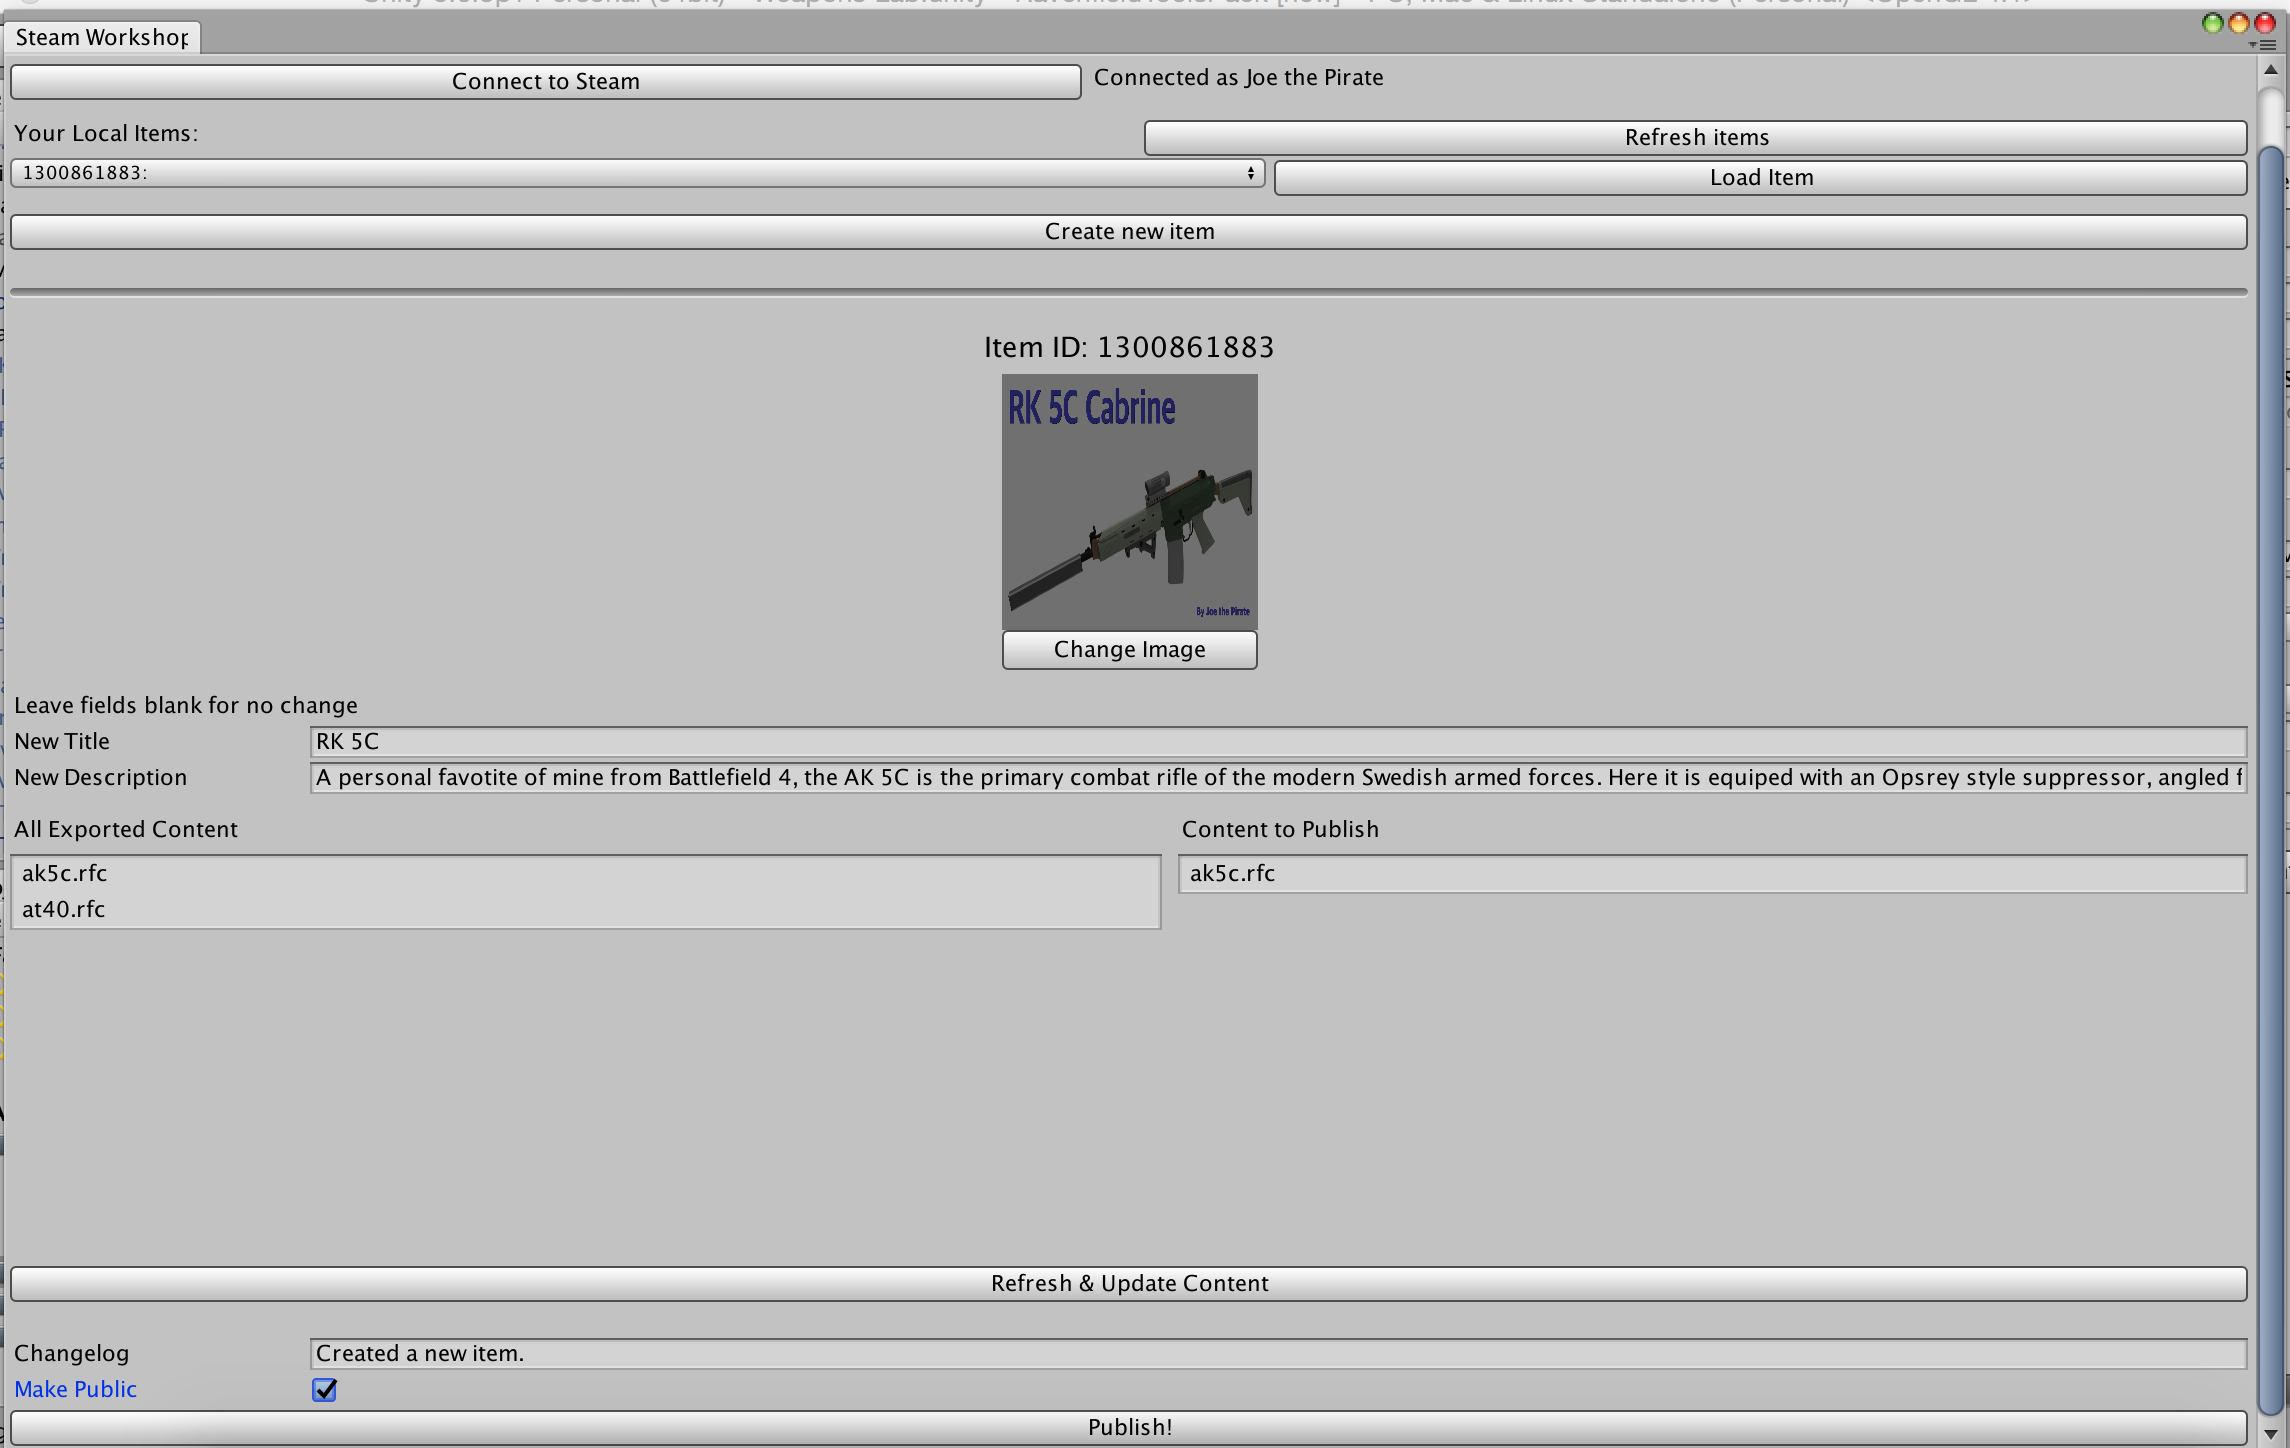
Select ‘create new item’. Select the thumbnail you created earlier after choosing ‘change image’.
Titling is very important for attracting players. I prefer to stick to Ravenfield’s convention of using a fictionalized name, but you may choose to use the weapon’s real name. If you have made a pack, name it for the parent weapon, such as my ARC-170 Pack, or by a unifying factor, such as WW2 pack or Machine Gun Pack. Try to avoid excessively long titles.
Your description is less important, but still a useful tool to attract an audience. Use your own personal voice and flair to help your mod stick out. In general, provide a brief description of the weapon and its features. Additionally, the extra pictures in your mod will help give players an idea of what to expect. These can be captured in game while you beta test. I use:
-how it looks in the load out to help players identify it
-held at the hip
-the sight picture
-and in reload to show off the model and animations.
This is also down to personal preference.
Find your weapon in the ‘all exported content’ list and click it. It should now appear in ‘content to publish’. Lastly, click ‘make public’ if you want your weapon to be visible to everyone. Click ‘publish’ and your mod will be put on the workshop!
The workshop, updates, and maintenance
As soon as the mod publishes, I like to make three pinned discussions as soon as the mod is published; bug reporting, suggestions, and future requests. It gives players a good place to give their input and makes it easier for you to quickly find all the feedback.
Once your mod is on the workshop, you will quickly get comments both praising your work, and offering feedback. Constructive criticism is extremely helpful in making a better mod, improving future projects, and responding to it builds a reputation of reactivity. That being said, you are not slaved to every suggestion you receive. It is fundamentally your mod and how you choose to run it is yours.
If you have chosen to join the discord, post a link to and the thumbnail of your mod in the ‘modding feedback channel’. You’ll get extra feedback, and some extra subscribers.
Continue to update your mod as long as you want, I personally choose to work on something until either I feel it is done, or the majority of comments do not contain criticism.
Congratulations, you’ve made it to the end of my very long guide. I hope that you found it helpful and that you are now able to make that awesome weapon you’ve always wanted to!
Special Thanks
Just a brief thank you to all the people that helped me both with this guide, and with modding in general.
{442}Ryuu Turner: walked me through dual render, and was a lot of help in getting dynamic reloads working for me
Sui DEagle: has helped me several times with animator questions and helped with sound effects
Megajoemama: just general help with modding, and getting some of my mods off the ground
Artecus: has given tons of really helpful feedback and helped with the SCARB remaster
And to tons of people on the Discord who have helped me figure out all manor of things
Additional resources and contact
If anything is unclear, or if you have a specific issue, please leave a comment and I’ll do my best to reply quickly. Also, if you feel the issue is more complex, feel free to add me on steam and message me, or message me via discord. Please only contact my email for collaboration or file requests. I’m willing to share .blend files for scopes, grips, and suppressors; as well as .psd files for reticles as long as credit is given when they’re used.
Other contact info:
email: [email protected]
discord name: Joe the Pirate (in Ravenfield and ATDF discords)
YouTube: https://www.youtube.com/channel/UCcvpo3AJvQQg62Xa8Kd8H3g?view_as=subscriber