Overview
This guide will teach you to create some level logics using prefabs (props) shipped with the game.
Prerequisites
This guide assumes that you have completed the Making Your First Level guide and continues from there. If you have a different setup, the steps can be applied to add the functionality to any level.
Signal Concepts
Signals are used to communicate between components in Human: Fall Flat. Every signal has a value, normally signal value is in the [0,1] range, with 0 representing the off state and 1 being on. There might be signals with a different range, but basic components like buttons, doors and interpolators rely on 0-1 signal values.
Currently there is a single component that can set the value of a signal – Button. It may be used to rig different types of triggers. Ranging for buttons responding to touch only, to pressure plates that are manipulated with physics.
Note. More transmitters like levers or triggers will be added to human workshop in subsequent builds.
Signal receiver components shape the level according to the value of the signal. Currently there are the following signal receivers:
- LerpEmission – will interpolate emissive values of materials between from and to values.
- LerpLightintensity – will interpolate the intensity of the light component,
- AutomaticDoorDual – allows rigging a door with two panels that will open and close based on signal value.
More receivers like linear and angular motors will be added to human workshop in the future.
The third type of components react to signal changes and expose their value as a new signal. These can be used to form signal chains. Here are the currently shipped ones:
- Signal Proxy – A very simple component that will have the same value as the original signal it is connected to. It is very useful when working with reusable props. For example a wall button assembly has the Button, LerpEmission and LerpLightintensity components inside that all have to be bound to the same signal. Connecting all there receivers to a single SignalProxy, allows connecting a button to some signals by changing a single property – the source of the Signal Proxy.
- SignalSmooth – provides the value of the original signal smoothed over time. It has controls like speed – how fast the signal is allowed to approach it’s target value and whether it should use easing function to make the output signal even more smooth as it approaches the end values. It is useful to insert SignalSmooth in the chains consumed by LerpXXX components.
Using Pressure Plates to Open a Door
Create a new object as a child of the Level and name it DoorAssembly.
Add another empty gameobject inside the DoorAseembly, name it Signal.
Add the Human>Signal component to the Signal gameobject.
Drag a PressurePlate from HumanWorkshop>Prefabs on DoorAssembly and move it to be on top of the Room2Ground in the scene view.
The alternative way is dropping PressurePlate to the scene view and then dragging it in the hierarchy to parent it to the DoorAssembly.
To connect pressure plate to the signal, make sure PressurePlate is selected in the Hierarchy view, drag Signal gameobject from Hierarchy and drop it to the Source property of the SignalProxy component or the PressurePlate gameobject.
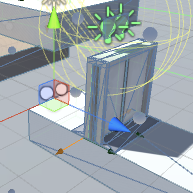
In a similar manner place HumanWorkshop>Prefabs>AutomaticDoor prefab in the scene above the Room3Ground and parent it to DoorAssembly. It will block the path to the exit while the door is closed.
Connect Signal gameobject to Source of AutomaticDoorDual component of the AutomaticDoor gameobject.
You can place an exit sign above the door. It is located in HumanWorkshop>Prefabs>ExitSign. Position it above the door and parent it to the DoorAssembly as well.
Connect SignalProxy of the ExitSign to the same Signal as everything else.
Congratulations, you’ve just rigged your first exit door! But you need something to place on the pressure plate in order to pass the exit door. Drop a crate from HumanWorkshop>Prefabs>Crate1x1x1 somewhere on your level or create a custom rigidbody object as described in the previous guide. Make sure its mass is between 50 and 100kg – anything lighter wont trigger the pressure plate and anything heavier will be too difficult to carry.
Next Steps
Make sure to playtest and capture a thumbnail for your level as described in the previous guide before Uploading to Steam Workshop.
Now you should be able to create levels consisting of static geometry, dynamic objects, buttons, pressure plates and doors. You can also use built in Unity things like joints to make more complex setups as well as use provided components to rig your own signal triggers and receivers.
Stay tuned, as more guides are being created covering advanced topics!