Overview
This is a straightforward walkthrough of the basic game, meant for your first playthrough. It is structured to be useful whether you want to follow it all the way through or just get unstuck at a specific point without any additional spoilers.
Introduction and Purpose
This guide is a straightforward walkthrough of the basic game, plus general advice and hints. It does not cover any secrets, alternate endings, or the journal. It also does not say much about any of the Steam achievements. It’s for getting you unstuck during your first year walk.
To quickly find a specific puzzle you need help with, open the game’s Hints screen and look at the top for the name of the current chapter. The guide’s sections are named the same. Or try the General Hints section if you want to figure it out on your own and just need a nudge.
Extra note: As of this writing, all other walkthroughs easily findable on the web are for the earlier iOS version. The PC version is different. Much of the information from those walkthroughs is still applicable, but a good number of puzzles were completely redone, many because they relied on touch-screen mechanics that did not translate to mouse and keyboard. If you’ve already been burned by this discrepancy, you may be assured that this walkthrough was written with only the Steam PC edition of Year Walk in mind.
The Controls
The controls are simple. Although they’re a bit different from a typical PC adventure game, they don’t take long to get used to. You will use the mouse and pointer exclusively for interacting with objects, while the keyboard is exclusively for movement (almost).
Your view always faces north, and the world is divided up into “areas”. A and D will move west and east within an area. W will move north to a new area, or enter a door, or occasionally move closer to an object in front of you. S will move south, or out of a door, or back away from an object. At points where S or W is available, you will see an arrow indicator at the top or bottom of the screen. This generally corresponds to the lines between regions on the Map. All of this movement can also be done with the arrow keys.
Clicking the mouse pointer on some objects will manipulate them in various ways. The required maneuvers include single clicks, continuous tapping, and clicking and dragging. Some objects can be held and carried around by clicking and holding them while moving with the keyboard, even between areas. This is the only way to carry things; there is no inventory.
The Tools
The upper right of the screen has several tools. If they are hidden, just press the left angle bracket icon to reveal them.
Map: A guide to getting around. Hovering over each area will show its name above the map in both English and modern Swedish. The areas contain pictures of many of the landmarks and points of interest in the areas, as well as Xes and lines showing where you can move between areas. Your current location is shown with an animated white arrow. The map is not interactive (i.e., no fast travel). Some parts of the map may be a lighter, faded grey. These areas are not accessible yet, so the transition points shown on the map will not exist.
There is a Steam achievement for completing a year walk without opening the map. I would encourage you not to worry about this for your first time. You will want to do at least one more playthrough, so try for that achievement when you’ve already become more familiar with the areas and it is less frustrating. In any case, this walkthrough is written with the assumption that you can use the map. Detailed directions are not given.
Encyclopedia: This contains background information: a short biography of the game’s researcher, Theodor Almsten; an explanation of the tradition of the year walk; and a description and example stories for each of five figures from Swedish folklore. Reading all of the content here is highly recommended, as the information is extremely helpful in solving many of the puzzles (not to mention in understanding what the game is about). In particular, make sure you are familiar with the iconic shapes used for each of the five creatures; you will be seeing them again.
Journal: Ignore this for now. It requires a username and password that you are not expected to know until after you have finished at least one year walk.
Hints: Until this guide was written, this was where you went if you were stumped about how to proceed. Opening the Hints menu will show the name of the current chapter and a number of obscured hints. They increase in directness, and you can reveal as few or as many as you wish. The chapter names match the sections of this guide, so it is easy to jump to the section that interests you at the moment.
There is a Steam achievement for doing “a full year walk without any hints”. I have confirmed that you can get this achievement even if you open the menu to see the chapter name, as long as you reveal no hints. In any case, it should be very easy to achieve this on year walks later than your first, if you take good notes or follow this guide. So don’t sweat it.
Settings: Self-explanatory. Setting the Walking Speed to fast is probably useful for getting the “Year Run” achievement, but you won’t be doing that on your first year walk.
Quit: Your game is always saved when you quit. There is no manual saving or loading.
General Hints (Vague Help Without Spoilers)
- Read the Encyclopedia thoroughly.
- Do not walk without pen and paper handy. When something looks interesting, but you don’t yet know why, write it down or draw it. You’ll want it later. (You could just take screenshots instead, but you lose the experience of your own hand creating what looks like the scribblings of a Lovecraftian madman.)
- Some locations “feel” significant, but only become so at the appropriate time. Be patient and keep exploring.
- Some objects are not just clicked, but clicked and dragged, or tapped repeatedly. Try some different gestures before deciding something is not interactive.
- Certain items can be not only held, but carried with you as you move. You just have to keep the mouse button down the whole time. If an item disappears when you release it, try looking where you originally found it.
- The keyboard is not only used for movement. Not quite.
- The ladder in the windmill is a red herring.
- Read the Encyclopedia again.
- You cannot open the box. Not yet. Just trust me.
- Likewise, you cannot access the Journal. Yet.
- The inscriptions around the edges of the rune stones do not need to be deciphered. (I’m not sure they even can be: Most of the runes are part of the Futhark set, but not all of them.)
- The third rune stone is not accessible at first.
- You do not need to decipher the engraving on the stone slab on your first year walk. In fact, it would be impossible.
Prologue – Part I
After the introductory text, you begin at your Cottage. Your next objective is not clear, but if you view the map you will see that the most prominent location that is accessible is the Windmill. (You will also see that much of the map is faded, meaning you cannot yet reach it.)
However, I strongly recommend first reading the Encyclopedia, accessed from the toolbar at the top. Being familiar with all the information in there will help tremendously in understanding the rest of the game.

Once you reach the Windmill, enter it by moving north, and you will find a young lady inside. Have a conversation with her by repeatedly clicking her, then clicking the screen to advance/remove the text. You will learn a little about your relationship to her, and that you intend to do a year walk. Once she suggests that you return home, the conversation is over. (A point, because it confused me my first time: On reflection it seems clear that all of the text is her speech, and your character’s responses are only implied.)
Prologue – Part II
Return to the Cottage. Like she told you to. Also, wear a hat like she told you to, except you can’t. But if you don’t, you will apparently lose your ears.
Titles
Once you reach the Cottage, the screen darkens. If you move the pointer around, various images will fade in and out. Click each one to make it permanent. When you have clicked them all, the shapes will spell “YeAR WALK”. Don’t miss the top piece of the second A. When it’s complete, you will return to the Cottage and begin your year walk.
The Huldra – Part I
You are outside your Cottage at the start of your year walk. There is no indication of what your next objective is, but reading the explanation of the year walk in the Encyclopedia is a good start. You may assume that it is now midnight, and you have gone without feast, fire, or friends all day.
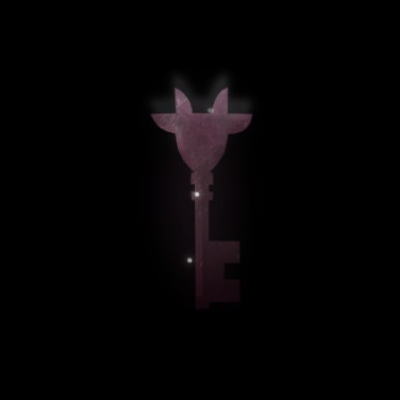
Ultimately, you want to make your way to the Church, but you must get there by way of the Cemetary [sic] Gate. When you get there, you will find it closed and locked, but you will be shown a vision. A key shaped like the Church Grim will be enclosed by a lady with twigs around her. If you read about her in the Encyclopedia, it’s not hard to guess that this is The Huldra.
The Huldra – Part II
Your objective now is to find The Huldra, who seemingly holds the key, but there are few clues as to how. There is a faint female vocal to the background music that will grow as you get nearer, but if you are far away you must simply wander. Fortunately, she is always in the same place.
Make your way to the Woods & Kiln area, and travel to its far eastern end. The Huldra will appear. You need not interact with her. After a moment, she will begin moving, and you should follow her. She will lead you to the easternmost “Woods” area, then reveal the entrance to the Dead Tree by making a path of flowers grow. Proceed there.
The Huldra will vanish into the Dead Tree, but it will remain closed to you. However, there is an owl on either side, and you can click either to have them hoot. Each has a different pitch. Having the owls hoot in the correct sequence will solve this puzzle. This is Part III.
The Huldra – Part III
You have access to the Dead Tree, which is closed, and you can make a couple of owls hoot when you want them to. Now you must learn what hoots are the right hoots. There is no obvious clue to this given thus far; it is down to exploration and smarts.
In the Woods & Shed area is, unsurprisingly, a shed. Go there and enter the shed, which looks rather like an outhouse without a door. Inside is a wooden doll with no legs hanging by a noose. Notice that the doll’s shape is similar to the icon for The Huldra. Behind her on the wall are scratched two pictures of owls.
[N.B.: Doing the steps in the next paragraph will disqualify you from gaining the Cheat Walk achievement on this year walk. This part is in fact completely optional, if you already know the correct sequence, but it’s easy enough to get the achievement on a later year walk.]
This doll is interactive, in that you can click-drag her head to spin it, but it is not necessarily intuitive what purpose this serves. However, note that if you drag the head to your left (her right, clockwise from the top), it moves slightly closer to her body: It is screw threaded. Spin it far enough in that direction, and you have “wound up” the doll. (You may not be able to do this in one click, due to the edges of your screen, but just drag the head left repeatedly.) She will then play a tune and “dance” as she unwinds. She will point to the two owls eight times in a particular sequence. This is the sequence needed to open the Dead Tree, so write it down. At the end of the sequence, the doll suddenly has a bloody mouth. Ominous.
Return to the Dead Tree, and click on the two owls in this order: 1.left, 2.right, 3.left, 4.right, 5.right, 6.right, 7.left, 8.left. The tree will open, and you will be drawn inside.
The Huldra – Part IV
You are now inside the Dead Tree, and you will immediately notice that you can’t go back; you have to go forward to go back. But how? You can move right or left endlessly, moving past numerous glowing spots that will each allow you to move “north”. Moving through the right spots five times will solve the puzzle, but moving through the wrong ones will force you to start over.
Sound is especially important here. If you listen closely, you may notice that these spots produce different sounds when you are near them. However, these sounds will repeat as you move, and not in the same order. You are not just turning in a small, predictable circle, but neither is it random. Either way, you still have to choose the correct spot repeatedly to advance.
The answer is in the sound that each produces. Some are clear and steady tones, some waver or rise or fall in pitch, and some are just cacophonous dissonance. Once you pick up on this, it seems like the dissonant ones are obviously no good, and maybe the clear and steady ones are correct. Sadly, this is not quite good enough.
Listen closely to the background music, which is just voices and chimes. Although they are not all the same octave, every sound in that music is the same note. The correct spot to move through is the one that matches that note. There will be some that are firm and strong, but are not perfectly in harmony; these are still wrong.
You will know when you have made the right choice, because there will be a chimey sound as you make the transition. More importantly, the background music will go up in pitch. If you make the wrong choice, you will hear a dissonant falling tone, and the background music will reset to its original pitch.
You must choose correctly five times in a row to advance. Fortunately, for the tone deaf, there is a consistent solution. From the first note or the reset point, choose:
the second on the right
the third on the left
the third on the right
the second on the right
the second on the left
After the fifth correct choice, you will face The Huldra again. After you are scared witless and a brief cutscene, out of the tree will emerge the Grim-headed key that you were seeking. Click it to see it… melt into a puddle of water. It’s important to realize that you do not have the key at this point. It was melted, not placed in an invisible inventory. On to the next chapter.
Mylings & Horse – Part I
Since your first attempt to obtain a key has failed, and the Hint screen tells you that this chapter is about the Mylings and the Brook Horse, your next objective is clear: Read those two Encyclopedia entries. Something about dead babies, drowned children, and horses in water. Sounds wet. There is an area called Brook far to the south, so head there.
Once you’ve crossed the log bridge, move right to see a horse head in the brook. This may not seem interactive at first click, but in fact it is: drag it up out of the water. The brook horse will show that he has the key, then he will show you four unusual transparent shapes. Are they shaped like… babies? This is Part II.
Mylings & Horse – Part II: Brook
You’ve contacted the Brook Horse, and there’s something about four ghostly shapes next to him. What does he want? In fact, he wants the souls of four dead babies. Mylings, to be exact. Good news: There are four to be had in Vedtorp. (There are probably many more, to be brutally honest, but only these four matter. There may be a specific reason for that, but you won’t learn about it until much later.)
Now, it seems that you’re supposed to be able to find the locations of these Mylings by way of the music, but I have found that difficult to comprehend at best. The following sections reveal where they are, in the order they will appear with the Brook Horse, left to right. (This is not the same order that the Hints allude to them.)
Mylings & Horse – Part II: Windmill
Travel to the Windmill, and you should notice two things. More obviously, there is a large trail of blood. Somewhat less, the windmill vanes are not turning, and there is blood dripping from above. Make note of where the drips are coming from. (Note to the frustrated: I’m sure that the windmill vane is what the official Hints are oddly calling a “wing”.)
Enter the mill, just as in the Prologue. The lady is no longer there, but you may notice that the wheels inside are also no longer turning, just as the vanes are not. You can turn them by hand by clicking the large, light grey wheel on the left, and dragging it in a circle, which will also turn the vanes. Direction does not matter. You could always know when you’ve turned it to the correct position by stepping outside and seeing where the blood drip has moved to, but the game will make it even easier for you. When the apparition of a woman startles the excrement out of you, you’ve hit the right spot, and you should go back outside.
(Side note: The woman who appears is not the same woman that you met here in the Prologue. If you’re looking closely both times, you will realize that it is the same woman you see when you retrieve the Myling from the carriage. There’s a reason for this, but you won’t understand why until after your first year walk.)
You will see a swaddled baby, a Myling, dangling from one of the windmill vanes. Depending on the position of the vanes, you may not immediately be able to interact with it, but try moving left or right to get hold of it. Just click it, hold it, and don’t let go until you’ve reached the Brook. Like the other Mylings, if you release it, it disappears, and you must go back to where you first found it. (Yes, this means the Map is not accessible. Hope you’ve been paying attention.) Once you reach the Brook, the Myling will automatically take its place among the four souls.
Mylings & Horse – Part II: Freebie
This one is very sneaky. The moment you dragged the Brook Horse out of the Brook, your Encyclopedia icon became bloody. You may have noticed this, and you may have not, especially if your tool icons were hidden to make your screen prettier!
Anyway, if you now re-read the Encyclopedia’s entry on The Mylings, you will see that it is bloodied. And at the end of it is in fact an actual squirming Myling. Click and hold it to carry it back to the Brook. Like the other Mylings, if you release it, it disappears, and you must go back to where you first found it. But since this is the Encyclopedia, it doesn’t matter. Just get to the Brook, grab it, and let it go.
Mylings & Horse – Part II: Kiln
Travel to the Woods & Kiln area, and go to the western end. You will see a trail of blood, and blood mist rising from the kiln’s smokestack. Enter the kiln. (Note that only the kiln itself, on the right, can be entered; the house attached to it on the left cannot.)
Inside, the working door of the kiln is closed and locked. You may find this unusual if you have visited here before, as it was never locked before (but also the kiln was not fired). If you try to open the door, it is held fast by two latches, top and bottom. You can try to pull the latches aside, but they are hindered by two blocks, labeled “U” and “N”.
This is a somewhat pernicious puzzle, because it is the only one that breaks the rule that “the keyboard is only for movement”. If you press the “U” and “N” keys on your keyboard, you will see those blocks depress. While they are depressed, you can move aside the two latches by clicking and dragging with the mouse. Once they are clear of the door, you can click and drag the door to the right to reveal the apparition of a baby: a Myling.
Click the Myling, hold it, and don’t let go until you’ve reached the Brook. Like the other Mylings, if you release it, it disappears, and you must go back to where you first found it. (Yes, this means the Map is not accessible. Hope you’ve been paying attention.) Once you reach the Brook, the Myling will automatically take its place among the four souls.
Mylings & Horse – Part II: Carriage
Travel to the easternmost area called “Woods” (the one with the exit to Dead Tree). Travel toward its western end, and you will find a carriage between two stones, and a trail of blood. Click-drag the carriage to the right, halfway between the stones, and you will see the ghosts of a woman and a baby; then the carriage will reset to the left. Drag it right again, and you will reveal the floating apparition of a baby: a Myling.
The baby must be carried to the Brook Horse. To carry it, just click, hold, and don’t let go until you’ve traveled there. Like the other Mylings, if you release it, it disappears, and you must go back to where you first found it. (Yes, this means the Map is not accessible. Hope you’ve been paying attention.) Once you reach the Brook, the Myling will automatically take its place among the four souls.
Mylings & Horse – Part II: Key
Once you have delivered all four Mylingen to the Brook Horse, he will reveal the key again. Click it, and it will be… stolen by a raven. But you’re not finished with the Brook just yet…
Mylings & Horse – Part III
The Brook Horse’s key was stolen from you. How can you get it back? Well, don’t abandon the Brook just yet. There are still four bright souls hovering above the water.
If you click one, you will see it create a shadowy flame in the center, but it disappears after a short pause. The trick is to click all four quickly before any disappear. When you do, they will become one bright flame, and you will advance to the next chapter.
The Night Raven – Part I
You have delivered four infant souls to the Brook Horse, and you have figured out that they can be combined into a blue-white flame. But your key was stolen by a raven, so now what? Well, the first thing to realize is that you can carry this flame around. Just click and hold it, as you did with the Mylingen.
What’s the use of a flame? You may have noticed that in the Woods & Underground Storage area there is a storage room in the side of a hill, and you can enter it. You can even move around some, but other than the light from the door it’s pitch dark and you can’t see anything. Now you have a light, so click the flame and hold it to carry it around. Unlike the Mylings, you can safely let go of the flame, and it will stay where it is, even if you leave the area. Carry it into the storage room.
The Night Raven – Part II
Now that you have some light in the storage room, you can move further in both directions. As before, you can drag the flame around, and this will shine light on different areas. There are several interesting things to see, so make note of them, but there is only one thing to interact with.

The Night Raven – Part III
A ladder is now available in the storage room, so climb it. You cannot take the flame with you, but you won’t need it. At the top of the ladder is the Hill. Move east to see an apparently dead raven. Click it, and it will stand up. Click it again and it will open its mouth. But that seems like the only thing it will do.
The trick is to click it rapidly and repeatedly. Gradually, the Night Raven will emerge from it, then fly away, leaving the key behind.
The Church Grim – Part I
The Night Raven left you the key, and finally you can touch it without it disappearing. Click and hold to carry it, and travel to the Cemetary [sic] Gate. Hold the key over the gate, and the lock will dissolve. The gate will open, and you can now travel north to the Cemetary [sic].
The Church Grim – Part II
You now have access to the Cemetary [sic], so go there. You will see four gravestones with the icons for the Huldra, the Brook Horse, the Myling, and the Night Raven. In the middle is a large stone slab with the icon for the Church Grim and some complex engraving. You do not need to decipher that engraving, though you might want to try later.
But you do need to get that slab out of the way, because it’s blocking the path to the Church. If you click and drag the gravestones upward, you’ll see they slide out and that they have a series of four dots on them. When you release, they settle at a point that shows some number of dots. Dragging each one to the correct number of dots is the key to removing the slab, but the information about those numbers is in two parts.
You probably noticed as you explored that some trees had pictures carved into them. There are four, in fact, carved with those same four icons, and underneath each icon is a rune. Hopefully you spotted all four and jotted them down, but if not, the Map can help you find them. They are represented by a tree trunk with a letter T underneath.
I will hand you those locations in a moment, but first the other half of the key. Each of those runes corresponds to a number. Those mappings can all be found in the same place: the Underground Storage room. If you look thoroughly at the whole room from edge to edge, you will find six different runes in various places. Next to each one is a number of dots, from one to six.
Mapping the icons to the runes, and the runes to the numbers, you will know how many dots to show beneath each gravestone. (The five-dot and six-dot runes are irrelevant, since the gravestones only have four dots.) Drag each to the appropriate height, and the slab will sink down, clearing access to the Church.
Here are the locations, runes, and number of dots:
The Church Grim – Part III
Now that you can reach the Church, travel there. The door is closed, and you cannot enter. Moving east and west walks you around the church in a circle. The first clue about what to do is found in the Encyclopedia. The Year Walk entry says that the final step of the year walk is to walk around the church in an “intricate pattern”.
But what’s the pattern? It’s not hard to guess that it’s some combination of clockwise and counter-clockwise circles, since that’s all you can do. The next thing to notice is the symbol above the church door. Not the Church Grim icon, the one above it: a double-headed arrow pointing both left and right. There is one other place to see a symbol like that. And now you will finally answer the riddle of the rune stones.
There are four rune stones to be found: three small and one large. The small ones each have one large symbol engraved on them and a single eye at the top, while the large one has six dots and three eyes. (They also have small runes around the edge, but there is no need to decipher these.) You can find the small stones because they are marked on the map with a symbol that looks like an eye beneath a triangle. They are at the east end of the Hill (only accessible once you have a light for the Underground Storage room), north from the east end of Woods & Box, and in Woods & Kiln west of the path to the Cottage. You can find the large one because it is in the area called “Rune Stone”. Recreating all three of the small stones’ symbols onto the large stone will reveal the “intricate pattern”.
[N.B.: Doing the steps in the next paragraph will disqualify you from gaining the Cheat Walk achievement on this year walk. This part is in fact completely optional, if you already know the correct sequence, but it’s easy enough to get the achievement on a later year walk.]

Once you know the sequence, travel to the Church to perform the walk. Move left or right until you’ve made a complete circle back to the door. You will know that each circle is complete when you see the Church Grim icon above the door pulse. (This will happen even if the circle was in the wrong direction.) Make another circle in the proper direction, until you have completed all seven circles. The church will open, and you may enter.
The correct sequence is: 1.left, 2.right, 3.left, 4.right, 5.right, 6.left, 7.right.
The Church Grim – Part IV
Now that the Church is open, enter. You are confronted by the Church Grim. Reading about him in the Encyclopedia will give you a clue about how to deal with him. First you must reveal his heart. Click and drag each side of his robe up and away, and there it will be. If you click the heart, the screen and the Church Grim’s eyes will flash, but it doesn’t accomplish much. Gradually the robe will fall back into place, but just drag it open again.
The trick is to click the heart repeatedly and rapidly until it breaks. Afterwards, you will be viewing the scene through cracked glass. Click on different parts of the glass to make them break and fall away, until it is all cleared.
Beyond – Part I
You have broken through the screen of your reality to the Beyond. You may notice that the Map is now disabled, but you won’t be moving around anyway. You’re faced with a strange shape floating in space, with six protrusions. The protrusions are parasites that you must remove. Click a parasite, and a point in space with pulsate. Click that point, and the parasite will be destroyed. Destroy all six to continue.
Beyond – Part II
A see-through icosahedron is slowly spinning in space. Click and drag it to spin it either toward the top or the bottom. As it spins, it will begin to deform, and the faces will turn white one by one. Just spin it faster and faster until all the faces are white and it implodes. (I imagine this was easier on a touchscreen than it is with a mouse.)
Beyond – Part III
An image of your cottage is surrounded by a hexagon and six constellations. If you click a constellation, it will vanish. If all six vanish, they will reappear, unless you clicked them in the correct order. The order is based on the number of stars. Click the one-star constellation, then the two-star, etc.
Beyond – Part IV
A mass is surrounded by a ring of eight irregular black and white shapes. If you drag the ring clockwise or counter-clockwise, it will spin with a chimey noise, and the shapes will rapidly change. I must admit that I don’t completely understand this one; I suspect it looks much more sophisticated than it is.
Regardless, solving it is actually easy. Spin the ring in one direction until one of the shapes leaves the ring and attaches to the mass. Now spin in the opposite direction until another leaves the ring. Continue alternating directions until the ring is empty.
Beyond – Part V
A three-dimensional Church Grim head is floating in space. You can click and drag to spin it left or right. As you continue spinning it in one direction, it will slowly change its shape and become simpler. It doesn’t matter which direction, but if you reverse, it will change back to its original shape. Just keep spinning until it devolves to a tetrahedron.
The Future – Part I
You are no longer in the Beyond, but it’s not clear whether you’re in the real world either. These look like your woods, but it is no longer winter. In fact, this is the vision of the future that was the reason you began the year walk in the first place.
The map is still inaccessible, and there’s only one thing you can do: walk east. It is a long walk, and it even looks like the background repeats some, but just keep going. At the end you will see… something of interest. As soon as you do, the credits roll.
Keep paying attention. The credits are short, and afterwards you will be given vital information. (If you miss it, quit the game before starting another walk. When you launch, it will be shown again.) Although this is the end of your first year walk, it is not the end of the game.
It is, however, the end of this guide. The rest is up to you. I will just say: Don’t stop playing until you finally see “The End”.