Overview
The galaxy is vast and uncaring, and the only things you can count on are yourself and your ship.Rebel Galaxy Outlaw is a fun game, with a lot of rough edges. The game is rather terrible at explaining some critically important mechanics, leaving it up to the player to learn through trial and error. Unfortunately such a stumbling in the dark approach often comes at the cost of losing lots of time and progress, and having to redo content in a game already this grindy by design can range from tediously unfun to downright frustrating.So this guide is here to share with you the things I’ve learned, so that hopefully I can save a few of my fellow outlaws from some of the frustrations that have beset me, so that you might have a smoother and more enjoyable experience than I did.See you space cowboy…
Preamble
noun
- A preliminary or preparatory statement; an introduction.
I am NOT a pro-player, elite gamer, or otherwise make any claim to expertise. I’ll never tell you to ‘Git Gud’ or call you a scrub. I honestly think I’m just kinda decent at the game, at best. I’m just here to share what information I can, about a game that I initially struggled with greatly. This game is pretty old-school in more than just it’s low-fi visual presentation. It can be very unforgiving and punishingly difficult at the best of times, all the while remaining incredibly opaque and obtuse, yet it still expects you to know when to run from unwinnable situations. Getting to grips with the game’s expectations goes a long way towards smoothing out the experience.
I’ve written this guide in the vein of old-school Game-Faq’s styled plain text word dumps, but with more pretty pictures and less ASCII art. It is meant to be read top to bottom, as there will be references in the text to prior sections found in later sections. That is to say, the guide is kinda of a meandering screed, and meant to be ingested as a whole rather than à la carte. This is not a RGO wiki, even though I do have my fair share of organized information for reference (including plenty of stuff you cannot find on the RGO wiki).
But again, I make no claim to expertise. There is no one path to dog-fighting supremacy, or to being an effective Outlaw. What I’ve done my best is to supply factual information where I can, and then present the rest of my very subjective opinions as a sort of ‘Best Practices’ suggestion. My hope is that my insight will help if you’ve hit a roadblock so frustrating that you went looking outside the game for help. I did too, and spent quite some time picking the brains of those on forums and Discord. I’ve bounced ideas off of people who have performed the ‘Platypus Challenge’ (completed the whole story campaign with the starting ship), even if I’m not personally skilled or masochistic enough to do that myself. So it you find something else that works, some other way to square that circle, that’s great! My solutions aren’t the be-all-end-all, they’re just one possible way to do things.
So while starting the guide with self depreciating humor and disavowing my own skill could be seen by some as shooting myself in the foot vis-à-vis my credibility, if nothing else I hope you can appreciate my honesty and candor.
I do want to take the time to thank you for reading even this far, and I hope you find my guide helpful.
And if that makes sense to you, congratulations, you’re an Outlaw.
As it turns out, there is a lot of cross-over between being a successful outlaw in the Dodge Sector and being a Catapult pilot in the Inner Sphere or the Periphery. Thanks professor Tex!

The Things They Forgot to Teach You in Flight Training
Welcome. First off, did you complete the Flight Training tutorial from the game’s main menu?
No? Go do that, I’ll wait…

So now you get how the basics work, insofar as I trust you can at least not fly yourself into the side of a station or asteroid. Good enough. Now I’m going to expand on what they taught you, and better yet, stuff that they utterly failed to mention.
If you’re remotely familiar with arcade flight games, then you probably already picked up on Rebel Galaxy Outlaw’s (RGO from here on out) two stand out gimmicks; Autopersuit, and Inertial Dampening.
Autopersuit is going to be your bread and butter in RGO. The game really wants you to play from the cockpit view, while also saddling you with an often largely obtrusive interior layout that hogs the screen, and a tight field of view (FOV) that effectively prevents any peripheral vision. Autopersuit will keep you glued to the afterburners of whoever you have targeted once you get close enough, leaving you to largely deal with adjusting your aim to account for projectile travel time (i.e. leading your target), while managing your power levels and ECM Packages.
Inertial Dampening is the other trick, however it is of rather niche application; so much so that you’ll probably forget you can do it by the time you get far enough into the game to be in a situation where it could be useful. When is it useful? Really, only when attacking stationary or relatively stationary targets. When will you find these? The defense turret platforms guarding supply depot missions, and the gun turrets on capitol ships (frigates, cruisers, and the like). Smart use of Inertial Dampening can allow you to keep yourself as a moving target, while maintaining a bead on a relatively slow moving and easy to hit target, without having to fly straight into it.
Defense – The Second Best Defense
Missiles with homing capabilities, especially the swarms that some units can fire, are one of the largest threats to you and your ship. Effectively countering them is crucial to your survival, as the deck will quite frequently be stacked against you and your continued survival. Too bad the game never teaches you how to deal with them effectively.

As the old saw goes, the best defense is indeed a good offense. Prioritizing enemy units that are equipped with swarm launchers, such as the Adze, Revenant, and Barghest (among others), really helps to kneecap the amount of missiles flying towards you or your allies. After all, it’s kinda hard for them to operate a missile launcher when they’ve been atomized into space dust.
The next best trick, at least for the early game when funds for upgrades are limited, is to quite literally shoot the homing missile down with your hardpoint weapons. This can be done a few different ways, and it helps to have rapid firing weapons for the task. If your ship turns aggressively (like the 110 degrees per second of the Sandhawk), then you can just turn or use Inertial Dampening to bring your forward facing hardpoints to bear on the offending missiles.
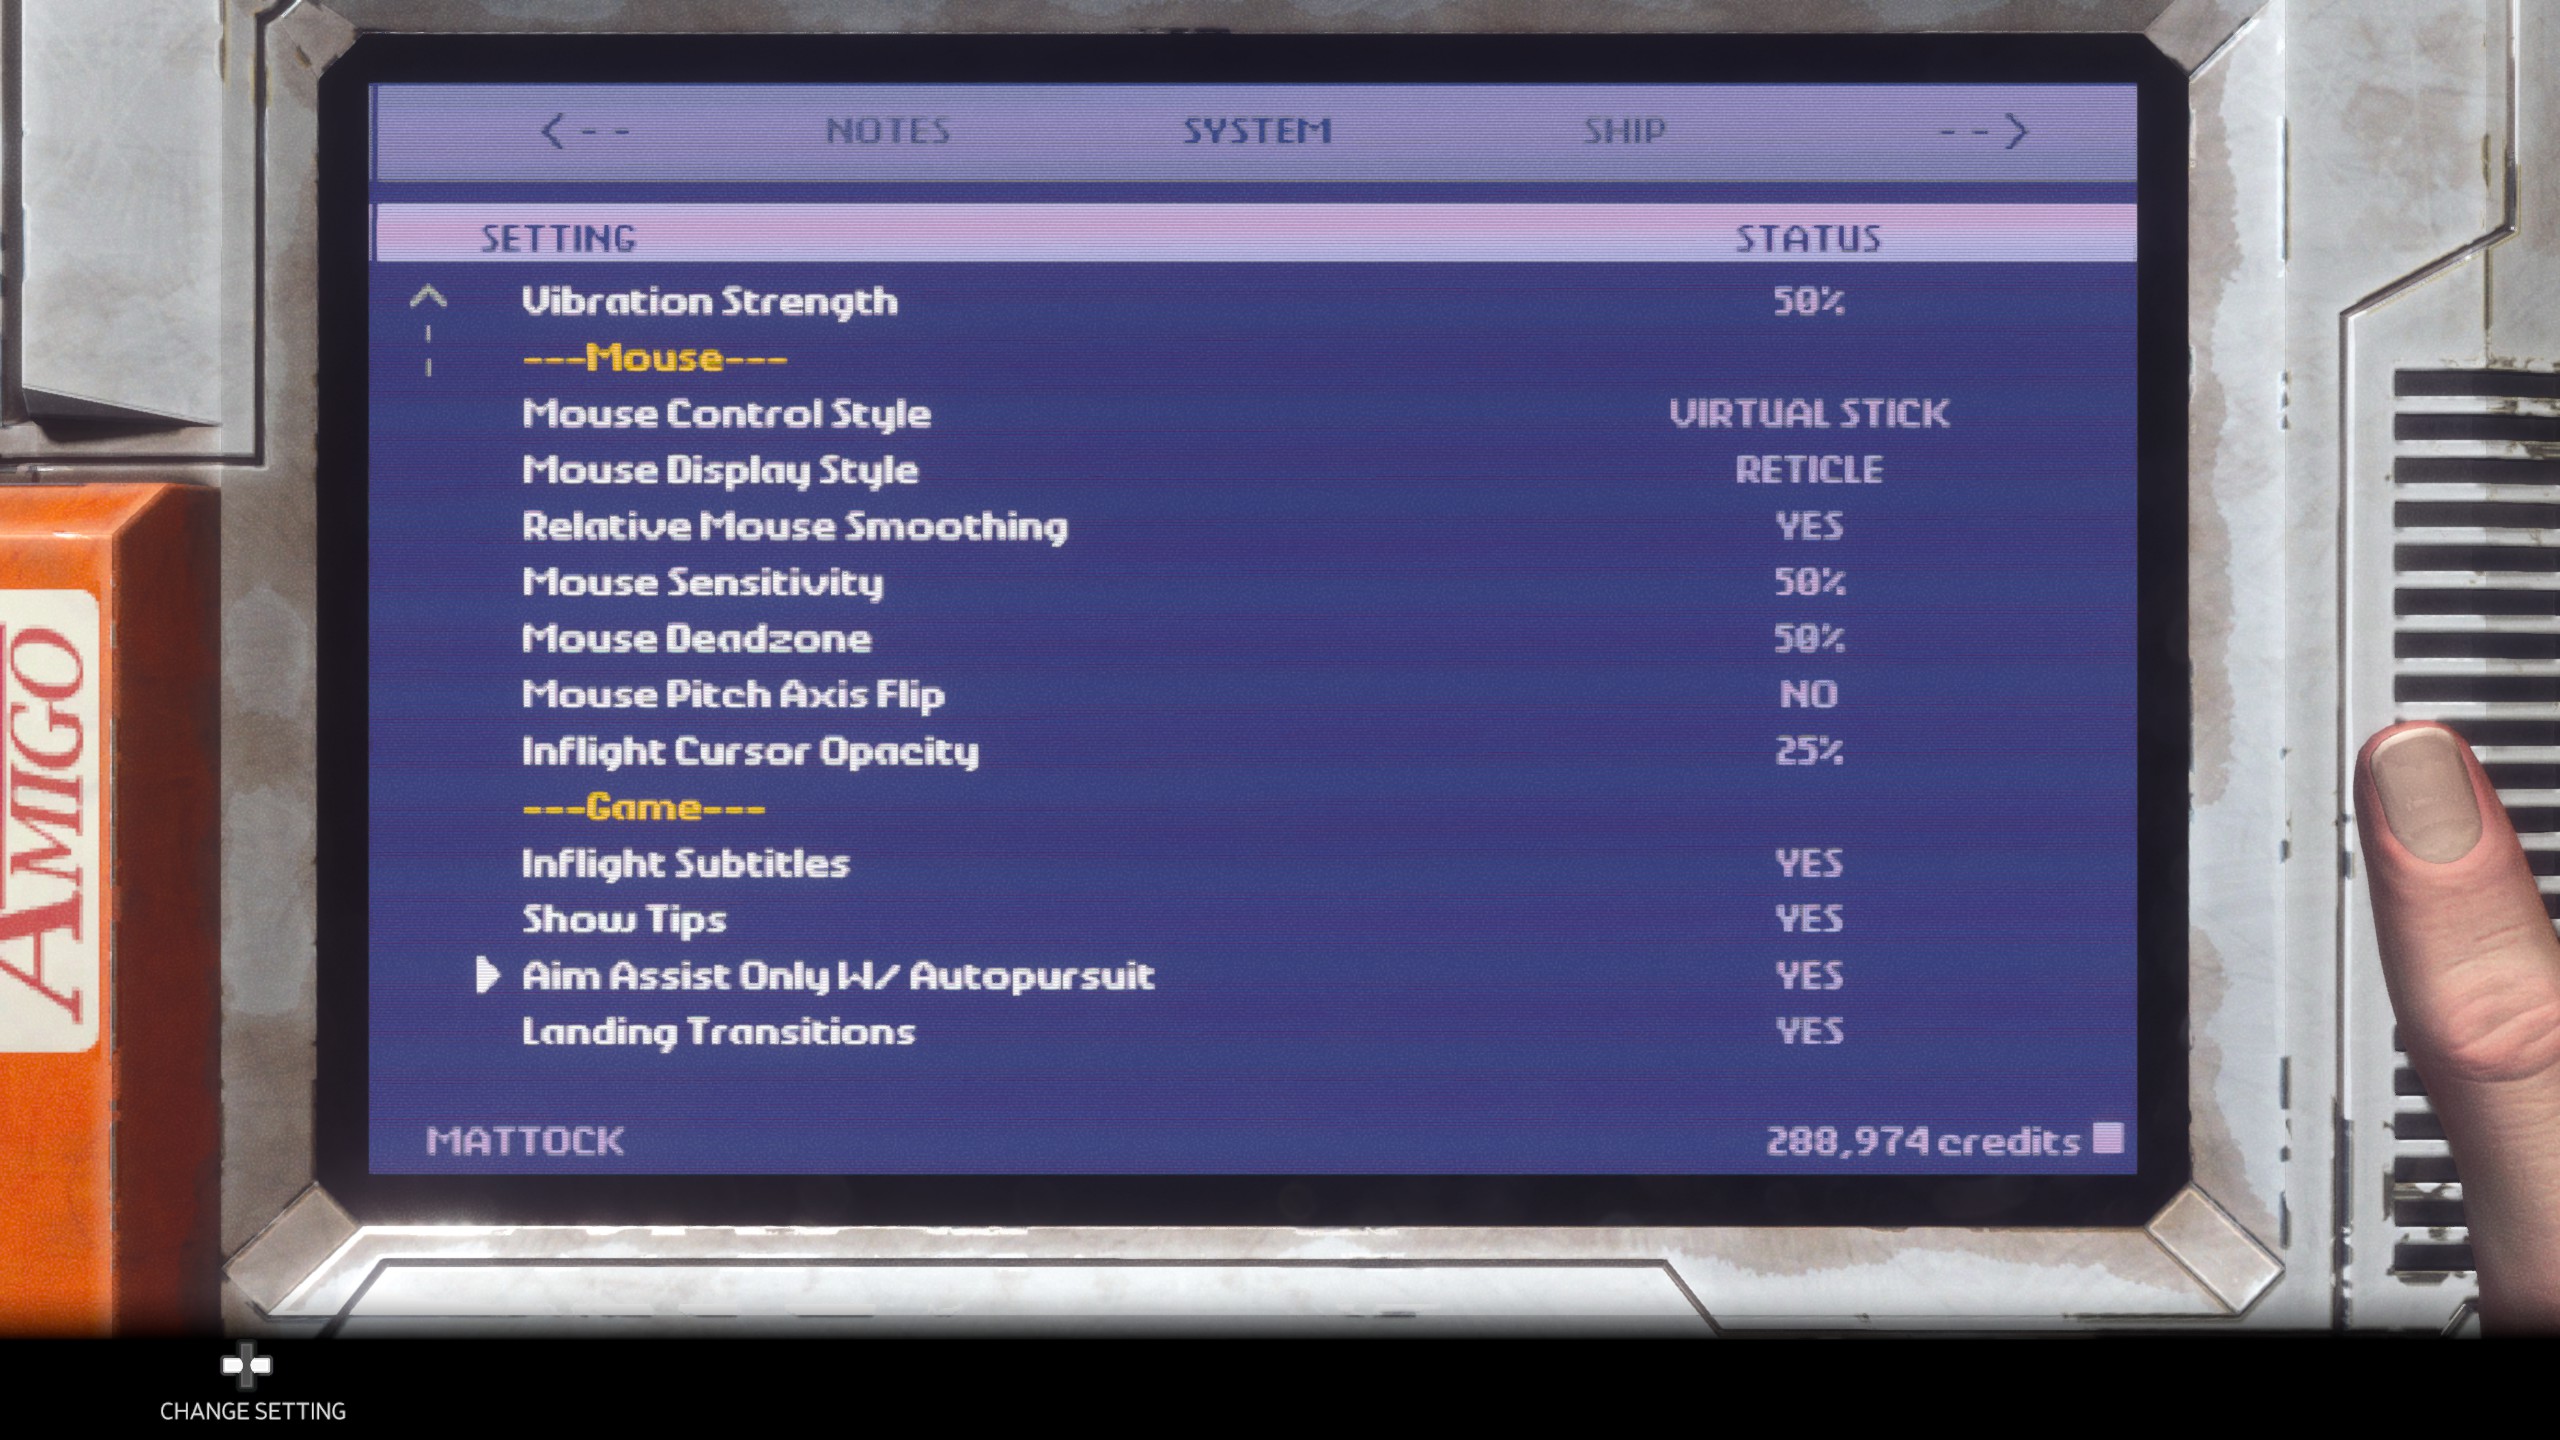
Some ships with turret mounts (such as the Sonora and it’s single rear facing turret), can be quickly swapped into and used to target and destroy missiles. If however you find yourself eating missiles to the face while playing chicken with enemy craft, I’d suggest going into the game’s Settings and scroll all the way down to the second to last option from the bottom, Aim Assist Only W/ Autopersuit, and set that option to YES.
This does exactly what it says on the tin, allowing you to disable auto-aim by letting go of the Left Trigger and exiting Autopersuit. This can allow you to quickly pick off incoming missiles without your forward facing hardpoint weapons auto-targeting the ship that fired them instead. This can also be useful in capital ship battles when you are attacking a specific weapon turret, and find it easier to just eyeball the needed target lead for your weapons fire, rather than fuss with selecting a target in the heat of battle.
The next defense are ECM Packages, which are a defense system all ships can equip that allows them to launch decoys in the hopes of throwing off the homing system of the incoming missiles. This is a separate piece of equipment, and crucially, it must be activated manually (R3 by default). That being said, the only ECM package really worth the effort is the final one (ECM Package 3), so skip the earlier two and just save up for that.

Then, once someone does launch a missile at you, simply click your right stick in and deploy your counter-measure. The same ship voice that warns you of impending enemy missiles will also tell you when a ECM has managed to successfully counter. ECM Packages have a reload time, but don’t otherwise have or use expendable ammo, so use them early and often once you get a hold of one.
If all else fails, and you still have that proximity alert beeping at you, your last line of defense is old-school evasion. Pop open your Command Menu, dump all power into Engines and Shields (this is covered below if you’re not familiar), and peel out. Pull up on your flight stick while initiating a roll to get yourself into a corkscrew, and hold down the afterburner. If you have and use lock-on enabled launchers yourself, then you already know that their homing capabilities and flight range are limited. Missiles CAN be evaded, it just takes more time, is somewhat unreliable, and forces you to disengage with your own target.
Still, better to let a target go for the moment than get an engine thruster full of swarm missiles. You can always reengage faster than you can generate shields back. Another thing to consider is that while evasion might not always be reliable in dodging missiles, what it can reliably do is buy you more time; so that your ECM Package can finish reloading and can be deployed again.

A homing missile has a 25% chance to ignore an ECM Package 3 deployment and continue on target, but that chance to successfully maintain a lock-on drops down to little over 6% after a second ECM (0.25 * 0.25 = 0.0625 = 6.25%). Nothing will make you missile-proof in this game, but with the right gear and tactics, you can greatly limit how often you get hit.
For those who like numbers here are the respective stats for all the ECM Package models, including how likely they are to successfully counter a homing missile with their first and second deployments against the same target-lock.
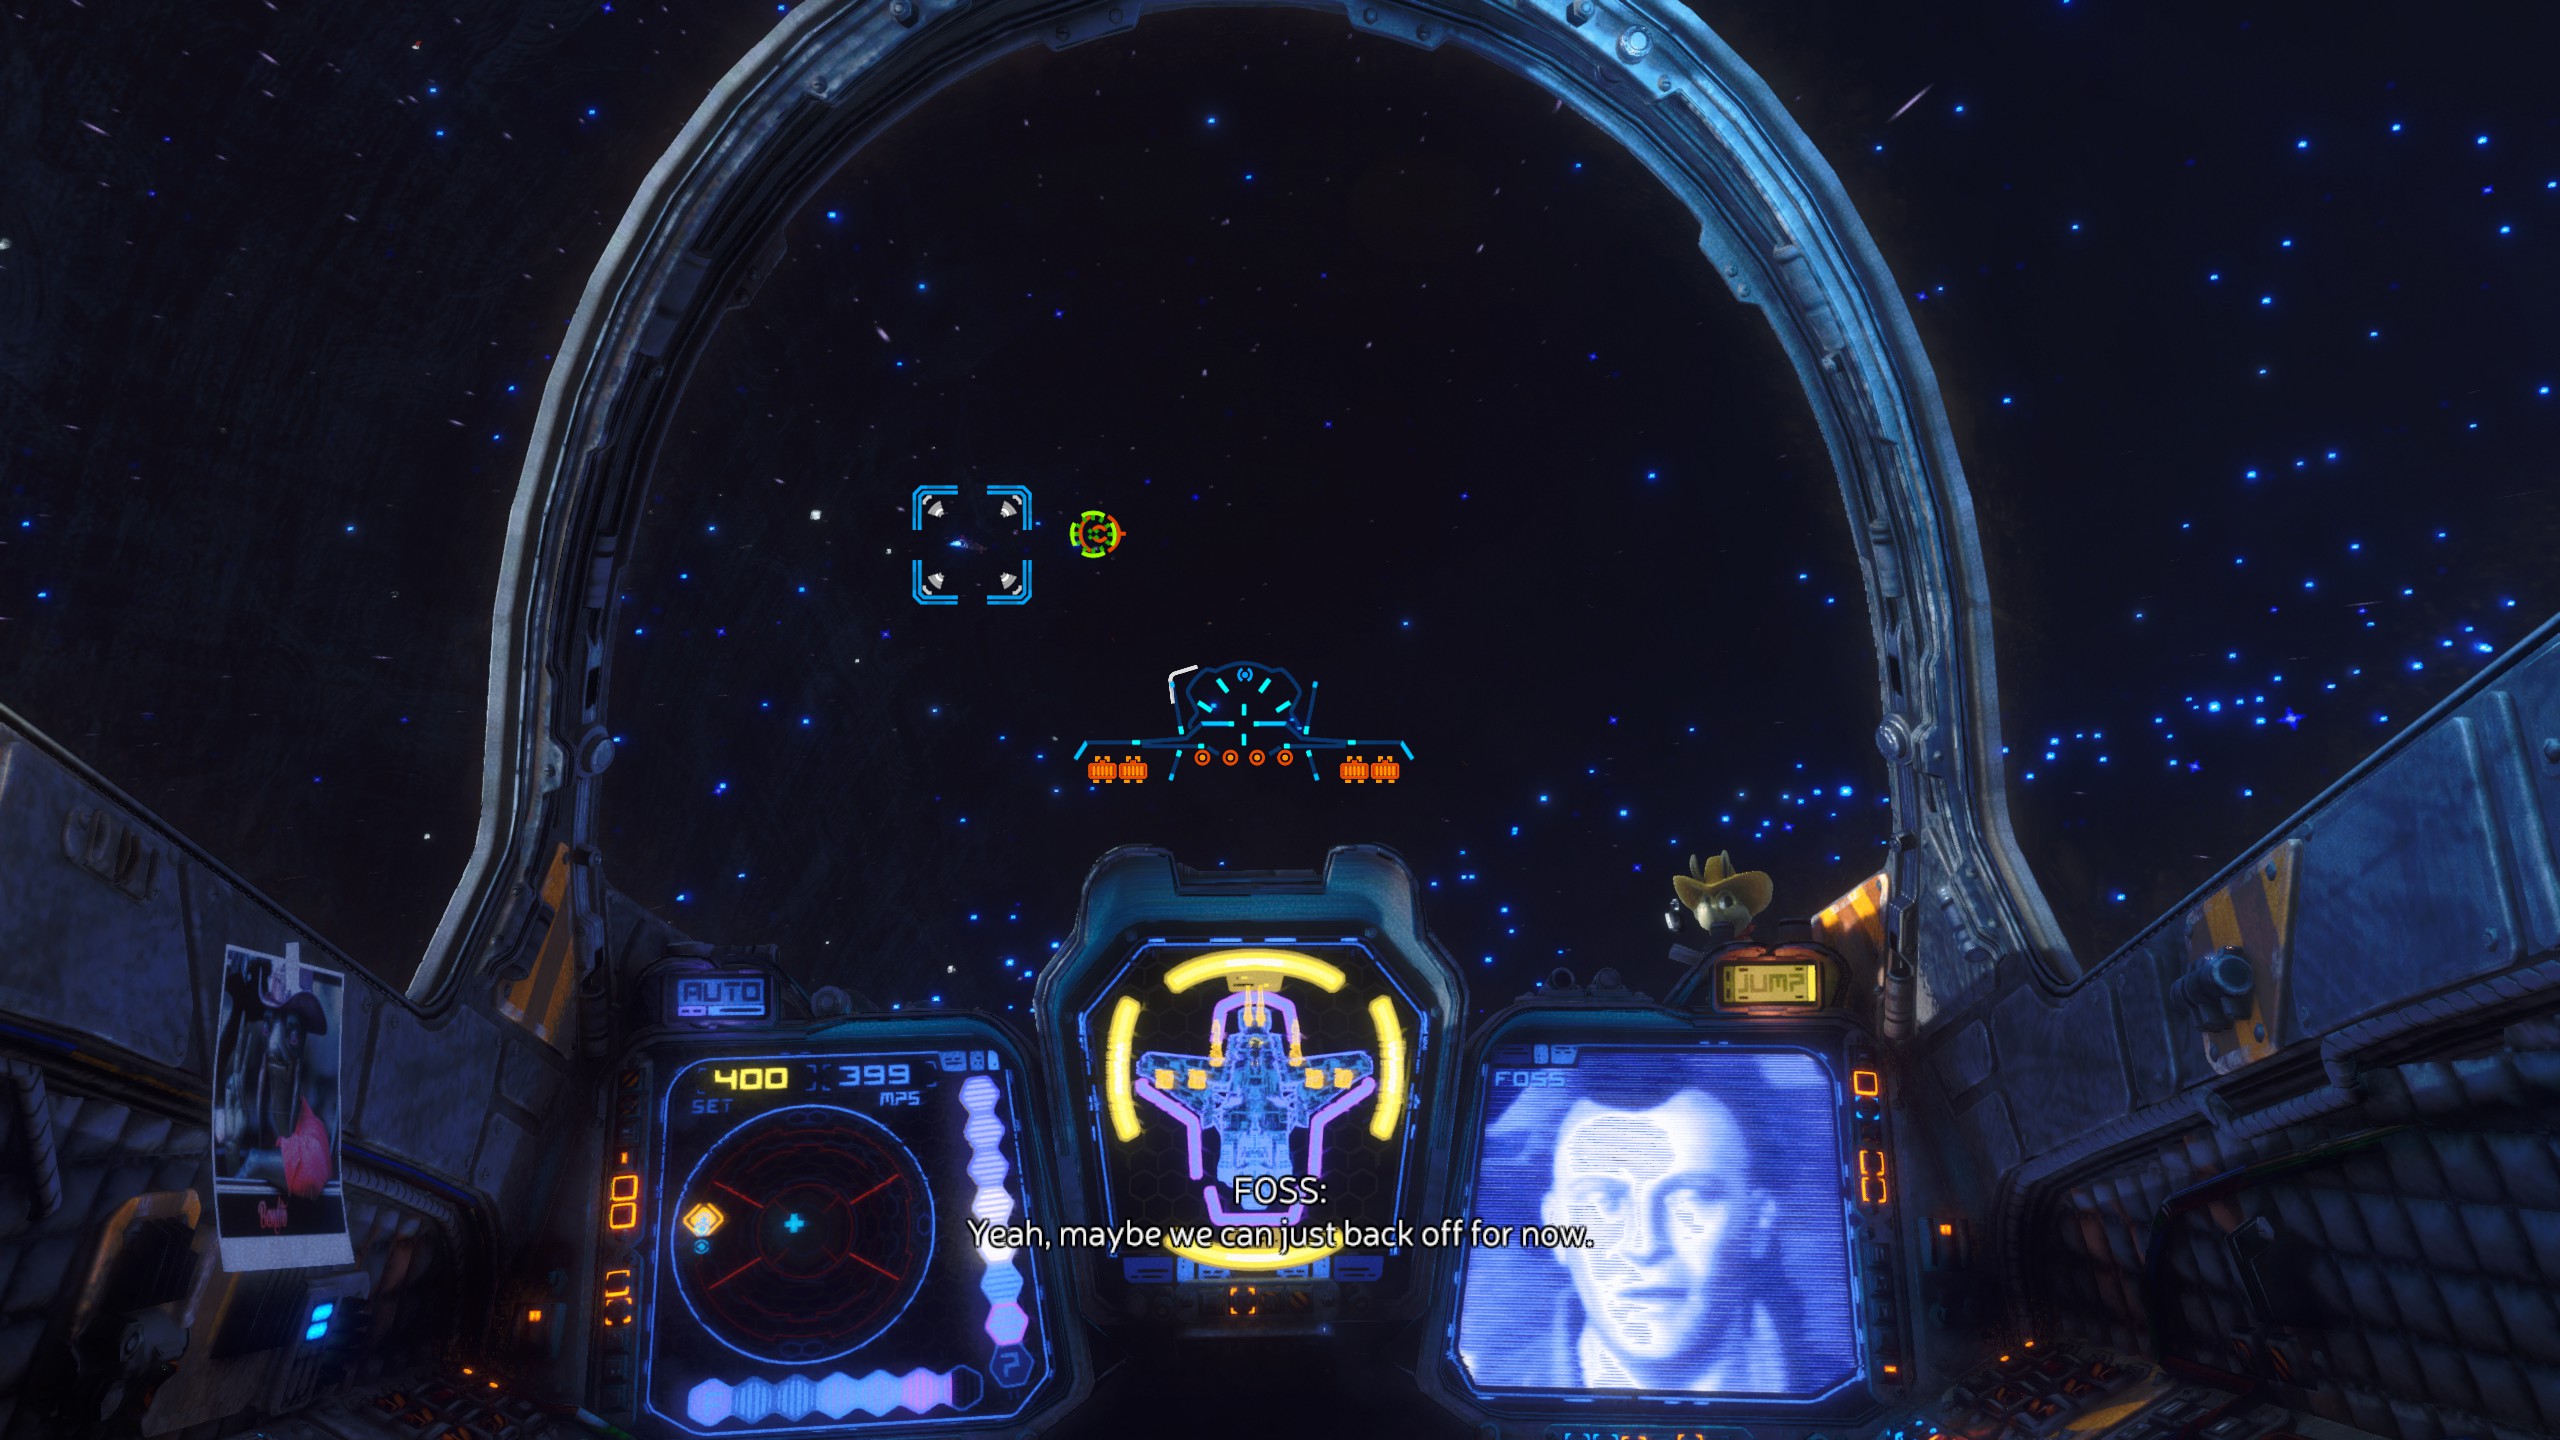
If you want to see me put my money where my mouth is, here’s a quick dogfight to demonstrate. I’m flying a Dingo with a full suite of end-game components, armed with 2x Auto-Cannons and 2x Photon Cannons on the hardpoints. I also have 2x Swam Launchers and 2x EMP Javelins that I didn’t end up needing to use at all. In the opposing corner is a Pirate Lord gunship, with a trio of Swarm Launcher equipped Adze bombers on escort duty. I manage to finish the fight with no ship damage, but only have yet another Trion Accelerator to show for the trouble.
Reducing how often you take damage, so that your shields don’t get overwhelmed and fail, is the key to survival.
Command Menu – Use it Like an Outlaw
This is probably going to be one of your most used tools, as it gives you quick and easy access to most anything you want to do or know. So let’s give it a quick rundown, starting at 12 o’ clock, and moving clockwise along the menu.

This is probably what you’ll use this menu for the most, if you’re anything like me. When you open the Command Menu, the game slows to a crawl, but doesn’t stop. However accessing Targeting Mode freezes the game, and gives you access to a zoomed out view of your surrounding area, filled in with the information your ship radar and scanners currently display. When you’re preparing to go into a fight, or in the middle of one, checking this regularly is very helpful in maintaining situational awareness.

At the start of combat, it’s good to know who is actually targeting who. Moving the map cursor over a unit will display the unit’s faction, ship type, any outstanding bounties, and their current cargo; in addition to drawing a yellow line from that unit to whoever they are currently targeting. At the start of a fight, it is good to know who is potentially targeting you, how many of them there are, and where they are coming from. This way you can effectively prioritize your targets.
Have fun messing around with them if you like, but they’re fluff options.

Outside of showing that the engine and the developers can indeed implement a dynamically adjustable camera FOV, but stubbornly refuse to implement them in the game proper, there’s not much I’m interested in here. You certainly won’t lose a fight cause you don’t know how to operate Photo Mode.
Probably the thing you’ll use the most when folks aren’t shooting at you (rare, I know). It opens up a 2D map of the local system, allowing you to quickly see all the relevant points of interests, in addition to any mission waypoints or map markers you’ve placed.

Crucial for knowing where you are, and where you need to go. Be sure to stop in every friendly and neutral station you can while in a system, and check their commodities market, so their economic information can be populated into the game’s Sector Map (the one you use to navigate between the various systems). You can place custom waypoints anywhere on the map, and they can be used as targets for your ship’s Auto-Pilot or Sublight navigation.
This is the big one. How the game failed to mention this function, I have no idea. This tool, when used correctly, can help save your ass in an emergency, or otherwise take the edge off a bad accident or mistake. This allows you to drain your energy reserves and give your shields a kickstart to regenerating. It seems like there is a slight delay before you notice shield levels return, but dumping your energy reserves certainly helps you get your shields back faster and stronger.
This is why power capacity, regeneration, and good energy management, are all crucially important. If you have a mixed hardpoint loadout of ballistic and energy weapons, have good trigger discipline, and have an upgraded ship Powerplant with a large capacity, then you can more easily take bad hits and keep rolling with the punches. If your weapons aren’t constantly draining your reserves, then you have an emergency buffer to dump into afterburners or your shields. These are some of the keys to being a successful, and alive, outlaw.
Same as above, but far less useful. The only situation where I can think this might be useful, would be if you’re already in rough shape with a damaged Powerplant that has trouble supplying enough power to let you operate the ship. So if you’re trying to limp back to a station after a near death fight, this can help you use your shields as an energy reserve, to potentially dump into thrusters in an effort to outrun a fight if you get ambushed. I cannot think of any other situation where you’d be in such a desperate need of energy as to risk draining your shields for it.
Just a shortcut to the same map you can access from your Mission Menu. It shows a map of the whole of RGO’s systems, allowing you to see how they are connected, and their planets and stations. It also gets updated with economic data as you visit the various system stations and check out their commodity markets.

White lines are normal Jump Gate paths, while red lines represent Unstable Jump Gates; these require the Shielded Jump Drive to use safely, otherwise your ship can incur (potentially catastrophic) damage upon using the gate. Your active mission will be displayed with the yellow icon, and the most direct and safest path to it will be displayed in yellow lines. A personal path that you set, or just the path to a system your cursor is currently hovering over, will be displayed in blue, and will turn to purple where it overlaps with the yellow lines.
Does what it says on the tin. If you have multiple missions in system, it’ll make the one closest to you the primary one and change it’s UI icon accordingly.
Yep, clears your custom set map waypoint.
This is another important tool in your arsenal, and will save you quite a bit of frustration from time to time. This pulses out a scan that can highlight other ships and points of interest far beyond the limited range of your combat radar system. Not only can this be used to scan the area for potential threats or bounties from a considerable distance, it can also likewise be used to find and hunt down mission important units that have gotten far away from the mission area (like a convoy protection mission refusing to complete when all immediate enemies are defeated, cause one lone pirate somehow either spawned or flew way out of the engagement area).
The Area Scan just gives you a much better idea of what is going on around you, and stretches your awareness far beyond what can be seen with your eyes alone. It can also be combined with the Targeting Mode to see things just beyond your combat radar, useful for gaining intel before engaging with the enemy, and especially so if you find yourself in a situation where you need to try and bait out a few units from a much larger force.
Just sets a custom map waypoint on the nearest available station. Useful if you want a faster escape without bringing up the Local Map.
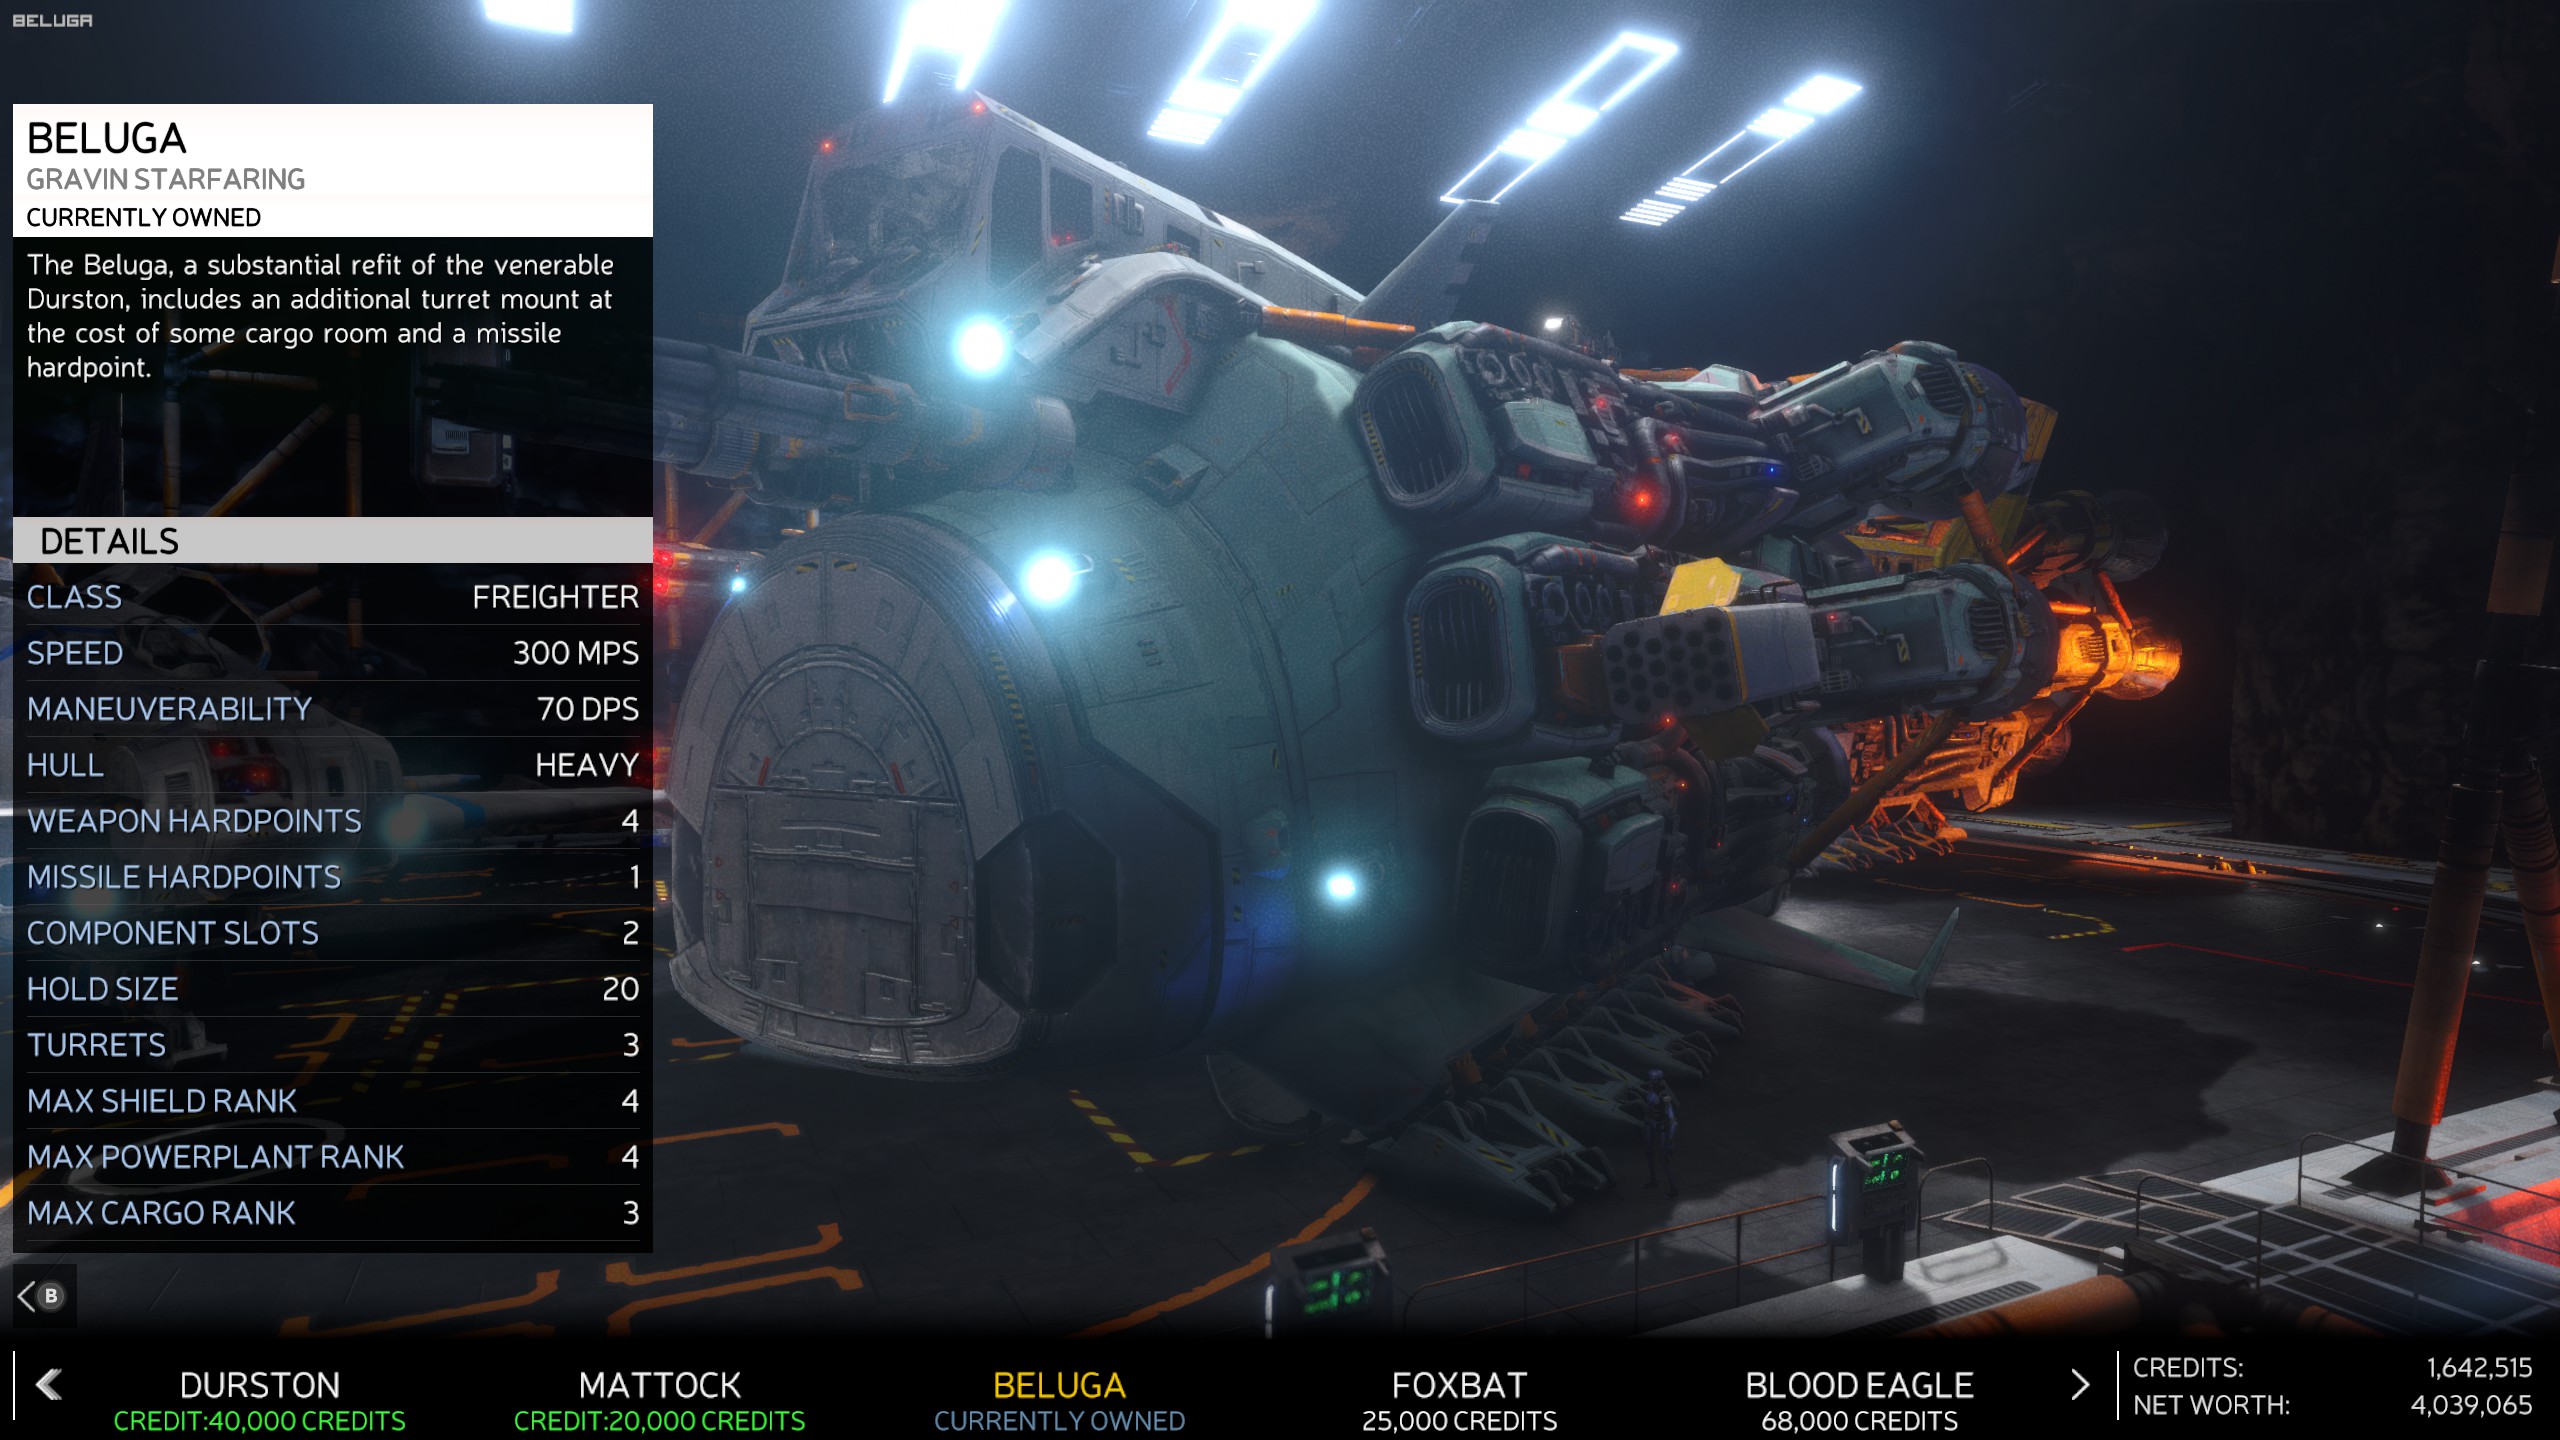
If your ship has any turrets equipped, you can access them from the final slot on the Command Menu. Ships with multiple turrets (SPZ, Durston, Beluga) will allow you to cycle through all of your turrets by repeatedly opening the menu and selecting the options again, and will eventually cycle back to your cockpit or 3rd person view. You can also do the same thing directly by pressing down on your controller’s D-Pad.
Command Menu II – The More You Know
Not part of the wheel menu, but still accessed from the Command Menu screen, power management is displayed on the left side of the screen. Balance is controlled with the D-Pad, where pressing each of the directions corresponds with adding power to one of your systems, or resetting power back to balanced stock operation. Each of your three ships systems, Engines, Shields, and Weapons, have their relative levels displayed and managed here. There is only so much power to go around, so boosting one system can only be done at the expense of one or both of the other systems.
The easiest way to think about this is that there are 6 points of energy to go around, and Balance gives all three systems 2 of those points. Just tapping on one system will raise it 2 points (to 4) at the expense of lowering the other two to just 1 point, and a further tap can make one system cap at all 6 while lowering the others to 0. You can likewise also get 4, 2, and 0, or even 3 and 3, depending on the order you try to adjust the levels. 4 Engines, 2 Shields, 0 Weapons is great for evading ambushes or missiles; while 0 Engine, 4 Shield, 2 Weapon (or 3 each) works wonders for trying to take down capitol ship turrets.
Another thing to keep in mind, is that not all power settings are equal. What do I mean by that? Well, at balanced power, a Dingo cruises at 400 m/s. If Engine power gets dropped down to 1, your cruise speed drops down to 300 m/s, and at 0 power it drops down to 200 m/s. Conversely, raising power above balance only nets you an increase of 40 m/s to cruise speed for each unit of power, reaching 440, 480, 520, and finally 560 m/s with all power to the engines.
The same applies to weapons and shields. The more power you put to shields, the faster they’ll regenerate and manually dumping power to shields will be more robust and efficient. Power level also effects the reload speed of slug weapons. The 5 second long reload of the Tracer can be drawn out to almost 8 seconds without power, or sped up to about 3 seconds with maxed power.
Get familiar with the system, and use it frequently. Even without an afterburner, just dumping everything into Engines can get you the speed you need to outrun some early game encounters.
An important note for those of you playing with mouse and keyboard or with full HOTAS setups; there are shortcut keybindings available to adjust power in flight, and to dump excess power into shields and vice versa. They’re unbound by default, but they are there if you want them.
Hey, do you want Auto-Pilot to stop when you detect a distress signal? No? Then toggle this option so it says Ignore Distress Signals with a red exclamation icon. Do keep in mind that this option is not a saved state, so you’ll have to re-toggle it every time you load into the game.
Still, you’re welcome.
You can find various NPC’s in the game that, if you help them with their troubles, they’ll return the favor. What this basically does is summon that Buddy to your location in their ship, and they’ll follow you around for 10 minutes. They’ll fly with you through the system, and can go on multiple missions. You can also give them orders from the ship intercom system (the same one you use to hail other NPC ships), including the ability to dismiss them early if you want.
Once they’ve been dismissed, they have a 10 minute long cooldown before they can be summoned again. If you’ve helped out multiple folks, you can potentially have more than one Buddy willing to help out. You can pick which one you want to be your lifeline by going to their home station, and there will be a menu option as part of the station options (like Commodity, Missions, and the Guilds). Also, if a particular Buddy needs your help with something and is waiting on you with an active quest, they won’t be summonable. So either go help them out pronto, or swap them with a different Buddy till then.
Outlaw Knowledge – It’s Half the Battle
The ship roster is split among three general types of ship Hull, that being Light, Medium, and Heavy. While the game doesn’t supply any more information than that, and without having mod-tools to look at the numbers directly, I cannot tell you exactly what they mean. It isn’t speed or maneuverability, as the game flat out just gives you those numbers, and they’re hardly universal within each category. It isn’t just Armor either, as all ships can equip all types of Armor too.
What the general consensus appears to be however, is that Hull Type acts as a sort of multiplier to a ship’s equipped Armor. So any two given ships with the same Armor, will be able to absorb more or less damage depending on how heavy their respective Hulls are. So what this means in practice is that Heavy ships like the Durston and Mattock are better able to take a hit right to the hull without sustaining as much damage to internal components.
No, I’m not a flat Earth nutter, but hear me out. The way the game handles positioning is all relative to the box each system map is contained within. Notice how the game’s Local Map is a top-down grid? How the Targeting Map is viewed and operates much the same way? That’s not an accident. Most locations are laid out around the system as if it were a flat plane. You’ll find points of interest all around one another along the grid, but never above or below them, relative to the system’s horizon.
Enter photo mode? The camera always starts aligned relative to the system, not your ship. Activate your Sublight engines, and your ship will auto-rotate you to be properly aligned with the system’s horizon (top of your ship face up, towards the overhead map view) before launch. Exit a station, and you’re aligned with the system.
This also means that when you get surrounded in an ambush, you are only ever surrounded along two planes of movement in a three dimensional space. That means that the best way to escape ANY ambush, is to fly straight up or down (again, relative to the system’s horizon) as best as you can manage, as that’ll keep the most distance between you and all of your attackers.
Get interdicted, and can’t be bothered to kill whoever got in your way? Quickest way around is to fly up or down, then re-engage your Autopilot or Sublight once you get enough distance.
Every piece of upgradeable equipment can be damaged and destroyed. Probably the most common and likely source of damage will be taking enemy fire that manages to hit an unshielded section of your ship. Get into enough dog-fights over a long enough time, and you’re gonna have the scars to show for it.
What the game doesn’t tell you however is that each piece of equipment has an inherent ‘fragility’ value. The more damage a piece of equipment takes, the more often it needs to be repaired, the more likely the component will break outright and need to be replaced. Each component piece has an inherent fragility value that the game tracks. While this can happen from combat, you’ll most likely encounter this mechanic if you make a habit of regularly jumping through unstable Jump Gates without a Shielded Jump Drive. Doing so can cause massive, even catastrophic damage, directly to internal ship components.
Yep. The value given for the various Shield Generator units corresponds to the damage capacity of a single quadrant of your ship’s overall shield capacity. So a starter Tier 1 Shield is able to handle 200 points of damage before it fails. But even if it fails in one section, the others have their own separately tracked capacity.
The ship-to-ship radio is an oft overlooked piece of kit that every ship has, and does more than you’re probable aware. It allows you to open communication with other ships, and this allows for a few different interactions. For starters, you can try to talk down hostile units.
While it doesn’t always work, it is free, and works often enough (especially against a lone unit camping a Jump Gate) to be worth a try if you don’t want to be bothered atomizing them. You can also use it to be a pirate yourself, demanding that ships drop their cargo or else. However my personal favorite is to taunt and intimidate enemies.

Calling out an enemy ship and taunting them will can cause them to switch targets and come after you, or even to disengage and try to fly out of the area. Either can be incredibly useful when you are trying to protect other ships, as redirecting attention (especially from bombers) can greatly reduce how much damage your allies take while you’re busy cleaning house.
There is a wanted system, indicated by a trio of stars in the top left corner. When you’re neutral, they fade away and aren’t visible. However if you help the local police (such as defending troopers in a fight with pirates), you can gain a single blue star. This is kind of a small friend-of-the-law buffer that cause police to be slower to scan you for contraband.

If however you take actively hostile actions that harm civilians or the police, you’ll quickly gain red stars, representing your wanted level. More aggressive actions add points, and will increase your level, up to three stars. Keep in mind however that this meter is fluid, and can quickly go from one star to thee just by sticking around too long at the scene of your crimes. You can also actively lower it, buy fighting pirates in the presence of police forces. Careful with this, as if you haven’t lowered your wanted level enough by the time the fighting ends, the police can and will turn on you when all the pirates are dead or out of the area.
Wanted levels can and do decay over time, losing about 1 star every 10 minutes of game time on average, if you aren’t doing anything else to add/lose notoriety or draw attention to yourself. If you have your back to the wall, your ship is badly damaged, and you don’t want to risk getting interdicted by the police in transit to a station so they can finish you off? Then just sitting there and hiding in a quiet corner of empty space is a perfectly valid (if boring) tactic to save your bacon.
Picking the Right Ship for You
RGO’s progression system is, in a word, rough. It’s options are limited, and their importance varies greatly. Also, some systems and upgrades are hull limited, while others are not, leading to a very lopsided design that ends up gutting the utility and access to mid-tier options. Generally speaking, your best bet is to make do with what you got, until you can afford the best available option your ship can handle.
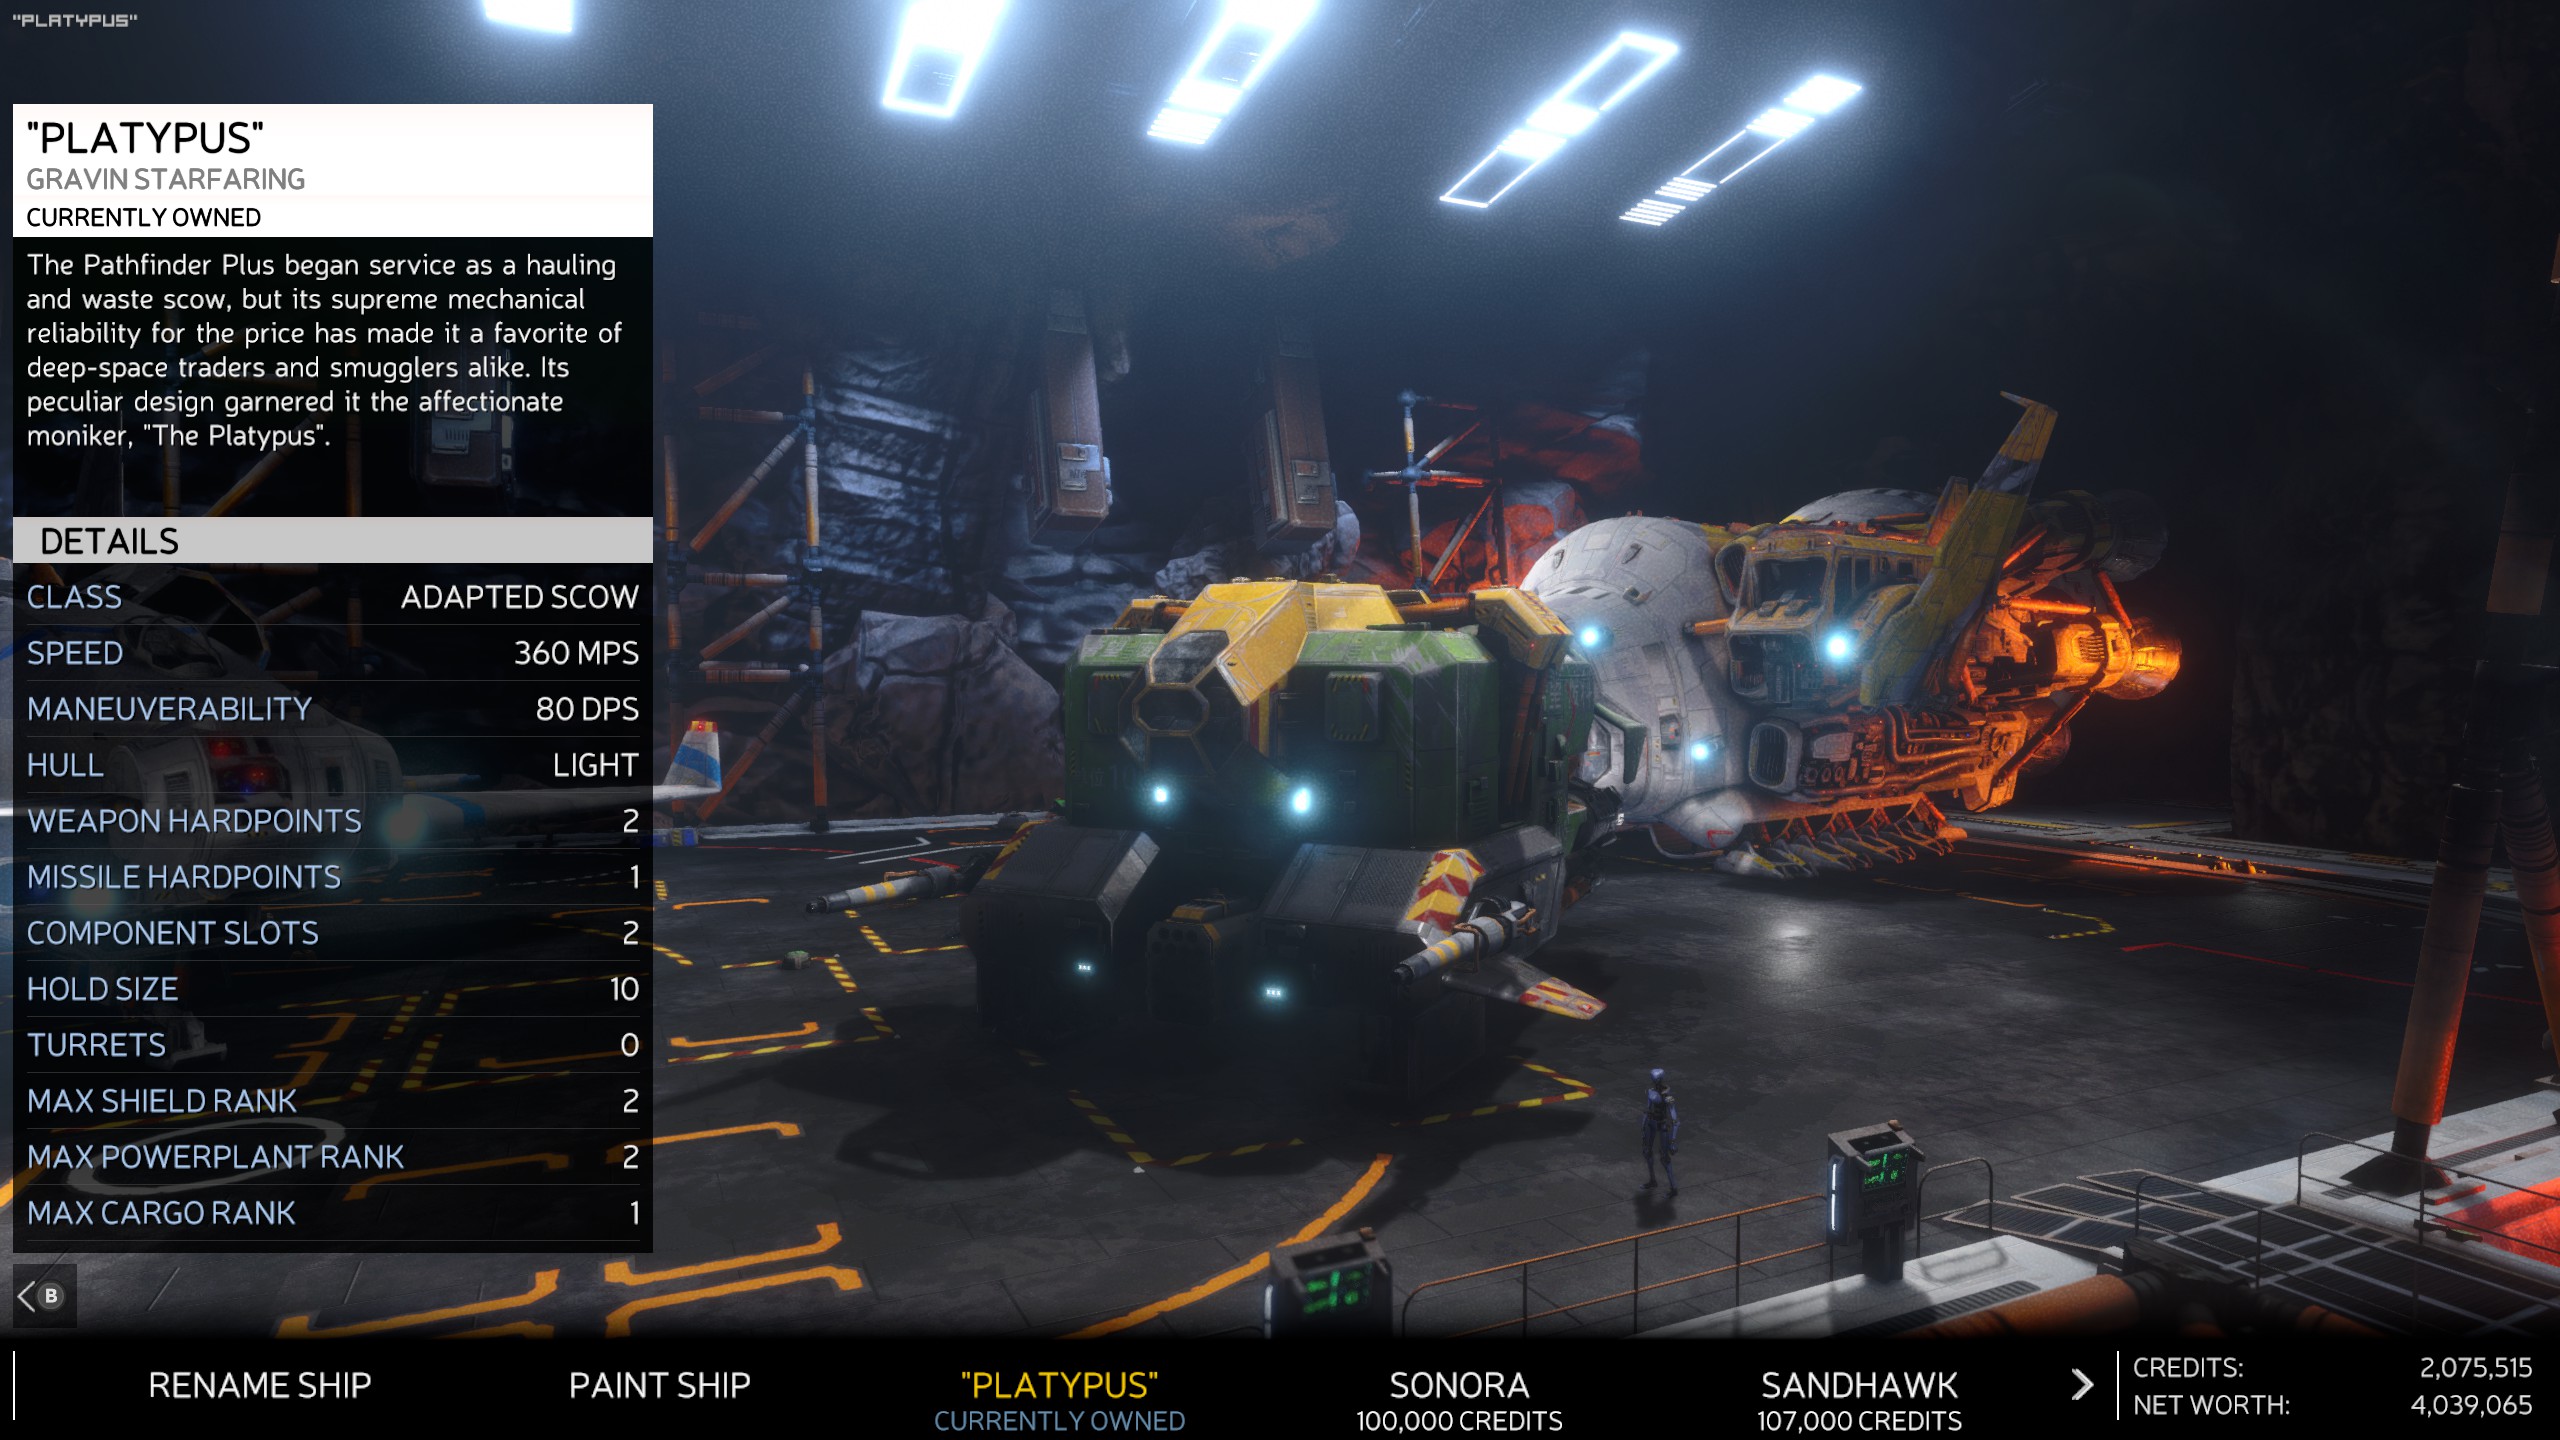
While on one hand it is entirely underwhelming, the stoic Platypus is quite adaptable (even if it is a flying garbage truck). You can use it to mine, trade, or fight; and get a feel for what you’re gonna enjoy doing going forward. It can equip everything you need to throw down, haul ass, and dig for riches. It can also accept up to Tier 2 Shields and Powerplants, ECM Package 3, the heaviest Duratanium Armor, and the full selection of hardpoint weapons.
Probably the best option for early game money making, with big payouts and relatively low risk. It just takes some startup investment (Mining Laser, Mining Scanner, Tractor Beam, and the biggest Cargo upgrade your ship of choice can handle, and probably an Afterburner). Fly out to asteroid belts, nebulas, and other points of interest. Use your Area Scanner, and it’ll highlight resource deposits. Fly over to them, get close, and hit ’em with your mining laser. Hoover up the resources with your tractor beam, fly back to the closest station, and kick on the Afterburners in case of trouble. Rinse and repeat until you can afford whatever you want. If you want the most efficient way to grind up to afford an end-game ship like the Durston heavy hauler or the Coyote fighter, this is how you do it.
Having the right ship for the right job will make your life easier. While you can haul some cargo in a Coyote fighter, it’s gonna be tight and very limited. Sure you can outgun anything interested in your measly 5 to 9 units of cargo, but that really limits your trading options. Likewise, the flying behemoth Durston can haul between 24 and 44 units, but with an anemic turning speed and a top speed that makes the Platypus seem spritely, probably not the best option for duking it out with your local Pirate Lord.
Unfortunately, here’s where the game’s limited roster rears its ugly head. The game only has 12 ships, and of those, fully half of them are end-game ships (being able to equip both Tier 4 Shields and Powerplants). Not only that, but 5 of them are variants of the stock roster, and 4 of those are only accessible through a mid-game quest line that is very easy to miss, and takes considerable time and effort to complete even if you make a beeline for it. Two more ships are also locked behind that quest, or other hard to get to vendors in late-game territories. This leaves the mid-tier ship options lacking and hard to get to, making a strong argument to just save up for a Durston or Coyote.
If you’re digging mining (hehe), but want to get out of the Platypus, the most straightforward upgrade is the SPZ. You can use the single hardpoint for your mining laser, and rely on the two turret mounts to provide some protection. You won’t be dogfighting in this, so it’s upgraded Shields, top speed, maneuverability, and cargo space (12 default, 22 max), make it a nice quality-of-life upgrade over the poor Platypus.
Maybe upgrade to the Sonora, but keep in mind that it is an all-rounder, and kinda all the weaker for it. The end goal is the Durston, or its variant the Beluga, but this is assuming that you are going to focus mostly on trading and running from fights. Don’t let the Sonora’s 3 hardpoints fool you, it is not a fighter craft, in the same way the Bloodhawk is. It is still limited to the same Tier 2 Powerplant and Shields as the lowly Platypus, and while its Sequoia variant that can make use of Tier 3 upgrades, it is locked behind that Bountiful Vista station restoration quest in the Eureka system.
Take your pick. Get the Sandhawk, or just go right for the Coyote. Once you finish the station restoration quest in Eureka, you can have fun trying out some of the other end-game craft, like the Foxbat, Blood Eagle, Dingo, or even the Mattock if you are feelin’ real saucy. They all can equip Tier 4 Powerplants and Shields, and plenty of weapon and missile hardpoints.
But the crowns probably have to go to the pair of most expensive ships in the game, the Coyote and the Dingo. When it comes to hardpoint firepower, the Coyote is simply unmatched with 6 forward facing hardpoints with a nice flat horizontal alignment due to their under-wing mounting positions. While the Dingo has a respectable 4 weapon hardpoints, it has the most launcher hardpoints at 4, making it the King of Missile Town.
Don’t. Just, don’t.
Learn from my mistakes. Being an all rounder puts yourself at a pretty severe handicap until you reach late game and can get your hands on a Mattock or a Dingo. Being an all-rounder means that you’re often filled with enough cargo to attract the wrong kind of attention from the game’s procedural encounter generator, but you lack the firepower, defenses, speed, and maneuverability to handle that kind of heat. Plus, your only real option is the lowly Sonora until after the Bountiful Vista station restoration or you unlock Jesse’s Den, and by the time you’re done with that, you’ll probably be able to skip over the Sequoia and go right for the Mattock.
There just aren’t any good, easily accessible, mid-tier options for general purpose ships. If you want to haul, there are better ships. If you want to fight, there are better ships. Being general purpose means you trade in being good for one thing in exchange for being passable at everything, but passable can quickly slip into less so depending on your other upgrades or the situation you find yourself in. Probably the most frustrating and disappointing path to take until you can afford end-game upgrades and ships. Sorry.
NOTE: A Cyclic Afterburner on a balanced power setup has a higher top speed than the vanilla Afterburner with all energy directed to the Engines.
Ship Roster – FREE to 180K
________________________________________________________________
a.k.a. The Platypus

________________________________________________________________


________________________________________________________________


________________________________________________________________

Where to Buy – This one is a Bountiful Vista exclusive variant. You’ll need to progress far enough along the Bountiful Vista station restoration quest to have added a ship dealer to the station before you can access the Sequoia. Scroll down the Bountiful Vista part of this guide for more information.

________________________________________________________________


________________________________________________________________


Ship Roster – 200K to 320K
________________________________________________________________

Where to Buy – This can be found at Jesse’s Den, the Doublejack’s HQ in the Juarez system. You’ll gain access to the station by progressing through the main story quest. It is also part of the extended inventory of the Bountiful Vista ship dealer. If you’d like to know more about the station restoration quest, just scroll down the Bountiful Vista part of this guide for more information.

________________________________________________________________
Where to Buy – This one is a Bountiful Vista exclusive variant. You’ll need to progress far enough along the Bountiful Vista station restoration quest to have added a ship dealer to the station before you can access the Beluga. Scroll down the Bountiful Vista part of this guide for more information.

________________________________________________________________

Where to Buy – This can be found at Police Stations, located in the Montana and Utah systems, You just need to have a Neutral or Lawful reputation to access the stations. It is also part of the extended inventory of the Bountiful Vista ship dealer. If you’d like to know more about the station restoration quest, just scroll down the Bountiful Vista part of this guide for more information.

________________________________________________________________

Where to Buy – This one is a Bountiful Vista exclusive variant. You’ll need to progress far enough along the Bountiful Vista station restoration quest to have added a ship dealer to the station before you can access the Blood Eagle. Scroll down the Bountiful Vista part of this guide for more information.

________________________________________________________________


________________________________________________________________

Where to Buy – This one is a Bountiful Vista exclusive variant. You’ll need to progress far enough along the Bountiful Vista station restoration quest to have added a ship dealer to the station before you can access the Dingo. Scroll down the Bountiful Vista part of this guide for more information.

Ship Upgrades – The Essentials
Some upgrades are limited by your ship, most notably the maximum Powerplant and Shield capabilities. Plenty of others, such as the Armor and Weapons, are entirely no-holds-barred, and can be used across the entire fleet. Here’s my recommendations on where to spend your limited resources to gain the most impact.
First off, get the largest Powerplant your current ship is capable of using, followed up by the largest Shield your ship can equip. For the lowly starter Platypus, and the next two cheapest ships in the roster (Sonora and Sandhawk), that is the Tier 2 upgrades. Powerplants, along with a ship’s innate Reactor Core, determines how many gigajoules per second (GJ/s) your ship generates, and how much power it can store in reserve to be used.
Everything that draws power, from passive systems like your Shields and Radar, or active systems like Weapons and Afterburners, are limited by how much power you can generate and store. Larger Powerplants can add more power regeneration per second and have a larger reserve capacity, allowing you to more liberally make use of things like Afterburners or weapon loadouts with larger power draws.

Fun Fact: The gigajoule (GJ) is equal to one billion (10^9) joules. 6 GJ is about the chemical energy of combusting 1 barrel (159 liters) of crude oil. The internal Reactor Core of the lowly Platypus generates 22 GJ/s by itself.
Once you have a robust energy platform, the biggest passive power drain is your Shields. You go Powerplant first, because you don’t want to run into power droughts in an emergency. Having massive Shields does you little good, if you cannot supply enough power to regenerate them while also fighting back or otherwise making your escape. Running out of power in an emergency is the fast track to getting yourself spaced.

While Powerplants and Shields are limited by ship type, Armor and ECM Packages are not, and they are your next go-to upgrades. Now as mentioned earlier in the guide, only the final ECM Package 3 is worth getting, and the reason for this is reload times and random number generation (RNG). The ECM Packages are NOT a guaranteed missile countermeasure, they only have a chance to work. For the lowly ECM Package 1, this is a 25% chance of success with an 8 second long reload between deployments. Compare that to ECM Package 3, with a 75% chance of success and a much snappier 4 second reload.
Armor on the other hand (not to be confused with Hull size, but correlated to it) is how robust your ship is at taking damage when unshielded. These upgrades are worth getting incrementally, as each is just a raw increase in how robust your ship becomes, and can be used unrestricted by every ship in the game. Once you own Duratanium Armor, you are set for the rest of the game, no matter what ship you fly (even the poor Platypus).

Now unlike a game such as MechWarrior, Armor doesn’t appear to be protection against internal damage until it is all gone. While I cannot say for certain, it does appear that the underlying internal system can be damaged through repeated hits to the Armor, without fully depleting all of it for that area. That, or how the game tracks locational damage is far more robust and granular than the UI would otherwise suggest. Either way, having more armor is a good thing, as it helps to better protect your squishy insides (heavier Hulls help too), and has no detrimental aspect outside of its purchase price.
Get an Afterburner ASAP. If you started on Normal (like a sane person), you already have the basic Afterburner and you’re good for the moment. If however you picked any of the other harder settings (like a masochist), you don’t start with one. This should be at the top of your priority list, even above and beyond upgrading your Powerplant and Shields. The ability to get the hell out of dodge should never be underestimated. Running away from a fight stacked against you is almost always a viable solution.

That being said, the basic Afterburner will do you well enough in the early game. Combined with proper power management, and it can get you fast enough to out-run most trouble early on. For the most part I’d generally ignore the second option, the Injection Burner 2K, as it is purpose built for limited high-intensity combat use. It has a place on late game dog-fighters with Tier 4 Powerplants, but it lacks the general utility the Cyclic Afterburner grants most ships for the majority of the game’s content.
Seeing as how the most common use for Afterburners is to haul ass away from or around trouble, the better top speed and less power draw of the Cyclic Afterburner makes this the ideal option, as its slower acceleration is less of an issue when you’re doing a sustained burn. While the UI speed display does max out at 999 m/s, you can in fact go faster than this, so don’t be afraid that you’re leaving performance on the table.
Outlaw Pro Tip – The default Afterburner button is L3, pressing in on the left control stick. That is just awful and will cramp your hands. Swap that with the right shoulder bumper, which by default toggles your cockpit UI info screen across 3 different readouts. It’ll just make your life easier and your hands far more comfortable.
If you are, again, a sane person and started on Normal, you are already set when it comes to Radar units for the whole game. You start with the Ranger LS 3I, which already does most everything you want or need out of a radar system; IFF color coding and lock-on capabilities. If you started on Veteran, you have the Optus Mk2, which provides lock-on capabilities but is otherwise monochromatic. Finding and targeting enemy units in a fight will require liberal use of the Targeting Mode, and manually selecting your lock-on targets from there. A good habit to get into, and certainly can be lived with for a time, but the at a glance red and blue IFF capabilities of the Ranger LS 3I really is what you want.
If you are on an even harder setting (Sim or Old School), you have no starting radar. Get the Optus Mk 2, as you want target lock-on capabilities at a minimum, with an eye towards upgrading in the future to the Ranger LS 3I when you are comfortable and have the funds. The Optus Mk1 is black and white with no target lock capabilities, and the Ranger LS 3 provides color IFF but also lacks target lock-on; give both of them a hard pass.

The penultimate radar is the Ranger LS Infinity, which has a higher power draw (3 GJ/s), while the only benefit it provides over the prior model is support for up to two distinct lead targets. While you can certainly make do just fine with the Ranger LS 3I, the upgraded lead targets are much more distinctive and easier to see, even if you only have one hardpoint weapon type. The value increases further if you have a mixed loadout, even more so if they have very different projectile velocities.
Ship Upgrades II – Space Boogaloo
Expanded cargo capacity is a huge quality of life improvement for all outlaws, even the fighter jockeys. But it is just that, quality of life, it is not a necessity. Even dedicated haulers can get a lot of work done with a proper freighter, given their much larger stock cargo capacity; the end-game Foxbat and Coyote fighters max at 9 units, less than the stock 12 unit capacity of the Sonora light cargo hauler. Getting upgrades on top of that allows you to carry more with less trips, but having more cargo also makes you a juicer target for pirates. So keep that in mind, your cargo capacity should never exceed your capability to defend it or haul ass with it.

That being said, Cargo Extenders are worth getting incrementally, and keeping. Not every ship can use every upgrade, so when you move up to a Cargo Extender 2, you should keep your prior Cargo Extender around in case later you switch to another ship with a more limited Max Cargo rank.
What about the Secret Stash and Smuggler’s Hold? They’re practically useless, and not worth the massively cut down capacity. Why? If you’re going to deal a lot in contraband, you should probably be a bandit yourself and trading with their outposts, and they aren’t going to stop you. Even if you insist on taking contraband to the plebes in space police patrolled systems (stations typically only deal in an illegal good if it is in particularly high demand, otherwise you cannot sell it at all), the space police are idiots.
Even if they do try to scan you for contraband, you can pause the game and go into your Cargo Hold menu, and just jettison all of your contraband right in front of the space police. They don’t seem to register this at all, and will let you pass once they scan your now contraband-free hold. Since the space police only do this outside of active combat, and non-pirate NPC’s don’t hoover up contraband, there is no fear of anyone flying off with your freshly jettisoned cargo. It’ll take a bit of time to Tractor Beam it all back in, but that’s it. The smuggler focused upgrades aren’t worth the limited capacity just to avoid the mild inconvenience that are idiot space police.
Tractor Beams are critically important to miners (and a more useful upgrade for a smuggler than the actual smuggler cargo upgrades, see above), and nice to have for everyone else. Being able to swipe cargo from destroyed enemies is a nice way to earn credits on the side. It also opens up more mission options, such as bounties that must be taken alive (the ejected target pilot needs to be picked up, and you need a Tractor Beam to do that).

So the starter Tractor Beam is very nice to have, but won’t get you killed if you don’t have one. Getting one allows for new sources of income and opens up more job opportunities, and the basic one will serve you well through the whole game. However the extended range of the Enhanced Tractor will make your life easier, especially if you’re trying to hoover up dropped cargo mid battle before other NPC’s swipe it.
You’ll need the basic Jump Drive before you can even leave the starter system, so consider its 20K cost the price of admission to the wider Rebel Galaxy. The Shielded Jump Drive is what you need to safely travel using Unstable Jump Gates, the red colored ones on the maps. These open up vast shortcuts across the galaxy that can quickly speed up your travel on long hauls.

That being said, these Unstable Jump Gates can be used without a Shielded Jump Drive, but you risk mild to severe damage to your ship’s components. So you might be fine dipping into a system accessible with an Unstable Jump Gate, if you immediately make a beeline for the nearest station for repairs. You might do this to complete a quest chain objective (such as the restoration of the Bountiful Vista Station, which requires travel to the Discouragement system), but don’t plan to regularly make use of these shortcuts without first ponying up the cash for a Shielded Jump Drive.
Only dedicated miners need apply for the Mining Scanner. It doesn’t have a passive power cost, but using your Area Scan anywhere around asteroid fields will cause your UI to clutter with resource markers. So if you aren’t actively mining, you should uninstall it even if you have bought one already.

The Repair Droid is an upgrade trap, designed to look good on paper, but be awful in practice. It cannot repair Armor (Boo!), your Reactor Core, or itself. It can repair everything else, and will prioritize repairs to Weapon systems before moving onto internal systems like Radar, however It is very slow to make those repairs. The 5 GJ/s power draw is not an inconsequential amount of power either. It is equivalent to firing a Taychon Gun shot every second, regardless of whether you have any systems currently damaged or not. This power drain is close to a full quarter of the power draw of a Tier 4 Shield unit (22 GJ/s), and at least Shields have the decency to stop drawing power when they’re not damaged.
I personally prefer to skip the Repair Droid altogether, and put the extra power as needed into Shields with the manual dump option from the Command Menu. If your shields never drop, your armor, hull, and components can’t take any damage in the first place. The Repair Droid is at best a set of training wheels, something to help you get on your feet, but that you discard once you know what you are doing. At worst, it’s a power leeching crutch that promotes bad habits. Either way, it is a constant power drain whose gameplay value is inversely proportional to how knowledgeable and skilled you are.
If you don’t have a picture of Barto Raynolds (voted Sexist Greel Alive 6 years and counting) and a Bucky the Buckshot Armadillo bobblehead, are you even a real Outlaw?

The answer is no, you are not. Fix that.
Offense – Blasting Ships for Fun & Profit!
Your weapons are largely split into three broad categories, fixed hardpoint projectile weapons, missile launchers, and turrets. By and far, hardpoint weapons have the greatest variety and depth, and allow for the most customization.
Followed by launchers, a class of powerful weapons that are largely limited by their slow reloads and limited ammo capacity. These generally are your threat multipliers, you use them to even the odds when the deck is stacked against you, and to otherwise burst down hardened priority targets faster.
Finally turrets are a passive automatic weapon system that make up for their lack of power and range, with their wide threat angles and largely hands-off and power free operation. You can however jump into and manually control any equipped turrets your ship currently has, by simply tapping down on your controller’s D-Pad (the change camera button), which will rotate through your available camera positions, including all of your turrets.
For hardpoints, early on, stack Combat Lasers. Maybe mixed in with Tracers if you have plenty of hardpoints, like on a Sandhawk, or if you are having issues with power management. This will serve you well enough until you can afford some better higher tier options. If you want to extend your engagement distance, the Gauss Gun will almost double your range for a little more power consumption than the Combat Lasers, and makes for a nice stepping stone to more powerful weapons.

I prefer to run a mixed setup of Auto-Cannons and Photon Cannons, as not only is the setup very power management friendly (slug weapons have no power cost to fire, but must be reloaded when their magazines empty), but their massive 200% damage bonuses to Armor and Shields respectively complement each other quite nicely. They also have very similar ranges and projectile velocities, which makes hitting your target with all of your hardpoints at once just that much easier.
While the Photon Cannon / Auto-Cannon duo is probably the ‘comfiest’ combo, and one that works on most any ship because of it’s relatively low power requirements, it’s hardly the only one. Later game ships with Tier 4 Powerplants can be very effective running other mixed sets, or even straight sets with higher energy draw weapons. A Dingo with quad Tachyon Guns is another personal favorite of mine.

There are also three hardpoint weapons that drop as potential rewards from vanquishing Pirate Lords, those being the Gatling Cannon, CPC Laser, and Flak Cannon. While these weapons are certainly fun to toy around with, they’re all side-grades, and none of them really stand out from the pack, and certainly none of them represent the be-all-end-all for hardpoint weapons.
The CPC Laser does impressive raw damage, but costs 40 GJ/s to fire just one of them continuously. They also only deal 87% damage against Armor, which greatly blunts their otherwise terrific damage potential. Gatling Cannons are also fun if you want MAXIMUM DAKKA, but don’t have the range or damage to justify the second highest energy draw (26.7 GJ/s, surpassed only by the CPC Lasers) combined with an 8 second long reload.
Flak Cannons are possibly the best side-grade alternative to Auto-Cannons, specifically for the three Heavy ships with their slower turn speeds. The Flak’s AOE explosions makes it easier for Beluga and Durston to hit moving targets in the turns, and I had quite a bit of fun using them. However any ship with the speed and maneuverability to make effective use of Auto-Cannons, will probably be better off with the superior range those provide.

Launcher weapons come in a few varieties, largely split between dumbfire and guided systems. Dumbfire launchers don’t require a lock-on, they just fire forward like hardpoint weapons. These tend to be comparatively powerful and cheaper than their guided counterpart, the cost being the fact that you generally need to be quite close and a good shot to use them effectively.
The ImRec Launcher works wonders for when you really want to reach out and touch someone at range, while the Swarm Launcher is for when you just really need to kill whatever you are aiming at with one pull of the trigger. The EMP Javelin does wonders as a utility tool, allowing you to disable enemies for a few seconds and really open up on them with everything you got. Torpedoes also fill a unique spot for dealing burst damage to larger ships, such as trade vessels or capital ships. If you need to destroy 3 trade frigates to ‘send a message’ and get out of there before you get overwhelmed with merc and police forces, you want Torpedoes.

You can get access to special variants of launcher weapons (and more copies of the EMP Javelin) as part of the Bountiful Vista station restoration quest in Eureka. These modified launchers cost more, but have expanded ammunition capacities, typically holding around 20% more ammo.
Turrets come in just five flavors, one of them is a Mining Lasers, and another is equipped with lowly Utility Lasers. So really, the only two worth using for actual combat are the Mass Driver Turret or the Tracer Turret, depending on whichever of the two suites your particular needs and budget more.

I’d say that the Mass Driver is probably the more useful of the two, and its price reflects that. While all turrets have their own power supply and don’t put a drain on your ship’s reactor, the Tracer Turret still needs to reload when its magazines run out. But if you insist on having ALL THE DAKKA, the Tracer will do you good.
Bountiful Vista – Homesteading in Space
Bountiful Vista is a space station up for purchase in the Eureka system, and effectively becomes your home base once bought. Why would you waste your time, effort, and energy, restoring a space station? Because the developers decided to lock exclusive weapons, and half the game’s ship roster, behind this quest.

Now that you know why you should care, here is how you do something about it.
First, pay attention to your radio. I have no idea what the in-game triggers are to enable the start of the quest, but you need to wait until you hear an advertisement about visiting Bountiful Vista before you head there. Fortunately once that happens, there are no Unstable Jump Gates between Eureka and the starting systems.
Once you arrive on Bountiful Vista station, you are greeted by the robot in charge and the source of the radio advert, Spanner. He’ll offer you ownership of the station for a whopping 250K. Chumps take that offer, real (poor) Outlaws can do better. Decline, and he’ll bargain down to 50K.
You’ll now get a series of quests that must be completed in order. Unfortunately, you cannot pick which station parts you’d like to restore or upgrade first, so you are gonna need to slog through some busy work before you can get the Ship Dealer setup. Also keep in mind that there is often a wait period between each quest step, where you need to make yourself busy until Spanner calls you over the intercoms and tells you to come back for the next step.
Pay the robot, and be prepared to put some work in. First step is to restore the station’s Mission Log terminal. Follow Spanner’s instruction, fly out to the location specified, and be prepared for a pirate ambush. Kill all the pirates to complete the mission successfully. This finally unlocks the Mission Log terminal, which has a 20% payout boost over other stations.
Go to meet up with Leeds in the Mississippi system, then complete her transport escort mission. Yes, you are gonna need to fight once again. If you fail, just go back to Leeds to start the quest over. You’ll also need 4 units each of Steel and Components. The two best spots to go looking for said supplies are Port Ozark in Missouri, and Iola Refinery in Kansas. Once you’ve successfully assisted Leeds and have your supplies, return to Spanner and he’ll begin construction of the Equipment Bay.
But hey, you now have access to the upgraded launcher modules with expanded ammunition capacities (in addition to more copies of the EMP Javelin if you want), but only here in Bountiful Vista.
Spanner will task you with getting a bartender and 10 units of Greel Whisky. Fortunately, you can deliver the whiskey in batches of 5, if you’re working with a limited cargo space. Easiest place to source that much booze is going to be the Witchita Distillery back in Kansas. You’ll also want to have 30K on hand to pay the bartender to convince him to come to Eureka. He’s working at the Velos Casino in the Discouragement system, which is only accessible by use of an Unstable Jump Gate, so have additional funds on hand for ship repairs coming and going if you don’t already have a Shielded Jump Drive.
Pretty straightforward this time. You just need to source 10 units of Robot Modules and to front the 50K franchise fee. Credits are credits, do your thing however you like. Robot Modules can be reliably found at the Joplin station in Missouri, and just like the whisky earlier, can be delivered in batches of 5. Give everything to Spanner, then wait a bit for construction to finish.
Just like the expanded selection of the Equipment Bay, a few of these ships are only available here in Bountiful Vista (with the exception of the Mattock and Foxbat, but they’re also otherwise relatively hard to get).
How much do you like the bar minigames? Spanner will task you with a series of tasks to beg, borrow, or steal the accoutrement of a respectable and well furnished space bar. So be prepared to fly around and play a lot of the minigames. On the plus side, if you do, you’ll increase the passive income gains from Bountiful Vista. But if you want to stop here, there aren’t any more important upgrades locked behind further progression, unless you consider being able to play 8 Ball at your home station to be an ‘important upgrade’. You do you, outlaw.
I can confirm that these aren’t services available to be added to Bountiful Vista in the game currently.
With Friends Like These…
Okay, unlike most of this guide, this part is a bit spoiler-tastic. So just a fair warning and a heads up, I’ll be showing off all of RGO’s available support Buddies, and who all is in this exclusive club is (again) pretty spoiler-tastic.
You have been warned.

Your first Buddy, and easily the most underwhelming equipment wise. Richter’s dinky little camo painted junk heap packs only a pair of Tracers and a single EMP Javelin launcher, giving him the firepower of a moderately upgraded Platypus. He’s okay in a fight for the very early systems, but don’t expect him to be too much help (outside of simply drawing attention away from you) much further past Texas and its surrounding systems.

You get acquainted with Satchel fairly early in the story, and will unlock him fairly early as well with just a bit of work to the side of the main story. Not only that, but his string of personal content will keep you busy with challenging missions through the rest of the story as well. He brings a whole freakin’ gunship to the field, that although it does bristle with a large amount of armaments, are mostly of relatively lower tier fare. His ship is armed with quad Ion Blasters, a pair of Gauss Guns, three Laser Turrets, an EMP Javelin, and a Torpedo Launcher. Still, boyo is a robot that wears a bomb-squad vest, so he’s cool.

Unless you make no effort to help out other characters, Marla will most likely be your third companion, as much like Richter you unlock her via the main story. She is your bestie from your former Doublejack days, and she has a pirate tug to match the smudged face and overalls. Her ship packs a pair of Gauss Guns and a pair of Ion Blasters, in addition to a EMP Javelin and a Torpedo Launcher. She certainly packs far more of a punch than poor ol’ Richter, and her ship is channeling that primo-junker energy.

The next buddy you’ll get by mainlining the story missions, Connor, is also easily my least favorite. Not cause he has a particularly bad setup, indeed his ship is rather armed to the teeth with a trio of Tracers, dual Combat Lasers, an EMP Javelin and a Swarm Launcher. I just don’t like him personally. His voice is annoying, as is his persona. At best he’s boring, and at worst he’s just very irritating and entirely one note. He has a cool looking ship, but The Catholic is always the last pick for my Juno’s varsity dodge-ball squad.

Hey, remember when I warned you about spoilers? Yeah, this is why. Oh, you didn’t read that part? Well that’s on you. But yeah, the dude you literally shot in the head during the animated intro cinematic? Not only does he become an on-call wingman, he’s almost certainly the most well armed and most effective one in combat. Ruth comes equipped with quad Trion Accelerators, a pair of Tracers, with a Torpedo Launcher and a Swarm Launcher for good measure. That is Coyote levels of firepower right there. If you need the very best, Ruth is your dude. He might not be my personal favorite, but he’s the best at what he does; ruining other people’s sh*t.

I <3 SHARKY
While she comes with a very underwhelming equipment loadout, with a single Gauss Gun, a pair of Tracers, and a single EMP launcher; I don’t much care. Look at that paint job. Look at it! It is Baby Shark: The Paintjob. She flies a fuchsia colored ship with cartoon sharks all over it, cause she’s SHARKY and she gives zero f*cks. You don’t meet her until much later in the story, and even then, you won’t unlock her as a buddy until after you’ve done all of the missions to help her out. I don’t care, she’s my favorite, and it’s for entirely silly reasons. If you need help, there are others that can do more and do better. But if you need a smile and a pick-me-up? Sharky is your girl.
Your Reputation Precedes You
This is different from the Wanted mechanic mentioned earlier. The Reputation system doesn’t effect your current ‘heat’ and how much the police really want to atomize you at the moment (to a point), but rather has a huge effect on what locations you can access and how certain factions treat you. It is entirely possible to have a blue star Wanted Level, while being a Pirate, as nonsensical as that might seem.

Your Reputation is tracked along the bar just below the option wheel when you bring up the Command Menu. It ranges from Pirate, to Neutral, and finally Lawful. Unlike Wanted Levels, you largely don’t change your Reputation with your moment to moment actions, rather with the missions you complete. When you go to a mission board, missions that will grant you favorable Reputation with the Commonwealth and move your Reputation towards the Lawful side are marked with their star-in-circle symbol in the mission’s header. Likewise missions that grant you favorable Reputation with the Red Devil Pirates will have a skull icon in the header, and completion will slide your Reputation away from Lawful and towards Pirate.
Keep in mind, that this is really a balance between Red Devils and the Commonwealth, and the Troopers as enforcers of the Commonwealth’s law and order. So while fighting Inviolates or Steel Rat pirates won’t change your Reputation, destroying Red Devil or Trooper ships (especially capital ships) will. It is generally much smaller and less noticeable, but the change is there. Go pick a fight with the Police HQ station in Montana, and your Reputation meter will shift towards Pirate after a few kills.
You start the game with a Neutral Reputation, which grants you access to all Independent and Commonwealth stations, even the Police HQ’s in Montana and Utah. I imagine this is how most player will experience the game, for the majority of their play time. There is no discernible difference between Neutral and Lawful that I’ve noticed, outside of just being further away from going Pirate. That being said, things start to change in interesting ways once you cross over the Neutral border and become a (honorary Red Devil) Pirate.
Once your Reputation hits Pirate, the reaction of the Dodge Sector Police and the Red Devil Pirates flip. Police are now instantly hostile, regardless of your wanted level, while the pirates of the Red Devil’s (and Red Devils only) are friendly. You’ll still encounter hostile Inviolates and other rogue pirates or rival pirate gangs like the Steel Rats, but the Red Devils will have your back. This can lead to odd situations, like massive fights where everyone is your ally (Red Devils versus Mercenaries) or your enemy (Dodge Troopers versus Steel Rats). It also means that you now have access to all Red Devil stations and their Black Markets, opening up locations to purchase specific contraband that are otherwise inaccessible. Likewise, you lose access to all Commonwealth stations, as they becomes hostile to you. Fortunately you’ll never lose access to Independent stations.
So you gain access to about 10 Pirate station, all equipped with Black Markets to easily deal with Contraband. However you lose access to about 16 Commonwealth stations and the 2 Police HQ’s (the only place you can purchase the Foxbat ship outside Bountiful Vista). Granted the Pirate stations offer a new feature, the Black Markets, which arguably makes them more useful anyways if you are really into moving contraband.
Neither path is wrong, or suboptimal, they’re just different ways to approach the game. The story missions don’t seem to care one way or another, and will have even a Lawful Juno doing pirate stuff and a Pirate Juno being selfless and helpful.
Being an Effective Space Trucker
Why is the section on Trade right after Reputation? Cause Reputation effects where you can dock, and that has a huge effect on Trade.
Now I spent several days flying to every station, making note of their Supply and Demands, and then alphabetizing them and putting it all in a spreadsheet. I then had to tank my reputation and do it all over again to get the same information for all the Pirate stations. I did this, so you don’t have too. The following section will contain detailed information for each Commodity and Contraband trade item, but for right now, I want to share some insights that are visible looking down at the meta level over the whole data set, that probably isn’t as noticeable from looking at a organized search friendly list.
Something else to keep in mind, is that the trading in RGO is pretty basic. The Market Value represents a baseline value for an item, and an item’s local value fluctuates based on a stations supply and demand. So not only will the various stations with an item In Demand pay different amounts for it depending on their current supply or desire for it, this can sometimes tip the price enough to take it out of the green (above market value) to white (around market value) or even into the red (below market value). In all my time with RGO, I think I’ve seen maybe one or two instances where a station was so flooded with an In Demand good that it’s local value dropped into the red. So while rare, it can happen.
Commodities you cannot find a In Demand station to sell to, if you are a Pirate.
- Antimatter Speck
- Progenitor Shard
Contraband you cannot find a In Demand station to sell to, if you are not a Pirate.
- Hijacked Valuables
Contraband you cannot find a Produced at station to buy from, if you are not a Pirate.
- Bio-Weapons
- Black-Market Weapons
- Explosives
- Human Organs
The most In Demand Commodities, by number of stations.
- Soy Paste (12)
- Red Star Beer (12)
- Robot Workers (8)
- Steel (7)
- Robot Modules (7)
- Greel Whiskey (7)
The most Produced Commodities, by number of stations.
- Obtanium Ore (10)
- Alien Fossiles (7)
- Diamonds (6)
- Gold Ore (6)
- Iron Ore (6)
The most In Demand Contraband, by number of stations.
- Narco-Cola (8)
- Scag (8 )
- Stolen Freight (7)
The most Produced Contraband, by number of stations.
- Stolen Freight (7)
- Void (6)
- Hijacked Valuables (5)
Progenitor Shards cannot be bought anywhere. They seemingly only drop from defeated enemies, typically capital ships.
Thralls also cannot be bought, only sold or created. Ejected Pilots when rescued turn into either a Rescued Pilot or a Citizens Arrest in your hold (depending on the pilot’s faction), and is perfectly safe cargo. If however you choose to enslave the pilot, they become a Thrall and are considered Contraband. That means they will trip a police scan, and can only be sold where they are in demand or at Black Markets.
Black Markets operate just like normal Trade Markets, except they also deal in Contraband. That means that you can offload ANY contraband at a Black Market, and get slightly below Market Value for it (unless it is In Demand or being Produced by that location), just like any other mundane Commodity at any other location. While all Red Devil Pirate stations are Black Markets, there are a few Independent operated ones for those who only moonlight as smugglers.
Independent Black Market locations.
- Rockfarming, Granite Station
- Juarez, Loretto Station
- Hampton, Cordell Station
For the early game, Granite Station will be your go-to Black Market, as it’s just 2 jumps away from the Texas hub system. Juarez is quite a ways north, and really a hassle to get do unless you have a Shielded Jump Drive and take the Unstable Jump Gate in Colorado to get there. Hampton is of course in the top right corner of the map, smack dab in the late game territories.
Here’s a quick explanation of the format for the following sections that list all the game’s trade goods. The entries are organized by item, so if you are looking for a specific item it’ll tell you all you need to know about it.
The Market Value as listed in game.
Which stations list the item as In Demand and will pay a premium above Market Value.
- System first, then Station, cause that’s how the game’s map is organized.
- Listings ending with (L) for Lawful, denote Commonwealth locations.
- Listings ending with (P) for Pirate, denote Red Devil locations.
Which stations list the item as Produced, and will sell at a discount below Market Value.
- The same formatting above applies here as well.
Do Note: Not all items names are a 100% match with their in-game name, cause unlike the developers Double Damage Games, I use consistent capitalization after a hyphen. It is my guide, I do what I want.
Commodities A-H
19,197 – Market Value
Where to Sell
- Backbone, Anders Tech (L)
- Dutch, Calpurnia
- Hitchcock, Alfred Outpost
- Utah, Provo (L)
Where to Buy
- Slaughter, Chancey Mining
4,622 – Market Value
Where to Sell
- Louisiana, Lafitte Tech
Where to Buy
- Discouragement, Morgain
- Juarez, Loreto
- Littlehope, Clanton (P)
- Merlin, Blackknight (P)
- Merlin, Pellinore Outpost
- Rockfarming, Granite
- Slaughter, Chancey Mining
12,798 – Market Value
Where to Sell
- Arizona, Flagstaff
Where to Buy
- Colorado, Denver
- Hitchcock, Fontaine Mining
- Slaughter, Chancey Mining
4,725 – Market Value
Where to Sell
- 1156-C, 872-D
- Dutch, Calpurnia
Where to Buy
- Backbone, Ridley
- Gore, Virian (P)
- Gore, Zadar
- Utah, Tremonton (L)
6,468 – Market Price
Where to Sell
- Backbone, Anders Tech (L)
Where to Buy
- Discouragement, Velos
1,260 – Market Value
Where to Sell
- Carolina, Charleston Tech
- Carolina, Spartanburg (L)
- Medicine Hat, Callahan MFR (L)
- Medicine Hat, Dautry Outpost
- Nimpoo, Stantz MFR (L)
- Sweetland, Parhelion MFRS
- Thibodoux, Bonnaire MFRS
Where to Buy
- Kansas, Iola Refinery
- Laredo, Saguaro Refinery (L)
- Montana, Chinook Refinery
683 – Market Value
Where to Sell
- Kansas, Topeka (L)
- Mississippi, Manatchie
- Missouri, Jefferson (L)
- Texas, Austin (L)
- Texas, Nacogdoches Mining
- Tombstone, Hickok
Where to By
- Louisiana, Lafitte Tech
- Medicine Hat, Callahan MFR (L)
- Missouri, Ozark (L)
1,890 – Market Value
Where to Sell
- Hampton, Cordell
- Laredo, Rutherford (L)
- Montana, Ravalli (L)
- Utah, Provo (L)
Where to Buy
- Carolina, Charleston Tech
- Carolina, Spartanburg (L)
- Louisiana, Lafitte Tech
- Nimpoo, Stantz MFR (L)
2,592 – Market Value
Where to Sell
- Alabama, Arbuthnott
- Colorado, Boulder Tech (L)
- Dakota, Darius Junction (P)
- Missouri, Joplin
- Texas, Austin (L)
Where to Buy
- Hampton, Cordell
- Utah, Provo (L)
2,160 – Market Value
Where to Sell
- Arizona, Buckeye
- Backbone, Venger Outpost
- Hampton, Cordell
- Utah, Provo (L)
Where to Buy
- 1167-C, 872-D
- Arizona, Flagstaff
- Sweetland, Parhelion MFRS
- Tombstone, Hickok
1,138 – Market Value
Where to Sell
- Missouri, Ozark (L)
- Montana, Ravalli (L)
- Nevada, Neuvegas Casino
Where to Buy
- Colorado, Boulder Tech (L)
- Discouragement, Morgain
- Louisiana, Tallulah
- Rockfarming, Granite
- Texas, Nacogdoches Mining
- Utah, Tremonton (L)
1,530 – Market Value
Where to Sell
- Merlin, Pellinore Outpost
- Nevada, Neuvegas Casino
- Slaughter, Chancey Mining
- Sweetland, Parhelion MFRS
- Texas, Lubbock (L)
- Tombstone, Hickok
Where to Buy
- Hitchcock, Hedren (L)
- Mississippi, Manatchie
- Missouri, Jefferson (L)
- Montana, Belgrade
- Texas, Austin (L)
3,888 – Market Value
Where to Sell
- Backbone, Venger Outpost
- Hampton, Cordell
- Utah, Provo (L)
Where to Buy
- 1167-C, 872-D
- Arizona, Flagstaff
1,800 – Market Value
Where to Sell
- Kansas, Iola Refinery
- Laredo, Saguaro Refinery (L)
- Montana, Chinook Refinery
- Slaughter, Harbinger
Where to Buy
- Hitchcock, Fontaine Mining
- Juarez, Loreto
- Kansas, Topeka (L)
- Louisiana, Tallulah
- Texas, Amarillo Mining Base
- Texas, Lubbock (L)
3,240 – Market Value
Where to Sell
- Backbone, Ridley
- Littlehope, Clanton (P)
- Nevada, Sparks Casino
- Slaughter, Chancey Mining
- Tennessee, Jellico (P)
Where to Buy
- Hitchcock, Hedren (L)
- Kansas, Witchita Distillery
2,160 – Market Value
Where to Sell
- Discouragement, Velos
- Laredo, Saguaro Refinery (L)
- Nevada, Neuvegas Casino
- Sexton, Crow’s Nest
- Slaughter, Harbinger
- Tagart, Noir (P)
- Taggart, Rasmussen
Where to Buy
- Backbone, Venger Outpost
- Kansas, Witchita Distillery
- Mississippi, Manatchie
936 – Market Value
Where to Sell
- Backbone, Ridley
- Discouragement, Velos
- Montana, Ravalli (L)
- Nevada, Neuvegas Casino
- Nevada, Sparks Casino
- Sexton, Crow’s Nest
Where to Buy
- Derringer, Backfire
- Hitchcock, Alfred Outpost
1,440 – Market Value
Where to Sell
- Arizona, Buckeye
- Hitchcock, Hedren (L)
- Kansas, Topeka (L)
- Mississippi, Manatchie
- Montana, Belgrade
Where to Buy
- Sweetland, Parhelion MFRS
- Tombstone, Hickok
Commodities H-Z
1,080 – Market Value
Where to Sell
- Hampton, Cordell
- Montana, Ravalli (L)
- Utah, Tremonton (L)
Where to Buy
- Carolina, Charleston Tech
- Colorado, Boulder Tech (L)
- Sexton, Crow’s Nest
- Taggart, Rasmussen
- Tagart, Noir (P)
650 – Market Value
Where to Sell
- Kansas, Iola Refinery
- Laredo, Saguaro Refinery (L)
- Slaughter, Harbinger
Where to Buy
- Discouragement, Morgain
- Kansas, Topeka (L)
- Louisiana, Tallulah
- Rockfarming, Granite
- Texas, Lubbock (L)
- Texas, Nacogdoches Mining
1,620 – Market Value
Where to Sell
- Montana, Ravalli (L)
- Utah, Provo (L)
Where to Buy
- Backbone, Anders Tech (L)
- Louisiana, Lafitte Tech
1,890 – Market Value
Where to Sell
- Backbone, Anders Tech (L)
- Sweetland, Parhelion MFRS
Where to Buy
- Dutch, Calpurnia
- Laredo, Rutherford (L)
- Laredo, Saguaro Refinery (L)
- Slaughter, Harbinger
2,700 – Market Value
Where to Sell
- Dutch, Calpurnia
- Laredo, Rutherford (L)
- Taggart, Rasmussen
- Tagart, Noir (P)
Where to Buy
- Backbone, Anders Tech (L)
- Medicine Hat, Dautry Outpost
17,910 – Market Value
Where to Sell
- Backbone, Anders Tech (L)
Where to Buy
- Cannot be bought, only looted.
390 – Market Value
Where to Sell
- Carolina, Charleston Tech
- Colorado, Boulder Tech (L)
- Dakota, Astoria
- Derringer, Backfire
- Texas, Amarillo Mining Base
Where to Buy
- Alabama, Arbuthnott
- Louisiana, Lafitte Tech
- Rockfarming, Shanksville (P)
- Sexton, Crow’s Nest
- Utah, Provo (L)
3,150 – Market Value
Where to Sell
- Derringer, Backfire
- Hitchcock, Hedren (L)
- Kansas, Witchita Distillery
- Missouri, Jefferson (L)
- Montana, Belgrade
- Texas, Austin (L)
Where to Buy
- Backbone, Ridley
- Colorado, Denver
- Colorado, Boulder Tech (L)
- Texas, Amarillo Mining Base
780 – Market Value
Where to Sell
- Dakota, Astoria
- Derringer, Backfire
- Discouragement, Morgain
- Gore, Virian (P)
- Gore, Zadar
- Hitchcock, Fontaine Mining
- Kansas, Iola Refinery
- Laredo, Rutherford (L)
- Louisiana, Tallulah
- Missouri, Ozark (L)
- Texas, Lubbock (L)
- Utah, Tremonton (L)
Where to Buy
- Mississippi, Manatchie
- New Mexico, Hobbes Station
- Texas, Austin (L)
530 – Market Value
Where to Sell
- Arizona, Buckeye
- Kansas, Topeka (L)
- Missouri, Jefferson (L)
- New Mexico, Hobbes Station
Where to Buy
- 1167-C, 872-D
- Arizona, Flagstaff
- Derringer, Backfire
- Tombstone, Hickok
813 – Market Value
Where to Sell
- Colorado, Denver
- Derringer, Backfire
- Kansas, Witchita Distillery
- New Mexico, Hobbes Station
- Rockfarming, Granite
- Texas, Austin (L)
- Texas, Lubbock (L)
Where to Buy
- Carolina, Spartanburg (L)
- Missouri, Joplin
- Missouri, Ozark (L)
- Nimpoo, Stantz MFR (L)
- Thibodoux, Bonnaire MFRS
3,375 – Market Value
Where to Sell
- Hampton, Cordell
- Littlehope, Clanton (P)
- Slaughter, Chancey Mining
Where to Buy
- Medicine Hat, Callahan MFR (L)
- Missouri, Joplin
- Nimpoo, Stantz MFR (L)
- Thibodoux, Bonnaire MFRS
2,250 – Market Value
Where to Sell
- Hitchcock, Fontaine Mining
- Hitchcock, Hedren (L)
- Laredo, Rutherford (L)
- Mississippi, Manatchie
- Montana, Belgrade
- Montana, Ravalli (L)
- Montana, Chinook Refinery
- Utah, Tremonton (L)
Where to Buy
- Medicine Hat, Callahan MFR (L)
- Missouri, Joplin
- Nimpoo, Stantz MFR (L)
- Thibodoux, Bonnaire MFRS
553 – Market Value
Where to Sell
- 1167-C, 872-D
- Arizona, Buckeye
- Colorado, Denver
- Discouragement, Morgain
- Juarez, Loreto
- Kansas, Topeka (L)
- Louisiana, Tallulah
- Medicine Hat, Dautry Outpost
- Rockfarming, Granite
- Texas, Lubbock (L)
- Texas, Nacogdoches Mining
- Texas, Amarillo Mining Base
Where to Buy
- Dakota, Astoria
- Missouri, Jefferson (L)
- Montana, Belgrade
- New Mexico, Hobbes Station
- Texas, Austin (L)
455 – Market Value
Where to Sell
- Carolina, Spartanburg (L)
- Louisiana, Lafitte Tech
- Medicine Hat, Callahan MFR (L)
- Missouri, Joplin
- Missouri, Ozark (L)
- Nimpoo, Stantz MFR (L)
- Thibodoux, Bonnaire MFRS
Where to Buy
- Kansas, Iola Refinery
- Laredo, Saguaro Refinery (L)
2,295 – Market Value
Where to Sell
- Backbone, Ridley
- Hampton, Cordell
- Nevada, Sparks Casino
- Slaughter, Chancey Mining
- Vacaville, Redreaver (P)
Where to Buy
- Dakota, Astoria
- Hitchcock, Hedren (L)
- Mississippi, Manatchie
- Montana, Belgrade
Contraband A-Z
3,600 – Market Value
Where to Sell
- Alabama, Arbuthnott
- Hampton, Godfried (P)
- Littlehope, Clanton (P)
Where to Buy
- Tennessee, Jellico (P)
- Vacaville, Redreaver (P)
900 – Market Value
Where to Sell
- Medicine Hat, Dautry Outpost
- Thibodaux, Dante (P)
Where to Buy
- Rockfarming, Shanksville (P)
- Tennessee, Jellico (P)
- Vacaville, Redreaver (P)
1,965 – Market Value
Where to Sell
- Juarez, Loreto
- Merlin, Blackknight (P)
- Merlin, Pellinore Outpost
- Tennessee, Jellico (P)
- Thibodaux, Dante (P)
- Vacaville, Redreaver (P)
Where to Buy
- Dakota, Astoria
- Dakota, Darius Junction (P)
- Tagart, Noir (P)
- Taggart, Rasmussen
2,400 – Market Value
Where to Sell
- Dakota, Darius Junction (P)
- Gore, Virian (P)
- Gore, Zadar
- Hitchcock, Fontaine Mining
- Taggart, Noir (P)
- Taggart, Rasmussen
Where to Buy
- Tennessee, Jellico (P)
- Vacaville, Redreaver (P)
3,000 – Market Value
Where to Sell
- Rockfarming, Shanksville (P)
- Thibodaux, Dante (P)
Where to Buy
- Alabama, Arbuthnott
- Dutch, Calpurnia
- Hampton, Godfried (P)
- Hitchcock, Alfred Outpost
- Littlehope, Clanton (P)
12,200 – Market Value
Where to Sell
- Hampton, Cordell
- Nevada, Neuvegas Casino
Where to Buy
- Rockfarming, Shanksville (P)
8,200 – Market Value
Where to Sell
- Discouragement, Velos
- Montana, Chinook Refinery
Where to Buy
- Backbone, Venger Outpost
- Sweetland, Parhelion MFRS
1,100 – Market Value
Where to Sell
- Arizona, Buckeye
- Arizona, Flagstaff
- Kansas, Iola Refinery
- Rockfarming, Granite
- Rockfarming, Shanksville (P)
- Sexton, Crow’s Nest
- Texas, Amarillo Mining Base
- Tombstone, Hickok
Where to Buy
- Thibodaux, Dante (P)
- Dakota, Darius Junction (P)
3,015 – Market Value
Where to Sell
- Alabama, Arbuthnott
- Hampton, Godfried (P)
- Juarez, Loreto
- Littlehope, Clanton (P)
- Merlin, Blackknight (P)
- Merlin, Pellinore Outpost
- Texas, Nacogdoches Mining
- Thibodoux, Bonnaire MFRS
Where to Buy
- Dakota, Darius Junction (P)
- Gore, Virian (P)
- Gore, Zadar
700 – Market Value
Where to Sell
- Dakota, Darius Junction (P)
- Gore, Virian (P)
- Gore, Zadar
- Hitchcock, Alfred Outpost
- Rockfarming, Shanksville (P)
- Tennessee, Jellico (P)
- Vacaville, Redreaver (P)
Where to Buy
- Discouragement, Velos
- Juarez, Loreto
- Medicine Hat, Dautry Outpost
- Merlin, Blackknight (P)
- Merlin, Pellinore Outpost
- Thibodoux, Bonnaire MFRS
- Thibodaux, Dante (P)
2,600 – Market Value
Where to Sell
- Discouragement, Velos
- Littlehope, Clanton (P)
- Thibodaux, Dante (P)
- Vacaville, Redreaver (P)
Where to Buy
- Created when you Enslave an Ejected Pilot.
975 – Market Value
Where to Sell
- Colorado, Denver
- Missouri, Joplin
- Texas, Amarillo Mining Base
- Texas, Nacogdoches Mining
Where to Buy
- Slaughter, Harbinger
- Vacaville, Redreaver (P)
4,500 – Market Value
Where to Sell
- Carolina, Charleston Tech
- Discouragement, Morgain
- Discouragement, Velos
- Louisiana, Lafitte Tech
- Nevada, Sparks Casino
Where to Buy
- Alabama, Arbuthnott Station
- Dutch, Calpurnia
- Hampton, Godfried (P)
- Littlehope, Clanton (P)
- Taggart, Noir (P)
- Taggart, Rasmussen
Pirate Lords: Big Game Hunting
So there is a bit of an extended ‘end game’ grind that exists, and that is hunting down Pirate Lords. Why should you care? Cause they are the only way you can get access to 3 otherwise exclusive weapon drops. If you want to try playing around with the Gatling Cannon, CPC Laser, or Flak Cannon, you’re gonna need to start hunting down Pirate Lords and stealing their booty.

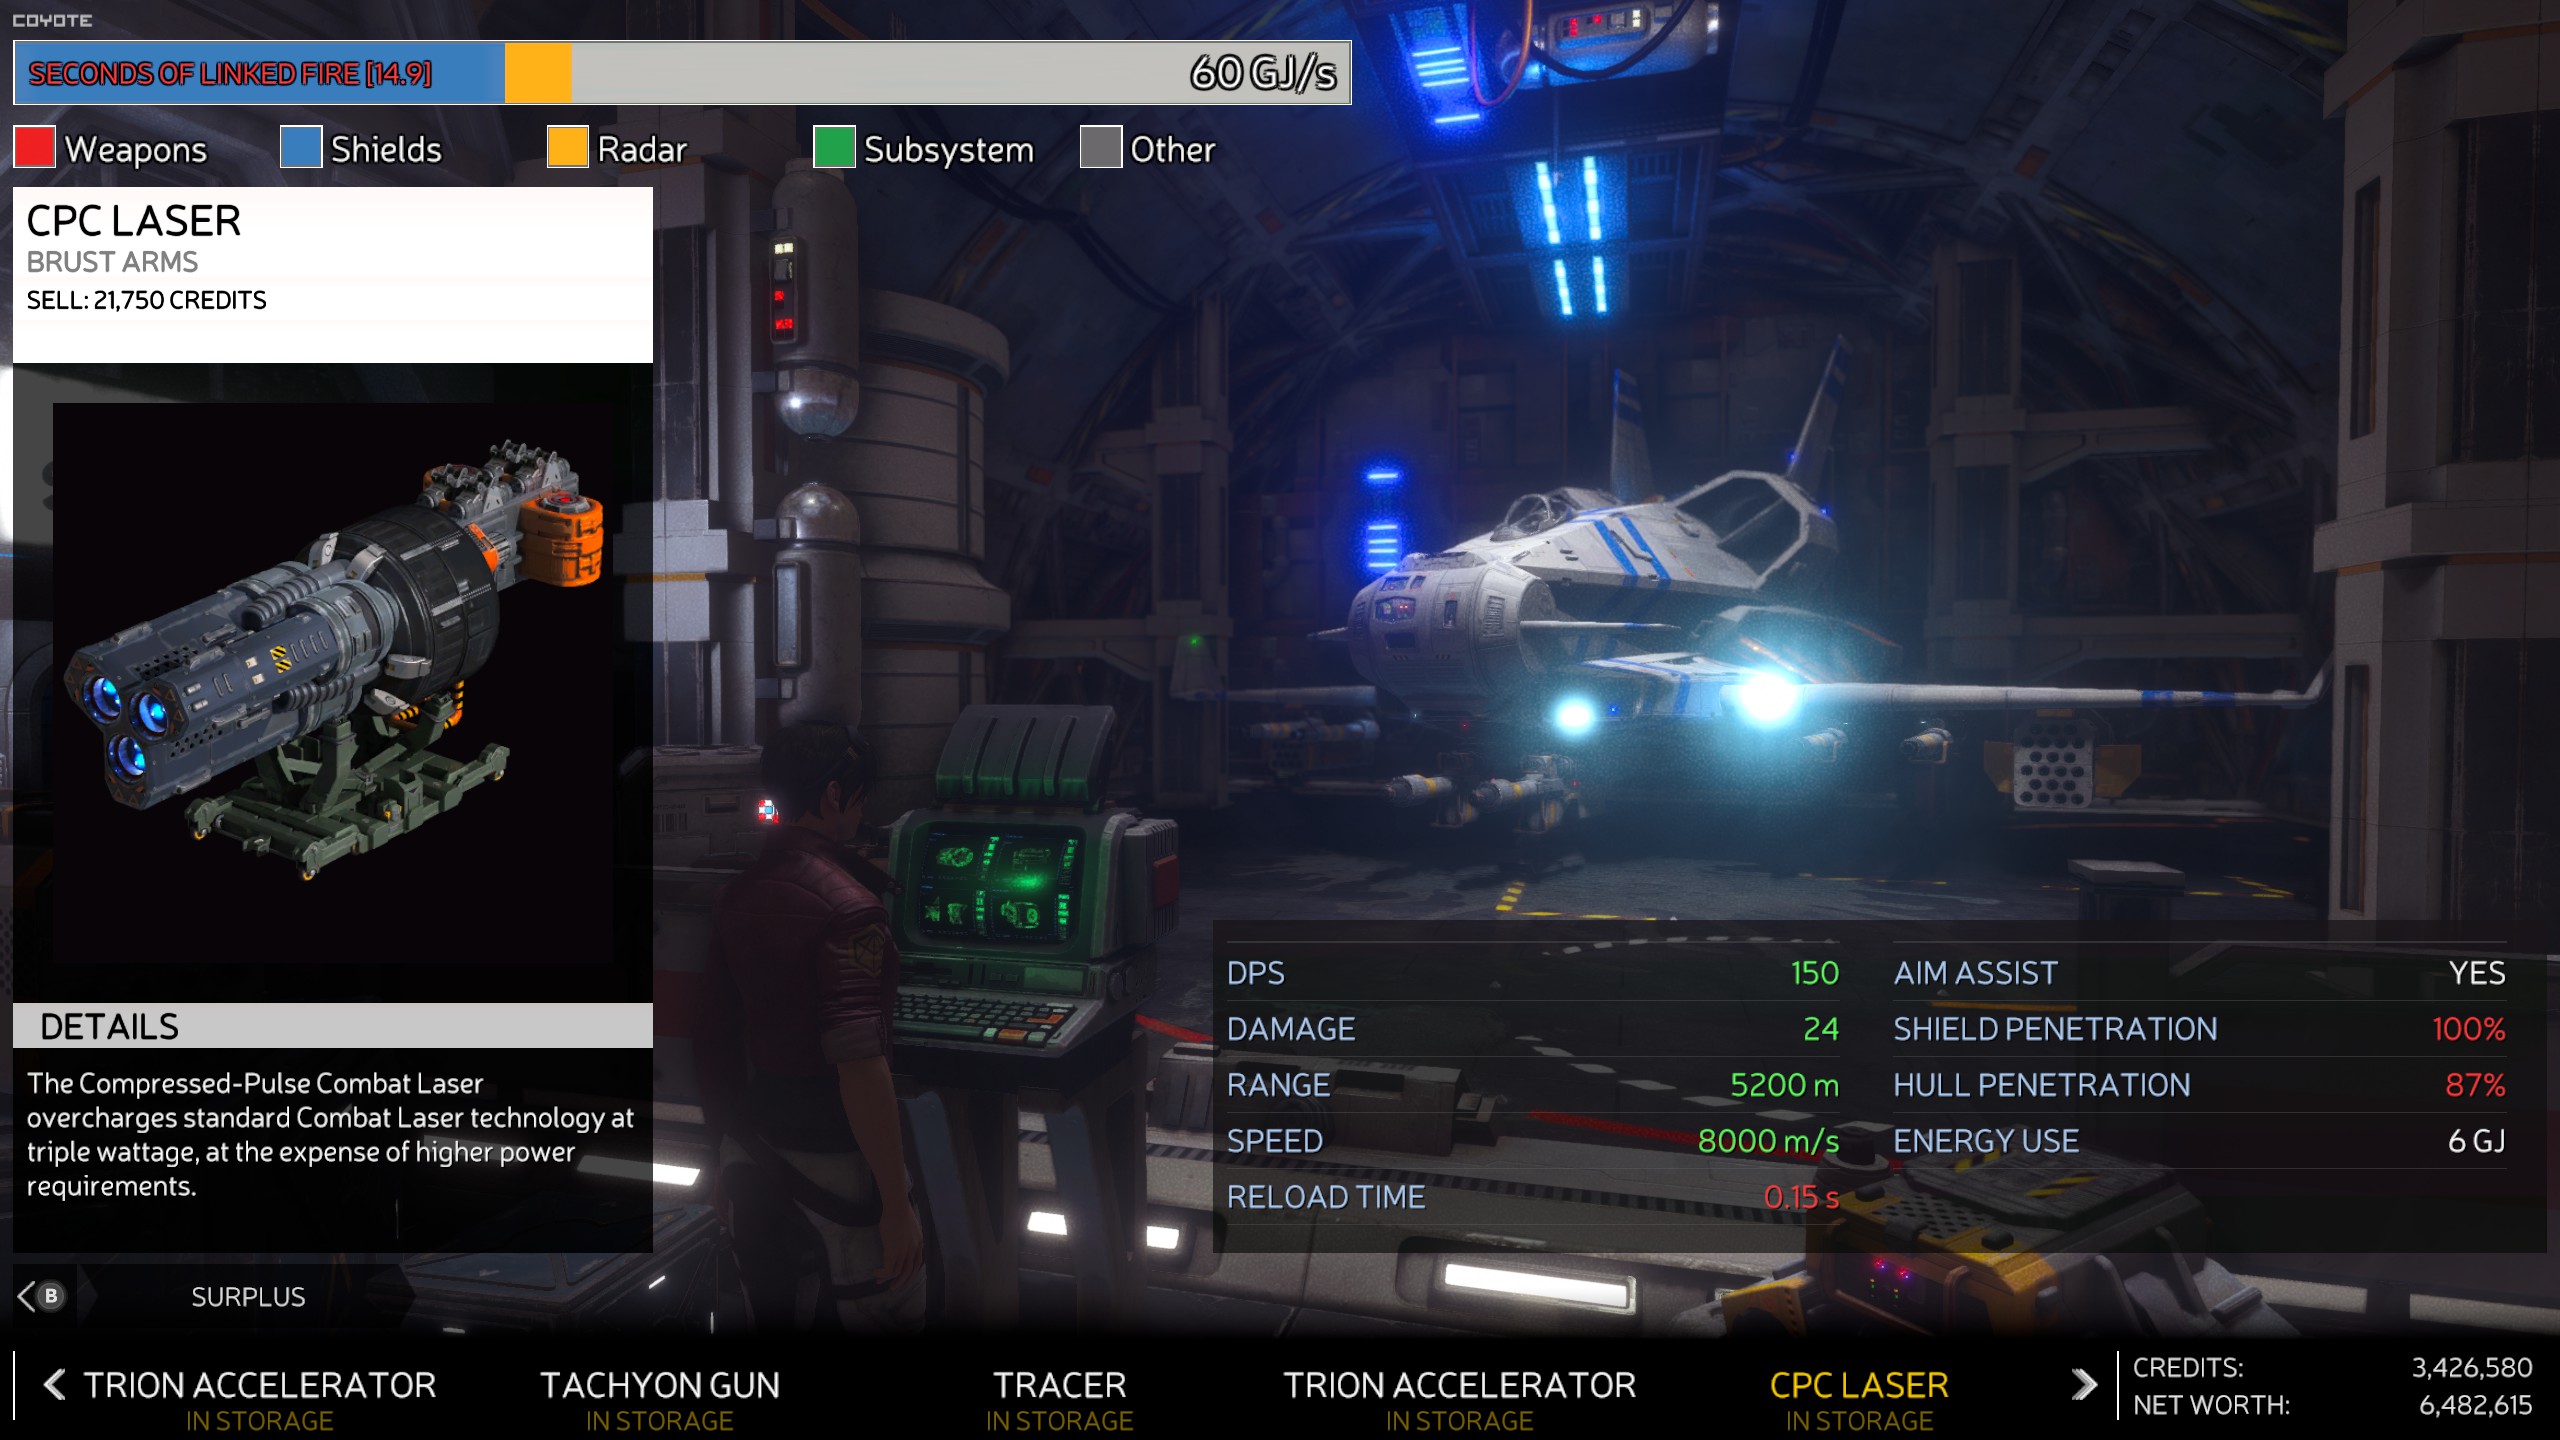

The easiest way to find a Pirate Lord is to find a system with a station than has had a ‘Pirate Lord Sighting’. This information will be shown in red, and listed next to a station’s Status when looking at location from the Sector Map. This means that you can quickly check areas by moving the cursor over a system, then tapping down to quickly cycle through all the locations, and see if any stand out with the really obvious red warning text.
Once you’ve found a sighting location, travel to that system. If the sighting was at a station you can access, and also has a bar, you’re 90% of the way there. Go to the bar, talk to the bartender, and ask about bounties. Pay the finders fee, then leave the station. The vast majority of the time, this will give you a number of red circle and cross icons on your HUD, and hopefully one with a big skull in the center of the circle. That’s your Pirate Lord.

Travel there, kill the Pirate Lord and their escort. The big one will always be in a Gunships (very similar to police Patrol Ships), and they have a few turrets and can easily keep the heat on you from most angles. Still, they are a hardened target, so I tend to focus on thinning out the escorts to make my life easier. Things can get a bit hairy when those escorts have Swam Launchers, but if you already read the section on Defense, you should be well prepared to dance and come out on top. Without escorts, Gunships aren’t actually that much of a threat, they can just take quite a beating. That’s why your smart bet is to focus down the escorts, as their combined firepower is more dangerous, while conversely they’re much easier to kill individually.
Also keep in mind, that if you are a Pirate yourself, their station bartenders DO NOT give out bounty info. So tracking down Pirate Lords can be a bit harder from the wrong side of the law, considering you cannot access all of the bars at Commonwealth stations.
Sometimes the location that has the sighting isn’t accessible, or otherwise doesn’t have a bar. There are ways to work around this. If there is another station in system that you can access that has a bar, that’ll also work the vast majority of the time. It’ll be funny when you look at your map and see the Pirate Lord map marker halfway across the system, but it’ll get the job done just as well.
Things get much harder when there is no bar at all, like in Pirate station only system such as Tennessee or Vacaville. You can do your best to keep yourself busy in these systems and hope that the Pirate Lord decides to party crash whatever you are busy doing at them moment, but this is both very time consuming and incredibly hit or miss. Fortunately the galaxy isn’t limited to just one Pirate Lord at a time, so I generally ignore these and go looking elsewhere. Not only that, but you’ll be more likely to get a fresh Pirate Lord to spawn if you go do something else, cause while you can have more than one in the galaxy, you cannot seem to have more than one per system. So staying in a system with a Pirate Lord you cannot easily track down can take longer than waiting for another to spawn elsewhere.
Hack the system! Not really… This method makes use of how the game generates Pirate Lords, and how it handles game saves, to basically ‘save scum’ a Pirate Lord’s loot till it has the drop you want. When you enter a station and buy bounty info from the bartender, if you leave and see a skull icon, know that you’re ready to save scum. Fly to the Pirate Lord and once there, open your Targeting Mode from the Command Menu, and place the cursor on your target to see their inventory. You can actually see what weapon they have. If you don’t like it, EXIT THE GAME WITHOUT SAVING.
This would be Alt-F4 on PC.
Now when you reload, it should be at the auto-save the game made then you left the station, and you should even see the other bounty locations, but not the skull icon. So turn around and dock again, pay the bartender again (indeed, you will be out both the docking fee and the finders fee each time you do this), and when you leave you should see the skull marker again. Now when you travel there, the game will have rolled the Pirate Lord’s loot anew. Check their booty with your Target Mode, and continue to rinse and repeat until you get a drop you’re happy with.
I discovered this after the game crashed on me after killing a Pirate Lord, and his name was so distinctive (“YikYak” Sneed) that it really stuck out in my memory, and that’s when I noticed he dropped a different weapon on the second encounter. So I quit out, reloaded, and got yet another different drop. Tried this for about five times until I got a Flak Cannon for my trouble.
This method is not 100% guaranteed. The second time I tired it I got 5 Photon Cannons in a row, and I was afraid it was a fluke, or there was some other variable I hadn’t accounted for. But it worked on the next 4 Pirate Lords that I tried it on, and I filled out my armory with at least 4 of each Pirate Lord exclusive weapons. So it works far more often than not.
I got 50 Pirate Lords in before I discovered the save-scum trick on number 51, so while he doesn’t count, I did keep a running tally of what each target dropped when I brought them to justice. So while the sample size is pretty poor to do any sort of real statistical analysis, it’s the only number set I’ve got (and it still took a lot of time to do all that killin’ too). So keep in mind that the percentage is based out of just my own 50 kills, and represents a percentage out of the 50 weapons drops, it is NOT the game’s actual drop percentage (which is almost certainly different, given the nature of RNG).
TL;DR – Pirate Lord exclusive weapons dropped 7 times out of 50, or about 14% of the time.
WIP – More Coming Soon!
Want to do a section on Pirate Lords, and how to abuse the ship-to-ship radio for fun and profit.
Ship-to-Ship Radio section already added!
Pirate Lord section, and how to cheese their booty, is up!
Loot cheesing requires more testing!
Loot cheesing works the majority of the time, and is still a huge time-saver over doing vanilla grinding, even when it occasionally doesn’t work.
Working on tanking my reputation down, so I can access Pirate stations, and complete my commodity station trading spreadsheet.
The Trade and Reputation sections are also up!
Also should really add in the theoretical top speed for all the ships too…
Updated the section just above the individual ship listings with a chart, showing all of the ship’s balanced speed, top speed, and max speed with the various afterburner options!
Removed the part about facing, direction, and the shield UI. Turns out, Mattock is the only one with a incorrectly corresponding shield HUD. I’ve started bugging the devs on their Discord about fixing it.
NEW! – Added section showing off all of the game’s Buddy’s.
Yes, I also completed the bonus Star-Venger mission after beating the high score.
Now I feel a little less sh*t at the game.
If I can think of anything else, I’ll put it here while fleshing it out.
If YOU can think of anything you’d like to know, ask in the comments! I can’t make any promises, but it never hurts to ask!
________________________________________________________________