Overview
A very simple guide to teaching you the basics of what is a functional sub in a short amount of time
Intro
Creating a submarine can be a daunting experience for someone who just opened the editor. There are thousands of different items, but only a few that are really useful for building a proper, functioning submarine. Learning how to make your sub water-proof, learning which are the necessary machines, and learning to wire them, even the official guide does not mention these steps.
But worry not, this guide will help you understand how to piece together your own sea-coffin, following a very simple set of requirements:
- The submarine needs to move, up and down, left and right
- The submarine needs power for the machinery
- The submarine needs to produce Oxygen for the crew
- The submarine needs to have an Airlock and Docking port
- The submarine needs to be properly wired
- The submarine needs a mounted gun to shoot the fishies

Placing the essentials
There is a lot to see in this picture, but it’s actually quite simple.
Search for every item depicted, and place them down in a somewhat straight line as shown.
Place your walls to make your outer shell, with a reservoir at the bottom for a pump (our ballast). For now, just use vertical (90°) and horizontal (0°) “shells”: Drag and extend them to the desired size
All of the machines serve a particular function that will be vital for the sub.
The Nuclear Reactor will power all other machines. Don’t forget to place the fuel rod and turn it on in automatic control

The Junction Boxes will help distribute power coming from the reactor across your sub
The Engine will propel your sub from Left to Right. There are two parts: the body itself which must be inside your sub, and the propeller which must be placed outside, in water. Red square out, Green rectangle in.
The Pump, placed in a specific, enclosed room, will act as a ballast, allowing your sub to go Up and Down by pumping water in and out of the sub. Don’t forget to TURN IT ON
The Oxygen Generator will generate… oxygen so your crew doesn’t suffocate. You then need to place vents around the ship, and link those vents to the generator by holding spacebar and clicking on both (also applies to coilguns):
The Supercapacitor, Coilgun Loader and Periscope all work together to power, load and man the coilgun respectively. For shooting aliens, naturally
The Navigation Terminal and Status Terminal will allow you to control the sub, use the sonar, dock the sub and check the state of your rooms.
The Docking Hatch is required to dock to stations. Make sure to use the predefined “Automated Docking Hatch” assembly, so you don’t have to wire it yourself. Note: the size is currently bugged, you have to manually reduced the size of the item to half to properly match the hatch
The Airlock Doors and Airlock Pump will allow you to safely leave and enter the sub in a diving suit without flooding the whole thing. For the sake of simplicity, use the premade assemblies
The Emergency Lights do not consume power and give off weak lighting, so we will use those for the moment
The Spawn points will determine where your crew and cargo spawn at the start of a mission. You have to place a Crew spawn, but also Cargo spawn to make the annoying little message disappear when you save your sub in editor
…and that’s it. You’ve placed all the essentials according to our checklist. Keep in mind, this is a purely functional sub, it doesn’t have other functions such as fabricators, a medbay, or even storage, so I advise getting inspiration from the existing subs
Hulls&gaps: how to not drown your sub
You’ve placed walls, but walls aren’t enough to keep the water flowing in. Walls will only block player pathing, but not water by themselves. Barotrauma relies on a very particular mechanic to regulate the flow of water:
Hulls
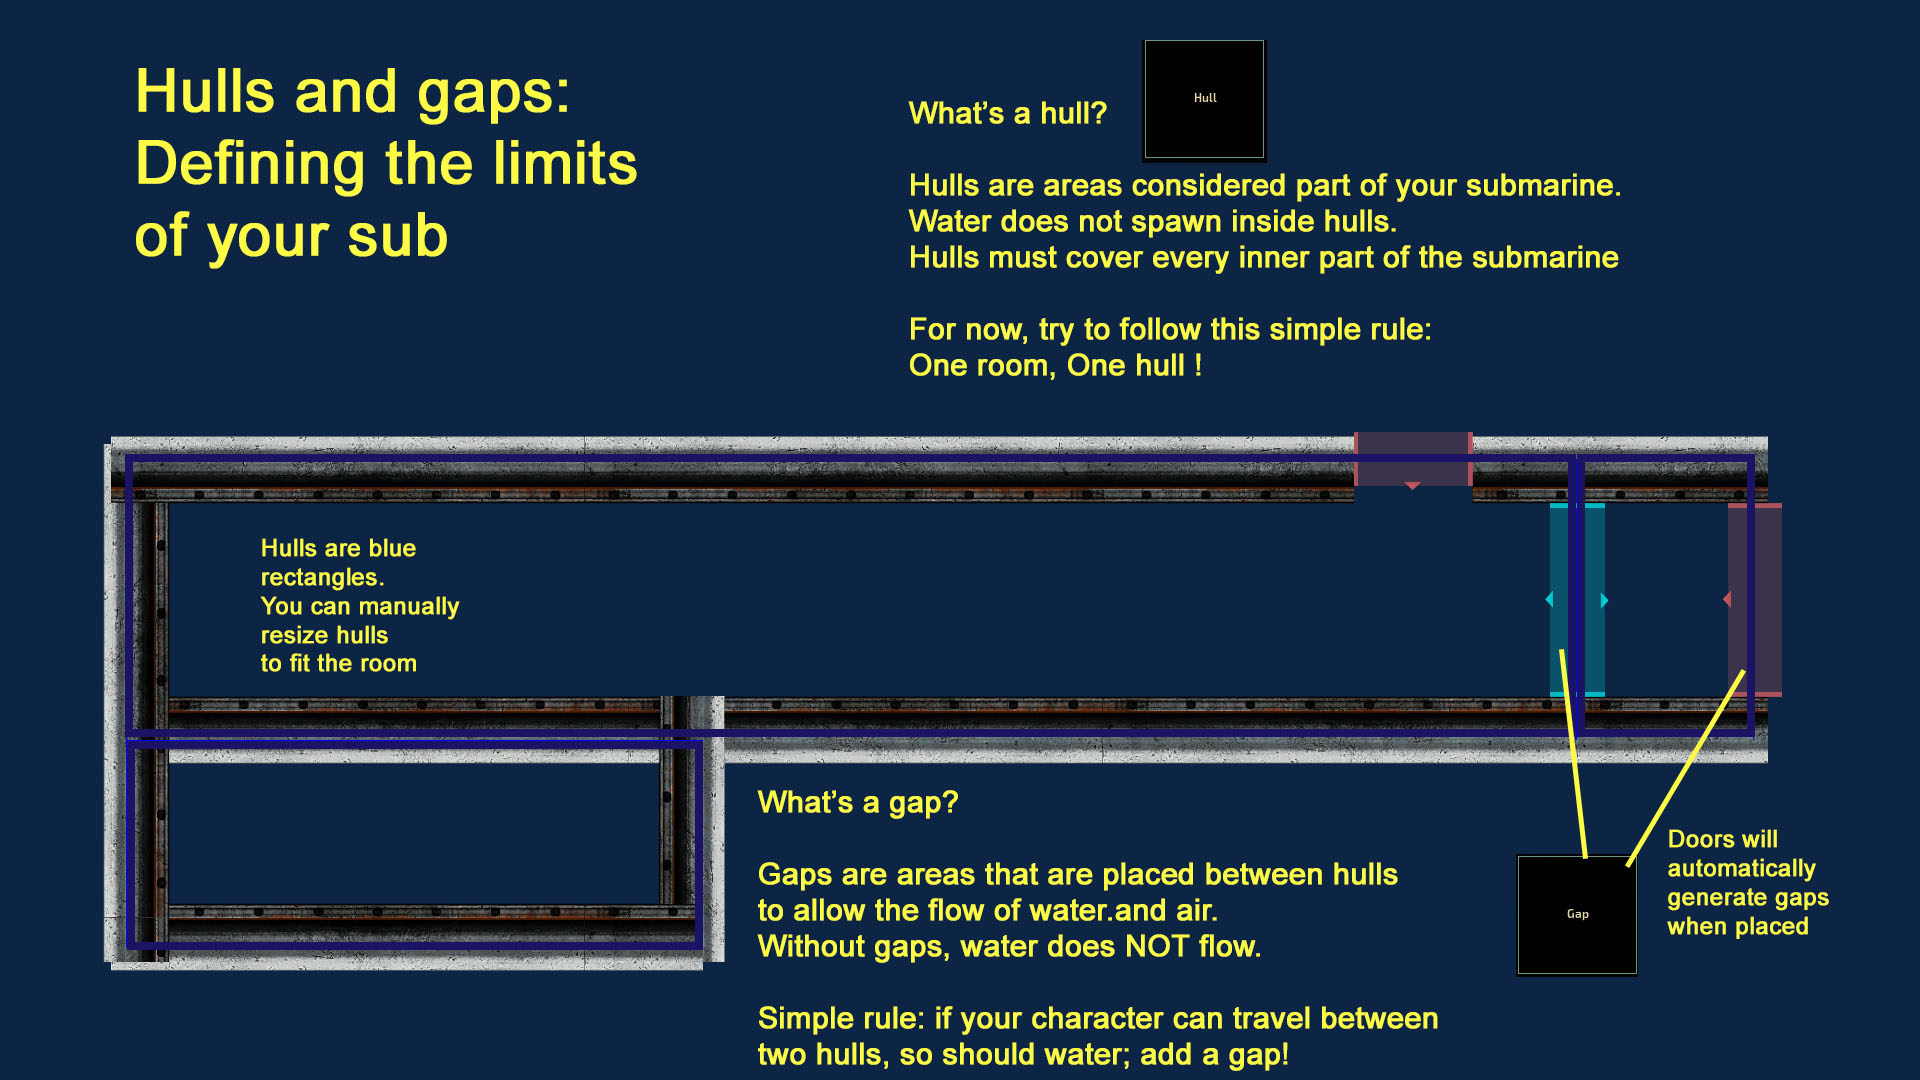
Hulls are rectangular areas where water doesn’t spawn. Any area not covered by a hull will be instantly flooded by water, so you need to follow a few simple rules:
- Cover the entirety of your sub with Hulls. Every single room should be covered. Here we have a simple rectangle, but more complex shapes will require multiple small hulls.
- Make sure your hulls connect: drag and resize them so they touch; don’t leave a space, but don’t overlap either. Try to avoid “ghost water” in between hulls which can mess up the character physics
- Always cover a little more than the room you’re in. Extend the hull to partly cover your outer walls
Once you’ve set up your Hulls, you need to place Gaps. Without gaps, water doesn’t flow from hull to hull, as if blocked by an invisible wall. The small arrows will tell you which way the water will flow through the gaps. If between two hulls, you should have arrows on both directions.
Finally, there is one particularity: Ballasts.
When defining a Hull size for your ballast (the room where you’ve placed the Pump, makes the sub go up and down by filling with water, remember?), you’ll see a little box on the top left:
You need “Optimal ballast level” to show up, otherwise your hull/room is too small to act as a ballast. But what the hell does it mean? The number that shows (here 0.472) means your ballast will be 47.2% full when you sub is “floating”, not going up or down”. Here, just aim for the default value of 0.5 and you’re set.
Wiring: connect the dots
With all the machines placed down, they need to be wired together to convey both Power and Signals.
Wiring uses its own specific menu, so let’s click on that:
Wiring is… kind of a chore. But it’s simple enough for this very basic sub, and you don’t have to go into advanced logic circuits; you’ll only have to connect the right pins.
Almost all of your machines will require power, and you’ll need enough junction boxes to distribute said power (5 cables per power pin) across your sub without risking voltage issues. Connect your junction boxes in serial mode (power in and out), and draw power from those into your machines.
Signal wiring is a bit more complicated, but there are only two kinds of signals you should care about in this sub: velocity X, and velocity Y
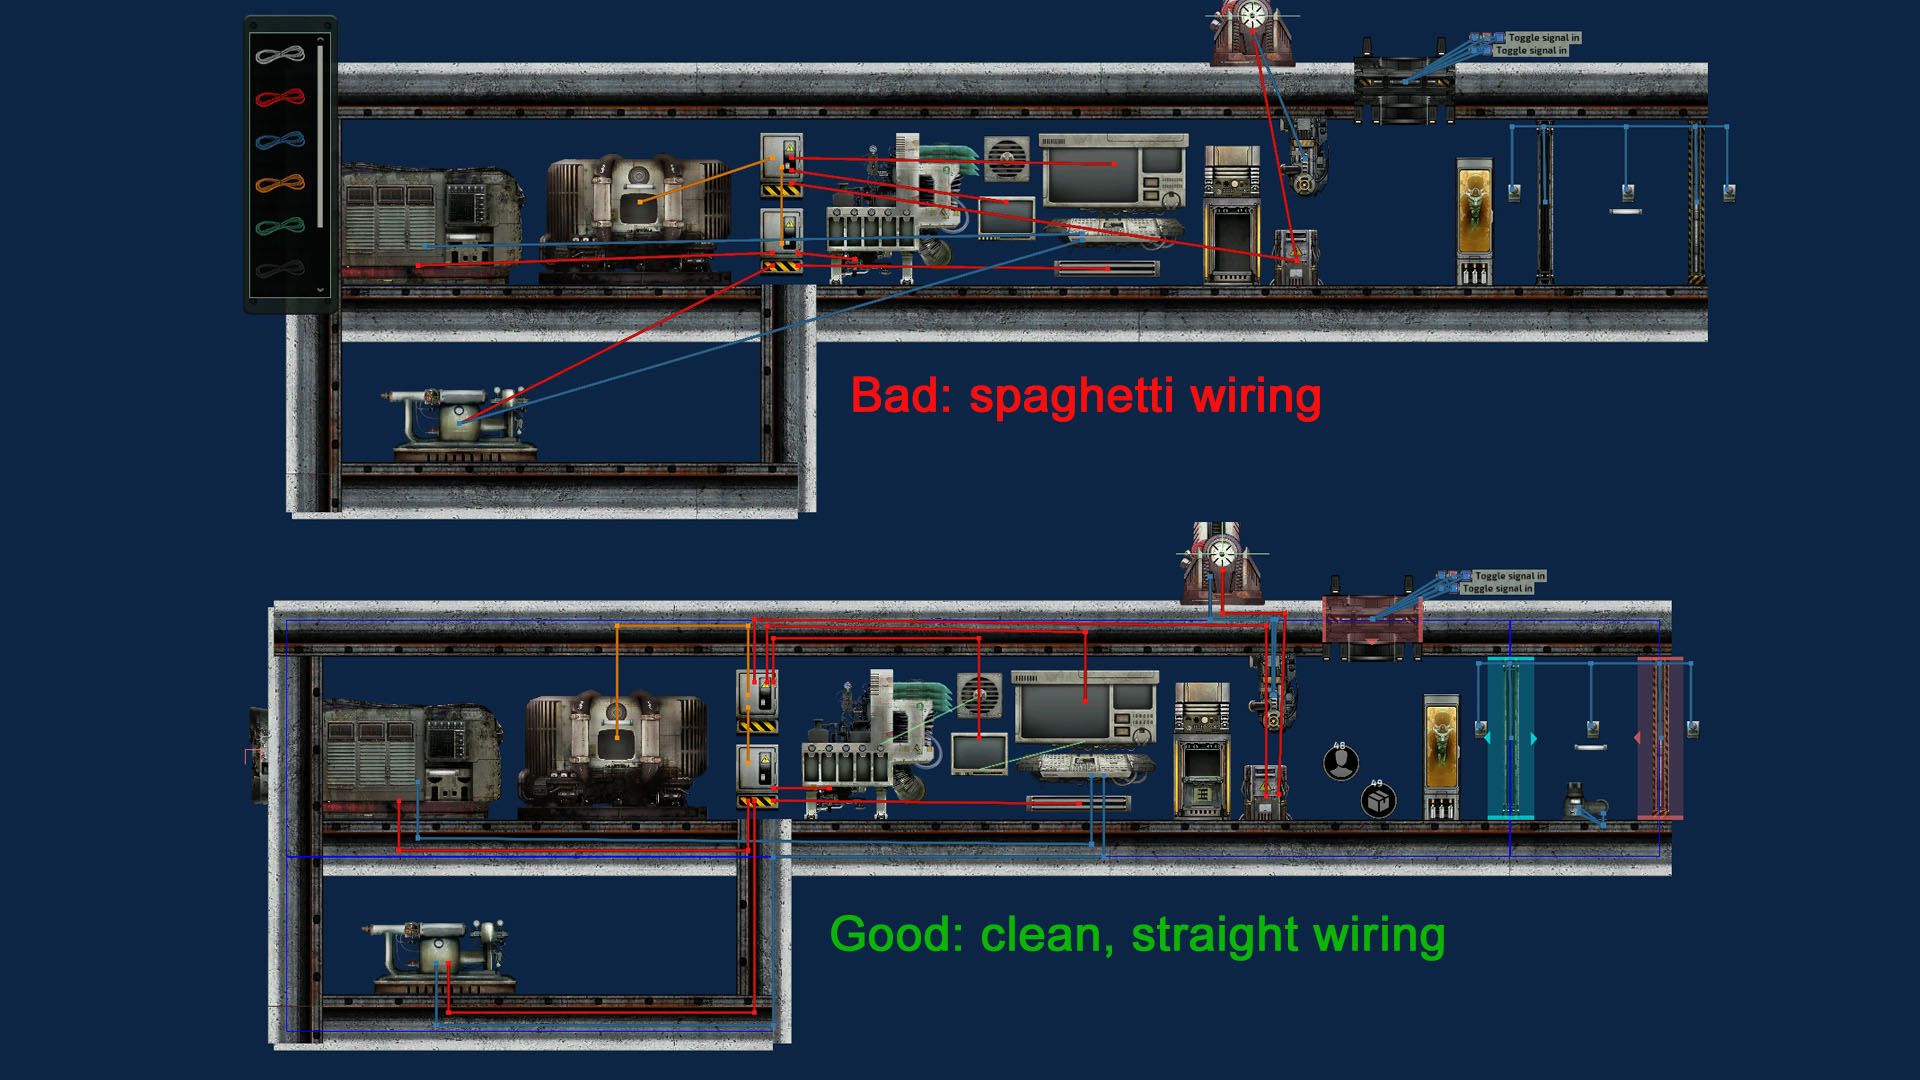
Wire according the the plan above and you’re done! But, most importantly, be CLEAN when wiring. You don’t want your wiring to turn into a cold noodle soup as your sub gets more complex:
Wiring can and will take time, more so than actually building the sub, so you need to get used to it, use color wire codes and easily identify your cables at a glance.
Finishing touch: Cabinets, storage and inventory
The final aspect of completing your sub will be adding storage elements to carry all the necessary items and resources for safe travel. You have several storage options: 
Open the cabinet by pressing E, then you can fill it with any item of your choice.
Look at the default subs for more inspiration, so you will learn how to prepare your submarine with a preset amount of tools and basic resources
That’s about it, sailor
Your first sub should be completely operational, congratulations!
Of course, this is merely a steel coffin; if you go out on the open seas inside this tin can, chances are you’ll die, horribly. But at least you have grasped the basics of sub-making in record time.
Once you are done, move on to the official guide, which covers everything in more detail:
[link]You can also join the official Discord where people will be more than willing to help in your sub-building endeavors:


