![Yuppie Psycho Full Game Walkthrough [Ooutdated] for Yuppie Psycho](https://steamsolo.com/wp-content/uploads/2021/08/yuppie-psycho-full-game-walkthrough-ooutdated-yuppie-psycho.jpg)
Overview
Simple guide for the game, let me know if I missed something or should explain a section moreEdit: It has been ages since I’ve played the game, so honestly I probably can’t help you past what’s already in the guide, my best advice is to just backtrack and checked over Everywhere you have gone and cross check with this guide as you goEdit 2: lmao, okay since the games gotten the executive edition update, this walkthrough isn’t exactly relevant now. I’ll try and make some time to go through and remake a new one at some point. However if someone else wants to do it, they are more than welcome to do so and use my guide as a base for it
What you should know
This game is very good at hinting you towards mechanics and telling you what is necessary without handholding you through everything, but this will summarise it for you in case you may have missed the cues. However I will be doing my best not to spoil things in advance and just give directions to locations where the story will continue
I will primarily be talking about specific actions to take, as well as puzzle solutions then a step by step process. Explore yall and make sure to do other stuff before following what I tell you have to do next. I’ll also have a listing off all the possible usable extra’s you can get at each point at the very end so skip to that if that’s all you wanna know. Also this is not an achievement guide, there is a perfectly good one right here you can use for that
Default Key bindings
[WASD] Movement
[Shift] Hold down to run
[E] Interact/Speak
[.I] Inventory (Press Tab to cycle through the sections, press [E] to Use/Look at items and press [I/Esc] to exit inventory)
[T/Y] Quickly switch/turn off items
-Interact with everything. Cupboards, filing cabinets, trashcans, bookshelves all have the possibility to give you health items, kill mines, or have witch paper which is vital to saving. Check every thing you see
-You can buy usable items from Mappy and Doshi in the first section of the game, I’d recommend doing this only if you need them, as the needed items tend to be fairly plentiful if you’re looking around and not using them all willy nilly
-This isn’t an action game, but Brian has a health bar that you need to keep an eye on, try not to take unnecessary damage and be careful. Brian only has the ability to sprint, so just run until you can escape, or you avoid until you figure out what to do. However Brian has can’t sprint if his health is too low, so keep that in mind
-Whenever you find a water cooler, drain it dry. You can get max 3 Cups of Water from a water cooler, however some only give you 2. Save them to make coffee
-Items can either be Used or Looked at, occasionally just interacting with an object in the area is enough to prompt the needed item, but occasionally you will have to go into the Inventory and use it while standing close enough to the interactable object
-Manual saving is done at Photocopiers, they require Ink Cartridges to activate (only needed once), after which you only need Witch Paper to use them. It also occasionally happens after story activated events
-Save sparingly. You have limited amounts of Witch Paper. That being said, don’t hoard them needlessly. A good rule of thumb is to do it when you complete a puzzle that took you a while, defeated a boss or area and/or just done a bunch of scavenging around for items
-At certain points you will need witch paper, always have at least two to spare, also you can trade Cheese for more Witch Paper later on in the game, so I’d suggest just saving the Cheese if you save regularly
For a video playthrough/walkthrough, watch ManlyBadassHeroes LP of the game
Welcome to Sintracorp! or Let’s Hunt This Witch
>Speak to Mr. Chapman (Upper left beside elevator)
>Speak with Kate Hicks (Lower right on the furthest possible seating)
>Once both characters have left through the elevator, stand in front of the elevator, use the Job Offer and then return to the entrance. The elevator will then open for you. Go in
>When you arrive, exit the elevator and follow the “red paint” to the executive table, examine the writing behind the desk, and then look at the contract which will give 2 choices
NO
After choosing not to sign after interacting with the contract, return to the Elevator and go back down to the Lobby, then leave the building
ENDING: I’m better off at home
(You need to start a new game after getting this)
YES
>Now head back to the elevator and interact to open it and then enter. Examine the keypad and go to the 5th floor
>New NPC(s): Mr. Hugo and Ms. Sosa
>When you have control, look around the room for the items Hugo needs
>Coffee Powder is in the wastebasket to the lower right hand corner
>Water Cup can be gotten from the Water Cooler
>Interact with the Coffee Maker to get Coffee
>The following scene will automatically save your game for you, so don’t waste any paper immediately afterwards
>After this interact with your computer (the ancient one on the top left, next to the photocopier), then examine the Power Cord to the left of the door and use the computer again
>Speak with Hugo, and then interact with the Phone, You’ll be asked to visit Office D to the upper right of the 5th floor
>Push the chair out of the way of the door and then enter, your only option will then be to continue north
>Get as close to shaking objects as possible so they will be flung forward without having to actually take the hit
>Attempt to interact with the tied-up employee, and then push him to the west as far as you can and grab the Cardboard Box off the floor. Push him back to the centre of the room and slightly north for the next cardboard box
>Continue pushing the employee north through the now open hallway, following the path when it goes west, grab the last cardboard box and read the warning on the wall, then immediately begin sprinting back the way you came
>Once your back in the room, head to the air duct to the east, and use the cardboard boxes from your inventory to stack them up and escape through the air vent, follow the air duct back to the 5th floor open area
>Follow Sosa and watch the scene, then enter the Boss’ Office. You can then grab your ID Card from the desk in the centre before return to your desk and interacting with your computer
>New NPC: Sintra
>Sintra will explain that you were hired as a Witch Hunter, and that your first task is to locate the Hexenhammer, which is located in the Library on the 7th floor
>You can now enter Sintranet at any time by interacting with your computer
>You can also follow Hugo’s suggestion and check out the canteen
>Optional New NPC: Ms. Malone
The Archives or Preparing the Hexenhammer
>Interact with the terminal next to the large Library doors. It will give you Form R-301, the you will need to complete with info gathered from the Archives before the terminal will open the door to the library. Once you’ve recieved it, go through the white door to the left to enter the Archives
-A usuable lightswitch is green, an unusable one is red
>Press the lightswitch directly ahead of you and save if you have an Ink Cartridge
>Head north and turn on the next light switch
>Note the marking on the ground around the filing cabinet, and then push it aside to reveal a hidden Square (make note of these). Continue east to interact with the corpse, and examine the fuse box at the end of the hall with a missing fuse and the out of reach ladder. Ignore the white door with the cassette tapes for now and go back to the T-junction
>Move the cabinet near the light switch to reveal the hidden Upright Triangle and then enter the Author room
Mobile Archivers Room/Author’s Name
>Press the light switch and proceed north until you reach the corpse, examine it for the first clue (A-2). Note the moving filing racks, they are grouped in two sets (A and B), and numbered with Roman Numerals 1-10, a quick guide to those who might not know
>Those odd landmine looking things will detonate and cause you damage if you get too close to them, so try and go around them. They will flash red and beep before exploding if you keep getting closer. You cannot detonate them in advance, or Sprint past, and they will reactivate after exploding
>Return to the A series racks to the south, and move the racks using the black handles on the sides, you can only move a rack if at least one side is free
>Move them until you can access rack A-2, and then examine it to receive the next clue
>Answer: Examine AVII rack for the next clue
>The X in the image will mark the next rack you need to examine, fill in the blanks to work it out
>Answer: Go to rack BI and examine it, then move racks BVI, BVII and BVIII south to make a path west or just wall crawl to avoid the mines
>Head north up the stairs and turn on the lightswitch, examine the artistic expression on the wall, and then grab the cardboard box, move the filing cabinet to find the last hidden Upright triangle
>Go south to the broken barrier, and drop down-oh wait we forgot to line them up, go back down the stairs to the B series racks, move BI, BII and BIII as far north as possible, don’t move BIV and BV, go back up the stairs to the broken section and drop down and then walk to the file containing the Hexenhammer’s Author’s Names. Go back, and then exit to the door to the east
>Now you’re back in the main area, but on the second level, continue to the north and east towards the hanging corpse, untie it so that it will drop back down to the ground level. Interact with the Emergency ladder to create a shortcut
>After the short scene, turn the light switch to the left back on, and examine the briefcase on the ground, near the pool of blood to get the Wrapped Sandwich. Examine the slightly open door and then enter the room
Audio Cassettes Room/Year of Publication
> Examine the poster of the list of differently grouped symbols, recall the symbols that had been hidden behind filing cabinets and locate the right one (there is no particular order you need, only the shape and position)
Hint: /The symbols are a Square and two Upright Triangles/
Answer: /The correct rack is in the second row from the top, third from the right/
>You will get a Cassette Tape when you examine the right shelf
>Examine the second cabinet from the left to talk to the “corpse” for information
>Head back out and return to the fuse box. If you haven’t already, Look at the Wrapped Sandwich /then Use it in front of the fuse box. This will restore power to the two rooms on the upper level/
>Climb back up the ladder and enter the room surround by eyes
Videoclub Misterio
>Turn on the light switch, and go past the banging door à la Disney’s Haunted Mansion. To the west, you will notice a destroyed landmine with a pencil sticking out of it
>New NPC: Mappy
>Speak to Mappy who will spell it out for you that using pencils on alerted mines kills them
>Exit, and then enter the middle door, get close enough to the landmine that it starts flashing red, then go into your Inventory and Use a Pencil to kill it
>Head north, and use the Cassette Tape on the Tape Player on the right of the room to learn the Hexenhammer’s Year of Publication and watch the short scene
>Return to the second floor of the main room
Box Storage Room/Publisher
>Enter the door to the east of you, just before the ladder and turn on the lighswitch. Activate the Photocopier and save if you like
>Navigate between mines or destroy them with pencils at chokepoints. Examine the folder on the desk to acquire the Hexenhammer’s Publisher
>A definitely unrecognisable someone will then turn off the lights off the room, and you will need to carefully return back to the entrance, avoiding landmines. They will however light up if you get too close, so as long as you walk and go carefully you won’t be injured
>Turn the light back on if you like and explore, or just leave the Archives
>If you make your way to the lower right of the room (destroying any remaining mines in the way), you can get a Chrysalis VHS Tape from a fallen cabinet. You can play this VHS Tape in the same room you used the Cassette Tape back in Videoclub Misterio.
The Hexenhammer or Only the Hexiest of Hammers in My Games
>Head back to the library entrance and interact with the terminal, where you will be prompted to return to Sintranet
>Enter the elevator
>New NPC: Ms. Rostov
>Go to the 5th floor and return to your office
>Speak with Sosa and then interact with your computer
>Head to the far east, and then go north to find Sintra on a swingset. After talking with her and getting the stamp, attempt to leave Sintranet and you’ll receive a new message mentioning Office C. You can now go back to your office, where you’ll receive the Stamped Form R-301
>Return to the Library Entrance on the 7th floor and interact with the terminal to unlock the door
>Enter the Library, and pick up the Flashlight from the ground
-Use [T/Y] to toggle the flashlight on and off. You can check the remaining charge by Looking at it in the Inventory. If you have spare Batteries in your inventory, the flashlight will automatically use them as necessary
- Red Book- Go north and grab the Red Book from the broken display case
- Green Book- Continue north and examine the Green Book inside the locked display case. Push the case down south, and then go east to a Wooden Cart with an Owl. Push this cart to the left so it crashes into the case. Return to the case and grab the Green Book. Push the display case back up, and then push the Cart back the way it came
- Blue Book- Go northeast to the far wall to grab the Blue Book off the couch
- Yellow Book- Go northwest and push a different Owl Cart to the right to reveal the Yellow book
>Now, head north to the large portrait behind a switch
-Pressing the switch before you place the books correctly triggers a gas trap, quickly press the switch again to stop it if you do
>Examine the portrait, it will give you a clue as to which bookstands you put each of the four books
Hint 1: Make note of the visible Roman Numerals and what Colour they are
Hint 2: Move the Owl Carts to reveal the other locations
Answer:
- Red Book- II (centre)
- Blue Book- VIII (centre)
- Green Book- XII (northwest)
- Yellow Book- XIII (northeast)
>After placing all four books, go back to the switch in front of the Portrait and press it. If you did it right, you’ll be able to continue
>Follow the path and read the Red Notes on the ground as you go. Continue until you reach the dead end. Before grabbing the Hexenhammer, I highly recommend activating the Photocopier and Saving
>Grab the Hexenhammer and head back down to the library
>You are trapped in the library, the exits have all been sealed off
>Run around, avoiding it until it spawns mines on the ground
>You need to damage the Spider with a mine at least three times as it explodes.
>The boss itself won’t detonate the mines, so your only options are to detonate the mines yourself, or use the Owl Carts to detonate the mines when the Spider is nearby
>Keep your health as high as possible whatever you decide to do, but remember, Brian can’t sprint if his health is too low
>When the Spider flees, you can leave the Library (be warned the mines are still active) and return to your office. Go to Sintranet through your computer and complete your first mission
The Hive or Hi Kate!
>After you give Sintra the Hexenhammer, you will receive your next 3 main tasks; the witches base, how to identify a witch, and finally how to kill the witch
>You will then be interrupted and have to leave for your motivational group meeting in Office C
New NPC(s): Col. Dulmott and Dada
>Pay attention to the employee motto each time it’s given, as you will have to recite it back to the Colonel at the end. You also lose 200 credits for ever part you get wrong when it’s your go
Motto:
I’m the lowest of the low!
I’m garbage!
The best!
The best of the best!
With my work!
My blood!
Enjoy your new office nickname Parsnip
>You now have a new goal, make a friend on the 4th floor, also known as The Hive
>Going to the receptionist area, you will see a familiar girl from the Videoclub Misterio, is now selling various items
>Take the Elevator down to the 4th floor where you’ll want to look for Kate Hicks from the beginning of the game. The Hive is very dark, illuminated only by monitors
-Leave the employees alone, as talking to them can cause them to lash out and cause minor damage to your health
>Kate is northwest of the elevator
>Go directly north of the elevator, and then turn west at the T-junction
New NPC: ???
>Go directly north of the elevator, and then turn west at the T-junction
>Kate will be there, ready to teach you to how to duck under certain desks, as well as hide in double door cabinets. This lets you avoid enemies, and ducking under desks means you can also crawl underneath and access more areas of The Hive
>Directly after this talk, you will offer to help lure back the four missing employees of the Marketing Department east of Kate. You will do this using Peppy Marketing Slogans
The slogans are found throughout The Hive, there is no obvious similarities between them, but look out for odd (well odder) events in the office, or things that catch your eye
>The missing employees are far easier to spot, as all four will be crawling on the ground on all fours. Just speak to them and use the right slogan on them to get them to follow you, then lead them back to the marketing section
Anarchy Slogan
>Head south, back where you meet the unknown NPC, near the cubical covered in yellows flyers, and with an anarchy symbol on the wall. Examine the flyer on the wall for the first slogan “Unite and be free!”
>Duck under the nearby desk and crawl to the west to reach two filing cabinets that contains the Blood Trail VHS tape
Diet Slogan
>You will hear a conversation between employees. Speak to the male employee to learn the next slogan “Make diet your best medicine”
Holiday Slogan
>Return back to the Elevator, and go east, and then north. You will hit a fork in the road at this point, go west and examine the travel brochures on the table beside the vending machines, this will give you the third slogan “When you like your work, everyday is a holiday”
>Once you get a short event about hicks to the southeast, you should examine the computer with the glowing blue screen, this is only possible if the man is gone. Make a note of the combination code it gives you and then continue south
Rage Slogan
>Head east until you reach the fork, and then go north. Be wary of mutant mines, and take out the mines at chokepoints. Continue until you reach a corpse surrounded by mines. Here you will use the combination you got from the glowing blue computer screen on the briefcase to unlock it and learn the final marketing slogan needed “Swallow your anger. Pretend!”
Rage Employee
>Head directly northeast of the unlocked briefcase and talk to the employee. Answer with “Swallow you anger. Pretend!”, and then lure him back
Anarchy Employee
>Head west of Kate until you reach a locked door. ignore it for now and just go directly south for this employee. Push the chairs aside, and then answer with “Unite and be free!” Then lure him back to his department
Holiday Employee
>You probably noticed the employee that was seemed to be stuck in a closed off area, she’s the next target. Go south of the chairs you got the previous employee at, and then go east at the T-junction until you see a desk with a broken monitor on top. Crawl underneath the desk, and then crawl under the L shaped desk to enter the area
>Answer “When you like your work, everyday is a holiday”, then carefully lure her back. There are occasionally pathing issues at this point so just patiently lead her around it and back to the her department
Diet Employee
>New NPC: Mr. Doshi
>Finally, go back to the Elevator, and then go east to speak to the last employee. He is chewing the cable. Answer with “Make diet your best medicine” to win him over, and Doshi will reward you with a screwdriver as thanks and tell you to visit the 3rd floor some time. Lead the final employee back to the marketing department
>Kate will tell you that one of the marketing employees that had been inside the department has escape to human resources, the locked door to the west
Human Resources
>Turns out it’s still locked, so you will need to clumb up the empty cabinet to its right, and the Use the screwdriver (courtesy of Doshi) to get into the air duct. Head southwest to exit into the department itself from the airduct, where you will have short scene with the escape marketing employee
>You can now enter and leave through the main door between The Hive and the Human Resources department at any time
>Follow where the employee went to the west, where you meet the HRS (Human Resource Spitters) for the first time. Getting hit by their spit will, of course, cause you damage, so try and avoid being hit
>You can use moveable objects to block the projectiles, or crawl under convenient tables/desks
>Move the cabinet next to the closest HRS to block her spit so you can continue west
>Either duck under the table at the bottom of the screen to avoid her spit, or time your sprint through well to avoid being hit
>Move the last filing cabinet west to block the third HRS’ projectiles and continue west where you will see the employee crawling north, move close enough for her to notice you, then either run back and wait under the nearby table until she goes past, or you can run and try and dodge her spit attack
-Patrolling HRS’ spit attacks will home in on you, keep this in mind when deciding what to do
>Head west and then north once you have an opening and enter the next area
>Speak to the employee in his undies about resumes, and then continue north
>You will see the employee scurrying off to the east, but explore the room for now. Ignore the head of HR’s offer, and make to speak to the only two clothed employees sitting in the room. One will give you a slogan, while the other gives a clue on how to deal with the very normal head of HR. Don’t even move towards the mouth, or do, I can’t make you not but I’d recommend against it
>Follow the employees path east, where you will find her hiding under a table, examine the filing cabinet to the north east for another slogan. Now return back to the unclothed employee south of the mouth, and speak to him again for the last slogan. Then go back to the room with the hiding Marketing employee
>Now go back to to the Marketing employee and choose “No more slogans, just be yourself” to win her trust
>Make sure you push aside the filing cabinet to the south, the one blocking the table, this will create a shortcut,
>Next, while standing beside the female employee to the right hand side of the room, use the paper doll in your inventory that was absolutely there the whole time, and then try again with the Marketing employee to attach it to her, then lead her to the large creepy mouth without going near yourself. After the mouth spits out the employee, you can safely grab the Family Photo off of the floor while the employee is in her mouth
>Go east and the large mouth will sic the HRS on you, so start running and leave the area through the path you cleared before and head for the exit
>Once you talk with Kate and return the employee, you will be prompted to duck under the desk with Kate, then when the area is clear, start heading back for the elevator. However, 3 HRS’ will be patrolling the Hive from this point onward, so either dodge the spit or duck under desks and hide in cabinets until you can get to the elevator
>Return to your office on the 5th floor to speak to Sintra about the photograph
>Your next task is to investigate the Sintra Family Cemetery, located on the 8th floor, The Garden
>Before heading up, go to the 3rd floor where you’ll meet Doshi again, back in the IT department to the east of the elevator. Speak to him and he’ll open up shop
Item Price (Credits) Max Available
Battery x1 100 4
Ink Cartridge x1 150 6
Glowsticks x1 125 1
>He will also give you three Glowsticks for free
-The Glow Sticks provide light in dark areas similar to the Flashlight. Now while Glow Sticks don’t need batteries and have a near unlimited life span, They have far less range which is just centred around the you, so I would recommend using them to light your way through an unknown path
-BUT, Glow Sticks can be dropped on the ground by holding down E, while the you has one out. You can drop as many of them as you have in your inventory, and after you can grab them off the ground again to resuse them
Let’s Go in the Garden
>Head west and speak to the crying employee on the bench, just south of them, at the flowers, go west until you reach a chest contains the Follow a Cat through the Woods VHS Tape
>Continue north, following the path. Speak to the smoking employee beside the swingset, and interact with the cemetary gate to the north (it’s covered in flies if you try to do this too soon), then head back down and follow the path to the west
>Here you will have to avoid the glowing flies, similar to the patrolling HRS’ attacks, they will home in on you and hurt you until you get far enough away. You will need to duck in and out of bushes to avoid the flies, using them to lure the flies away so you can get through
>Approaching the employee directly doesn’t give you anything, so you need to head around and eavesdrop on him
>You will need to head southwest, ducking into bushes and then running past the flies to the next one, keep doing this until you see the candles beside a rock, to the east of this, there is a path up. Go up, past the chest until you see the employee and then you can eavesdrop on his conversation(?)
>Continue west and then north through the tiki torches towards the river. You need to push the three boxes in that area into the river where the rather chilly looking fellow is. You will also need to lure the flies around so you can do this without taking damage. If you attract them while trying to push the boxes, just lure them out of the way again to put them at a distance before trying again
>You need to push all three of them in to make a path across the river to the next area
>Speak with the last employee floating in the river as you go north
>Once in the new area, head northwest to the campfire, use a witch paper at the campfire to trigger a quiz, if you’ve spoken to (or eavesdropped on) all the employees as you went, you should know all the answers to the questions. If you get one wrong, you have to Use another sheet of Witch Paper to try again
Answers:
- Cheese
- For seeing the Witch too many times
- You use magic from the consumer-driven society of common folk
- Controlling, obsessive, and ambitious
>Completing this will allow you to trade with the Forest Goblin. He will offer a Poison Gas Contract for two witch papers, which you will need to continue, you can also get additional sheets of witch paper for one slice of cheese per sheet from him
>Now, go to the nearby air duct grate and use the screwdriver, this will return you to the 5th floor through the washrooms. You can now use these ducts at anytime to return to the Forest Goblin on the 8th floor
-While in office E, if you go to speak with Sosa, you can get a Videoclub Misterio membership card from her, joy?
>If you go in Office B, you can speak with Malone who will ask you a question. The second answer seems to get a better reaction from her, but I don’t know if that has any effect on the game itself. You can also speak to Rostov again, who will give you Sleeping Pills if you ask
The Hive Returns
-You will want at least a few Ink Cartridges, Batteries, and Pencils for this area. Getting the complimentary Glowsticks from Doshi is also a good idea
>Head for the HR department entrance, go south past the circle of chairs, and then west into the poison gas to the new area
>Or you can go through the entrance just northwest, and then continue southwest until you see the broken monitor, and keep going west until you get to the new area in the poison gas
>There is a blocked off area to the north along the path to the R.C.’s little area, but it isn’t accessible yet, keep going west
>In the chest to the furthest side is an electronic piece, grab it
-This is a good time to return the second electronic piece to Doshi so you can get the Lantern in return. The lantern is similar to the Glowsticks, but has a much larger range. However it consumes batteries twice as fast as the flashlight, so use it carefully
>Now you have the poison gas contract, head back to the 4th floor. Remember the HRG’s are still patrolling the area so avoid them and their attacks, head south and speak with the employee that just spewed an impressive amount of blood. He will give you a short message, after which you should continue south into the fog
>You will enter a new area, full of poison gas, but that doesn’t matter to us now! Head west and press the blue switch to move the nearby cubicle down. Next, continue south and crawl under the desk you just moved, and press the next blue switch
>Now there is a new enemy in this area, Poisoned Employees (PE’s), who damage you by spewing on you, but they only direct what is directly in front of them. So as long as you stay behind or to their sides, they won’t attack. They also won’t attempt to seek you out if they see you, but some move in a set pattern, so you have to find a safe path around them, or wait for the opportunity to sprint past. You will also be able to push them around, which is necessary for getting past a few of them and clearing areas
>Go south past the first PE, and continue south. Crawl under the table and then push the next PE west until you reach a small open area with the next blue switch to the north, with a mine in front. Destroy the mine if it gets in the way, and push the PE’s around so you make a path to the blue switch, press it, and then return east and north to where the first PE is
–I’d also recommend pressing the switch just above the PE again (second switch you interact you with), as this will make an open path between the Lair and the Elevator for you later on, otherwise the area is no longer accessible
>Crawl under the desk to the south, then go west, avoiding the rotating PE, then crawl under the next desk to reach some filing cabinets that contains The Weary Human Face VHS tape
>Go east from the PE to the next area. You will be meet by a junction with 2 choices. You will want to go north, push the poisoned employee east to get to the next switch, press it, then return to the junction
>Go east where you’ll be met with a wall of PE’s. You can avoid them by hugging the north wall, and then sprinting through as they turn around
>In the next area you’ll find another blue switch. North of the switch is a photocopier, I’d recommend using it to save before heading onwards as the boss is up next
>Activate the switch and go east, but be aware that once you do, you can’t go back the way you came from, so make sure you collect everything you can first to avoid having to come back to explore for items
>This suspiciously large area is exactly what you think it is, but until you activate it, the boss won’t appear just yet, so familiarise yourself with the area. There are PE’s along the walls, but unless you get very close, you shouldn’t really worry about them. To the north, next to the coffee machine is a filing cabinet with 3x Glowsticks, near what looks like the massive broken printer in the centre, is a cabinet with x3 Glowsticks
>You will notice these odd rectangles on the ground, these will come into play during the boss, so clear any obstacles around them, and drop some glowsticks next to them so you can find them easily. There are 7 rectangles in total, but there are at least 6 glowsticks you can find in the area if you didn’t talk with Doshi first
>Head northeast, in a doubledoor cabinet, you will find Kate, but only do this once you’re done looting as this triggers the Dot Matrix
>If you talked with Doshi earlier, you will have an idea about what to do. But these are some points to keep in mind
- Do not sprint, it’s better to walk or hide if you hear it nearby, otherwise it will notice you
- The Dot Matrix (DM) moves in a big circle, to start it goes clockwise, but it can switch directions if it managed to spot you but you escaped
- Despite what Doshi says about it’s sight, the DM is entirely able to spot you in the dark and chase after you
- If you duck under a table within view of the DM while it’s chasing you, it will spill a pool of poison underneath to try and flush you out. This pool spreads, but try and stay out of the pool and it will eventually fade away
- If the DM manages to grab you, quickly open your inventory and use and Ink Cartridge. If you don’t have any left, or aren’t fast enough, the DM will insta kill you. Successfully doing this will force the DM to toss you a short distance away, and you should immediately find a place to hide until it loses sight of you
>Your first task is to go to where the DM used to be in the centre, and grab the switch button where the DM used to be. What you need to do is Use the Switch Button on 3 of the 7 circuits, while avoiding the DM. You’ll know you got the right circuit if the cubicle to the north moves, otherwise you’ll hear an error noise. Once you Use the Switch Button on the third correct circuit, the cubicle will move completely out of the way and open up the escape route out
The Correct Circuits
- Behind a stationary PE near the centre, to the east of where the Switch Button was, push him aside without getting in front of him
- Directly south of the first circuit, close to the southern wall
- Northwest of the centre, along the wall
>With the exit opened up, you need to head north, but the DM is still actively wandering around, so you need to avoid it as you go. Duck under desks to hide as it goes past, and point your flashlight around to get a good view of the area before continuing onwards. Exit through the escape route to the north to the new area. When Brian starts a dialogue, you’re home free
>Once you have control of Brian after his monologue. Use the Screwdriver on the DM, this let’s you move it around the pool when you interact with it
Clean = West
Out = East
Inject = South
Select = North
>The task her is to use these commands to move yourself to the ladder north, but first, move east to the filing cabinet which contains the Dot Matrix Manual. You will need to use this on the DM to unlock the Print command which will allow you to poke things out of the way
>Head up towards the ladder, near the floating body, and Use the Print command, then move in front of the ladder and climb out of the pool
>Go northeast and interact with the drain valve, once the pool is empty, you will be prompted to investigate the skeletal remains that were apparently lying on the bottom. Climb back into the pool and interact with the skeleton to receive R.Corvo’s ID Card
>Exit the pool to the southeast and you’ll find yourself on the 2nd floor. Head north towards the elevator, once you enter you will automatically return to the 5th floor and have some scenes to watch and a certain someone to boot out of employee of the month
The Graveyard
>Head back to office E, interact with your computer, then examine the double door cabinet beside it
>After that you will have a discussion with Sosa, and if you ask about the metallic card, she will say it was what Hunters used to be given
>When you’re done, if you go into Sintranet, you’ll find Sintra isn’t there, so instead you should use R.Corvo’s ID on the computer
>You will enter a similar virtual world, but it’s completely glitched. There are 3 corrupted emails lying around on the pathways, as well as one flying around the area, and you will occasionally run into a corrupted version of Sintra who will say:
>BELL – BELL – BELL
>Followed by four 1 digit numbers. Now where did you last see a bell?
>Hint: Try the elevator
>The flying email will say At the girl’s grave if you can catch it
>There is nothing else you can do from here so you will want to follow up on that code you just received. Make sure you have at least 1 pencil first
/Go to the elevator and press the bell 3 times before entering the four digits
>You will land on an unknown floor, head east, take out the mine as you go
>Use R.Corvo’s ID Card on the device beside the door at the end. Once your inside, grab the Golden Key dead ahead of you
>Now, this section is optional, but I’d recommend doing it as it will make a section at the end so much easier
>You’re going to want to return to the 2nd floor, and speak to Chapman near a large set of double doors. After a short talk, he will “ask” that you do the Initiation Test on his behalf; you can demand 1,000 credits for it, but you won’t get the money anyway
>Agree to do it, and press the intercom button, then say that you’re Mr. Chapman
>To successfully completely the test, you need to tag 5 Box headed employees
>But of course it’s not that easy, you can’t leave the marked out circle for more than 3 seconds, and only the employees that walk in a straight line are valid, the diagonally walking ones will just cause you damage. You will know you hit the right one if a small heart appears above its head. As you go, the difficulty will increase, more diagonally walking employees will cross the circle, and at the last one, they will try and trick you by suddenly walking straight across
>When the test is complete, he’ll drop an Empty Cigarette Box with a large barcode on it
>Now, return to the Forest Goblin through the 5th floor washroom, talk to him about barcodes and he’ll offer a Water Breathing Contract for 3x Witch Paper. Trading for it will, obviously, allow Brian to breath underwater which is VERY handy later on
-Note that after completing the following section, there is a massive change to the Sintracorp building, and many areas will become inaccessable, so first lets do a checklist of missable items that can’t be done after this point
-Activate all 3 Shrines to A.M. If it’s broken, Use the Screwdriver on it so you can activate it. Cost’s 5 Credits to activate
1. Far western side of the Canteen on the 1st floor
2. Inside the Residences hallway on the second floor. Go south from the elevator, and then west at the wall. After entering through the double doors, continue west until you reach the shrine
3. Same hallway as the washrooms on the 5th floor, just keep going west
-Complete the Initiation Test on the 2nd floor to get the Water Breathing Contract from the Forest Goblin on the 8th Floors
-Get the Lantern by trading in an Electronic Piece with Doshi on the 3rd floor I.T. Department
-Get the Blood Trail and Weary Human Face VHS Tapes from The Hive on the 4th floor
-Get the Voice Cassette Tape north of Dot Matrix’s Lair on the 4th floor
-Get the Chrysalis VHS Tape from the Box Storage Room in the 7th floor Archives
-Get the Follow a Cat through the Woods VHS Tape from the hidden area just to the northwest of 8th floor Garden Elevator
>So, if you’ve completed these tasks, let’s continue onwards. I’d also recommend getting some extra pencil’s from Mappy’s store, as well as picking up the Cardboard boxes on floor’s 7 and 8
>If you haven’t done so yet, visit Rostov in office B, she will provide you with Sleeping Pills that you need for the following section
>I’d recommend saving as you won’t be able to do so for quite a while after this
>Go north towards the locked gate blocking the way to the Sintra Family Cemetery, examine it to use the Golden Key on it automatically and open the gate
>You will notice an owl flying north, follow it
>To the northeast, there is a chest behind a gravestone containing the Apparition VHS Tape
>To the northwest there is a broken fountain, use the Sleeping Pills on it
>Examine the mausoleum, there is an angel missing a red eye on the door
>Next head for the tree to the side of the Mausoleum, and chase the owl from it. It will then go for a gravestone to the south, chase it from there and it will head for the fountain. If you didn’t put the pills in or you scared it away before it could drink, then the owl is back at the cemetery entrance, shoo it from there and repeat the cycle
>Once it takes a drink, the owl will become drowsy and fall asleep. Examine it and remove the owl eye
>Return to the door and Use the Owl Eye. Enter the Mausoleum, and then interact with Rei Sintra’s tomb. Open the tomb and you will find some familiar Jingle Bells inside, but no body?
-If you activated all three Shrines to A.M before this, then you’ll get some neat and VERY expansive backstory once you try and leave the Mausoleum
>Leave the Cemetery and return to the Elevator, where you will be jumped by Rostov and forced to go to the Canteen on the first floor to help with Hugo’s “Surprise” Birthday Party preparations. You won’t be able to leave the area until then. Yay
-There doesn’t seem to be anyway to avoid Rostov and save before going to the party, so just get the festivities over with
A Very “Happy” Birthday
>Ah, it’s so nice to be doing something normal, unfortunately, it’s for Hugo, which puts a bit of a damper on the whole thing
>This section is just get the items, and then use them where necessary
>Once you’ve spoken with all the main people here, then Rostov will tell you to place the balloons around the room. Use them on the pink weights with hooks in them
>When you’re done, Kate will ask for help with putting out the glassware. Go to the east of the room where the massive table is, and Use the glassware on both sides to set it out
>During the following scene however, you will learn the first names of the main characters, you need to remember them if you want to complete a sidequest later on
Irina Rostov
Catherine/Kate Hicks
Marta Sosa
Jenna Malone
Anthony Chapman
Inay Doshi
>Repeat the action of the glassware with the dishes
>Rostov will tell you to make Cheese Sandwiches, and Sosa will cough. Talk to Sosa first, and then make a break for it
>Foiled once again, this time by a new character, called Mr. Spader, now we have to teach Chapman how to make a Cheese Sandwich. Cheese is in the fridge, Bread is on the table to the left of where Rostov was sitting
>Speak to Chapman and he will make some, uh, delicious sandwiches. Repeat what you did with the glassware and dishware with the Burnt Sandwiches
>Now the party will begin, speak to everyone at the party, especially Doshi, and then attempt to leave. Watch everything to go to literal hell
>5 out of the original 6 friends you had at this party are still present, all of them have sustained horrific injuries and are in varying states of mental ♥♥♥♥♥♥♥. But their wounds will help you identify them later on, so make a note of what it is for each of them
>Speak to Doshi beside the Shrine, go to the elevator, and then return to Doshi to get his help. He will try and get the elevator running again, but he needs you to keep shining the flashlight on him while he’s trying to hack it
>The goal is to keep your Flashlight pointed at Doshi throughout this. This would be fairly simple, if not boring, if you weren’t being chased down by a massive Child of the Witch. Your friends are also being turned into creepy maggot like things that will crawl around the Canteen, Fortunately they won’t actually hurt you, but they will indicate where the massive one that will harm you might be. If they’re close, she’s likely to be nearby. She causes a huge amount of damage if she is close to you. White markings will appear when she’s closing in on you, so move to a different spot when that happens
>The idea is to lure the Cursed Child away to the west side of the canteen every time she starts getting close to you. She is invisible most of the time, but occasionally she will appear so you can tell how far away she actually is. Once the telltale white markings start flashing on your screen, run back to the elevator and hold the light for Doshi, who apparently couldn’t take his lantern back or hold a flashlight in his teeth
>Once all the lights on the display are lit up, you’ll automatically jump in, try to select a floor, but it doesn’t matter, you have no choice in the matter
>The Elevator will travel as it pleases, while it does this you need to avoid the bloody spikes that will appear from the floor, you will be able to see where they are a bit in advance
>Keep dodging until you get saved by the NPC you might have seen before on 4th floor
>You’ll be hanging from a rope next time you see Brian. use your left and right input to quickly alternate going left and right Brian to swing to the emergency ladder on the left, he will jump of automatically once you have enough momentum. Try and be quick, the tentacles slowly rising will kill you if they manage to grab you
>Climb up the ladder to be beside the air duct grate, then Use the Screwdriver to open it, then go in. Quickly head east following after our saviours trail, which is relatively straightforward aside from some obvious dead ends, or minor goodies. Quickly continue east through the air ducts to get to the exit in the southeast
>The choices in the following scenes do not matter
>Buckle up kiddos, the real Yuppie Psycho starts here
Back to Work or Hugo is Bad
>After escaping that eventful birthday party, Brian will wake up in Office E. South of your computer is a note from the U.S.S.R. If you access Sintranet, you will only find the destroyed remains of Sintra and a scrawled message across the wall. There’s nothing you can do there, so head back to the office, and I’d suggest you save now. The image might look a bit different somehow though…
>Your main goal is to rebuild the android, but you have an optional goal as well, which is to free your coworkers from being Witches Children. This is optional, but gives an achievement if you get all of them, as well as extra dialogue at the end. But all you need to do is use the plastic knife on them and then, remembering their first names and the injuries they had, figure out who they are.4 of them are gettable from the 5th floor, with the 5th one in Doshi’s Lab on the 3rd. The 6th one isn’t freeable until later on
>Leave Office E and go west to the elevator, which has been blocked off by fallen cabinets
>Look out for the first of the Witches Children, who will be patrolling the floor from this point on. You might recognise them from such encounters as when you got tricked into going into Office D at the very beginning of the game
>If it sees you, it will charge at you, but you can easily avoid it by just moving out of it’s way then going on your merry way, or hiding under tables. But if it hits you even once it will instantly kill you
>Go north, in Office C you can speak with Col. Dadamont, who will encourage you to seek out your friends, and tell you to call their names to save them. Just east of Office C is a briefcase with the Fired VHS Tape
>Head west for the 5th floor washrooms, grabbing the Cardboard Box to the west of the door, just in front of the A.M shrine, and use the air duct shortcut you made earlier to speak to the Forest Goblin on the 8th floor. Speak with him to update Brian’s next objective: Get to the IT Department on the 3rd floor
>Now, the elevator is no longer available to travel between floors, instead you have to make use of the Emergency Exit Stairwells that can be accessed by the unlocked doors, typically placed on the far west of most floors. The 5th floor Emergency Exit is to the northwest of the floor
>Now you have a sort of inbetween area to travel to the different floors. There are patrolling mines now that you need to be wary of, take them out with a pencil if they get to close or just go around them
-The 5th cursed friend is on the 2nd floor, hope you did the initation test earlier. The box heads will no long hurt you
>Head for the 1st floor Canteen where that amazing party was held, enter the Canteen, and head east towards the Elevator so you can grab the Yuppie Devil disguise off the body in the centre of the pentagram
>Return to the 3rd floor via the stairwell. After entering it, head north east for the locked door you might have noticed behind Doshi, it will have been covered by a sort of hospital divider. You can enter the room now you have Doshi’s Keys
>One you enter, go for the machines left of what looks like part way completed android and grab the Mr.Fileto VHS Tape, then interact with the computer terminal to the right of the android
>Exit the 3rd floor and go back to the stairwell, then walk all the way up to the 9th floor. We’re ignoring the 10th floor for now
The Devil Wears a Dead Man’s Suit
>Once you get to the 9th floor, head all the way east until you get to the intercom, then use the Devil Suit, you will automatically change and then enter the new area
>Head north and speak with the receptionists, then go behind them
>Now this bit seems a bit tricky at first, but once you have the layout figured out, you’ll be relatively fine
>This is not a rotating area, after you go behind the receptionists, it’s a set space with 9 art installations set up with walls, so you don’t have to worry about getting lost
>There are 3 wings on each side, with 3 paintings on each one. There are 2 in the centre, one with Sintra’s head in a glass case, with a non functional Dot Matrix above it. At the very top is a empty painting, with an unhung empty painting leaning next to it
>Basically this ♥♥♥♥♥♥ drawing is the layout:
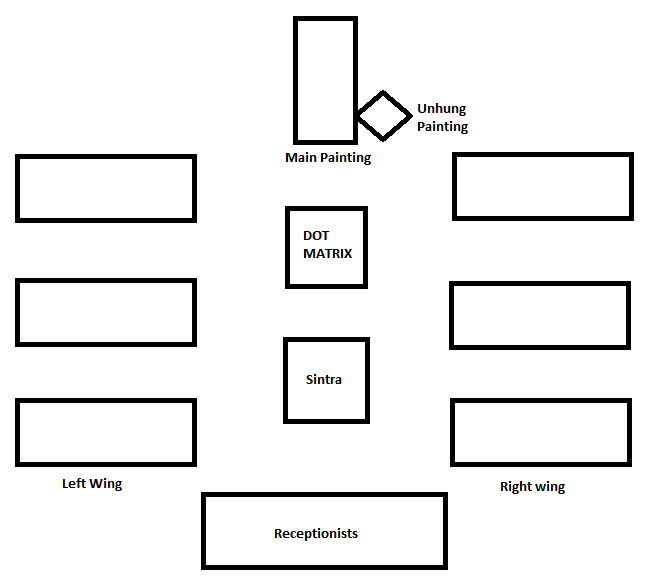
>Examine every painting except hers, This will break the barricade around the Dot Matrix, which is what we want don’t worry
>The Lady in Red will cycle between the 4 empty paintings in the gallery (excluding the topmost left set, and the bottommost right set), she will do this every time you interact with a painting beside her, this is important to note
>Towards the north is a red cocktail on a table that will replenish health so use that if you feel you’re in danger, and an unhung painting. Grab the empty painting
>Next head east, there will be a blank spot in the centre, interact with it to hang up the blank painting, then search out the Lady in Red
>The goal here is to warp her to the solitary painting to the north at the far end of the gallery
>Now depending on the side you interact with, the painting will go to a different spot
>If she’s on the left, examining the painting to her left will cause her to travel up or down on the left side, examining the painting to her right will cause her to switch to the right wing. The opposite is true for if she’s on the right side of the gallery
Answer(From her starting position):
/Examine the painting to the right of the Lady in Red, “The creature’s skin was whitish.”
Next, examine the painting to its right again, “Method”
Finally, examine the painting to its left, “Olivier”
>When the painting is in it’s rightful place, you will a short scene with Mr. Spader. Your answer here doesn’t matter but he will give you the Sintra head, and then follow you to the entrance of the gallery
>If you broke the barricade around the Dot Matrix earlier, then you can grab the Office Party VHS tape on the walk back down
Completing the Android
>When your on your way back to the Emergency Exit, an alarm will trigger, Sintracorp sentries are now actively on the lookout for you, but you still have to get to the 3rd floor
-If you get caught in the sensor range of a sentry, you take damage. And sentries will continue to chase you until you get out of it’s range and hide. Stay out of the sensor and you’ll be fine. Being caught in the yellow alerts it, red hurts you. If one spots you, duck into the nearest hiding spot you can find
>Head down until you’re at the stairs just below the 9th floor and wait until the sentry shows up
>Once it turns around, follow behind it then hide in the cabinet on the 7th floor, wait for it to go past you, and then exit your hiding spot and head for the 3rd floor
>The IT Department has two sentries patrolling it. Wait beside the exit until the first sentry faces east, and then crawl under the table, when the first sentry faces west, you can run to the next table to the east, near the elevator. Remember there’s another sentry on the other side you have to be careful of. Take your time and watch their movements before making a break for it
>When the second sentry heads east, follow after it and then quickly hide in the cabinet before it turns around. Wait in the cabinet until it turns west, the exit the cabinet and make a run for Doshi’s lab in the northeast, you’re safe once you make it into the lab
-From this point on, it’s endings time. I’d advise doing them once you have everything done, but before you say Yes to Sintra in the lab, so you can minimise having to repeat things
Ending: Fired
>Sintra will ask if you’re ready, say nope, and get going to the 10th floor buddy it’s a long walk
>Avoid the sentry as you go up, saving at the Photocopier as you go, you need the reload point, and then just continue to the 10th floor, then walk forwards to talk with Hugo, and at the end of the discussion, you’ll receive a Dismissal Letter from him, as well some slight backstory on Hugo himself (still deserves a punch though)
>There’s nothing else you can do now, so you need to go all the way back down to the lobby. And you still have to avoid the sentry. Thanks Hugo, you’re a real p…each
>You are now free to leave the Sintracorp office building forever by leaving through the entrance you started the game at
>And now it’s time to reload!
Stealing the Athame
-Having the Athame means that you will get a credit sequence you wouldn’t have otherwise, but you need to complete the Depth’s sequence twice, one without the Athame, and one with
>Now as entertaining as it would be to just hit Hugo over the head with a pot, you need the Athame before you can confront him
>Head to the 10th floor just like you did before, avoiding the sentry as you go. But once you enter the room, DON’T go all the way north to confront Hugo, we’re gonna be stealthing this, and for that, you need to get the controller, which you can find between the elevator and the CEO’s desk on the long table, in front of the coral-plant-decoration
>Use two batteries from your Inventory to get the remote working. Brian, our lovable idiot, will automatically turn it on, which isn’t the best timing for us. Don’t worry though, just run east and hide under the long table while Hugo walks down to turn the screen off. When Hugo is back at the desk, head back for the remote and wait there
>What you’re waiting for is Hugo to leave the Athame out on the desk, this is usually when he’s making those “croaking” (quacking) noises. You need to turn on the television while it’s out to startle Hugo, so he’ll forget the Athame on the desk while he goes down to turn off the screen
>As soon as you turn on the screen, run east and dive under the long table. Crawl under it until your to the north, as close as you can get to the CEO’s desk
-If the Athame isn’t on the desk, just keep repeating these steps until it is
>While Hugo is on his way down, quickly run out of hiding, grab the Athame, and run west to duck under the nearby table, then crawl south. Keep going south and then crawl under the next table
>Now sprint for the Emergency Exit (the door to the very south you entered through) BEFORE Hugo gets there
>Head back to Doshi’s lab
-Now, this is the point where your accomplishments up to this point will lock you in to an ending. Stealing the Athame locks you out of getting the Fired ending, and missing the final friend will lock you out of one ending
–The Ending: Back Home, is always available by default, regardless of what you’ve managed to do, but stealing the Athame and rescuing all your friends just make it easier to get all the ending in one fell swoop
-Make sure you have bought the Water Breathing Contract from the Forest Goblin if you did the Initiation as it will make the next section a piece of cake. If you didn’t, seek out pipes with bubbles to replenish oxygen so you don’t drown
The Depths of Sintra or the Underwater Level
>If you’re ready to go, accept Sintra’s offer, and she’ll take you to the 2nd floor Residences to the southwest. Once you have control again, attempt to leave the area, and you’ll discover the path was blocked. Follow the door Sintra went through, then examine the north wall inside of the room
>Continue north of the new area, and I suggest saving at the Photocopier here
>Jump into the water and head east until you reach a T-junction
>Go south and then east at the T-junction, stay at the top of the passage to avoid the spiky coral trap and keep going until you get to a fork
>Head south, it’s longer, but there’s a VHS tape on the way and less mines
>Follow the south park until you hit a fork, go east, destroy the mine and then open the briefcase for Mom & Dad VHS tape, the last one you can find!
>Continue north along the path, sticking to the west to avoid more coral spikes
>At the next junction, you can go southeast to refill your oxygen, but you need to go northwest to the next one
-To the west is a pencil in a filing cabinet for the VHS tape if you need it
>Head north past the oxygen supply to the last T-junction, go east. Bait the coral, then wait for the coral to retract their spikes enough, and then quickly continue to swim east to the new area
Nest of Vipers
>Once the white snake bites you, you’ll be transported to the underwater office, the final area of the game! The photocopiers don’t work, even if you use Witch Paper, so ignore them
>The danger here are the white snakes, who will take a sense from you every time they bite you and make it more difficult to move around/get the clues for the other ending
The best order, in my opinion, is:
Nose (With the Water Breathing Contract it doesn’t affect you)
Ears
Mouth
Hands
Eyes
-If you don’t have the Water Breathing Contract, switch the places of Ears and Nose
The Finale
Ending: Back Home
>Chose to be bitten by all 5 snakes and you will be transported to a rather unsettling area, just head north and Sintra will come to the rescue. After the dialogue, run past the Serpent and Sintra, and interact with the Serpent’s body to climb on top of it, and then run along the body until you get to the entrance of the den. Press E to climb up onto the cliff, then Use the Jingle Bells from your Inventory while standing next to the large crystal containing Rei Sintra. Leave through the lobby and then watch the credits, and post credits scene, and then continue from your last save once you hit the main menu
Ending: Stay With Me
-In this ending, you need to rescue Kate at the very bare minimum
>First head west from where you started, and look for Circuit on the ground, like the ones that were in the Dot Matrix’s Lair
>Use the Switch Button in your inventory on it, to move a cubicle to the east out of the way
>Head northeast to the wall where the next Circuit is and use the Switch Button on that. This will move a cubicle out of the way and reveal a briefcase to the southeast. Interact with it to grab the first bit of the code
>Go south and destroy the mines, then grab next part of the clue from the filing cabinet, the one just in front of the coral
>Go northwest to two photocopiers in front of two vending machines, use Witch Paper on the one to the right to get the next part of the code
>Swim to the north wall where you’ll notice a bunch of air duct grates. Go for the one above a tower of fallen cabinets, then Use your screwdriver for the next piece
>Now head back to the elevator and enter it once you have the four clue pieces, and then input the code into the elevator keypad
Code: Bell-Bell-Bell-2-4-6-8
>This will warp you to a hidden area, head towards the familiar figure ahead of you and use your Plastic Knife on it (occasionally it will glitch and disappear, just use the Plastic Knife near the northern wall) and then tell the last cursed child it’s name
>If you rescued all your other friends, then the answer is obvious as it will be the only one left. But otherwise, the answer is Kate. Whether you get the answer right or not, you will still be forced to leave the area
>You will appear with Sintra in the Serpent’s Lair. After the dialogue, run past the Serpent and Sintra, and interact with the Serpent’s body to climb on top of it, and then run along the body until you get to the entrance of the den. Press E to climb up onto the cliff, then Use the Jingle Bells from your Inventory while standing next to the large crystal containing Rei Sintra
>After the scenes on the 10th floor, speak with Kate in the lobby, then interact with the emergency Stairwell to view her ending
Cocoon-Worker Locations
Inay Doshi
>In your office, use R.Corvo’s card (gained after the fight with the DOT by checking the skeleton at the bottom of the pool) on your computer and enter Sintranet
>Head towards the cocoon with bleeding ears and use the plastic knife
>Answer with Inay
Marta Sosa
>Using the vents in Office E, go to the 7th floor
>In the room where Mappy was before (Furthest to the west), use the plastic knife on the cocoon with bleeding eyes
>Answer with Marta
Irina Rostov
>In the office where the the filing cabinet monster was (Office D, floor 5) Head through the now opened area and check out the area behind where it was to the far northwest
>Use the plastic knife on the cocoon with the bleeding mouth
>Answer with Irina
Jenna Malone
>Use the airducts in the bathroom of floor 5 to go to the Forest Goblin on floor 8
>Head south of the forest goblin, back towards the river, and use the plastic knife on the cocoon split down the middle
>Answer with Jenna
Anthony Chapman
>Use the emergency staircase to go down to the 2nd floor, then go to the room where you helped him get promoted (The Initiation test room)
>The box heads won’t hurt you so you don’t have to avoid them
>Use the plastic knife on the cocoon splattered in blood
>Answer Anthony
Catherine/Kate Hicks
>Once you have found all the pieces of the code, go into the elevator and enter it on the keypad, then go up to the Child of the Witch that was chasing you at the party earlier
>Use the plastic knife on it (If it disappears due to a glitch, don’t panic, just use the knife on on the furthest wall and it will still work)
>Code Bell, Bell, Bell, 2, 4, 6, 8
>Answer with Kate
Items Part 1
This will be divided into two sections, basically before the party and after, as some areas will get rid of the old spots, assuming you’ve already grabbed them, but it does introduce new ones as well as new areas. If I knew how to pull out the games map, I’d be able to just circle where items are but alas, yall will have to do with descriptions. It all flows on from each other, so if you don’t know where one is, go to the past item you know the location of and work from there. I know it’s a bit roundabout, but it was the best way to do it without just giving the cardinal directions and being done with it
-Water Cooler beside the fridge
-30 credits in the southeast corner
-Empty Cereal Box on a table to the southwest
– Ramen in the fridge
– Later on there’s a Cheese in the fridge, check before going to the Graveyard
-Ink Cartridge in the ashtray beside the elevator
-Witch Paper from the briefcase to the south
-Batteries x2 from a stand off to the west (next to the Emergency Exit)
-Coffee Powder in the trash to the east, near Chapman
-A slice of Bread from a fallen file cabinet in the southwest corner
-A can of Soda from the chair to the east
-You can grab a Battery x1, Witch Paper x1 and a slice of Cheese from the desks and cabinets behind Doshi.
-Directly west of the Elevator is a Water Cooler, a filing cabinet with Witch Paper, and a wastebasket with Candy Bar x1. Go south to find a group of employees circling what appears to be a destroyed printer, then go west to find a cubicle with Battery x1 in a wastebasket, as well as Batteries x2 and Pencil x2 in nearby filing cabinets. Then duck under a desk to the west and crawl under to the other side. You’ll find filing cabinets with Raw Pizza x1 and Electronic Piece x1.
-Near Kate is a filing cabinet with Witch Paper.
-The briefcase on the ground in the center of the Marketing Department has 30 Credits.
-At the Anarchy slogan duck under the nearby desk and crawl to the west to reach two filing cabinets that contain Batteries x2 and a Blood Trail VHS tape
-Go back to the Elevator and head east, then north. If you head east at the fork, you can continue southeast to find a briefcase on the ground with Witch Paper inside.
-Head west of Kate to find a cabinet with a Packet of Coffee Powder x1.
-From the HR door, head directly south to the circle of chairs. To the southwest of it is a briefcase with Battery x1
-Once inside, you can get Coffee Powder x1 from a briefcase to the northeast.
-Examine the first filing cabinet for Batteries x2
-Examine the second HRS’ desk for Batteries x2
-Examine the third HRS’ desk for an Ink Cartridge
-Go west and grab the Witch Paper from the briefcase on the ground
-Cheese x1 from the filing cabinet to the north
-Ink Cartridge x1 from the briefcase on the ground.
-You can grab Batteries x3 and a Candy Bar x1 from the cabinets to the north in the same room.
-The fallen filing cabinet to the southeast contains 25 Credits.
Once you have the Poison Gas Contract
-Head south at the circle of chairs, and then west into the Poison Gas area you couldn’t enter the last time you were here. You can grab a Battery x1, and Ink Cartridge x1, and Witch Paper x1 from the filing cabinets along the way.
-In the next area, you can find Witch Paper x2 and Dry Noodles x1 from the fallen cabinets around the bloody words on the ground. You can grab an Electronic Piece from the chest in the centre
-Head south past the bodies into the fog. You can grab 20 Credits from a briefcase.
-If you have spare Pencils left, you can push the filing cabinets to the west, past the first blue switch, to create access to a Water Cooler and a cabinet with an Ink Cartridge
-Destroy the mine with a Pencil if possible, then grab Bread x2 and Glow Sticks x2 from the filing cabinets ahead. The cabinet to the upper left contains Coffee Power x1.
-Crawl under the desk to the west to reach some filing cabinets with Dry Noodles x1 and The Weary Human Face VHS tape
-Witch Paper x1 from the briefcase
-Find an Ink Cartridge x1 from the briefcase to the southwest
Dot Matrix Boss Area
-Up north, next to a Coffee Vending Machine, is a filing cabinet with Glow Sticks x3.
-Near what seems to be a broken printer in the centre of the lair, is a cabinet with Glow Sticks x3.
-Toward the south of the lair are fallen cabinets containing a Cheesex1 each.
–Along the far eastern wall is a Cardboard Box x1. Grab 30 Credits from the briefcase on the ground to the southeast.
-Head northeast. The fallen cabinet beside Kate has Ink Cartridge x1.
-Grab the Coffee Powder x1 from the briefcase when you go north to escape the area
-The filing cabinet to the west meanwhile has another Ink Cartridge.
-Look to the northwest for a Cola x1 on the stand
-If you return to this area later on, there will be a Cassette Tape in the chest to the northwest, and a raw Pizza in the filing cabinets to the east
In your office
-Bread x1 from the filing cabinet to the east, and Candy Bar x1 from the computer in the southwest cubicle
-The water cooler is to the west
-The desk next to the first Coffee Maker has a can of Soda.
-Grab the can of cat food from Hugo’s desk while he isn’t there
Outside your office
-The filing cabinet behind the 5th floor receptionist’s desk has Witch Paper x1
-The bin near the Vending Machine next to the Office A door has 30 Credits
-In the washroom, you can get a Water Cup from an employee inside if you, uh, like
-When that employee is gone, you can grab the From the Drain VHS tape by examining the stall he was in
Office D
-Bread in a fallen filing cabinet
-20 Credits in the bloody corpse hanging from the ceiling, and another 20 Credits from an upright filing cabinet along the way.
Office B
-A Water Cooler
-In the cabinets and bin: Witch Paper x1, Dry Noodles x1, 30 Credits and Batteries x2.
Archives
-Water Cooler
-Cheese from the cabinets up north
-Candy Bar from the filing cabinet.
-You can find Witch Paper in the middle filing cabinet behind the reception desk
-Ink Cartridge in the filing cabinet to the left of the first symbol
-Pencil in the filing cabinet to the right of the Water Cooler.
-Going from the authors area, the briefcase has Witch Paper
-Pencil x2 and a sheet of Witch Paper from the filing cabinets further right
-Bread from one of the nearby filing cabinets.
-Pencil x1, Soda x1, and 2x Packs of Coffee Powder x2 from the cabinets lining the wall
-The briefcase near where the corpse dropped has Witch Paper and a Wrapped Sandwich
-Pencil and Witch Paper from the cabinets lining the back wall.
-Pencil x2 from the filing cabinet near the door.
-Witch Paper from a briefcase near the center of the room if desired.
-Chrysalis VHS Tape from a fallen cabinet
-Grab Batteries x3 from the briefcase near the corpse.
-You can grab a sheet of Witch Paper and Candy Bar x1 from the bookcases along the walls
-You can grab Batteries x2 from a chest to the left
–UPDATED Cardboard box in room full of mines, it’s behind one of the mines
-There is a chest southwest of the crying NPC, at the flowers go west until you reach a chest contains the Follow a Cat through the Woods VHS Tape
–UPDATE Directly south of the fireflies and bushes area is a cardboard box
-To the northeast of the elevator, and southeast of the gates, there is a chest with witch paper inside, past the NPC and the swingset
– In the next area, on the way to eavesdrop on the employee, there is a chest with Witch Paper x2.
-Directly south is another path to a chest containing Coffee Powder x2
-The chest near the Forest Goblin contains a slice of Cheese
Items Part 2
Only applies AFTER Hugo’s Party
-Grab a Yuppie Devil disguise from the body off the floor on the far east, south of the elevator
-Grab Batteries x2 and Coffee Powder x1 from the cabinet in Doshi’s Lab
-Glow Sticks x3 from the bin
-Mr. Fileto VHS Tape from the machines to the left of the android
-Examine the red envelope for Witch Paper x1
-Once you leave Office E, grab Witch Paper x1 from the briefcase on the floor near Office F.
-The fallen cabinets blocking the elevator, contains 30 Credits and Dry Noodles x1.
-Cardboard Box x1 just west of the 5th floor washrooms (which you can use to create a shortcut inside Office E if you haven’t done so already)
-Use the air duct shortcut to return to the Forest Goblin on the 8th floor. Speak with him to get a slice of Cheese and sympathy
-East of Office C’s entrance is a briefcase containing the Fired VHS Tape
-Batteries x2 near Office B
-30 Credits in the briefcase in the first fork to the right
-Coffee Powder x1 in the dead end behind the cursed child
-Grab the Water Cup x2 from the briefcase as you continue east
-Grab the Bread from the one of the nearby filing cabinets.
-Pencil x2 in the filing cabinet near the 3rd floor door
-Going down to the 1st floor Canteen, there’s 50 Credits from a briefcase along the way
-Candy Bar x1 from the cabinet next to the emergency exit door of the 1st floor Canteen
-Glow Stick x1 from the pile of cardboard boxes to its south.
-Soda x1 from a fallen cabinet along the way on the 8th floor
-One of the filing cabinets near the 10th floor entrance has Witch Paper x1.
-Witch paper from the fallen cabinet north of the Photocopier before going into the water
-Head east when you are underwater, grabbing Batteries x3 from a cabinet along the way.
-Grab Pencil x2 from the briefcase at the T-junction
-You can grab a Candy Bar x1 from a cabinet if you head north to a dead end.
-Head south and grab Cola x1 from the filing cabinet at the next T-junction.
-Go east (the west path only leads to a dead end) and grab Glow Sticks x2 from a cabinet at the fork.
-Go south, grab a Candy Bar x1 from the filing cabinet at the next fork
-Head east, using a Pencil to destroy a landmine in front of a briefcase. Open it to get the Mom & Dad VHS Tape
-Go north, sticking to the west side of the passage to avoid another spike hazard. Grab a Candy Bar x1 from the filing cabinet
-Go northeast to find Nicoterol x1 in a briefcase near a spike hazard
-At the next junction, go northwest to grab a Pencil x1 from a filing cabinet
-Grab a Pencil x1 from the briefcase, then head west.
-Candy Bar x1 from a filing cabinet.
-Candy Bar x1 from the nearby briefcase
-Pencil x2 from the cabinet to the west
-Witch Paper x1 from the briefcase to the northwest
-Coffee x1 from the filing cabinet further west from the surrounding area.
-There are also a few Water Coolers nearby if you need some Cups of Water.
-Head east and grab Coffee x1 from the cabinet,
-Continue north, grabbing Cheese x2 from the cabinet north of the eastern set of Photocopiers, —–Pencil x2 from the cabinet along the northern wall
-Go north near the eastern group of Photocopiers, then head west, grab Pencil x2 and Cheese Sandwich x1 from the filing cabinets
-One of the two briefcases near to the western filing cabinet contains Witch Paper x1, the other has a white snake
-Swim back down to the nearby Vending Machines to collect Soda x1 from one of them
-Go west for Batteries x3 from the filing cabinets in the northwest corner.
-Head south and grab a slice of Bread from the filing cabinet
-Get a coffee from the vending machine