Overview
Japan can do a lot with little land and has great military potential. Here, I detail Japanese strategies and counter-strategies.
Legacy Guide
If you have the Rise and Fall expansion, click here for the updated guide.
This guide is no longer updated, but will remain for the sake of those without the Rise and Fall expansion.
Introduction
Note: This guide only covers content released prior to the Rise and Fall expansion. Content from any DLC pack released between the base game and Rise and Fall is marked as such.
The sun rises upon your realm. You have a civilization that can do a lot with a little land, and defend it well. But be warned – your people will soon demand housing and amenities, and failure to provide them will limit the potential of your realm. Be ready for war in order to secure such limited resources. Your Samurai will never tire of war, and will be relentless in their drive to secure the coasts of the world. And if you cannot awe the world on the battlefield, you can awe the world in their own homes; through innovations in consumer electronics and the myriad forms of media that define the information age.
This guide is divided into multiple sections explaining how best to use and play against this specific civ.
- The Outline details the mechanics of how the civilization’s unique features work and what their start bias is (assuming they have one at all).
- The Victory Skew section describes to what extent the civ (and its individual leaders where applicable) are inclined towards particular victory routes.
- Multiple sections for Uniques explain in detail how to use each special bonus of the civilization.
- Administration describes some of the most synergistic governments, civic cards, pantheons, religious beliefs, wonders, city-states and Great People for the civ. Only the ones with the most synergy with the civ’s uniques are mentioned – these should be given more consideration than they would be for other civs but are not necessarily the “best” choices when playing as the civ for a given victory route.
- Finally, the Counter-Strategies discusses how best to play against the civ, including a consideration of leader agendas if the civ is controlled by a computer.
Note that all costs (production, science, culture, gold, etc.) mentioned within the guide assume a game played on the normal speed settings. To modify these values for other game speeds:
- Online: Divide by 2
- Quick: Divide by 1.5
- Epic: Multiply by 1.5
- Marathon: Multiply by 3
Terminology used in this guide and not in-game is explained here.
AoE (Area of Effect) – Describes bonuses or penalties that affect multiple tiles in a set radius. Positive examples include Factories and Stadiums (which by default offer production and happiness respectively to cities within a 6 tile radius unless they’re within range of another building of the same type) and a negative example is nuclear weapons, which cause devastation over a wide radius.
Beelining – The strategy of obtaining a technology or civic quickly by only researching it and its prerequisites. Some deviation is allowed in the event that taking a technology or civic off the main track provides some kind of advantage that makes up for that deviation (either a source of extra science/culture or access to something necessary for a eureka or inspiration boost.
CA (Civ Ability) – The unique ability of a civilization, shared by all its leaders. Unlike unique units, buildings, districts and improvements, civ abilites do not have to be built.
Civic cards – Another name for policy cards; you fill up your government with these for additional bonuses and can switch them for free every time you unlock a civic.
Compact empires – Civs with cities close together. This is useful if you want to make use of districts that gain adjacency bonuses from other districts, maximise the number of copies of the same district in the same area, or to maximise the potential of area-of-effect bonuses later in the game.
Dispersed empires – Civs with cities that are spread out. This is useful if you want to ensure cities have plenty of room for both districts and tile improvements. Civs with unique tile improvements generally favour a more dispersed empire in order to make use of them, as do civs focused on wonder construction.
GWAM – Collective name for Great Writers, Artists and Musicians. All of them can produce Great Works that offer tourism and culture, making them important to anyone seeking a cultural victory.
LA (Leader Ability) – The unique ability of a specific leader, which like civ abilities do not have to be built. Usually but not always, they tend to be more specific in scope than civ abilities. Some leader abilities come with an associated unique unit on top of the standard one every civ has.
Start bias – The kind of terrain, terrain feature or resource a civilization is more likely to start near. This is typically used for civilizations that have early bonuses dependent on a particular terrain type. There are five tiers of start bias; civs with a tier 1 start bias are placed before civs of tier 2 and so on, increasing their odds of receiving a favourable starting location.
Complete information on start biases within the game can be found in the Civilizations.xml file (find the Civ 6 folder in Steam’s program files, then go through the Base, Assets, Gameplay and Data folders to find the file). If a civilization is not listed as having a start bias there, it does not have one, even if you feel like you keep spawning in the same terrain when playing as that civ.
Tall empires – Empires that emphasise city development over expansion, usually resulting in fewer, but bigger, cities.
Uniques – Collective name for civ abilities, leader abilities, unique units, unique buildings, unique districts and unique improvements.
UA (Unique Ability) – A collective name for leader abilities and civ abilities.
UB (Unique Building) – A special building which may only be constructed in the cities of a single civilization, which replaces a normal building and offers a special advantage on top.
UD (Unique District) – A special district which may only be constructed in the cities of a single civilization, which replaces a normal district and offers some unique advantages on top. In some cases, there may be minor disadvantages as well, but these are always outweighed by the positive features. All unique districts cost half as much to construct relative to the regular districts they replace.
UI (Unique Improvement) – A special improvement that can only be built by the Builders of a single civilization. Unlike unique buildings or districts, these do not replace a regular improvement. Some require a technology to unlock, and many have their yields improved with later technologies. “UI” always refers to unique improvements in my guides and not to “user interface” or “unique infrastructure”.
UU (Unique Unit) – A special unit that may only be built by a single civilization, and in some cases only when that civilization is led by a specific leader. These usually replace an existing unit and offer extra advantages (and occasionally minor disadvantages as well in exchange for bigger advantages).
Wide empires – Empires that emphasise expansion over city development, usually resulting in more, but smaller, cities.
Outline
Japan has no start bias.
- Campus, Commercial Hub, Harbour, Holy Site, Industrial Zone and Theatre Square districts receive +1 of their respective yields for every adjacent district, instead of for every two.
- This is separate to the +2 gold Commercial Hubs get from being adjacent to Harbours; that bonus is unaffected.

- All military land and naval units gain +5 strength in land tiles adjacent to the sea and coastal (shallow water) tiles
- This bonus is applied based on where the defending unit is at the start of combat.
- Lake tiles are treated as land tiles for the purpose of determining where the bonus does and does not apply.
- This bonus has no effect on air units.
- -50% production cost for Encampment, Holy Site and Theatre Square districts
A medieval-era melee infantry unit which does not replace anything


Military Tactics
Technology
Medieval era

Gunpowder**
Technology
Renaissance era

Musketman
(100
 )
)
or
640
or
320
 *
**Purchasing units with faith requires the Theocracy government, which in turn requires the renaissance-era Reformed Church civic. This number does not take into account Theocracy’s 15% discount on faith purchases.
**If you lack access to nitre, you may continue to build Samurai even beyond the Gunpowder technology.


- Does not lose strength when injured
- +10 strength vs. anti-mounted units
Notable features
- Does not require resources to build
- Has 48 strength, 12 more than classical-era Swordsmen and 7 less than renaissance-era Musketmen
- Does not lose strength when injured
An industrial-era Industrial Zone building which replaces the Factory

Industrialisation
Technology
Industrial era

Industrial Zone

Workshop

Power Plant
or
1560

4
 with the modern-era Electricity technology
(2
if filled)

*Cities cannot benefit from the production of more than one Electronics Factory.
Positive changes
- 4 production, up from 3 to cities within six tiles, unless they are already in range of an Electronics Factory
- Provides 4 culture with the modern-era Electricity technology
- Unlike the producton bonus, this does not extend to all cities within a six-tile radius.
Victory Skew
In this section, the civ is graded based on how much it leans towards a specific victory type – not how powerful it is. Any score of 3 or above means the civ or leader has some kind of advantage to the victory route above a hypothetical civ with no unique features. A score of less than 2 means some kind of aspect of the civ actively discourages a particular victory route. All values are subjective and may be edited in future.

Culture

Domination

Religion

Science
(Decent)
(Ideal)
(Decent)
(Good)
Culture isn’t a bad option for Japan. Half-price Theatre Square districts and double adjacency bonuses from other districts makes Japanese Theatre Squares nearly as good as Greek Acropoles. Furthermore, strong coastal defensive bonuses incentivises you to build or conquer near the sea, where you can build lots of coastal resorts later. The +4 culture from Electronics Factories will be a minor help in getting through the civics tree, but is more useful for players neglecting culture than ones with lots of it already.
Domination is the best path. Samurai are devastatingly powerful if you can unlock them quickly, and getting extra science from Campus districts adjacent to other districts will help you get there fast. Cheap Encampments means you can get the juicy +1 production bonus and +25% XP gain from Barracks quickly ready to spam Samurai. There’s also the matter of extra production from Industrial Zone adjacency and Electronics Factories to help you build more throughout the game.
Religion is a fine path to take. Holy Sites with extra adjacency are nice to have, though Holy Site adjacency bonuses are fairly easy to get anyway. Still, the low cost of the districts can provide you with a head start towards founding a religion. Japan’s good mid-game combat ability discourages civs from trying to declare war on you and pillaging your religious units.
Science is a pretty effective option. Placing cities close together early in the game allows you to build Campuses next to each other and enjoy a strong early science output. You can do something similar for Industrial Zones to help you with the spaceship.
Civ Ability: Meiji Restoration (Part 1/2)
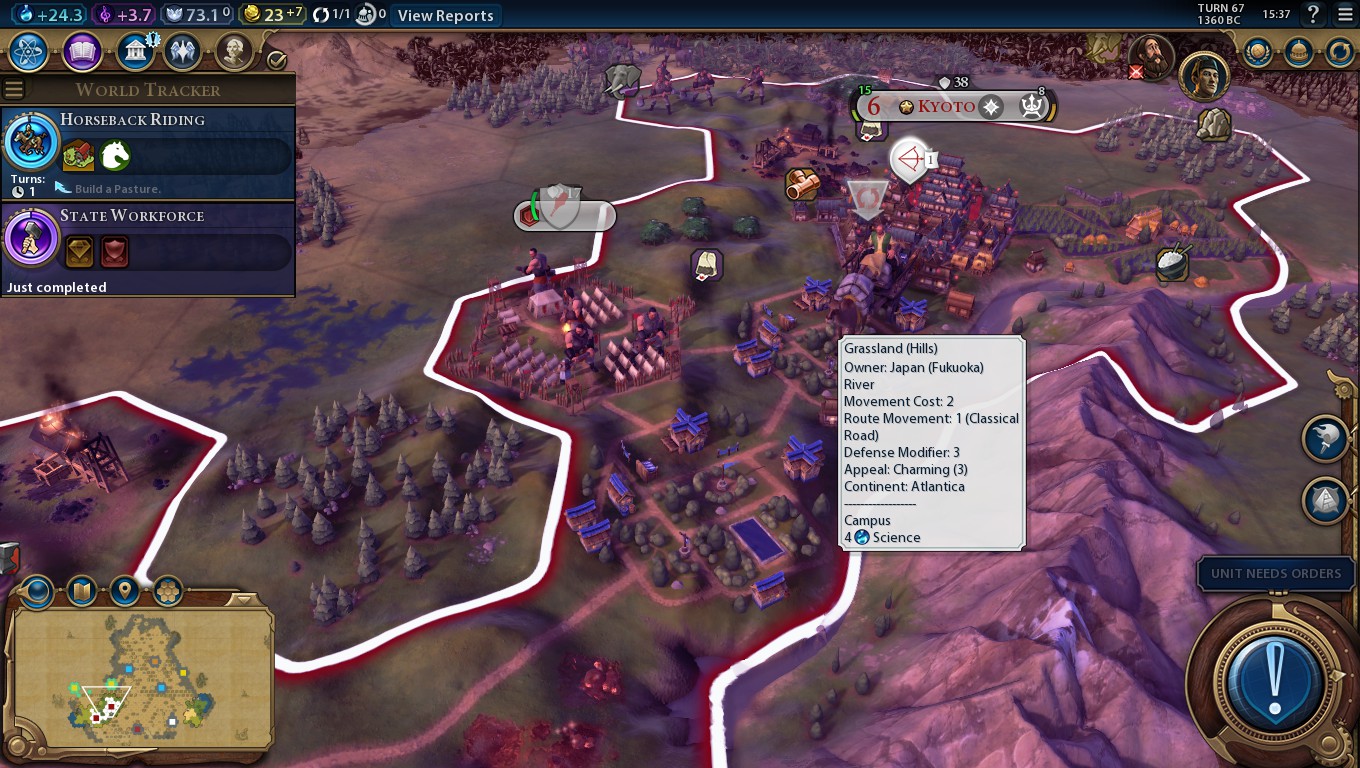
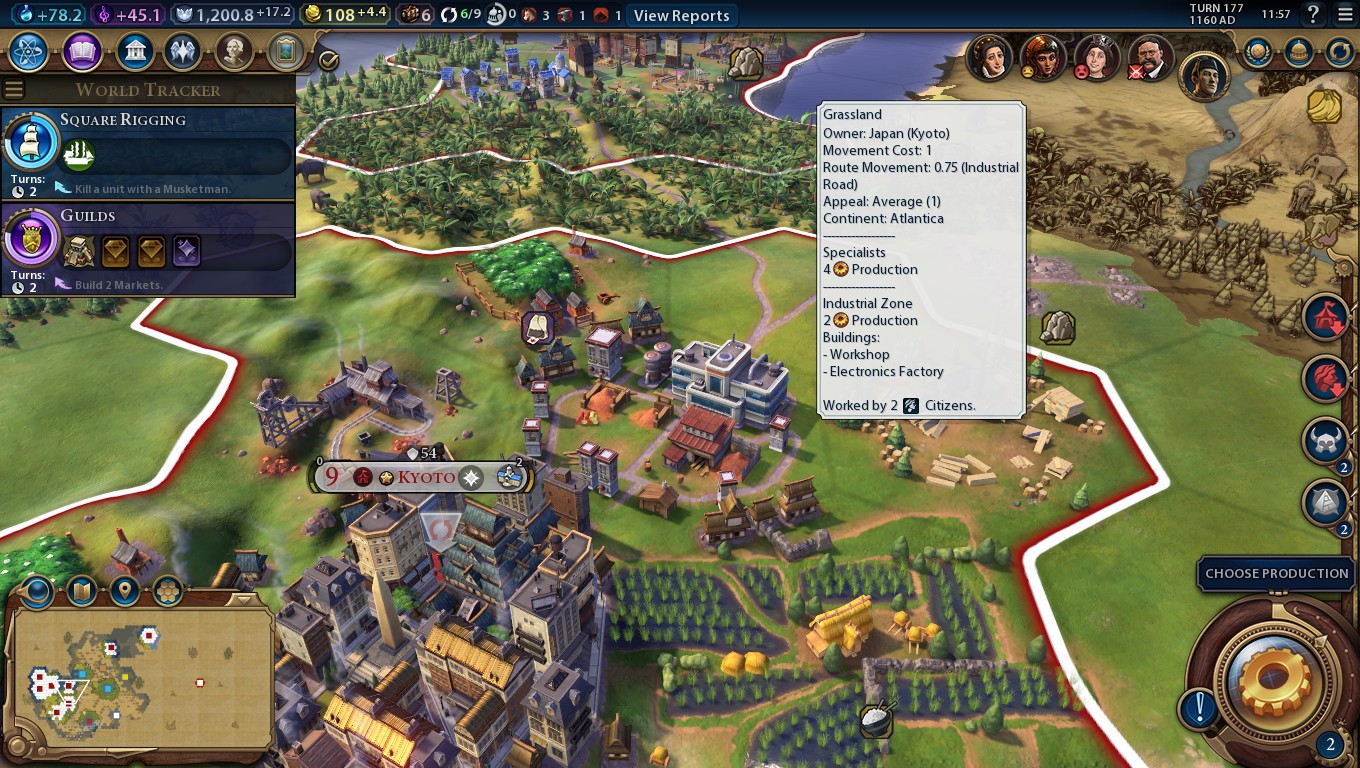
The other Campus offers +5 science. Not bad for this early in the game.
The Meiji Restoration lets you do a lot of things subtly more effectively than normal. It’s a very flexible bonus that aids any victory route and remains useful throughout the game. Before going into how exactly it should be used, first it’s important to go over the mechanics.
Six districts in the game (Campus, Commercial Hub, Harbour, Holy Site, Industrial Zone and Theatre Square districts) normally receive +1 of their respective yields (science, gold, gold again, faith, production and culture respectively) for every two adjacent districts of any kind. If the district is adjacent to an odd number of other districts, this is rounded down. This means a Campus next to three districts will only get +1 extra science, for example. Consequently, Japan’s civ ability is better than simply doubling the contribution of adjacent districts.
At first, you won’t have many districts so it’s a good idea for look for terrain-based adjacency bonuses. As the game develops, however, terrain can mostly be ignored in favour of creating blobs of districts. In order to maximise bonuses, put districts that gain adjacency bonuses in the middle of the blob of districts, and ones that don’t on the outskirts. Placing your cities close to each other will make it easier to build a good-sized blob of districts sooner, thus maximising the bonus.
Finally, pillaged districts still contribute towards adjacency bonuses, so if you get raided by Barbarians or suchlike the districts left standing are still good.
In a typical game as Japan, you should aim to build Campus districts first. You’ll need plenty of science if you want to unlock Samurai early and take them on the offensive. It’s a good idea to expand to three cities early on and have them build Campuses adjacent to each other as well as near mountains, rainforest and/or a city centre if possible.
Let’s look at this image again. The first district was Kyoto’s Campus, next to the City Centre. With one adjacent district and two mountains, it made 3 science. My second city built a Campus next to it, making the net Campus science output 7 per turn. Finally, Kyoto built an Encampment adding another two points, or 9 science in total.
You can double Campus adjacency bonuses with the Natural Philosophy economic civic card, which requires the classical-era Recorded History civic. This gets replaced in the modern era with Five-Year Plan, which requires the Class Struggle civic and also doubles industrial zone adjacency yields.
Considering Hojo Tokimune’s ability makes Holy Sites half-price and Japan’s civ ability will make getting high adjacency yields easier, going down the religious path at first seems to make a lot of sense. The problem is, while you could try and rush Holy Sites to get an early religion and strong faith bonuses, Russia is much better at that specific playstyle. A better use of Holy Sites as Japan is as a second or third district to build next to your Campuses to increase their yields while giving you a good shot at a religion.
It’s worth remembering that Holy Sites get +2 faith from adjacent natural wonders, which is better than you’ll get from adjacent districts. If you’re playing the religious game, putting a few cities around a natural wonder and placing Holy Sites adjacent to it and each other can result in pretty amazing yields.
You can double Holy Site adjacency bonuses with the Scripture economic civic card, requiring the classical-era Theology civic.
For most civs, early Commercial Hub construction is important as an early source of production via internal trading, Hojo Tokimune builds Encampments for half-price, however, and Barracks offer a production bonus of their own, so it’s viable to put off building them for longer than normal. Still, Currency is a technology on the way to Samurai and you’ll need gold to maintain Samurai, so you’ll still want to have some Commerical Hubs around anyway.
The key thing to remember with Commercial Hubs is that they get two adjacency bonuses that can stack with district adjacency. Being next to a Harbour adds +2 gold (on top of the +1 gold from being an adjacent district – although having both districts gives you only one trade route capacity) and being next to at least one river adds +2 as well. It’s not a bad idea to place Commerical Hubs based on maximising these bonuses, and worry about district adjacency later.
You can double Commercial Hub adjacency bonuses with the Town Charters economic civic card, available with the medieval-era Guilds civic. The modern-era Suffrage civic replaces this with Economic Union, which also doubles the adjacency bonuses for Harbours.
Harbours are a good all-round district type, initially offering a decent amount of gold as well as a trade route slot and eventually also offering food, production and housing. Building cities near the coast makes them easy to defend thanks to Hojo Tokimune’s strength bonus in coastal areas, but the problem with building Harbours as Japan is that it’s hard to surround them with a large number of other districts to maximise the adjacency bonus. If you’re building the district for the extra trade route, it may be a good idea to get a Commercial Hub built instead.
If you build a Harbour in a lake, it won’t be much good for building a navy with, but it will be good for maximising adjacency bonuses with. Shipyards make the adjacency bonuses of Harbours also add to production, making them almost like a second Industrial Zone in that sense. If you want to make use of that, be sure to build the city next to a lake in the first place, seeing as Harbours get a +2 gold bonus (and therefore +2 production later) for being next to a city centre.
You can double Harbour adjacency bonuses with the Naval Infrastructure economic civic card, available with the medieval-era Naval Tradition civic. The modern-era Suffrage civic replaces this with Economic Union, which also doubles the adjacency bonuses for Commercial Hubs.
Civ Ability: Meiji Restoration (Part 2/2)
Japan basically gets Greece’s Acropoles, though without the envoys on completion. Hojo Tokimune provides the 50% price discount, while the Japanese civ ability gives you the increased adjacency bonuses from other districts. While you only get +1 culture from an adjacent City Centre instead of +2, you have the advantage of not being restricted in where you can build the Theatre Square (the Acropolis district can only be built on hills).
Considering Theatre Squares are the hardest district type to get adjacency bonuses for, the increased contribution is a very welcome bonus. Cutting the price in half means new cities can afford to get them up and running. What stops Japan using their Theatre Squares as extensively as Greece uses Acropoles is the lack of other culture bonuses helping you to get to Drama and Poetry quickly, and that you’ll want to focus heavily on science and production to get Samurai armies up and running. If you can get to Drama and Poetry early, a well-placed Theatre Square can help you reach Feudalism and the important Feudal Contract military civic card (which makes you build Samurai faster) sooner. This isn’t something you can necessarily do every game, however. You will have to judge for yourself whether or not building a Theatre Square prior to the arrival of Samurai is worth your time.
You can double Theatre Square adjacency bonuses with the Aesthetics economic civic card, available with the medieval-era Medieval Faires civic. With the atomic-era Professional Sports civic, this is replaced with Sports Media which has the added bonus of adding +1 amenity to all stadia.
Getting a bigger adjacency bonus from Industrial Zones makes them worth building if most, if not all, your cities, even before taking account the culture bonus of Electronics Factories (which unlike the production bonus applies only in the city that’s built it, meaning the more cities with an Industrial Zone, the more you can get out of your UB). Once you’ve researched Military Tactics for Samurai, Apprenticeship is a good technology to head for next. Although the production bonus isn’t quite on a par with Germany’s Hansa, production is crucial for domination victories and very important for both scientific and cultural victories as well making any bonus welcome.
If you place Industrial Zones near the centre of a cluster of districts, you can not only take advantage of lots of production from adjacency bonuses, but you’ll also keep the negative appeal Industrial Zones create away from potential Neighbourhood spots.
You can double Industrial Zone adjacency bonuses with the Craftsman economic civic card, available with the medieval-era Guilds civic. This gets replaced in the modern era with Five-Year Plan, which requires the Class Struggle civic and also doubles Campus adjacency yields.
Districts that don’t gain adjacency bonuses from adjacent districts (City Centres, Aquaducts, Encampments, Entertainment Complexes, Neighbourhoods, Aerodomes and Spaceports) are best-positioned on the edge of your main district clusters. That way, the central part of the district cluster with the biggest adjacency bonuses is dedicated to districts that can actually make use of it.
You’ll probably want to minimise your use of building Entertainment Complexes and Aerodomes in particular as they use up part of your district capacity but don’t synergise well with Japan’s uniques. Fewer Entertainment Complexes means you will need to be careful with amenities; don’t over-extend, make sure you have a good diversity of luxury goods and look for civic cards that offer more amenities. Cutting back on Aerodomes shouldn’t be too bad if you make use of Aircraft Carriers.
- Campus districts are a good first choice
- Use Holy Sites second if you want to found a religion, otherwise Encampments are a good first option for adding to Campus yields
- Commercial Hubs and Theatre Squares come a little later but are worth building fairly early if you can spare the production
- It’s harder to use this ability to boost the yield of Harbours compared to other districts. If you’re mainly after the extra trade route capacity, build Commercial Hubs instead.
- Industrial Zones are worth building in most cities as production is very useful. Try to put them in the middle of a district cluster for maximum yields.
- Eventually, districts should form clusters between two or more cities, with the districts that gain adjacency bonuses in the middle of the cluster.
Hojo Tokimune’s Leader Ability: Divine Wind
There’s two distinct parts to Hojo Tokimune’s leader ability: the coastal strength bonus and the faster construction of three different district types. The former is rather situational in usefulness (although it can be powerful on archipelago maps) while the latter is more consistent in effectiveness.
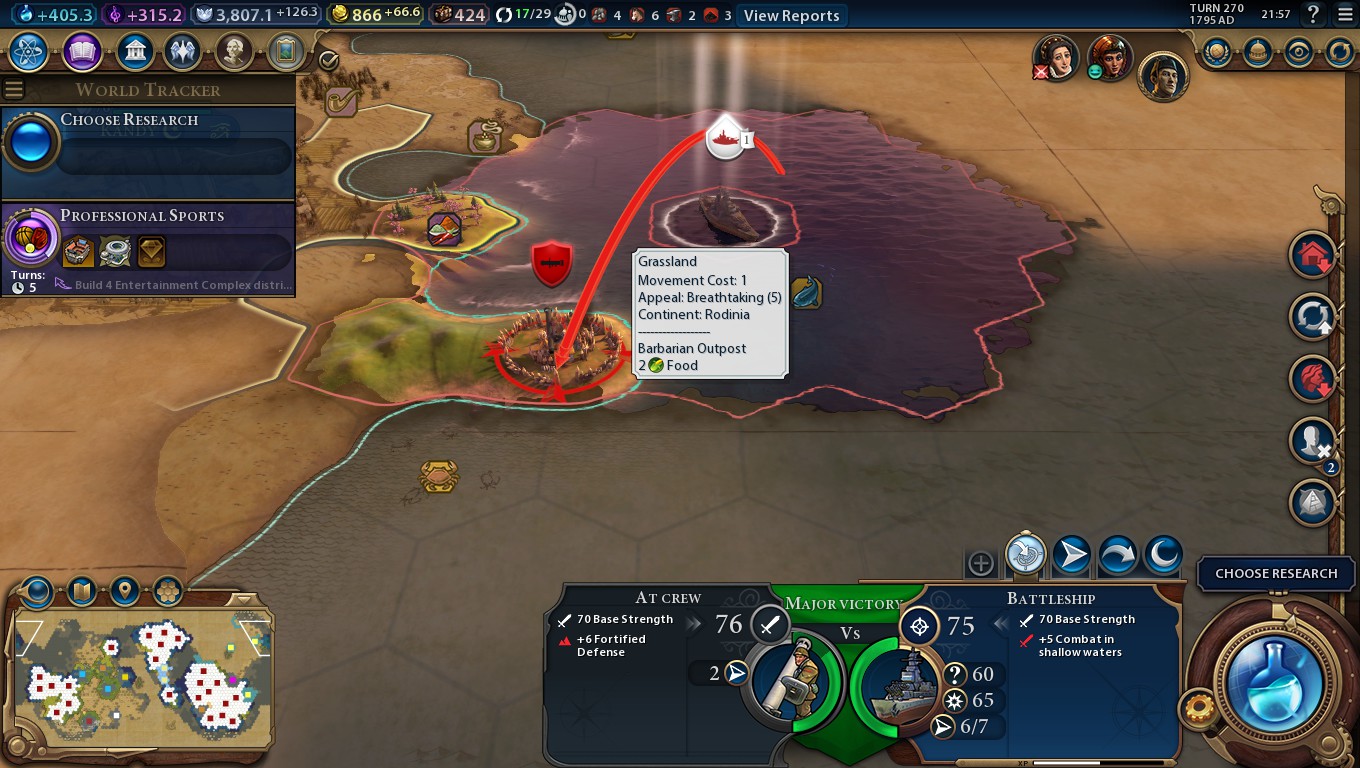
Getting +5 strength for land and naval units adjacent to the sea or in shallow water has three main uses: fighting coastal Barbarians, preventing amphibious assaults, and attacking coastal cities.
Barbarian encampments next to the sea are the only source of Barbarian naval units, which can be a pain if you have trade across seas or oceans. Although a decent navy can repel Barbarian pirates, most can’t stop encampments – you’ll need either a land unit or a coastal raider unit (like a Privateer). Land units are the most common option, but bringing in one alone can be risky for most Civs. For Japan, the +5 strength bonus can help greatly in survivability giving that lone unit a chance to take on all the Barbarians itself.
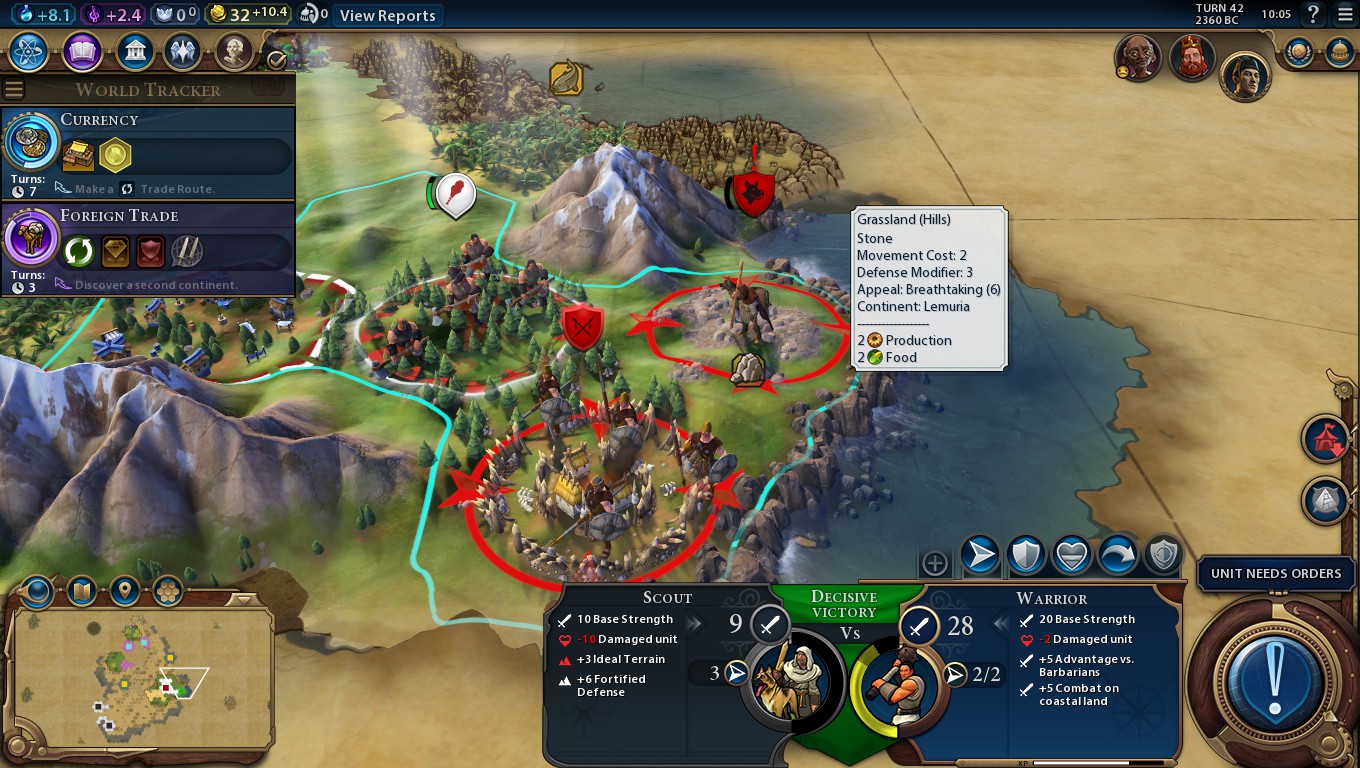
The bonus is applied based on where the defender is, not the attacker. My Battleship is on an ocean tile but because they’re attacking a land tile adjacent to the sea, the +5 strength still applies.
Placing a line of units on coastal tiles can create a powerful barrier to prevent invasion by that route, even if your navy is weak. Pay attention to where cliffs are located so you can minimise the number of land units you might need to dedicate to this. If you’re going for a cultural victory, this strategy is especially useful for protecting your coastal resorts. If your navy is strong enough not to need that extra layer of defence, you can still appreciate the +5 strength bonus in shallow water tiles to help repel incoming forces before they land.
Finally, a +5 strength bonus when attacking coastal cities is perhaps the best use of this unique feature. In areas that lack rivers, cities will usually be built next to the sea. Until Harbours, only cities on the coast can build navies, giving another reason for your opponents to settle there.
And settle they did! In this game Brazil settled all of their cities next to the sea. You may not always be that lucky but there tends to be quite a few sea-adjacent cities in any given game.

Hojo Tokimune allows you to build three different district types at half the cost, much like a unique district. This saves quite a bit of time, especially for smaller cities, but these three district types aren’t typically the ones you’ll want to build first. Instead, they’re good choices for enhancing adjacent Campus districts early in the game to maximise your science output.
Holy Sites should be built relatively early if you’re after a religion, but resist the temptation to simply rush them out first. Getting Samurai out as soon as possible is important and building a Holy Site first instead of a Campus delays them. If you’re not after a religion or they’ll all be exhausted before you can found one, don’t be afraid to skip building Holy Sites.
Encampments are a good choice of cheap district to build next to Campuses to enhance them. Barracks offer extra production which will help to get Samurai built faster, and makes your units gain experience at a faster rate.
Theatre Squares can help you get to Feudalism and the important Feudal Contract civic card (which helps you build Samurai faster), but you may not necessarily be able to build one before you get to that point. Still, it’s useful to have a cheap source of culture to get through civics faster.
Unique Unit: Samurai
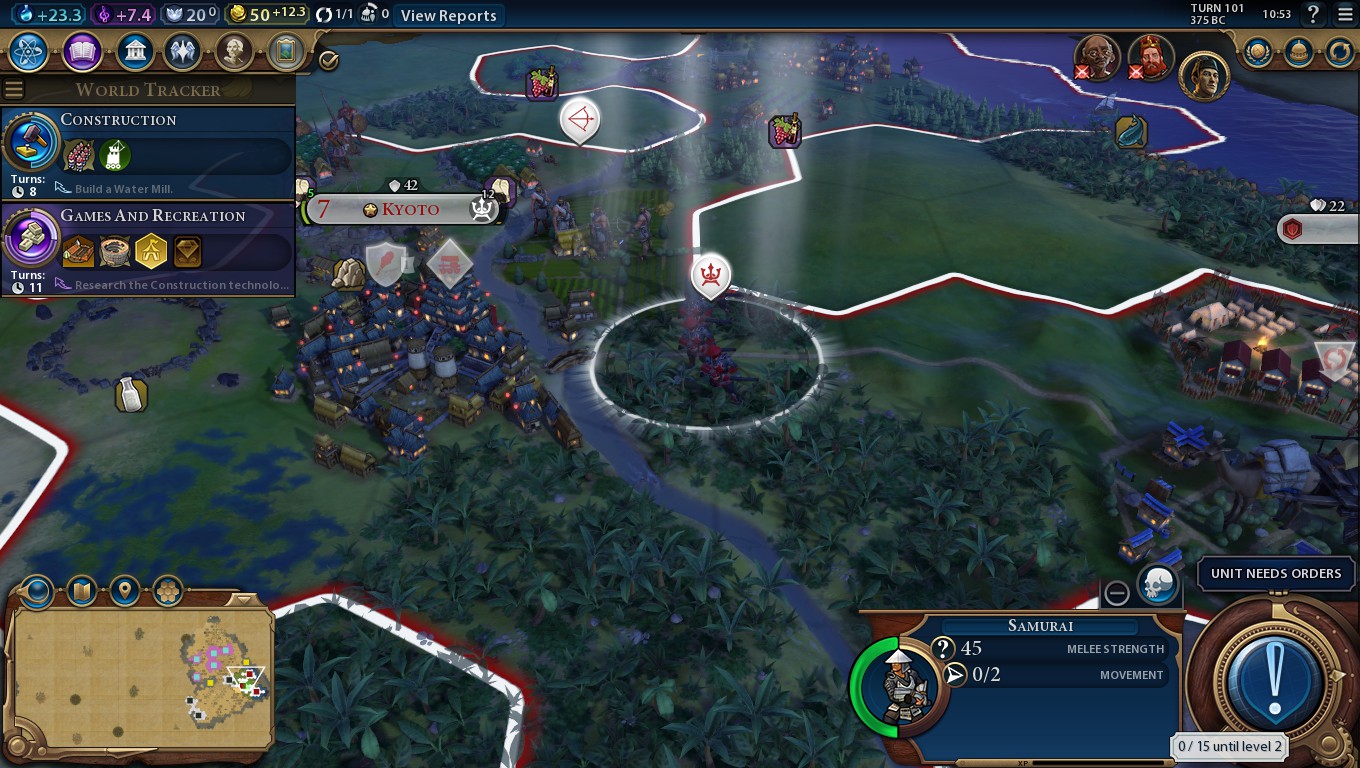
Samurai define the first three eras of the game as Japan. At first, the aim is unlocking them early. Start by beelining Writing so you can get Campus districts quickly. If you can discover another continent early, you can usually pick up the Foreign Trade civic and unlock the eureka for Currency (forming a trade route) fairly early. If you’re playing a map type such as Continents where you’re unlikely to discover a second continent early, don’t be afraid to research it without the boost.
Make a detour to Bronze Working for Encampments and Spearmen, and kill a Barbarian with the Spearman for the boost to Military Tactics. The number of turns you spend researching Mining and Military Tactics will be fairly close to the number of turns you save from the boost, but take into account the ability to build cheap Encampments next to your Campus districts for extra science and production from Barracks, and it’ll save more time than it costs.
Next up is the Mathematics technology, which you usually won’t be able to unlock the Eureka for in time. Just research it without the boost. Finally, Military Tactics won’t take long to unlock with the boost.
Once Military Tactics is done, you can build Samurai while working towards the Construction technology for Siege Towers. The combination of the two is devastating at this stage in the game. Bringing Crossbowmen as well is nice, but it requires a significant technological detour which will delay your initial attack. Crossbowmen can enter the war later.
What’s nice about the route to Samurai is that it contains two technologies – Writing and Currency – that are important to unlock fairly early anyway. After unlocking Construction as well, you’ll be just one technology away from Apprenticeship.
There is one major problem, however. Being a unique unit that doesn’t replace any other, you can’t simply stock up on older units and spend gold to upgrade them to your UU. Good production is crucial in a Samurai rush.
With 48 strength, Samurai are as strong as Knights and will be more so in certain situations. On tiles adjacent to the coast, they’ll have 53 strength, making them nearly on a par with Musketmen from other civs. Additionally, the ability to fight at full strength even when injured allows the units to gain an advantage in a battle of attritrion.
Units usually lose strength when injured at a rate of 1 strength per 10% of health lost, rounded up. A unit at 90-99 health will lose 1 strength, a unit at 80-89 health will lose 2, and so forth. At 30-39 health, Samurai are therefore equally powerful to a Musketman of that level of health, although you probably don’t want to use them in combat at that point. Having persistently high strength means you don’t need many Samurai to deal massive amounts of damage to civs behind in military technology, and just a couple plus a Siege Tower can deal surprising amounts of damage. You can also wait longer before you need to retreat Samurai (or hold off pillaging farms for health for longer).
The Elite Guard promotion takes some time to reach, but makes melee units able to attack twice, making them more dangerous. For most units, the second attack will be weaker than the first due to them losing health from the first round of combat, but Samurai fight just as well both times.
Samurai will remain effective until Musketmen become commonplace, and even then can hold their own reasonably well for a time. Still, you shouldn’t be afraid to upgrade them once you have the opportunity to do so. You can carry on the Samurai wars using Musketmen and Infantry among other things, or you can instead switch to a different victory path. Science and culture both fit Japan reasonably well.
Unique Building: Electronics Factory
Electronics Factories arrive late, and the main bonus arrives even later. While you get a welcome +1 production right away relative to normal Factories when you build an Electronics Factory, as the name suggests, you’ll need the modern-era Electricity technology for the full effect. To make things trickier, while you only need to build a few Factories to spread its production bonus to all your cities, the culture from Electronics Factories has no such advantage; to reach their full potential you’ll need one in every city.
If you’ve been neglecting culture throughout the game thus far to focus on warmongering and science, Electronics Factories will aid in making up for that. 4 culture per city is more than you can usually get from an unimproved Theatre Square for the cost of a building you’d be building in some cities anyway. With the advent of Replaceable Parts’ huge bonus to food from farms, and Urbanisation offering Neighbourhood districts, cities can get much larger at this point in the game and handle many more districts than before. As such, if you held off building Theatre Squares before, you’ll usually be able to around this point without sacrificing more immediately relevant districts. The combination of Electronic Factory culture and more Theatre Squares can zoom you through the late-game civics.
Being an Industrial Zone building, Electronics Factories are prone to sabotage by Spies – this can pillage them even in peace-time! To avoid this, make sure you have plenty of counter-Spies ready. Japan’s civ ability encourages you to cluster districts together, and Spies protect the district they’re assigned to and all surrounding ones in a one-tile radius, so you can get good coverage of your main targets for enemy Spies without having to use many Spies of your own.
Administration – Government and Religion
Here are the governments, policy cards, pantheons, religions, wonders, city-states and Great People which have particularly good synergy with Japanese uniques. Be aware that these are not necessarily the best choices, but rather options that you should consider more than usual if playing as Japan relative to other civs.
Classical Era Governments
Oligarchy is typically the best choice early on. The +4 strength bonus to Samurai makes them even harder for unprepared civs to deal with them while there’s a good mix of policy cards on offer.
Medieval/Renaissance Era Governments
Merchant Republic is a reliable government type with a helpful boost to trade route capacity. If whether through conquest or by constructing Holy Sites you have a high faith output, Theocracy is a reasonable alternative.
Modern Era Governments
Fascism is often the best option if you’re pushing for a domination victory, although sometimes having four military slots can be overkill.
If you intend to switch to science, go for Communism instead. Cultural players can do well with Communism, but Democracy works as well.
Classical Era
Natural Philosophy (Economic, requires Recorded History) – Doubles Campus adjacency bonuses. One of the best adjacency bonus boosts to pick up, especially considering you should be maximising Campus adjacency bonuses anyway early on to get Samurai sooner.
Scripture (Economic, requires Theology) – Doubles Holy Site adjacency bonuses.
Veterancy (Military, requires Military Training) – Makes setting up a developed Encampment district lightning-fast. Building Samurai in cities with a Barracks makes them earn experience faster, allowing them to achieve their full potential sooner.
Medieval Era
Aesthetics (Economic, requires Medieval Faires) – Doubles Theatre Square adjacency bonuses.
Craftsmen (Economic, requires Guilds) – Doubles Industrial Zone adjacency bonuses. Considering the importance of production, this is one of the better double-adjacency cards to get.
Feudal Contract (Military, requires Feudalism) – Speeds up construction of Samurai. Considering you can’t upgrade them from earlier units to save time, this is an important policy to get.
Naval Infrastructure (Economic, requires Naval Tradition) – Doubles Harbour adjacency bonuses. Rather effective if you have plenty of Shipyards as it will also double the production output they offer.
Town Charters (Economic, requires Guilds) – Doubles Commercial Hub adjacency bonuses.
Renaissance Era
Liberalism (Economic, requires The Enlightenment) – A valuable source of amenities allowing you to put off building Entertainment Complexes in favour of more districts with adjacency bonuses.
Modern Era
Economic Union (Economic, requires Suffrage) – Combines the effects of Naval Infrastructure and Town Charters.
Five-Year Plan (Economic, requires Class Struggle) – Combines the effects of Natural Philosophy and Craftsmen. A very useful policy worth keeping to the end of the game.
New Deal (Economic, requires Suffrage) – Although it’s quite costly to run, getting +2 amenities in every city means you can focus on districts that offer adjacency bonuses instead of buiilding Entertainment Complexes.
Atomic Era
Cryptography (Diplomatic, requires Cold War) – Unlike Police State, this doesn’t lower your amenities, but it still offers a helpful bonus to Spies used defensively. This is helpful for preventing your Electronics Factories from being sabotaged (and hence your civic accumulation).
Sports Media (Economic, requires Professional Sports) – A late game replacement for Aesthetics. Offers the same bonus, but also adds +1 amenity for Stadiums on top.
City Patron Goddess – Makes setting up your first district in each city faster, which can get you stronger adjacency bonuses sooner.
Divine Spark – Combined with lots of early Campus districts, you can get a great early edge to science.
God of the Harvest – Japan’s incentive to dedicate a huge proportion of land to tightly-packed districts means you may need to clear a few resources. This pantheon gives you extra yields from doing so.
God of the Sea – Japan’s strong coastal defence makes this pantheon easier to use.
You can have one founder, one follower, one enhancer and one worship belief.
Burial Grounds (Enhancer) – Japan’s low-cost Holy Sites makes this belief rather good if you need more land (whether neutral land or that owned by another civ).
Papal Primacy (Founder) – All city-states except industrial and militaristic ones offer bonuses that are applied to all districts of a certain type, which as far as the game is concerned are adjacency bonuses. You’ll probably be using a lot of adjacency bonus-boosting policy cards anyway due to the synergy with Japan’s civ ability. Put all that together, and this is a good belief to take – assuming you have a reasonable number of envoys present in city-states.
Religious Unity (Founder) – A potentially early source of envoys will really help you make the most of your districts.
Stewardship (Founder) – Makes your strong Campus and Commercial Hub districts slightly stronger.
Jesuit Education (Follower) – Cheap Holy Sites combined with this belief means you won’t need production or gold to get your Campuses or Theatre Squares developed.
Zen Meditation (Follower) – A decent source of amenities without having to build Entertainment Complexes.
Administration – Wonders, City-States and Great People
Colosseum (Classical era, Games and Recreation civic) – Although it requires an adjacent Entertainment Complex, the main advantage of building this is you won’t need to build more Entertainment Complexes for quite some time thanks to all the amenities on offer. That helps you focus on the districts with adjacency bonuses.
Alhambra (Medieval era, Castles technology) – An extra Military civic card can help strengthen your conquests, while extra amenities helps alleviate war weariness. The catch is that it’s on the other end of the technology tree to Samurai, and the Castles technology has a tricky eureka boost to achieve if your cultural output is poor.
Angkor Wat (Medieval era, Medieval Faires civic) – Bumping up all your cities by a population point as well as providing extra housing will really help you maximise the number of districts you can fit in a small area. Requires the Khmer and Indonesia Civilization and Scenario Pack.
Buenos Aires (Industrial) – More amenities to help you avoid having to use Entertainment Complexes.
Carthage (Militaristic) – A city-state that you’ll really want to hold onto and never let go. For Japan, Encampments cost half as much as Commercial Hubs, making them an excellent choice for new cities to build. They can then make use of the trade route to trade internally for some food and production. With a Commercial Hub or Harbour and Encampment, those cities can add two trade routes each!
Kabul (Militaristic) – Faster experience gain means Samurai can get to Elite Guard sooner. Attacking twice is less of a risk for Samurai relative to other melee units as they’ll still fight at full strength.
Muscat (Trade) – Adds an amenity to every Commercial Hub, meaning there’s less need for you to build Entertainment Complexes. Requires the Vikings Scenario Pack.
Palenque (Scientific) – Building lots of Campuses early on can now also be rewarded with fast city growth. The faster your cities grow, the more productive they’ll become sooner. Requires the Vikings Scenario Pack.
Toronto (Industrial) – Building your first Electronics Factory will have a bigger immediate impact, and you won’t need as many Entertainment Complexes to bring Zoo and Stadium amenities to all your cities.
Valletta (Militaristic) – Your Encampments are cheaper to build than those of other civs, but your Encampment buildings aren’t any cheaper to construct. This City-State allows you to purchase their buildings with faith, freeing up production and gold for other uses.
Zanzibar (Trade) – An amazing source of amenities without you having to build Entertainment Complexes.
Remember that these are only the ones that have particular synergy with Japanese uniques, not necessarily the most effective options. Obviously, all Great Generals and Admirals can be useful for a domination victory, and Great Writers, Artists and Musicians are important for cultural victory, but it would be redundant to list them all.
Medieval Era
Bi Sheng (Great Engineer) – Bi Sheng increases the district limit in a city by 1. Having lots of districts increases the effectiveness of Japan’s civ ability.
Hildegard of Bingen (Great Scientist) – Makes a Holy Site’s adjacency bonus also add to science. Considering they’re cheap for Japan to build, it’s easy enough to make use of.
Renaissance Era
Leonardo da Vinci (Great Engineer) – Makes all Workshops produce +1 culture. Considering you’ll want to build plenty to make use of Electronics Factories, that’s rather effective.
Mimar Sinan (Great Engineer) – A minor source of amenities (as well as housing) helping you avoid having to build Entertainment Complexes.
Industrial Era
James Watt (Great Engineer) – Instantly builds an Electronics Factory and makes all Electronics Factories provide +2 production. This makes them twice as good at providing production as the regular Factories of other civs!
John Spilsbury (Industrial Merchant) – More amenities.
Joseph Paxton (Great Engineer) – Helps get more out of an Entertainment Complex, so you can dedicate more cities to districts that offer adjacency bonuses. Beyond this point, cities will soon grow rapidly with the food bonus from Replaceable Parts and the housing provided by Neighbourhood Districts so building more Entertainment Complexes won’t carry as high an opportunity cost. As such, it won’t be as important to look for amenity bonuses.
Modern Era
Joaquim Marques Lisboa (Great Admiral) – Reduces war weariness so a lack of Entertainment Complexes is less of an issue.
Nikola Tesla (Great Engineer) – Makes both an Electronics Factory and a Power Plant in the same city stronger.
Information Era
Masaru Ibuka (Great Merchant) – Very useful if you want to change course towards a cultural victory. The Electronics Factory UB combined with Japan’s civ ability already encourages you to have lots of Industrial Zones. Masaru Ibuka adds +10 tourism to every single one.
Counter-Strategies
Many of Japan’s strengths are hard to take away from them, but that’s not to say you can’t play around them. Here’s some good ways to take on Japan.
Doubled adjacency bonuses for adjacent districts can be tricky to counter-play. One possibility is to prevent Japan settling cities close together so the strongest adjacency bonuses are tricky to get hold of. One mean method is blocking off the best locations for Settlers with your own military units, and an effective alternative is to settle a city right in Japan’s face, although this carries the strong risk of that city being attacked.
The advantages of the Meiji Restoration will be lessened if Japan builds a lot of districts that can’t have adjacency bonuses. Avoid trading Japan luxuries so they’re more likely to build Entertainment Complexes. If you appear to be a militaristic threat, they might be pushed to build more Encampments. Air superiority might encourage them to develop more Aerodomes.
Coastal combat bonus
On map types such as Archipelago, where the strength bonus can rarely be avoided, be prepared to put up stronger defences than usual when facing Japan. Otherwise, if Japan starts near you, you can lessen their threat to you by avoiding founding cities directly on the coast. This will deny them a +5 strength bonus against those cities and reduces the risk of you having to fight a Japanese unit on terrain that favours them.
Prior to the renaissance era, it’s a good idea to avoid fighting naval battles with Japan where possible. If they have a navy and intend to use it against you, make sure any naval units you have are kept close together and near to your coastal cities. That way, they can group together to bring down the stronger Japanese units, and heal up again afterwards ready to face more.
Japan’s strength bonus will be useless if they can’t fight in sea-adjacent land tiles or shallow water tiles. Try to position your naval units in ocean tiles, and make sure your land units aren’t adjacent to the coast where possible.
Faster Encampment, Holy Site and Theatre Square construction
Fast construction of these district types pushes Japan into building these more than other civs might. Holy Sites and Theatre Squares gain from the Meiji Restoration bonus, but Encampments don’t. If Japan goes to war a lot, they may be incentivised to build more Encampments. Starting a war against Japan early on might help push them down such a path, even if otherwise little lasting damage is done.
Hojo Tokimume likes civs that have a strong military as well as strong faith or culture, while disliking the civs with strong militaries but without either.
If you want to befriend him, keep in mind that he has a requirement of strong faith or culture – you don’t need both. Either way, you’ll still need a strong army. Some civs will be naturally inclined this way (Spain tends to have a good army and good faith, while Greece under Gorgo will usually have strong culture and a good army, as examples) but even if the civ you’re playing as isn’t, you can still adjust. A cultural or religious civ just needs to build a stronger defence (a good idea anyway if you’re nearby a warmongering civ like Japan) while a domination-inclined civ can boost its cultural output. For scientific civs, your tech advantage will make your armies stronger without having to build as many units, and upping your culture output will be useful anyway for getting to key civics such as Space Race faster.
Samurai have 48 strength. So do Knights, making them an excellent choice for countering them. If Samurai are exploiting the Japanese strength bonus on coastlines, promoting your Knights with Charge (+10 strength against fortified defenders) can help. Crossbowmen also work well if you can keep your distance. Keep your Pikemen away from Samurai, or you’ll be dealing with a strength difference of 14 in their favour.
In the event you don’t have access to Knights when Japan attacks, Horsemen and Swordsmen can work. They each have 36 strength which is 12 less than Samurai, but their lower cost means in a prolonged war you should be able to outnumber Japan’s forces.
A notable thing about Electronics Factories relative to other buildings that provide culture is that you can pillage them without even having to go to war. Spies can sabotage Industrial Zones, which includes Japan’s UB. Do so and you set back not only Japan’s production, but their culture as well.
The combination of strong production and some culture makes Industrial Zones a good target in war-time as well. Bomber-class aircraft are good at pillaging, as are fast-moving units such as Tanks.
Other Guides
If you like these guides and want to send a tip, you can click here![ko-fi.com]
- America (Cultural/Domination)
- Arabia (Religious/Scientific)
- Australia (Scientific)
- Aztecs (Domination)
- Brazil (All)
- China (Cultural/Scientific)
- Egypt (Cultural/Religious)
- England (Cultural/Domination)
- France (Cultural)
- Germany (Domination/Scientific)
- Greece (Cultural/Domination)
- India (Religious)
- Indonesia (Cultural/Domination/Religious)
- Japan (Domination)
- Khmer (Cultural/Religious)
- Kongo (Cultural)
- Macedon (Domination/Scientific)
- Norway (Domination)
- Nubia (Domination)
- Persia (Cultural/Domination)
- Poland (Cultural/Domination/Religious)
- Rome (Domination)
- Russia (Religious)
- Scythia (Domination/Religious)
- Spain (Domination/Religious/Scientific)
- Sumeria (Domination/Scientific)