Overview
The Ottomans have advantages in nearly every aspect of warfare and will dominate the renaissance-era battlefield. Here, I detail Ottoman strategies and counter-strategies.
Introduction
Following this guide requires the Gathering Storm expansion.
It also assumes you have all other Civ 6 content, listed below, though it is not necessary to have these to utilise the key strategies of each civ.
- Pre-Rise and Fall content packs
- Vikings, Poland, Australia, Persia/Macedon, Nubia, Khmer/Indonesia
- Rise and Fall Expansion
- New Frontier content packs
- Maya/Grand Colombia, Ethiopia, Byzantium/Gauls, Babylon, Vietnam/Kublai Khan, Portugal
These content packs include exclusive civs, city-states, districts, buildings, wonders, natural wonders, resources, and a disaster, but not core game mechanics – all you need is the base game and the Gathering Storm expansion for those.
I myself, the Qaysar-i Rūm, am known under varying names.
Lawgiver, First, Magnificent, the past through which history frames.
Only one aim have I: believing, this worship bygone from those who speak for me.
Everyone aims at the same meaning, but many are the versions of the story.
This guide is divided into multiple sections explaining how best to use and play against this specific civ.
- The Outline details the mechanics of how the civilization’s unique features work and what their start bias is if they have one.
- The Victory Skew section describes to what extent the civ (and its individual leaders where applicable) is inclined towards particular victory routes. This is not a rating of its power, but an indicator of the most appropriate route to victory.
- Multiple sections for Uniques explain in detail how to use each special bonus of the civilization.
- Administration describes some of the most synergistic governments, government buildings, policy cards, age bonuses, pantheons, religious beliefs, wonders, city-states and Great People for the civ. Only the ones with the most synergy with the civ’s uniques are mentioned – these are not necessarily the “best” choices when playing as the civ for a given victory route.
- Finally, the Counter-Strategies discusses how best to play against the civ, including a consideration of leader agendas if the civ is controlled by a computer.
Note that all costs (production, science, etc.) mentioned within the guide assume a game played on the normal speed settings. To modify these values for other game speeds:
- Online: Divide by 2
- Quick: Divide by 1.5
- Epic: Multiply by 1.5
- Marathon: Multiply by 3
Terminology used in this guide and not in-game is explained here.
AoE (Area of Effect) – Bonuses or penalties that affect multiple tiles in a set radius. Positive examples include Factories (which offer production to cities within a 6 tile radius unless they’re within range of another building of the same type) and a negative example is nuclear weapons, which cause devastation over a wide radius.
Beelining – Obtaining a technology or civic quickly by only researching it and its prerequisites. Some deviation is allowed in the event that taking a technology or civic off the main track provides some kind of advantage that makes up for that (either a source of extra science/culture or access to something necessary for a eureka or inspiration boost)
CA (Civ Ability) – The unique ability of a civilization, shared by all its leaders.
Compact empires – Civs with cities close together (typically 3-4 tile gaps between city centres). This is useful if you want to make use of districts that gain adjacency bonuses from other districts, or to maximise the potential of area-of-effect bonuses later in the game.
Dispersed empires – Civs with cities that are spread out (typically 5-6 tile gaps between city centres). Civs with unique tile improvements generally favour a more dispersed empire in order to make use of them, as do civs focused on wonder construction.
GWAM – Collective name for Great Writers, Artists and Musicians. All of them can produce Great Works that offer tourism and culture, making them important to anyone seeking a cultural victory.
LA (Leader Ability) – The unique ability of a specific leader. Usually but not always, they tend to be more specific in scope than civ abilities. Some leader abilities come with an associated unique unit or infrastucture.
Prebuilding – Training a unit with the intention of upgrading it to a desired unit later. An example is building Slingers and upgrading them once Archery is unlocked.
Sniping – Targeting a specific city for capture directly, ignoring other enemy cities along the way. Typically used in the context of “capital sniping” – taking a civ’s original capital as quickly as possible to contribute towards domination victory without leading to a drawn-out war.
Start bias – The kind of terrain, terrain feature or resource a civilization is more likely to start near. This is typically used for civilizations that have early bonuses dependent on a particular terrain type. There are five tiers of start bias; civs with a tier 1 start bias are placed before civs of tier 2 and so on, increasing their odds of receiving a favourable starting location.
Complete information on start biases within the game can be found in the Civilizations.xml file (find the Civ 6 folder in Steam’s program files, then go through the Base, Assets, Gameplay and Data folders to find the file). DLC and Expansion civs have a similarly-named file in their corresponding folders.
Super-uniques – Unique units that do not replace any others. Examples include India’s Varu and Mongolia’s Keshigs.
Tall empires – Empires that emphasise city development over expansion, usually resulting in fewer, but bigger, cities.
Uniques – Collective name for civ abilities, leader abilities, unique units, unique buildings, unique districts and unique improvements.
UA (Unique Ability) – A collective name for leader abilities and civ abilities.
UB (Unique Building) – A special building which may only be constructed in the cities of a single civilization, which replaces a normal building and offers a special advantage on top.
UD (Unique District) – A special district which may only be constructed in the cities of a single civilization, which replaces a normal district, costs half as much to build and offers some unique advantages on top.
UI (Unique Improvement) – A special improvement that can only be built by the Builders of a single civilization. “UI” always refers to unique improvements in my guides and not to “user interface” or “unique infrastructure”.
UU (Unique Unit) – A special unit that may only be trained by a single civilization, and in some cases only when that civilization is led by a specific leader.
Wide empires – Empires that emphasise expansion over city development, usually resulting in more, but smaller, cities.
Outline (Part 1/2)

The Ottomans have a tier 4 start bias towards nitre resources. Nitre is required for both Janissaries and Bombards, both of which are powerful units in the Ottomans’ hands. While nitre isn’t revealed until the medieval-era Military Engineering technology, placing a district on a tile that is later revealed to contain nitre will still allow you to obtain the resource.
- +50% production when training siege units
- Siege units gain +5 bombard strength when attacking city defences
- Capturing cities does not cause them to lose population
- Cities owned but not founded by the Ottomans gain +1 amenity and +4 loyalty per turn.

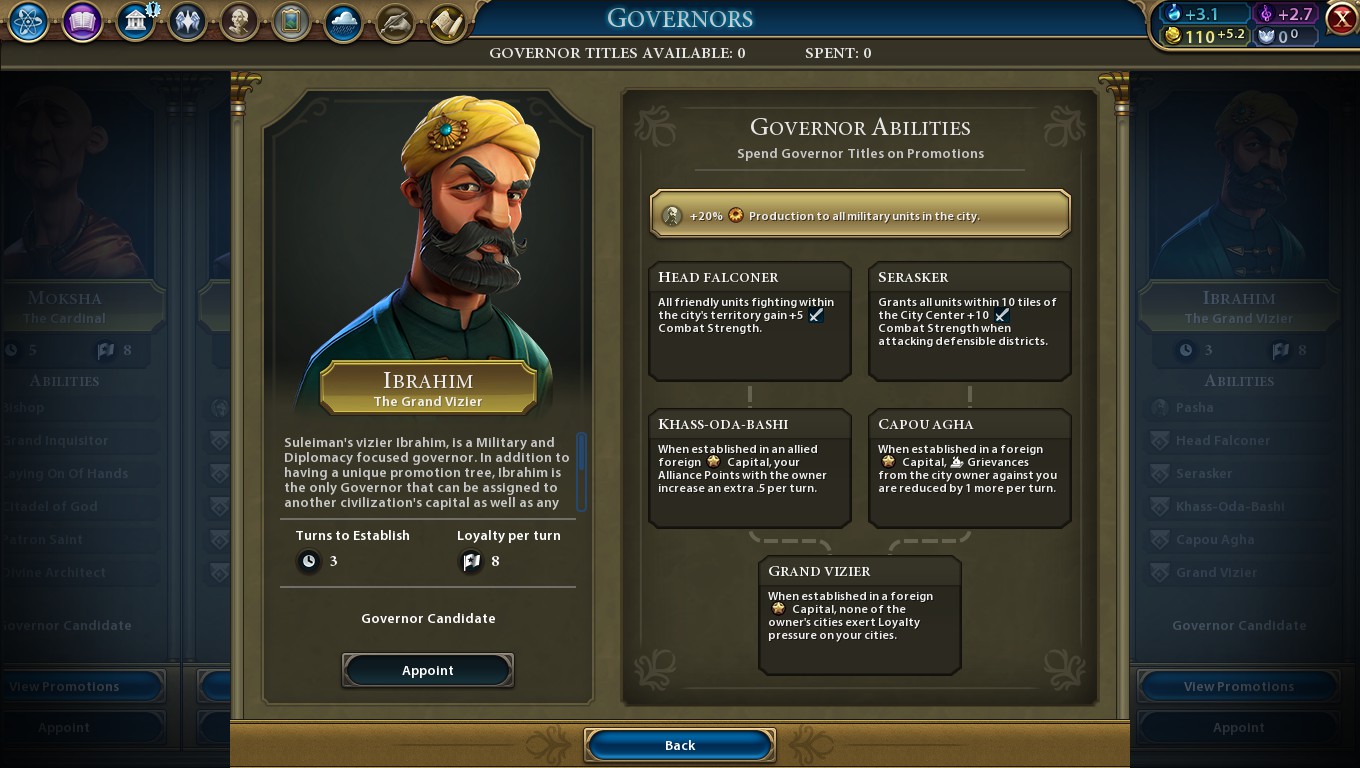
- In addition to the regular seven Governors, may recruit Governor Ibrahim (the Grand Vizier).
- As a unique Governor, Ibrahim cannot be targeted by the World Congress resolution Governance Doctrine.
- Receive a free Governor title at the renaissance-era Gunpowder technology.

- +20% production when training any military unit in this city
- If Ibrahim is present in a city owned by another civ, they receive this bonus.
- All owned military and religious units fighting within this city’s territory gain +5
- All owned military units within 10 tiles of this city gain +10
when attacking city defences
- When present in the capital of an allied civ, gain +0.5 alliance points per turn.
- When present in the capital of another civ, they lose 1 grievance per turn against you.
- When present in the capital of another civ, their cities impose no loyalty pressure against yours.
A renaissance-era melee infantry unit which replaces the Musketman


Gunpowder
Technology
Renaissance era

Military Science**
Technology
Industrial era

Man-at-Arms
(10
 10
10  )
)
Line Infantry
(490
20 )
or
480
or
240
 *
**Purchasing units with faith requires the Grand Master’s Chapel government building, which requires either the medieval-era Divine Right or renaissance-era Exploration civics.
**If you have insufficient nitre, you may continue to train Janissary units even beyond researching Military Science.


- May only be trained/purchased in cities of at least size 2 population.
- Training/purchasing Janissaries in cities founded by the Ottomans costs the city 1 population.
- Deals -85% damage to city walls and urban defences
- +5
- Starts with 10 XP (enough for the first promotion), unless upgraded from a unit with 10 XP or more already.
- May only be trained/purchased in cities of at least size 2 population.
- Training/purchasing Janissaries in cities founded by the Ottomans costs the city 1 population.
- Costs 490 gold to upgrade to Line Infantry, up from 250 (+96%)
- Costs 120 production/480 gold/240 faith, down from 240/960/480 to train (-50%)
- Costs 10 gold to upgrade to from a Man-at-Arms, down from 150 (-93%)
- Costs 10 nitre to train, down from 20 (-50%)
- 60 strength, up from 55
- Starts with a free promotion
- Upgrading a unit to a Janissary will provide you with enough experience for its next promotion.
Outline (Part 2/2)
A medieval-era naval raider unit which replaces the Privateer


Medieval Faires
Civic
Medieval era

Electricity*
Technology
Modern era

Submarine
(490
1  )
)or
960
or
480
**If you have no access to oil, you may continue to train Barbary Corsair units even beyond researching Electricity.

- Deals -50% damage to city walls and urban defences
- Unable to capture cities
- Does not exert zone of control
- Ignores zone of control
- Invisible to other civs unless it’s in the sight range of their city centre, Encampment district, Destroyer unit or is adjacent to any of their other units.
- May coastal raid for no movement point cost, pillaging an adjacent land tile or capturing an unescorted civilian unit
- Costs 490 gold to upgrade to a Submarine, up from 410 (+20%)
- Unlocked at the medieval-era Medieval Faires civic, instead of the renaissance-era Mercantilism civic
- This means classical-era Great Admirals improve the movement speed and strength of these units, but renaissance-era Great Admirals do not.
- Costs 240 production/960 gold/480 faith, down from 280/1120/560 to train (-14%)
- Maintenance cost of 3 gold, down from 4 (-25%)
- Coastal raids cost no movement points
A renaissance-era Commercial Hub building which replaces the Bank


Banking
Technology
Renaissance era

Commercial Hub

Market

Stock Exchange
or
440
- 1
per improved luxury resource within the city’s limits
(4
if filled)

- The first copy of each improved strategic resource in the city limits produces +1 copy of their resource per turn
- Costs 220 production/880 gold, down from 290/1160 (-24%)
- 1 amenity per improved luxury resource within the city’s limits
- Improved strategic resources produce +1 copy of their resource per turn
Victory Skew
In this section, the civ is subjectively graded based on how much it leans towards a specific victory type – not how powerful it is. Scores of 3 or more mean the civ has at least a minor advantage towards the victory route.

Culture

Diplomacy

Domination

Religion

Science
(Acceptable)
(Decent)
(Ideal)
(Acceptable)
(Decent)
Cultural games aren’t really all that effective with the Ottomans. Being able to keep the population of big conquered cities can help with wonder construction, but excessive warfare can cause problems with things like warmonger penalties
Diplomatic victory is a possibility, but requires the Ottomans to substantially downplay their more significant domination advantages in favour of using their army for warfare-based emergencies. The Grand Bazaar building incentivises building lots of Commercial Hubs and hence you’ll have plenty of gold for aid emergencies. Governor Ibrahim can help you develop alliances faster, and eliminate grievance penalties faster as well, maximising your diplomatic favour gain.
Domination is by far the best route for the Ottomans, and they are one of the game’s most inclined civs towards the victory route with bonuses to a huge variety of aspects of warfare. For setup, you have cheap siege units, cheap Musketmen, cheap Privateers, the unit production bonus from Ibrahim and even a cheap Bank. The Grand Bazaar provides extra strategic resources as well, letting you support an even bigger army. Ibrahim and the civ ability together helps you make mincemeat of city defences, while Janissaries deal with enemy land units, and Barbary Corsairs threaten the seas. War weariness is less of a problem thanks to the amenities from the Ottoman civ ability and the Grand Bazaar, which also helps maintain the higher city populations captured cities will have. Amenities and population boost city loyalty, but you’ll get another loyalty boost on top to really help hold onto what you capture. And you can even try some peaceful city-flipping, too, thanks to Ibrahim’s Grand Vizier ability!
The Ottomans aren’t really built for the religious game. Ibrahim can offer a little edge in theological combat in a city and via faster-developing religious alliances while Barbary Corsair coastal raids can provide faith, but it’s not really enough to build a complete strategy around.
Science is probably the best backup strategy for the Ottomans if domination doesn’t work out. Keeping the full population from captured cities means more science. Faster scientific alliance development can secure a little more on top. But the real draw is the bonus strategic resources on offer via the Grand Bazaar building – coal, oil and uranium helps with developing a power infrastructure, and that together with bonus aluminium can help speed up the exoplanet mission.
Civilization Ability: Great Turkish Bombard (Part 1/4)
No-one tears down city defences like the Ottomans do, and few warmongers get as much out of the cities they take. Together, these bonuses outline an important point: You shouldn’t wait until the Ottoman UUs become available before starting a war. You’ll want to start sooner than that.
The early Ottoman game is all about preparing for your first war. Expanding to 3-4 cities quickly will help you have a decent base for research and unit production – make sure at least one of those cities is on the coast if possible so you can start training Barbary Corsairs later. You’ll also want a couple of Campuses for sufficient science, so research Writing quickly. Archery will be useful for versatile Archers, but otherwise it’s a good idea to beeline Engineering so you can start training Catapults.
Meanwhile, on the civics tree, getting State Workforce and Early Empire will provide you with two Governor titles – enough to get Grand Vizier Ibrahim with the Serasker promotion. Position him in whichever city you have closest to a potential enemy’s lands so you can use the powerful bonus against city defences.
With this all together, a force of Catapults, Archers and Heavy Chariots will be able to smash through city defences with ease. Catapults already are good against city defences, but add +5 strength from the Ottoman civ ability and another +10 from Ibrahim, and few civs can compare.
Taking out a civ (or at least their capital) will give you a powerful base for later warfare. It’s not a bad idea to focus on consolidation for a while so you can prepare for Janissary/Bombard/Barbary Corsair wars later. Make sure you have plenty of Commercial Hubs for gold and trade route capacity, Campuses for science and Monuments for culture. A couple of Encampments will help as well to grab a Great General ahead of the renaissance.
Now that we’ve got a plan for an Ottoman opening covered, let’s look more closely into siege units and how the Ottoman civ ability affects them.
Siege units are a classification of land-based units which all have the following common traits:
- No policy card to speed up production, unlike most other unit types.
- Attacks by range; initially a range of 2, but later units can fire from further away.
- Because of their ranged attack, they cannot capture cities.
- Always deals full damage vs. city defences (walls or urban defences)
- Has a -17 strength penalty when attacking land units, though no penalty vs. naval units
- Needs at least two movement points remaining to attack.
- Relatively low melee strength
- Low number of movement points
- Does not impose zone of control
All together, this makes siege units relatively expensive, strong against cities, weak against land units and moderately effective against naval units. You’ll never want to leave siege units out in the open as they’ll die very quickly. Melee infantry units pair well with them; they can impose zone of control and soak up plenty of damage while also being able to capture cities. The Ottoman civ ability covers the downside of siege unit cost with a +50% production bonus, while building on their advantage against cities, but doesn’t offer anything to help them defend.
Civilization Ability: Great Turkish Bombard (Part 2/4)
With the role of siege units covered, let’s look into the four different types of generic siege unit in the game:

Catapult

Engineering
Technology
Classical era


Trebuchet

Military Engineering
Technology
Medieval era

Bombard

Metal Casting
Technology
Renaissance era
20

Artillery

Steel
Technology
Modern era
1
1 
Rocket Artillery

Guidance Systems
Technology
Information era
1
1 Civilization Ability: Great Turkish Bombard (Part 2/4)
Siege units also have a common set of promotions which are worth examining:
vs. land units while defending vs. land units vs. cities vs. naval units, as if the unit was a land ranged unit.
Bigger cities produce more science and culture. Before taking into account loyalty/amemity penalties or what buildings it may have, this city will add 5 science and 3 culture per turn! Quite a difference this early in the game.
Normally, when capturing a city, the following happens:
- You generate grievances for the target civ and other civs based on the casus belli used to start the war, unless you have grievances with the targeted civ.
- Effects on units present in the city:
- Great People are relocated to another one owned by the same civ.
- Spies return back to their home civ.
- Settlers and Builders are captured.
- Otherwise, any other unit present in the city is killed.
- Effects on buildings in the city:
- If it had walls, they are completely destroyed.
- All buildings in the city centre are pillaged.
- Unique districts and buildings are converted appropriately (e.g. the Ottomans capturing a Malinese Suguba with a Market and Bank would convert it into a Commercial Hub with a Market and Grand Bazaar).
- Anything under construction is stopped (so if a wonder was under construction, capturing the city would clear the tile).
- The conquerer is able to keep any wonders present and their passive bonuses, but not any one-off ones (so for example capturing Angkor Wat will add +1 housing in all cities, but not add population).
- Captured improvements, buildings, districts and wonders are considered constructed by the conquerer for purposes of meeting eureka and inspiration boosts.
- Unique improvements in the city’s radius are completely destroyed.
- Great Works are captured.
- The city will be set to 50 loyalty, with associated yield penalties until it recovers to 100.
- The city will become “occupied” until the end of the war
- The city will be unable to grow in population, though it may still lose population if there is insufficient food.
- It will have a 75% science and culture penality
- It will have a 50% production and gold penalty
- It will have a -5 loyalty penalty per turn unless a military unit is present as a garrison.
- It will have an additional loyalty penalty scaling from 0 to -10 depending on how many grievances the target civ has with you.
- The city will permanently be considered not founded by you, so:
- War weariness will reduce this city’s amenities before it affects cities you founded.
- Other civs are able to liberate it to the founder if they capture it, granting them 100 diplomatic favour.
- Training Janissaries in this city has no population loss penalty.
- The city will lose 25% of its population.
Sounds like a lot! In a nutshell, the city will have a one-off effect rolling back some of its development, and it’ll also have a passive effect weakening it until the end of the war.
Two civs notably modify how captured cities work: Persia and the Ottomans. But while Persia avoids the passive occupation penalties that captured cities have, the Ottomans instead avoid the population loss. This makes the Persian ability better for prolonged wars, and the Ottoman ability better for faster wars where the occupation penalties don’t last long.
Civilization Ability: Great Turkish Bombard (Part 4/4)
Let’s look into how keeping more citizens affects the Ottomans. First of, let’s start with the downside: more citizens needs more housing and amenities.
Captured cities will have their Granaries pillaged, and they may have housing loss from pillaged farms or other housing-granting improvements. Capturing cities from civs with housing-granting unique improvements (e.g. Cree, India, Indonesia) can be a particular problem as you won’t be able to easily recover that housing shortfall. To sort out this issue, consider purchasing a Builder in larger captured cities to quickly repair and build new farms, while repairing/building a Granary in the city centre.
As for amenities, the Ottomans thankfully have a +1 amenity bonus in captured cities, which should help with managing all but the largest cities. Here’s a table to show how it all works out:
(Ottoman capture)
(Ottomans)
(not Ottomans capture)
(not Ottomans)
So, taking cities of size 16 or higher will cause more amenity loss to the Ottomans than other civs even taking into account the +1 amenity bonus. At size 24, the Ottomans have a deficit of 2 amenities relative to other civs, and at size 30, a 3 amenity deficit. Thankfully, by this point, the Grand Bazaar UB should be providing plenty of amenities to handle that issue. Ultimately, you shouldn’t have to worry about bigger populations draining amenities.
Now, what do to with that extra population? It’ll passively produce more science and culture, and allow working more tiles, but a particularly useful advantage is that it makes it much more likely there’ll be spare district capacity in the cities you take. That means if you take cities off a civ that builds districts you don’t really need, you can still build the ones you want (e.g. Commercial Hubs, Campuses, Encampments).
Very strong captured cities will be in a good state to build wonders once the war’s over, if they’re not busy training Janissaries. This is particularly useful for wonders with one-off benefits you don’t get from capturing them, such as the Casa de Contratación’s free Governor promotions.
On top of the amenity bonus, the Ottomans also get +4 loyalty per turn in cities they did not found, which is half as much as the bonus from a present Governor. Considering that larger cities exert more loyalty pressure on themselves and other cities anyway, this makes holding onto your conquests a lot easier. For land-based warfare, you might not need to move around any Governors other than Ibrahim, minimising the amount of downtime they have and maximising their bonuses. If you’re capturing cities by the sea, it may still be necessary to move in Governors to secure their loyalty, but the risk of losing them is greatly diminished.
- Get Catapults early along with Archers and Heavy Chariots so you can rush an opponent and take some cities.
- Research Metal Casting after Gunpowder so you can accompany your Janissaries with Bombards. If your nitre supplies are low, you can use Trebuchets instead.
- Don’t forget to bring Observation Balloons or Drones with later siege units
- Try not to drag out wars for too long so you can make the most of your larger captured cities.
Suleiman’s Leader Ability: Grand Vizier (Part 1/3)
Instead of a conventional leader ability, Suleiman brings a unique unit (the Janissary) and his friend Ibrahim, a unique governor. Ibrahim can be thought of as a counterpart to governor Victor (the Castellan) only with an emphasis on offensive rather than defensive warfare.
With an entirely new governor to the roster, there is a lot to get through in this leader ability section. As such, here’s a list of contents:
- Basic Governor Mechanics – Part 1/3
- Enter an Eighth Governor – Part 1/3
- Pasha – Part 1/3
- Head Falconer – Part 1/3
- Serasker – Part 2/3
- Khass-Oda-Bashi – Part 2/3
- Capou Agha – Part 2/3
- Grand Vizier – Part 3/3
- Summary – Part 3/3
Skip ahead to the summary if you just want a basic overview of how you can use Ibrahim effectively. But to really get the most out of all of his unique advantages, the entire rest of the section will look into that…
With a unique governor available, it helps to understand how governors function in the game.
Once you have your first governor title (typically after researching either the ancient-era State Workforce or Early Empire civics), you are able to appoint a governor to a city. Appointing a governor to a city will immediately apply a +8 loyalty per turn bonus (useful for border cities or ones newly-captured) and after a few turns (3 for Victor and Ibrahim, 5 for everyone else) they will establish themselves and apply their own special bonuses. Governors may be relocated at any time to another city, establishing the loyalty bonus immediately and other bonuses after the typical waiting period.
Subsequent governor titles can either promote an existing governor to provide stronger bonuses, or be used to hire a new governor. Each governor can be promoted up to five times, and there are a total of seven governors in the game (eight for the Ottomans). A civ cannot appoint more than one governor in the same city, so avoid hiring more if there aren’t enough cities to hold them!
Enemy civs can remove your governors from your own cities via Spies using the Neutralise governor mission. This also prevents them being reassigned for 6 turns. To avoid this happening, make sure your city centres are in range of one of your own Spies in a counter-Spy operation.
To make the most of governors, you’ll want as many governor titles as you can get. You can obtain governor titles from the following civics:
- Early Empire (Ancient)
- State Workforce (Ancient)
- Defensive Tactics (Classical)
- Recorded History (Classical)
- Medieval Faires (Medieval)
- Guilds (Medieval)
- Civil Engineering (Industrial)
- Nationalism (Industrial)
- Mass Media (Modern)
- Mobilisation (Modern)
- Globalisation (Information)
- Social Media (Information)
- Future Civic (Future, repeatable)
You can also gain governor titles from:
- Tribal villages (rarely)
- Building a Government Complex
- Building any Government Complex building (up to a total of 3 titles)
- The medieval Great Merchant Irene of Athens
- The renaissance-era Casa de Contratación wonder (grants three titles)
- The industrial Great Merchant Adam Smith
Suleiman uniquely can also grant an extra Governor title when the renaissance-era Gunpowder technology is researched – which helpfully is the same technology that unlocks Janissaries.
Having an eighth governor complicates things for the Ottomans, but also adds some special opportunities as well.
The biggest problem is the need to choose between assigning and promoting regular governors such as Magnus (the Steward) or Pingala (the Educator), and assigning/promoting Ibrahim. There’s only so many titles to go around, so choose carefully. No matter what you do, you should try and get Ibrahim with the Serasker promotion prior to launching your first war as the strength bonus against cities is too good to miss.
Ibrahim’s other promotions beyond Serasker are not quite so important early on, so feel free to spend a few titles on things like Pingala’s Connoisseur and Researcher promotions, and maybe Magnus’ Black Marketeer promotion. Pingala’s culture and science boost will help you get to Janissaries, Bombards and Barbary Corsairs, while the Black Marketeer promotion will really help manage the strategic resource costs of Janissaries and Bombards. Depending on your game, you might want to vary which governors you employ – Amani could be useful if there’s a city-state with a strong suzerain bonus you want, for example.
With the downside out the way, there’s also an upside – having an extra governor means Suleiman’s Ottomans can potentially get more out of bonuses which work on a per-governor basis. A good example to highlight here is the Casa de Contratación wonder. With the wonder in your control, cities you own on continents not containing your capital will gain +15% gold, production and faith if they have a Governor present. The Ottomans can potentially extend that bonus to eight cities instead of seven.
There’s also a niche advantage of Ibrahim – as a unique Governor, he cannot be targeted to be neutralised by the World Congress resolution Governance Doctrine.
Finally, let’s get onto the bonuses! The basic bonus Ibrahim offers is a +20% production boost to all military units trained in the city he’s active in. While not a huge bonus, this is quite helpful early on when you might have only one or two cities training your entire military.
What complicates this promotion is if you use Governor Ibrahim in foreign capitals for the later promotions like Capou Agha. Rather than you receiving the +20% production boost, the other civ will! While helpful if the other civ is an ally, it may cause problems for you if the civ exploits the bonus to train up a larger army, only to attack you.
This is a great defensive promotion which is particularly useful if your sieging ability is much better than your ability to fight enemy units. The +5 strength bonus offered works similarly to (and stacks with) the Defender of the Faith belief, allowing you to get an edge when fighting off enemies which are too close to your city. When capturing a city you intend to keep from a strong foe, move in Ibrahim with this promotion, hold off as well as you can in the 3-turn interim, and then you should have enough of an advantage to hold the city.
Suleiman’s Leader Ability: Grand Vizier (Part 2/3)
Probably Ibrahim’s strongest promotion, this combined with the Ottoman civ ability allows you to crush city defences with ease. It offers a massive +10 strength bonus against city defences within 10 tiles of Ibrahim, allowing Catapults to have effectively 50 strength against them, or 70 strength for Bombards.
For cities with lots of units defending them but weak walls, consider using cavalry units. Cavalry can slip through zone of control and land a hit on the city without the vulnerability siege units have.
Be sure to keep checking that enemy cities you’re attacking are in range of Ibrahim. As you can’t appoint him to the capital of a city you’re at war with, you’ll have to instead appoint him to the closest city you own to their territory. Move him up when necessary, but don’t move him too much – he’ll need time between movements to re-establish his bonuses.
The Serasker promotion has two key shortcomings. Firstly, it only applies when attacking city defences hence offering nothing to help you deal with enemy units or even to defend against city ranged attacks. Retreating to Ibrahim’s city can help if he has the Head Falconer promotion, but neither promotion will help you fight units in enemy territory. Secondly, being limited to a 10-tile range means you can’t use the promotion when launching attacks on new continents. A decent navy will help there, and thankfully the Barbary Corsair UU encourages you to keep one.
The remaining promotions require Ibrahim to be present in foreign cities, which can make it hard to use the previous promotions to their full potential. Largely, you’ll want to use them in peace-time and move Ibrahim back to a border city for war-time.
The Khass-Oda-Bashi promotion itself allows you to get extra alliance points with another civ you’re allied to. Alliances require the medieval-era Civil Service civic and initially largely provide bonuses to trading between the civs as well as +1 diplomatic favour per turn. With 80 alliance points, you’ll be able to make level 2 alliances for better rewards and a total of +2 diplomatic favour per turn, and with 240 alliance points, you can make level 3 alliances with the civ for even better bonuses and a total of +3 diplomatic favour per turn.
You gain alliance points by the following means:
- 1 per turn you’re allied to the civ
- +0.25 per turn for having at least one trade route with them (+0.5 if the ally is Cleopatra of Egypt)
- +0.25 per turn if they have at least one trade route with you (+0.5 if the ally is Cleopatra of Egypt)
- +0.25 per turn if you have the Wisselbanken policy card (diplomatic, requires the renaissance-era Diplomatic Service civic respectively)
- +0.25 per turn if they have the Wisselbanken policy card
- +0.5 per turn if you’re allied to Gilgamesh of Sumeria and you’re both at war with the same foe.
- +0.5 per turn if you’re playing as Suleiman of the Ottomans and have Governor Ibrahim with the Khass-Oda-Bashi promotion present in their capital
- +0.5 per turn if the other civ is the Ottomans with Suleiman as their leader, and they have Governor Ibrahim with the Khass-Oda-Bashi promotion present in your capital.
All alliance point bonuses are for the alliance, not for a specific civ, so any boost to alliance point generation will help both civs.
Compared to the leader abilities of Gilgamesh (Sumeria) and Cleopatra (Egypt) which can also offer the same alliance point bonus, this doesn’t require the other civ to do anything for you to receive the full bonus. However, the Ottomans are much more inclined to war than Egypt and even Sumeria, which can make securing an alliance difficult due to all the grievances generated – especially in singleplayer games. As such, the Capou Agha promotion will be very helpful as well.
This promotion steadily reduces the amount of grievances another civ has with you. It’s largely more useful in singleplayer than multiplayer as grievances have a big impact on other civs’ relations with you, but this has its uses in multiplayer as well. To understand that, we need to delve into the grievances mechanic.
When you perform certain negative actions towards a civ, you generate grievances against them – the amount depending on the specific action.

- Razing the civ’s city
- Declaring a surprise war
- Capturing the final city of a civ
- Declaring a formal war
- Declaring war on the civ’s city-state they’re suzerain over
- Declaring a War of Territorial Expansion
- Declaring a Holy, Colonial, Retribution or Ideological War
- Declaring war on a city-state the civ has at least one envoy present in
- Capturing a city-state (all civs gain grievances against you)
- Declaring a Golden Age war (requires the To Arms! Golden Age dedication)
- Capturing a city
- Denouncing the civ
- Refusing to make a promise
- Breaking a promise (repeated per incursion)
- Controlling the civ’s original capital (per turn)
- Controlling any cities founded by the civ unless you have their original capital (per turn)
In addition to this, allies of the targeted civ will gain 50% of the grievances you generate against them, and declared friends will gain 25%. Grievances from war-based actions (e.g. capturing cities) are modified based on the casus belli used in the war; if you are the defender in a war, you have a 75% reduction to grievances you generate.
Suleiman’s Leader Ability: Grand Vizier (Part 3/3)
A civ having grievances with you has a few effects. Firstly, they’ll be able to perform actions against you that’d otherwise inflict grievances without the associated penalties (it instead subtracts from the grievances they’ve accumulated against you). In other words, one civ can have grievances with the other, but not the other way around at any given time.
Secondly, and exclusively against computer-controlled civs, grievances will create a diplomatic relations penalty. This can make it extremely hard to secure alliances if you fight wars extensively.
Thirdly, if a civ has at least 200 grievances with you and you then start a war against them, they are able to trigger a military aid emergency. Other civs will be able to gift them gold for a shot at rewards such as diplomatic favour and a diplomatic victory point. This can cause a lot of trouble for you, as a seemingly weak target can suddenly receive hundreds or even thousands of gold and buy/upgrade large numbers of units.
Finally, if a civ has at least 200 grievances with you, you’ll lose 1 diplomatic favour every turn. This increases by by 1 for every extra 50 grievances they have with you. You can lose up to 10 diplomatic favour per turn this way, making it hard for a warmonger to have much impact at the World Congress.
If (and only if) you’re at peace with a civ, grievances decay at a rate varying depending on the current game era. In the ancient era, they decay at a rate of 10 per turn. In the classical era, 9 per turn. The decay rate drops all the way to the future era, where they decay at a rate of 2 per turn.
Capou Agha only takes 1 grievance a turn, which is hardly going to turn a civ you conquered half of into a friend. However, it can be helpful for keeping hold of an ally and preventing them from hitting the 200 grievance threshold against you. It’s not the most powerful bonus Ibrahim offers, but it has its niches.
After a couple of niche bonuses, here’s something much more considerable: The ability to completely ignore the loyalty pressure of another civ with the only catch being you cannot be at war with the civ. Unlike cultural alliances, the situation isn’t reversed, so you can still exert loyalty pressure on the other civ!
This ability has three main applications. Firstly, it allows you to settle cities right next to the other civ’s lands, offering a good base to launch an attack on them later. This is also useful if the civ is leaving an area free for settling later with the assumption that loyalty pressure will stop anyone settling it. If they try to stop you by declaring a war on you then, well, you’re playing as the Ottomans and chances are you have a better military than they do. They’ll also be inflicting grievances on you, so that’ll allow you to take some of their cities without penalty.
The second application of the Grand Vizier bonus is to aid with city-flipping. By being able to settle a lot of cities near another civ, you may be able to pressure their cities enough to flip to your ownership. You’ll most likely need cities with a lot of citizens while being in a Golden/Heroic Age for the best impact (it helps for the target civ to be in a Dark Age as well).
Thirdly, the Grand Vizier bonus can help you with holding conquests once a war is over. If you conquer a direct path through a civ, normally you’d struggle with loyalty pressure from the chain of cities and end up losing them. But if you’re fast (the siege bonuses help), you can take a line of cities, declare peace, move in Ibrahim to the target civ’s current capital, and avoid the loyalty penalties. Splitting a civ’s land into pieces in such a way can leave some of their remaining cities vulnerable to loyalty pressure, meaning you can snap up a few extra cities at no grievance cost.
- Give Ibrahim the Serasker promotion as soon as possible as the +10 strength bonus will be very useful for early warfare.
- Other promotions are more situationally useful and should be weighed up against other options.
- Head Falconer is useful for holding onto freshly-captured cities.
- Khass-Oda-Bashi and Capou Agha pair well together in singleplayer to hold an alliance through warfare, but are generally the least powerful of Ibrahim’s promotions.
- Grand Vizier is powerful for allowing you to colonise next to a civ, and for maintaining loyalty once a war is complete.
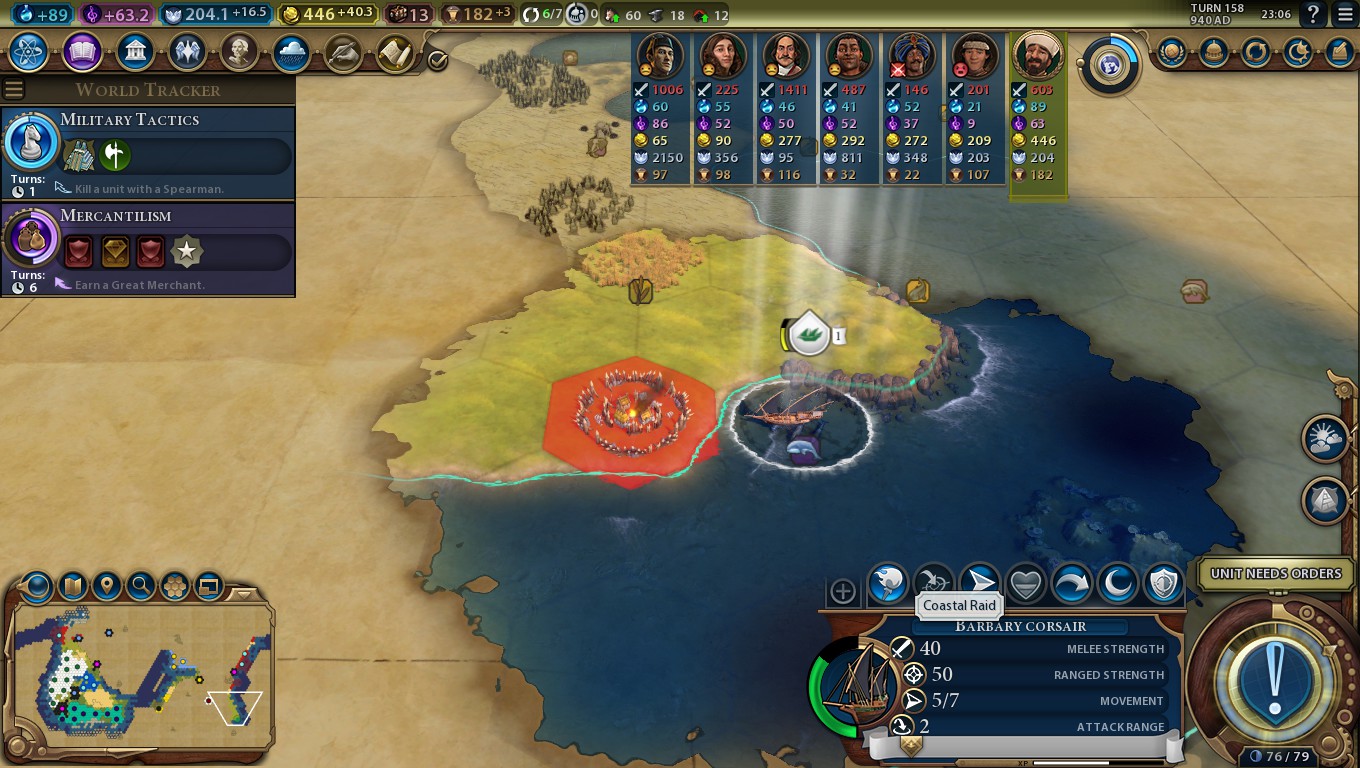
Unique Unit: Barbary Corsair
Ottoman power doesn’t just extend to the land – with the Barbary Corsair unit, you can pressure the seas as well! While not as important to the Ottoman game as Janissaries, they’re still useful even in small quantities in a variety of roles.
Perhaps the biggest strength of Barbary Corsairs is their early arrival. Regular Privateers arrive at the late-renaissance era Mercantilism civic with a relatively small window of usage before Ironclads arrive. Barbary Corsairs, however, arrive an entire era earlier on a civic that’s much easier to beeline – so in practice, you can often have Privateers an era and a half before anyone else!
That being said, it’s probably best to avoid a direct beeline from Political Philosophy unless you’re on a particularly water-heavy maps. For a start, you’ll want to grab Military Tradition for flanking/support bonuses to aid with early warfare. Taking a detour to Recorded History also provides the Natural Philosophy economic policy card which can provide a strong boost to your science output. That’ll help with unlocking ocean crossing, Janissaries and Bombards.
When you’re done researching Medieval Faires, start work on a Barbary Corsair or two in coastal cities. It’s a good idea to dedicate Ottoman-founded cities towards training them so non-Ottoman-founded cities can focus on Janissaries instead. On the civics tree, now work towards Exploration – it gives you access to the Press Gangs military policy card to aid with faster training of Barbary Corsairs. The Raid military policy card will also be unlocked along the way, boosting the yields from pillaging and coastal raids.
While regular Privateers aren’t especially strong when they arrive (Caravels have 10 more melee strength and Frigates have 5 more strength in both melee and range), they have three distinct advantages:
- Invisibility to everything except adjacent units, city centres, Encampments and Destroyers
- The ability to pillage adjacent land tiles unoccupied by an enemy unit (coastal raiding)
- The ability to ignore zone of control.
The first advantage makes Privateers suited for sneak attacks on enemy navies – so long as you deal enough damage to prevent retaliation (using multiple Privateers may help). The second gives you the potential for generating lots of gold or faith while setting back your opponents. The third builds on the previous two advantages by allowing you to slip through enemies and attack or pillage regardless.
Coastal raiding is all very well and good, but Barbary Corsairs take it one step further by eliminating the usual 3 movement point requirement. This allows a single unit to pillage multiple tiles in a single turn, or move in, pillage, and retreat to safety. You can get a lot of gold extremely quickly this way, which can be used to purchase further military units or other things you need.
Coastal raiding can clear unoccupied Barbarian encampments and tribal villages. Regular Privateers generally arrive too late to be able to use this function much, but Barbary Corsairs typically arrive just before many civs start crossing oceans.
But that’s not the only trick of Barbary Corsairs. It’s worth noting that their early arrival gives them a short-lived period of dominance on the seas. They can reliably destroy Galleys in two hits, and will kill Quadriremes in just one hit around half the time. While in theory Catapults and Trebuchets could pose a threat, Barbary Corsairs have the mobility to avoid their attacks.
Furthermore, Barbary Corsairs are the second-earliest naval unit in the game with a range of 2, only beaten by Byzantium’s Dromons. This makes them excellent for damaging enemy coastal cities as many can attack in the same turn. While not as effective against city defences as Frigates, they can still do a reasonable job in the mean-time. Bring along an embarked unit with a melee attack, Galley or Caravel to get the final hit on the city and capture it.
Barbary Corsairs have a reasonable window of usage. Even when Ironclads arrive, they can still withstand a hit, and their mass-raiding utility remains useful. Destroyers, however, are able to see Barbary Corsairs and destroy them in a single hit – so upgrade them before that can happen. The loss of free coastal raiding is a shame, but you can still get a lot out of a few Submarines.
Barbary Corsairs offer a small window of naval dominance, but their main purpose is in a support role. Their coastal raids can get you the gold you need to purchase Janissaries or other things outright, while their ranged attacks can help other units attack cities or units near the coast.
Suleiman’s Unique Unit: Janissary
Having trouble getting an edge on the battlefield? Struggling to reach enemy cities to start taking down their defences? Or just want a versatile powerful unit to guide you through the renaissance and industrial eras? The Janissary unit will help with all this and more.
Janissaries arrive at the renaissance-era Gunpowder technology. But resist the urge to beeline it – by capturing a few cities early on with Catapults, Archers and Heavy Chariots early on, you can get a stronger start making your eventual Janissary-led wars even better. That’ll require a diversion to Engineering.
Once you’ve finished researching Engineering, there’s a few possible research paths to take. It’s a good idea to first clean up any remaining Builder technologies you need (e.g. Sailing if you have a lot of sea resources that need improving). They won’t cost much to research and the potential yield bonuses make them worthwhile.
Next up, researching Currency unlocks Commercial Hubs and Markets, which will help you generate money and increase your trade route capacity. It gives your cities something to build between your early Catapult wars and Janissary/Bombard wars, and prepares them for building the Grand Bazaar UB, so it’s generally worth researching sooner rather than later.
It’s a good idea to research Bronze Working to build Encampments and Barracks (assuming you have spare district capacity) – that’ll give you a shot at a medieval/renaissance Great General to go with your Janissary/Bombard wars. If you have iron in your lands, research Iron Working so you can start training Swordsmen ready for upgrading later. However, this detour does mean researching Gunpowder a little later. It’s not worth training Men-at-Arms units ready for upgrading to Janissaries, as Men-at-Arms are actually more expensive to train – just upgrade Swordsmen directly to Janissaries once you are able to.
Whether you research Currency and/or Iron Working now or later, you should definitely research Military Engineering before Stirrups on your road to Gunpowder. Military Engineering reveals nitre, and revealing it in advance gives you time to find it, improve it and build up a little stockpile of it. It also lets you build Trebuchets.
After Gunpowder, research Metal Casting so you can upgrade your Trebuchets to Bombards, Banking to let you build the Grand Bazaar UB, and Cartography so you can cross oceans with your Barbary Corsairs. You don’t necessarily need to research in that specific order, but it does help you get the most relevant bonuses to warfare sooner.
Janissaries cost just 120 production each to train. By this point, you should already have the Feudal Contract policy card unlocked for a 50% production bonus when training them.
However, there’s two problems: Firstly, training Janissaries in cities you founded will cost population, so you’ll want to ensure they’re trained in cities you captured earlier. Secondly, training Janissaries costs 10 nitre a time, meaning you can quickly exhaust your stockpile. A possible solution is to move Governor Magnus (the Steward) to your most productive captured city and give him the Black Marketeer promotion, cutting the strategic resource cost to just 2 nitre – however, you may save more nitre if you move him to a city training Bombards.
Alternatively, if you have less than 10 nitre in your stockpile, you’ll still be able to train Men-at-Arms. You can then upgrade them to Janissaries, avoiding the potential population loss at the cost of some additional production and iron. The Retinues military policy card (medieval era, requires Mercenaries) helpfully cuts the resource cost of upgrading Men-at-Arms down from 10 nitre to 5, and Trebuchets from 20 nitre to 10.
While generally you shouldn’t train Janissaries in founded cities, one exception is if a city is under attack. Draining its population makes it a less lucrative target, and having a defensive unit closer to your enemy increases the chances you can hold onto it.
As a final note, Janissaries are no cheaper to maintain than generic Musketmen despite their halved production/resource costs, but the Ottoman incentive to build plenty of Commercial Hubs should cover that.
Janissaries receive a free promotion – for new units, that gives you a choice of Battlecry (+7 strength vs. melee infantry and ranged units) or Tortoise (+10 defence vs. ranged attacks). Battlecry leads to the Commando promotion (+1 movement and can scale cliff walls), while Tortoise leads to Amphibious (no penalty to attacking across rivers/while disembarking).
Generally, Battlecry is a better promotion for fighting enemy armies, while Tortoise is more useful when sieging cities. Bombards will do most of your city sieging work, so it’s a good idea to give more Janissaries Battlecry than Tortoise.
Janissaries have both advantages in quantity and quality. Their halved production and resource cost means you can produce them twice as fast as other civs can create Musketmen, letting you use flanking and support bonuses more effectively. Add the free promotion and +5 strength on top, and enemy units shouldn’t pose a threat until the industrial era.
The main role of Janissaries is to cut through enemy units so your Bombards can hit enemy cities. As melee infantry units, no enemy unit classes are especially strong against them and they defend well against counter-attacks. Their low movement speed is their main weakness, though this is partially mitigated by the Commando promotion and/or a Great General, and the Bombards they’ll be accompanying are slow anyway.
With the industrial-era Nationalism civic, you can form corps out of your Janissaries. Getting the industrial-era Military Science technology lets you build Military Academies and will allow you to directly train Janissary corps in cities with it (though as usual, make sure those cities aren’t ones you founded!). Janissary corps are cheaper than single Musketman units for other civs, but are stronger than Line Infantry – albeit at a higher gold maintenance cost than either. Accounting for their free promotion, new Janissary corps can outperform new Infantry.
Janissary armies trained at a city with a Military Academy are 16% cheaper than an Infantry unit but are 2 points stronger (plus the free promotion) at the cost of twice as much gold maintenance. That makes them remain useful until Tank corps enter the battlefield.
- Research Military Engineering before Stirrups on your route to Gunpowder so you know where nitre is.
- If you want to prebuild Janissaries, train Swordsmen prior to unlocking Apprenticeship – don’t train Men-at-Arms if you can avoid it as they are more expensive than Janissaries.
- Unless a city’s under attack and needs a rapid defence, always train Janissaries in cities you didn’t found.
- Janissaries are most useful fighting enemy units – as such, the Battlecry promotion is often a good first choice.
Unique Building: Grand Bazaar
To round out the Ottoman advantages in all kinds of elements of warfare, the Grand Bazaar UB offers gold, amenities and bonus strategic resources to support the effort.
It’s a good idea to start building up Commercial Hubs and Markets in cities in the time after launching early Catapult wars, but before Janissaries become available. Not only will Markets provide valuable trade route capacity, but you’ll also generate plenty of gold to support the maintenance of Janissaries, Barbary Corsairs and Bombards.
Grand Bazaars themselves require the renaissance-era Banking technology. Research it after you’re done with Metal Casting so you can start training Janissaries and Bombards first, as the sooner you launch an attack, the stronger it’ll be.
Grand Bazaars are 24% cheaper than the Banks they replace, representing one of the biggest reductions in cost any UB has relative to their generic counterpart. This makes it a lot easier to slip it in between new Janissaries, Bombards and Barbary Corsairs and ensures you can make use of its handy +5 gold yield sooner.
Improved strategic resources in the range of a city with a Grand Bazaar will produce +1 quantity per turn (so long as they are the first copy). Any city with nitre should build a Grand Bazaar as soon as possible so you can support more Janissaries/Bombards, and as you reveal more strategic resources later in the game, you should ensure the appropriate cities also have the building in place.
Grand Bazaars also provide amenities based on the quantity of improved luxury resources in the city’s limits. The impact varies from city to city, but essentially allows you to get the key benefits of both Commercial Hubs and Entertainment Complexes/Water Parks in a single district. This frees up district capacity for other things like Campuses or Encampments.
All this being said, resist the temptation to focus on building up Grand Bazaars in all your cities right away. Focus on the cities with nitre first, and build them elsewhere when you need the gold or amenities. The time Grand Bazaars enter the game is when your UUs are at their most relevant, and spending lots of production on Grand Bazaars now will mean sacrificing some of their potential.
Grand Bazaars find new functionality as more strategic resources are revealed. Resources from coal onwards are required in maintenance, and generating more of them increases the maximum number of units or buildings you can maintain. More coal, oil or uranium may mean more power generation. More coal, oil, aluminium or uranium means you can support a bigger army, navy or air force without needing to boost your strategic resource generation with policy cards. That’s rather helpful as you upgrade your Janissaries, Bombards and Barbary Corsairs, and as you start training air units.
The bonus strategic resource generation of Grand Bazaars also makes the Ottomans a rare civ with a direct advantage in the nuclear arms race (Canada being another).
The Grand Bazaar is a great support building which provides you with the gold and strategic resources to support your armies, while also allowing you to circumvent the need for Entertainment Complexes or Water Parks in handling war weariness.
Administration – Government and Policy Cards
Note that the Administration sections strictly cover the options that have particularly good synergy with the civ’s uniques. These are not necessarily the best choices, but rather options you should consider more than usual if playing this civ relative to others.
Oligarchy is a great choice – the strength bonus will help your Janissaries later. Still, its policy card arrangement is bad for general development, so you may want to take it for the legacy card and then switch to Classical Republic for the economic policy card slots.
Complement Oligarchy with the Warlord’s Throne for bonus production every time you take a city,
Merchant Republic has a good set of policy cards and comes at the same civic as Press Gangs, needed to train Barbary Corsairs faster.
The Grand Master’s Chapel is usually the best choice of Government Plaza building. You’ll get a fair amount of faith from Barbary Corsair raids and capturing cities with Holy Sites, and you’ll be able to funnel that faith back into purchasing military units.
Fascism offers an all-round strength bonus which aids further conquests. However, Communism‘s production bonus can be quite effective for the Ottomans given you can extend the production bonus to one additional city compared to other civs.
The War Department complements it nicely by giving all your units health when they score kills.
If you can handle the science penalty, Corporate Libertarianism is your best choice. The Ottoman inclination towards Commercial Hubs and Encampments will pay off with the production boost.
Agoge (Military, requires Craftsmanship) – Training some Swordsmen now to upgrade into Janissaries later allows you to use the unit sooner and avoids the population loss.
Raid (Military, requires Military Training) – Boosts the yields you get from Barbary Corsairs engaging in coastal raiding. Also useful for your land-based units as they can pillage farms for more health if necessary.
Feudal Contract (Military, requires Feudalism) – Allows you to train Janissaries even faster. With this card, Janissaries can be trained faster than civs without this policy card can train Swordsmen.
Retinues (Military, requires Mercenaries) – Halves the resource cost of upgrading units. This is very helpful when upgrading Swordsmen to Janissaries and upgrading Catapults and Trebuchets to Bombards.
Drill Manuals (Military, requires Mercantilism) – In case you need more nitre for your Janissaries and Bombards.
Free Market (Economic, requires The Enlightenment) – The Ottoman incentive to build a lot of Grand Bazaars means this policy card could potentially generate a lot of money – perfect for maintaining your army and navy.
Logistics (Military, requires Mercantilism) – Siege units are slow, making the movement bonus on offer here very relevant.
Press Gangs (Military, requires Exploration) – Aids in training Barbary Corsair units.
Wisselbanken (Diplomatic, requires Diplomatic Service) – Offers a bonus to alliance point generation to complement Ibrahim’s Khass-Oda-Bashi promotion.
Force Modernisation (Military, requires Urbanisation) – Halves the cost of upgrading units, including resource costs. Upgrading Janissaries to Infantry can be pretty expensive, so this can save you a lot of gold.
Total War (Military, requires Scorched Earth) – Doubles pillaging yields, including coastal raids.
Levee en Masse (Military, requires Mobilisation) – If you’re using Janissary corps or armies at this point, the maintenance costs can get quite harsh. This policy card should help.
Administration – Age Bonuses and World Congress
Free Inquiry (Golden Age, Classical to Medieval eras) – A neat way to make early development more efficient. By building Commercial Hubs instead of Campuses, you can prepare for the Grand Bazaar UB while still generating science via this Golden Age dedication.
Letters of Marque (Dark Age, Renaissance to Modern eras) – If you don’t mind losing half your trade route yields, you can get a massive bonus to training Barbary Corsair units, as well as a movement speed bonus to them. That allows them to engage in a lot of coastal raids in a single turn.
Hic Sunt Dracones (Golden Age, Renaissance to Modern eras) – Speed up your Barbary Corsairs allowing them to pillage even more in a single turn.
Robber Barons (Dark Age, Industrial to Information eras) – While most warmongering civs would want to avoid the amenity penalty, the Ottomans can manage it with the Grand Bazaar and some Entertainment Complexes and/or Water Parks. Cities with Grand Bazaars already can then work towards Stock Exchanges for a massive +50% gold bonus! There’s also a nice production bonus on offer for cities with Factories.
To Arms! (Golden Age, Industrial to Information eras) – Ibrahim’s grievance reduction bonus only goes so far; if you want to keep hold of an alliance you’ll want to ensure you’re not generating too many grievances to begin with. This dedication’s special casus belli should help with that.
How you should vote in the World Congress will often be specific to your game – if you have a strong rival, for example, it might be better to vote to hurt them than to help yourself. Furthermore, there may be general bonuses to your chosen victory route or gameplay which are more relevant than ones that have stronger synergy with civ-specific bonuses. Otherwise, here’s a list of key relevant votes that have high relevance for this civ relative to other civs.
Luxury Policy – Effect A (Duplicates of the chosen luxury resource grant duplicate amenities) on a resource you have many copies of.
The Grand Bazaar encourages you to get as many luxuries as possible. This bonus can build on that advantage.
Migration Treaty – Effect A (+20% faster population growth but -5 loyalty per turn in this player’s cities) targeting a player with cities vulnerable to your loyalty pressure, if you have Governor Ibrahim present with the Grant Vizier promotion in their capital.
Together with the Grand Vizier promotion, you can pressure rival cities into flipping to your control. Alternatively, the population growth can mean more population for you to take later.
Military Advisory – Effect A (Units of the chosen promotion class gain +5 strength) on siege units, or melee infantry when Janissaries are present, or naval raiders when Barbary Corsairs are present. Alternatively, Effect B (Units of the chosen promotion class lose 5 strength) on either type of cavalry, bomber-class aircraft, or melee naval units when Barbary Corsairs are present.
There’s a lot of good options here so you can work off what other civs want to see. Obviously, strengthening units the Ottomans are already good at using is an effective option. But you can also try countering cavalry or bomber-class aircraft (the main threat to your siege units), or naval melee units (the main threat to your Barbary Corsairs).
Public Relations – Effect B (The chosen civ generates 50% fewer grievances, and other civs generate 50% fewer grievances toward this civ) on yourself
If you want to make the most of Ibrahim’s alliance points, you’ll want to minimise the grievances you generate.
Urban Development Treaty – Effect A (+100% production towards buildings in this district) on Commercial Hubs
Really helps you develop Grand Bazaars.
Administration – Pantheons, Religion and City-States
God of Craftsmen – The Grand Bazaar UB will be more effective the more strategic resources you have, and so will this pantheon.
God of the Forge – A great help in your classical-era Catapult-led warfare.
Religious Settlements – Saves time in early expansion by granting a bonus Settler – with the saved production, you can train a couple of military units.
You can have one founder, one follower, one enhancer and one worship belief.
Cross-Cultural Dialogue (Founder) – Large captured cities can now produce bonus science.
Crusade (Enhancer) – A powerful option which covers up a key Ottoman weakness: their relative lack of fighting ability in foreign lands. By spreading this religion to other civs, you’ll get a massive +10 strength boost when fighting there later. It also applies against cities – siege units boosted with Ibrahim’s Serasker promotion and this belief get a massive +25 strength boost!
Defender of the Faith (Enhancer) – Helpful in defence, especially combined with Ibrahim’s Head Falconer promotion.
Stewardship (Founder) – The Ottoman incentive to build plenty of Commercial Hubs can make this a mildly stronger source of gold than it’d otherwise be, though you might be better off taking Church Property or Tithe.
World Church (Founder) – Large captured cities can yield plenty of bonus culture.
Akkad (Militaristic) – The combination of Janissaries, Bombards, Ibrahim’s Serasker promotion and Akkad makes it extremely easy to tear down city defences.
Hattusa (Scientific) – A lifeline if you don’t have any nitre in your land, given how essential it is for both Janissaries and Bombards. Be sure to use Governor Magnus (the Steward) with the Black Marketeer promotion to make the small supply of nitre go further.
Muscat (Trade) – A useful means of getting amenities out of your Commercial Hubs before Grand Bazaars enter the game.
Taruga (Scientific) – Been searching for strategic resources to use in conjunction with the Grand Bazaar? Now you can get science on top.
Administration – Wonders and Great People
Great Lighthouse (Classical era, Celestial Navigation technology) – The faster Barbary Corsairs are, the more coastal raids they can conduct.
Terracotta Army (Classical era, Construction technology) – A helpful wonder to build during or after early Catapult-led wars, as you’ll be able to get plenty of highly-promoted units ready for renaissance-era warfare later.
Casa de Contratación (Renaissance era, Cartography technology) – With an extra Governor relative to other civs, you can get a lot more out of the bonus Governor promotions, as well as the bonuses to gold, production and faith.
Taj Mahal (Renaissance era, Humanism civic) – If you want to exploit Ibrahim’s Grand Vizier promotion to its fullest potential, you’ll need to maximise the loyalty pressure on rival cities. The best way to do so is to enter a Golden or Heroic age – the bonus era score from the Taj Mahal will help.
Venetian Arsenal (Renaissance era, Mass Production technology) – Allows you to train double quantities of Barbary Corsairs.
Big Ben (Industrial era, Economics technology) – The cheap Bank replacement the Ottomans have makes the adjacency prerequisite for this wonder easy to achieve. Extensive raiding with Barbary Corsairs can also help you build a large treasury, which can then be boosted once the wonder is complete.
Great Generals and Admirals are only mentioned if their retirement bonuses have specific synergy with the civ; not merely for providing a strength bonus to a unique unit.
Gaius Duilius (Great Admiral) – If you have another spare classical/medieval era Great Admiral, go ahead and retire Gaius Duilius on a Barbary Corsair unit. It’ll receive +10 strength, making it even more dominant on the seas prior to the renaissance era, and stand up reasonably well to renaissance-era threats.
El Cid (Great General) – Got a spare medieval/renaissance-era Great General? Great! You can retire El Cid on a Janissary (or even a Catapult, Trebuchet or Bombard) for an especially powerful unit. Bombard corps will deal massive damage against cities, while Janissary corps can fend off practically any pre-modern era threat.
Irene of Athens (Great Merchant) – Grants a Governor title; useful for making the most of Ibrahim.
Leif Erikson (Great Admiral) – A particularly useful Great Admiral for the Ottomans. Crossing oceans early allows Barbary Corsairs to attack foes from more angles, and extra sight helps to scout out for danger (or spy on enemy lands while you’re raiding coasts).
Rajendra Chola (Great Admiral) – A very handy +3 strength bonus to all naval units, including Barbary Corsairs.
Francis Drake (Great Admiral) – Get a Barbary Corsair for free!
Giovanni de Medici (Great Merchant) – Get a Grand Bazaar for free!
Gustavus Adolphus (Great General) – A free Bombard without the need for nitre or the Metal Casting technology. Can save a few turns before launching a Janissary-led war.
Santa Cruz (Great Admiral) – Allows access to an early Barbary Corsair armada, which fights almost as well as a Battleship!
Adam Smith (Great Merchant) – Grants a bonus Governor title.
James Young (Great Scientist) – Revealing oil early helps you work out which cities need to focus on building up Commercial Hubs and Grand Bazaars ahead of the Refining technology.
Napoleon Bonaparte (Great General) – Allows you to create a Janissary army with an impressive 77 strength.
Mary Katherine Goddard (Great Merchant) – The Ottomans lack much in the way of combat bonuses against units, so the strength bonus from diplomatic visibility is useful if an advantage can be achieved there.
Tupac Amaru II (Great General) – Receive a group of Janissaries for free!
Georgy Zhukov (Great General) – Having a greater supply of strategic resources allows you to support more units on the battlefield and hence get more out of this boost to flanking strength.
Counter-Strategies
The Ottomans come with a huge variety of bonuses in warfare, and that on the face of it can seem pretty scary. But the Ottomans have some notable limitations – their dependence on nitre in the renaissance era, and their relative lack of fighting ability against enemy units beyond it.
Ottoman siege units will be very effective against cities, but not very effective against units. Light cavalry are your best bet against them due to their ability to ignore zone of control, their superior movement and their access to two promotions (Coursers and Spiking the Guns) which offer strength bonuses against siege.
When they capture cities, the Ottomans keep the full population and get a bonus to both loyalty and amenities. The combined effect means the Ottomans tend to have fewer loyalty problems than other civs, so don’t count on being able to flip cities out of their control. However, keeping a city’s full population does mean that losing a city to the Ottomans and then recapturing it isn’t as much as a loss as it would be if you recaptured a city taken by a different warmonger. One possibility is to use the Crusade belief in your religion so if you lose a city it’s easier to take back. Crusade offers twice the strength bonus of Defender of the Faith, so it can have a bigger impact.
This bonus is at its most effective when the Ottomans can secure a high number of governor titles. Denying them access to the Casa de Contratación wonder will definitely be useful, as denying them the Great Merchants Irene of Athens and Adam Smith.
Having an extra governor means the Ottomans have to rearrange their distribution of titles relative to many other warmongers, which might delay them access to Governors like Magnus (the Steward) or Pingala (the Educator). That could slow down their production or research to some extent.
Keeping your diplomatic visibility on the Ottomans high is a good idea. At level one (achievable by researching the Printing technology), you can see where they have Governors located. At level two (achievable with the Printing technology and a Spy on the Listening Post mission) you can see specifically where Governor Ibrahim is. In peacetime, all you need is a delegation and a trade route to achieve level two visibility, but that won’t help you in war-time. Once you know where Ibrahim is, you can send a Spy over to disable him with the Neutralise Governor mission.
This promotion can make it tough to fight Ottoman cities, especially seeing as Ibrahim can relocate in just three turns. Attacking two Ottoman cities at once is a possible workaround, as is trying to lure Ottoman units to leave the city’s territory before finishing them off.
This promotion is a huge threat, but only if the Ottomans can reach your cities to begin with. Cavalry units are good against Ottoman siege units, can deal with their other land units reasonably well, and impose zone of control (so their Janissaries/siege units won’t slip through). Still, watch out for any cavalry units that they try and move through your defences – having a wall of units defending your city from the side facing the Ottomans should help.
This promotion works both ways – if you’re allied with the Ottomans, your alliance will develop faster! The strong military power of the Ottomans can make them a good ally, though your other allies might not get on with them so well.
While one of the weaker promotions for Ibrahim, it still can prevent you from calling military aid emergencies in certain situations or result in the Ottomans having more diplomatic favours than you’d otherwise expect. Oh the whole, however, the effect is minimal and it’s not something you need to play around.
A powerful and tough promotion to counter. If you have level two diplomatic visibility on the Ottomans, you’ll know where Ibrahim is. If he’s present in another civ’s capital, check the loyalty lens for any Ottoman cities near to them. If the level of loyalty gain seems unusually high, then Ibrahim most likely has this promotion.
Forming a cultural alliance with the Ottomans is a good way of circumventing this promotion’s bonus, as you’ll get no loyalty pressure from them that way (plus you’ll get the extra aliance points from Khass-Oda-Bashi). But if that isn’t an option, you’ll want to make sure your internal loyalty pressure is high – having plenty of amenities, era score and well-positioned Governors will help if you’re struggling to keep hold of some border cities.
If the Ottomans can’t get nitre, they can’t train Janissaries, and if they can’t capture any cities early on, they’ll lose population when training them. As such, the best counter to Janissaries is to constrain Ottoman expansion early on. Aside from the two Ottoman UUs, the civ generally lacks strength advantages against units leaving them with some weaknesses in their early warfare. Things get a lot tougher if the Ottomans are able to train up Janissaries.
Janissaries both have strength and numbers advantages. Promoted Knights can work if you have more of them than the Ottomans have Janissaries, but until the industrial era you’ll need more than just using specific units. Other strength bonuses like the Defender of the Faith bonus, or Governor Victor (the Castellan)’s defensive bonus, will be really helpful while you work towards industrial-era units. Into the industrial era, Cuirassiers or Cavalry will perform well against the Ottomans, and Field Cannons will help as well.
A computer-controlled Suleiman prefers to keep the amenity and loyalty level of his cities high. He likes civs that have high amenities and loyalty as well as captured cities, and dislikes civs that have low amenities and loyalty or few captured cities.
Suleiman’s agenda is a perfect fit for a civ with good city-flipping capabilities like England/France under Eleanor of Aquitaine or Phoenicia. It also works well for civs incentivised to war a little but not throughout the game such as America. Purely peaceful civs, and warmongers without amenity bonuses, will struggle to meet this agenda.
Barbary Corsairs are mostly a threat in the medieval era. They can easily pick apart Galleys and Quadriremes, and they’re hard to attack with siege units. As such, your best option to counter them is to research Cartography and build some Caravels. You can also reduce the risk of coastal raids by avoiding building improvements or districts on the coast if the Ottomans start near you.
Relative to Privateers, Barbary Corsairs have no advantages in combat. This makes them vulnerable to the attacks of Caravels, Frigates and Ironclads – or even other Privateers. Use your navy to keep Ottoman Barbary Corsairs away from your coast, as even one can destroy a lot and gain a lot of health/gold/faith in a single turn.
Getting Great Admirals will help. The Ottomans have a stronger incentive to build Commercial Hubs than Harbours, so they’re unlikely to have many of their own.
The less land the Ottomans can secure, the less effective this building is, as they’ll have fewer strategic and luxury resources. But if restraining Ottoman expansion early on isn’t an option, this is a good building to target for pillaging. It’ll cost the Ottomans amenities, gold and strategic resources all at once.
The Siphon Funds mission is a great way to train new Spies, and can be done at Commercial Hubs. The Ottomans will have plenty of them thanks to this UB, so you can earn plenty of cash and Spy promotions ready for use against them in Neutralise Governor missions.
Other Guides
If you like these guides and want to send a tip, you can click here![ko-fi.com]
- America – with persona packs (Cultural/Diplomatic/Domination/Scientific)
- America – without persona packs (Cultural/Diplomatic/Domination)
- Arabia (Religious/Scientific)
- Australia (Domination/Scientific)
- Aztecs (Domination)
- Babylon (Cultural/Domination/Scientific)
- Brazil (Cultural/Domination/Religious/Scientific)
- Byzantium (Domination/Religious)
- Canada (Cultural/Diplomatic)
- China (Cultural/Scientific)
- Cree (Diplomatic)
- Egypt (Cultural/Diplomatic/Religious)
- England (Cultural/Domination/Scientific)
- Ethiopia (Cultural/Religious)
- France (Cultural/Domination)
- Gaul (Domination)
- Georgia (Diplomatic/Religious)
- Germany (Domination/Scientific)
- Gran Colombia (Domination)
- Greece (Cultural/Diplomatic/Domination)
- Hungary (Diplomatic/Domination)
- Inca (Religious/Scientific)
- India (Domination/Religious)
- Indonesia (Cultural/Domination/Religious)
- Japan (All)
- Khmer (Cultural/Religious)
- Kongo (Cultural)
- Korea (Scientific)
- Macedon (Domination/Scientific)
- Mali (Diplomatic/Religious)
- Māori (Cultural/Religious)
- Mapuche (Cultural/Domination)
- Maya (Scientific)
- Mongolia (Domination)
- Netherlands (Scientific)
- Norway (Domination)
- Nubia (Domination)
- Ottomans (Domination)
- Persia (Cultural/Domination)
- Phoenicia (Domination)
- Poland (Cultural/Domination/Religious)
- Portugal (Diplomatic/Scientific)
- Rome (Domination)
- Russia (Cultural/Religious)
- Scotland (Scientific)
- Scythia (Domination/Religious)
- Spain (Domination/Religious/Scientific)
- Sumeria (Diplomatic/Domination/Scientific)
- Sweden (Cultural/Diplomatic)
- Zulus (Domination)
Guides listed here have no Gathering Storm counterpart. These guides are for those with the Rise and Fall expansion, but not Gathering Storm. If you want to see a pre-Gathering Storm version of any guide, click any of these links and scroll down to the “Other Guides” section.
The Vanilla guides are for those without the Rise and Fall or Gathering Storm expansions. These guides are no longer updated. To look at them, click here to open the Vanilla Civ Summaries guide. The “Other Guides” section of every Vanilla guide has links to every other Vanilla guide.