
Overview
In this step-by-step guide, we’ll take a look at FourChords (FC) Instant Play Method and how to use this approach to learn and play guitar chords to any song in our large catalog. We’ll also cover some basic features of the FC application. No tracking of your performance is ever applied, so you can just play your heart out. All songs have been arranged into simplified versions, which means you only need to learn a few open chords to get you nicely started. Only 10 minutes a day will get you rocking with your friends in a week.This guide is aimed at absolute beginners and assumes no prior knowledge of guitar playing. In case you’re a more experienced guitarist, check out the Q&A before starting.
Step 1. Check Your Guitar Is in Tune
A well-tuned guitar is a must-have for chords to sound right. If you need help in tuning your guitar, you can consult our tuning guide . If you’re already in tune, proceed to the next step.
Step 2. Choose a Song – Example ‘House of the Rising Sun’
After firing up the FC app, we’re just going to go ahead and select LET’S PLAY.

For the purposes of this particular guide, we’ll be using ‘House of the Rising Sun’ as our example song. You can find it under ‘Traditional’ song category. Scroll down the list (alphabetically ordered by song name) and select our example song.

Step 3. Select Your Skill Level and Review the Chords in the Song
Choose Skill Level:
After song selection, we’re going to look at the chords needed to play the song. The first thing you need to know is, you can choose between three skill levels:
- Single String is the easiest. You’ll be playing only a single bass note of the chord.
- 3-String Chords (Half Chords) are a stripped-down versions of full open chords. They make use of the top three strings (thinnest strings) to form easy but still great sounding chords.
- Full Chords are the hardest. These are the bread-and-butter open chords and are commonly used by all guitarists from seasoned professionals to absolute beginners.

Chord Video Guidance:
All chords are demonstrated in the form of easy-to-follow video clips. Each chord video shows you first, where to place your left hand fingers on the fretboard. After this, you can observe the right hand pick movement, which should be used to produce that particular chord sound. You can play or replay chord videos by clicking on the chord bubbles. For each full chord, you can also get in-detail guidance and LEARN THIS CHORD ON JUSTINGUITAR.
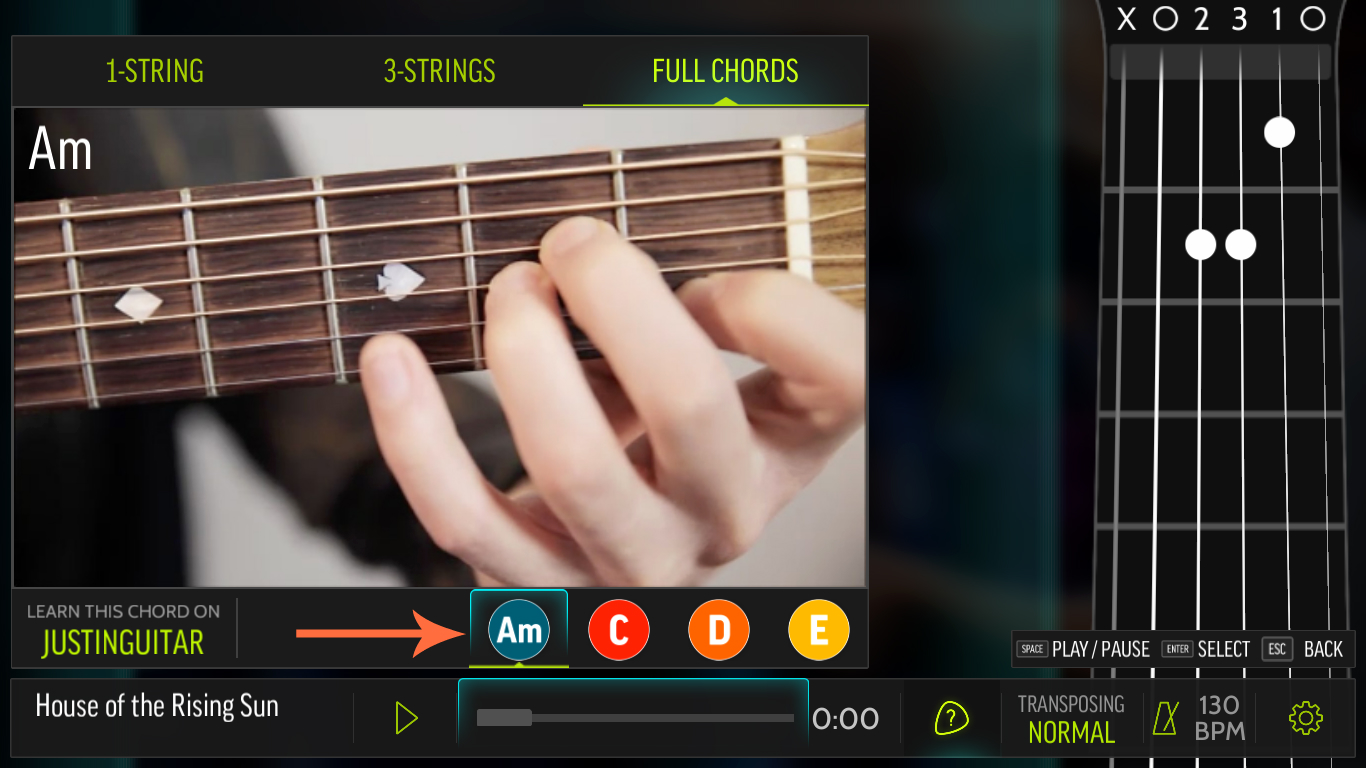
Now, for the sake of this guide, let’s proceed with using full chords to play our very first song. As you can see, our example song has only four different chords: A minor, C Major, D major and E major. We’re going to tackle these chords one at a time, so you’ll feel comfortable enough to play along the song.

First Chord Sound:
Let’s check the chord diagram or the ‘chord grip’ for our first chord, A minor open chord. Place your fingers, pluck or pick all chord tones from the lowest to the highest sounding note and listen to the sound. Accuracy is the key here. For a clean overall sound, make sure your finger joints are nicely curled and fingertips are pressing down the strings just behind the fret. Replay the chord video as many times as you need to get comfortable with this chord grip.
If you need more information on reading the chords charts, we have a separate guide for that, too!

Step 4. Start the Gameplay – Play One Chord Only
Review of the PLAY-SCREEN:
Before you start your first FC song, let’s take moment to review our PLAY SCREEN and it’s basic features. In FC, chords and lyrics are presented ‘karaoke-style’, which means, row by row and scrolling from top to bottom. Each row corresponds to a musical measure, which will help with the timing of your chordal playing. Each song has also a supporting audio backing track, which provides you with basic rhythmic cues to match your playing against. A playback cursor sweeping from left to right informs you about the playback position inside each measure.

First goal / challenge: strike the A minor
Now, go ahead and start the gameplay by clicking on the play icon at the bottom. Shortly thereafter, you’re greeted with FC’s play screen, followed by a brief count-in sequence before the song starts. This count-in doesn’t last long, so you need to be prepared to play the very first chord. I trust you still remember how to play our beloved A minor chord?

On this first playing round, your only goal should be to strum down (with a pick or right hand fingers) the A minor open chord, whenever the playback cursor crosses the ‘Am’ bubble. Remember to control chord timing accuracy by listening to the backing track. Pay special attention to the first beat of the measure. In our example song, all chord changes occur on the first beat of the measure.
Next goal: String mute
After you’ve successfully grabbed the A minor chord and strummed it in a nicely timed manner, let it ring out for a moment. Now, and this thing is important – before the next chord appears, lift your fingers and mute all strings by placing your fingers flat across the strings. You may do it either sooner or later during this ‘let ring stage’. In our example song, the next chord is C major, so execute the string mute before this chord occurs.
This string mute resets your left hand fingers before repeating the same chord grip again. This serves the purpose of developing the muscle memory associated with each chord. In time and after a fair amount of repetitions, you’ll find your fingers landing unconsciously on their correct places. This practice method also helps a great deal with tackling those tricky chord changes.
After muting the strings, you should have enough time to prepare your fingers for the next occurrence of our familiar A minor chord. Repeat this ‘chord-followed-by-mute’ process throughout our example song.
Third goal: C major, D major and E major
After you have completed the song playing ‘A minor only’, repeat the same process using the other chords in the song as well (C major, D major and E major). Remember to mute the strings between playing your selected chord.
If at any time you feel like you can’t keep up or want replay some part of the song, you may find the following in-built functions helpful:
- You can PAUSE and RESUME the song at any time by clicking on play/pause symbol or pressing space key.
- In case you want to replay some part of the song, you can rewind and fast forward by dragging the progress bar.
- You may also change the song tempo by clicking on the metronome icon. The current tempo is displayed in beats per minute (BPM). Tempo can be affected by increments of 5 BPM to slow it down or speed it up.
- If you’re still finding it hard to recall all those chord fingerings while playing, you can turn to our fretboard overlay to assist you. This feature should be on by default, but if not, you can turn it on by going to SETTINGS (in the lower right-hand corner) -> FRETBOARD -> ENABLE THE FRETBOARD and it will appear on the right-hand side of the screen.
- You can adjust percussions, guitar sounds, bassa sounds, vocals and lyrics in the same way.


Step 5. Continue the Gameplay – Practice Chord Changes
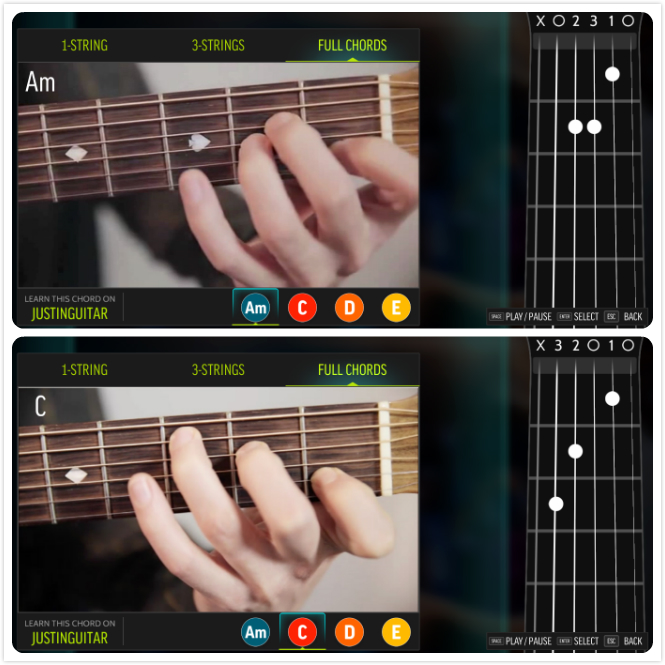
To get really down to business, as soon as you feel comfortable grabbing the basic chords of our example song, we can start working out on those chord changes. In the following, we are going to take a look at the first chord change in the song ‘House of the Rising Sun’. This takes us from A minor to C major chord.
As it happens, these two chords have common tones, which you can make use of to facilitate the chord change. As you can see in the chord charts, just by relocating the ring finger you can move between C and Am chords. This is one of the easiest chord change you can encounter! Start our example song again and this time, practice only the chord change from C to Am.
The key to a clean chord change is to practice it in isolation. ‘House of the Rising Sun’ has also trickier chord changes, where you have to lift all your fingers to go from chord to another (for example, from C major to D major). In the beginning, you may want to lift your fingers well before the change, so you have enough time to prepare for the next chord. However, the final goal should be to delay the chord change to be as late as possible.
As soon as you feel comfortable with all the chord changes, start the song again and try play it through with all four chords – A minor, C major, D major and E major. Don’t worry, if you make minor mistakes here and there. The most important thing is to keep on playing along and enjoying the music.
Yee-haw! You have played your first song!!!
Step 6. Next Steps – Select Your Favorite Song and Learn More
Now that you have successfully learned a few basic chords and chord changes, you can start exploring our extensive song catalog. We trust there are enough songs in FC to satisfy any musical taste. Every FC song arrangement uses a simplified chord vocabulary, which means you’ll be learning a lot of songs just by learning a few simple chords. Every new chord you encounter can be exercised by repeating the method described in Step 4.
Every new song reveals new connections between the chords you already know. This means you’ll be spending a lot of your practice time on those new chord changes. Some of the changes will be a bit tricky, but always try to aim for a clean and rhythmically accurate execution. Remember, you can always slow down the song tempo, if it seems too fast for you.
Patience is the key to efficient practice routines, so just keep at it, even if it feels frustrating at times. And, an essential part of any effective learning process is to always have fun while you’re at it!