100% BL:TPS Achievement Guide - Descriptions, Details and Hints included.
Story related
You'll unlock these achievements just by playing (and finishing) the main story. Warning: spoilers!


Levelling and Combat related




The easiest way: go to an enemy-populated area (Regolith Range, plenty of spots in Triton Flats and the Titan Industrial Facility), freeze 3 enemies with a low level cryogenic weapon (emphasis in "low level" so you freeze them before you kill them) and then shatter them all with a butt-slam.

As soon as you get the stingray in Triton Flats, look for an enemy, press F (jump) and then G (slam) to crush them with your vehicle.

The easiest way: when you're at least lvl 20, get back to a low level area (Serenity's Waste, for example) so you can safely attempt to do it without being killed first.

The easiest way: co-op with 3 other players -each equipped with an different elemental weapon- and go after RK5. Mercilessly shoot at it until you get the achievement.
"But I have no friends": use Claptrap, be at least lvl 25 and unlock the Rainbow Coolant skill. Go to an enemy-populated area, use VAULTHUNTER.EXE and hope for the best.
Another option is to use a grenade mod called "Four Seasons"[borderlands.wikia.com] (it randomly spawns an AOE 'nade with one of the 4 elements). Preferably, a lower level grenade against a badass enemy should be used (so it won't die easily). You can also try to combo it with as many of your character's skills/weapons as you have available. But changing between 4 different element type weapons will not be fast enough.

The easiest way: go to Tycho's ribs, and as soon as you get through the door, a Lost Legion Eternal will come out of the building on the right, shoot at him to trigger the evolution and don't kill anyone else. If he evolves into an Eternal Unstable, get as many enemies close to you as you can, so he'll kill them after exploding. A good alternative is the Eternal Magus, so he kills his partners while trying to kill you. Any other evolution is useless and should be killed immediately; you probably won't get it on the first try, so feel free to restart the game in Tycho's Ribs over and over until you get the achievement.
Loot related

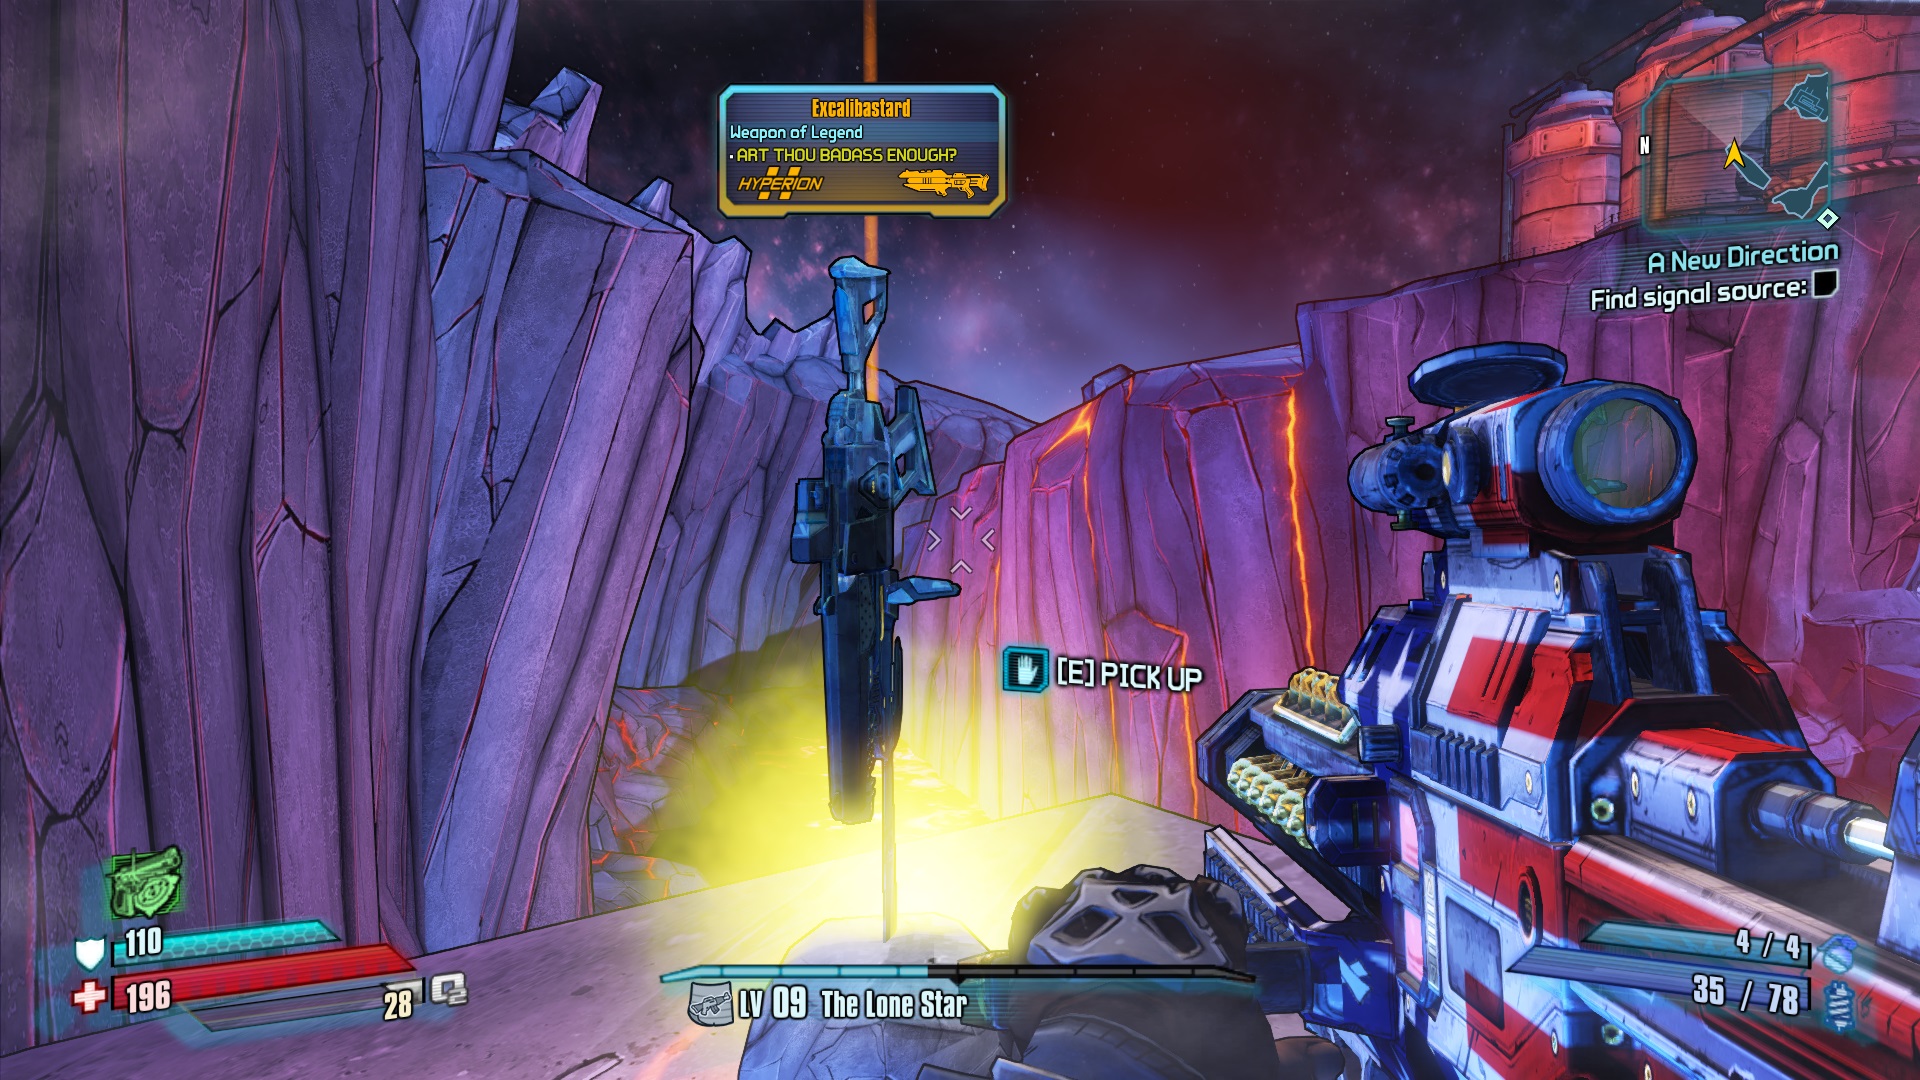
- You'll need to have at least 2500 Badass points for that, it should come easily with time. The achievement pops once you obtain the "Excalib@stard[borderlands.wikia.com]" located in Stanton's Liver in a rock in the northwest portion of the map. You'll need to jump across several cliffs at the left edge of the map, as seen from the entrance, before crossing the bridge leading to the refinery complex. You can only obtain it once per character, and it scales to the level you are when you pick it up.

- This can be done after you complete the 5th story mission "A New Direction". Talk to Janey Springs in Concordia, complete the side mission and she'll ask you to try the grinder out with 3 white rarity guns on her table. Achievement pops once you grind them.

- This should come relatively easy as you play, but one easy way to this is by using the SHiFT keys services that Gearbox provides us. Each key can open a chest in Concordia that contains 1 or more purple rarity loot. For more details about SHiFT keys and SHiFT codes check the linked guide on the bottom of this guide.

- This should also come easily as you play, but if you haven't got it yet an alternative is to fast travel to Titan Robot Production Plant after you defeated the boss "Felicity" and open the chest near her location, then log off and repeat. You will need 40 moonstones per chest, so make sure you have them when you go there. An easy way to farm moonstones is by defeating the secret boss Iwajira.[borderlands.wikia.com]

- This should come pretty early in the game. Customizations are dropped randomly from enemies and also given in certain quests.

- You need to grind a legendary weapon. Basically you need at least 2 other legendary weapons and one purple weapon. If you don't use moonstones you're not guaranteed to receive a legendary weapon from the grinder, but if you do, there's a 100% chance to get a legendary weapon from the grinder and also the possibility of it containing a luneshine effect. So, even though it costs alot of moonstones, I would say the risk to grind without them is not worth it.
Side Mission related

- This achievement should come with time if you have been doing every side quest that gets available to you. There is not much I can say about it apart of giving you an idea of when you should get it. I was around level 18-20 when I got it and the first playthrough is usually finished at level 28-30.

- This achievement requires you to complete ALL of the 60 side missions, so if you want to get this achievement as soon as possible I would suggest doing every side mission as they get available to you.

- The first part of this achievement is done by completing a quest called "The Voyage of Captain Chef". This mission is avaliable after completing story mission "Let's Build A Robot Army" and you can get it in Triton Flats.
- The second quest you need to complete is "The Return of Captain Chef". It unlocks after completing story mission "Eye to Eye" and you can get this quest in Vorago Solitude.

- This achievement is for doing the side mission "Don't Shoot the Messenger". It appears as an exclamation mark as you make your way through Tycho Ribs during the final mission story "The Beginning Of The End". The exclamation mark will be an echo device next to the giant cannon you need to use to disable the force-field.

- IMPORTANT: You need 3 co-op partners for this achievement. To start the quest, meet Pickle in the Outlands Canyon and he will tell you to "Find the Sub-Level 13 entrance". The quests in there must be done with the group.
Curious fact: This achievement is a reference to Ghost Busters.

- This achievement is earned in the "Guardian Hunter" side quest that you can get in Vorago Solitude after beating the final story mission. At the end of the quest you will be asked to deliver the guardians or kill the master poacher. IMPORTANT: To get the achievement you MUST choose to kill the master poacher.

- This achievement is earned by completing the side quest "To Arms" that starts at the bounty board in Triton Flats. You'll need to deliver 50 White rarity weapons in order to complete this side quest. So it's very important that you get this quest as early as possible and keep delivering the white rarity guns you drop as your inventory gets full. Otherwise just keep buying white rarity weapons from vending machines as much as your budget allows you.

- "Wiping the slate" that is located at Concordia bounty board.
- "No such thing as a free launch" given by Cosmo Wishbone in Triton Flats near the fast travel station.
- "Home Delivery" after you completed another side mission called "Treasures Of Echo Madre" given by Pickles in Outlands Canyon, once you have completed it, "Home Delivery" will be available at the Concordia bounty board.
- "It Ain't Rocket Surgery" that is given by Dr. Spark in the Research and Development area after completing the main mission "Science and Violence".

- The side mission to open the Zarpedon's chest is located in Pity's Fall and called "The Secret Chamber". It's available after defeating "The Bosun" during the story mission "Intelligences Of The Artificial Persuasion".

- After defeating the final boss "The Sentinel" for the first time, you can get the side quest "The Bestest Story Ever Told" at the Concordia bounty board. Achievement pops after beating the Sentinel again.
Read in Tina's voice: "RAAAAAAAAAAAAAID BOOOOOOOOOOSS"
Character/Co-op related
You'll get these after completing certain tasks with a specific character. Most of these are self-explanatory and need no special instructions.

Recommended tree[thepresequel.com]

Recommended tree[thepresequel.com]

Recommended tree[thepresequel.com]

- Funzerker - Salvador
- Shh... trap - Zer0
- Blightbot - Maya
- Mechromagician - Gaige <3
- Miniontrap - Axton
- Meat unicycle - Krieg
- Rubber duck - original
- Med bot - original
- Nonsensical sacrifice - original
- Torgue fiesta (green tree, 4th row)
- Pirate ship mode (green tree, last row)
- Clap in the box (blue tree, 2nd row)
- Gun wizard (blue tree, 3rd row)
- One shot wonder (red tree, 3rd row)
- Laser inferno (red tree, last row)

The easiest way: get your co-op buddy to die 10 times and revive them with oxygen said 10 times. You don't have to do it with 10 different players in order to get the achievement.

Location related
You'll get these by discovering all the named locations in all the maps. Yes, these are the annoying ones.
Tip: explore the maps from north to south, slowly, making sure you're walking through every single area. Reference maps[borderlands.wikia.com]

Important: Regolith Range and Crisis Scar count as well.

These are the locations that you'll need to explore: Hyperion Hub of Heroism, Jack's Office, Research and Development, Veins of Helios, Eye of Helios and Lunar Launching Station. Veins of Helios is by far the biggest and hardest one to explore, so take your time.

Important: Pity's Fall, Titan Industrial Facility, Titan Robot Production Plant, Outfall Pumping Station, Tycho's Ribs and Eleseer count as well.

A/N: actually, "Eridian Explorer" doesn't require all of those maps (just most of them), but if you explore them as well, you'll get both Eridian Explorer and Cosmic Completionist at the same time.
Others

- I guess most people will say this is the hardest achievement in BL:TPS. The hardest part is actually knowing what to look for (some ranks are locked with a "???" and are only unlocked after completing certain levels or a certain different challenge) and be smart about how you play since the start. Try to use every type of gun as you play through the game and keep an eye on your badass rank tab from time to time. Also, save the weapons you collect for grinding challenges (those are a pain in the ass). I can't really explain any better than this guy from trueachievements has explained, this is what helped me get this achievement and so I'll just link you to his post here. [www.trueachievements.com]

- There are a total of 8 drinks on Moxxi's bar in Concordia and each sample costs 10 moonstones. As mentioned before, a good way of hunting moonstones is by farming the secret boss Iwajira[borderlands.wikia.com]

- You need to spend 5 minutes without dying while outside any oxygen regenerating place. I did this one with Wilhelm's action skill, but any other character with healing hability works fine. Other alternatives are Moxxi's Health Regen drink, Health Regen Mods (+1.1) or a Co-op partner reviving you with oxygen (if you choose that, you need to remove your Oz kit)
Note: This achievement can not be unlocked on claptrap since he doesn't suffocate.
The Holodome Onslaught DLC
- The first "Storyline" DLC contains 3 achievements


The single best advice for these 3 achievements is doing them on an easier difficulty. The last achievement is seriously difficult and I wouldn't recommend achievement hunting for those unless you have already overleveled the playthrough 1 or 2. Other then that, the descriptions are very self-explanatory.
I'll be getting back to give more advices for those of you who want to attempt it on higher difficulties later.
Claptastic Voyage DLC

- Storyline mission and can not be missed. Given right when you enter "The Nexus" in Claptrap's brain.

- Storyline mission and can not be missed. Given right when you destroy Tassiter's proxy during the "File Search" mission.

- Storyline mission and can not be missed. Given in "The psychology of a Claptrap" mission.

- Storyline mission and can not be missed.

- Storyline mission and can not be missed.

- Be careful not to miss this side quest. Check gaige's guide below for screenshots and detailed informations.

- All of them are in nexus. There is a total of 5 holo statues (Lilith, Brick, Roland, Springs and Pickle). You need to click each one at least once. Check gaige's guide below for locations.

- You can easily farm them while doing "file search" main quest, while inside the recycle bin. They will spawn indefinitely as long as you dont shot the generators.

- Simply complete a round using any combination of mutators after you beat the DLC story.

- I have just confirmed that it's not necessary to play on all the 9 levels, I did them all on level 1. So the easier way would be changing 1 mutator of the right and one from the left on each attempt (so a total of at least 9 rounds are going to be needed).
For a better and very well-detailed achievement description with locations and side quest details, check Gaige's guide here
http://steamcommunity.com/sharedfiles/filedetails/?id=414296181
Notes
Beat Borderlands: The Pre-Sequel's 100% run?
Flex it — let your friends know you pulled it off.
- SHiFT Codes★ 5 (4.8k)123k views9.2k ♥3 minUpdated Jul 28, 2017
- Grinder Recipes★ 5 (2.1k)77k views4.2k ♥8 minUpdated Apr 3, 2018
- "Goddess of the Storm" - An Athena Build★ 5 (482)29k views1.5k ♥18 minUpdated Dec 19, 2016
- R4MB0-TP!!! A Fragtrap Build★ 5 (582)28k views1.5k ♥21 minUpdated Jan 8, 2019
- Vault Symbols, ECHOs, and Other Collectibles Location Guide★ 5 (1.2k)23k views2.5k ♥21 minUpdated Feb 20, 2016
- Гайд по достижениям+DLC★ 5 (1.3k)17k views1.6k ♥20 minRussianUpdated Jun 8, 2019




- Upgrading to PremiumTeam Fortress 2★ 5 (20k)1441k views11k ♥6 minUpdated May 11, 2022
- No More Room in Hell Official ManualNo More Room in Hell★ 5 (2.8k)569k views2.1k ♥29 minUpdated Apr 22, 2019
- NMRiH Community Hosting GuidesNo More Room in Hell★ 5 (526)351k views653 ♥1 minUpdated Aug 10, 2022
- ULTIMATE GUIDE FOR GAME DEV TYCOONGame Dev Tycoon★ 5 (5.8k)326k views10k ♥4 minUpdated 23 Jan, 2014
- How to 'Git Gud' Soon™MORDHAU★ 5 (2k)318k views3k ♥68 minUpdated Nov 16, 2024
- Лучшие кооперативные игры SteamPAYDAY 2★ 5 (1.5k)315k views2.1k ♥56 minRussianUpdated Apr 27, 2025






This guide was created by its original author on the Steam Community. Are you the author and want it removed? Request removal.