A Reference Guide to Bitterblack Gear Lv.1/2/3
And countless lifetimes come to pass...

A Few Pointers…
A number of things to note to help you get started
- There are 4 types of *Cursed* items you’ll come across in Bitterblack: Weapon, Armor, Novelty, and Gear. The focus of this guide is solely on Bitterblack Gear. These Cursed items are unusable until Purified[dragonsdogma.wikia.com]by Orla. You can think of it as ‘identifying’ - a process which costs Rift Crystals (RC)[dragonsdogma.wikia.com] (more on that later).
- Bitterblack Gear are simply unique jewelry that provide particular skill upgrades (Bonus Enhancements), provide stat boosts, or unique utilities to the wearer.
- Bonus Enhancement (or Skill Bands & Rings) maximise many existing weapon and vocation specific skills to their fullest potential - Tier 3. Enhancement includes boosts to power, effectiveness and duration. Most Bonus Enhanced skills receive visual upgrades as well.
- Purification outcomes may also yield Stat Rings, and in the case of Gear Lv.3, unique rings that imbue the wearer with exclusive 'passives' similar to Augments.
- There are 3 tiers of Gear in Bitterblack, 3 being the highest in terms of value. Not to be confused with 'Tier 3 Skill', which refers to Bonus Enhanced skills.
- Cursed items can be gifted, but not their purified form.
- You will find a number of datasheets in this guide showing a complete listing of all types of skill- enchancing bands/rings, in-game descriptions, stat & unique rings found by purifying.
- This guide will hopefully help you in your farm (or search), but keep in mind there are a good few 'Skill' Bands and difficulty acquiring them varies. Undoubtedly, there are only a few that would set out to ‘catch ‘em all.’ For the most part, you would be hunting down specific bands, or rings(s).
- Generally, the best source for farming Gear Lv.3 (which contains most of the skill enhancements) is none other than Good Ole Death. Yes. Farming Death is something you will not be able to attempt without the *right* set-up. Any vocation can attempt it, but only a few are well suited for the task. Mainly ranged, agile damage dealers. That being said, there is nothing that a well-equipped party cannot accomplish. For more on Death, check out the wikia page.[dragonsdogma.wikia.com]
- Before you rush off into the cold, loving embrace of Death do note that while Death maybe the best source for farming Gear Lv.3 -which contain most Skill Bands-, it may not be the most ideal. Many chests have some very good odds of containing Cursed Gear items, scattered throughout the labyrinth.
- It's recommended you visit the following pages on wikia containing detailed information on chest locations for G1[dragonsdogma.wikia.com], G2[dragonsdogma.wikia.com] and G3[dragonsdogma.wikia.com]respectively. You can use the maps provided to plan a farming route.
- It costs 500 RC to purify a Gear 1, 1000 RC for a Gear 2 and 3000 RC for a Gear 3 item.
- Attempting to acquire all of the Tier 3 Skill Bands/Rings is a time (and rift crystal) consuming effort, therefore, if you intend to farm Bitterblack armaments you should (ideally) set your priorities as follows:
Bitterblack Weapon -> Bitterblack Armor -> Bitterblack Gear
That’s not saying you should find absolutely every Weapon or Armour piece before you start looking for Gear, -or even Novelty- simply that you will be able to climb that progression wall more efficiently with better overall stats and damage. Purifying the higher tier Cursed items can be very costly, so consider your personal priorities wisely.
Skill Bands (Part 1)
Here you will find a list of all the Bonus Enhanced skills, what vocation colour they are tied to, and which of the Cursed Gear items *might* contain them.
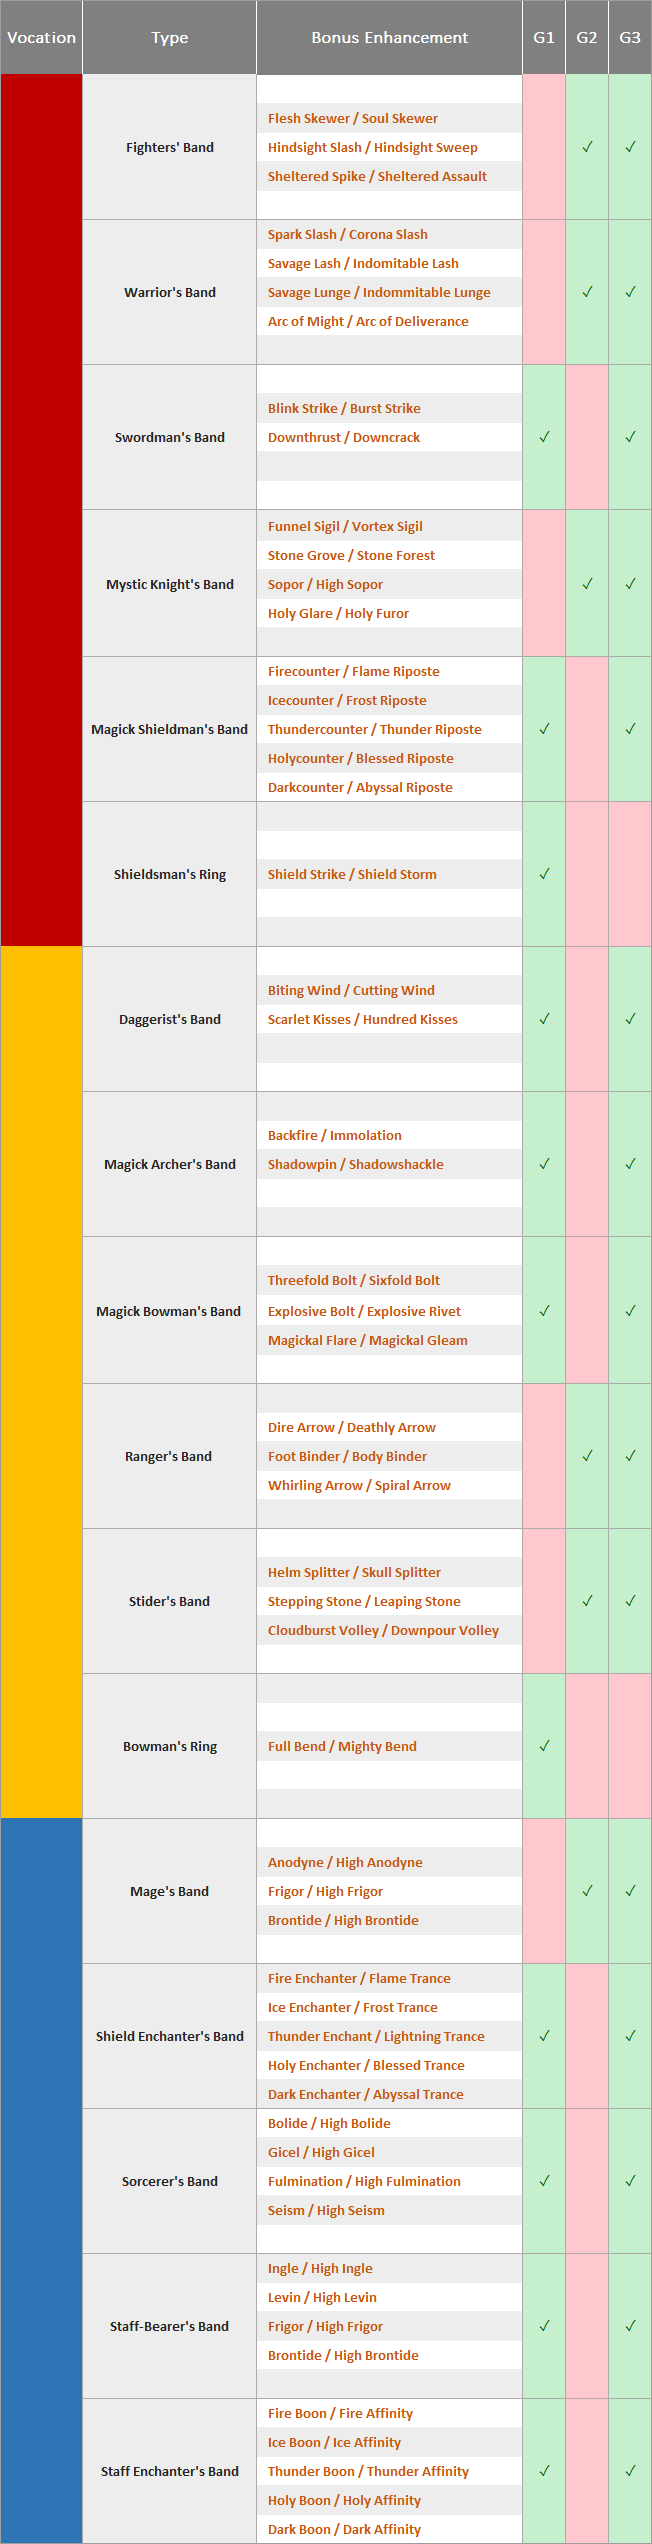
- The Red/Yellow/Blue colour on the first column denotes the Vocation colour of the Arisen, and Main Pawn at the time purification is carried out. Bitterblack Gear purifying outcomes are tied to vocation colour, not the specific vocation of your Arisen and pawn when you purify. Same is true for Weapon and Armor, however, Gear follows a slightly different pattern.
Arisen and Main Pawn vocation:RED/REDYELLOW/YELLOWBLUE/BLUEMIXEDRed OnlyYellow OnlyBlue OnlyAny within the colour range
It is more efficient to focus your results on specific colours than dispersing them with mixed colour vocations. - Purifying results are based on a predetermined-list; destroying or removing a cursed item will not change the outcome of the next item you purify. The results will be exactly the same as the last Cursed item you destroyed or removed. Therefore, you will have to go through quite a few to find the Ring/Band you are missing. The Godsbane exploit [dragonsdogma.wikia.com]can be used to reverse purification to a more suitable outcome for a different vocation, or to avoid duplicates.
- It is not possible to modify your results by ‘Godsbaning’ until you receive the one you want - unlike chests or random loot from monsters - however, all three vocation colours will have different outcomes. If you purified with yellow/yellow vocations and the results were unsatisfactory, you can Gobsbane, change to red/red or blue/blue and purify.
- Neutral rings are common results for all vocation colours, e.g. Master Ring.
- Please note that Ring variations (with the exception of Bowman’s and Shieldman’s) have been omitted to avoid clutter and useless data. 'Rings' enhance a single skill as opposed to 'Bands' that enhance two at a time.
- Some Gear Lv. 1 have a chance of purifying Skills Bands rather than Rings. However, the chance is significantly lower than Gear Lv.3. In most circumstances, you will receive Rings that enhance a single skill, as stated above. Gear Lv.3 is the better overall choice for most bands.
- Bonus Enhancement - the skills that are receiving the upgrade to Tier 3. Note that skills enhanced by Bitterblack Gear are upped to their final version, regardless of current skill level.
- G1, G2, G3 shows what needs to be purified to find the Skill Band/Ring you're looking for.
Skill Bands (Part 2)
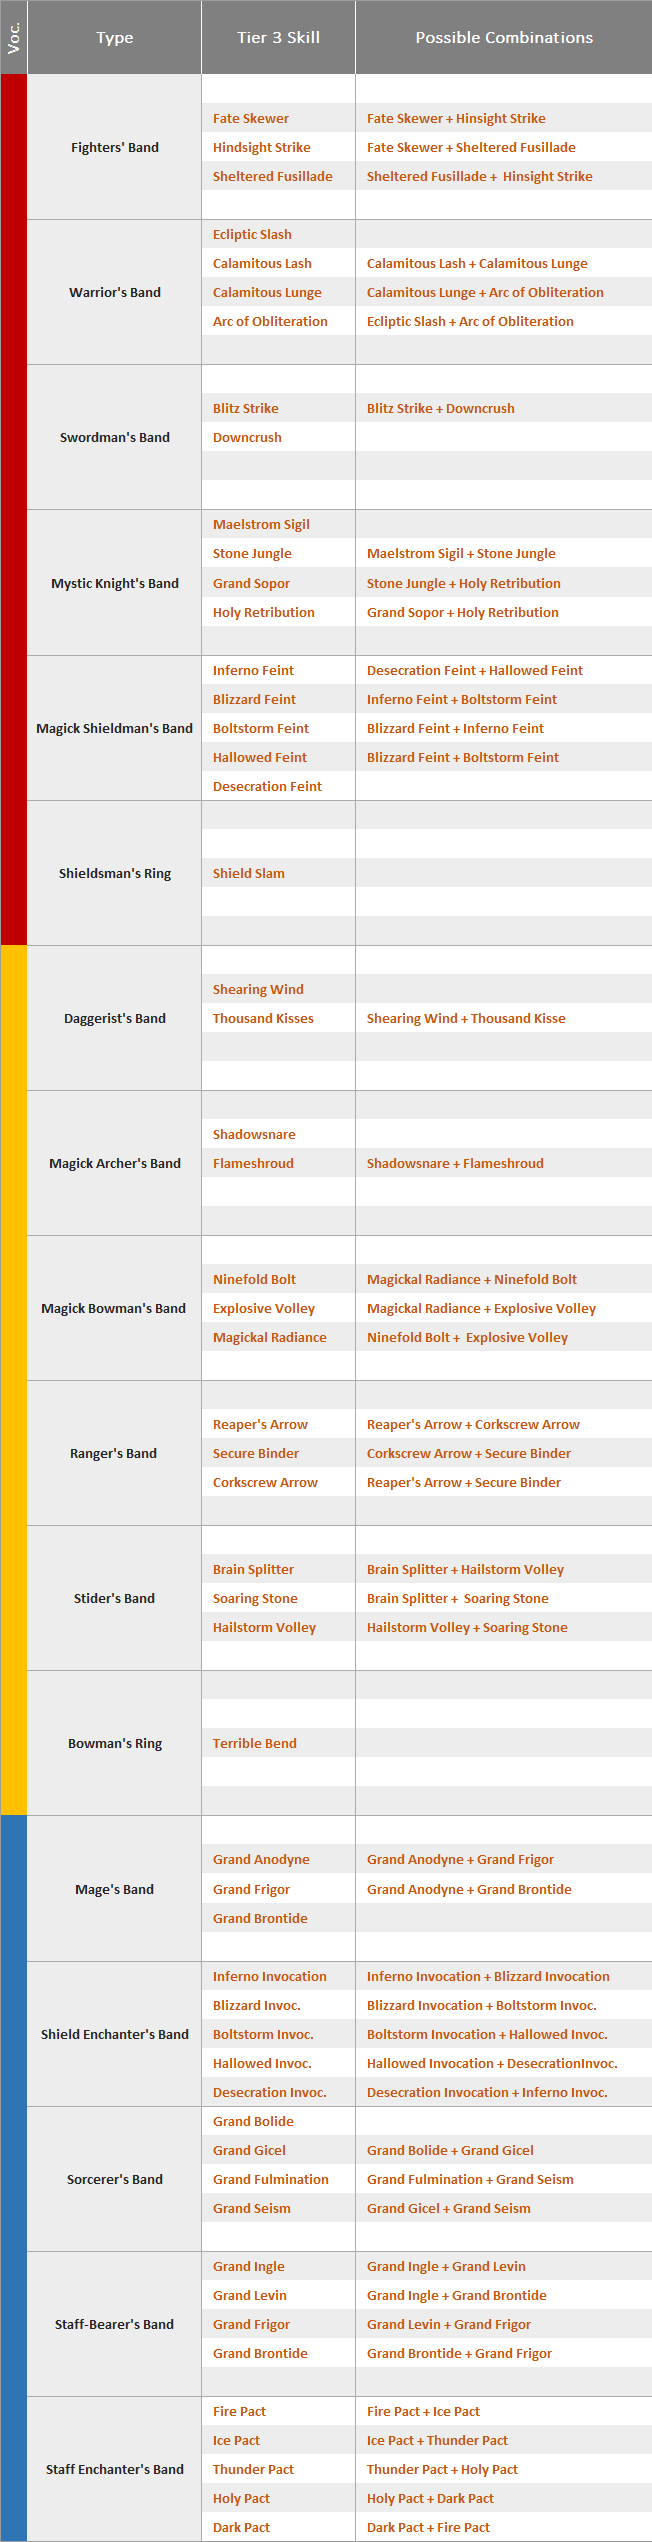
Tier 3 Skill names, along with possible outcomes/combinations you may find. Keep in mind the ‘Possible Combinations’ section may not be 100%, but very close.
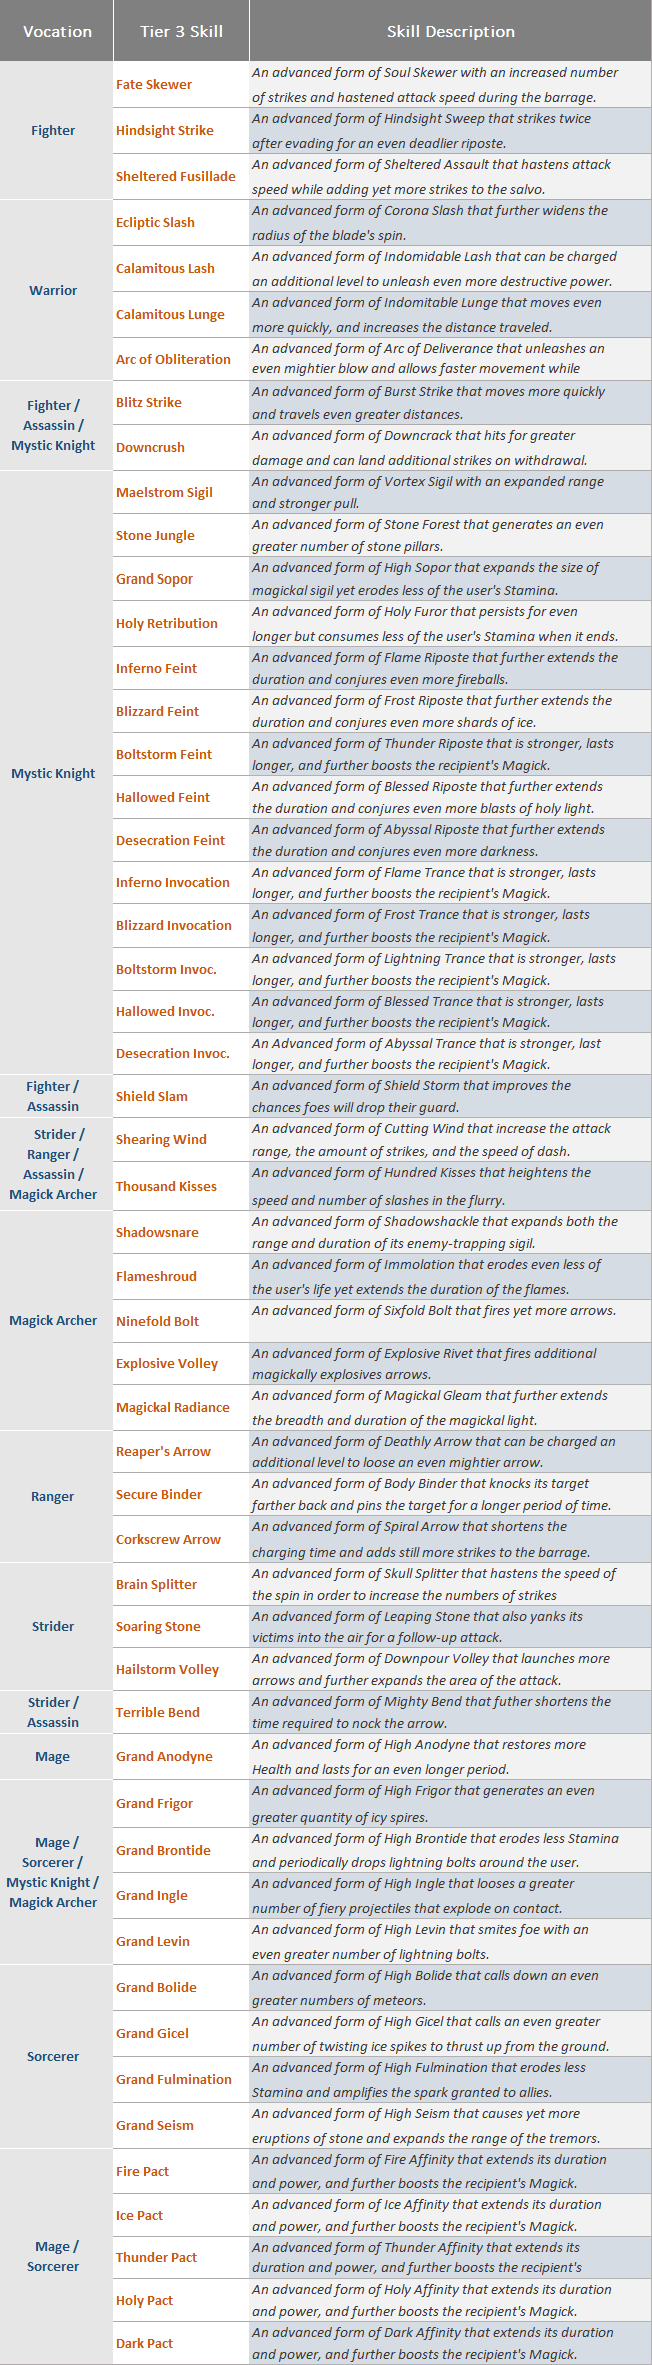
Tier 3 Skill Descriptions
This somewhat optional datasheet lists out all the Tier 3 skills by vocation along with the in-game descriptions. The Vocation column on the left should help you find out the exact vocation(s) able to use the enhanced skills.
Neutral Results
Neutrals are common outcomes of purification for all vocation types, regardless of colour, hence 'neutral.' Godsbaning to swap vocation colour does not change a neutral result, although it rarely may. You can find more information on wikia regarding purifying results for Bitterblack Gear.
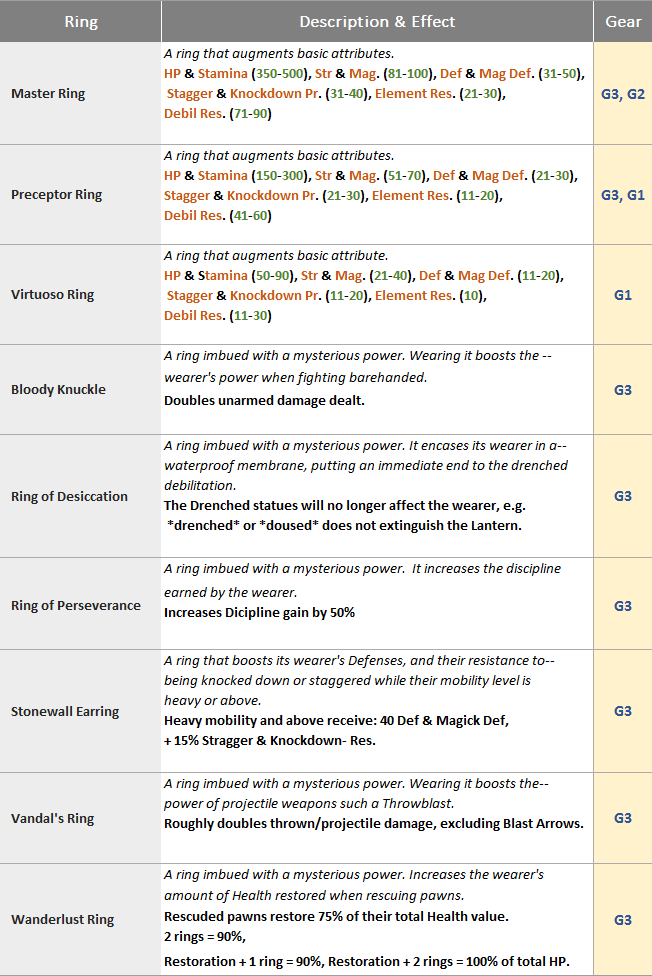
- Unique rings can be used by any vocation.
- Stat Rings enhance 2 of any stat (orange) within the range (green) shown below. The commas below are done for the sake of grouping stats that are similar in function (I wanted to squeeze everything in a small enough window to fit here, whoops), not to separate your possible purification outcome. You could have a Master Ring with +100 Strength and 400+ Stamina ( for Master Rings the Stamina and Health bonus is always between 350 to 500 ). There's a good chance that you'd purify a ring with two bonus enhancement to Elemental Res e.g. 24% ice resistance & 24% fire resistance. Same is true for Debilitation Res. Then again it's all kinda random.
- The wikia page states that there are "possible outcomes of 77,196 different Master Rings"
All the Above in One Place (Google Docs)
The complete datasheet is available on Google Docs. I highly recommend you use that version; it will help you keep track of your progress. You can grab it here[docs.google.com].
Tips & Hints on Rift Crystals
 ‘Rift Crystal’ is unique in-game currency used for a multitude of things in Bitterblack. Prior to the expansion, RC was -more or less- a novelty to have with no distinct uses besides purchasing a handful of vanity items, a number of Pawn and character customization options, and hiring higher level Support Pawns. Much of the ‘end-game’ content of Bitterblack is reliant on RC. Purifying requires RC; it costs 3000 RC to purify a single cursed Gear 3 item, as in example. Here is a number of ways you can acquire more RC:
- Have your main Pawn hired. Whether Public or Friends Only, your Main Pawn is the easiest, steadiest source of RC. Have them hired regularly for a steady influx of RC.
- From a Different Sky[dragonsdogma.wikia.com] Time consuming, but maybe worth the effort.
- Farming Rift Crystals. RC drops at a much higher rate in Bitterblack, and some enemies/chests may drop large portions of RC not available elsewhere in Gransys. With that in mind, you can efficiently farm RC with an adequately equipped and skilled party.
Here’s my recommended RC farming method (Bitterblack equipped, high level PC and Main Pawn recommended. Post-Daimon only):
- Silver Knights[dragonsdogma.wikia.com]. Defensive spell-casting Silver Knights are a type of Skeleton enemy that usually spawn alongside the physical damage-dealing Golden Knights -forming a very deadly combo- in various locations in Bitterblack isle. They are somewhat rare, but have a very decent chance of dropping 9000+ Rift Crystals.
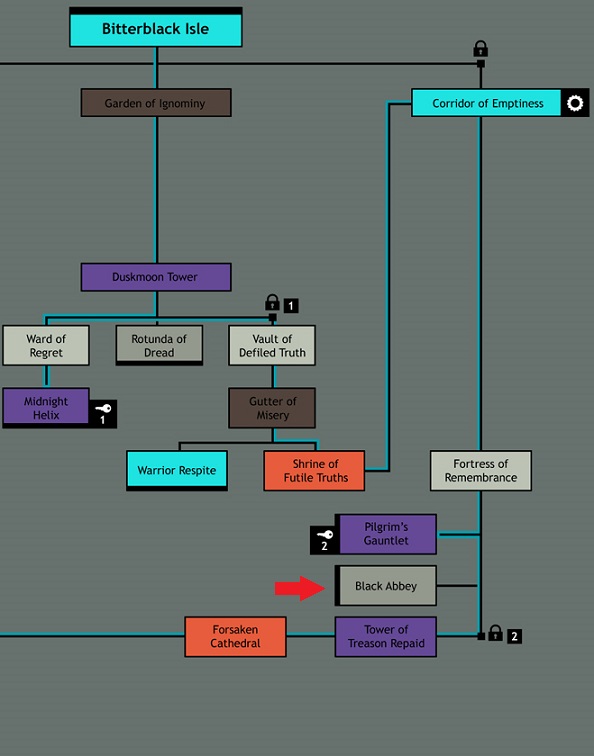
- The Black Abbey[dragonsdogma.wikia.com]y. Normally, it would not be easy to farm Silver Knights for RC due to their rarity. However, the Black Abby (shown below) is a unique gladiatorial-style location deep within the labyrinth that houses multiple types of enemies (in groups) that spawn at random each time the Arisen leaves and enters the arena. The Black Abbey is exempt from the respawning time periods that govern most monsters elsewhere in Bitterblack, making it a great source for farming. One such spawns are the Silver Knights in the Black Abbey, which spawn in groups of 3, sometimes 4, alongside Golden Knights or paired with other monsters.
- This method works with any set-up. Always adjust your party, if need be. Silver Knights are capable of healing allies and inflicting Torpor (move-slow.) Golden Knights deal massive damage and can annihilate an ill-equipped party, so prepare accordingly. If you find yourself struggling, exploit the enemies’ weaknesses -All Skeleton types take extra damage from blunt attacks, use Debilitations such as Torpor to slow them down, and so on.
Enter the Black Abbey ->peep through to look for Silver Knights ->when missing, leave and re-enter until you see them -> break some bones. Rinse & repeat.
Note: Cursed Dragon are also a viable farming choice, although may not be as ideal.
Credits
Much of the information in this guide is taken from the official Dragon's Dogma wikia; info for the datasheets, icon, logo, BBI map, and RC images are from wikia. A special thanks to the Wonderful Wikia Contributors that made it possible.
The datasheets (Steam and Google Docs versions) are my own work. Please do not repost/host anywhere without my prior permission.
And finally... Source[blondesanta.deviantart.com]
Thank you for reading, and happy hunting!
More Dragon's Dogma: Dark Arisen guides
- Hero Achievement and Missable Quests Guide★ 5 (3.5k)58k views7.1k ♥30 minUpdated Aug 2, 2016
- Dragon's Dogma: Dark Arisen. Getting started 101 and "did you know's?"★ 5 (918)53k views1.1k ♥17 minUpdated Jan 20, 2016
- The Arisen's Handbook: A Guide to Adventuring in Gransys★ 5 (1.7k)42k views3.4k ♥91 minUpdated Oct 8, 2023
- The Guide to Vocations and Skills★ 5 (806)42k views1.9k ♥86 minUpdated Jan 1, 2020
- Chronological Quest Guide for dd:da★ 5 (779)33k views2k ♥54 minUpdated Jul 5, 2023
- Vocations, Strengths and Weaknesses, all Part of a Whole - Writings of an Aged Arisen★ 5 (575)32k views873 ♥33 minUpdated Jan 3, 2021



🔥 Popular guides
- Upgrading to PremiumTeam Fortress 2★ 5 (20k)1441k views11k ♥6 minUpdated May 11, 2022
- No More Room in Hell Official ManualNo More Room in Hell★ 5 (2.8k)569k views2.1k ♥29 minUpdated Apr 22, 2019
- NMRiH Community Hosting GuidesNo More Room in Hell★ 5 (526)351k views653 ♥1 minUpdated Aug 10, 2022
- ULTIMATE GUIDE FOR GAME DEV TYCOONGame Dev Tycoon★ 5 (5.8k)326k views10k ♥4 minUpdated 23 Jan, 2014
- How to 'Git Gud' Soon™MORDHAU★ 5 (2k)318k views3k ♥68 minUpdated Nov 16, 2024
- Лучшие кооперативные игры SteamPAYDAY 2★ 5 (1.5k)315k views2.1k ♥56 minRussianUpdated Apr 27, 2025






This guide was created by its original author on the Steam Community. Are you the author and want it removed? Request removal.