ACC VR - The definitive VR Performance Guide [SteamVR]
Introduction
Before you start going down the hole in order to improve your VR performance, let's state some obvious stuff.
There is multiple ways to gain performance in VR, this guide is aimed at the way i think works the best, this will probably change with time. Stuff will be added here and or changed as i learn more, both from VR users and from my own testing.
What i found was that the DLSS and FSR implementation in the game is great for screen/pancake gaming, however that was not the case for me in VR. Objects overall tend to get blurrier in exchange for a higher framerate. Although this is great, it seems that there is no inbetween (atleast for me) sweetspot for resolution/framerate.
Therefore, i have decided to resort to the OpenVR_FSR plugin along with a modified engine.ini file, again.
In my experience and with the tests i have done in 1.8, i find that there is overall a crisper picture and higher framerate as a result.
So, with that out of the way, lets move on to the guide.
You will have to tweak some of the settings to be fitted for your specific headset though. For example, the G2 VR Headset has a higher resolution compared to the Index, (what i am using for a baseline) so you will need to have that in consideration while you configure your settings, so that it will be according to that of what you have.
Comment down below if you are stuck and need help with that.
This guide is intended for Valve Index, Vive and other SteamVR headsets, it's not tested for Oculus (OpenVR_FSR is probably only supported with SteamVR)
Please notify me if you have found good settings for your specific setup and headset.
Comment with what hardware you are using and what headset you have so we can add it to the guide.
Before you get started
If you have a setup currently, there are many things that you probably have configured already.
Before you start making changes with the help of this guide, make sure you backup everything. Here is a list of what you need to backup (in order):
- Your computer's bios/uefi, create a profile and save your current configuration if you plan to overclock your ram.
- SteamVR Settings (Take a printscreen of these and save to a folder)
- Nvidia/AMD GPU Settings (Take a printscreen of these and save to a folder)
- ACC Ingame configs (Located at: User\Documents\Assetto Corsa Competizione\Customs\VideoSettings)
- Your Engine.Ini file (Located at: C:\Users\User\AppData\Local\AC2\Saved\Config\WindowsNoEditor)
- Your GameUserSettings.Ini file (Located at: C:\Users\User\AppData\Local\AC2\Saved\Config\WindowsNoEditor)
Any other file/setting that you could think of, that is related to ACC VR, either save by printscreen or save the actual configuration file. There is no guarantee that this guide will work for you, so make it easier for yourself and back everything up, so you can roll back to your previous setup with eaze.
Check your hardware
So before writing this guide, i tried ACC on multiple setups and did benchmarks to get an overall understanding of the current performance situation.
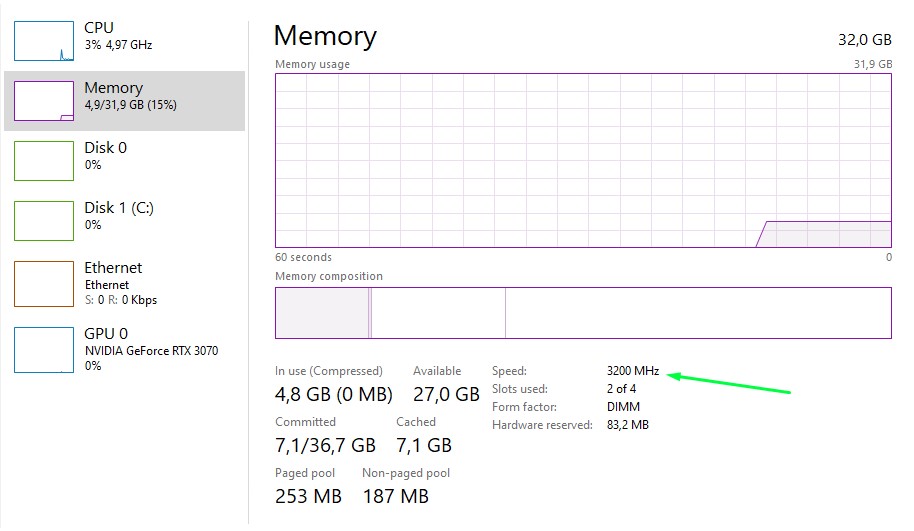
I found out that ram clock speed made huge difference in VR.
When i was running my ram at 2100mhz, i got stuttering ingame, both in VR and on pancake display. Most of the stuttering occured when turning the car into a corner or when there was a complex scene of multiple cars moving.
After that i tried 3200mhz and the difference was staggering, no more stuttering or lag when turning into corners and i could run a fairly high amount of AI cars in the grid without any issue at all.
Have in mind that the rig i tested this with, is fairly high-end. However, most users out there that are having issues with fps-consistency, have fairly good hardware.
Now when that's out of the way, lets have a look at an example of how i would do it.
So to sum it up:
- Make a backup of your current bios/uefi profile before changing anything, so you can go back to your stable profile easily.
- Make sure you are running your ram at the highest possible frequency without causing instability (Usually when you install ram, you need to manually set XMP to ON in bios/uefi, otherwise they run at default speed eg. 2100mhz or 2000mhz for example)
- If the XMP 1 profile introduces instability to your system, try the XMP 2 profile.
- This requires a fair amount of knowledge, please do not attempt this if you have no idea of what you are doing and what the possible implications could be.
If you got a prebuilt one, check the specifications of that.
When you know what speed your ram is rated at, you can check in Windows, what speed they are actually running at.
Expectations
With this config, i was able to push around 120 fps almost constantly in a 16 grid AI race, however, there are some dips in FPS every now and then, so don't expect this to be comparable with the VR performance of AC for example, however it is working WAY better then normally.
It works even better when practicing alone.
- CPU : i7 9700K @ 5.0GHz
- GPU : RTX 3070
- RAM : Vengeance LPX Black 32GB / 3200MHz
If you got better hardware then this, you can probably push even higher settings, if you have worse hardware then this, you probably need to lower some settings.
However, try these settings as a baseline for your own configuration first and try to identify the issue before you start to change settings.
Leave a comment and let me know how it works with your rig, be sure to leave your specs and explain what issue you are having.
SteamVR Settings [UPDATED FOR 1.8]
120Hz is really smooth and nice, however lower this to 90 or even 80 if you are struggling with gaining FPS.
In this revised version of the guide, i have decided to set the resolution scaling in SteamVR instead of ingame due to performance reasons. For some reason, it works better for me. However, this might not be the case for you. In that case, set the Render Resolution in SteamVR to 100% and tinker with the resolution scales in-game. Video Settings:
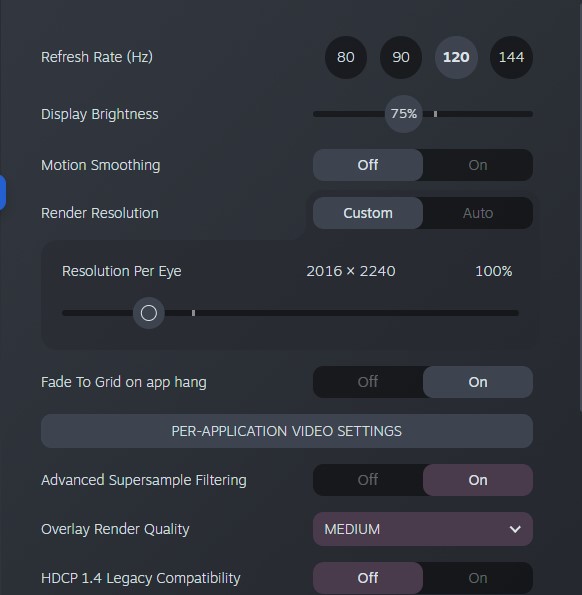
- Refresh rate: 120Hz (Valve Index specific, set to whatever your VR headset works with, try the highest first)
- Motion Smoothing: Off
- Render Resolution: Custom - Set this to 100%
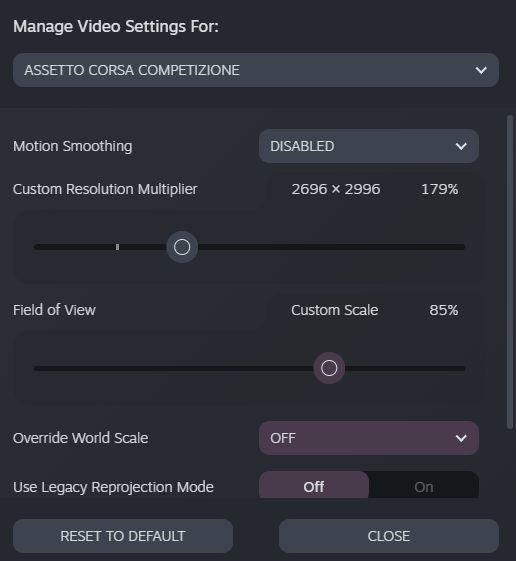
Per Game Settings:
 Per Game Settings 2: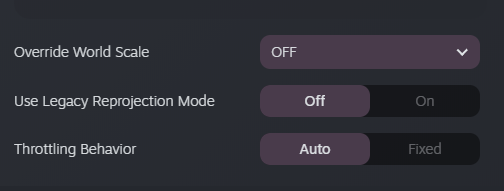
- Motion Smoothing: Disabled
- Custom Resolution Multiplier: 170-180% <--- This is what i am using, you should leave this att 100% if you are using a G2 headset for example, or increase it even more if you are using a original Vive, you need to understand this before making changes.
This is also based on what GPU/CPU combo you have, set this accordingly. - Field Of View: 85% <--- This one can improve performance, tinker with it if you are struggling to gain FPS. I have it set to 85%, it introduces a cyclop feeling, i have no problem with that, but you might, so set this accordingly.
PS: This does work for G2 sometimes, and sometimes it completely breaks the picture. Beware. - Override World Scale: Off
- Use Legacy Reprojection Mode: Off
- Throttling Behavior: Auto
Nvidia Control Panel Settings [UPDATED FOR 1.8]
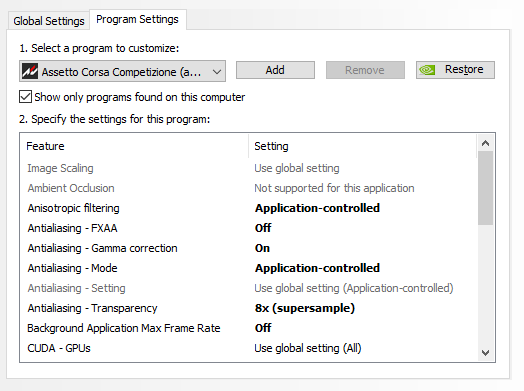
Use these settings as a baseline for your own config, i recommend starting off with these settings.
- Pick Program Settings
- Select Assetto Corsa Competizione in the dropdown menu
Configuration:
- Anisotropic Filtering: Application-Controlled
- Antialiasing - FXAA: Off
- Antialiasing - Gamma Corretion: On
- Antialiasing - Mode: Application-Controlled
- Antialiasing - Transparency: 8x (Supersample)
- Background Application Max Frame Rate: Off
- CUDA - GPUs: All
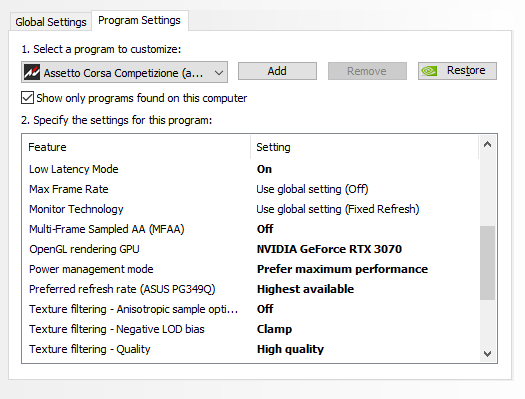
- Low Latency Mode: On <---- Set this to OFF if you experience FPS loss.
- Max Frame Rate: Off
- Monitor Technology: Fixed Refresh
- Multi-Frame Sampled AA(MFAA): Off
- OpenGL Rendering GPU: Auto-Select
- Power Management Mode: Prefer Maximum Performance
- Preferred Refresh Rate: Highest Avaliable
- Texture Filtering - Anisotropic Sample Optimization: Off
- Texture Filtering - Negative LOD Bias: Clamp
- Texture Filtering - Quality: High Quality
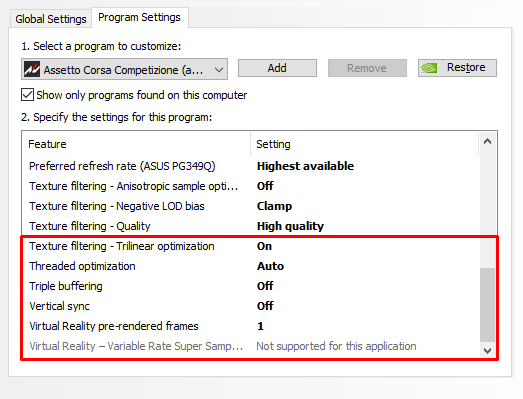
- Texture Filtering - Trilinear Optimization: On
- Threaded Optimization: Auto
- Triple Buffering: Off
- Vertical Sync: Off
- Virtual Reality Pre-Rendered Frames: 1 - This can create higher latency rendering. Lower this to 0 if 1 doesn't work for you. If you have a high end GPU and CPU, try to set this setting a bit higher.
Stop the game from showing on the screen (Optional)
ACC Doesn't have an option to disable screen rendering in-game.
So you have to edit another file to disable the normal window while in VR.
Go to C:\Users\User\Documents\Assetto Corsa Competizione\Config and open the file called vrSettings.json
Change
"spectatorScreenMode": 5,
to
"spectatorScreenMode": 0,
This will not necessarily increase your performance, just a convenient setting if you want to disable the game from also showing up on the screen.
Engine.ini (Optional, not needed)
Since we don't have direct access to the console, this is the only way we can access those parameters.
The config below is what I'm using and found that it works the best in VR.
Let me know if you know any better settings, either for you, with your hardware or with your specific headset.
Editing your engine.ini file or using a custom file may create unwanted issues, and beyond unintended graphical appearance it may also result in software or hardware crashes.
ALSO: Beware that these settings are only made with VR optimization in mind (Although shadows could be lowered for more performance), these settings will render the photo-mode depth of field turned off, so if you wanna use the photo-mode, you have to remove the parameters in the Engine.ini file.
Example:
r.Streaming.FullyLoadUsedTextures 1
This is an alternative to disabling textures all together, streaming the textures at full resolution could give you a better visual experience if you have the overhead available.______________________________________________
We need to edit Engine.ini, this file can be found at: \user\AppData\Local\AC2\Saved\Config\WindowsNoEditor
I'm not gonna go into detail to any of these settings, but if you feel like it, try to tinker with them in order to find the best settings for your rig.
If you want to find out for yourself what these rendering related parameters do, you can do so here.
FIRST and foremost, create a backup of your current "Engine.ini" file, for example you can rename it to "bak.Engine.ini".
Then, you can copy the backup file and rename it to "Engine.ini" and paste the following config there, replacing the old config.
Config file:VR Performance Toolkit
PS: This is the new method.
You have to remove OpenVR_FSR2.0 if you have it installed, before you install this.
To do that, remove this file from the following folder:
Remove "openvr_api.dll" in
\Steam\steamapps\common\Assetto Corsa Competizione\Engine\Binaries\ThirdParty\OpenVR\OpenVRv1_5_17\Win64 and verify the game on Steam.
This is the new method to gain extra performance in ACC. This mod will work with Direct3D 11 graphics APIs, is supported by OpenVR and Oculus.
I found that it is better then OpenVR_FSR as it adds additional functionality, such as Foveated Rendering and Variable Rate Shading (The latter is only avaliable for Nvidia RTX or GTX 16xx cards)
You cannot use the in-game DLSS and FSR settings when you are running with this modified version.
You can find the toolkit here: https://github.com/fholger/vrperfkit
Download the latest version, at the time of writing it's V0.3
https://github.com/fholger/vrperfkit/releases/download/v0.3/vrperfkit_v0.3.zip
The installation of this mod is fairly straight forward.
Go to the following folder, unpack dxgi.dll and vrperfkit.yml in the same folder as AC2-Win64-Shipping
You should find the AC2-Win64-Shipping in the following folder:
C:\Program Files (x86)\Steam\steamapps\common\Assetto Corsa Competizione\AC2\Binaries\Win64
Now we need to tinker with the settings to get the most out of it.
The following example is what i used to achieve a balance between smooth fps and sharpness.
PS: This here is the full config i use with my specs, it works great with my GPU, CPU and VR headset.
That does not mean it will work perfectly for you, you need to learn the meaning of these parameters and tinker on your own if you are having issues, this should be a good starting point for most users though.
Here you can play with some settings to suite your needs.
Refer to this section of the guide to get a better understanding of the settings:
https://blog.lynxsec.se/acc-vr-the-definitive-vr-performance-guide#h_79180736721801666945826405
OpenVR_FSR V2.0 [OLD METHOD, DON'T USE]
I found that this is still better then the ingame options for DLSS and FSR for VR.
It's pretty obvious, but you cannot use the ingame DLSS and FSR settings when you are running with this modified version.
This modified version of openvr_api.dll works with ACC, this is what made the game playable for me (Together will the correct configurations overall)
You can find the modified dll here: https://github.com/fholger/openvr_fsr
Go to Releases: https://github.com/fholger/openvr_fsr/releases/
Download the latest version, at the time of writing this, it's V2.0
Direct download: https://github.com/fholger/openvr_fsr/releases/download/fsr_v2.0/openvr_fsr_v2.0.zip
Replace "openvr_api.dll" in \Steam\steamapps\common\Assetto Corsa Competizione\Engine\Binaries\ThirdParty\OpenVR\OpenVRv1_5_17\Win64 with the one provided from github.
Make sure you include openvr_mod.cfg in the same folder as the modified openvr_api.dll.
You can tinker with the settings a bit, but i would suggest not to at first, if needed later on you can check out openvr_mod.cfg, it looks like this.
Here you can play with some settings to suite your needs.
"useNIS" - Set this to True if you want to try Nvidia's Image Scaling instead of AMD's FSR that is the default. I find this less crips compared to AMD's FSR, but it might render a different result for you depending on your headset.
"renderScale" - Set the renderscale, a lower number will render the game at a lower resolution and upscale to the native resolution set in SteamVR. Try different values here to fit your headset.
"sharpness" - If set this to 1.0 as it worked best for me, however try lowering this and compare the results. Start with this at 1 though.
"radius" - This one is important, this will set how big of an area should be "sharp", default is 0.5. If you want a larger sweetspot, increase this. If you want a smaller sweetspot, lower this.
Lower means better performance, higher means worse performance. 0.5 is a good starting point.
Ingame Graphics Settings [UPDATED FOR 1.8]
These settings will highly depend on what computer you have, use these settings as a baseline and make your own small tweaks.
Tip: ACC has a great feature that allows you to save multiple graphics settings and load them back when needed.
Start off with saving your current settings, give it a name and save it.
Go to Put this file in \Documents\Assetto Corsa Competizione\Customs\VideoSettings
Here you can copy the file that already exists, and rename it to "VR Main Settings" for example.
Then you can edit the file and replace the contents with the following:
If you don't want to go the config editing way, here is some screenshots for you
Let's do this right from the beginning, step by step.
Step 1:Begin with clicking "Manage Custom Video Presets"
Step 2:
Create your presets, usually i would recommend having one for your normal PC screen and one for VR.
In this case, if you already have one for VR, save that and name it, so you can go back to that in case you don't like the new one that we are about to configure.
PS: When switching from Desktop to VR, you need to set VR Pixel Density again, this get's reset everytime i switch.
Step 3:
Now that we have saved our old configs, we can go about and make our new config.
Let's start at the top:
A:
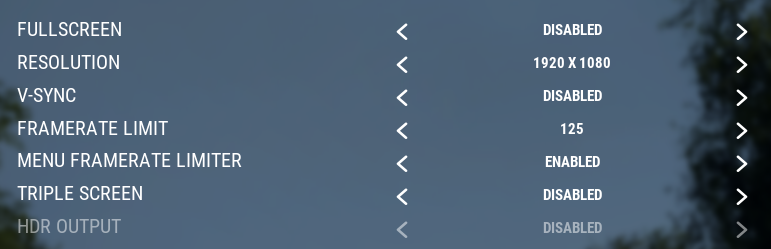
- Resolution: Doesn't matter, the game will only render in VR anyways.
- V-Sync: Disabled
- Framerate Limit: Set this a little bit higher then your VR headset refresh-rate, if you got a beefy computer, try to up this a little bit for a smoother feeling.
- Menu Framerate Limiter: Enabled
- Triple Screen: Disabled
- HDR: Disabled
B:
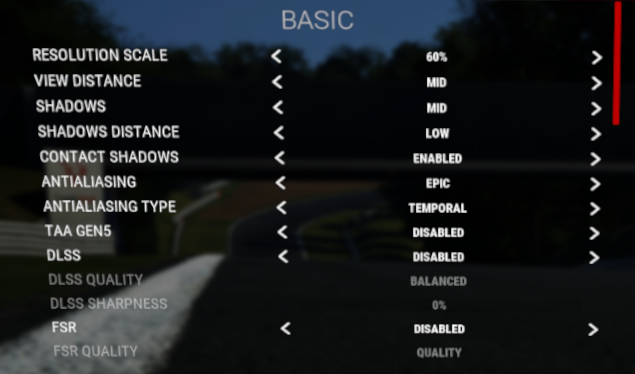
Resolution Scale: 60% (This will give you a bit more clarity, if you got a highend rig, you could try to up this a tiny bit, lower it to 55% or 50% if you are having performance issues)
View Distance: Mid (Set this to low on lower end PC's)
Shadows: Mid
Shadows Distance: Low
Contact Shadows: Enable
Antialiasing: Epic
Antialiasing Type: Temporal (Try KTAA if you are out of options)
TAA Gen5: Disabled
DLSS: Disabled
FSR: Disabled
C:
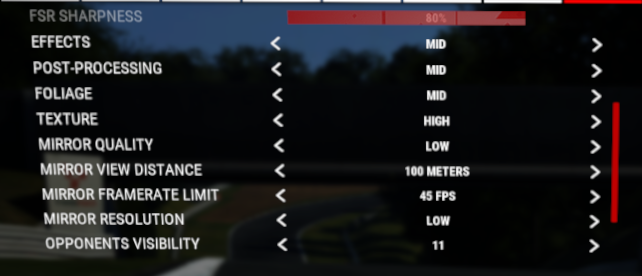
Effects: Mid
Post-Processing: Mid <---- Set this to low if you want more FPS.
Foliage: Mid
Texture: High
Mirror Quality: Low
Mirror View Distance: 100 Meters (Useful for online racing, set this to lower if you want less performance impact)
Mirror Framerate Limit: 45 or 60 FPS (Set this to 45 for a performance increase)
Mirror Resolution: Low
Opponents Visibility: 11 (Useful for online racing, set this higher/lower if you need to see more or if you need more performance)
D:
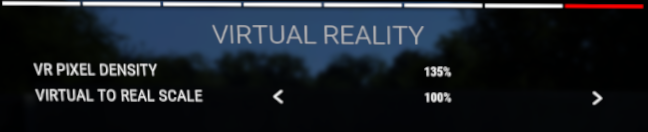
VR Pixel Density: 135%
Virtual To Real Scale: 100% <--- Increase this to make the world scale smaller, makes it easier to spot the apex and can have a performance impact, but not certain.
E:
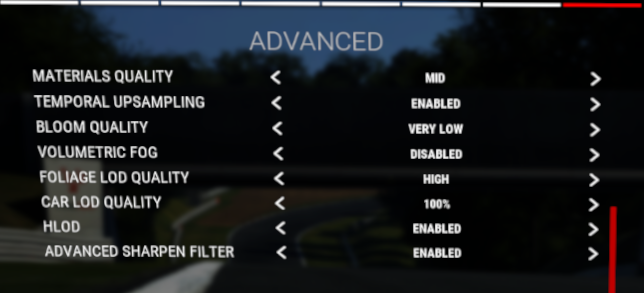
Materials Quality: Mid
Temporal Upsampling: Enabled
Bloom Quality: Very Low
Volumetric Fog: Disabled (This is a VR killer in terms of performance, always have this turned off)
Foliage Lod Quality: High
Car Lod Quality: 100%
HLOD: Enabled
Advanced Sharpen Filter: Enabled
F:
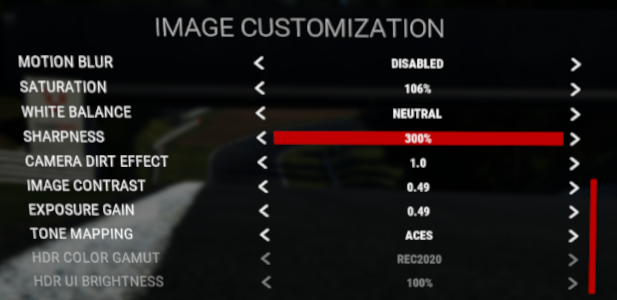
This section is up to personal preference, except for the "Sharpness" option.
Motion Blur: Disabled
Saturation: 106% (Set this to 100 if you dont want more color)
White Balance: Warm (Set this to neutral if you want, this is up to personal preference)
Sharpness: 300%
Camera Dirt Effect: 1.0
Image Contrast: 0.49
Exposure Gain: 0.49
Tone Mapping: Aces (Set this to whatever suites you best)
Video of improved performance
Here is some videos of the improved config in action (Not updated for 1.8)
Imola Hotlap
With Rain and 29 AI cars on the grid (I'm ♥♥♥♥ in rain):
Following AI - 29 cars on the grid:
Comparison between ACC and IRL:
Summary
Download guide in PDF format:
https://www.racedepartment.com/downloads/acc-vr-the-definitive-vr-performance-guide.48679/
- Logitech G29/G27/DGFT Force Feedback LUT Settings★ 5 (329)27k views740 ♥2 minUpdated Jan 3, 2020
- FREE stable race setups & simplified setup tweak guide★ 5 (1.4k)22k views2.6k ♥8 minUpdated Aug 2, 2025
- Assetto Corsa Competizione - ECU Map Guide★ 5 (607)20k views1.2k ♥5 minUpdated May 20, 2020
- Beginner steps to setup★ 5 (530)18k views1k ♥5 minUpdated Apr 25, 2023
- VR quality guide (+ Quest 2 & 3 in depth settings)★ 4 (123)17k views379 ♥5 minUpdated Feb 16, 2025
- Setup Checklist★ 5 (425)17k views980 ♥1 minUpdated Jul 27, 2025


- Upgrading to PremiumTeam Fortress 2★ 5 (20k)1441k views11k ♥6 minUpdated May 11, 2022
- No More Room in Hell Official ManualNo More Room in Hell★ 5 (2.8k)569k views2.1k ♥29 minUpdated Apr 22, 2019
- NMRiH Community Hosting GuidesNo More Room in Hell★ 5 (526)351k views653 ♥1 minUpdated Aug 10, 2022
- How to 'Git Gud' Soon™MORDHAU★ 5 (2k)318k views3k ♥68 minUpdated Nov 16, 2024
- Лучшие кооперативные игры SteamPAYDAY 2★ 5 (1.5k)315k views2.1k ♥56 minRussianUpdated Apr 27, 2025
- Desert Eagle Heat Treated | Blue GemCounter-Strike 2★ 5 (1.6k)293k views1.5k ♥2 minUpdated Jan 16





This guide was created by its original author on the Steam Community. Are you the author and want it removed? Request removal.