Beginner's Guide to Clicker Heroes
Overview
Options
 In the top right of the screen you will see a wrench icon. This opens up the options menu.
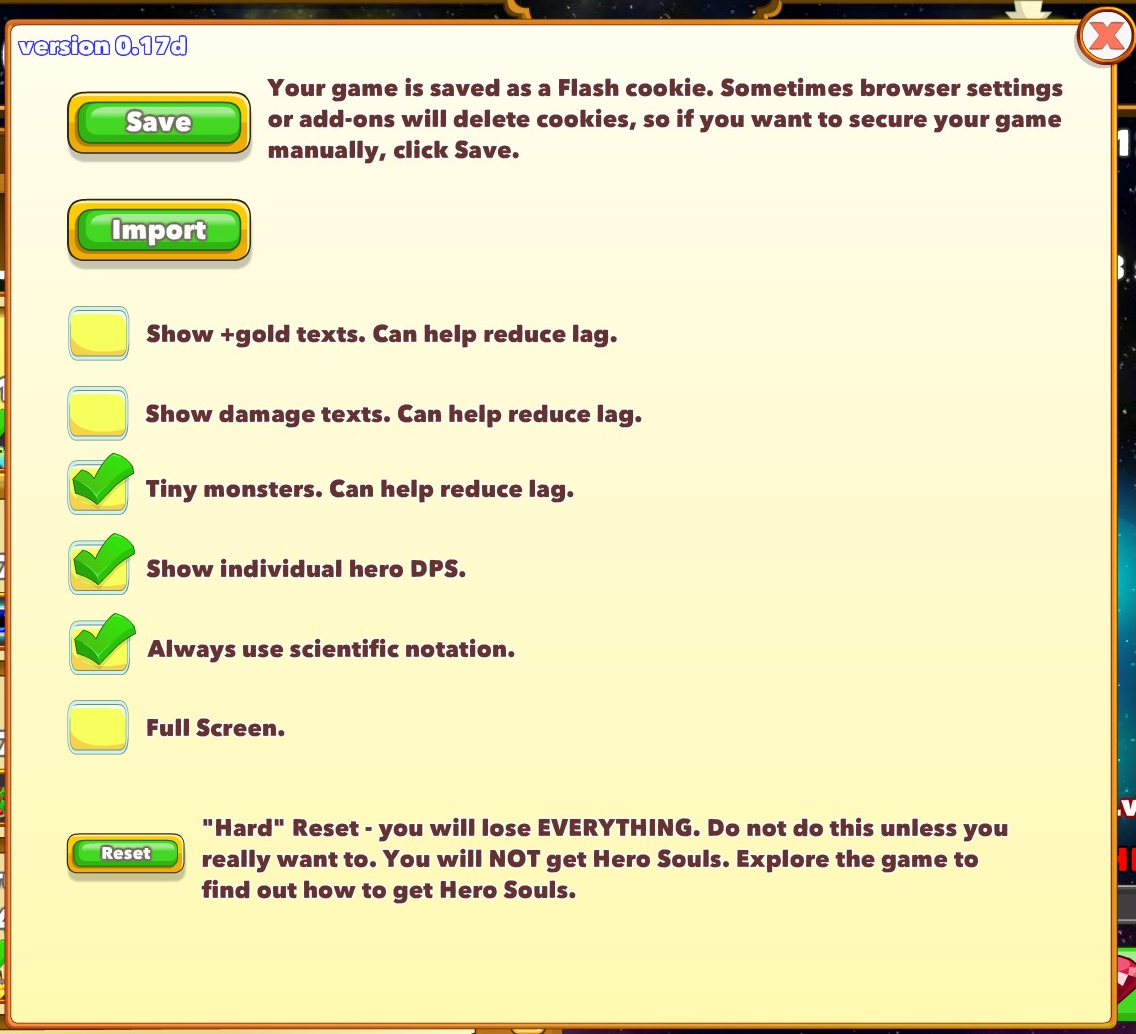
Note that, the game also uploads a copy of you game to the Steam cloud when you exit the game. If you suffer a powercut or other abnormal way in which the game is closed, your progress may not be saved when you next open the game. As such performing a manual save periodically is generally advised as a good idea.
The Steam version of the game by default saves in the following location.
C:\Program Files\Steam\steamapps\common\Clicker Heroes\clickerHeroSave.txt
- 'Show +gold texts' and 'Show damage texts' toggle the display of the quantity of gold collected form each coin and the damage done with each click respectively. Toggling them off can help if the game becomes laggy.
- 'Tiny monsters' toggles if the monsters scale in size with the current zone level that has been reached. This is purely visual and has no effect on the monsters health or gold dropped. Toggling it on can help if the game is suffering slowdown.
- 'Show individual hero DPS' toggles the display of how much DPS each hero is currently contributing on their bar in the left hand pane.
- 'Always use scientific notation' toggles if all numbers are displayed using conventional notation, e.g. 6,341B or scientific notation, e.g. 6.341e12. As numbers reach very high levels they will automatically switch over to using the scientific notation but this toggle allows that to happen from the start.
- The final toggle switches the game to running in full screen. At the time of writing(0.17d), in order to close the game it is necessary to switch back out of full screen before you can exit the game.
Controls
When upgrading an Ancient, upgrade by up to 1,000 levels per click.
Note: when using q to add a very large number of levels, it may be a good idea to hold Shift first to avoid lag problems experienced by some players.
Game Modes
The game has three main modes of play, Active, Off-line and Idle. Only the first two will be available on your first run and on following runs until one of the Idle Ancients is purchased.
If a game save is imported, the time since the save was made will be treated as if the game was in Off-line mode until the time of import.
Idle mode is broken as soon as an ability is activated or a click is made that would cause damage. Notably, clicking on a clickable that appears within the game area(currently appearing as a small headcrab as of Steam version 0.17d) does not break the idle mode.
If a Boss is not defeated within the allotted time while in Progression mode, the game will automatically change to the prior zone level and switch to Farm mode. This is to allow gold to be accumulated to enable the upgrading of Heroes to defeat the boss that blocked progress.
Getting Started
On the right you will see your first monster and on the left you will see Cid, the first Hero waiting to be hired, but Cid is greyed out as you lack any gold to do so.
Click on the monster and you will see it's health drop by one point. Do this ten times and you have killed your first monster and will see a single gold coin drop to the ground. You can either move the mouse over/near it to collect the coin or wait a short while for it to be collected automatically. Either method gives you the same total gold.
You will also see the counter by the skull in the top-center of the zone area increment by one. This is the number of monsters that must be slain to advance to the next zone level.
Slay another four monsters and you will have sufficient gold to hire Cid. You will also see an new Hero appear greyed out in the list, Treebeast. Hire Cid, and you will see your damage per click will have increased to 2.
Occasionally you will see Treasure Chests spawn instead of monsters. These are attacked and destroyed in just the same way as other monsters but they drop seven times the gold as a regular monster.
Kill another five monsters and you will have cleared the zone. As this is your first run, you must manually advance to the next zone by clicking on it at the top of the game window. Later once you unlock Progress mode the game will automatically advance each time you clear a zone.
By this point you should have sufficient gold to level up Cid. Do so and you will see your damage per click has increased again to 3. Continue killing monsters and possibly levelling Cid again until you clear the zone, then click at the top to progress to zone 3.
Continue through zone 3 and 4 levelling Treebeast and Cid as you go. Then proceed to the next zone.
If you find that you can't cause sufficient damage to kill this or any following boss, use the zone selection at the top of the screen to jump back to the last completed zone before the boss and earn money to allow you to upgrade your Heroes until you cause sufficient damage to proceed.
The majority of upgrades available to heroes cause a percentage increase in their damage done and these bonuses stack together multiplicatively. Other upgrades can give a smaller bonus to every Hero's damage, improve the critical chance and damage multiplier of your clicks, grant a percentage of the total DPS of your Heroes to your click damage, increase the gold dropped by monsters and unlock abilities.
Abilities, particularly when used in combination, can give a temporary enormous boost in the damage done by your Heroes and clicking and can be vital to getting past bosses during your first run.
Zone 6+
A general piece of advice for hiring and levelling Heroes is to level each Hero to level ten and purchase their upgrade before moving on to purchasing the next Hero. Continue doing this until you have five Heroes at level ten, then return back to your first hero and Increase their level to 100(holding the Shift key while clicking will enable you to purchase ten levels per click) and purchase their upgrades. Level the next Hero down the list to level 75, the next to level 50 and the following to level 25 and purchase all available upgrades. As you proceed further level the next Hero to level ten before keeping to the same pattern fir the preceding Heroes. At this point, it is not advised to continue levelling a Hero if they possess no further upgrades.
Continue levelling your Heroes and progressing to higher zones. You should be aiming on this run to reach zone level 140. This is typically the slowest part of the game and it may take one or more days to reach 140.
Note, do not purchase Amenhotep's final upgrade, Ascension, at this point. This upgrade removes all gold and Hero levels and places you back at zone one and should be used later once you have gained Hero Souls that will carry over to your next run.
You will likely need to use your abilities to pass bosses without waiting for great amounts of time to farm gold to upgrade your Heroes instead. Before using them, let one pass of the boss occur and note how much damage was done to the boss. If damage of more than half of the bosses health was done then just use the first two abilities Clickstorm and Powersurge to defeat the boss. If more than a quarter but less than half of a bosses health was done in damage you will need to use the third ability Lucky Strikes in conjunction with the first two abilities. If less than a quarter but more than an eighth of the bosses health was damaged you will need to use the seventh ability Super Clicks along with the prior three abilities. If you are not doing at least an eighth of the bosses health in damage you will likely have to go back a level and farm some gold to upgrade your Heroes before trying again.
Eventually you will reach the Hero Frostleaf. You will notice the jump in cost to the next Hero Dread Knight, which you will not be able to afford on this run. Get Frostleaf up to level 100 and purchase his upgrades then go back up the hero list to Treebeast. Use the Ctrl key to add 100 levels at a time to Treebeast and you will swiftly see his damage increase to be comparable with that of Frostleaf. This is because from level 200 and every 25 levels after the damage done by a hero is multiplied by four, with a multiplier of x10 at level 1,000 and following increments of a thousand. Combined with these earlier heroes being much cheaper to level up, this allows you to increase the DPS of your Heroes faster than just trying to level Frostleaf.
Repeat this for the other early Heroes, Ivan, Brittany, Samurai and Forest Seer. You will notice certain Heroes have been skipped, that is because they do not have a full set of damage upgrades so are less worthwhile investing in.
Continue adding 25 levels at a time to these Heroes(use the z key to do so with a single click) and to Frostleaf if it is cheaper to add 25 levels to him.
Clickables, Omeet, Gilds, Hero Souls and Rubies
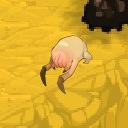 After reaching zone 35, you may start to see clickables appearing. They appear at random intervals and only one clickable of this type can be on screen at once. In the Steam version of the game these currently appear as small headcrabs that appear in one of six locations. Five of these are around the edges of the zone land block, while the sixth is near the vertical center of the screen, slightly to the left of the scrollbar, on the Hero pane.
Clicking on one of these headcrabs will drop a quantity of gold equal to ten times that of a monster on the highest level unlocked in the current run as well as a reasonable chance to drop a ruby, the currency that can be purchased for real money. Later when you have Ancients such as Libertas, Mammon or Fortuna they will effect the gold dropped from the clickable.
It is also important to note for later that headcrab clickables persist through an Ascension but do not persist if the game is closed and reopened.
 A sceond type of clickable also exists in the form of a small creature that will slowly fly across the top of the zone from right to left, disappearing if it reaches the left border of the zone. Clicking 50 times on this will cause a random ability to be activated, without causing the skill to enter cooldown, and can include abilities that have not yet been unlocked.
If the random ability activated is Clickstorm it will break Idle status, but other abilities will not. This may not be immediately obvious as it is very easy to click once too often when clearing the creature. One note, if you have the Energize ability active, the random ability will use the Energize charge.
Omeet is similar to the previous bosses but on his defeat will give one Hero Soul(HS) that will be granted after you Ascend. The very first time you defeat Omeet also grants you one additional Hero Soul directly into your bank and grants you your first Gild. A new tab for managing Ancients is also opened on the Hero pane, but should be left for now.
The progression mode/farm mode toggle button should now also be unlocked and appear on the right hand side of the window. If it doesn't appear, try saving, closing and reopening the game, or wait until after your first Ascension.
It is possible to move Gilds between Heroes, but initially they should be left on whichever hero they are granted to, as initially the cost in HS is more than it is worth to move the Gild.
One Hero Soul is granted for every 2,000 levels possessed in total by your Heroes at the time that you Ascend. However this will relatively quickly become a very small proportion of the HS you earn on each Ascension.
The other, and main source of HS is defeating Centurions at every 100th zone and primal bosses that spawn 25% of the time for each boss past zone 100. Note that, you only receive HS for the first time you defeat a Centurion or Primal boss on each run.
The actual number of HS that will be dropped by a Primal boss or Centurion can be determined by the following formula.
HS=(((Zone-80)/25)^1.3)*(1+Solomon bonus)
They can be spent on three different boosts.
Timelapse for 20 rubies resets all abilities that were on cooldown and grants gold as if the game had been left farming for eight hours at the highest unlocked zone. However this is regarded as a very poor use of rubies in all but a couple of specialized circumstances.
For 30 rubies a set of three gilds will be granted each of which will go to a random Hero. These are otherwise identical to the Gilds awarded every ten levels.
For 50 rubies you are granted a Quick Ascension(QA). Without effecting your current run, this adds one to your count of ascensions for the purposes of stats and achievements and grants a number of HS directly into your bank. A QA always grants a minimum of 7 HS, even if you have not yet passed zone 100. Beyond that Souls are based on the highest zone you have ever reached as well as the Ancients Solomon and Atman.
It has been proven that QA results in the greatest increase in damage potential per ruby spent, the maths of which can be found on the Clicker Heroes subreddit.
Zone 140 and Ascension
At zone 140 You will encounter the Octotentacle boss. If this boss is not a Primal it will not be worth your time defeating it, and you should go straight to preparing for Ascension.
If it is a Primal then you will need to have upgraded your effective damage dealing Heroes as far as you can and utilize all of your damage dealing abilities in a combination right at the start of the fight. Using Energize on Super Clicks or Lucky Strikes usually provides the best chance of defeating the boss.
Zone 140 is one of the first walls you will come across, points where it takes far too much time to pass and trying to push further will be even slower.
Prior to ascending you will want to go back through your Heroes and buy as many levels in total as possible. For every 2,000 total levels you will receive one Hero Soul. You should be able to obtain between five to eight HS in this fashion on your first Ascension.
Once you have purchased all the levels you are able to afford, move to Amenhotep and purchase his Ascension upgrade. All of the HS you have earned will be added to your bank, your gold total will be set to zero, you lose all Hero levels and upgrades and are moved back to zone one. The progression mode toggle is also switched to farm mode.
Going Further
It may be tempting to now purchase an Ancient from the new tab that has appeared on the Hero pane.
Don't.
Each Soul that is sitting in your bank gives your clicks and your Heroes +10% to damage. At this point that is far more valuable than any Ancient you could purchase.
Starting from zone one, progress back up through the levels, similarly to how you did before. You will find that it is much quicker, and what took one or more days now only takes several hours. Again, when you reach zone 140, see if the Octotentacle is a Primal and defeat it if it is, collect as many hero levels as can be afforded and Ascend again.
Again, don't spend any of your Souls and repeat the process. you will find that it goes even faster, perhaps down to one or two hours. Keep repeating this process until you find you can reasonably easily defeat the boss of zone 140 then start trying to push five to ten zones further with each Ascension.
Active play involves you clicking and using abilities frequently. Vaagur reduces the cool down times on your abilities and is fairly cheap to level up, letting you use your abilities much more frequently. Juggernaut is a good second Ancient to pick for this style as long as you can maintain the combo by never pausing in clicking for longer than 10 seconds.
Idle play where you let your Heroes do the damage and only periodically check in to level up and purchase upgrades is based around the Ancients Siyalatas and Libertas. Purchase whichever one you see first and when it comes to time to purchase your second Ancient pick up the other, re-rolling if necessary.
Don't let your HS bank drop below 50 at this point when purchasing or upgrading your Ancient, and proceed to gather another 50 HS before purchasing your second Ancient, with the total of 100 HS becoming the new floor below which you should not spend.
Upgrade both of your ancients to level 10, never dipping below the floor of 100 HS, then expand your bank by another 50 HS and purchase one of Mammon, Dogcog, Mimzee, Dora or Fortuna.
Again level the ancient you purchased to level 10, never dipping below the new floor, and gather another 50 HS for a total of 200. Purchase another one of the five and level it to 10 then increase your bank by 100 HS. Repeat this each time until you have all five purchased and leveled to 10 and are sitting on a bank of 500 HS.
From here which ancients are picked depends on if you are using an active or Idle playstyle. A sample order for an Idle playstyle is shown below.
- Collect 50 HS into bank, don't spend below this.
- Purchase Siyalatas or Libertas. Level to 10.
- Collect 50 HS into bank. Total 100 HS, don't spend below this.
- Purchase Siyalatas or Libertas. Level to 10.
- Collect 50 HS into bank. Total 150 HS, don't spend below this.
- Purchase Mammon, Dogcog, Mimzee, Dora or Fortuna. Level to 10.
- Collect 50 HS into bank. Total 200 HS, don't spend below this.
- Purchase Mammon, Dogcog, Mimzee, Dora or Fortuna. Level to 10.
- Collect 100 HS into bank. Total 300 HS, don't spend below this.
- Purchase Mammon, Dogcog, Mimzee, Dora or Fortuna. Level to 10.
- Collect 100 HS into bank. Total 400 HS, don't spend below this.
- Purchase Mammon, Dogcog, Mimzee, Dora or Fortuna. Level to 10.
- Collect 100 HS into bank. Total 500 HS, don't spend below this.
- Purchase Mammon, Dogcog, Mimzee, Dora or Fortuna. Level to 10.
- Collect 200 HS into bank. Total 700 HS, don't spend below this.
- Level all ancients to 25. Try to keep them equal as you do this.
- Purchase Bubos or Kumawakamaru. Level to max.
- Collect 200 HS into bank. Total 900 HS, don't spend below this.
- Purchase Bubos or Kumawakamaru. Level to max.
- Collect 300 HS into bank. Total 1,200 HS, don't spend below this.
- Purchase Atman or Solomon. Level Atman to max or Solomon to 20.
- Collect 300 HS into bank. Total 1,500 HS, don't spend below this.
- Purchase Atman or Solomon. Level Atman to max or Solomon to 20.
- Collect 500 HS into bank. Total 2,000 HS, don't spend below this.
- Purchase Argaiv or Morgulis. Level Argaiv to 25, place all bank HS into Morgulis.
- Collect 500 HS into bank. Total 2,500 HS, don't spend below this.
- Purchase Argaiv or Morgulis. Level Argaiv to 25, place all bank HS into Morgulis.
- Purchase Khrysos or Iris. Level Khrysos to max or Iris to 33.
- Purchase Khrysos or Iris. Level Khrysos to max or Iris to 33.
- Level Siyalatas, Argaiv, Dora to 50. Level Libertas, Mammon, Mimzee to 45. Level Fortuna to 40. Level Solomon to 35. Level Morgulis to 5,200.
- Purchase Chronos. Level to 18.
Ancients
The Ancient Siyalatas(Siya) is used as the basis to determine the appropriate level that other Ancients should be at. If using an active build that doesn't use Siyalatas, Argaiv can be substituted instead as a base.
Abilities
If Energize is activated and waiting for the next ability to be used, activating the moving clickable will use up the Energize.
On-line Tools
- Clicker Lister[lilylicious.deadmano.com] - Extracts information, on Ancients, Gilds, Souls and others from the code of a saved game and displays it in a friendly format ready for copying and pasting into discussion posts. Use this tool if you want to show off your progress or ask for advice rather than vaguely describing your game.
- Gilding Calculator[theriebel.de] - As the order in which gilds are assigned is fixed by the games seed and is unaffected by saving and reloading, it is possible to use this tool to determine if it is cheaper to use the 2HS degild option multiple times when moving gilds to specific Heroes/Hero later in the game rather than using the 80HS direct assigning option.
- Ancient Optimizer Calculator[s3-us-west-2.amazonaws.com] - This tool will take the data of a save and calculate the optimal levels of Ancients that you should spend your current and after next ascension total of HS on to maximize HS gain per hour.
While a useful tool, following it blindly may not be the best of ideas if you want to make progress to higher zones and it may encourage you to purchase certain Ancients at the wrong point for efficient progress. It also tends to under-level gold Ancients while over-leveling Solomon. - Hero Level Calculator[calc.rbservers.org] - Not intended for use early on a run(ie not before Frostleaf is purchased to 100, and all available upgrades have been purchased), this imports the data from a save and calculates in which order Heroes should be levelled to maximize DPS for that run.
Clicker Heroes Wiki[clickerheroes.wikia.com] - currently under revision/reorganisation at the time of writing.
- How to buy Dread Knight (Beginner's Guide)★ 5 (651)48k views510 ♥5 minUpdated Jun 28, 2015
- The Non-Intrusive Autoclicker★ 5 (483)43k views458 ♥3 minUpdated Jun 11, 2015
- Clicker Heroes Explained with Strategies - NO HACKING★ 5 (735)39k views1k ♥99 minUpdated Jul 12, 2024
- Unlock all Achievements [100% Save File] (v6 - transcension achievements)★ 4 (488)28k views221 ♥1 minUpdated Jul 19, 2016
- Make Dark Ritual extra efficient★ 5 (291)24k views218 ♥2 minDutchUpdated Aug 23, 2015
- Самый подробный гайд по Clicker Heroes. Достижения и не только.★ 5 (483)22k views239 ♥6 minRussianUpdated May 28, 2015




- Upgrading to PremiumTeam Fortress 2★ 5 (20k)1441k views11k ♥6 minUpdated May 11, 2022
- No More Room in Hell Official ManualNo More Room in Hell★ 5 (2.8k)569k views2.1k ♥29 minUpdated Apr 22, 2019
- NMRiH Community Hosting GuidesNo More Room in Hell★ 5 (526)351k views653 ♥1 minUpdated Aug 10, 2022
- ULTIMATE GUIDE FOR GAME DEV TYCOONGame Dev Tycoon★ 5 (5.8k)326k views10k ♥4 minUpdated 23 Jan, 2014
- How to 'Git Gud' Soon™MORDHAU★ 5 (2k)318k views3k ♥68 minUpdated Nov 16, 2024
- Лучшие кооперативные игры SteamPAYDAY 2★ 5 (1.5k)315k views2.1k ♥56 minRussianUpdated Apr 27, 2025






This guide was created by its original author on the Steam Community. Are you the author and want it removed? Request removal.