Beginner's Guide to Total War Rome 2
Basic Concepts
Unit Recruitment and Upkeep
All units must be recruited and led by a general. Each unit has a one-off recruitment cost and a recurring per turn upkeep cost. Apart from some exceptions, more powerful units generally cost more to recruit and upkeep.
Public Order
Public order is the level of happiness in your province. All settlements you own in the same province will share the same public order. These are shown by colored faces on the settlement when you select it, specifically green (happy), yellow (neutral) and red (angry). A red face is associated with a negative public order level. When this negative number reaches -100, rebels will spawn in your province. They will first spawn as a small army but if left unchecked, will grow bigger and harder to put down later on.
Culture
The cultural composition of your settlements may range from 100% population with your faction's culture to 100% of a foreign culture. A high level of foreign culture in your settlements compared with your own will result in high public disorder. The solution is to build temples to speed up the cultural conversion process to your own.
Campaign Movement
All armies have movement points and their full extent is shown by the colored boundary appearing around an army when you click on it. Movement points may be increased if you set your army to forced march stance, but that also means your army will definitely be ambushed if attacked.
Zone of Control
All armies are surrounded by a red zone of control (zoc). If your armies somehow end up in a neutral army's zoc, they cannot move for the entire turn unless you declare war on that faction and attack the blocking army. Deciding to go around another faction's zoc will cost precious movement points unless you declare war and attack the blocking army head on.
Stances
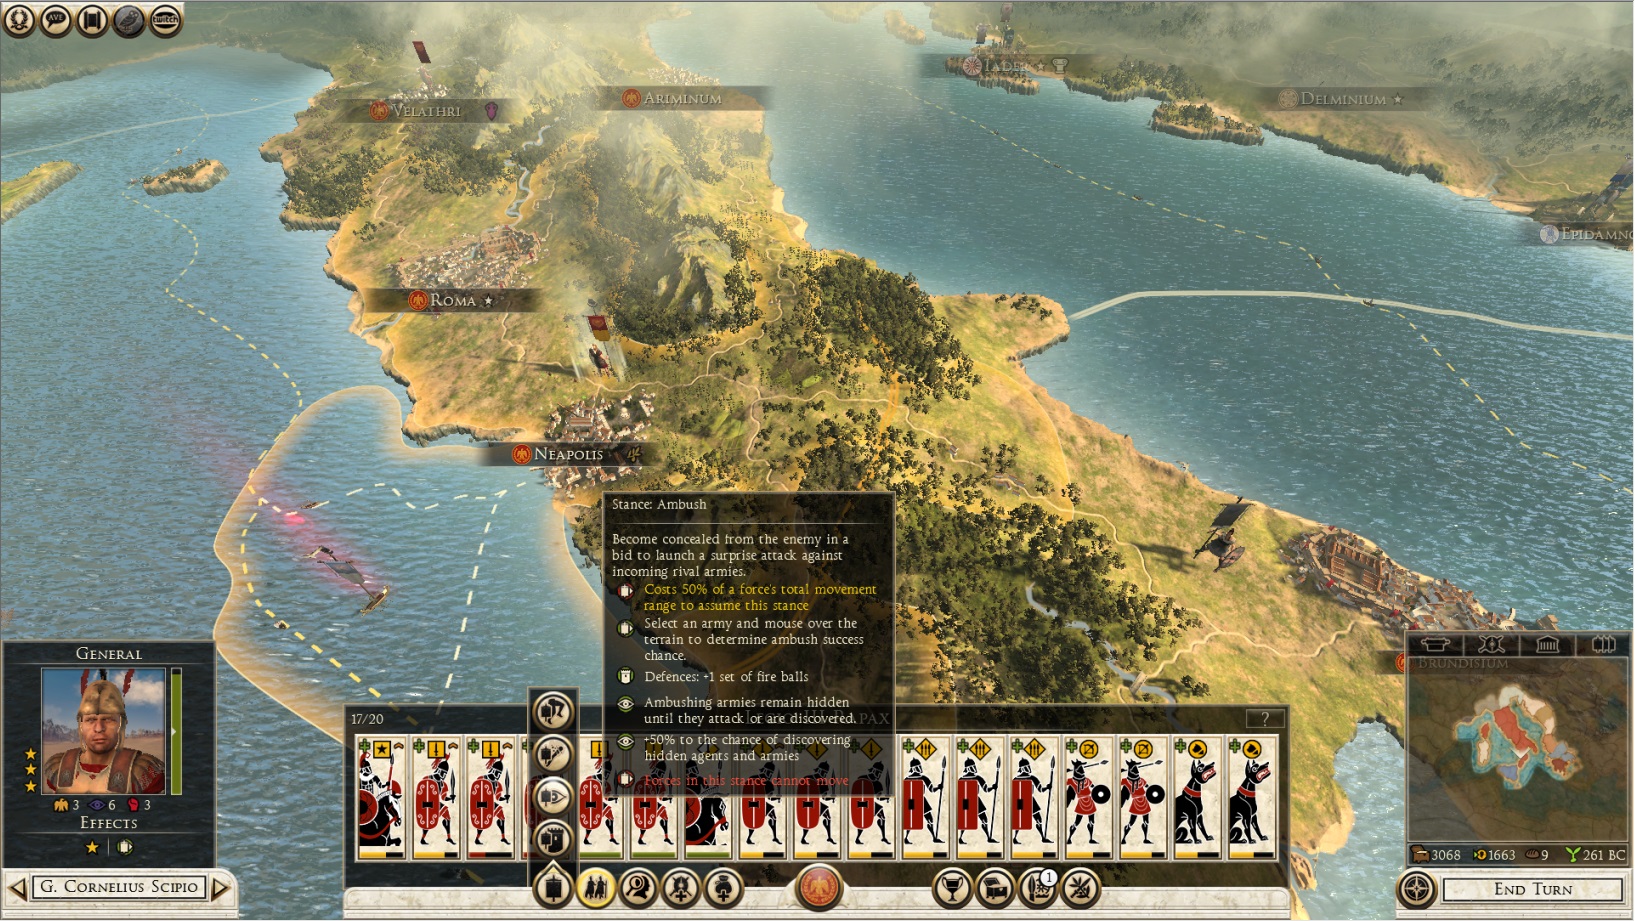
An army may assume several stances as shown below. These give bonuses but also often penalties as well. Choose wisely given your army's situation.
Line of Sight
Line of sight (los) refers to the field of view of each individual unit. Los may be blocked by terrain such as hills or forests, making enemy armies hidden behind/within these obstacles invisible to your troops. The same goes for enemy units if your troops are hidden likewise. You can tell if any units lack los by the ghostly eye icon that appears above the unit.
If you lack los to the enemy when battle first commences, it's good to move your armies into a more open area to force the enemy units out of their hidden positions if possible. For example, moving to open ground on the extreme corner of the map may force the hidden enemy army to reposition itself in the open to avoid being flanked.
Edicts
You must own all settlements in the same province to issue an edict for that province. This may have changed in Attila but I'm not sure. Bonuses granted by your selected edict only apply to the province where it's issued.
Short and Long Term Objectives
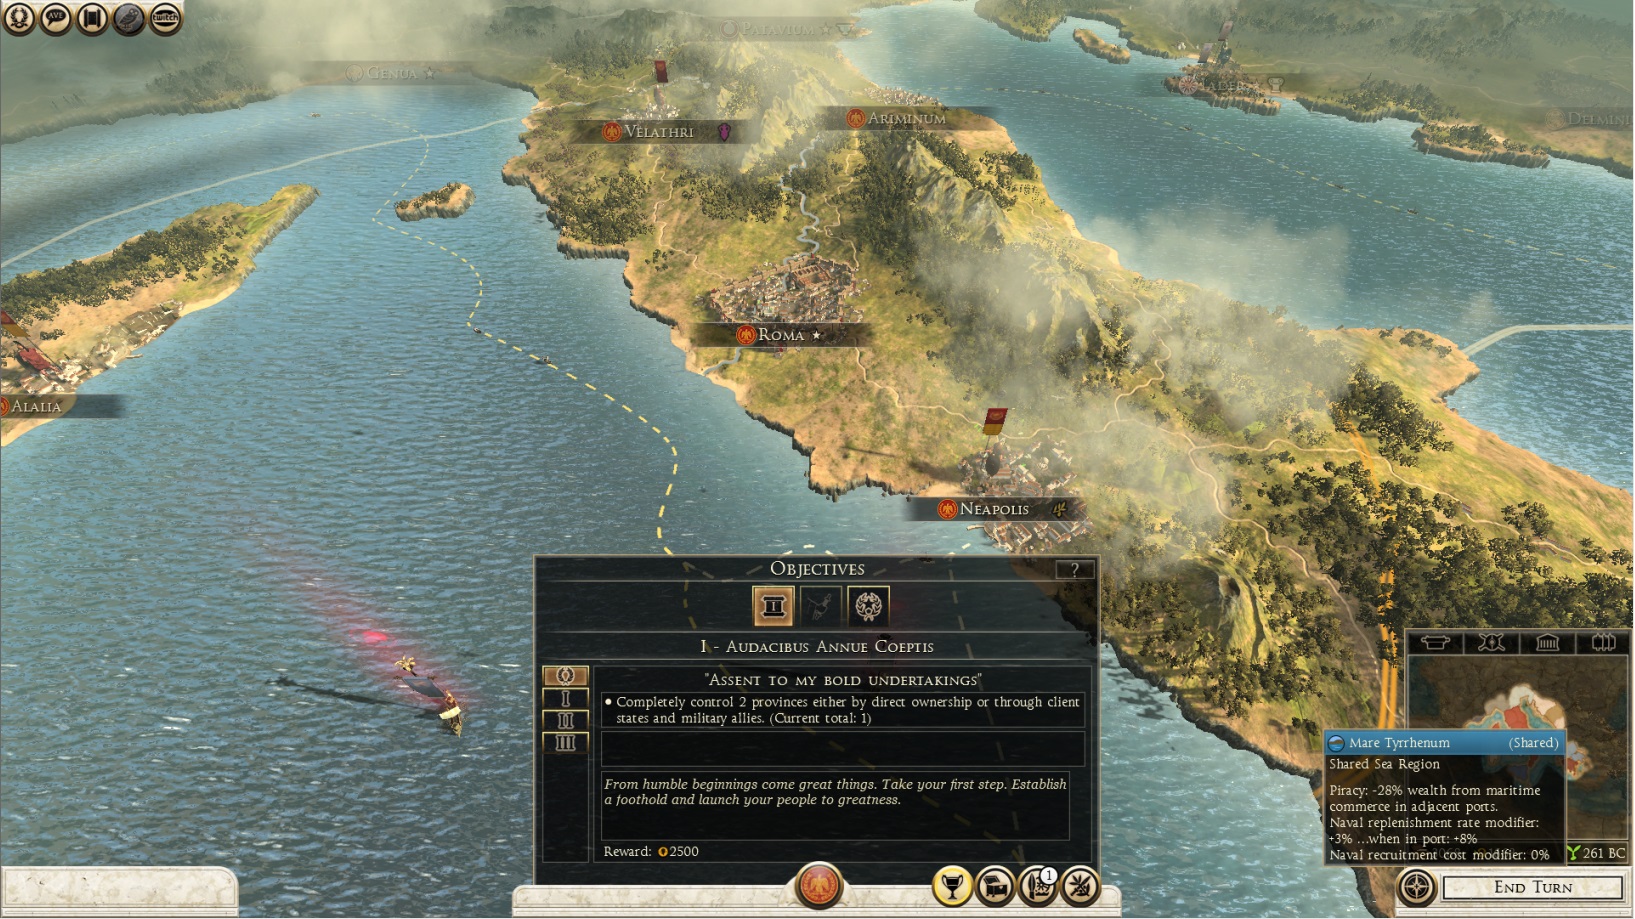
When you first start a grand campaign, you will receive the first of a series of short term objectives with monetary rewards for accomplishing them. There are also optional bonus objectives (I, II, III, IV etc) below the main short term objective as shown below.
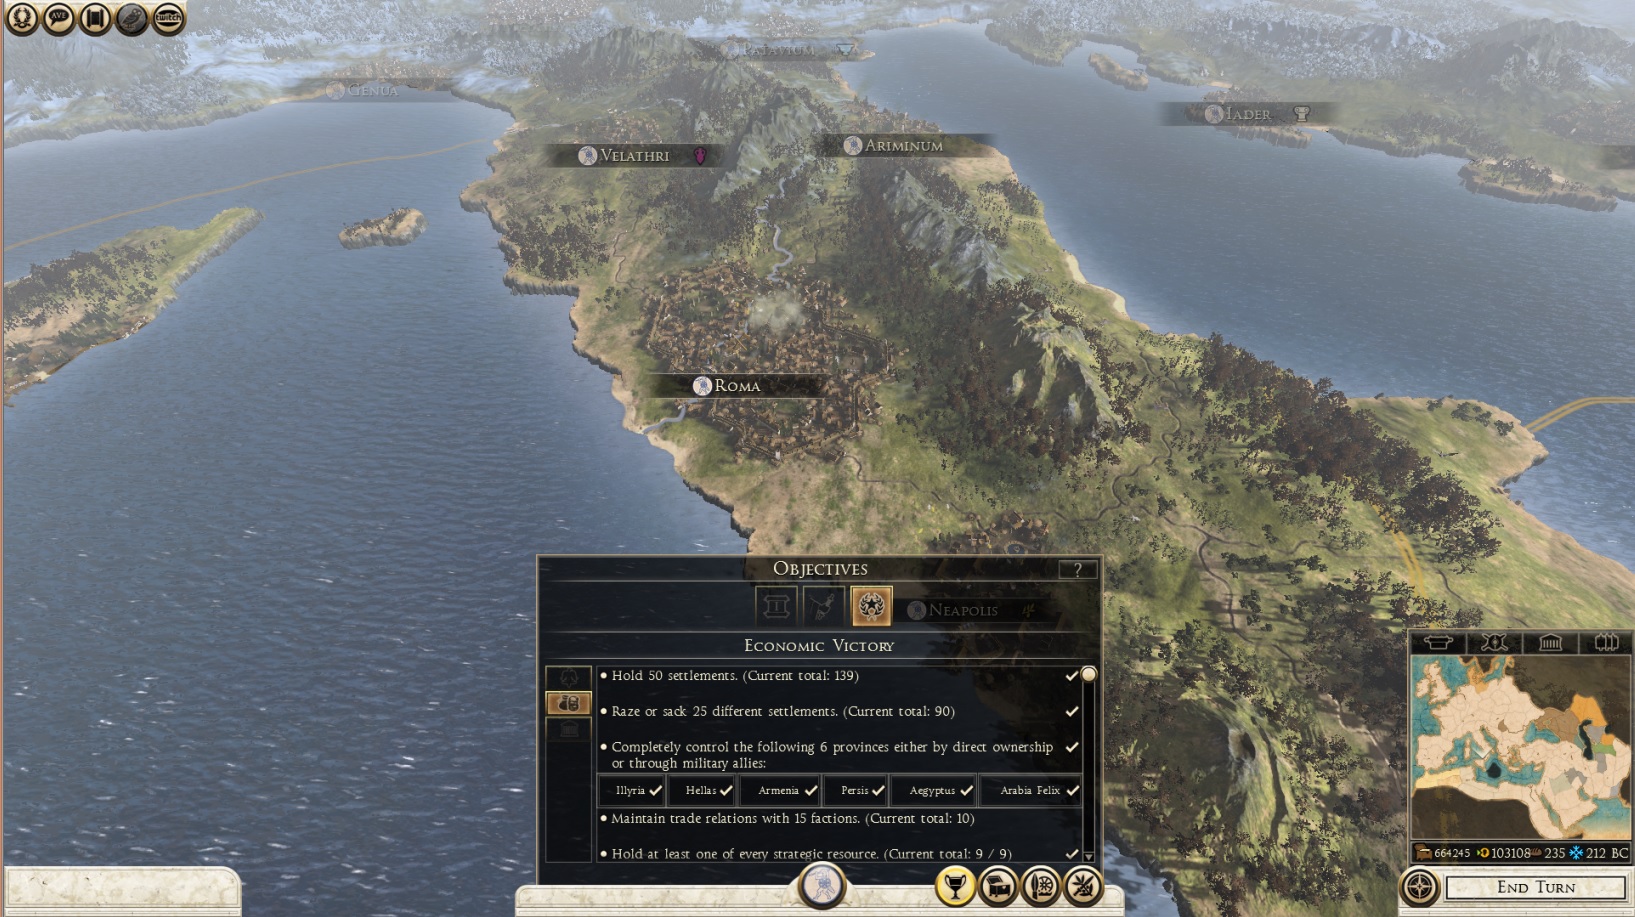
Your long term objectives are the requirements for you to achieve a military, economic or cultural victory as shown below. If you feel that going for a particular victory type takes too long given the campaign situation, you may consider winning another victory type. Of course, if you're going for the achievements for all three victory types, you're free to do so.
All units must be recruited and led by a general. Each unit has a one-off recruitment cost and a recurring per turn upkeep cost. Apart from some exceptions, more powerful units generally cost more to recruit and upkeep.
Public Order
Public order is the level of happiness in your province. All settlements you own in the same province will share the same public order. These are shown by colored faces on the settlement when you select it, specifically green (happy), yellow (neutral) and red (angry). A red face is associated with a negative public order level. When this negative number reaches -100, rebels will spawn in your province. They will first spawn as a small army but if left unchecked, will grow bigger and harder to put down later on.
Culture
The cultural composition of your settlements may range from 100% population with your faction's culture to 100% of a foreign culture. A high level of foreign culture in your settlements compared with your own will result in high public disorder. The solution is to build temples to speed up the cultural conversion process to your own.
Campaign Movement
All armies have movement points and their full extent is shown by the colored boundary appearing around an army when you click on it. Movement points may be increased if you set your army to forced march stance, but that also means your army will definitely be ambushed if attacked.
Zone of Control
All armies are surrounded by a red zone of control (zoc). If your armies somehow end up in a neutral army's zoc, they cannot move for the entire turn unless you declare war on that faction and attack the blocking army. Deciding to go around another faction's zoc will cost precious movement points unless you declare war and attack the blocking army head on.
Stances
An army may assume several stances as shown below. These give bonuses but also often penalties as well. Choose wisely given your army's situation.
Line of Sight
Line of sight (los) refers to the field of view of each individual unit. Los may be blocked by terrain such as hills or forests, making enemy armies hidden behind/within these obstacles invisible to your troops. The same goes for enemy units if your troops are hidden likewise. You can tell if any units lack los by the ghostly eye icon that appears above the unit.
If you lack los to the enemy when battle first commences, it's good to move your armies into a more open area to force the enemy units out of their hidden positions if possible. For example, moving to open ground on the extreme corner of the map may force the hidden enemy army to reposition itself in the open to avoid being flanked.
Edicts
You must own all settlements in the same province to issue an edict for that province. This may have changed in Attila but I'm not sure. Bonuses granted by your selected edict only apply to the province where it's issued.
Short and Long Term Objectives
When you first start a grand campaign, you will receive the first of a series of short term objectives with monetary rewards for accomplishing them. There are also optional bonus objectives (I, II, III, IV etc) below the main short term objective as shown below.
Your long term objectives are the requirements for you to achieve a military, economic or cultural victory as shown below. If you feel that going for a particular victory type takes too long given the campaign situation, you may consider winning another victory type. Of course, if you're going for the achievements for all three victory types, you're free to do so.
Economy & Income
Why is income important? Because you won't have enough money in your treasury to recruit and pay for unit upkeep otherwise. Your per turn income is shown next to your treasury income above the end turn button. If it's positive, your treasury will increase by that amount every turn. If negative, it will decrease.
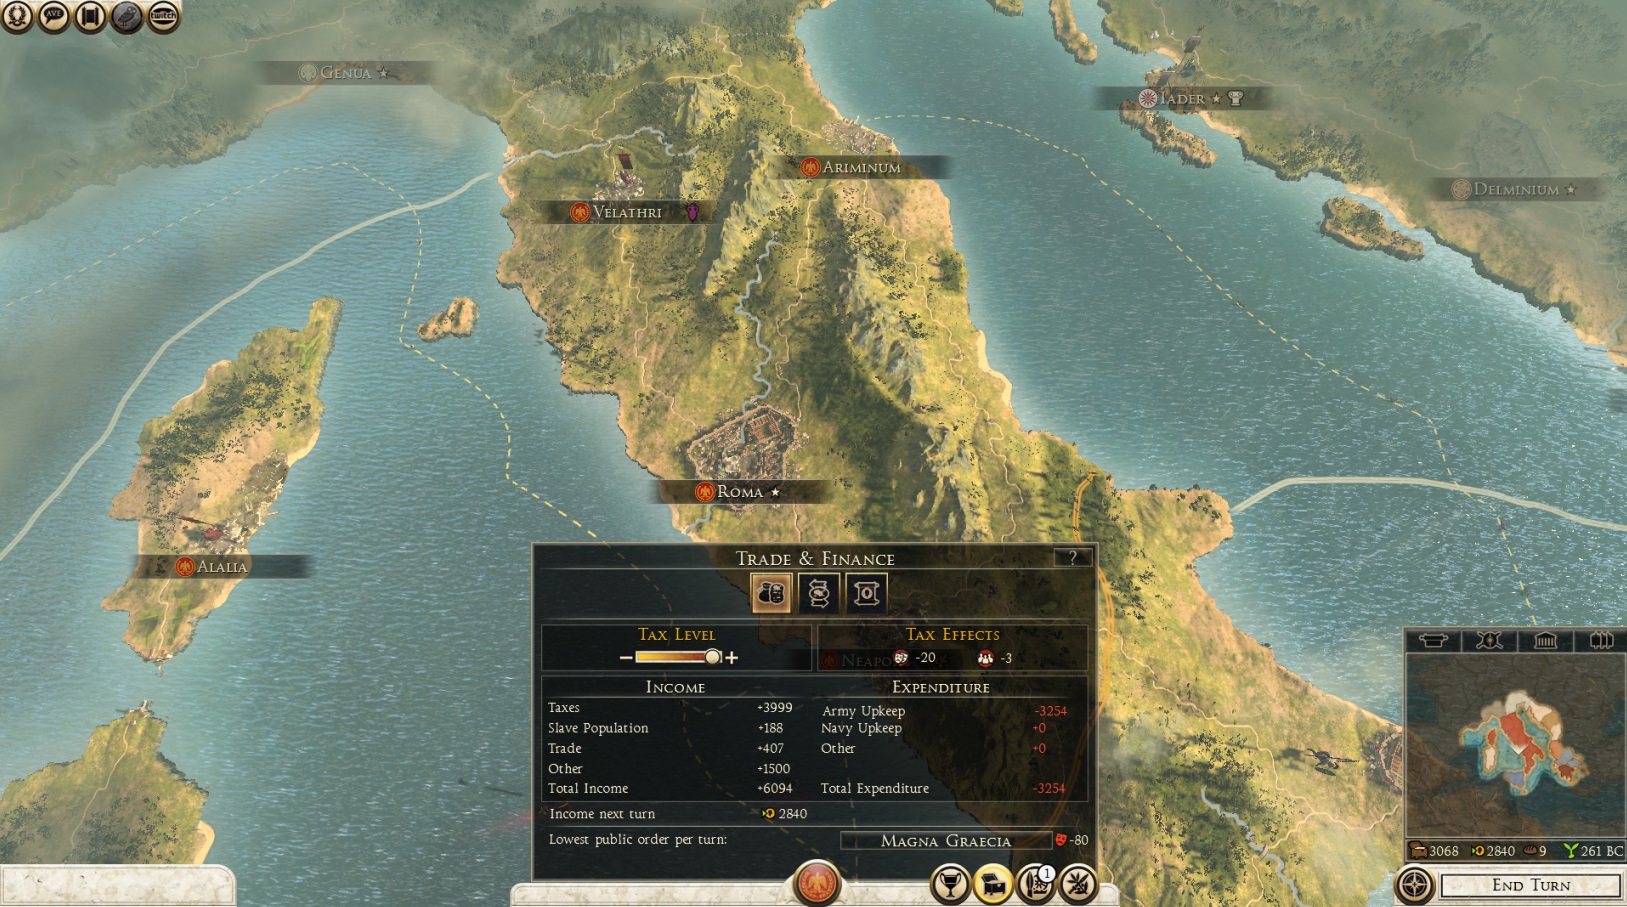
You can temporarily set your tax rate to max on the tax slider as shown below when you need a quick income boost. But don't overdo it as it increases public disorder and I think affects settlement growth as well.
Newly captured settlements will have high disorder. You can choose to occupy, loot or exterminate with different consequences. Occupying will result in a lower disorder penalty but you get nothing else. Looting gives you lots of money but has a diplomatic penalty and higher disorder penalty. Exterminating is useful to get rid of foreign culture buildings immediately (which add to disorder and often don't grant any benefits to your faction) instead of having to wait a turn to demolish them. But it causes the most diplomatic and disorder penalty. Occasionally, capturing certain settlements also gives you the option to liberate the faction that previously owned it, making it your client state. A large part of the client state's income goes into your treasury every turn in return for your obligation to protect it should it be attacked.
Besdies tax, other sources of income include:
-Trade with other factions
-Constructing buildings that give income bonuses including trade ports
-Raiding (beware that raiding trade routes may also anger factions you are not at war with whose trade is also affected as a result)
-Looting/sacking settlements
-Tributes from client states/satrapies
You can temporarily set your tax rate to max on the tax slider as shown below when you need a quick income boost. But don't overdo it as it increases public disorder and I think affects settlement growth as well.
Newly captured settlements will have high disorder. You can choose to occupy, loot or exterminate with different consequences. Occupying will result in a lower disorder penalty but you get nothing else. Looting gives you lots of money but has a diplomatic penalty and higher disorder penalty. Exterminating is useful to get rid of foreign culture buildings immediately (which add to disorder and often don't grant any benefits to your faction) instead of having to wait a turn to demolish them. But it causes the most diplomatic and disorder penalty. Occasionally, capturing certain settlements also gives you the option to liberate the faction that previously owned it, making it your client state. A large part of the client state's income goes into your treasury every turn in return for your obligation to protect it should it be attacked.
Besdies tax, other sources of income include:
-Trade with other factions
-Constructing buildings that give income bonuses including trade ports
-Raiding (beware that raiding trade routes may also anger factions you are not at war with whose trade is also affected as a result)
-Looting/sacking settlements
-Tributes from client states/satrapies
Building Types & Construction Slots
Building Types
The different building types in Total War Rome 2 are color coded according to their categorizations as shown below. These include farms (green), temples (purple), entertainment and government (yellow), industry and military (red), marine (blue) and mining (dark grey).
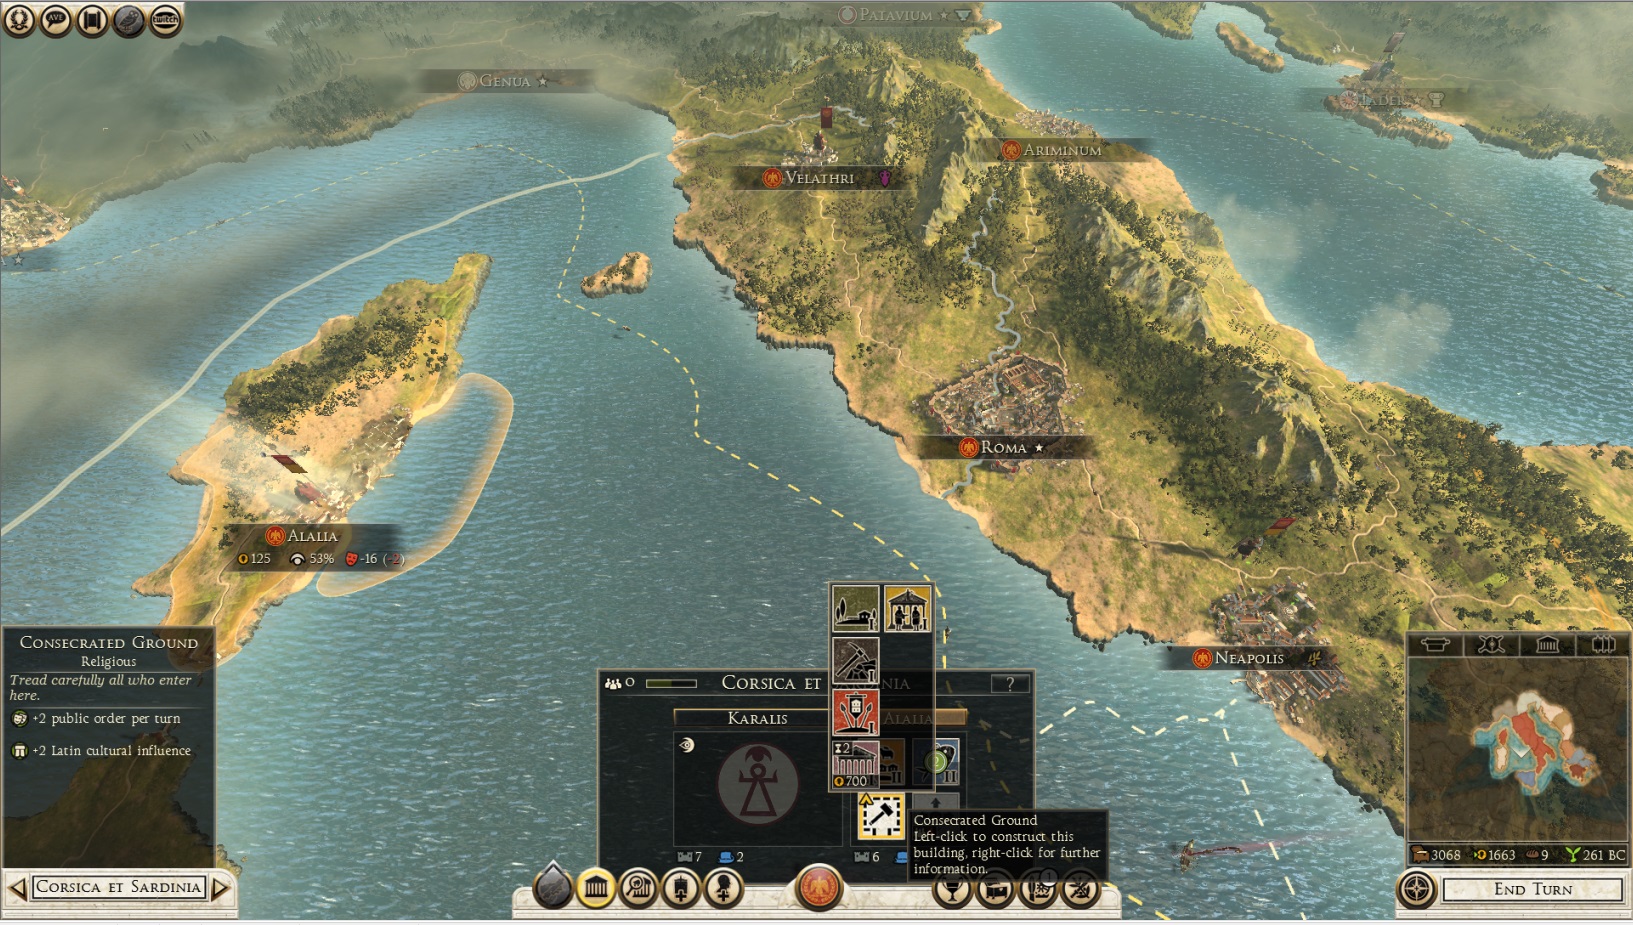
While there may be variations in specific bonuses depending on what faction you play, they generally provide benefits common to all buildings of their type:
Farms = +food
Temples = +public order/cultural conversion/special units for some factions
Entertainment and government = +public order/income/research bonus/special units for some factions
Industry and military = unlock new land units/+income
Marine = unlock new naval units/+trade/+food
Mining = +income
As attractive as these bonuses are, they also often come at a cost either by consuming food or increasing disorder.
Construction Slots
Each province may have 2-4 settlements, of which all/some/none are owned by your faction. A 4-settlement province will have more construction slots in total than a 2 or 3-settlement province. In order for a settlement to increase its number of construction slots, you have to wait for it to grow.
Because of the limited number of building slots available for each settlement, you need to decide what are the most appropriate buildings to construct in the province. You may make it a recruitment center where most building slots are taken up by different types of military buildings or an economic-focused one where you only have buildings that increase your income. It's generally a good idea to make provinces near the border military-focused so that troops can be recruited near the frontline when needed. Provinces deep within your empire should be economic focused to ensure you have enough income to sustain your armies.
The different building types in Total War Rome 2 are color coded according to their categorizations as shown below. These include farms (green), temples (purple), entertainment and government (yellow), industry and military (red), marine (blue) and mining (dark grey).
While there may be variations in specific bonuses depending on what faction you play, they generally provide benefits common to all buildings of their type:
Farms = +food
Temples = +public order/cultural conversion/special units for some factions
Entertainment and government = +public order/income/research bonus/special units for some factions
Industry and military = unlock new land units/+income
Marine = unlock new naval units/+trade/+food
Mining = +income
As attractive as these bonuses are, they also often come at a cost either by consuming food or increasing disorder.
Construction Slots
Each province may have 2-4 settlements, of which all/some/none are owned by your faction. A 4-settlement province will have more construction slots in total than a 2 or 3-settlement province. In order for a settlement to increase its number of construction slots, you have to wait for it to grow.
Because of the limited number of building slots available for each settlement, you need to decide what are the most appropriate buildings to construct in the province. You may make it a recruitment center where most building slots are taken up by different types of military buildings or an economic-focused one where you only have buildings that increase your income. It's generally a good idea to make provinces near the border military-focused so that troops can be recruited near the frontline when needed. Provinces deep within your empire should be economic focused to ensure you have enough income to sustain your armies.
Diplomacy & Trade
Clicking on the diplomacy button will bring up a list showing all the factions you are already in contact with or met during your exploration around the campaign map. Their opinion of your faction may range from very friendly/friendly (green face) to neutral (yellow) and furious (red). If a faction's opinion of your faction is around -70 or more, there's a chance they will declare war on you. But this also depends on the faction's traits (eg.warlike or cautious), how powerful you are and your relationship with other factions.
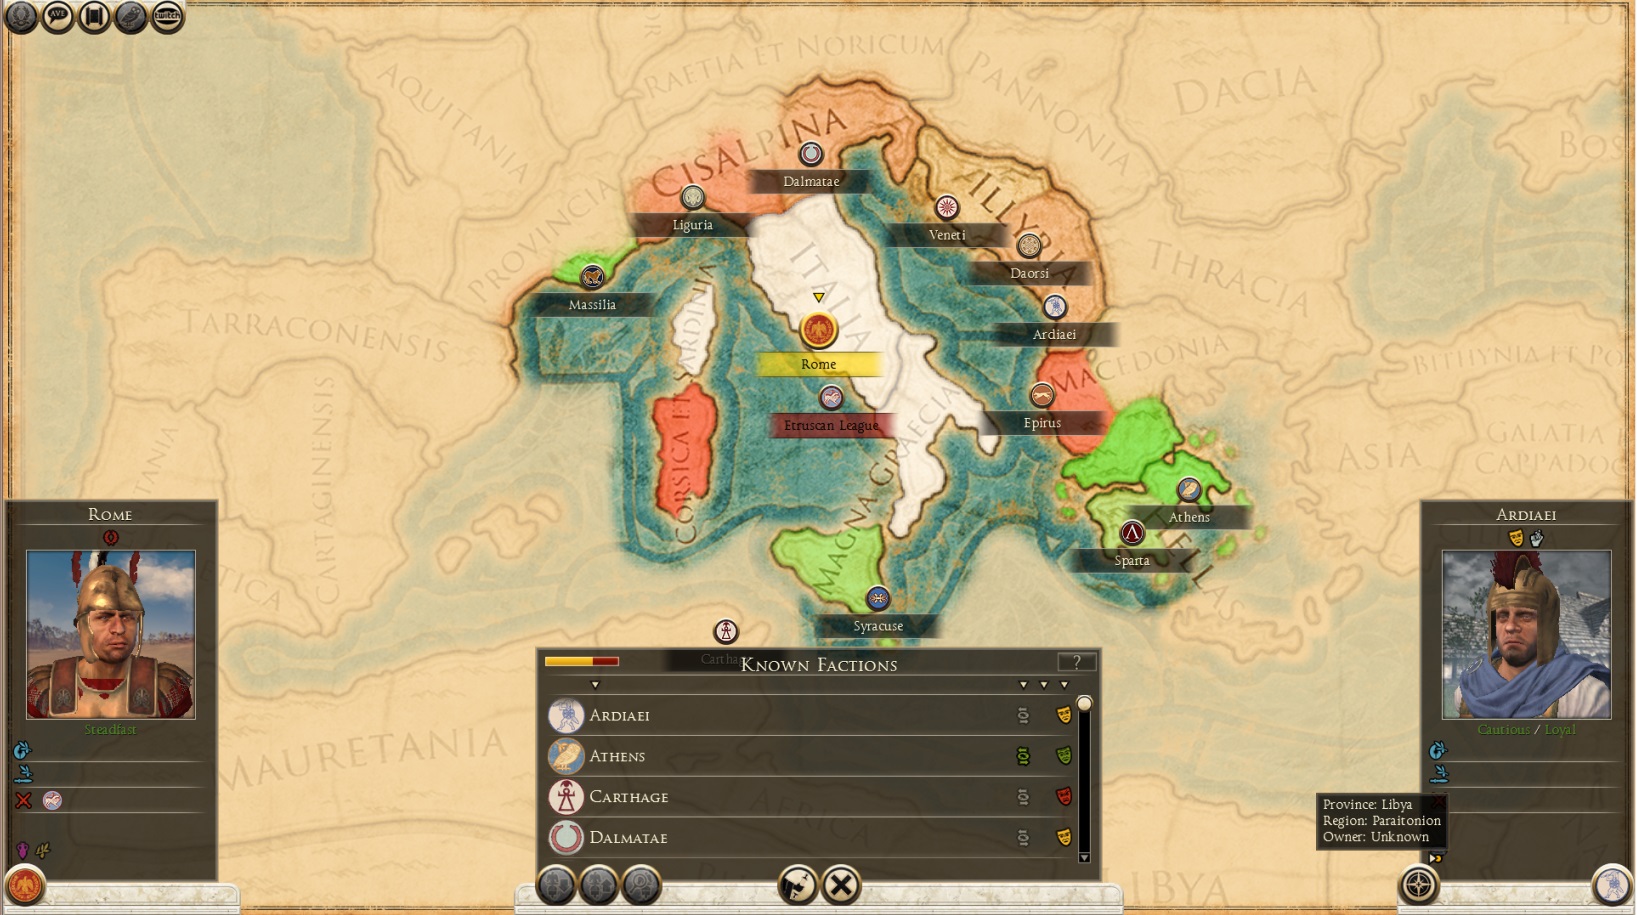
The more friendly a faction is towards you, the more likely they will accept an agreement. The likelihood of their acceptance to a proposed deal is shown as "low", "moderate" or "high". If it's low, you will need to sweeten the deal or wait for a more opportune time.
Demanding more deals during negotiation is often less likely to be successful. So if for example you offer trade and a non-aggression pact at the same time and the success chance is "low", try to settle for a non-aggression agreement first. Then come back to the trade offer in later turns when the chance of acceptance may be higher. That's because each successful deal improves your diplomatic standing with the other faction.
How allies behave depends on the nature of their alliance. Military allies can set war targets for each other, defensive allies will only join the war if one of the alliance members is attacked, non-aggresion pacts do not carry the obligation to go to the other faction's aid when it's attacked.
Just as successful deals improve your diplomatic standing with other factions, declaring war on their allies, raiding their trade routes, breaking agreements too soon and betraying/refusing to aid an ally when it's attacked carry diplomatic penalties. So your overall standing is the net of your positive diplomatic standing and negative penalties. In general, you should not break an agreement within 10 turns of making it to avoid a diplomatic penalty.
Ally only with factions you don't plan to invade anytime soon and break agreements with advance notice instead of doing so immediately through declaring war to avoid the penalty as well.
Releasing enemy troops will make their allies hate you less but your allies will be upset. Executing them will make their allies hate you more, but your allies will like you more as well. Enslaving gives a boost to income from the slave population, but too many slaves may disrupt public order and lead to a revolt.
The more friendly a faction is towards you, the more likely they will accept an agreement. The likelihood of their acceptance to a proposed deal is shown as "low", "moderate" or "high". If it's low, you will need to sweeten the deal or wait for a more opportune time.
Demanding more deals during negotiation is often less likely to be successful. So if for example you offer trade and a non-aggression pact at the same time and the success chance is "low", try to settle for a non-aggression agreement first. Then come back to the trade offer in later turns when the chance of acceptance may be higher. That's because each successful deal improves your diplomatic standing with the other faction.
How allies behave depends on the nature of their alliance. Military allies can set war targets for each other, defensive allies will only join the war if one of the alliance members is attacked, non-aggresion pacts do not carry the obligation to go to the other faction's aid when it's attacked.
Just as successful deals improve your diplomatic standing with other factions, declaring war on their allies, raiding their trade routes, breaking agreements too soon and betraying/refusing to aid an ally when it's attacked carry diplomatic penalties. So your overall standing is the net of your positive diplomatic standing and negative penalties. In general, you should not break an agreement within 10 turns of making it to avoid a diplomatic penalty.
Ally only with factions you don't plan to invade anytime soon and break agreements with advance notice instead of doing so immediately through declaring war to avoid the penalty as well.
Releasing enemy troops will make their allies hate you less but your allies will be upset. Executing them will make their allies hate you more, but your allies will like you more as well. Enslaving gives a boost to income from the slave population, but too many slaves may disrupt public order and lead to a revolt.
Research
Research is divided into the military (red) and civil (blue) tech branches. These are further sub-divided into 3 different focus areas. Generally speaking, military techs typically give combat bonuses and unlock more advanced units, although they may also help your treasury if they reduce recruitment and/or upkeep costs. Civil techs typically give income, trade, political or cultural bonuses and unlock more advanced buildings. As shown below, researching all the techs in each stage (I, II, III) of a focus area also gives extra bonuses.
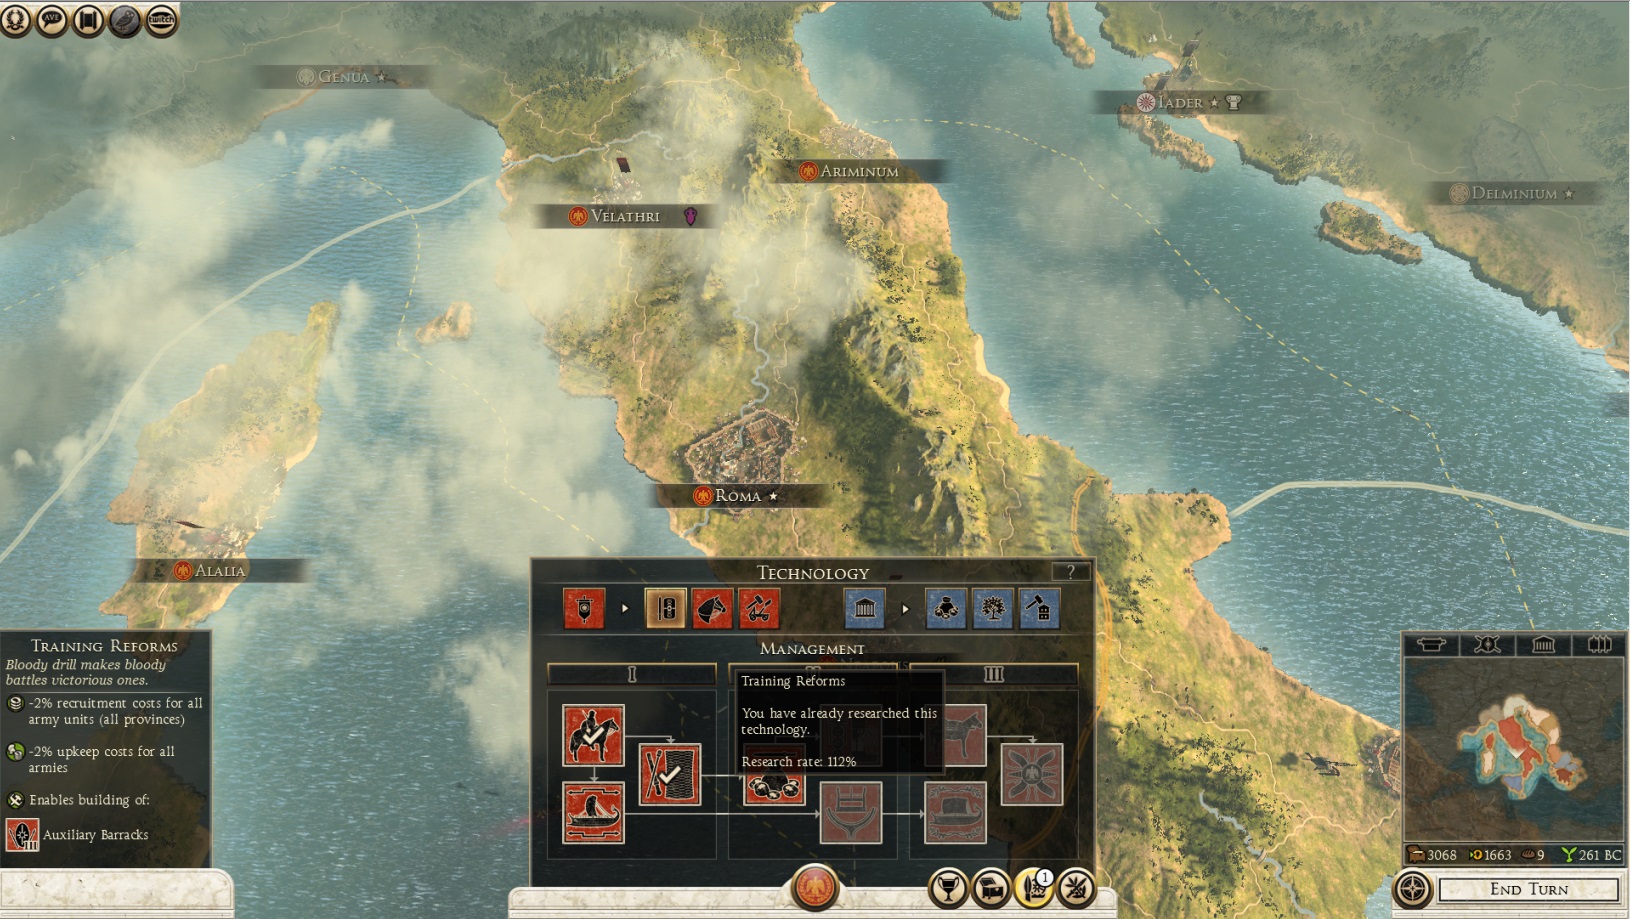
The 100% shown when you mouse over each tech at the start of the campaign is your default research rate. This will increase over 100% (require less time to research) if you construct libraries and other buildings that increase research rate. So a rate of 200% should take half the number of turns to complete research for the selected tech compared to 100%.
The 100% shown when you mouse over each tech at the start of the campaign is your default research rate. This will increase over 100% (require less time to research) if you construct libraries and other buildings that increase research rate. So a rate of 200% should take half the number of turns to complete research for the selected tech compared to 100%.
Recruitment
Only an army led by a general can recruit new units.
The number that appears on the unit card of units being recruited is the number of turns needed for the unit to be ready. What type of units you can recruit depends on what kind of military buildings you have in the province where they are being recruited. As long as you have a barracks/other military building built in a settlement, you can recruit the units unlocked by that facility even if your general is in another settlement within the same province. But you cannot recruit units from a military facility located in another province.
If you're Rome for example, building a Field of Mars unlocks 2 separate building chains. One for specializing in recruitment of frontline melee troops (legionaries aka swordsmen) and the other for recruiting support (missile/cavalry) troops. There are variations for different factions where for example you need to build stables/horse trainers (under agriculture building chain) instead to recruit cavalry. It's good to consult the game's encyclopedia to see exactly what and how units are unlocked for your specific faction.
More advanced units can only be unlocked and recruited after you research the appropriate tech and then upgrade your military facility. Without the relevant tech, you cannot upgrade the facility and the slot for upgrading will be greyed out until the tech is researched. This also applies to civil buildings. However, not all upgraded buildings need to be researched.
The number that appears on the unit card of units being recruited is the number of turns needed for the unit to be ready. What type of units you can recruit depends on what kind of military buildings you have in the province where they are being recruited. As long as you have a barracks/other military building built in a settlement, you can recruit the units unlocked by that facility even if your general is in another settlement within the same province. But you cannot recruit units from a military facility located in another province.
If you're Rome for example, building a Field of Mars unlocks 2 separate building chains. One for specializing in recruitment of frontline melee troops (legionaries aka swordsmen) and the other for recruiting support (missile/cavalry) troops. There are variations for different factions where for example you need to build stables/horse trainers (under agriculture building chain) instead to recruit cavalry. It's good to consult the game's encyclopedia to see exactly what and how units are unlocked for your specific faction.
More advanced units can only be unlocked and recruited after you research the appropriate tech and then upgrade your military facility. Without the relevant tech, you cannot upgrade the facility and the slot for upgrading will be greyed out until the tech is researched. This also applies to civil buildings. However, not all upgraded buildings need to be researched.
Grouping, Unit Deployment & Battle Mechanics
Grouping
Before battle starts, you can group your units according to their roles like all infantry in 1 group, all cavalry in another and so on. This allows you to easily order all of the same unit type to move into tactically advantageous positions befitting their role on the battlefield. You may also group different unit types together according to task, eg. 1 group to distract the enemy from the front, another group to flank them from behind.
Unit Deployment
Before battle starts, you will be allowed to deploy your units anywhere within the yellow boundary (unless your army is ambushed). The enemy is deployed within the red boundary. Some players like to deploy missile/skirmish/javelin troops in front of melee units because they can take full advantage of their superior range before the enemy can engage in melee, then pull back behind melee troops at the last moment for protection. My preference is to put all missile troops behind melee infantry during deployment and keep it that way as this keeps them safe from cavalry charges. But it's just your preference.
Battle Mechanics
How well a unit type can fight other unit types depends on many factors like the general's traits and morale. But the biggest factor is the rock, paper, scissors system.
In general, melee sword/axe infantry easily beat spearmen (except elite and heavily armored spearmen with decent weapon stats), but are less effective against cavalry and too slow to catch missile troops (especially if they are weighed down by heavy armor).
Spearmen have a huge combat bonus against cavalry if they manage to catch them in melee but are too slow to catch them if they are running away. They are particularly useful when flanking cavalry already engaged in melee with other units.
Missile troops including archers, javelinmen and slingers cause decent damage against all unit types at a distance. But they are very weak in a melee fight and cause less damage to heavily armored units. Cavalry have a huge bonus against missile troops and are the only other unit type fast enough to catch them.
All professional troops have an advantage over levy/militia units, which suffer from poor morale and poor stats.
Before battle starts, you can group your units according to their roles like all infantry in 1 group, all cavalry in another and so on. This allows you to easily order all of the same unit type to move into tactically advantageous positions befitting their role on the battlefield. You may also group different unit types together according to task, eg. 1 group to distract the enemy from the front, another group to flank them from behind.
Unit Deployment
Before battle starts, you will be allowed to deploy your units anywhere within the yellow boundary (unless your army is ambushed). The enemy is deployed within the red boundary. Some players like to deploy missile/skirmish/javelin troops in front of melee units because they can take full advantage of their superior range before the enemy can engage in melee, then pull back behind melee troops at the last moment for protection. My preference is to put all missile troops behind melee infantry during deployment and keep it that way as this keeps them safe from cavalry charges. But it's just your preference.
Battle Mechanics
How well a unit type can fight other unit types depends on many factors like the general's traits and morale. But the biggest factor is the rock, paper, scissors system.
In general, melee sword/axe infantry easily beat spearmen (except elite and heavily armored spearmen with decent weapon stats), but are less effective against cavalry and too slow to catch missile troops (especially if they are weighed down by heavy armor).
Spearmen have a huge combat bonus against cavalry if they manage to catch them in melee but are too slow to catch them if they are running away. They are particularly useful when flanking cavalry already engaged in melee with other units.
Missile troops including archers, javelinmen and slingers cause decent damage against all unit types at a distance. But they are very weak in a melee fight and cause less damage to heavily armored units. Cavalry have a huge bonus against missile troops and are the only other unit type fast enough to catch them.
All professional troops have an advantage over levy/militia units, which suffer from poor morale and poor stats.
Siege Battles
Siege battles take place whenever you attack any settlement. Walled settlements (aka provincial capitals) are more well defended than other non-walled settlements within the province. More developed walled settlements also have artillery defenses like ballistas, catapults and scorpions, which make a walled assault very costly.
All settlements (both walled and non-walled) are defended by a garrison in addition to any field armies stationed within them. These and any other armies within reinforcement range will support one another if the settlement is attacked. The garrison will also be stronger if there are any military buildings in the settlement. So make sure you bring along adequate troops of the right quality for a siege attack.
There are 2 ways to take a walled settlement. Either starve the defenders into submission (which usually forces them to sally out to fight you in open battle without the protection of their walls), or recruit siege weapons like ballistas and onagers to level those walls to create breaches.
The 1st option may be time consuming as more developed provincial capitals can hold out sieges for many turns. For the attacking army, there's the risk that enemy reinforcements will arrive to relieve the defenders before the garrison is forced to surrender. You can build siege ladders and rams to attack the garrison sooner rather than wait for them to sally, but your men will likely take many losses from bastion defenses as they approach the walls.
The 2nd option tends to reduce your losses because any defenders still on the wall when it is destroyed will go down with it, which softens up enemy resistance. Later patches have made the AI smart enough not to stay too long on walls that are about to be destroyed. But they do end up too slow sometimes especially when bombarded by multiple siege weapons at the same time. By creating multiple breaches with your siege weapons, your men will be able to attack the defenders from more than one direction to flank them or divide their forces.
However, siege weapons have limited ammo and once used, they serve no further role for the rest of the battle. Precious ammo is also often used to destroy enemy arrow towers. So getting the most you can out of your siege weapons requires smart use of ammo. Against hard-to-hit targets like arrow towers, use standard ammo. While they cause less damage than fire ammo, they are more accurate. Fire ammo are ideal for destroying easily hit targets like walls and scorpion towers as they cause more damage to such targets but have an accuracy penalty (not that it matters if the target is big enough). Explosive ammo are ideal against enemy units but also suffer from poor accuracy. They are most useful against bunched up enemy units. You can increase your ammo or siege weapon damage by researching the right techs.
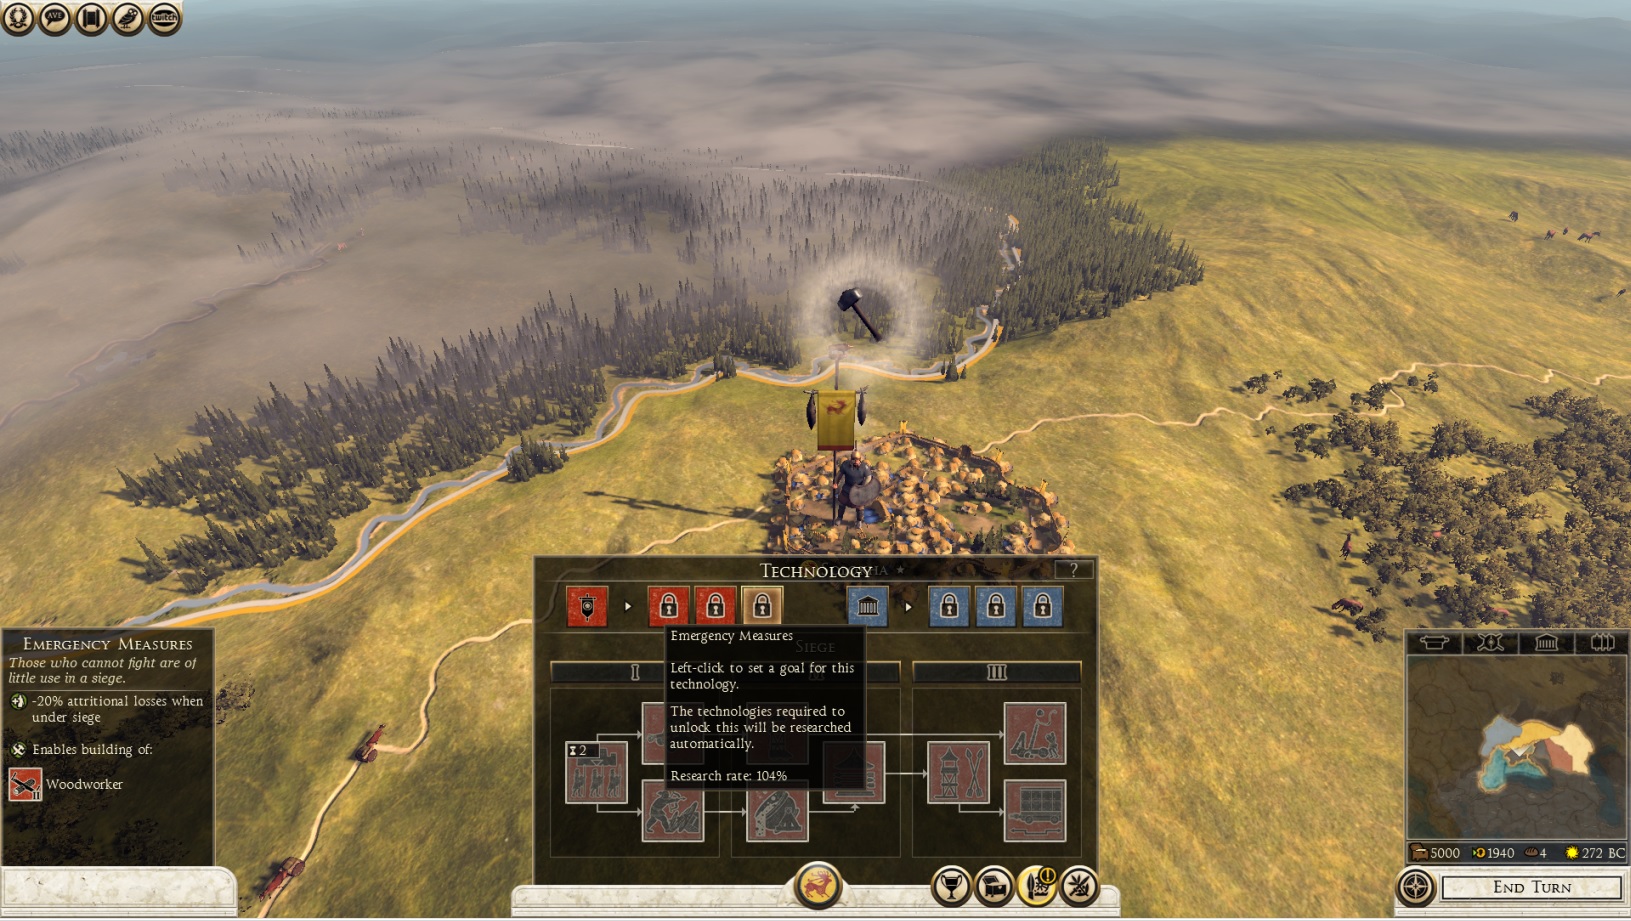
Ballistas are your first level siege weapons and can be recruited early in the game. Just click on the third branch of the military tech tree and select the very first tech as shown below. The names may be different for different factions, but they are essentially the same. Heavy onagers (not available for some barbarian factions) can be accessed further down the same tech tree and are the ultimate wall destroyers. But ballistas are still useful late game against enemy units.
All settlements (both walled and non-walled) are defended by a garrison in addition to any field armies stationed within them. These and any other armies within reinforcement range will support one another if the settlement is attacked. The garrison will also be stronger if there are any military buildings in the settlement. So make sure you bring along adequate troops of the right quality for a siege attack.
There are 2 ways to take a walled settlement. Either starve the defenders into submission (which usually forces them to sally out to fight you in open battle without the protection of their walls), or recruit siege weapons like ballistas and onagers to level those walls to create breaches.
The 1st option may be time consuming as more developed provincial capitals can hold out sieges for many turns. For the attacking army, there's the risk that enemy reinforcements will arrive to relieve the defenders before the garrison is forced to surrender. You can build siege ladders and rams to attack the garrison sooner rather than wait for them to sally, but your men will likely take many losses from bastion defenses as they approach the walls.
The 2nd option tends to reduce your losses because any defenders still on the wall when it is destroyed will go down with it, which softens up enemy resistance. Later patches have made the AI smart enough not to stay too long on walls that are about to be destroyed. But they do end up too slow sometimes especially when bombarded by multiple siege weapons at the same time. By creating multiple breaches with your siege weapons, your men will be able to attack the defenders from more than one direction to flank them or divide their forces.
However, siege weapons have limited ammo and once used, they serve no further role for the rest of the battle. Precious ammo is also often used to destroy enemy arrow towers. So getting the most you can out of your siege weapons requires smart use of ammo. Against hard-to-hit targets like arrow towers, use standard ammo. While they cause less damage than fire ammo, they are more accurate. Fire ammo are ideal for destroying easily hit targets like walls and scorpion towers as they cause more damage to such targets but have an accuracy penalty (not that it matters if the target is big enough). Explosive ammo are ideal against enemy units but also suffer from poor accuracy. They are most useful against bunched up enemy units. You can increase your ammo or siege weapon damage by researching the right techs.
Ballistas are your first level siege weapons and can be recruited early in the game. Just click on the third branch of the military tech tree and select the very first tech as shown below. The names may be different for different factions, but they are essentially the same. Heavy onagers (not available for some barbarian factions) can be accessed further down the same tech tree and are the ultimate wall destroyers. But ballistas are still useful late game against enemy units.
Politics
The political system in R2 is quite meaningless imo but I'll still cover it here for completeness. Every faction has multiple families/political groups vying for power. For Rome, there are 4 political groups including your own that share power in the senate. For other factions, there are only 2 groups, your own and the tribal council. But otherwise, the political system works the same way.
The % numbers you see are your family's influence level in the senate compared to other political groups. By clicking on the politics button at the top of the political screen, you can see the research, income and public order bonuses you're enjoying due to your influence level. Early in the game, it is highly desirable to keep a high infleunce level (70% or more) as you will get better bonuses than if your influence was low. But later in the game when you have a large empire, you want to keep your influence below 70% to prevent civil war. In a civil war, the generals from other families and their armies will turn against you. This brings me to the next part on gravitas.
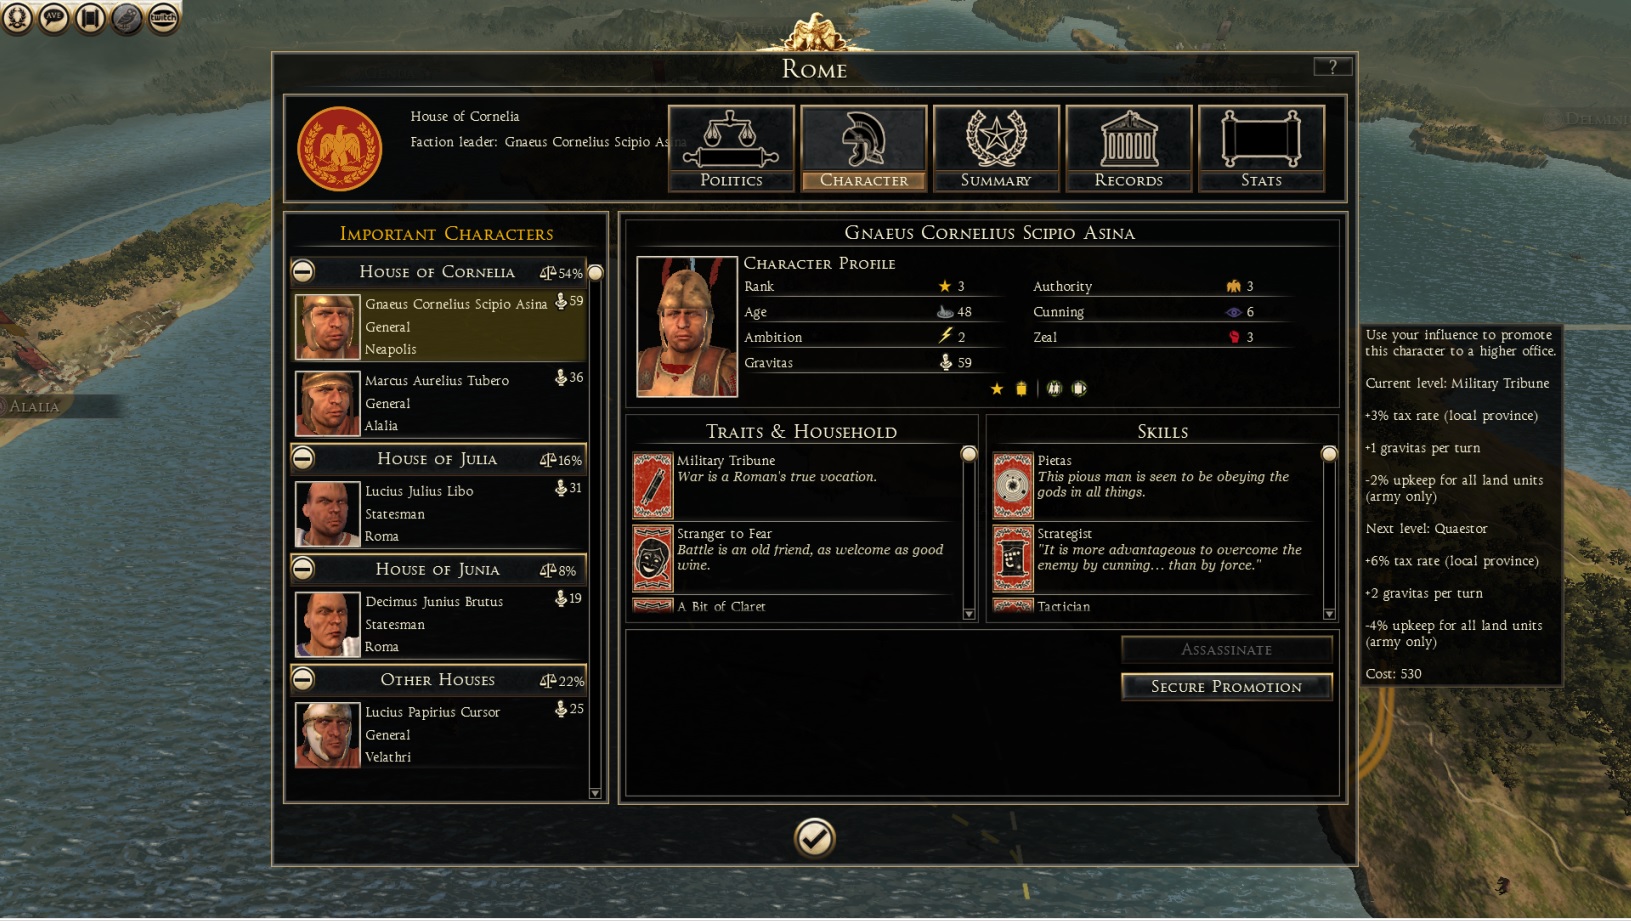
Gravitas refers to the little statue icon next to each statesman's/general's name. These can be increased through victories in battle and promotions of generals. Only generals from your family can be promoted, other families will automatically promote their own generals. The higher the promotion (rank) of your general, the greater the tax bonus and upkeep savings you will enjoy. Gravitas slowly increases your family influence over time as long as your family's total gravitas outweighs that of other political groups. Your generals can lose gravitas through event decisions you make. If you attempt assasinations or seek to discredit generals from other families, these will cost you influence.
You can promote generals by clicking on the promote button as shown below.
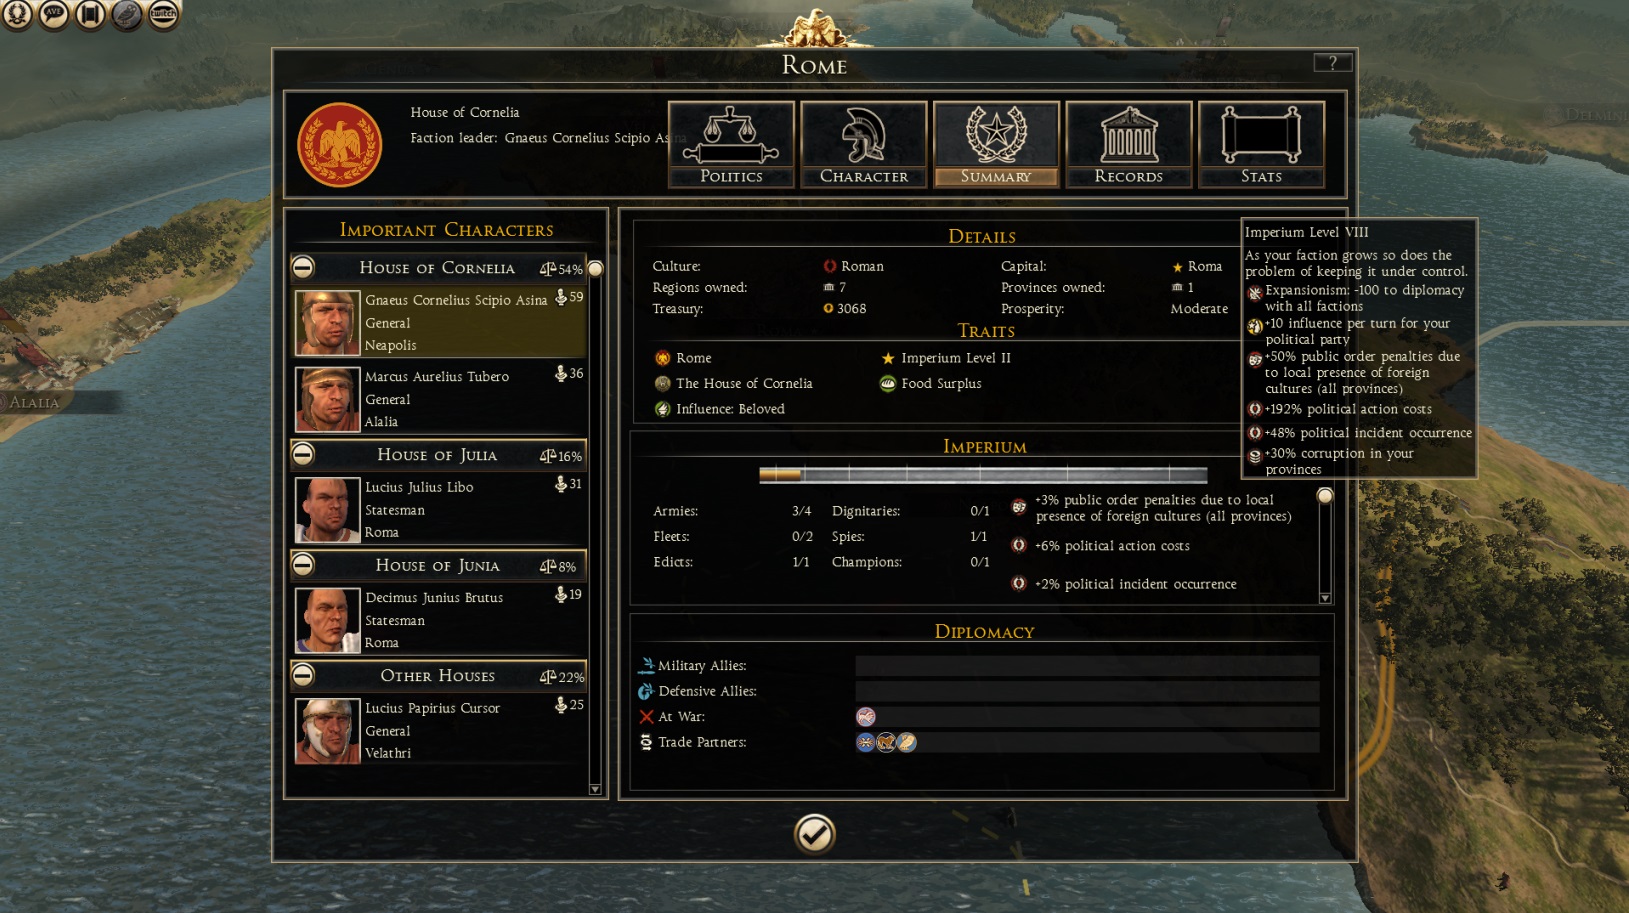
As you conquer more settlements, your imperium will increase, but so will the penalties of managing a larger empire as shown by the imperium bar below. You will never have a civil war below imperium level 5. But from imperium 5 onwards, there's a chance of civil war if your family influence is more than 70%. That's when you may want to consider assassinating generals with too high an influence in your family. Ah, the ugly side of politics.
It is possible to avoid civil war for the entire campaign if you keep your influence down after imperium 5. But you also won't want too low an influence as that reduces your bonuses as mentioned earlier.
The % numbers you see are your family's influence level in the senate compared to other political groups. By clicking on the politics button at the top of the political screen, you can see the research, income and public order bonuses you're enjoying due to your influence level. Early in the game, it is highly desirable to keep a high infleunce level (70% or more) as you will get better bonuses than if your influence was low. But later in the game when you have a large empire, you want to keep your influence below 70% to prevent civil war. In a civil war, the generals from other families and their armies will turn against you. This brings me to the next part on gravitas.
Gravitas refers to the little statue icon next to each statesman's/general's name. These can be increased through victories in battle and promotions of generals. Only generals from your family can be promoted, other families will automatically promote their own generals. The higher the promotion (rank) of your general, the greater the tax bonus and upkeep savings you will enjoy. Gravitas slowly increases your family influence over time as long as your family's total gravitas outweighs that of other political groups. Your generals can lose gravitas through event decisions you make. If you attempt assasinations or seek to discredit generals from other families, these will cost you influence.
You can promote generals by clicking on the promote button as shown below.
As you conquer more settlements, your imperium will increase, but so will the penalties of managing a larger empire as shown by the imperium bar below. You will never have a civil war below imperium level 5. But from imperium 5 onwards, there's a chance of civil war if your family influence is more than 70%. That's when you may want to consider assassinating generals with too high an influence in your family. Ah, the ugly side of politics.
It is possible to avoid civil war for the entire campaign if you keep your influence down after imperium 5. But you also won't want too low an influence as that reduces your bonuses as mentioned earlier.
More Total War: ROME II - Emperor Edition guides
- The Noob's Guide To: Taking A City Without Going Into "Total War"★ 5 (758)57k views667 ♥4 minUpdated Aug 15, 2021
- Rome 2: Formations (unit control tips)★ 5 (1k)49k views1.5k ♥5 minUpdated Sep 21, 2013
- ROME 2... EMPEROR EDITION. Easy public order and money income guide★ 5 (1.4k)47k views2.9k ♥33 minUpdated Feb 1, 2019
- A Comprehensive Guide to the Power & Politics System★ 5 (575)45k views1.1k ♥13 minUpdated Jul 5, 2018
- The one and only mod list for Rome II★ 5 (649)44k views1.6k ♥7 minUpdated Oct 19, 2023
- Late Republic and Principate Army Composition (Historical)★ 5 (729)30k views1.3k ♥25 min


This guide was created by its original author on the Steam Community. Are you the author and want it removed? Request removal.