Dishonored 2 Ultimate Achievement Guide (All Achievements Explained)
Overview
NOTE: NO ATTEMPT TO CONCEAL SPOILERS WERE MADE, READ AT YOUR OWN RISK.
Unmissable
These achievements are unmissable upon completion of your first playthrough
 Imperial Seal
 Jewel of the South
 The Beast Within
 Labyrinth Mind
 A Night in 1849
 Spirit Thief
 Down with the Duke
No Kill/Detect & Flesh and Steel
 Flesh and Steel "Complete the game without supernatural powers."
To Complete: Simply refuse the outsider's mark after the first mission. That playthrough will have no powers.
 Ghostly "Finish an entire mission without being spotted."
To Complete: Complete a mission without being spotted. Being spotted counts as a guards detection meter turning completely red.
 Shadow "Finish the game without being spotted."
To Complete: Complete all missions without being spotted. Check mission summary at end of each mission for any detections, if any restart the level or load a save. Being spotted counts as a guards detection meter turning red.
 Alternative Approach "Finish an entire mission with no casualties."
To Complete: Complete a mission without killing an enemy. Animals such as fish, wolfhounds, and bloodflies do not count as kills. Bloodfly Nest Keepers are counted as kills however.
 Clean Hands "Complete the game without killing anyone."
To Complete: Complete each mission without killing. This includes doing all nonlethal takedowns. Note: On Dust District mission, delivering Paolo Or Vice overseer Byrne, knocked out to one of the other does not count as a kill, but there is a nonlethal way to take out both of them.
Multiple Play-through achievements
 The Empress
 "Finish the game with Emily Kaldwin."
 he Royal Protector
 "Finish the game with Corvo Attano."
 In Good Conscience
 "Complete the game in low chaos."
 Empire in Chaos
 "Complete the game in high chaos."
 The Greatest Gift
 "Saved your last known family member."
To Complete: this Achievement is unmissable in low chaos, but can be missed in high chaos. To obtain in high chaos, simply interact with whoever was encased in stone before interacting with the throne.
 Years Ago, Another Time
 "Heard Meagan Foster's story."
To Complete: In low chaos, Meagan will tell you her story after the 8th mission and before the final mission. However on High chaos, she will not talk to you, and you must pickpocket her and unlock the room in the central part of the dreadful whale. (The room beside the whiteboard with newspaper clippings)
Souvenirs Achievement
This Achievement must be obtained over multiple levels.
 Souvenirs "Collect all the decorative objects for the Dreadful Wale."
You should receive the achievement upon collecting the final souvenir doll, if not, you have forgotten a souvenir.
Well Funded Achievement
 Well Funded
"Find 60% of all available loot"
This achievement requires you to be vigilant in searching for coins, looking in every cabinet and room, and picking up every item is recommended.
This achievement is helped greatly with Dark Vision and it's upgrade, which will allow you to see coins through walls and cabinets.
It is also recommended that you collect every blueprint, painting and rob every black market shop to increase your total earnings, this will not be enough for the achievement, but are easy sources of large amounts of money.
If you maintain an average of 60% or more throughout the game, this achievement should trigger around the end of Mission 7 Crack in the slab, or beginning of Mission 8 The Grand Duke.
Note: Spoilers ahead... Mission 7 Crack in the Slab, has a deceptive amount of hidden loot. The optimal route to obtaining all loot is to collect everything in the past first, then use the timepiece to find loot in the present. After completing both, then go into Aramis Stiltons backyard area, collect whatever loot you can find there in the past and present, and knock out Aramis Stilton. When you return inside the house in the present, the house will no longer be ruined, and Stilton will have a new office and new loot throughout the house. Once the house is fully looted, return to the outside courtyard where Stilton is unconscious. Killing him will change the house yet again, as now it will be owned by a new wealthy aristocrat, again travel throughout the house and collect all loot you can. Then proceed on with the story mission behind the locked combination door.
Royal Spymaster Achievement
 Royal Spymaster "Peruse all journals and audiographs by Meagan Foster and Anton Sokolov aboard the Dreadful Wale."
This achievment requires you to read all notes, journals, and audiographs by Foster and Sokolov, you do not need to read every single peice of literature on the boat inbetween each mission. Just the ones written by Foster/Sokolov.
Below is a list of required document to read/listen to:
After Mission 1 and beginning of Mission 2/3- (NOTE) Limited Resources - On door next to crossbow
- (NOTE) Trying to fix Secondary Engine - In the engine room, around the corner of the stairs
- (NOTE) Sokolov's Notes: Bloodfly Study - On top of crate in Sokolov's room
- (JOURNAL) Anton Sokolov's Investigation Notes - On Sokolov's bed
- (JOURNAL) Dreadful Wale Accounting - On bedside table next to bed at top of stairs
- (AUDIOGRAPH) Anton Sokolov's Abduction - On table in Sokolov's room
After Mission 2/3 and beginning of Mission 4
- (JOURNAL) Meagan Foster's Notebook - On bedside table next to bed at top of stairs
- (AUDIOGRAPH) Anton Sokolov's Abduction - On table in Sokolov's room
After Mission 4 and beginning of Mission 5
- (NOTE) Trip to the Market - On desk in main briefing room near the kitchen door
- (JOURNAL) Anton Sokolov's Diary, Painting Again - Next to painting of Delilah, near Sokolov
- (JOURNAL) Meagan Foster's Notebook - On the bed at top of stairs
After Mission 5 and beginning of Mission 6/7
- (NOTE) Note from Meagan to Sokolov - Enter the door on the left when coming up from the engine room, on table near toilet
- (JOURNAL) Anton Sokolov's Diary, Gears of Time - On Sokolov's bed
- (AUDIOGRAPH) Searching for Aramis Stilton - On table at top of stairs next to the bed
After Mission 6/7 and beginning of Mission 8
- (AUDIOGRAPH) Losing Deidre - On bedside table next to bed at top of stairs
- (AUDIOGRAPH) Decisions - On floor in Sokolov's room
After Mission 8 and beginning of Mission 9
- (NOTE) Note to Billie Lurk - On bedside table next to bed at top of stairs
- (JOURNAL) Meagan Foster's Notebook - In the locked room in the briefing room after Meagan gives you the key/you pickpocket the key
- (AUDIOGRAPH) Daud on Delilah - In the locked room with the previous journal
- (AUDIOGRAPH) Life on Sea - On floor outside of Sokolov's room
Art Collector Achievement
 Art Collector
"Acquire all collectible paintings."
There is a total of 27 paintings, Below is a list of each one, and then a picture/ description of its location.
MISSION 1: A Long Day in Dunwall
1 Curtis, Morgan And The Postulate Child
2 The Obtuse Arguments Of Lady Boyle
MISSION 2: Edge of the World
3 High Overseer Thaddeus Campbell
4 The Outsider In Conditional Dreams
5 The Vice Overseer’s Predicate Logic
6 Hypatia’s Protective Gaze
MISSION 3: The Good Doctor
7 Duke Abele’s Propositional State
8 I Regard Her, Within and Without
9 Anton Sokolov In Subtractive Light
MISSION 4: The Clockwork Mansion
10 Ramsey's Stochastic Eyes
11 The Spymaster’s Axis Of Asymmetry
12 Jindosh Considers An Odd Numerator
13 Light Along The Inverse Curve
14 I Look Upon The Craftsman
15 The Blood Topology Of Grim Alex
MISSION 5: The Royal Conservatory
16 Her Heart, I Bathed In Poison
17 My Fires Burn Within Breanna’s Marrow
18 Ashworth Within An Existential Graph
MISSION 6: Dust District
19 Paolo and the Inaccessible Cardinal
20 Vera Moray And The Affix Of Her Skin
21 Indiscrete Time Finds Aramis Stilton
MISSION 7: A Crack in the Slab
22 The Commutative Rats And The Weeper
23 The Torturer’s Quaternionic Groan
MISSION 8: The Grand Palace
24 Daud and The Parabola of Lost Seasons
25 My Name On Their Lips
26 Her Face Is My Smile
MISSION 9: Death to the Empress
27 Lucia, His Eyes Upon Me
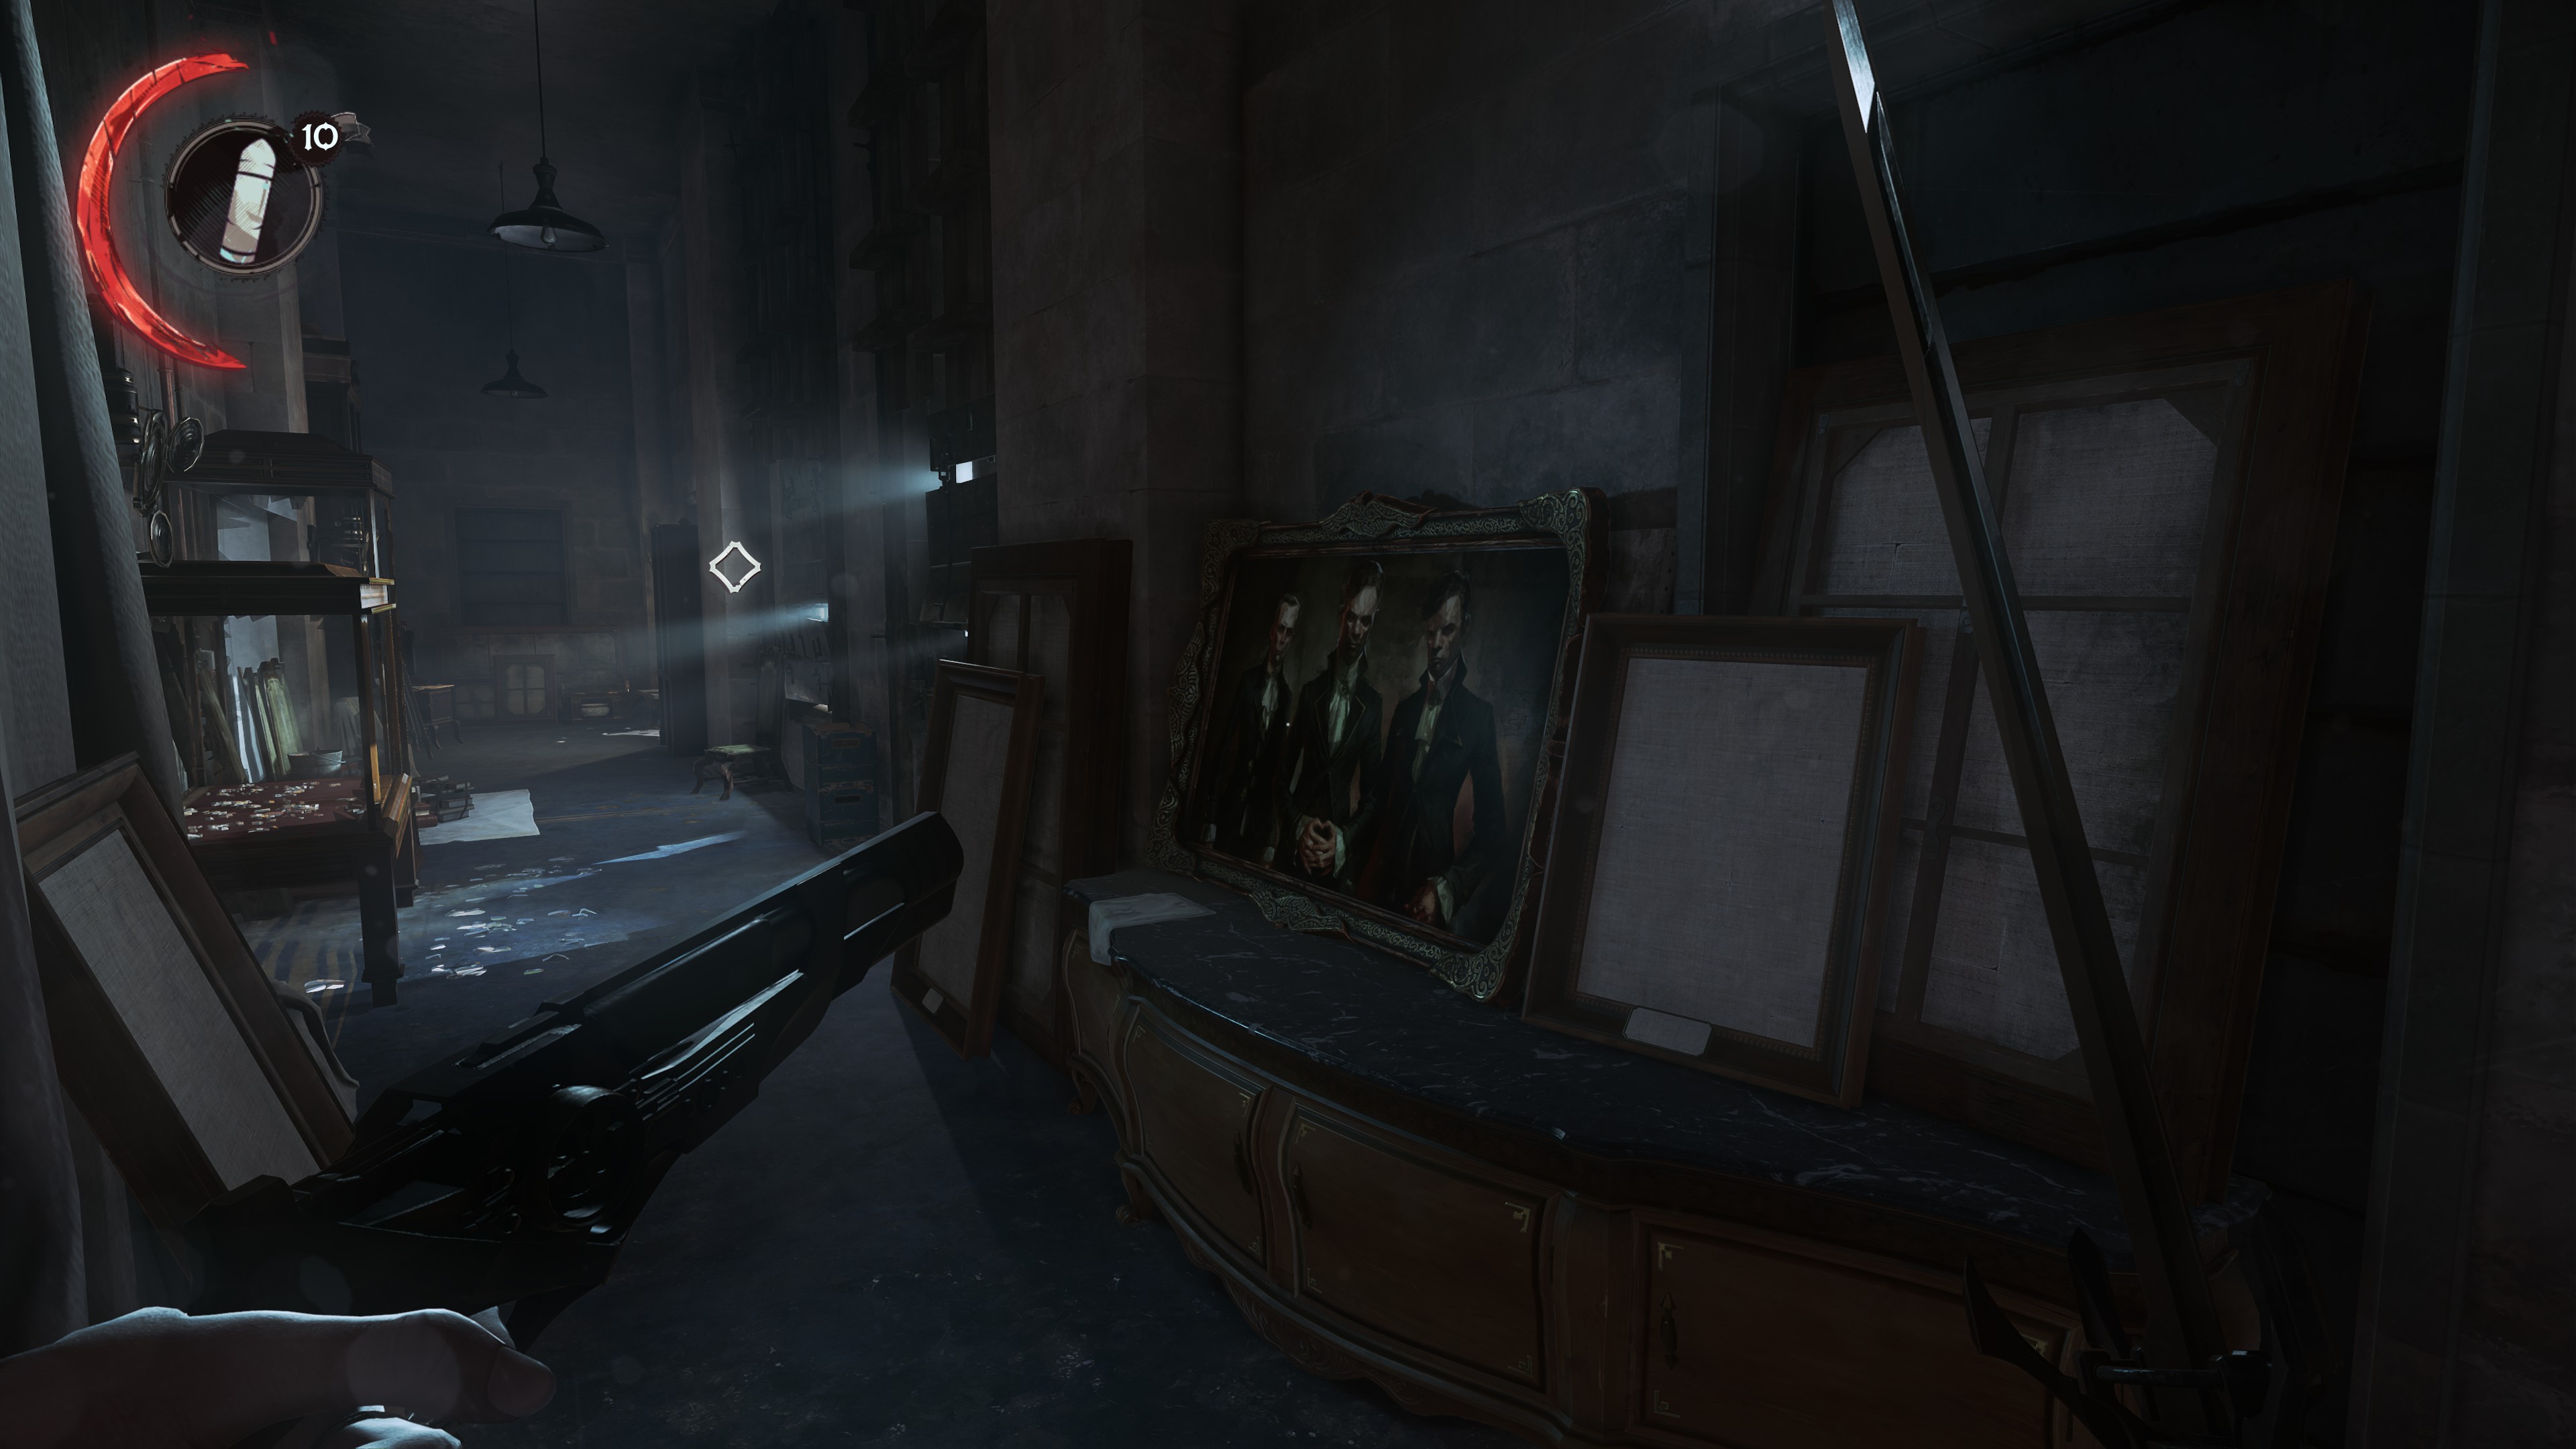 Curtis, Morgan And The Postulate Child
 Outside of the Imperial Safe Room
ㅤ
ㅤ
ㅤ
ㅤ
2)
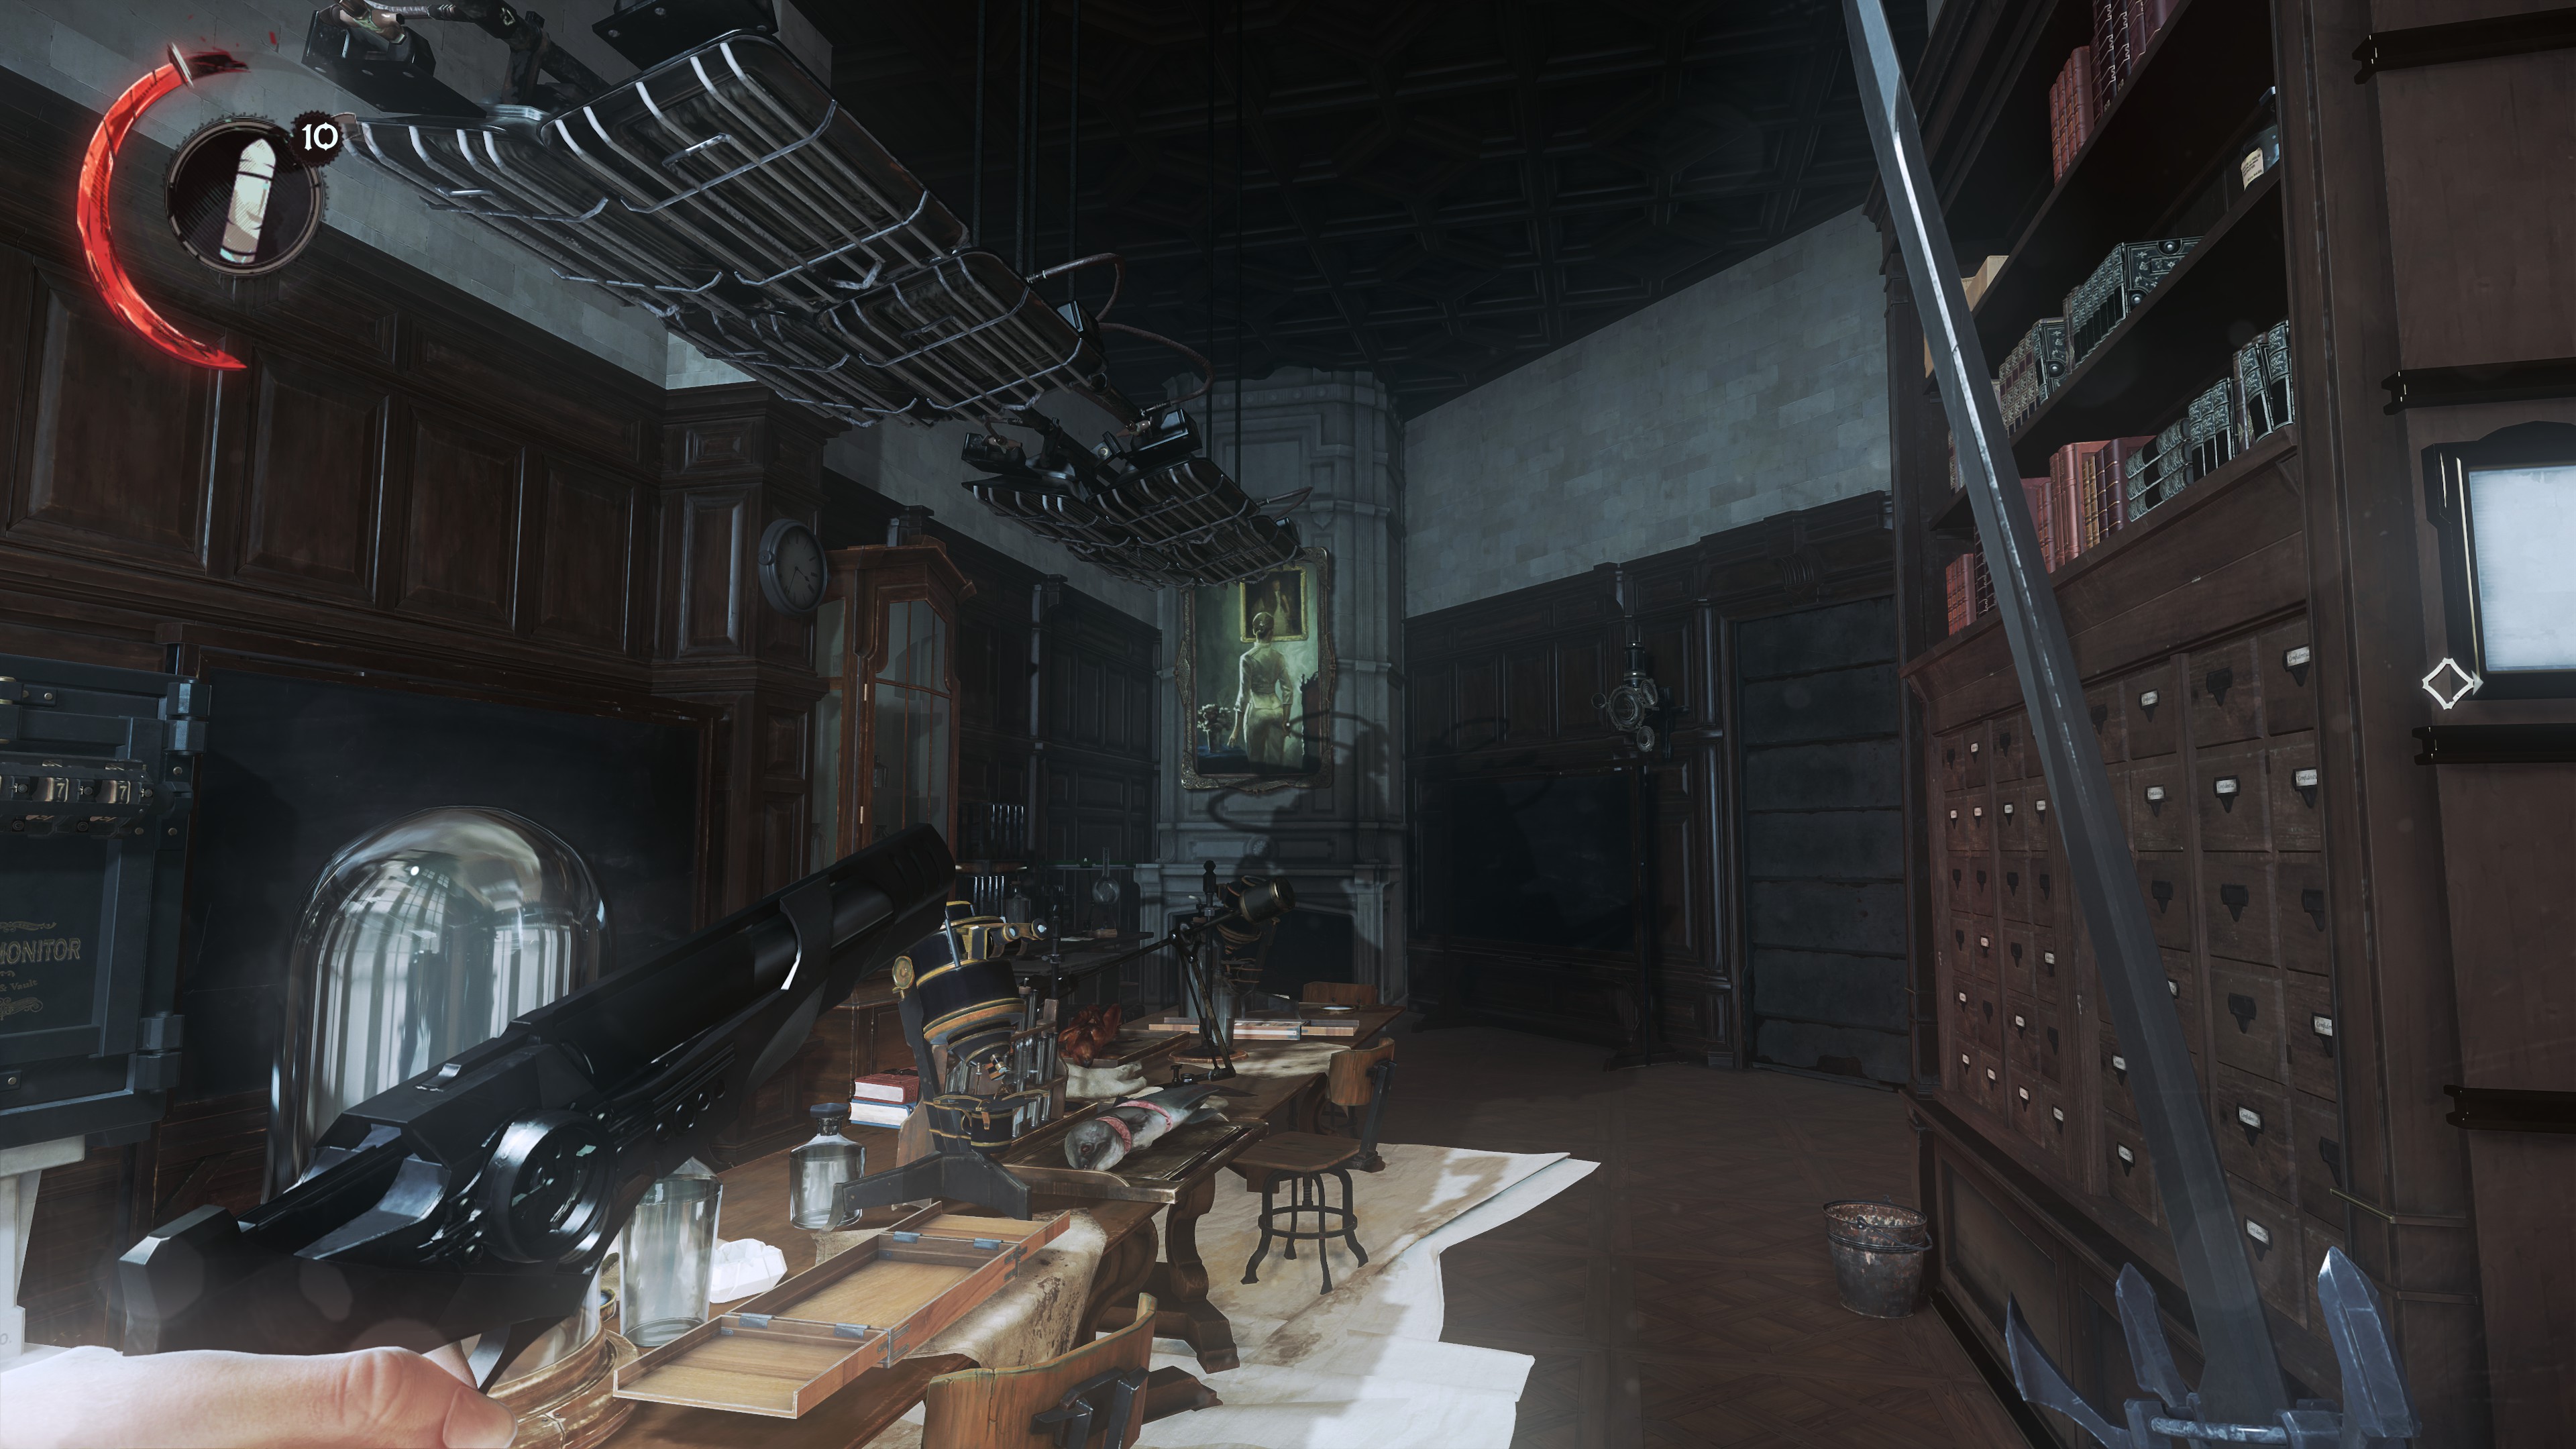 The Obtuse Arguments Of Lady Boyle
 In Dr.Galvani's Lab, directly next to Dunwall Tower, first floor entrance
ㅤ
ㅤ
ㅤ
ㅤ
3)
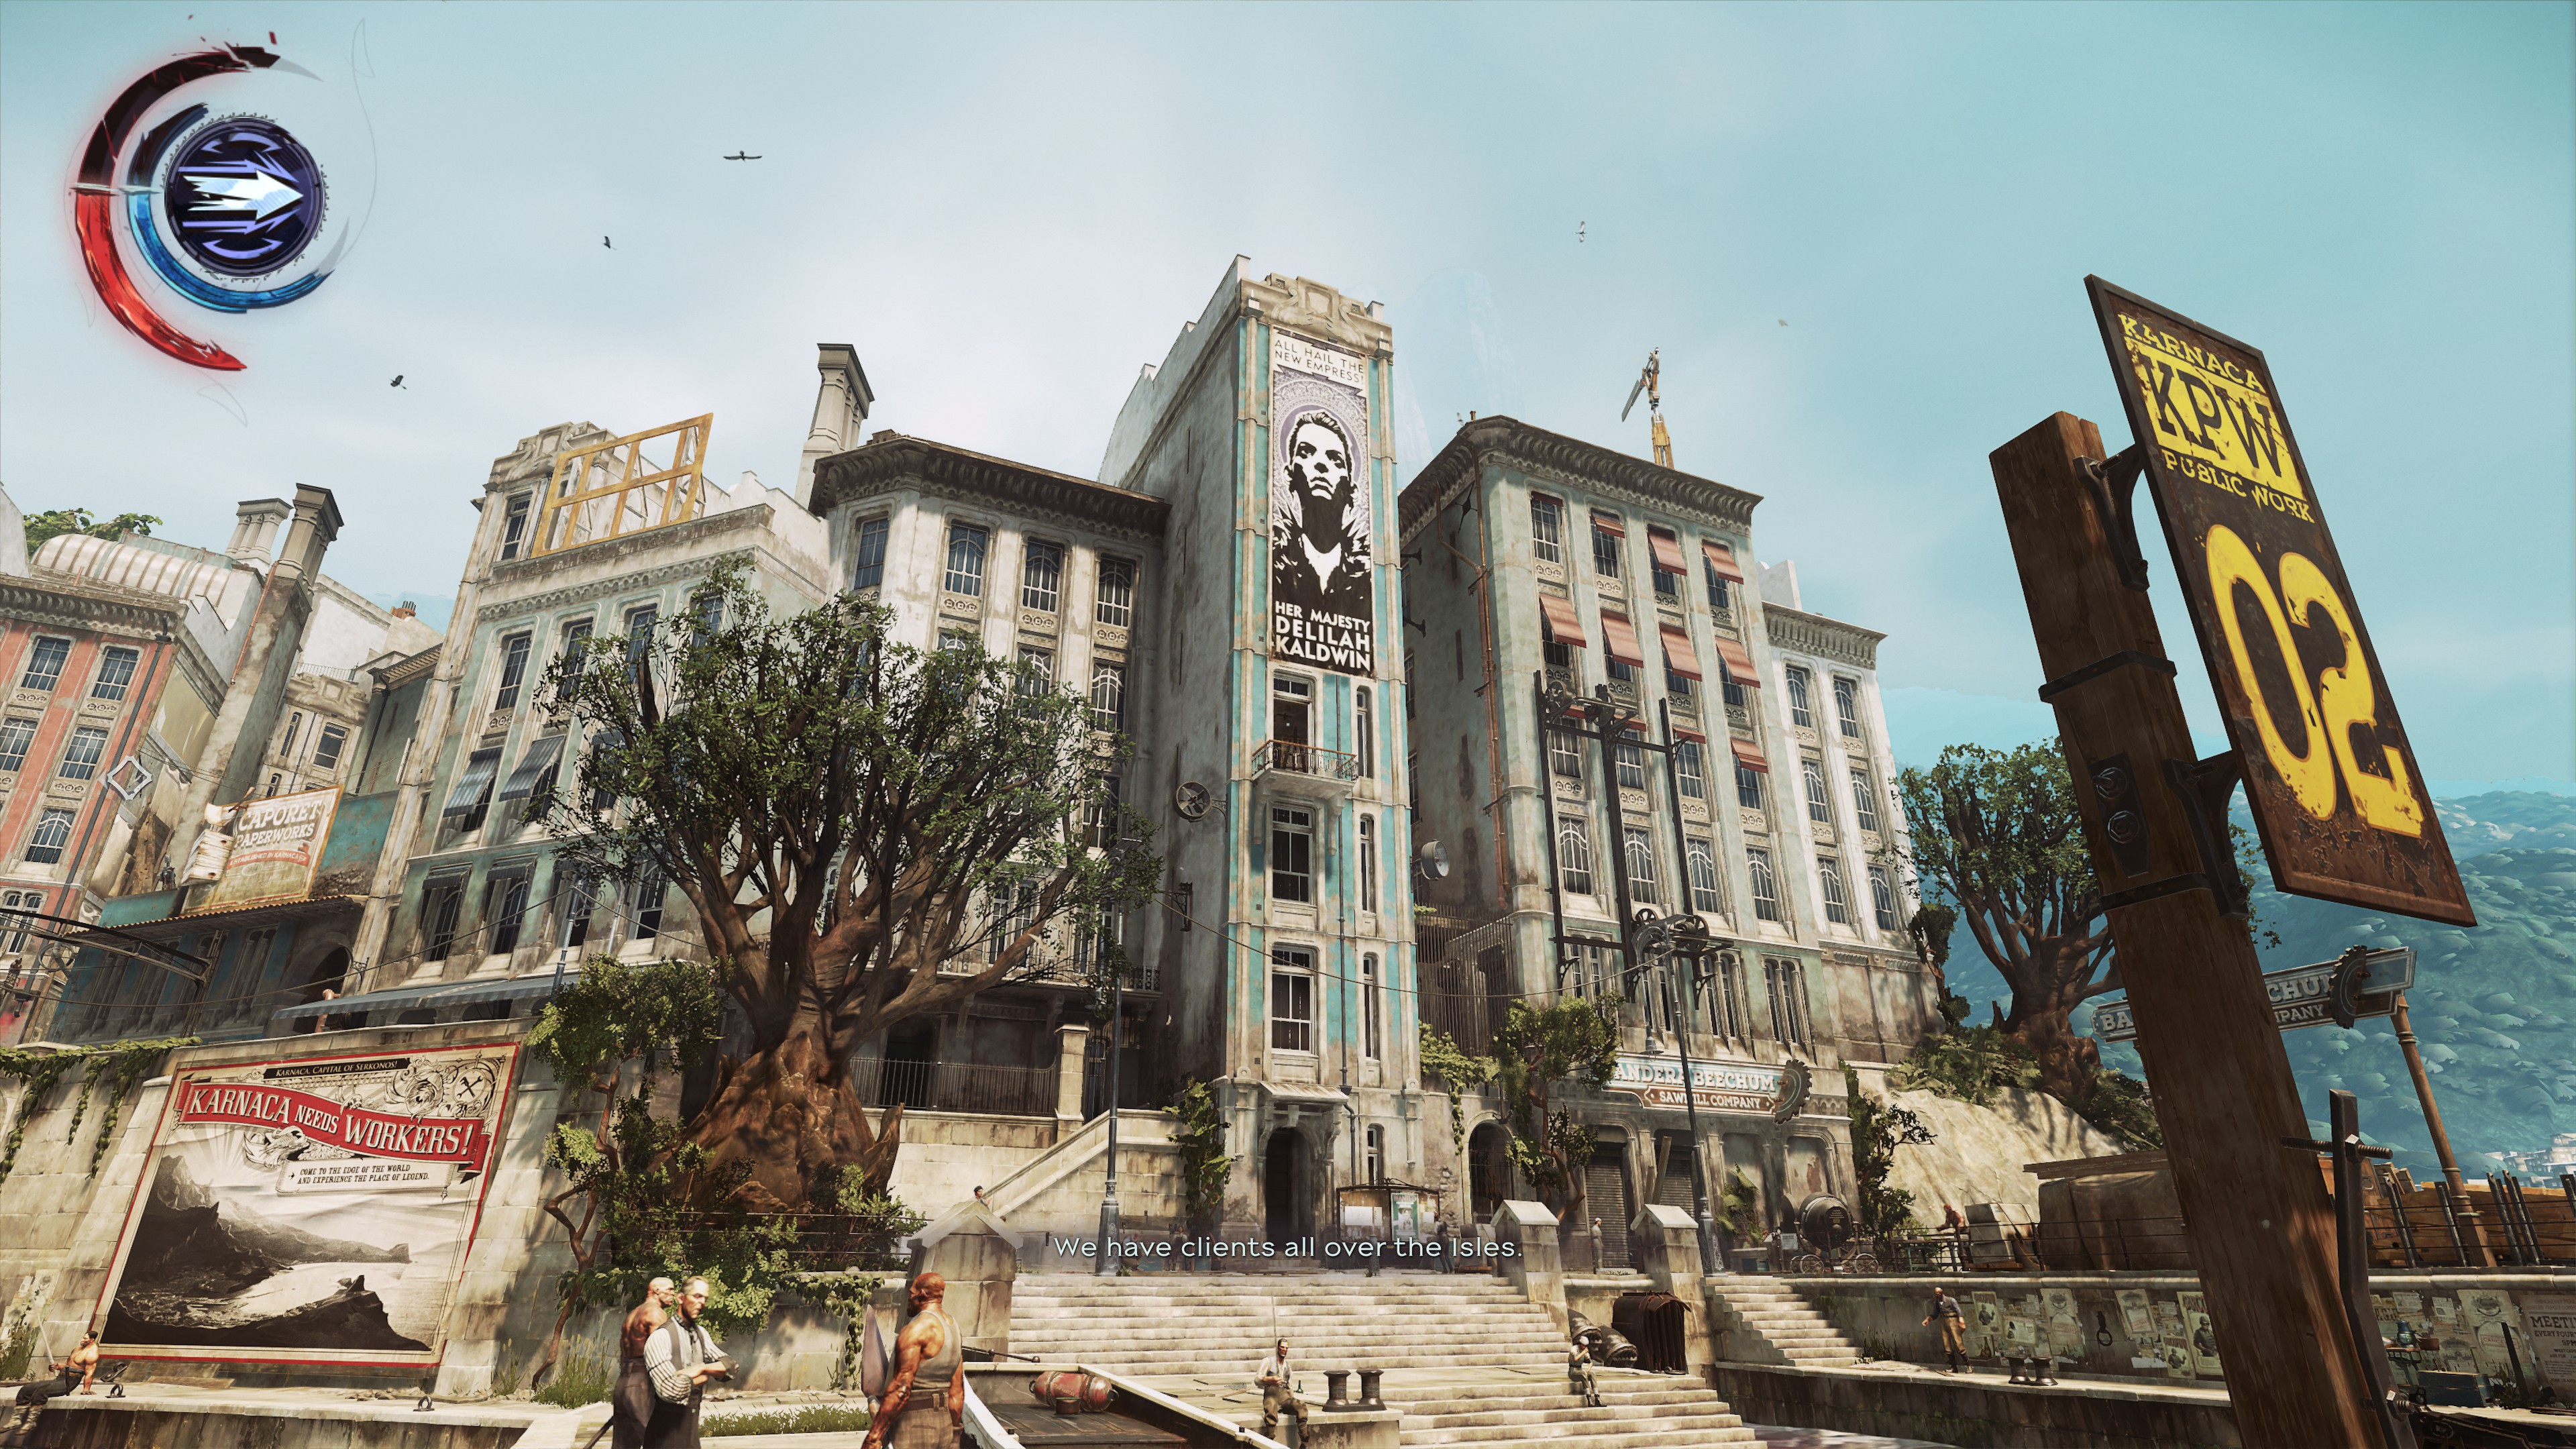 High Overseer Thaddeus Campbell
 Go through the top door thats underneath the delilah poster and Cambell's portrait is inside
ㅤ
ㅤ
ㅤ
ㅤ
4
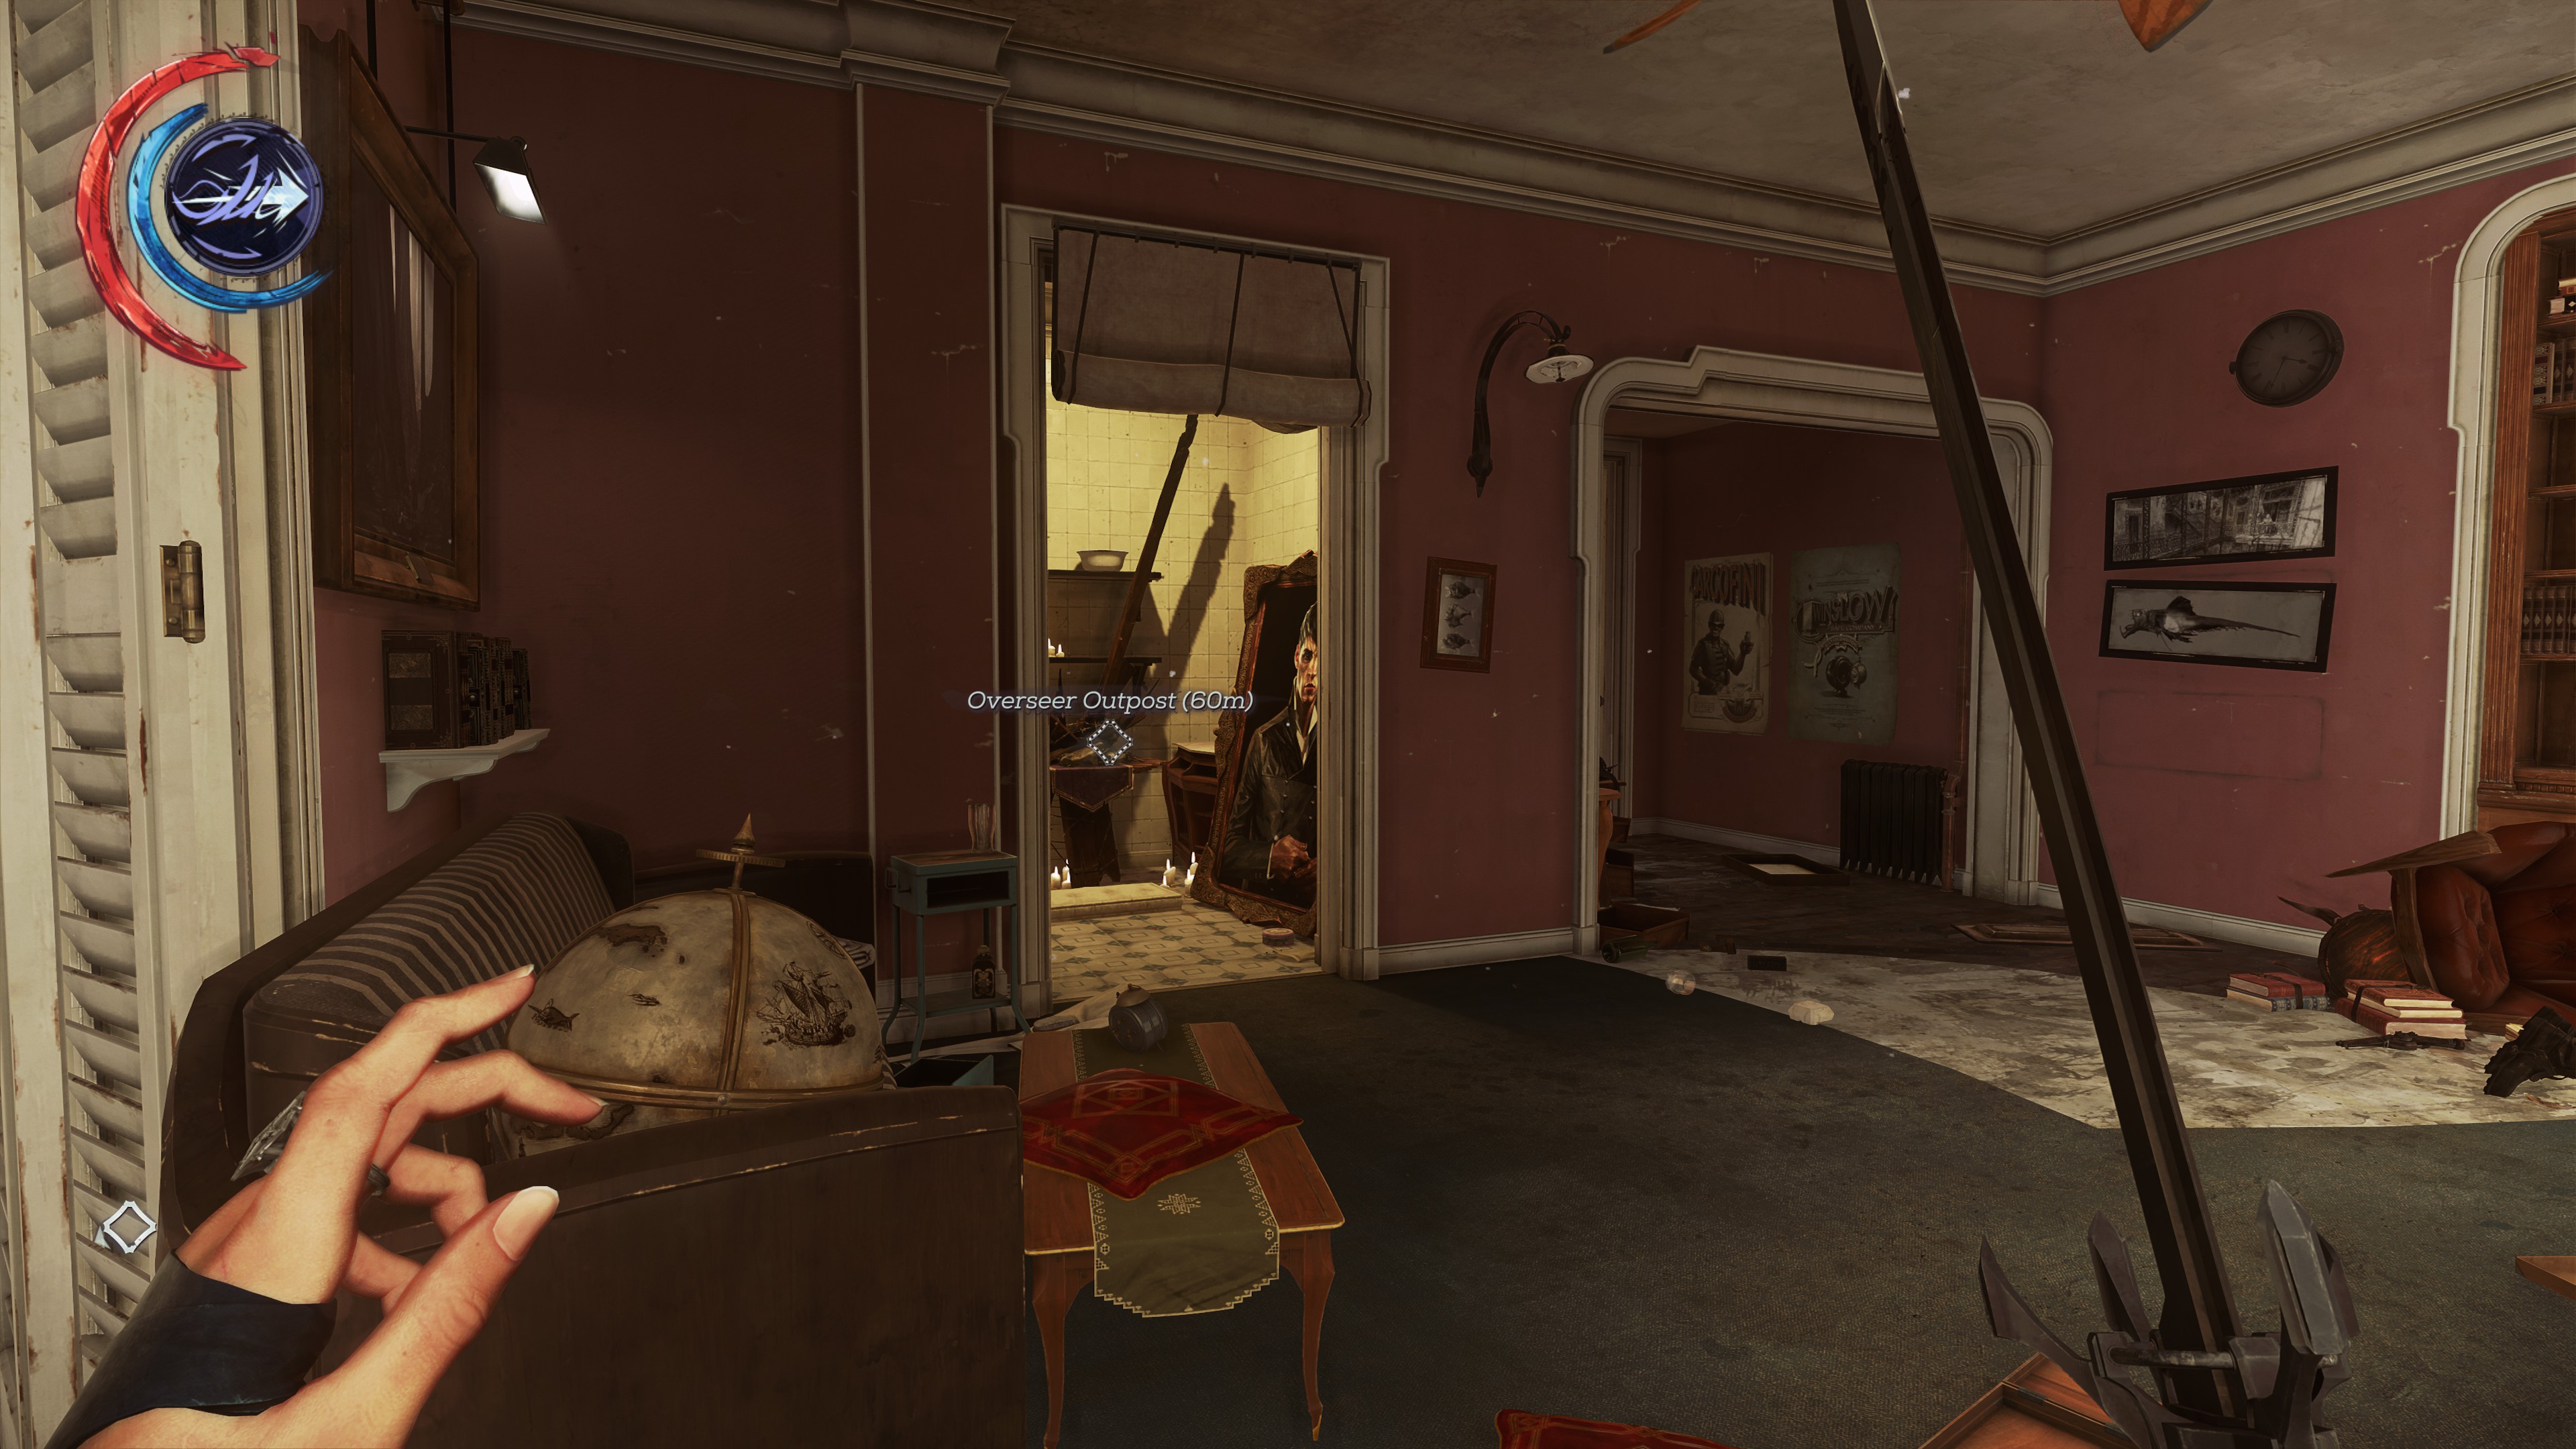 The Outsider In Conditional Dreams
 In the heretics house across from the overseer base (Overseer shrine is in this spot)
ㅤ
ㅤ
ㅤ
ㅤ
5
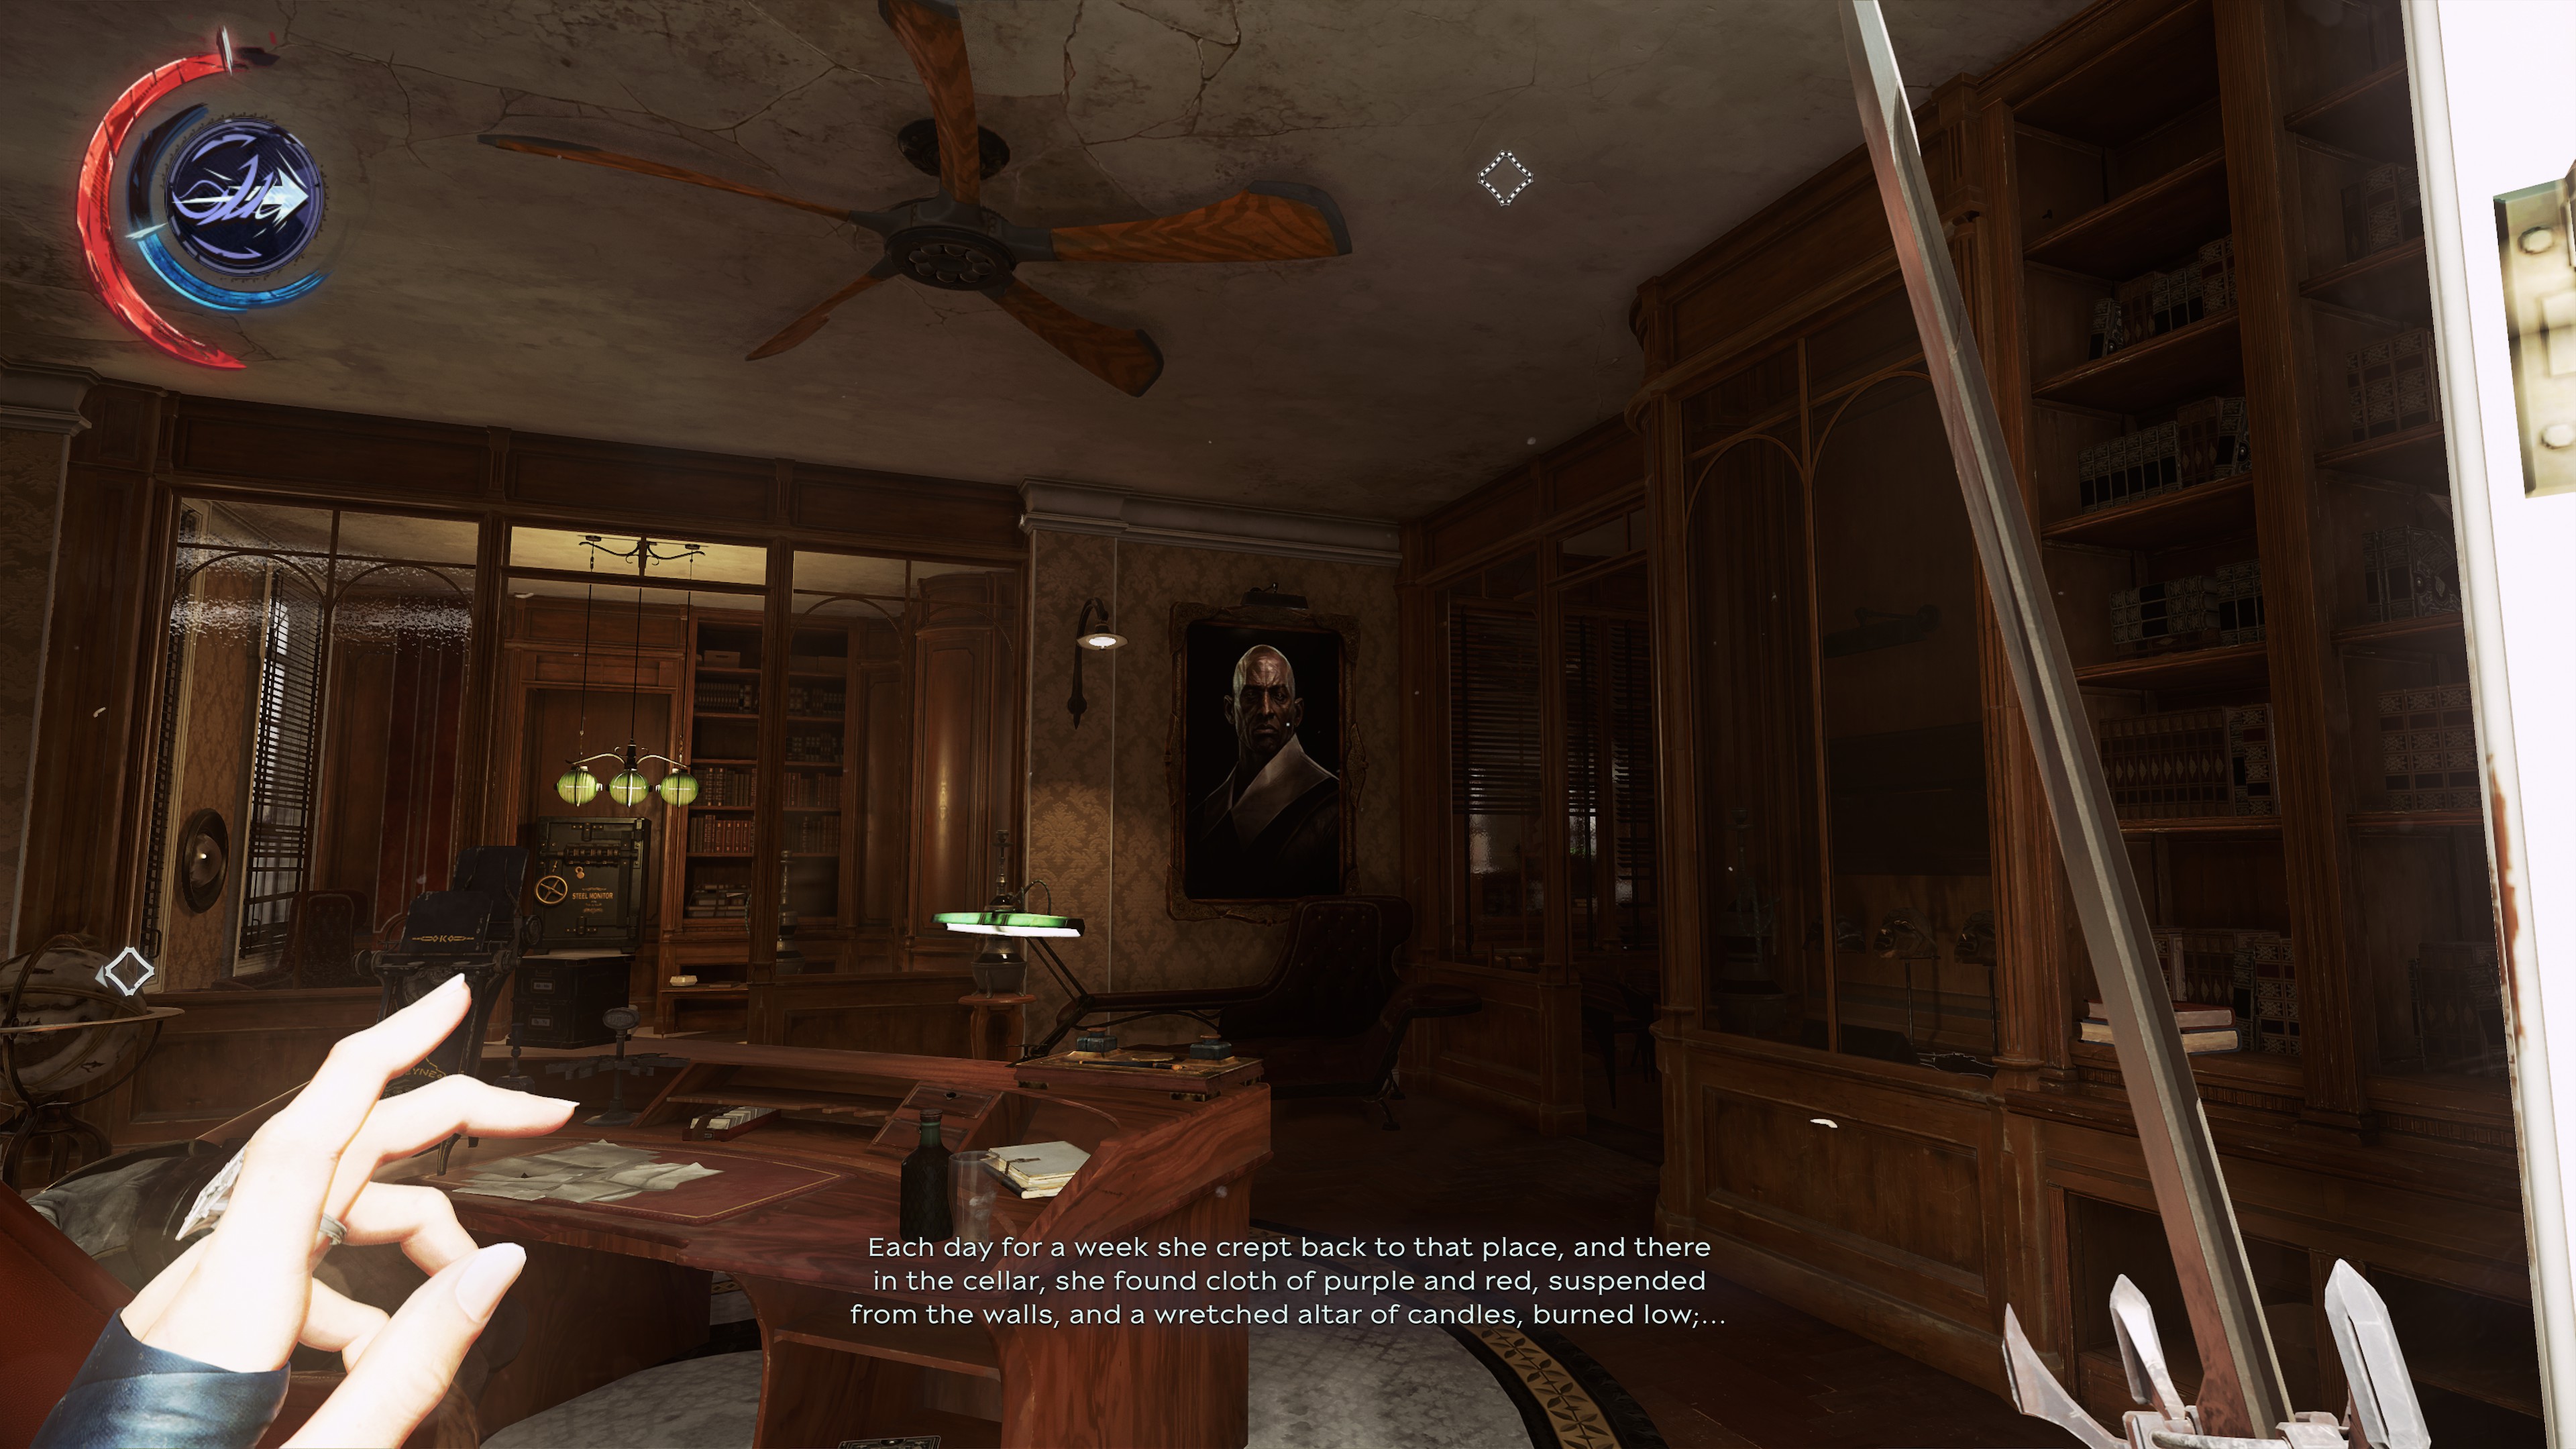 The Vice Overseer’s Predicate Logic
 In the Overseer base
ㅤ
ㅤ
ㅤ
ㅤ
6
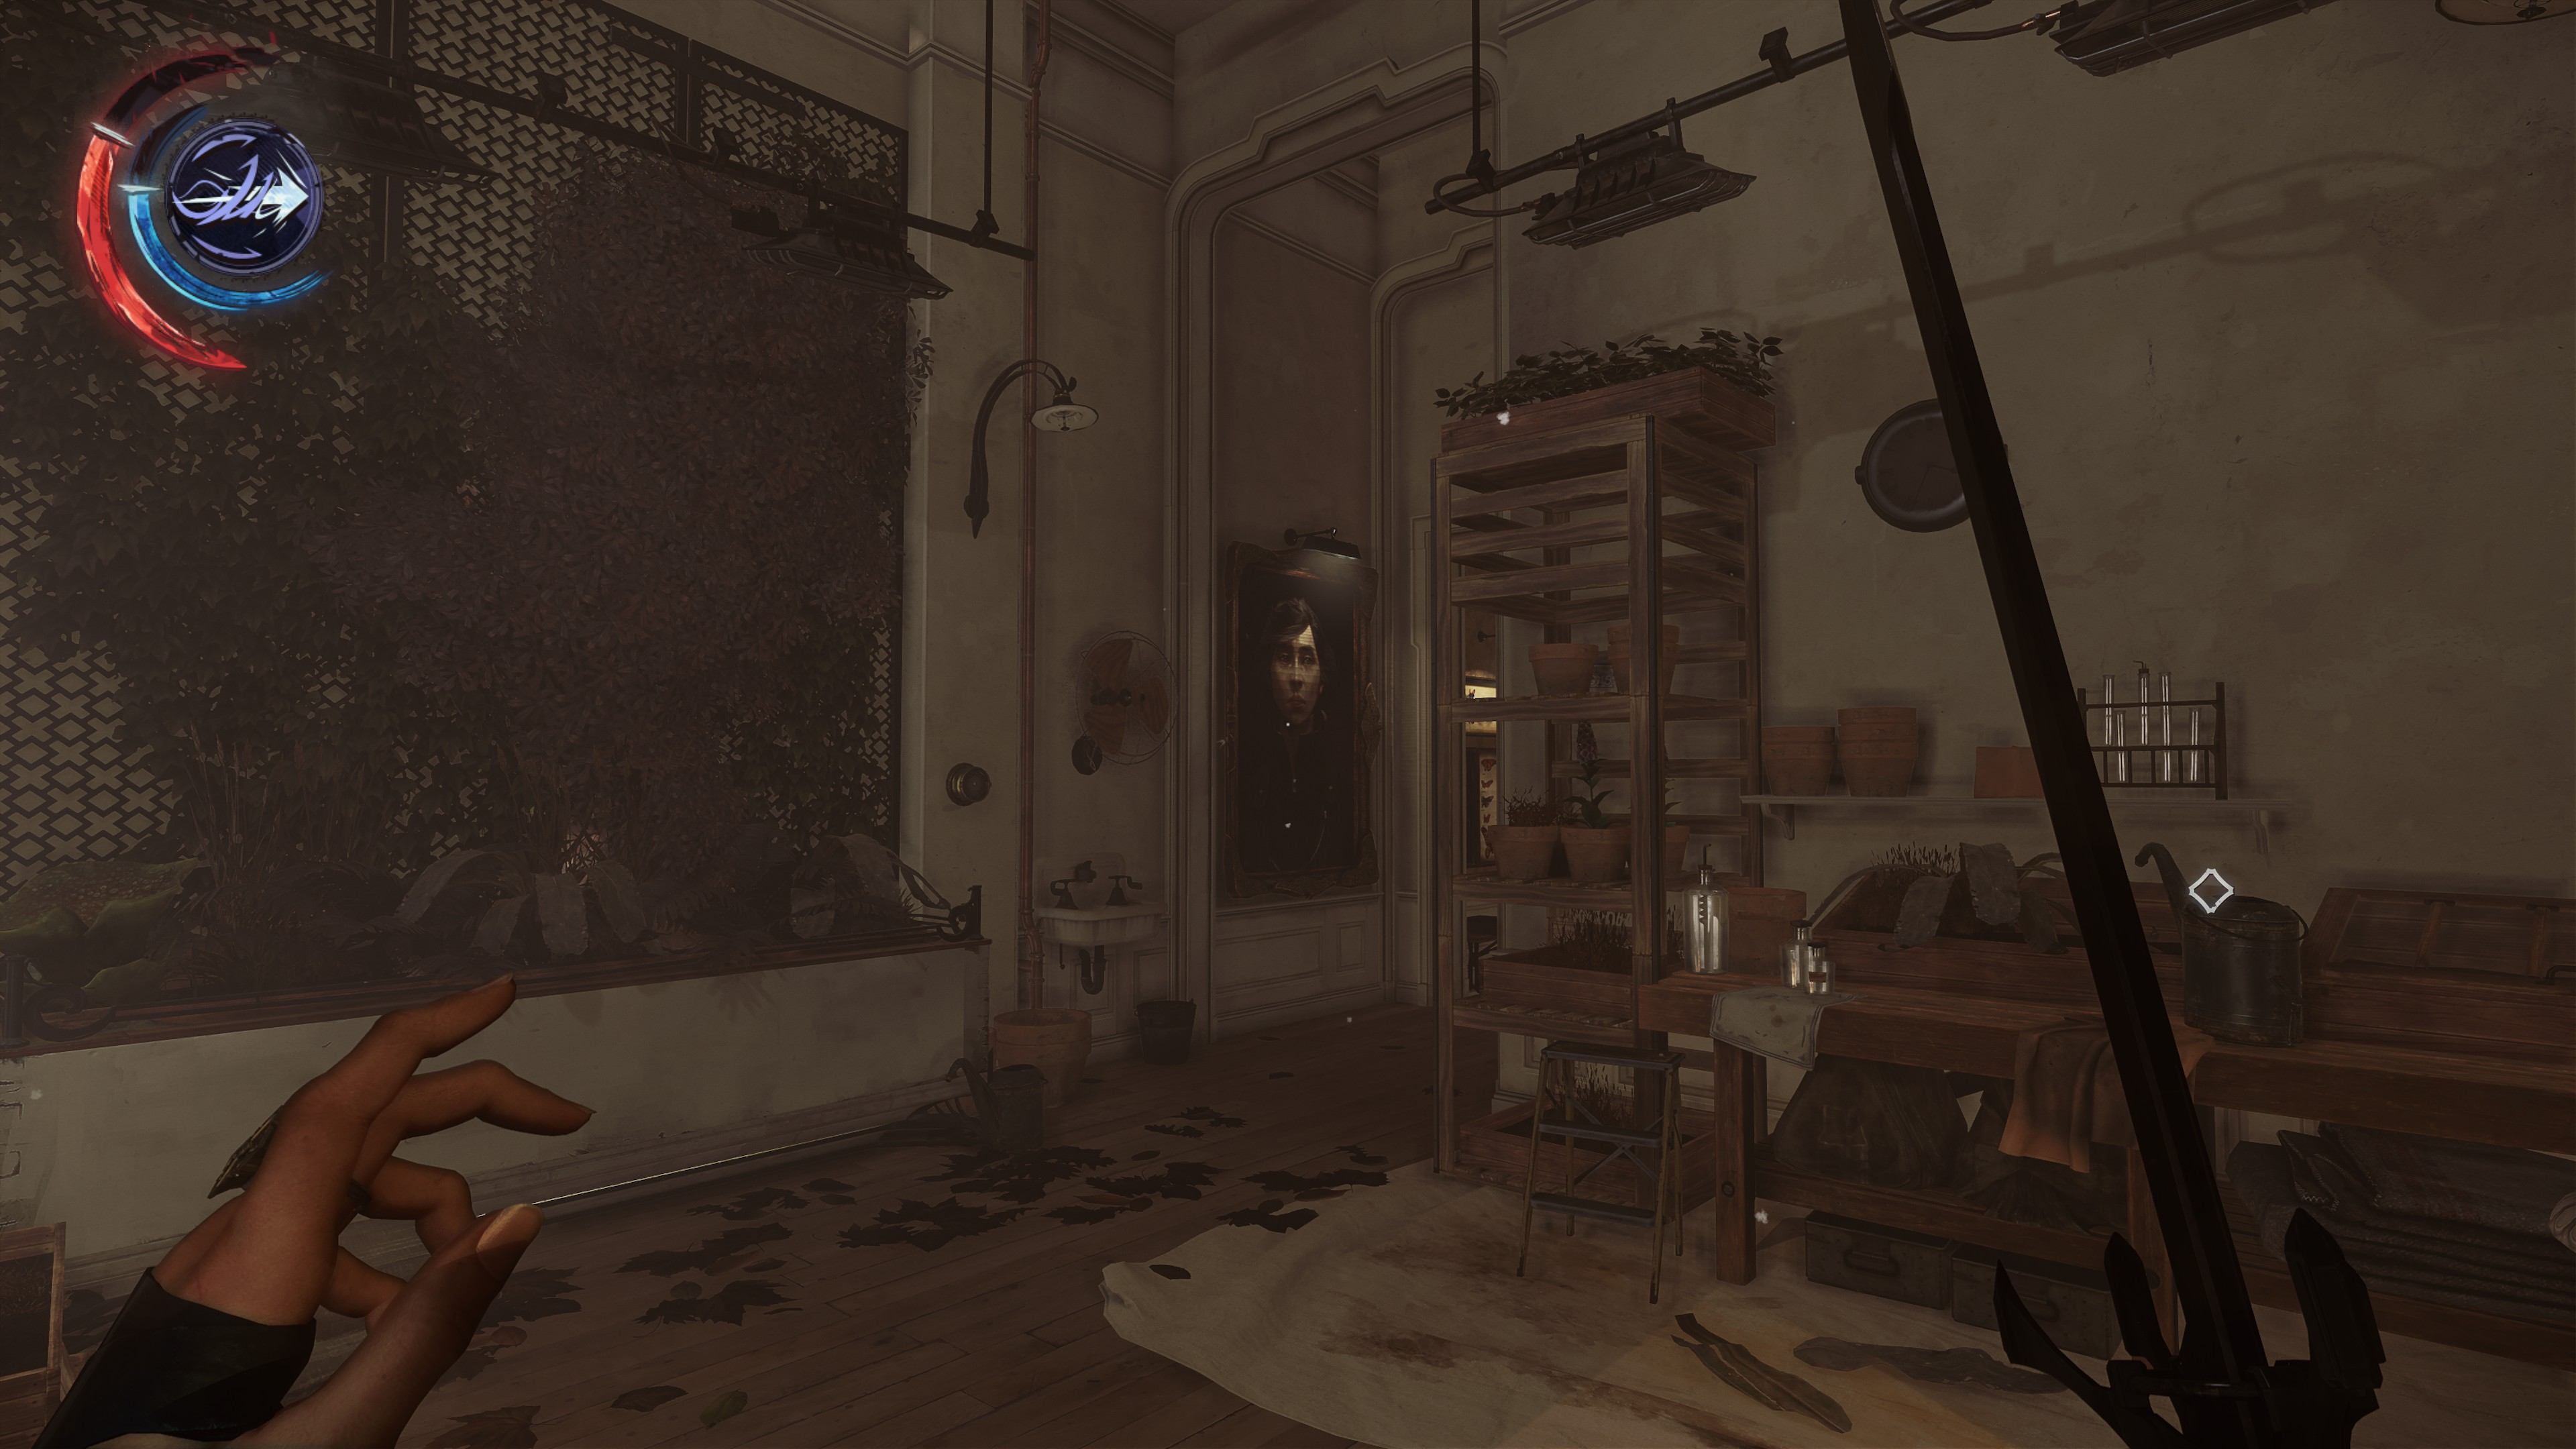 Hypatia’s Protective Gaze
 In Hypatia's apartment, directly across from the Addermire station
ㅤ
ㅤ
ㅤ
ㅤ
7
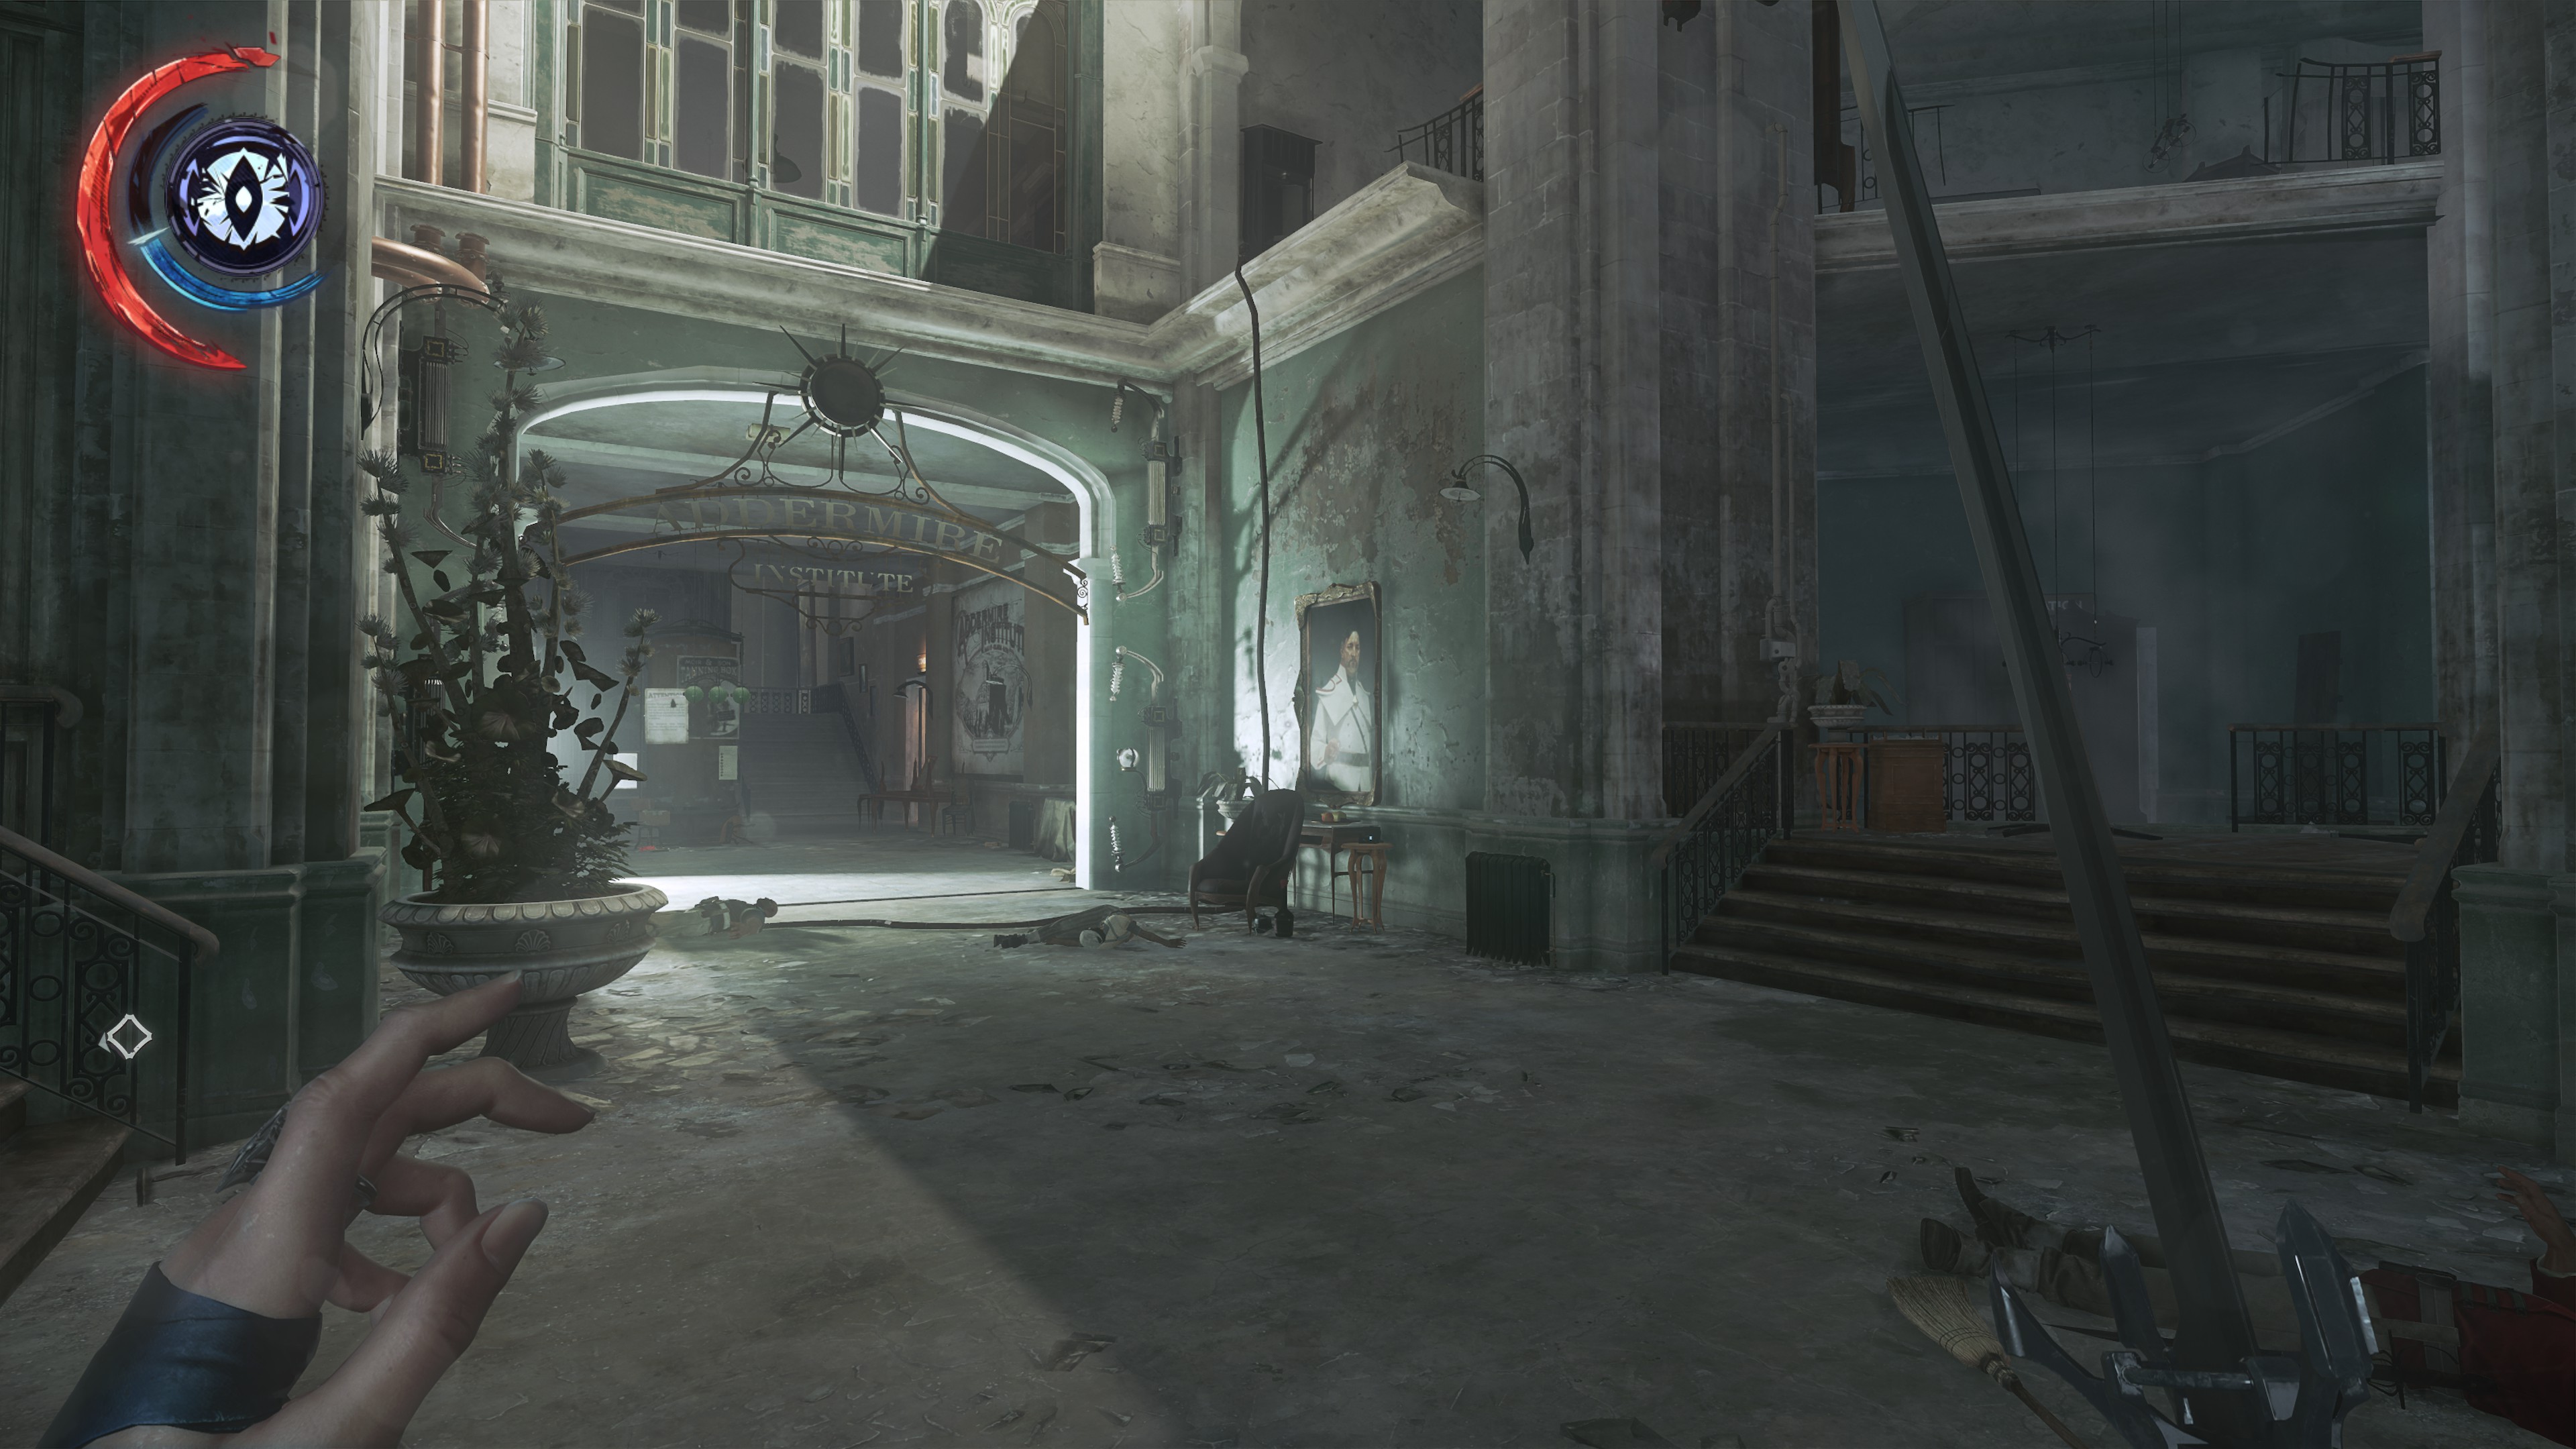 Duke Abele’s Propositional State
Next to the wall of light in the foyer/lobby
ㅤ
ㅤ
ㅤ
ㅤ
8
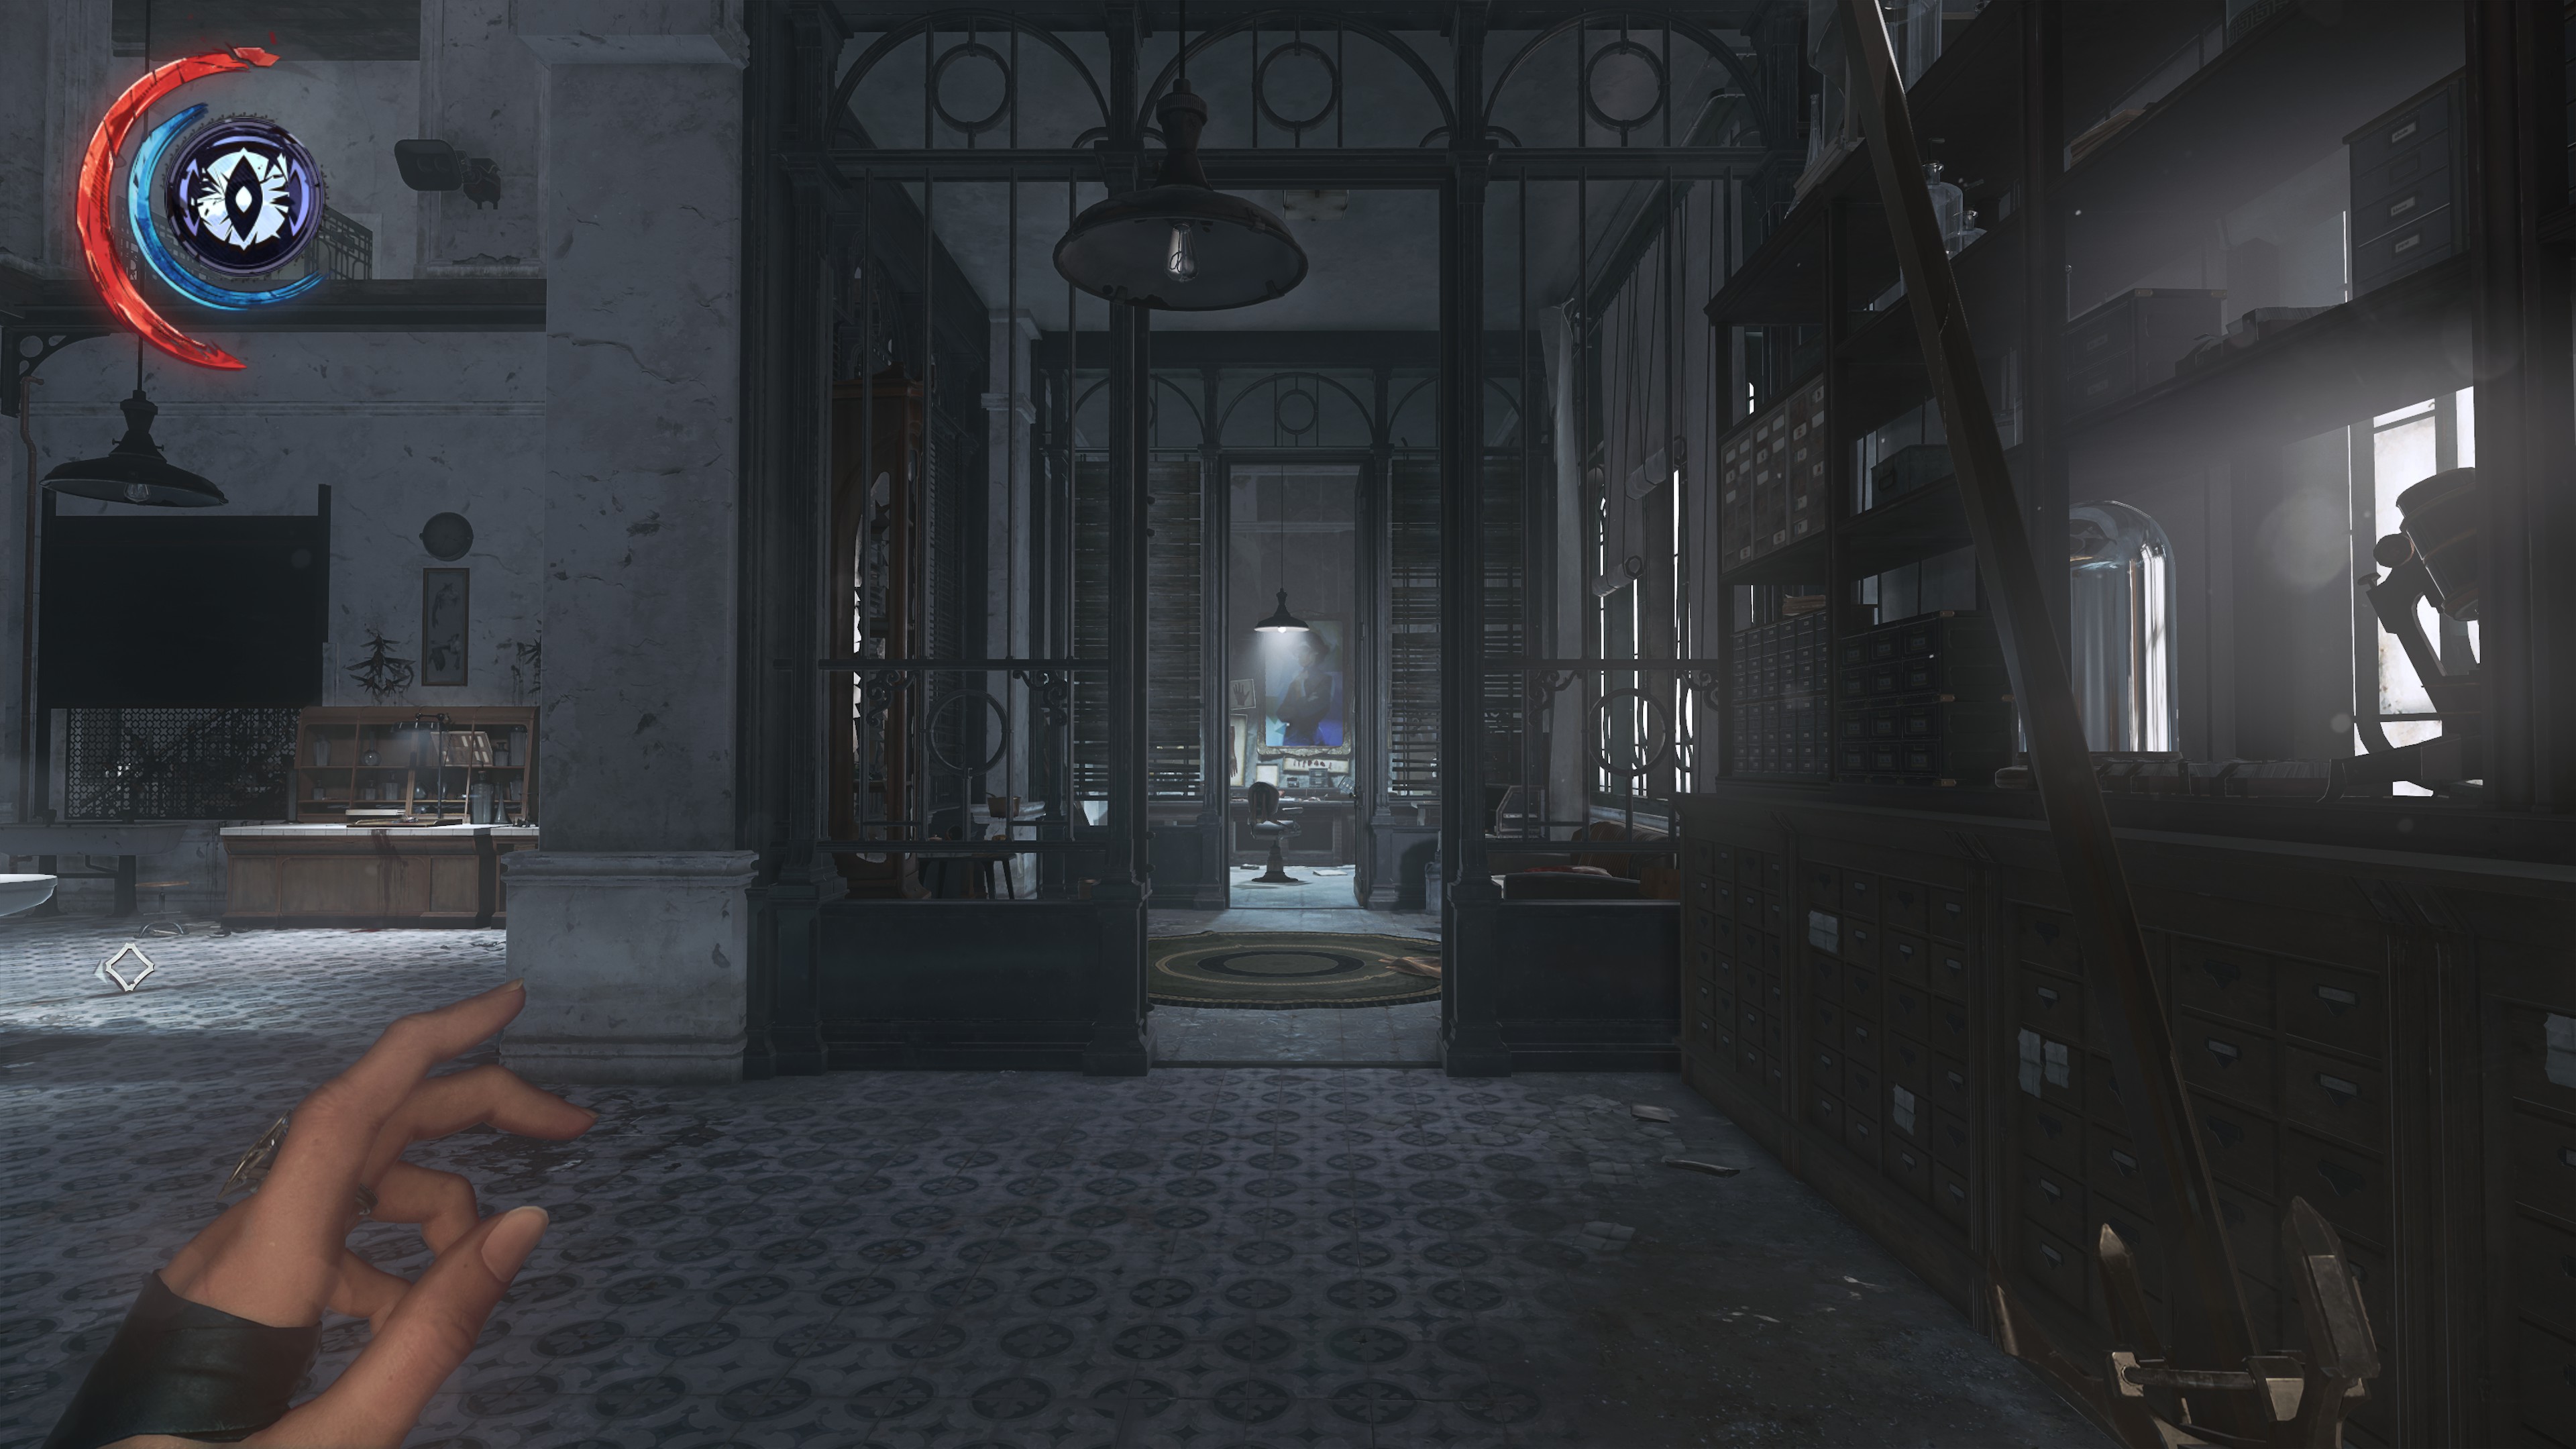 I Regard Her, Within and Without
Found in Hypatia's lab office with the Sokolov note/bonecharm
ㅤ
ㅤ
ㅤ
ㅤ
9
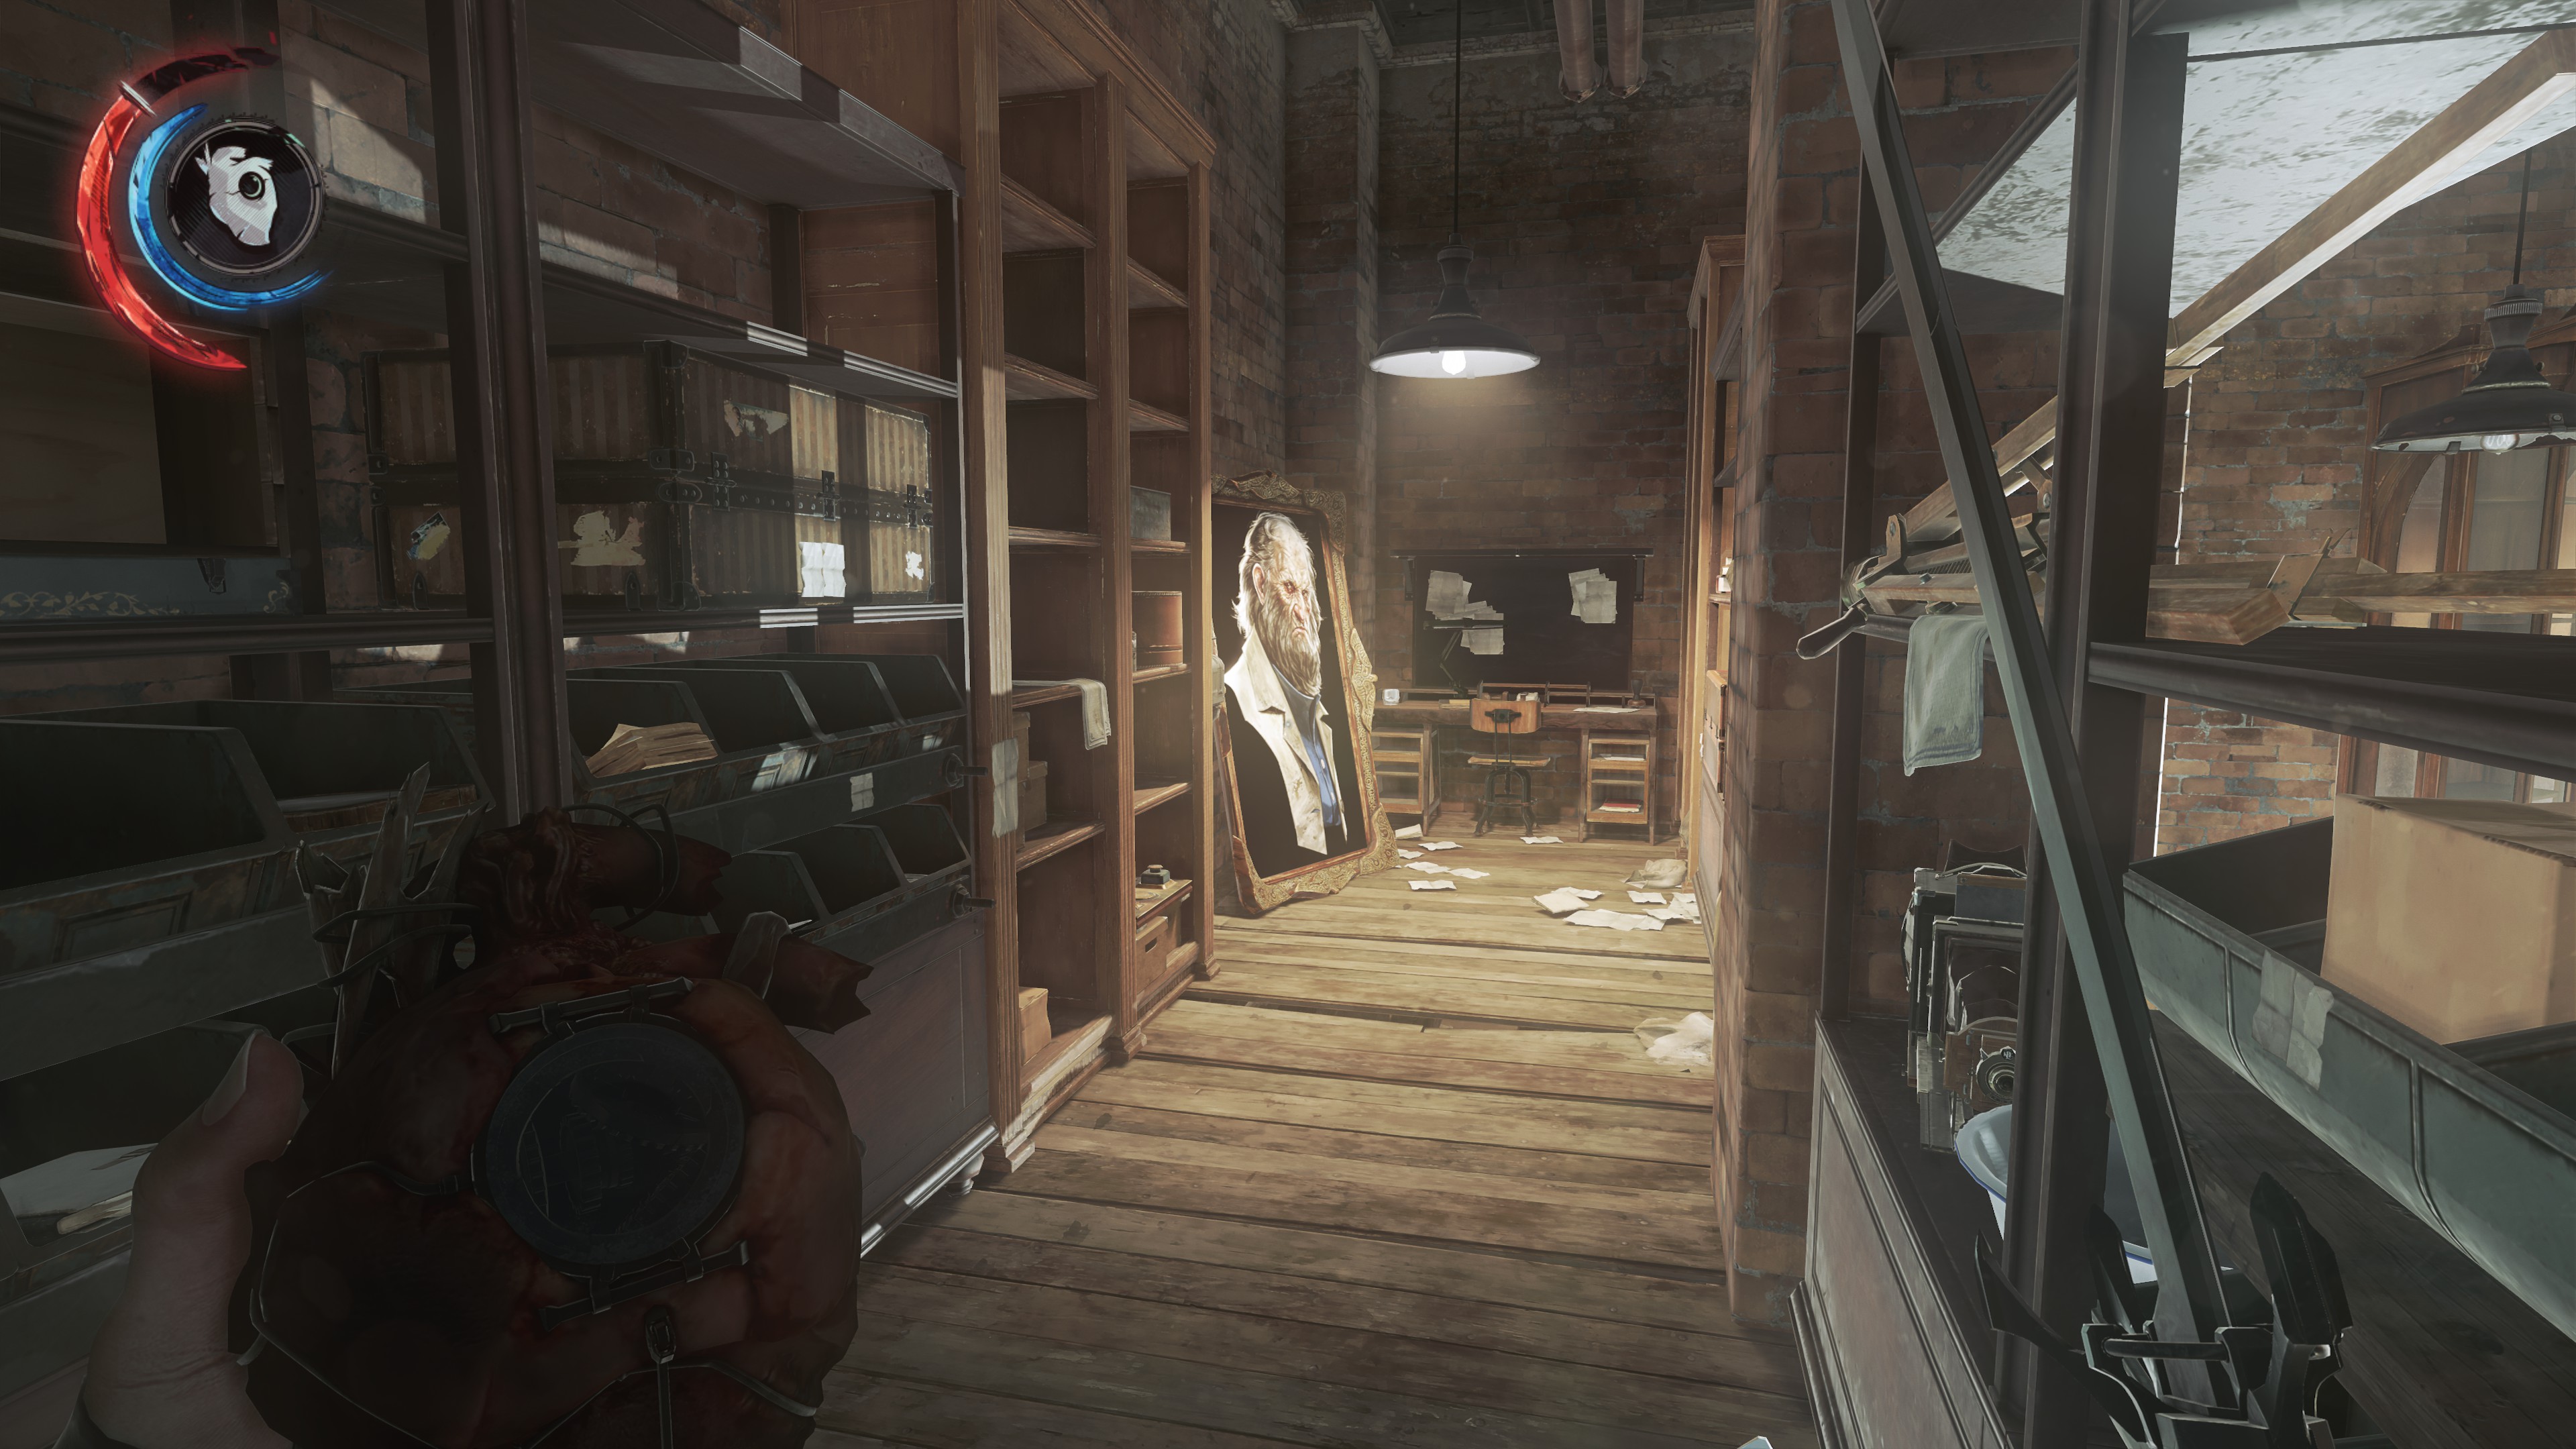 Anton Sokolov In Subtractive Light
In the flooded basement with Vera Moray's valuables
ㅤ
ㅤ
ㅤ
ㅤ
10
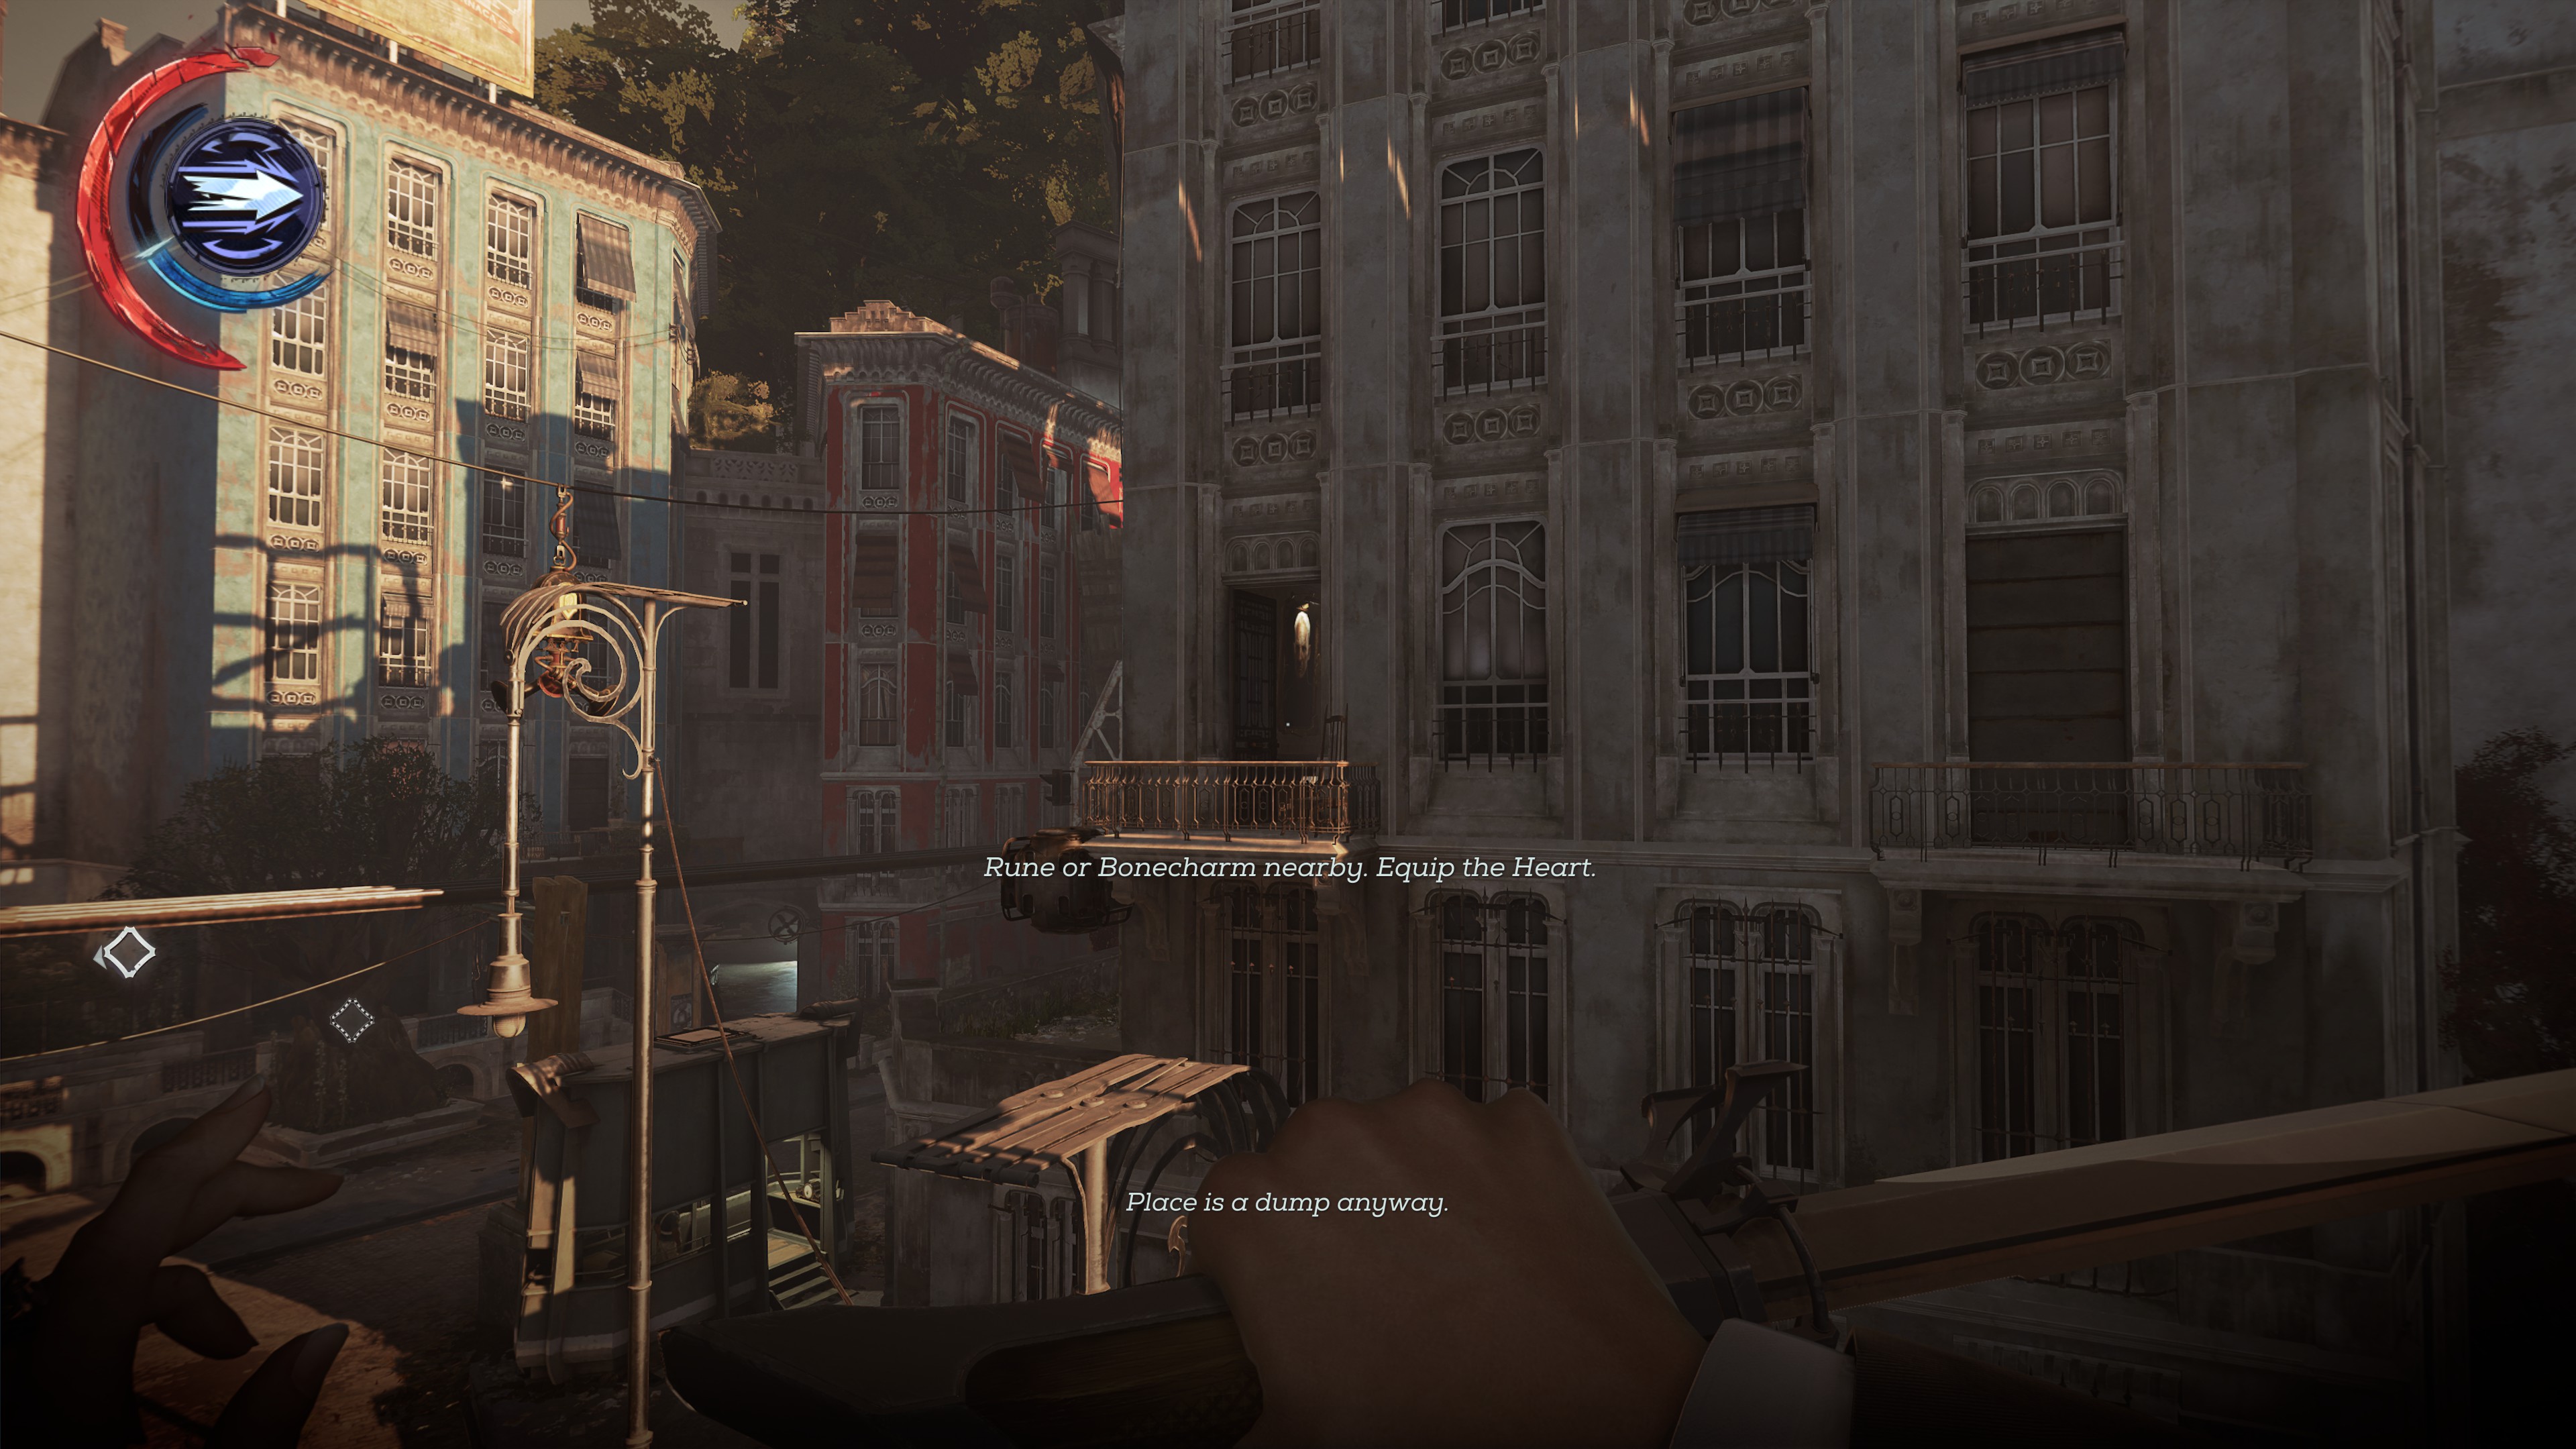 Ramsey's Stochastic Eyes
In the upper apartment across from the carriage station
ㅤ
ㅤ
ㅤ
ㅤ
11
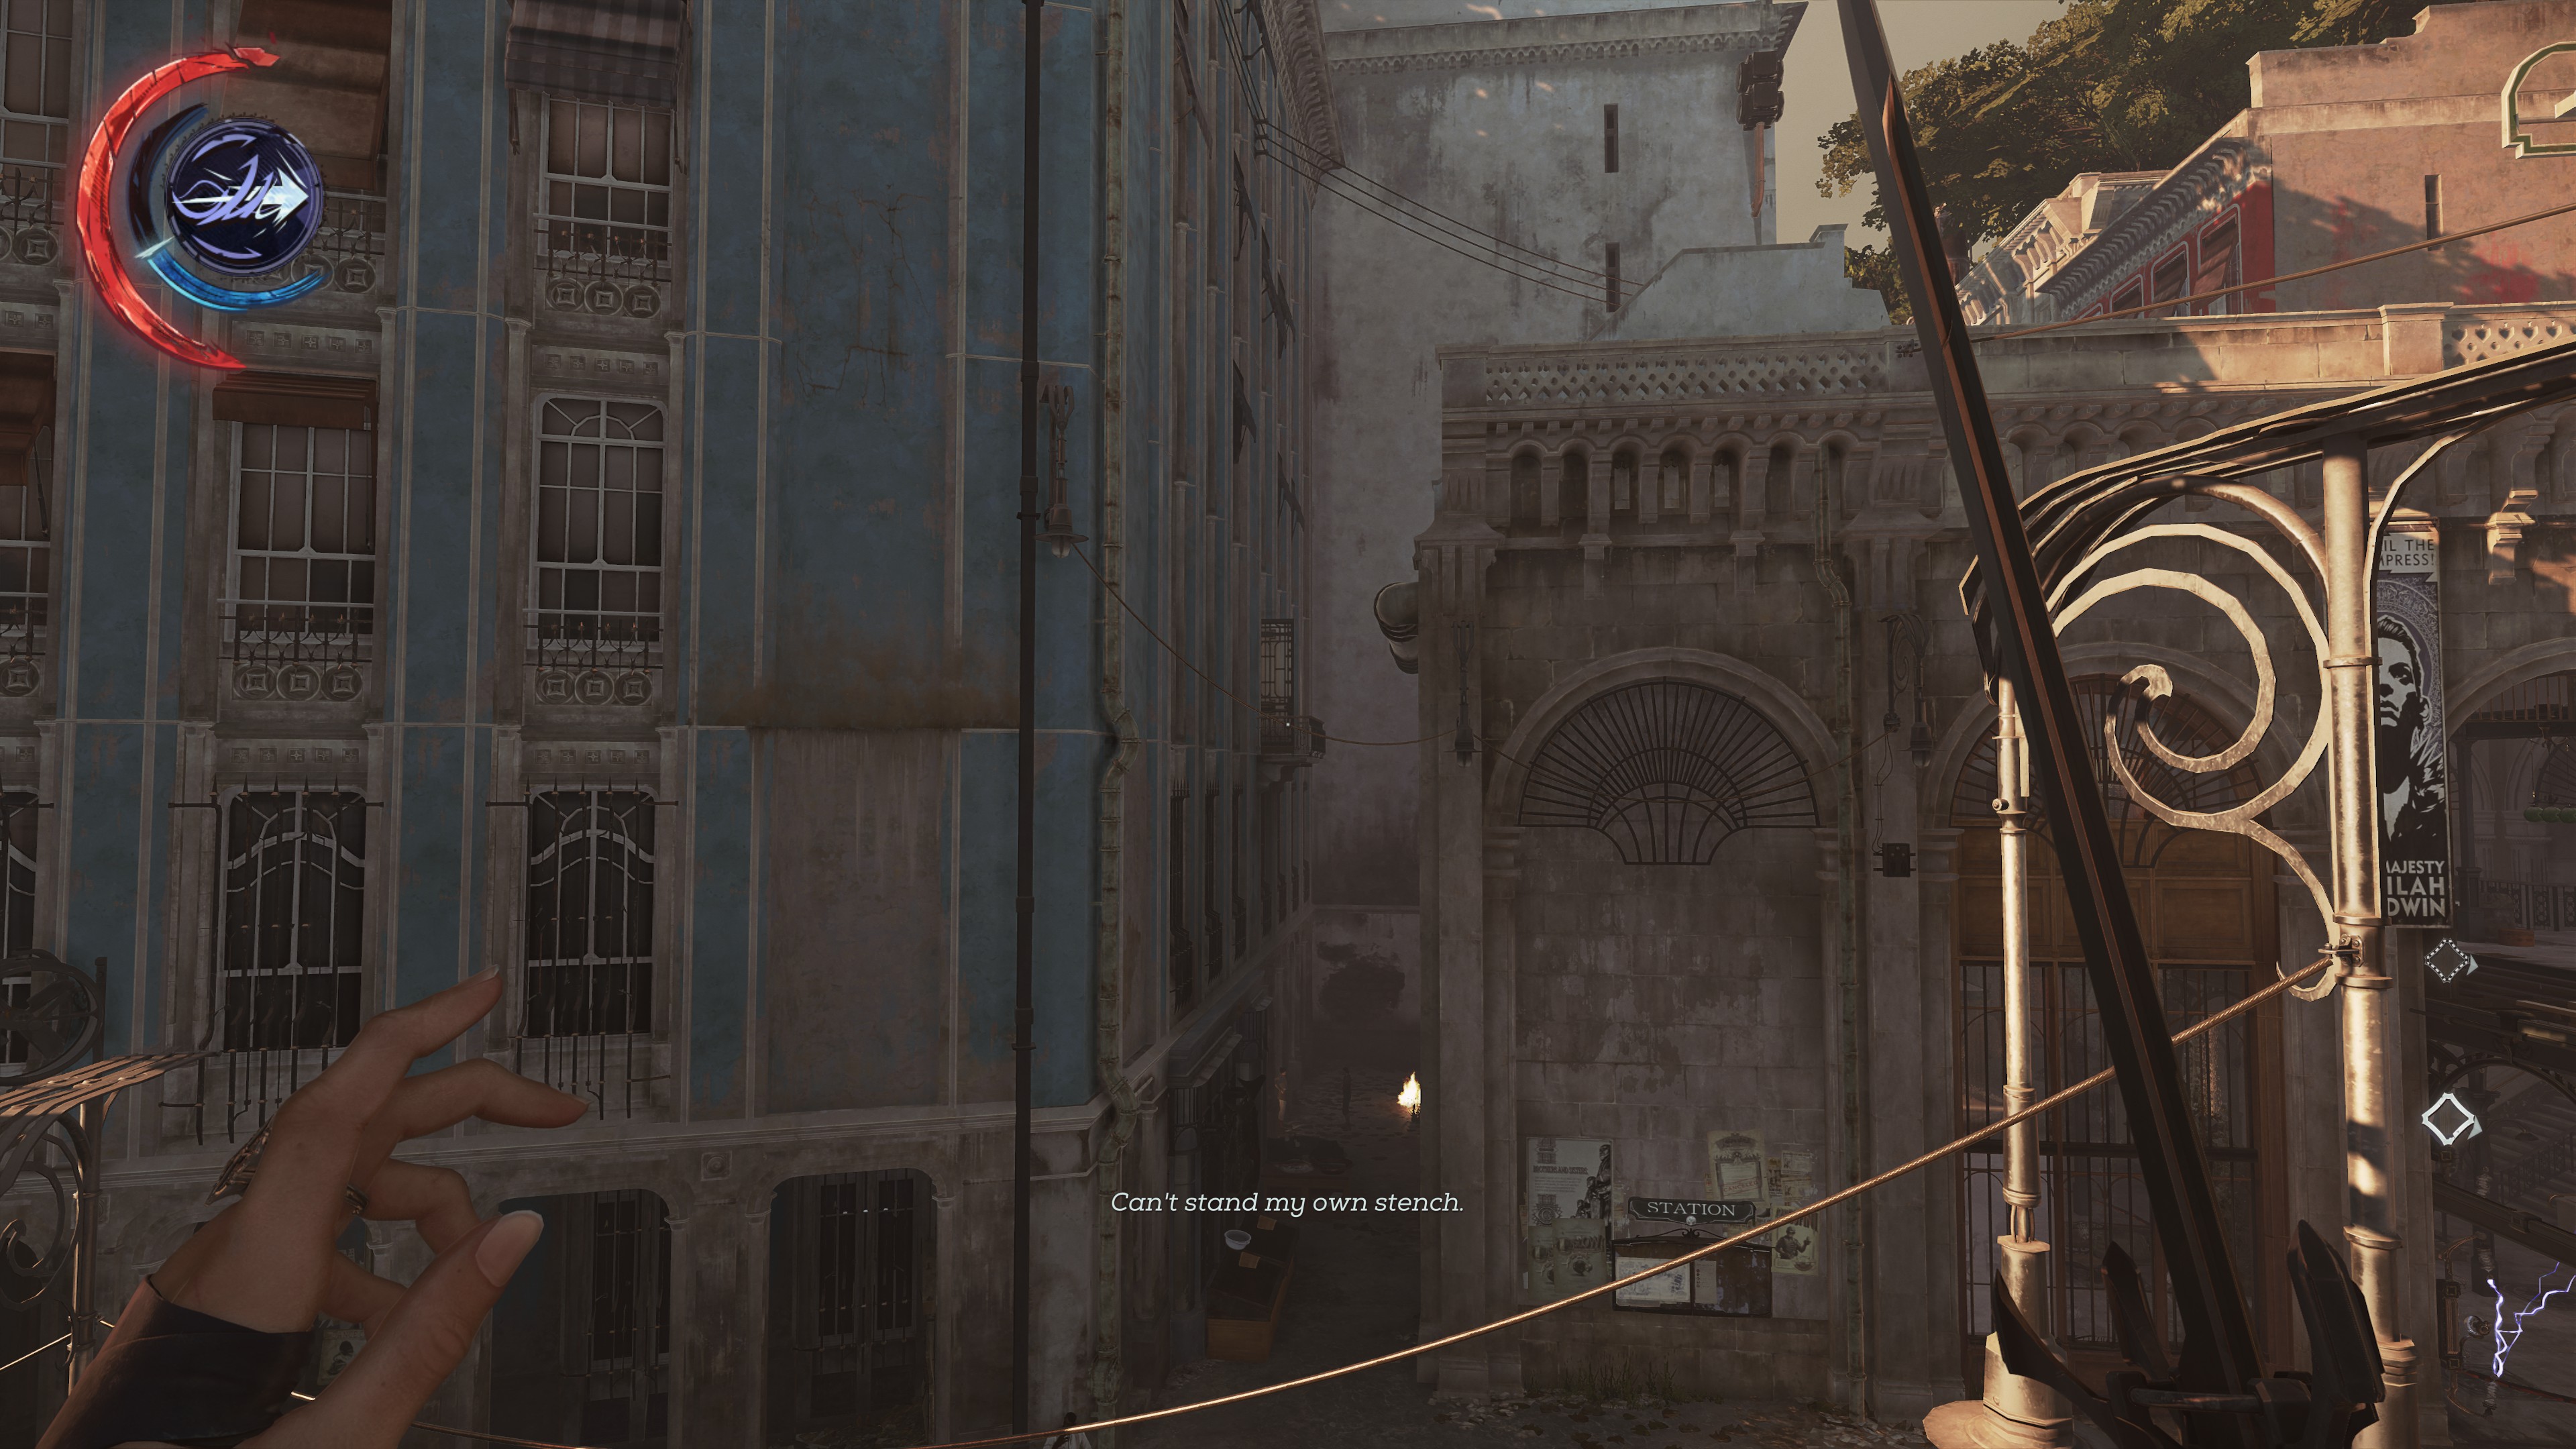 The Spymaster’s Axis Of Asymmetry
Painting is in this apartment to the left of the carriage station (if looking at station from the rails/ front)
ㅤ
ㅤ
ㅤ
ㅤ
12
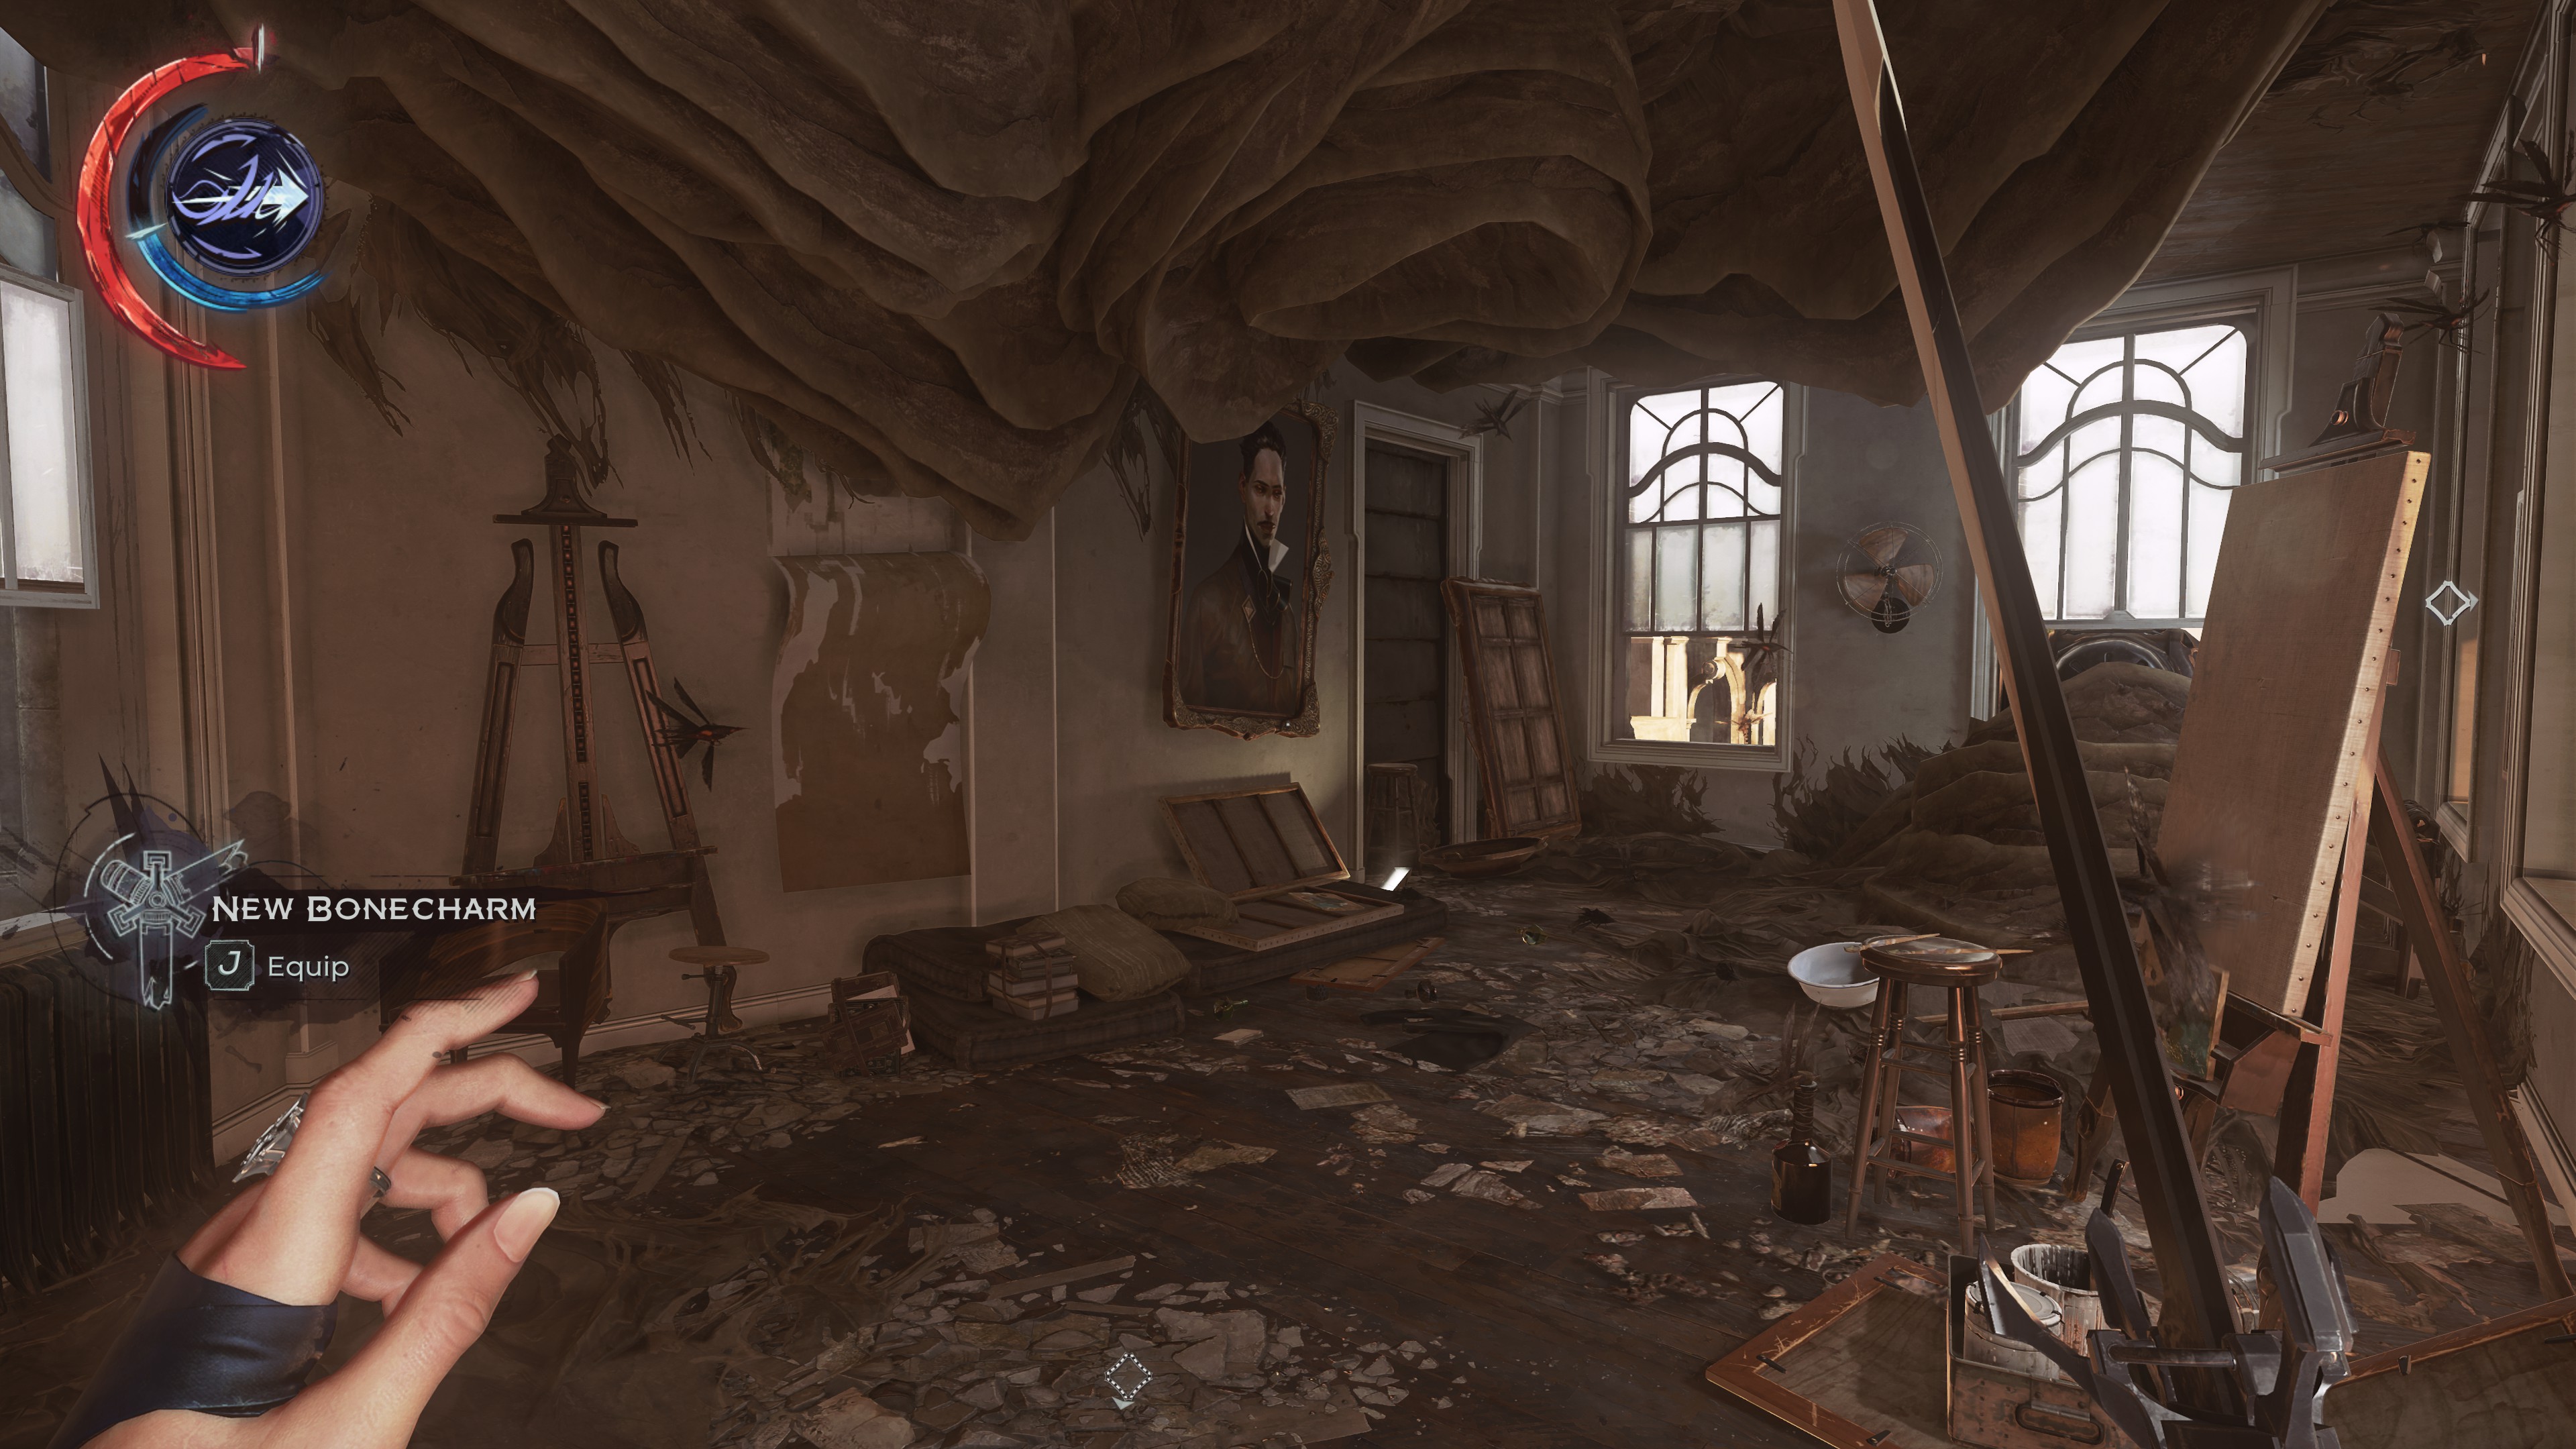 Jindosh Considers An Odd Numerator
In bloodlfy infested apartment in the Upper Aventa Area
ㅤ
ㅤ
ㅤ
ㅤ
13
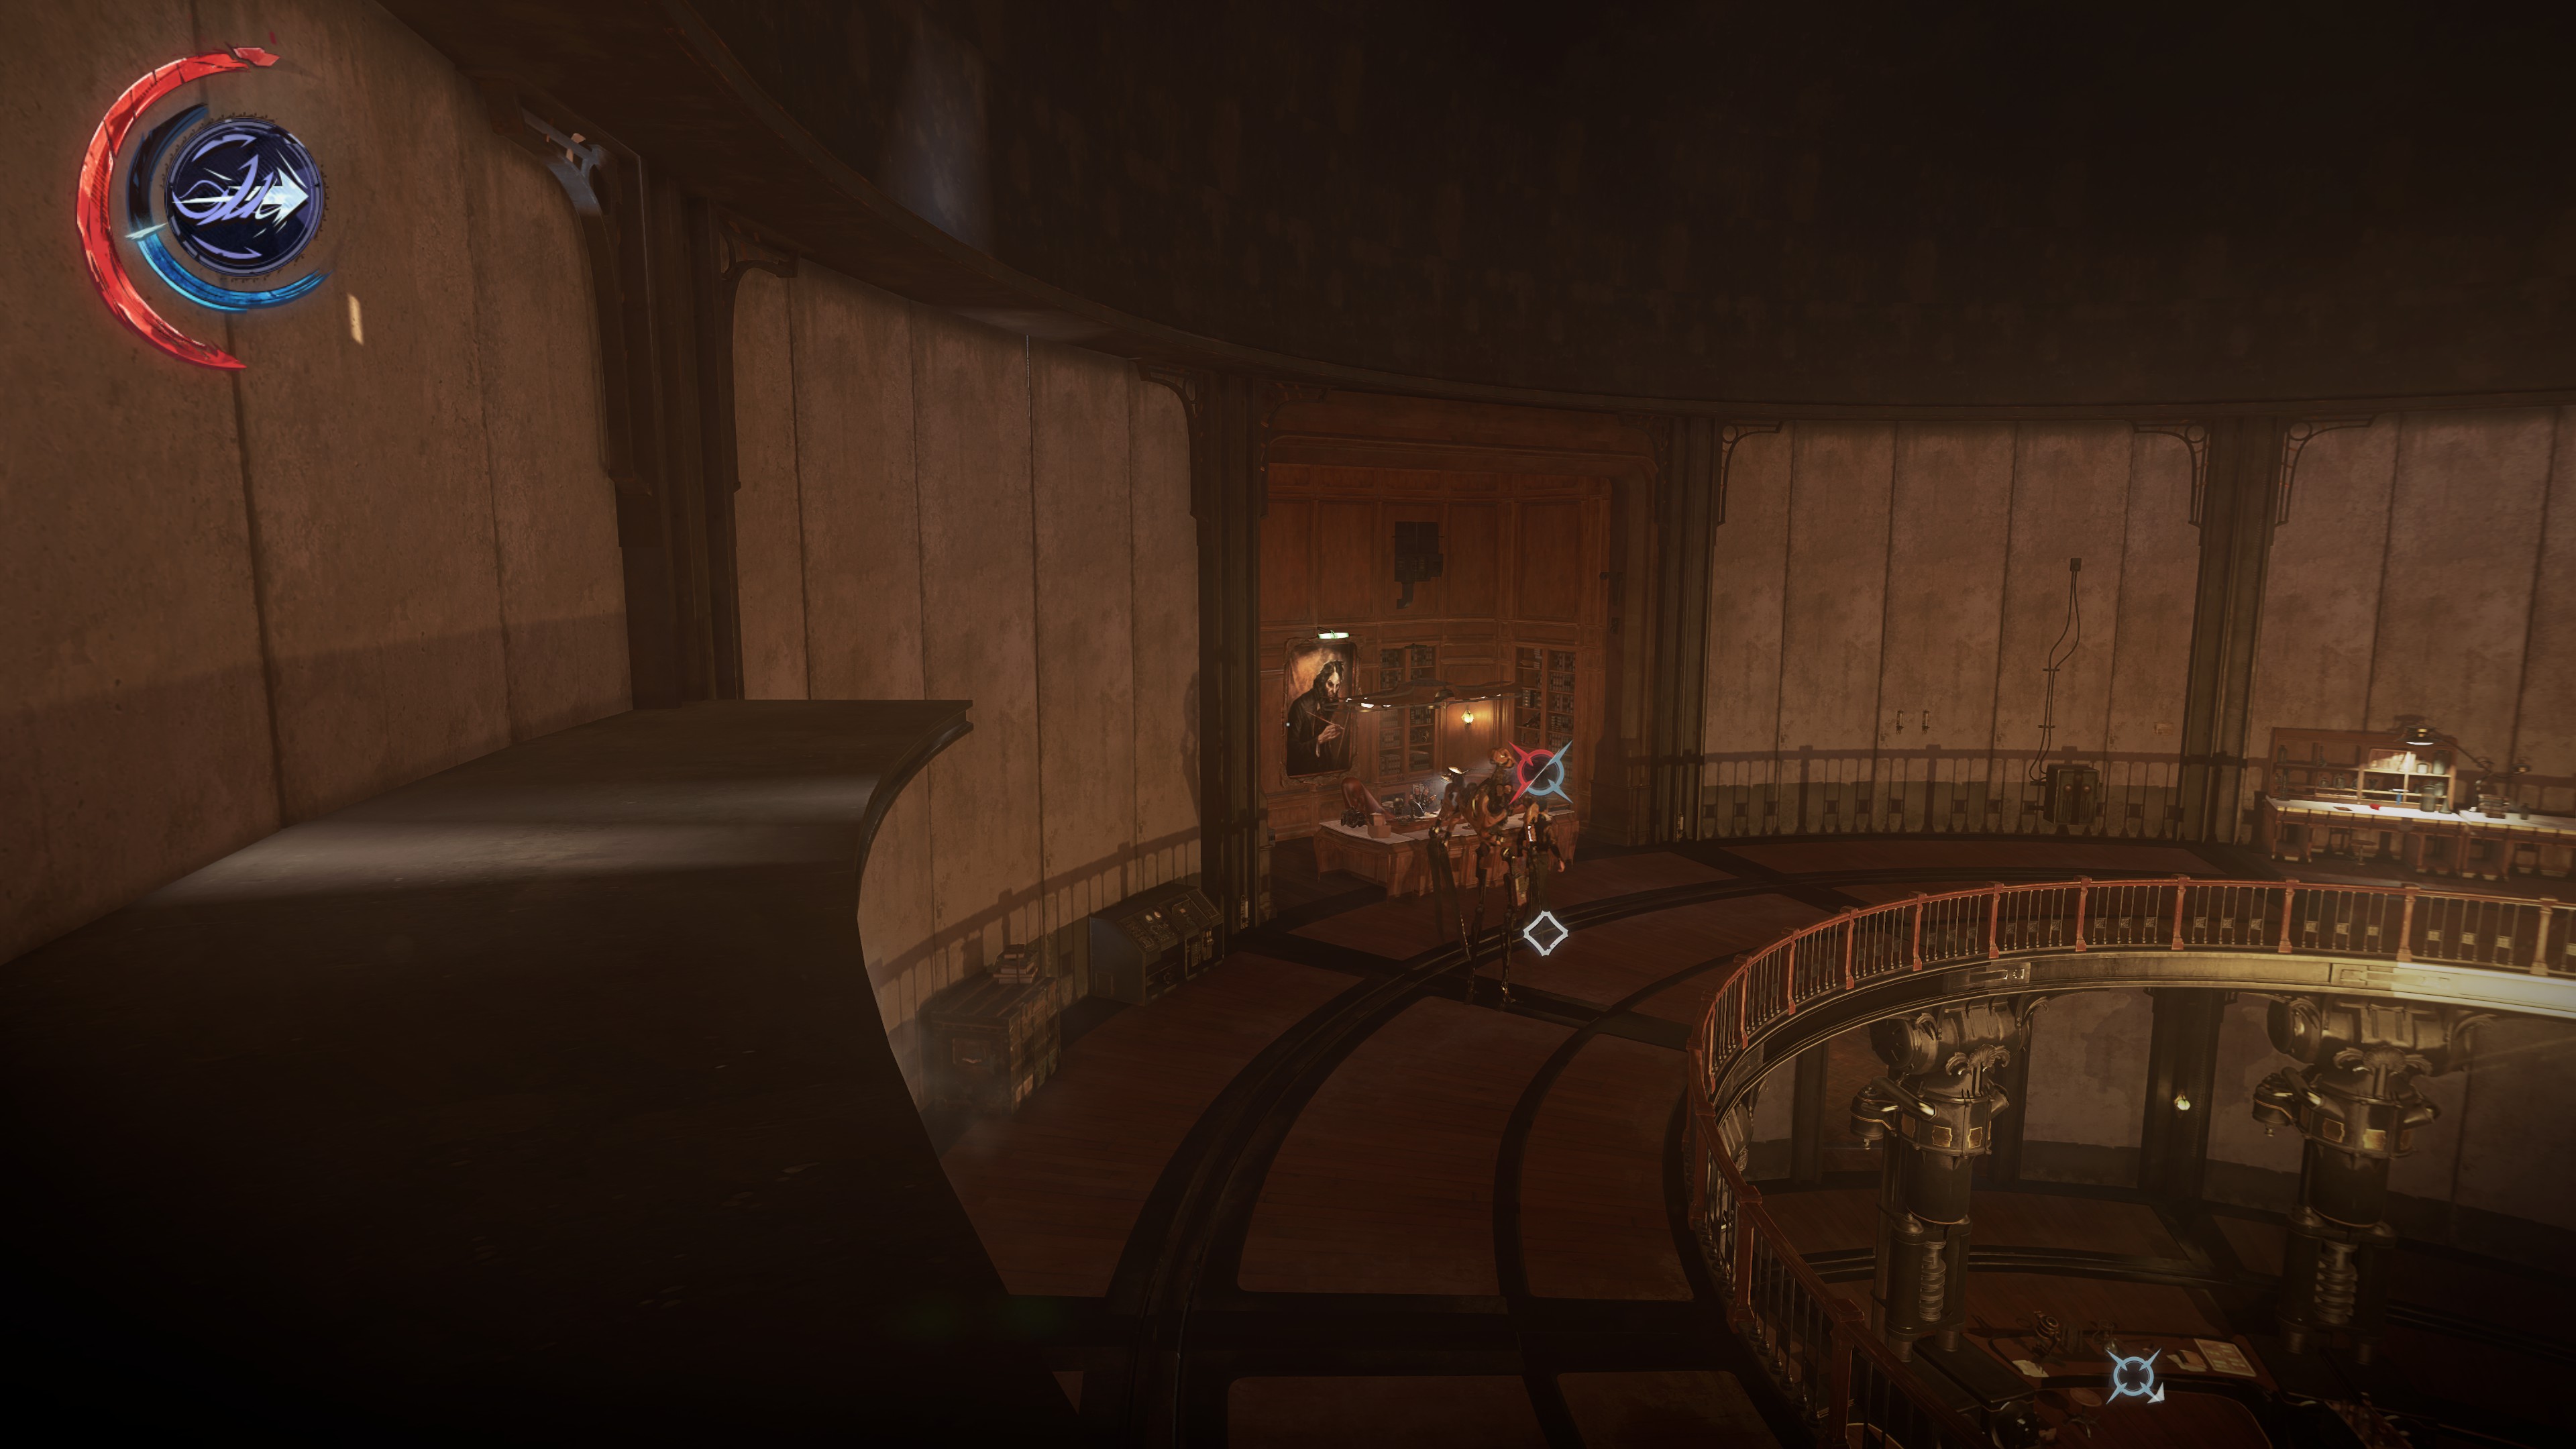 Light Along The Inverse Curve
Above Jindosh's Desk in lab
ㅤ
ㅤ
ㅤ
ㅤ
14
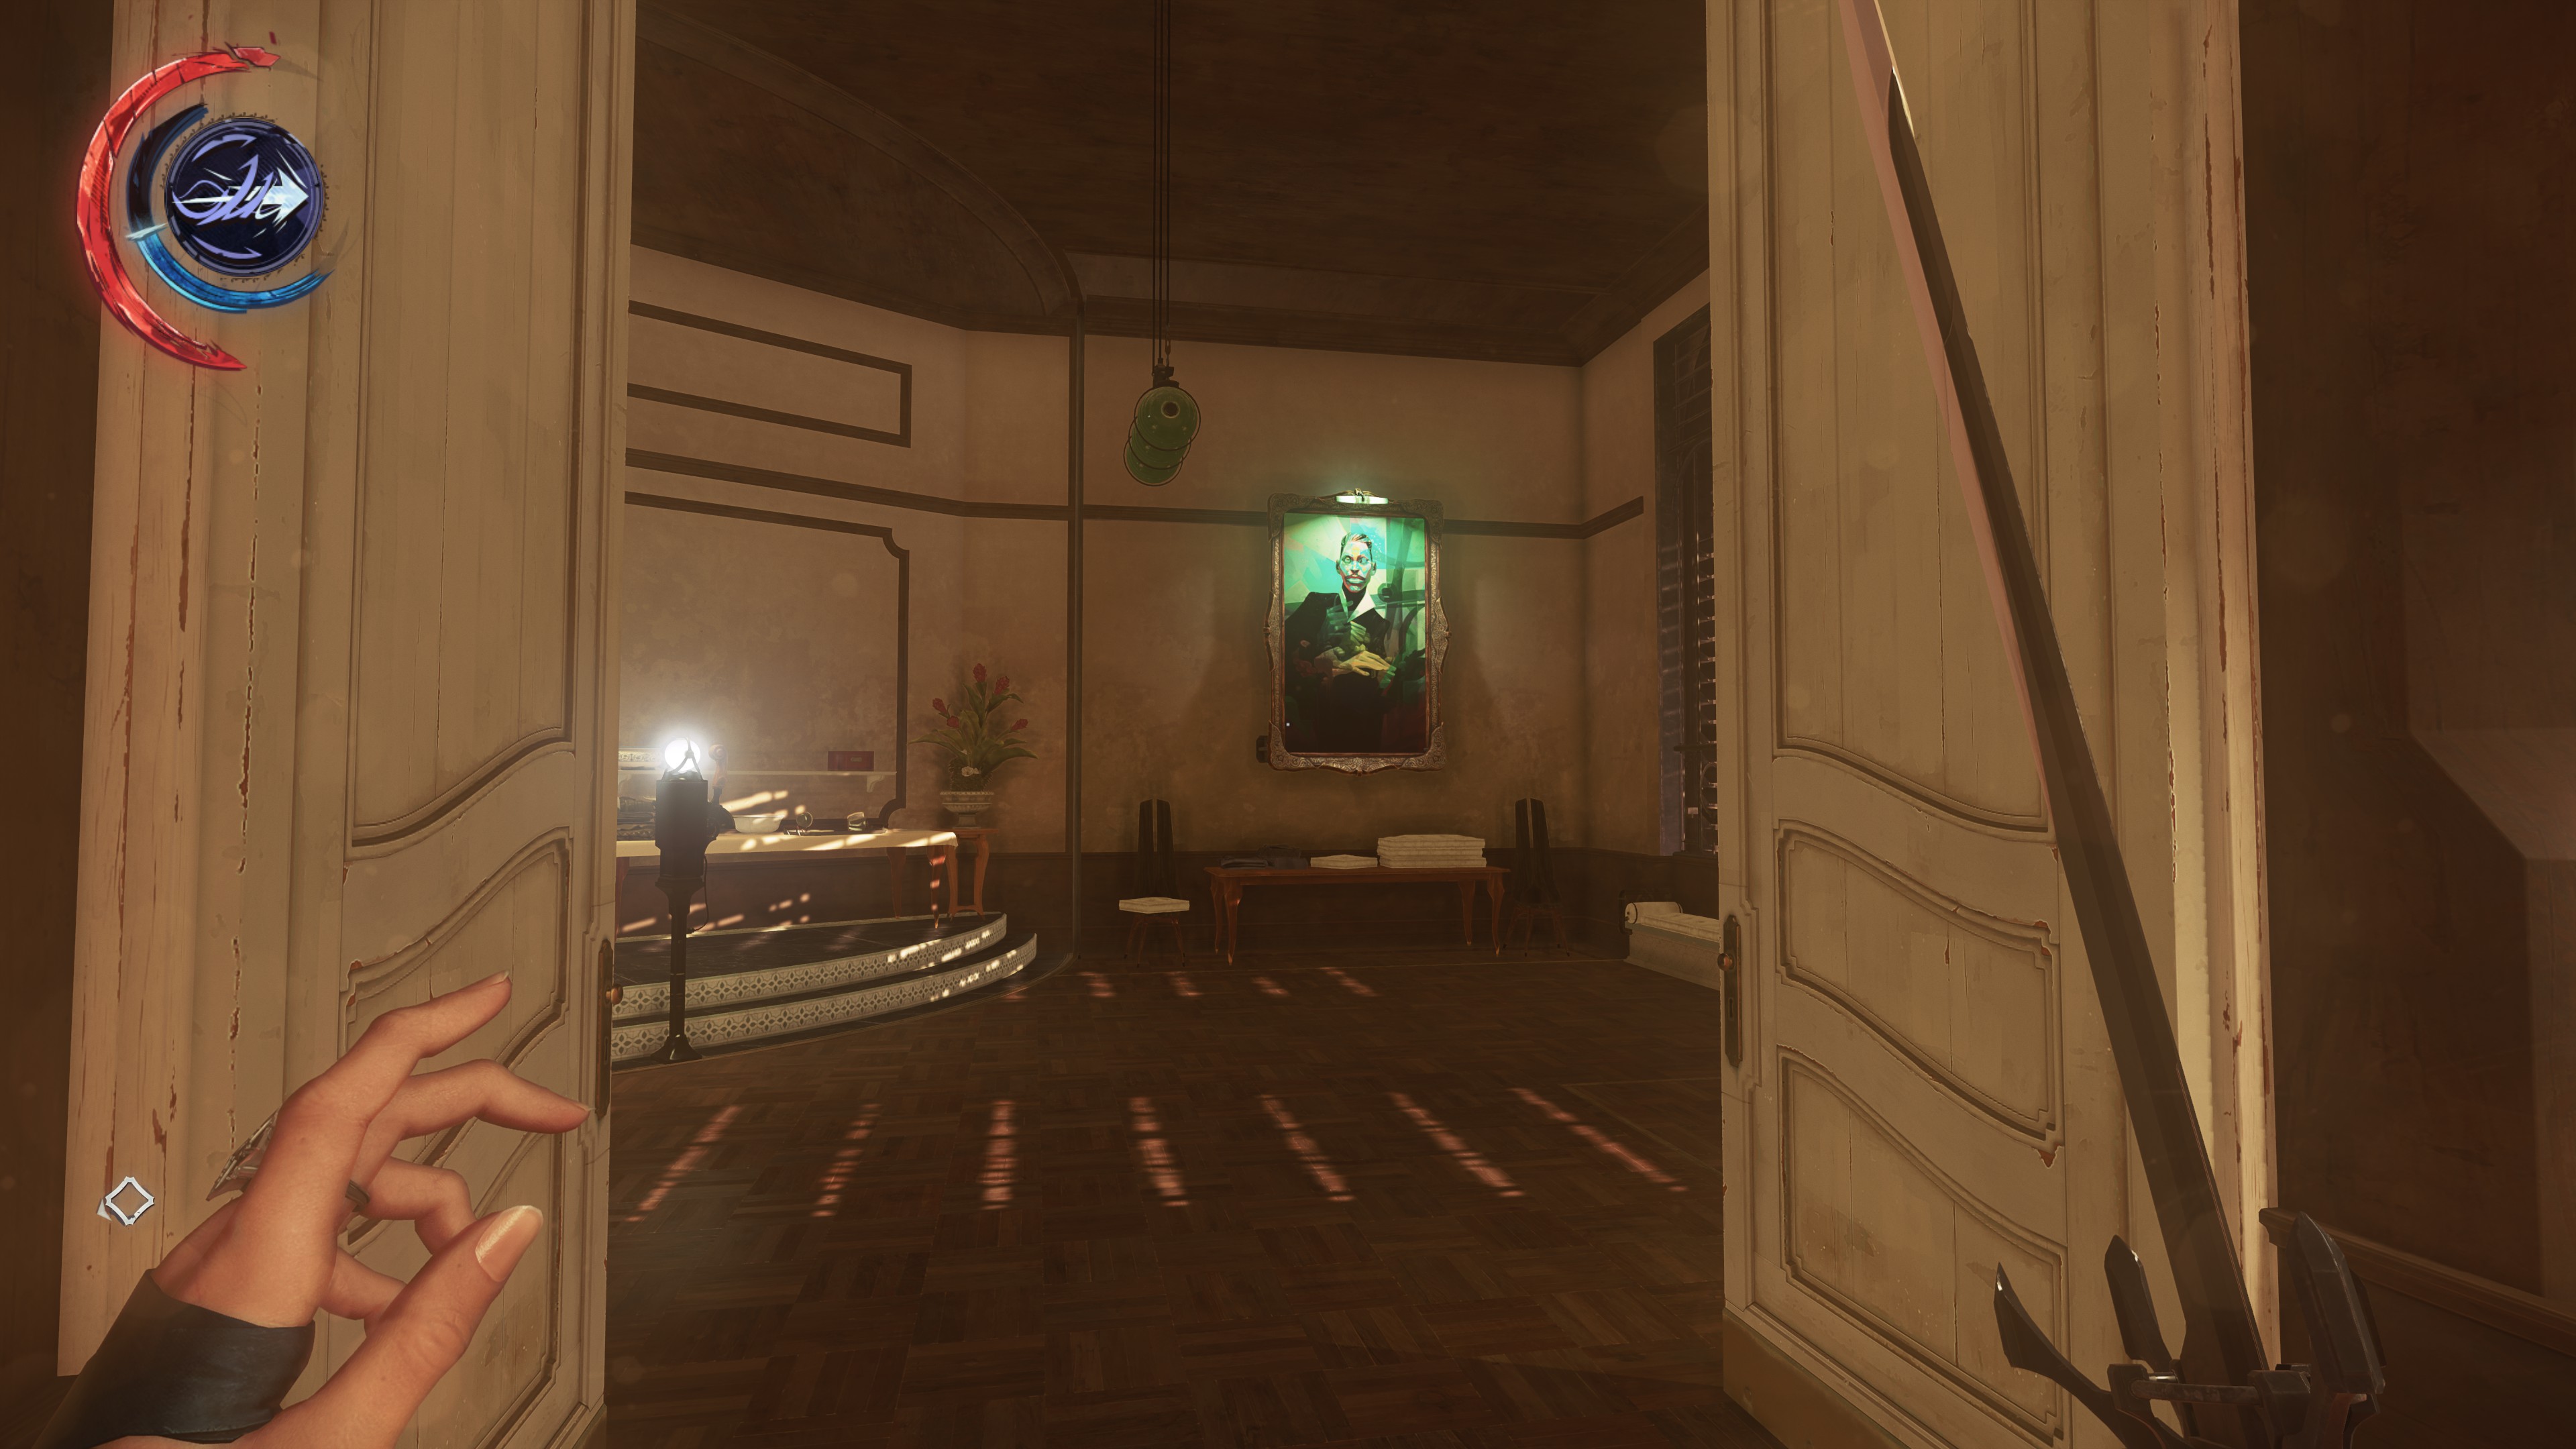 I Look Upon The Craftsman
In Jindosh's spinning bedroom/bathroom/terrace
ㅤ
ㅤ
ㅤ
ㅤ
15
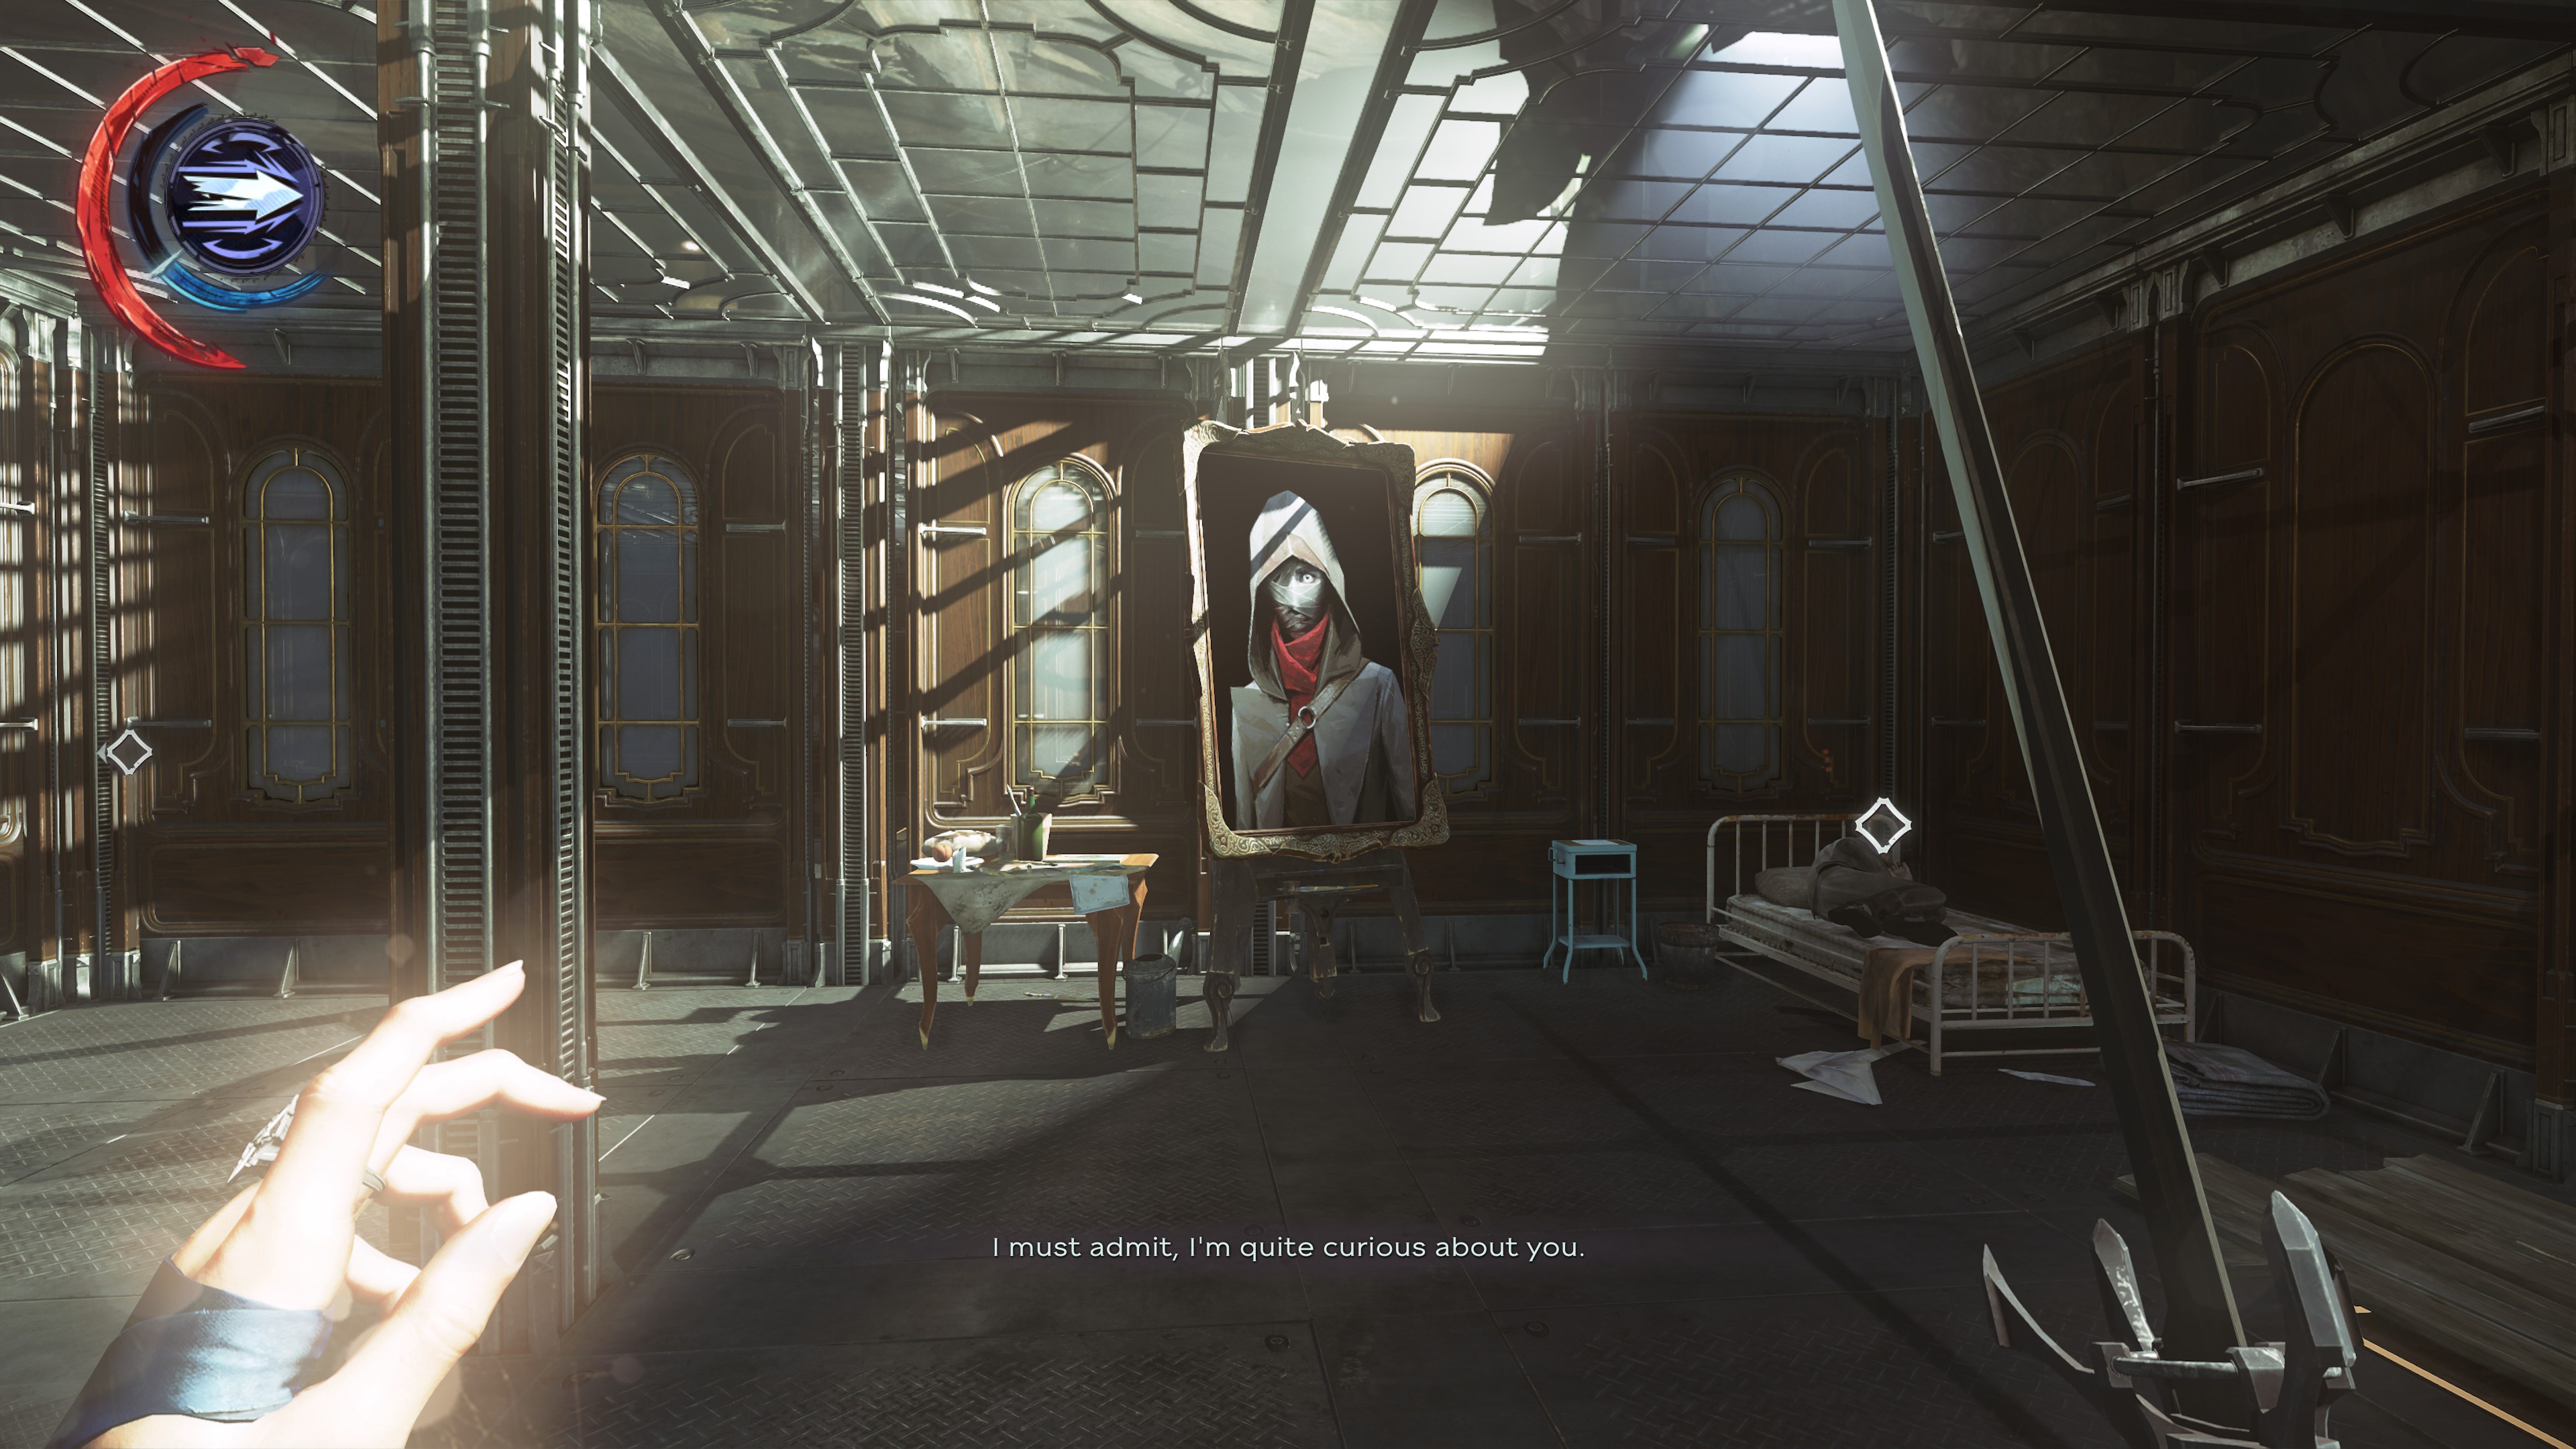 The Blood Topology Of Grim Alex
With Sokolov in the assessment chamber
ㅤ
ㅤ
ㅤ
ㅤ
16
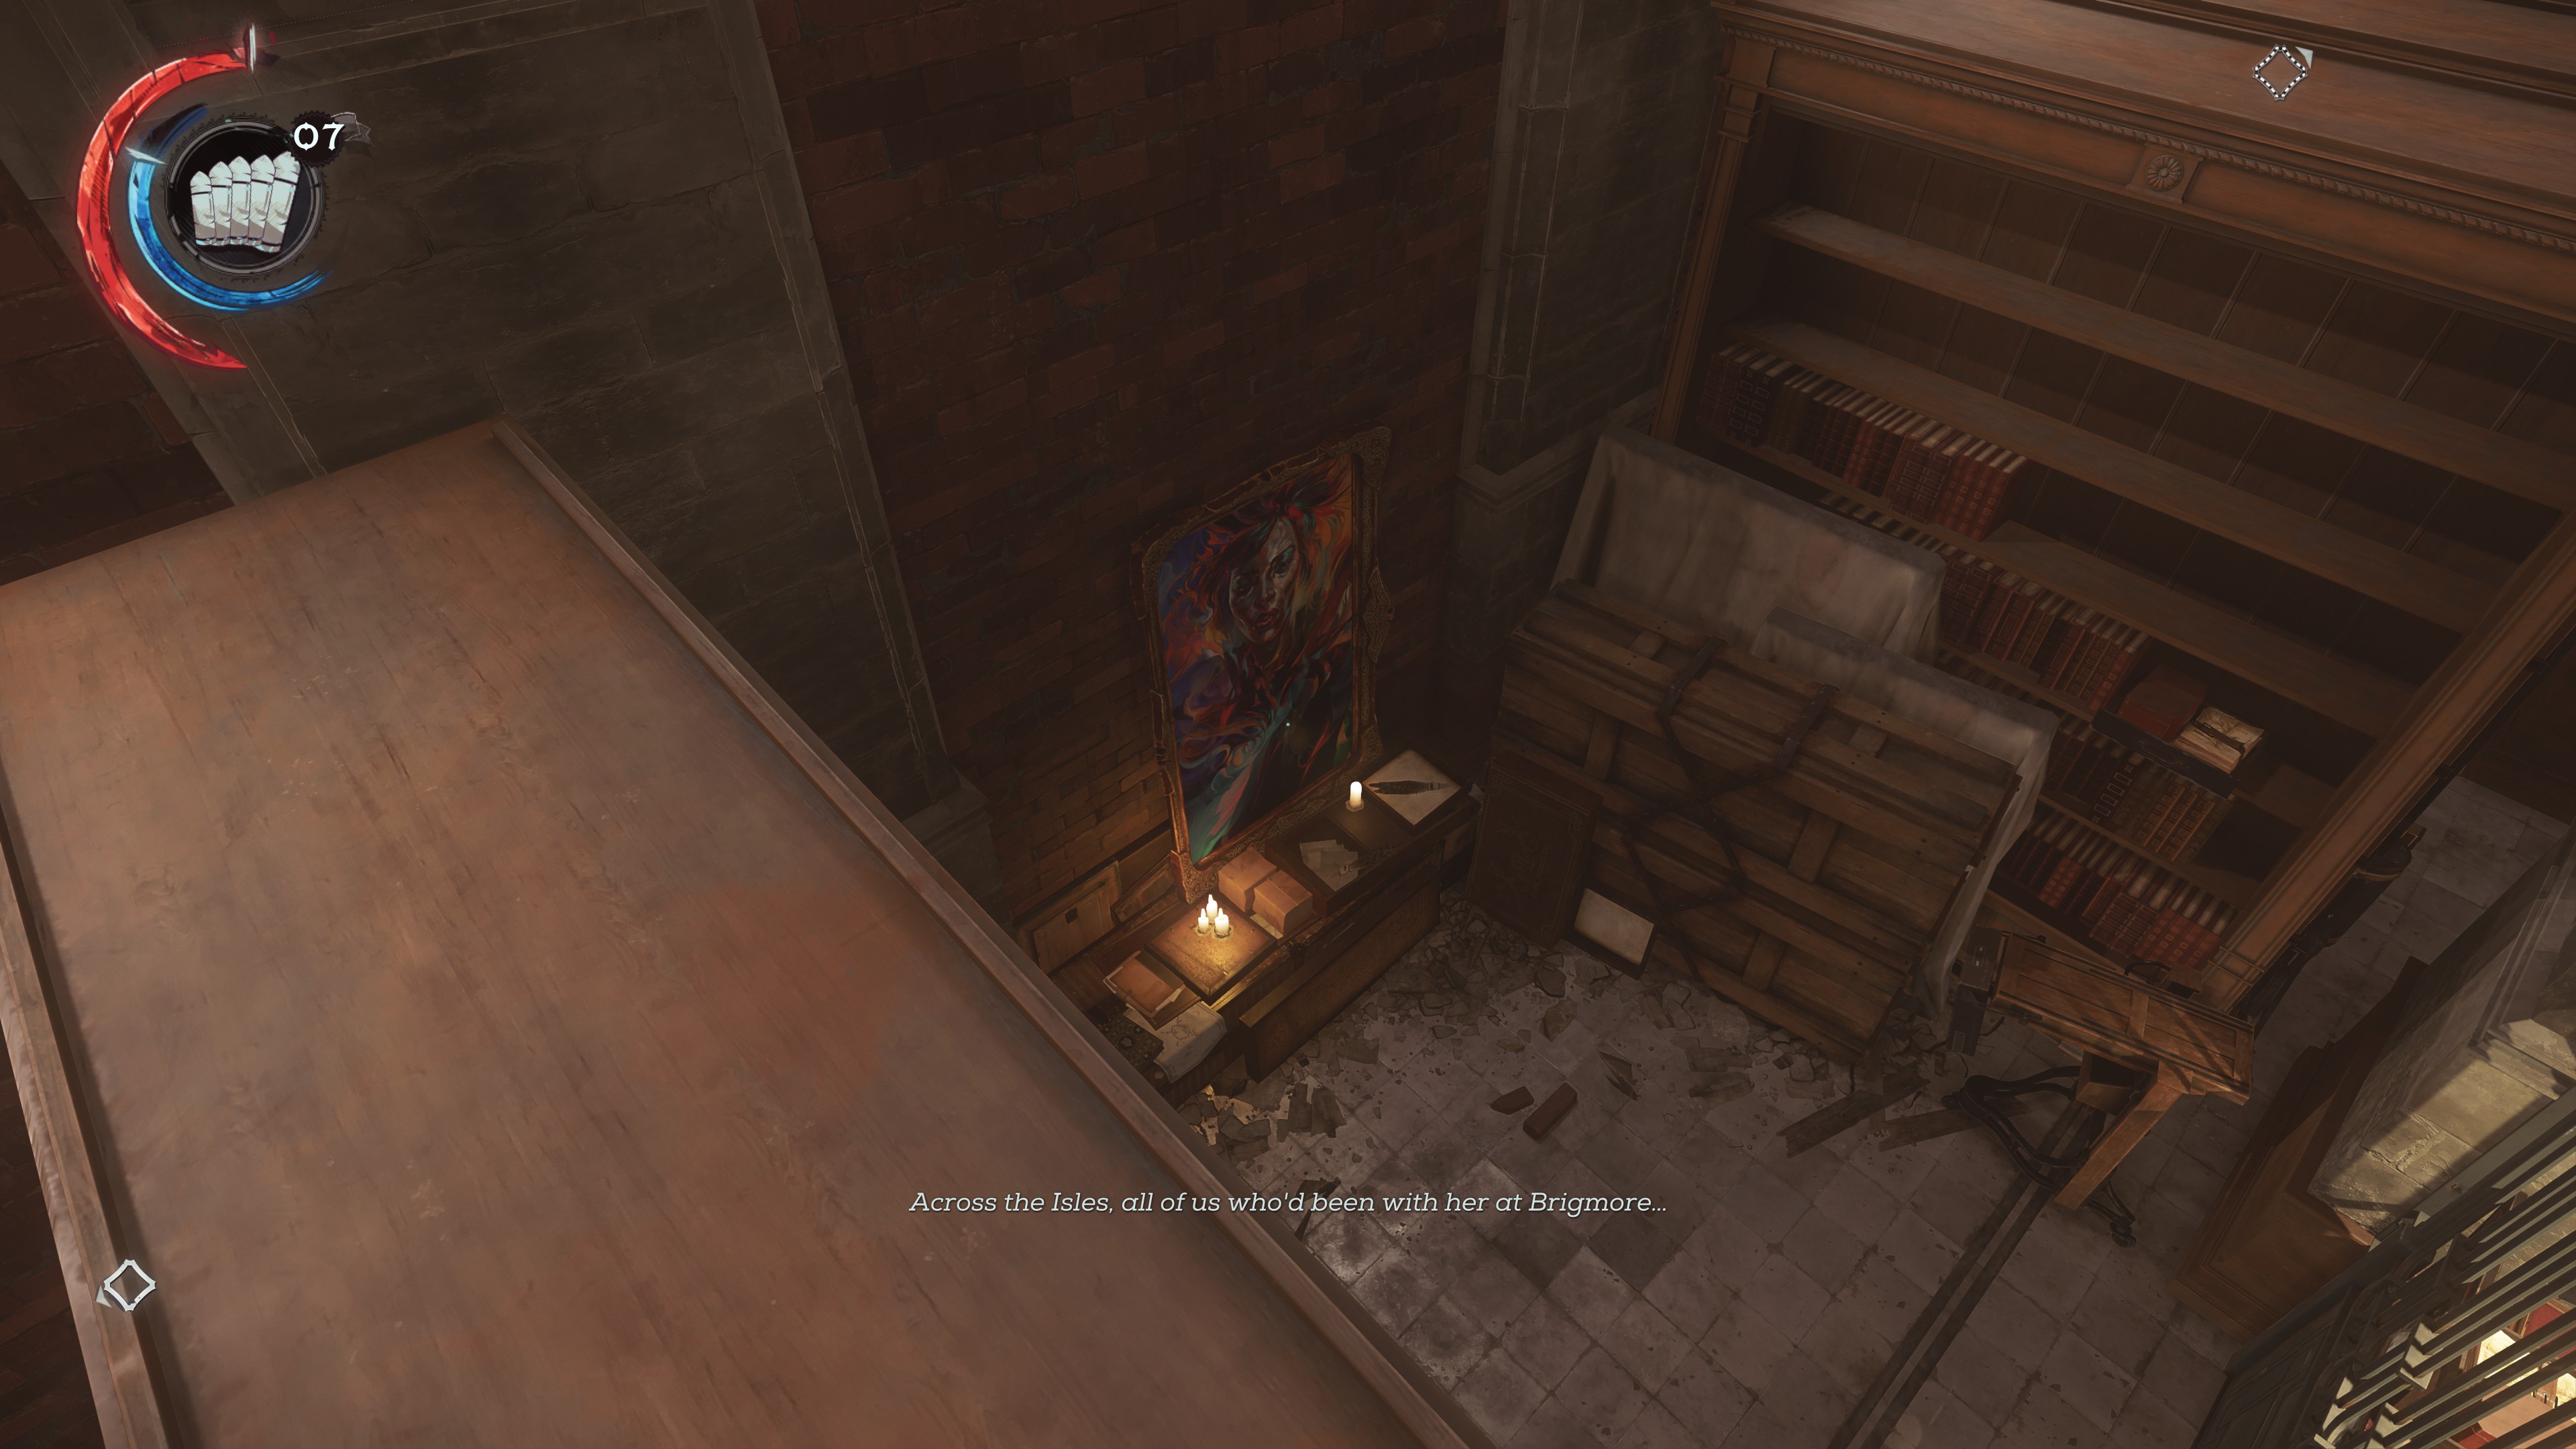 Her Heart, I Bathed In Poison
In locked bookcase area in basement of conservatory, enter from the rightside by walking into small hole with bookcase behind, you will push the bookcase forward and be able to enter. This is also where the audiograph is.
ㅤ
ㅤ
ㅤ
ㅤ
17
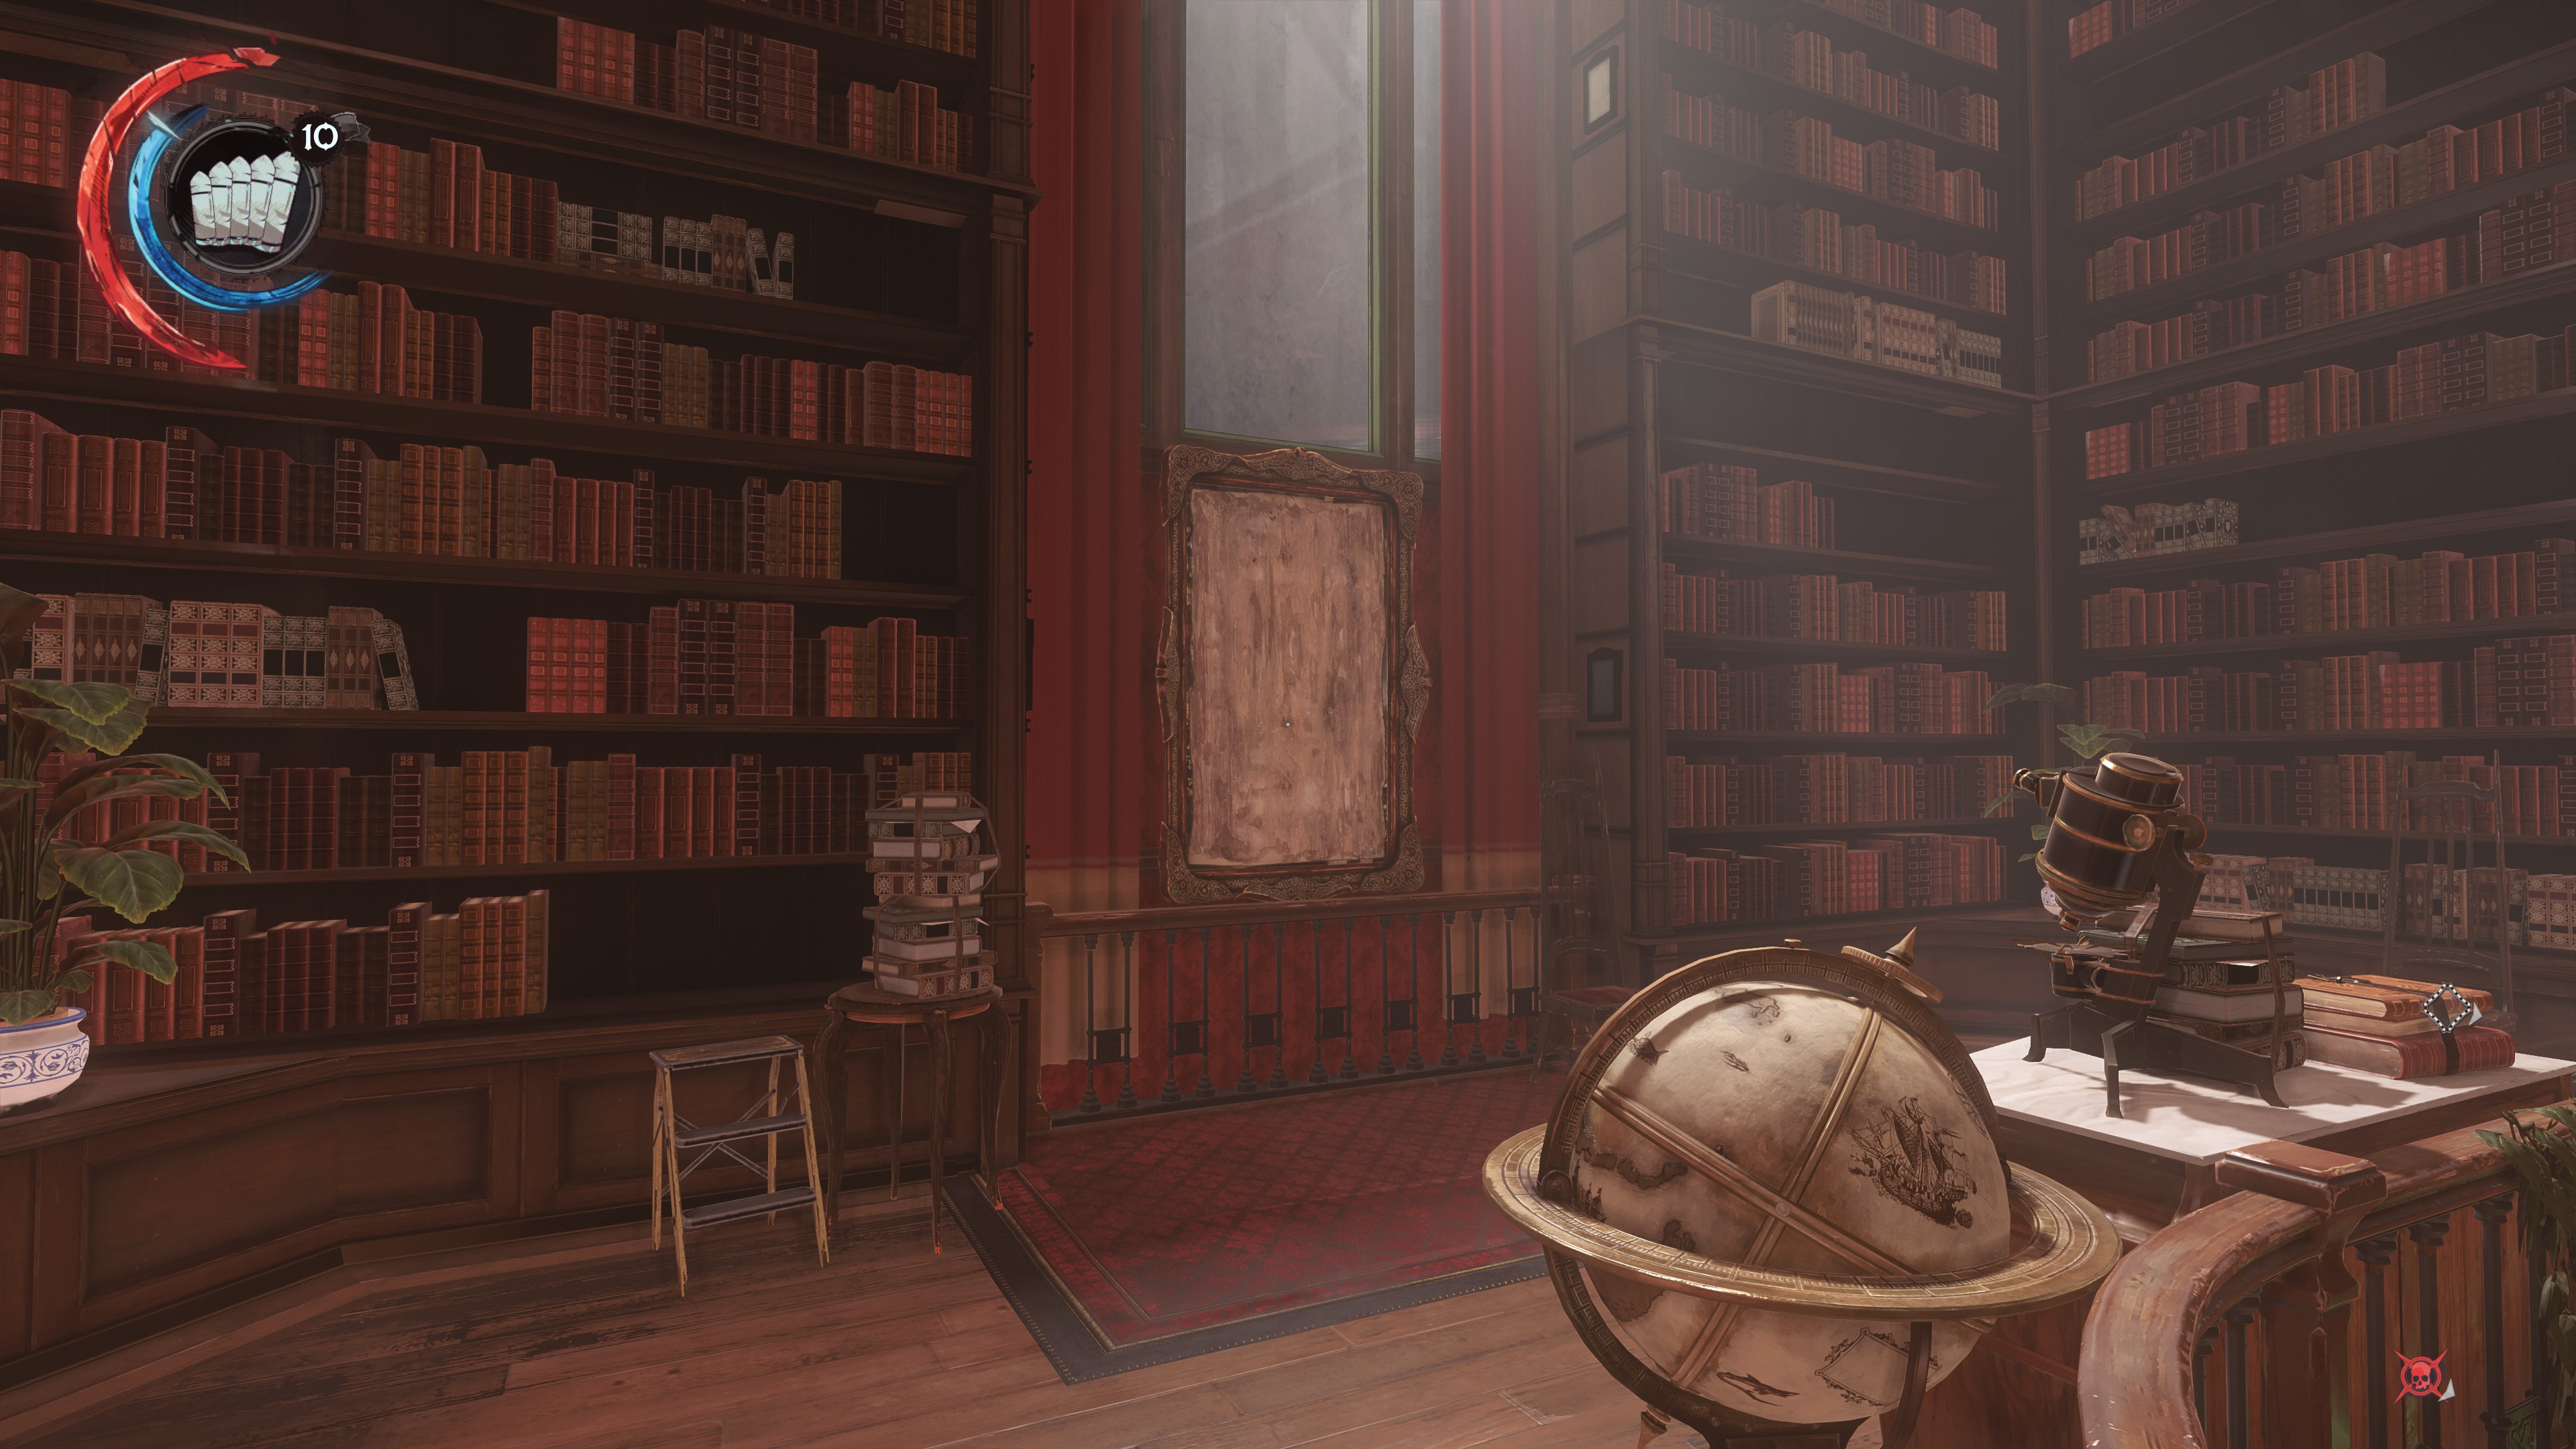 My Fires Burn Within Breanna’s Marrow
On the staircase in Breanna Ashworth's office
ㅤ
ㅤ
ㅤ
ㅤ
18
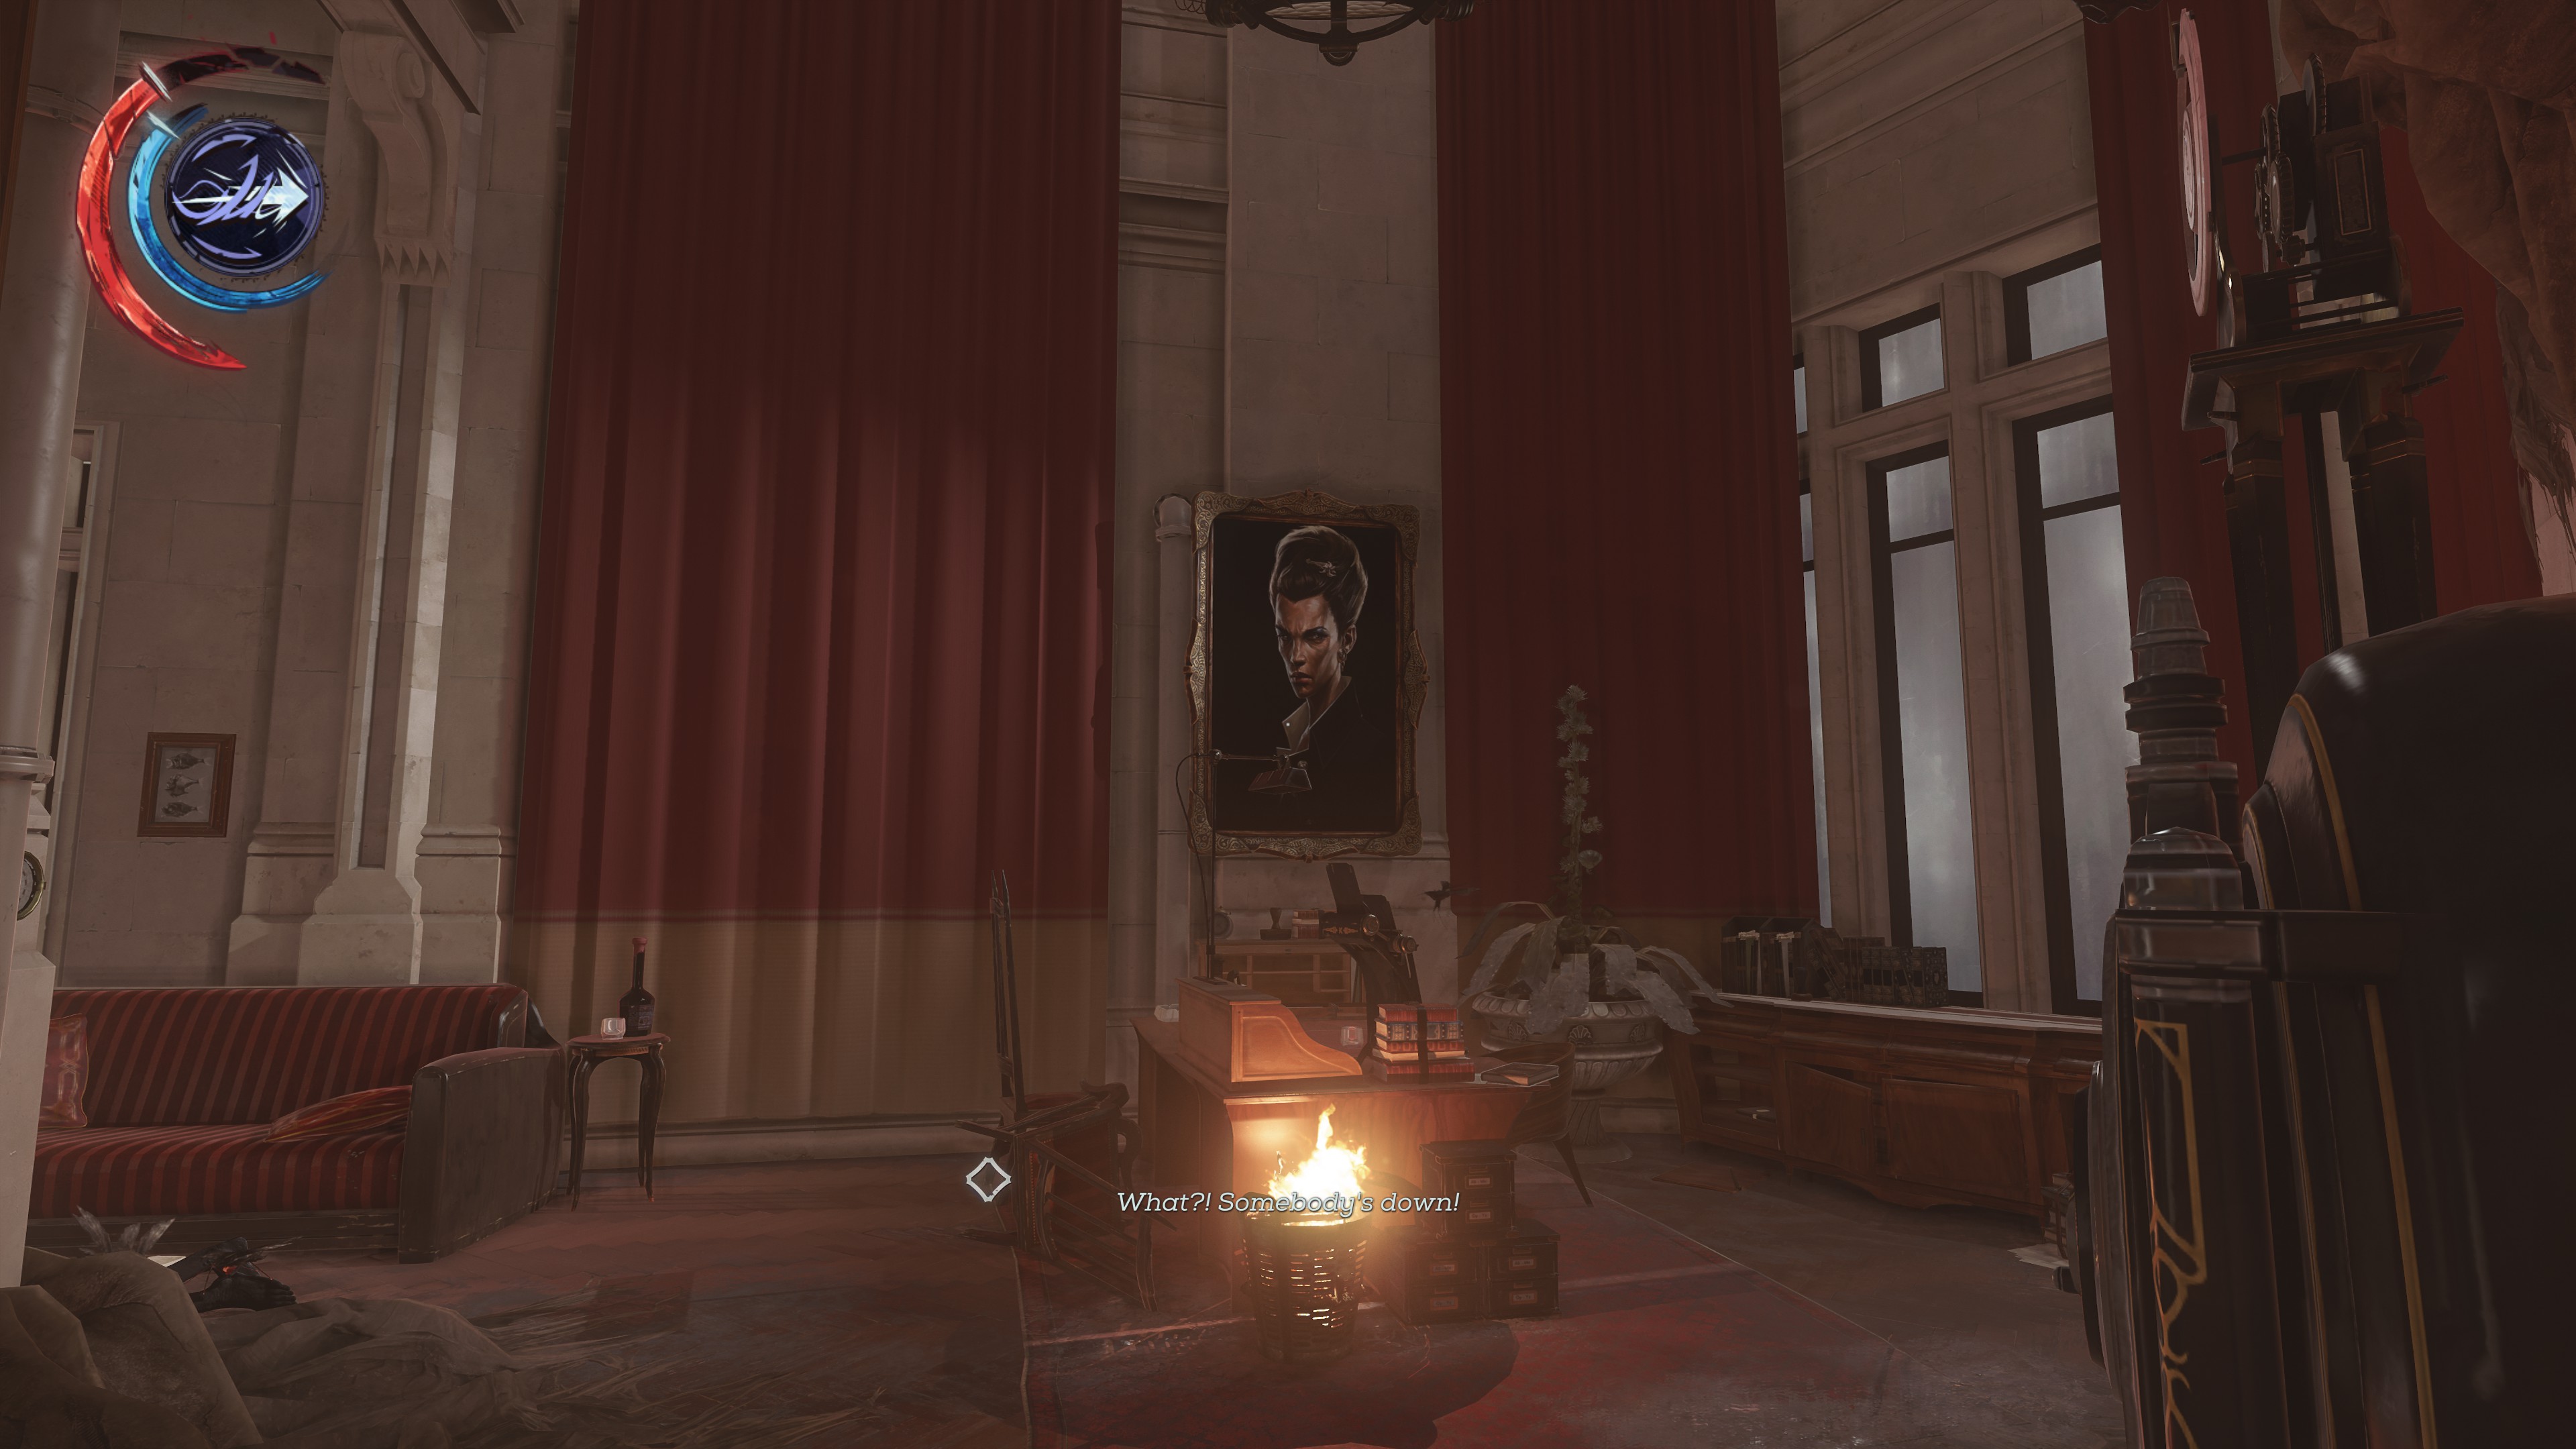 Ashworth Within An Existential Graph
In Bloodfly apartment across from conservatory
ㅤ
ㅤ
ㅤ
ㅤ
19
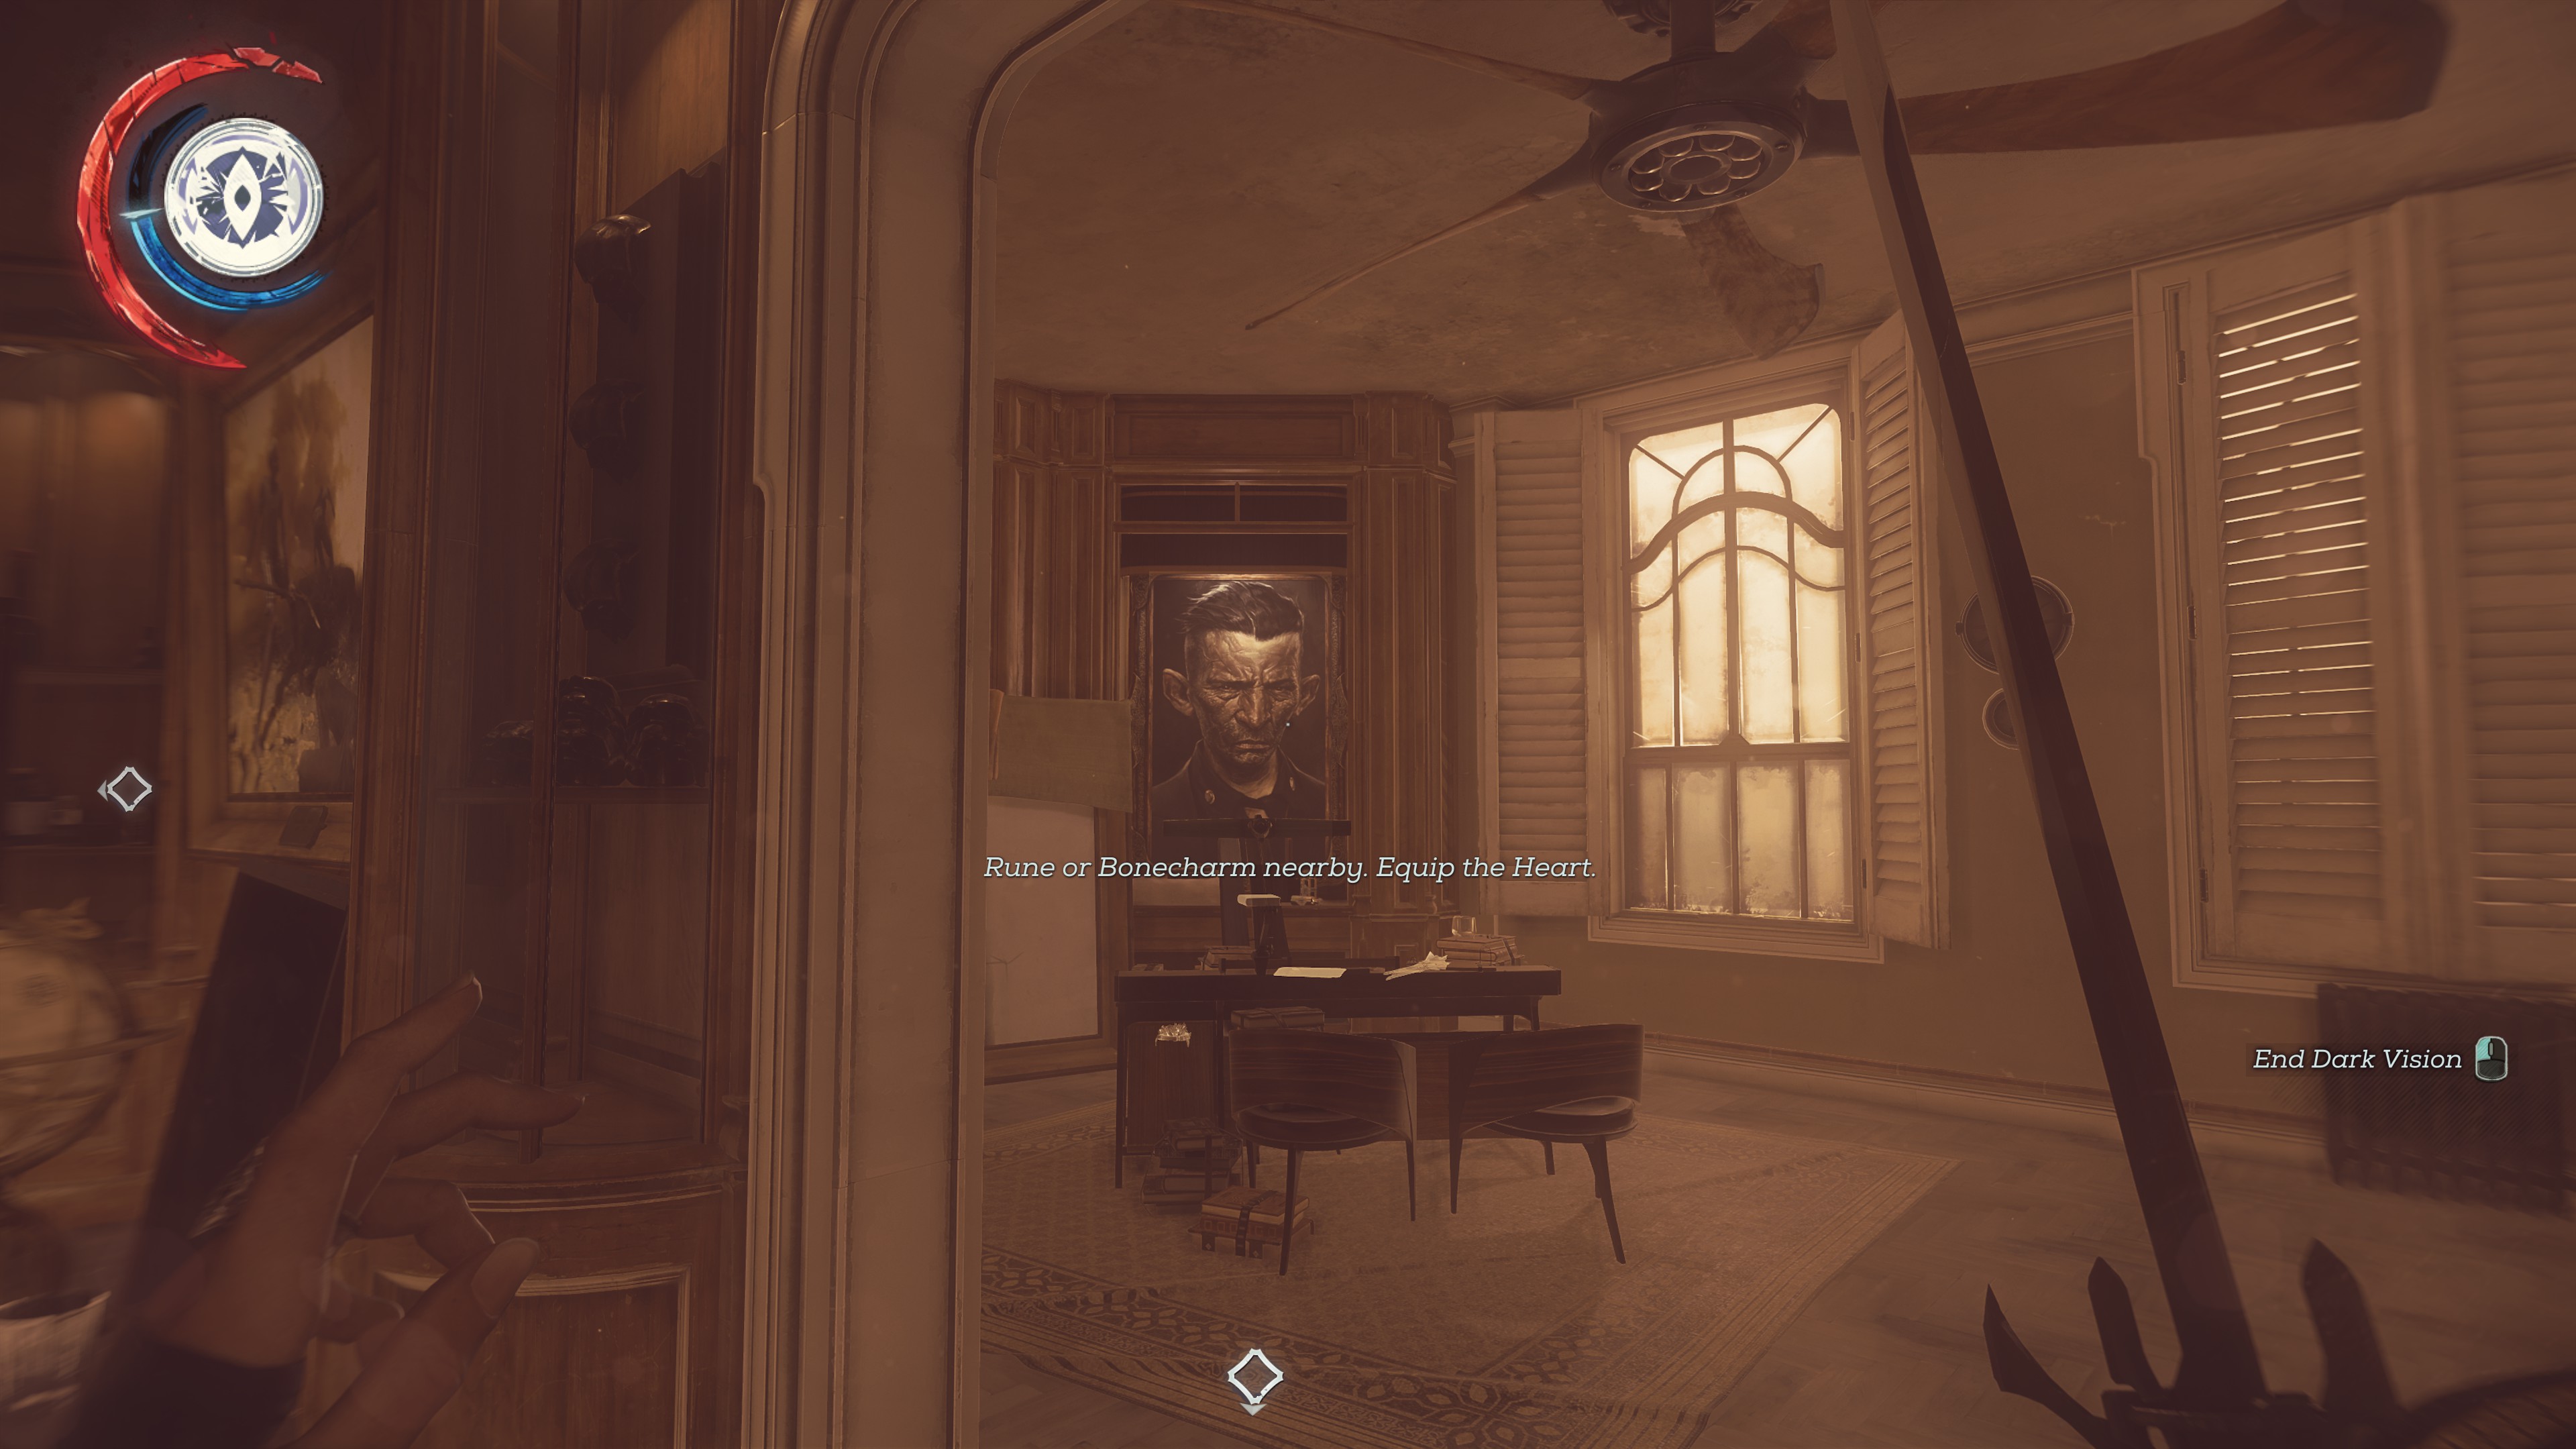 Paolo and the Inaccessible Cardinal
In Paolo's apartment in the Crone's Hand Saloon, on the top level
ㅤ
ㅤ
ㅤ
ㅤ
20
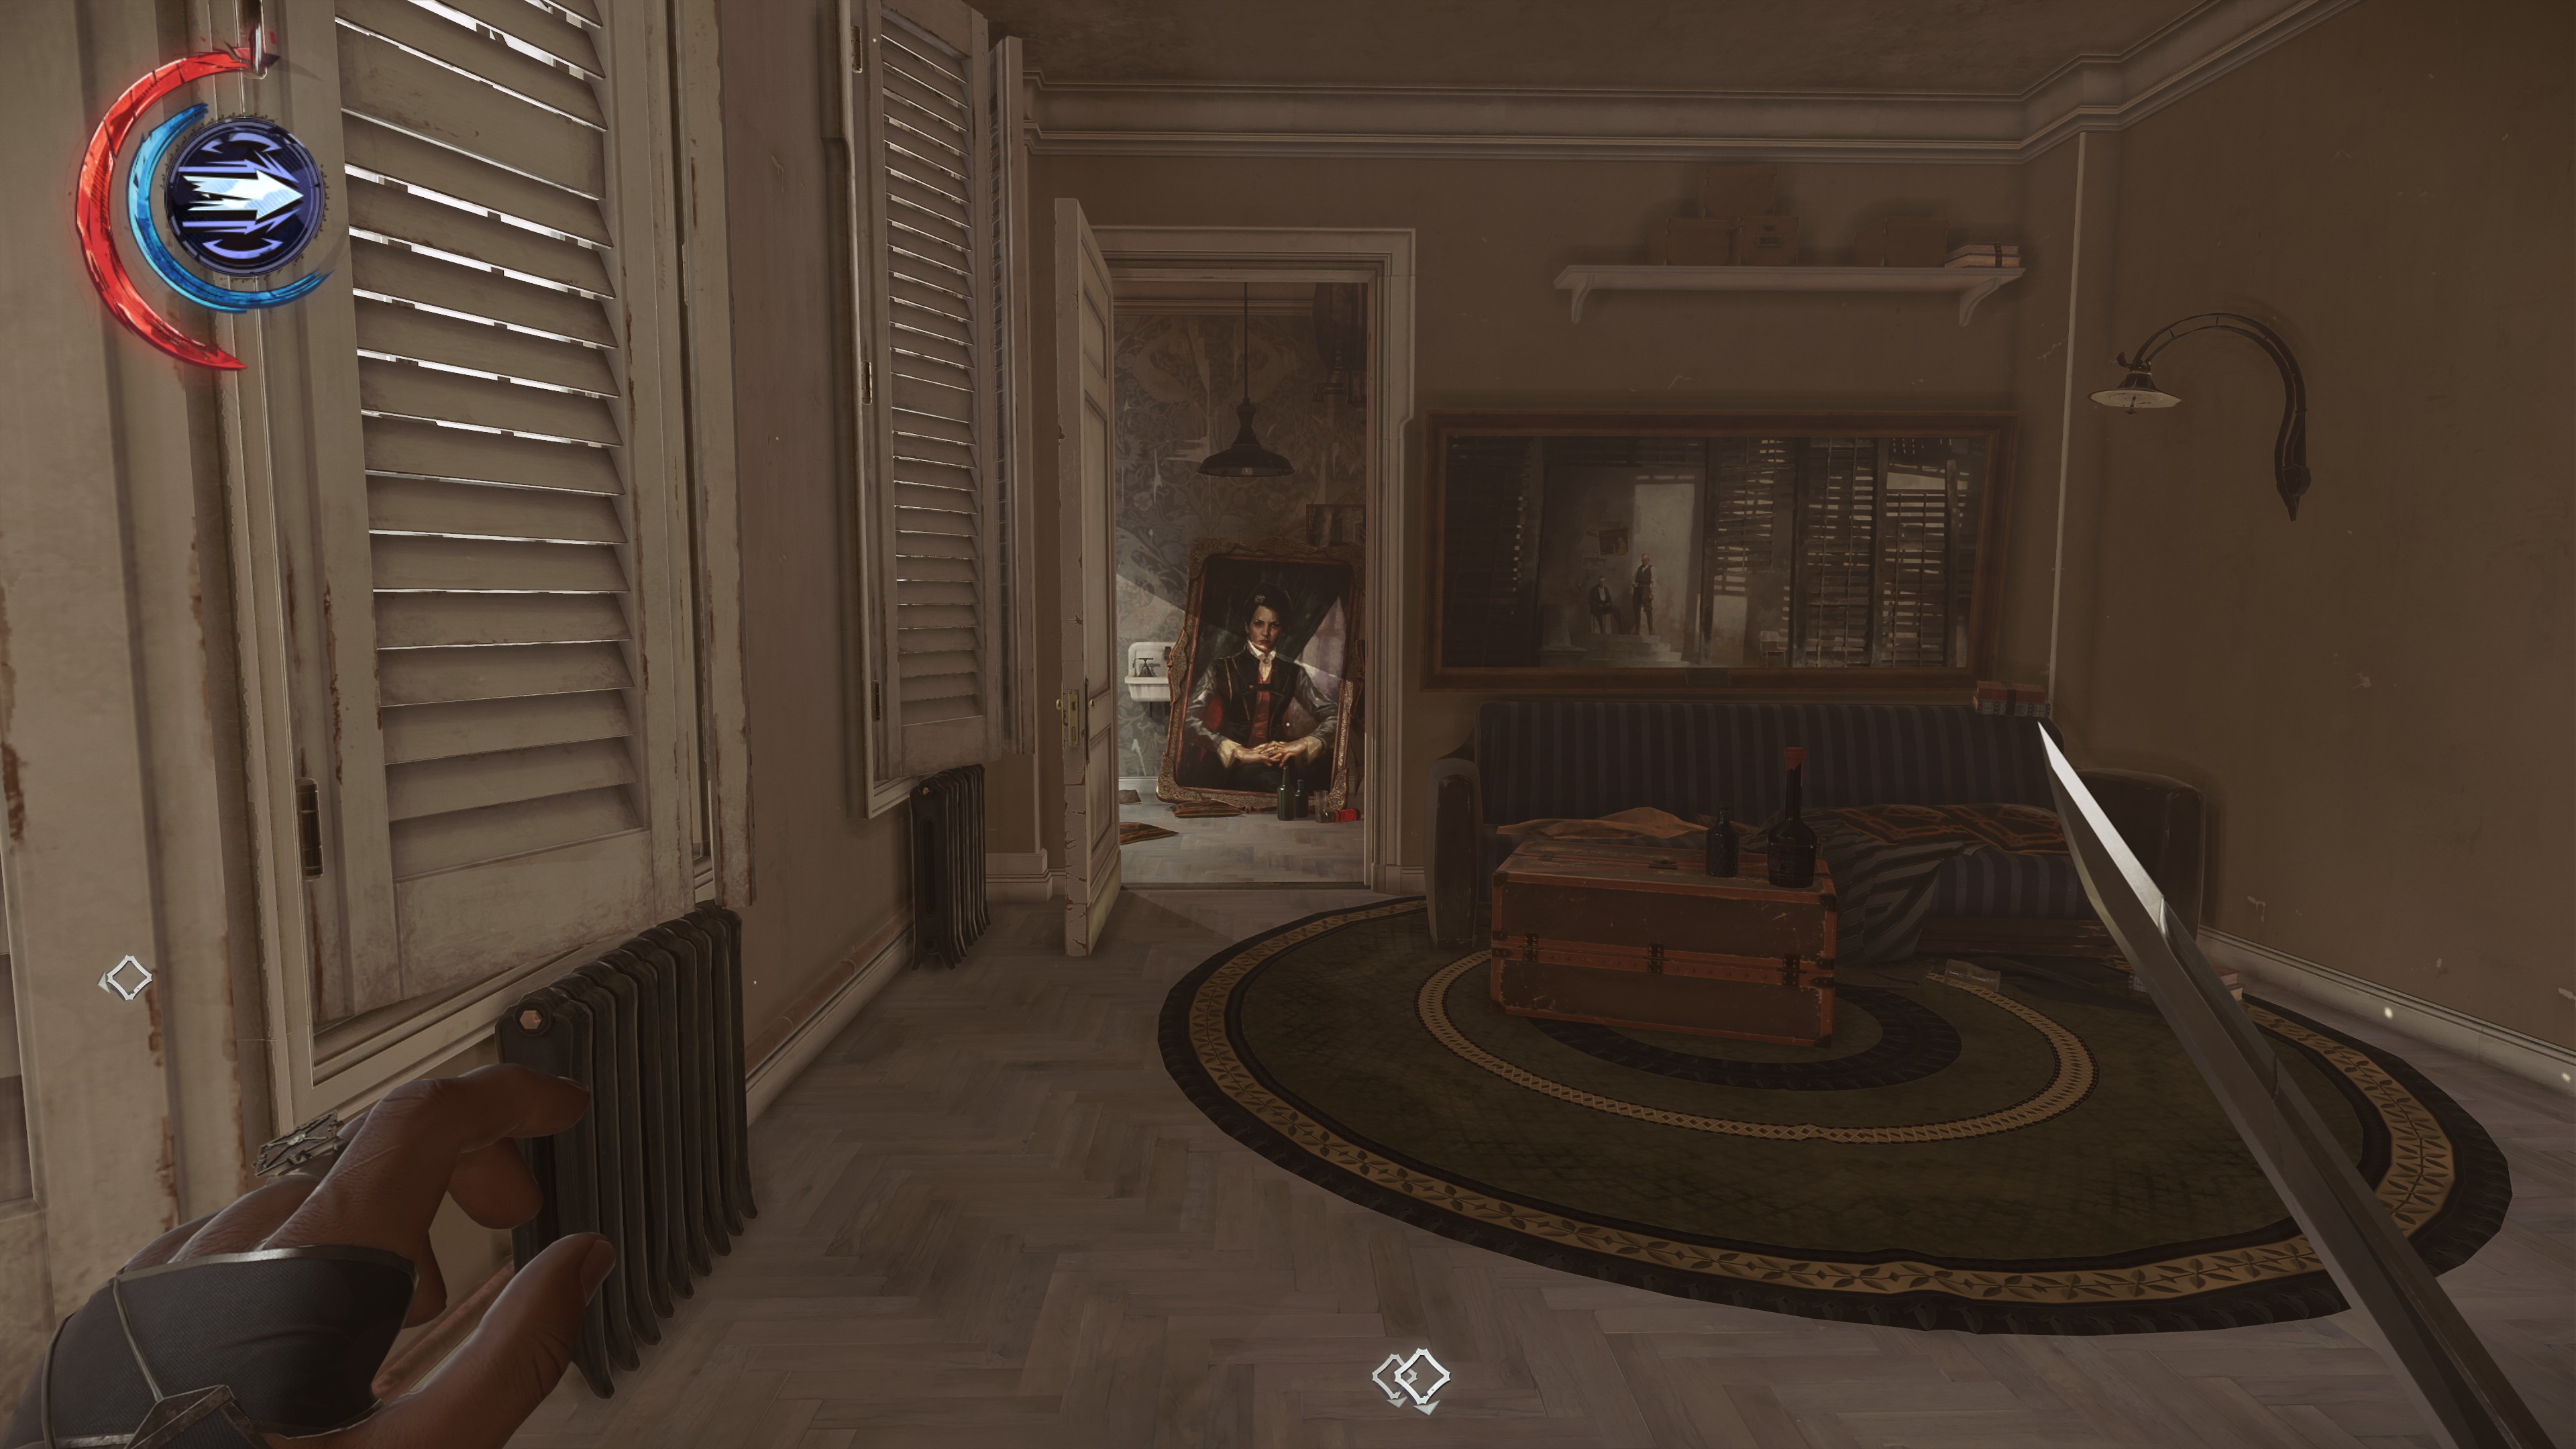 Vera Moray And The Affix Of Her Skin
Near the Shrine also located in Paolo's apartment in the Crone's Hand Saloon, on the top level
ㅤ
ㅤ
ㅤ
ㅤ
21
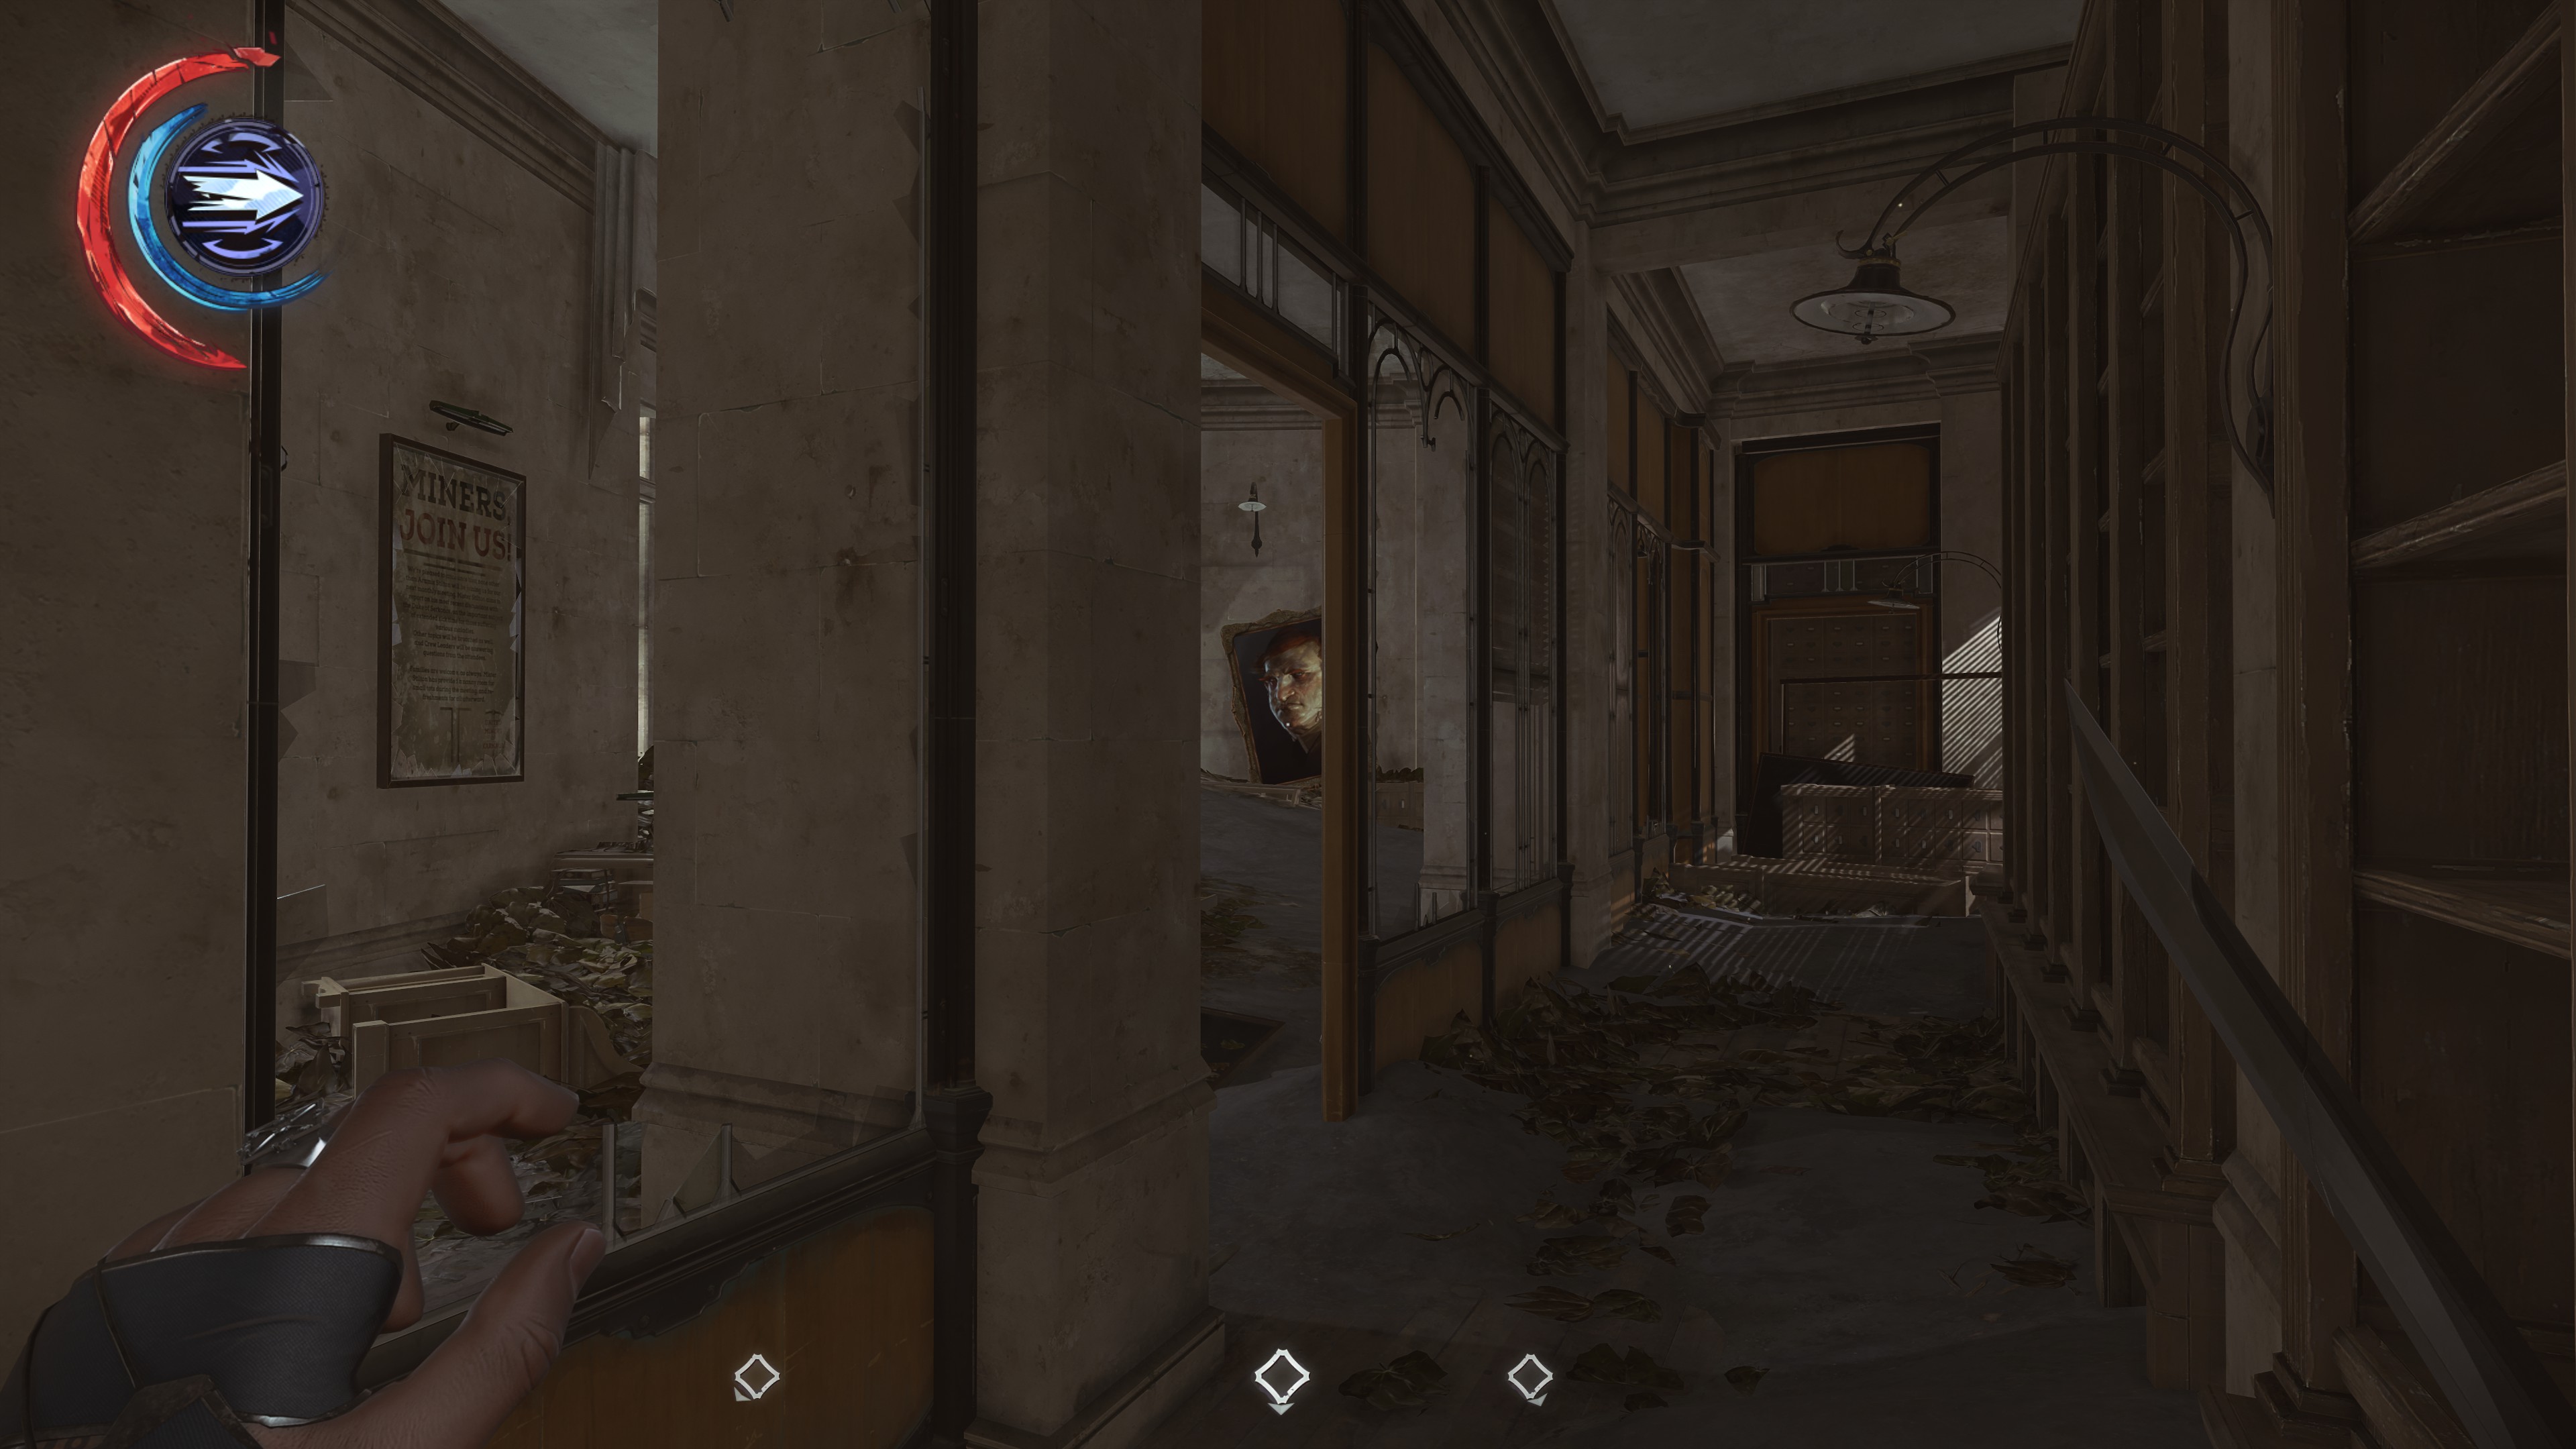 Indiscrete Time Finds Aramis Stilton
On the top level of the overseer outpost, jump up from Vice Overseer Byrne's office to the left side of the top floor
ㅤ
ㅤ
ㅤ
ㅤ
22
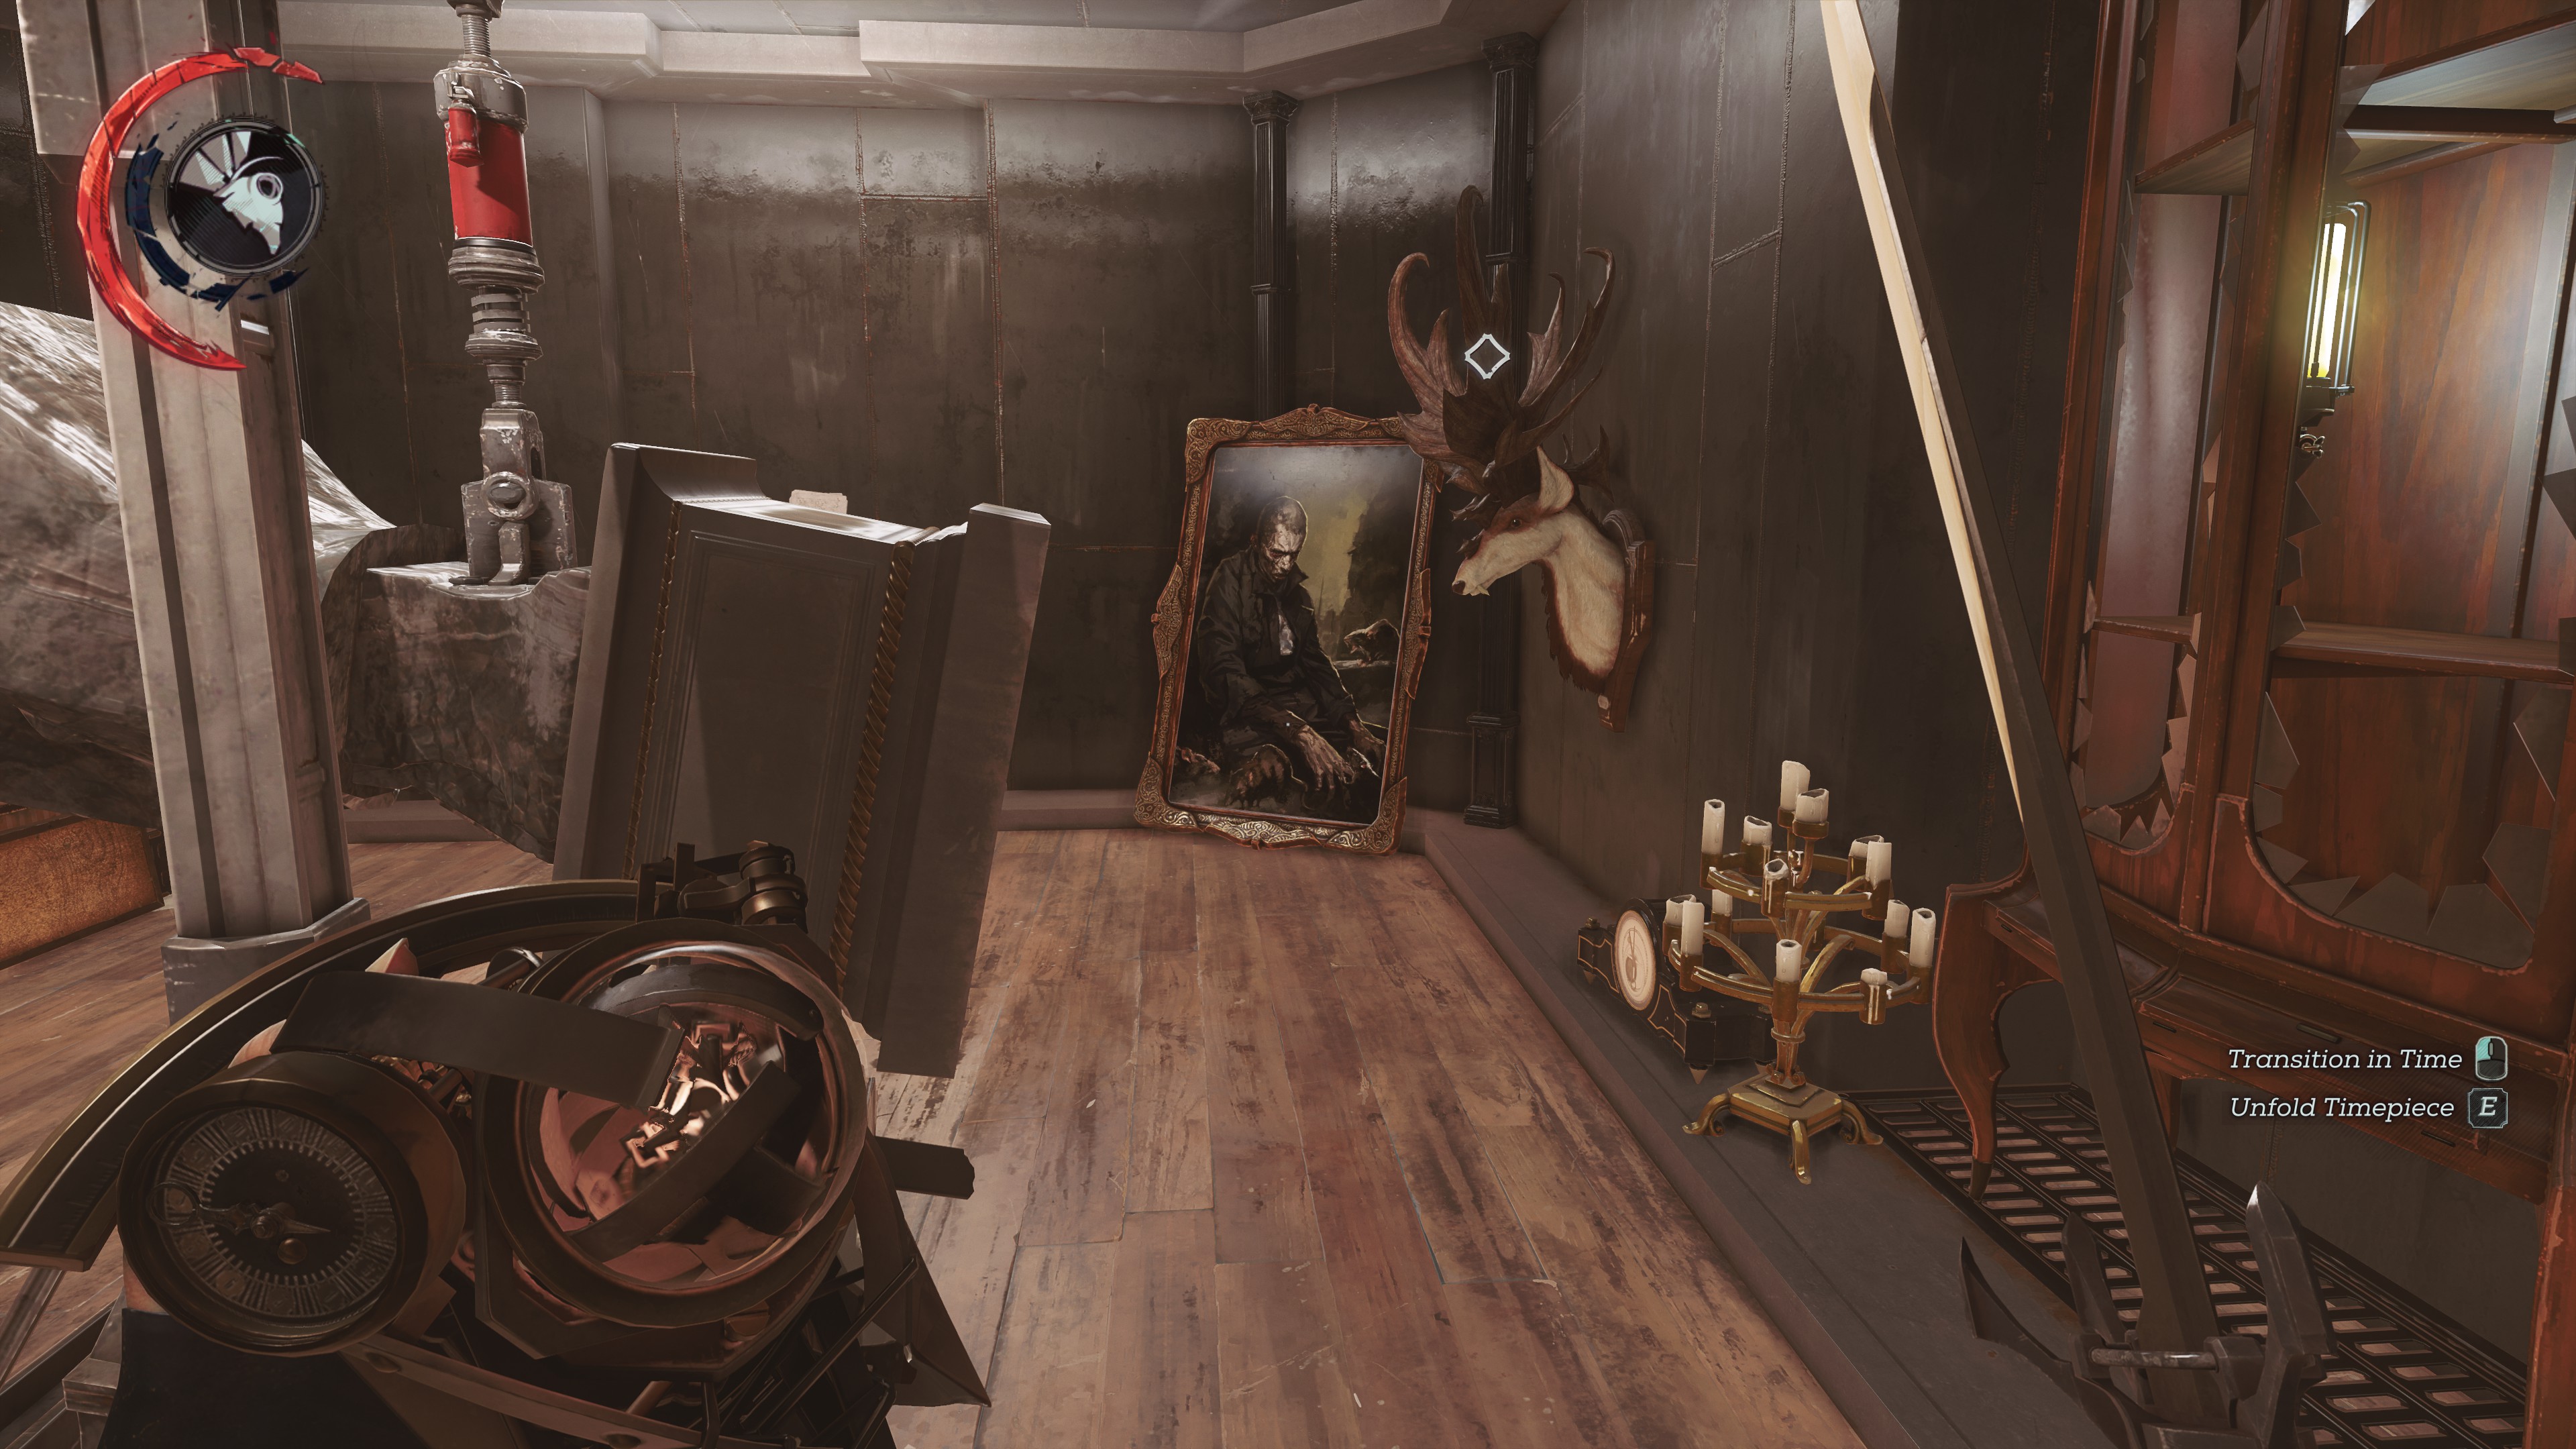 The Commutative Rats And The Weeper
In Stilton's vault only available in the past
ㅤ
ㅤ
ㅤ
ㅤ
23
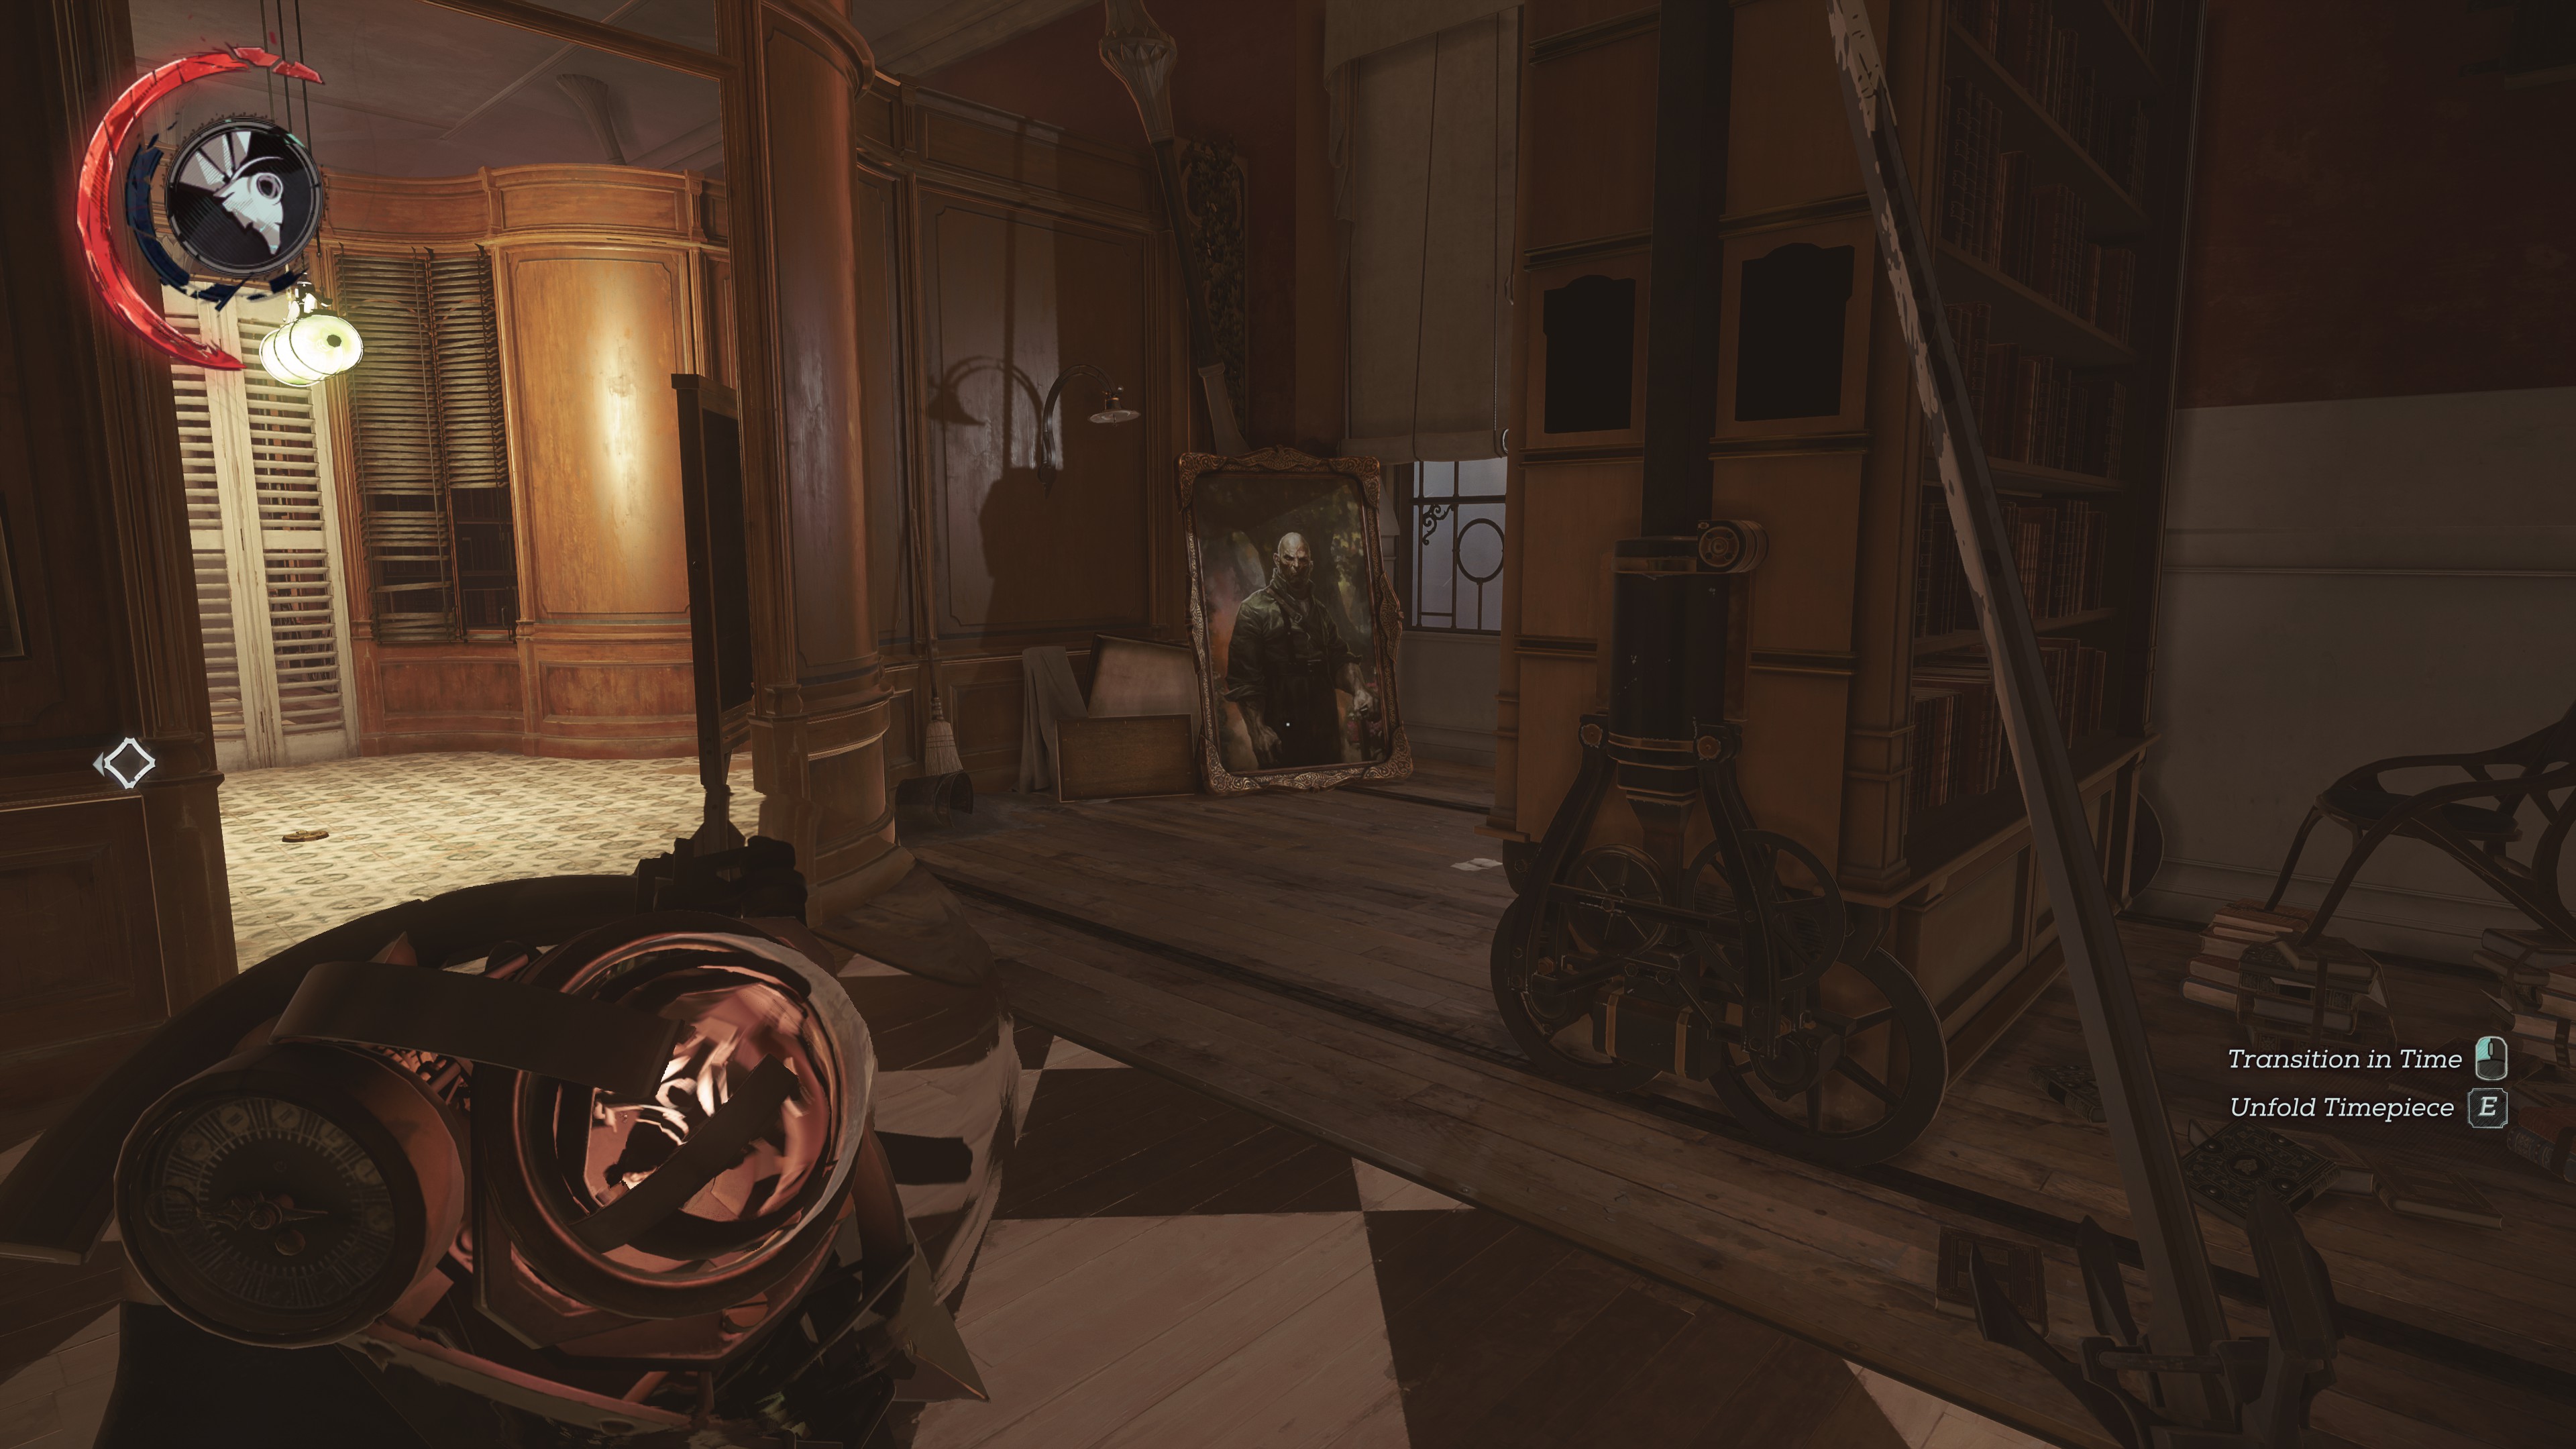 The Torturer’s Quaternionic Groan
In the library/butterfly room on the second level above the pool, only available in the past
ㅤ
ㅤ
ㅤ
ㅤ
24
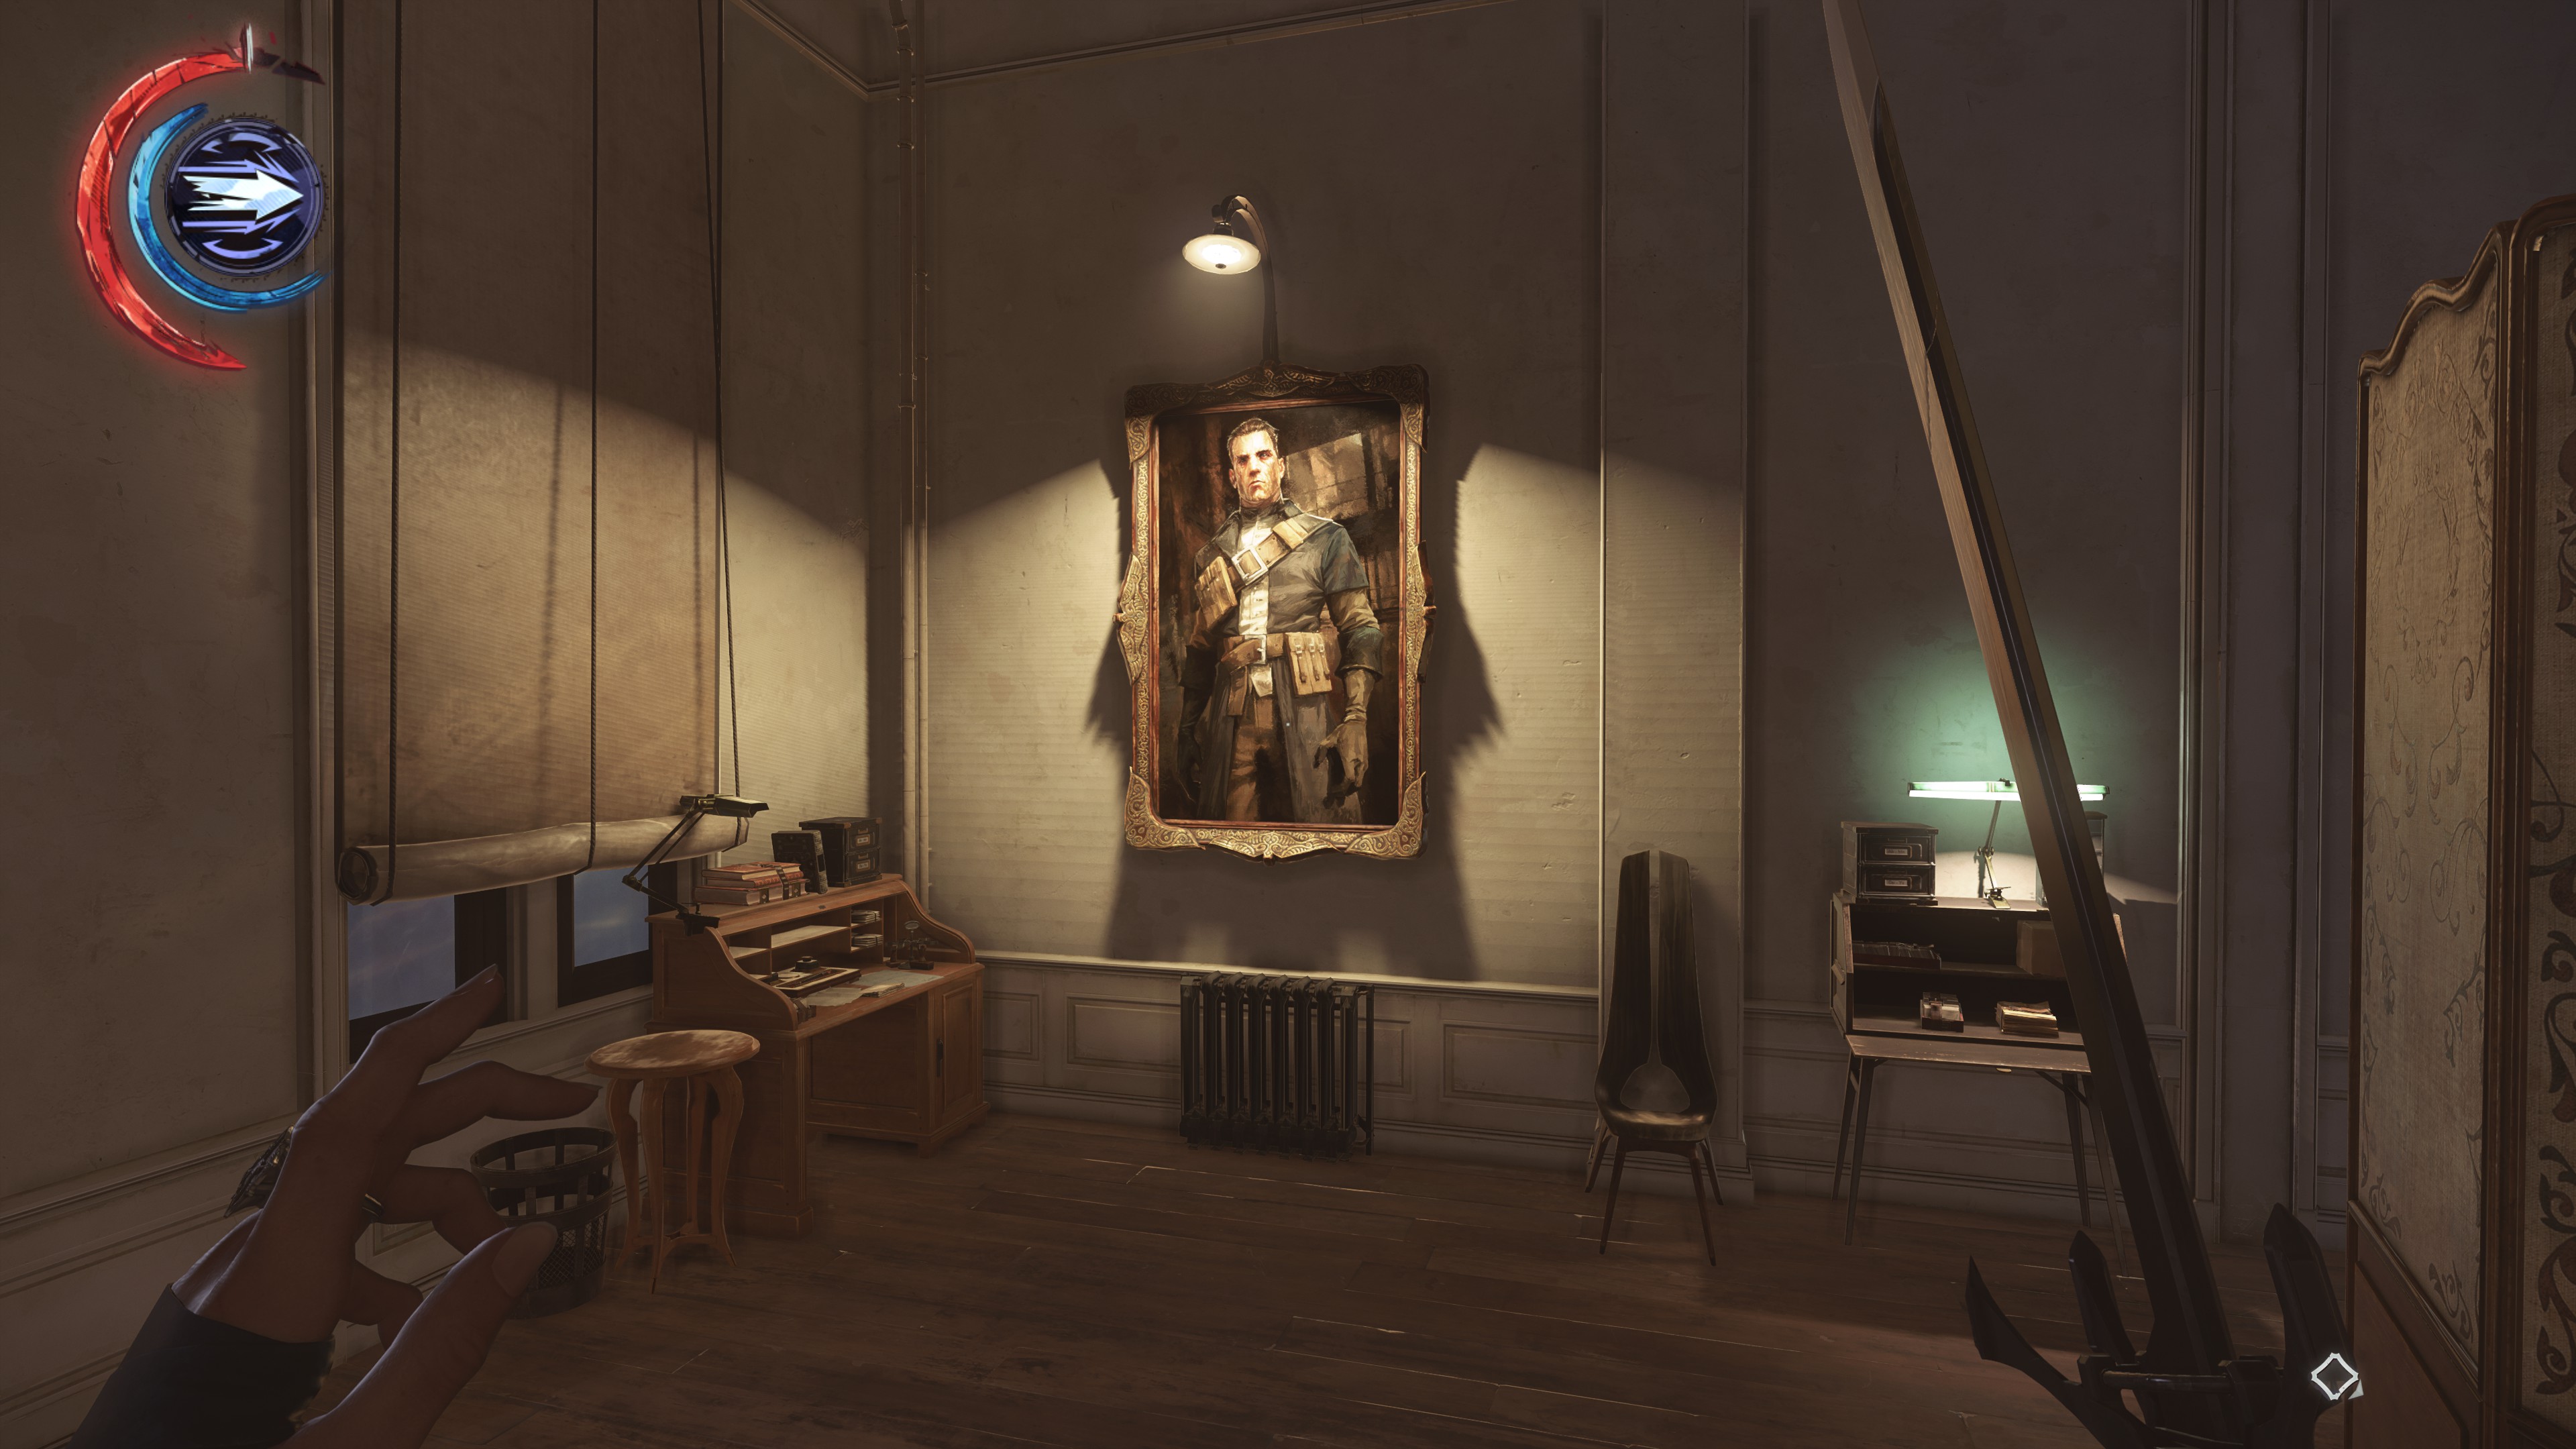 Daud and The Parabola of Lost Seasons
In the apartment directly below the windmill near the watchtower
ㅤ
ㅤ
ㅤ
ㅤ
25
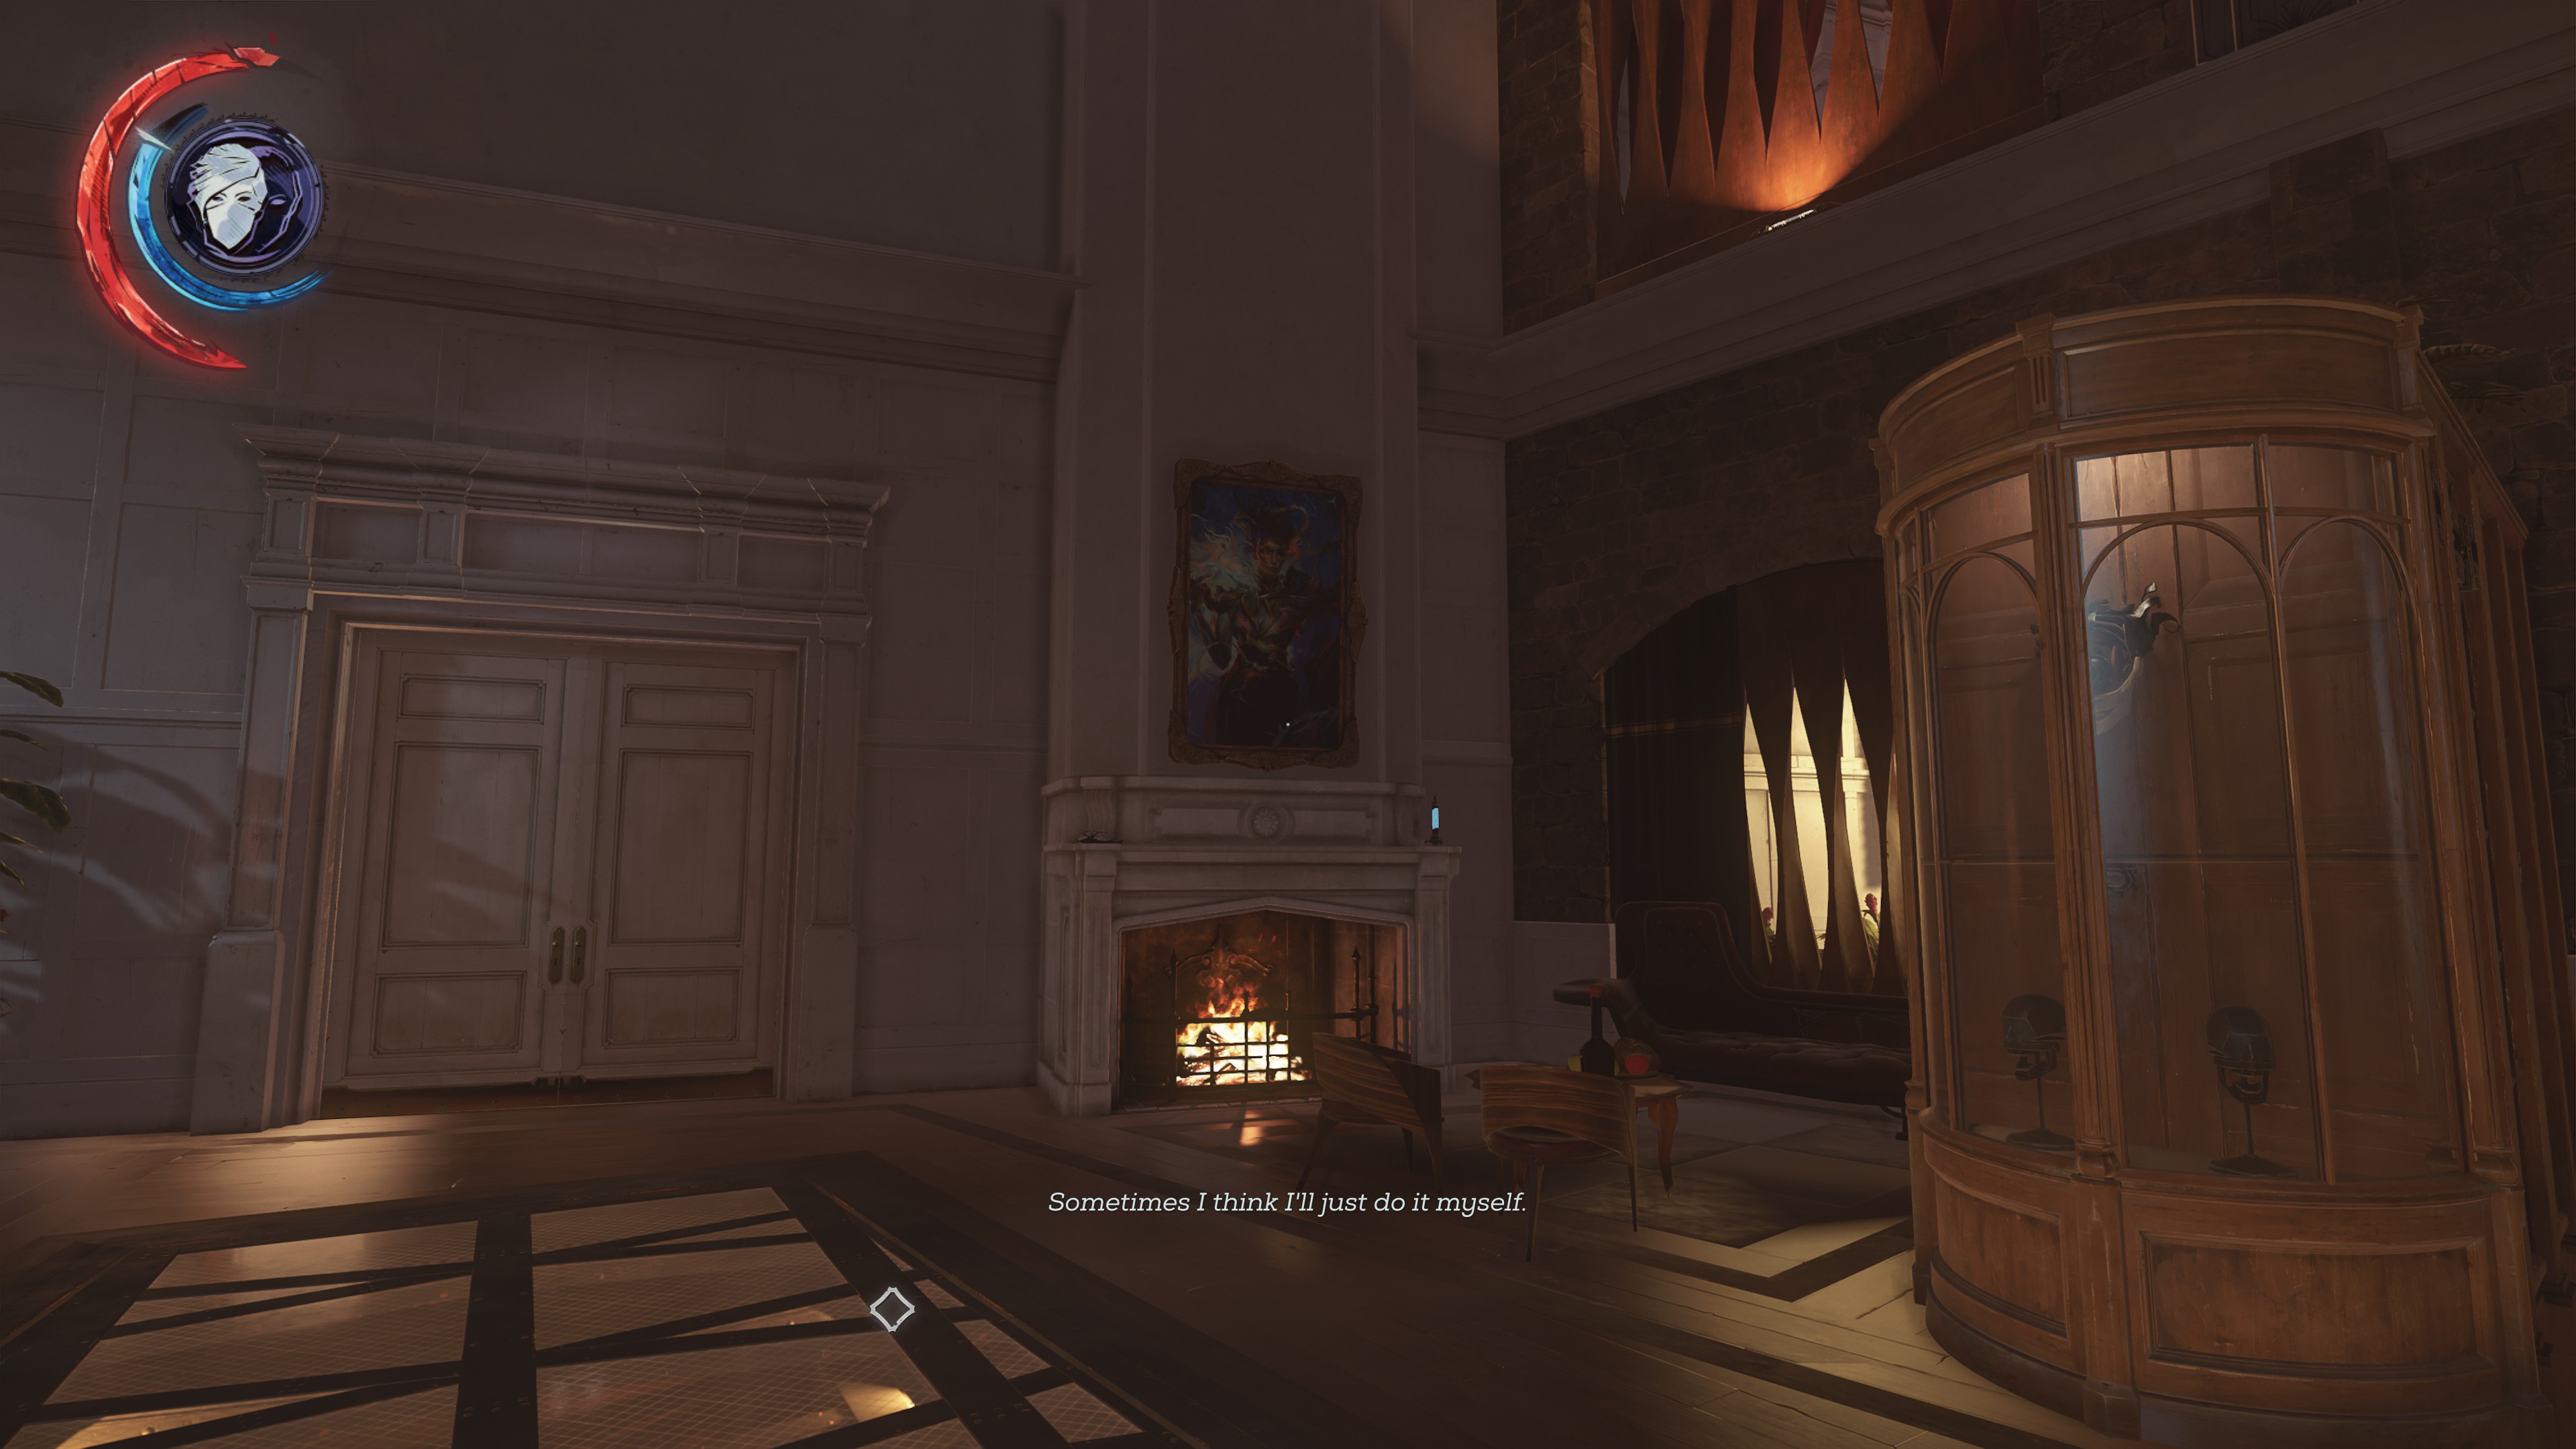 My Name On Their Lips
Above the fireplace in the Grand Duke's office
ㅤ
ㅤ
ㅤ
ㅤ
26
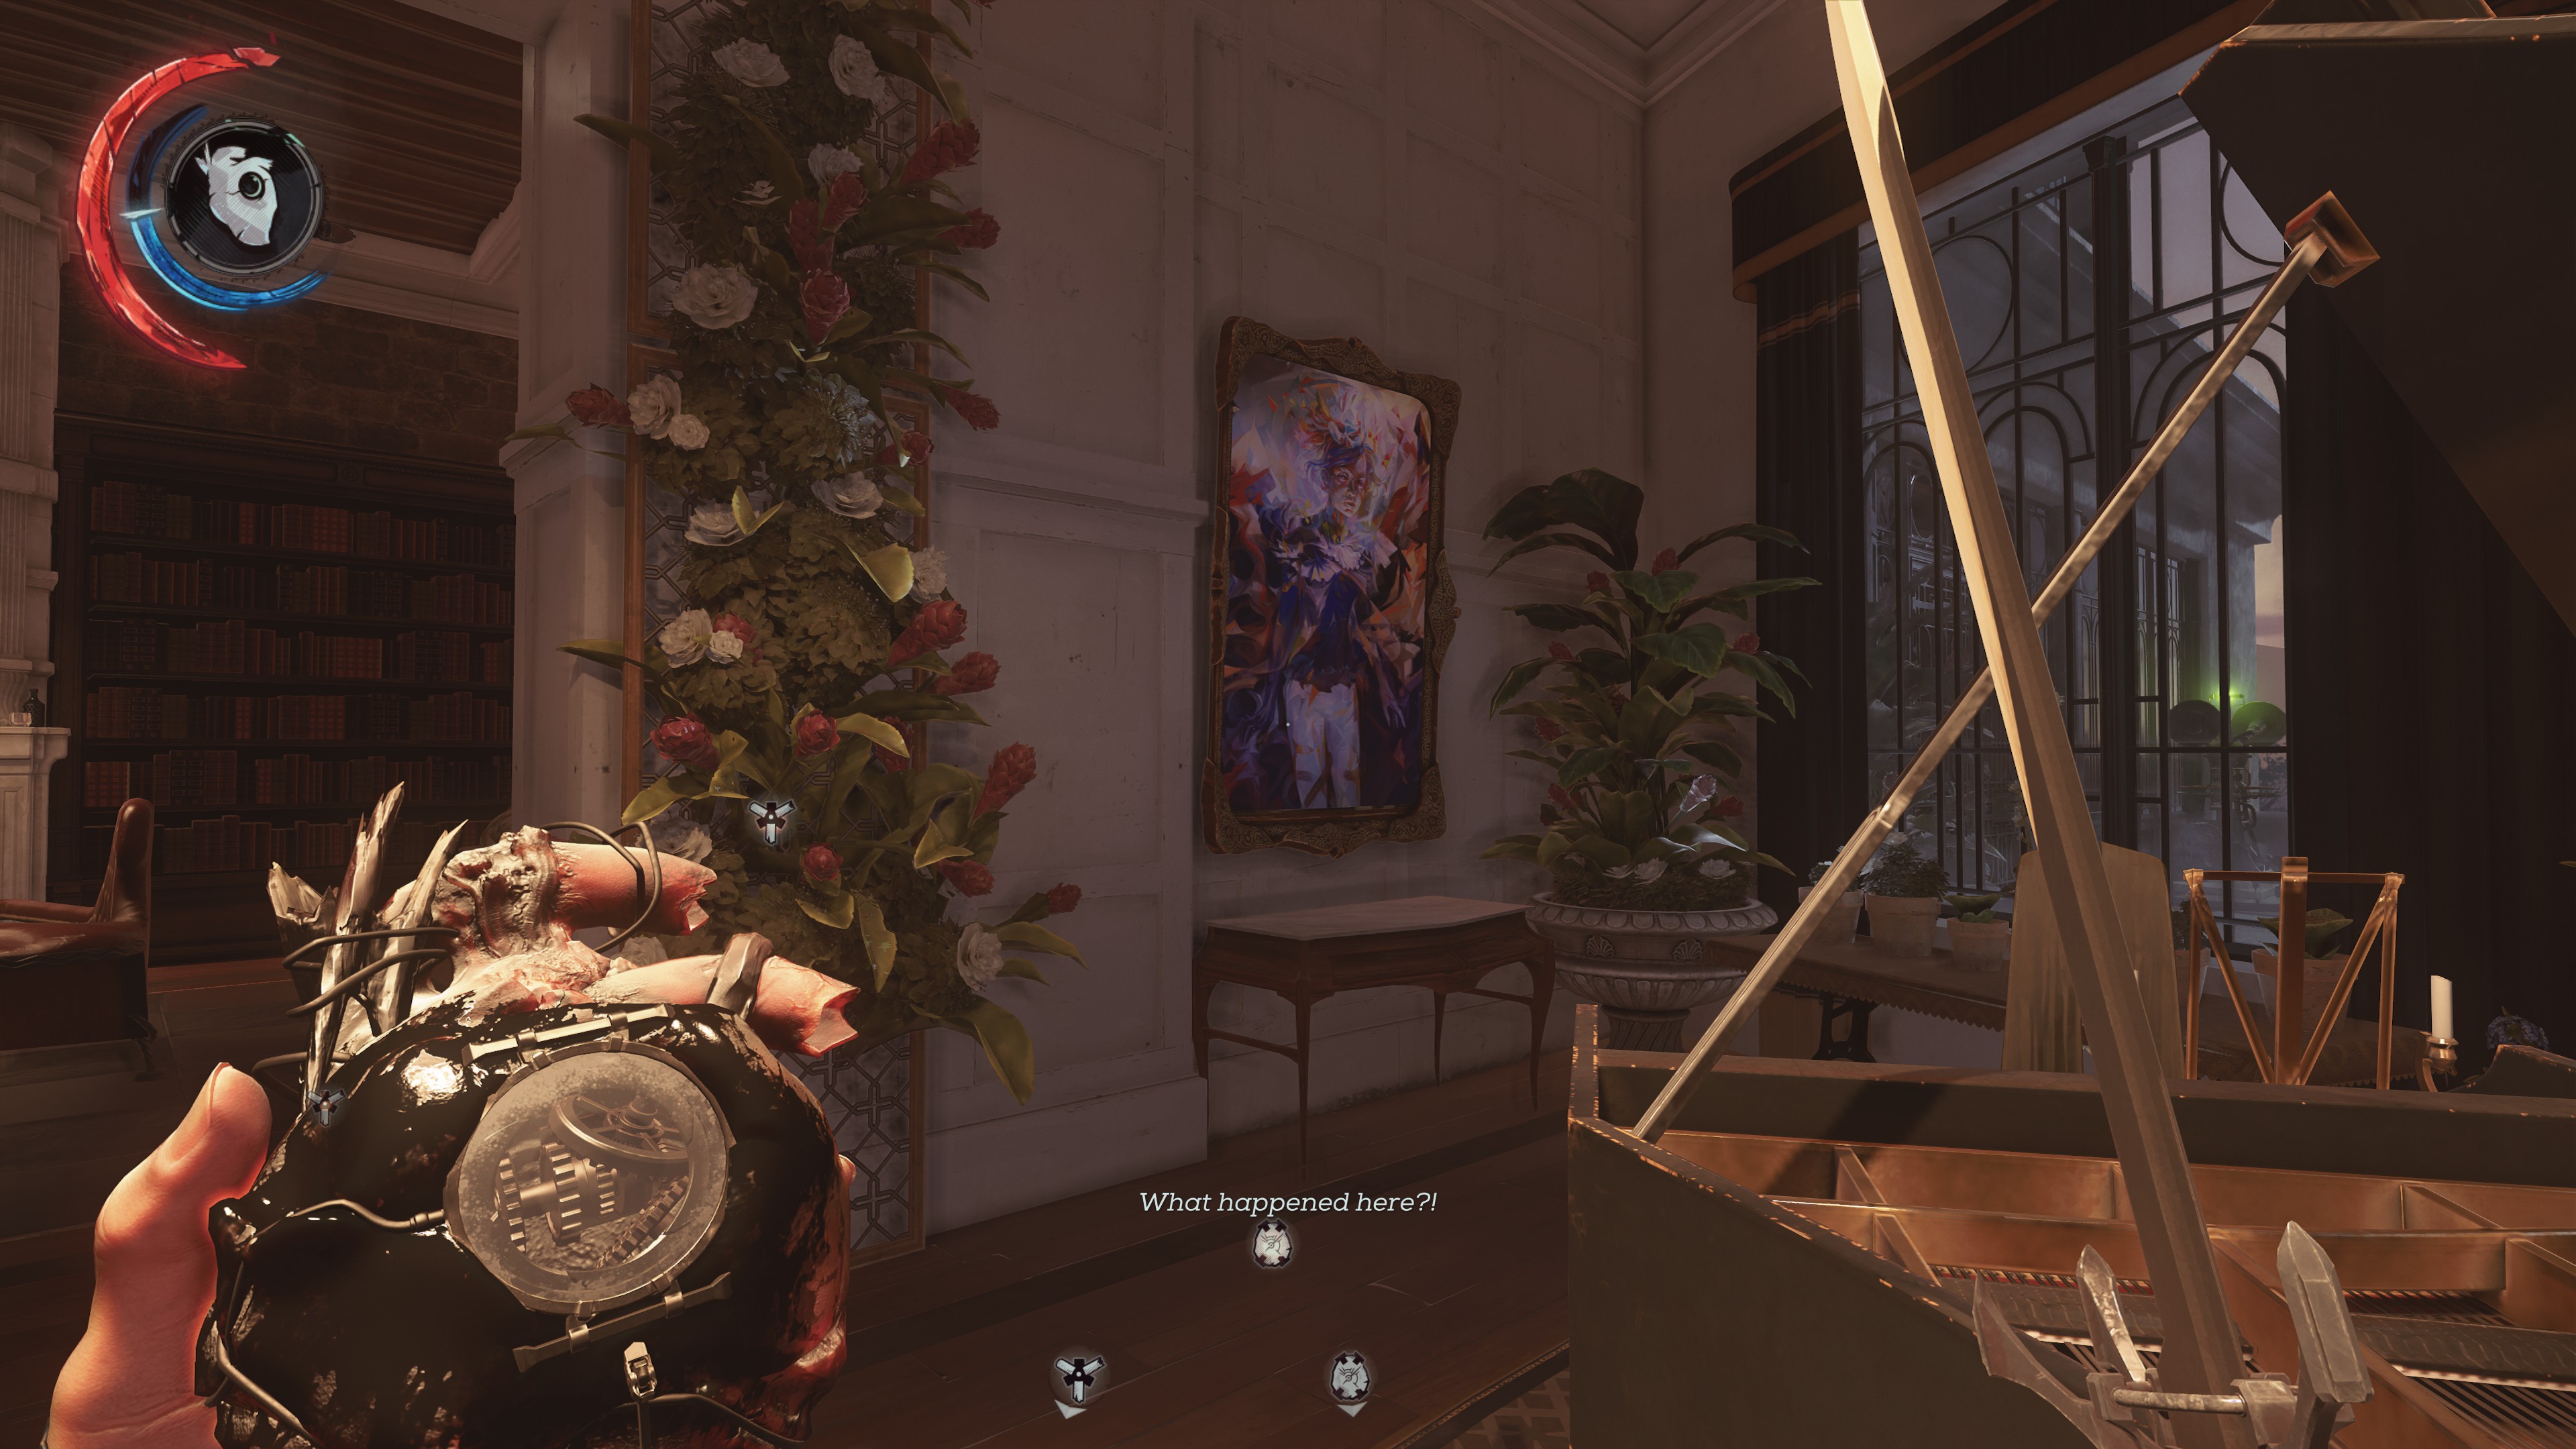 Her Face Is My Smile
Near the piano in the Gallery beside the Grand Duke's office
ㅤ
ㅤ
ㅤ
ㅤ
27
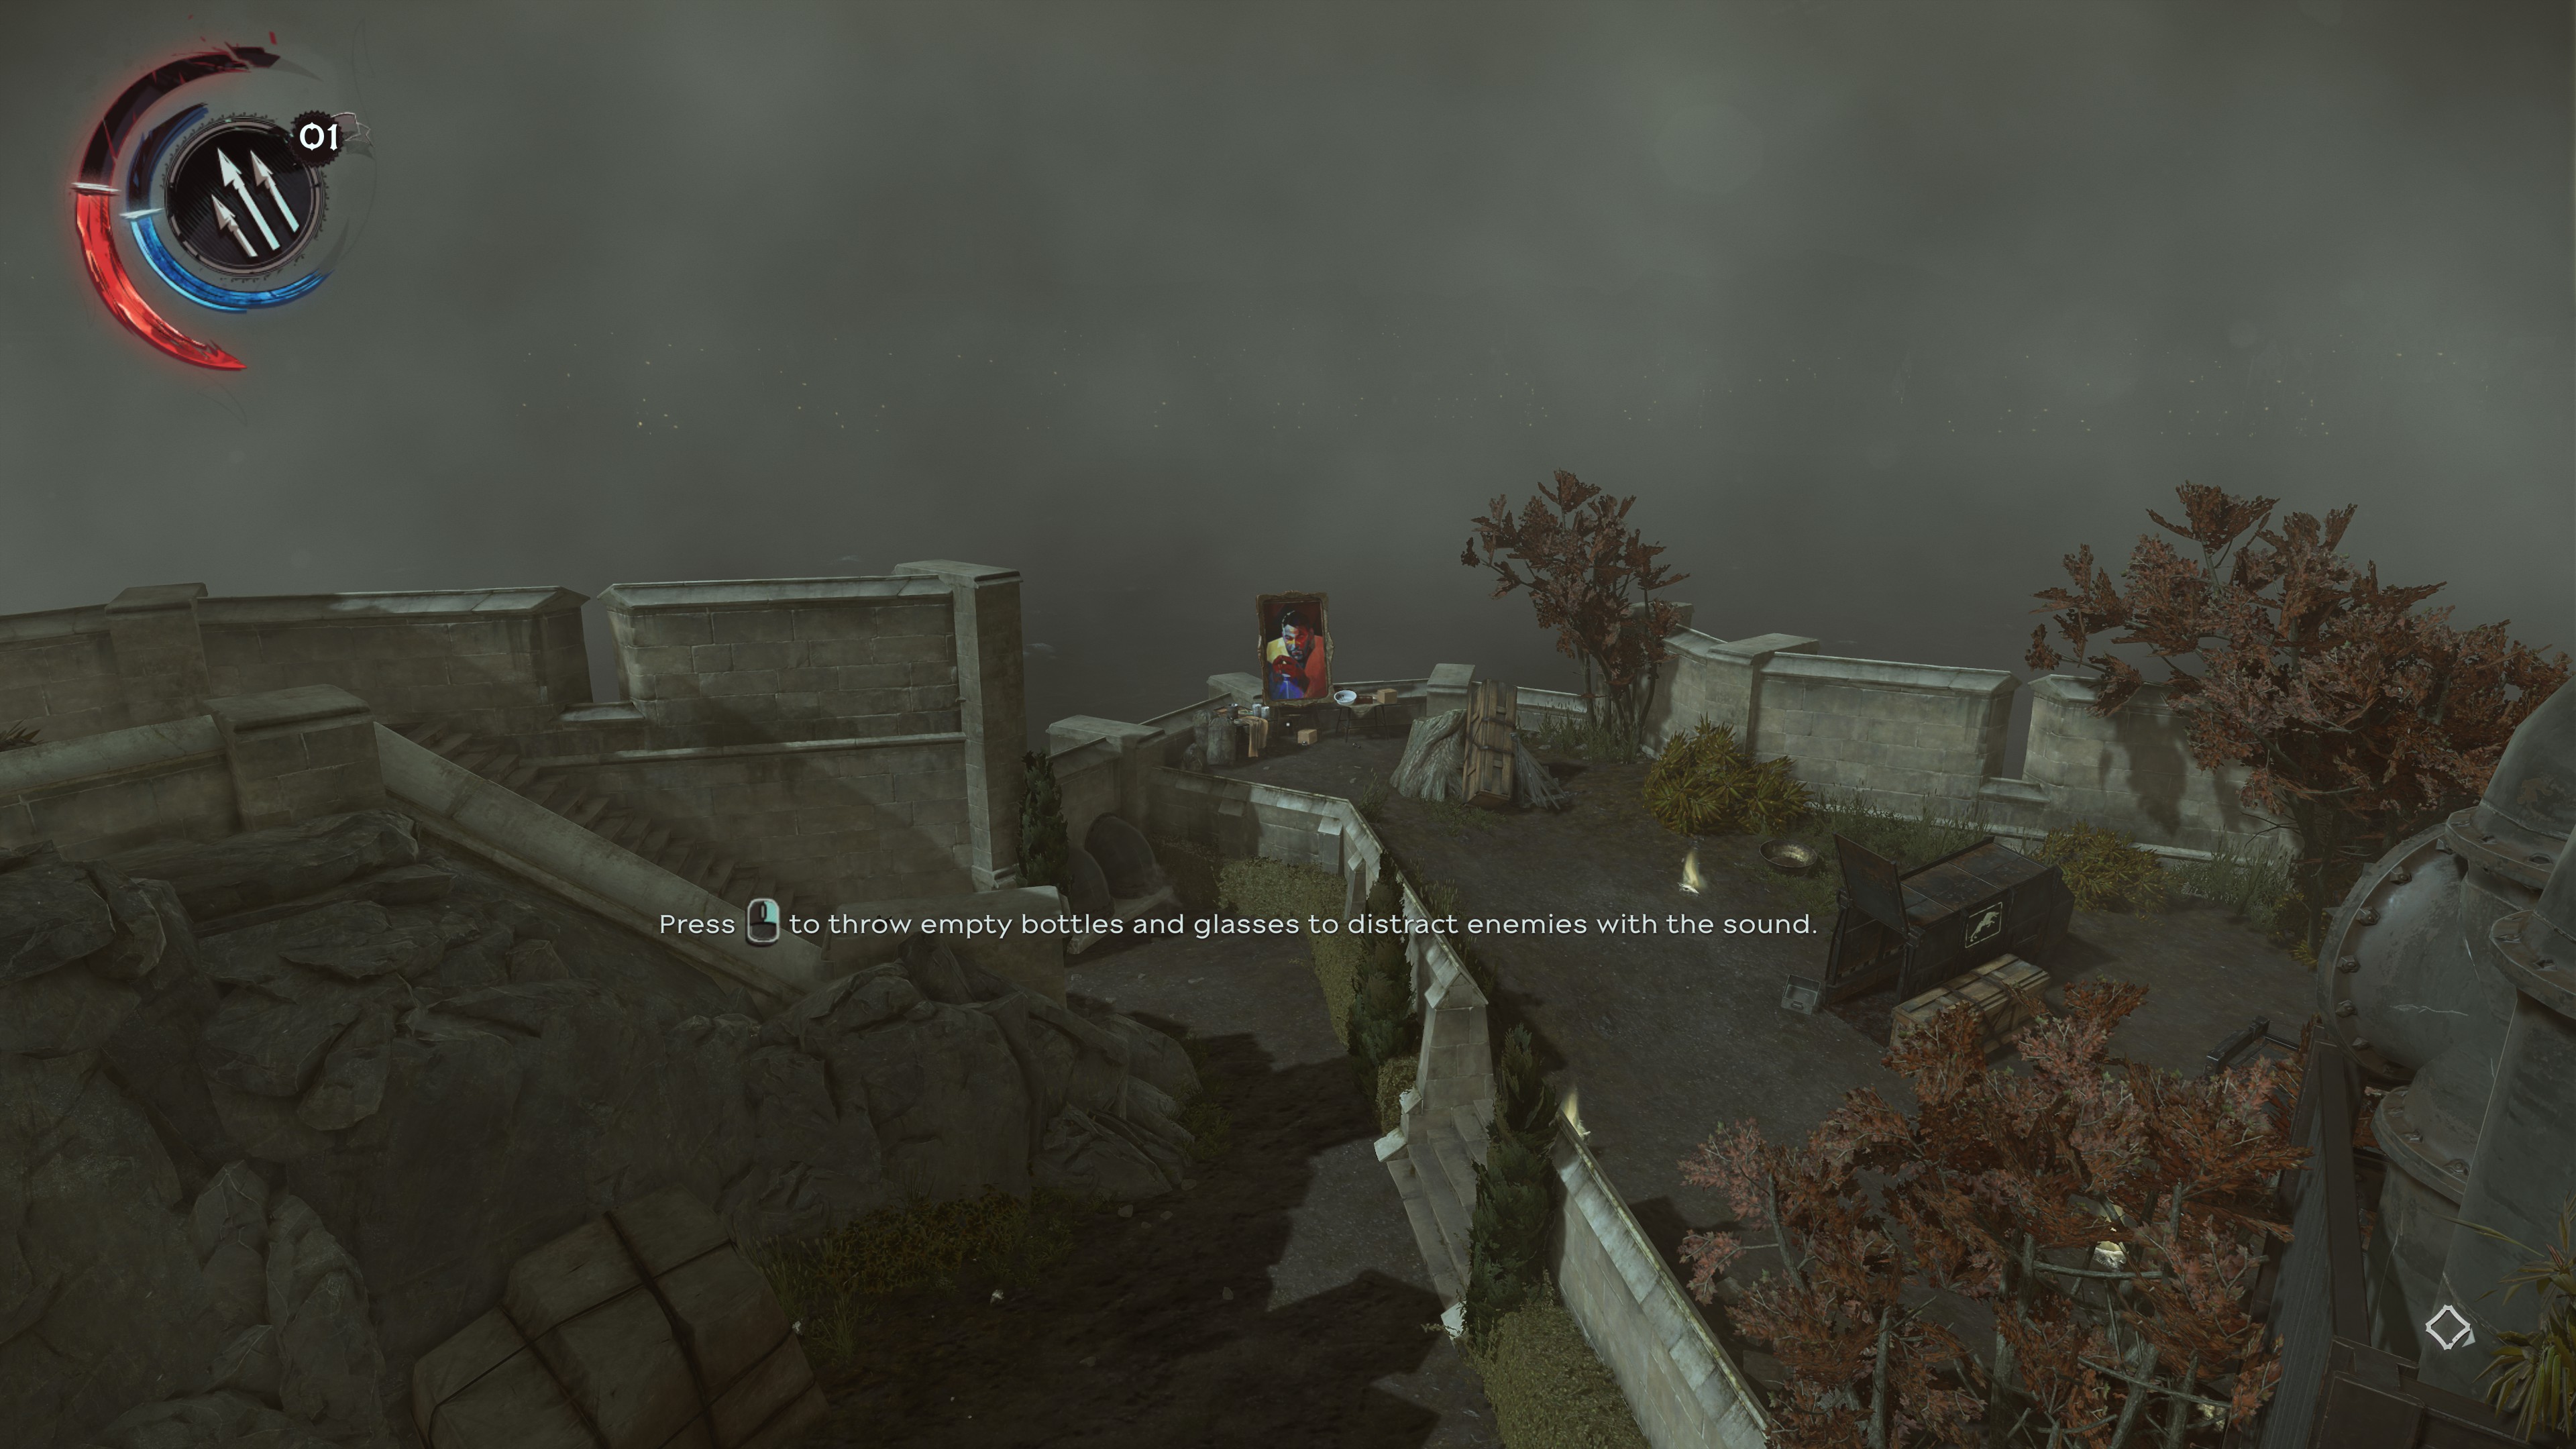 Lucia, His Eyes Upon Me
In the courtyard below Empress Jessamine's Grave/Gazebo
Multiple Levels Achievements
 Place of Three Deaths
"Kill Paolo three times"
To Complete: To kill Paolo three times, you must first kill him on the clockwork mansion mission when he arrives at the black market shop in the Aventa District, he will turn into a bunch of white rats.
Then on the Dust district mission, kill him two more times. He can be found the first time at the bottom of the Crone's Hand Saloon. Upon death, he will reappear in his apartment on the top level by the overseer shrine.
 Familiarity Breeds Contempt
"Rob Dr. Galvani twice"
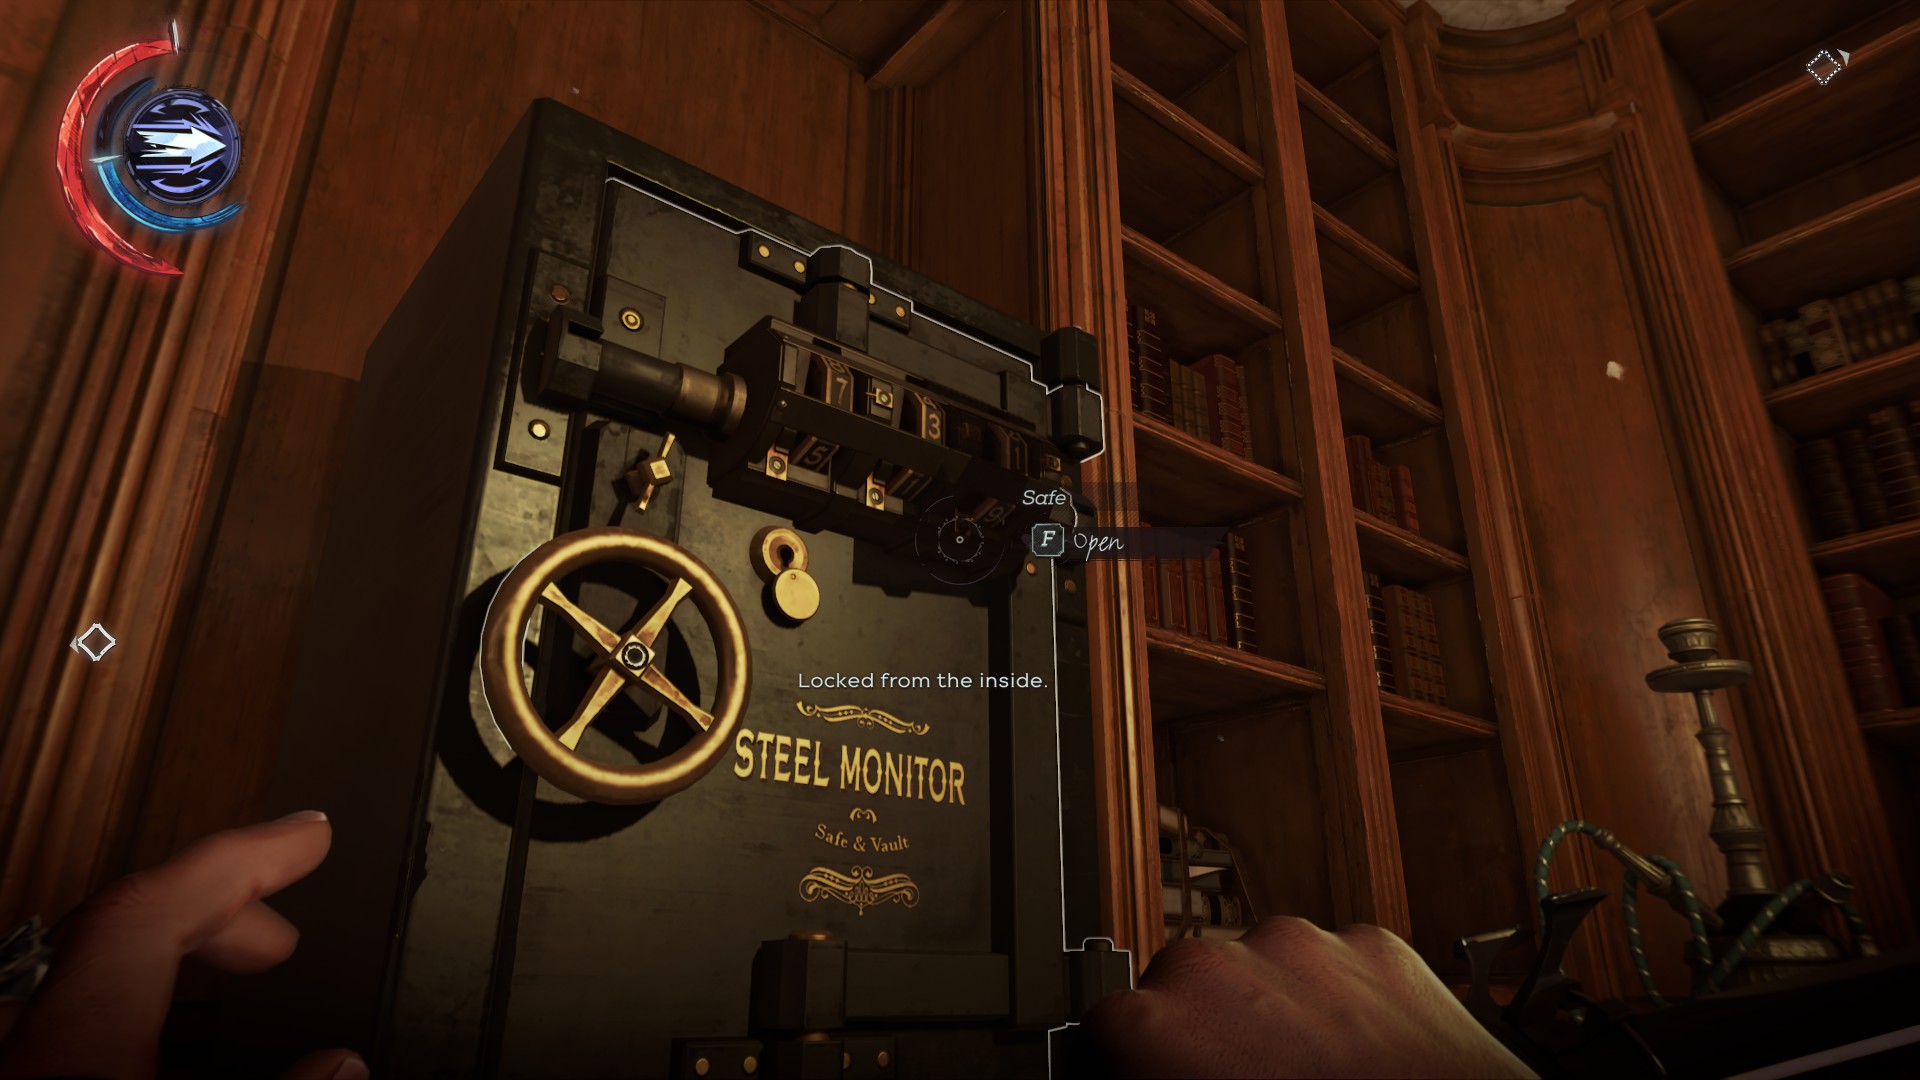
To Complete: Break into Galvani's safe in the first and last mission. Dr.Galvani's shop is the first door on the left when facing away from Dunwall tower/looking down the road torwards the harbor. It is a street level entry and the safe is in the left-most room.
The combination to the safe is always the same on every playthrough: 451. And it will be the same combination when you revisit it again on the last mission. Furthermore, on the last mission, the front door is trapped and will release explosives when opening it.
 Songs of Serkonos
"Find 3 musical duos across Karnaca, and listen to their songs."
To Complete: This one is deceptively difficult, as there are no indications for when you have listened to enough of thier songs.AS SUCH IT IS RECOMENDED THAT YOU LISTEN TO THE BAND FOR 10-15 MINUTES. Yes it is a long time, but so is replaying the game because you didn't listen long enough. Furthermore, you can use your magnifying optics to listen in at a distance.
The band can be found for the first time in mission 2 (Edge of the World) outside of Addermire station next to the second wall of light. There is a balcony above them you can sit on and AFK safely.
The band can be found the second time in Mission 6 (Dust District) playing on the bottom floor of the Crone's Hand Saloon, it is recommended to listen from the top balcony or roof, as you can be spotted on the middle balconies. Using the magnifying optics is usually necessary for this.
The band can be found the third time in Mission 8 (The Grand Palace) in the palace district before entering the grand palace. They are off to the far left of the watchtower, surrounded by howlers. Yet again there is a balcony above them that you can AFK on safely.
- If you rob more than 1 black market shop, then the final appearance in the palace district will be replaced with a howler ambush. you can not rob more than 1 black market shop.
- It is recommended to listen to the bands for 10-15 minutes, I did 15, but I've seen people say they've only had to do 10 minutes.
- If any band members are killed at any point, they will no longer appear at subsequent spots. They must stay alive.
Action Achievements
 Rogue
Rogue"Eliminate 20 unaware enemies."
To Complete: Kill or Knock out 20 enemies, becoming aware counts as the guards detection meters filling completely white.
 Acrobat
"Eliminate 10 enemies with a drop assissination."
To Complete: Drop down and kill or Knock out 10 enemies, agility power makes this very easy as you can simply jump high into the air above an enemy from ground level and trigger an air assassination.
 Clockwork Collector
"Obtain numbered plates for 3 Clockwork Soldiers."
To Complete: Kill 3 clockwork soldiers, they will have a numbered plate on the right chest that falls off, pick up 3 of them in one playthrough and you should get this achievrment.
 Black Market Burglar
"Rob a Black Market Shop."
To Complete: Rob any black market shop, guide for robbing shops is found here:https://steamcommunity.com/linkfilter/?u=http%3A%2F%2Fdishonored.wikia.com%2Fwiki%2FBlack_Market_Shops%23Robbing
 Heart Whispers
"Using the Heart, listen to the secrets of 40 different people."
To Complete: Use the heart on 40 different NPC's. The heart can only be used on non named characters once, but the achievement can be completed over multiple playthroughs.
 The Lovers
"Link 2 characters with Domino just before one kills the other."
To Complete: This one is only complete-able by Emily, unless in New Game+, either way you will have access to the optimal strategy of using Domino. Use Domino on a Doppleganger and an enemy, as both will fight on sight and either one killing the other will trigger the achievement. However if you do not want to use domino, on high chaos, a woman officer will push a maid off of a building roof in the Royal Conservatory mission, and an overseer will mercy kill another overseer stung by bloodflies in the overseer base in the Dust District mission. Domino-ing either of these will also complete the achievement.
 Sliding Marksman
"Score a headshot while sliding."
To Complete: This achievement is very easy with the Reflex power upgrade: Focused Slide, which slows down time when aiming a weapon and sliding. This achievement does not require you to hit an enemy either, and characters like Meagon Foster or Sokolov can be used.
 Heartbeat Reaper
"Eliminate 6 enemies in less than 1.5 seconds."
To Complete: Killing enemies is counted in real time, using Bend time/ Domino are good options, but the easiest way to complete this achievement is to gather up 6-8 unconscious enemies and throw a grenade or whale oil tank at them. Remember to save before hand in case one of the bodies shielded another one from dying (Physics in this game can be weird)
 Occult Carver
"Craft 10 Bonecharms"
To Complete: You must have unlocked the Bonecharm Crafting power, the easiest way to complete it is to wait until mission 8 or 9, drop a save, and sacrifice all of the bone charms you have collected, then craft 10 bone charms, and once you earn the achievement, reload the save from before you sacrificed all of your bone charms.
 Fatal Redirect
"Killed an enemy with their own bullet."
To Complete: You must purchase the Reflexes power upgrade Superior Deflection, which will allow you to deflect bullets to wherever your cursor is aiming while parrying. Simply purchase the upgrade, find a lone Grand guard officer, and parry the shots back at them until they die. Note that only guards wearing red will have pistols, and any pistol bullet upgrades you have purchased will not apply to deflected ones. Alternatively, you can freeze time right after a guard fires a shot, and possess him, then simply walk him in front of the bullet and un-possess and resume time. The bullet should fly forward and kill him. Make sure to leave space for the bullet to move forward and hit the guard. Do not plant the guard too close to the bullet.
 Circle of Life
"Cast Possession once, chaining between human, hounds, rat, fish and Bloodfly."
To Complete: It is reccomended that you have all upgrades of possession unlocked for this, the easiest way to unlock it is on the Royal Conservatory Mission, using the far right gate. This video guide shows the optimal way.
Mission 1-5 Achievements
Mission 1 A Long Day in Dunwall
 Freedom of Speech
"Saved the Printer of the Dunwall Courier"
To Complete: Look for the building with the sign reading Dunwall Courier and reach the top floor, where and NPC will have a guard harassing him. Killing or knocking out the guard and talking to the NPC will unlock the achievment.
Dont forget to Collect the wooden boat in the safe room, and collect the two paintings on this level.
Mission 2 Edge of the World A Stay of Execution
"Stopped the Grand Guard from pushing someone into the Wall of Light."
To Complete: When you first arrive at the wall of light (immediately after the 'Play your own way' pop-up), two guards will push a civilian into the wall of light, distracting, knocking out, killing, or disabling the wall of light will allow the civilian to run back towards the fish market where you came from. The guards push him quite quickly so saving immediately after the pop-up is recommended for giving yourself the best chances.
 Morbid Theft
"Stole a corpse for Mindy Blanchard"
To Complete: Find Mindy Blanchard behind the black market and talk with her, she will ask you to steal a corpse from the overseer' office, upon obtaining the corpse, take it outside towards the street below the rail line where the band can be found playing, and bring it to the left to the dentists office basement. upon throwing it in the grave you will receive the achievement. Mission 3 The Good Doctor
 Fearless Fall
"Dropped from Addermire's highest point and take out an enemy below"
To Complete: Reach the highest roof of Addermire, you must use powers to reach the top, there is no way of completing this achievement during a 'Flesh and Blood' play through. After reaching the top you must jump off and either kill or knock-out a guard with a drop assassination. There is an easy guard on the dock's side of the roof, or alternatively, you can place a doppelganger below and drop onto that. It is recommended to save upon reaching the roof.
 Counter Serum
"Chat with Dr. Hypatia aboard the Dreadful Wale"
To Complete: Non-Lethally take out Dr. Hypatia during this mission, and speak to her. After telling her about the Dreadful Wale, she will appear on it after the mission is completed. After speaking to her once, the achievement will unlock. She will also bring with her 8 bottles of Addermire Solution, so remember to stock up on those. Mission 4 The Clockwork Mansion
 Silence
"Eliminate Jindosh without him ever knowing you were there."
To Complete: You must either kill or knock out Jindosh without him ever realizing someone is in his house. Note: There are multiple ways of doing this, it is even complete able in a 'Flesh and Blood' play through, although it is not recommended. Below is a video showing the path I used. It should be noted that you can flip 1 switch and not lock yourself out of the achievement; flipping two switches will alert him that someone is in the building. Other sources say that you can flip as many switches as necessary, as long as it isn't the ones in the main room that cause him to cross the bridge and view you. If the dialogue plays where he states he knows who you are, then the acheivment should fail. That being said I still recommend the path shown in the video below.
Note: Every upgrade into Possession is required. Mission 5 The Royal Conservatory
 Oracular Echoes
"Listen to the voices of the sisters of the Oracular Order."
To Complete: Simply interact with the Oraculum three times, it is the large machine on the second floor balcony of the Conservatory. The machine cannot be used if sabotaged with the incorrect lenses. You must use the machine three times before sabotaging.
Circle of Life"Cast Possession once, chaining between human, hounds, rat, fish and Bloodfly."
To Complete: It is reccomended that you have all upgrades of possession unlocked for this, the easiest way to unlock it is on the Royal Conservatory Mission, using the far right gate. This video guide shows the optimal way.
Mission 6-9 Achievements
 Eureka
"Crack the Jindosh Lock without finding the solution elsewhere."
To Complete: The riddle is randomized every playthrough, theres only one solution, however the riddle itself is standardized, and has been decoded. Follow this guide:
Simply match the colors with the names in your play through, note that the order they are in does not matter, just as long as the item and name align.
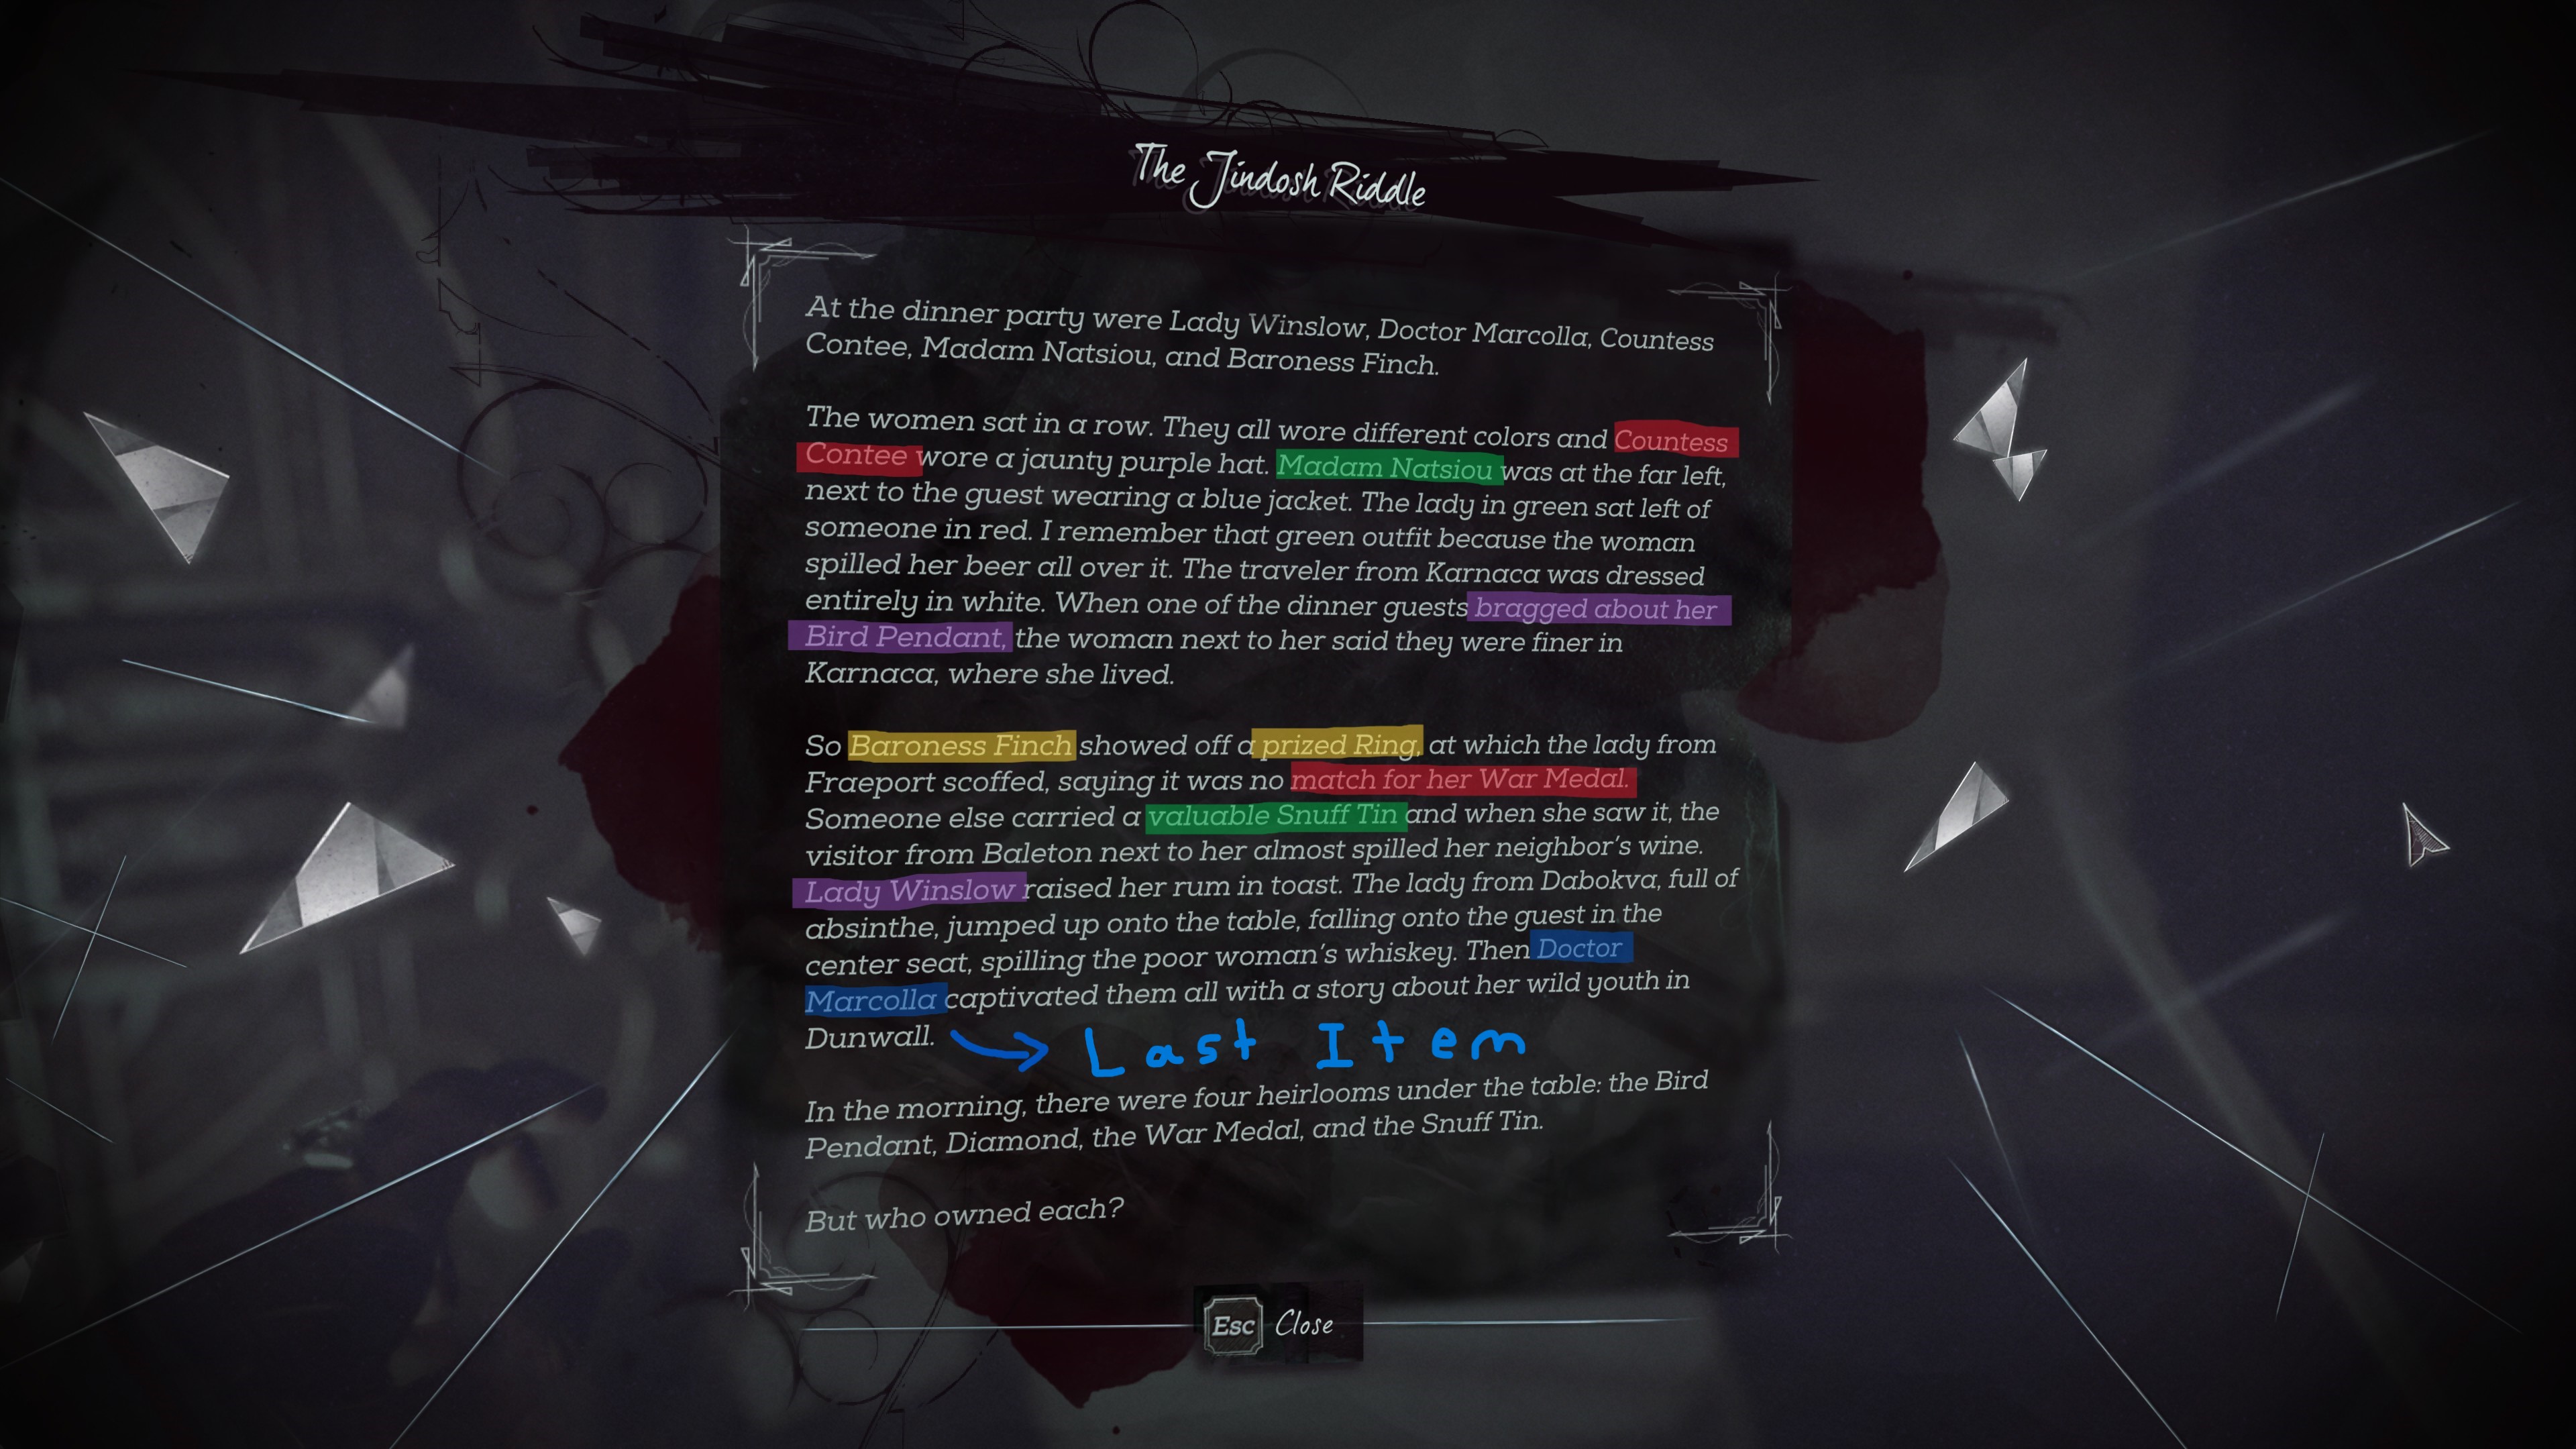
Alternatively you can steal the key off the dead howler in the overseer base and unlock his room at the crones hand saloon, which will have the answer inside.
 Howlers 'til the End
"Side with the Howlers in the Dust District"
To Complete: Bring Vice Overseer Byrne's body to Paolo in the Crone's Hand Saloon. He can be brought either knocked out or dead. Note: Bringing Vice Overseer Byrne to Paolo unconscious does not count as a kill at the end of the mission.
 "Side with the Overseers in the Dust District."
To Complete: Bring Paolo's body to Vice Overseer Byrne in the Overseer Base. He can be brought either knocked out or dead. Note: Bringing Paolo to Vice Overseer Byrne unconscious does not count as a kill at the end of the mission. Mission 7 A Crack in the Slab
 Under the Table
"Obtain Stilton's master key from under the table, with the guards there conscious & unalerted."
To Complete: An easier achievement, simply walk to the dining room (the hallway to the left of the front door) and crouch underneath the dining table while in the present. Travel with the timepiece to the past, and grab the master key on the chair while still hiding under the table. Then travel back to the present and receive the achievement.
 Flooded Basement
"Drain the water to recover a Rune."
To Complete: Head to the basement of the manor, in the present there may be a rat swarm if you are on high chaos, in the past there will be two guards by a wall.
- In a crack in the wall you will see a hidden room, to access the rune, find the crank wheel to the left of the wall in a display case. throw that into the room, then destroy the bloodfly nest within.
- Afterwards, travel to the present and crawl through the larger hole into the room, this room will be full of water, travel back to the past and move the crank wheel close the blocked gate.
- Travel again to the present, swim through the unlocked gate door, and travel again back to the past. Now you should be able to grab the wheel through the ajar blocked gate.
- Place the wheel on the wall, when you turn the wheel fully, the water in the present will disappear and the floating crate to the left of the crank wheel you just turned will have a rune on top of it.
 Dilapidation
"Find the hidden balcony passageway."
To Complete: In the indoor courtyard garden, travel to the past and you will see a balcony being constructed, underneath the balcony are two red bearings. Shoot both bearings and travel back to the present. A pathway ramp of broken wood should now be available to reach the second floor in front of you. Walk up the ramp to the second floor and receive the achievement.
Mission 8 The Grand Palace
No Level Specific Achievements
Mission 9 Death to the Empress Gazebo
"Pay tribute to Jessamine one last time."
To Complete: Visit the Gazebo outside Dunwall Tower and interact with the memorial stone for Empress Jessamine Kaldwin, this will trigger some dialogue from your character and the achievement
Thank You!
Thank you for anyone who has read and/or used this guide, I hope it has been helpful.
Special thanks to
PowerPyx - for the videos on "Art Collector", "Royal Spymaster" & "Silence".
Dishonored Wiki[dishonored.wikia.com] - for achievement images and various information.
nekov4ego - for his guide on "Art Collector".
ThePugHybrid - for his Dishonored 2 Achievement guide
https://steamcommunity.com/sharedfiles/filedetails/?id=1319683757
Beat Dishonored 2's achievements?
Flex it — let your friends know you pulled it off.
- Why You Have a Kill or Detection Listed in Your Dishonored 2 Stats Even Though You Didn’t Kill or be Detected by Anybody★ 5 (536)50k views516 ♥8 minUpdated 10 Aug, 2020
- Dishonored 2 - Complete Achievement Guide★ 5 (1.3k)39k views2.8k ♥22 minUpdated 19 May
- Solving the Jindosh Riddle★ 5 (441)38k views483 ♥1 minUpdated 29 Dec, 2016
- Safe Locations / Codes★ 5 (677)38k views1.9k ♥1 minUpdated 21 Mar, 2017
- Dishonored 2: All Canonical Choices! - What did Emily do?★ 5 (523)36k views839 ♥8 minUpdated 25 Apr, 2023
- Достижения Dishonored 2★ 5 (2k)33k views3.2k ♥9 minRussianUpdated 19 May





- Upgrading to PremiumTeam Fortress 2★ 5 (20k)1441k views11k ♥6 minUpdated May 11, 2022
- No More Room in Hell Official ManualNo More Room in Hell★ 5 (2.8k)569k views2.1k ♥29 minUpdated Apr 22, 2019
- NMRiH Community Hosting GuidesNo More Room in Hell★ 5 (526)351k views653 ♥1 minUpdated Aug 10, 2022
- How to 'Git Gud' Soon™MORDHAU★ 5 (2k)318k views3k ♥68 minUpdated Nov 16, 2024
- Лучшие кооперативные игры SteamPAYDAY 2★ 5 (1.5k)315k views2.1k ♥56 minRussianUpdated Apr 27, 2025
- Desert Eagle Heat Treated | Blue GemCounter-Strike 2★ 5 (1.6k)293k views1.5k ♥2 minUpdated Jan 16





This guide was created by its original author on the Steam Community. Are you the author and want it removed? Request removal.