Dress My Slugcat: Custom Slugcat Tutorial - Basics, Setup, Workarounds (WIP!)
General look at Dress My Slugcat
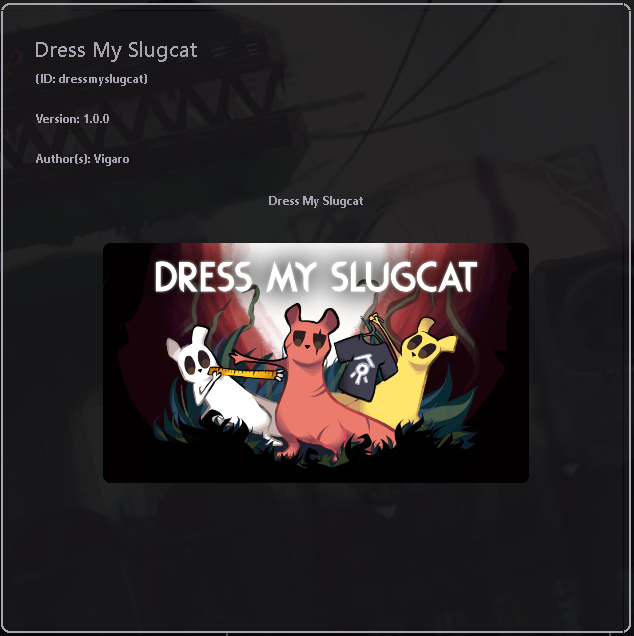
Simplified slugcat asset replacement by Vigaro
DMS is a cosmetic tool that allows you to make drastic changes to the slugcat by loading your own assets to replace vanilla using its gallery method, without the need to code a separate plugin to get them in the game. Here, you will be walked through the basics of setting up, how to make your custom assets and how to achieve certain effects.
It can be accessed through the Get Fancy menu.
Table of contents
- I - Compiling your sprites - Template
Using the template | Folder formatting - II - Setting up your custom slugcat in-game
- III - Uploading to Workshop
- Observations and warnings
- Porting Fancy Slugcat sprites
- Sprite frame guide
- Making a custom tail
- Asymmetrical sprites
- Long-headed slugcats - Removing the face | Head and face hybrid
- Multi-coloured slugcats
- Face markings
- Perspective-following details
- Artificial height (Stilting)
- Extended borders
- Compiling your sprites - TexturePacker
I - Compiling your custom sprites | Template
Compiling your sprites for your mod can be done in two ways. Organising and packing the sprites yourself, or using an downloadable template. Making your atlas from scratch is an option if you want untouched assets and want to expand borders further than what the template provides.
Github Opensource template[github.com]
-----------------------------------
OnTopOfTerrainHand by Frith.
All assets included are templates, and meant to be used as such. These are for making YOUR OWN custom sprites with no need for TexturePacker.
All relevant body parts have their frames labelled, and bordered to indicate the limits of how far you can edit in terms of width and height of the sprites.
II - Setting up your custom slugcat in-game
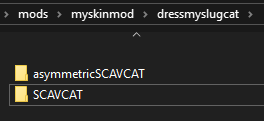
IMPORTANT NOTE: Unless you plan on making asymmetric sprites, which are covered in a separate section of the guide, remove the "asymmetry template" folder next to it, as it is not required.Direct yourself to the mods folder and drag the .zip's "dms_template" folder into it.

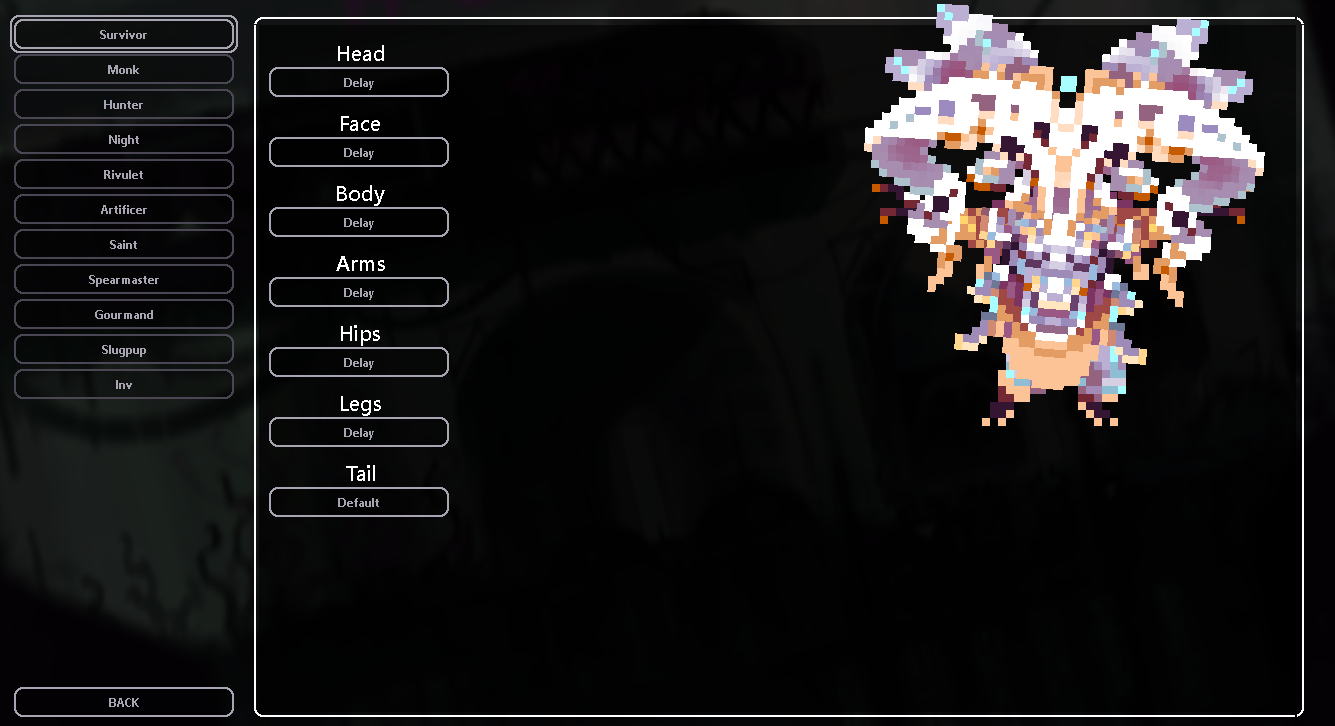
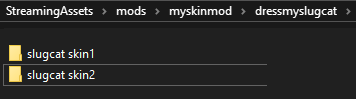
The result in your directory should look something like this
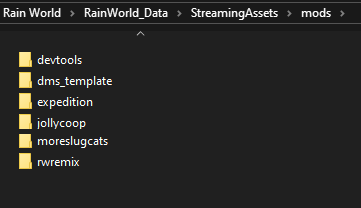 The filepath to the Steam folder depends on where it is installed in your computer. You can access RW's internal folders easily by its Settings in Library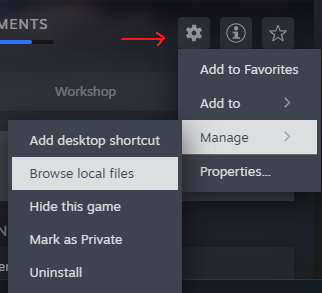
Rename the "dms_template" folder and the "template" folder inside it to something unique. A folder only supports one body part .png and .txt of each.
"myskinmod" and "slugcat skin1" are used as examples.
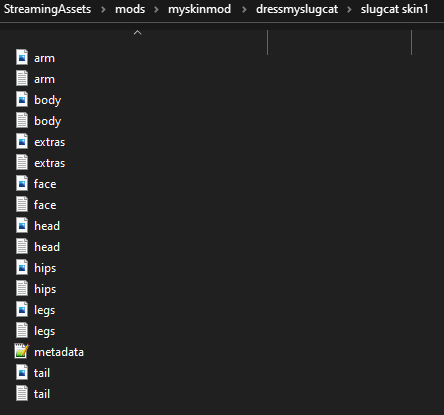
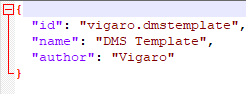
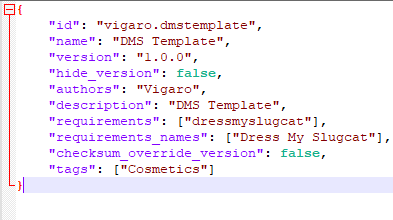
Open the metadata.json file next to your .pngs and .txts. Replace "vigaro" with whatever you wish to be called and change dmstemplate and DMS template to the name of your skin set, preferably unique in order to avoid duplicates with similarly-named authors and skins.
This file will mark all sprites inside the folder as a set to be loaded all at once
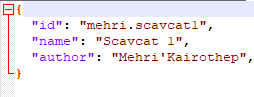
Return to the mod's main folder.
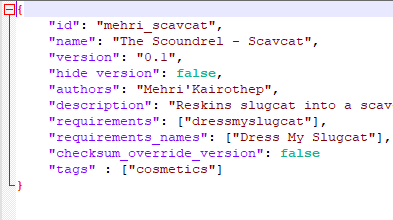
Opening the modinfo.json next to thumbnail.png, change the contents to reflect your mod as well. "Dress My Slugcat" mentions should not be removed, as they prevent the user from enabling your skin set without the dependency.
DLC (MSC, Watcher) should be listed as a dependency when using assets specific to them (Artificer's scar, Saint's additional sprites, Rivulet's gills), they are inacessible otherwise.
It is highly recommended to follow the Sprite frame guide for insight on in-game sprite usage
Open the .png in an art program that supports transparency and a pixelated (aliased) brush. Draw your edits on the frames freely. Remove borders and labels.
Pixels drawn beyond the border will be cut off and invade other frames. Touching the red pixels however, is harmless.
You are expected to have basic understanding on how to draw digitally.
There is no limit to how the sprites are edited or drawn. Downscaled stock images can be stuffed inside the frames, for example, and slugcat's silhouette can be changed entirely.
The tail is a trianglemesh and not a sprite of its own, elaborated later on. The Mark's sprite is pixel.png
The amount of sprite frames cannot be changed. It is impossible to add new animation frames to a bodypart using only DMS.
Slugcat is composed of 6 traditional sprites. There are a total of 87 vanilla slugcat frames:- PlayerArm: 15 (counting OnTopOfTerrainHand 1 and 2 )
- HeadA: 18
- LegsA: 32
- FaceA-B: 20
- BodyA: 1
- HipsA: 1
Downpour slugcats have unique sprite copies attributed to them (extras.png):
- Rivulet gills: LizardScaleA3 (solid sprite) and LizardScaleB3 (gradient)
- Artificer scar: MushroomA
- Saint wheel: guardEye (x) and WormEye (dots)
- Spearmaster spots: tinyStar
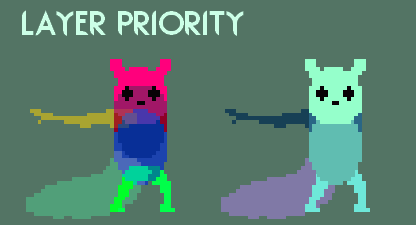
- Slugcat body sprites are layered. Refer to the Layer Priority guide detailing sprite hierarchy.
Concluding this, run Rain World and enable your mod in Remix by clicking the X mark on its left. Apply Mods.
Move back to the main menu and click the Get Fancy button. Press Reload Atlases to refresh DMS and select your sprites by clicking the respective body parts, opening the sprite gallery and using the preview.
Using the template | Multiple skinsets
If your mod aims to add more than one set of sprites, create additional folders inside "dressmyslugcat" for each and place the respective sprites for the separate sets in them. Each skinset folder needs a metadata.json with unique contents to work, repeat this step for every one you make.

III - Uploading to Workshop
Uploading to Workshop is not required for your skin to work. Simply having your mod's folder sitting in the game's mods folder will make it functional.
This step is specifically for publishing.
Replace the thumbnail.png image in main folder of the template with yours. The original image should be removed if you don't have a replacement in hand, in order to avoid confusing users browsing the workshop. Thumbnails must be 676x380 in dimensions in order to upload them along the mod.
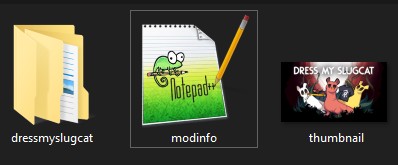
This image appears in the Remix tab of your mod and is also uploaded as a thumbnail once published.
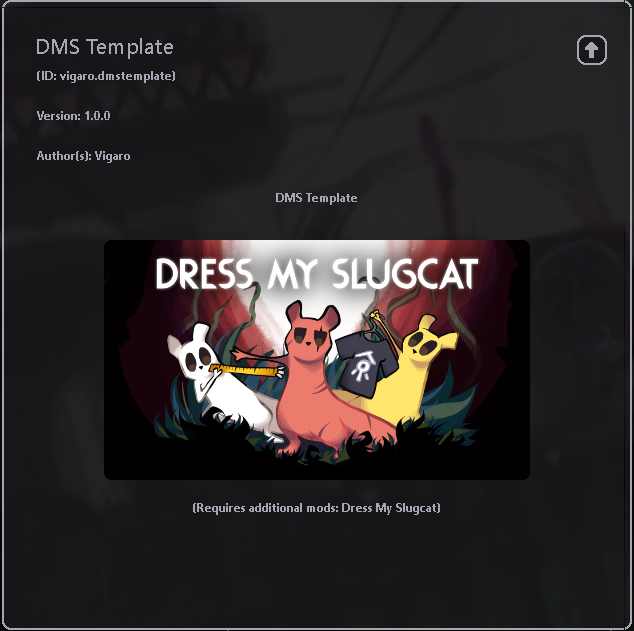
Finally, when everything is in order and working well, press the arrow on the top right to upload your mod to the workshop. The game will open a new tab on Steam and publish the mod under Unlisted visibility once done.
Your workshop item will stay hidden from searches and the workshop mod list until you change visibility to Public.
Mods can be updated by reuploading it through the same function.

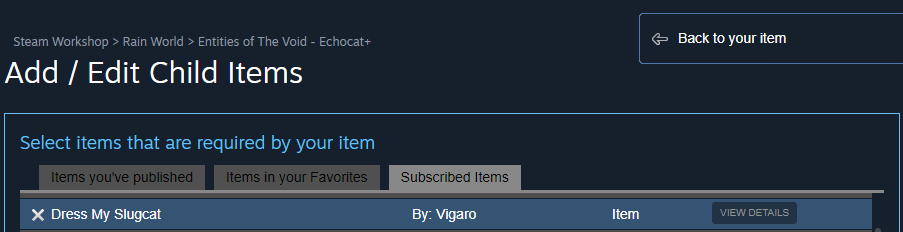
Visiting your workshop item, list Dress My Slugcat as dependency through Add/Remove Required Items to prompt its subscription whenever an user downloads it.
If the content requires a DLC, list it as well.
This concludes the publishing process.
IV - Observations and warnings
- The game expects slugcat’s idle heads and idle faces to be relatively symmetrical (unless made by asymmetrical templates). As these sprites will flip when slugcat moves, extreme asymmetry on the frames makes this effect conspicuous to the point of markings and others appearing to “flash” to their opposite side.
Markings that are supposed to follow the face should be drawn on the face frames.
Body and hip sprites are stationary and only have one frame each. - Slugcat's master animations are governed by procedural animation first foremost.
What DMS covers is sprite-specific frames they use, which are traditionally hand-drawn animation. You cannot "rewrite" physics-based animations such as the tail itself, or how slugcat moves its entirety, or make it do a spectacular flourish backflip. - DMS allows you to customize the sprites of existing slugcat bodyparts, not add new independent ones.
It cannot, by its own, code a new body part to edit such as a separate hat sprite with its own frames. It is incapable of making new physics-based bodyparts. - Increasing the borders of the sprites with no knowledge of the exact location of their anchors will dislocate the sprite away from its center.
This is especially noticeable when expanding the borders of legs, arms, body and hips. The tail texture is exempt from this behaviour. - All sprites are white because their colours are set through hard code.
Any manually-added colours will have a multiplying effect on them and might appear muddy or dull. This behaviour allows greyscale-reactivess.
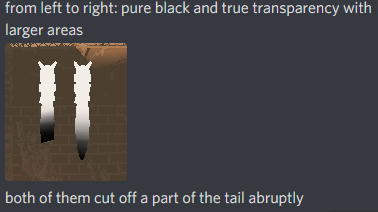
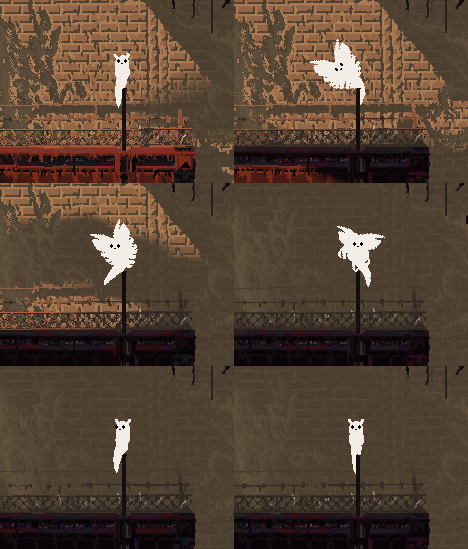
Sprite colours are naturally susceptible to room shaders, not region palettes, and can temporarily shift in hue although not entirely governed by them. - Pure black (#000000) is recognized as transparent. It is recommended that you use #0E0202 instead when drawing black markings or any relatively dark shade of colour. Colour codes too close to black might turn transparent when shaded by certain room palettes or coated in dark hues via the body colour menu option.
- Slugcat's sprites can suffer visual glitches if DMS' menu is repeatedly reloaded in the same second. Temporary until next reload. Colours can revert to default, frames can break, an entire body part can disappear, asymmetric sprites can misbehave when turning around.
- Mods with integrated custom slugcat graphics of their own can possibly interfere with DMS . Additionally, DMS on its own won't support customizability for those graphics unless compatibility is coded to work with it. Especially observable in graphics which are trianglemeshes and not hand-drawn traditional sprites.
Examples of mods with integrated graphics: Sacrifice, Dronemaster, Outsider - Gourmand doesn't use unique body sprites.
Any body sprite used by this slugcat is automatically stretched by code. There are no means to disable this, it can be counteracted by thinning the sprite accordingly. - Artificer's scar can visually deviate off the boundaries of the head. This is a chronic effect directly related to how it was coded to follow the face, DMS has no interference in this situation.
- Spearmaster's tail spots can detach from the tail itself. This is also a chronic effect directly related to how it was coded and unrelated to DMS. It can be more apparent depending on the custom sprite set for the spots.
- After compiling an atlas through Texture Packer, you can edit it directly. By opening the .png, without having to pack all the sprites again. Changing the dimensions of sprites and frames requires you to pack again.
- Tail length has a small chance of “falling” through terrain and ignoring collision depending on the slugcat's position. The longer the tail, the bigger the chance.
- The arm frames reach an Obstruction Point at the low bottom of their images. The lower details are drawn on the frames, the more they betray the fact that slugcat's arms cross each other when receding. Particularly big arms are also victim of this.
Porting Fancy Slugcat sprites
If you are a newcomer, do not follow this.
DO NOT PUBLISH PORTS OF ANOTHER MODDER'S ASSETS WITHOUT THE AUTHOR'S PERMISSION AND KNOWLEDGEContacting the original creator should be the very first thing you do
Preferably, have a copy of the template in place before continuing.
You should have a backup copy of your old skin files ready
As CustomSpritesLoader was previously used for Fancy Slugcats to load sprites, many skins included ModConfigs in part for the dependency.
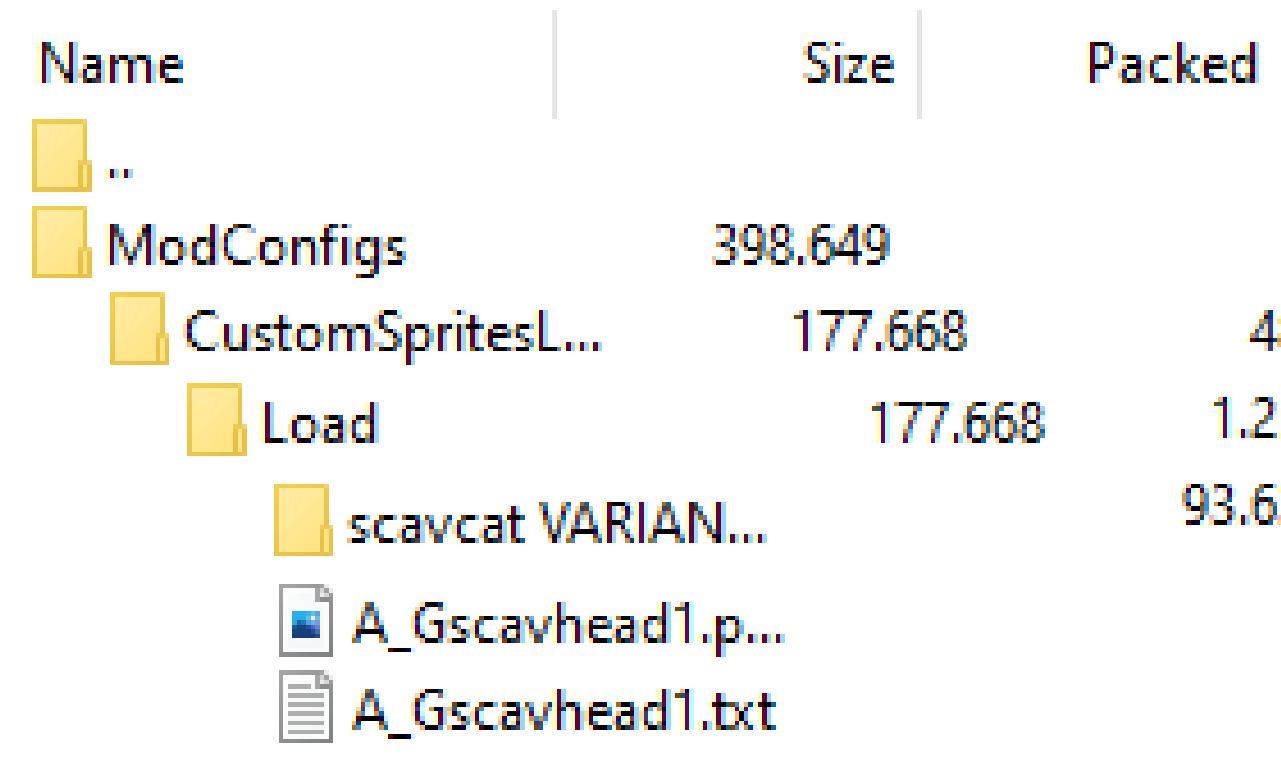
Having a copy of dms_template ready, create a folder for your port next to template folder (path shown below) and move your .png and .txt files into it.
Copy the metadata.json of template and paste it into your new folder as well, changing its contents appropriately as instructed earlier in this guide.
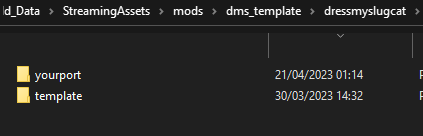
For setting it up to publish in the workshop, the previous instructions apply.
The immediate thing to tweak in the files themselves are the contents of your invididual atlases' .txt files, which no longer must use unique name identifiers within the bounds of DMS. DMS loads all .txt sprites using a default identifier. Ie, the vanilla name for all frames.
Refer to the Template's .txt contents for each body part, as it uses them as an example.
Shown here are the .txt contents of the head for DMS and FS. Contents are different for every body part.
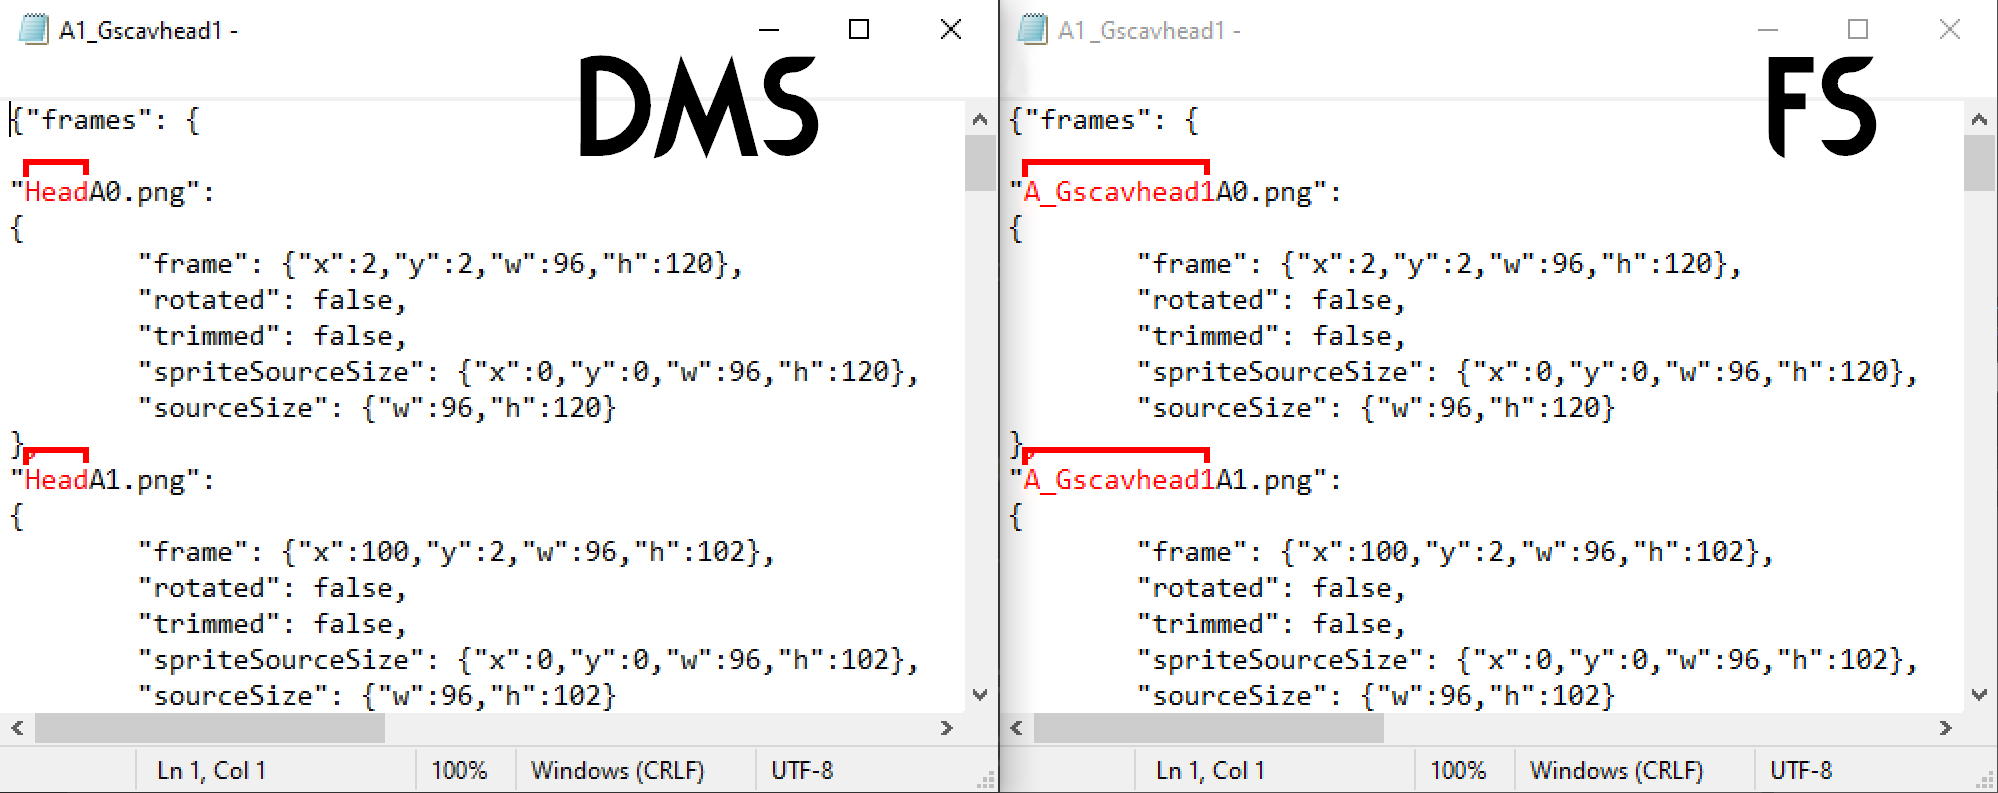
Note: If your Fancyslug-based atlas' .txt dimensions match the ones of the respective body part's template, changing should be as simple as replacing the file for the template's, or copying the contents of the template's .txt and pasting them into the old one.
Having concluded this, delete the template subfolder inside the dressmyslugcat folder.
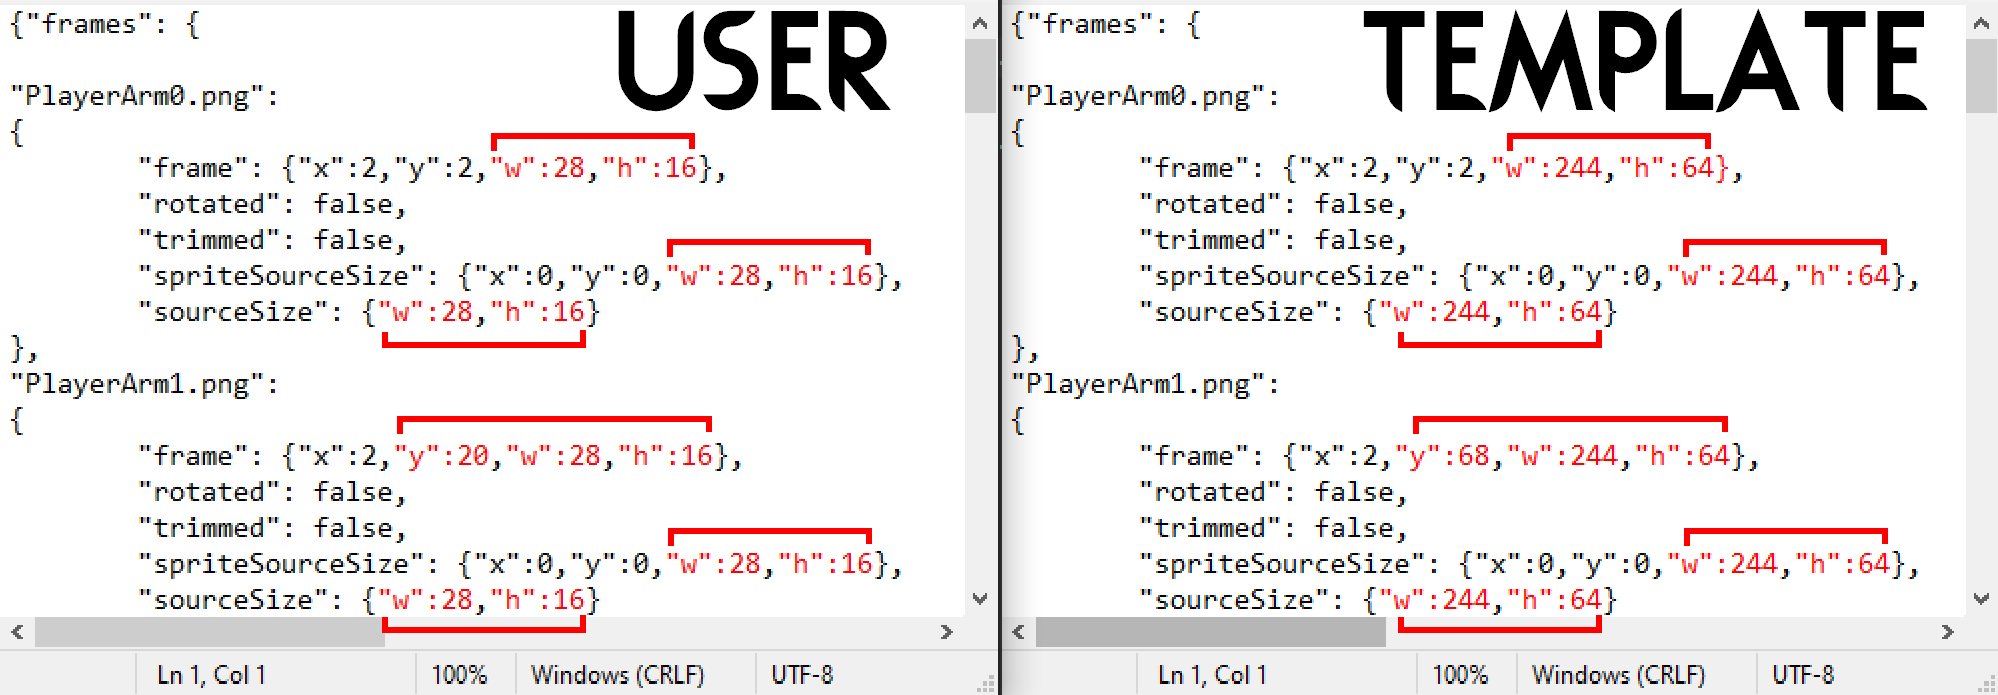
Pasting the template's contents to refer to a .png which uses different dimensions will visually break the sprites. If your old .txt has such thing, use CTRL+H to replace the unique name with the default one.
(What .txt refers to as dimensions shown below)
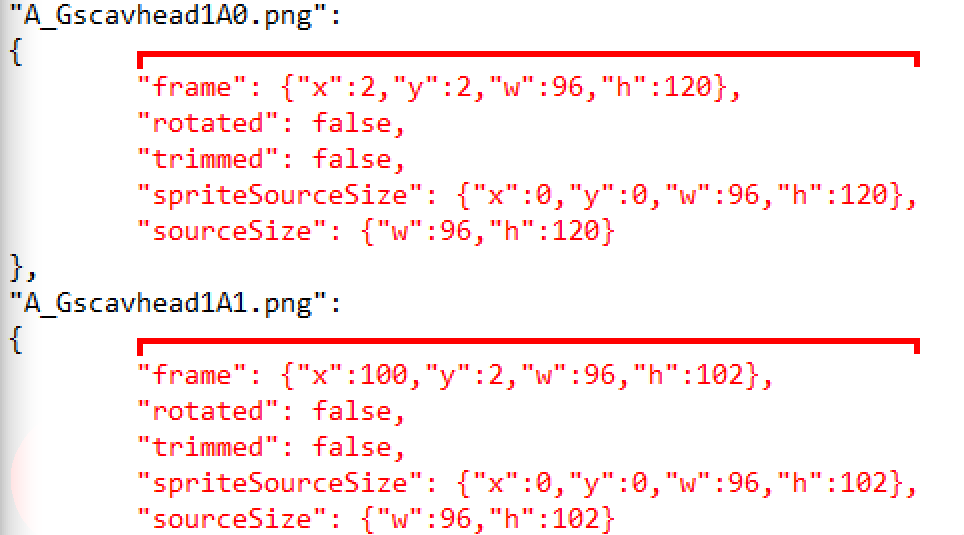
Two .txts referring to different dimensions. User's .txt dimensions match only the ones of their .png and not the template's.
Making a custom tail
Creating a custom tail follows the same procedure as the sprites of other body parts. As a triangle mesh instead of a true hand-drawn sprite, it behaves differently and earns its own category.
The texture of the tail can have any dimensions and the template provided is recommended. Alternatively, it can be easily made from scratch.
Note: The recommended dimensions for a custom tail texture are 128x64. Purely white parts will be coloured with the slugcat’s body colour.
Smaller sizes provide higher pixel-fidelity at the cost of lower detail and dependency on high values for Tail Width and Roundness
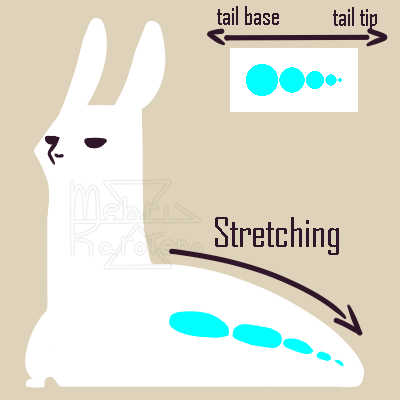
As the sprite reaches the far right side, it’ll gradually deform and shrink to fit the tip of the tail, details become harder or impossible to notice if they’re small. As shown in the visual representation of the render, circles won’t keep their perfect shape when added to slugcat’s tail, details will stretch to accompany its shape. Markings such as spots and horizontal stripes must be kept short, let the tail do the stretching for you.
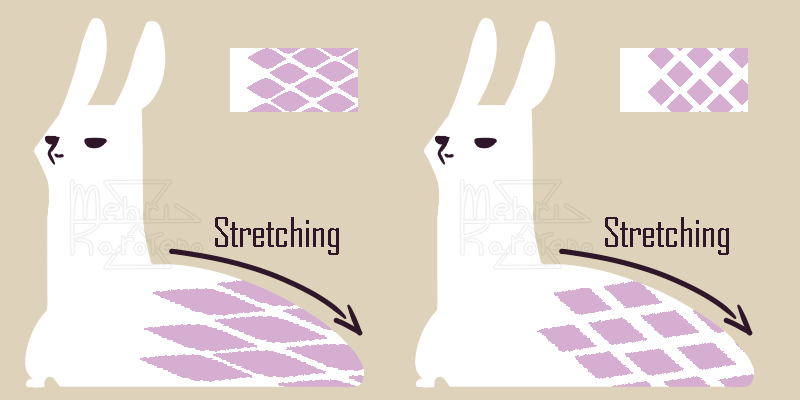
Detail destruction is lessened the smaller the dimensions of the tail sprite are.
As such, very delicate, shape-specific details such as feathery tufts might benefit more from sprites smaller than 128x64. Smaller and smaller sprites are also less flexible and customizable when it comes to the proportion sliders, depending more on high values for better displayability and intended effect.
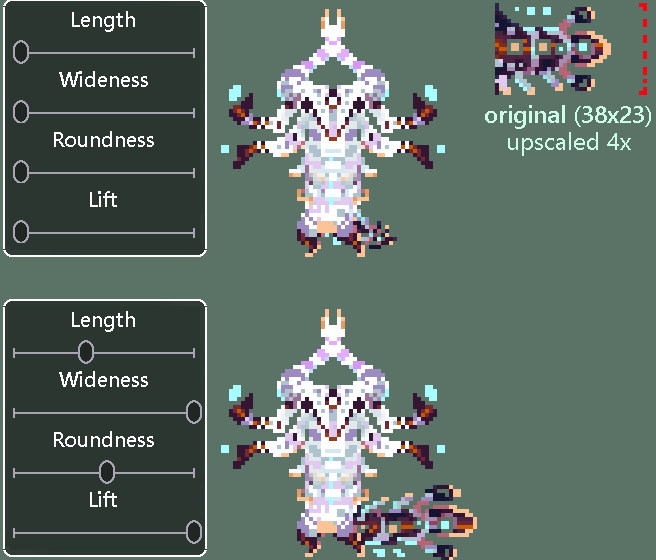
Once you’re done editing the tail to your liking, it is recommended to rename both the .txt and .png to something else consistently for convenience and ease of discern. Place them next to the other sprites, as shown here.
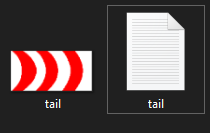 Contents of .txt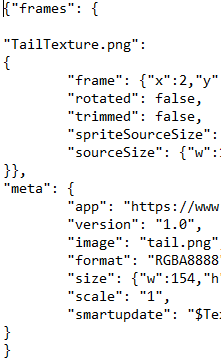
Likewise with any other sprite edited, after that, launch Rain World and go the Get Fancy menu. There, click the Tail button to open the tail gallery and select your custom tail sprite.
Test out your new tail by playing campaign or arena. Make adjustments if necessary.
Asymmetric Sprites
In vanilla, near symmetry in slugcat sprites is always expected by the game.
Details such as wings, antennae or fluff drawn on the vanilla body or hips will not follow the direction slugcat faces, as they use only one frame.
In addition, the idle head and eyes are "flashing" from one side to another even when jumping
Asymmetric custom slugcats should have their custom sprites made with copies of the templates under the "asymmetry template" folder, included in the "dms_template" .zip, in order to work properly.
Asymmetric and normal templates can be mixed for different body parts.
All asymmetric atlas templates for each bodypart, except the tail, have 6 files - 3 .txts and 3 .pngs for front, left and right.
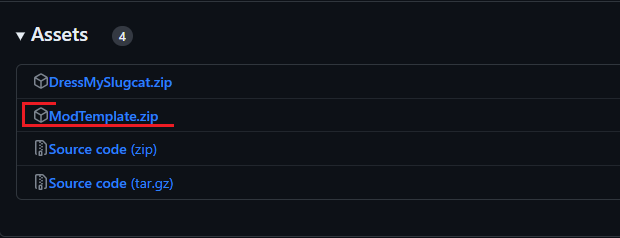
Have the ModTemplate.zip or an extracted copy open in a tab. It is recommended to disregard the normal "template" folder in this situation if you won't mix with symmetric sprites, as it is not necessary for specifically making asymmetric sprites and only clogs your mod with existing unaltered sprites otherwise.
Before using them, you can do either depending on the intent:- Create a subfolder for the skin in your mod as usual. Select and separately drag from the .zip only the files of bodyparts inside that you need (ex: all 6 files for the arm).
- Drag the entire folder from the .zip and paste it into your mod if you aim to make the entirety of slugcat asymmetrical. "asymmetry template" should be renamed to something unique, likewise with the normal process of setting up your folders.
Ex: "asymmetry template" folder dragged into "dressmyslugcat", next to already-existing skinset subfolders.

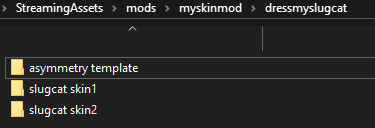
Don't use the entire template (head, arms, etc) if your slugcat isn't meant to be entirely asymmetrical, that is unnecessary. You can place just the 6 files of a single bodypart in your skin folder. For example, an asymmetric arm and normal templates for the rest of slugcat.
Ex: Asymmetric body and symmetric head coexisting within one skin subfolder
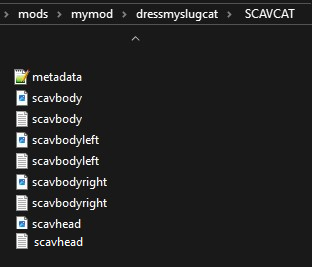
Asymmetric skin sets and sets using the normal template can be included within the same mod and can both exist in the dressmyslugcat folder, as they don't interact with each other.
 Asymmetric slugcat attempted with normal symmetrical template, showing clear errors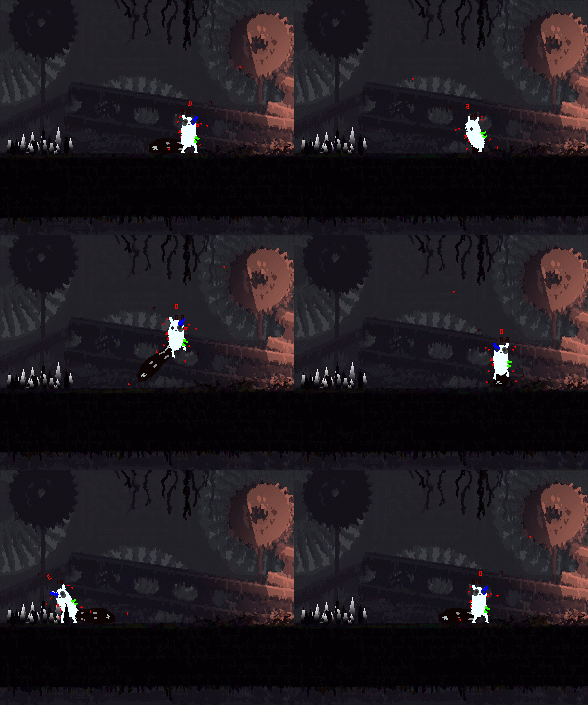
The head, face, body, hips, arms and legs of the asymmetric template each have separate 3 atlas copies with colour-coded borders for Left (green) and Right (blue), and Default (red) used for the front.
Default (red) is only used by the body and hips when they switch frames. The default of all other slugcat sprites are still necessary for them to work, and should be treated as the front as usual.
IMPORTANTAll three atlases and .txts of a bodypart are necessary for the sprites to work. Missing any of the copies for the respective sides, be it a .png or .txt file, will break them.
All sides of the face assembled together as example. Default (above) and Scavcat (below). Each side is a separate atlas as opposed to the image
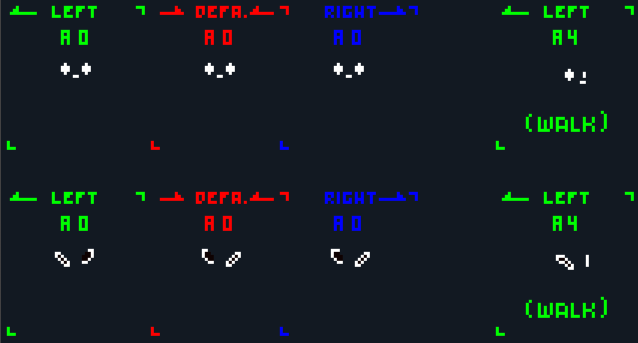
Closed left eye as an example of a working asymmetric face
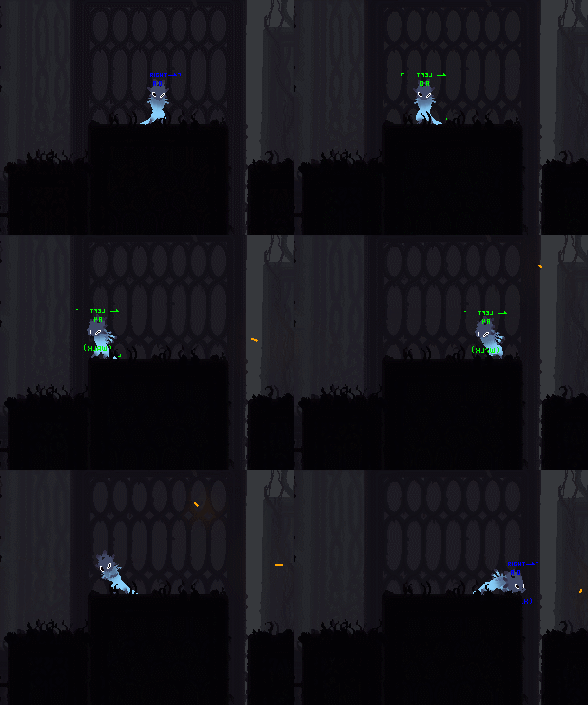
Details supposed to show on the back of hips and body sprites should be drawn according to where these face.
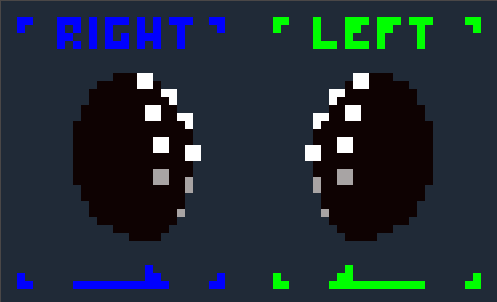
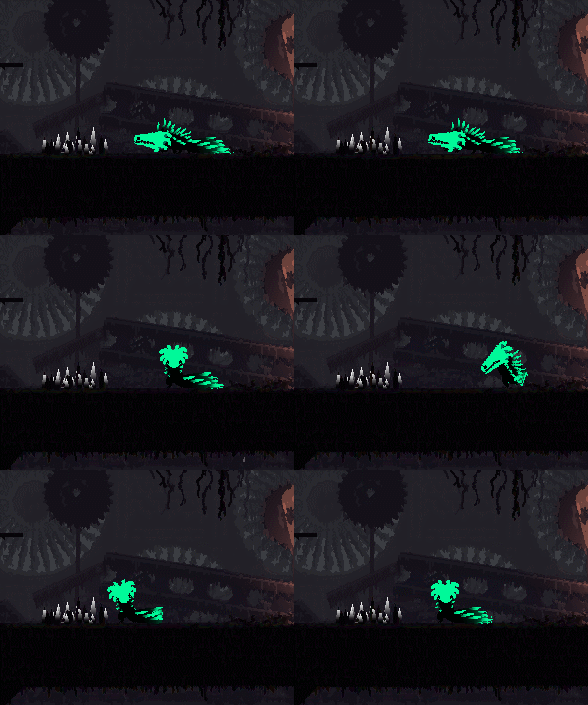
The sprite stretched over the triangle mesh of the tail follows a different scheme, being akin to an unwrapped UV map. The asymmetric tail is dynamic and constantly shifting according to where slugcat faces.
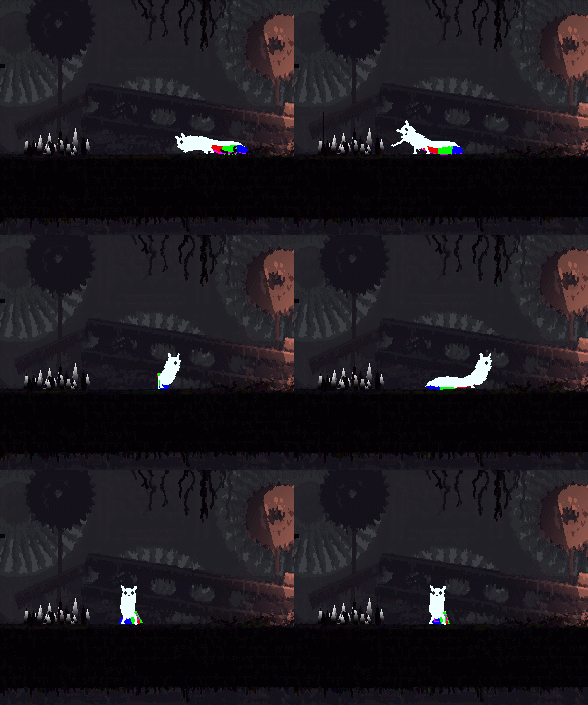
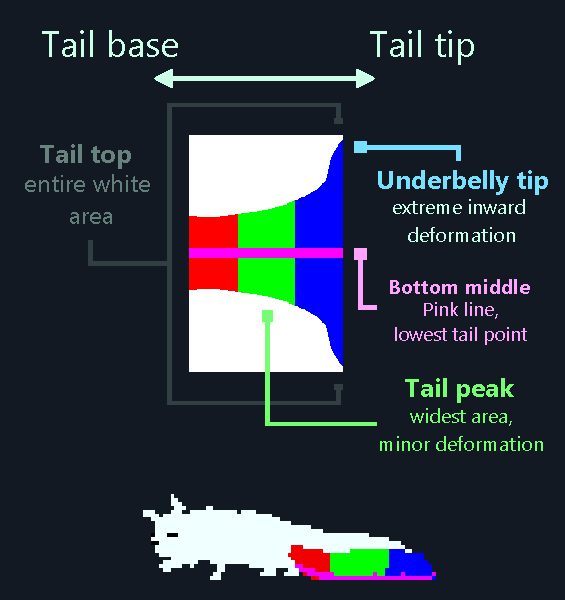
Like the pixel detail behaviour explained in the previous tail section, the .png is deformed by the tail mesh as it widens in the middle and tapers at the end. With asymmetric tails, meticulous details need to be drawn extremely squashed in order to not overstretch due to tail length.
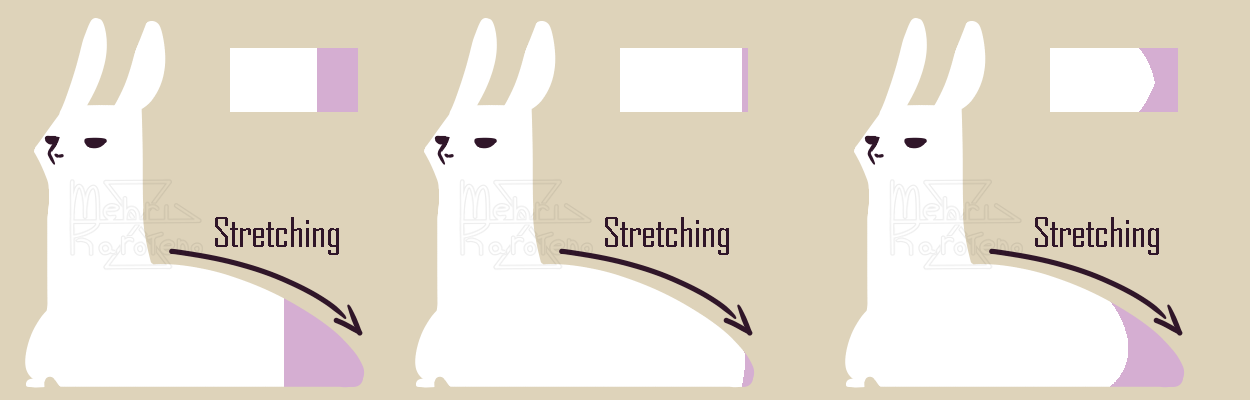
The coloured zone in the middle of the tail represents its "underbelly", the lower point. The pure white part is the "back" or top. The underbelly coverage area widens to the extreme at the tip of the tail, but also destroys details the most as it reaches the center (pink line) and the far right.
DLC Slugcat sprites
By default in DMS, DLC slugcat-exclusive sprite templates are included in the extras.png and extras.txt files in the template folder. Extras have no asymmetric versions.
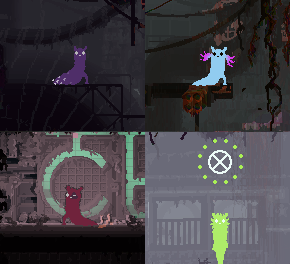 The alternate version of the extras template with all sprites separated is recommended[drive.google.com]
Expanded dimensions are included.
DLC slugcat sprites will only be accessible and usable if the DLC is active.
These graphics are used only by their respective slugcats and cannot be interchanged among eachother by DMS alone. You won't be able to add Rivulet's gills to Artificer, for example.
Spearmaster's tail spots uses a single sprite (tinystar) which repeats along the tail and fades near the base by default. It temporarily grows in size whenever the ability is used.
Rivulet's sprites are (LizardScaleA3) for the gill and (LizardScaleB3) for the gill gradient.
The gills on their entirety use only the two sprites, which are repeated for each gill pair.
Artificer uses (MushroomA) for the scar, which follows the face.
Saint's ability uses (guardEye) for the center and (WormEye) for the surrounding dots.
Reiterating: Gourmand has no extra sprites and instead forcibly stretches the vanilla hips through code. There are no means to disable this, it can be counteracted by thinning a hip sprite accordingly.
Perspective-following details - Head Exploit
Details such as wings, antennae or fluff drawn on the vanilla body or hips will not follow the direction slugcat faces, as they use only one frame
Using the asymmetric template allows you to draw extra frames of the body and hip sprites for slugcat's turnaround. However, the asymmetric template for those include only 3 frames which account for slugcat's direction: front, right and left. Rotation states such as backflipping, tunnel-turning and underwater swimming are not accounted, as they don't include frames for slugcat's back facing the viewer.
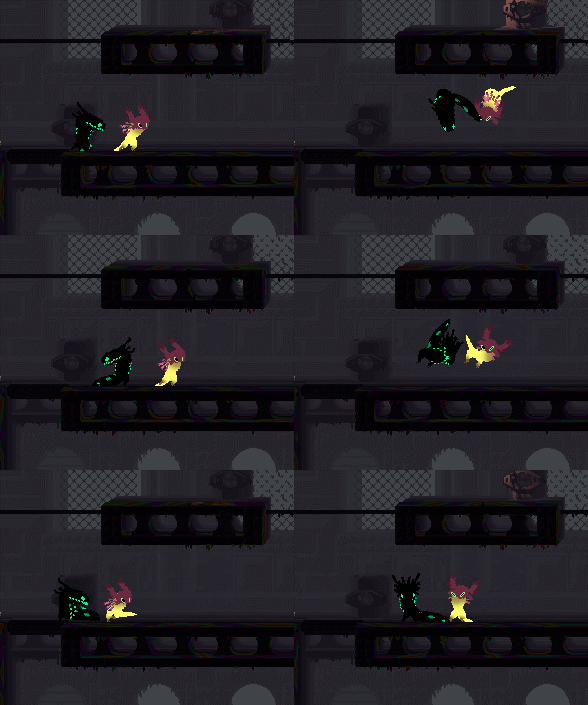
Asymmetric user Lizardcat & Head Exploit Scavcat
Lizardcat's asymmetric body and hips snap back into the frontview frame as they rotate, while scavcat has back fur drawn directly on every frame of the rotating head.
Using the head sprites and drawing those features on each frame achieves a similar effect, and gives the illusion that they’re part of the body while retaining a more natural rotation.
Body details drawn on the head sprite have much smoother turn-arounds, as the head sprite has *15 unique frames which can be exploited.
This option isn't particularly good if you want to include customization for the decoration on the body, it is entirely dependant on the head atlas.
* Not counting 1-3, which are identical copies of frame 0
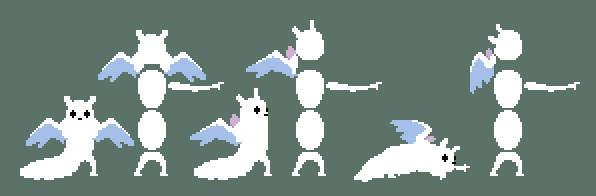
Wings drawn directly on the head sprite
This situational workaround requires a fair amount of care, as it is worth noting the head has a priority in layer and details will go over the arm sprites. In turn, the details drawn on the head will follow its separate colour chosen via menu.
Multi-coloured slugcats
Making sprites ignore the multiplying effect of colour code
Adding multiple colours of different hues to slugcat sprites requires you to manually colour the raw sprites themselves, drawing and painting on the frames instead of leaving them as the white default.
You must set whatever manually-coloured body part to white in the DMS menu, in order to preserve the colours of the sprites. The colours will be untouched as it can't overlay them.
This makes multi-colour markings on mainly white-bodied slugs very easy to make, as the sprites themselves already are naturally white and won't need interfacing with menu colours.
Example 3 face frames of two different spritesheets, a manually coloured one and a default-normal white one.
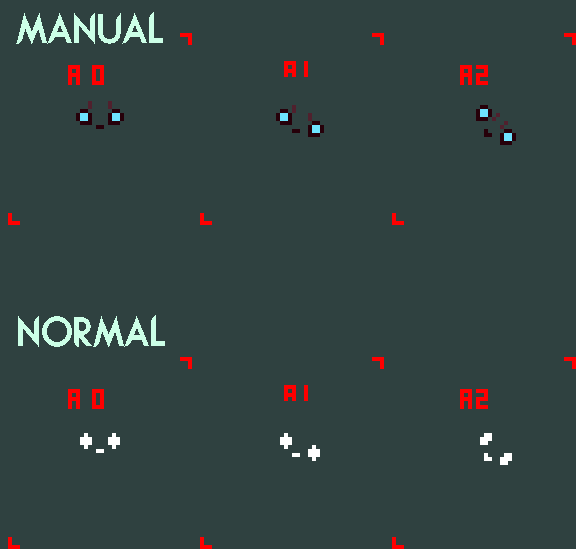
For fullbodied multi-coloured slugcats, if the tail is used, you must also either colour it separately through menu or apply a custom tail sprite.
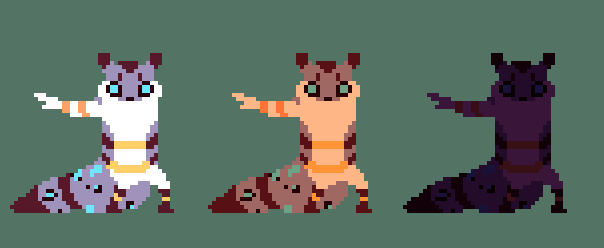
Examples of manually coloured sprites and their outcomes. The disassembled body parts shown are the raw sprites.
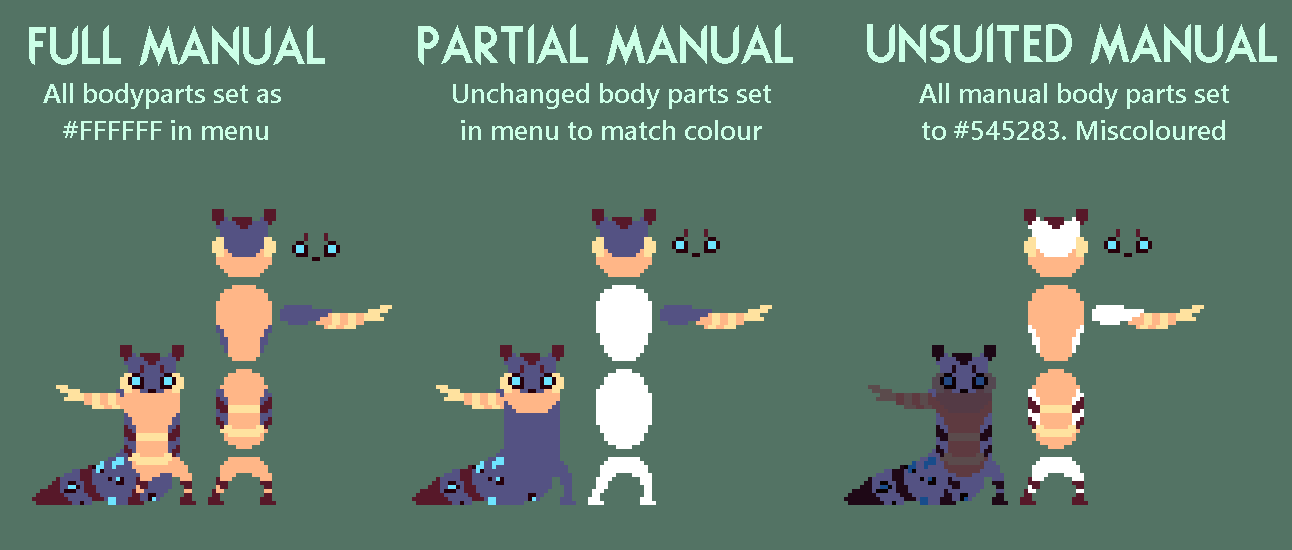 From left to right, one custom slugcat manually coloured to have multiple different colours, and two with untouched sprites (set to white) coloured through the DMS menu.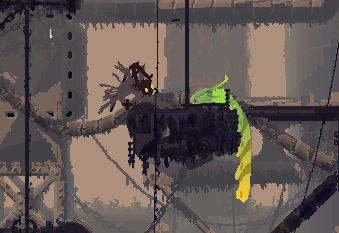
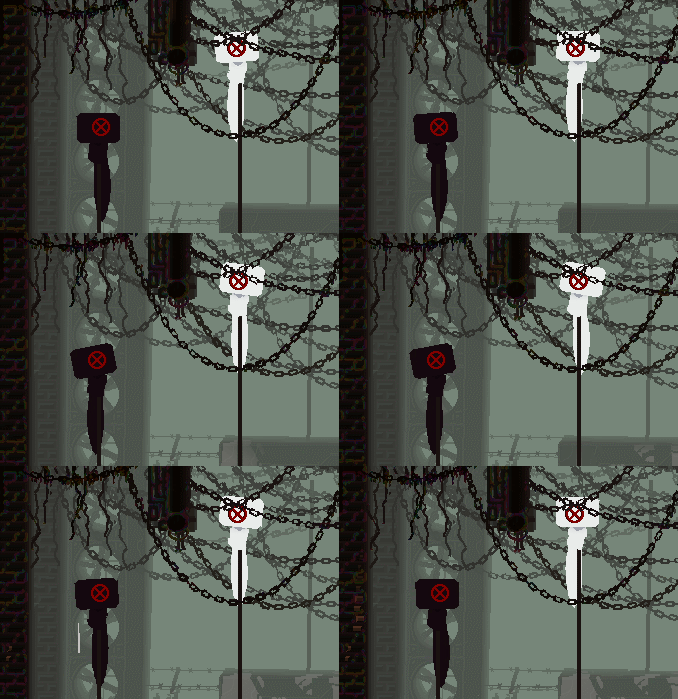
All of Rain World sprites are white because they’re coloured through code with an effect similar to “Multiply” in art programs, which forcibly floods them with whatever colour they’re set to through code. Because of that, it's impossible to add lighter markings to slugcat by convenient means without manually colouring.
Adding multiple colours to a non-fullywhite slugcat (especially dark-coloured ones) will cause their hues to darken and shift.
Greyscaling/Masking
Shifting slugcat's colour while remaining menu-friendly
This requires directly editing the sprite to add hue/value-shifted pixels or gradients, colouring the markings with a shade of grey or any other hue relatively close.
The lighter this detail on a pure white sprite, the less noticeable it will be and the more faithful to the original body colour in-game. This is effective for making slugcat markings that are just a darker shade of the base colour or slightly more vibrant while retaining control of the body colour.
When colouring slugcat through the default custom colour selector, dark-value details will pick up that colour and darken it consistently.
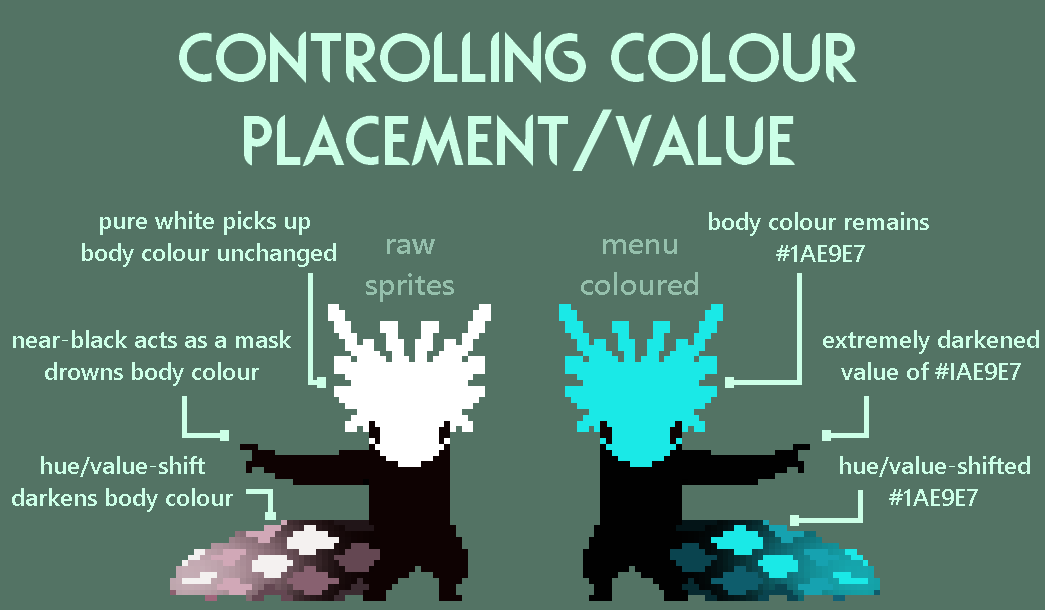
Dark details can be made more lively-looking once coloured in-game by applying a slight tint of colour to them on the sprite.
Hue-shifted details in specific might look muddy depending on the colour your set slugcat's body to. Manually colouring each sprite while keeping the body white, as explained above this section, attains unchanged results if you wish for the markings to be a very specific colour or a value lighter than the body itself without darkening the entire slugcat for the difference to show.
Artificial height (Stilting)
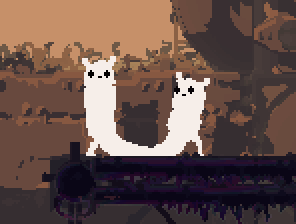
A stilted slugcat next to a slugcat on max height. Note that the face is drawn on the head sprite.
Using this method requires the face to be drawn directly on top of the head sprite (See Removing the face for insight) or have its frames pushed upwards in the atlas to look normal.
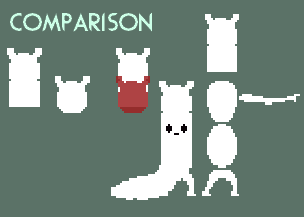 Comparisons between a stilted head sprite and a normal one. Both sprites are in the same position.
Noting that this workaround does not extend slugcat’s collision.
Long and Different headshapes
One fairly common, perhaps unsolvable issue with slugcat heads being long, having glorious snoots or simply unconventional shapes, is the inconsistent follow-up of the face. Normally this would be semi-fixed or at least tolerable to some degree by editing the face and moving the sprites past the anchor, but it ends up visibly floating when slugcat faces certain angles, or having visible placement differences when switching from walk to crawl body mode.
Removing and replacing the face
Simply select the Empty option for the face and apply it in the Dress My Slugcat menu. You’ll then draw or paste the face sprites directly on top of the head sprite for every single frame. This makes the face static, emotionless, not conveniently colourable, and also prone to pixel deformation.
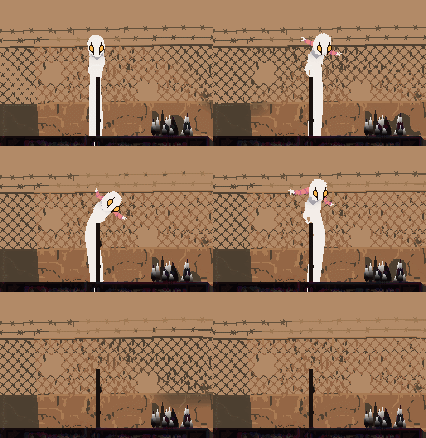
-
Long-headed slug using this method
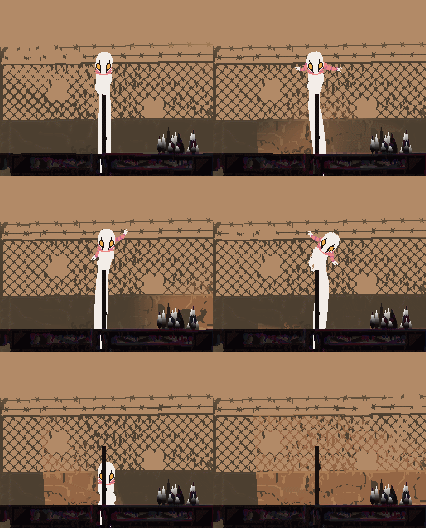
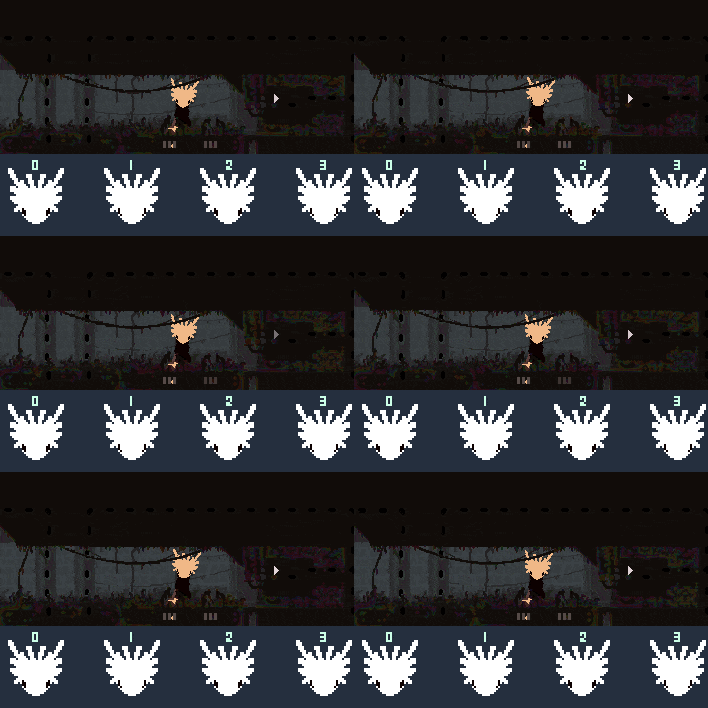 Blinking can be partially simulated through frames 1 and 3 of the idle head. 8, 9, 16 and 17 might also prove useful for other angles.
Refer to the Sprite frame guide.
The switch to these frames isn’t constant, and mainly depends on slugcat tilting its head.
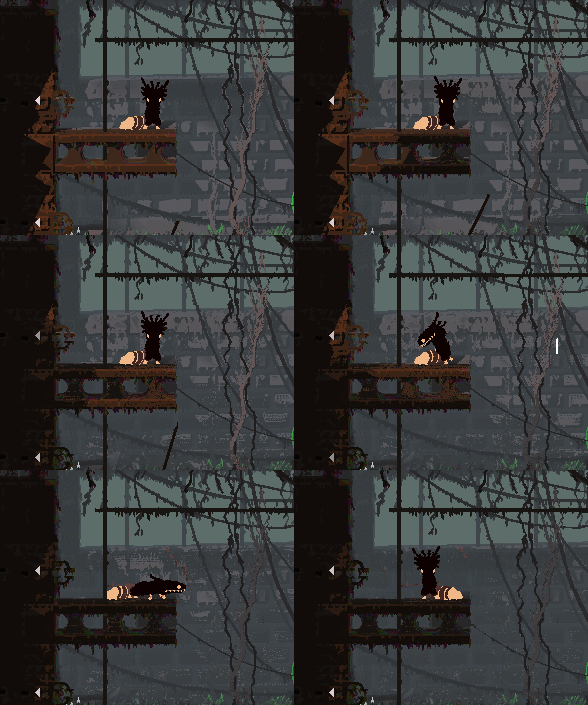 Head and face hybrid
This solution is rather finicky, as the frames of the face and when they’re used are largely influenced by the game’s procedural animation. Manually colouring your slugcat might be necessary depending on what you do, as colouring the face manually drawn on the head sprite isn’t possible and can result in colour inconsistencies among frames.
The general idea is that face frames unable to line up to the unconventional head, no matter how much you tweak them, should be erased from the .png and drawn directly on the head sprite .png.
Here, Frame A0, A1, A8, B0, B1, B8 are visible in the FACE .png, with all other frames erased.
The HEAD .png’s Frame 0, 1, 2 and 3 are completely blank to favour a moving, blinking face.
The entirety of the slugcat, except for the face sprites, are manually coloured.
Face markings
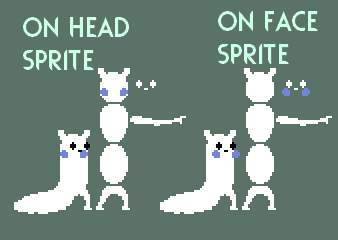
Face markings must be drawn directly on the face sprite for them to follow, well, the face. Draw markings sparingly. Depending on how far away from the face you place them, they might leave slugcat’s head when it looks around. Face markings by default are expected to be relatively symmetrical.
Artificer's scar sprite can also be edited for this end, as it naturally follows the face and uses a single frame. The downside is that the placement in relation to the head whenever it moves can be inconsistent.
Extended borders
The vanilla dimensions for slugcat’s sprites are, most of the time, very limiting when it comes to drastic changes in their shape. It is possible to expand the border (or canvas) of the sprites, using an art or image-editing program. Applying this change requires you to expand every single sprite/frame of a body part by multiplying their current dimensions (width-height) with even numbers. You must pack the sprites again, after expanding.
This process is very sensitive to deal with, as it can directly interfere with the anchor of the sprites, depending on the body part and how you expand it.
Height - Arms
Width - Legs
Height and Width - Head
Height and Width - Face
*Body and hip sprites should be left alone until a solution is found.
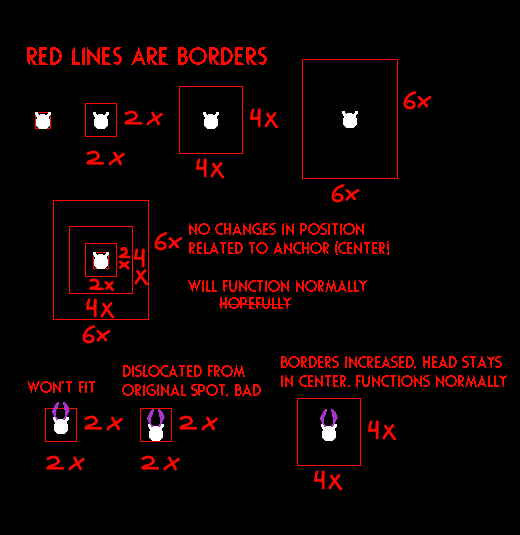
Sprite pixels should be kept in the borders. Crossing the borders will cut off the segment outside them, and the part that left the borders might even appear in another frame.
Extra - Compiling your custom sprites | TexturePacker
IT IS HIGHLY RECOMMENDED THAT YOU USE THE TEMPLATE INSTEAD OF THIS METHOD
This is mainly a resource if you want to expand the borders of sprites into the dimensions you want. This is purely manual work, unlike the template which skips this entirely.
- Locating slugcat’s sprites
After downloading Custom Assets, unzip (extract) the file to Downloads or any preferable path.
Ignore CustomAssets.dll included in the file. Slugcat’s sprites are included in Unpacked Atlases> RainWorld. Use Search to find them.
The necessary sprites are:
Head: HeadA0 to HeadA17.
Face: FaceA0 to FaceA8 and FaceB0 to FaceB8, FaceDead, FaceStunned.
Arm: PlayerArm0 to PlayerArm12.
Body: BodyA.
Hips: HipsA.
Legs: LegsA0 to LegsA6. LegsAAir0 to Legs AAir1. LegsAClimbing0 to LegsAClimbing6. LegsACrawling0 to LegsACrawling5. LegsAOnPole0 to LegsAOnPole6. LegsAPole, LegsAVerticalPole and LegsAWall.
There is a total of 85 slugcat sprites: 13 PlayerArm sprites (not counting OnTopOfTerrainHand), 18 HeadA sprites, 32 LegsA sprites, 20 FaceA-B sprites, 1 BodyA sprite and 1 HipsA sprite.
Store all of the sprites and organise them in folders for ease of use and access.
Each custom atlas must be made separately, for example: use only head sprites if you’re making a custom atlas that changes slugcat’s head. One custom atlas for each body part.
It is highly recommended to follow the Sprite frame guide for insight on in-game sprite usage.
- Packing your sprites
After identifying slugcat’s sprites, edit them as you wish with any art program that supports some sort of aliased (pixelated) pen and transparency (DO NOT use MSPaint). Do not rename the individual .pngs. Once you’re done with your edits and put all of them in a folder, you must pack them using TexturePacker[www.codeandweb.com].
Once you’re done installing TexturePacker, select Use Free Version. This will open the program ready for use. For this process, head sprites are used as an example. You have to go through this for every body part you edit.
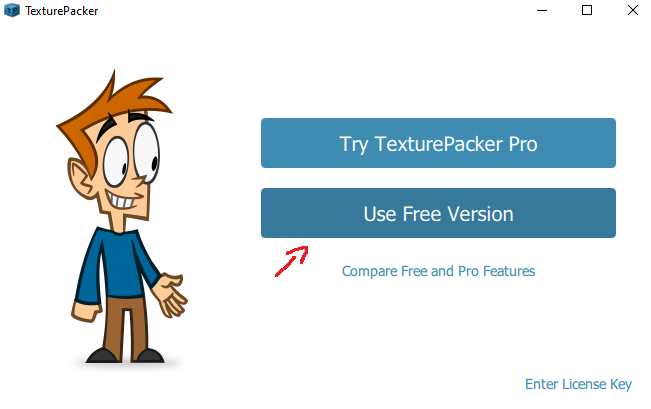
Select the folder containing all the sprites for the body part you edited, drag and drop them into the program.
IMPORTANT
Once your custom sprites are loaded, you might be greeted with a pink window at the bottom of the program. Remove it by clicking “Disable features”. You must click Disable features or your sprites will break when compiling them.
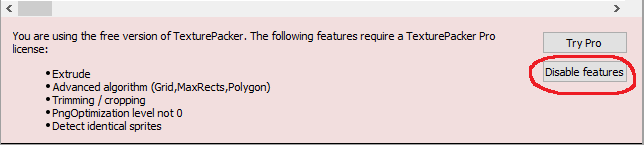
Before you do anything else, click “Advanced settings” in the window to the right.
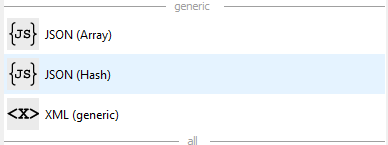
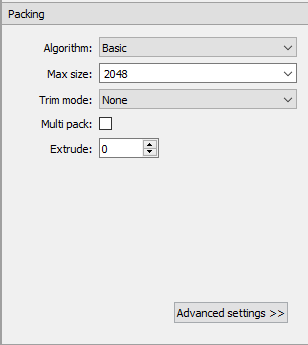 Locate the “Data” dropdown tab. At the very beginning, click
  . A window will open showing the available formats. Select JSON (Hash) located in the “Generic” category.
Right under “Data Format”, click the blue folder to the right of “Data file”, write your custom atlas name and save.

This will prompt a window to appear at the bottom of the program, requesting you to add a suffix. Click “Change to .json”.

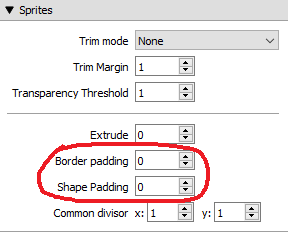
Scroll down the right window until you see the “Sprites” dropdown tab. There, set Border padding to 2 and Shape padding to 2. Don’t touch anything else.
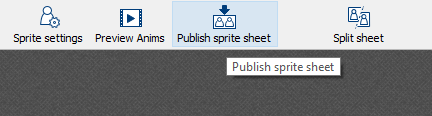
Click “Publish sprite sheet” located above the visualisation of the sprites packed together. This will immediately pack them together nicely.
After that, you’ll get a png file including all of your edited sprites and a .json file containing information about their dimensions and names, as well as the frames used. The default path where they are dropped is Documents.
For your own convenience and to avoid mistaking assets for others, rename both to share an unique name.
Click “Save as”, name the file the same as the custom atlas, add a “.txt” at the end and save it. This will convert the .json into a .txt file.

Example of a custom atlas with all steps done correctly. Packed .png and .txt files:
Sprite frame guide
Identified by file names and their enumeration.
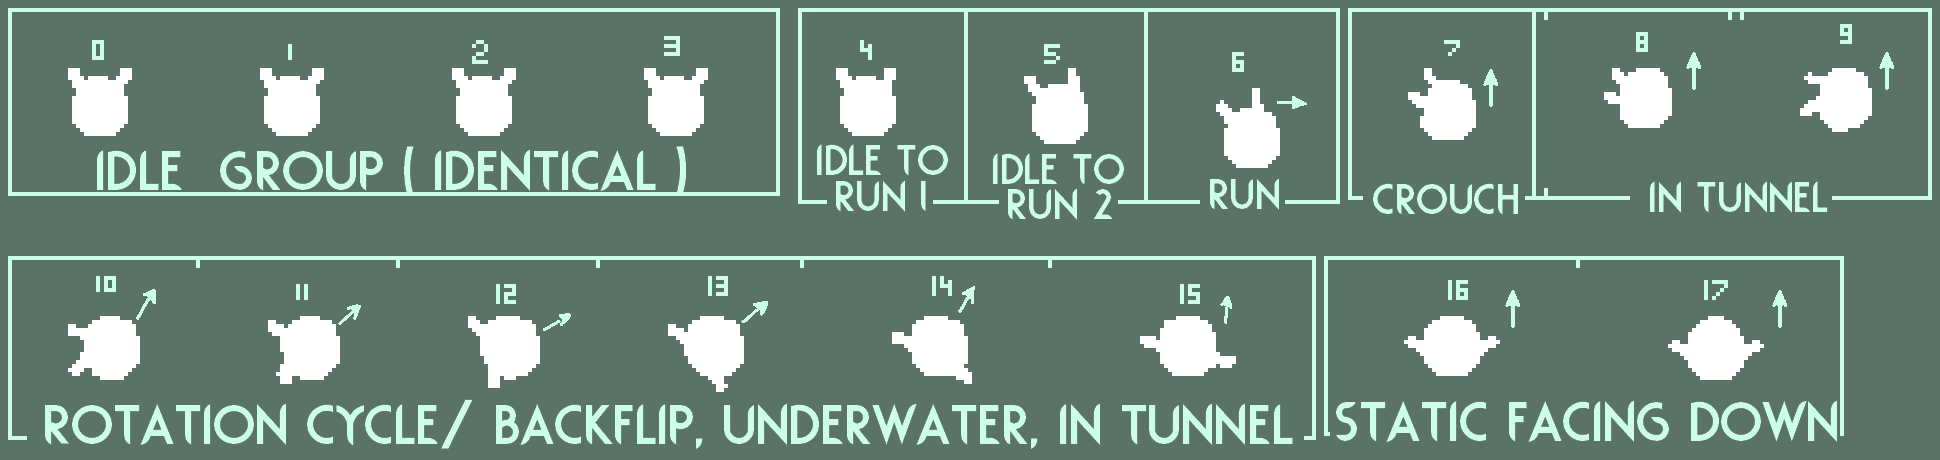
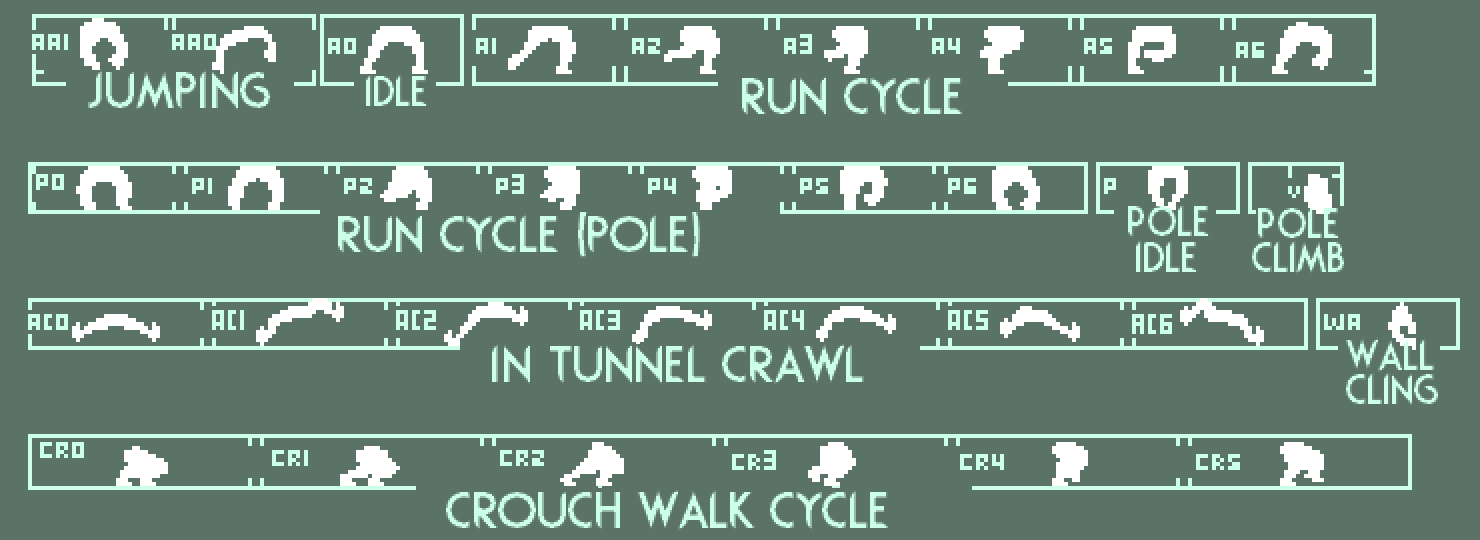
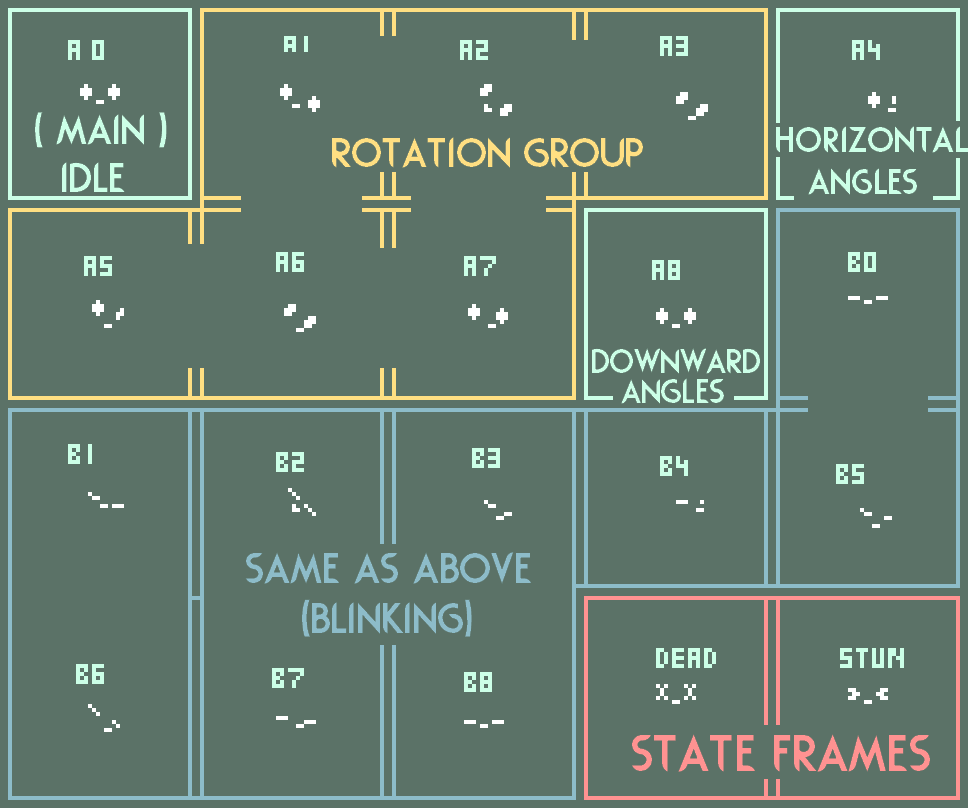
Identified by real-time usage and when they’re rendered at specific angles and body states.
Elaboration on heads and their usage by observation
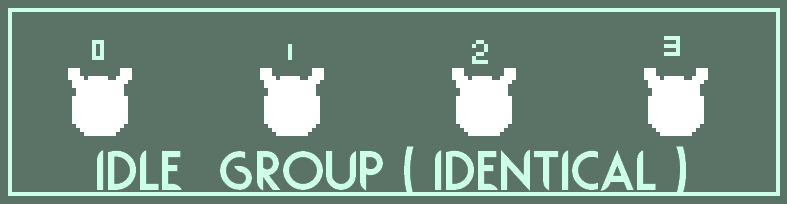 The idle group is completely stationary, and used primarily when slugcat is standing still and/or facing completely towards the viewer.
Frame 0 will quickly flash to Frames 1, 2 and 3 if slugcat is very slightly angled to a side, rarely when it looks around, and are interchangeable. The transition between each is quick, snappy, and with no particular order. This transition is noticeable when climbing vertical poles.
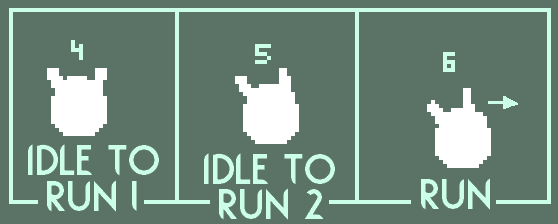 The turning cycle (4 and 5) is primarily used when slugcat sways on the tip of vertical poles as a smooth transition to the side angle. These frames can also appear at some angles when crawling in tunnels, usually when turning.
It will also be used when slugcat is forced into the sleeping animation and when that finishes.
All frames, including 6, might be present when swimming underwater.
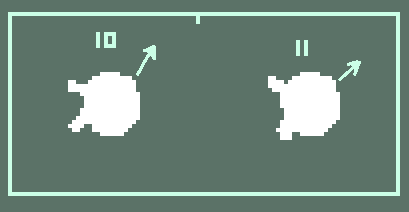 The crawl turn cycle is often used as inbetween for the Rotation Cycle and its inclusions, primarily but not exclusively when turning inside tunnels.
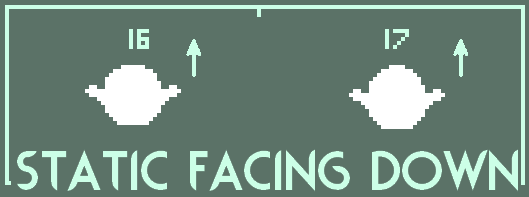 The static down group is most used in the backflip animation and when slugcat is peeking out of vertical tunnels while crawling or hanging downwards.
- Storyline Region Routes★ 5 (592)31k views1.4k ♥2 minUpdated 20 Jun, 2017
- 100% Steam Achievement Guide★ 5 (887)20k views1.9k ♥37 minUpdated 17 Dec, 2025
- Detailed Region Maps★ 5 (803)19k views1.7k ♥1 minUpdated 10 Mar, 2023
- General and Advanced Movement Guide★ 5 (572)17k views1.3k ♥15 minUpdated 5 Mar, 2021
- All Slugcats Guide★ 5 (682)15k views916 ♥9 minUpdated 30 Oct, 2025
- **SPOLIER FREE** Rainworld Guide★ 5 (257)14k views409 ♥10 minUpdated 30 Mar, 2023


- Upgrading to PremiumTeam Fortress 2★ 5 (20k)1441k views11k ♥6 minUpdated May 11, 2022
- No More Room in Hell Official ManualNo More Room in Hell★ 5 (2.8k)569k views2.1k ♥29 minUpdated Apr 22, 2019
- NMRiH Community Hosting GuidesNo More Room in Hell★ 5 (526)351k views653 ♥1 minUpdated Aug 10, 2022
- ULTIMATE GUIDE FOR GAME DEV TYCOONGame Dev Tycoon★ 5 (5.8k)326k views10k ♥4 minUpdated 23 Jan, 2014
- How to 'Git Gud' Soon™MORDHAU★ 5 (2k)318k views3k ♥68 minUpdated Nov 16, 2024
- Лучшие кооперативные игры SteamPAYDAY 2★ 5 (1.5k)315k views2.1k ♥56 minRussianUpdated Apr 27, 2025






This guide was created by its original author on the Steam Community. Are you the author and want it removed? Request removal.