Graphics Optimization and DLSS Upgrade + Frame Generation Integration for ALL GPUs
Introduction
I've compiled this guide for performance enhancement and quality optimization, to make people not overuse resources on negligble graphics settings.
The DLSS Enabler mod is capable of making things run on pretty much any card with staggering performance gains. On average you can expect a whopping 100% gain in either performance or quality.
I went from High/Very High in 1440p to now being able to play this in 4K on the same settings, no problem. Isn't that crazy?
My System Specs:
-OS: Windows 10
-GPU: Sapphire AMD Vega 64 Nitro+ 8GB (comparable to an RTX 1080 or 2060), overclocked to the limit
-CPU: i9 -9900K, overclocked to 4.8gHz on all 8 cores
-RAM: 48GB HyperX 3466 mHz
-Mainboard: Gigabyte Z390 Designare
 Please don't forget to LIKE if this guide was helpful for you. If you're happy with the results and feel generous leave a Steam points award. Commenting your experience will also be appreciated. Thank you and I really hope you find success with it.
DLSS Enabler
https://www.nexusmods.com/site/mods/757
"This all-in-one package allows the users of any DX12 compatible GPUs (from NVIDIA / AMD / Intel) to enable DLSS upscaler and DLSSG Frame Generation in most of the games implementing NVIDIA DLSS 2 / DLSS 3 features."

Installation:
Make sure you locate the right folder for the installation
The path should look something like this:
D:\Programs\Steam\steamapps\common\Rise of the Tomb Raider
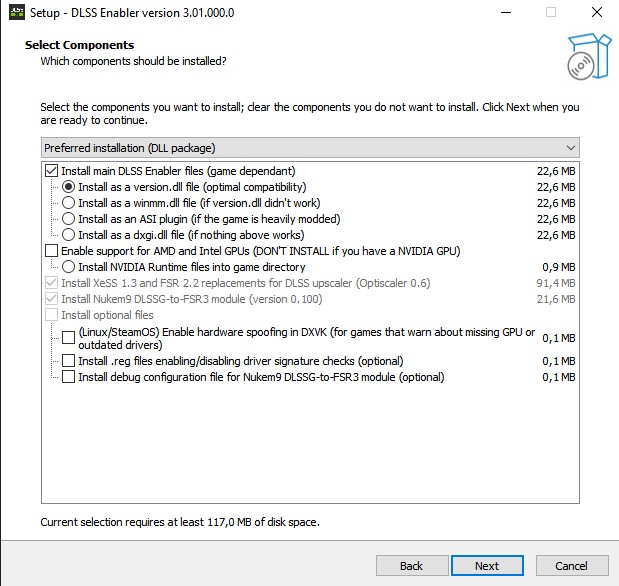 Have those things checked during the Installation if you have an AMD GPU: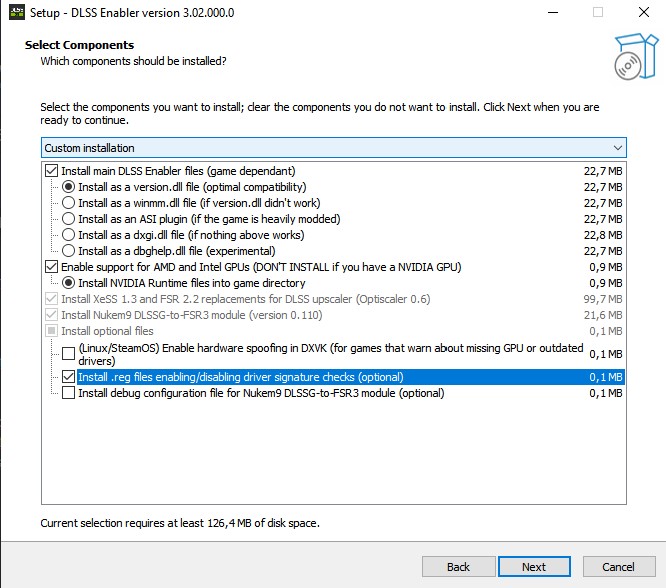
If you have an AMD: After installation find the "DisableNvidiaSignatureChecks.reg" file in that folder and run it.
That's it. You're done. Now it should work. You can modify it with the instructions from the readme file if you wish to.
I haven't spent any time trying to modify or optimize the mod. If you start runninng into problems I suggest combing through the forum posts on the nexusmods page to find out how people are combating certain abnormalities in mod behavior.
If you wanna uninstall it, run the "unins000.exe" in the folder.- Go back into the folder where DLSS Enabler is installed
- Delete the "nvngx.ini" file from that folder.
- Start the game
- Make sure that an upscaler is enabled. From the game's display options, choose an upscale type like NVIDIA DLSS or AMD FSR.
- Press the INSERT (or Ins) key on the keyboard while in game.
- The Optiscaler menu will appear. Then, at the bottom, click "Save INI"
- Close the game and return to the game folder. You should either see a new "nvngx.ini" file or "Optiscaler.ini"
- Open that file and find the line "DisableOverlays = auto", replace "auto" with "false". Then save the file.
Optiscaler - The multitool for all upscaling and frame generation
https://github.com/OptiScaler/OptiScaler
The latest DLSS Enabler Beta version includes an older version of Optiscaler, but as far as I know the latest version of Optiscaler can basically do everything the DLSS Enabler does. Just that it doesn't organically integrate through the ingame options, but it works through its own interactive overlay. So if you got the DLSS Enabler installed already you can also test it. Uninstall DLSS Enabler and use the newest Optiscaler, because I'm not sure if it's advised to mix the versions together. Use one or the other.
Within DLSS Enabler you can test it like this:NOTE: Using this together with the MSI Afterburner/Rivatuner Frame Cap can lead to problems or latency issues. I am not sure, I wouldn't recommend it.
NOTE: I'd upgrade all upscalers with DLSS Swapper first before doing the Optiscaler installation. Depending on what files from Optiscaler you replace with DLSS Swapper later it will break the Optiscaler.
- Download the latest version from the link above
- Unzip and copy all the files into the directory of your game where the .exe file is and replace everything. Then run the setup_windows.bat and give the prompts that fit your system to finish it.
- When you next start the game an overlay message should display from Optiscaler. Optiscaler wants you to first choose any upscaling (DLSS, FSR, XESS) in the game menu options. Do that and then open the Opti overlay by pressing the insert key. Now you can override any game options with Optiscaler.
Choose an upscaler you want in the overlay, then for Frame Generation choose "Opti FG" and check "Hud Fix" boxes. In a lot of circumstances the game will run better if you check "Async" too.
Then at the bottom it says save.ini, click it so that the options you chose in the overlay will always be applied upon game startup. Now the game wants you to restart to apply the frame generation. Afterwards everything should work.
So this will effectively double any frames you have pretty consistently. There could still be some little glitches on the hud or subtitles, depending on the options you checked, but nothing major. You can then experiment with increasing or decreasing the Hud Fix option. Just one final step to re-enable the Steam overlay by modifying the Optiscaler.ini file in the folder. Open it and hit CTRL+F and search for DisableOverlays. Change it from true or auto to this:
DLSS Swapper
"DLSS Swapper is a tool that allows you to conveniently download, manage, and swap DLSS, FSR and XeSS dlls allowing you to upgrade or downgrade DLSS, FSR and XeSS version in a game without the game needing an update."
https://github.com/beeradmoore/dlss-swapper?tab=readme-ov-file
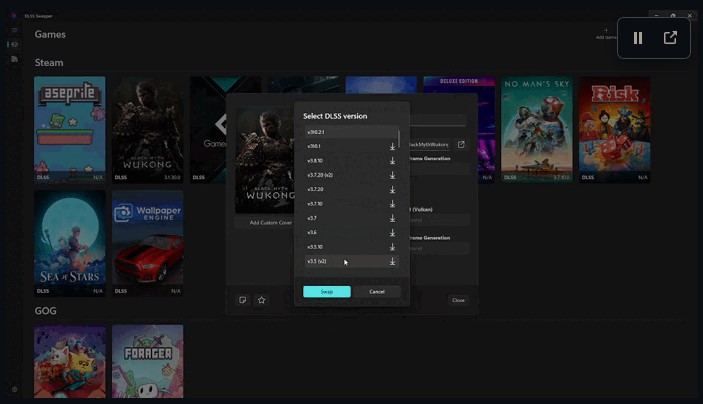
This is an insanely great tool, I am so impressed with it. It could not be easier and reverting the changes is also an inbuilt function.
NOTE: If you're using the DLSS Enabler, you should only swap after the installation.
Graphics Settings
I've done some testing and drawn inspiration from some benchmarking sites and videos.
I know, this video is about Shadow of the Tomb Raider, the sequel to Rise, but the games are very similiar in all aspects, because it was built with the same engine. The graphics options between the games differ a little bit, but a comparison of performance behavior is possible and helpful.
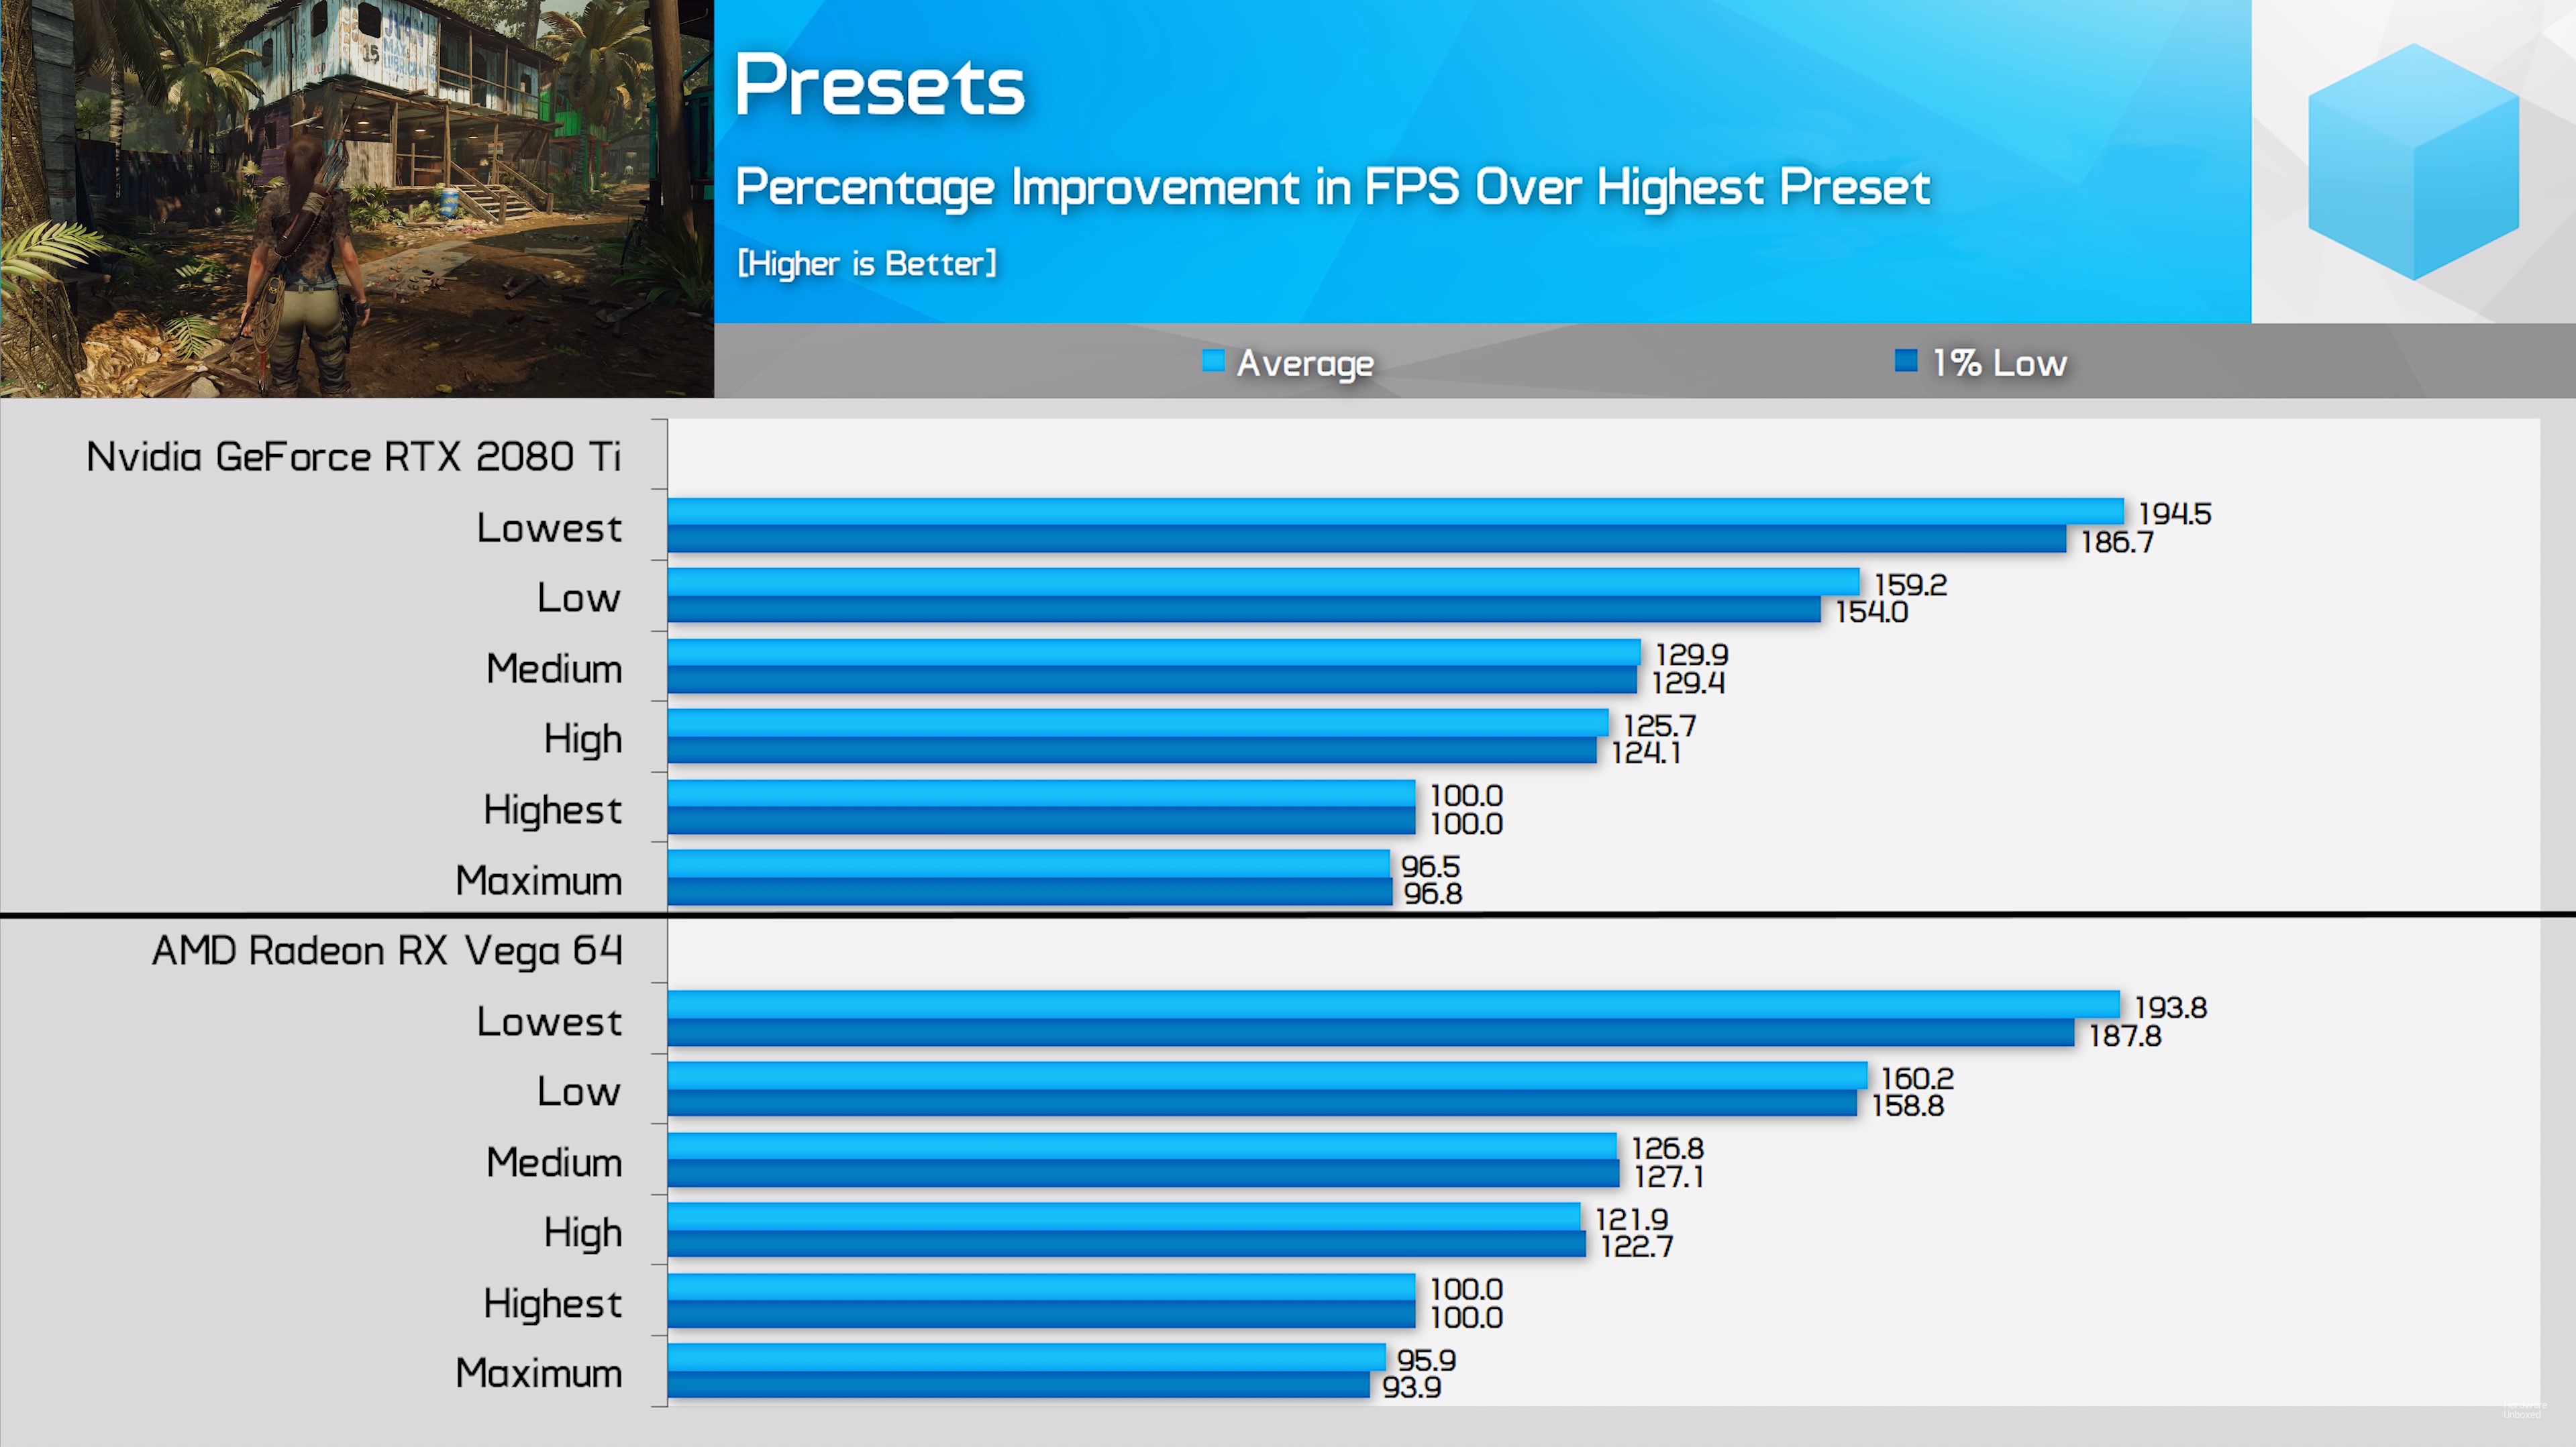
It all depends on your hardware, but the High Preset will be a good baseline to start from. It's a ~20% performance increase in FPS from Very High.
If you can handle Very High, manually adjusting the remaining settings to maximum will only cost you like 5%. That's roughly speaking though, I can't confirm that across the entire game. There will surely be differences in fluidity.
The most demanding settings seem to be Shadows, Ambient Occlusion and PureHair. Which also give the biggest bump in perceived quality, I guess. Textures also of course, but they only demand VRAM.
So after testing stuff for myself and cross referencing it with benchmark results, this is what I came up with:
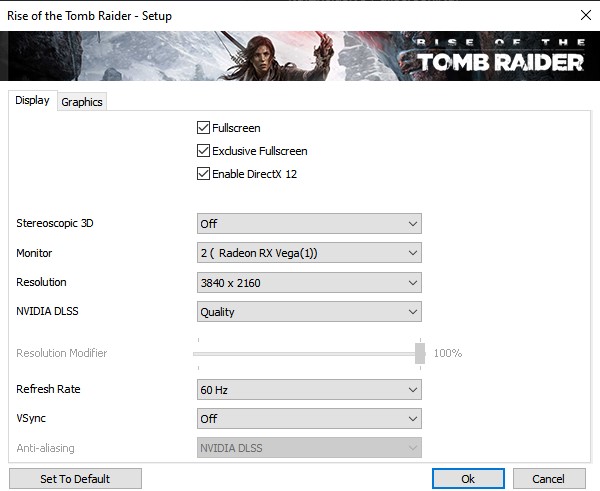
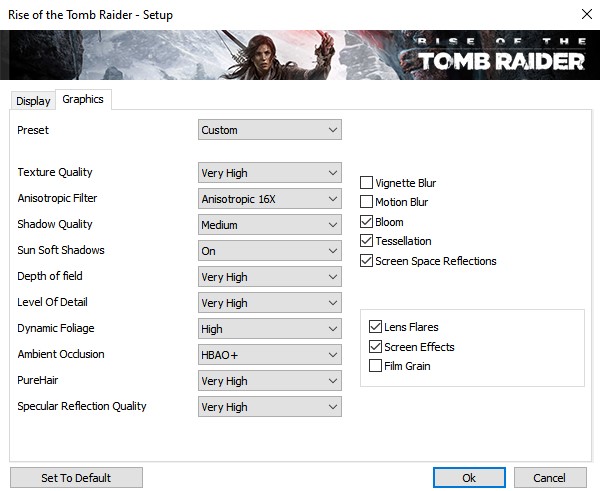
Adjust it to your needs. I was just going for a 60FPS lock in 4K. I still have some drops to 50 every now and then, but I generally prefer quality over performance. You can certainly crank this harder for more quality if you have a better card than me.
If this was in any way helpful for you, I'd appreciate a thumbs up! :)
Improve DX12 Performance
It is a known thing that people do, more commonly known in multiplayer games where everybody's desperate for every fps they can get. Here another article explaining the same thing, so you don't have to take some random Youtuber's opinion at face value:
https://www.toolify.ai/hardware/unlock-the-full-potential-of-dx12-games-improve-performance-and-stability-2856272
I got around 8% of performance gain out of this. It will depend on your system though how much this does for you. It's said to improve FPS and resolve stutters some systems might experience with DX12. You can do this for all games you know that run on DX12.
- Collectables and challenges★ 5 (715)37k views1.3k ♥1 minUpdated 19 Nov, 2018
- Руководство по достижениям Rise of the Tomb Raider★ 5 (2k)35k views2.2k ♥29 minRussianUpdated 12 Jan, 2025
- Достижения Rise of the Tomb Raider★ 5 (1.4k)27k views1.8k ♥24 minRussianUpdated 14 Sep, 2018
- [RU/ENG] Rise of the Tomb Raider: Карты/Maps★ 5 (681)24k views979 ♥2 minUpdated 29 Jan, 2016
- Обзор графических настроек★ 5 (514)21k views414 ♥17 minRussianUpdated 6 Mar, 2016
- Rise of the Tomb Raider 100% Guia + Logros + DLCs★ 5 (562)20k views542 ♥9 minSpanishUpdated 2 Sep, 2021


- Upgrading to PremiumTeam Fortress 2★ 5 (20k)1441k views11k ♥6 minUpdated May 11, 2022
- No More Room in Hell Official ManualNo More Room in Hell★ 5 (2.8k)569k views2.1k ♥29 minUpdated Apr 22, 2019
- NMRiH Community Hosting GuidesNo More Room in Hell★ 5 (526)351k views653 ♥1 minUpdated Aug 10, 2022
- ULTIMATE GUIDE FOR GAME DEV TYCOONGame Dev Tycoon★ 5 (5.8k)326k views10k ♥4 minUpdated 23 Jan, 2014
- How to 'Git Gud' Soon™MORDHAU★ 5 (2k)318k views3k ♥68 minUpdated Nov 16, 2024
- Лучшие кооперативные игры SteamPAYDAY 2★ 5 (1.5k)315k views2.1k ♥56 minRussianUpdated Apr 27, 2025






This guide was created by its original author on the Steam Community. Are you the author and want it removed? Request removal.