How do I upload a mod? (PC Steam only) - Further Explanation
Introduction
This guide will provide more details on how to turn your mod into a Steam mod.
The basis for it is the post by Gilgamesh on the Aspyr Support forums.
Make sure you read that first, hopefully this guide will explain anything you don't understand:
https://support.aspyr.com/hc/en-us/articles/205258020?utm_source=Steam&utm_medium=WorkshopPage&utm_campaign=KOTOR2
This guide will not cover how to make a working mod, only how to turn your mod into a Steam mod.
Preparation
Prepare some folders with short paths that you can easily remember.
Examples
Your main mods location:
E:\MyMods
The mod you want to upload:
E:\MyMods\MyFirstMod
Make sure you always put your mod's contents in a folder named override, so for the example you put them all in E:\MyMods\MyFirstMod\override
Some easy to find location for your preview images:
E:\MyMods\MyPreviews
A Vdf File - Your Upload's Recipe
You now need to make a vdf file, which will act like a reference file for your upload.
It needs to have the file extension .vdf, but it is a plain text file that you can make with a plain text editor like Windows Notepad.
Start with this as content, with example values, you can tweak it later:
"workshopitem"
{
"appid" "208580"
"contentfolder" "E:\\MyMods\\MyFirstMod"
"previewfile" "E:\\MyMods\\MyPreviews\\myawesomefirstmod.jpg"
"visibility" "0"
"title" "My First Mod"
"description" "This is my first KotOR 2 Mod!"
"changenote" "Version 1.0.0"
}
Notes:
- "appid" is the id for KotOR 2, so don't change that.
- "contentfolder": notice the double backslash, use that instead of single backslash. Also notice that this path does not include the override folder (it still needs to be in there though).
- "previewfile": must be under 1MB in size. Suggested formats include JPG, PNG or GIF.
- "visibility": I found that this gets ignored. If you want to hide your mod after publishing you can go to it on Steam and turn off the visibility there if you like.
p.s.
You can change the title and description after publishing.
Save the file as a .vdf file once you have tweaked the values.
The location is not very important as long as you can find it again. To stay in line with the examples it could be in E:\MyMods\VDF and as a file name MyFirstMod.vdf.
Steamcmd.exe
Now we need to get the program that will use the vdf file to upload your mod.
First get it at:
https://developer.valvesoftware.com/wiki/SteamCMD
Again I recommend to keep the path to this as short as possible.
If you only have a C: drive then I would put it in C:\SteamCMD. If you have more drives then maybe put it on another drive to keep your C: clean.
Make sure after extracting that steamcmd.exe is in that folder and not something redundant like C:\SteamCMD\steamcmd\steamcmd.exe
The Command Prompt
steamcmd.exe is a basic command line program. Some of you may know what that means (and could possibly skip this section), some of you may have never seen the Windows command prompt.
Before there was an operating system with a graphical interface like Windows (and after), we used to do things by typing commands. Some programs still do and there is still a way to use those programs, with the command prompt.
In most of the latest Windows versions the easiest way to start it is the Run option:
- Hit Windows key + R
- type cmd
You will now likely start at your user account folder, you will need to learn about a few basic commands to navigate to where you stored steamcmd.exe.
- to go to the root of the drive you're at, type: cd\
- to change drives, for example to go to E:, type e:
- to change directory, type cd foldername, for example: cd SteamCMD
You're ready for the final sections once you've navigated to the folder where steamcmd.exe is located.
Publishing your Mod
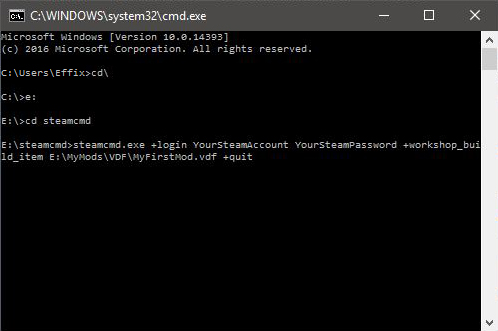
Now through the command prompt it's a matter of running steamcmd.exe with the correct parameters. You can't have Steam running for this to work.
For example enter (tweak to your situation):
steamcmd.exe +login YourSteamAccount YourSteamPassword +workshop_build_item E:\MyMods\VDF\MyFirstMod.vdf +quit
If all went well then you can check out your mod on Steam, maybe add some more images, tweak the description if needed.
The .vdf will get a new line, with the id of the mod. If you use the vdf again it will update the mod because of that line (instead of making a new mod).
A Word of Warning
- I recommend starting with a reskin mod or something straight forward like that
- If you know how to add unique items that aren't in the game yet then that's fairly safe too, make sure you add details
- A part of the Steam audience will just hit the subscribe button after seeing an image, they will ignore instructions, warnings, might not know English etc. If they run into problems they will turn to you, or worse turn to the general discussion area having no idea what's going on.
- After learning about how restricting Steam mods are I can't say I'd recommend including any .2da files in your mod. Also note that most people use TSLRCM, which includes quite a few of them. You can try to communicate things but with the above point in mind... I would not recommend it.
- KotOR II Cheat Codes★ 5 (1.6k)116k views4.4k ♥17 minUpdated Jul 20, 2017
- KOTOR II: The Sith Lords - Go-To Essential Mods★ 5 (768)56k views2.2k ♥13 minUpdated Feb 28
- Character and Party Optimizing Guide - Archival★ 5 (1.1k)56k views2.7k ♥51 minUpdated Apr 24, 2024
- KotOR II Steam Workshop Modding Guide★ 5 (499)46k views1.1k ♥9 minUpdated Dec 20, 2015
- KOTOR: Tips and Tricks★ 5 (386)42k views756 ♥5 minUpdated Jun 12, 2023
- Ultima Pearl (Code)★ 5 (329)32k views749 ♥1 minUpdated Nov 25, 2025


- Upgrading to PremiumTeam Fortress 2★ 5 (20k)1441k views11k ♥6 minUpdated May 11, 2022
- No More Room in Hell Official ManualNo More Room in Hell★ 5 (2.8k)569k views2.1k ♥29 minUpdated Apr 22, 2019
- NMRiH Community Hosting GuidesNo More Room in Hell★ 5 (526)351k views653 ♥1 minUpdated Aug 10, 2022
- ULTIMATE GUIDE FOR GAME DEV TYCOONGame Dev Tycoon★ 5 (5.8k)326k views10k ♥4 minUpdated 23 Jan, 2014
- How to 'Git Gud' Soon™MORDHAU★ 5 (2k)318k views3k ♥68 minUpdated Nov 16, 2024
- Лучшие кооперативные игры SteamPAYDAY 2★ 5 (1.5k)315k views2.1k ♥56 minRussianUpdated Apr 27, 2025






This guide was created by its original author on the Steam Community. Are you the author and want it removed? Request removal.