Juice Guide - Harvest Guide of Kinsect Buffs for Insect Glaive Beginners
This Guide
Greetings hunters, if you have picked up the superior weapon that is the Insect Glaive, but need a little help which monster parts give that sweet, sweet juice, then this is the guide for you. I am myself an Insect Glaive afficienado and can promise you I myself have forgone the ways of the land and am now permanently in the air.
Also, the internet is dying. Trying to search anything these days without it being AI generated and wrong is rough. While doing research for what buffs exactly do, I found too much contradicting stuff. And the game isn't clear on anything either. Some of the numbers I use from this guide are from JVandelous' Guide[gamestegy.com]. With the hours I put in the game, this guide seems most correct numberwise. I will have some of their numbers displayed here as well, mostly the numbers for the buffs from Kinsect extracts and Slinger Ammo. So if you find issues for those, cool, but I'm gonna need proof of it being the case and not "this google search result said something different". Cause they all do, this one just seems most inline with what I actually played in the game.
This guide is done, but I am still missing data on Lunastra. If you know where to hit them and what juice they give, please tell me in the comment section.

Kinsect Juice Basics
There's a total of four extracts a Kinsect can obtain when hitting amonster part: Red, White, Orange, and Green.
These buffs also come from the same body parts most of the time, but the problem there is that a lot of monsters do deviate from this. Full monster guide is in the rest of this guide. In general buffs come from these locations:- Red: Head
- White: Wings/Limbs
- Orange: Body
- Green: Tail
Red extract is your bread and butter. It gives you access to much more powerful weapon animations for 90 seconds, or 135 seconds with Kinsect Charge Stamina Boost. You need this buff at the minimum to start Aerial combat, else you'll just be flying through the air doing minimal damage.
White extract gives faster Movement Speed and higher Vaulting Height, lasting 120 seconds, or 165 seconds with Kinsect Charge Stamina Boost.
Orange extract gives a 5% Defense Boost and Knockback Resistance, lasting 150 seconds, or 195 seconds with Kinsect Charge Stamina Boost.
Green extract heals you for a bit of Health if you're not at maximum Health.
Then there's three total combinations of buffs.
Red + White extracts at the same time gives +10% Attack
Orange + White at the same time gives +10% Defense
Red + White + Orange gives +15% Attack and +10 Defense, plus refreshes the timers off all buffs to 90 seconds, 135 seconds with Kinsect Charge Stamina Boost. Also during this time, buffs can't be refreshed until they've fully run out.

The UI always show you which extracts are active, and they start blinking when they have less than 10 seconds left. The UI is also slightly different when you have a Kinsect Charge active. Also important to know is that as long as Kinsect Charge is active, the UI on the insect itself opens its wings, indicating that it can hold a total of two extracts at the same time.
Power Prolonger allows buffs to stay active for longer.
Level 1 gives +10%, level 2 + 20% and level 3 + 40%
This would mean the triple extract that normally lasts 90 seconds, can now last 99/108/126 seconds.
Flinch-free gives a stack of Earplugs, Windproof and Tremor Resistance for as long as the triple buff is active. Each level of Flinch-Free gives an extra stack of these skills, up to a maximum of 3 for Earplugs and Windproof, and 2 of Tremor Resist.
Kinsect Charge
Kinsect Charge is a mechanic added with Iceborne. You feed your insect a bite of whatever is in your slinger ammo, and it gains a passive based on what it's fed. You can only have one buff active and feeding new ammo replaces the old buff with a new one.
There's two buffs slinger ammo can give the Kinsect:- Spirit: Feeding ammo that provides this Buff, immediately replenishes all Kinsect Stamina, as well as extending its stamina bar. On top of that, it makes any extracts and triple extract harvested while this buff is active last 50% longer.
- Power: Increases your Kinsects damage by 1.5 and Elemental power by 3.5. Also increases dust strength by 1.15 and increases the intervals between dust deposits. Also makes extracts last 50% longer, but not the triple extract buff.
Slinger ammo gives either Stamina buff or power buff, unless the weapon's kinsect bonus is Spirit & Strength Boost. In this case, no matter what you feed it, it always gives both buffs. It shows below where this kinsect bonus would show up in your Equipment's Info.
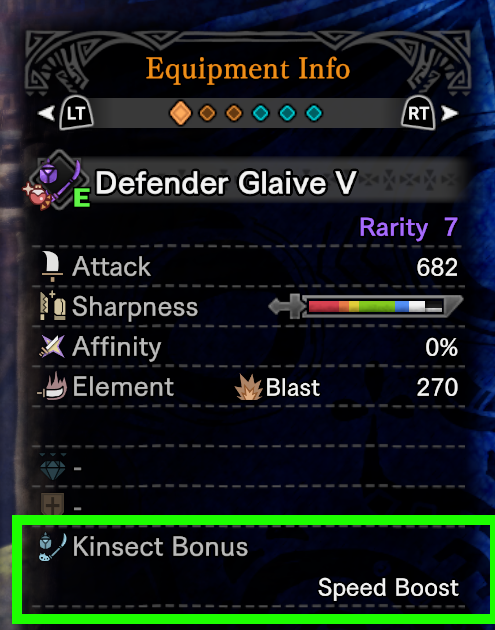
Below a list of slinger ammos and their respective buffs:
An Exact Guide on Which Part to Hit
Large Monsters
Great Jagras
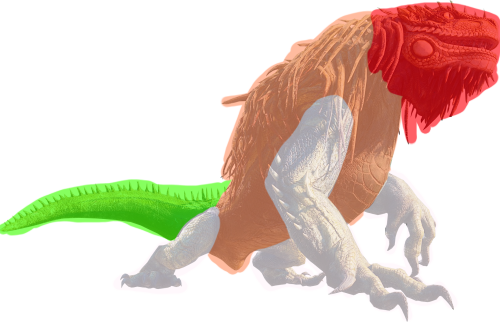
- Red: Head and small part of Mane
- White: Front and Back Legs
- Orange: Full Body and Mane
- Green: Tail
Kulu-Ya-Ku
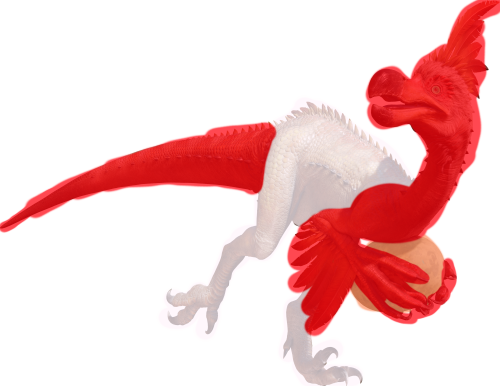
- Red: Head, Front Legs and Tail
- White: Body and Back Legs
- Orange: Rock
- Green: Not Available
Pukei-Pukei
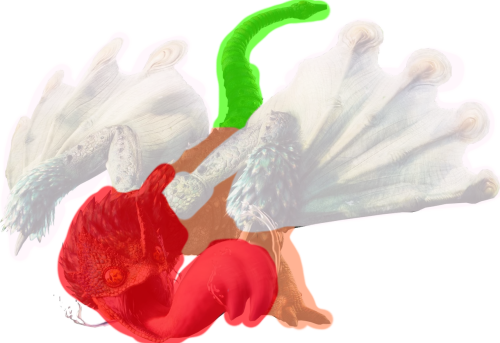
- Red: Head, Neck and Tongue
- White: Wings
- Orange: Body and Back Legs
- Green: Tail
Barroth
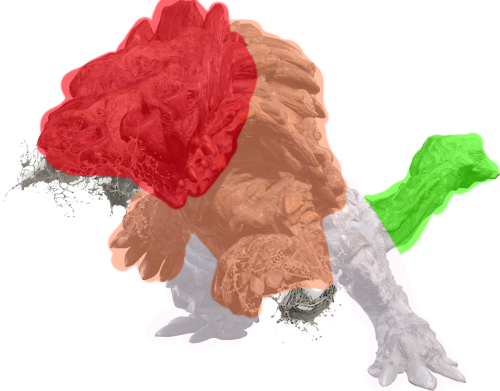
- Red: Head
- White: Back Legs
- Orange: Front Legs and Body
- Green: Tail
Jyuratodus
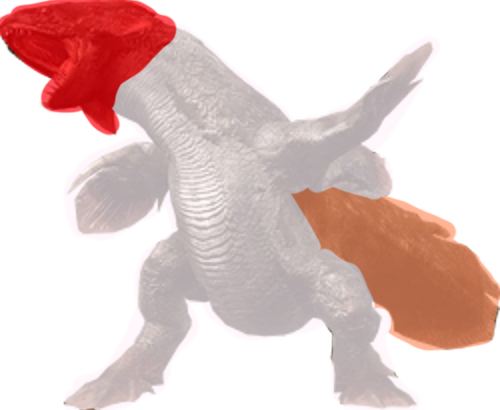
- Red: Head and Neck
- White: Body, Fins, and Back Legs
- Orange: Tail
- Green: Not Available
Tobi Kadachi
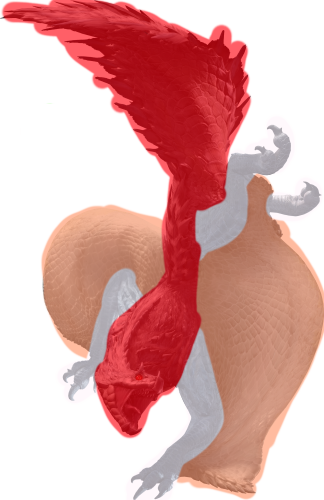
- Red: Head, Neck, Body, and Tail
- White: Front and Back Legs
- Orange: Wings (Can be hit while retracted, but very small hitbox)
- Green: Not Available
Anjanath
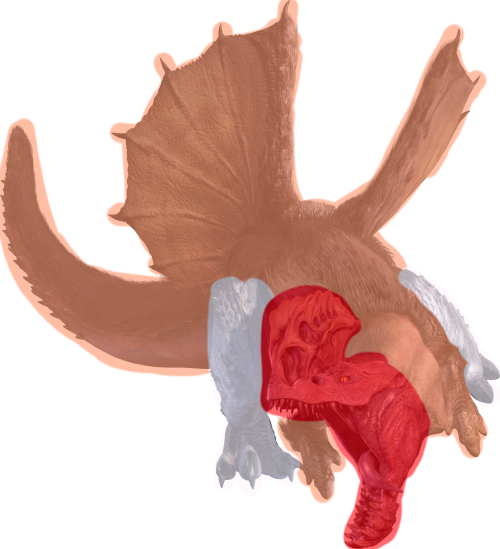
- Red: Head
- White: Back Legs
- Orange: Body, Front Legs, Neck, Frills, and Tail
- Green: Not Available
Rathian
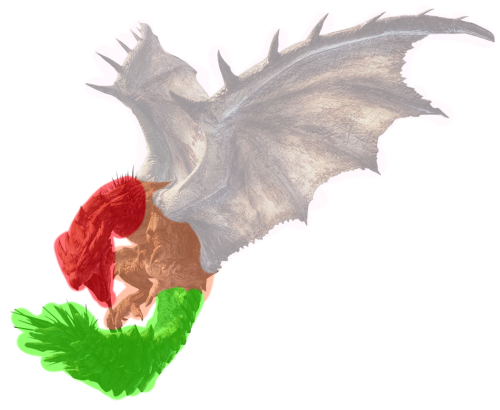
Rathian, Rathalos, Pink Rathian, Azure Rathalos, Gold Rathian and Silver Rathalos all have the same extract spots.
- Red: Head and Neck
- White: Wings
- Orange: Body and Back Legs
- Green: Tail
Tzitzi-Ya-Ku
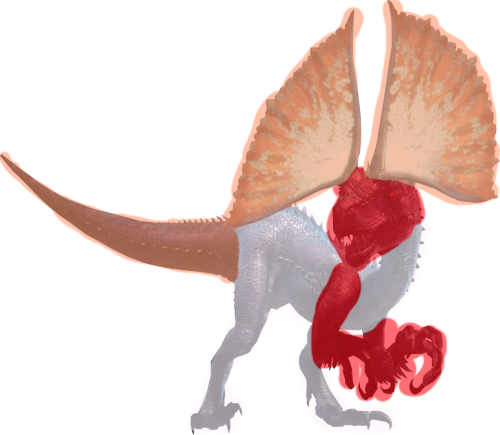
- Red: Head and Front Legs
- White: Body, Neck, and Back Legs
- Orange: Tail and Antennae
- Green: Not Available
Paolumu
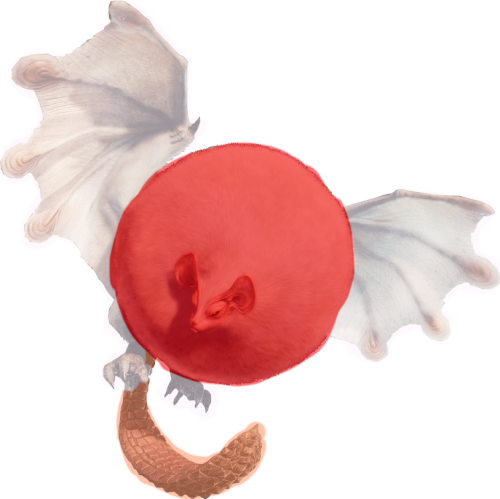
- Red: Head and Neck (Inflated)
- White: Wings, Back Legs, Fur Body, and Neck (Deflated)
- Orange: Tail and Hardened Belly
- Green: Not Available
Great Girros
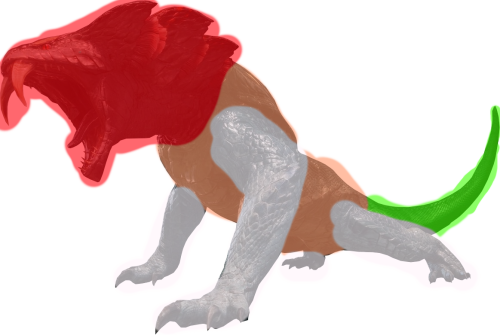
- Red: Head and Frills
- White: Front Legs and Back Legs
- Orange: Body
- Green: Tail
Radobaan
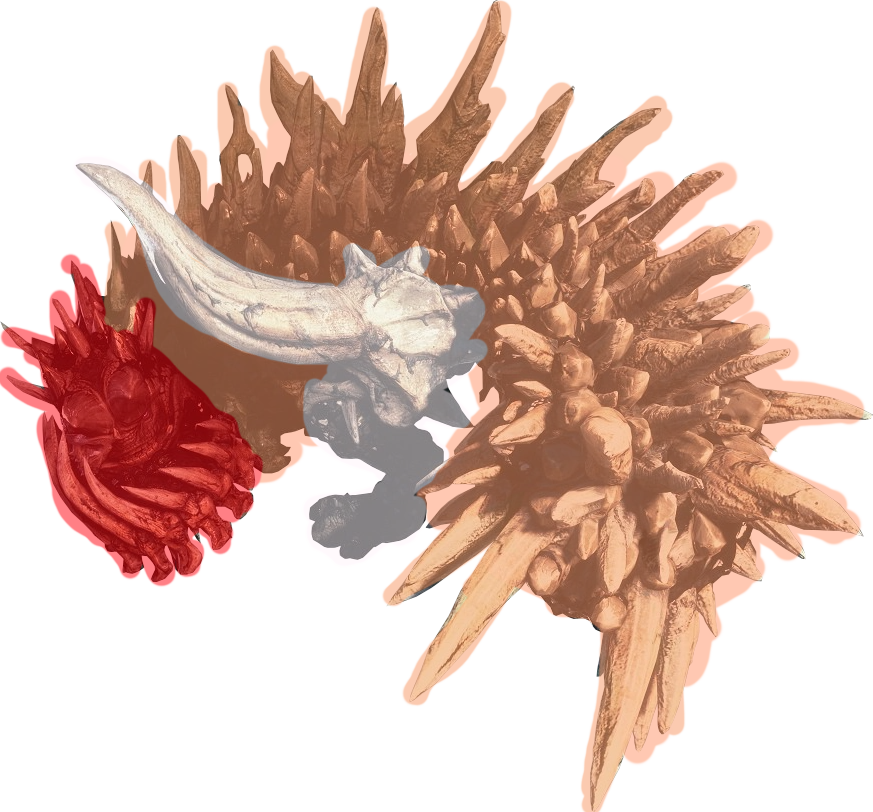
- Red: Head
- White: Back Legs and Attached Spikes
- Orange: Body, Front Legs and Tail
- Green: Not Available
Legiana
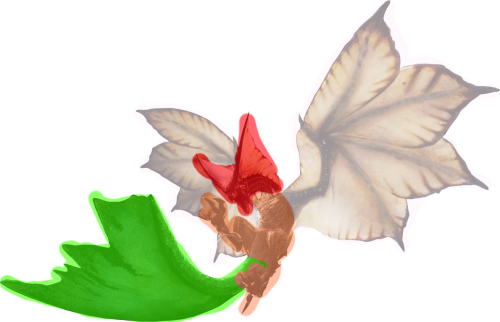
Legiana and Shrieking Legiana have the same extract spots.
- Red: Head and Antennae
- White: Wings
- Orange: Back Legs and Body
- Green: Tail and Tail Frills
Odogaron
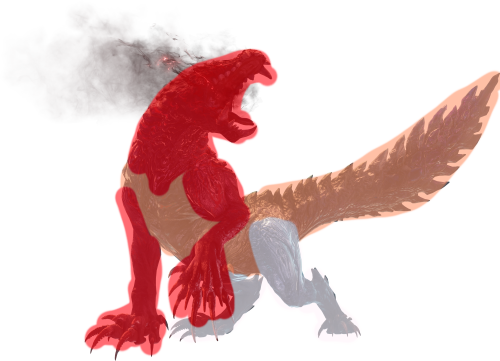
Odogaron and Ebony Odogaron all have the same extract spots.
- Red: Head, Neck, and Front Legs
- White: Back Legs
- Orange: Body and Tail
- Green: Not Available
Rathalos
Rathian, Rathalos, Pink Rathian, Azure Rathalos, Gold Rathian and Silver Rathalos all have the same extract spots.
- Red: Head and Neck
- White: Wings
- Orange: Body and Back Legs
- Green: Tail
Diablos
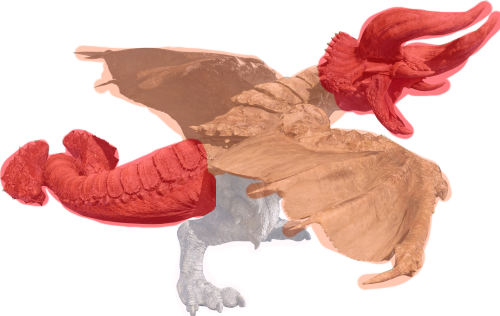
Diablos and Black Diablos all have the same extract spots.
- Red: Head and Tail
- White: Back Legs
- Orange: Body and Wings
- Green: Not Available
Dodogama
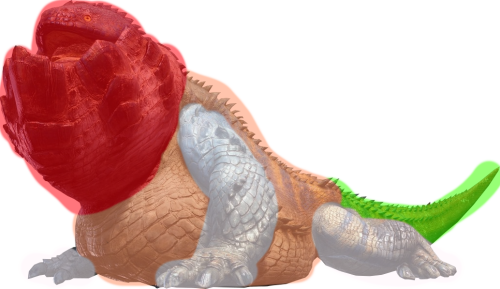
- Red: Head and Neck
- White: Front Legs and Back Legs
- Orange: Body
- Green: Tail
Pink Rathian
Rathian, Rathalos, Pink Rathian, Azure Rathalos, Gold Rathian and Silver Rathalos all have the same extract spots.
- Red: Head and Neck
- White: Wings
- Orange: Body and Back Legs
- Green: Tail
Bazelgeuse
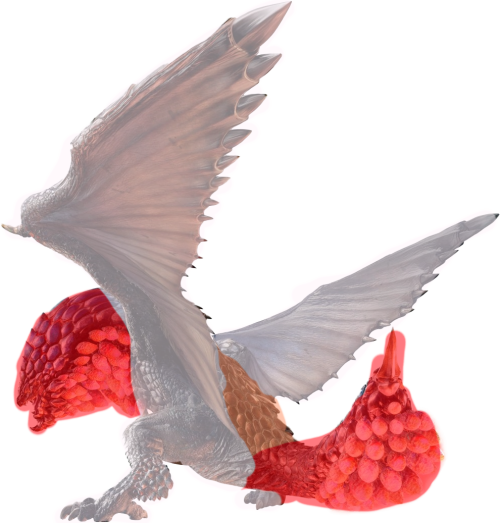
- Red: Head, Neck, and Tail
- White: Wings, Belly, and Back Legs
- Orange: Back
- Green: Not Available
Lavasioth
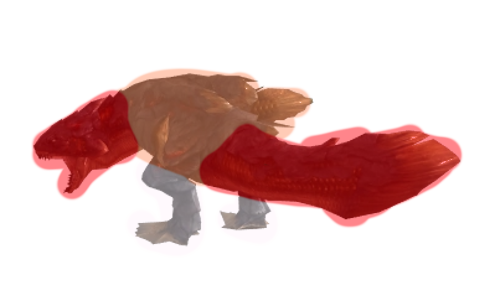
- Red: Head and Tail
- White: Back Legs
- Orange: Body and Fins
- Green: Not Available
Uragaan
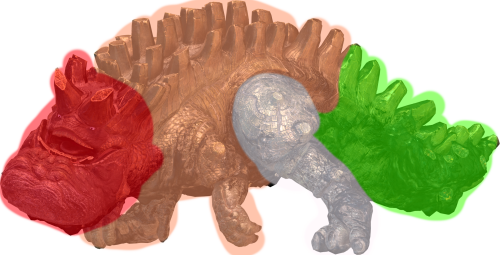
- Red: Head and Neck
- White: Back Legs
- Orange: Body and Front Legs
- Green: Tail
Azure Rathalos
Rathian, Rathalos, Pink Rathian, Azure Rathalos, Gold Rathian and Silver Rathalos all have the same extract spots.
- Red: Head and Neck
- White: Wings
- Orange: Body and Back Legs
- Green: Tail
Black Diablos
Diablos and Black Diablos all have the same extract spots.
- Red: Head and Tail
- White: Back Legs
- Orange: Body and Wings
- Green: Not Available
Elder Dragons
Kirin
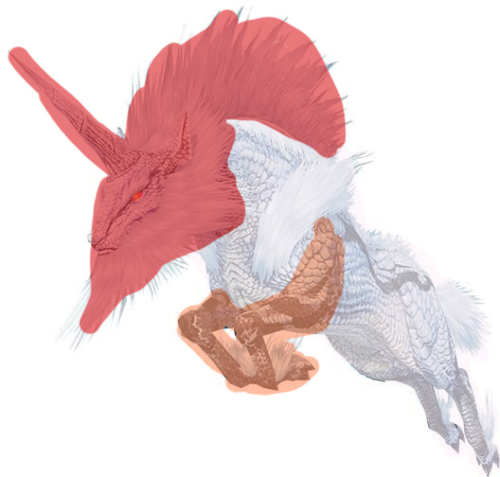
- Red: Head and Mane
- White: Body, Back Legs, and Tail
- Orange: Front Legs
- Green: Not Available
Zorah Magdaros
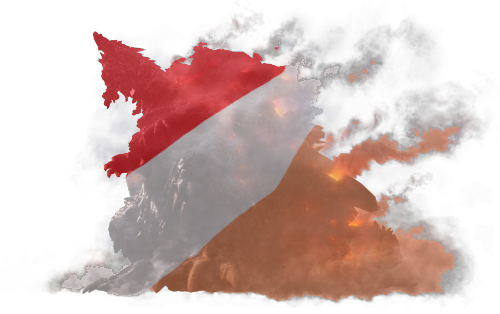
Hit his Magma Cores for a random Red, White, or Orange extract. I believe you can also hit him wnen you're not on his back, but what are you gonna use that juice for when firing canons?
Nergigante
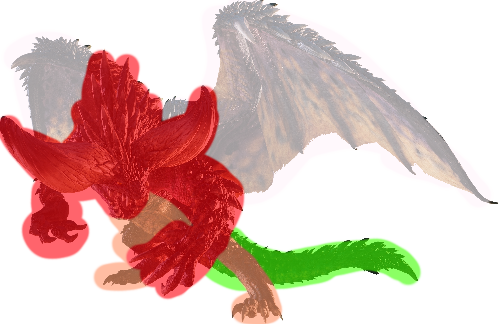
- Red: Head, Neck, and Front Legs
- White: Wings
- Orange: Back Legs and Body
- Green: Tail
Teostra
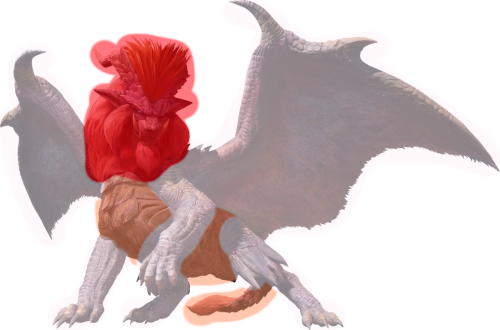
- Red: Head and Mane
- White: Front Legs, Back Legs, and Wings
- Orange: Body and Tail
- Green: Not Available
Kushala Daora
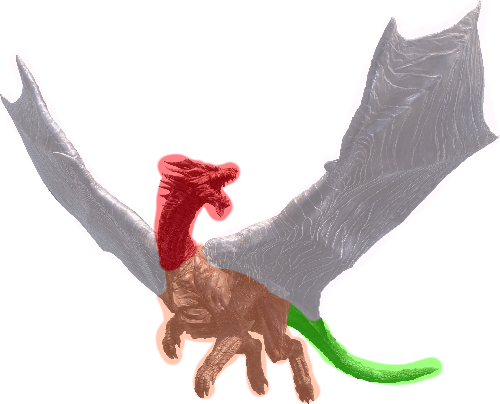
- Red: Head and Neck
- White: Wings
- Orange: Body, Back Legs, and Front Legs
- Green: Tail
Vaal Hazak
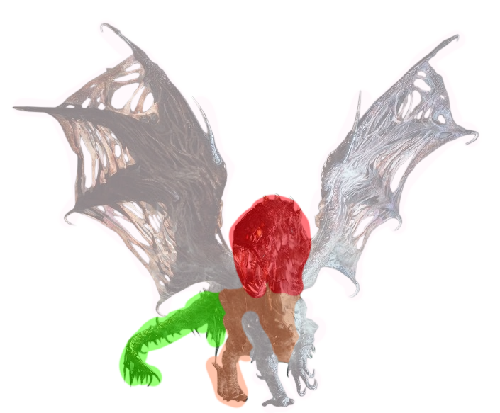
- Red: Head and Neck
- White: Wings and Front Legs
- Orange: Body and Back Legs
- Green: Tail
Xeno'jiiva
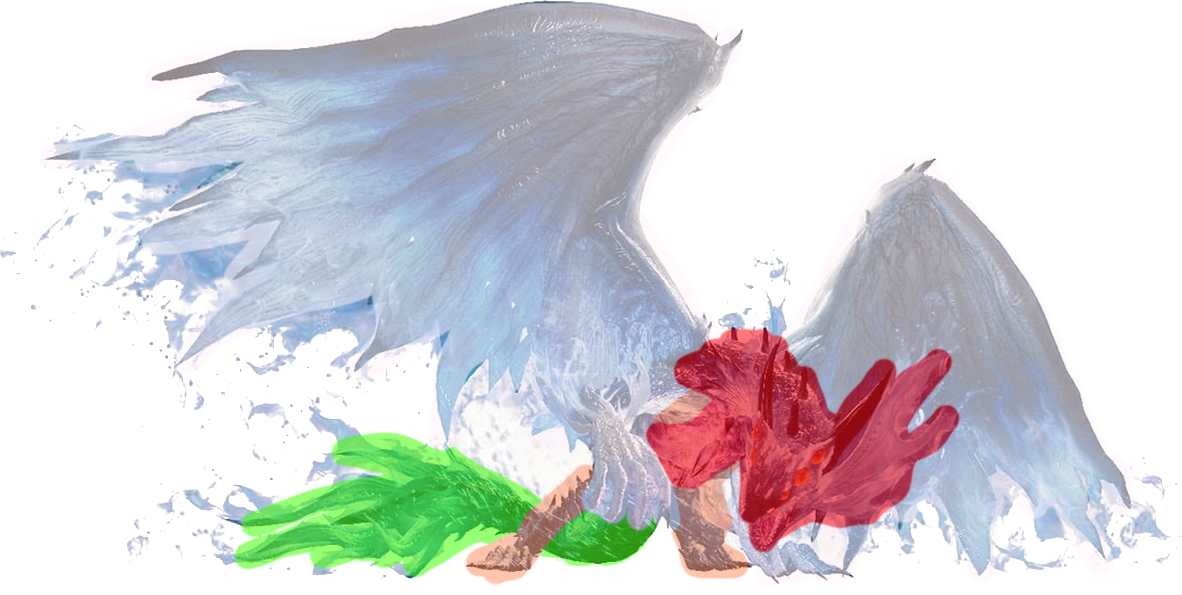
- Red: Head, Neck, and Chest
- White: Wings and Front Legs
- Orange: Back Legs, Lower Torso, and Back
- Green: Tail
Event/Update Monsters
Deviljho
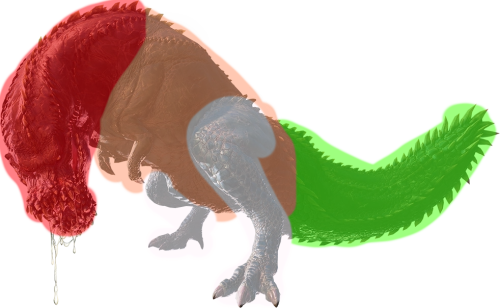
- Red: Head and Neck
- White: Back Legs
- Orange: Body and Front Legs
- Green: Tail
Lunastra
Kulve Taroth
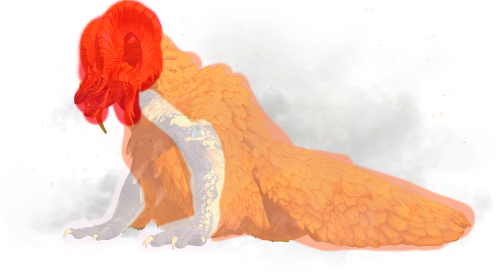
- Red: Head and Horns
- White: Legs
- Orange: Body and Tail
- Green: Not Available
Ancient Leshen
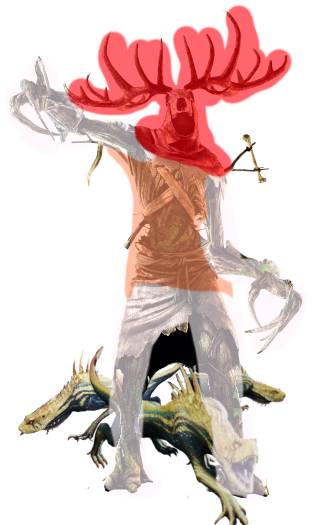
Extracts are same for both Leshen and Ancient Leshen.
- Red: Head and Antlers
- White: Arms and Legs
- Orange: Body
- Green: Not Available
Behemoth
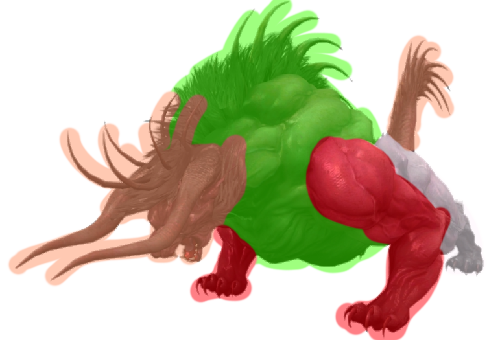
- Red: Front Legs
- White: Back Legs
- Orange: Head and Tail
- Green: Torso and Neck
Iceborne Large Monsters
Beotodus
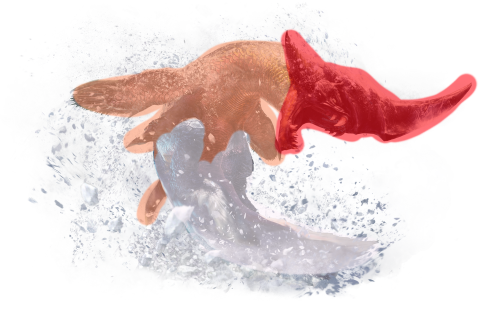
- Red: Head
- White: Tail and Back Legs
- Orange: Torso and Neck
- Green: Not Available
Banbaro
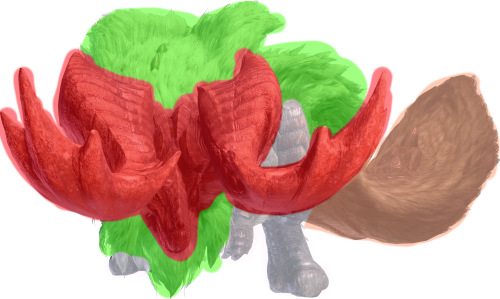
- Red: Head
- White: Back Legs and Front Legs
- Orange: Tail
- Green: Body
Viper Tobi Kadachi
- Red: Head
- White: Legs
- Orange: Tail
- Green: Body and Wings
Nightshade Paolumu
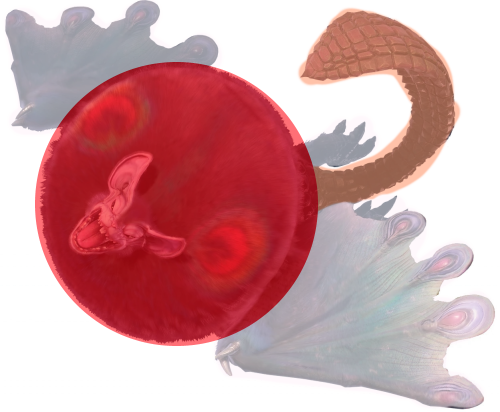
- Red: Head and Neck
- White: Wings and Legs
- Orange: Body and Tail
- Green: Not Available
Coral Pukei-Pukei
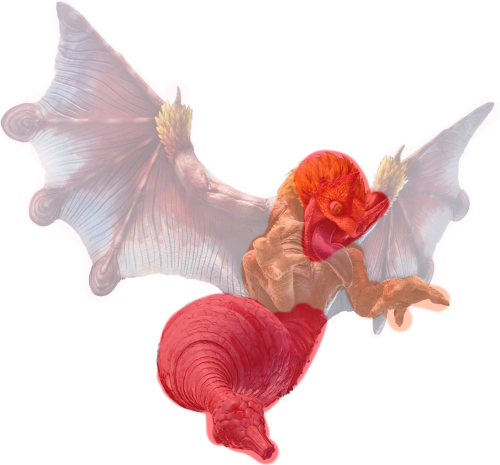
- Red: Head and Tail
- White: Wings
- Orange: Legs and Body
- Green: Not Available
Barioth
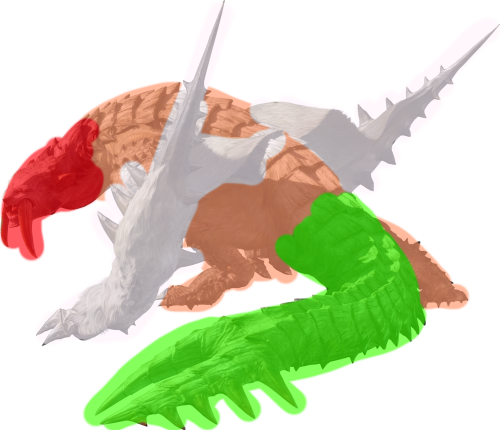
- Red: Head
- White: Wings
- Orange: Body and Back Legs
- Green: Tail
Nargacuga
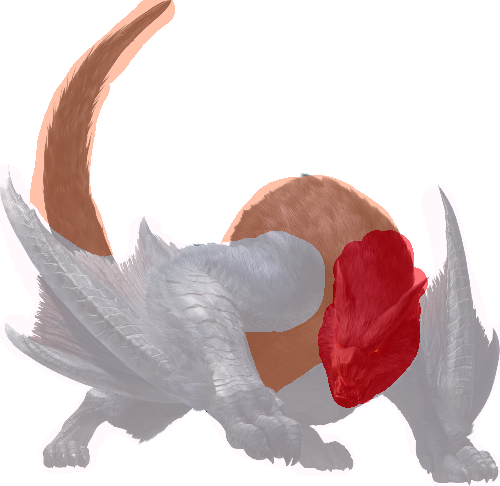
- Red: Head
- White: Legs and Wings
- Orange: Tail and Body
- Green: Not Available
Glavenus
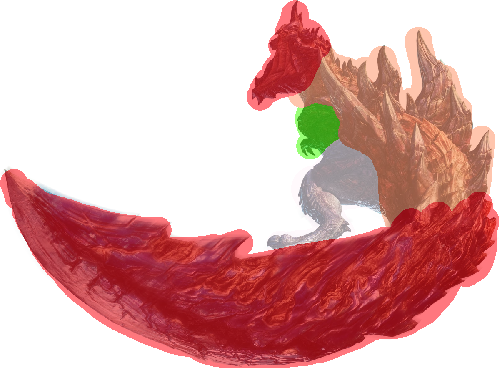
- Red: Head and Tail
- White: Back Legs
- Orange: Body
- Green: Front Legs
Tigrex
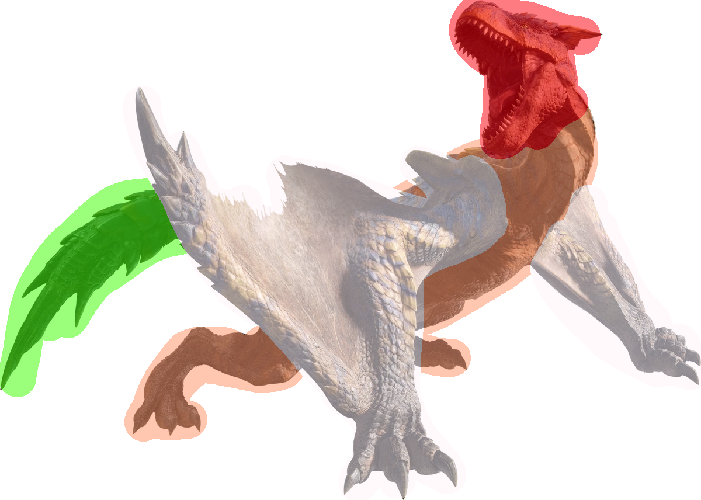
Tigrex and Brute Tigrex have the same extract spots.
- Red: Head
- White: Body and Back Legs
- Orange: Wings and Front Legs
- Green: Tail
Brachydios
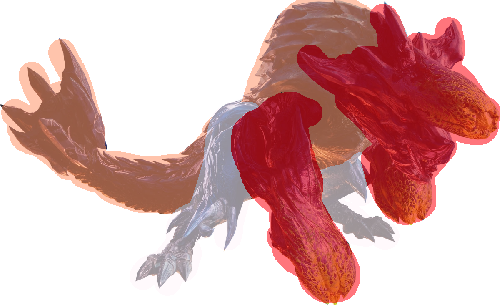
- Red: Head and Arms
- White: Legs
- Orange: Body and Tail
- Green:
Shrieking Legiana
Legiana and Shrieking Legiana have the same extract spots.
- Red: Head and Antennae
- White: Wings
- Orange: Back Legs and Body
- Green: Tail and Tail Frills
Fulgur Anjanath
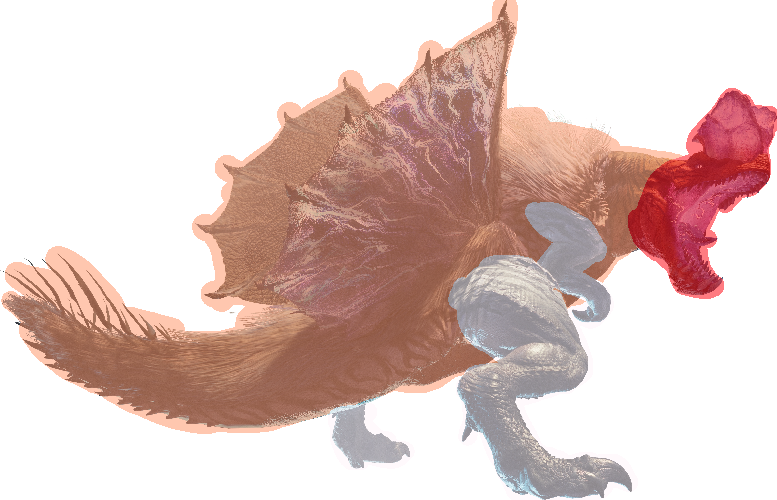
- Red: Head
- White: Legs
- Orange: Body and Tail
- Green: Not Available
Acidic Glavenus
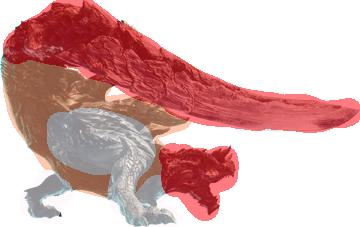
- Red: Head and Tail
- White: Legs
- Orange: Body and Back
- Green: Not Available
Ebony Odogaron
Odogaron and Ebony Odogaron all have the same extract spots.
- Red: Head, Neck, and Front Legs
- White: Back Legs
- Orange: Body and Tail
- Green: Not Available
Velkhana
- Red: Head and Tail
- White: Wing, Front Legs and Bodies
- Orange: Back Legs
- Green: Not Available
Seething Bazelgeuse
- Red: Head, Neck, and Tail
- White: Wings and Back Legs
- Orange: Back and Belly
- Green: Not Available
Blackveil Vaal Hazak
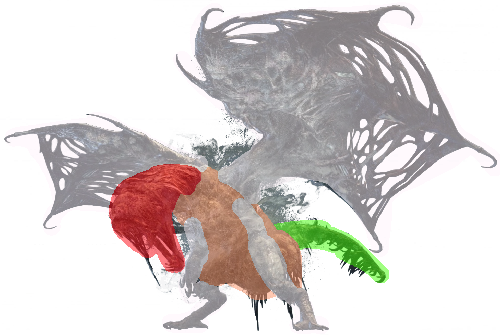
- Red: Head
- White: Wings and Legs
- Orange: Body and Spore Sacs
- Green: Tail
Namielle
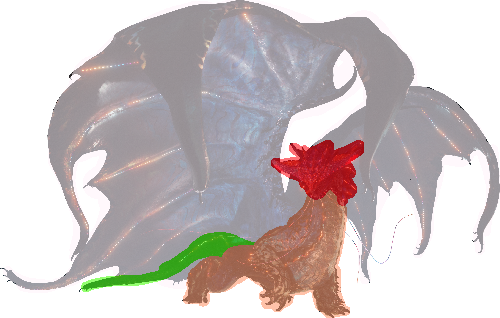
- Red: Head
- White: Body and Legs
- Orange: Wings
- Green: Tail
Savage Deviljho
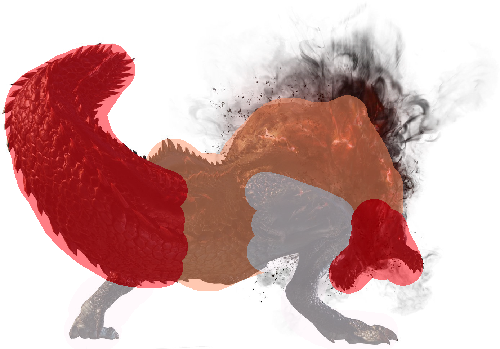
- Red: Head and Tail
- White: Body
- Orange: Legs
- Green: Not Available
Ruiner Nergigante
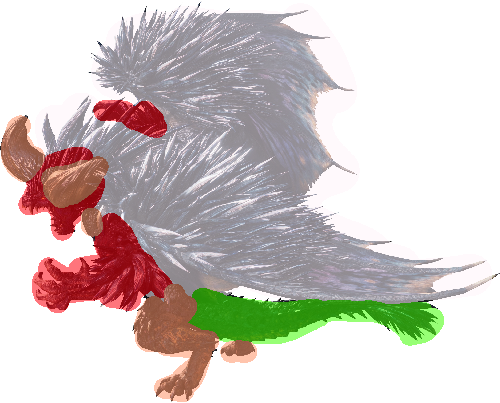
- Red: Head and Front Legs
- White: Wings
- Orange: Back Legs, Horns and Body
- Green: Tail
Shara Ishvalda
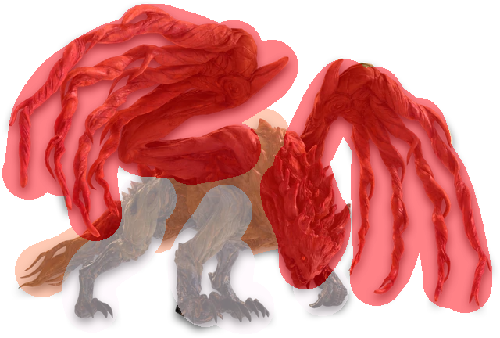
- Red: Head and Wings
- White: Legs
- Orange: Body and Tail
- Green: Not Available
Zinogre
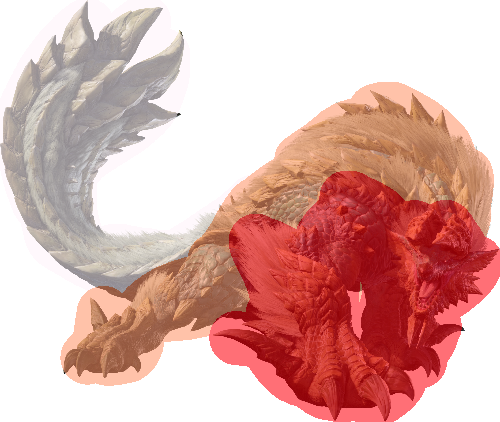
- Red: Head and Front Legs
- White: Tail
- Orange: Body and Back Legs
- Green: Not Available
Yian Garuga
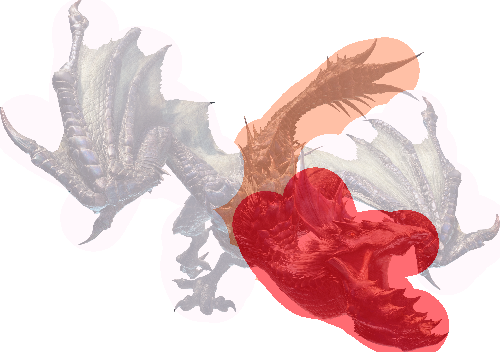
Scarred variant has the same extract spots.
- Red: Head and Neck
- White: Legs and Wings
- Orange: Body and Tail
- Green: Not Available
Brute Tigrex
Tigrex and Brute Tigrex have the same extract spots.
- Red: Head
- White: Body and Back Legs
- Orange: Wings and Front Legs
- Green: Tail
Gold Rathian
Rathian, Rathalos, Pink Rathian, Azure Rathalos, Gold Rathian and Silver Rathalos all have the same extract spots.
- Red: Head and Neck
- White: Wings
- Orange: Body and Back Legs
- Green: Tail
Silver Rathalos
Rathian, Rathalos, Pink Rathian, Azure Rathalos, Gold Rathian and Silver Rathalos all have the same extract spots.
- Red: Head and Neck
- White: Wings
- Orange: Body and Back Legs
- Green: Tail
Rajang
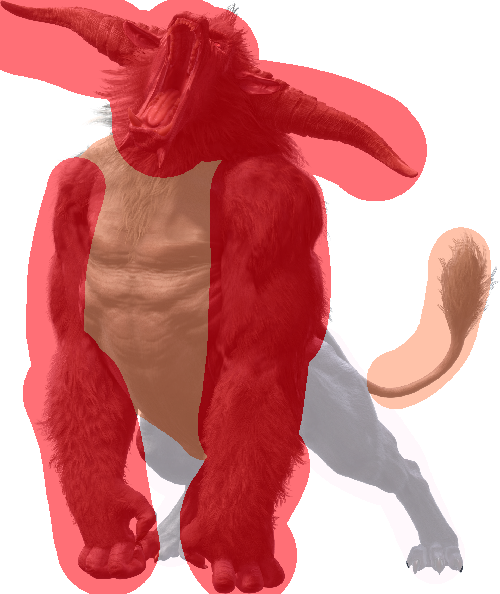
- Red: Head and Front Legs
- White: Back Legs
- Orange: Body and Tail
- Green: Not Available
Furious Rajang
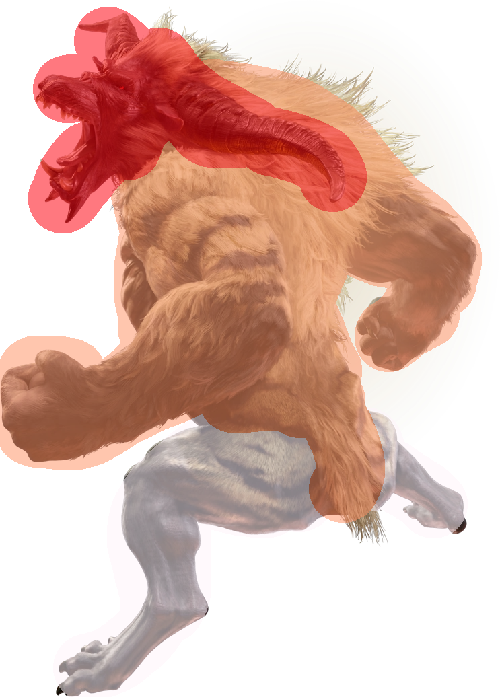
- Red: Head
- White: Back Legs
- Orange: Body and Front Legs
- Green: Not Available
Thank You
- Guide to Modding and Recommended Mods★ 5 (1.4k)77k views2.8k ♥100 minUpdated 9 Jul
- Monster Hunter: World - 100% Achievement Guide★ 5 (2.3k)72k views5.3k ♥14 minUpdated 21 Mar, 2025
- 休闲游戏玩家 MOD推荐★ 5 (1k)45k views2.6k ♥1 minSimplified ChineseUpdated 18 Sep, 2022
- The Hunter’s Handbook: A Beginner's Guide to the New World★ 5 (1.4k)39k views2.8k ♥110 minUpdated 22 Feb, 2025
- All about Crowns 👑★ 5 (1.3k)38k views2.8k ♥8 minUpdated 18 Sep, 2022
- Monster Hunter World: Iceborne [DLC] - 100% Achievement Guide★ 5 (1.3k)34k views3.4k ♥19 minUpdated 21 Mar, 2025


- Upgrading to PremiumTeam Fortress 2★ 5 (20k)1441k views11k ♥6 minUpdated May 11, 2022
- No More Room in Hell Official ManualNo More Room in Hell★ 5 (2.8k)569k views2.1k ♥29 minUpdated Apr 22, 2019
- NMRiH Community Hosting GuidesNo More Room in Hell★ 5 (526)351k views653 ♥1 minUpdated Aug 10, 2022
- Лучшие кооперативные игры SteamPAYDAY 2★ 5 (1.5k)315k views2.1k ♥56 minRussianUpdated Apr 27, 2025
- Desert Eagle Heat Treated | Blue GemCounter-Strike 2★ 5 (1.6k)292k views1.5k ♥2 minUpdated Jan 16
- Treasure Hunt Puzzle SolutionsTotal War: WARHAMMER II★ 5 (6.9k)281k views15k ♥3 minUpdated Aug 19, 2021






This guide was created by its original author on the Steam Community. Are you the author and want it removed? Request removal.