Missingno's Guide to Dwarven Superiority
Dic, the Little D
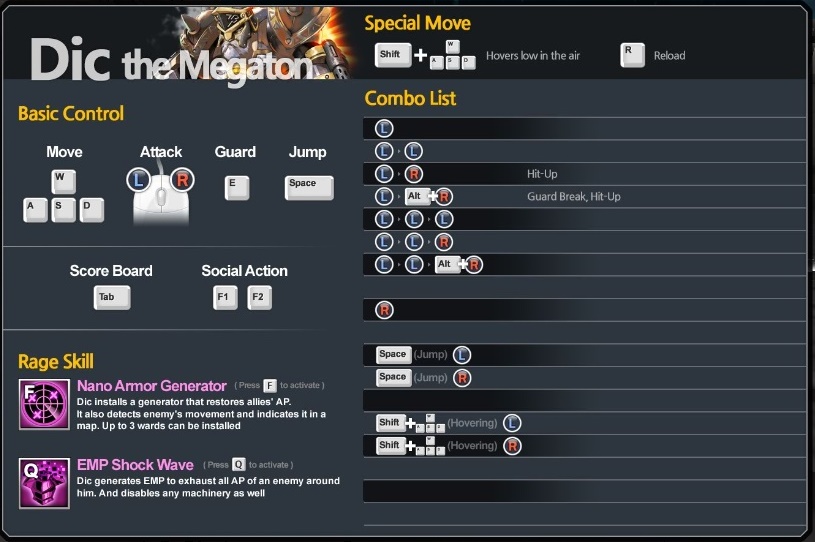
This here is Dic, a dwarven clone of the godly dwarven generaltissimo whatever. Dic is a weakass melee that plays better as a support to his less-dwarfy allies. He is most certainly NOT built for 1v1s, and has possibly the worst basic combo in the game. Dic is made to help his allies by planting wards and destroying shields while sometimes popping off shotgun blasts. The basics.
L > L > L
Dic's basic combo. He smacks people with his stovepipes and then does a shoulder charge that does about as much damage as a bird ♥♥♥♥♥♥♥♥ on your head. Only use to stunlock in conjunction with a nearby ally, otherwise it's never worth it.
L > R, L > Alt+R
This is how you're going to be of use to your team mostly, bashing people into the air with your mighty dwarven uppercut so your allies can wail on them. Just don't be stupid and stand underneath your victim, they'll be able to recover on your head and ruin your day.
L > L > R, L > L > Alt+R
The only damn thing in Dic's kit that does damage, and it's as unwieldy as his gigantic dwarven namesake. This will cause Dic to backstep before firing off a shockwave, hitting enemies barely a few feet in front of him. Used cleverly, you can back out of an incoming combo and blast two dumbasses at once. When Alt'd, the shockwave becomes impossible to hit unless you're bristling the person with your beard, but it gives you a powerful knockback that's perfect for ruining allied combos or rarely pushing people off ledges.
Dic's R ability is his wrist-mounted shotguns, which do about as much as your shoulder barge. You only have two shots, but the reload is near instant so you can poke away at people from long range and pretend you're Renoah if you want. Using this in melee range is suicide because the winddown on the blast will leave you open to Sewon's fist going straight up your ass. Jump-firing will cause you to fire both shots at once, and covers a slightly wider area making it more useful. Still, don't use them except to finish off people your Sewon just stole health from.
Dic's rage skills are what make him good as a support, and they're both damn useful on captures and deathmatches.
Nano Armor Generator is your Ward. You plant it somewhere you want watched, or in a safe place for your allies to heal up by. It costs 2 bars to plant, and you can have up to 3 active. They CAN be destroyed, but are otherwise out until you exceed your max. The armor regen is rather crappy in deathmatches, but a godsend in capture maps such as Bridge, where allies can back off and heal up. The ability to see enemies isn't as useful, but it can help spot those pesky back-cappers or running cowards.
EMP Shockwave should be your opener in deathmatch every time it's up. 3 bars to deplete the shields of everyone on the enemy team is a lot better than it sounds, especially at the very start of a round or right after your enemies respawned. Oh, and it can destroy Wards and Gaspar's mines, I guess. Great.
Gaspar, the Voltorb wannabe
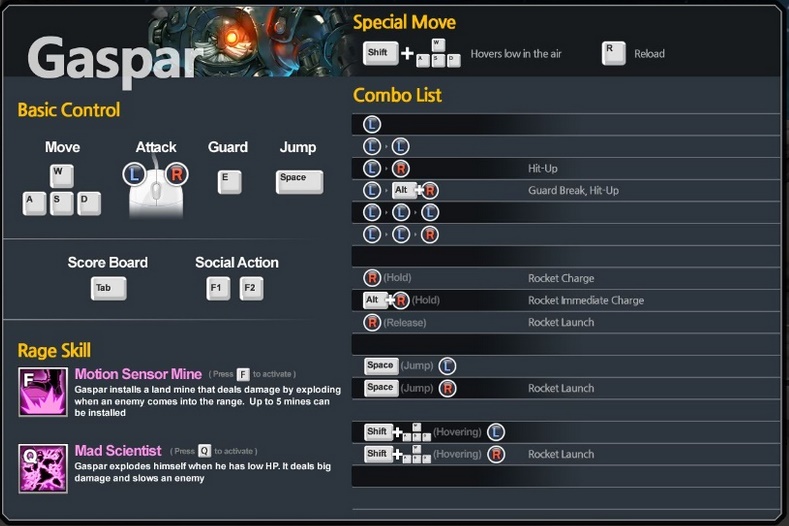
Gaspar is Dr Wily if he manned up and built a suit of armor instead of letting the robot masters do all the work. He is what Dic wishes he was, a godly bruiser in a tiny tin can. Gaspar's kit is made to deal huge damage and it does it well. You can poke away at enemies with his grenade launcher or go in and bust some heads with your iron fists and beam saber. Co-ordinating with your team to keep people in your basic combo will have devastating effects.
L > L > L
One-two punch with a saber sweep. This thing is fast, strong, and unblockable if the first hit lands. And when I say strong, I mean "cut through anyone less than Dan Mei like butter" strong. Your finisher. Your opener. Your everything.
L > R, L > Alt+R
A basic launcher, everyone has these. For the dwarves though, you have to be careful to time your combo as they land or else they'll fall on your head and proceed to run away like the beardless cowards they are. Jump-attacking can help alleviate this problem, as you should fall back down with them ready to set up the next combo.
L > L > R
Gaspar fires off a jet booster for this finisher, leaving a trail of 3 electric fields that deal damage to enemies that walk into them. Spamming this in a duel against a guarding coward can throw them off balance with your zipping around, as well as rack up damage due to the fields' damage stacking. Generally not your best option when comboing, but in fights where the other person has 200 ms, it can do a lot of damage.
Gaspar's R is his grenade launcher. He holds 3 grenades normally, and the button can be held to charge up his cannon with all of them before firing in an arc. Alt-firing can instantly load all 3 'nades, but generally this is a waste of stamina that could be spent hovering or Alt-Uppercutting. When jumping, the grenades shoot in a straight line instead of arcing, but can only be fired one at a time, making it more useful for sniping rather than damage. Speaking of, the grenades do a very good amount of damage on a direct hit, and have a small splash radius that you can abuse in fights. Gaspar's one-handed reload takes a huge 3 seconds to finish though, during which he can only walk around while he pats his cannon on the barrel. Make sure you're not going to get socked for doing it.
Gaspar's Rage abilities make him such a valuable deathmatcher and point protector, giving him very hefty AoE presence and forcing enemies into undesirable positions.
Motion Sensor Mine costs only 1 rage bar and plants a mine at Gaspar's feet. The mine will blow up when enemies get near it, and the thing can be spammed as long as you have the rage to supply it. Gaspar's mines do a huge amount of damage to people unlucky enough get in the way, and persist through deathmatch rounds. Blocking off certain sections of the map or spamming mines when your victims are caught by Renny or Cezanne is an effective way of removing a few problems. However, enemies in the detonate radius when the mine is planted will not activate it until they leave the radius and reenter it, or someone else does blows it up for them.
MAD SCIENTIST is Gaspar's game changer. His last resort, and a way to trick less attentive opponents into losing a winning fight. At the cost of 3 Rage bars and the rest of his health, Gaspar will charge up and explode on the spot, inflicting enough damage to kill most targets and leaving anyone still alive limping away to be cleaned up by your idiot Renoah teammate. You have to be at half health to use it however, and getting stunlocked before you can set your fuse can ruin an otherwise perfect team wipe scenario. However, when you are set to blow, Gaspar becomes immune and slows all enemies surrounding him to ensure their explosive demise. Just make sure they're not finishing a combo or can dash away, or else you'll be the only one getting fried.
Hovering for Dummies
Both Gaspar and Dic have the same movement ability, Hover. This causes the tiny bearded mechs to float on air, gaining speed and flying over the ground. When used from a higher place, they will stay at the same horizontal altitude, and will VERY slowly rise as the hover goes on. Attacking out of your hover yields the same results as if you were attacking from a jump and cancels your flight early.
It should be noted however that hovering cannot be done while jumping, and the height boost it gives you is negligible unless you've been floating about for a long time. On the plus side, backpedaling while hovering doesn't reduce your speed like normal walking, so you can use it as a quick escape mechanism if you have the room.
Hover is used usually at the beginning for speed purposes, as it gives you a noticable boost to your movement. On Capture matches you can use this to float quickly to a middle objective before the enemy team and have a chance at capping it early, while in Deathmatches you can drop in on an enemy team and kill yourself, you idiot. Falling on the enemy team as Dic and popping your EMP can give your allies a very good advantage at the start, but since you've come alone, you'll probably end up dying for it. Always keep an eye on your stamina gauge, you don't want your fuel giving out when you're trying to escape.
It should be noted however that hovering cannot be done while jumping, and the height boost it gives you is negligible unless you've been floating about for a long time. On the plus side, backpedaling while hovering doesn't reduce your speed like normal walking, so you can use it as a quick escape mechanism if you have the room.
Hover is used usually at the beginning for speed purposes, as it gives you a noticable boost to your movement. On Capture matches you can use this to float quickly to a middle objective before the enemy team and have a chance at capping it early, while in Deathmatches you can drop in on an enemy team and kill yourself, you idiot. Falling on the enemy team as Dic and popping your EMP can give your allies a very good advantage at the start, but since you've come alone, you'll probably end up dying for it. Always keep an eye on your stamina gauge, you don't want your fuel giving out when you're trying to escape.
More Archeblade guides
- How to make Your Own Server?★ 5 (283)17k views289 ♥1 minUpdated Mar 31, 2013
- Play more and better to get Meceta, Buy Recipies for Consumables★ 4 (114)9.9k views27 ♥1 minUpdated Nov 7, 2013
- Comprehensive Basics Guide★ 4 (145)6.1k views141 ♥95 minUpdated Aug 7, 2013
- ArcheBlade - The Original Novel in English★ 4 (92)4.8k views146 ♥9 minUpdated Mar 25, 2014
- All characters stats★ 4 (38)2k views13 ♥1 minUpdated May 10, 2014
- Beginners guide to Ridika★ 3 (28)1.9k views24 ♥4 minUpdated Apr 30, 2014


This guide was created by its original author on the Steam Community. Are you the author and want it removed? Request removal.