Mission: Starbase Incursion
Video Guide
Video and tips on successful completion of mission.
Main Objectives
- Defeat as many Saboteurs as possible in time limit
- Defeat the 4 Commander Saboteurs
- Defeat the Captain
General Tips
- The enemy faction you will face is randomly determined by the game engine. The more advanced the fleet starbase is, the more factions the game will choose from.
- Tier 0 = Federation, Klingon, Orion
- Tier 1 = Gorn
- Tier 2 = Nausicaan, Tholian, Fek'Ihri
- Tier 3 = Borg
- Tier 4 = Undine
- Tier 0 = Federation, Klingon, Orion
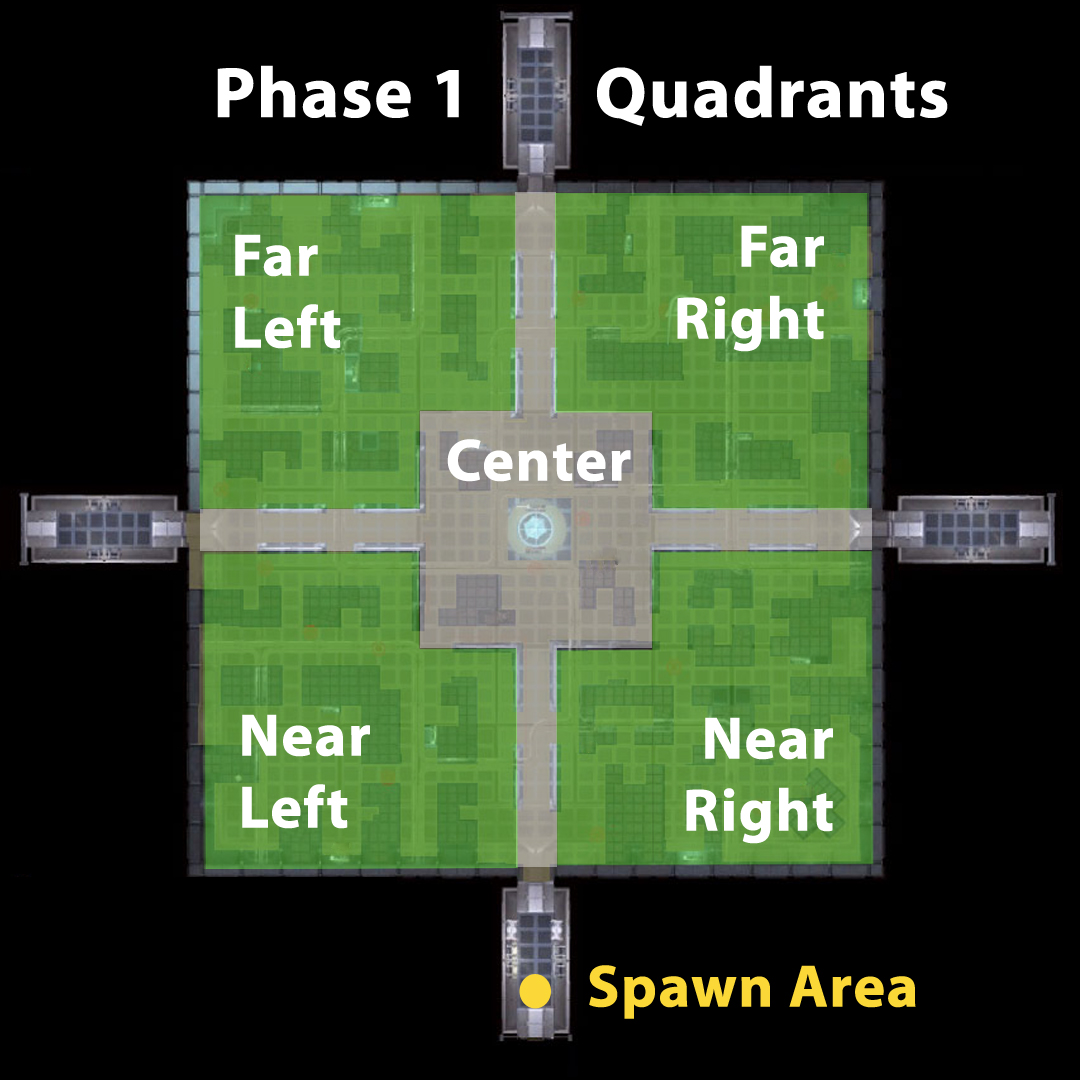
- First Phase - Saboteurs beam in throughout the hold randomly.
- Antiproton turrets and armed guards are distractions. Every saboteur defeated in this stage yields additional Fleet Marks.
- Players often run circuts or split up into quadrants near left, far left, near right, far right and center.
- Circuit Patrol - Players with run clockwise or counterclockwise through all sections of the cargo bay.
- Quadrant Patrol - move through an area in less time than it takes a saboteur to beam in, get things done and beam out. It requires you monitor your whole quadrant. Generally considered the most effective for kill count.
- Circuit Patrol - Players with run clockwise or counterclockwise through all sections of the cargo bay.
- Progress bar indicates saboteur tag them for transport or kill them quickly then return to quadrant patrol.
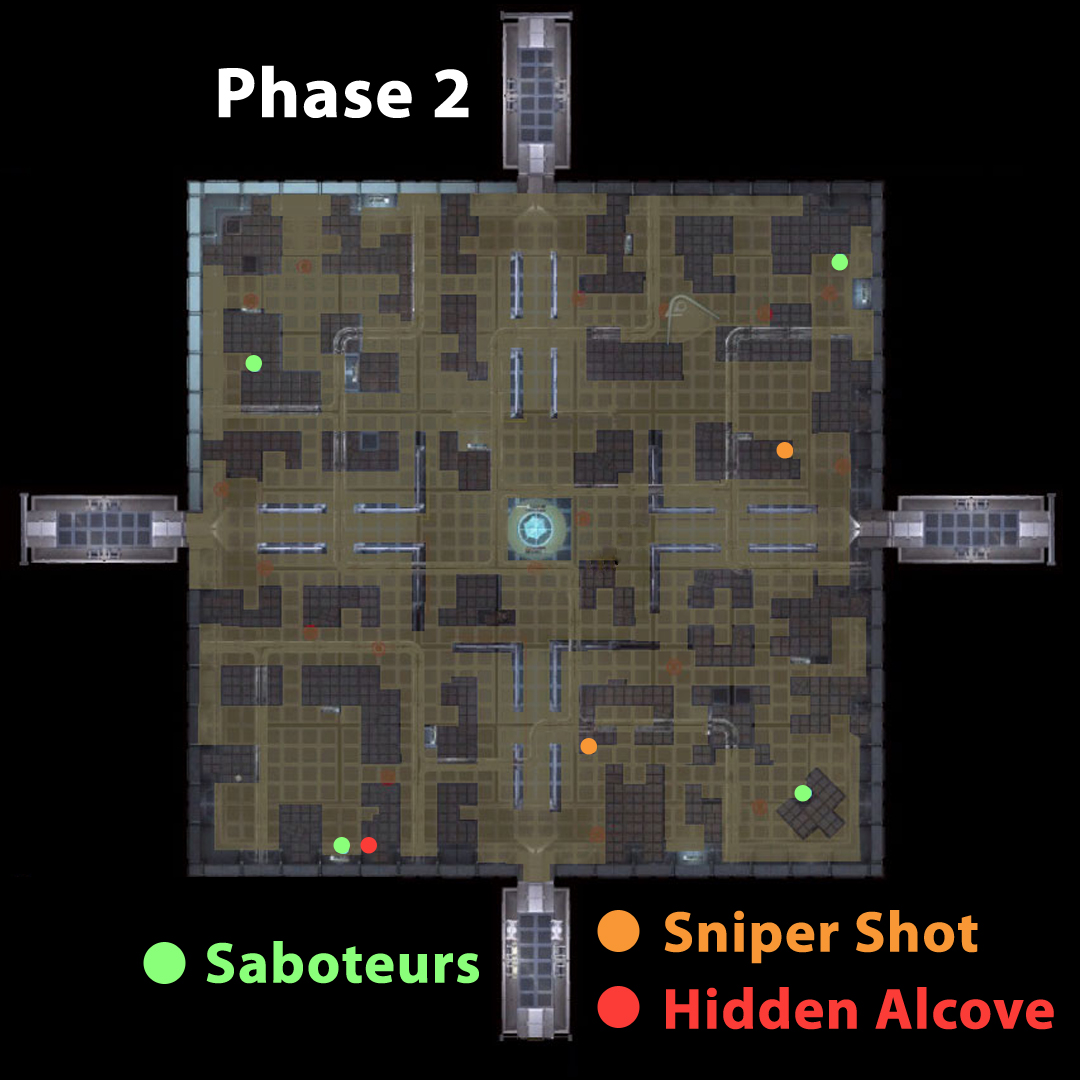
- Second phase kill 4 saboteurs. Preferred methods of attack include:
- Sniper - see map for sniper positions
- Shroud - Use of stealth module or distortion field
- Bait and charge - part of team flushes out enemies allowing rest of team access to saboteur. This can cause long respawn times
- Sniper - see map for sniper positions
- Final phase the captain and support crew are behind a force shield in the center of the cargo bay.
- Kill two waves of support crew outside the shield before a device uncloaks that will allow the forcefield to be lowered. You must do all this before the captain can finish requesting beam out (progress bar).
- The bar for the Captain to beam out, and the end timer begin when the first player leaves the holding area. This allows you time to resuscitate players and buff.
Recommended Equipment
- Distortion Field
- Stealth Module
Maps
Known Bugs
- In final phase killing off the first wave while still in the holding area may glitch the game. The second wave may never appears and players will have to leave the mission with no rewards.
Other Resources
Website - http://sto.llamavision.com
YouTube - LlamaVision
STO - Wiki[sto.gamepedia.com]
STO - Walkthrough[sto.gamepedia.com]
STO - Mission Guide[sto.gamepedia.com]
YouTube - LlamaVision
STO - Wiki[sto.gamepedia.com]
STO - Walkthrough[sto.gamepedia.com]
STO - Mission Guide[sto.gamepedia.com]
More Star Trek Online guides
- Beginners Guide to STO★ 5 (578)38k views908 ♥40 minUpdated 15 Jul, 2016
- A Beginner's Guide to Playing as the Federation★ 5 (173)14k views321 ♥20 minUpdated 8 Sep, 2020
- Starship Guide for Beginners and stuff (Updated!)★ 4 (182)14k views308 ♥11 minUpdated 12 Mar, 2021
- Path to 2409 daily trivia lore questions.★ 5 (635)14k views943 ♥16 minUpdated 26 May, 2013
- UltimateDoomer1's Guide for STO★ 4 (123)7.2k views206 ♥126 minUpdated 17 Jul, 2017
- 100% Critical Chance in Space★ 4 (96)6.7k views163 ♥3 minUpdated 12 Feb, 2021


🔥 Popular guides
- Upgrading to PremiumTeam Fortress 2★ 5 (20k)1441k views11k ♥6 minUpdated May 11, 2022
- No More Room in Hell Official ManualNo More Room in Hell★ 5 (2.8k)569k views2.1k ♥29 minUpdated Apr 22, 2019
- NMRiH Community Hosting GuidesNo More Room in Hell★ 5 (526)351k views653 ♥1 minUpdated Aug 10, 2022
- ULTIMATE GUIDE FOR GAME DEV TYCOONGame Dev Tycoon★ 5 (5.8k)326k views10k ♥4 minUpdated 23 Jan, 2014
- How to 'Git Gud' Soon™MORDHAU★ 5 (2k)318k views3k ♥68 minUpdated Nov 16, 2024
- Лучшие кооперативные игры SteamPAYDAY 2★ 5 (1.5k)315k views2.1k ♥56 minRussianUpdated Apr 27, 2025






This guide was created by its original author on the Steam Community. Are you the author and want it removed? Request removal.