[NEW] Human Workshop: Getting Started - Configuring Unity, Making your First Level, Publishing and Subscribing to Levels
Configuring Unity for Human Workshop
Click the following link to immediately download Unity 2017.4.13f1[download.unity3d.com]
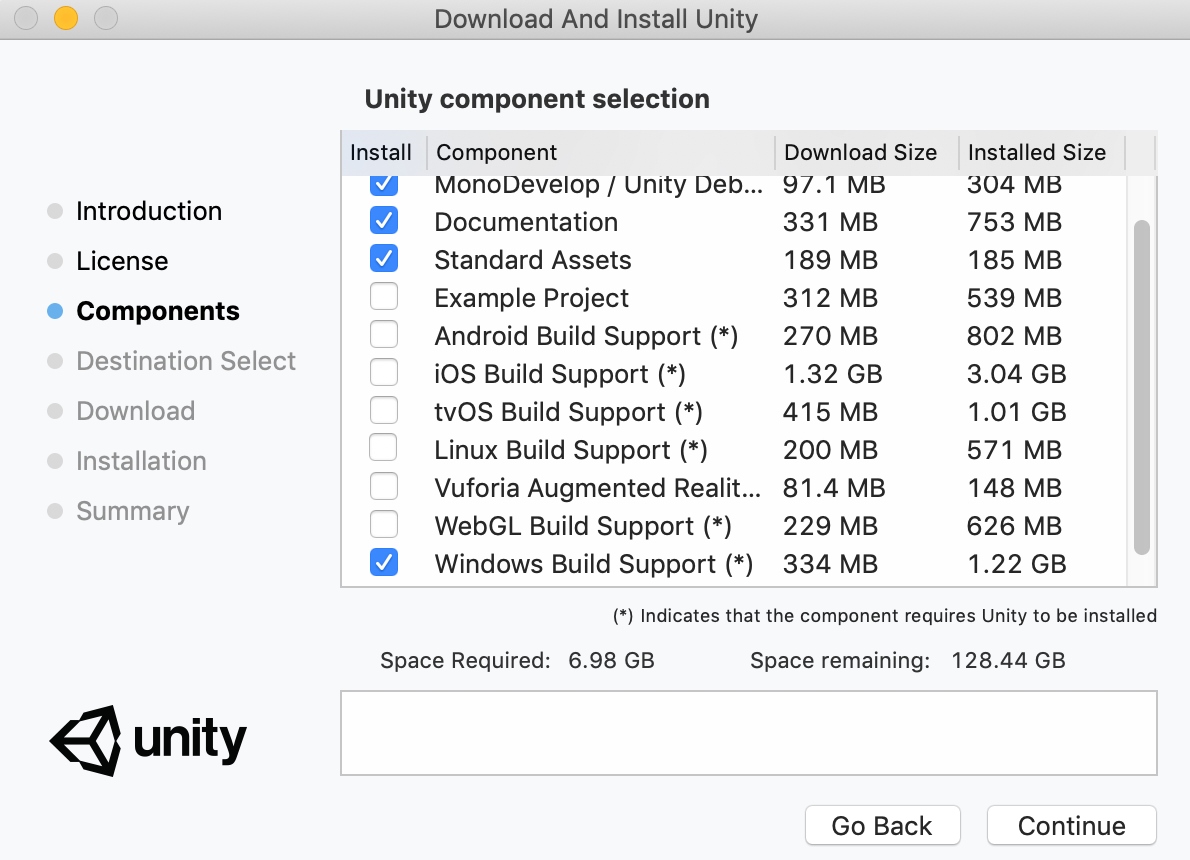
For Mac you'll need to ensure that you've checked the Windows Build Support checkbox during installation (see below). If this isn't done then you will be unable to export levels from Unity and will get the following error:
Building an AssetBundle for target 'WindowsStandaloneSupport' is not allowed because the required module is not installed.
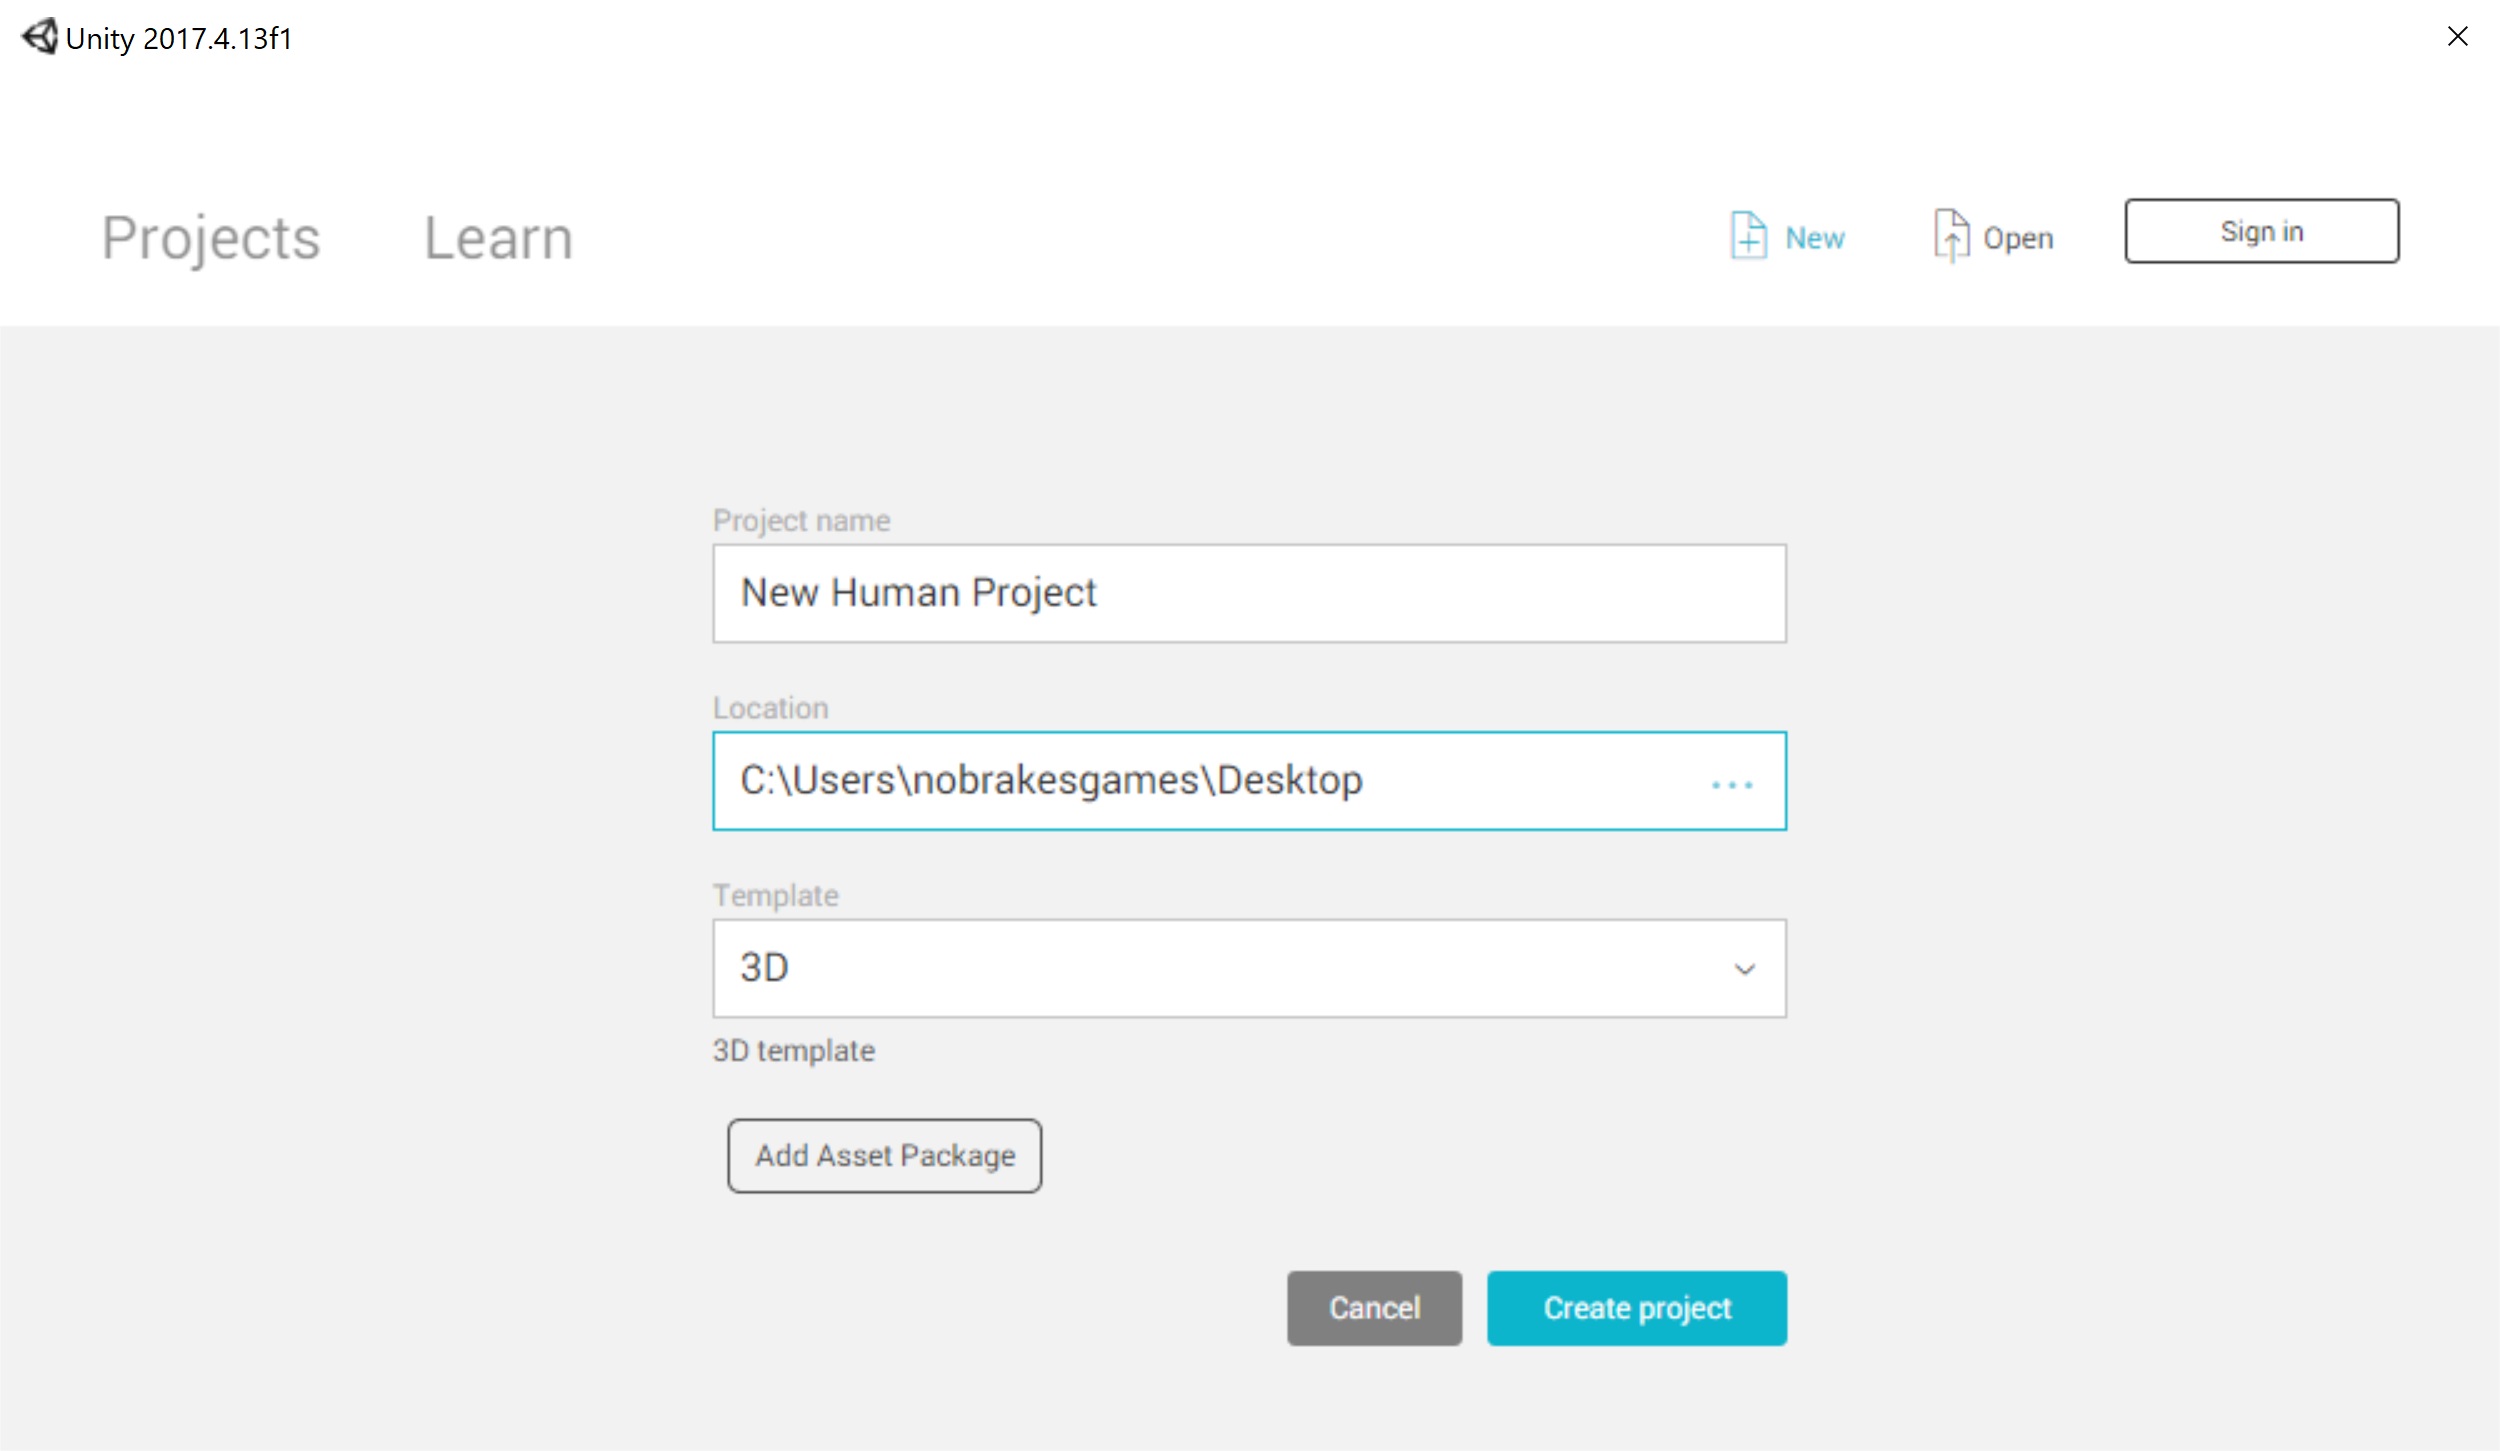
Once installed, launch Unity and create a New project. Specify the following details:
• Project name - Calling it whatever you like. For the purpose of this guide I've called it New Human Project.
• Location - Wherever you like. Just ensure that it's got a large amount of disk space.
• Template - That it is a 3D rather than 2D project.
Then select Create project:
• Select Import Package and click Custom Package:
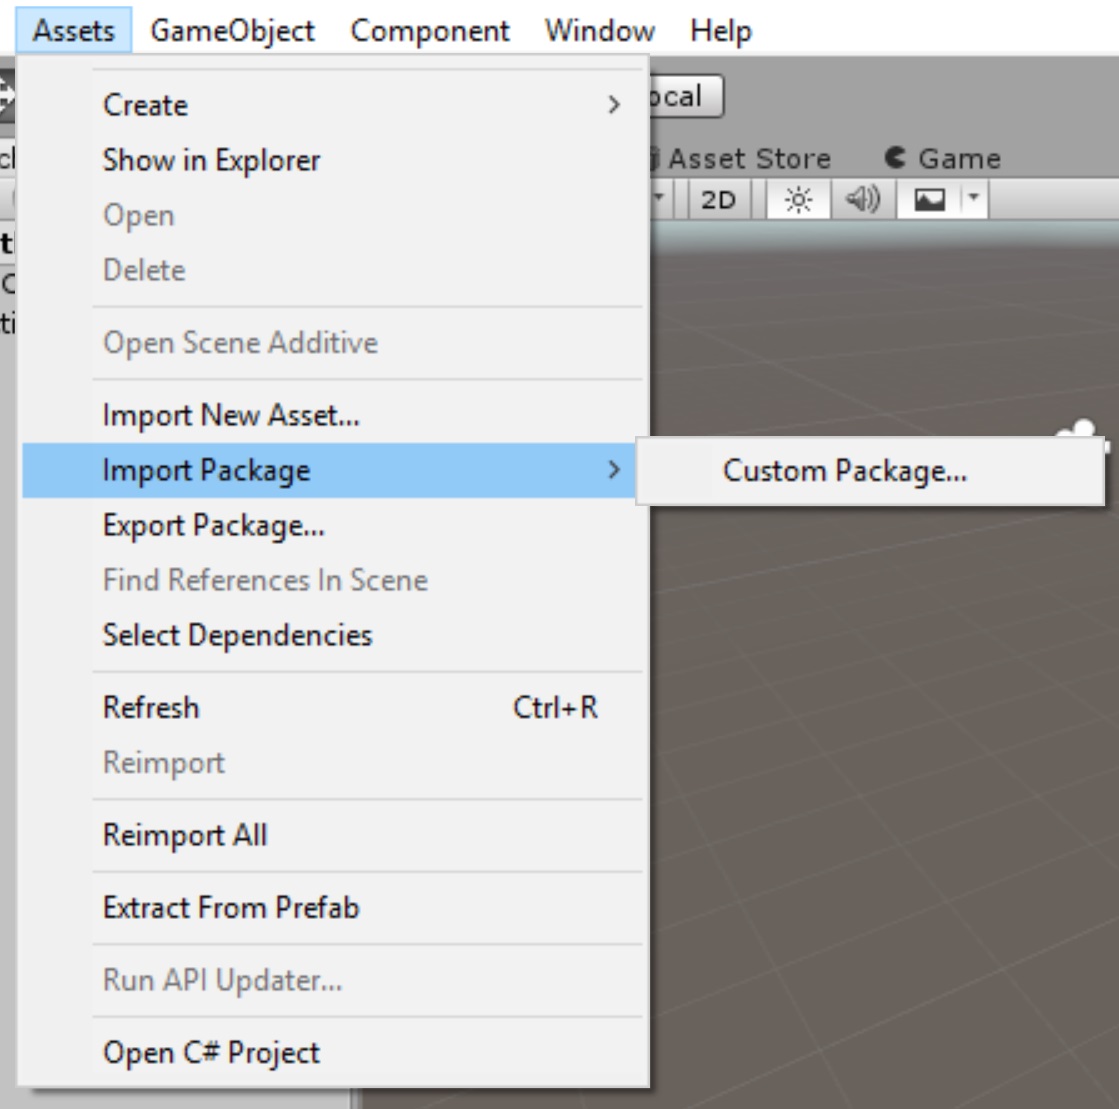
• This will bring up a window to select which package you’d like to import.
• Navigate to the Human Fall Flat install folder.
• The default location for Human Fall Flat Workshop files is:
C:/ProgramFiles(x86)/Steam/steamapps/common/Human Fall Flat/WorkshopPackage
• Once this is done select the Human Unity package file and select Open.
• After a short delay a Import Unity Package window should appear
• Press the Import button:
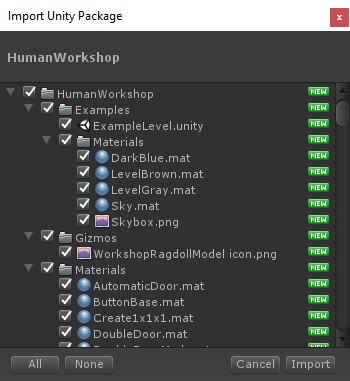
• You should see a progress bar. Wait until it has finished installing.
• Once this has finished quit Unity entirely.
• Copy the Project Settings folder from the supplied Workshop folder located here C:/ProgramFiles(x86)/Steam/steamapps/common/Human Fall Flat/WorkshopPackage:

• Paste this into the New Human Project folder so that it replaces the existing Project Settings folder:
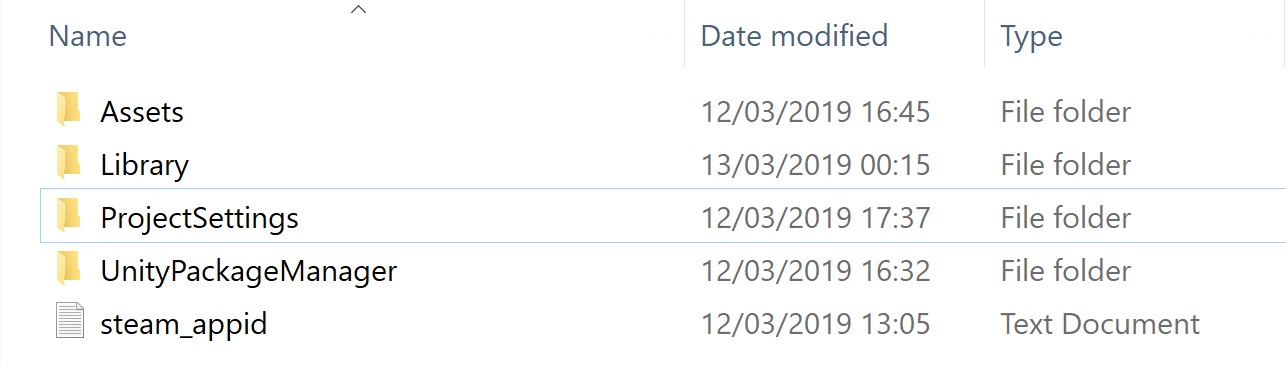
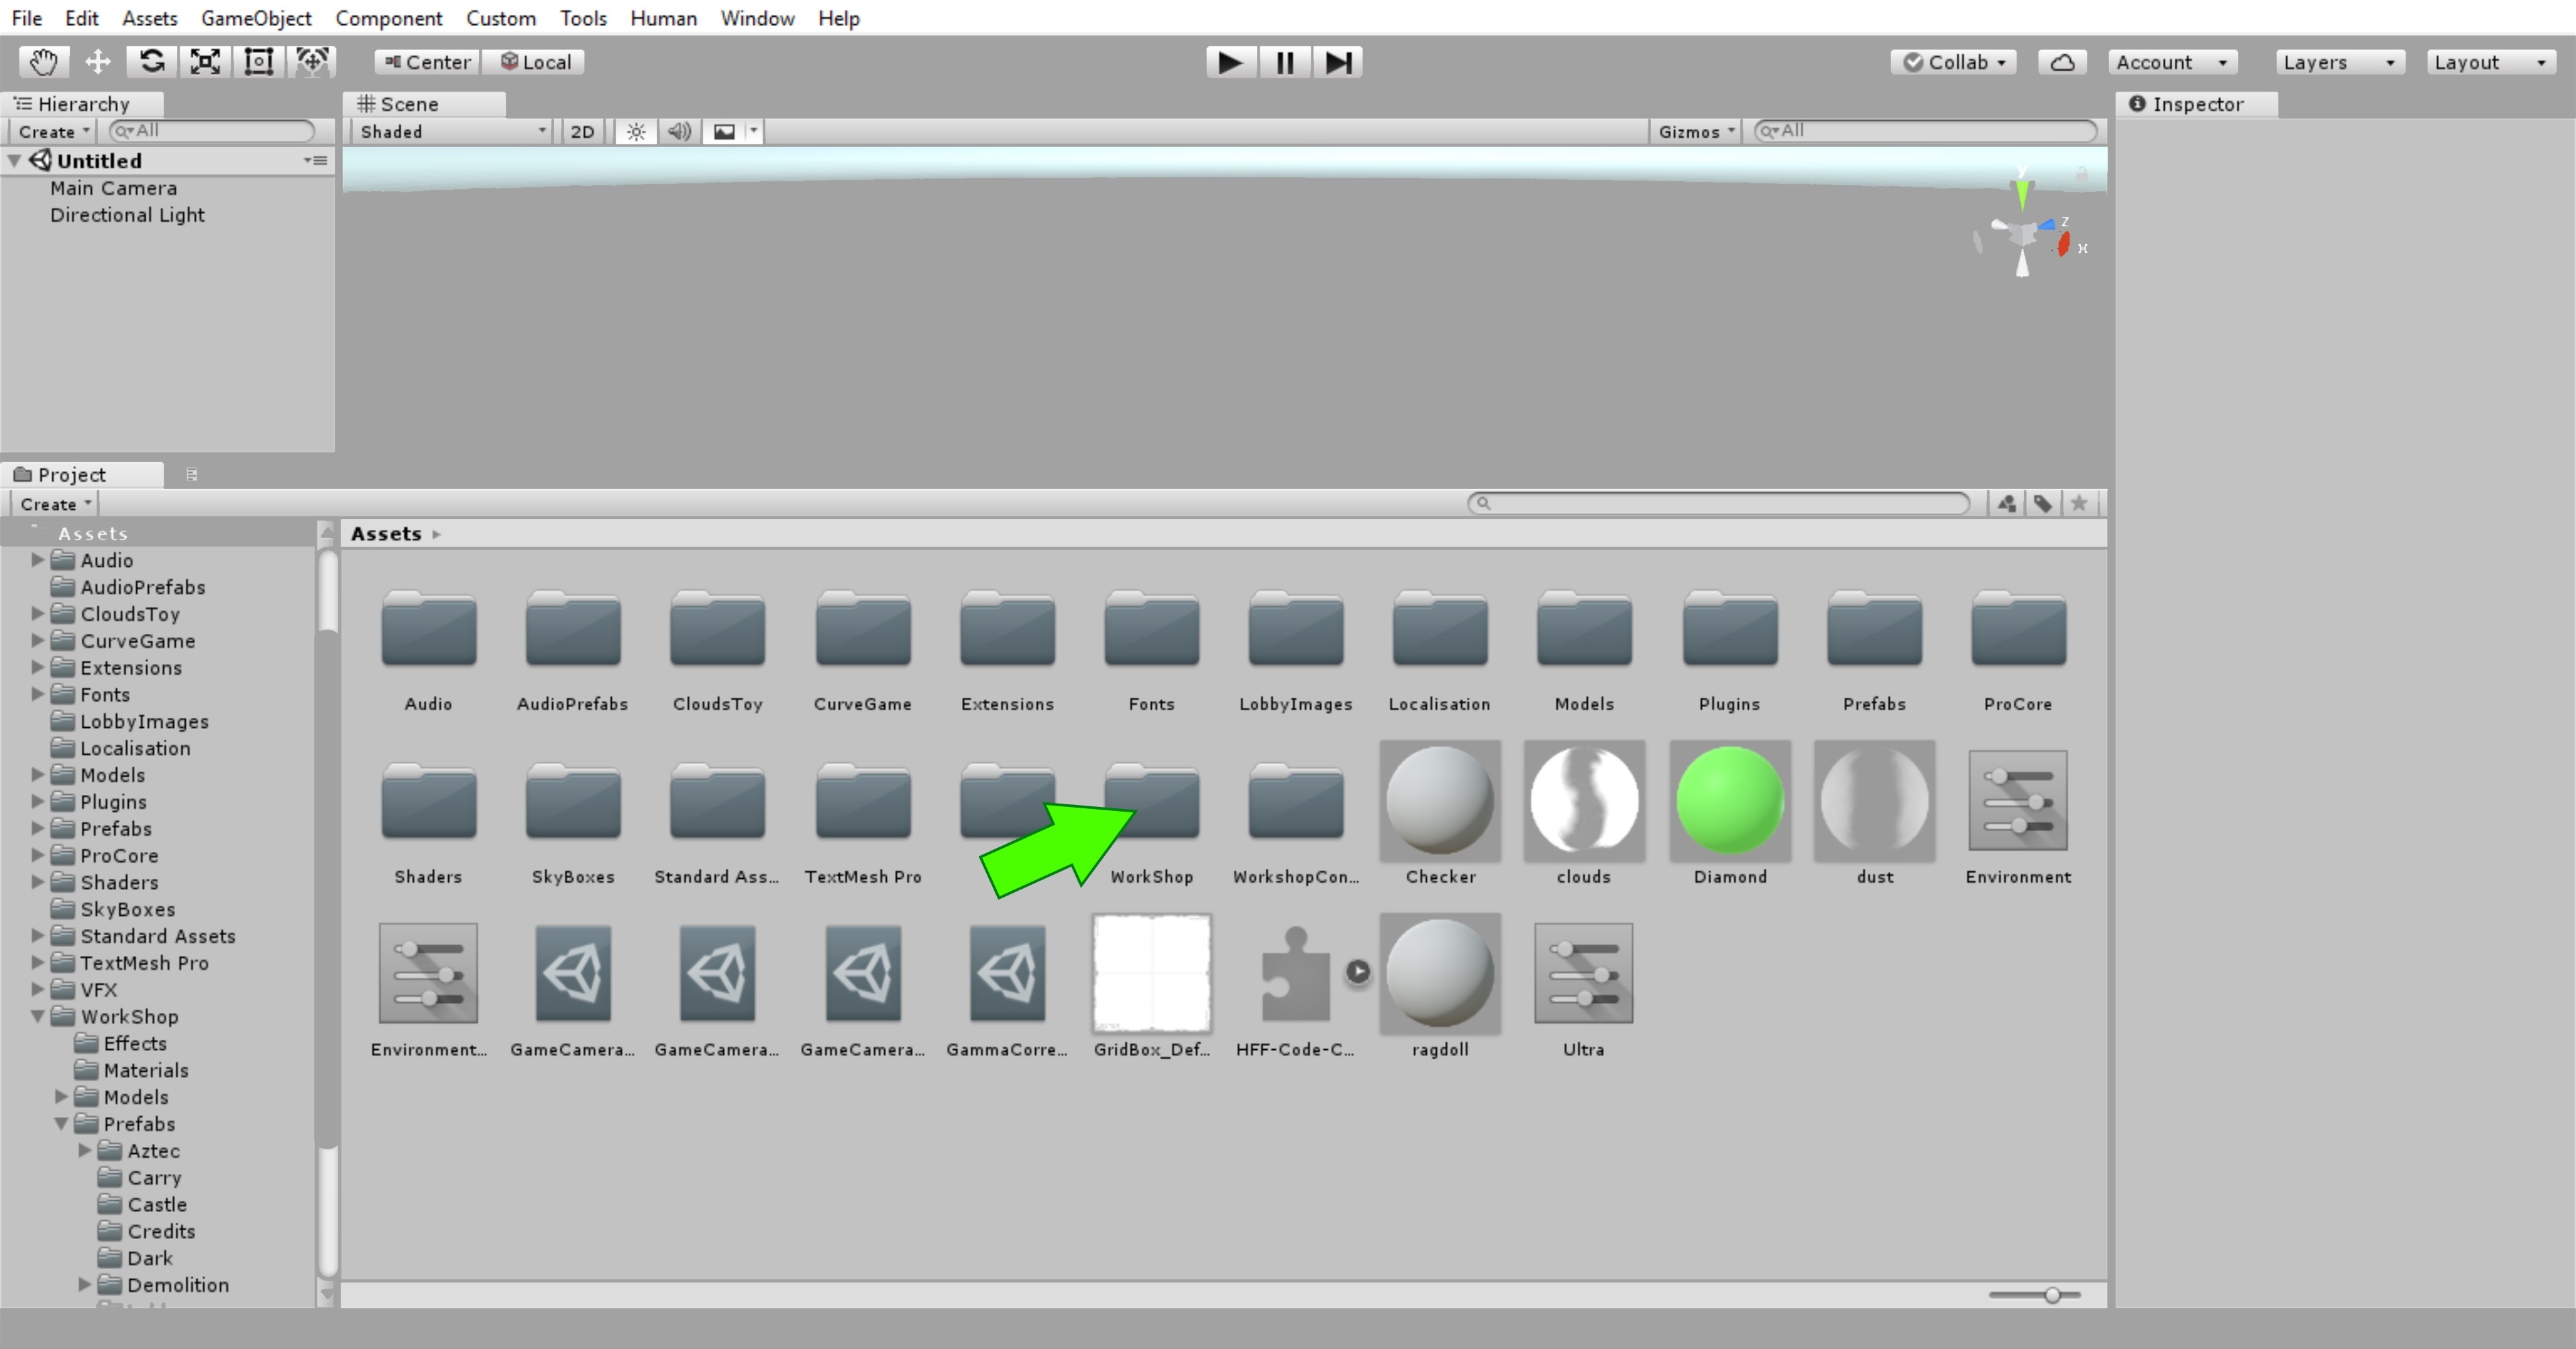
• Run Unity again and you now can start looking at the Workshop folder in your Assets window that's part of the Human package:
Reimporting Prefab Thumbnails
However, you'll now find that in the Assets window not all of the Prefabs have their expected thumbnails and look like this, which isn't very useful:
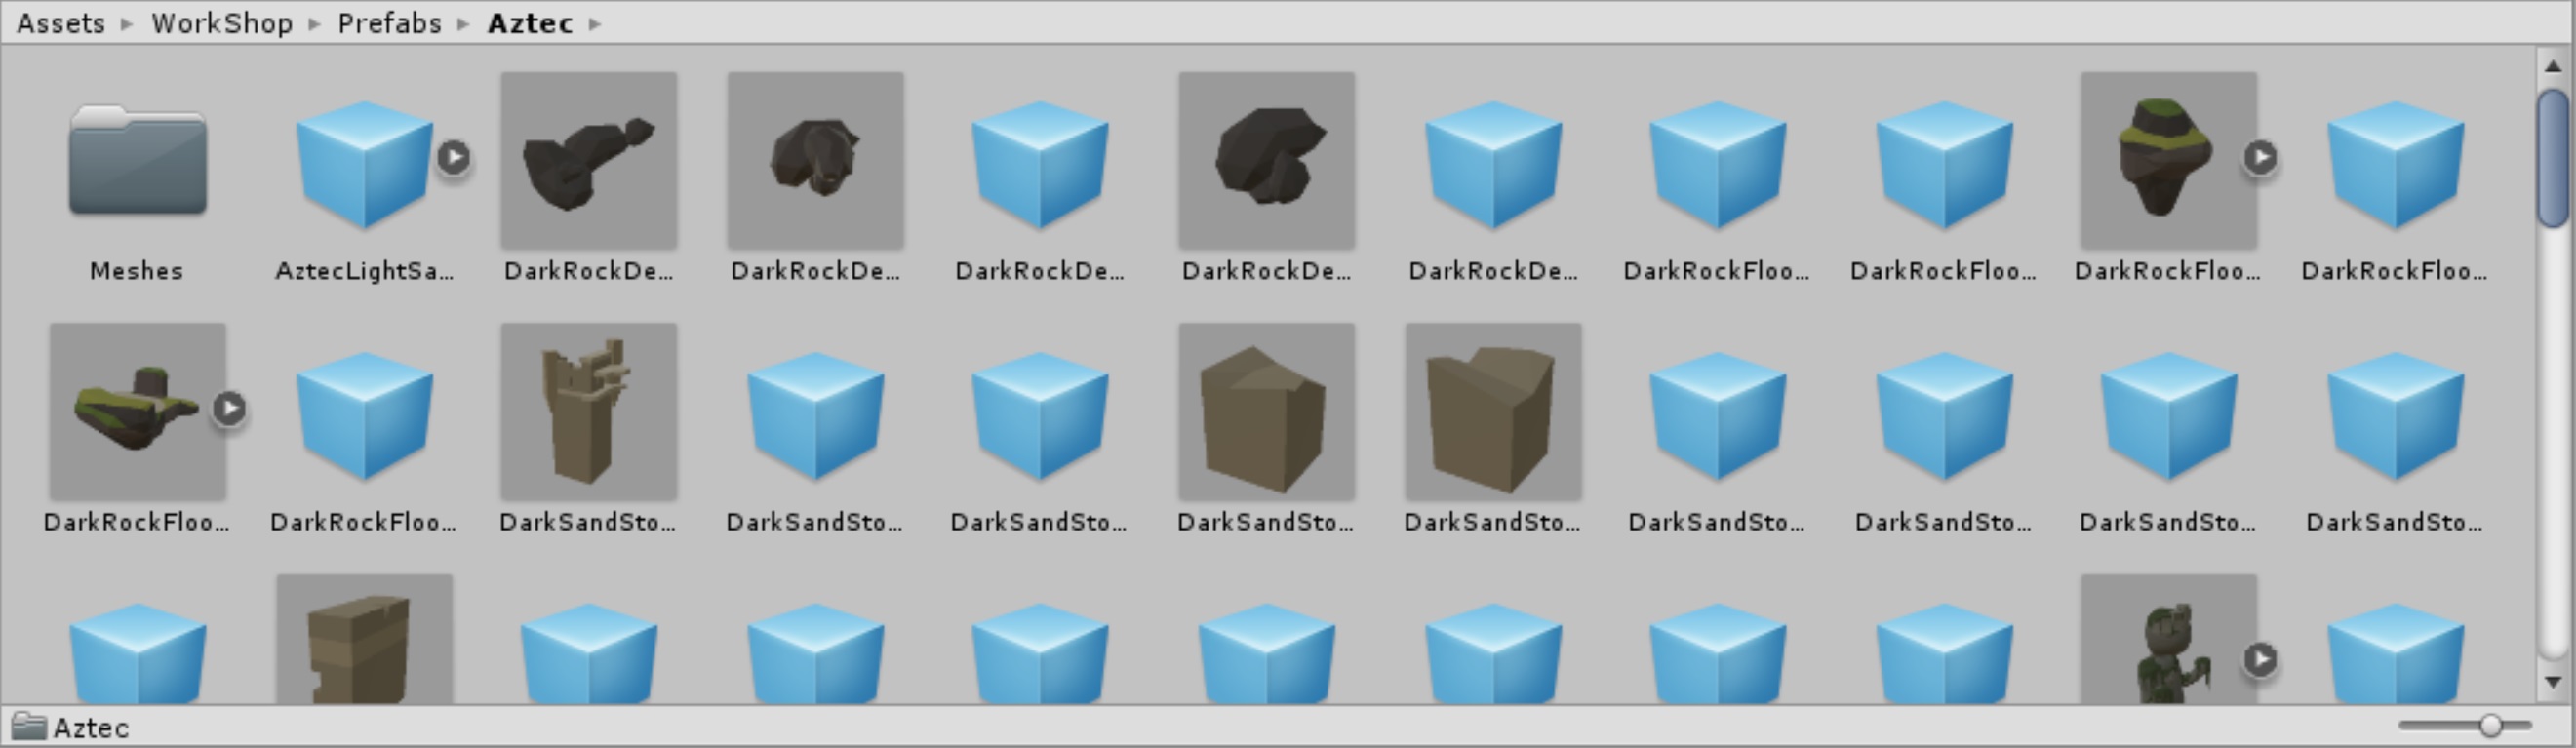
As noted on this page in the Unity Issue Tracker[issuetracker.unity3d.com]this is a bug in Unity, which will not be fixed.
However, to get these thumbnails to appear correctly for yourself, you can go through the following steps:
• Right click on the Prefabs folder.
• Select the Reimport All option and notice that once completed your thumbnails will appear correctly. Though, this process will take quite a while.
Create Your Level
• Rename to MyHumanLevel or whatever you want to call your Level.
• Open the Scene file.
• Delete the Main Camera from the hierarchy.
• Delete the Directional Light from the hierarchy.
This can be dropped into any fresh level to save time, or you can make it from scratch by going through the steps below.
Skip to the Initial Level Layout section of this guide if you don't want to know how to make the Level prefab for yourself.
• Make sure its position is set to 0 on all axis.
• Add a component called Builtin Level.
This component allows the level to play in editor.
• Add a component called Sound Manager.
This allows the level to use the games sound system.
• Add a component called Sound Library.
Points the game to the correct library of sounds.
• Add a component called Net Scene.
Allows the scene to work over the network for online multiplayer.
• Add a component called Scene Manager.
Controls the scene over the network for multiplayer.
• Create an empty object under Level and rename it InitialSpawnpoint.
This object will control where the player will spawn in the scene.
• Add a component called Checkpoint.
• Set position to 0,0,0
• Drag InitialSpawnPoint into the Spawn Point box and the Debug Spawn Point in the Builtin Level component of the Level.
• Create an empty object under Level and rename it FallTrigger.
This object will detect when the player has fallen off the level.
• Add components called FallTrigger and Box Collider.
• Set the position to 0,-30-0.
• Change the box collider size to 200,20,200.
• Make sure Is Trigger is ticked.
• Create an empty object under Level and rename it PassTrigger.
This is used to detect the player after they have progressed to the end of the level, when the player falls off the level after they have passed this point they will progress to the next level.
• Add components called PassTrigger and Box Collider.
• Set Position to 0,-3,34.
• Change the box collider size to 6,6,6.
• Make sure Is Trigger is ticked.
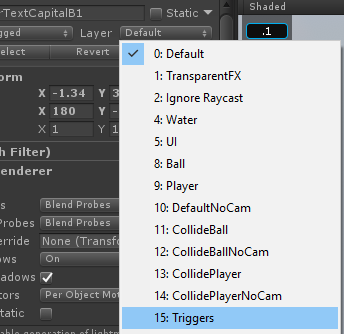
• On the Layer drop down button select Triggers:
Initial Level Layout
• Search in the Workshop prefab directory for GreyStoneEdgeLargeGrassFlooringStraight1.prefab
• Drag the prefab into the scene.
• Set its position to 0,-1,0.
• Set rotation to 0,0,0.
• Move into Level game object within the hierarchy.
• Label Floor1.
• Search in the workshop prefab directory for LightSandStoneFloorSmallAztecFloorPattern1.
• Drag the prefab into the scene.
• Position 0, -0.5,12.
• Set rotation to 90,0,0.
• Move into Level game object within the hierarchy.
• Label Floor2.
• Search in the workshop prefab directory for LightWoodFloorTreePlatform1.
• Drag the prefab into the scene.
• Position 0,0,25.
• Rotate 0,90,0.
• Scale 3,1,0.9.
• Move into Level game object within the hierarchy.
• Label Floor3.
• With Floor 1, Floor 2 and Floor 3 selected press CTRL + D to duplicate all three objects.
• Rename each to Floor4, Floor5, Floor6.
• Set Floor4 position to 0, -1, 37.
• Set Floor5 position to 0, -0.5, 55.
• Set Floor6 position to 9, 0, 55 and rotation 0,0,0.
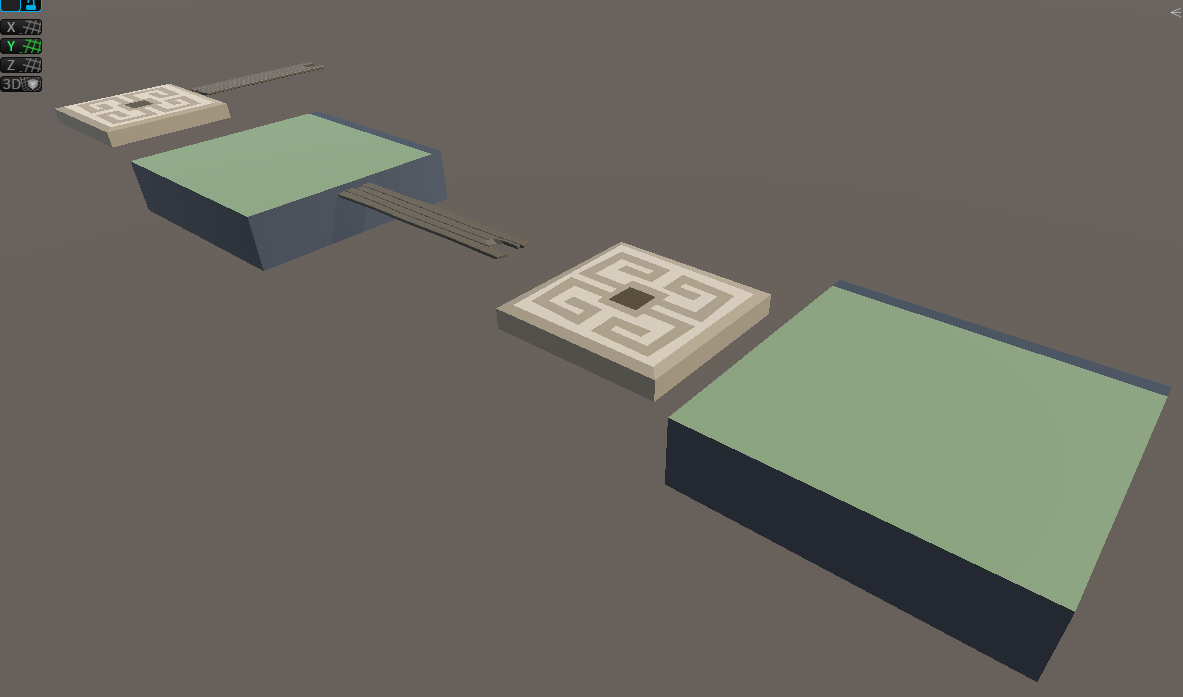
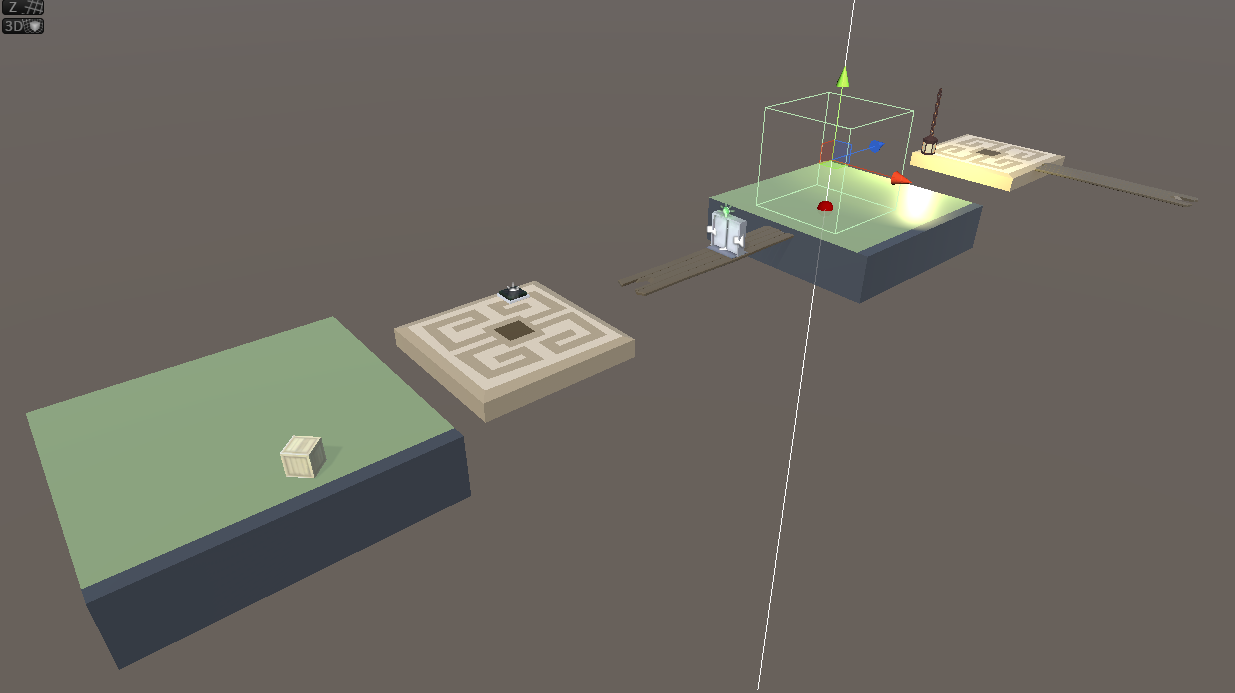
Your level should now look like this:
Adding Mechanical Prefabs
• Search in the Workshop directory prefab directory for MetalMechPressureSwitchDoorwLight1 and place it in the scene.
• Move into Level game object within the hierarchy.
• Rename it to DoorPuzzle1.
• Position 0, 0, 0.
• Click the triangle next to DoorPuzzle1 in the hierarchy to get a drop-down of its child objects.
• Select PressurePlate from the hierarchy.
• Set Position to -3,0.1,14.
• Select Indicator.
• Set Position to 0, 2.5, 26.
• Select AutomaticDoor from the hierarchy.
• Set position to 0,0.1,26.
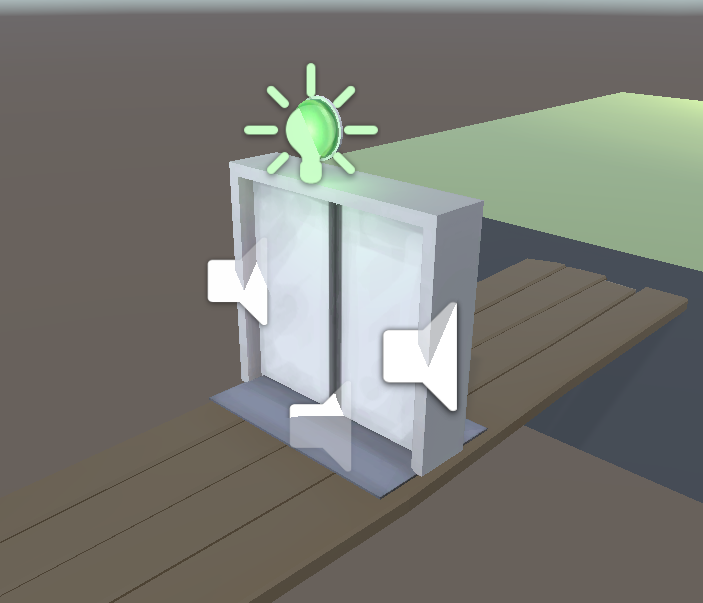
Your level layout should now look like this (OK, so you probably won't be staring so closely at a closed door):
• Search in the Workshop directory for LightGreyMetalMechMediumDanglingLantern1 and place it in the scene.
• Move into Level game object within the hierarchy.
• Set Position to 0, 6, 46.
Pass Trigger
• Select PassTrigger in hierarchy.
• Set Position to 15, -3, 55.
Rigid Bodies and Online Multiplayer
Any game object that has a Rigid Body component will require a Net Body component adding to ensure it syncs correctly across the network for online multiplayer.
You can see an example of this by clicking on Crate1x1x1 object. Adding a Net Body component will also automatically add a Net Identity component and this will be automatically assigned a value when the level is saved.
Generally, if the object moves within the scene, and has a Rigid Body component, it should also have a Net Body component.
Lighting
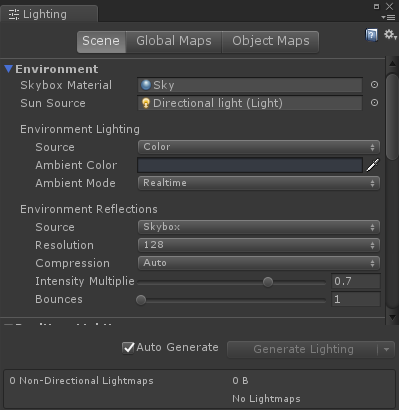
• Change the Skybox Material to Sky.
• Drag in the Directional Light that came with the Level prefab into the
Sun Source box.
• Change the Environmental Lighting Source to Color.
• Change the Ambient Color to #6C7B96.
• Change the Environmental Reflections Intensity Multiplier to 0.7:
Checkpoints
If you navigate to Workshop > Prefabs you will find a Checkpoint prefab. This can be dragged into the Level object to save time, alternatively you can make one from scratch:
• Select Level object and add an empty child game object and rename it to Checkpoint.
• Add component Box Collider.
• Set size to 6,6,6.
• Tick Is Trigger on Box Collider.
• Add component Checkpoint.
• Set the Number field on Checkpoint Script to 1.
• On the Layer drop down button select Triggers.
• Set position to 0,3.5,35.
• To add more Checkpoints, duplicate this object and move it into place.
• Increase the number on the Checkpoint component by 1 for each additional checkpoint you add to your level.
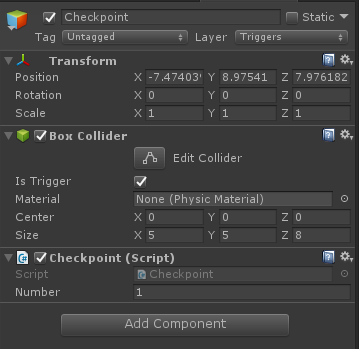
This is the Checkpoint prefab:
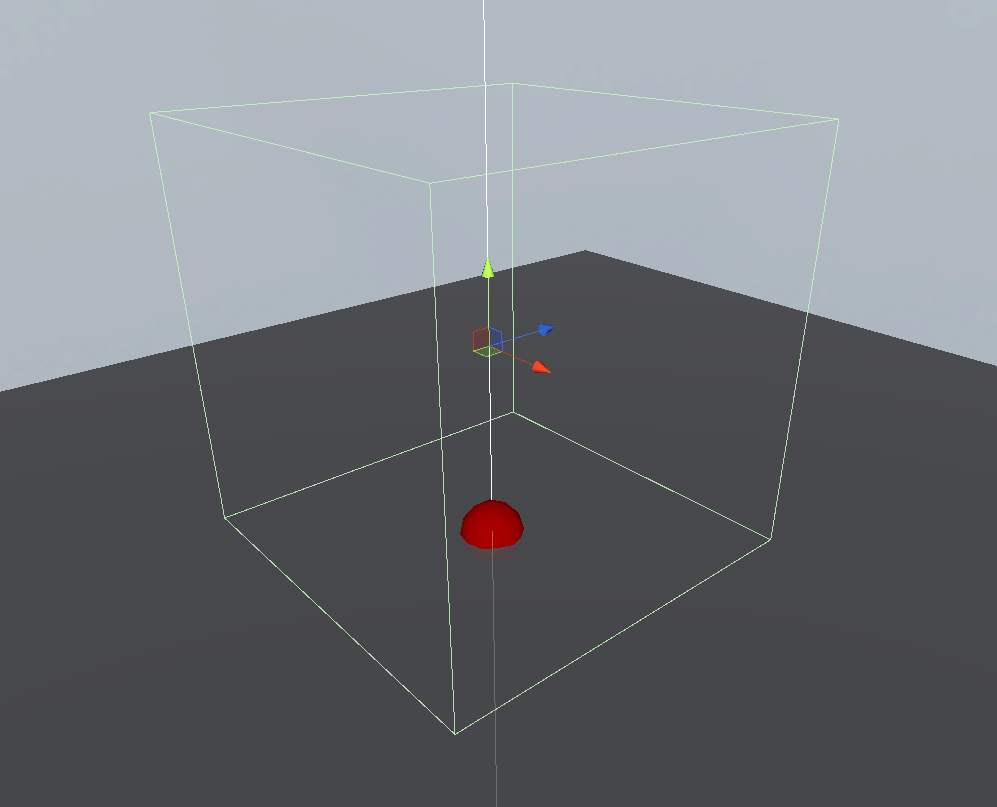
Your level should now look like this with the Checkpoint added to it:
Drop Human
• Press Play / Run.
• Select the Scene tab.
• Navigate the scene window to the desired location to drop.
• Select the Human drop down menu.
• Select Drop Human.
• Your Human will fall into the location in view within the scene window.
• Now switch back to the Game tab to carry on testing your level from where your Human fell flat.
Exporting to Local Levels
OK, so you've tested your level in Unity and you're now ready to export it to the game so that you can continue to test and play it there as well. However, before you are able to export your new level to the game there are a number of requirements that need to be met.
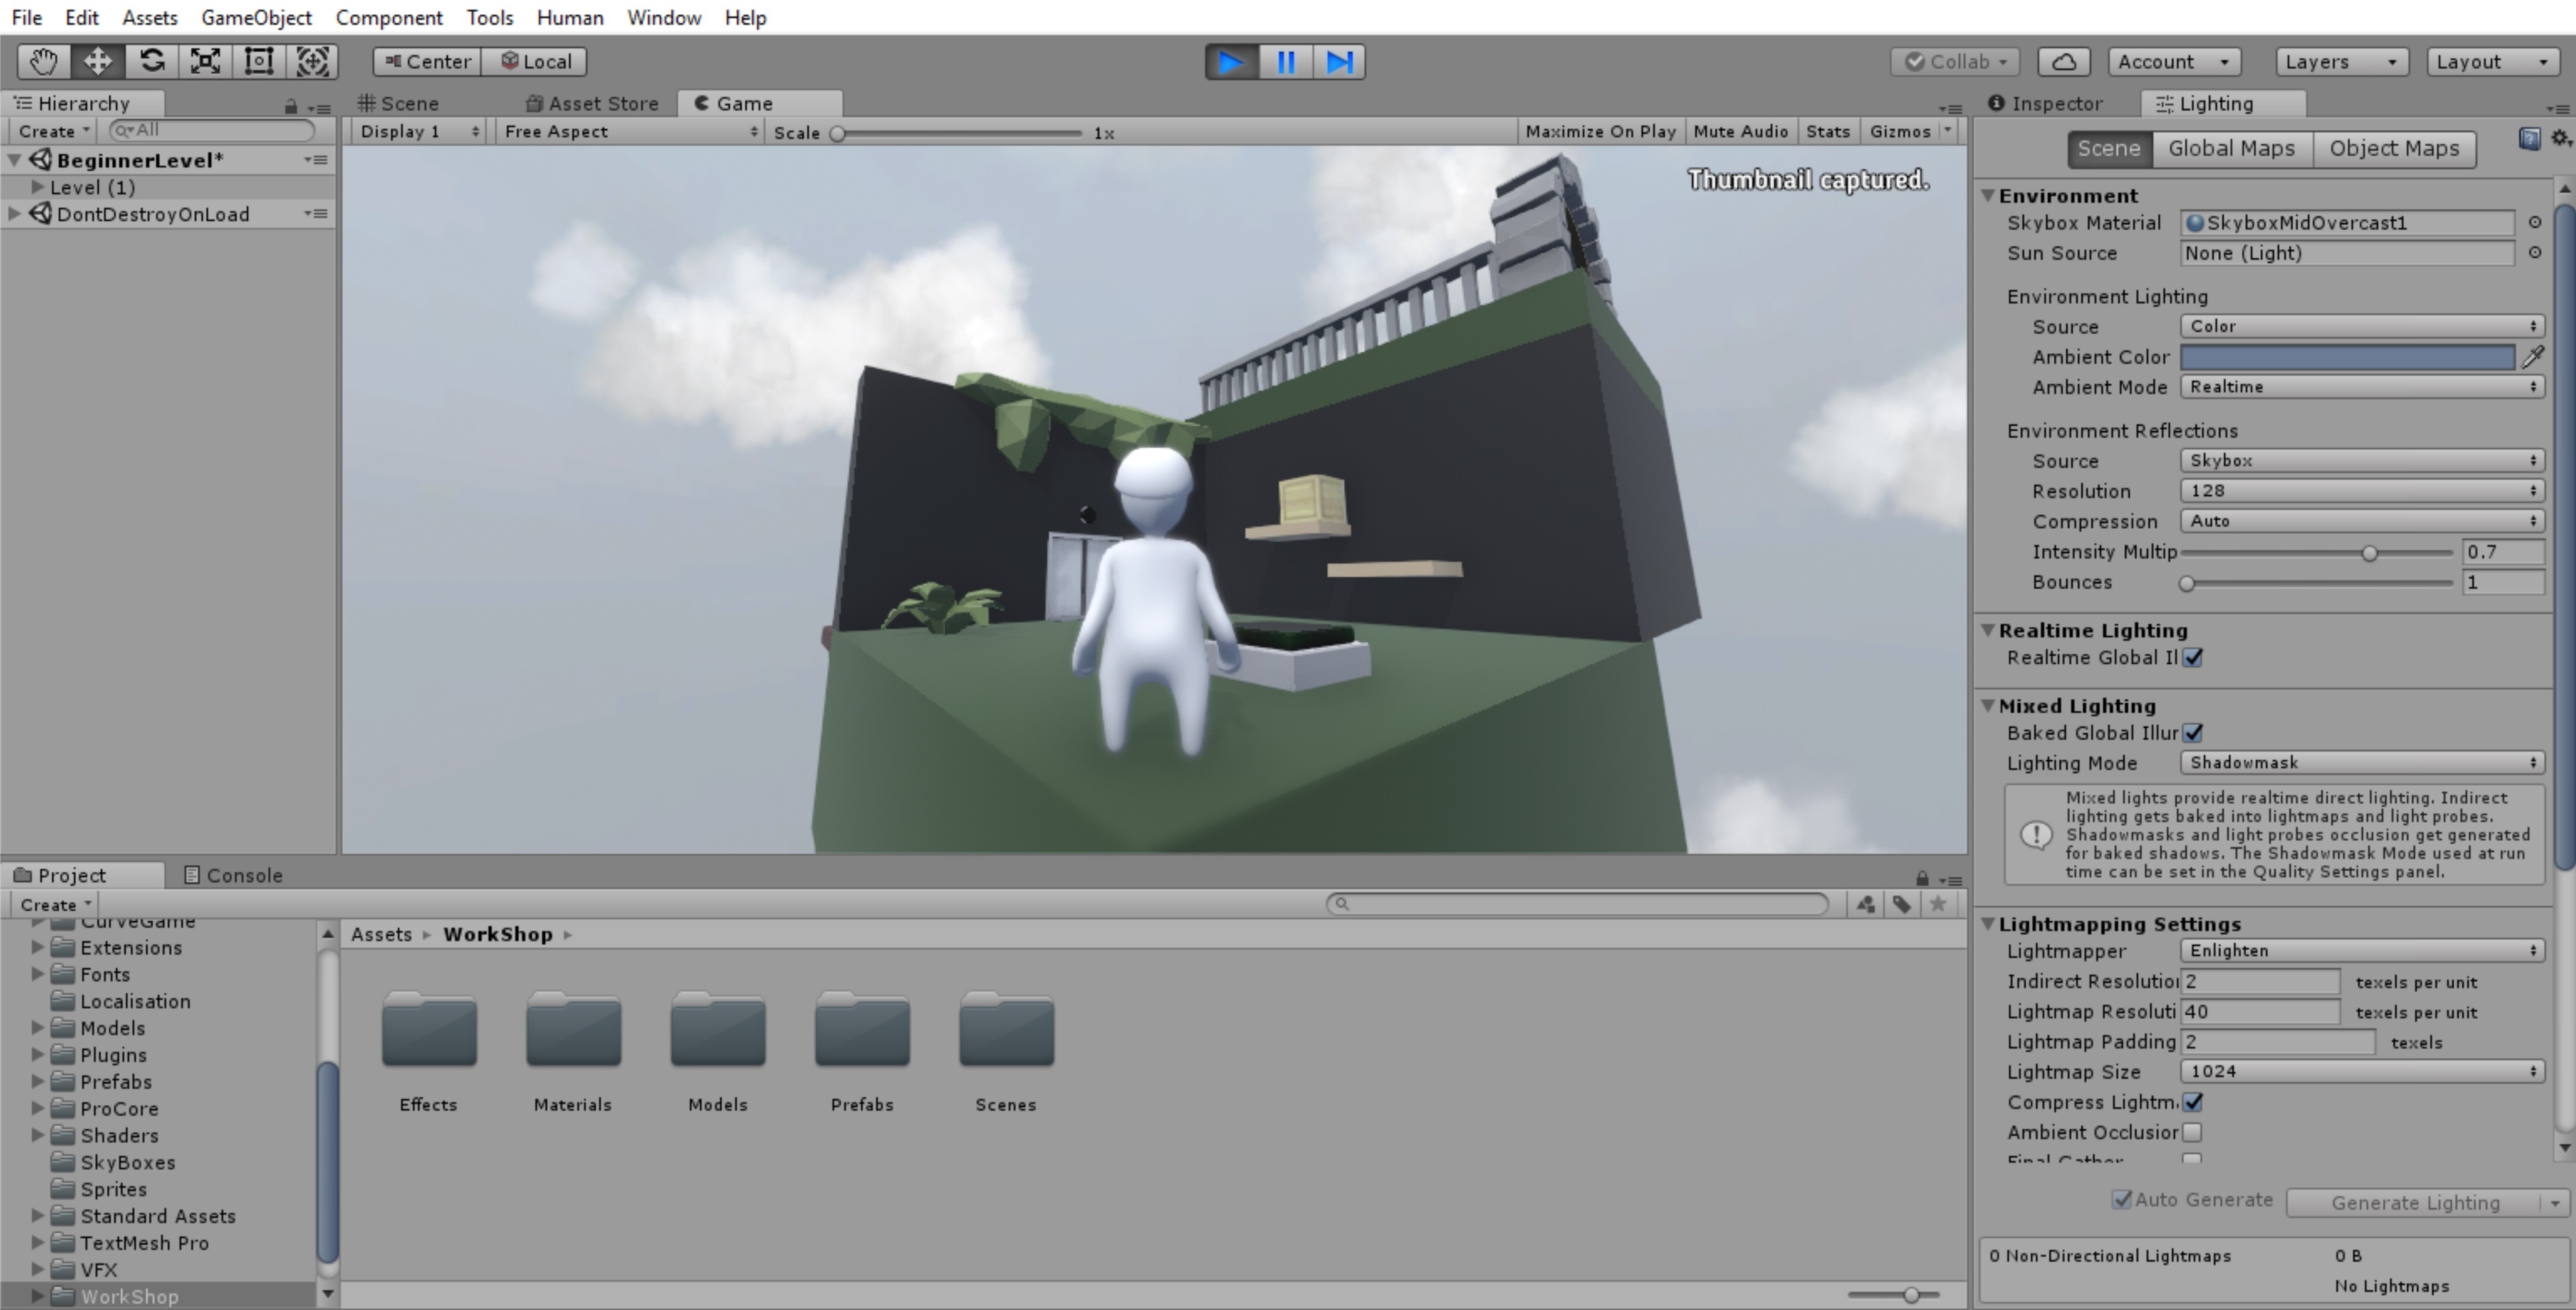
• Once in Play / Run mode press F9 at a good location to create a thumbnail screenshot for your level. You'll get shown a Thumbnail Captured confirmation message on doing so:
• Press Play / Run again to end the game.
• Select the Human option and then Human Export:
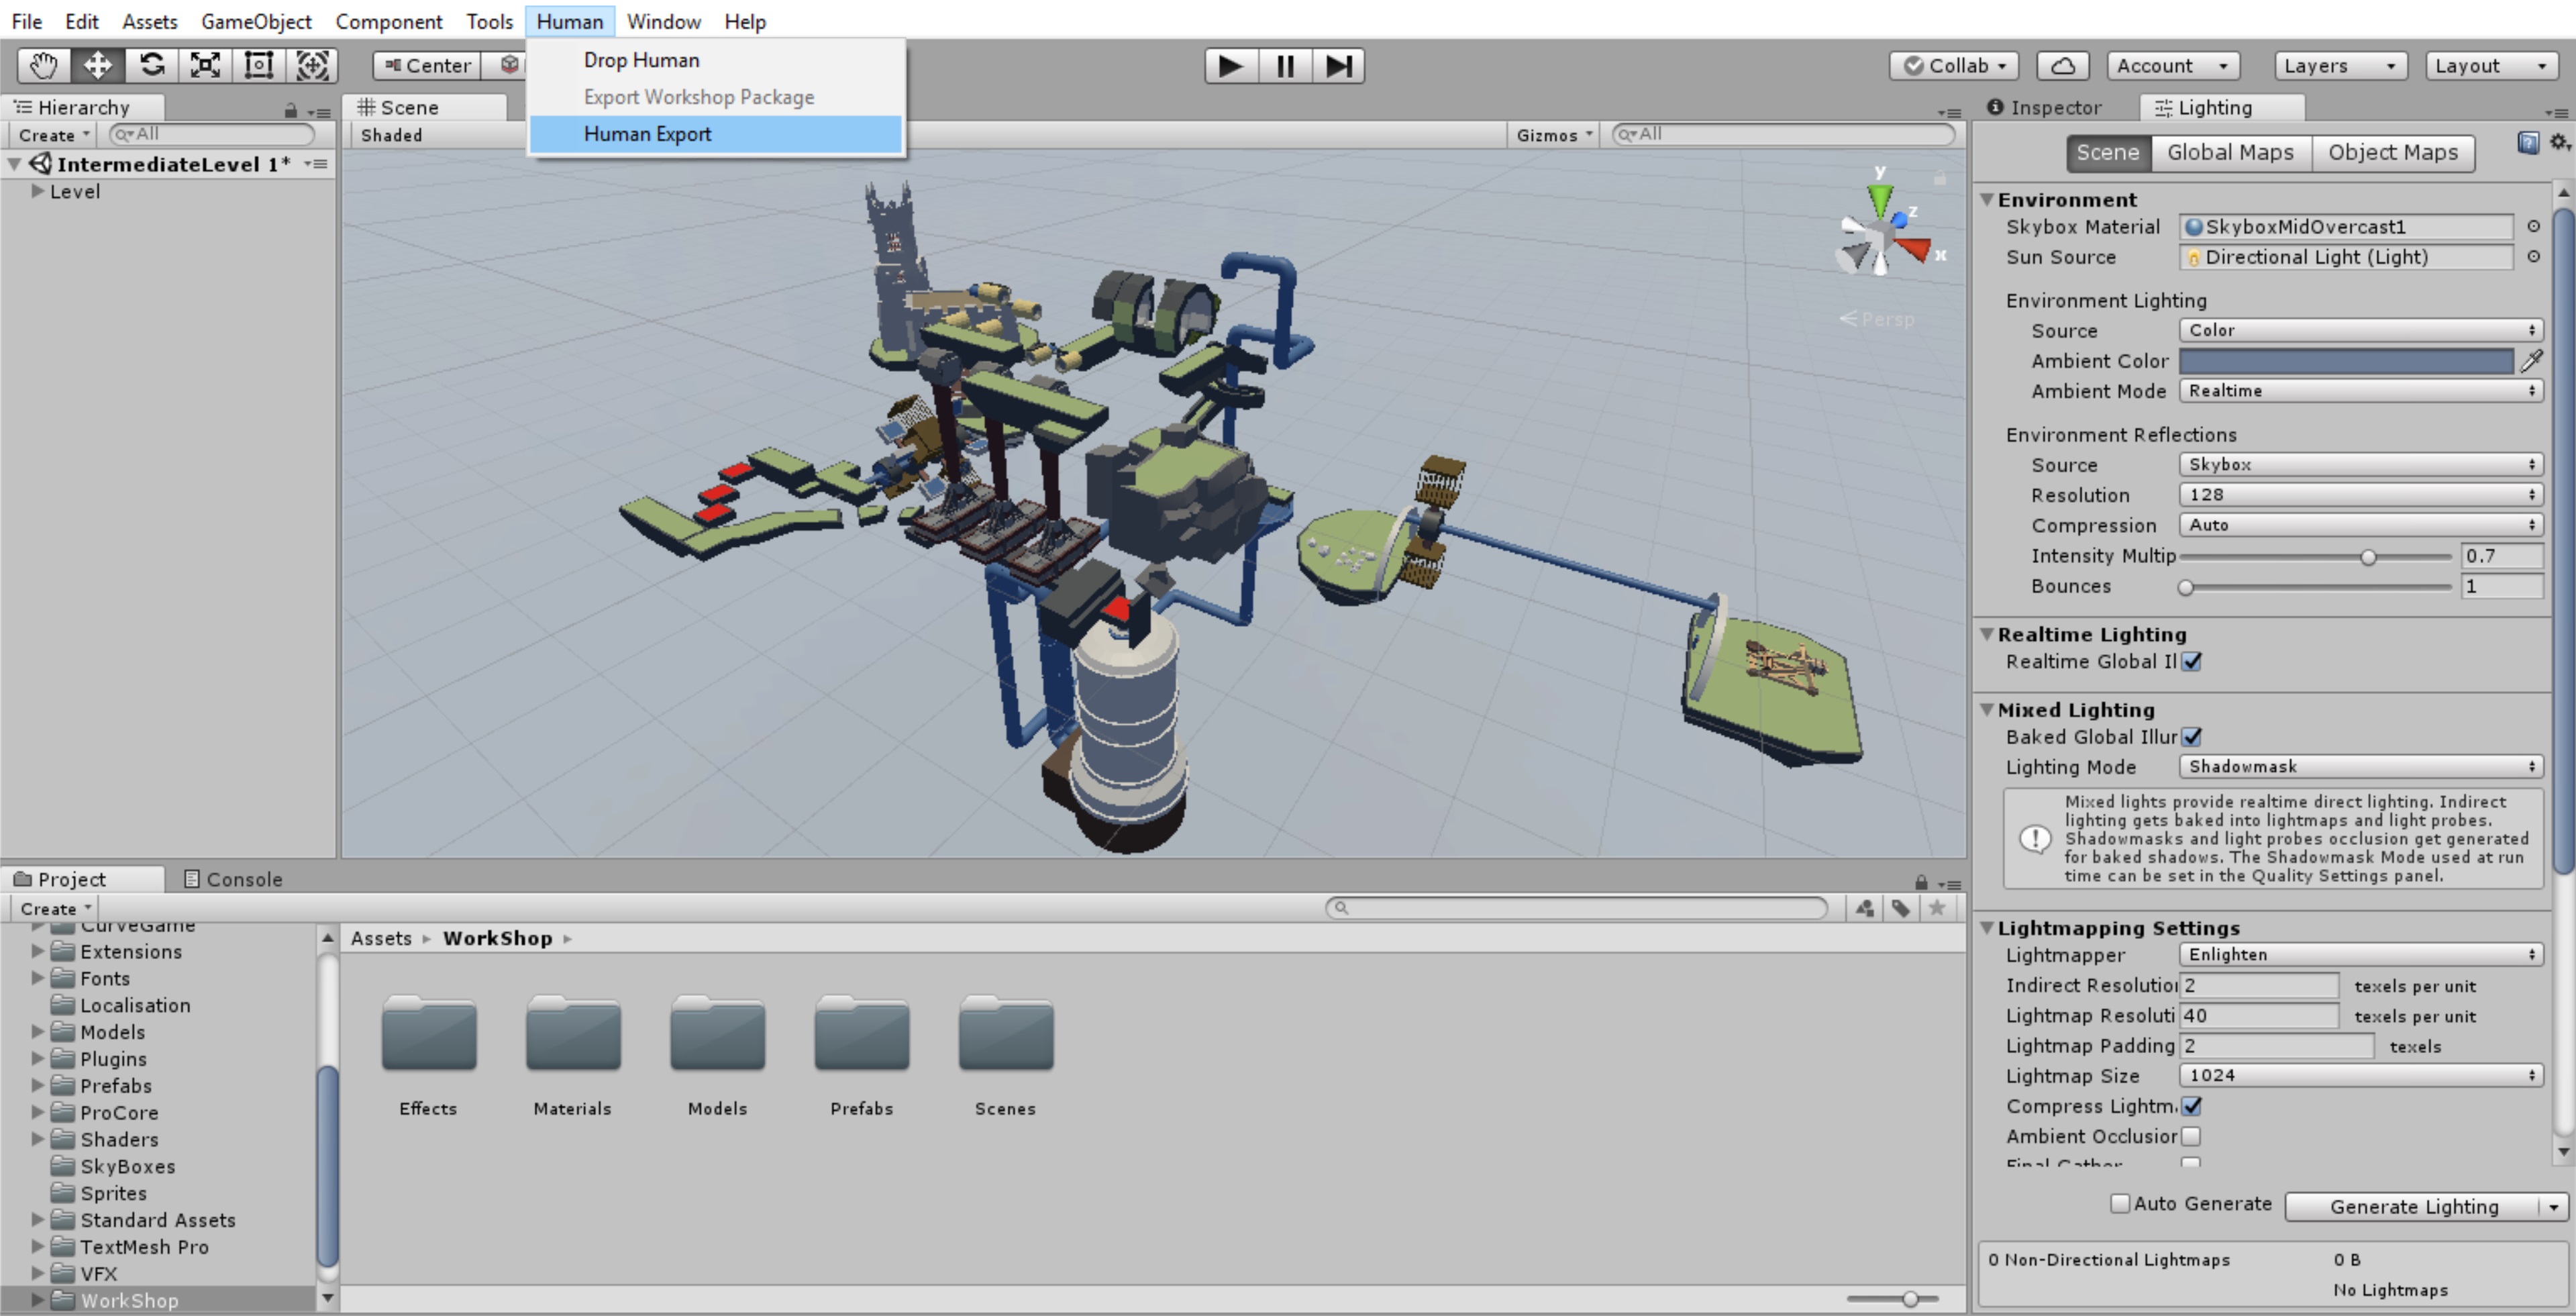
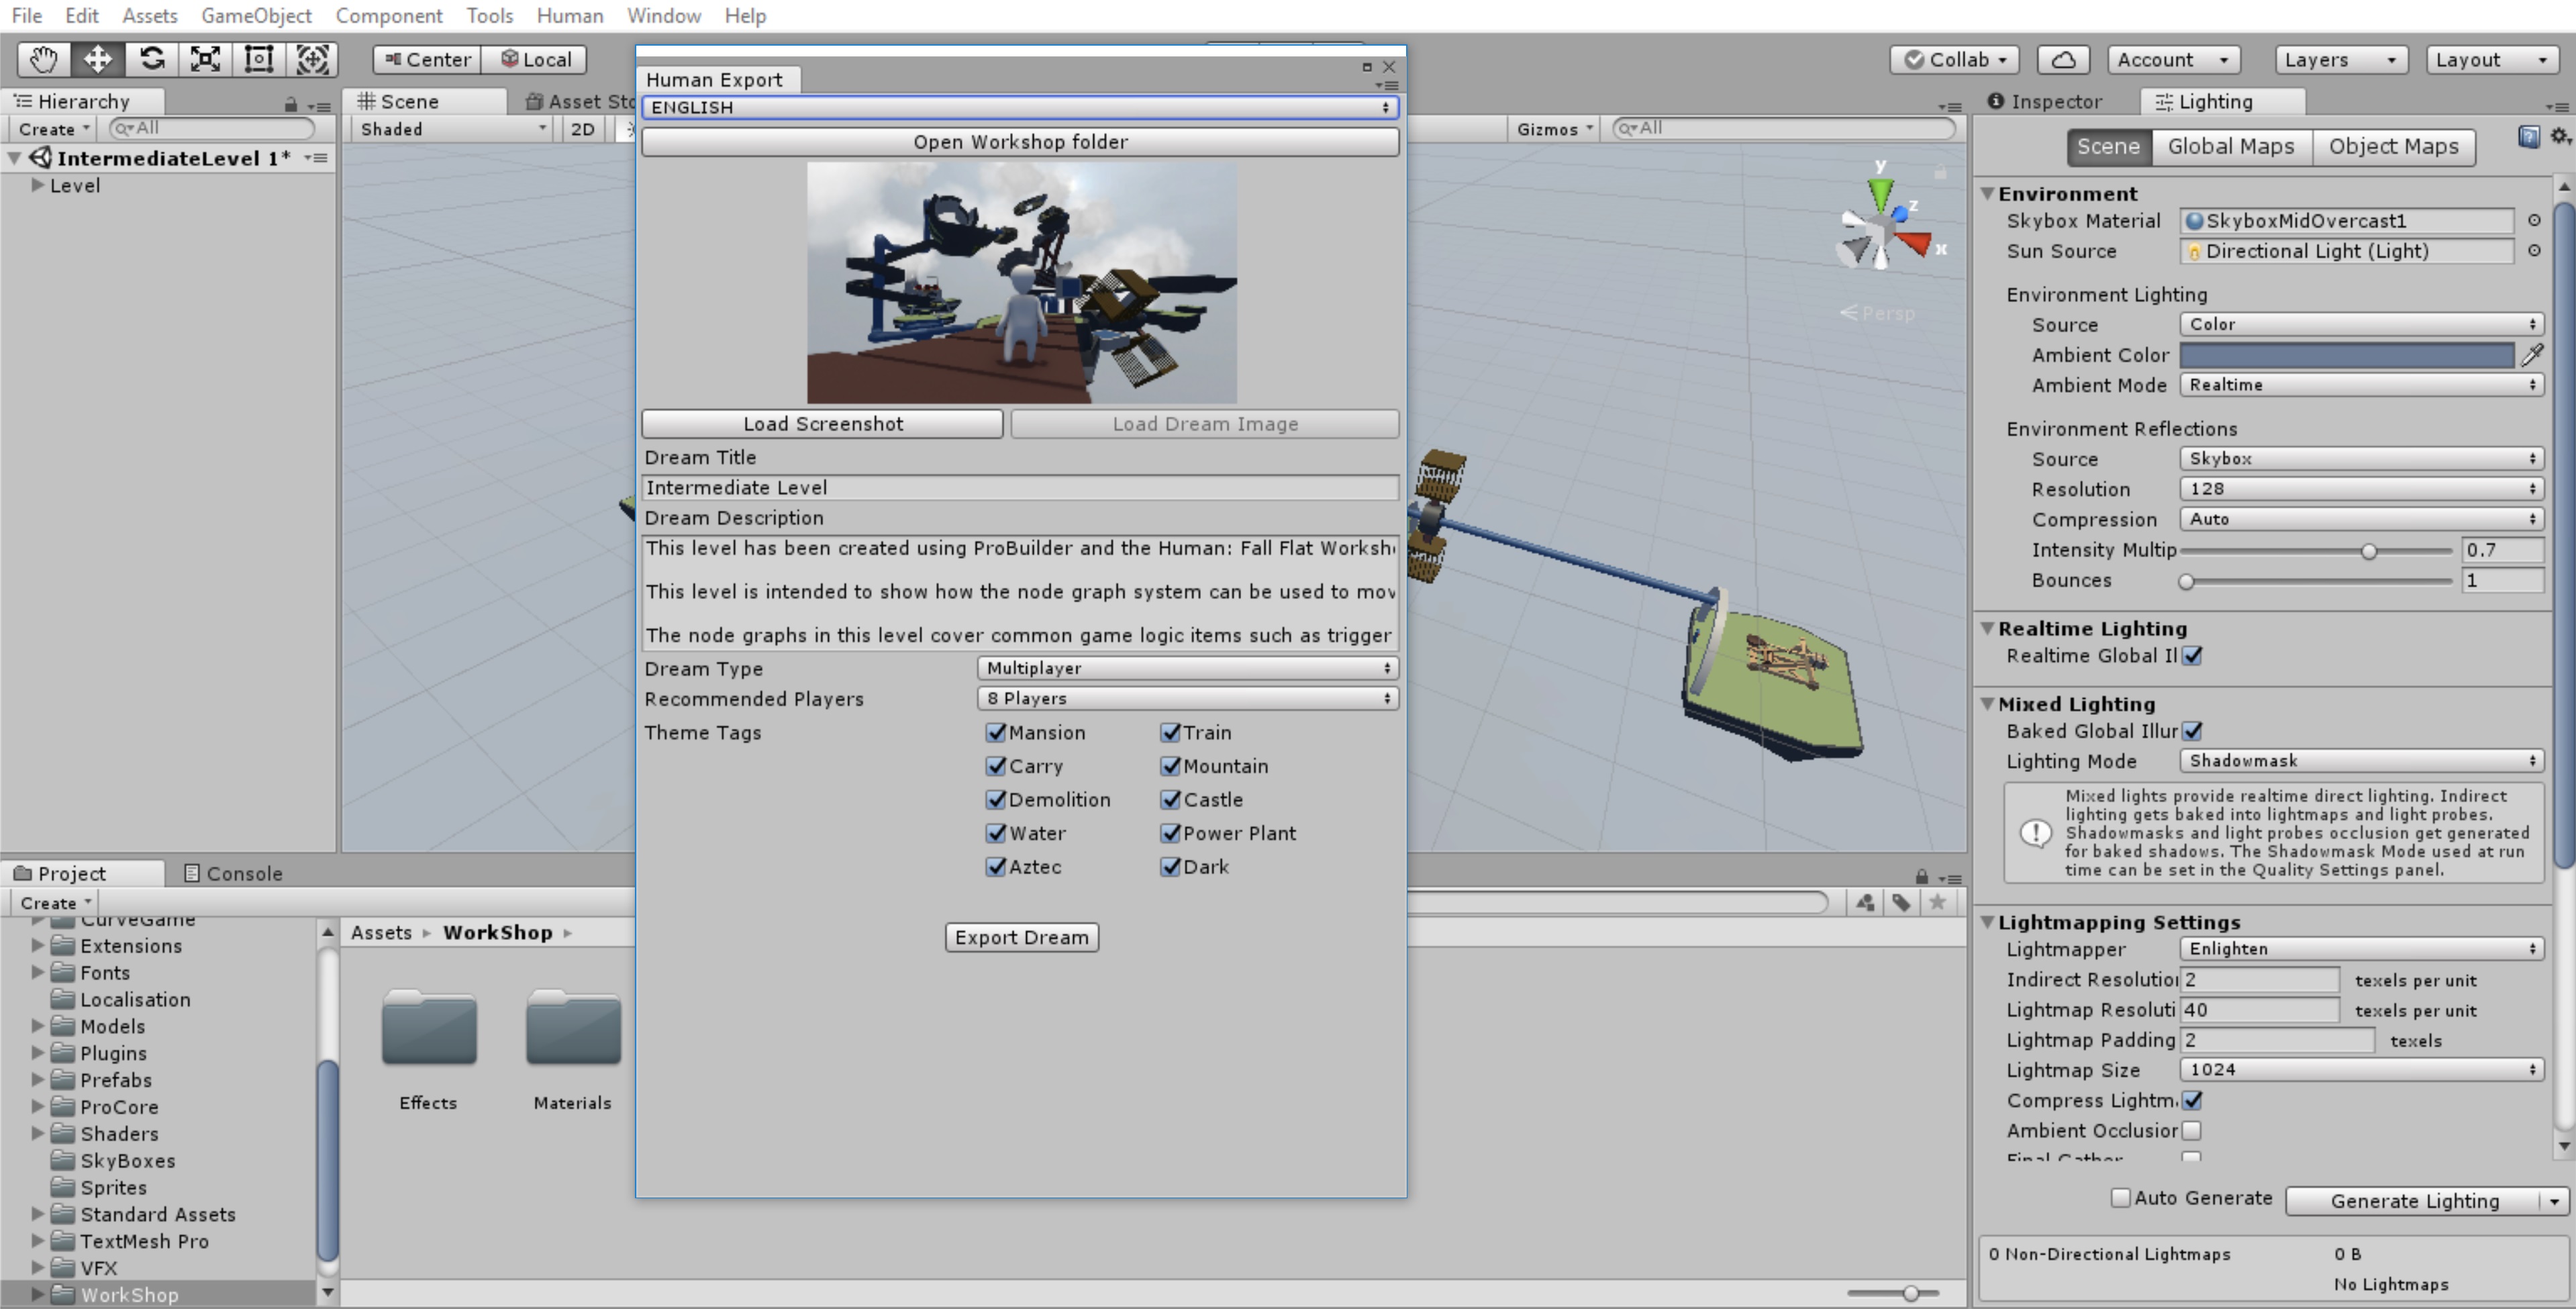
• Level Title. Enter what you’d like to call your Level in Level Title. Steam imposes a limit of 129 characters (including spaces) but it will get truncated well before reaching this limit in-game so try and keep it nice and short!
• Level Description. Enter more information about your level in Level Description. Steam imposes a limit of 8000 characters (including spaces) but it will get truncated well before reaching this limit in-game so consider what you want to say about your level. Both the Title and Description can be updated via the Workshop hub after you've published your level.
• Dream Type (Tag). Select if your level is really only suited to single player. If it is fine for both single player and multiplayer then choose the option of Multiplayer.
• Recommended Players (Tag). Select how many players, between 1-8, this level was intended for.
• Theme Tags. Next you'll see the Theme Tags tick boxes. By default these will look at any prefab you've used within your level and tick that theme automatically. As an example, the Intermediate Level example scene we've provided will auto-populate the Theme Tags of Mansion, Train, Demolition, Castle, Water, Power Plant and Aztec because it features prefabs from all of those level themes.
• Export Dream. Then press the Export Dream button at the bottom of the Human Export window. After a little while the exporting process will be complete and you will be able to close the Human Export window.
We'll take you through playtesting your level and how to publish it to Steam in the next section of this guide.
• There should be no cameras in the scene.
• There is more than one level in the scene.
• There are no level objects in the scene. Check Example scenes.
• SpawnPoint not defined on level.
• There are no lights in the level. Check Example scenes.
• There are no FallTriggers in the level. Check Example scenes.
• There is no LevelPassTrigger in the level. Check Example scenes.
• Checkpoint missing.
• Dream Title cannot be empty.
• Dream Description cannot be empty.
• Invalid metadata.
• Dream Image required.
• Language Select. At the top of the Human Export window there is a language select option where you can change any text within the Human Export window to the language of your choice, along as it is supported by the game. This will hopefully help with understanding any Export Errors displayed that you may need to clear before exporting your level.
• Open Workshop folder. This will open the location where your exported levels will be saved to locally, which is as follows:
C:/Users/user.name/AppData/LocalLow/NoBrakesGames/Human/Workshop
• Load Screenshot. Clicking this button will load the last screenshot thumbnail you've captured from either in-game (by pressing F9 while actively playing the level via the Local Levels menu) or from within Unity.
• Load Dream Image. If you've previously exported the level to the game this option will reload the saved thumbnail from the exported level rather than displaying any new thumbnail you may have captured since exporting the level to the game.
In other words, Load Screenshot switches to your new screenshot, whereas Load Dream Image switches to the existing screenshot of your level if you've previously exported it to the game.
Play-Test & Publish to Steam
Once you've successfully exported your level from Unity it will be available to play in-game, where you'll be able to play-test it in singleplayer or CO-OP before publishing it to the Steam Workshop hub. Only once you've published and subscribed to it will it also become available to play in online multiplayer. Here's how to do all of this:
• Open Human: Fall Flat.
• Select PLAY > LOCAL > SELECT A LEVEL.
• Select LOCAL LEVELS.
• You should see the level you've exported from Unity within this menu:
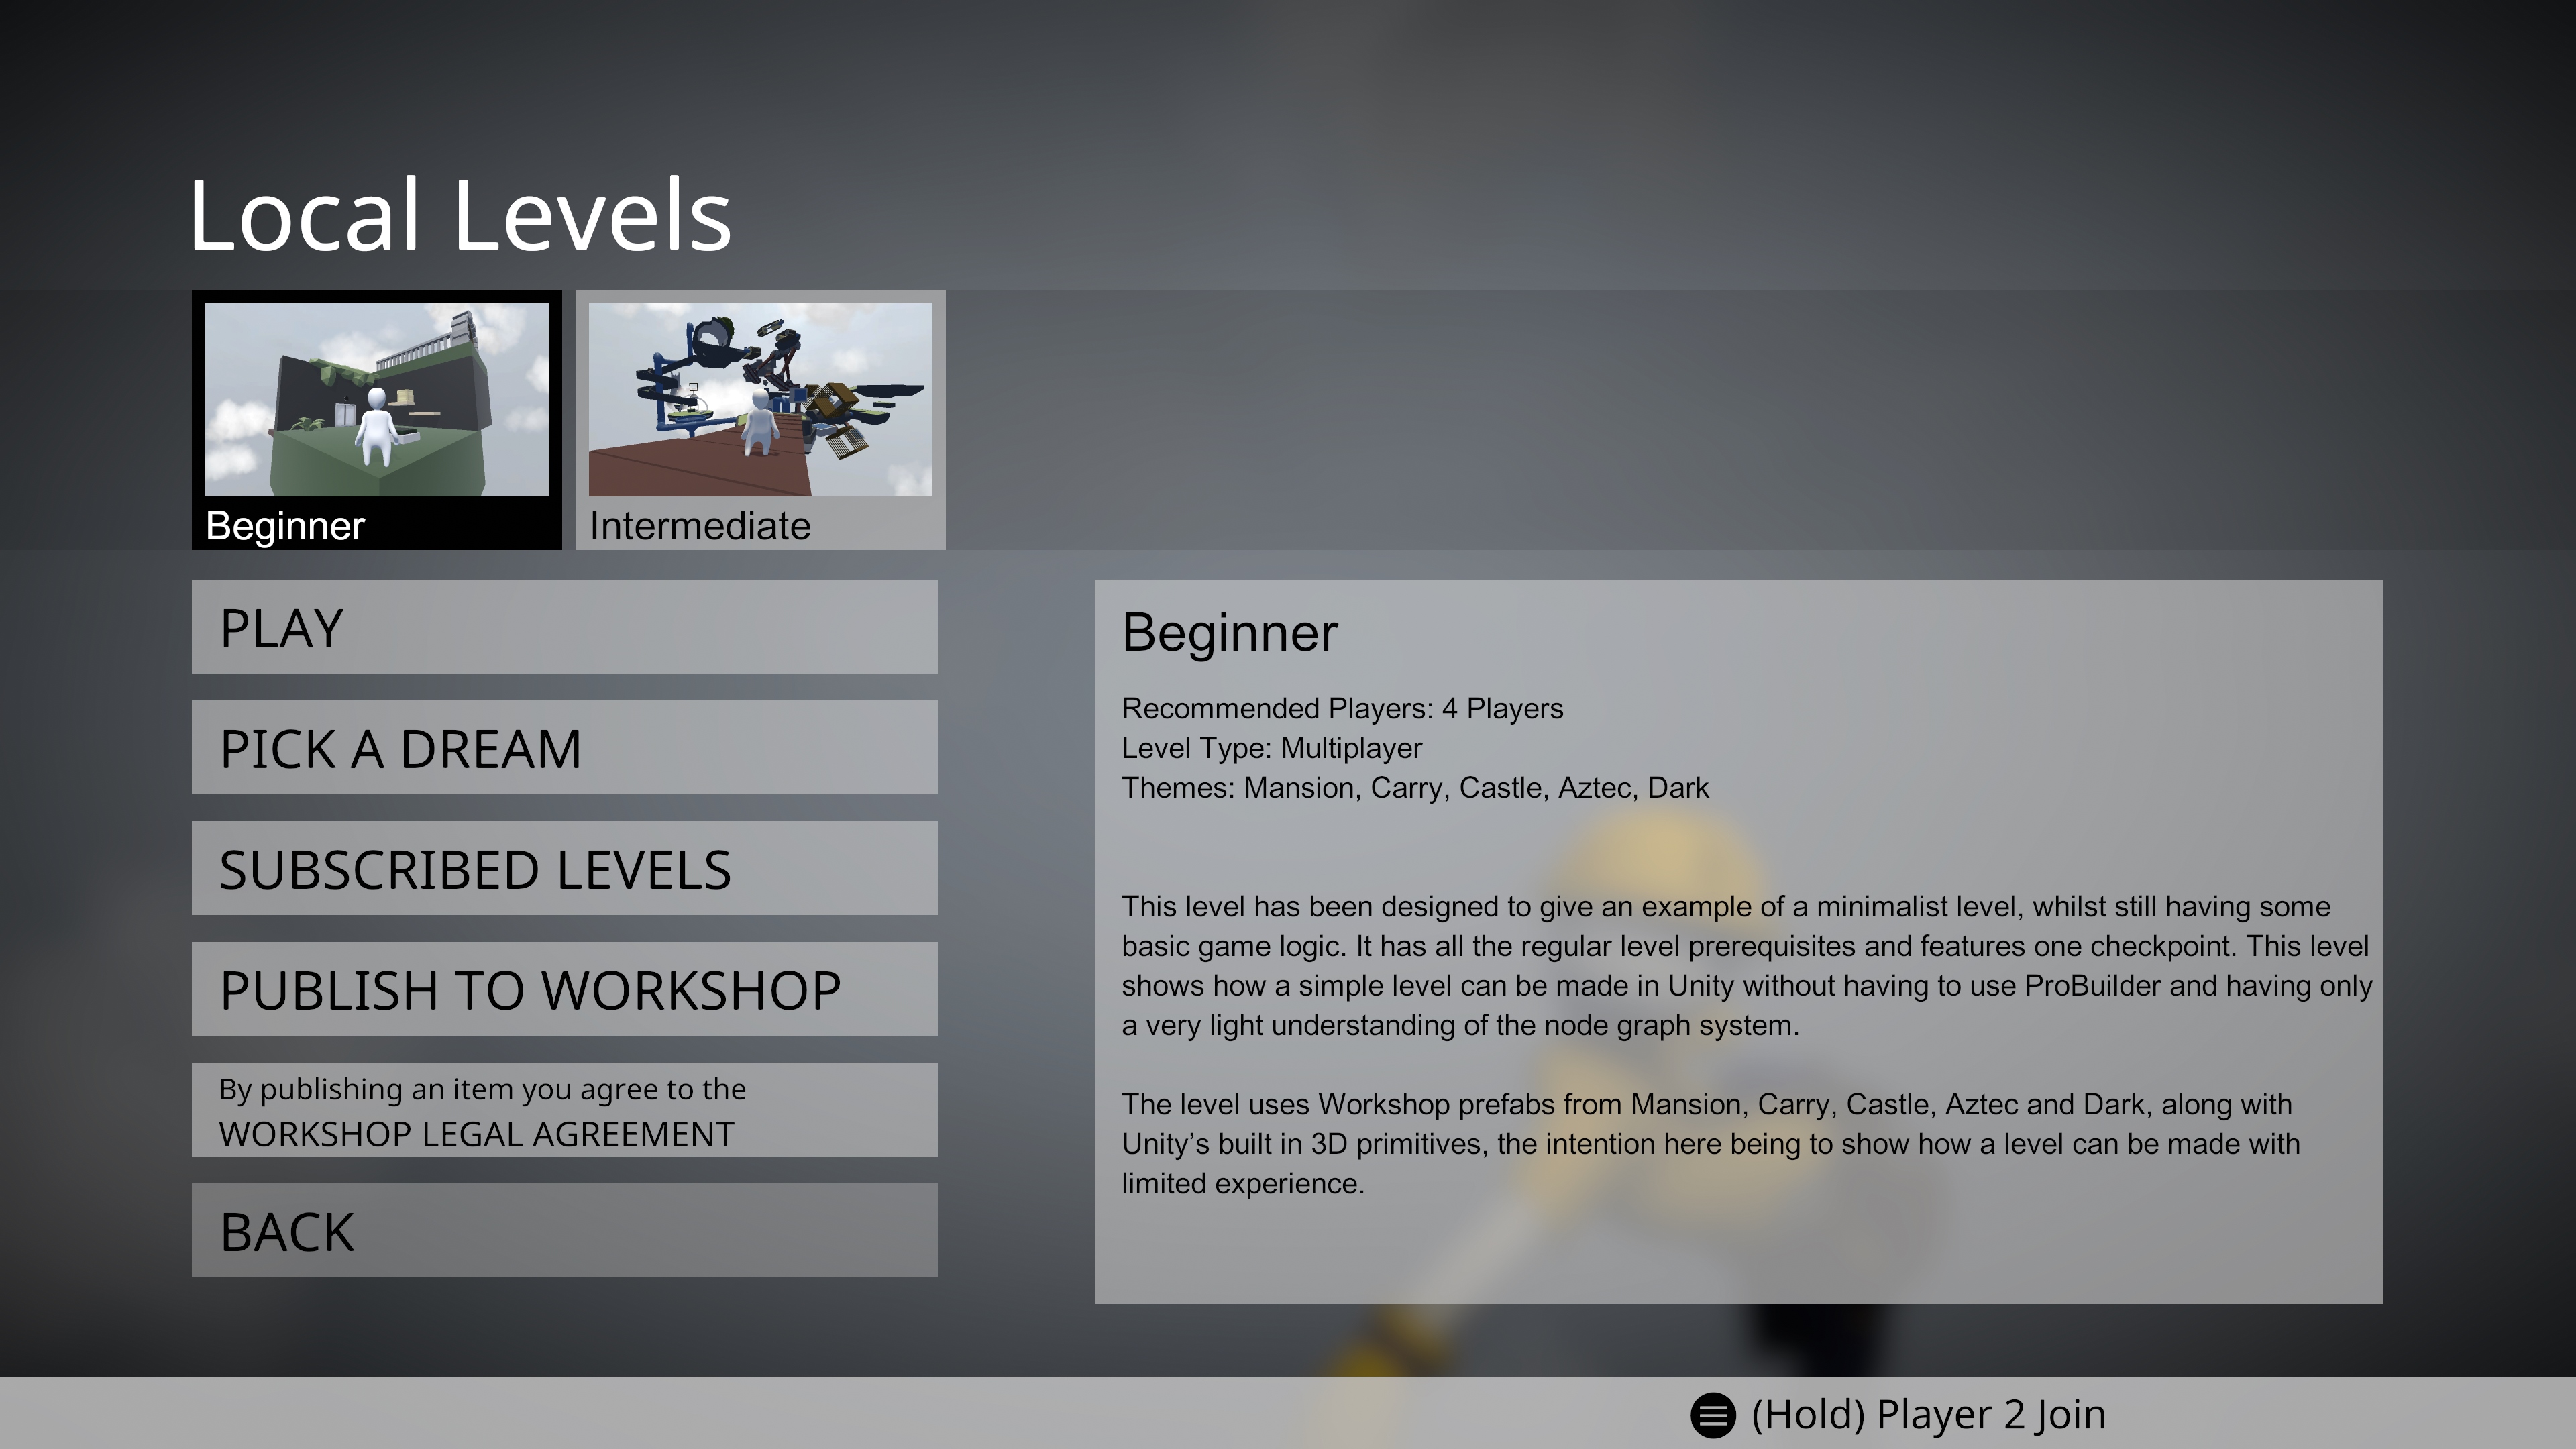
As you can see, you'll be able to review the Name, Description and the Screenshot Thumbnail of your level, as well as a breakdown of all of the Tags that you set for your level when you exported it from Unity.
From here you have a number of options open to you. They are as follows:
• WORKSHOP LEGAL AGREEMENT. If you haven't already done so then you are going to need to accept this before you can publish anything you've created to the Steam Workshop hub.
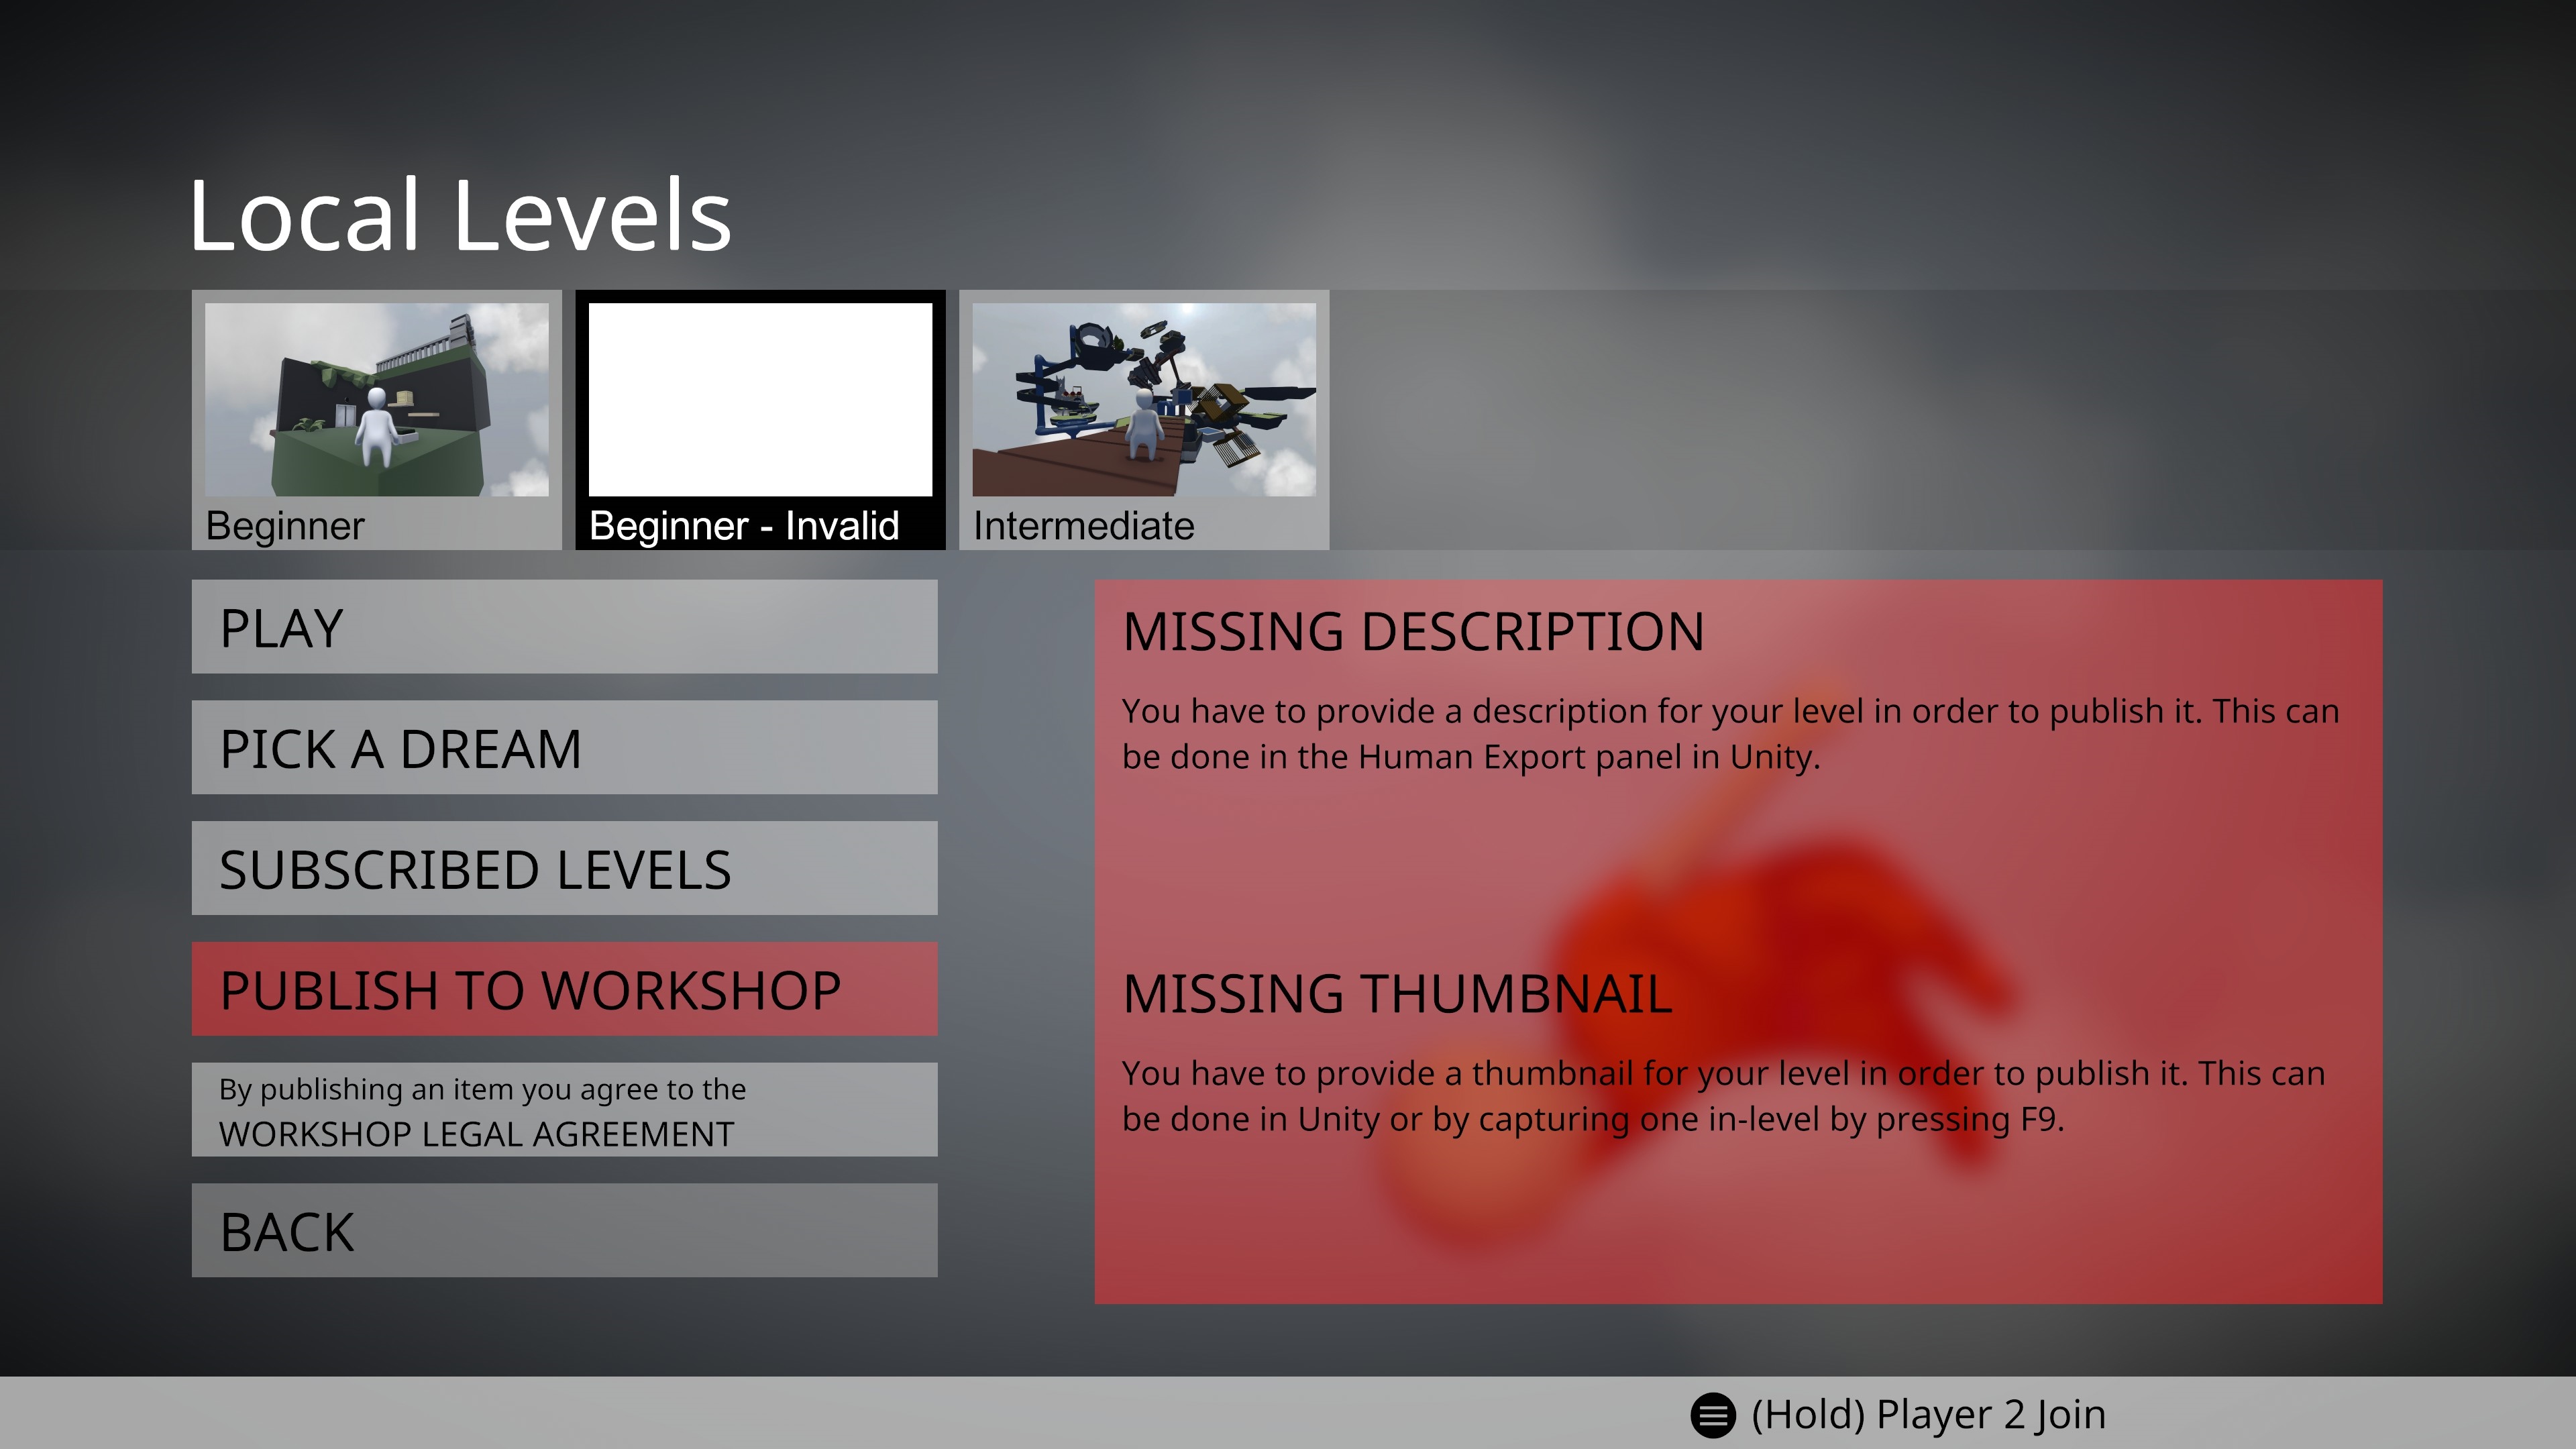
• PUBLISH TO WORKSHOP. You'll be able select this option once you've done the following:
o You've accepted the WORKSHOP LEGAL AGREEMENT.
o You've ensured that your level has a Name, Description and a Screenshot Thumbnail. If it doesn't have any of these then this option won't be available until it does so:
• PLAY. As far as play testing your level before publishing it to Steam this is the option that you should select so let's do that now.
• Press F9 in-level to capture a thumbnail screenshot. If you're playing a lobby you'll first have to press F8 twice in order to get into the correct camera view and then press F9 in-level to capture a thumbnail screenshot:
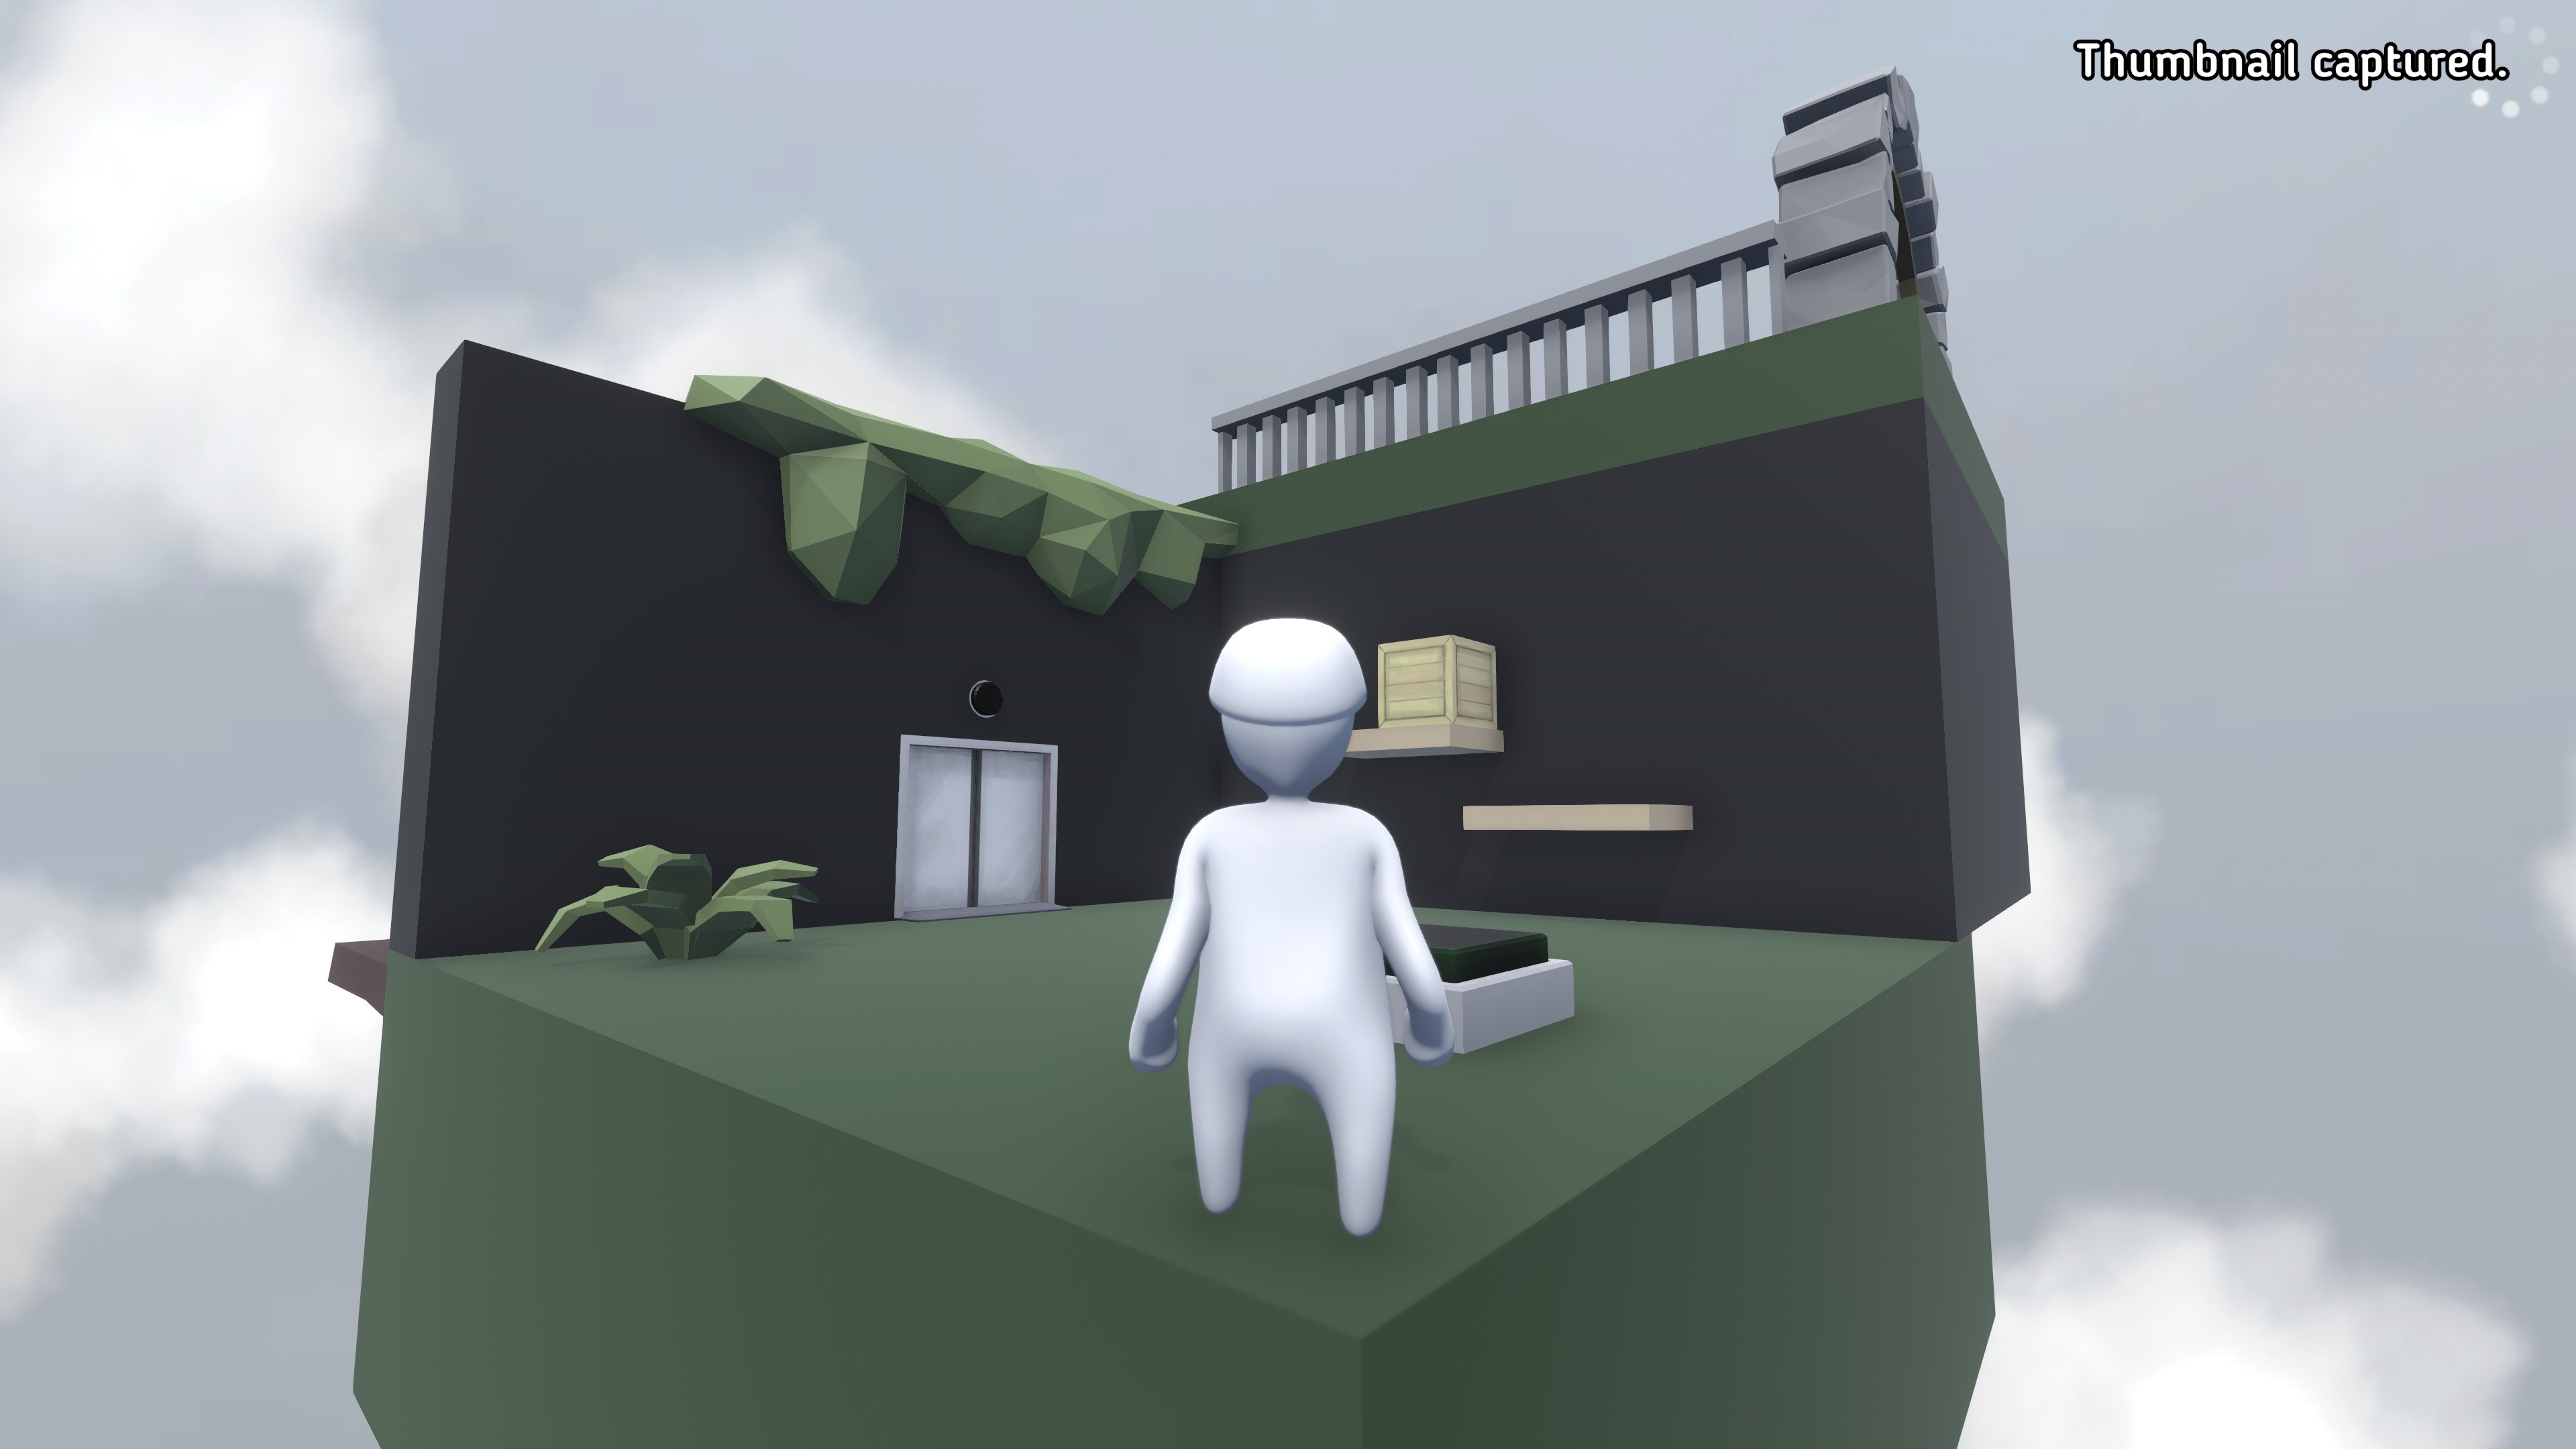
• You'll get shown a Thumbnail captured confirmation message.
• These captured thumbnail screenshots will be located here:
C:/Users/user.name/AppData/LocalLow/NoBrakesGames/Human
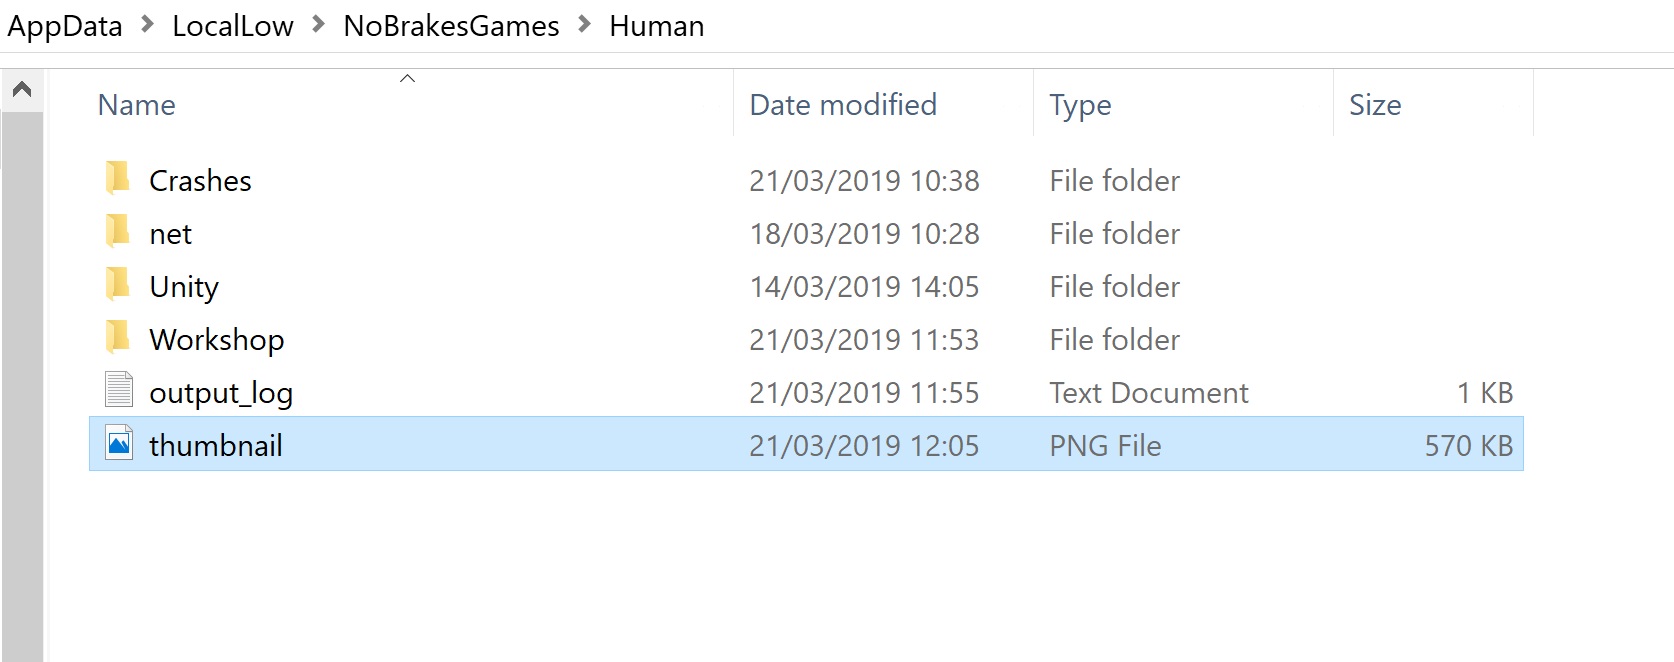
• It's then just a matter of moving this thumbnail file to the correct folder under the Levels folder so that it replaces the existing in-use thumbnail for that level.
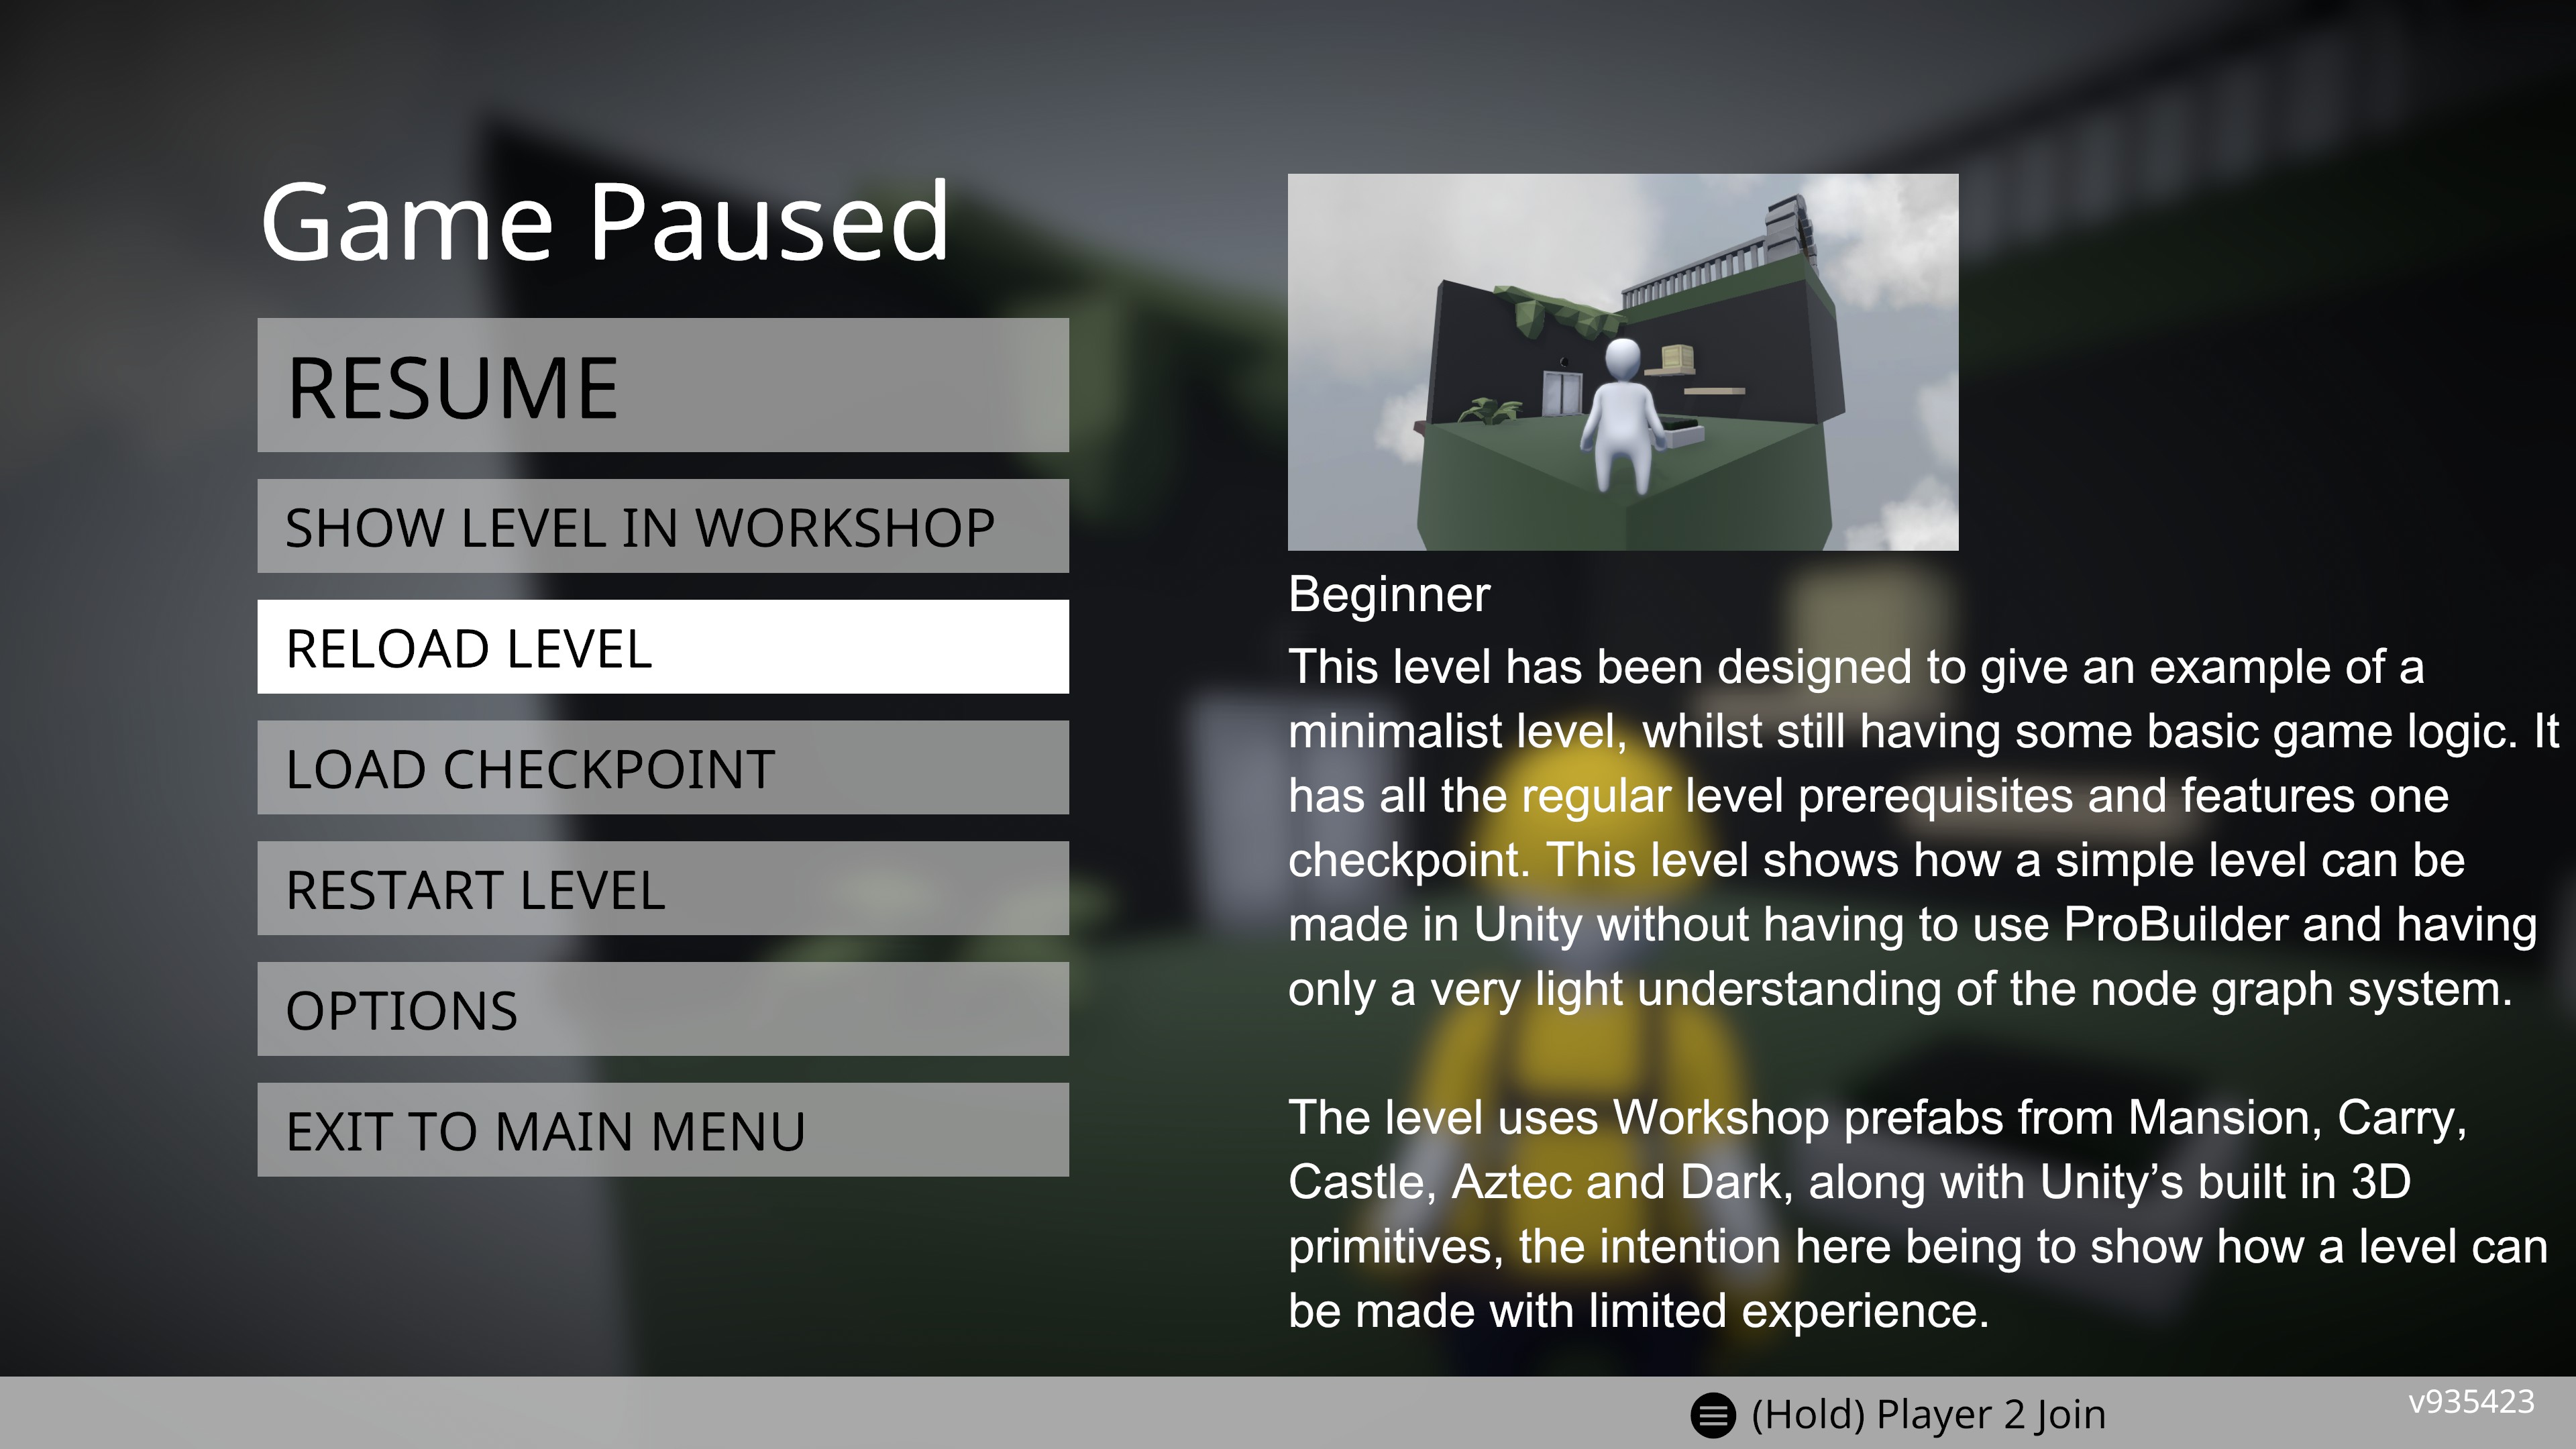
This is a really useful feature for play-testing your level in-game, making updates and improvements to it in Unity. You use it as follows:
• First run the game and then run Unity afterward so they're both active at the same time.
• In Unity successfully export a level so that it will be available in the LOCAL LEVELS menu in-game.
• Switch to the game and locate the exported level in the LOCAL LEVELS menu and play it.
• Once you're in the level, switch back to Unity.
• Make a change to the level, take a new thumbnail screenshot if required and then re-export it.
• Switch back to the game, enter the Pause Menu and select the RELOAD LEVEL option.
• The level will reload entirely and it will now include the changes from the last export you made from Unity.
• Select the PUBLISH TO WORKSHOP option and the upload to Steam will begin immediately:
• Once the upload is complete, the Steam Overlay will open automatically, which we'll look at in the next section of this guide.
Subscribing, Rating and Reporting
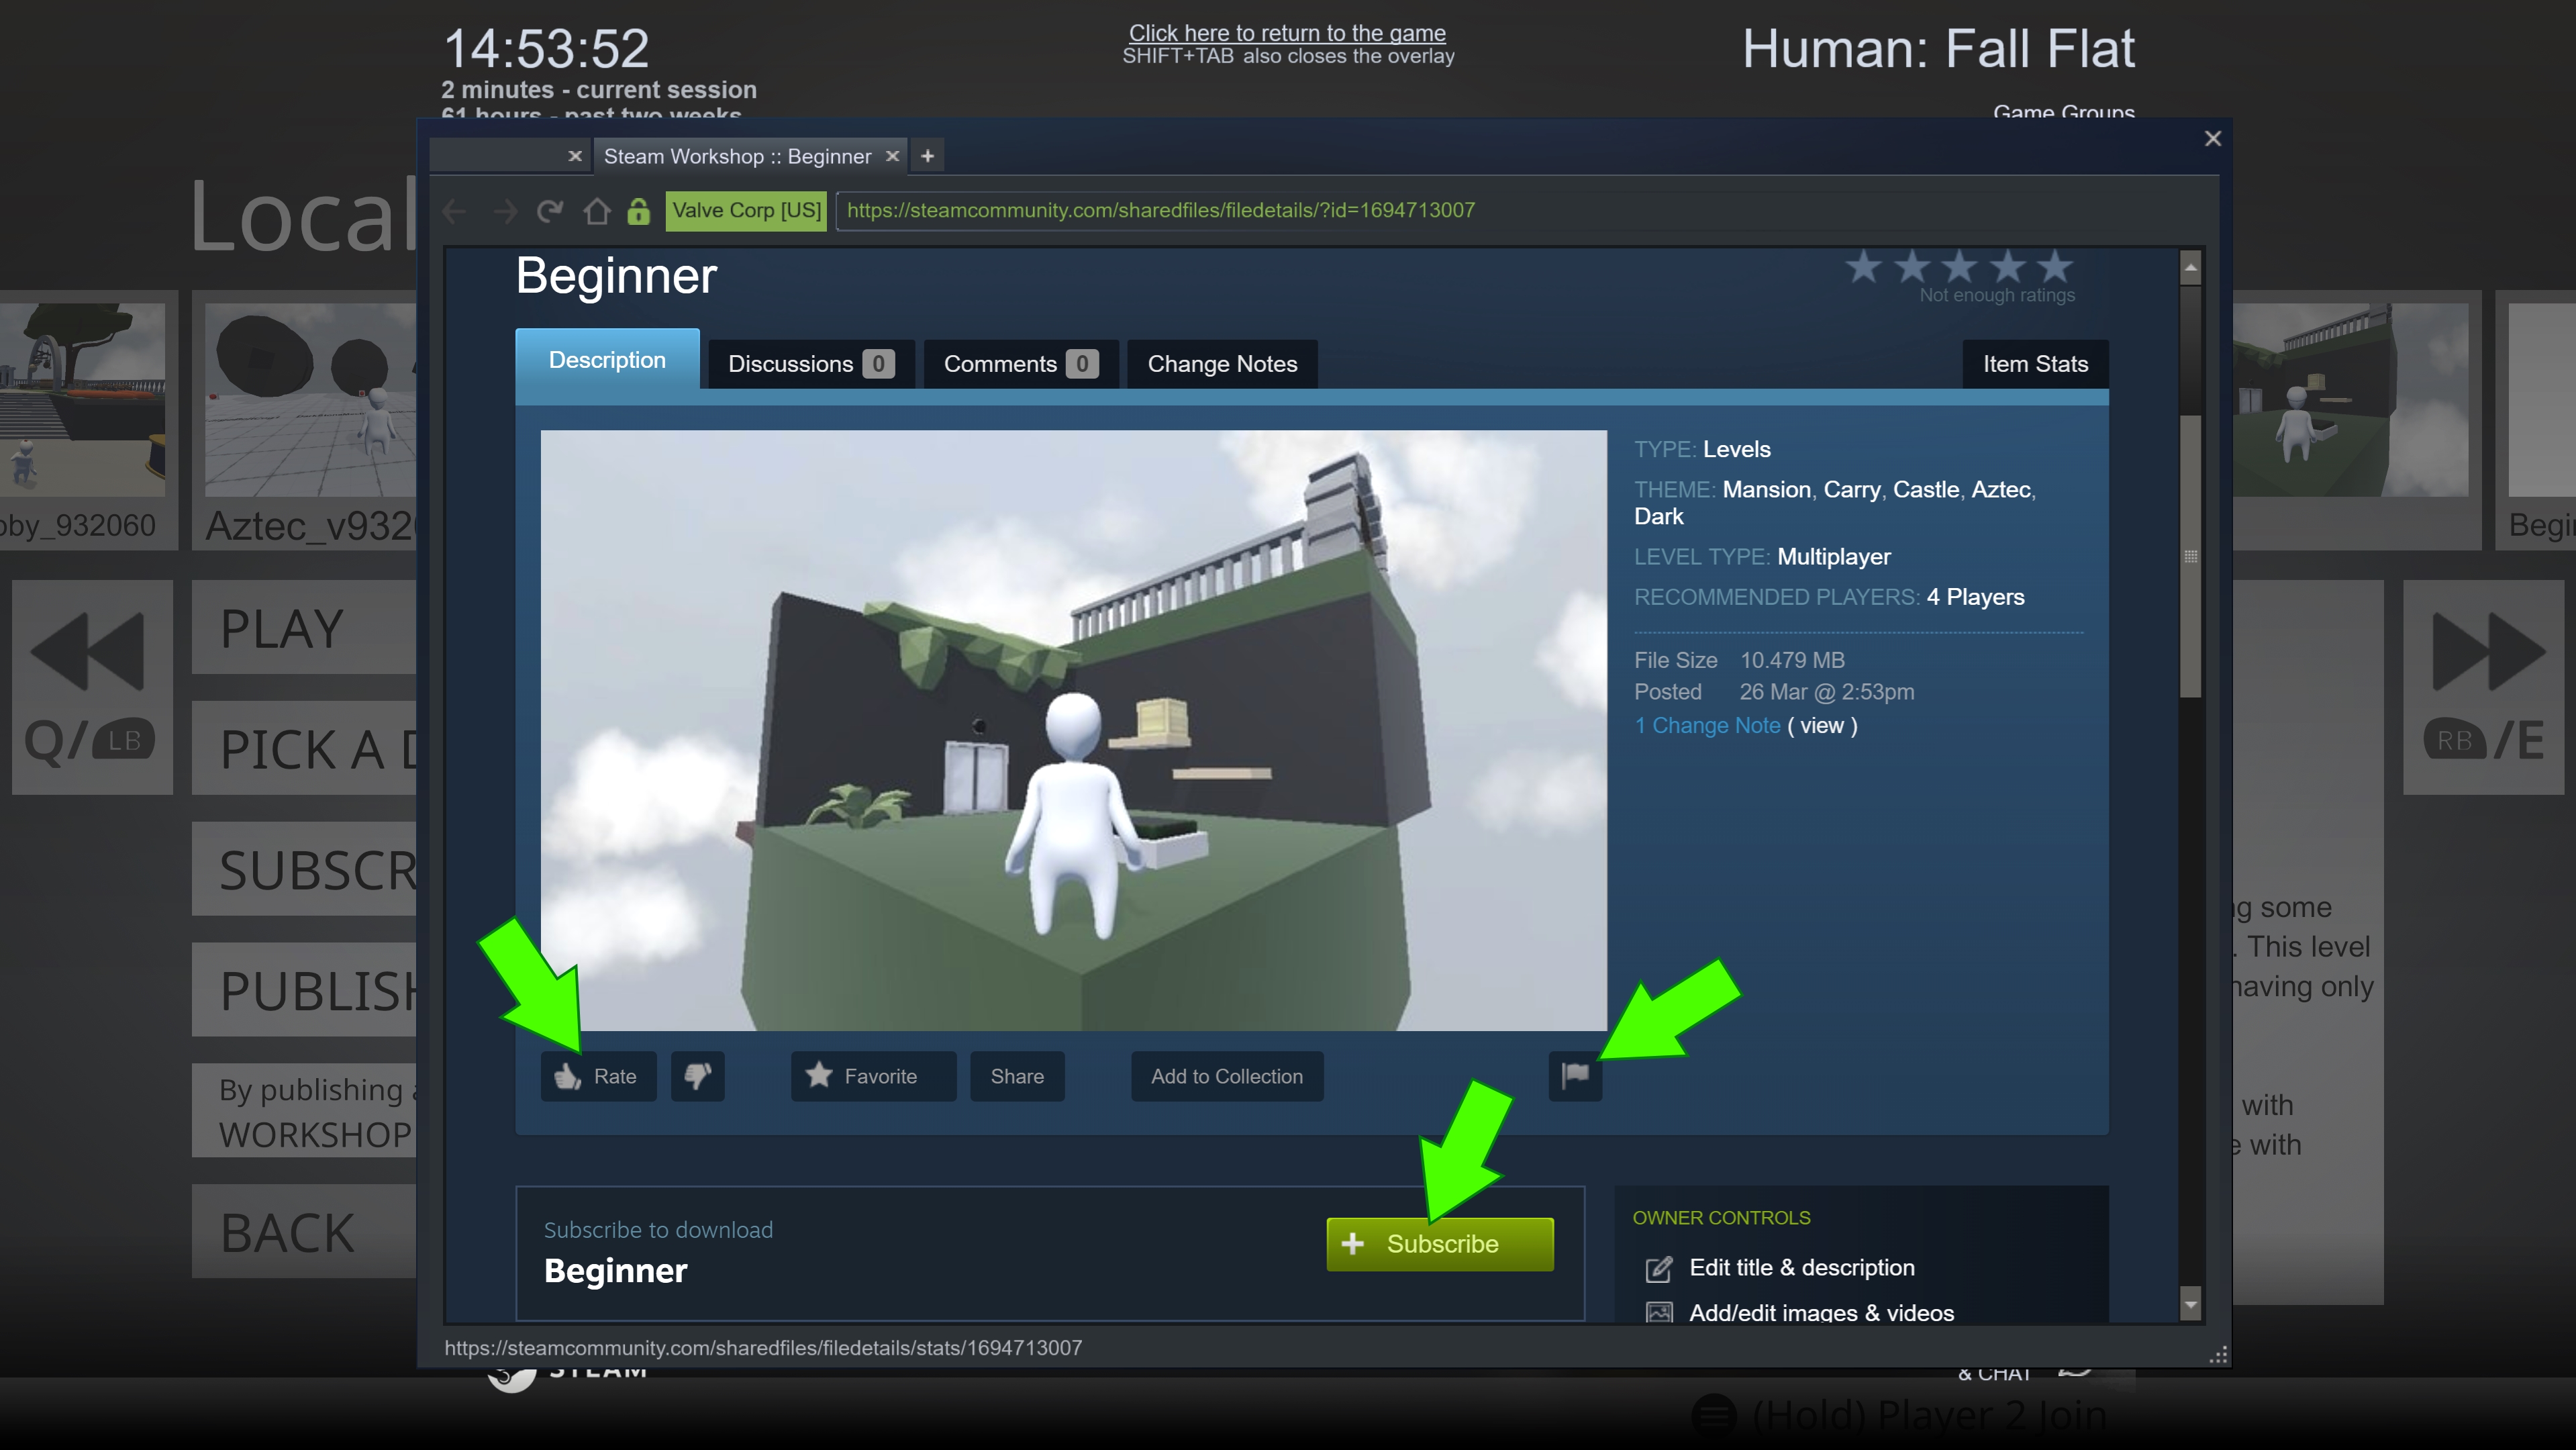
You can also Subscribe to and download other people’s levels, lobbies and models (skins) from the Workshop hub.
After you've closed the Steam Overlay and you're back in-game do the following:
• Select PLAY > LOCAL > SELECT A LEVEL.
• Select SUBSCRIBED LEVELS.
• You should see any levels you've subscribed to within this menu:
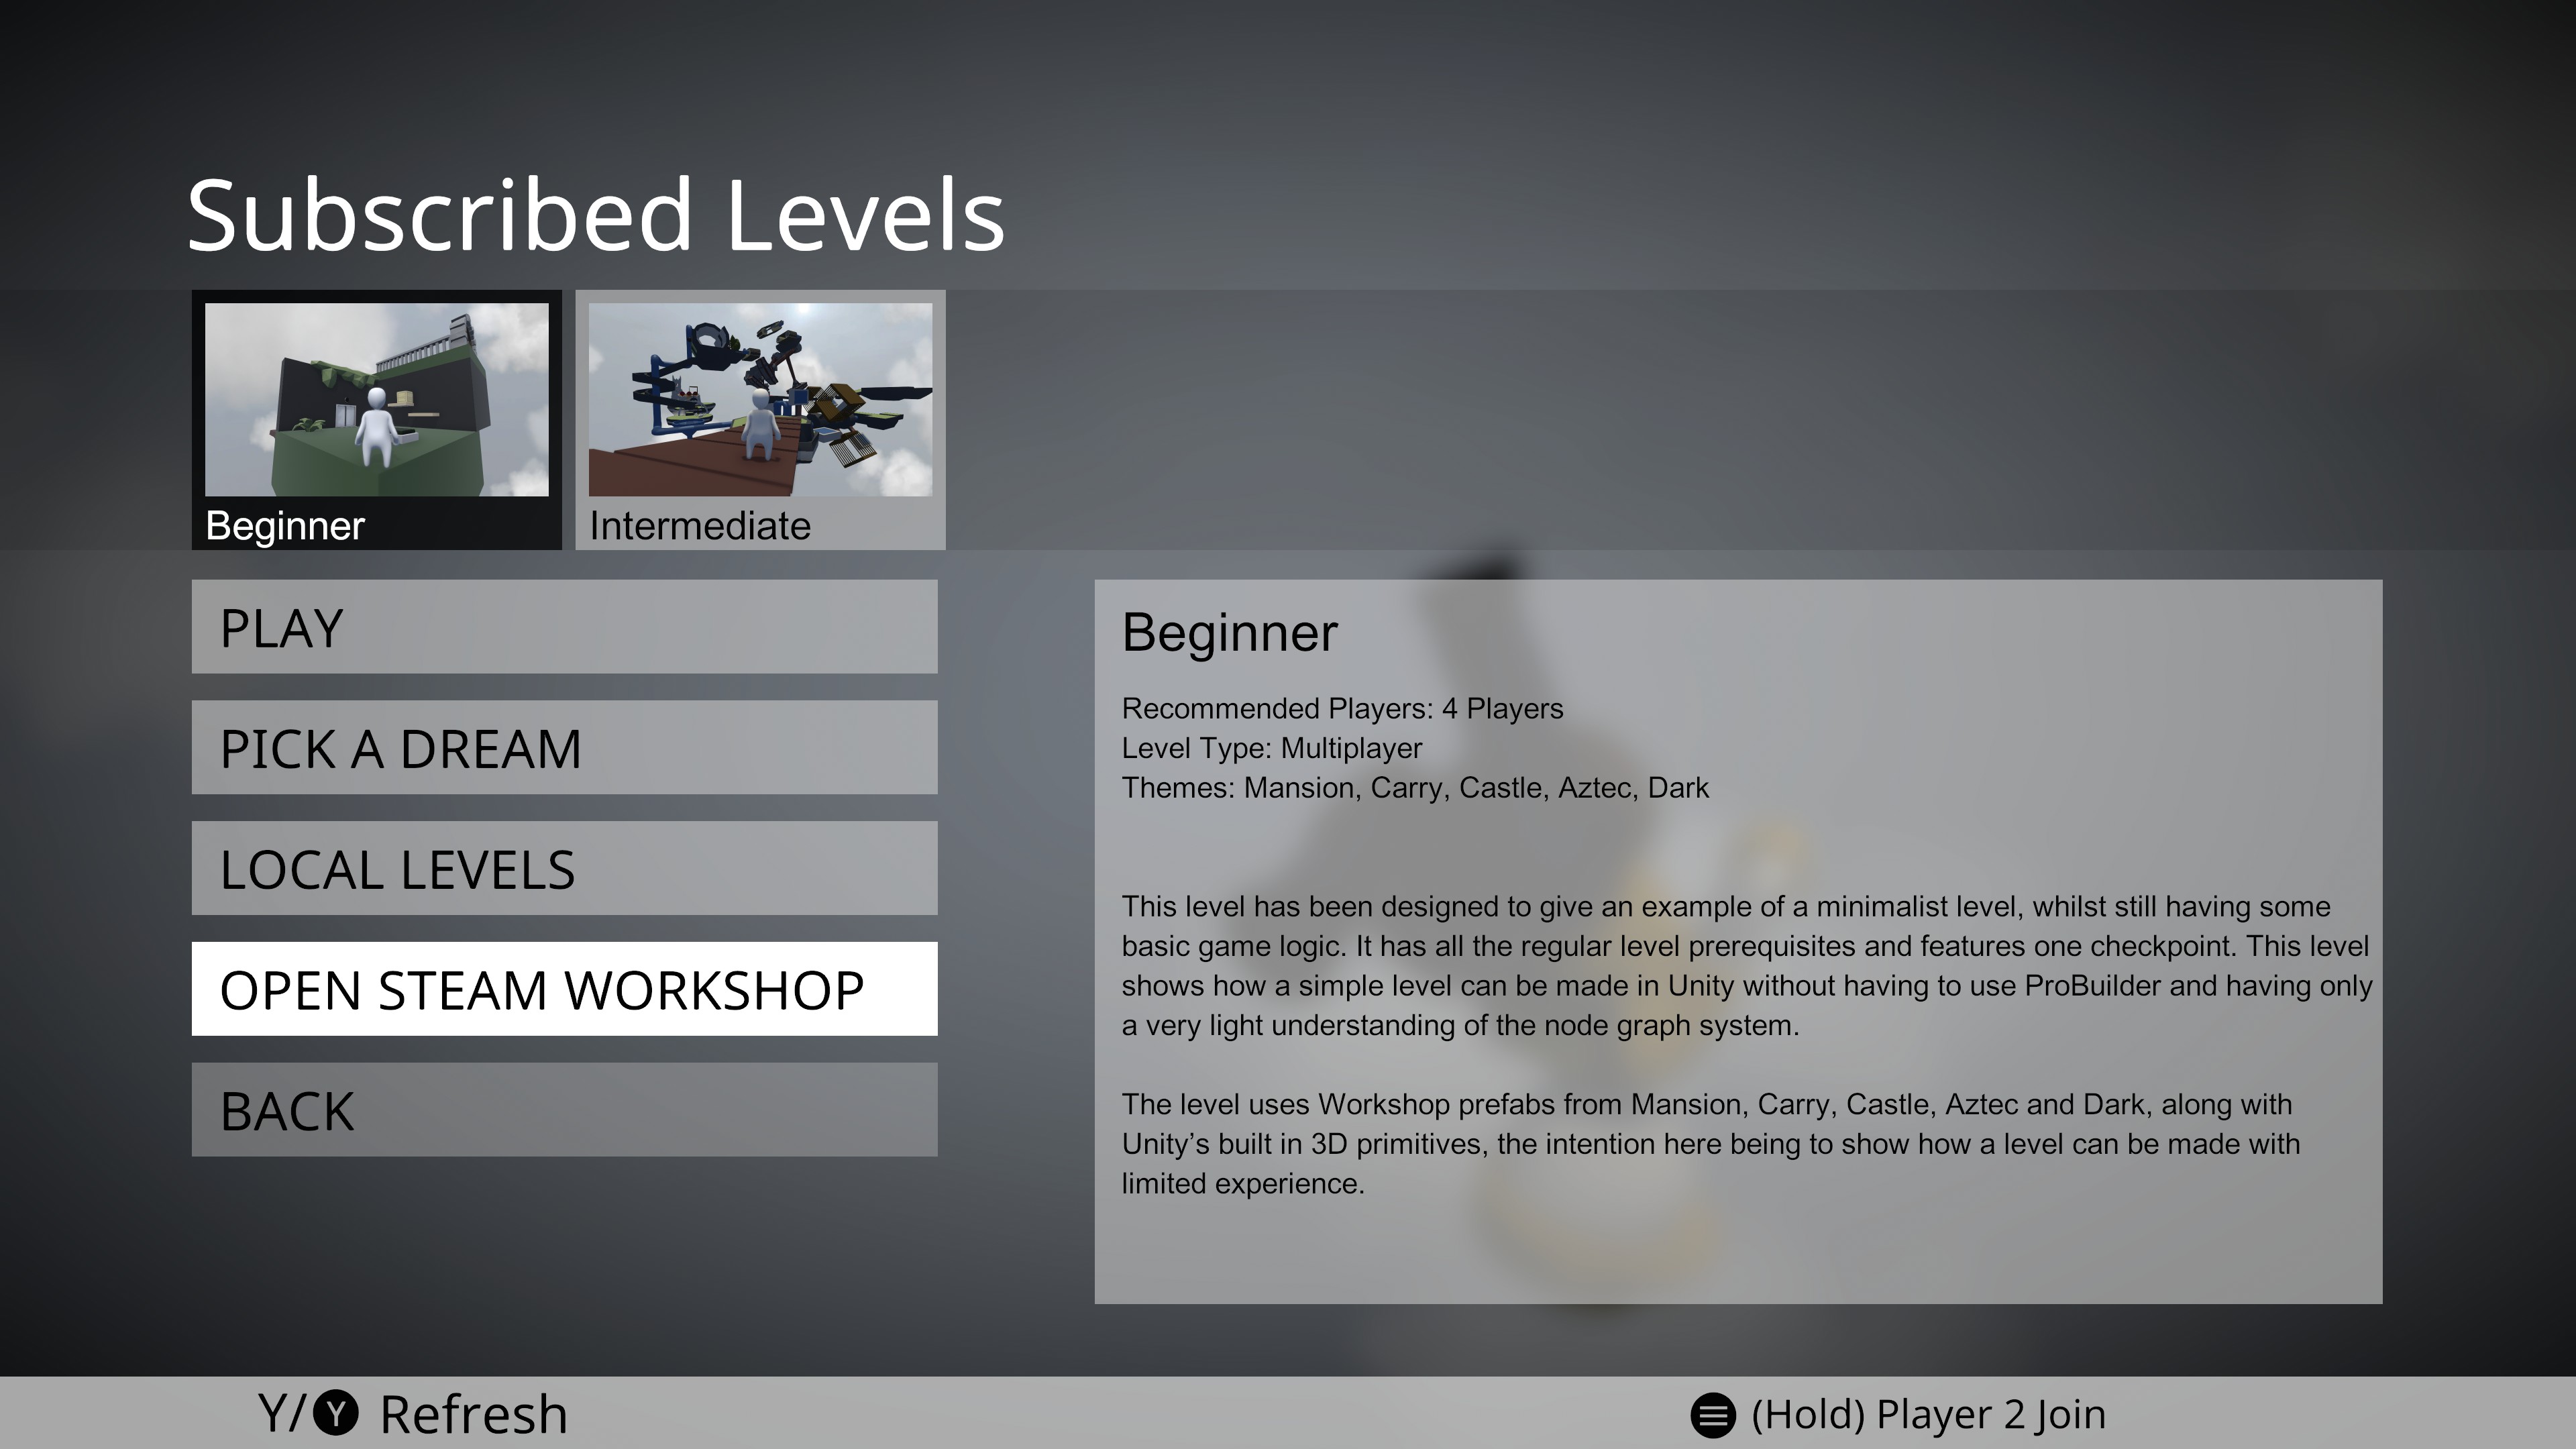
• The Subscribed Levels screen also has the additional option of OPEN STEAM WORKSHOP.
• Selecting this option will open the Steam Overlay and take you to relevant section of the Workshop hub based on what type of item you were looking at in-game - levels, lobbies or models (skins). This makes it quick to browse for and subscribe to new content.
The Subscribed Levels screen can also be found via the SELECT LEVEL option in online multiplayer when you're the Host of a session:
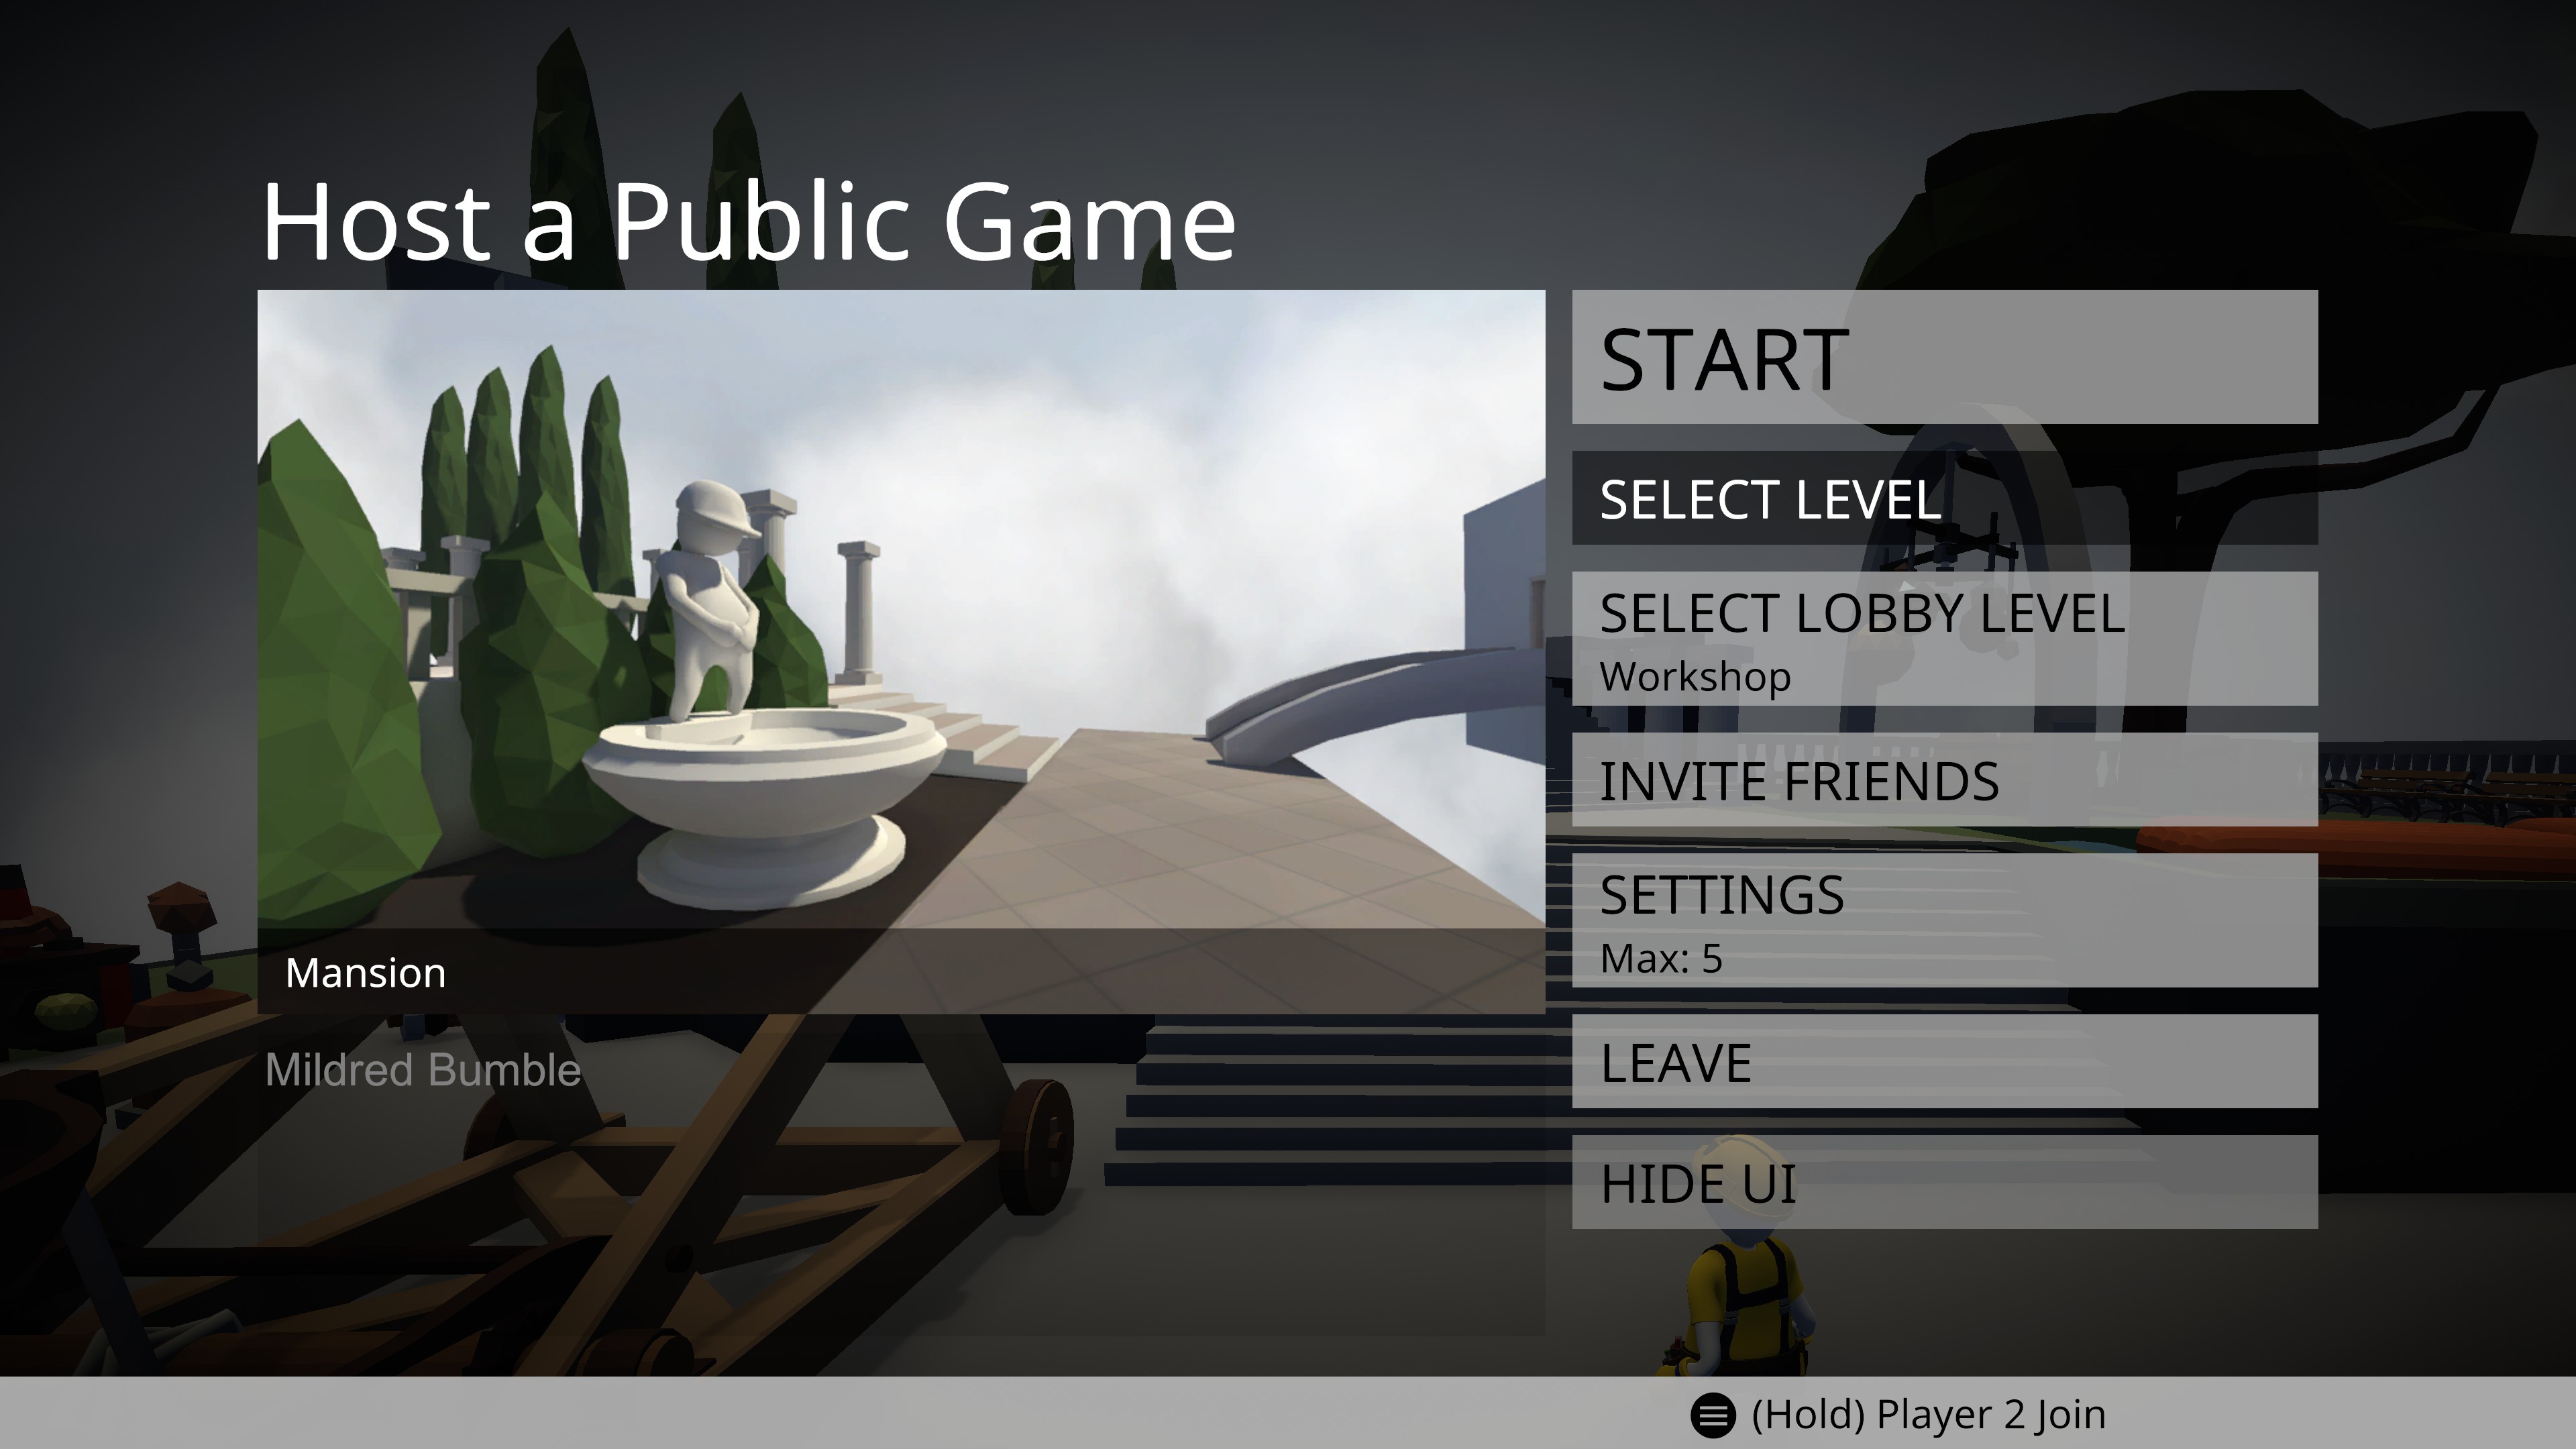
Please take a look at our other guides for information on multiplayer support, backward compatibility to 1.2 Alpha2, example Workshop levels, templates, prefab testbeds the Node Graph System and much, much more.
Hints & Tips
As reference, the water in the Water level only takes up under half of this distance and the actual playable area is even smaller than this.
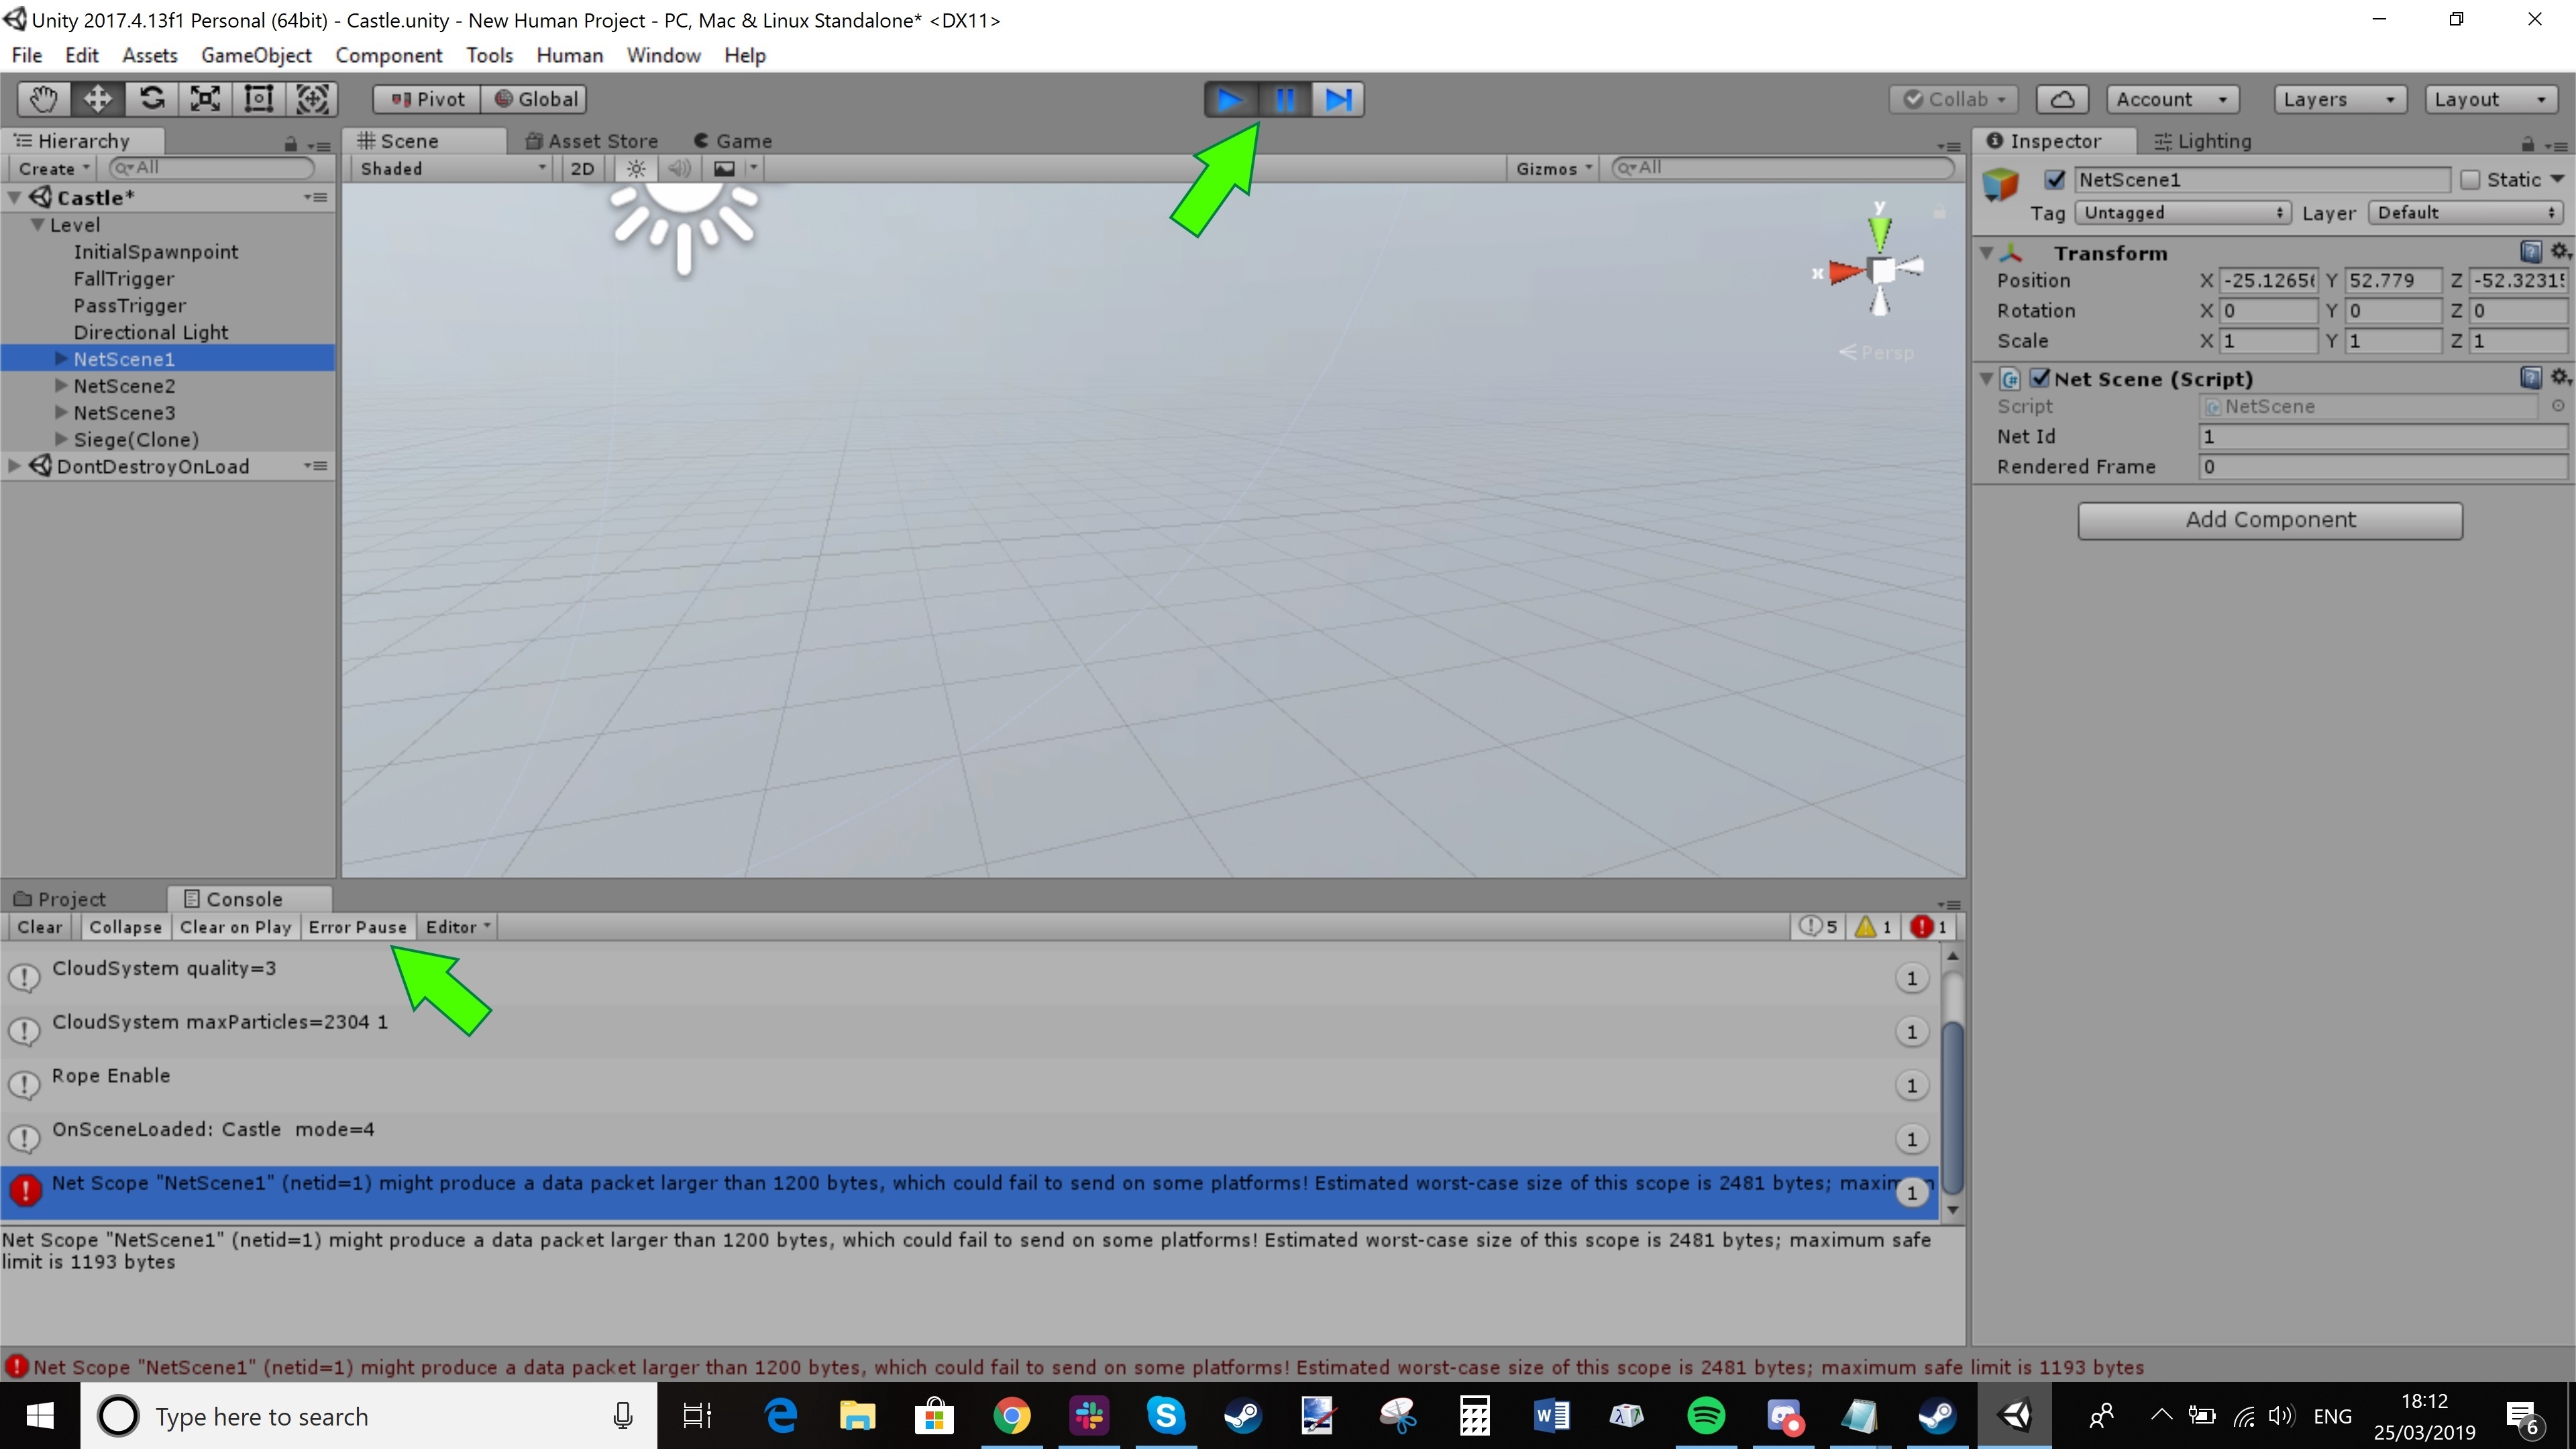
Net Scope "Level" (netid=0) might produce a data packet larger than 1200 bytes, which could fail to send on some platforms! Estimated worst-case size of this scope is 1395 bytes; maximum safe limit is 1193 bytes
The above warning is to do with having too many placements without dividing them between Net Scene Nodes. You can see examples of the set-up required for this within the PrefabTestbeds that are part of the Unity package we've provided:
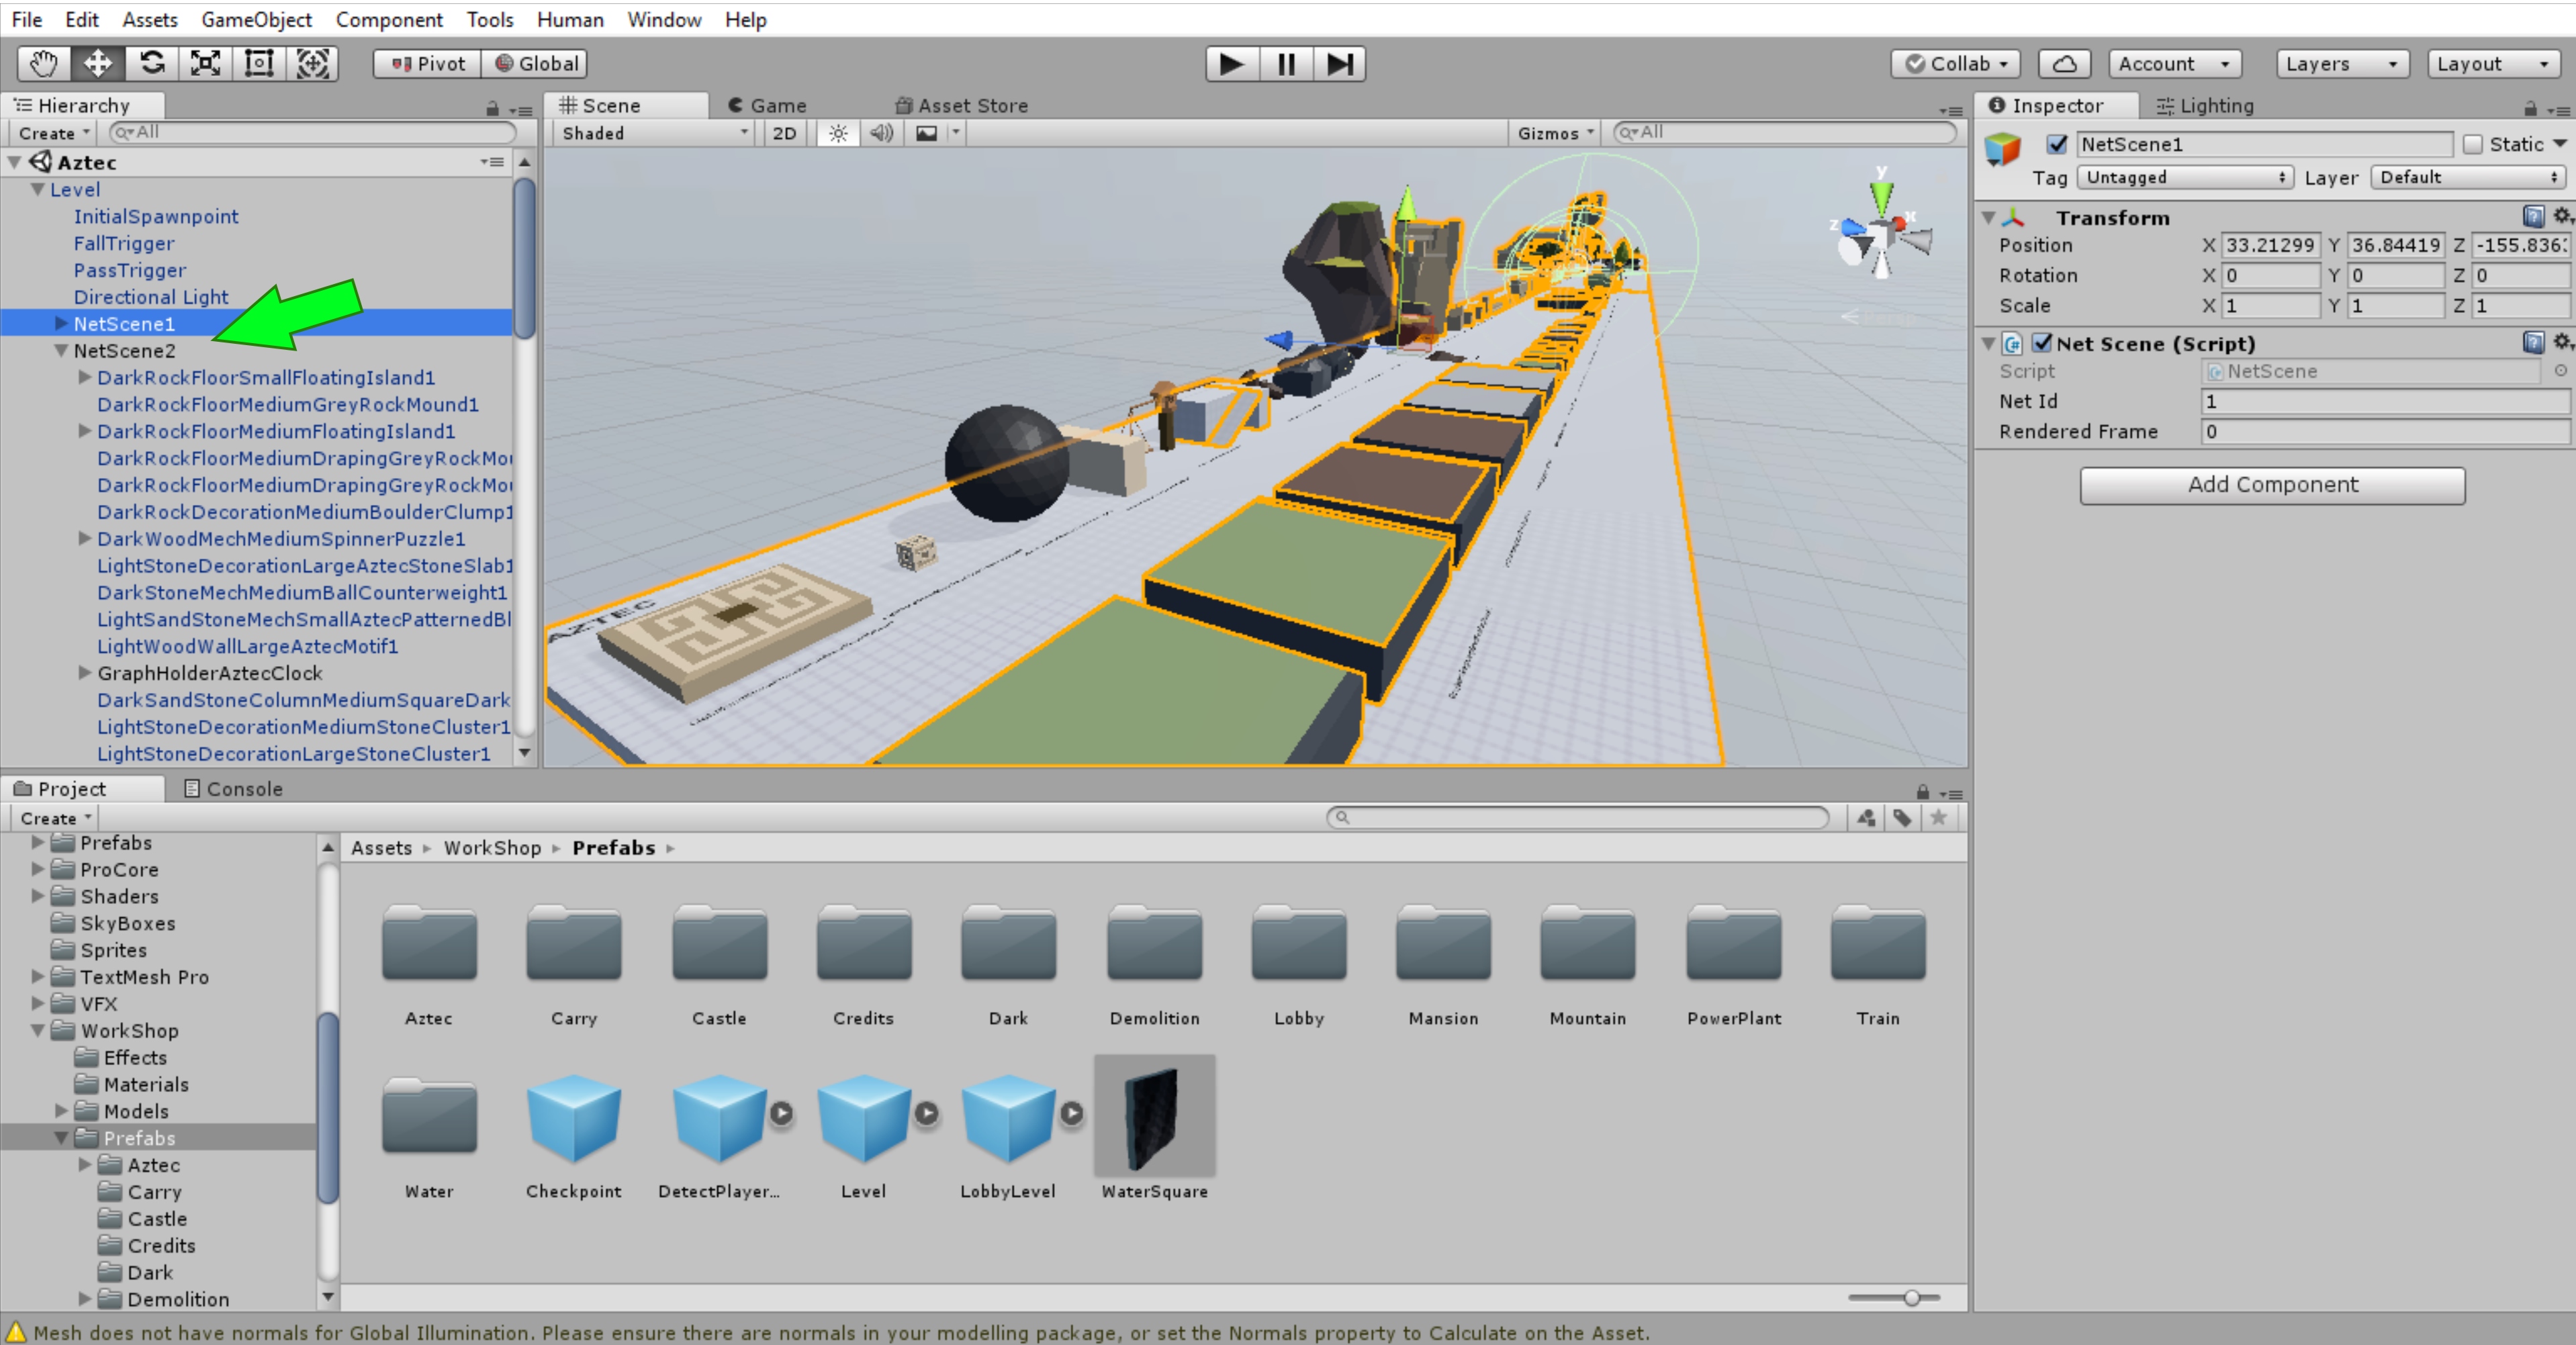
The PrefabTests started out as a single PrefabTested but during development we had to break up the PrefabTestbed into separate levels due to the sheer number of placements. Even after doing this they still needed splitting into individual Net Scenes within each level when it came to being able to test the prefabs for multiplayer.
If you get this warning then your level will need splitting into individual Net Scenes within the level so that it does not break when trying to get it to work in multiplayer. Without a at least a couple of Net Scene Parent Nodes everything will be under a single Net Scene by default, which will cause this error.
• Horizontal Jump Distance - This will need to be adjusted and play-tested on a case-by-case basis, as the jump distance is reliant on physics and the topography of the level area i.e. whether it's an uphill or downhill jump.
https://unity3d.com/learn/tutorials/s/interactive-tutorials
Official Learn Unity Playlist:
https://www.youtube.com/user/Unity3D/playlists?shelf_id=27&view=50&sort=dd
This will then be assigned to your level for when it comes to exporting it to the game once you're ready and then when finally publishing it to Steam.
You can also capture a screenshot of your level in-game but if you're playing a lobby you'll first have to press F8 twice in order to get into the correct camera view and then press F9 in-level to capture a thumbnail screenshot.
Further Reading
- Human Workshop: Features, Multiplayer Support and Backward Compatibility to 1.2 Alpha2
- Human Workshop: Example Workshop Levels, Templates and Prefab Testbeds
- Human Workshop: Editor Improvements and Node Graph System
- Human Workshop: Node Graph Reference Guide
- Human Workshop: Post-Launch Fixes, Updates and Additions – COMING SOON!
Appendix
Check out these scenes to quickly see it all! If you can't see something you want as a prefab then you need to let us know and we'll add it to the backlog of work to get it created for you.
- Секретные команды в Human: Fall Flat★ 5 (236)32k views446 ♥2 minRussianUpdated Oct 26, 2020
- 人类:一败涂地-------全成就指南★ 5 (838)20k views1.5k ♥1 minSimplified ChineseUpdated Dec 5, 2025
- ALL achievements in Human Fall Flat [151/151]★ 5 (413)14k views777 ♥37 minUpdated Mar 5
- Паркур.★ 5 (269)13k views320 ♥3 minRussianUpdated Jul 30, 2025
- Как загрузить свой принт на скин ( Возможно уже не актуально )★ 5 (215)11k views290 ♥1 minRussianUpdated Feb 14
- Типы игроков в Human: Fall flat★ 4 (155)7.3k views99 ♥12 minRussianUpdated Aug 17, 2025


- Upgrading to PremiumTeam Fortress 2★ 5 (20k)1441k views11k ♥6 minUpdated May 11, 2022
- No More Room in Hell Official ManualNo More Room in Hell★ 5 (2.8k)569k views2.1k ♥29 minUpdated Apr 22, 2019
- NMRiH Community Hosting GuidesNo More Room in Hell★ 5 (526)351k views653 ♥1 minUpdated Aug 10, 2022
- How to 'Git Gud' Soon™MORDHAU★ 5 (2k)318k views3k ♥68 minUpdated Nov 16, 2024
- Лучшие кооперативные игры SteamPAYDAY 2★ 5 (1.5k)315k views2.1k ♥56 minRussianUpdated Apr 27, 2025
- Desert Eagle Heat Treated | Blue GemCounter-Strike 2★ 5 (1.6k)292k views1.5k ♥2 minUpdated Jan 16





This guide was created by its original author on the Steam Community. Are you the author and want it removed? Request removal.