OI, You! A Simplistic Approach To Opposition Instructions
If You Enjoy The Guide, Give It A Rating

Introduction
(Below is from the Scout Report, knowing the roles helps a little to, however this may not marry up to the line-up you're against so always worth checking the OIs within the match).
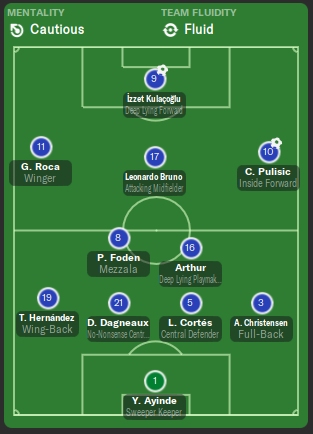
Tight Marking
Used to prevent the opposing player(s) from getting the ball, or restricting their movement on the ball.
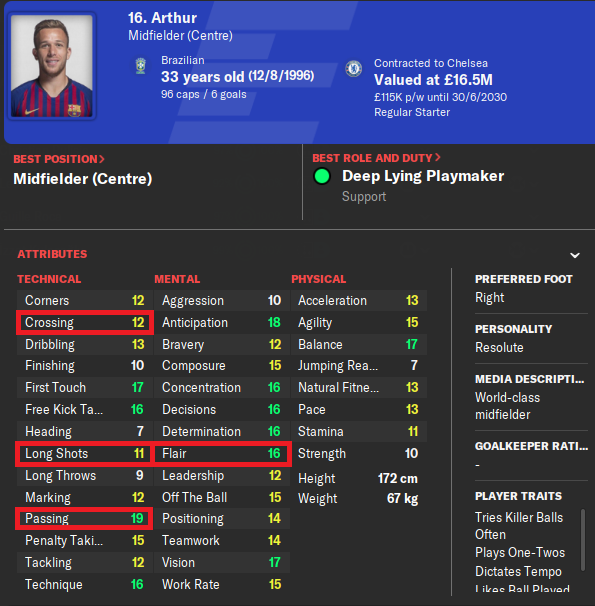
- Creative players are always a target to be tightly marked. Look for opposing players that have high attributes in Crossing, Long Shots, Passing, and Flair. If you can prevent these types of players from getting the ball or having to move out of position to receive it, you're preventing them from being that creative force.
- Isolated players. Again, this will depend on their attributes but good examples of this is a lone striker, or marking a DM with your AMC and vice versa. Taking them out of the game can lead to more interceptions and more chances for your own team.
- It is also important to note, not to overdo tight marking as it will and can impact your team shape and you do have to pay attention to what the opposition does during a game. They will change formation, player positions and of course substitutions.
- Lastly, it's worth thinking about the player that will be marking them. No point trying to use someone to tightly mark, who is very poor at Marking.
- Fast, pacey, good at dribbling, very mobile players. Those that have high Dribbling, Acceleration, Agility, Pace and the Knocks Ball Past Opponent PPM. As soon as they get the ball, they'll beat the marker. Where as if they were stood off him, they have a bit more time to get the tackle in.
- Also be weary of the Tries Tricks PPM as that can also lead them to beating their marker.
- The players that you don't mind getting the ball. For example, those less creative / no-nonsense players.
- Generally, I never, use never except in very rare cases.
Pressing Intensity
When not in possession, players hunt the ball to re-gain possession almost immediately after losing it.
- Indecisive players that aren't quick or good at dribbling. Players that have low Dribbling, Bravery, Composure, and Decisions. This will lead to that player often being pressured into a bad pass or shot.
- DMs are naturally a good choice to close down as they are often a linchpin for an opposing side.
- If you notice an opposing player is "Nervous" during the match, change your OIs and press them. Force them to make mistakes.
- Players that have PPMs like "Dwells on Balls" and "Stops Play" are also very good targets to press.
- Like tight marking, don't overdo pressing at it will impact your team shape.
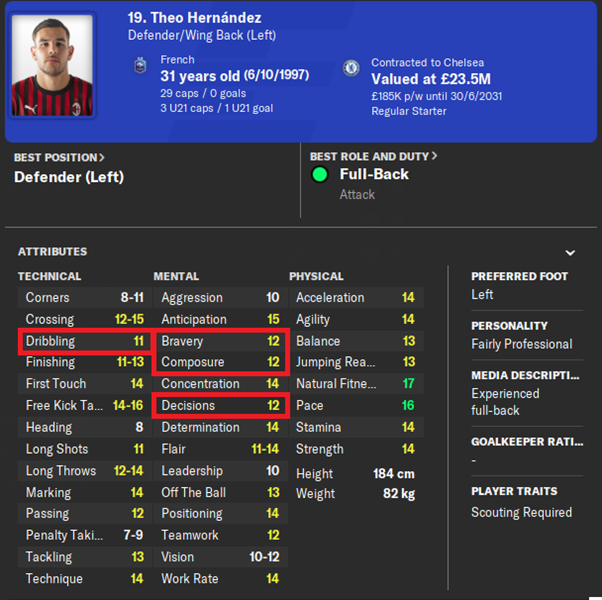
I am hoping my AMR will put him under enough pressure that he never really gets to have a free run.
- Agile, mobile players, that have high Dribbling. As soon as your guy goes to press, they'll get around them like there is no tomorrow.
- AMCs, they are usually more technical and have high dribbling, making the press on them risky as it'll likely be your DC that pushes them.
- Similar to the “Never Tightly Mark” instruction. I never, use never except in very rare cases.
Tackling
To dispossess the ball from the opposition.
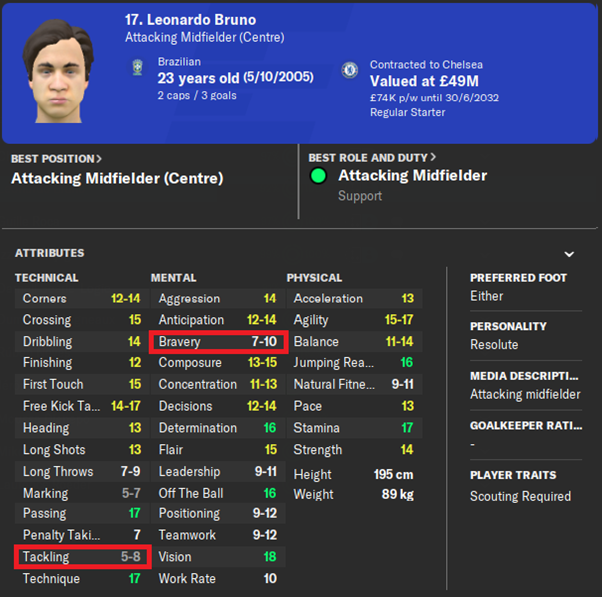
- Players that have low Bravery, and Tackling. LiamH talks about it well[clips.twitch.tv]. Essentially on a 50/50 challenge the opposition player will jump out of the way, or the opposing player will double-foot your player leading in yellows/red cards.
- Tired and injury prone players are also good candidates. If you can completely take out an opposing player, only a win for you right?
- An isolated striker, that is playing in a defensive setup to limit his involvement in the game.
- I never use "Normal Tackling". Seems a bit useless but it can have its circumstance. An example being, if using the team instruction "Get Stuck In" you can alter it for that particular position.
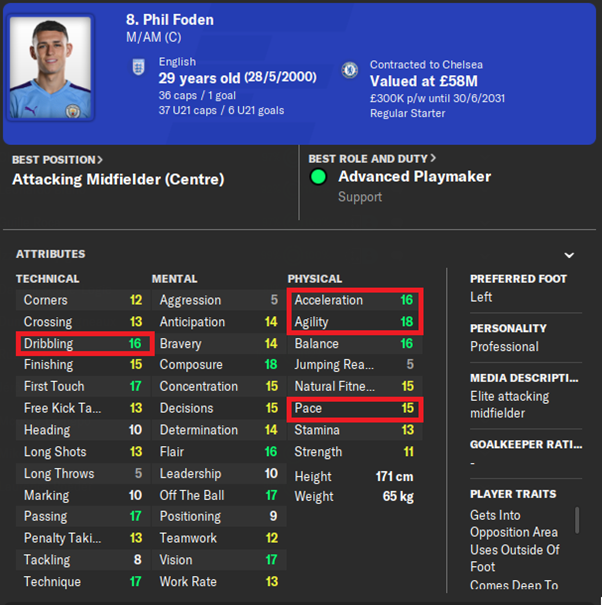
- Players that have high Dribbling, Acceleration, Agility, and Pace. Essentially if you went in hard on them, they will get the foul.
- An isolated striker in a more attacking/aggressive system. As this will prevent him winning a penalty of free kicks in dangerous positions.
In this case I am going to take it easier on Phil Foden, going hard on him isn't really going to gain my anything due to his attributes.
Show onto Foot
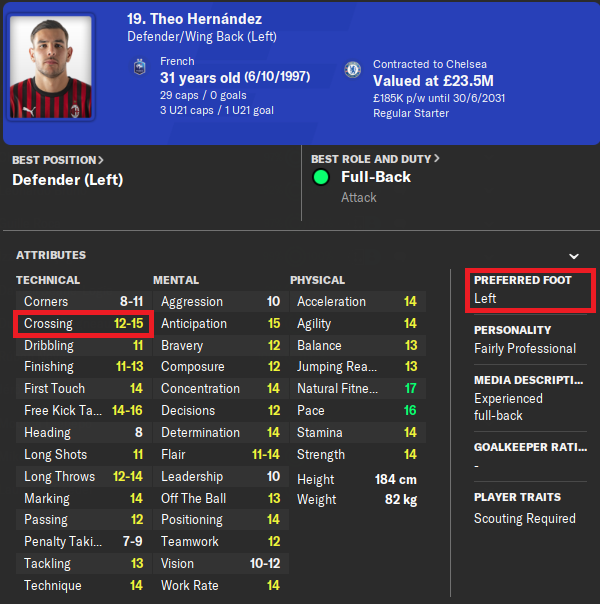
This will require you looking at the preferred foot of each player and their positions:
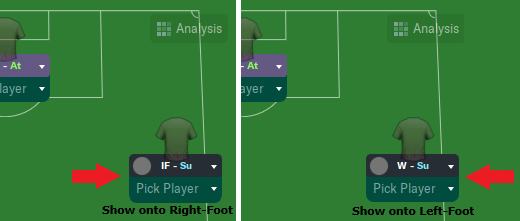
- Players that have the preferred foot as Right-Only, then Show onto Left-Foot.
- Players that have the preferred foot as Left-Only, then Show onto Right-Foot.
- Useful against wide-players:
- Showing an AMR Inside Forward onto their right-foot can prevent them from doing the Robben-esque cut-inside as it will push them out wide.
- Showing an AMR Winger onto their left-foot can prevent them from doing Beckham-esque crosses as it will push them in narrower.
- Showing an AMR Inside Forward onto their right-foot can prevent them from doing the Robben-esque cut-inside as it will push them out wide.
- Essentially the same as the above "Show onto Left/Right-Foot but more automatic.
- Useful for setting static OIs that aren't dependant on the player but the position.
- Generally used on more central players like CMs and DMs.
There's also another way to decide this taking from a theorem by wwfan in 2009.
- Slow striker(s) with good Jumping Reach and Heading and bad Acceleration, Agility and Pace (Peter Crouch).
- Allow the wider players to go inside.
- Fast, shorter, mobile striker(s) that have good Acceleration, Agility, and Pace but bad Jumping Reach and Heading.
- Force the wider players outside.
- Fast, and tall strikers.
- Show the wider players onto their weaker-foot.
End Product
(You'll notice the line-up doesn't quite match that of the scout report, it's why it's always important to check the OIs in the actual match itself)
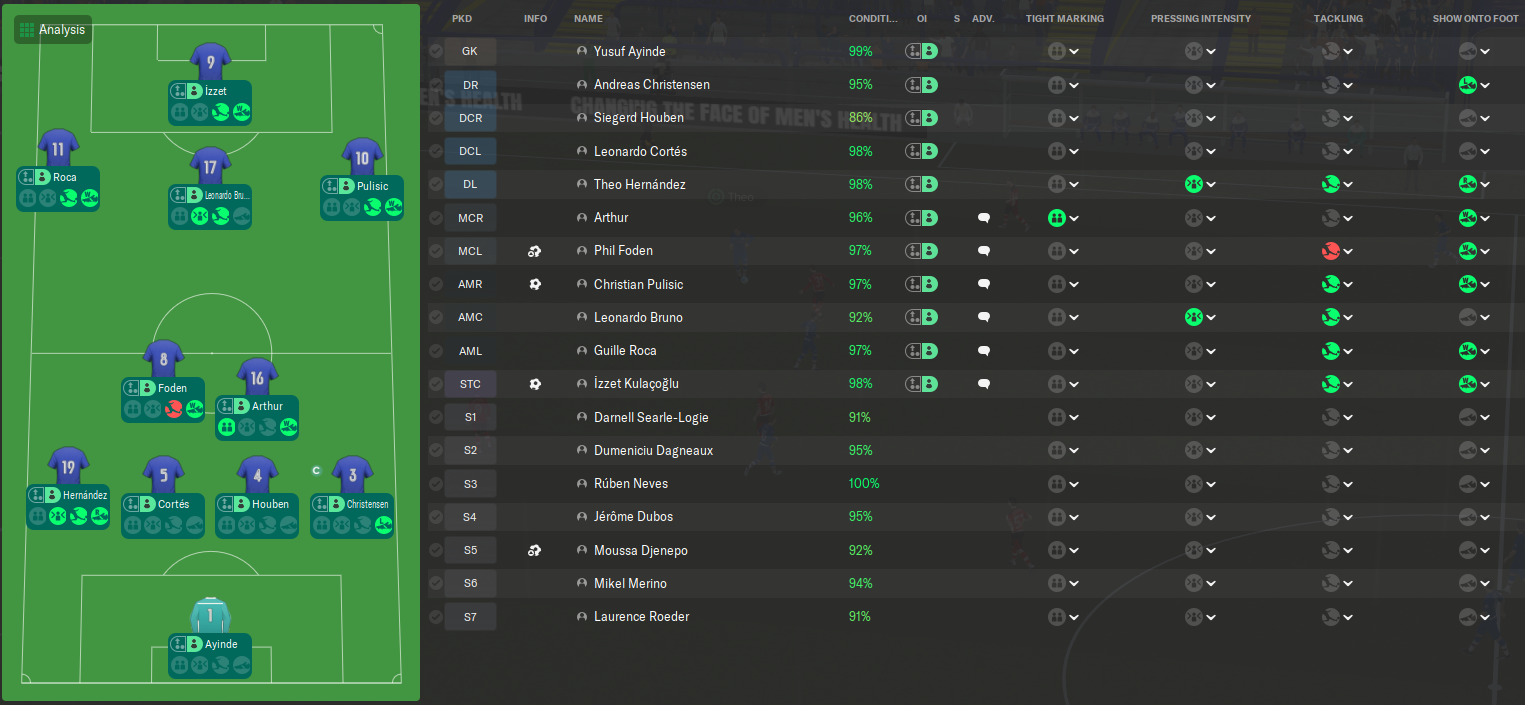
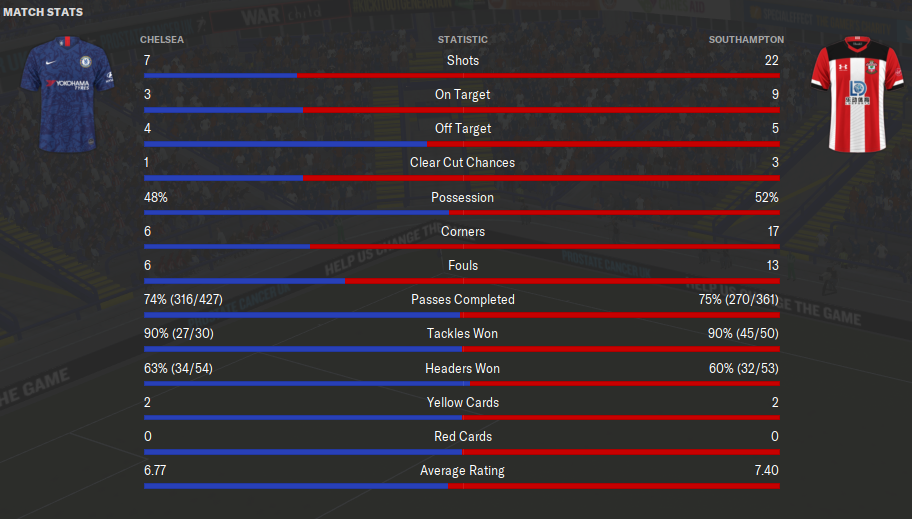
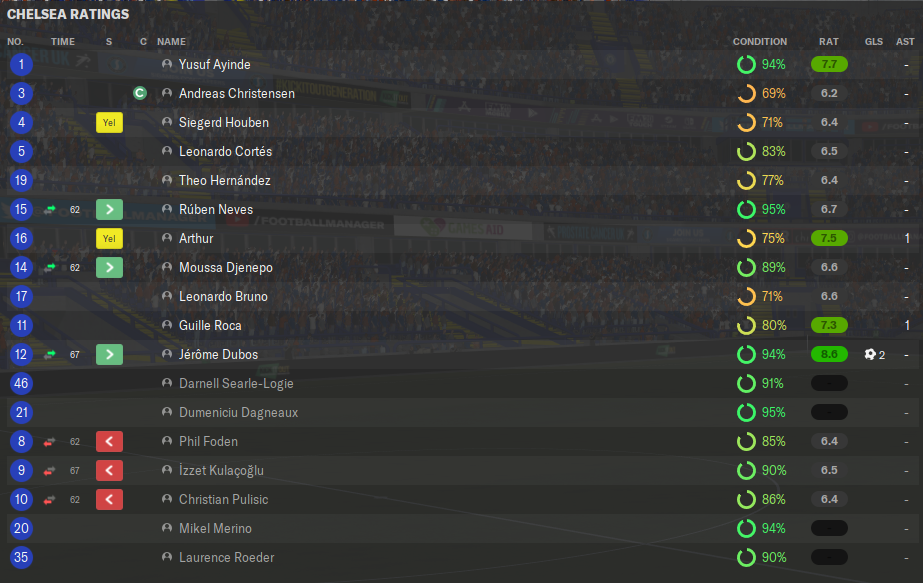
Both the LB and RB of Chelsea had a nightmare of a game! Arthur/Roca was to, until they got the assists to Dubos which was my mistake. I didn't adapt well enough and they got two balls over the top for Dubos to put away easily.
Overall, I'd say that was a success! We achieved what we wanted, and we got the 4-2 win. Still think it should have been 4-0... or at most 4-1.
Remember, adapt during the match! Teams will make subs, change mentality and shape! You need to adapt to them on the fly.
Don't make the mistake I made!
To see more like this, follow me on Twitch[www.twitch.tv], and come find me over on FM Base[fm-base.co.uk]!
Other Guides
Finding Your Voice! A Simplistic Approach To Shouting
Useful Tips And Explanations! A Simplistic Approach To FM
- Best young wonderkids in FM20 for each position★ 3 (63)9.4k views107 ♥1 min
- Finding Your Voice! A Simplistic Approach To Shouting★ 5 (269)8.9k views291 ♥4 minUpdated 27 Feb, 2020
- Useful Tips And Explanations! A Simplistic Approach To FM [WiP]★ 4 (96)5.9k views110 ♥7 minUpdated 22 Apr, 2020
- How To Find Wonderkids: Identify Hidden Gems★ 4 (65)4.3k views72 ♥5 minUpdated 4 Oct, 2020
- Real name and licensing fix for clubs, competitions and more3.9k views33 ♥1 min
- Dragon Force's Demolishing 442 FC Porto Gegenpress | FM20★ 4 (61)3.5k views110 ♥5 minUpdated 26 Jul, 2020



- Upgrading to PremiumTeam Fortress 2★ 5 (20k)1441k views11k ♥6 minUpdated May 11, 2022
- No More Room in Hell Official ManualNo More Room in Hell★ 5 (2.8k)569k views2.1k ♥29 minUpdated Apr 22, 2019
- NMRiH Community Hosting GuidesNo More Room in Hell★ 5 (526)351k views653 ♥1 minUpdated Aug 10, 2022
- ULTIMATE GUIDE FOR GAME DEV TYCOONGame Dev Tycoon★ 5 (5.8k)326k views10k ♥4 minUpdated 23 Jan, 2014
- How to 'Git Gud' Soon™MORDHAU★ 5 (2k)318k views3k ♥68 minUpdated Nov 16, 2024
- Лучшие кооперативные игры SteamPAYDAY 2★ 5 (1.5k)315k views2.1k ♥56 minRussianUpdated Apr 27, 2025






This guide was created by its original author on the Steam Community. Are you the author and want it removed? Request removal.